gcms plus quick start guide
TRANSCRIPT
GCMS Plus Quick Start Guide
MUFG Bank, Ltd. Transaction Banking Division
A member of MUFG, a global financial group
1
Table of Contents
Preface ................................................................................................................. 2
Chapter 1: Initial Login .......................................................................................... 3
Getting Ready ..................................................................................................................... 3
Login: Password Change .................................................................................................... 3
Chapter 2: Initial Setup ......................................................................................... 6
Set the Base Currency and Exchange Rate ........................................................................ 6
Set User Privileges ............................................................................................................ 12
Chapter 3: Payments .......................................................................................... 20
Overview of the Payments Menu ...................................................................................... 20
Create and Apply for a New Payment Instruction .............................................................. 20
Approve a Payment Instruction Application ....................................................................... 32
Chapter 4: Inquiries ............................................................................................ 35
Overview of the Inquiry Service ........................................................................................ 35
Balance Inquiry ................................................................................................................. 35
Transaction Inquiry ............................................................................................................ 37
Balances of Multiple Accounts .......................................................................................... 38
Chapter 5: Help .................................................................................................. 40
Online Manuals and Contact Information .......................................................................... 40
GCMS Plus Helpdesk in Japan ......................................................................................... 40
2
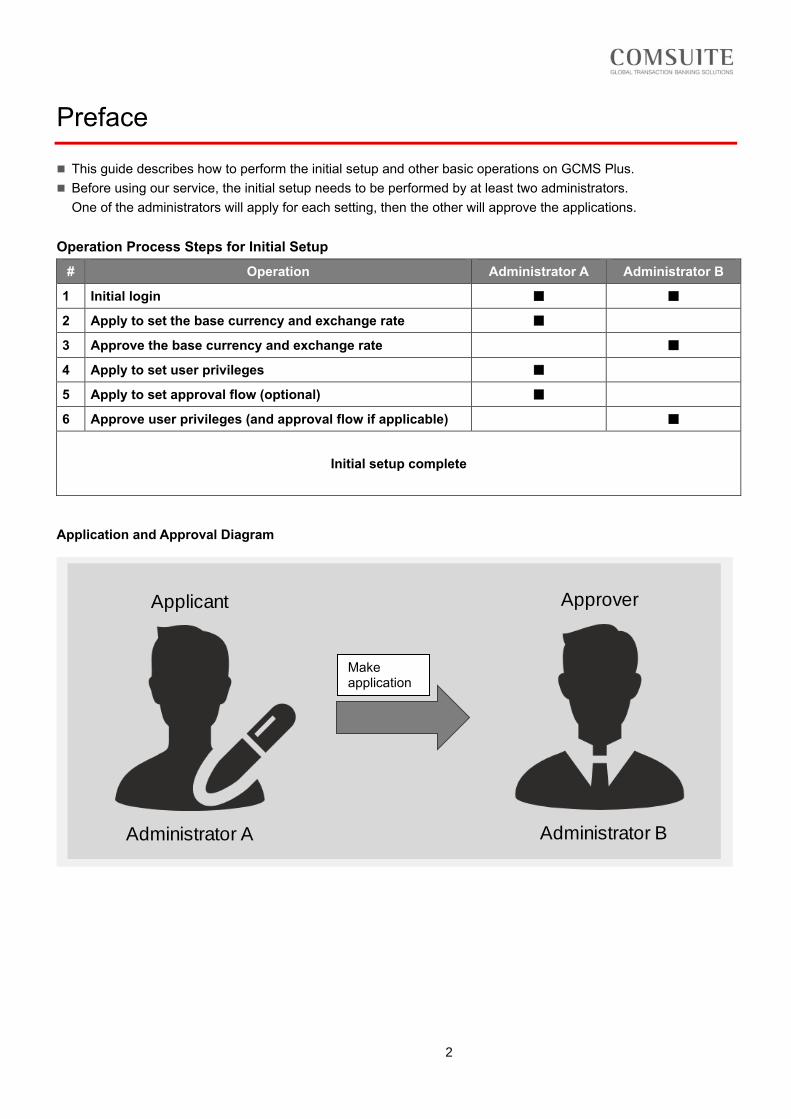
Preface
◼ This guide describes how to perform the initial setup and other basic operations on GCMS Plus.
◼ Before using our service, the initial setup needs to be performed by at least two administrators.
One of the administrators will apply for each setting, then the other will approve the applications.
Operation Process Steps for Initial Setup
# Operation Administrator A Administrator B
1 Initial login ■ ■
2 Apply to set the base currency and exchange rate ■
3 Approve the base currency and exchange rate ■
4 Apply to set user privileges ■
5 Apply to set approval flow (optional) ■
6 Approve user privileges (and approval flow if applicable) ■
Initial setup complete
Application and Approval Diagram
Applicant Approver
Apply
Administrator A Administrator B
Make application
3
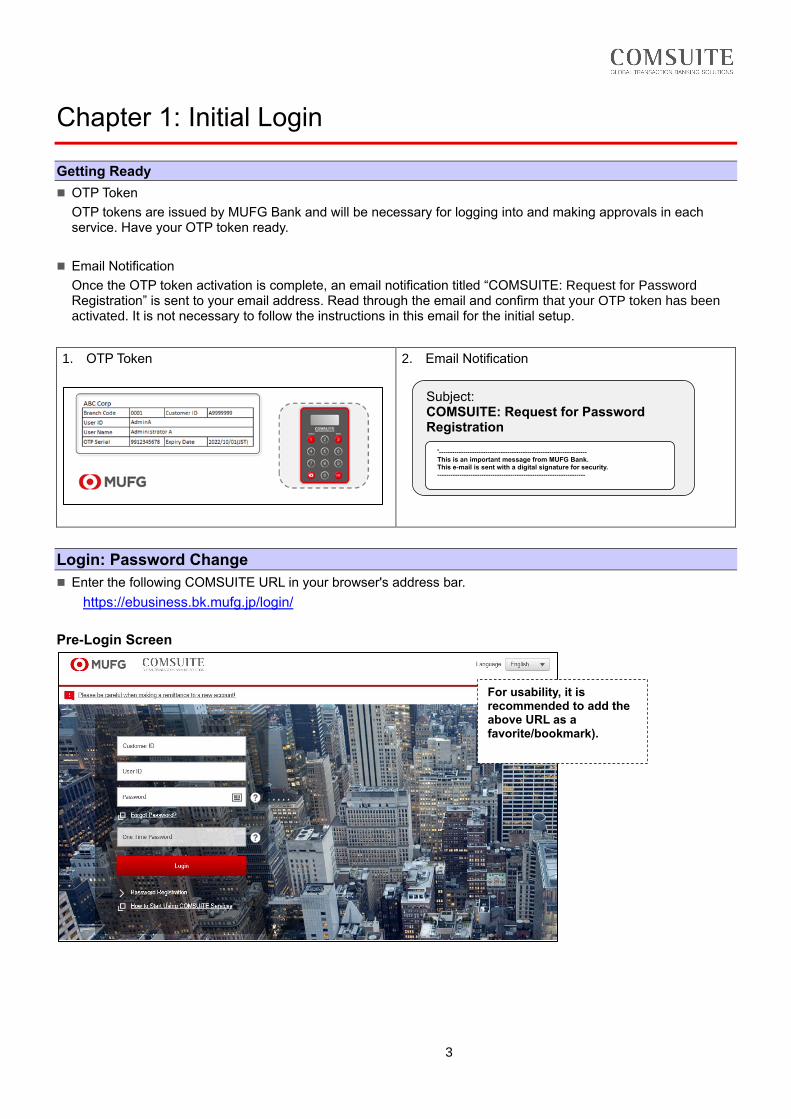
Chapter 1: Initial Login
Getting Ready
◼ OTP Token
OTP tokens are issued by MUFG Bank and will be necessary for logging into and making approvals in each service. Have your OTP token ready.
◼ Email Notification
Once the OTP token activation is complete, an email notification titled “COMSUITE: Request for Password Registration” is sent to your email address. Read through the email and confirm that your OTP token has been activated. It is not necessary to follow the instructions in this email for the initial setup.
1. OTP Token
2. Email Notification
Login: Password Change
◼ Enter the following COMSUITE URL in your browser's address bar.
https://ebusiness.bk.mufg.jp/login/
Pre-Login Screen
For usability, it is recommended to add the above URL as a favorite/bookmark).
Subject: COMSUITE: Request for Password Registration
'------------------------------------------------------------------- This is an important message from MUFG Bank. This e-mail is sent with a digital signature for security. -------------------------------------------------------------------
4
Chapter 1: Initial Login
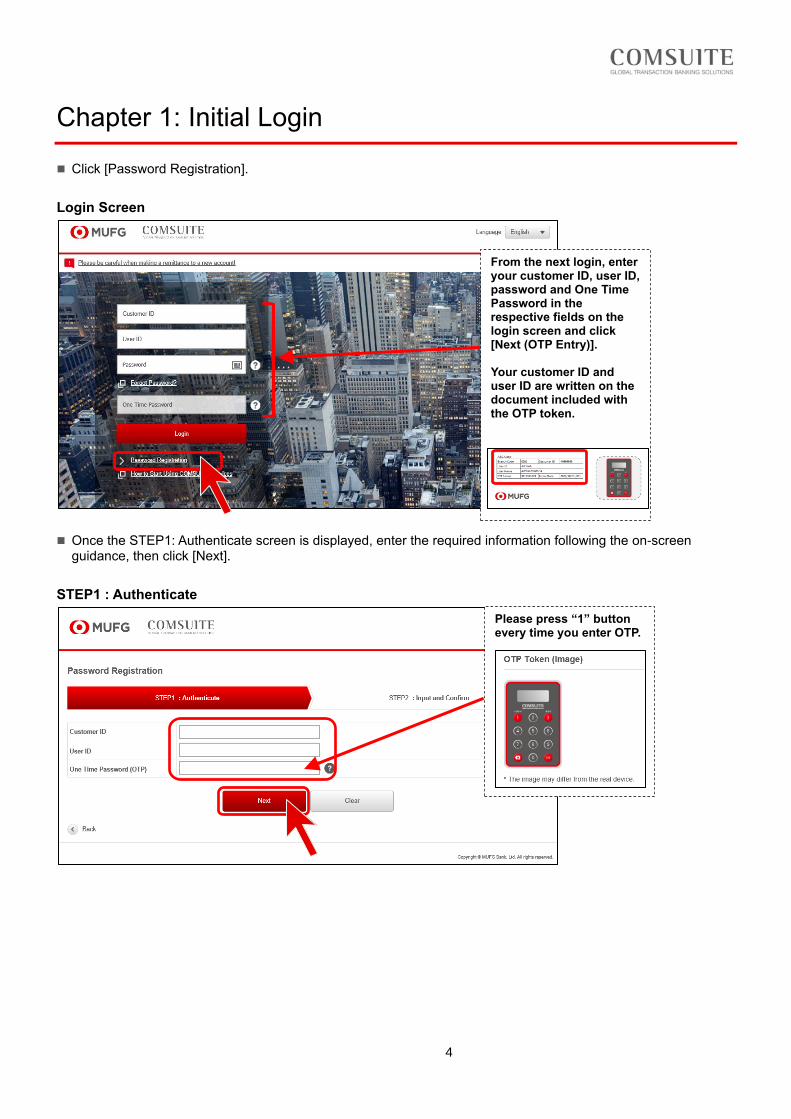
◼ Click [Password Registration].
Login Screen
◼ Once the STEP1: Authenticate screen is displayed, enter the required information following the on-screen guidance, then click [Next].
STEP1 : Authenticate
From the next login, enter your customer ID, user ID, password and One Time Password in the respective fields on the login screen and click [Next (OTP Entry)]. Your customer ID and user ID are written on the document included with the OTP token.
Please press “1” button every time you enter OTP.
5
Chapter 1: Initial Login
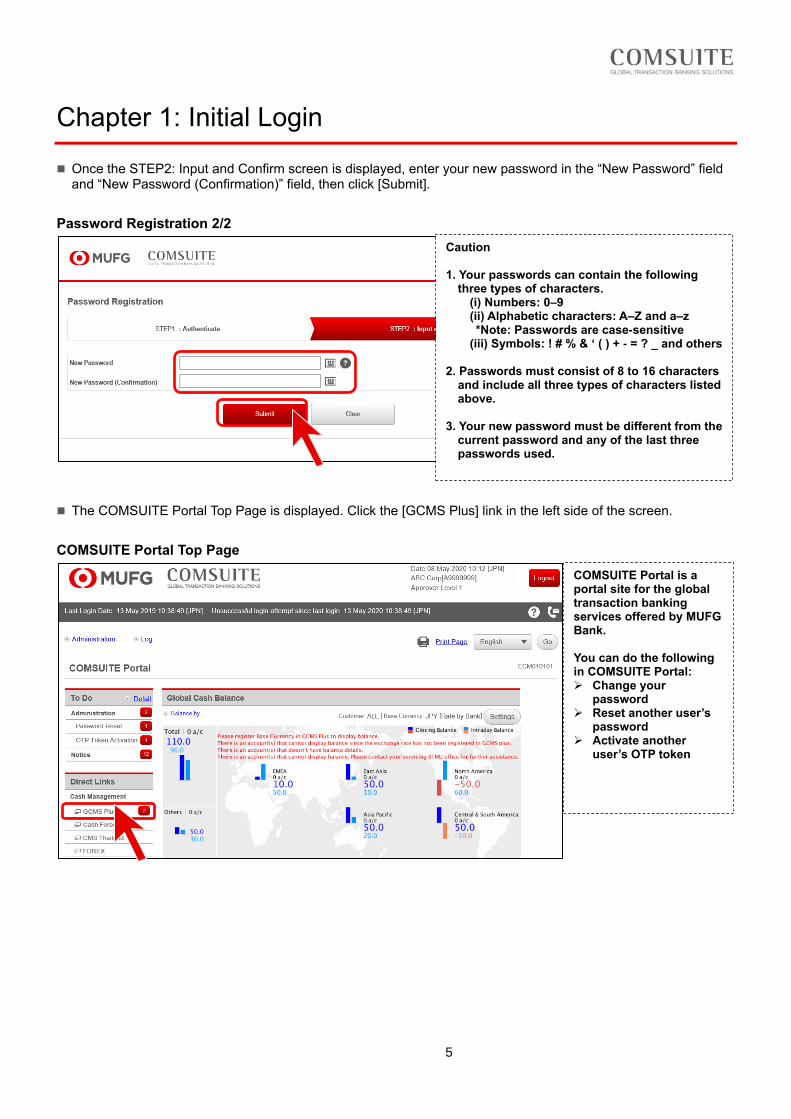
◼ Once the STEP2: Input and Confirm screen is displayed, enter your new password in the “New Password” field and “New Password (Confirmation)” field, then click [Submit].
Password Registration 2/2
◼ The COMSUITE Portal Top Page is displayed. Click the [GCMS Plus] link in the left side of the screen.
COMSUITE Portal Top Page
COMSUITE Portal is a portal site for the global transaction banking services offered by MUFG Bank. You can do the following in COMSUITE Portal: ➢ Change your
password ➢ Reset another user’s
password ➢ Activate another
user’s OTP token
Caution 1. Your passwords can contain the following
three types of characters. (i) Numbers: 0–9 (ii) Alphabetic characters: A–Z and a–z *Note: Passwords are case-sensitive
(iii) Symbols: ! # % & ‘ ( ) + - = ? _ and others 2. Passwords must consist of 8 to 16 characters
and include all three types of characters listed above.
3. Your new password must be different from the
current password and any of the last three passwords used.
3. Your new password must be different from the current password and any of the last three passwords used.
6
Chapter 2: Initial Setup
Set the Base Currency and Exchange Rate
◼ Set the base currency used as the basis for calculations in the system, and the exchange rate for the base currency.
Apply to Set the Base Currency and Exchange Rate
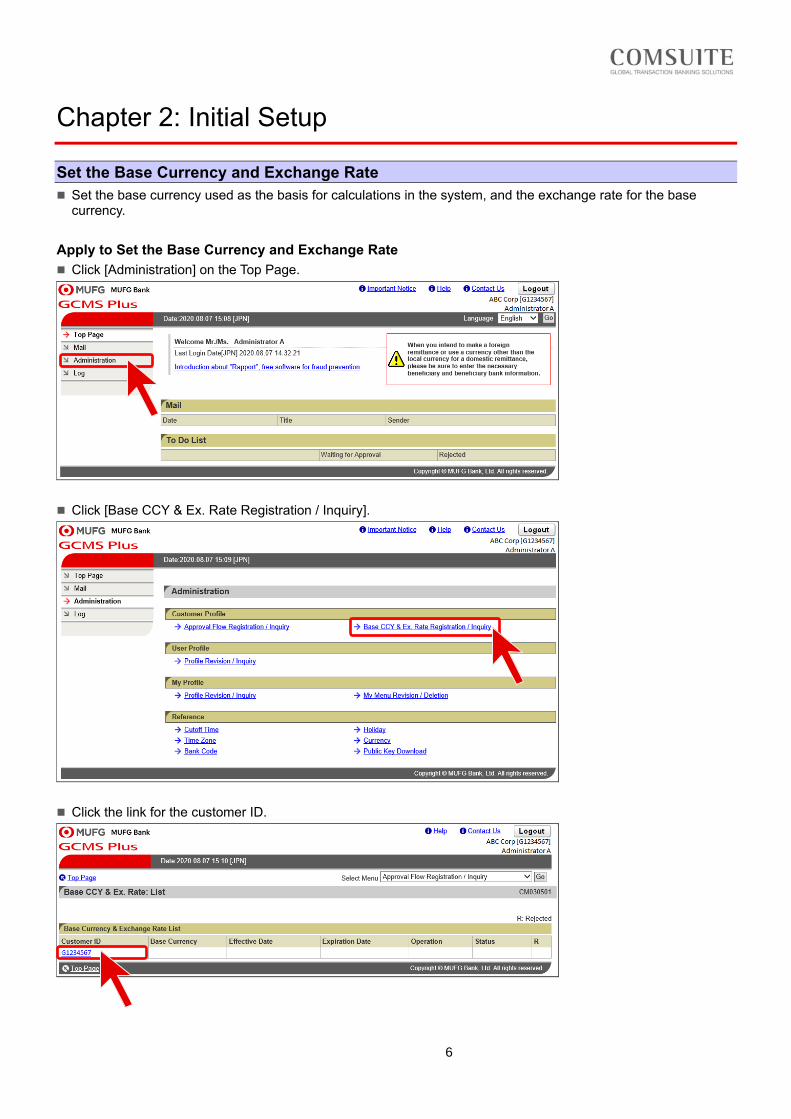
◼ Click [Administration] on the Top Page.
◼ Click [Base CCY & Ex. Rate Registration / Inquiry].
◼ Click the link for the customer ID.
7
Chapter 2: Initial Setup
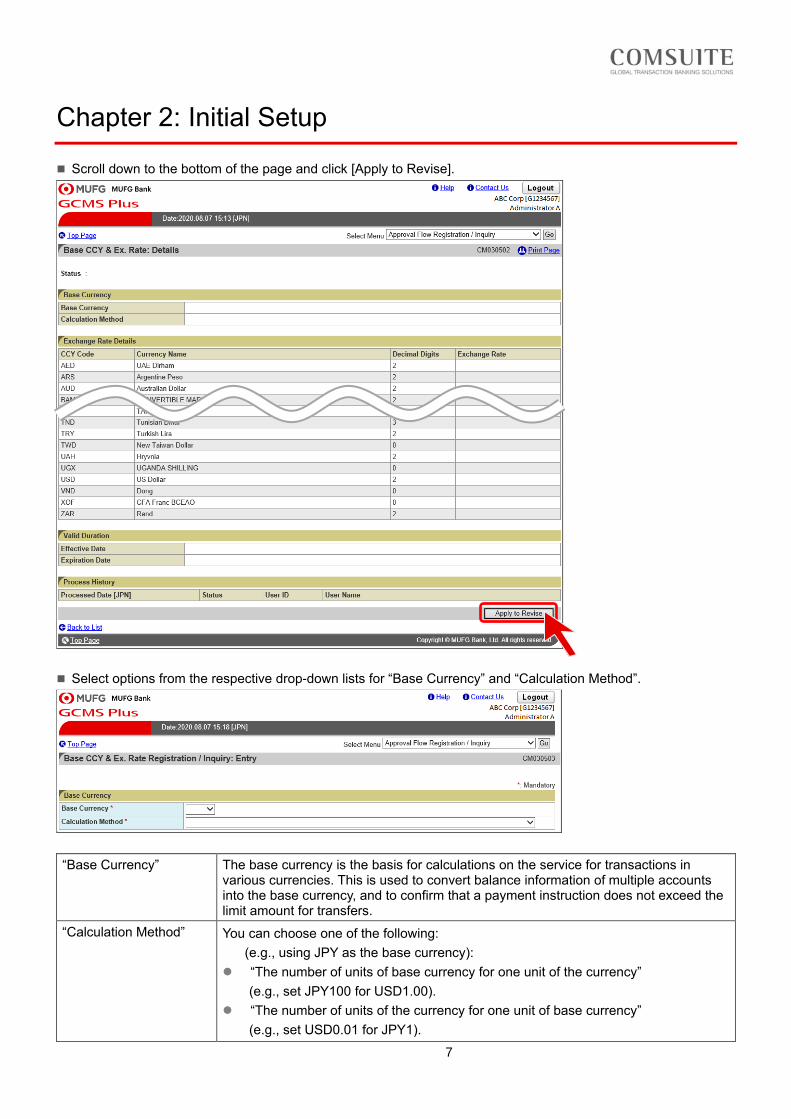
◼ Scroll down to the bottom of the page and click [Apply to Revise].
◼ Select options from the respective drop-down lists for “Base Currency” and “Calculation Method”.
“Base Currency” The base currency is the basis for calculations on the service for transactions in various currencies. This is used to convert balance information of multiple accounts into the base currency, and to confirm that a payment instruction does not exceed the limit amount for transfers.
“Calculation Method” You can choose one of the following:
(e.g., using JPY as the base currency):
⚫ “The number of units of base currency for one unit of the currency”
(e.g., set JPY100 for USD1.00).
⚫ “The number of units of the currency for one unit of base currency”
(e.g., set USD0.01 for JPY1).

8
Chapter 2: Initial Setup
◼ For currencies to be used in transactions, enter the exchange rates under the “Next Rate” column.
◼ Click [Apply].
Registration Examples (using JPY as the calculation currency for limit amounts for payments)
Example 1
“Base Currency”: JPY
“Calculation Method”: “The number of units of base currency for one unit of the currency”
“Next Rate”: JPY = 1, USD = 100
Example 2
“Base Currency”: JPY
“Calculation Method”: “The number of units of the currency for one unit of base currency”
“Next Exchange Rate”: JPY= 1, USD = 0.01
100
You do not need to set the exchange rate for currencies which you are not planning to use. These exchange rates are used mainly to calculate and verify the limit amounts for the service; they are not applied to actual payments.
9
Chapter 2: Initial Setup
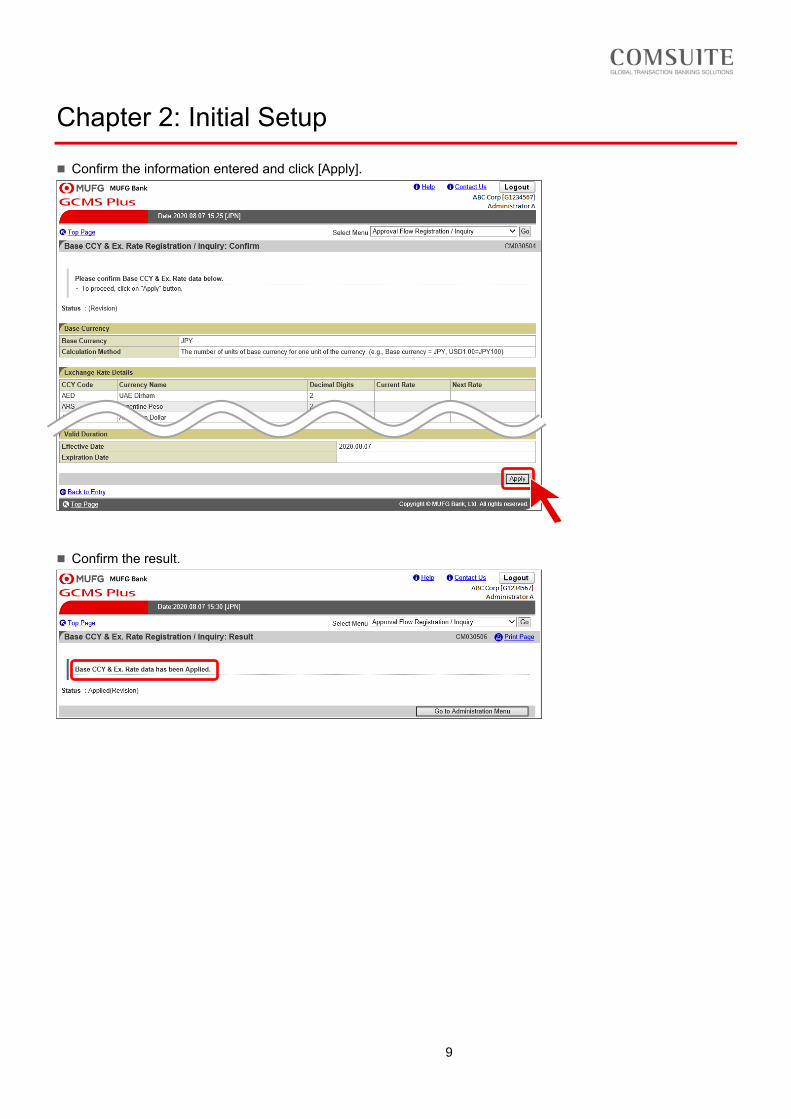
◼ Confirm the information entered and click [Apply].
◼ Confirm the result.
10
Chapter 2: Initial Setup
Approve the Base Currency and Exchange Rate
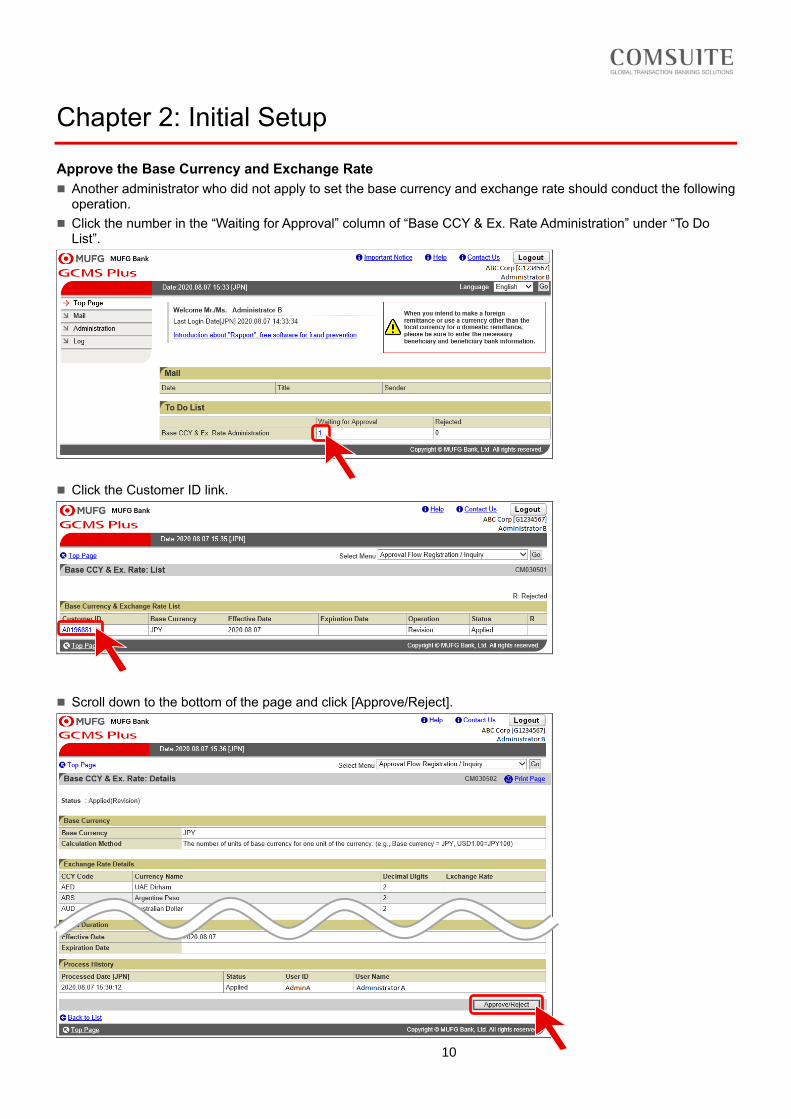
◼ Another administrator who did not apply to set the base currency and exchange rate should conduct the following operation.
◼ Click the number in the “Waiting for Approval” column of “Base CCY & Ex. Rate Administration” under “To Do List”.
◼ Click the Customer ID link.
◼ Scroll down to the bottom of the page and click [Approve/Reject].
11
Chapter 2: Initial Setup
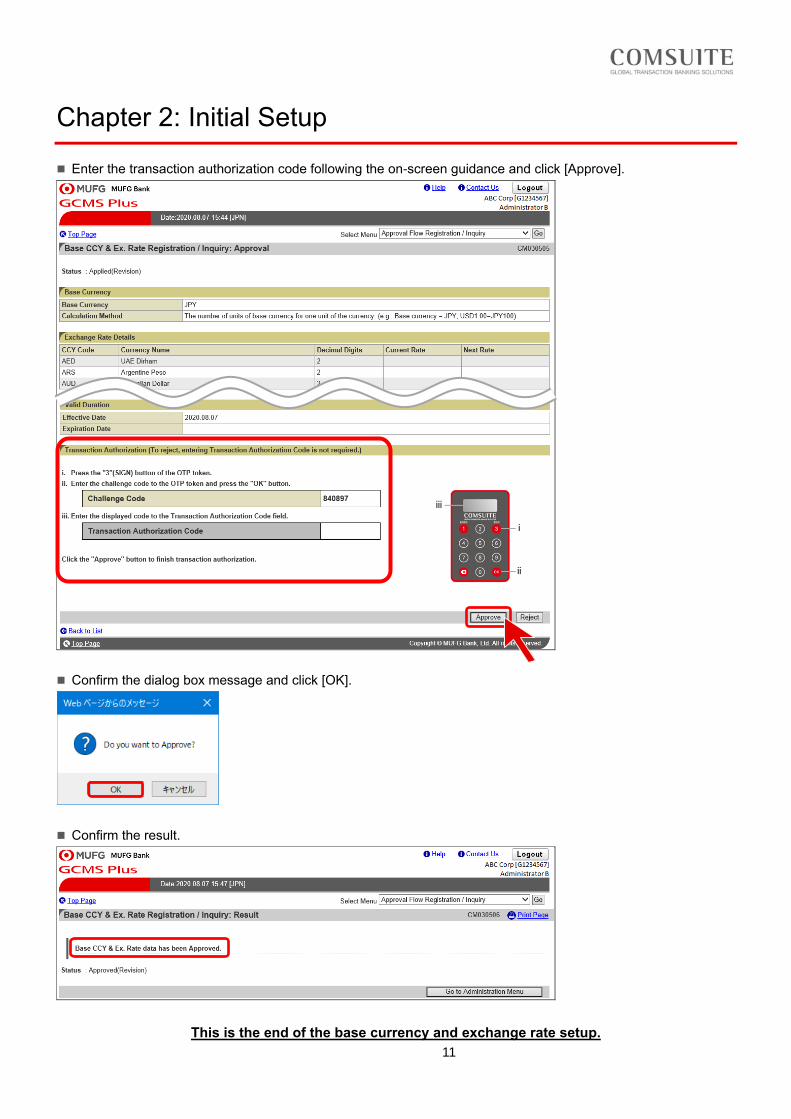
◼ Enter the transaction authorization code following the on-screen guidance and click [Approve].
◼ Confirm the dialog box message and click [OK].
◼ Confirm the result.
This is the end of the base currency and exchange rate setup.
12
Chapter 2: Initial Setup
Set User Privileges
Apply to set user privileges
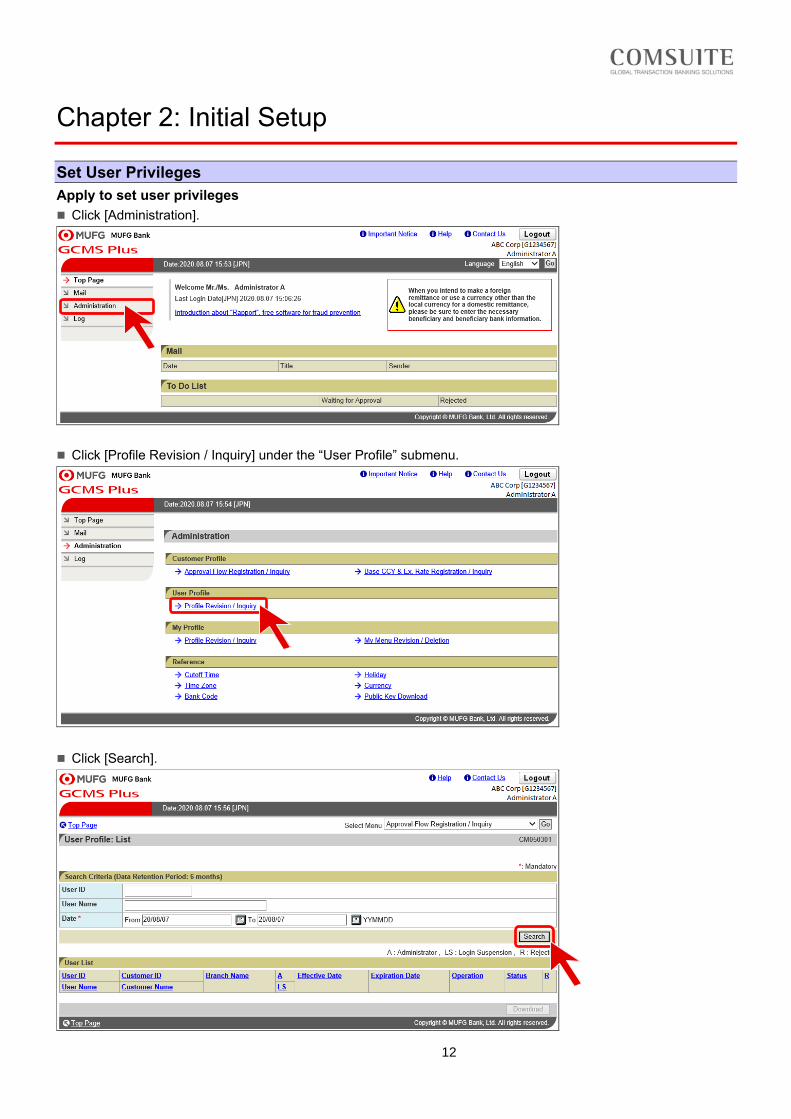
◼ Click [Administration].
◼ Click [Profile Revision / Inquiry] under the “User Profile” submenu.
◼ Click [Search].
13
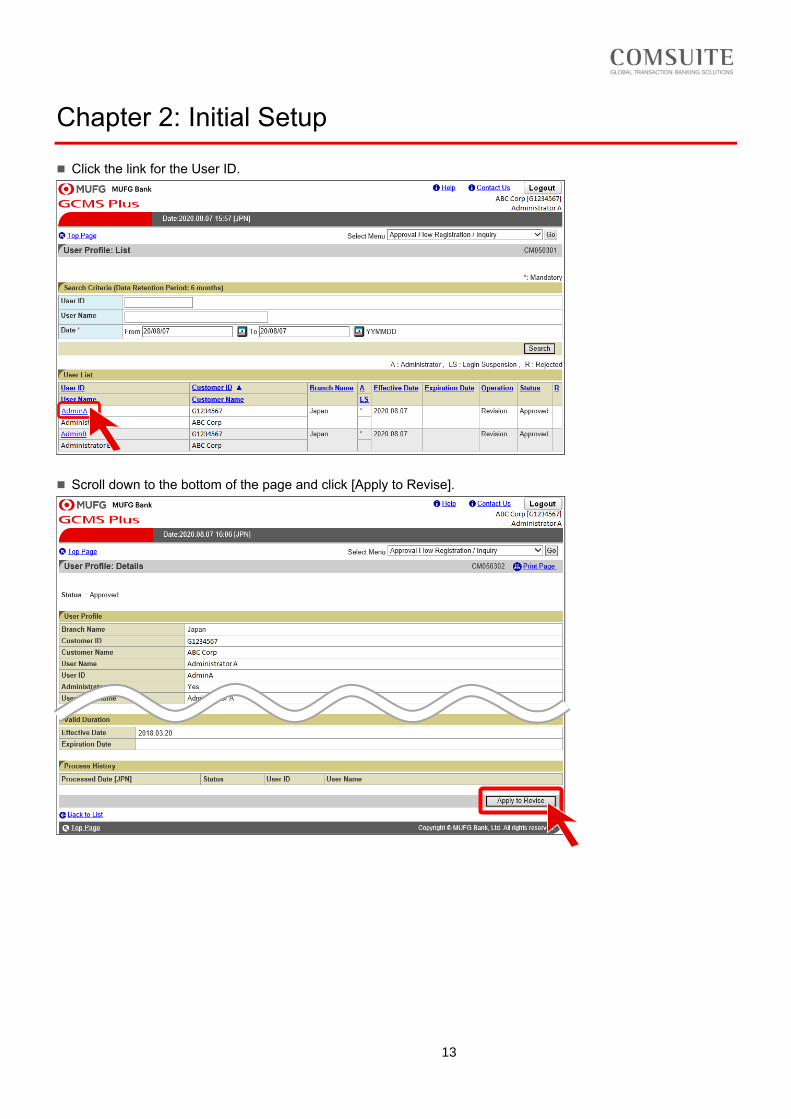
Chapter 2: Initial Setup
◼ Click the link for the User ID.
◼ Scroll down to the bottom of the page and click [Apply to Revise].
14
Chapter 2: Initial Setup
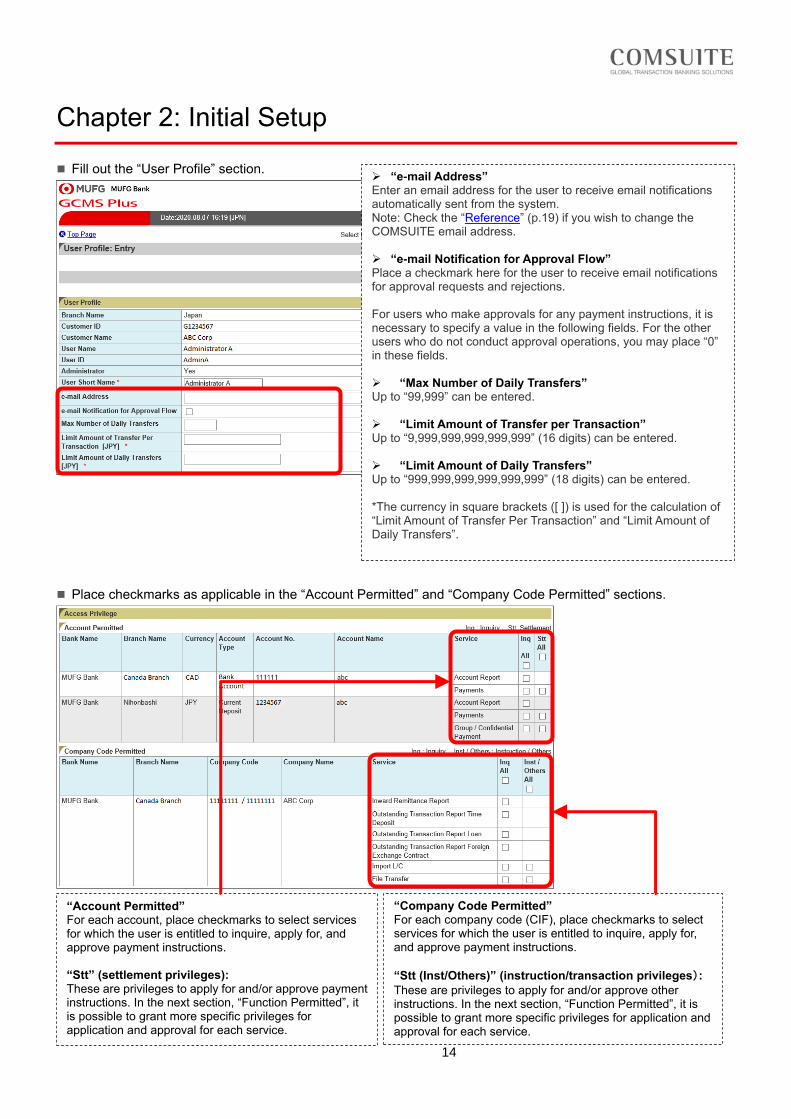
◼ Fill out the “User Profile” section.
◼ Place checkmarks as applicable in the “Account Permitted” and “Company Code Permitted” sections.
➢ “e-mail Address” Enter an email address for the user to receive email notifications automatically sent from the system. Note: Check the “Reference” (p.19) if you wish to change the COMSUITE email address. ➢ “e-mail Notification for Approval Flow” Place a checkmark here for the user to receive email notifications for approval requests and rejections. For users who make approvals for any payment instructions, it is necessary to specify a value in the following fields. For the other users who do not conduct approval operations, you may place “0” in these fields. ➢ “Max Number of Daily Transfers” Up to “99,999” can be entered. ➢ “Limit Amount of Transfer per Transaction” Up to “9,999,999,999,999,999” (16 digits) can be entered. ➢ “Limit Amount of Daily Transfers” Up to “999,999,999,999,999,999” (18 digits) can be entered. *The currency in square brackets ([ ]) is used for the calculation of “Limit Amount of Transfer Per Transaction” and “Limit Amount of Daily Transfers”.
“Company Code Permitted” For each company code (CIF), place checkmarks to select services for which the user is entitled to inquire, apply for, and approve payment instructions.
“Stt (Inst/Others)” (instruction/transaction privileges):
These are privileges to apply for and/or approve other instructions. In the next section, “Function Permitted”, it is possible to grant more specific privileges for application and approval for each service.
“Account Permitted” For each account, place checkmarks to select services for which the user is entitled to inquire, apply for, and approve payment instructions. “Stt” (settlement privileges): These are privileges to apply for and/or approve payment instructions. In the next section, “Function Permitted”, it is possible to grant more specific privileges for application and approval for each service.
15
Chapter 2: Initial Setup
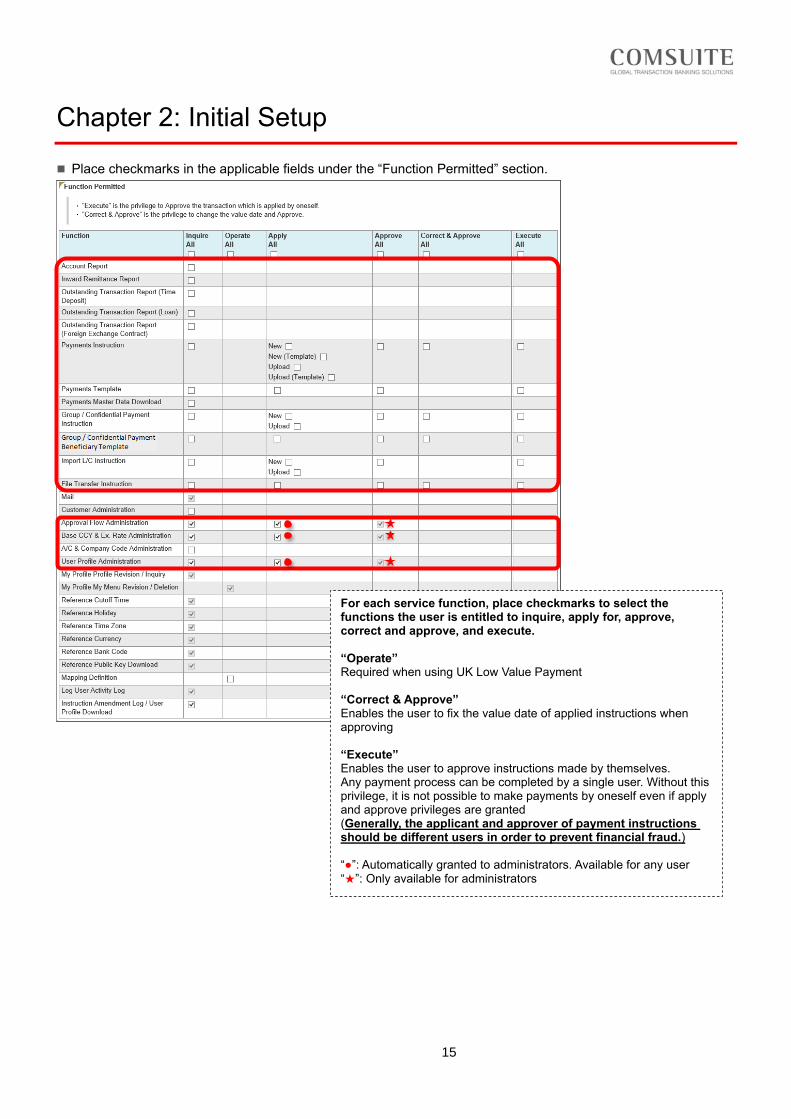
◼ Place checkmarks in the applicable fields under the “Function Permitted” section.
For each service function, place checkmarks to select the functions the user is entitled to inquire, apply for, approve, correct and approve, and execute. “Operate” Required when using UK Low Value Payment “Correct & Approve” Enables the user to fix the value date of applied instructions when approving “Execute” Enables the user to approve instructions made by themselves. Any payment process can be completed by a single user. Without this privilege, it is not possible to make payments by oneself even if apply and approve privileges are granted (Generally, the applicant and approver of payment instructions should be different users in order to prevent financial fraud.) “●”: Automatically granted to administrators. Available for any user “★”: Only available for administrators
16
Chapter 2: Initial Setup
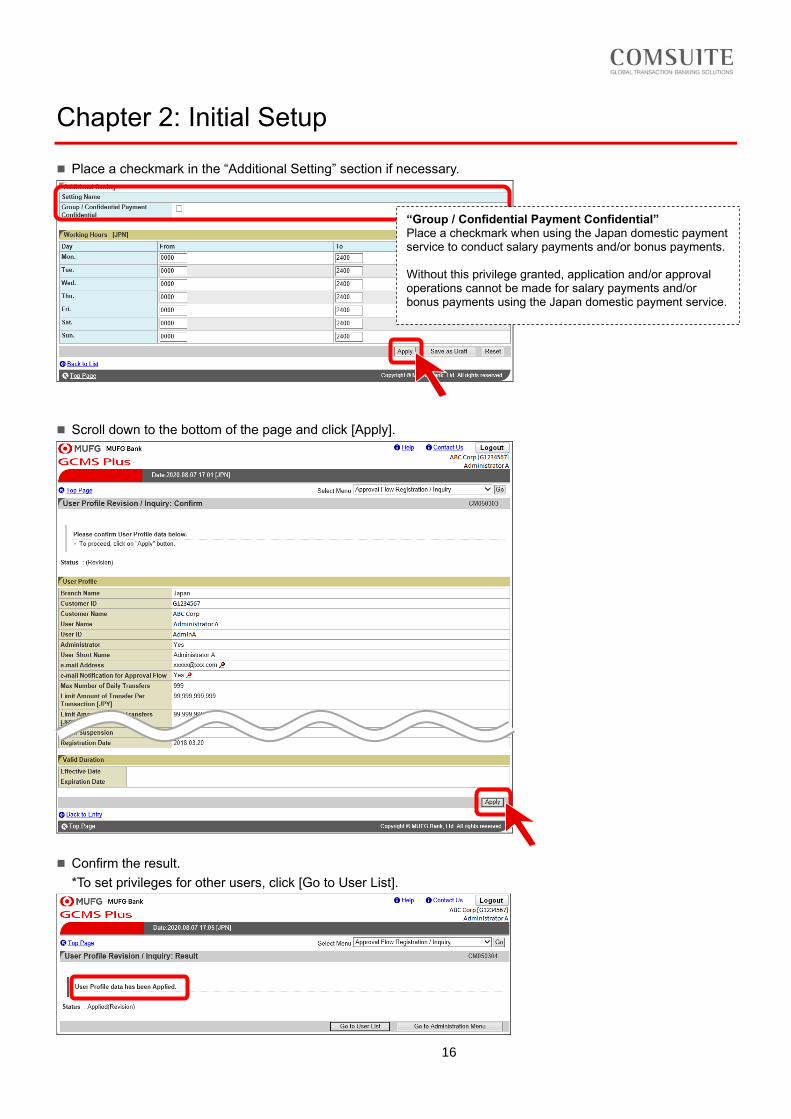
◼ Place a checkmark in the “Additional Setting” section if necessary.
◼ Scroll down to the bottom of the page and click [Apply].
◼ Confirm the result.
*To set privileges for other users, click [Go to User List].
“Group / Confidential Payment Confidential” Place a checkmark when using the Japan domestic payment service to conduct salary payments and/or bonus payments. Without this privilege granted, application and/or approval operations cannot be made for salary payments and/or bonus payments using the Japan domestic payment service.
17
Chapter 2: Initial Setup
Approve User Privileges
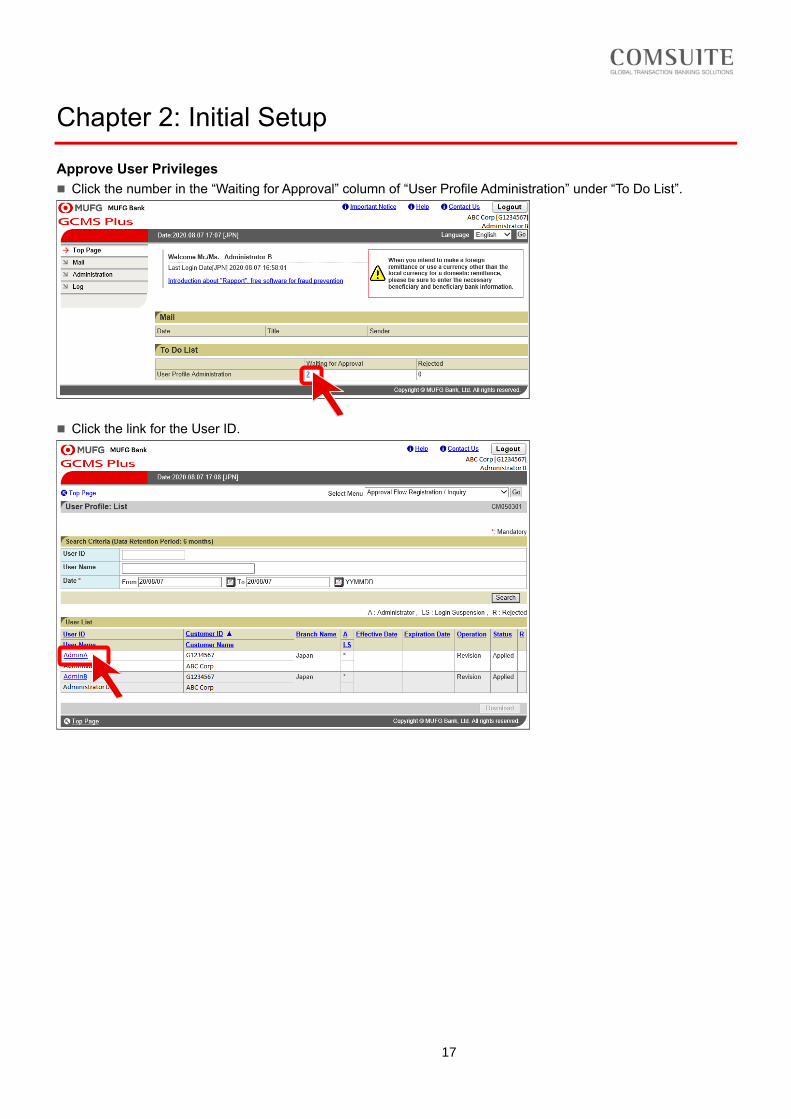
◼ Click the number in the “Waiting for Approval” column of “User Profile Administration” under “To Do List”.
◼ Click the link for the User ID.
18
Chapter 2: Initial Setup
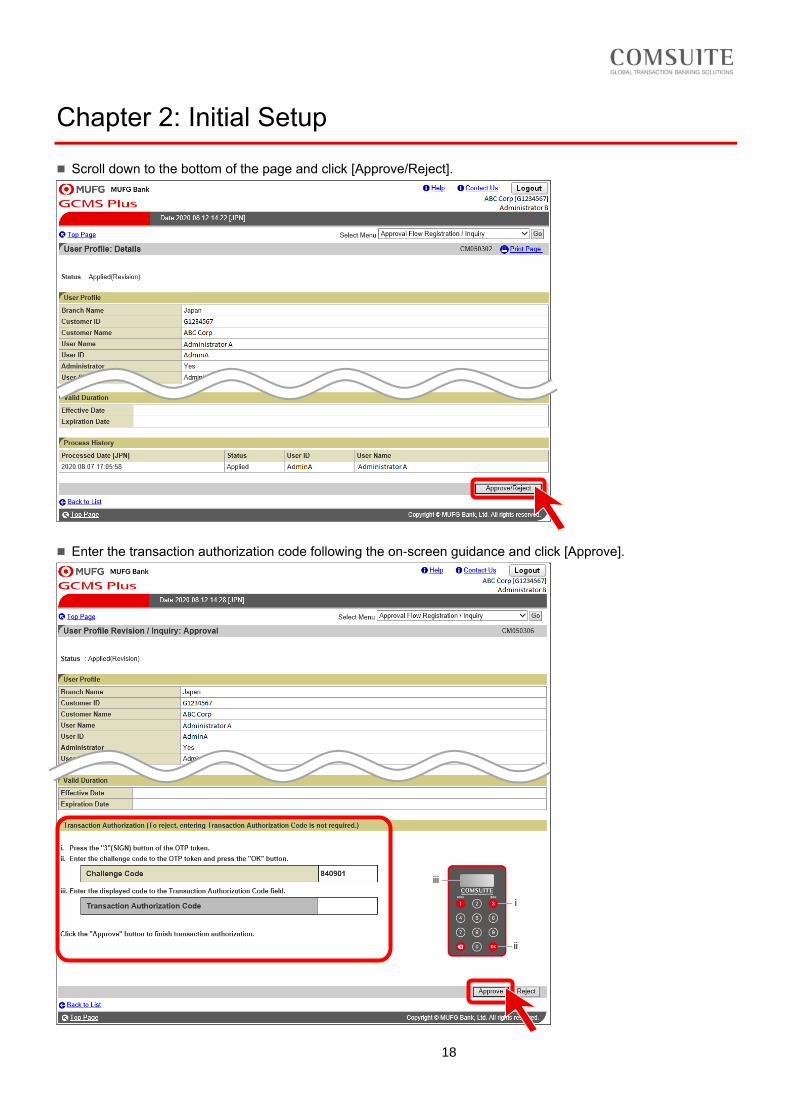
◼ Scroll down to the bottom of the page and click [Approve/Reject].
◼ Enter the transaction authorization code following the on-screen guidance and click [Approve].
19
Chapter 2: Initial Setup
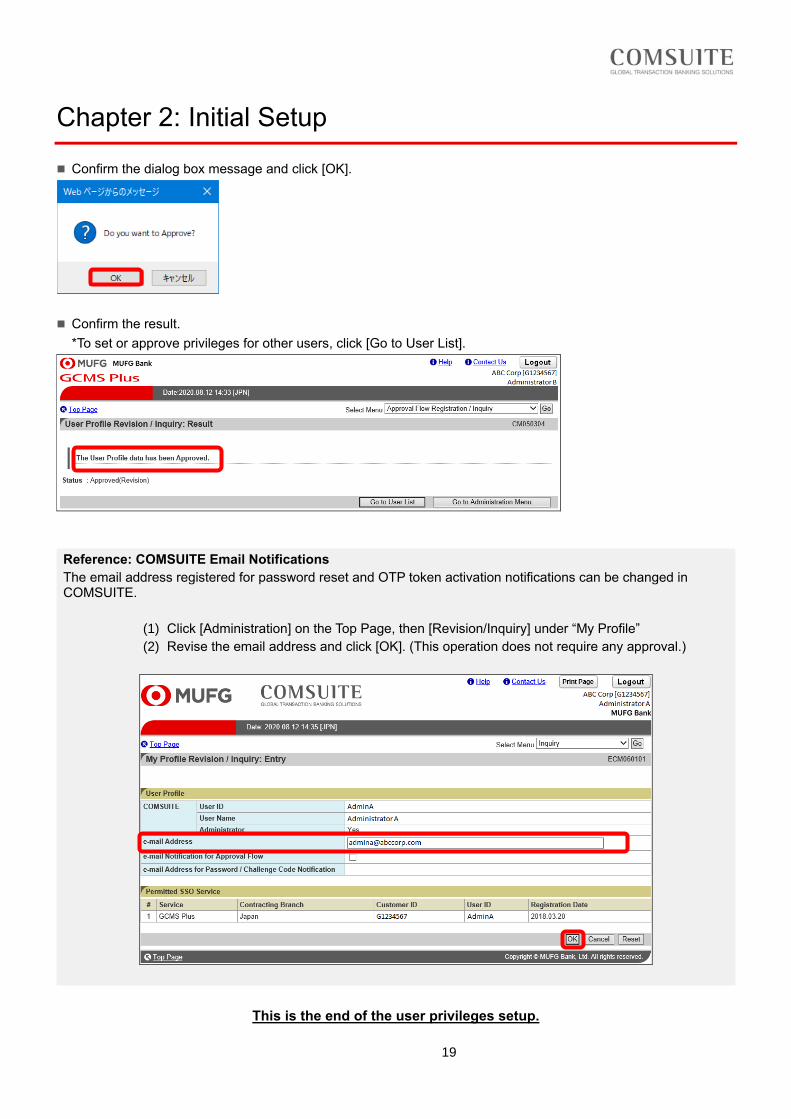
◼ Confirm the dialog box message and click [OK].
◼ Confirm the result.
*To set or approve privileges for other users, click [Go to User List].
Reference: COMSUITE Email Notifications
The email address registered for password reset and OTP token activation notifications can be changed in COMSUITE.
(1) Click [Administration] on the Top Page, then [Revision/Inquiry] under “My Profile”
(2) Revise the email address and click [OK]. (This operation does not require any approval.)
This is the end of the user privileges setup.
20
Chapter 3: Payments
Overview of the Payments Menu
◼ This service allows you to make a Payments instruction to the bank.
◼ The applicant creates a Payments instruction which is then approved by the approver. The approved Payments instruction is sent to the bank, thus completing the request.
# Operation Applicant Approver
1 Create and apply for a payment instruction ■
2 Approve the payment instruction application ■
◼ There are 4 ways to create a Payments instruction:
(1) Create by entering new data: “New”
Create a new instruction from a blank screen. (Explained in this chapter)
(2) Create by using a template: “New (Template)”
Create a new instruction by using a template created beforehand.
(3) Create by using a past instruction “New (Copy)”
Create a new instruction by using a previously approved or saved instruction.
(4) Create by uploading data “Data Upload”
Create new instructions by uploading instruction data into GCMS Plus.
Create and Apply for a New Payments Instruction
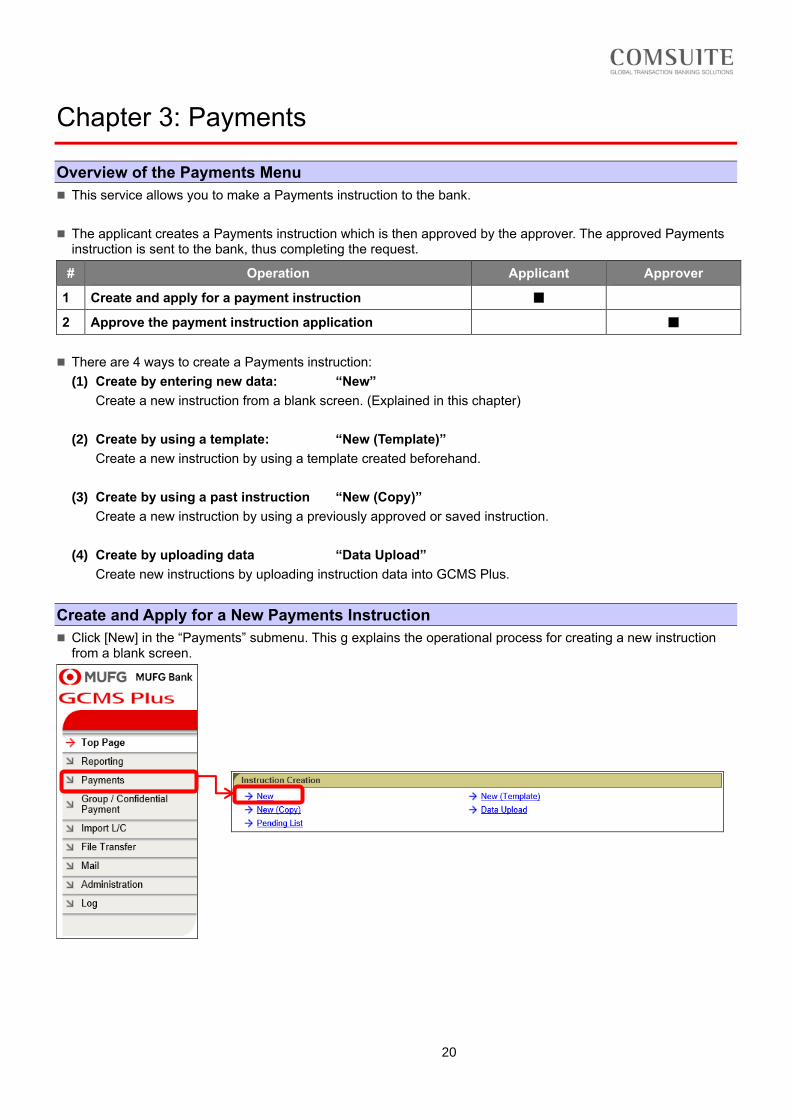
◼ Click [New] in the “Payments” submenu. This g explains the operational process for creating a new instruction from a blank screen.
21
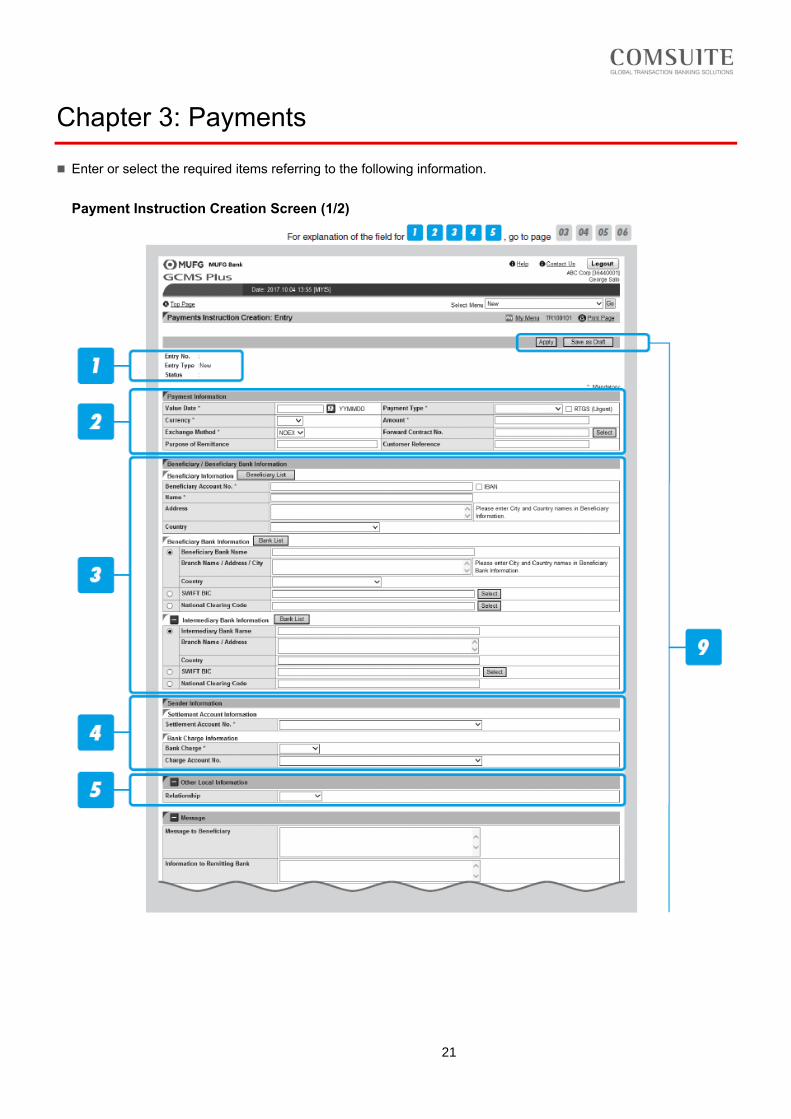
Chapter 3: Payments
◼ Enter or select the required items referring to the following information.
Payment Instruction Creation Screen (1/2)
22
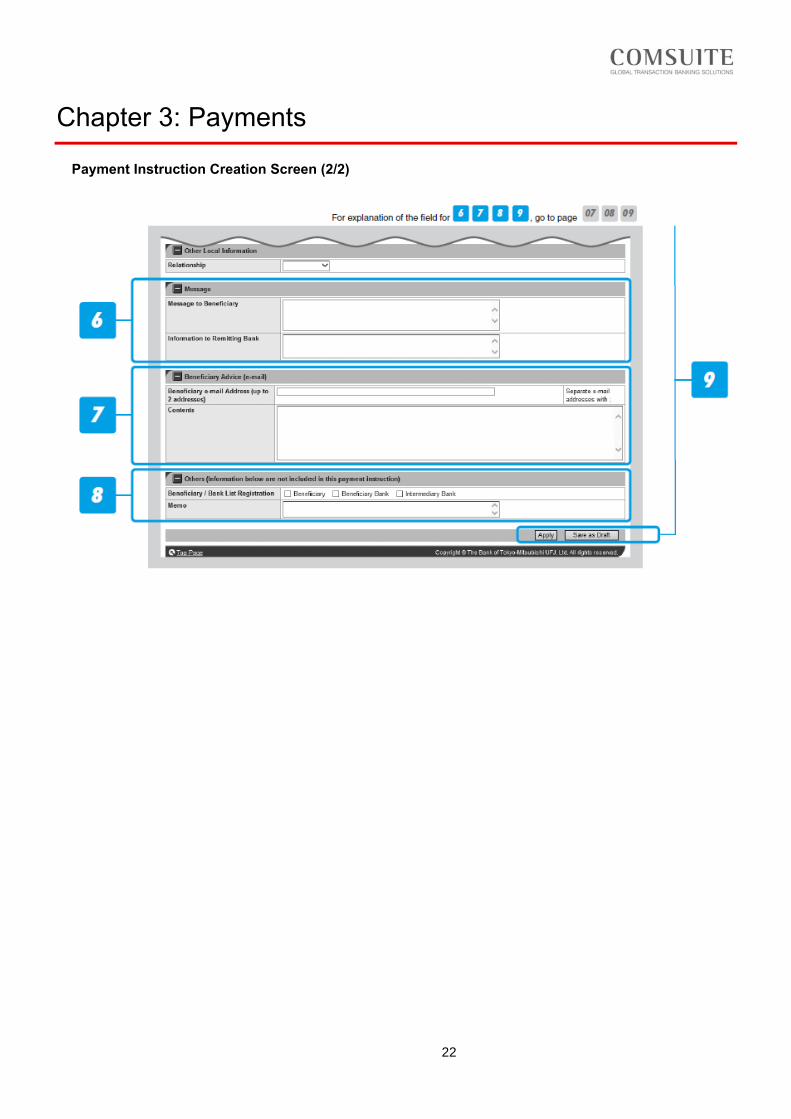
Chapter 3: Payments
Payment Instruction Creation Screen (2/2)
23
Chapter 3: Payments
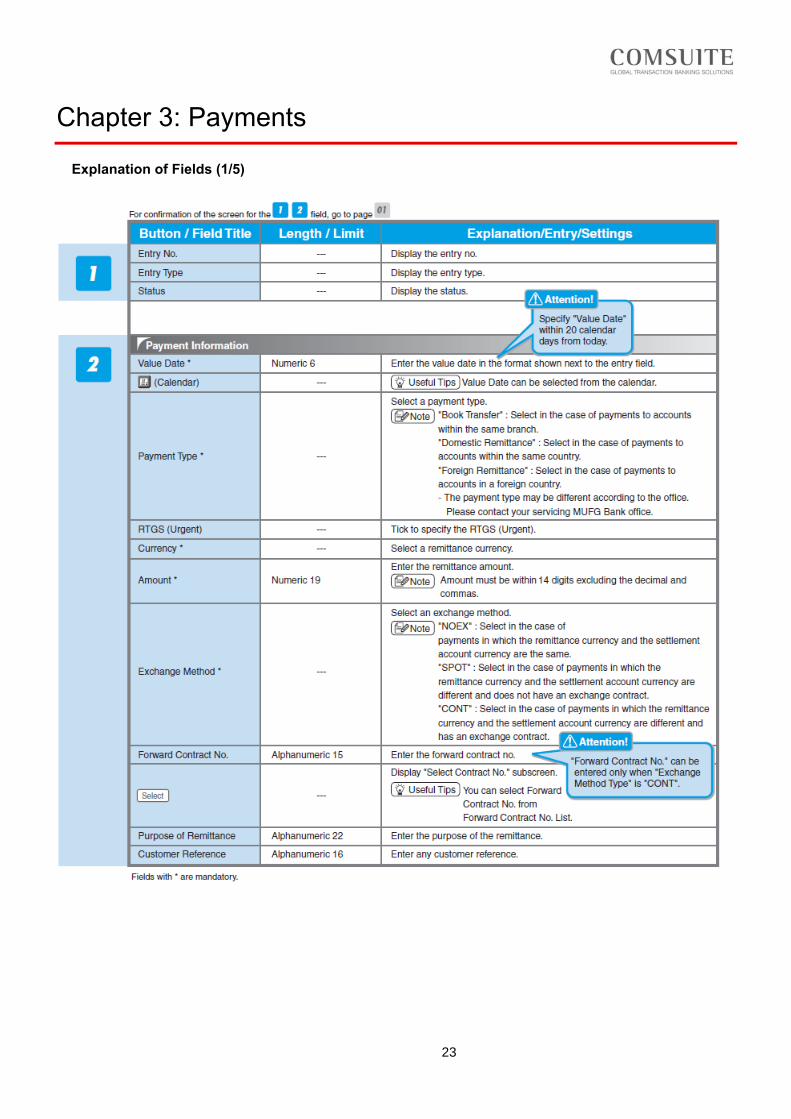
Explanation of Fields (1/5)
24
Chapter 3: Payments
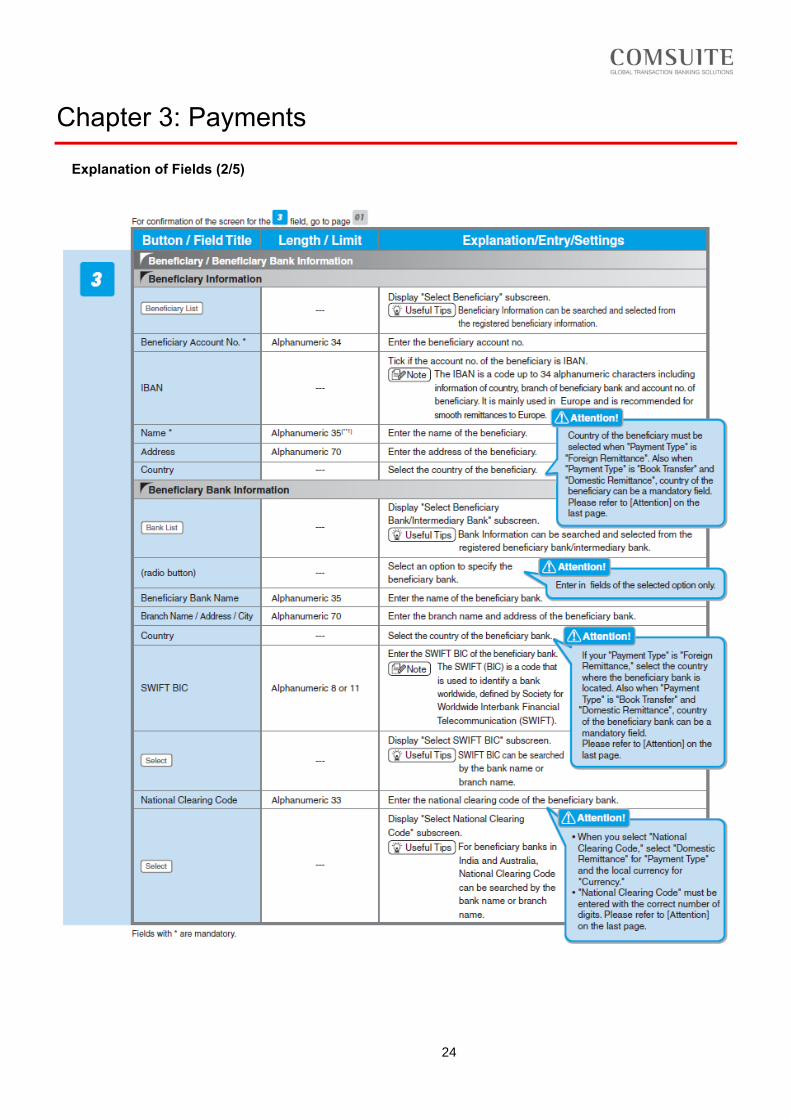
Explanation of Fields (2/5)
25
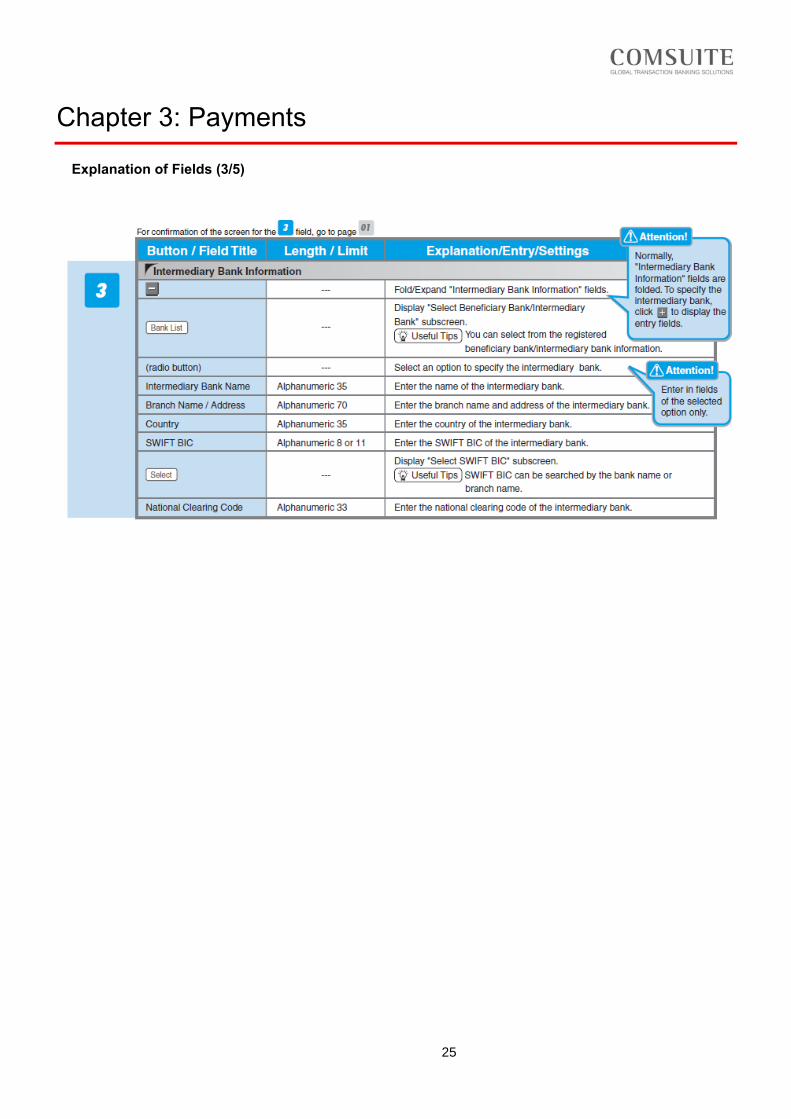
Chapter 3: Payments
Explanation of Fields (3/5)
26
Chapter 3: Payments
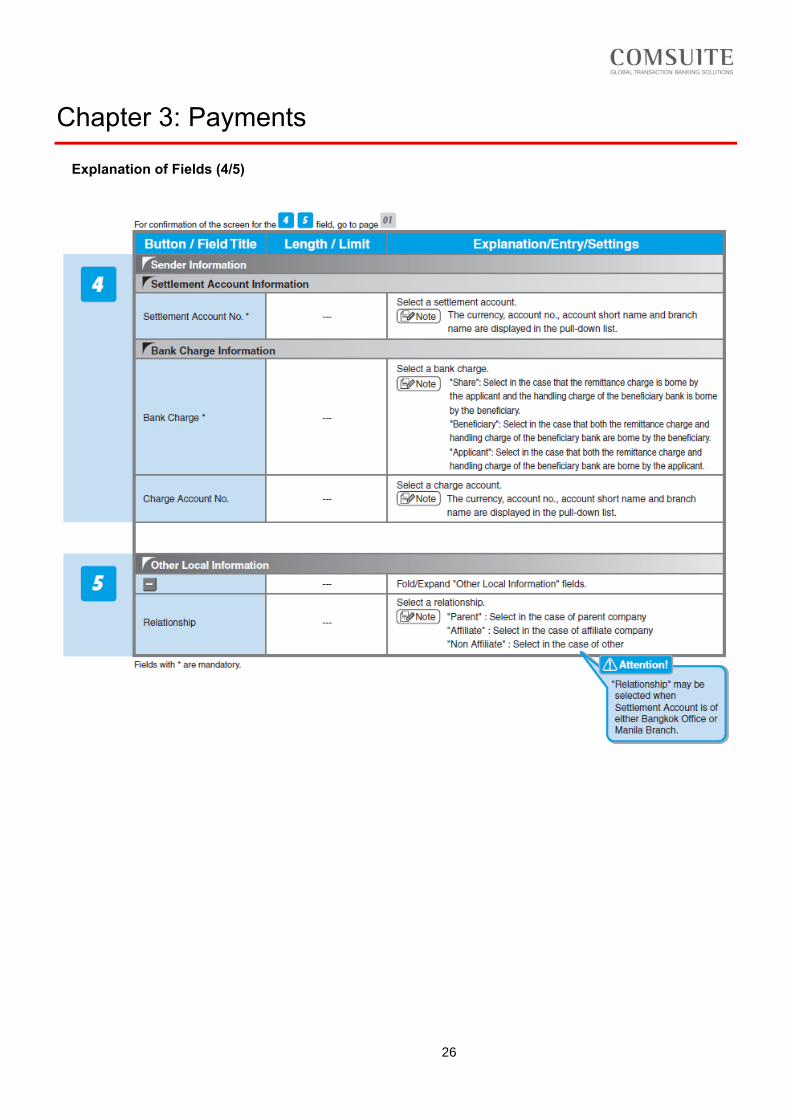
Explanation of Fields (4/5)
27
Chapter 3: Payments
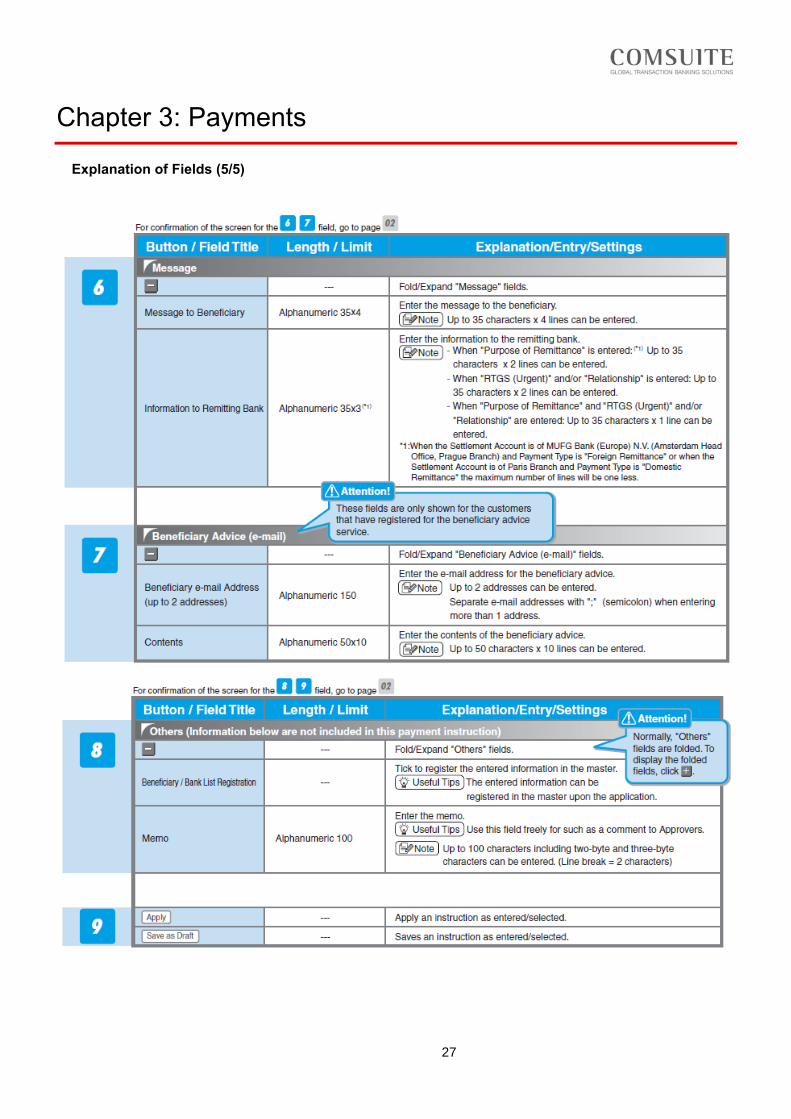
Explanation of Fields (5/5)
28
Chapter 3: Payments
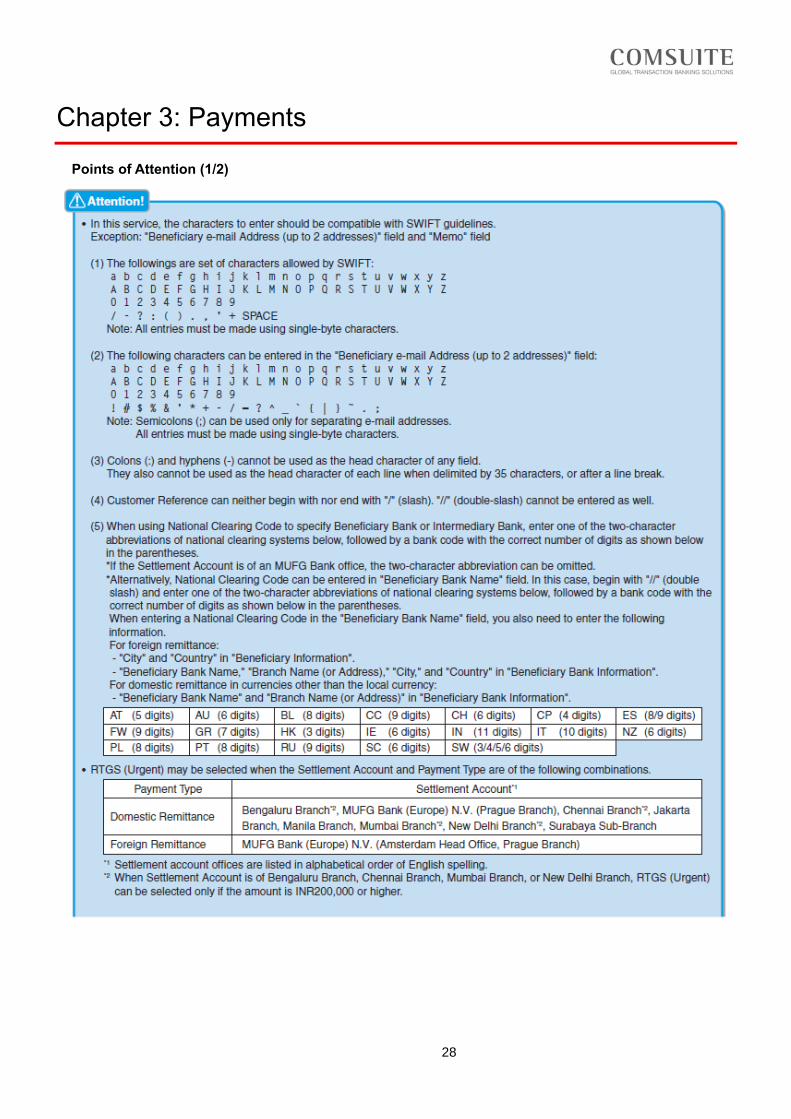
Points of Attention (1/2)
29
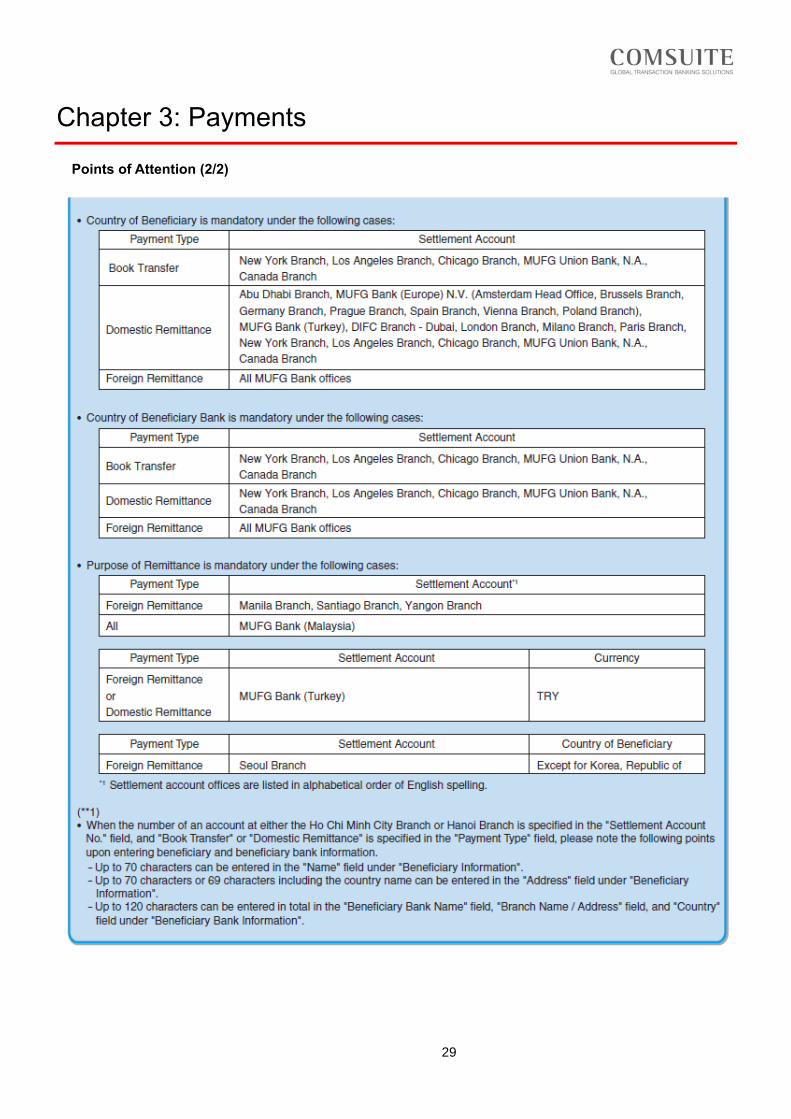
Chapter 3: Payments
Points of Attention (2/2)
30
Chapter 3: Payments
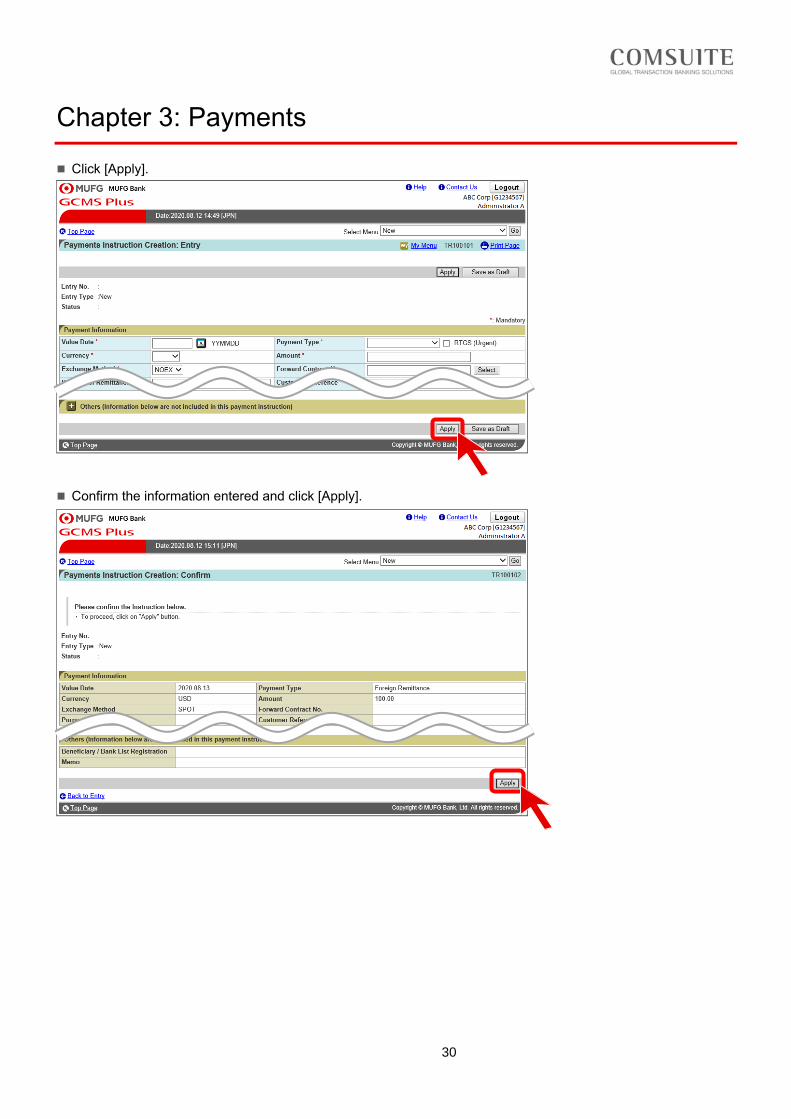
◼ Click [Apply].
◼ Confirm the information entered and click [Apply].
31
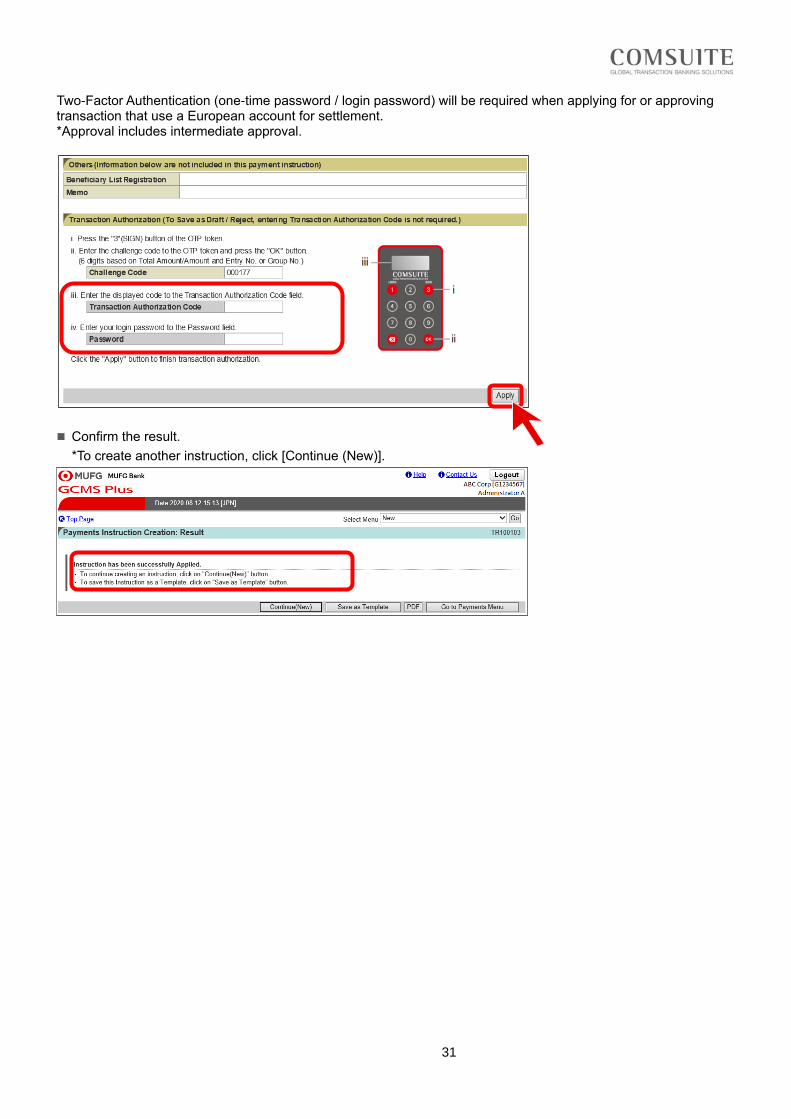
Two-Factor Authentication (one-time password / login password) will be required when applying for or approving transaction that use a European account for settlement. *Approval includes intermediate approval.
◼ Confirm the result.
*To create another instruction, click [Continue (New)].
32
Chapter 3: Payments
Approve a Payments Instruction Application
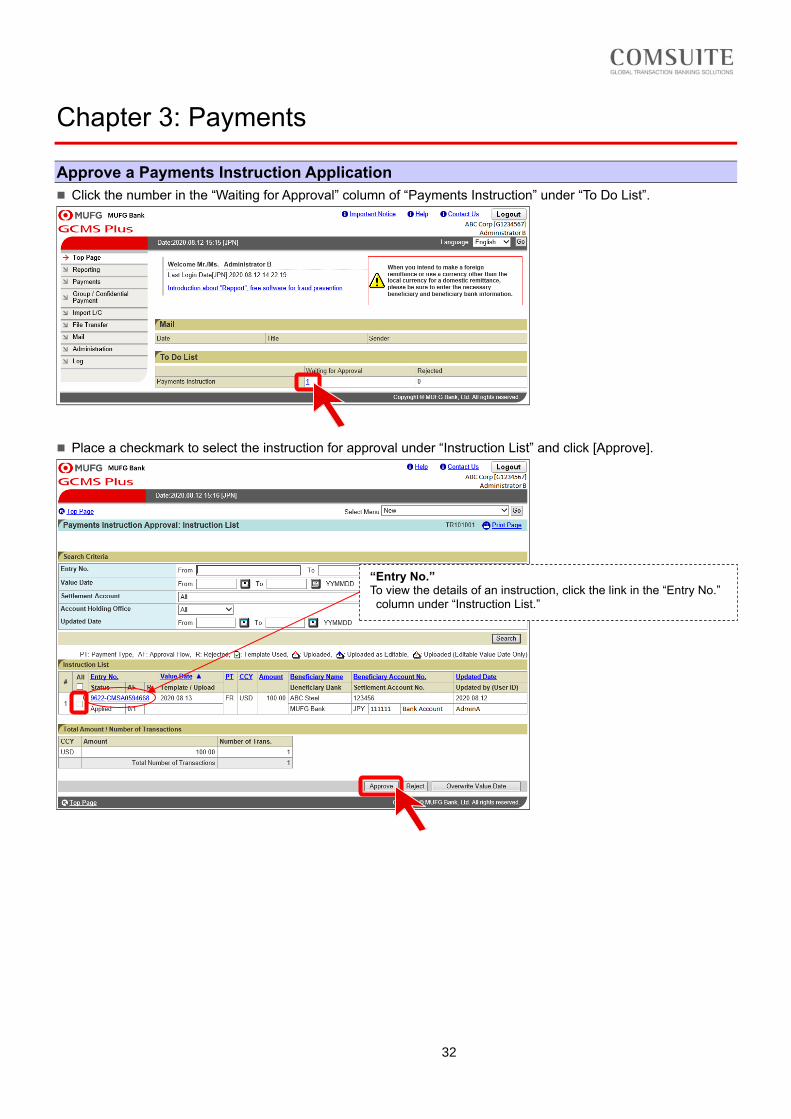
◼ Click the number in the “Waiting for Approval” column of “Payments Instruction” under “To Do List”.
◼ Place a checkmark to select the instruction for approval under “Instruction List” and click [Approve].
“Entry No.” To view the details of an instruction, click the link in the “Entry No.” column under “Instruction List.”
33
Chapter 3: Payments
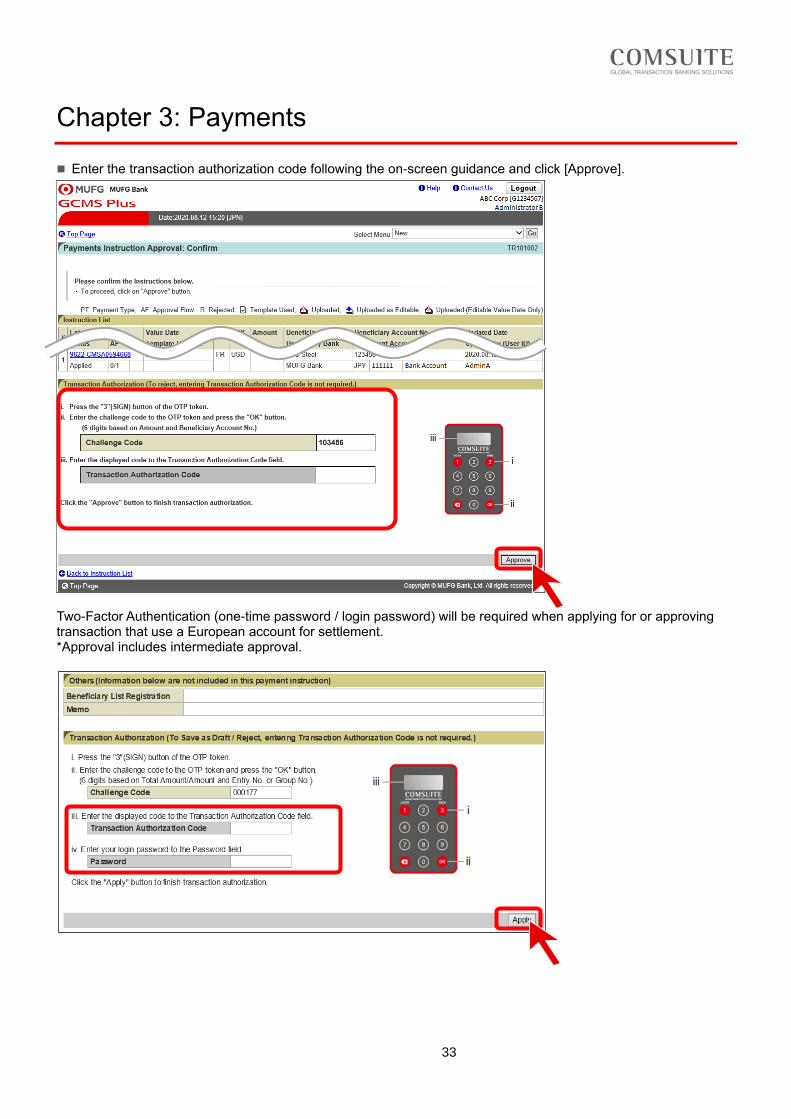
◼ Enter the transaction authorization code following the on-screen guidance and click [Approve].
Two-Factor Authentication (one-time password / login password) will be required when applying for or approving transaction that use a European account for settlement. *Approval includes intermediate approval.

34
◼ Confirm the dialog box message and click [OK].
◼ Confirm the result.
*To approve/reject other instructions, click [Continue (Approval)].
35
Chapter 4: Inquiries
Overview of the Inquiry Service
◼ The following submenus are available under “Account Report”:
(1) Display the balance of one account: “Balance”
(2) Display transactions for one account: “Transaction Details”
(3) Display the balances of multiple accounts: “Multi Account Balance”
Balance Inquiry
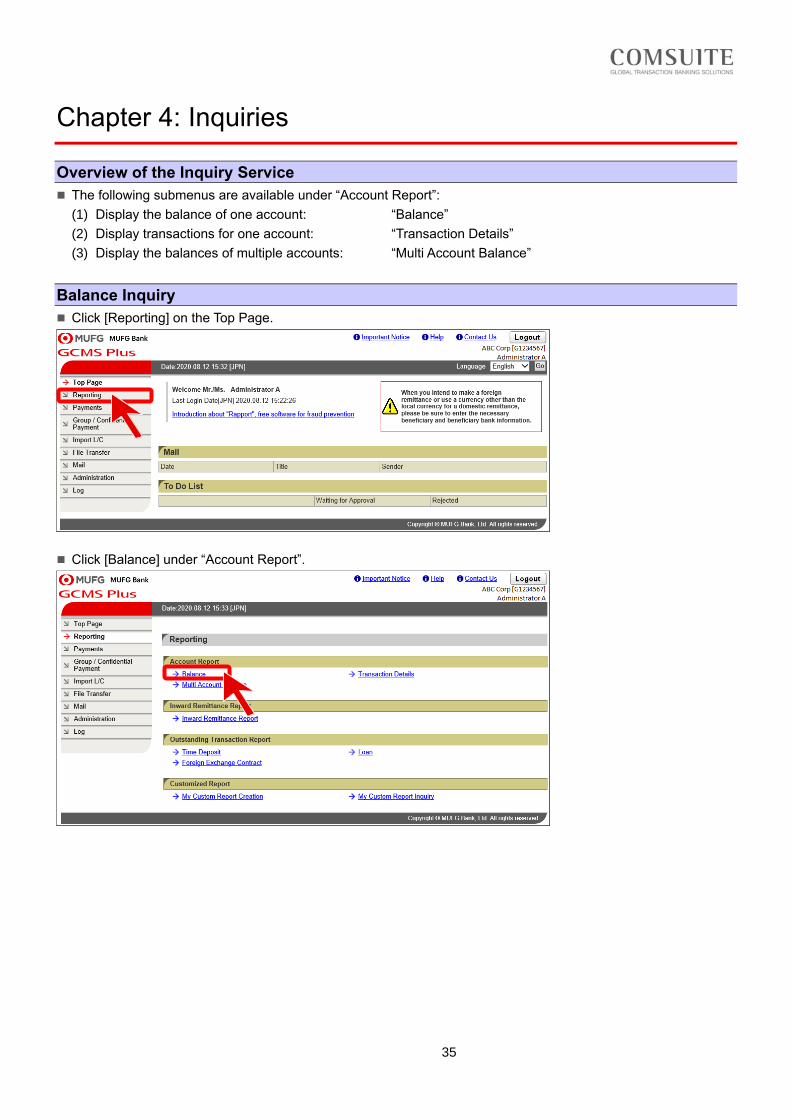
◼ Click [Reporting] on the Top Page.
◼ Click [Balance] under “Account Report”.
36
Chapter 4: Inquiries
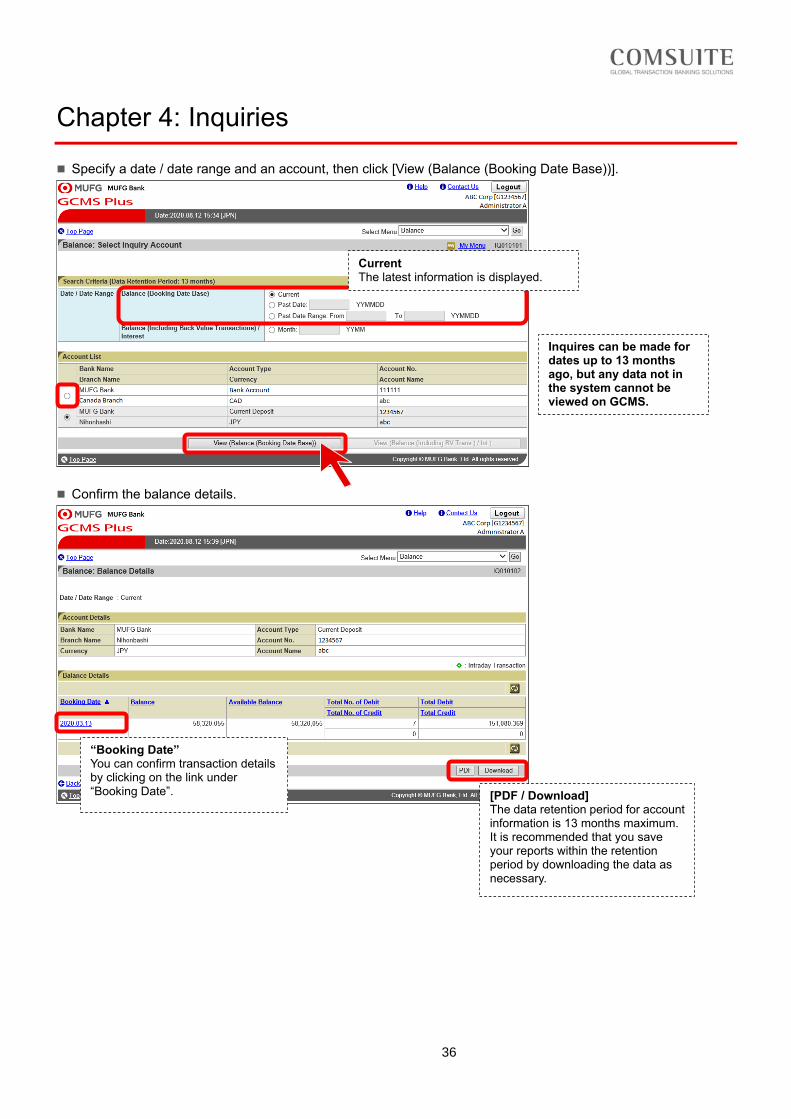
◼ Specify a date / date range and an account, then click [View (Balance (Booking Date Base))].
◼ Confirm the balance details.
“Booking Date” You can confirm transaction details by clicking on the link under “Booking Date”. [PDF / Download]
The data retention period for account information is 13 months maximum. It is recommended that you save your reports within the retention period by downloading the data as necessary.
Inquires can be made for dates up to 13 months ago, but any data not in the system cannot be viewed on GCMS. Plus.
Current The latest information is displayed.
37
Chapter 4: Inquiries
Transaction Inquiry
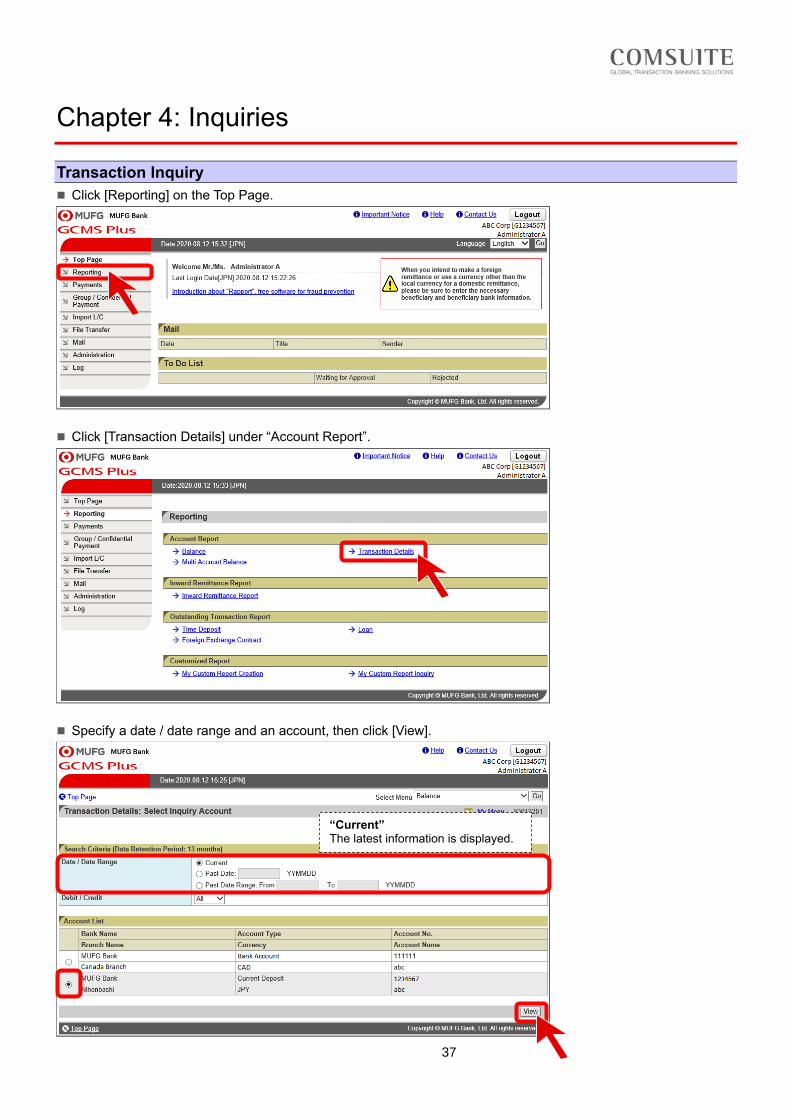
◼ Click [Reporting] on the Top Page.
◼ Click [Transaction Details] under “Account Report”.
◼ Specify a date / date range and an account, then click [View].
“Current” The latest information is displayed.
38
Chapter 4: Inquiries
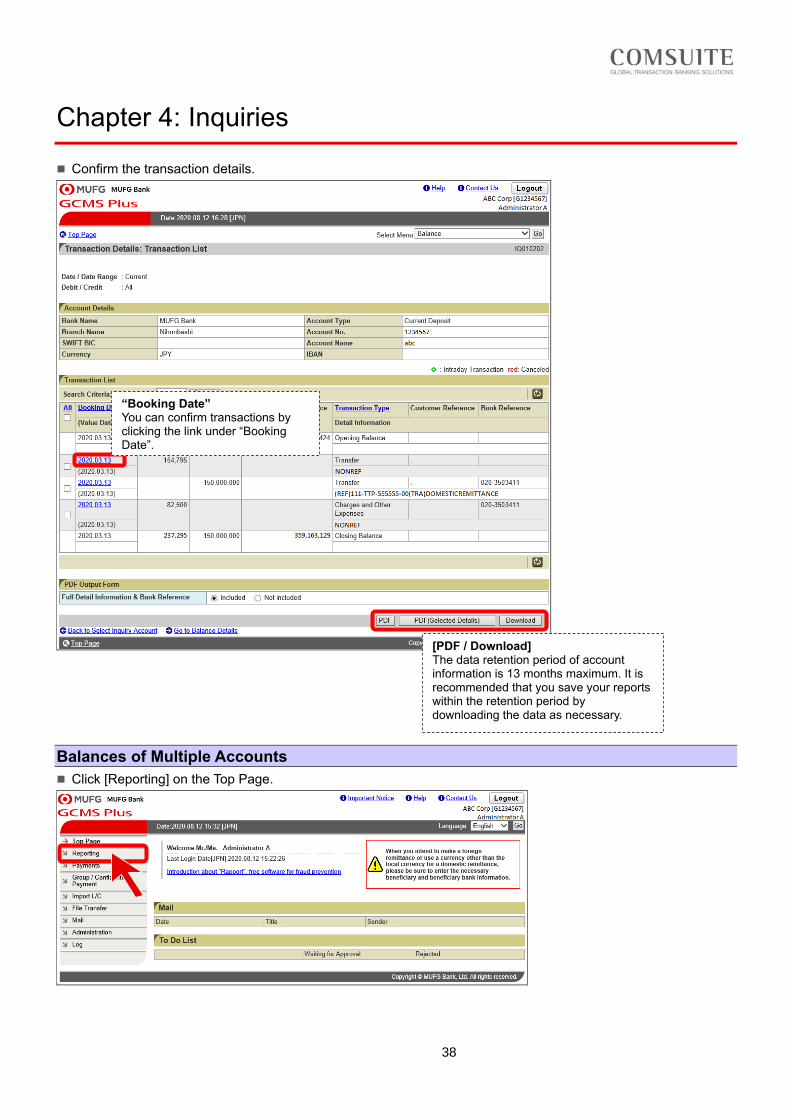
◼ Confirm the transaction details.
Balances of Multiple Accounts
◼ Click [Reporting] on the Top Page.
[PDF / Download] The data retention period of account information is 13 months maximum. It is recommended that you save your reports within the retention period by downloading the data as necessary.
“Booking Date” You can confirm transactions by clicking the link under “Booking Date”.
39
Chapter 4: Inquiries
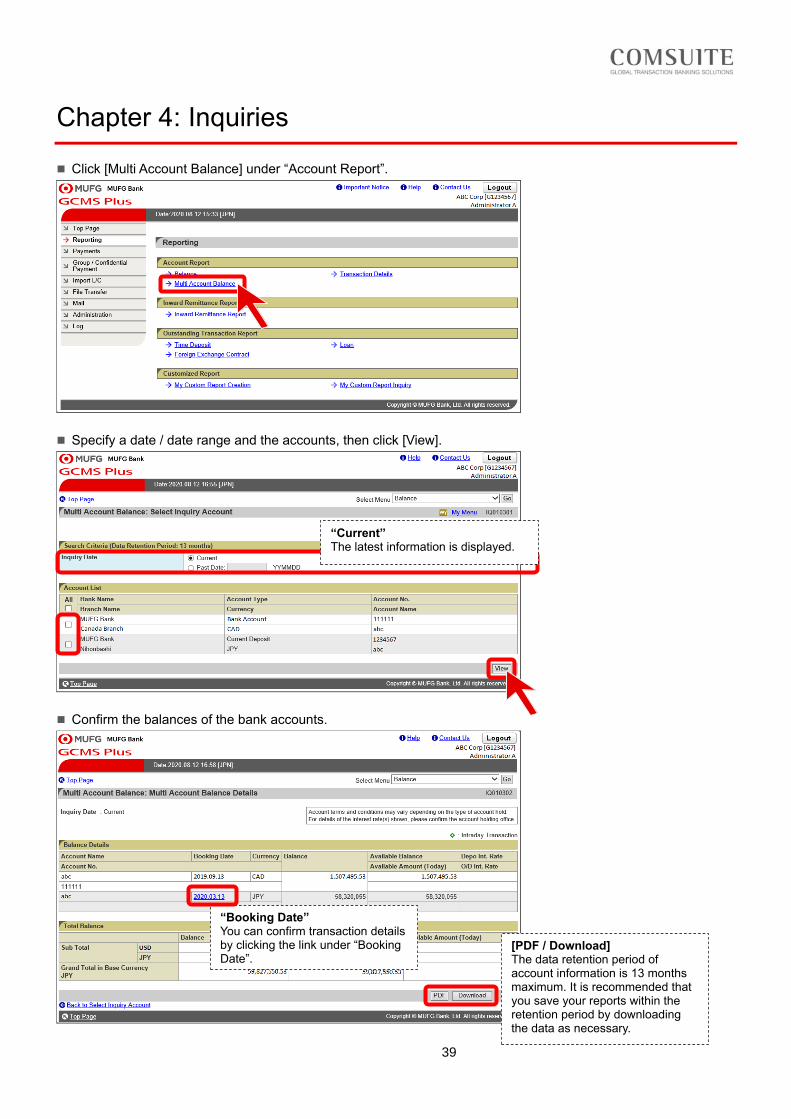
◼ Click [Multi Account Balance] under “Account Report”.
◼ Specify a date / date range and the accounts, then click [View].
◼ Confirm the balances of the bank accounts.
“Booking Date” You can confirm transaction details by clicking the link under “Booking Date”.
[PDF / Download] The data retention period of account information is 13 months maximum. It is recommended that you save your reports within the retention period by downloading the data as necessary.
“Current” The latest information is displayed.
40
Chapter 5: Help
Online Manuals and Contact Information
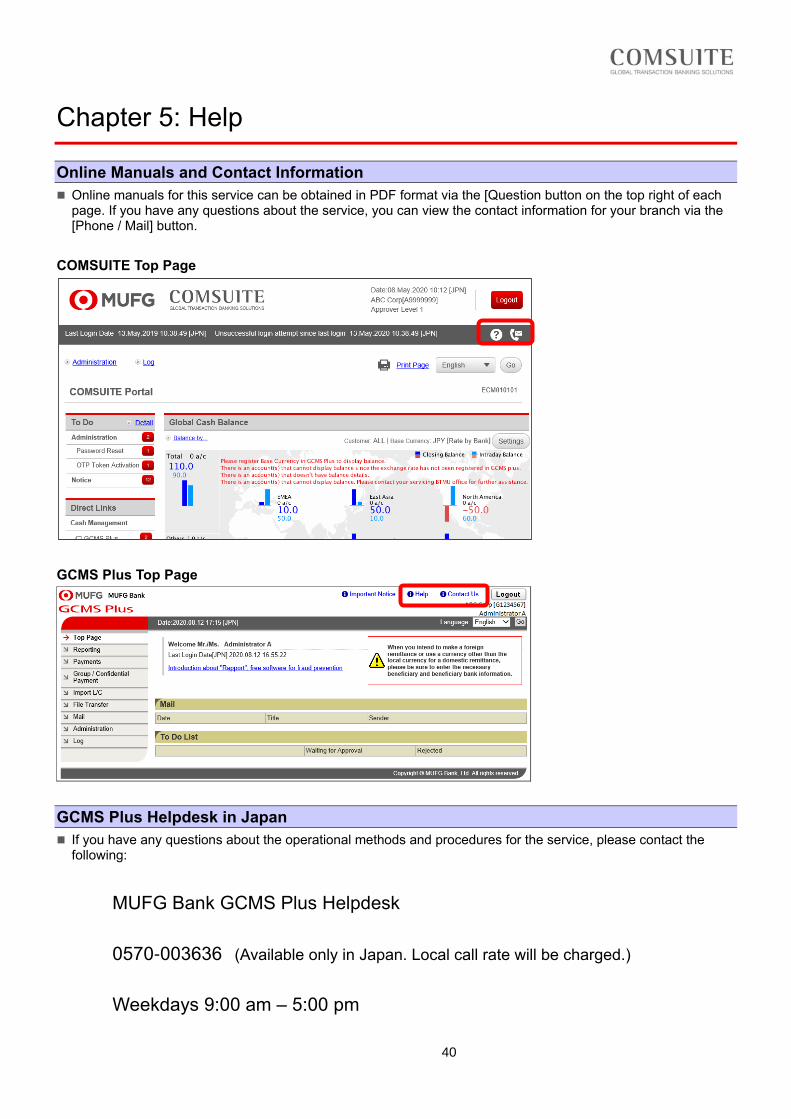
◼ Online manuals for this service can be obtained in PDF format via the [Question button on the top right of each page. If you have any questions about the service, you can view the contact information for your branch via the [Phone / Mail] button.
COMSUITE Top Page
GCMS Plus Top Page
GCMS Plus Helpdesk in Japan
◼ If you have any questions about the operational methods and procedures for the service, please contact the following:
MUFG Bank GCMS Plus Helpdesk
0570-003636 (Available only in Japan. Local call rate will be charged.)
Weekdays 9:00 am – 5:00 pm

41