general measuring guidelines – all pool...
TRANSCRIPT

Page 1
General Measuring Guidelines – All Pool Shapes
Measuring your pool will be easier if you have another person helping you.
Also, draining your pool will make the measuring process easier, however, it is not necessary. Measurements can be easily taken from outside of the pool.
Never assume your pool is standard. All pools are different. Please measure your pool for an exact fit. Actual pool measurements should be made even if original pool plans are available
due to the fact that slight variances may have occurred during construction. The builder may not have followed the pool plan precisely.
When measuring the pool, do not make allowances for weather conditions, temperature, or the fact that vinyl shrinks and expands. These calculations are made when the new liner is
designed.
Please supply all measurements in feet and inches. Round your measurements up to the nearest half inch.
Follow the “step-by- step” measuring instructions carefully, referring to all diagrams to ensure accurate measurements.
Remember to include your name, address, phone and fax numbers on each page that you send to us. You must also sign the MEASURING FORM before we can begin designing your
liner.
Remember to record ALL of your measurements on the MEASURING form. You may need to transfer measurements you have made on the “MEASURING INSTRUCTIONS” pages onto the actual MEASURING FORM. When recording your measurements, use feet-inch notation as in
15-9.5 or 15’-9.5” each of which is acceptable to represent 15 feet, 9 and ½ inches.
Write your measurements legibly, using BLACK INK. (No pencil or felt-tip marker please!) Make copies of all pages for your records BEFORE sending them to us. You will need to refer to your copies if we have questions regarding your measurements.
Don’t forget! If you’re stuck you can contact us at:
Email: [email protected] On-line: FindlayVinyl.com

Page 2
MEASURING INSTRUCTIONS
Non-standard or complex Pool Shapes (A-B Layout) Overview: Many pools which are not Rectangular, Oval, Grecian, True-L or Lazy-L require a measuring
method known as an A-B layout or A-B plot. This measuring method requires many measurements from 2 fixed points outside the swimming pool to points around the perimeter of your pool.
The method is illustrated in the diagram (Figure 1).
Each numbered X represents a point on the perimeter of the pool. The A and B in the diagram refer to the 2 key points outside the pool from which you will take a measurement to each
perimeter point. Remember that the points around the perimeter are at the on the deck at a point directly
above the pool wall (where the liner snaps into the track) not at the edge of the coping (the pool deck). See figure 2.
Figure 2
Figure 1
Page 3
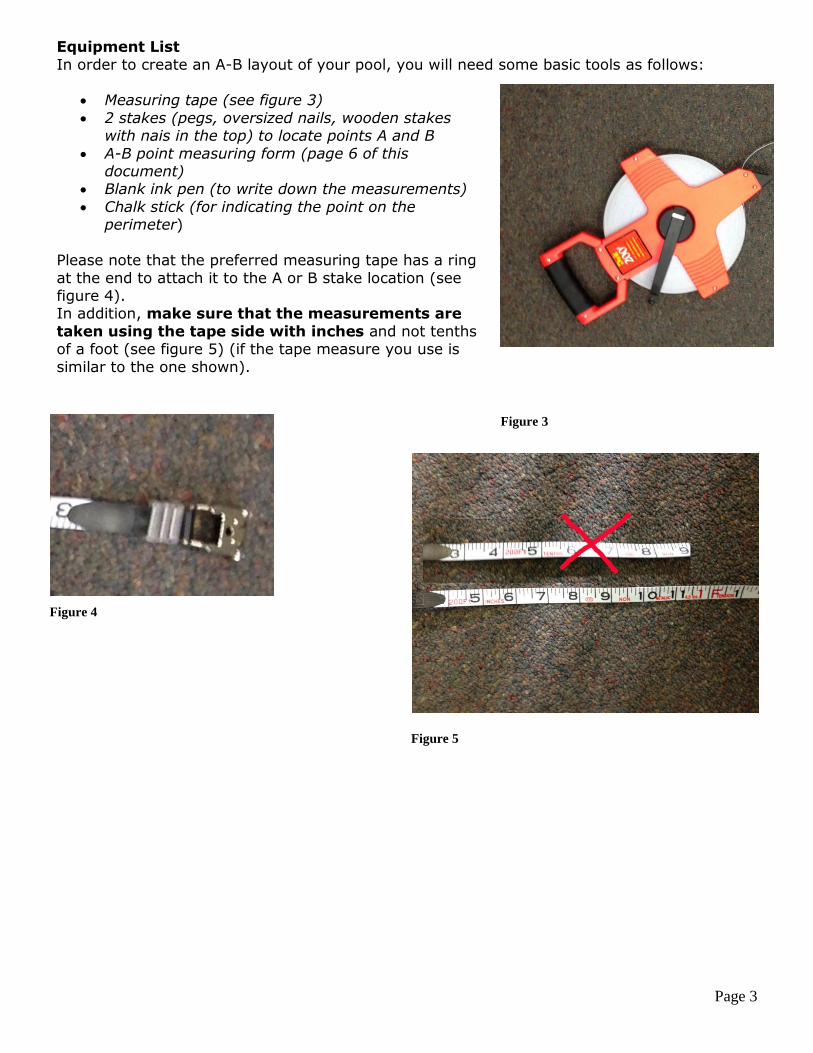
Equipment List
In order to create an A-B layout of your pool, you will need some basic tools as follows:
Measuring tape (see figure 3)
2 stakes (pegs, oversized nails, wooden stakes with nais in the top) to locate points A and B
A-B point measuring form (page 6 of this document)
Blank ink pen (to write down the measurements)
Chalk stick (for indicating the point on the perimeter)
Please note that the preferred measuring tape has a ring
at the end to attach it to the A or B stake location (see figure 4). In addition, make sure that the measurements are
taken using the tape side with inches and not tenths of a foot (see figure 5) (if the tape measure you use is
similar to the one shown).
Figure 3
Figure 4
Figure 5

Page 4
Step#1: Set your stake locations A
and B Points A and B must be at least 10 feet apart from each other and must each be
at least 3 feet from the nearest pool edge (see Figure 6) . Attach the end of your tape measure to the stake (peg/nail) at location A. Anchor the stake into the ground. Locate
and anchor the point B stake at least 10 feet from location A.
Measure the distance from point A to point B.
Record the distance from A to B on the measurement form.
Step#2: Mark and measure from Pt#1 to A Locate point #1 and use a chalk stick to mark it. Make a special mark or write a 1 beside the
point marker to indicate that this is the first A-B point. If your pool has a shallow end step use a point right beside the step at the bead receiver. If your pool has no step, pick a point
anywhere on the pool perimeter. Measure the distance from point#1 to A. Record the measurement on the A-B measurement form in the column marked Distance to A in the row numbered 1.
Step#3: Mark and measure from Pt#2 to A
Locate point #2 and use a chalk stick to mark it. If your pool has a shallow end step use the point right beside the step on the opposite side from point#1, at the bead
receiver. If your pool has no step, then locate point#2 approximately 18” from point#1(see Figure 7).
Measure the distance from point#2 to A. Record the measurement on the measurement form in the column marked Distance to A in the
row numbered 2.
Step#4: Repeat measurements for points around the pool perimeter Repeat the process of marking and measuring
from location A to perimeter points. Keep moving in the same direction around the pool locating
each point approximately 18” from the previous point (see Figure 7). Mark the new point and measure the distance from the new point to
location A (Figure 8). When marking and measuring around the deep end, select a point
near the end of the pool and mark it with the current point count (ex. #47). You will need to refer to this point later in step#10.
Record each measurement on the measurement form in the column marked
Distance to A in the row corresponding to the current point count.
Figure 7
Figure 6
Figure 8

Page 5
Step#5: Measure distances from A to break-off points (S1, S2) Locate the points on the edge of the pool where the shallow end stops and the slope down to
the hopper begins. Mark and measure the distance from each point to A. These 2 points have been labeled S1 and S2 (see Figure 9).
Record each measurement on the measurement form in the appropriate boxes. Step#6: Measure distances from A to hopper
points (D1, D2) Locate the points on the edge of the pool where the
slope from the shallow end stops and the deep end hopper begins. Mark and measure the distance from
each point to A. These 2 points have been labeled D1 and D2 (see Figure 9). Record each measurement on the measurement
form in the appropriate boxes.
Step#7: Measure the distances from location B to each marked point (steps 2,3,4) Carefully detach the tape measure from stake A and
attach to stake B. Be careful to maintain the stake positions when re-anchoring them in the ground.
Starting at point#1, measure the distance from location B to each consecutive point marked with chalk previously. Be careful to maintain the same
sequence (see Figure 10). Record each measurement on the
measurement form in the column marked Distance to B in the row corresponding to the current point.
Step#8: Measure distances from B to break-
off points (S1, S2) Locate the points on the edge of the pool where the shallow end stops and the slope down to the
hopper begins marked previously in step#6 (S1
and S2). Measure the distance from each point to B (see Figure 11). Record each measurement on the measurement form in the
appropriate boxes.
Step#9: Measure distances from B to hopper points (D1, D2) Locate the points on the edge of the pool where
the slope from the shallow end stops and the deep end hopper begins marked previously in step#7
(D1 and D2). Measure the distance from each point to B (see Figure 11). Record each measurement on the measurement form in
the appropriate boxes.
Figure 9
Figure 10
Figure 11
Page 6
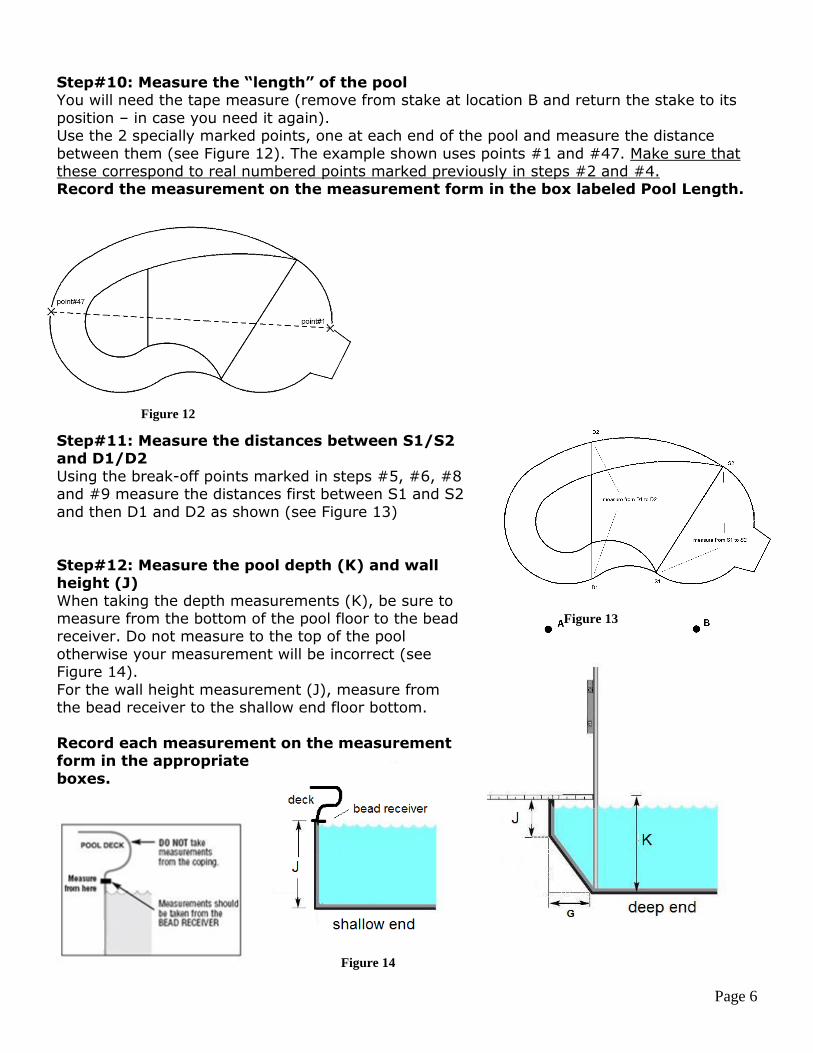
Step#10: Measure the “length” of the pool You will need the tape measure (remove from stake at location B and return the stake to its
position – in case you need it again). Use the 2 specially marked points, one at each end of the pool and measure the distance
between them (see Figure 12). The example shown uses points #1 and #47. Make sure that these correspond to real numbered points marked previously in steps #2 and #4. Record the measurement on the measurement form in the box labeled Pool Length.
Step#11: Measure the distances between S1/S2 and D1/D2
Using the break-off points marked in steps #5, #6, #8 and #9 measure the distances first between S1 and S2
and then D1 and D2 as shown (see Figure 13)
Step#12: Measure the pool depth (K) and wall height (J)
When taking the depth measurements (K), be sure to measure from the bottom of the pool floor to the bead receiver. Do not measure to the top of the pool
otherwise your measurement will be incorrect (see Figure 14).
For the wall height measurement (J), measure from the bead receiver to the shallow end floor bottom.
Record each measurement on the measurement form in the appropriate
boxes.
Figure 12
Figure 13
Figure 14

Page 7
Step#13: Measure pool perimeter
If possible, measure the perimeter of the pool. The perimeter is measured at the bead receiver all the way around the pool. If there is a step do not include the distance from one side of the step to the other (see Figure 15).
Use the bead receiver, and not the pool deck or coping, to measure the perimeter. Record the measurement on the measurement form in the box labeled Perimeter.
Figure 15

Page 8
Name: __________________________________________________
Address: ________________________________________________
City: ______________ State/Prov: ____ Zip/Postal Code: _________
Phone: Home (____) ___________ Work (____) ________________
Fax: (____) _____________ Email ___________________________
In ground measuring form A-B Layout – Page 1
Pnt
ft in. ft in.
1
2
3
4
5
6
7
8
9
10
11
12
13
14
15
16
17
18
19
20
21
22
23
24
25
Distance to A Distance to B
Distance from A to B ______ft. ________in. (step#1)
Pnt
ft in. ft in.
26
27
28
29
30
31
32
33
34
35
36
37
38
39
40
41
42
43
44
45
46
47
48
49
50
Distance to A Distance to B Pnt
ft in. ft in.
51
52
53
54
55
56
57
58
59
60
61
62
63
64
65
66
67
68
69
70
71
72
73
74
75
Distance to A Distance to B Pnt
ft in. ft in.
76
77
78
79
80
81
82
83
84
85
86
87
88
89
90
91
92
93
94
95
96
97
98
99
100
Distance to A Distance to B

Page 9
Pattern: ________________Gauge: ____ Bead Type: ______________________
In ground measuring form A-B Layout – Page 2
Deep end and Shallow end break-offs
Distance to A Distance to B
S1 ______ ft ______ in (step#5) ______ ft ______ in (step#8)
S2 ______ ft ______ in (step#5) ______ ft ______ in (step#8)
D1 ______ ft ______ in (step#6) ______ ft ______ in (step#9)
D2 ______ ft ______ in (step#5) ______ ft ______ in (step#9)
S1 to S2 Distance ______ ft ______ in (step#11)
D1 to D2 Distance ______ ft ______ in (step#11)
Name: __________________________________________________
Address: ________________________________________________
City: ______________ State/Prov: ____ Zip/Postal Code: _________
Phone: Home (____) ___________ Work (____) ________________
Fax: (____) _____________ Email ___________________________
Pool Length, Depth, Wall Height
Point used for length ______
Pool Length [B] ______ ft ______ in (step#10)
Wall Height [J] ______ ft ______ in (step#12)
Pool Depth [K] ______ ft ______ in (step#12)
Vinyl covered step section (Please fill out the Step Section Measuring Page)
P.O.# Signature
_________ _____________________ Your signature indicates that you have verified
your measurements and that the information you
have provided is correct.
Comments
Liner Description
Pattern: ________________Gauge: ____ Bead Type: ______________________
Pool Perimeter
Perimeter ______ ft ______ in (step#13)

Page 10
Name: ________________________________________________________
Address: ______________________________________________________
City: _______________ State/Prov: _____ Zip/Postal Code: ____________
Phone: Home (____) ______________ Work (____) ___________________
Fax: (____) _______________ Email _______________________________
Depth and Width: Measure the total step
width and depth. Note that the depth
includes the recess. Depth ________in
Width ________in
Step Location: Measure X and Y. Check the location box that applies.
X: ___ ft ___ in Y: ___ ft ___ in
Back Corners: If non-square measure the distance from 1 to 2
□ Square
□ Radius Size: ______ in.
□ Cut Size: _______in.
R1 ____in
R2 ____in
R3 ____in
R4 ____in
Recess Corner: If non-square measure the distance from 1 to 2
□ Square
□ Radius Size: ______ in.
□ Cut Size: _______in.
Riser and Treads: Measure the riser
heights and tread depths.
T1 ____in
T2 ____in
T3 ____in
Do you need loops for rods to secure the steps?
□ Yes
□ No
Take all measurements to the nearest ¼”
In Ground Vinyl Step Measuring Form