getting started managing calls with the skype...
TRANSCRIPT

Getting Started Managing Calls with the Skype
Application
dvanced Calling Features
InformationTechnology
One of the benefits of running University voice service to Skype for Business is the opportunity to manage calls through a PC or laptop using the Skype application with a compatible headset. With a properly-configured system running the Skype application, a dedicated telephone handset is not required to make and receive calls to and from a University phone number. In order to manage calls using the Skype application, service for the phone number must be running off of the Skype for Business (Microsoft) public branch exchange (PBX) service. On the PC where calls will be managed, the Skype for Business application must be logged in with the username and password of the University Computing Account associated with the phone number. These instructions cover only the Windows and Macintosh versions of the Skype for Business 2016 application. The mobile app versions of Skype support some of these functions, but not in the same fashion as documented here.
Contents
Signing In to the Skype Application .............................................................................. 2 Answering a Call .......................................................................................................... 3 Placing a Call to a Phone Number Using the Skype Virtual Keypad ............................. 4 Placing a Call to a Listing in the Global Directory ......................................................... 6 Checking Your Voicemail ............................................................................................. 9 Transferring a Call (Blind) to Another Extension......................................................... 11 Transferring a Call (Consultative) to Another Extension ............................................. 16 Merging Two Calls (Creating a Conference Call) ....................................................... 21 Forwarding Your Calls to Another Extension or to Voicemail...................................... 24 Recording or Changing Your Voicemail Greeting ....................................................... 27 Using an Alternate Voicemail Greeting ....................................................................... 30 Adding Favorites to Your Skype Application ............................................................... 31 Reviewing Your Call History ....................................................................................... 34 Setting up Simultaneous Ring at Another Number ..................................................... 36

Getting Started Managing Calls with the Skype
Application
v1.3 01/12/2018 2
InformationTechnology
Signing In to the Skype Application
The Need: You need to use a Skype for Business application on a PC to manage calls for a University phone number. The PC is outfitted with a Skype-compatible headset. You will need to sign in to the Skype application because all Skype phone numbers are tied to a University Computing Account. In most cases, faculty and staff will use their own personal username and password for their assigned University phone number. However if someone is managing calls for a shared or departmental phone number, then a Skype application will need to be signed in with the username and password of the University resource account associated with the number. If someone needs to monitor incoming calls for both their own University number and another number, they will need to be designated as a "delegate" for the other number. This process is described in the Boss-Admin Call Coverage Procedures document. How to Do It in Two Easy Steps:
1. Open the Skype for Business application. A Skype login screen will appear.
2. Enter the account username in the form of [email protected] in the top field. A custom email alias (such as [email protected]) cannot be used to sign in to Skype. Enter the account password in the field underneath and click Sign In. Make sure that "Save my password" or "Remember by password" is checked if you will use the PC to manage calls in the future.
Once the username and password are accepted, the Skype application will be ready to make and receive calls.

Getting Started Managing Calls with the Skype
Application
v1.3 01/12/2018 3
InformationTechnology
Answering a Call The Need: Your Skype application is registering an incoming call. Your headset or busylight is playing a repeating chime. Your busylight may also be pulsing blue.
How to Do It in One Easy Step:
1. If you have a University-issued Plantronics headset, then place it on your head. If your
headset is properly installed, it will signal Skype to answer the call as soon as it is mounted on your head. Otherwise, click on the blue telephone icon in the black alert box that should be prominent on your display. This is what you will have to do if you are already wearing your headset when a new call comes in.
The call will engage and should be audible through your headset.

Getting Started Managing Calls with the Skype
Application
v1.3 01/12/2018 4
InformationTechnology
Placing a Call to a Phone Number Using the Skype Virtual Keypad The Need: You need to place a call to another phone number using your Skype for Business application, which has been properly signed in. How to Do It in on a Windows System in Three Easy Steps:
1. Click the keypad icon at the top of the Skype display.
2. Use the virtual keypad on the right of the window to enter the five or ten-digit telephone number. As soon as you begin clicking on numbers, the phone number should appear in the top "Find someone or dial a number" field. You can also use your PC keyboard's number keys or keypad to enter the number.
3. Click the "Call" button at the bottom of the virtual keypad to place the call.
The call will engage and should be audible through your headset.

Getting Started Managing Calls with the Skype
Application
v1.3 01/12/2018 5
InformationTechnology
How to Do It in on a Macintosh in Three Easy Steps:
1. Click on the "Calls" icon on the left side of the Skype for Business application.
2. Use the virtual keypad on the right of the window to enter the five or ten-digit telephone number. As soon as you begin clicking on numbers, the phone number should appear in the field above the virtual keys. You can also use your PC keyboard's number keys or keypad to enter the number.
3. Click the "Call" button at the bottom of the virtual keypad to place the call.
The call will engage and should be audible through your headset.

Getting Started Managing Calls with the Skype
Application
v1.3 01/12/2018 6
InformationTechnology
Placing a Call to a Listing in the Global Directory The Need: You need to place a call to another phone number using your Skype for Business application, which has been properly signed in. You don't know the person's extension so you will have to search for them in the University directory. How to Do It in on a Windows System in Three Easy Steps:
1. Click the keypad icon at the top of the Skype display.
2. Enter the last name of the person that you wish to call in the top "Find someone or dial a number" field. The Skype application will list possible choices in a list below under the "My Contacts" tab. You can also enter the person's University email address or username.

Getting Started Managing Calls with the Skype
Application
v1.3 01/12/2018 7
InformationTechnology
3. When you see the listing for the person you wish to call, right click on the entry and navigate to the "Call" option. A secondary menu will pop-up. Navigate down and click on Skype Call.
The call will engage and should be audible through your headset.
How to Do It in on a Macintosh System in Four Easy Steps:
1. Click on the Contacts icon on the left side of the Skype for Business application.
2. Enter the last name of the person that you wish to call in the top "Search for Contacts" field. The Skype application will display possible choices in a list below the search field. You can also enter the person's University email address or username.

Getting Started Managing Calls with the Skype
Application
v1.3 01/12/2018 8
InformationTechnology
4. Click once on the listing of the person you wish to call.
5. The right side of the Skype application window will present more detailed contact information that will include a larger name listing and avatar photo, if available. Click on the telephone icon in this section to initiate the call.
The call will engage and should be audible through your headset.

Getting Started Managing Calls with the Skype
Application
v1.3 01/12/2018 9
InformationTechnology
Checking Your Voicemail The Need: A voicemail message has been left for a Skype for Business phone number. Unlike the old phone system, you do not dial 4-0003 to access voicemail. How to Do It in on a Windows System in Two Easy Steps:
1. Click on the keypad icon at the top of the Skype for Business application. The application
will display a list of voicemail messages.
2. To listen to any of the messages, move the mouse so that it hovers over the gray avatar
circle on the left (or the avatar image itself) until the name is replaced by a series of icons. Then click on the play icon (the triangle) to play the message on your headset.

Getting Started Managing Calls with the Skype
Application
v1.3 01/12/2018 10
InformationTechnology
How to Do It in on a Macintosh in Three Easy Steps: 1. Click on the Calls icon on the left side of the Skype for Business application. The application
will display a list of voicemail messages.
2. Then click on Voicemail. A list of voicemail messages will be listed below.
3. To listen to any of the messages, click on a message listing to expand the play options. Then click on the play icon (the triangle) to play the message on your headset.

Getting Started Managing Calls with the Skype
Application
v1.3 01/12/2018 11
InformationTechnology
Transferring a Call (Blind) to Another Extension The Need: Once a call has been answered, it needs to be transferred to another extension. You don't need to check to see if the destination person is available or wants to accept a call. How to Do It on a Windows System in Four Easy Steps (With a Call Already in Progress):
1. On the active call window, click the Call Controls (gray telephone icon) button.
2. The virtual keypad will appear. Click on the "Transfer" button at the top of the box.

Getting Started Managing Calls with the Skype
Application
v1.3 01/12/2018 12
InformationTechnology
3. A "Transfer Call" window will appear.
o To blind transfer the call to a five or ten-digit phone number, enter the number and click the "Transfer Now" button.
o To blind transfer to a someone in the University directory (you don't know their phone number), enter the person's last name in the field under "Choose a contact or conversation or type a name." The Skype application will display possible choices in a list below the search field. You can also enter the person's username or email address.

Getting Started Managing Calls with the Skype
Application
v1.3 01/12/2018 13
InformationTechnology
When you see the listing you want, click once on the listing so it is selected and then click Transfer Now.
The call will disappear from your Skype application and will ring at the destination extension. If the other party answers, the call will be recorded on their call log. If they do not answer, the call will be logged as a missed call to your number.
4. A "Transfer Complete" box will appear. Click OK to close this box.
How to Do It on a Macintosh in Four Easy Steps (With a Call Already in Progress):
1. On the active call window, click the Call Controls (white phone icon) icon in the upper right corner of the call window.

Getting Started Managing Calls with the Skype
Application
v1.3 01/12/2018 14
InformationTechnology
2. The virtual keypad will appear. Click on the "Transfer" button at the top of the box.
3. A "Transfer Call" window will appear.
o To blind transfer the call to a five or ten-digit phone number, enter the number in
the field under "Search for a contact to transfer this call to."
When the correct ten-digit number appears in the results field, click once on the listing so that it is highlighted and then click the "Transfer" button. The application will need a second or two to translate any five-digit University number to its assigned ten-digit number.

Getting Started Managing Calls with the Skype
Application
v1.3 01/12/2018 15
InformationTechnology
o To blind transfer to a listing in the University directory (you don't know their phone number), enter a name in the field under "Search for a contact to transfer this call to." The Skype application will display possible choices in a list below the search field. You can also enter the person's username or email address.
When you see the listing you want, click once on the listing so it is selected and then click the "Transfer" button.
4. The active call window will disappear from your Skype application and be replaced by a chat window. The transferred call will ring at the destination extension. If the other party answers, the call will be recorded on their call log. If they do not answer, the call will be logged as a missed call to your number. Close the chat window.

Getting Started Managing Calls with the Skype
Application
v1.3 01/12/2018 16
InformationTechnology
Transferring a Call (Consultative) to Another Extension The Need: After a call is answered, it needs to be transferred to another number. However, before you transfer the call, you need to contact the destination extension to make sure that the person answering the number wishes to accept the transferred call. This is known as a "consultative" phone transfer. Please note that consultative transfers using the Windows Skype for Business application do not create a conference call. Skype application consultative transfers initiate a second call between the parties, cutting you (the one performing the transfer) out of the call. If you wish to stay on the line and participate in the conversation, follow the instructions in the next section (Merging Two Calls). The following steps only cover the Windows 2016 (click-to-run) version of the Skype application that is installed from the Office 365 home page. For Macintosh Skype application users, the only consultative transfer option is to create a conference call. How to Do It on a Windows System in Five Easy Steps (With a Call Already in Progress):
1. On the active call window, click the Call Controls (gray telephone icon) button.

Getting Started Managing Calls with the Skype
Application
v1.3 01/12/2018 17
InformationTechnology
2. The virtual keypad will appear. Click on the "Consult" button at the top of the box. This will place the caller on hold. The "Consult" button will only appear on the "click-to-run" version of Skype for Business 2016.
3. A "Consult Before Transferring" window will appear with a list of your Skype Favorites under a search field.
o To start a consultative call to one of your Favorites, click once on the target listing and then click the "Consult" button at the bottom of the window.
o To start a consultative call to a five or ten-digit phone number, enter the number
in the field under "Choose a contact or type a name" and then click Consult.

Getting Started Managing Calls with the Skype
Application
v1.3 01/12/2018 18
InformationTechnology
o To start a consultative call to a someone in the University directory (you don't know their phone number), enter the person's last name in the field under "Choose a contact or type a name." The Skype application will display possible choices in a list below the search field. You can also enter the person's username or email address. When you see the listing you want, click once on the listing so it is selected and then click Consult.
4. Skype will bring up contact information for the party that you clicked on. At this point you have the option of sending them a text message by using the text box at the bottom of the window. You may decide to skip this step and just call the person instead.

Getting Started Managing Calls with the Skype
Application
v1.3 01/12/2018 19
InformationTechnology
Once you are ready to initiate the call, click on the blue telephone icon and select Skype Call.
5. The call will ring at the destination number. When the other party picks up, ask them if they wish to speak with the first caller (on hold). If they say yes, tap the blue Transfer (circular telephone) icon at the top right of the screen to transfer the call.

Getting Started Managing Calls with the Skype
Application
v1.3 01/12/2018 20
InformationTechnology
At this point, your call to the second party will disconnect and new call will be started between the first caller and the second party. This transfer will not be seamless. The second party will have to answer the transferred call attempt in order to speak to the first caller. The first caller will hear the ringing of the newly-placed call attempting to reach the second party. There is no guarantee that the second party will pick up. Once the second party picks up (or lets the call go to voicemail) a "Transfer Complete" box will appear. Click OK to close this box.

Getting Started Managing Calls with the Skype
Application
v1.3 01/12/2018 21
InformationTechnology
Merging Two Calls (Creating a Conference Call) The Need: An incoming call registers on your Skype application while you are already on a call. You decide to merge the two calls in order to create a three-way conference call. These steps can also be used to create a conference call out of a one-one-one conversation that you initiate. You can repeat this process to add as many as 249 other people to your call. How to Do It on a Windows System in Two Easy Steps (With a Call Already in Progress):
1. Click on the "Invite more people" (circular) icon in the upper right corner of the call window.
2. An Invite by Name or Phone Number box will appear in the middle of the call window.
o To invite another caller from your Favorites, click on the target listing from the choices that should be visible under the "Choose a contact or type a name or phone number" field. When the listing is selected, click OK.

Getting Started Managing Calls with the Skype
Application
v1.3 01/12/2018 22
InformationTechnology
o To invite another caller using a phone number, enter the five or ten-digit number into the "Choose a contact or type a name or phone number" field. Then click OK.
o To invite someone from the University's global directory, enter the last name of the person you wish to contact into the "Choose a contact or type a name or phone number" field. As you enter more characters, the Skype application will present a narrower choice of possible listings. When you locate the listing that you want, click once on it so that it is selected and click OK.
When the other party answers, the Skype application will add them to the "Conversations" window.

Getting Started Managing Calls with the Skype
Application
v1.3 01/12/2018 23
InformationTechnology
How to Do It on a Macintosh in Two Easy Steps (with a Call Already in Progress):
1. Click on the contacts icon in the upper right corner of the call window.
2. The right side of the window will display an "Invite more people" search field. Listings for yourself and your first caller will be displayed under "Attendees."
o To invite another caller using a phone number, enter the five or ten-digit number into the "Invite more people" field. When the number appears as a listing under the field, double click on the listing.
o To invite someone from the University's global directory, enter the last name of the person you wish to contact into the "Invite more people" field. As you enter more characters, the Skype application will present a narrower choice of possible listings. When you locate the listing that you want, double click on the listing.
When the other party answers, the Skype application will add them to the call window.

Getting Started Managing Calls with the Skype
Application
v1.3 01/12/2018 24
InformationTechnology
Forwarding Your Calls to Another Extension or to Voicemail The Need: You need to forward your incoming calls to another University extension or to a personal number such as a mobile phone. Calls to your University extension will ring at the forwarded number, not on your Skype phone or Skype application. You can set up (or turn off) forwarding directly on your Skype phone or by using a Skype PC or mobile application. The Skype PC applications (Windows or Macintosh) offer the most forwarding options. How to Do It in on a Windows System in Five Easy Steps:
1. Log into a Skype application using your University Computing Account username and password.
2. Click the forwarding icon ( ) at the bottom right of the Skype display.
3. Navigate down to Forward Calls to and then New Number or Contact. You can choose the "Voicemail" option as well.

Getting Started Managing Calls with the Skype
Application
v1.3 01/12/2018 25
InformationTechnology
4. A "Forward Calls" window appears. Enter the number where you want calls to forward in the field. Once you enter ten digits, the Skype client will create a profile listing for the phone under the field.
5. Click the OK button to set call forwarding to the number in the field. How to Do It on a Macintosh in Five Easy Steps:
1. Select the "Preferences" command under "Skype for Business."
2. Click on the "Calls" icon in the preferences window and then click the checkbox next to "Turn on call forwarding."

Getting Started Managing Calls with the Skype
Application
v1.3 01/12/2018 26
InformationTechnology
3. Click on the radio button next to "Forward my calls to." Select Custom Contact or Phone Number from the pop-up menu that will become available.
4. A new window appears with "Search for Contacts" in a search field. Enter the number where you want calls to forward in the field. Once you enter ten digits, the Skype client will create a profile listing for the phone under the field
5. Click Select to set call forwarding to the number in the field.

Getting Started Managing Calls with the Skype
Application
v1.3 01/12/2018 27
InformationTechnology
Recording or Changing Your Voicemail Greeting The Need: You would like to record a personalized greeting for voicemail. That way, callers that go to your voicemail will hear your voice instead of a generic greeting that identifies you as last name - first name. You can also follow these steps to record a new greeting. Recording a message requires logging into a Skype application running on a Windows or Macintosh PC with a headset or a microphone and speakers. At this time, you cannot record a personalized voicemail greeting directly from your Skype phone. Make sure you are wearing your headset or know the location of your computer's microphone before starting. How to Do It on a Windows System in Five Easy Steps:
1. Click on the keypad icon at the top of the Skype for Business application.
2. Click on the voicemail icon on the right side of the display until a pop-up menu appears. From this menu, select the Change Greetings option.
3. Your Skype application will connect to the Microsoft Message Center. You will hear through your headset or PC speakers that you can press 1 to record a new voicemail greeting or 2 to record an alternate greeting. Use the virtual phone keypad in your Skype application to click either 1 or 2.

Getting Started Managing Calls with the Skype
Application
v1.3 01/12/2018 28
InformationTechnology
4. Click 1 on the virtual phone keypad again to confirm that you wish to record a greeting. Then use the headset or PC microphone to record your greeting. Click the pound sign (#) on the virtual phone keypad when you are finished speaking.
5. The message center will play back the greeting to you. Click on 1 to accept it, click 2 to record something different, or click 3 to reset your greeting back to the default greeting.
How to Do It on a Macintosh in Six Easy Steps:
1. Select the "Preferences" command under "Skype for Business."
2. Click on the "Calls" icon in the preferences window and then click the "Change Voicemail Greeting" button.

Getting Started Managing Calls with the Skype
Application
v1.3 01/12/2018 29
InformationTechnology
3. Your Skype application will connect to the Microsoft Message Center. You will hear through your headset or computer speakers that you can press 1 to record a new voicemail greeting or 2 to record an alternate greeting. You will need to make the virtual dial pad visible in the call window in order to make a selection. Click on the phone icon in the upper right corner of the call window to make the black-background dial pad visible (the main white-background Skype window virtual keypad will not work).
4. Use the virtual phone keypad in your Skype call window to click either 1 or 2.
5. Click 1 on the virtual phone keypad again to confirm that you wish to record a greeting. Then
use the headset or PC microphone to record your greeting. Click the pound sign (#) on the Skype call window virtual keypad when you are finished speaking.
6. The message center will play back the greeting to you. Click on 1 to accept it, click 2 to record something different, or click 3 to reset your greeting back to the default greeting.

Getting Started Managing Calls with the Skype
Application
v1.3 01/12/2018 30
InformationTechnology
Using an Alternate Voicemail Greeting The Need: You would like an alternate voicemail greeting to be presented to callers. The alternate greeting can be used to inform callers that they have attempted to contact you outside of your regular working hours. It can also let them know that you will be away for a period of time. Setting up an alternate voicemail greeting requires managing your calendar using the Outlook application on a PC or using the Office 365 calendar functions (Outlook Online). How to Do It in Four Easy Steps:
1. Follow the steps in the previous section that document how to record a voicemail greeting.
Make sure to select 2 for the "greeting for when you are away" option before recording.
2. Once you have saved your alternate greeting. Use a web browser to go to the site https://aka.ms/vmsettings. You will need to log onto the site using your University username, password, and preferred multifactor method.
3. The "Skype for Business Settings" page will appear with the "Voicemail" tab selected. You
have three options on this page: • Click the box next to "Play Out of Office greeting" to switch your voicemail greeting to
the alternate greeting. This setting will put the alternate message into effect immediately and at all times of the day.
• Click the box next to "I have an Outlook auto reply" if you want your alternate
voicemail greeting to play only when you have activated an auto-reply message for incoming emails.
• Click the box next to "I have an Out of Office calendar appointment" if you want your
alternate greeting to play when you have an appointment or meeting that is tracked on your Outlook calendar.
4. Click "Save" at the top of the page to put the alternate voicemail settings into effect.
Repeat steps 2 and 3 to turn off alternate voicemail greeting settings.

Getting Started Managing Calls with the Skype
Application
v1.3 01/12/2018 31
InformationTechnology
Adding Favorites to Your Skype Application The Need: You want to set up quick access to numbers you contact frequently by adding listings to your Skype Favorites. On Windows systems, Favorites are visible on the default Skype window with the Contacts icon selected. On Macintosh systems, Favorites are listed above contacts from the University directory when "Contacts" are selected. How to Do It on a Windows System in Two Easy Steps:
1. Type the last name of the person that you wish to add into the "Find someone or dial a number" field at the top of the Skype application. You can also enter their University username or email address.
As you type, the view automatically changes to My Contacts, which lets you search your organization's address book.

Getting Started Managing Calls with the Skype
Application
v1.3 01/12/2018 32
InformationTechnology
2. As you type, the Skype application will present possible matches in the space under the search field. This list will become smaller as you enter more characters. Once the listing for the person you wish to add appears, hover your mouse pointer over the listing and then right click so the secondary menu appears. Select Add to Favorites from this list.
How to Do It on a Macintosh in Three Easy Steps:
1. Click the Contacts icon on the left side of the Skype window to make the search field appear. Enter the last name of the person that you wish to add into the field. You can also enter their University username or email address.

Getting Started Managing Calls with the Skype
Application
v1.3 01/12/2018 33
InformationTechnology
2. As you type, the Skype application will present possible matches in the space under the search field. This list will become smaller as you enter more characters. Once the listing for the person you wish to add appears, click the listing so that it is highlighted.
3. Select Groups under the Contacts menu heading until Favorites appears. Select
Favorites.
The name that you just selected should appear under Favorites on the main Skype window.
Getting Started Managing Calls with the Skype
Application
v1.3 01/12/2018 34
InformationTechnology
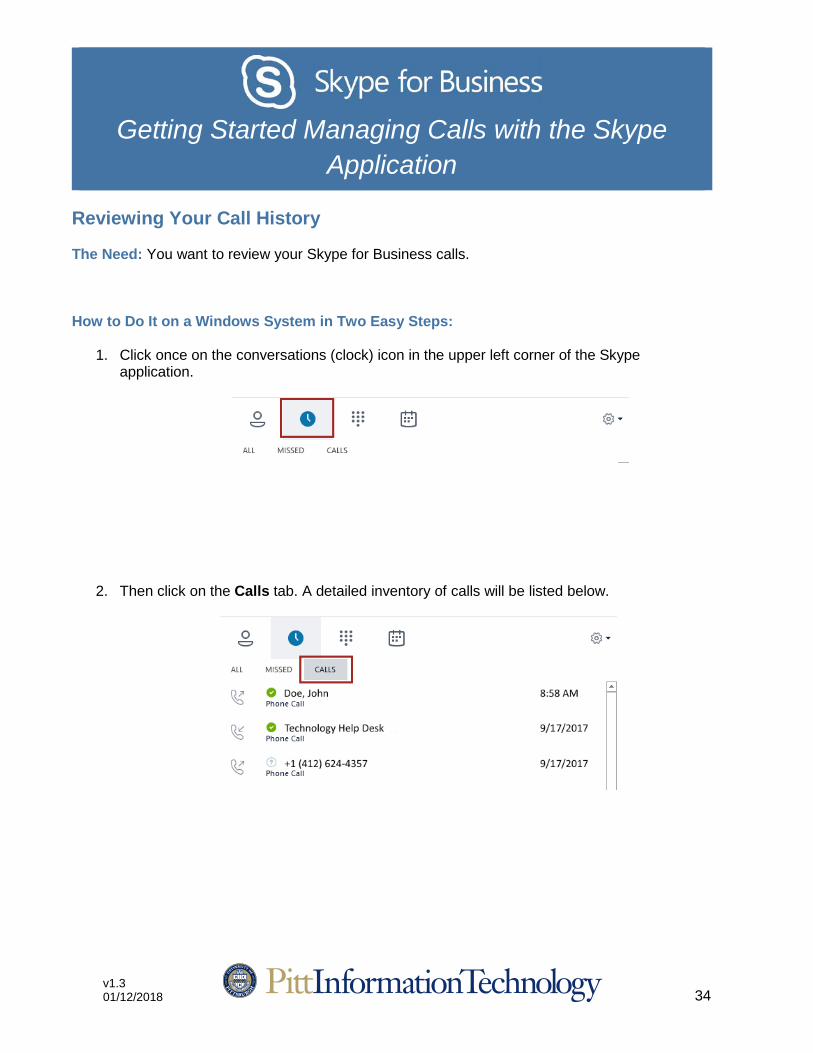
Reviewing Your Call History The Need: You want to review your Skype for Business calls.
How to Do It on a Windows System in Two Easy Steps:
1. Click once on the conversations (clock) icon in the upper left corner of the Skype application.
2. Then click on the Calls tab. A detailed inventory of calls will be listed below.

Getting Started Managing Calls with the Skype
Application
v1.3 01/12/2018 35
InformationTechnology
How to Do It on a Macintosh in Two Easy Steps:
1. Click once on the Calls icon on the left side of the Skype application window.
2. Click on All, if it is not already highlighted. A detailed inventory of calls will be listed below.

Getting Started Managing Calls with the Skype
Application
v1.3 01/12/2018 36
InformationTechnology
Setting up Simultaneous Ring at Another Number The Need: You want incoming calls to your University extension to ring at another number. This could be another office extension or a personal phone number such as a mobile phone. Simultaneous ring is different than forwarding. With forwarding, incoming calls will not ring at your Skype phone or any of your Skype applications. Simultaneous ring will have your Skype application alerting you as usual when an incoming call comes in, but the call will ring at an additional number as well. These instructions cover how to set up simultaneous ring to a single phone number. More complex simultaneous ring options are documented in the Boss-Admin Call Coverage Procedures document. How to Do It on a Windows System in Three Easy Steps:
1. Click the forwarding icon ( ) at the bottom right of the Skype display.
2. Navigate down to Simultaneous Ring and then New Number.
3. An "Edit Phone Number" dialog box will appear. Enter the five or ten-digit number of the phone extension where you want calls to simultaneously ring into the field. Click OK when you are finished.

Getting Started Managing Calls with the Skype
Application
v1.3 01/12/2018 37
InformationTechnology
How to Do It on a Macintosh in Five Easy Steps:
1. Select the "Preferences" command under "Skype for Business."
2. Click on the "Calls" icon in the preferences window and then click the checkbox next to "Turn on call forwarding."
3. Click on the radio button next to "Simultaneous ring." Select Custom Phone Number from the pop-up menu that will become available.
4. A new window appears with "Search for Contacts" in a search field. Enter the number where
you want calls to simultaneously ring in the field. Once you enter ten digits, the Skype client will create a profile listing for the phone under the field
5. Click Select to set simultaneous call forwarding to the number in the field.