getting started with taverna 2.1: building a simple workflow · 1. workflow explorer workflow...
TRANSCRIPT
Getting Started with Taverna 2.1:
Building a Simple Workflow
Katy Wolstencroft
myGrid
University of Manchester
Exercise 1: Installing the Workbench
Taverna can be downloaded for free from: http://www.taverna.org.uk/
Go to the page and find the Taverna 2.1 download You may also find system requirements and installation
instructions there Download the correct version for your operating system Follow the instructions in the Taverna installer

1: Installing on Windows
If you have administrator rights, you can download the Windows installer. If not, you can download the Windows archive
Follow the instructions in the Taverna installer or use 7zip to unzip the archive
Once installed, run Taverna from the new directory by clicking run.bat
1: Installing on MAC and Linux
Download and install the OS X disk image. A Finder window will appear when you open the disk image, then you can drag Taverna into your Applications folder
Download the Linux archive and unpack it using: tar zxfv taverna-workbench-2.1.tar.gz or by double-clicking it in your desktop environment.
Make sure you have SUN Java 1.5 or higher and Graphviz installed prior to running Taverna

Taverna Workbench

1. Workflow Explorer
Workflow Explorer is the primary editing component within Taverna. Through it you can load, save and edit any property of a workflow.
Shows inputs/outputs, services, data links and control links of a workflow
It is also where you find configuration details of services and advanced options like iteration and looping. We will come back to these things later
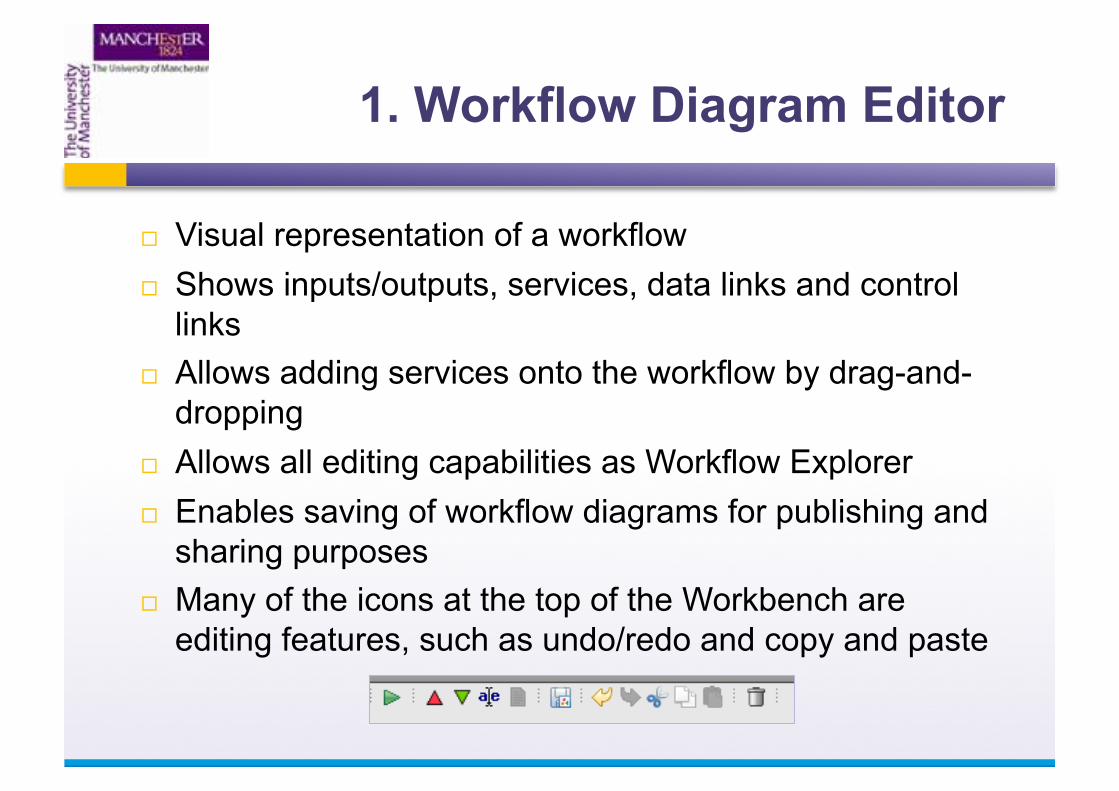
1. Workflow Diagram Editor
Visual representation of a workflow Shows inputs/outputs, services, data links and control
links Allows adding services onto the workflow by drag-and-
dropping Allows all editing capabilities as Workflow Explorer Enables saving of workflow diagrams for publishing and
sharing purposes Many of the icons at the top of the Workbench are
editing features, such as undo/redo and copy and paste
1. Available Services Panel
Provides a list of commonly used services and allows users to search for and add more
Taverna supports: WSDL Web services Soaplab services – legacy command-line applications wrapped
as Web services R services (analyses using the R statistical package ) BioMart database services BioMoby services Beanshells and local Java services Java methods (API Consumer) Nested workflows

Exercise 2: Adding New Services
New services can be gathered from anywhere on the Web
The default list are just a few that are commonly used - importing others is very straightforward.
The myGrid project in Manchester and the EBI have recently initiated the BioCatalogue project.
BioCatalogue is a public curated catalogue of Life Science Web services
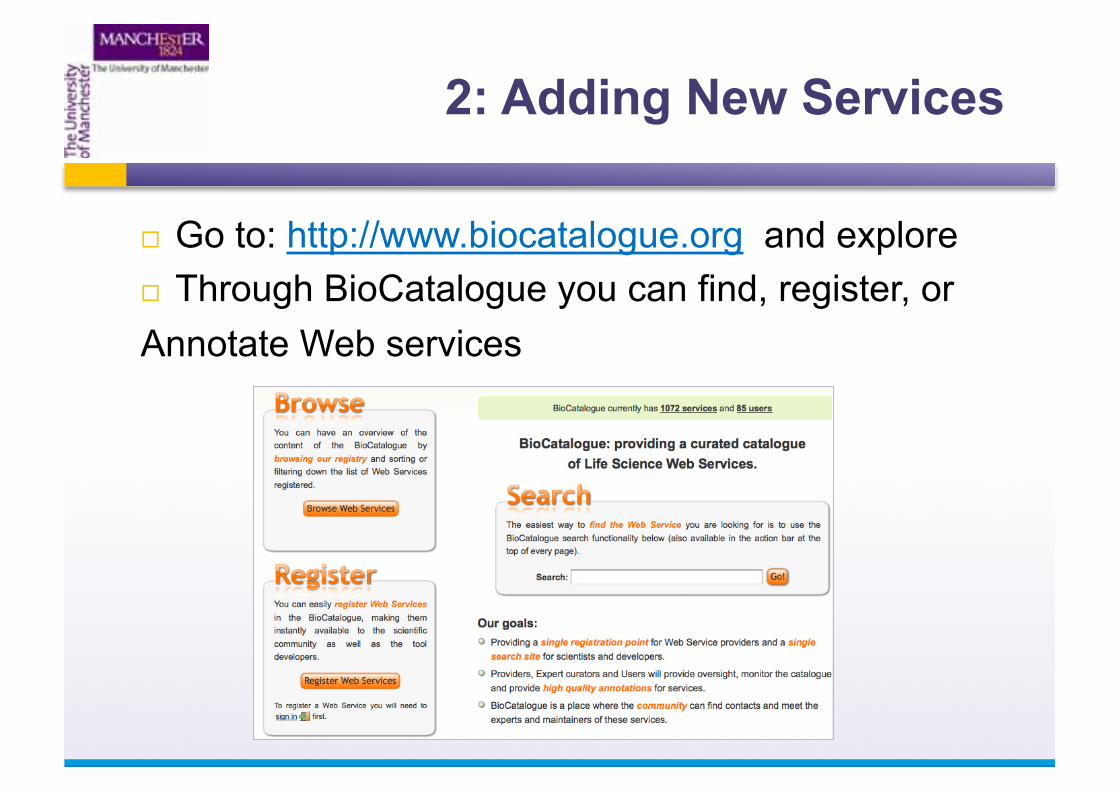
Go to: http://www.biocatalogue.org and explore Through BioCatalogue you can find, register, or Annotate Web services
2: Adding New Services
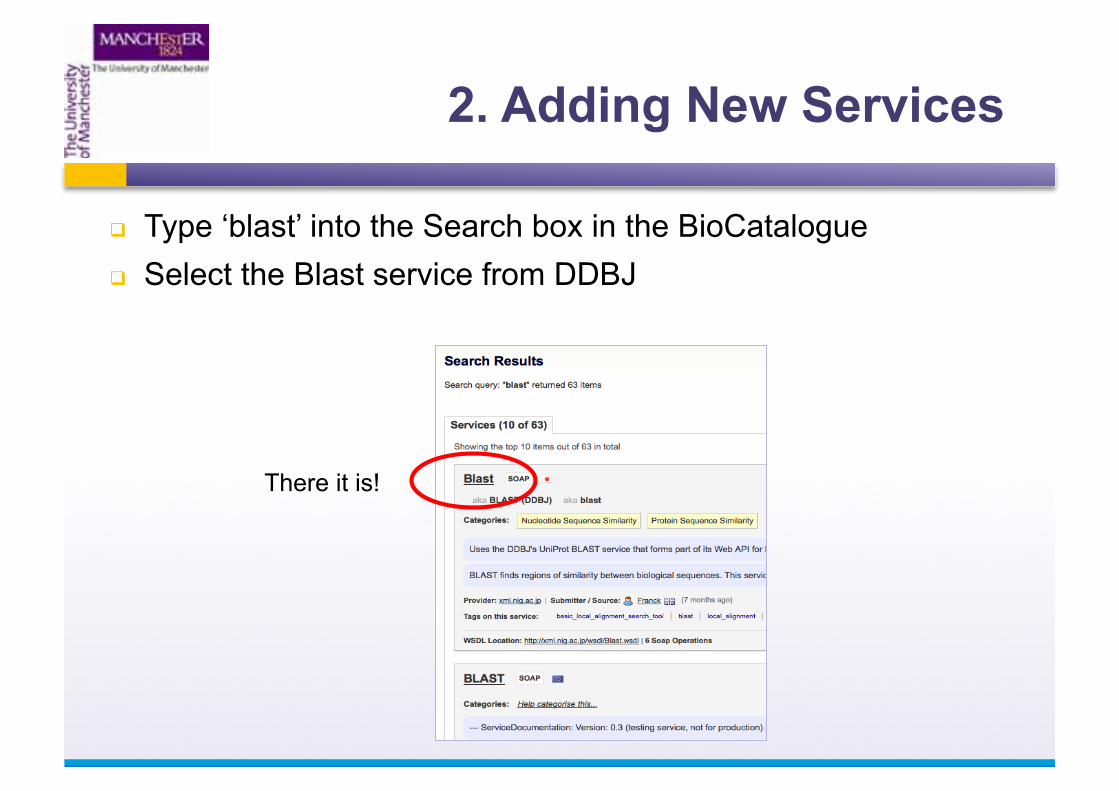
Type ‘blast’ into the Search box in the BioCatalogue Select the Blast service from DDBJ
There it is!
2. Adding New Services

Clicking on the Blast service brings you to the page describing the service and its operations
Copy the service’s WSDL location
This is what Taverna needs…
2. Adding New Services

2. Adding New Services
Go to the Service Panel in Taverna and click “Import new services”. For each type of service, you are given the option to add a new service
Select ‘WSDL service…’ A window will pop-up
asking for a Web service’s WSDL address (URL)
2. Adding New Services
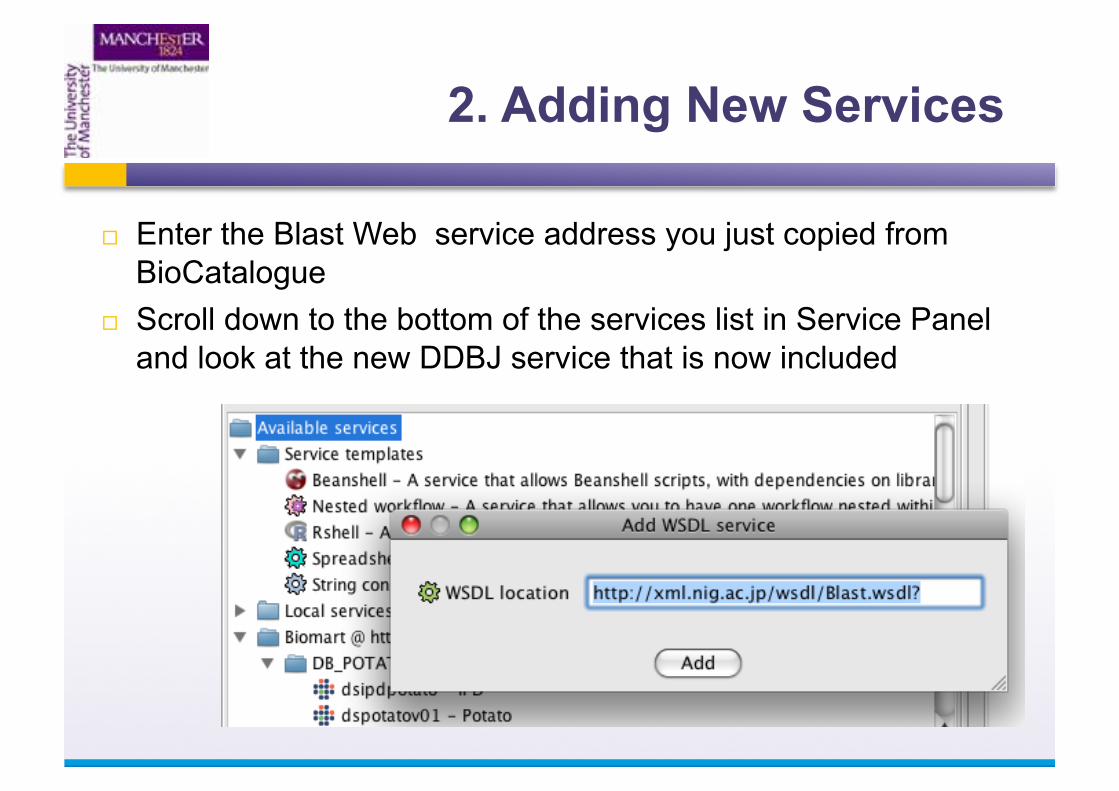
Enter the Blast Web service address you just copied from BioCatalogue
Scroll down to the bottom of the services list in Service Panel and look at the new DDBJ service that is now included
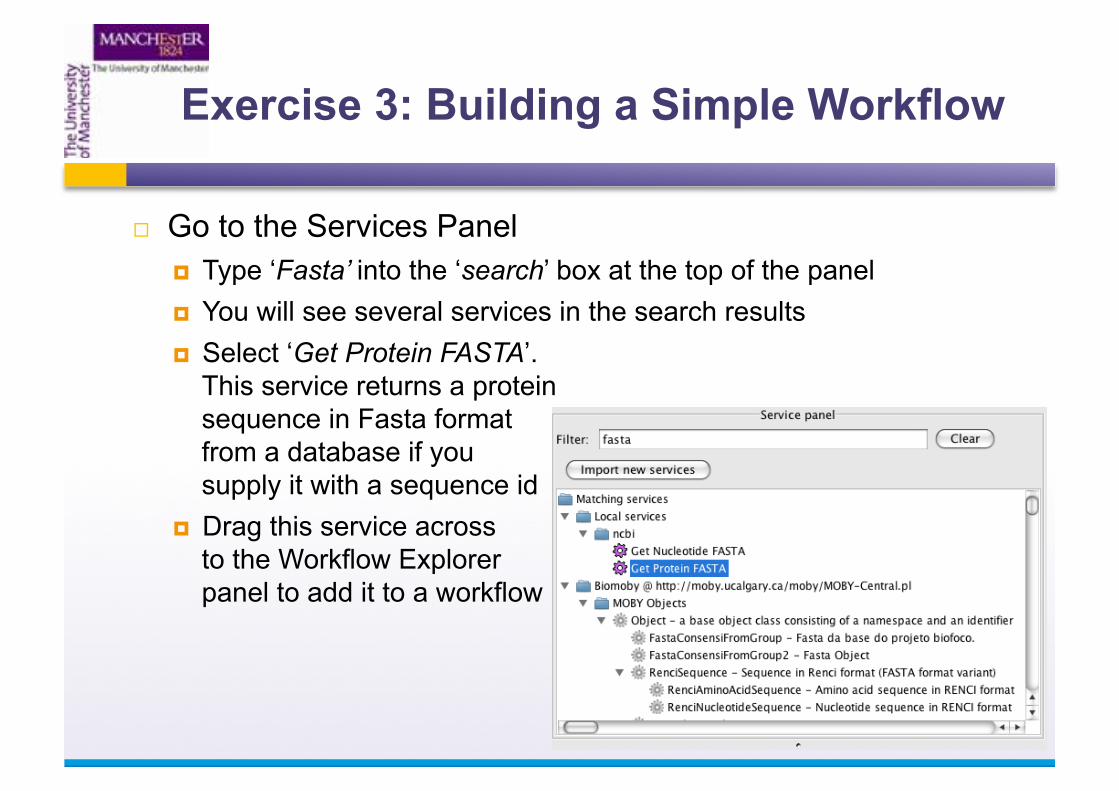
Go to the Services Panel Type ‘Fasta’ into the ‘search’ box at the top of the panel You will see several services in the search results Select ‘Get Protein FASTA’.
This service returns a protein sequence in Fasta format from a database if you supply it with a sequence id
Drag this service across to the Workflow Explorer panel to add it to a workflow
Exercise 3: Building a Simple Workflow
Exercise 3: Building a Simple Workflow
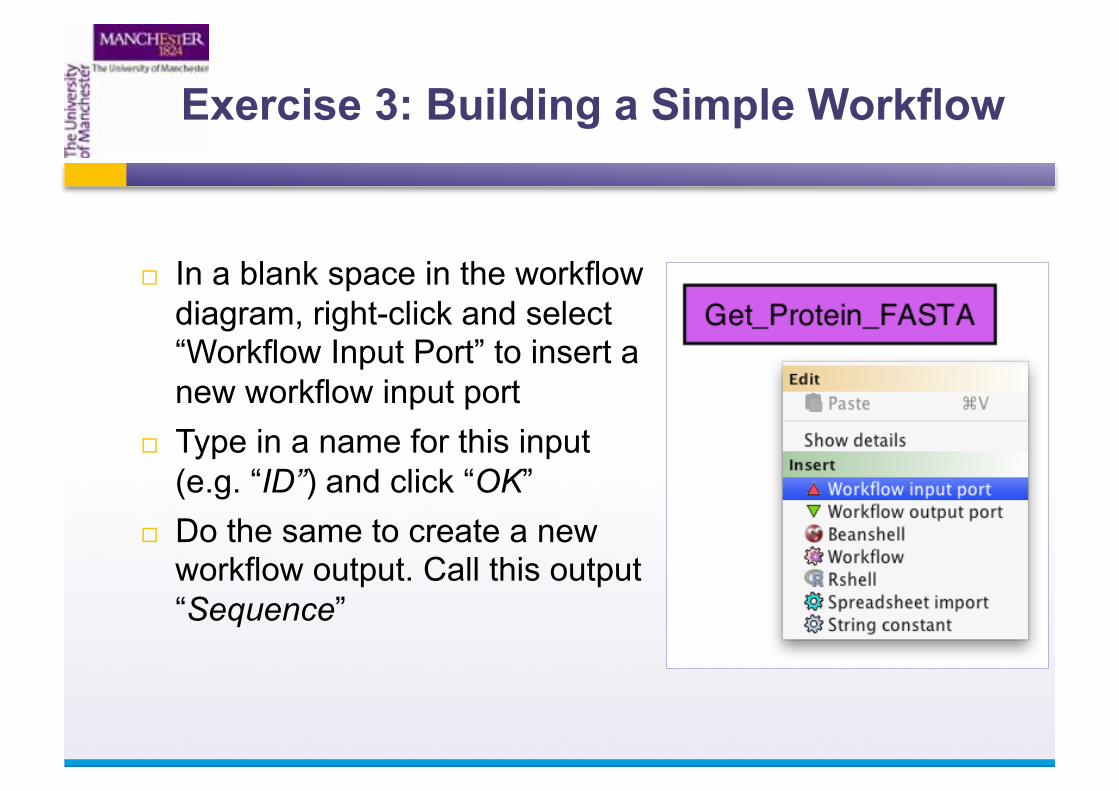
In a blank space in the workflow diagram, right-click and select “Workflow Input Port” to insert a new workflow input port
Type in a name for this input (e.g. “ID”) and click “OK”
Do the same to create a new workflow output. Call this output “Sequence”
Exercise 3: Building a Simple Workflow
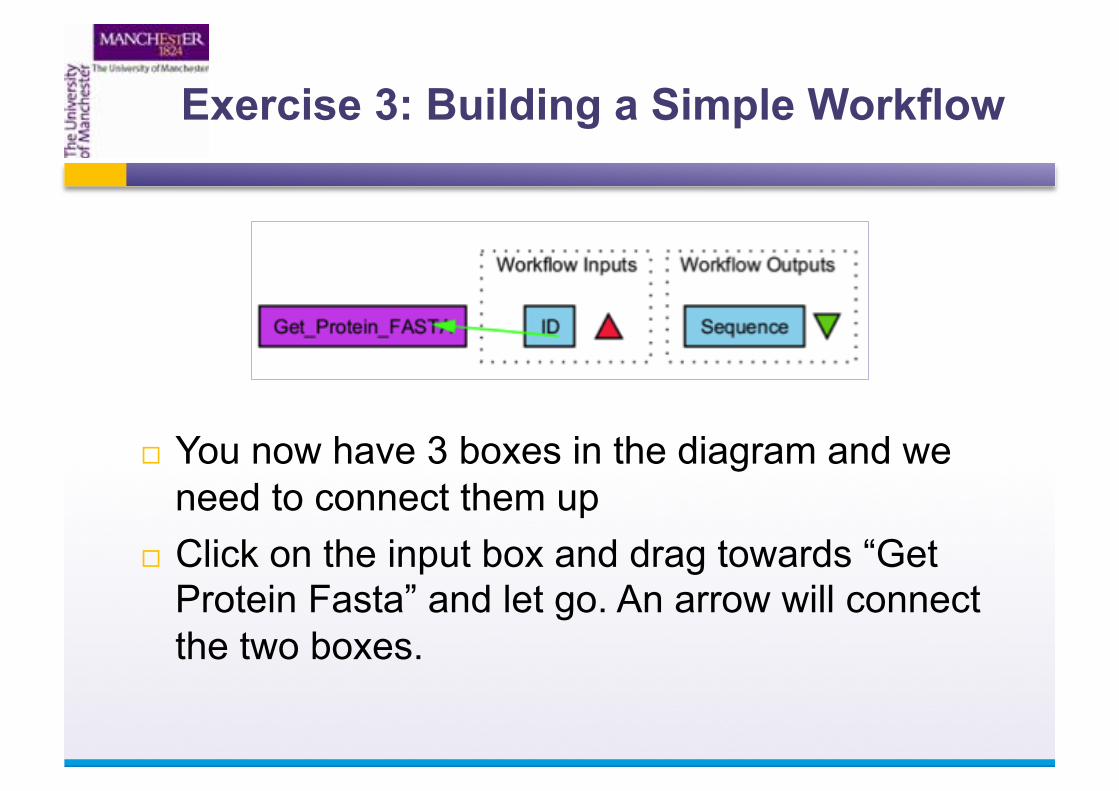
You now have 3 boxes in the diagram and we need to connect them up
Click on the input box and drag towards “Get Protein Fasta” and let go. An arrow will connect the two boxes.
Exercise 3: Building a Simple Workflow
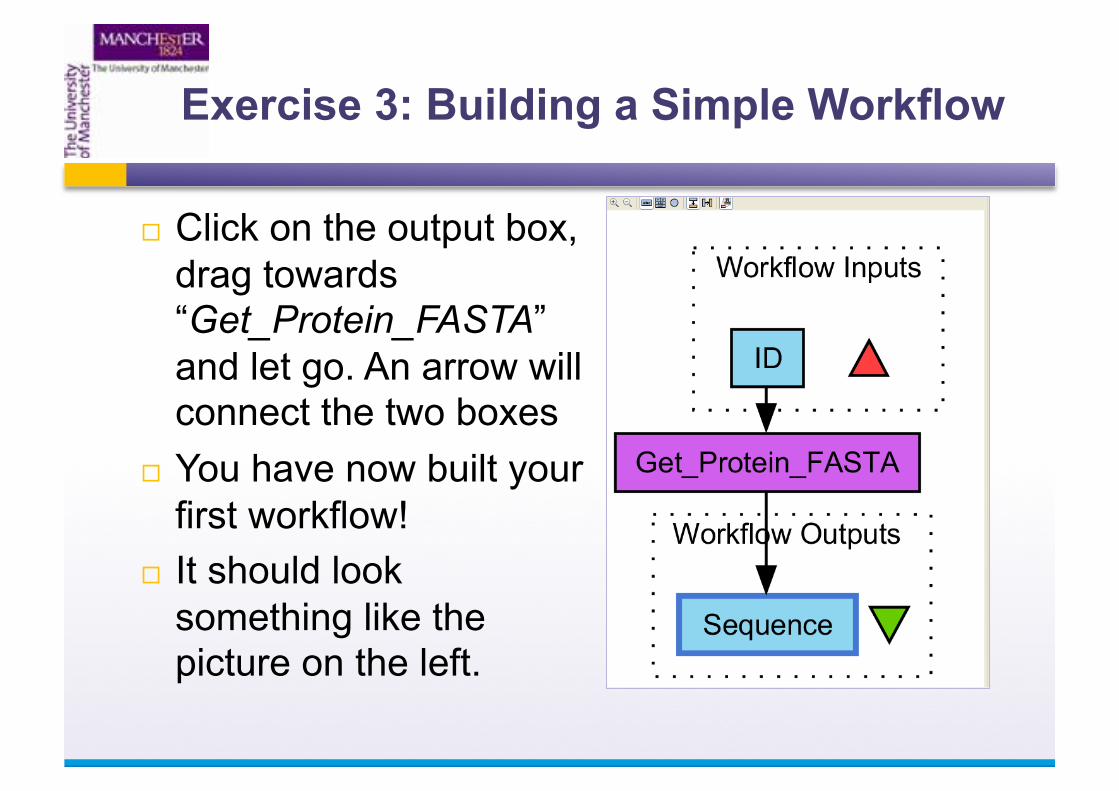
Click on the output box, drag towards “Get_Protein_FASTA” and let go. An arrow will connect the two boxes
You have now built your first workflow!
It should look something like the picture on the left.
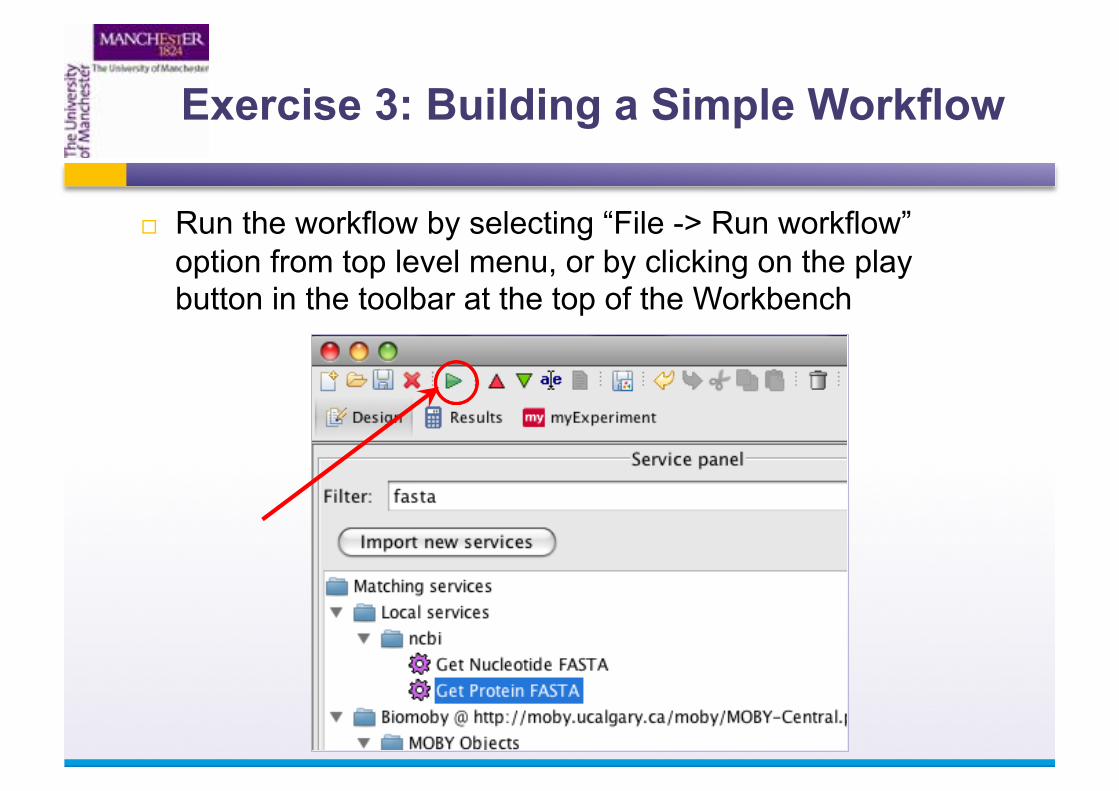
Run the workflow by selecting “File -> Run workflow” option from top level menu, or by clicking on the play button in the toolbar at the top of the Workbench
Exercise 3: Building a Simple Workflow
Exercise 3: Building a Simple Workflow
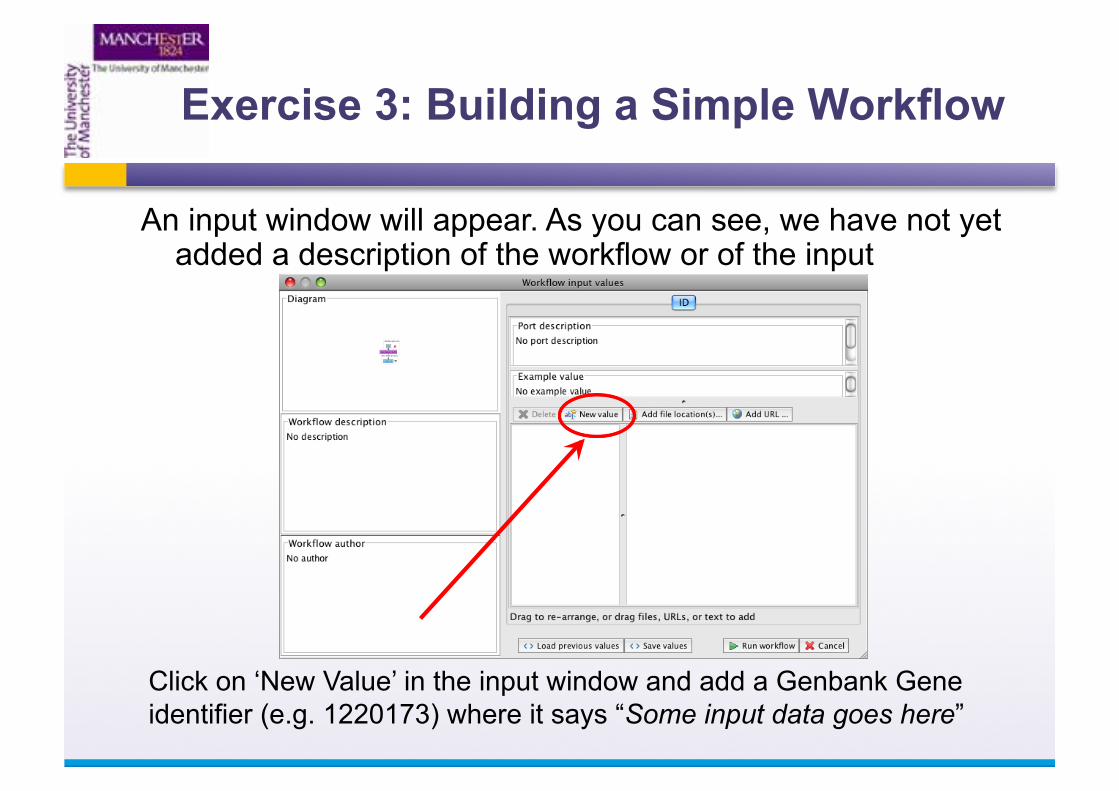
An input window will appear. As you can see, we have not yet added a description of the workflow or of the input
Click on ‘New Value’ in the input window and add a Genbank Gene identifier (e.g. 1220173) where it says “Some input data goes here”
Exercise 3: Building a Simple Workflow
Click “Run workflow” button In the bottom left of the results window, click on
the results (Value 1). You will now see a protein sequence from Genbank.
In the Service Panel, search for “blast” Find the result “SearchSimple – Execute Blast”
and drag it across to the Workflow Panel (this is the service we added at the beginning)
Exercise 3: Building a Simple Workflow
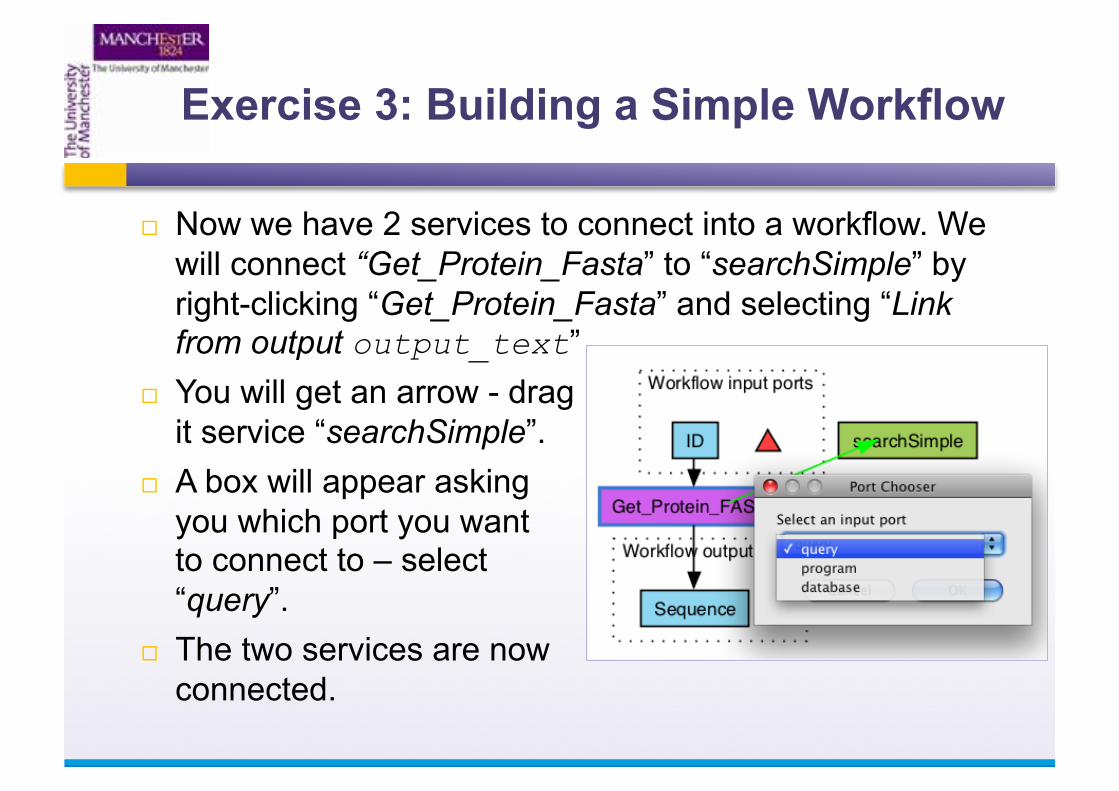
Now we have 2 services to connect into a workflow. We will connect “Get_Protein_Fasta” to “searchSimple” by right-clicking “Get_Protein_Fasta” and selecting “Link from output output_text”
You will get an arrow - drag it service “searchSimple”.
A box will appear asking you which port you want to connect to – select “query”.
The two services are now connected.
3: Building a Simple Workflow
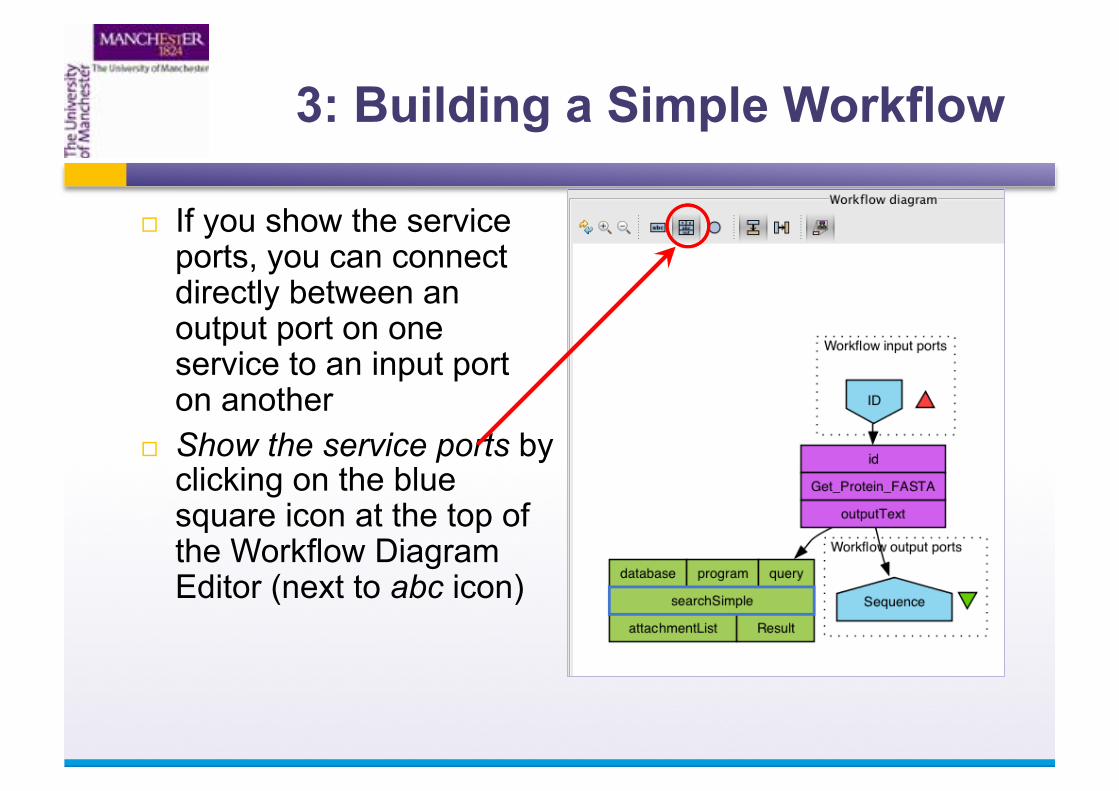
If you show the service ports, you can connect directly between an output port on one service to an input port on another
Show the service ports by clicking on the blue square icon at the top of the Workflow Diagram Editor (next to abc icon)
Exercise 3: Building a Simple Workflow
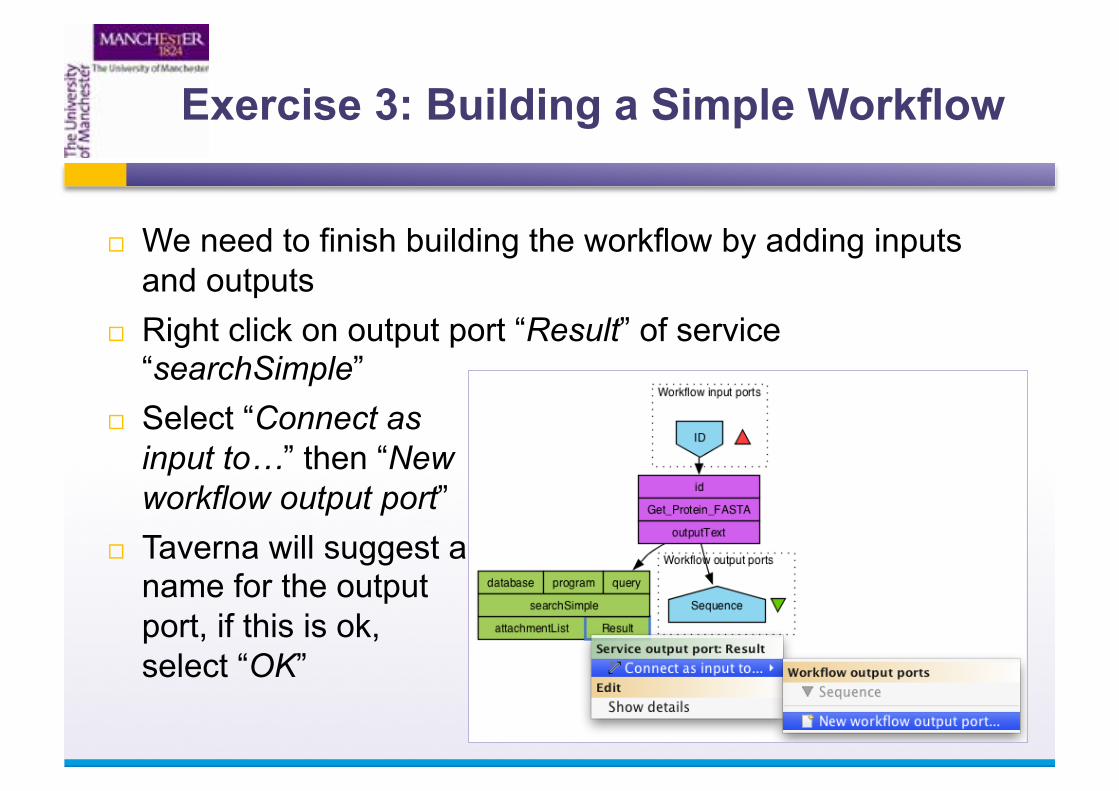
We need to finish building the workflow by adding inputs and outputs
Right click on output port “Result” of service “searchSimple”
Select “Connect as input to…” then “New workflow output port”
Taverna will suggest a name for the output port, if this is ok, select “OK”
3: The Finished Workflow!
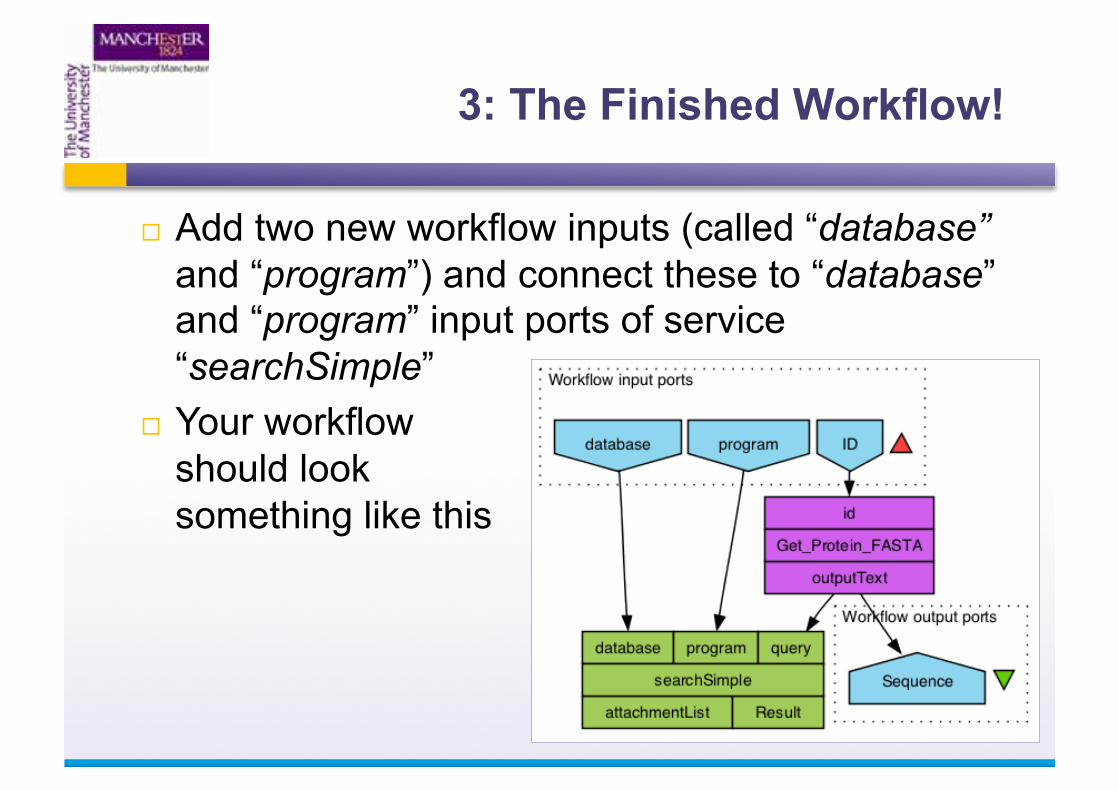
Add two new workflow inputs (called “database” and “program”) and connect these to “database” and “program” input ports of service “searchSimple”
Your workflow should look something like this

3: Adding a Workflow Description
Right-click on a blank part of the workflow diagram and select “Show details”
In the Workflow Explorer, the details page will open up. Add some details about the workflow, e.g. what the workflow does, who wrote it
You can also add examples and descriptions for the workflow inputs by selecting them and selecting “Show details”, then expand “Annotations”
An example for database is ‘SWISS’, for program ‘blastp’, and for ID ‘1220173’
Save the workflow from “File” -> “Save workflow”

4. Running the Workflow
Go to “File” -> “Run workflow”. A workflow input window will appear like before.
This time, each input has its own tab with descriptions and examples, as well as a panel to enter data.
For the input “ID”, select “New value” and add a Genbank GI number (e.g. 1220173)
For the input “database”, add “SWISS”. For the input “program”, add “blastp” Select “Run workflow” at the bottom of the panel to set
the workflow going
4. Running the Workflow with Multiple Inputs
Taverna 2 has type-checking built into the workflow. Before you execute, it will verify that all of your input and output values are syntactically correct (i.e. single values and lists).
Because of this, you have to declare the type of input you want for the workflow (we have declared single values by default).
4. Running the Workflow with multiple inputs
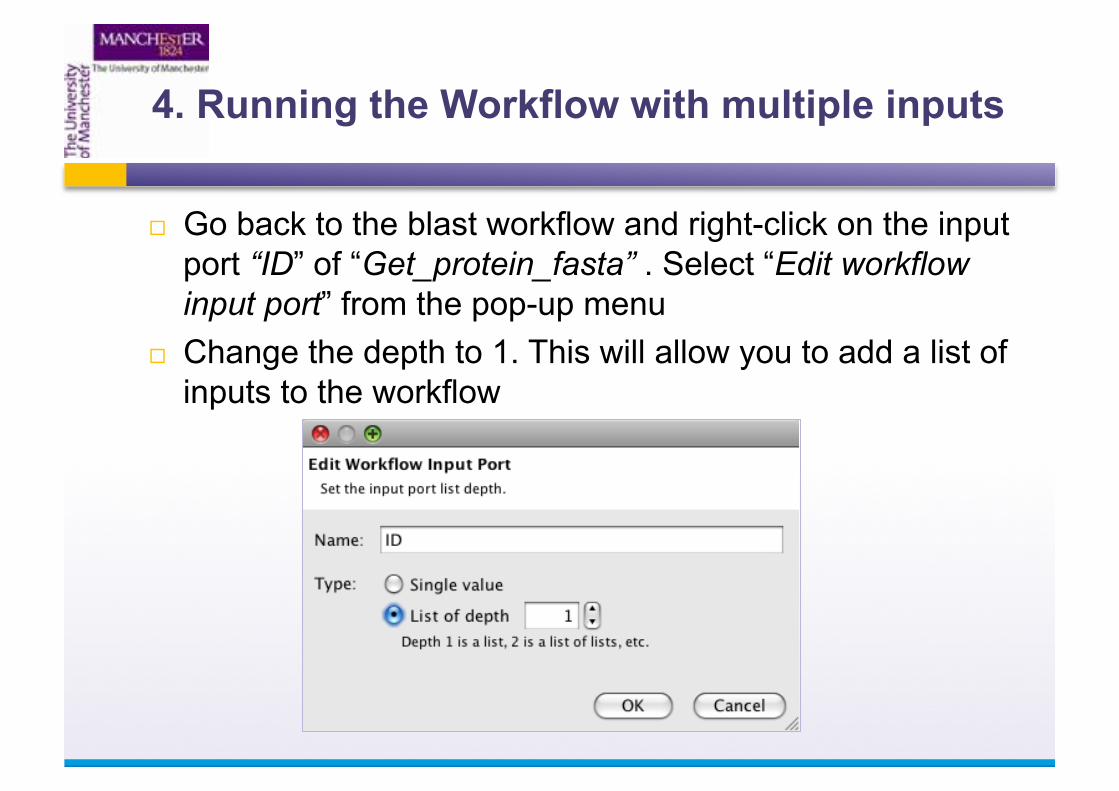
Go back to the blast workflow and right-click on the input port “ID” of “Get_protein_fasta” . Select “Edit workflow input port” from the pop-up menu
Change the depth to 1. This will allow you to add a list of inputs to the workflow

4. Running the Workflow with Multiple Inputs
Run the workflow again (notice it has remembered the values you added last time). Additionally, add another GI number, for example, 37722019
This time, the workflow will iterate over both as Taverna has an implicit iteration model
5. Saving Results
When a workflow has finished, you can chose whether to save all of the results plus the input data, just the results, subsets of results or individual values
In the Results window, click on the “Save Value”’ button on the left hand side. A pop-up will then allow you to make your selection.
Save all the values from the workflow To save individual values, click on the ‘Save
value’ button within each Result tab
5. Looking at intermediate values - provenance
As Taverna workflows are executed, the provenance of each workflow run can be recorded
When a workflow is complete, you can look at intermediate values by selecting a service in the workflow run diagram panel
This is very useful for debugging workflows during design and for evaluating previous workflow runs during analysis
5. Looking at intermediate values - provenance
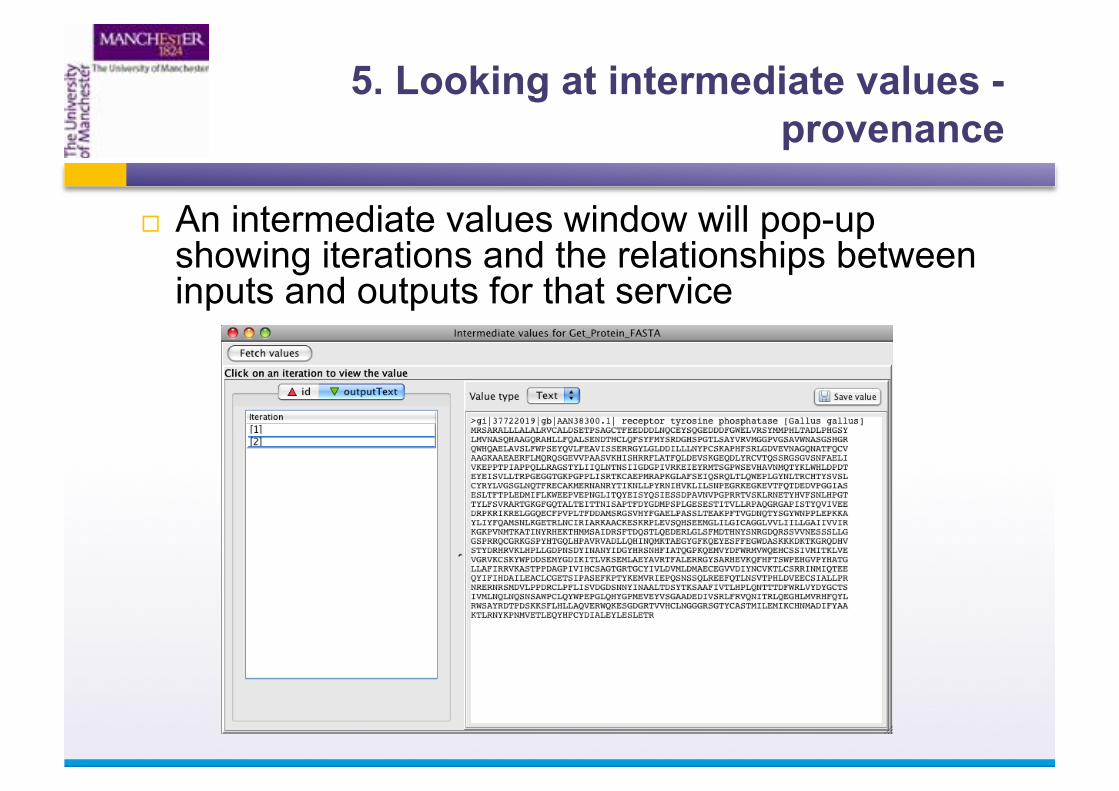
An intermediate values window will pop-up showing iterations and the relationships between inputs and outputs for that service