getting started with the optional mips simulator for the ... · getting started with the optional...
TRANSCRIPT

Getting Started with the optional Mips Simulator for the Home Practicalon Cache Memories
This Home Practical can be completed without installing any software, and without executing
any programs.
If you wish, you can try out our cache memory simulator. The rest of this document describes how to
get started with the simulator.
Installing and using the Software (optional)
You do not need to install or use this software. What follows are instructions for students who
want to try the simulator for themselves, and perhaps learn more than what is obligatory.
This Home Practical is prepared with the MipsIT Integrated Development Environment and the Mips
Simulator. This software has been tested with Windows XP Professional, and with Ubuntu GNU/Linux
10.04 LTS using the Wine compatibility package. We have also performed limited testing with Windows
7 Enterprise.
Download the self-extracting executable containing MipsIT and the simulator for Windows.
To install on a computer with Ubuntu: Download the file, right-click it and select Properties, then the
Permissions tab. Check the box "Allow executing file as program", then close the Properties dialog.
Now right-click the file again, and select "Open with Wine Windows Program Loader". Note: the Wine
package must be installed on your system. Use the Software Central to install the Wine package, if
necessary.
To install on your own personal computer with Windows 7: Download and open the file, then change
the "Unzip to folder" to C:\Users\yourusername\MipsIT; change "yourusername" to your actual
username on that computer. Then click "Unzip". When you see the message "114 files unzipped
successfully", click "OK" first, then "Close". If your username contains spaces (like, "your user name"),
this will not work.
To install in a managed computer room at KTH with Windows 7: Download and open the file, then
change the "Unzip to folder" drive letter to match your networked home drive before you click
"Unzip" Example: if your networked home folder is H:, change C:\MipsIT to H:\MipsIT .
When you see the message "114 files unzipped successfully", click "OK" first, then "Close".
Getting started with the Mips Simulator for the Cac... file:///home/f/Dokument/datorteknik/hemlabbar/lab...
1 av 11 2014-06-30 10:50

You may want to create desktop shortcuts for the two programs. Open the folder C:\MipsIT (or
H:\MipsIT or something similar in a managed computer room). Select the links "Mips Simulator" and
"MipsIT Studio". Right-click one of the files and use Send To - Desktop to add shortcuts to your
desktop.
On Ubuntu systems, open a file-manager window and browse to your home folder. If the .wine folder
is not shown, press Ctrl-H to show hidden files. Open the .wine folder, then the drive_c folder. The
MipsIT folder should now be visible.
Starting for the first time
Start MipsIT Studio. The message "Failed to open COM port" may be shown.
Click OK. This message will not affect your simulation.
Creating your first project
Getting started with the Mips Simulator for the Cac... file:///home/f/Dokument/datorteknik/hemlabbar/lab...
2 av 11 2014-06-30 10:50
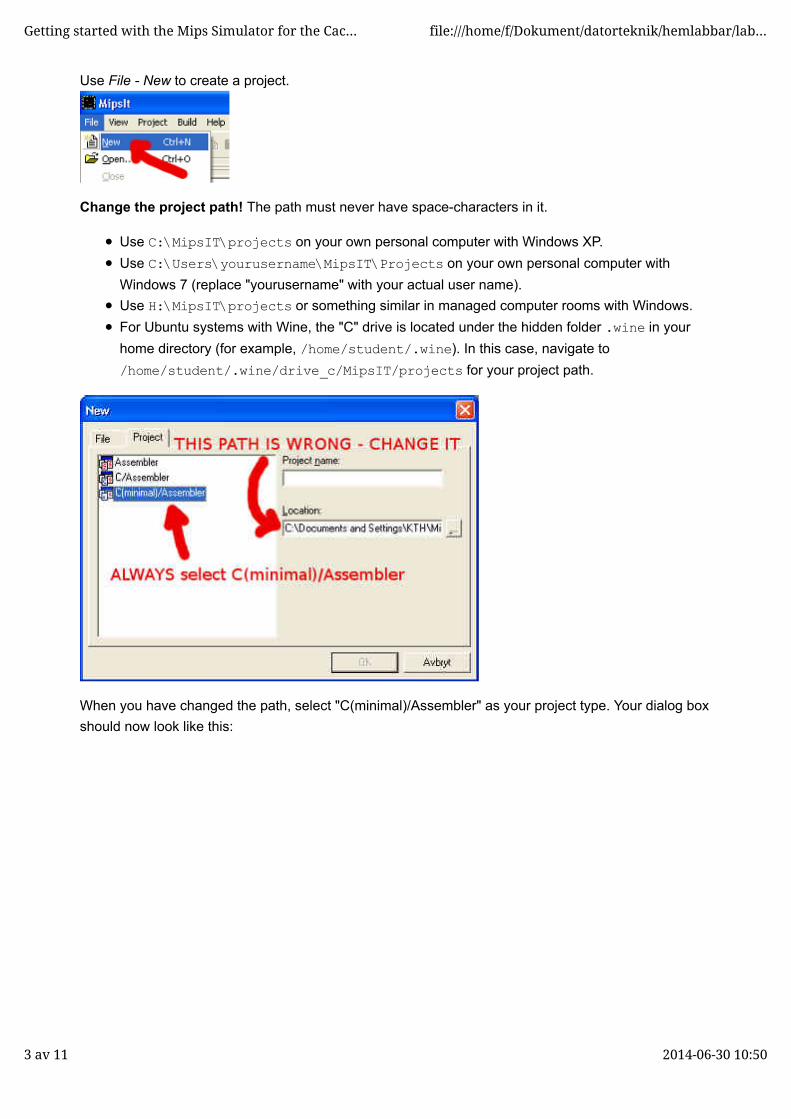
Use File - New to create a project.
Change the project path! The path must never have space-characters in it.
Use C:\MipsIT\projects on your own personal computer with Windows XP.
Use C:\Users\yourusername\MipsIT\Projects on your own personal computer with
Windows 7 (replace "yourusername" with your actual user name).
Use H:\MipsIT\projects or something similar in managed computer rooms with Windows.
For Ubuntu systems with Wine, the "C" drive is located under the hidden folder .wine in your
home directory (for example, /home/student/.wine). In this case, navigate to
/home/student/.wine/drive_c/MipsIT/projects for your project path.
When you have changed the path, select "C(minimal)/Assembler" as your project type. Your dialog box
should now look like this:
Getting started with the Mips Simulator for the Cac... file:///home/f/Dokument/datorteknik/hemlabbar/lab...
3 av 11 2014-06-30 10:50
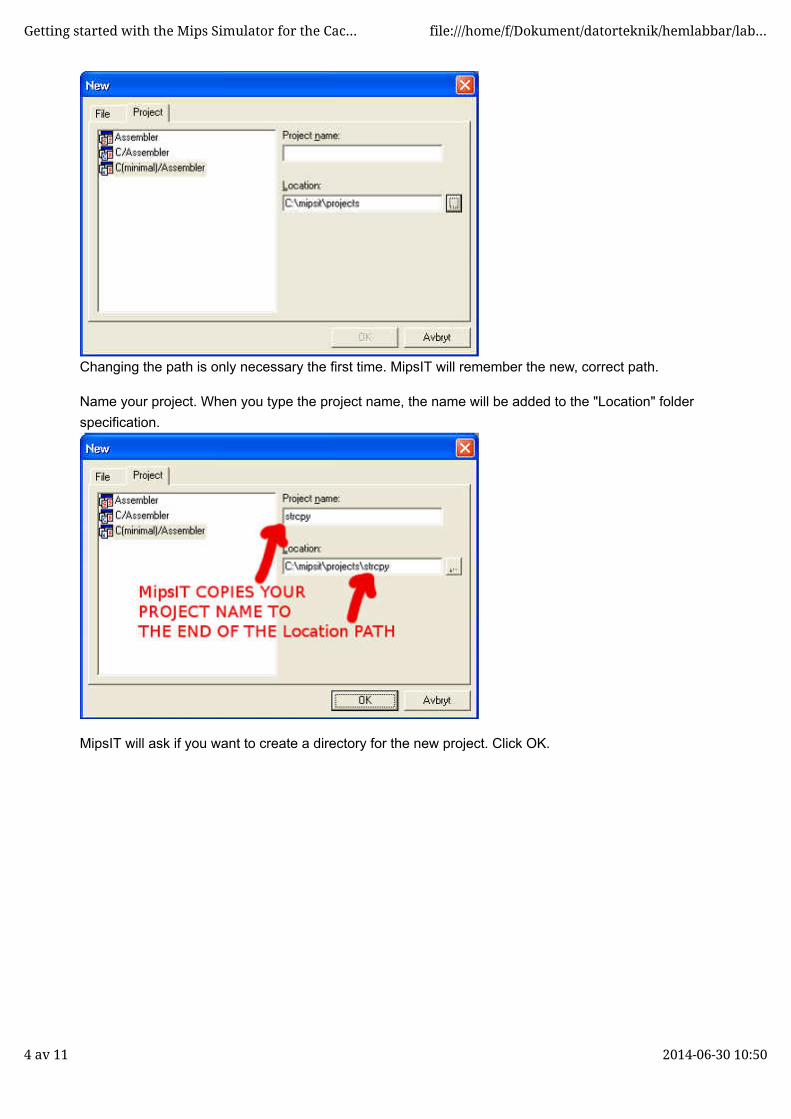
Changing the path is only necessary the first time. MipsIT will remember the new, correct path.
Name your project. When you type the project name, the name will be added to the "Location" folder
specification.
MipsIT will ask if you want to create a directory for the new project. Click OK.
Getting started with the Mips Simulator for the Cac... file:///home/f/Dokument/datorteknik/hemlabbar/lab...
4 av 11 2014-06-30 10:50

Adding files to your project
Now that you have created your project, you can add a file to it. Use File - New to create a file for the
project.
Use the File tab of the New dialog to specify the new file.
The check-box "Add to project" must be checked. Always use the "C" file type. Type the name of the
file, including the file-extension. For the first program in this exercise, use strcpy.c as the file name.
Open our supplied file strcpy.c. Select and copy the whole contents of the file. In the MipsIT window,
paste the contents into the strcpy.c subwindow.
Getting started with the Mips Simulator for the Cac... file:///home/f/Dokument/datorteknik/hemlabbar/lab...
5 av 11 2014-06-30 10:50
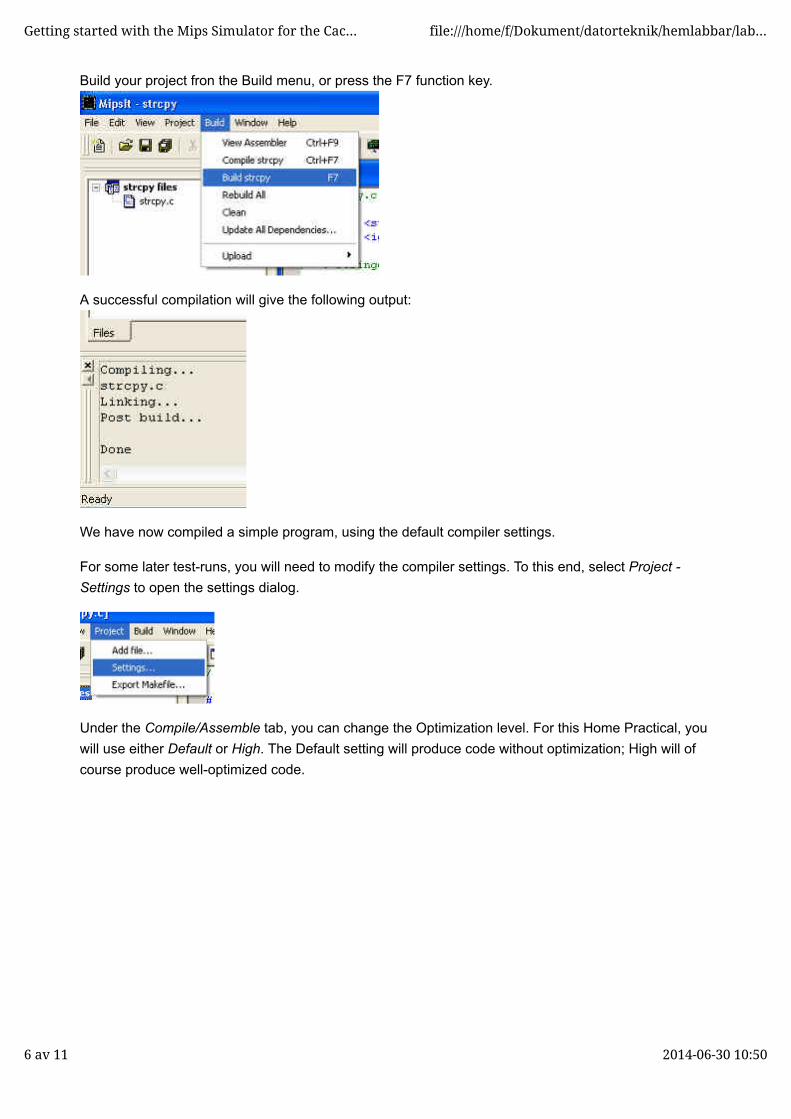
Build your project fron the Build menu, or press the F7 function key.
A successful compilation will give the following output:
We have now compiled a simple program, using the default compiler settings.
For some later test-runs, you will need to modify the compiler settings. To this end, select Project -
Settings to open the settings dialog.
Under the Compile/Assemble tab, you can change the Optimization level. For this Home Practical, you
will use either Default or High. The Default setting will produce code without optimization; High will of
course produce well-optimized code.
Getting started with the Mips Simulator for the Cac... file:///home/f/Dokument/datorteknik/hemlabbar/lab...
6 av 11 2014-06-30 10:50
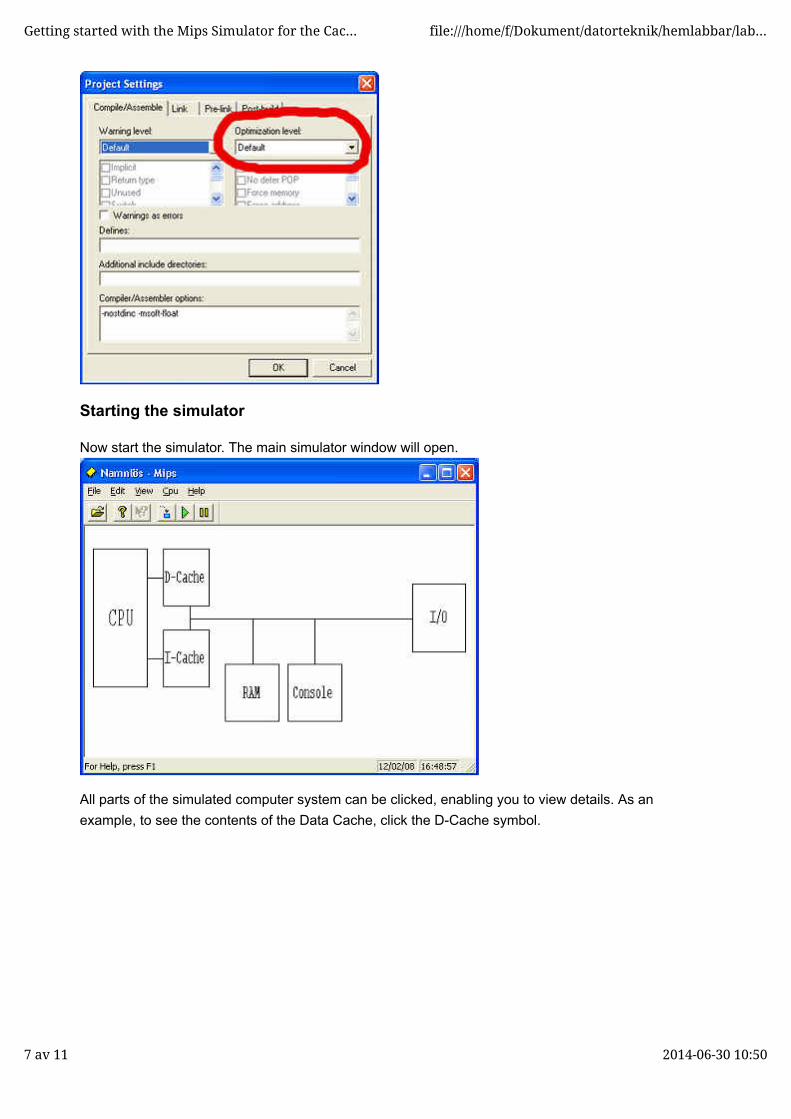
Starting the simulator
Now start the simulator. The main simulator window will open.
All parts of the simulated computer system can be clicked, enabling you to view details. As an
example, to see the contents of the Data Cache, click the D-Cache symbol.
Getting started with the Mips Simulator for the Cac... file:///home/f/Dokument/datorteknik/hemlabbar/lab...
7 av 11 2014-06-30 10:50

Note: this screenshot shows the D-cache after a program has been executed. Before your program
runs, cache contents and statistics will be zero.
Use Edit - Cache/Mem Config to open the cache-settings dialog.
For your first run, you will disable the caches. Make sure that both Disable and Disable penalty are
checked, both for the Instruction Cache and for the Data Cache.
Getting started with the Mips Simulator for the Cac... file:///home/f/Dokument/datorteknik/hemlabbar/lab...
8 av 11 2014-06-30 10:50

Switch to the MipsIT window. Upload your newly built project to the simulator. You can use the menu
as shown below, or press the F5 function key.
Switch back to the simulator. Click the Run button.
When the program writes to the standard output device, the simulator will open a console window.
After a short delay, the program is finished
Use View - I-Cache Stats to check the cycle-count.
Getting started with the Mips Simulator for the Cac... file:///home/f/Dokument/datorteknik/hemlabbar/lab...
9 av 11 2014-06-30 10:50
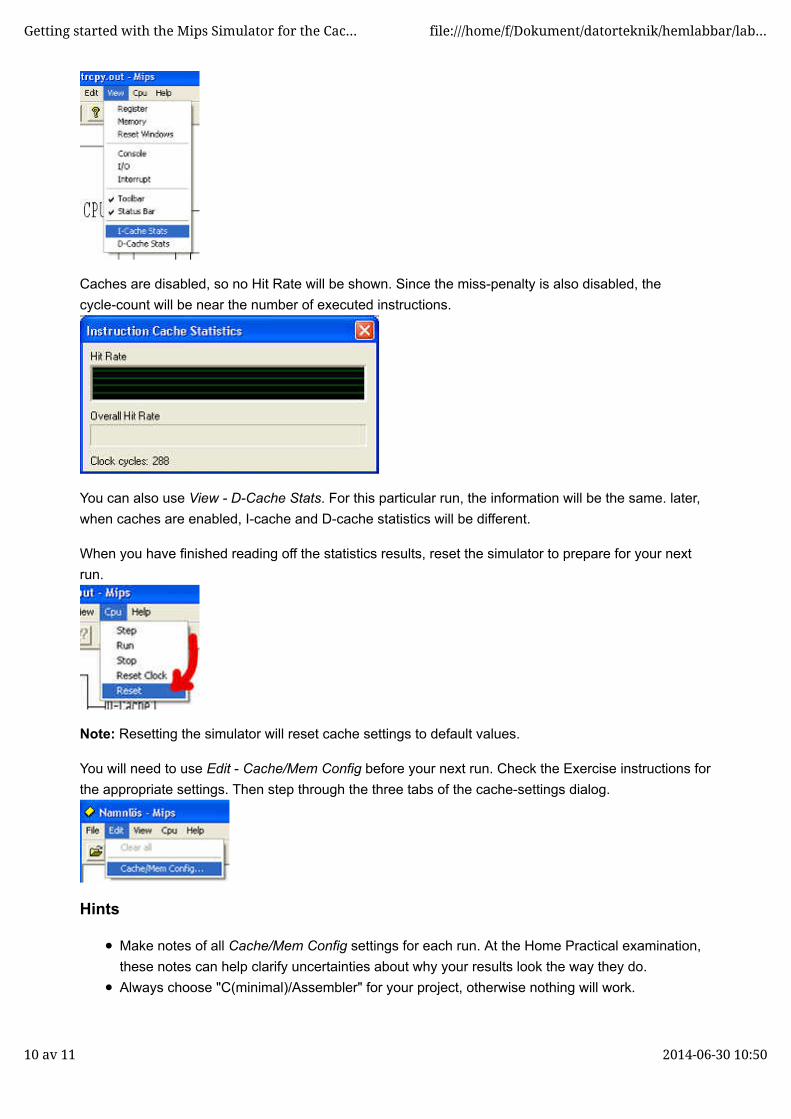
Caches are disabled, so no Hit Rate will be shown. Since the miss-penalty is also disabled, the
cycle-count will be near the number of executed instructions.
You can also use View - D-Cache Stats. For this particular run, the information will be the same. later,
when caches are enabled, I-cache and D-cache statistics will be different.
When you have finished reading off the statistics results, reset the simulator to prepare for your next
run.
Note: Resetting the simulator will reset cache settings to default values.
You will need to use Edit - Cache/Mem Config before your next run. Check the Exercise instructions for
the appropriate settings. Then step through the three tabs of the cache-settings dialog.
Hints
Make notes of all Cache/Mem Config settings for each run. At the Home Practical examination,
these notes can help clarify uncertainties about why your results look the way they do.
Always choose "C(minimal)/Assembler" for your project, otherwise nothing will work.
Getting started with the Mips Simulator for the Cac... file:///home/f/Dokument/datorteknik/hemlabbar/lab...
10 av 11 2014-06-30 10:50
In the MipsIT Studio you can compile your current project by pressing F7, and upload it to the
simulator by pressing F5.
You can start the simulator and MipsIT Studio independently. They can also be closed and
restarted independently.
On Windows 7 systems, always save your projects in a subfolder of H:\MipsIT\Projects in
managed computer rooms, C:\Users\yourusername\MipsIT\Projects on your own
computer.
On Windows XP, save in a subfolder of C:\MipsIT\Projects.
There is a detailed manual for the Mips Simulator and the MipsIT Studio Integrated Development
Environment.
Error messages
Some error messages are listed below, together with explanations and suggestions.
multiple definition of `main'
xgcc.exe: Internal compiler error: program ld got fatal signal 1
Discussion and suggested solution: A project can have only one main function. You must create
a separate project for each program.
The specified path name contains illegal characters.
Discussion and suggested solution: There must be no spaces in the path to the project directory.
Make sure that the project directory is a subfolder of C:\MipsIT (or H:\MipsIT in managed
computer rooms). Please note that "My Documents" is an alias for a folder, whose path contains
several spaces (since it is some levels below "Documents and Settings").
This page was last updated 2014-06-30.
Getting started with the Mips Simulator for the Cac... file:///home/f/Dokument/datorteknik/hemlabbar/lab...
11 av 11 2014-06-30 10:50