global license manager user guide - amazon s3€¦ · page 7 | global license manager user guide -...
TRANSCRIPT
Global License Manager User Guide
Global License Manager User Guide
13 March 2017
© 2017 A10 Networks, Inc. Confidential and Proprietary - All Rights Reserved
Information in this document is subject to change without notice.
Patent Protection
A10 Networks products are protected by patents in the U.S. and elsewhere. The following website is provided to satisfy the virtual pat-ent marking provisions of various jurisdictions including the virtual patent marking provisions of the America Invents Act. A10 Net-works' products, including all Thunder Series products, are protected by one or more of U.S. patents and patents pending listed at:
https://www.a10networks.com/company/legal-notices/a10-virtual-patent-marking.
Trademarks
The A10 logo, A10 Harmony, A10 Lightning, A10 Networks, A10 Thunder, aCloud, ACOS, Affinity, aFleX, aFlow, aGalaxy, aGAPI, aVCS, AX, aXAPI, IDsentrie, IP-to-ID, SSL Insight, SSLi, Thunder, Thunder TPS, UASG, and vThunder are trademarks or registered trademarks of A10 Networks, Inc. in the United States and other countries. All other trademarks are property of their respective owners.
Confidentiality
This document contains confidential materials proprietary to A10 Networks, Inc. This document and information and ideas herein may not be disclosed, copied, reproduced or distributed to anyone outside A10 Networks, Inc. without prior written consent of A10 Networks, Inc.
A10 Networks Inc. Software License and End User Agreement
Software for all A10 Networks products contains trade secrets of A10 Networks and its subsidiaries and Customer agrees to treat Soft-ware as confidential information.
Anyone who uses the Software does so only in compliance with the terms of the End User License Agreement (EULA), provided later in this document or available separately. Customer shall not:
1. reverse engineer, reverse compile, reverse de-assemble or otherwise translate the Software by any means
2. sublicense, rent or lease the Software.
Disclaimer
This document does not create any express or implied warranty about A10 Networks or about its products or services, including but not limited to fitness for a particular use and non-infringement. A10 Networks has made reasonable efforts to verify that the information contained herein is accurate, but A10 Networks assumes no responsibility for its use. All information is provided "as-is." The product specifications and features described in this publication are based on the latest information available; however, specifications are sub-ject to change without notice, and certain features may not be available upon initial product release. Contact A10 Networks for current information regarding its products or services. A10 Networks’ products and services are subject to A10 Networks’ standard terms and conditions.
Environmental Considerations
Some electronic components may possibly contain dangerous substances. For information on specific component types, please con-tact the manufacturer of that component. Always consult local authorities for regulations regarding proper disposal of electronic com-ponents in your area.
Further Information
For additional information about A10 products, terms and conditions of delivery, and pricing, contact your nearest A10 Networks loca-tion, which can be found by visiting www.a10networks.com.

page 3 | Global License Manager User Guide - 13 March 2017
Table of Contents
Overview .......................................................................................................................................... 5Global License Manager (GLM)............................................................................................................................... 5
Acquiring a Trial License ................................................................................................................. 7Creating a GLM Account ........................................................................................................................................... 7Creating a Trial License.............................................................................................................................................. 8
Obtaining your Activation Key License ....................................................................................... 11Obtaining your UUID/UID /Host ID .....................................................................................................................11
Obtaining an ACOS UUID ...............................................................................................................................12Obtaining an aGalaxy UUID ...........................................................................................................................13
Signing Into GLM.......................................................................................................................................................14Activating your Appliance To Obtain Activation Key License ...................................................................15Activation Key License Installation .....................................................................................................................18
Installing the ACOS Activation Key License .............................................................................................18aGalaxy Activation Key License Installation ............................................................................................23URL Classification License Installation .......................................................................................................23
Managing GLM Licenses ............................................................................................................... 27User Account Options..............................................................................................................................................27
Authorizing Licenses for Other Users ........................................................................................................27Authorizing Account for Other Users .........................................................................................................28Modifying User Settings .................................................................................................................................28
Working with Existing Licenses............................................................................................................................29Migrating an Existing License .......................................................................................................................29Renewing a URL Classification License .....................................................................................................29
Support and Resources ...........................................................................................................................................31Obtaining Technical Assistance ...................................................................................................................31Return Merchandise Authorization Requests .........................................................................................31Resource Downloads .......................................................................................................................................32

Licensing
Contents
Global License Manager User Guide - 13 March 2017 | page 4
page 5 | Global License Manager User Guide - 13 March 2017
Licensing
Global License Manager (GLM)
Overview
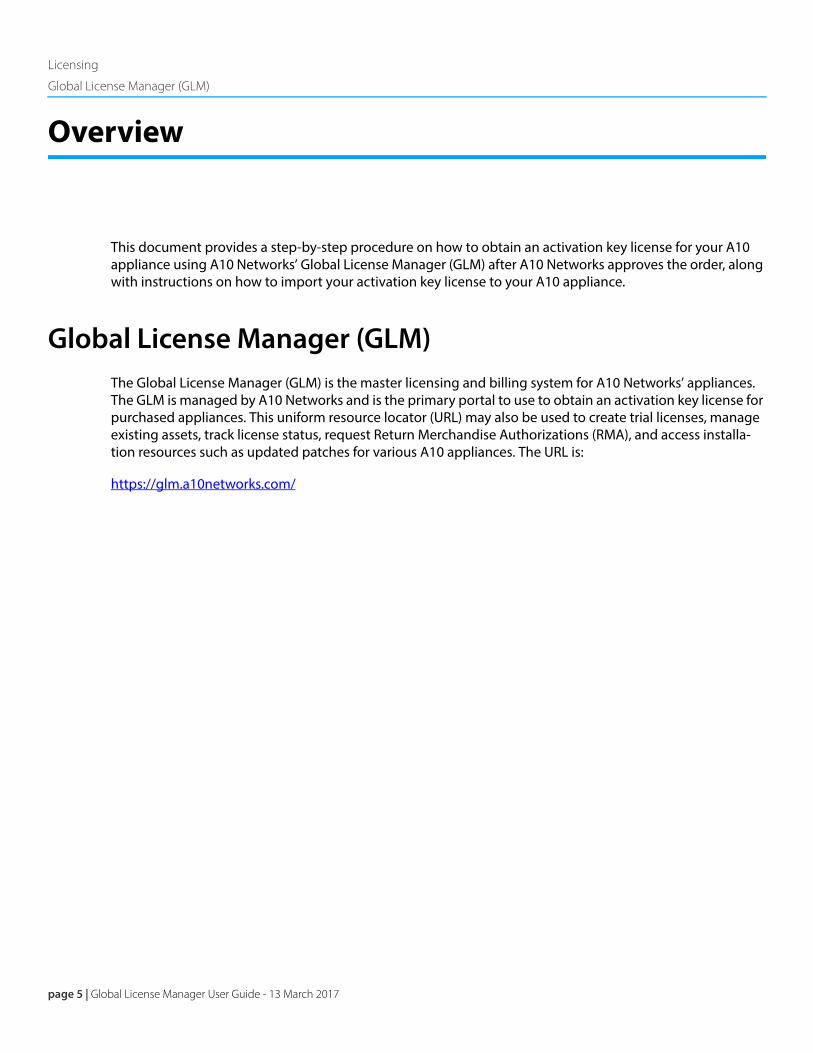
This document provides a step-by-step procedure on how to obtain an activation key license for your A10 appliance using A10 Networks’ Global License Manager (GLM) after A10 Networks approves the order, along with instructions on how to import your activation key license to your A10 appliance.
Global License Manager (GLM)The Global License Manager (GLM) is the master licensing and billing system for A10 Networks’ appliances. The GLM is managed by A10 Networks and is the primary portal to use to obtain an activation key license for purchased appliances. This uniform resource locator (URL) may also be used to create trial licenses, manage existing assets, track license status, request Return Merchandise Authorizations (RMA), and access installa-tion resources such as updated patches for various A10 appliances. The URL is:
https://glm.a10networks.com/
Licensing
Global License Manager (GLM)
Global License Manager User Guide - 13 March 2017 | page 6
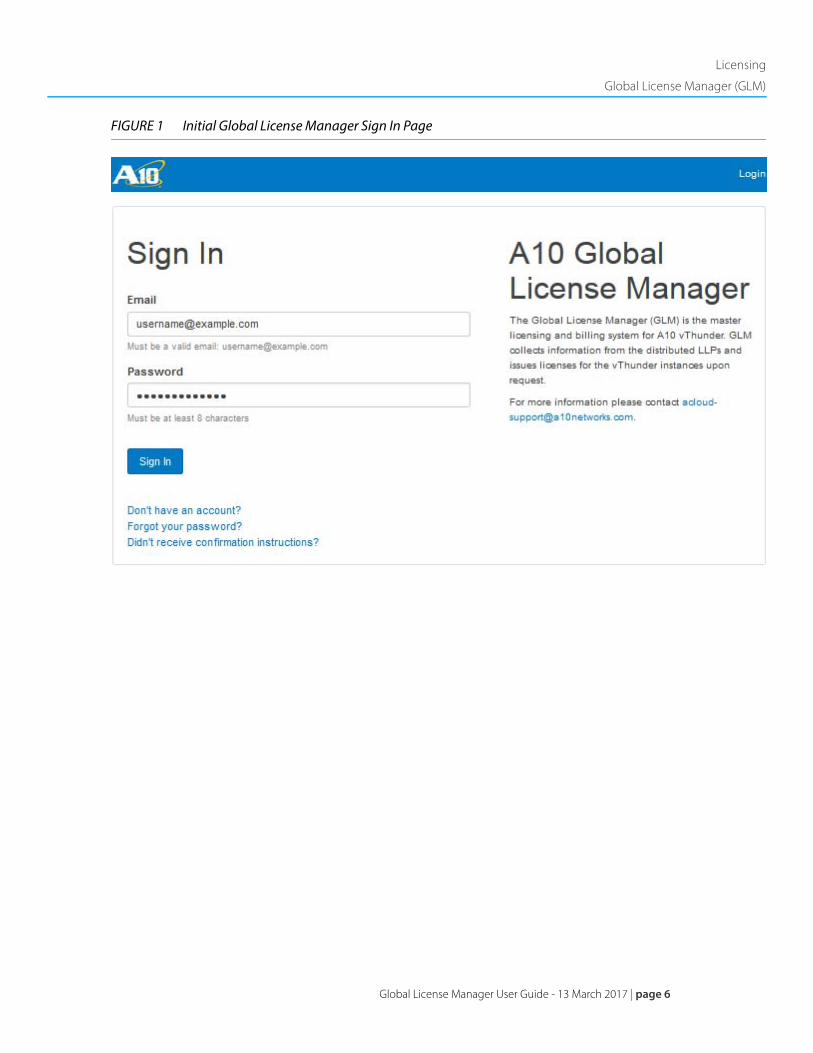
FIGURE 1 Initial Global License Manager Sign In Page
page 7 | Global License Manager User Guide - 13 March 2017
Licensing
Creating a GLM Account
Acquiring a Trial License
A10 Networks offers a trial license for a number of its appliances. This section provides a quick step-by-step guide to getting a trial license:
• Creating a GLM Account
• Creating a Trial License
Creating a GLM AccountTo acquire a trial license for the various appliances, a GLM account is required.
To create a GLM account:
1. Access the following page:
https://glm.a10networks.com/
2. In the Email field, provide your email address.
3. In the Password field, enter a password for your account.
4. An email will be sent to you for the email address provided. Click Confirm my account.
For future use, the login name is the user’s email from which they received the account information.
5. Log into GLM to acquire a trial license.
Licensing
Creating a Trial License
Global License Manager User Guide - 13 March 2017 | page 8
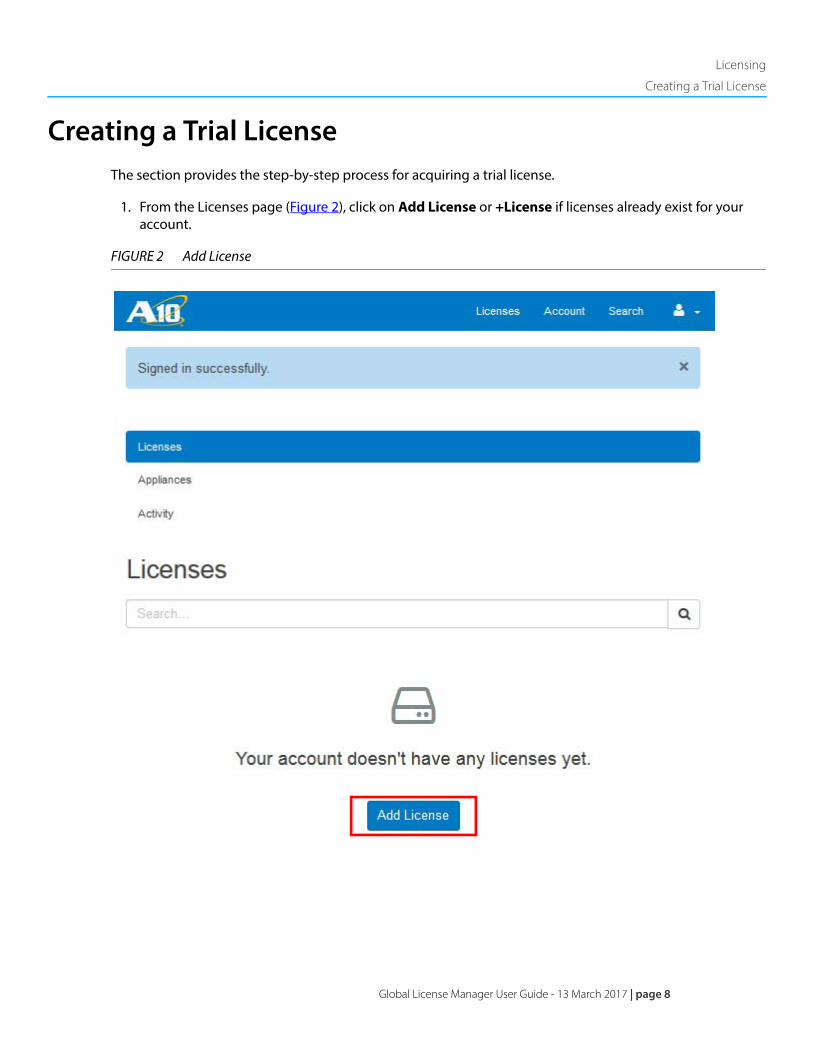
Creating a Trial LicenseThe section provides the step-by-step process for acquiring a trial license.
1. From the Licenses page (Figure 2), click on Add License or +License if licenses already exist for your account.
FIGURE 2 Add License
page 9 | Global License Manager User Guide - 13 March 2017
Licensing
Creating a Trial License
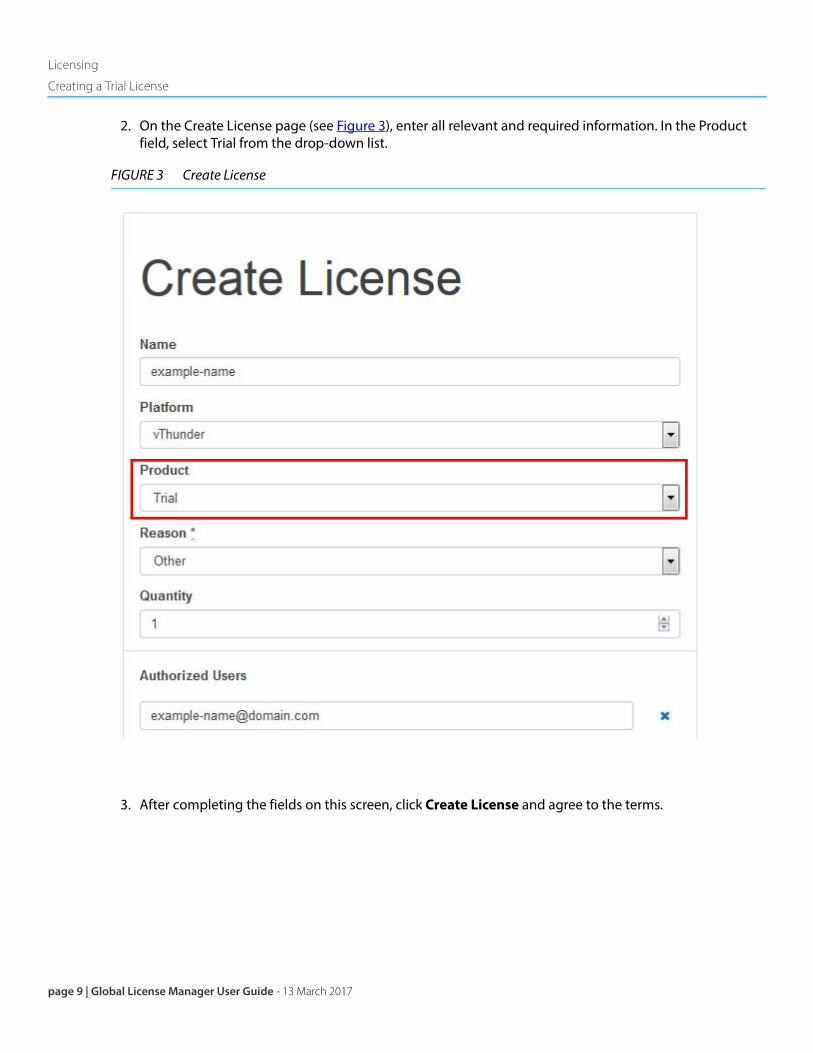
2. On the Create License page (see Figure 3), enter all relevant and required information. In the Product field, select Trial from the drop-down list.
FIGURE 3 Create License
3. After completing the fields on this screen, click Create License and agree to the terms.

Licensing
Creating a Trial License
Global License Manager User Guide - 13 March 2017 | page 10
page 11 | Global License Manager User Guide - 13 March 2017
Licensing
Obtaining your UUID/UID /Host ID
Obtaining your Activation Key License
The following provides a walk through for obtaining an activation key license after A10 Networks has pro-cessed a request for your appliance and completed the order.
NOTE: If you have an existing trial license or license that you wish to migrate, seeWorking with Existing Licenses on page 29
The overall steps are summarized below:
1. Before you begin, you must obtain your UUID/UID/Host ID. Skip this step if you already have this; if not, go to Obtaining your UUID/UID /Host ID on page 11 for more information.
2. Sign in to GLM. See Signing Into GLM on page 14.
3. Activate your device to obtain an activation key. See Activating your Appliance To Obtain Activation Key License on page 15.
4. Activate the license on your system. See Activation Key License Installation on page 18.
Obtaining your UUID/UID /Host IDTo obtain an activation key license, you must activate your appliance through GLM which requires a Univer-sally Unique Identifier (UUID), also known as the Unique Identifier (UID) or “Host ID”. Use the appropriate steps for your version of ACOS to locate your UUID/UID/Host ID.
NOTE: The Host ID is not the user-configurable system host name. It is a 40-digithexadecimal number that appears similar to the following:
5172DE29D49EE3C101C7A0CD54FB8A0B6EC92CEE
Licensing
Obtaining your UUID/UID /Host ID
Global License Manager User Guide - 13 March 2017 | page 12
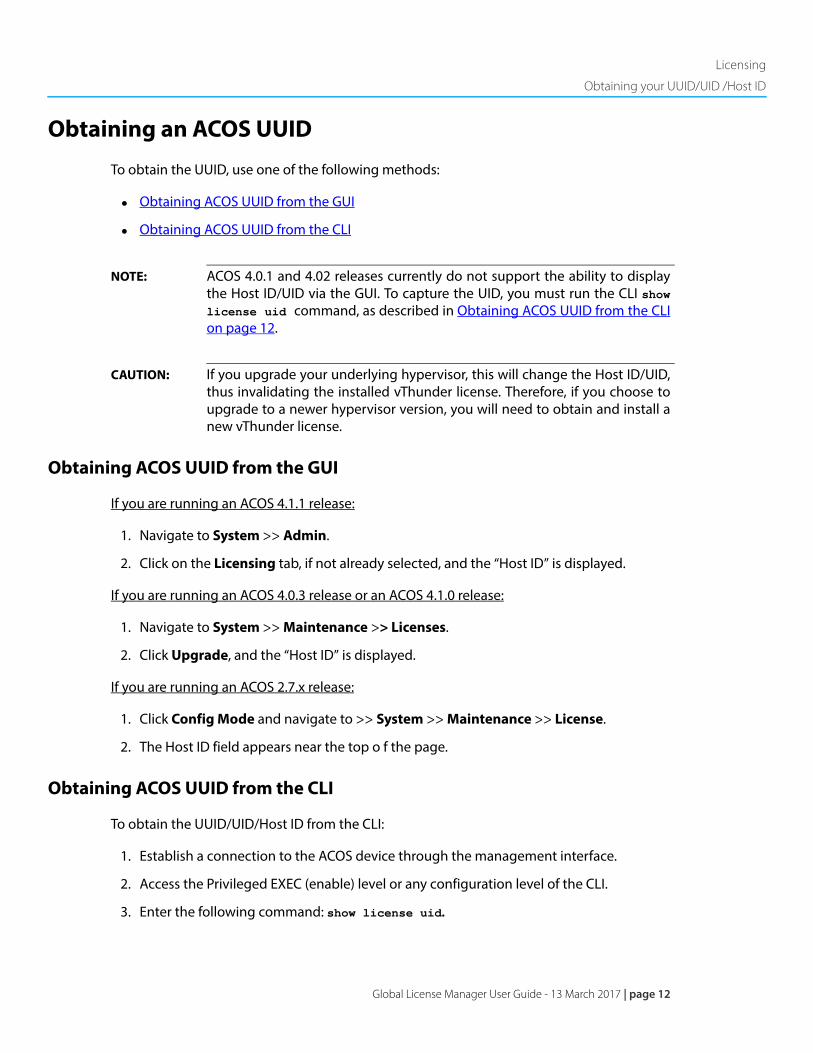
Obtaining an ACOS UUID
To obtain the UUID, use one of the following methods:
• Obtaining ACOS UUID from the GUI
• Obtaining ACOS UUID from the CLI
NOTE: ACOS 4.0.1 and 4.02 releases currently do not support the ability to displaythe Host ID/UID via the GUI. To capture the UID, you must run the CLI showlicense uid command, as described in Obtaining ACOS UUID from the CLIon page 12.
CAUTION: If you upgrade your underlying hypervisor, this will change the Host ID/UID,thus invalidating the installed vThunder license. Therefore, if you choose toupgrade to a newer hypervisor version, you will need to obtain and install anew vThunder license.
Obtaining ACOS UUID from the GUI
If you are running an ACOS 4.1.1 release:
1. Navigate to System >> Admin.
2. Click on the Licensing tab, if not already selected, and the “Host ID” is displayed.
If you are running an ACOS 4.0.3 release or an ACOS 4.1.0 release:
1. Navigate to System >> Maintenance >> Licenses.
2. Click Upgrade, and the “Host ID” is displayed.
If you are running an ACOS 2.7.x release:
1. Click Config Mode and navigate to >> System >> Maintenance >> License.
2. The Host ID field appears near the top o f the page.
Obtaining ACOS UUID from the CLI
To obtain the UUID/UID/Host ID from the CLI:
1. Establish a connection to the ACOS device through the management interface.
2. Access the Privileged EXEC (enable) level or any configuration level of the CLI.
3. Enter the following command: show license uid.
page 13 | Global License Manager User Guide - 13 March 2017
Licensing
Obtaining your UUID/UID /Host ID
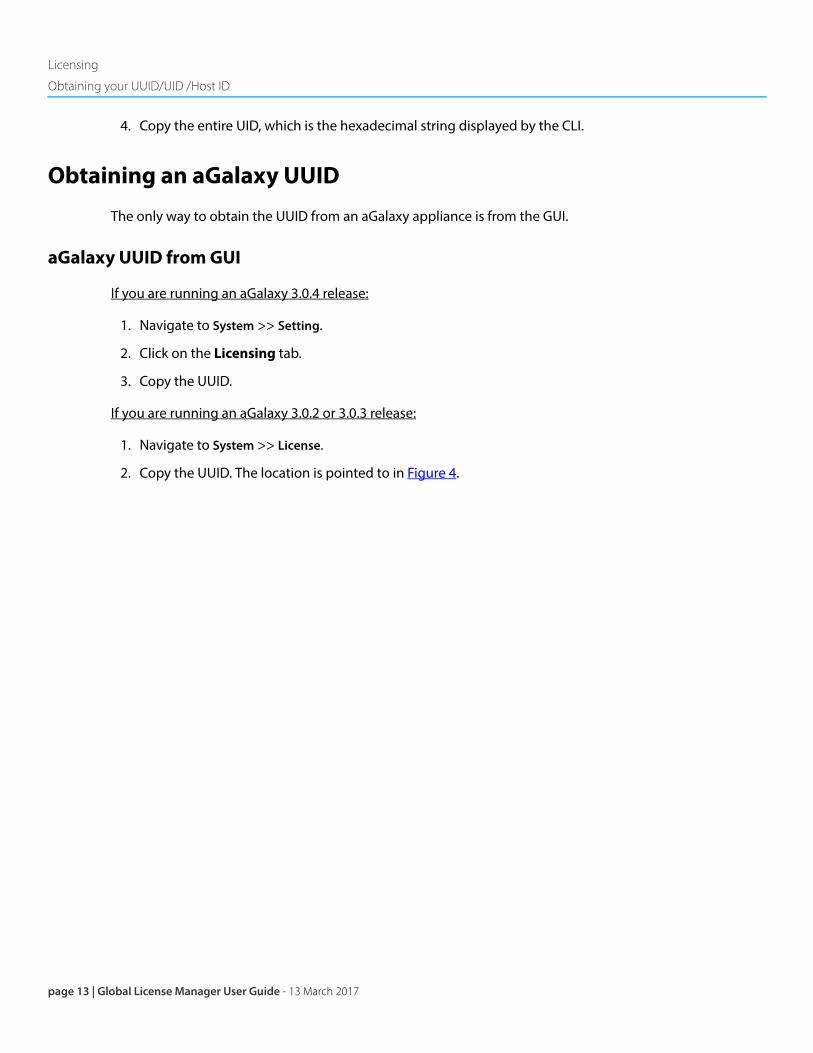
4. Copy the entire UID, which is the hexadecimal string displayed by the CLI.
Obtaining an aGalaxy UUID
The only way to obtain the UUID from an aGalaxy appliance is from the GUI.
aGalaxy UUID from GUI
If you are running an aGalaxy 3.0.4 release:
1. Navigate to System >> Setting.
2. Click on the Licensing tab.
3. Copy the UUID.
If you are running an aGalaxy 3.0.2 or 3.0.3 release:
1. Navigate to System >> License.
2. Copy the UUID. The location is pointed to in Figure 4.
Licensing
Signing Into GLM
Global License Manager User Guide - 13 March 2017 | page 14
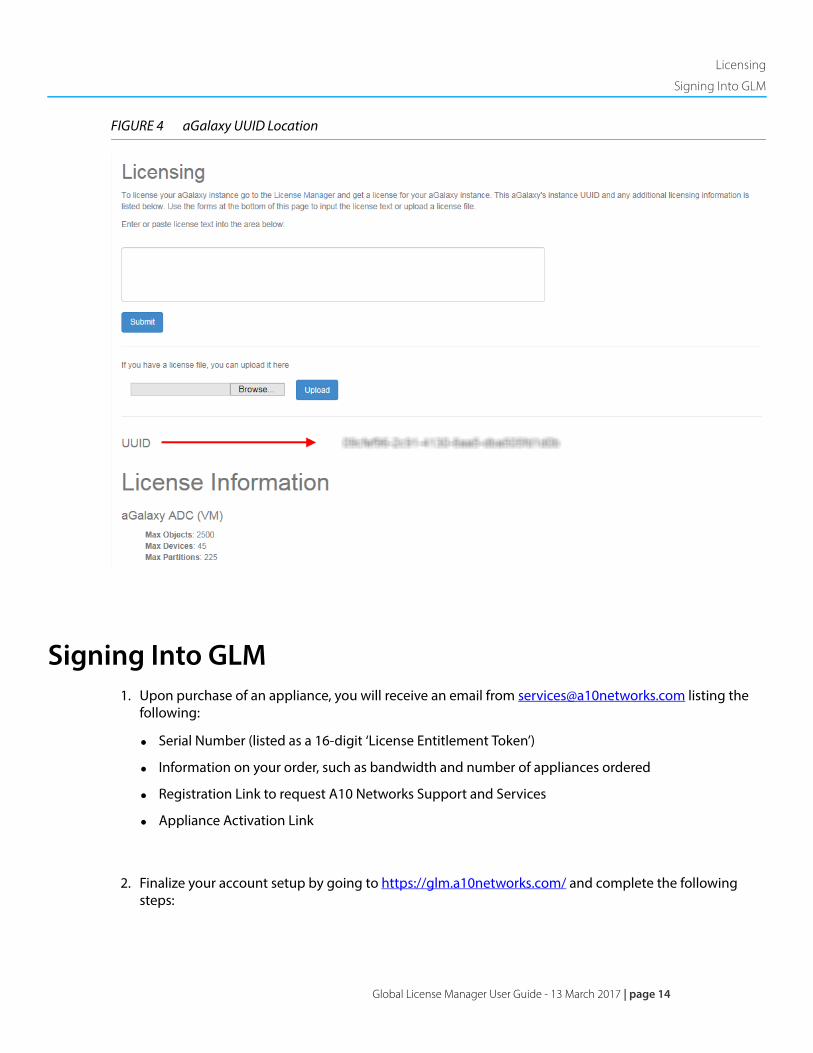
FIGURE 4 aGalaxy UUID Location
Signing Into GLM1. Upon purchase of an appliance, you will receive an email from [email protected] listing the
following:
• Serial Number (listed as a 16-digit ‘License Entitlement Token’)
• Information on your order, such as bandwidth and number of appliances ordered
• Registration Link to request A10 Networks Support and Services
• Appliance Activation Link
2. Finalize your account setup by going to https://glm.a10networks.com/ and complete the following steps:
page 15 | Global License Manager User Guide - 13 March 2017
Licensing
Activating your Appliance To Obtain Activation Key License
a. In the Email field, provide your email address.
b. In the Password field, enter a password for your account.
An email will be sent to you for the email address provided in Step a.
c. Click Confirm my account. For future use, the login name is the email from which you received the account information.
3. Return back to the original email and select Click here to activate an appliance. This will take you back to the GLM to begin the appliance activation process that will provide you with the activation key license.
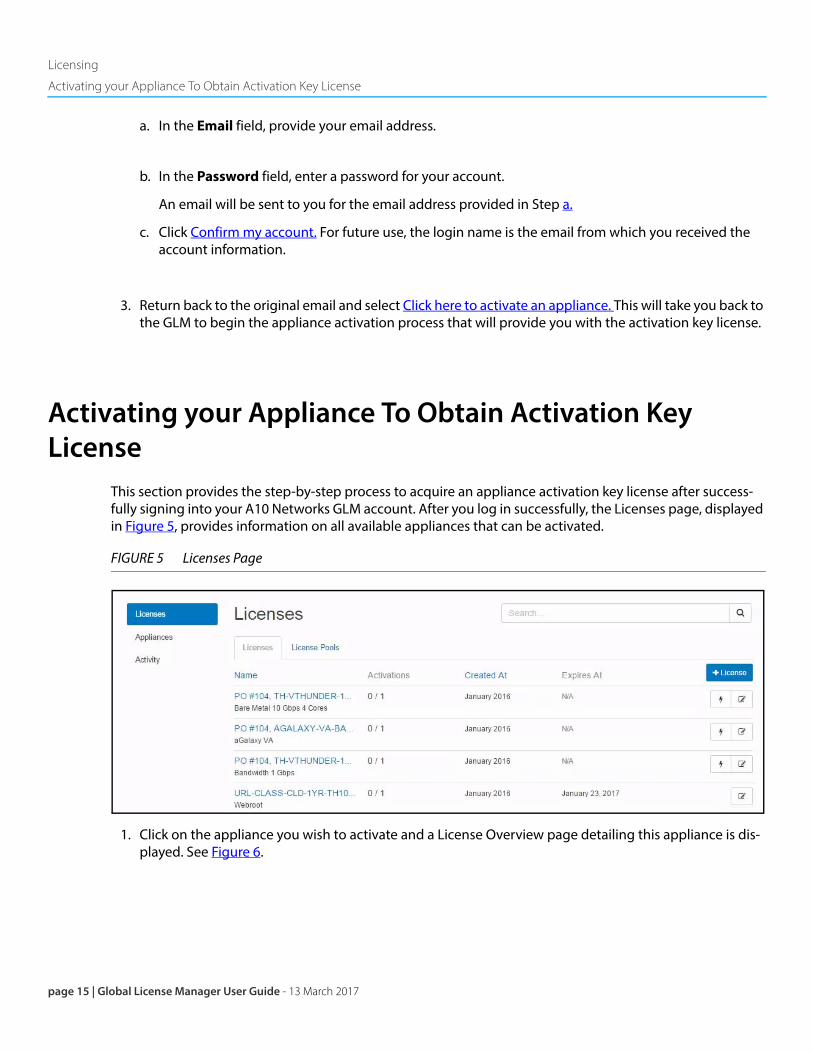
Activating your Appliance To Obtain Activation Key License
This section provides the step-by-step process to acquire an appliance activation key license after success-fully signing into your A10 Networks GLM account. After you log in successfully, the Licenses page, displayed in Figure 5, provides information on all available appliances that can be activated.
FIGURE 5 Licenses Page
1. Click on the appliance you wish to activate and a License Overview page detailing this appliance is dis-played. See Figure 6.
Licensing
Activating your Appliance To Obtain Activation Key License
Global License Manager User Guide - 13 March 2017 | page 16
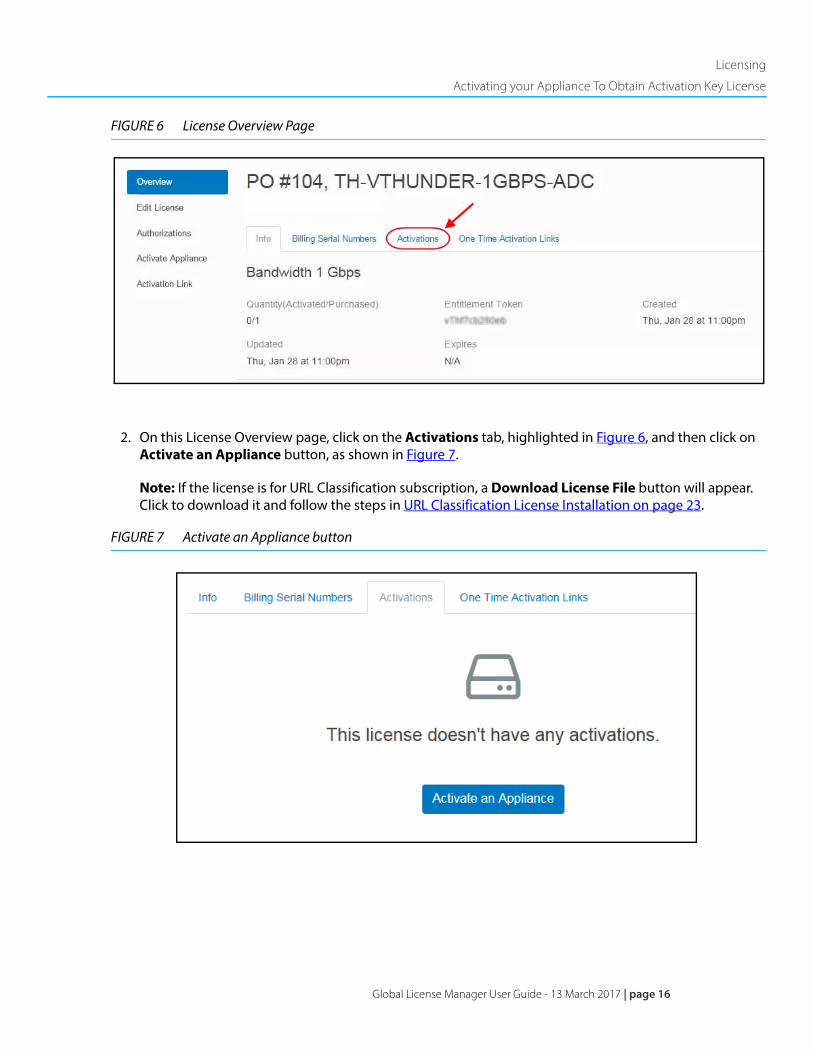
FIGURE 6 License Overview Page
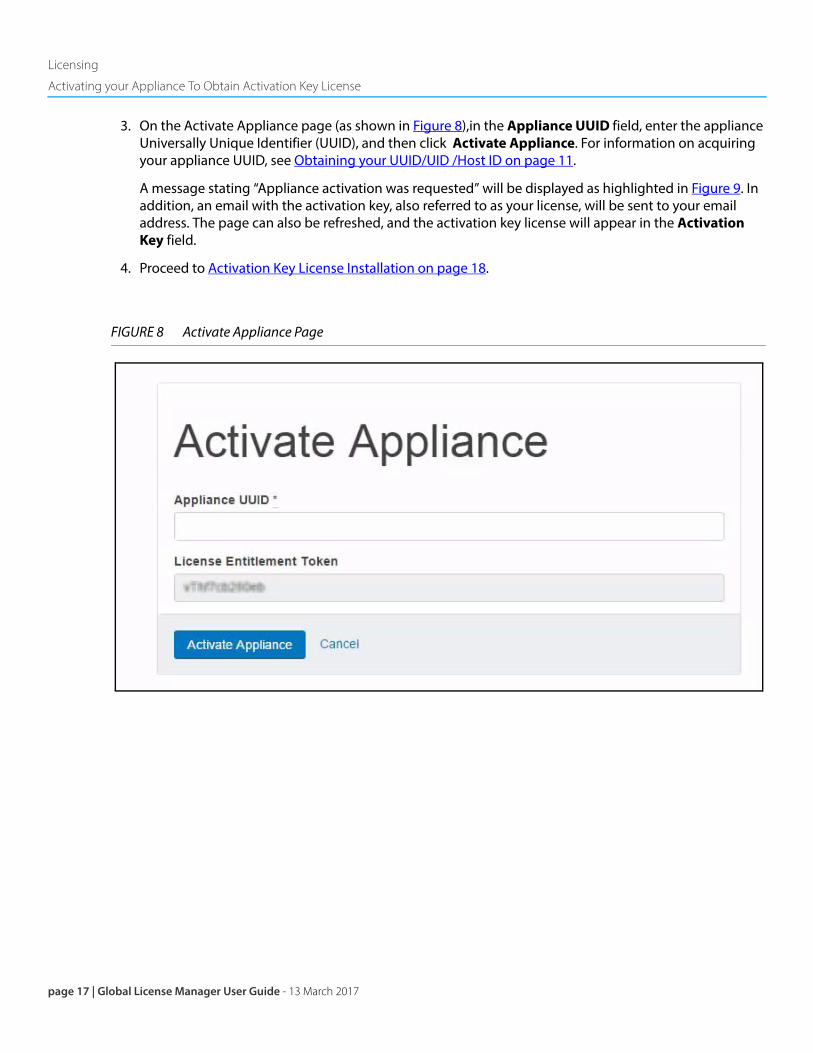
2. On this License Overview page, click on the Activations tab, highlighted in Figure 6, and then click on Activate an Appliance button, as shown in Figure 7.
Note: If the license is for URL Classification subscription, a Download License File button will appear. Click to download it and follow the steps in URL Classification License Installation on page 23.
FIGURE 7 Activate an Appliance button
page 17 | Global License Manager User Guide - 13 March 2017
Licensing
Activating your Appliance To Obtain Activation Key License
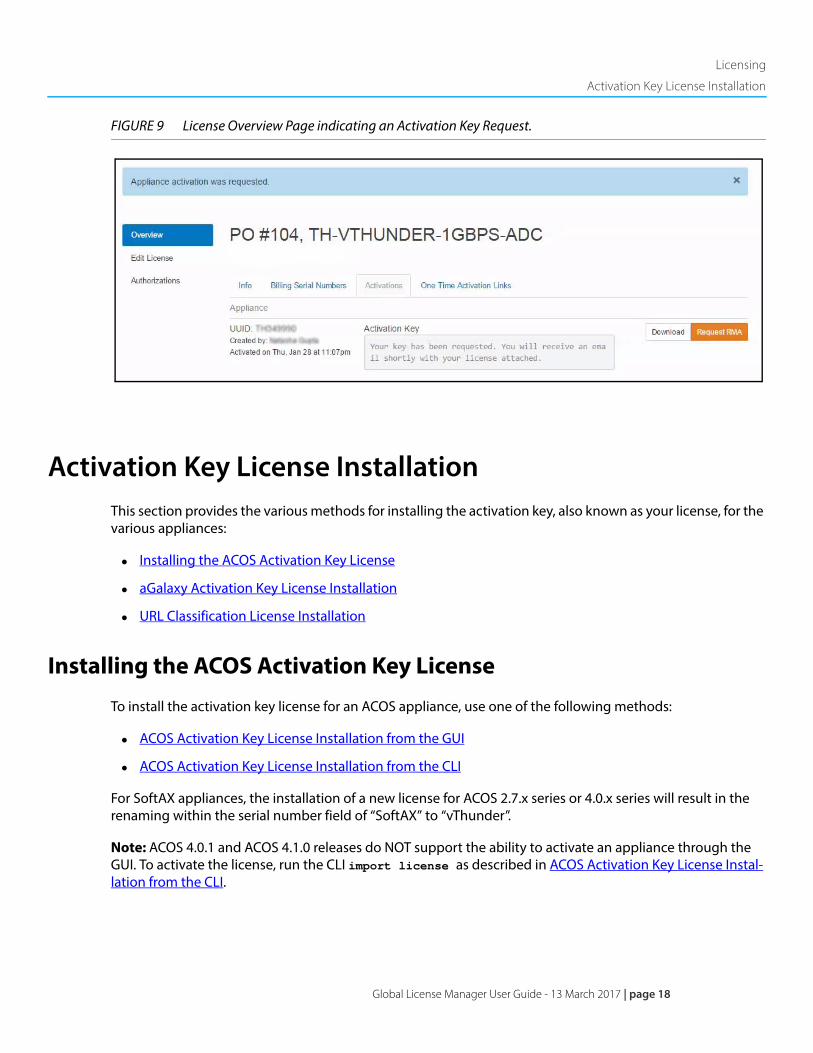
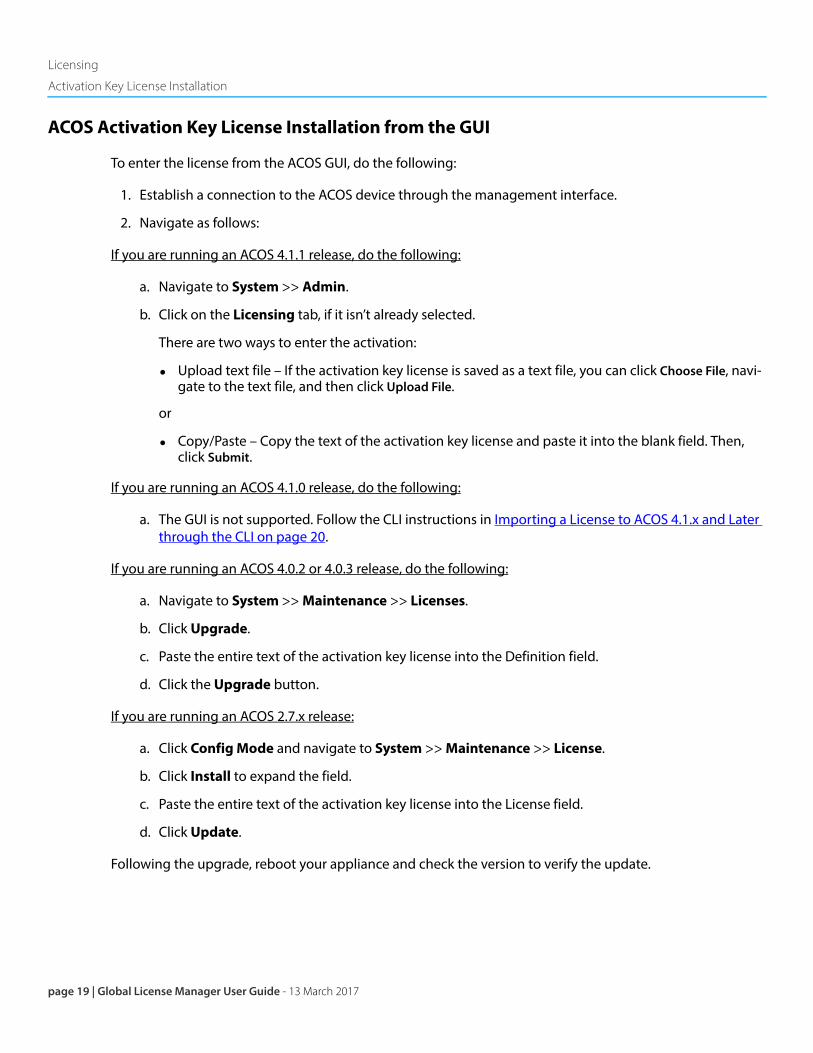
3. On the Activate Appliance page (as shown in Figure 8),in the Appliance UUID field, enter the appliance Universally Unique Identifier (UUID), and then click Activate Appliance. For information on acquiring your appliance UUID, see Obtaining your UUID/UID /Host ID on page 11.
A message stating “Appliance activation was requested” will be displayed as highlighted in Figure 9. In addition, an email with the activation key, also referred to as your license, will be sent to your email address. The page can also be refreshed, and the activation key license will appear in the Activation Key field.
4. Proceed to Activation Key License Installation on page 18.
FIGURE 8 Activate Appliance Page
Licensing
Activation Key License Installation
Global License Manager User Guide - 13 March 2017 | page 18
FIGURE 9 License Overview Page indicating an Activation Key Request.
Activation Key License InstallationThis section provides the various methods for installing the activation key, also known as your license, for the various appliances:
• Installing the ACOS Activation Key License
• aGalaxy Activation Key License Installation
• URL Classification License Installation
Installing the ACOS Activation Key License
To install the activation key license for an ACOS appliance, use one of the following methods:
• ACOS Activation Key License Installation from the GUI
• ACOS Activation Key License Installation from the CLI
For SoftAX appliances, the installation of a new license for ACOS 2.7.x series or 4.0.x series will result in the renaming within the serial number field of “SoftAX” to “vThunder”.
Note: ACOS 4.0.1 and ACOS 4.1.0 releases do NOT support the ability to activate an appliance through the GUI. To activate the license, run the CLI import license as described in ACOS Activation Key License Instal-lation from the CLI.
page 19 | Global License Manager User Guide - 13 March 2017
Licensing
Activation Key License Installation
ACOS Activation Key License Installation from the GUI
To enter the license from the ACOS GUI, do the following:
1. Establish a connection to the ACOS device through the management interface.
2. Navigate as follows:
If you are running an ACOS 4.1.1 release, do the following:
a. Navigate to System >> Admin.
b. Click on the Licensing tab, if it isn’t already selected.
There are two ways to enter the activation:
• Upload text file – If the activation key license is saved as a text file, you can click Choose File, navi-gate to the text file, and then click Upload File.
or
• Copy/Paste – Copy the text of the activation key license and paste it into the blank field. Then, click Submit.
If you are running an ACOS 4.1.0 release, do the following:
a. The GUI is not supported. Follow the CLI instructions in Importing a License to ACOS 4.1.x and Later through the CLI on page 20.
If you are running an ACOS 4.0.2 or 4.0.3 release, do the following:
a. Navigate to System >> Maintenance >> Licenses.
b. Click Upgrade.
c. Paste the entire text of the activation key license into the Definition field.
d. Click the Upgrade button.
If you are running an ACOS 2.7.x release:
a. Click Config Mode and navigate to System >> Maintenance >> License.
b. Click Install to expand the field.
c. Paste the entire text of the activation key license into the License field.
d. Click Update.
Following the upgrade, reboot your appliance and check the version to verify the update.
Licensing
Activation Key License Installation
Global License Manager User Guide - 13 March 2017 | page 20
ACOS Activation Key License Installation from the CLI
To install the activation key license using the ACOS CLI, based on the ACOS version, follow one of the listed procedures:
• Importing a License to ACOS 4.1.x and Later through the CLI on page 20
• Importing a License to ACOS 2.7.x-4.0.x through the CLI on page 22
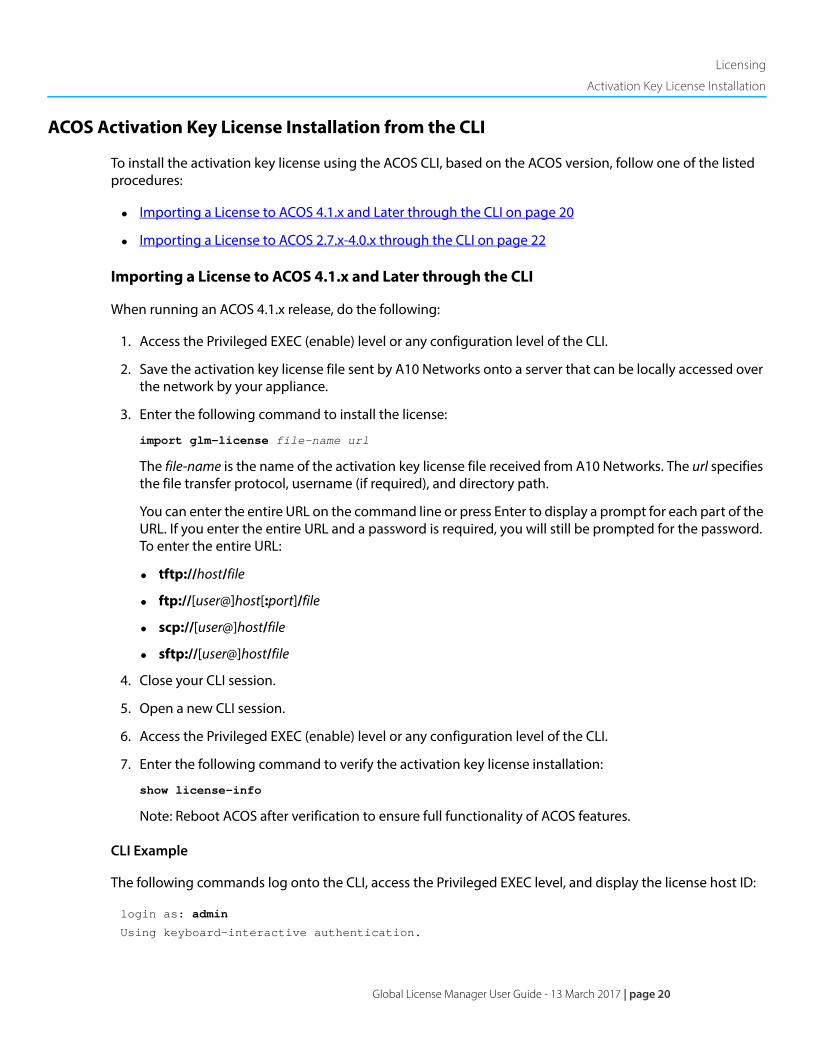
Importing a License to ACOS 4.1.x and Later through the CLI
When running an ACOS 4.1.x release, do the following:
1. Access the Privileged EXEC (enable) level or any configuration level of the CLI.
2. Save the activation key license file sent by A10 Networks onto a server that can be locally accessed over the network by your appliance.
3. Enter the following command to install the license:
import glm-license file-name url
The file-name is the name of the activation key license file received from A10 Networks. The url specifies the file transfer protocol, username (if required), and directory path.
You can enter the entire URL on the command line or press Enter to display a prompt for each part of the URL. If you enter the entire URL and a password is required, you will still be prompted for the password. To enter the entire URL:
• tftp://host/file
• ftp://[user@]host[:port]/file
• scp://[user@]host/file
• sftp://[user@]host/file
4. Close your CLI session.
5. Open a new CLI session.
6. Access the Privileged EXEC (enable) level or any configuration level of the CLI.
7. Enter the following command to verify the activation key license installation:
show license-info
Note: Reboot ACOS after verification to ensure full functionality of ACOS features.
CLI Example
The following commands log onto the CLI, access the Privileged EXEC level, and display the license host ID:
login as: admin
Using keyboard-interactive authentication.
page 21 | Global License Manager User Guide - 13 March 2017
Licensing
Activation Key License Installation
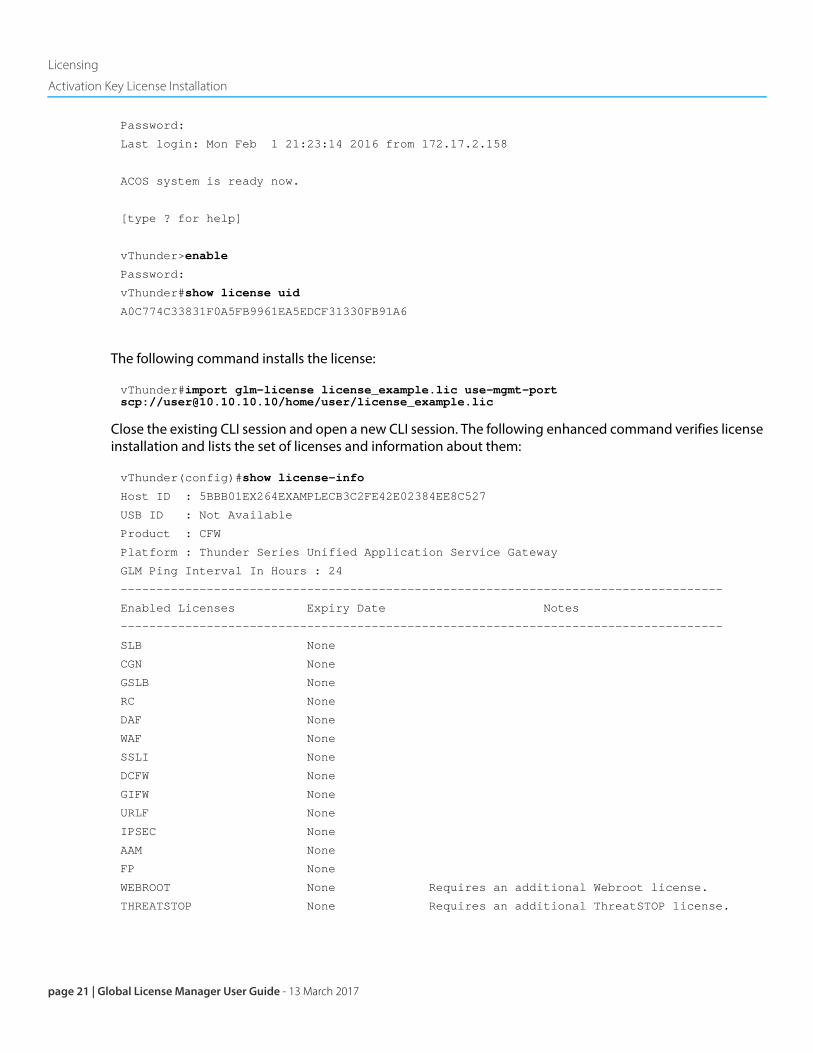
Password:
Last login: Mon Feb 1 21:23:14 2016 from 172.17.2.158
ACOS system is ready now.
[type ? for help]
vThunder>enable
Password:
vThunder#show license uid
A0C774C33831F0A5FB9961EA5EDCF31330FB91A6
The following command installs the license:
vThunder#import glm-license license_example.lic use-mgmt-port scp://[email protected]/home/user/license_example.lic
Close the existing CLI session and open a new CLI session. The following enhanced command verifies license installation and lists the set of licenses and information about them:
vThunder(config)#show license-info
Host ID : 5BBB01EX264EXAMPLECB3C2FE42E02384EE8C527
USB ID : Not Available
Product : CFW
Platform : Thunder Series Unified Application Service Gateway
GLM Ping Interval In Hours : 24
------------------------------------------------------------------------------------
Enabled Licenses Expiry Date Notes
------------------------------------------------------------------------------------
SLB None
CGN None
GSLB None
RC None
DAF None
WAF None
SSLI None
DCFW None
GIFW None
URLF None
IPSEC None
AAM None
FP None
WEBROOT None Requires an additional Webroot license.
THREATSTOP None Requires an additional ThreatSTOP license.
Licensing
Activation Key License Installation
Global License Manager User Guide - 13 March 2017 | page 22
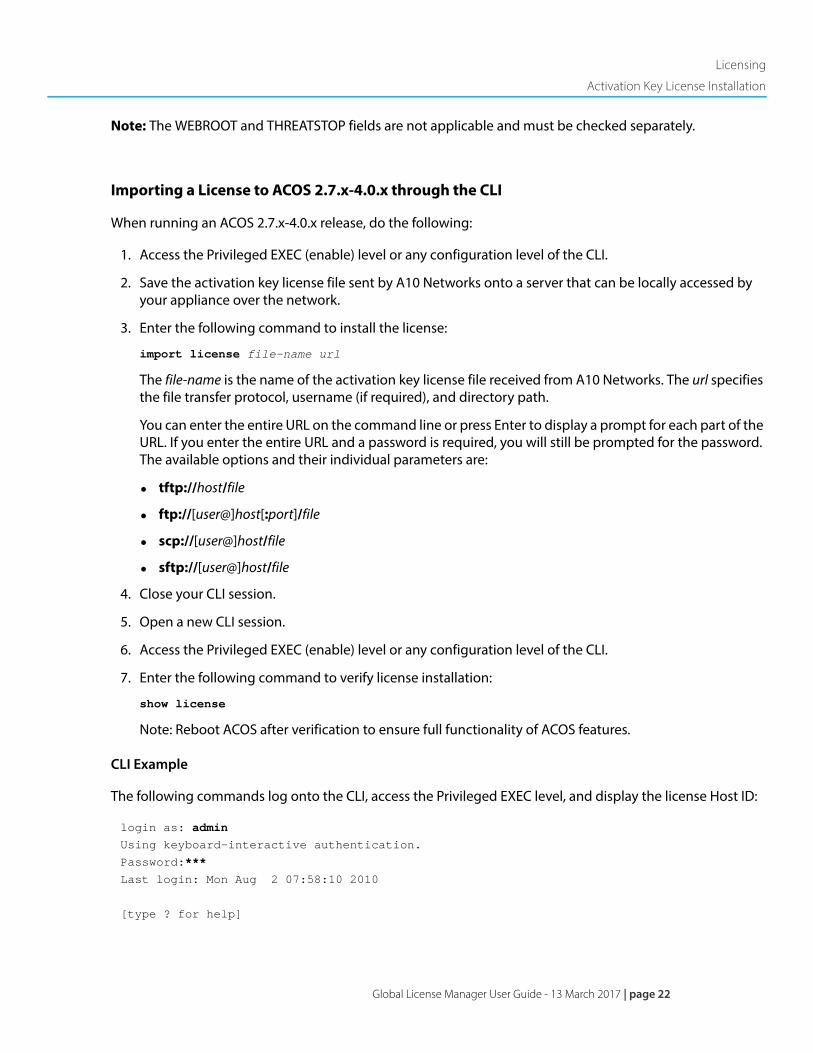
Note: The WEBROOT and THREATSTOP fields are not applicable and must be checked separately.
Importing a License to ACOS 2.7.x-4.0.x through the CLI
When running an ACOS 2.7.x-4.0.x release, do the following:
1. Access the Privileged EXEC (enable) level or any configuration level of the CLI.
2. Save the activation key license file sent by A10 Networks onto a server that can be locally accessed by your appliance over the network.
3. Enter the following command to install the license:
import license file-name url
The file-name is the name of the activation key license file received from A10 Networks. The url specifies the file transfer protocol, username (if required), and directory path.
You can enter the entire URL on the command line or press Enter to display a prompt for each part of the URL. If you enter the entire URL and a password is required, you will still be prompted for the password. The available options and their individual parameters are:
• tftp://host/file
• ftp://[user@]host[:port]/file
• scp://[user@]host/file
• sftp://[user@]host/file
4. Close your CLI session.
5. Open a new CLI session.
6. Access the Privileged EXEC (enable) level or any configuration level of the CLI.
7. Enter the following command to verify license installation:
show license
Note: Reboot ACOS after verification to ensure full functionality of ACOS features.
CLI Example
The following commands log onto the CLI, access the Privileged EXEC level, and display the license Host ID:
login as: admin
Using keyboard-interactive authentication.
Password:***
Last login: Mon Aug 2 07:58:10 2010
[type ? for help]
page 23 | Global License Manager User Guide - 13 March 2017
Licensing
Activation Key License Installation
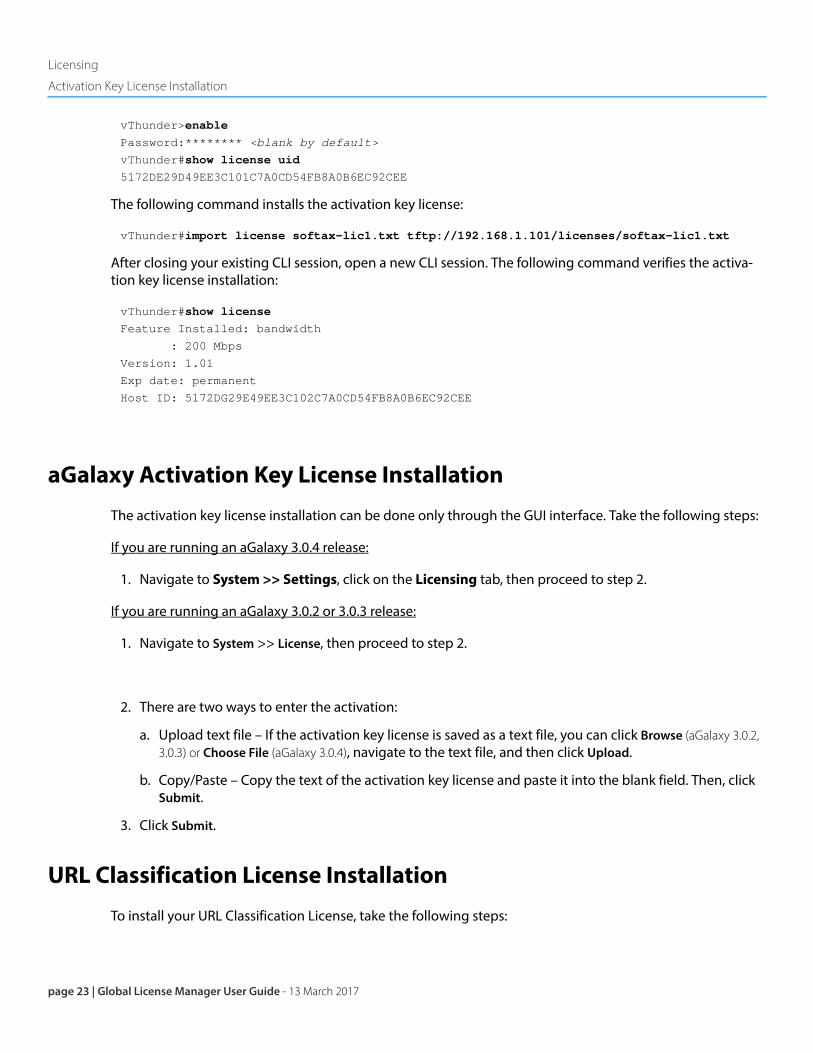
vThunder>enable
Password:******** <blank by default>
vThunder#show license uid
5172DE29D49EE3C101C7A0CD54FB8A0B6EC92CEE
The following command installs the activation key license:
vThunder#import license softax-lic1.txt tftp://192.168.1.101/licenses/softax-lic1.txt
After closing your existing CLI session, open a new CLI session. The following command verifies the activa-tion key license installation:
vThunder#show license
Feature Installed: bandwidth
: 200 Mbps
Version: 1.01
Exp date: permanent
Host ID: 5172DG29E49EE3C102C7A0CD54FB8A0B6EC92CEE
aGalaxy Activation Key License Installation
The activation key license installation can be done only through the GUI interface. Take the following steps:
If you are running an aGalaxy 3.0.4 release:
1. Navigate to System >> Settings, click on the Licensing tab, then proceed to step 2.
If you are running an aGalaxy 3.0.2 or 3.0.3 release:
1. Navigate to System >> License, then proceed to step 2.
2. There are two ways to enter the activation:
a. Upload text file – If the activation key license is saved as a text file, you can click Browse (aGalaxy 3.0.2, 3.0.3) or Choose File (aGalaxy 3.0.4), navigate to the text file, and then click Upload.
b. Copy/Paste – Copy the text of the activation key license and paste it into the blank field. Then, click Submit.
3. Click Submit.
URL Classification License Installation
To install your URL Classification License, take the following steps:
Licensing
Activation Key License Installation
Global License Manager User Guide - 13 March 2017 | page 24
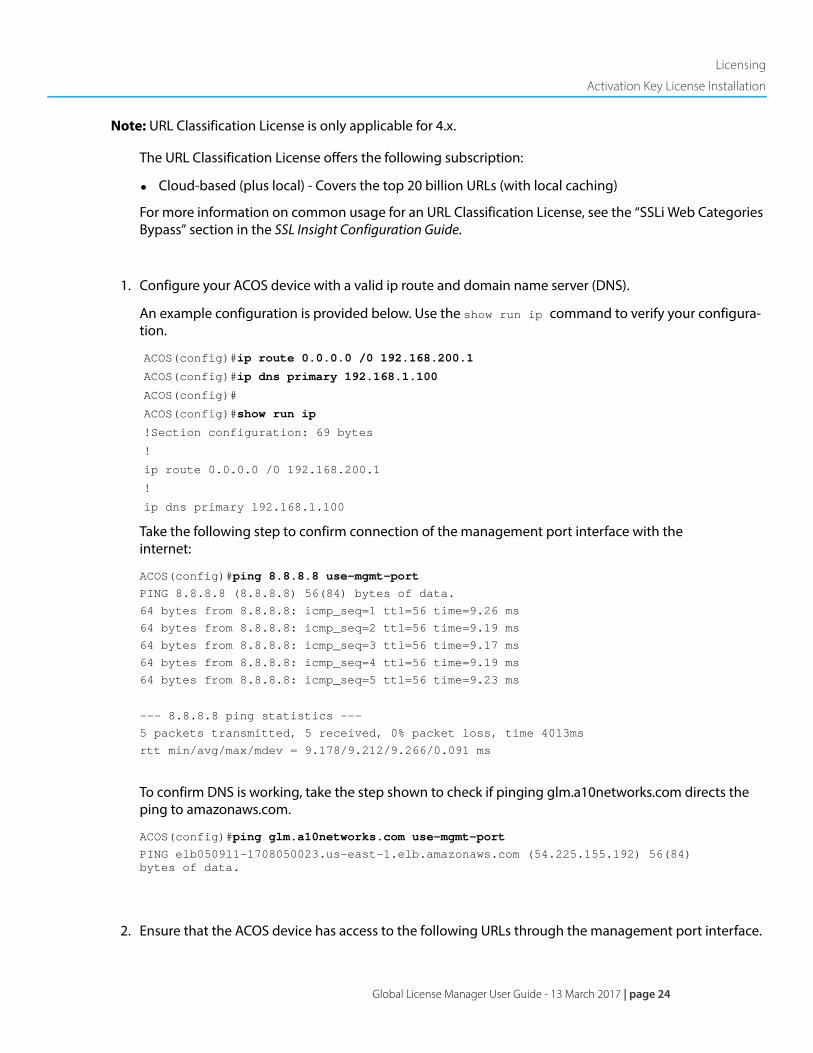
Note: URL Classification License is only applicable for 4.x.
The URL Classification License offers the following subscription:
• Cloud-based (plus local) - Covers the top 20 billion URLs (with local caching)
For more information on common usage for an URL Classification License, see the “SSLi Web Categories Bypass” section in the SSL Insight Configuration Guide.
1. Configure your ACOS device with a valid ip route and domain name server (DNS).
An example configuration is provided below. Use the show run ip command to verify your configura-tion.
ACOS(config)#ip route 0.0.0.0 /0 192.168.200.1
ACOS(config)#ip dns primary 192.168.1.100
ACOS(config)#
ACOS(config)#show run ip
!Section configuration: 69 bytes
!
ip route 0.0.0.0 /0 192.168.200.1
!
ip dns primary 192.168.1.100
Take the following step to confirm connection of the management port interface with the internet:
ACOS(config)#ping 8.8.8.8 use-mgmt-port
PING 8.8.8.8 (8.8.8.8) 56(84) bytes of data.
64 bytes from 8.8.8.8: icmp_seq=1 ttl=56 time=9.26 ms
64 bytes from 8.8.8.8: icmp_seq=2 ttl=56 time=9.19 ms
64 bytes from 8.8.8.8: icmp_seq=3 ttl=56 time=9.17 ms
64 bytes from 8.8.8.8: icmp_seq=4 ttl=56 time=9.19 ms
64 bytes from 8.8.8.8: icmp_seq=5 ttl=56 time=9.23 ms
--- 8.8.8.8 ping statistics ---
5 packets transmitted, 5 received, 0% packet loss, time 4013ms
rtt min/avg/max/mdev = 9.178/9.212/9.266/0.091 ms
To confirm DNS is working, take the step shown to check if pinging glm.a10networks.com directs the ping to amazonaws.com.
ACOS(config)#ping glm.a10networks.com use-mgmt-port
PING elb050911-1708050023.us-east-1.elb.amazonaws.com (54.225.155.192) 56(84) bytes of data.
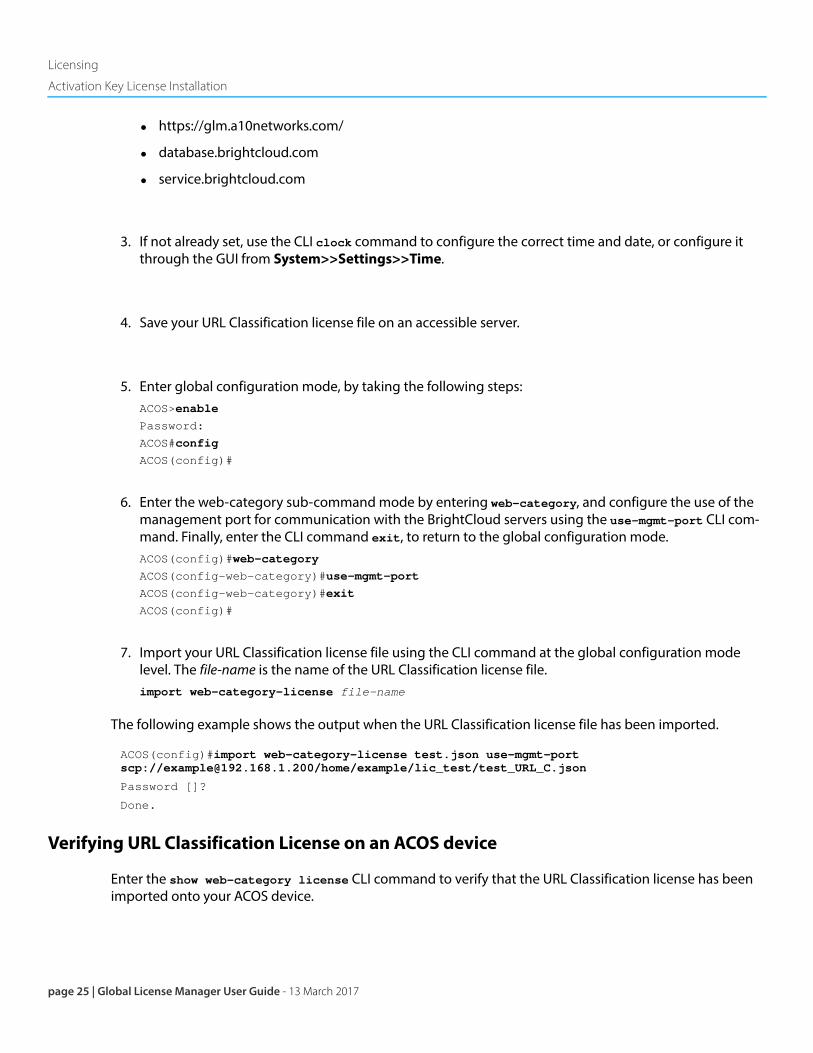
2. Ensure that the ACOS device has access to the following URLs through the management port interface.
page 25 | Global License Manager User Guide - 13 March 2017
Licensing
Activation Key License Installation
• https://glm.a10networks.com/
• database.brightcloud.com
• service.brightcloud.com
3. If not already set, use the CLI clock command to configure the correct time and date, or configure it through the GUI from System>>Settings>>Time.
4. Save your URL Classification license file on an accessible server.
5. Enter global configuration mode, by taking the following steps:ACOS>enable
Password:
ACOS#config
ACOS(config)#
6. Enter the web-category sub-command mode by entering web-category, and configure the use of the management port for communication with the BrightCloud servers using the use-mgmt-port CLI com-mand. Finally, enter the CLI command exit, to return to the global configuration mode.ACOS(config)#web-category
ACOS(config-web-category)#use-mgmt-port
ACOS(config-web-category)#exit
ACOS(config)#
7. Import your URL Classification license file using the CLI command at the global configuration mode level. The file-name is the name of the URL Classification license file. import web-category-license file-name
The following example shows the output when the URL Classification license file has been imported.
ACOS(config)#import web-category-license test.json use-mgmt-port scp://[email protected]/home/example/lic_test/test_URL_C.json
Password []?
Done.
Verifying URL Classification License on an ACOS device
Enter the show web-category license CLI command to verify that the URL Classification license has been imported onto your ACOS device.
Licensing
Activation Key License Installation
Global License Manager User Guide - 13 March 2017 | page 26
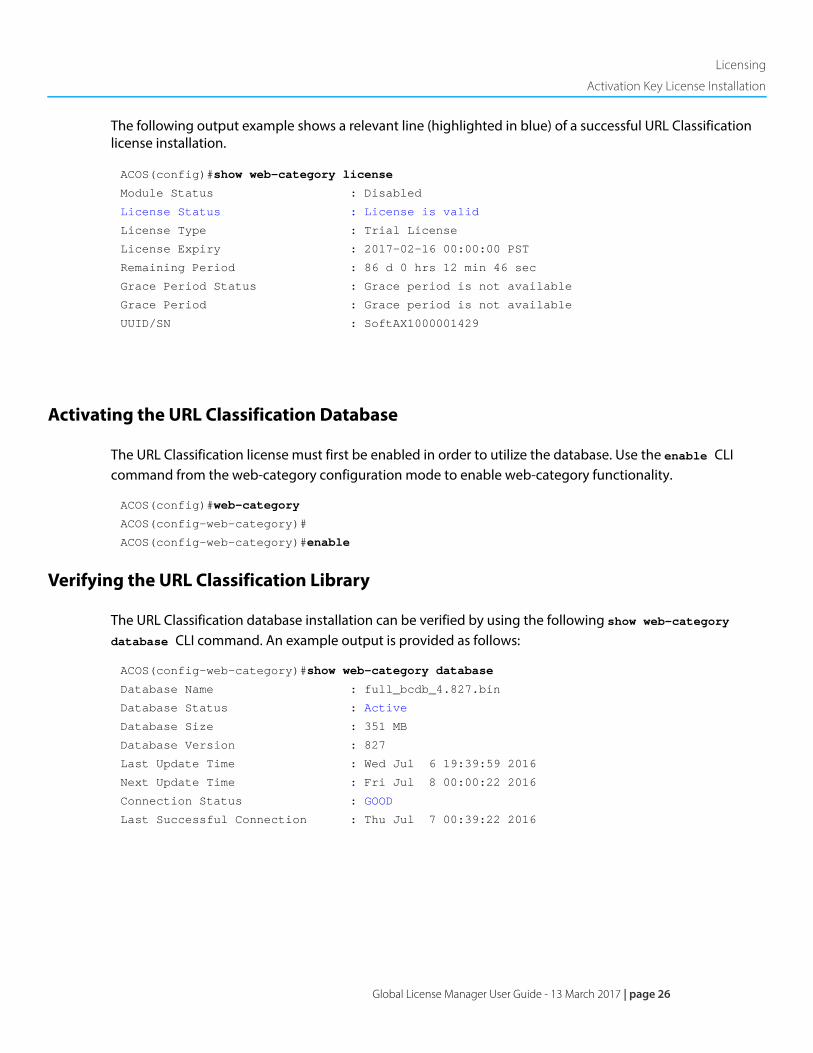
The following output example shows a relevant line (highlighted in blue) of a successful URL Classification license installation.
ACOS(config)#show web-category license
Module Status : Disabled
License Status : License is valid
License Type : Trial License
License Expiry : 2017-02-16 00:00:00 PST
Remaining Period : 86 d 0 hrs 12 min 46 sec
Grace Period Status : Grace period is not available
Grace Period : Grace period is not available
UUID/SN : SoftAX1000001429
Activating the URL Classification Database
The URL Classification license must first be enabled in order to utilize the database. Use the enable CLI command from the web-category configuration mode to enable web-category functionality.
ACOS(config)#web-category
ACOS(config-web-category)#
ACOS(config-web-category)#enable
Verifying the URL Classification Library
The URL Classification database installation can be verified by using the following show web-category database CLI command. An example output is provided as follows:
ACOS(config-web-category)#show web-category database
Database Name : full_bcdb_4.827.bin
Database Status : Active
Database Size : 351 MB
Database Version : 827
Last Update Time : Wed Jul 6 19:39:59 2016
Next Update Time : Fri Jul 8 00:00:22 2016
Connection Status : GOOD
Last Successful Connection : Thu Jul 7 00:39:22 2016
page 27 | Global License Manager User Guide - 13 March 2017
Licensing
User Account Options
Managing GLM Licenses
This chapter contains the following topics:
• User Account Options
• Working with Existing Licenses
• Support and Resources
User Account OptionsGLM offers flexibility by allowing its users to authorize licenses or their own account to other users. This can be useful for organizations with numerous departments to allow delegation of responsibilities to the proper resources.
• Authorizing Licenses for Other Users
• Authorizing Account for Other Users
• Modifying User Settings
Authorizing Licenses for Other Users
To authorize other users to use the licenses for your account, take the following steps from the Licensing page:
1. From the Licenses page, click on the license you wish to give authorization access to.
2. On the License Overview page, click on Authorizations followed by clicking on Manage Users.
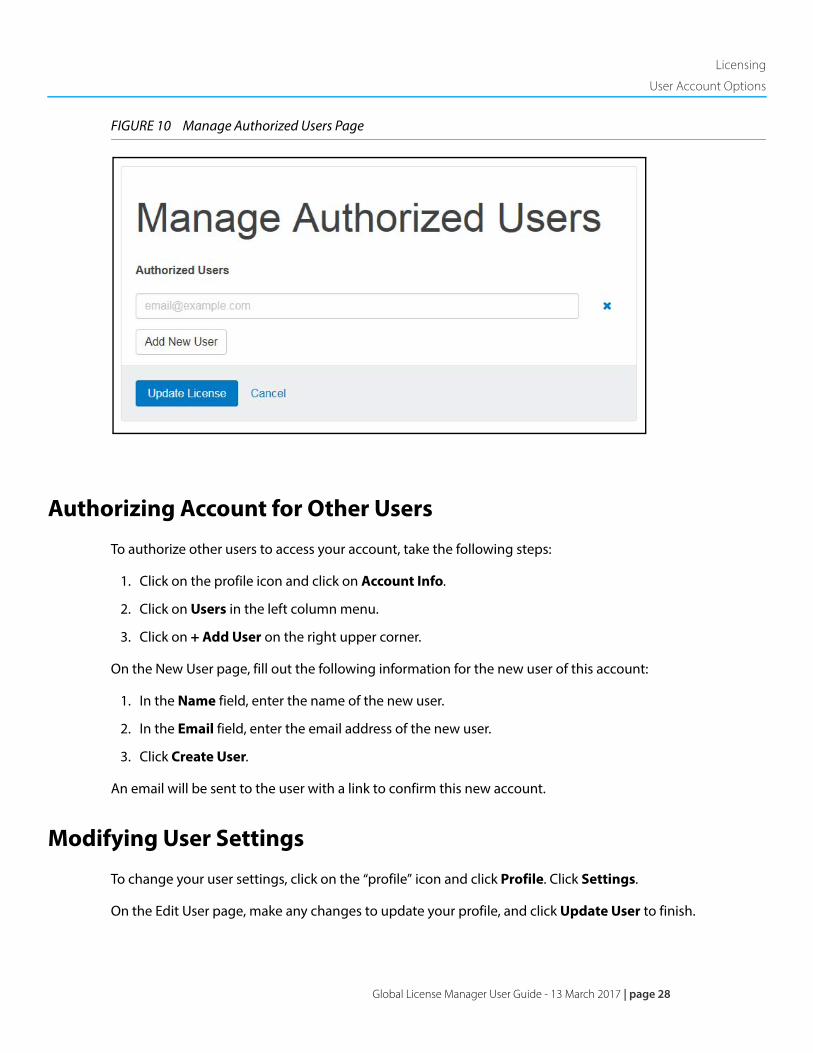
3. On the Manage Authorized Users page (Figure 10), in the Authorized Users field, enter the email address of the user you wish to give license access to.
4. (Optional) To add more users, click on Add New User to generate another Authorized Users field and repeat step 3.
5. When done, click Update License.
Licensing
User Account Options
Global License Manager User Guide - 13 March 2017 | page 28
FIGURE 10 Manage Authorized Users Page
Authorizing Account for Other Users
To authorize other users to access your account, take the following steps:
1. Click on the profile icon and click on Account Info.
2. Click on Users in the left column menu.
3. Click on + Add User on the right upper corner.
On the New User page, fill out the following information for the new user of this account:
1. In the Name field, enter the name of the new user.
2. In the Email field, enter the email address of the new user.
3. Click Create User.
An email will be sent to the user with a link to confirm this new account.
Modifying User Settings
To change your user settings, click on the “profile” icon and click Profile. Click Settings.
On the Edit User page, make any changes to update your profile, and click Update User to finish.
page 29 | Global License Manager User Guide - 13 March 2017
Licensing
Working with Existing Licenses
Working with Existing LicensesThis section contains the following:
• Migrating an Existing License
• Renewing a URL Classification License
Migrating an Existing License
If you wish to transfer an existing standard license to another appliance, the license must be revoked from the current appliance before this license can be activated for a new appliance.
To revoke the license for migration, you will need to send a Return a Return Merchandise Authorization (RMA) request through GLM (See “Return Merchandise Authorization Requests” on page 31.) where A10 Net-works will review and take action on the RMA request. After you have confirmed that the RMA Request has been approved, the existing license may be migrated onto another appliance.
NOTE: When submitting the RMA request for license migration, please make surethe following information is included in the Reason for RMA Request field:
• State that the request is for license migration.
• Planned date for license migration.
• The original Host ID/UID/UUID.
If you experience any further issues after your license has been revoked, please contact A10’s Technical Assis-tance center (TAC) or your local sales representative.
Renewing a URL Classification License
If you wish to renew your URL Classification License, you will need to contact your local sales representative. While URL Classification Licenses have a grace period of 30 days after the license expiry date, it is strongly recommended to get a renewal prior to this date. When a license is renewed, the renewal is applied to license expiry date.
To check the status of your URL Classification License, use the following command
show web-category license
Licensing
Working with Existing Licenses
Global License Manager User Guide - 13 March 2017 | page 30
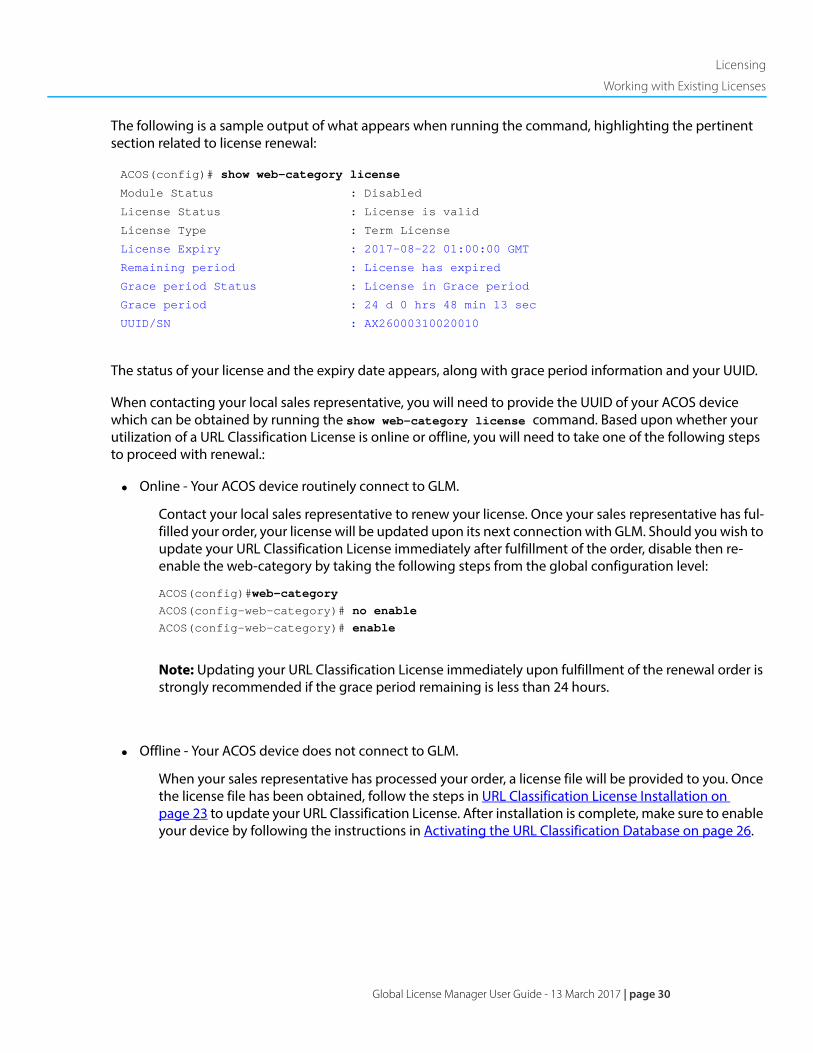
The following is a sample output of what appears when running the command, highlighting the pertinent section related to license renewal:
ACOS(config)# show web-category license
Module Status : Disabled
License Status : License is valid
License Type : Term License
License Expiry : 2017-08-22 01:00:00 GMT
Remaining period : License has expired
Grace period Status : License in Grace period
Grace period : 24 d 0 hrs 48 min 13 sec
UUID/SN : AX26000310020010
The status of your license and the expiry date appears, along with grace period information and your UUID.
When contacting your local sales representative, you will need to provide the UUID of your ACOS device which can be obtained by running the show web-category license command. Based upon whether your utilization of a URL Classification License is online or offline, you will need to take one of the following steps to proceed with renewal.:
• Online - Your ACOS device routinely connect to GLM.
Contact your local sales representative to renew your license. Once your sales representative has ful-filled your order, your license will be updated upon its next connection with GLM. Should you wish to update your URL Classification License immediately after fulfillment of the order, disable then re-enable the web-category by taking the following steps from the global configuration level:
ACOS(config)#web-category
ACOS(config-web-category)# no enable
ACOS(config-web-category)# enable
Note: Updating your URL Classification License immediately upon fulfillment of the renewal order is strongly recommended if the grace period remaining is less than 24 hours.
• Offline - Your ACOS device does not connect to GLM.
When your sales representative has processed your order, a license file will be provided to you. Once the license file has been obtained, follow the steps in URL Classification License Installation on page 23 to update your URL Classification License. After installation is complete, make sure to enable your device by following the instructions in Activating the URL Classification Database on page 26.
page 31 | Global License Manager User Guide - 13 March 2017
Licensing
Support and Resources
Support and ResourcesThis section contains the following topics:
• Obtaining Technical Assistance
• Return Merchandise Authorization Requests
• Resource Downloads
Obtaining Technical Assistance
For all customers, partners, resellers, and distributors who hold valid A10 Networks Regular and Technical Support service contracts, the A10 Networks Technical Assistance Center provides support services online and over the phone. To facilitate services, please have your Billing Serial Number available when you contact us.
To locate your billing serial number, take the following steps from the Licensing page:
1. Click on the “License” of the appliance for which you wish to obtain technical support.
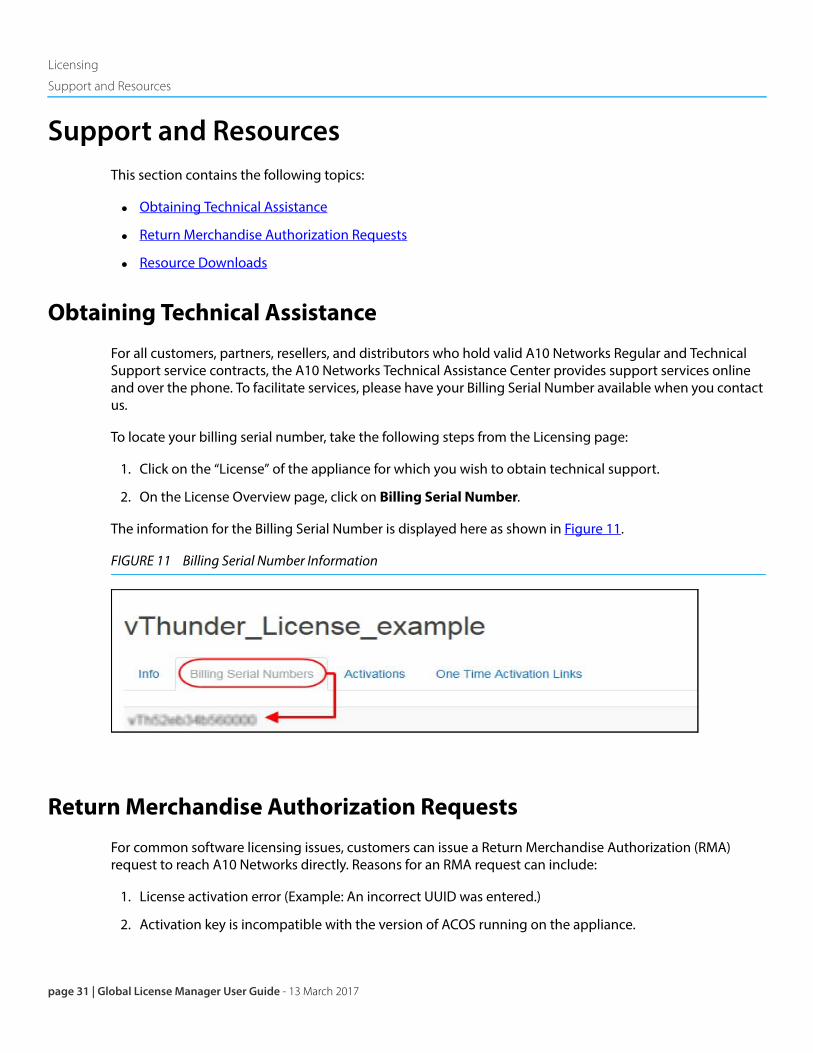
2. On the License Overview page, click on Billing Serial Number.
The information for the Billing Serial Number is displayed here as shown in Figure 11.
FIGURE 11 Billing Serial Number Information
Return Merchandise Authorization Requests
For common software licensing issues, customers can issue a Return Merchandise Authorization (RMA) request to reach A10 Networks directly. Reasons for an RMA request can include:
1. License activation error (Example: An incorrect UUID was entered.)
2. Activation key is incompatible with the version of ACOS running on the appliance.
Licensing
Support and Resources
Global License Manager User Guide - 13 March 2017 | page 32
3. Incorrect product received. (Examples include a product with the wrong bandwidth, wrong aGalaxy device, or an incorrect URL class subscription.)
4. Transfer of a vThunder license.
To send a Return Merchandise Authorization (RMA) request, on the Overview page of the License selected, click Request RMA. On the New RMA Request page, in the Reason For RMA Request field, enter the reason for the request and click Agree.
NOTE: An RMA requests on GLM requires that the appliance is activated. You mustalso agree to the terms to uninstall the existing license on the appliance.
If you are issuing an RMA request on a previously purchased vThunder which needs to be migrated, in the Reason for RMA Request field, please provide the following information:
• State that the request is for license migration.
• Planned date for license migration.
• The original Host ID/UID/UUID.
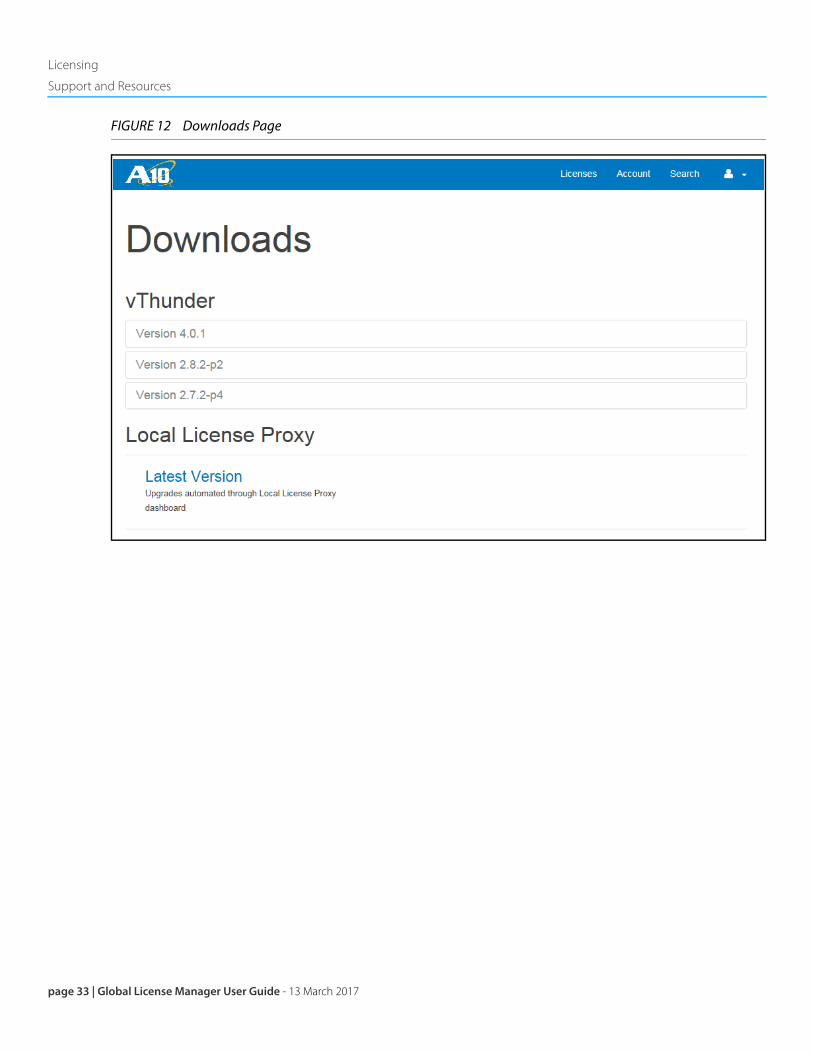
Resource Downloads
To access available vThunder or Local License Proxy resources, click on the “profile” icon and click on Down-loads.
page 33 | Global License Manager User Guide - 13 March 2017
Licensing
Support and Resources
FIGURE 12 Downloads Page

Licensing
Support and Resources
Global License Manager User Guide - 13 March 2017 | page 34

page 35 | Global License Manager User Guide - 13 March 2017
GLM—Global License Manager User Guide

Global License Manager User Guide | 13 March 2017
3