gorilla post base plate installation instructions
TRANSCRIPT
Gorilla Post Base Plate Installation Instructions – Magnetic Posts & BollardsCongratulations on your recent purchase of the Gorilla Post System. The system components include the metal mounting baseplate, epoxy to permanently attach the plate to the concrete or asphalt subsurface, the post or bollard and, if the standardmagnetic base, a removal tool.
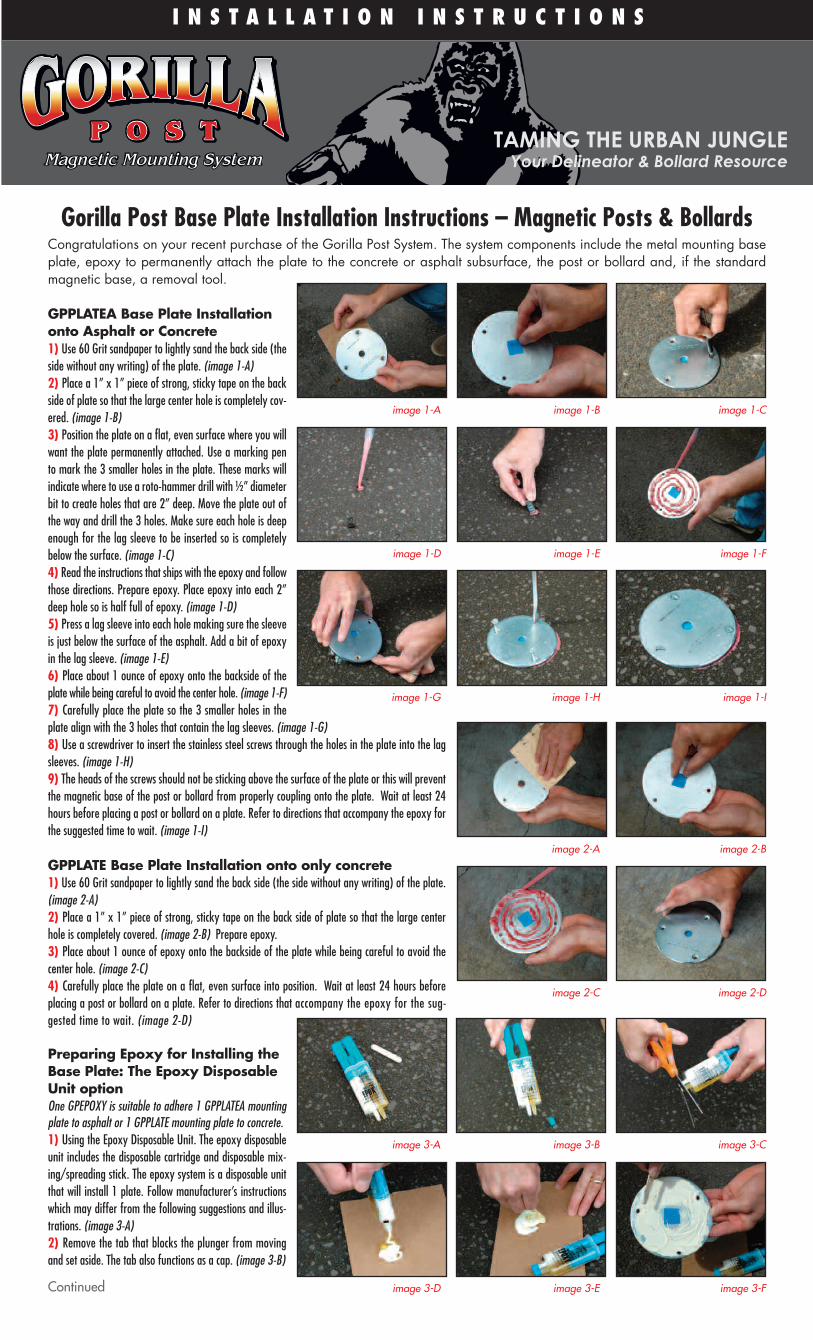
GPPLATEA Base Plate Installationonto Asphalt or Concrete1) Use 60 Grit sandpaper to lightly sand the back side (theside without any writing) of the plate. (image 1-A)2) Place a 1” x 1” piece of strong, sticky tape on the backside of plate so that the large center hole is completely cov-ered. (image 1-B)3) Position the plate on a flat, even surface where you willwant the plate permanently attached. Use a marking pento mark the 3 smaller holes in the plate. These marks willindicate where to use a roto-hammer drill with ½” diameterbit to create holes that are 2” deep. Move the plate out ofthe way and drill the 3 holes. Make sure each hole is deepenough for the lag sleeve to be inserted so is completelybelow the surface. (image 1-C)4) Read the instructions that ships with the epoxy and followthose directions. Prepare epoxy. Place epoxy into each 2”deep hole so is half full of epoxy. (image 1-D)5) Press a lag sleeve into each hole making sure the sleeveis just below the surface of the asphalt. Add a bit of epoxyin the lag sleeve. (image 1-E)6) Place about 1 ounce of epoxy onto the backside of theplate while being careful to avoid the center hole. (image 1-F)7) Carefully place the plate so the 3 smaller holes in theplate align with the 3 holes that contain the lag sleeves. (image 1-G)8) Use a screwdriver to insert the stainless steel screws through the holes in the plate into the lagsleeves. (image 1-H)9) The heads of the screws should not be sticking above the surface of the plate or this will preventthe magnetic base of the post or bollard from properly coupling onto the plate. Wait at least 24hours before placing a post or bollard on a plate. Refer to directions that accompany the epoxy forthe suggested time to wait. (image 1-I)
GPPLATE Base Plate Installation onto only concrete1) Use 60 Grit sandpaper to lightly sand the back side (the side without any writing) of the plate.(image 2-A)2) Place a 1” x 1” piece of strong, sticky tape on the back side of plate so that the large centerhole is completely covered. (image 2-B) Prepare epoxy.3) Place about 1 ounce of epoxy onto the backside of the plate while being careful to avoid thecenter hole. (image 2-C)4) Carefully place the plate on a flat, even surface into position. Wait at least 24 hours beforeplacing a post or bollard on a plate. Refer to directions that accompany the epoxy for the sug-gested time to wait. (image 2-D)
Preparing Epoxy for Installing theBase Plate: The Epoxy DisposableUnit optionOne GPEPOXY is suitable to adhere 1 GPPLATEA mountingplate to asphalt or 1 GPPLATE mounting plate to concrete.1) Using the Epoxy Disposable Unit. The epoxy disposableunit includes the disposable cartridge and disposable mix-ing/spreading stick. The epoxy system is a disposable unitthat will install 1 plate. Follow manufacturer’s instructionswhich may differ from the following suggestions and illus-trations. (image 3-A)2) Remove the tab that blocks the plunger from movingand set aside. The tab also functions as a cap. (image 3-B)
image 1-A image 1-B image 1-C
image 1-D image 1-E image 1-F
image 1-G image 1-H image 1-I
image 2-A image 2-B
image 2-C image 2-D
I N S T A L L A T I O N I N S T R U C T I O N S
image 3-A image 3-B image 3-C
image 3-D image 3-E image 3-FContinued

3) Cut away the end of the cartridge. (image 3-C)4) Push the plunger into the cartridge. Use scrap cardboard or the backside of the base plate to hold the epoxy as you prepare to mix the epoxy. (image 3-D)5) Stir the epoxy for 2 minutes in concentric circles taking care not to spread the epoxy too far. The epoxy is ready to be used. (image 3-E)6) Use the mixing stick to apply the epoxy. (image 3-F)
Preparing Epoxy for Installing the Base Plate: The Epoxy System Kit optionEach cartridge will affix approximately 12 GPPLATEAmounting plates to asphalt or 12 GPPLATE mounting platesto concrete.1) Using the Epoxy System Kit. The kit includes the gunwith piston, disposable epoxy cartridge and disposable noz-zle. The epoxy system kit will install around 12 plates andthe reusable gun can be used with replacement cartridgesto put down additional plates. Follow manufacturer’s in-structions which may change and differ from the followingsuggestions and illustrations. (image 4-A)2) Pull the pressure plunger outwards. (image 4-B)3) Make sure the pressure plunger is fully extended.(image 4-C)4) Rotate the piston and lift it out of the gun. (image 4-D)5) Insert the disposable cartridge in the piston. (image 4-E)6) Place the piston with the cartridge back into the gun byrotating the piston. (image 4-F)7) Remove the cap from the cartridge. (image 4-G)8) Install the disposable nozzle onto the cartridge. (image4-H)9) Pull the gun’s trigger until the pressure plunger pressesagainst the cartridge causing epoxy to flow down the noz-zle. Discard the first 2 squirts of epoxy. The epoxy is readyto be used. The epoxy mixes as it flows down the nozzle.The epoxy will set in the nozzle so if the cartridge is notcompletely used, be sure to order spare nozzles for subse-quent use of a single cartridge. Do not discard the piston when you discard the cartridge. Do discard the nozzle. (image 4-I)
image 4-A image 4-B image 4-C
image 4-D image 4-E image 4-F
image 4-G image 4-H image 4-I
Lyle Peters - U.S. Sales Director1.800.292.7275 ext. 207 • [email protected] • GorillaPost.com
14208 NW Third Court • Suite 200 • Vancouver, WA 98685-5759
Installation Fails:
Hex or Wrong Bolts Epoxy in Center Hole No or Wrong Epoxy
Debris on Base Plate Uneven Surface Uneven Surface
Please use proper safety precautions and equipment including protective gloves and eyewear during installation.
After testing over 100 formulations, there are only two epoxy options approved for installing the GPPlate and GPPlateA:Hilti HIT-RE 500 V3 and SuperGlue Metal Epoxy #15212