gp10 ultra lite led projector user manual -
TRANSCRIPT
GP10Ultra Lite LED ProjectorUser Manual

Table of contents2
Table of contentsImportant safety instructions ................... 3
Introduction.................. 6Projector features.....................................6Shipping contents ......................................7Projector exterior view...........................8Controls and functions ............................9
Positioning your projector ..................... 14Obtaining a preferred projected image size..............................................................14
Connection ................. 16Connecting the power...........................16Connecting the DVD player.................16Connecting a computer.........................17Connecting Video source devices.......19Connecting an HDMI source device ..20Connecting a Component Video source device.........................................................21Connecting a composite Video source device.........................................................22Connecting an external speaker..........23Connecting to an external memory device.........................................................24Playing sound through the projector..25
Operation ................... 26Starting up the projector ......................26Switching input signal .............................26Adjusting the projected image .............27Hiding the image......................................28Securing the projector...........................29Firmware upgrade...................................31
Selecting the aspect ratio...................... 31Optimizing the image............................. 32Operating in a high altitude environment ............................. 34Adjusting the sound ............................... 34Displaying images with PC and Video source devices......................................... 36Using PC/ Video pop-up menus .......... 37Displaying files with internal memory, USB Drive and SD card......................... 39Using USB streaming ............................. 51Using wireless streaming ...................... 53Using settings menu ............................... 60Shutting down the projector ............... 65
Maintenance ............... 66Care of the projector............................ 66
Troubleshooting......... 68
Specifications.............. 69Projector specifications......................... 69Dimensions .............................................. 70Timing chart............................................. 71
Warranty and Copyright information................. 74

Important safety instructionsYour projector is designed and tested to meet the latest standards for safety of information technology equipment. However, to ensure safe use of this product, it is important that you follow the instructions mentioned in this manual and marked on the product.
Safety Instructions
1. Please read this manual before you operate your projector. Save it for future reference.
2. Do not look straight at the projector lens during operation. The intense light beam may damage your eyes.
3. Refer servicing to qualified service personnel.
4. In some countries, the line voltage is NOT stable. This projector is designed to operate safely within a mains voltage of 19 volts DC, but could fail if power cuts or surges of 10 volts occur. In areas where the mains voltage may fluctuate or cut out, it is recommended that you connect your projector through a power stabilizer, surge protector or uninterruptible power supply (UPS).
5. Do not block the projection lens with any objects when the projector is under operation as this could cause the objects to become heated and deformed or even cause a fire.
Important safety instructions 3

Safety Instructions (Continued)
6. Never replace any electronic components unless the projector is unplugged.
7. Do not place this product on an unstable cart, stand, or table. The product may fall, sustaining serious damage.
8. Do not attempt to disassemble this projector. There are dangerous high voltages inside which may cause death if you should come into contact with live parts. Refer servicing only to suitably qualified professional service personnel.
9. When the projector is under operation, you may sense some heated air and odor from its ventilation grill. It is a normal phenomenon and not a product defect.
10. Do not place this projector in any of the following environments.
- Space that is poorly ventilated or confined. Allow at least 50 cm clearance from walls and free flow of air around the projector.
- Locations where temperatures may become excessively high, such as the inside of a car with all windows rolled up.
- Locations where excessive humidity, dust, or cigarette smoke may contaminate optical components, shortening the projector's life span and darkening the image.
Important safety instructions4
Safety Instructions (Continued)
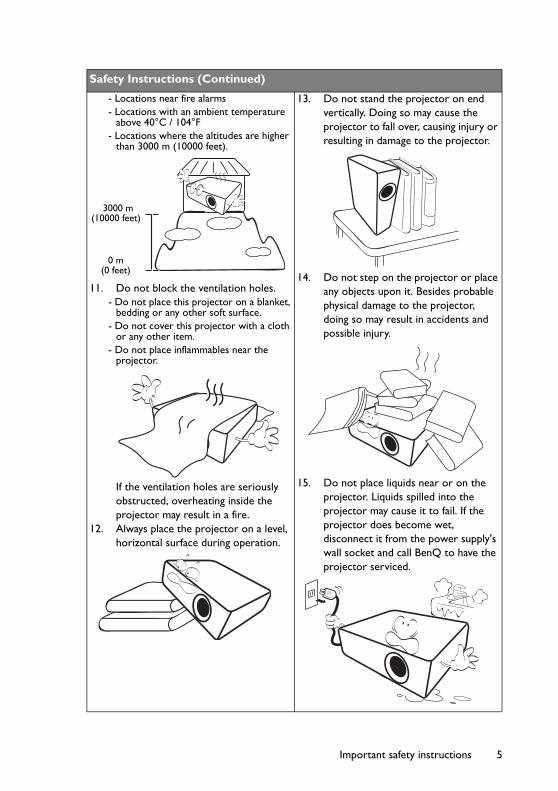
- Locations near fire alarms- Locations with an ambient temperature
above 40°C / 104°F- Locations where the altitudes are higher
than 3000 m (10000 feet).
11. Do not block the ventilation holes. - Do not place this projector on a blanket,
bedding or any other soft surface. - Do not cover this projector with a cloth
or any other item. - Do not place inflammables near the
projector.
If the ventilation holes are seriously obstructed, overheating inside the projector may result in a fire.
12. Always place the projector on a level, horizontal surface during operation.
13. Do not stand the projector on end vertically. Doing so may cause the projector to fall over, causing injury or resulting in damage to the projector.
14. Do not step on the projector or place any objects upon it. Besides probable physical damage to the projector, doing so may result in accidents and possible injury.
15. Do not place liquids near or on the projector. Liquids spilled into the projector may cause it to fail. If the projector does become wet, disconnect it from the power supply's wall socket and call BenQ to have the projector serviced.
3000 m(10000 feet)
0 m(0 feet)
Important safety instructions 5
IntroductionProjector features
The projector integrates high-performance optical engine projection and a user-friendly design to deliver high reliability and ease of use.
The projector offers the following features.
• Advanced LED light sourceLong lasting LEDs provides a longer life span than traditional lamps.
• Optical engine with DLP technologiesWXGA resolution and a bright picture.
• Various useful featuresSupports iPhone/iPod player, multimedia player, document viewer, internal memory, SD card, USB flash drive, and USB display
• Easy to carryThe projector is small and light, making it useful for business trips and leisure activities.You can view documents, videos and photos anywhere.
• Multiple input portsMultiple input ports, including PC, AV, HDMI, USB, and SD card provide flexible connectivity with peripheral devices.
• Audio input & outputEquipped with 3W x 2 speakers with RCA & mini-jack input ports and phone jack output port
• Convenient menu itemsFriendly menu is used for all types of inputs, making the projector easy to use.
• The apparent brightness of the projected image will vary depending on the ambient lighting conditions, selected input signal contrast/brightness settings, and is proportional to projection distance.
• The lamp brightness will decline over time and may vary within the lamp manufacturers specifications. This is normal and expected behavior.
Introduction6

Shipping contentsCarefully unpack and verify that you have all of the items shown below. If any of these items are missing, please contact your place of purchase.
Standard accessoriesThe supplied accessories will be suitable for your region, and may differ from those illustrated.
*The warranty card is only supplied in some specific regions. Please consult your dealer for detailed information.
User manual is inside the Projector device internal memory. Please use USB cable to link PC/Notebook and Projector device. In main UI page, choose "USB streaming" > "USB File transfer". Meanwhile, projector device will be treated as external storage and you can access UM via PC/Notebook.
Optional accessories
Projector Power cord VGA cable
Quick start guide Warranty card* Projector carrying bagPull the tab before using the remote control.
Remote control with battery
Wi-Fi dongle
DVD Player
User Manual
Joybee GP2 Mini Projector
Introduction 7

Projector exterior view
Do not block the ventilation openings. Blocking the ventilation openings can cause your projector to overheat and may cause it to fail.
1. Vent (cold air intake)2. Internal Speakers3. Vent (heated air exhaust)4. Front IR remote sensor5. Projection lens6. Lens cover7. External control panel
(See "Projector" on page 9 for details.)
8. Focus ring9. AC power jack10. SD card slot11. Type A USB jack12. Mini-B USB jack13. HDMI input jack14. RGB (PC)/Component Video
(YPbPr/ YCbCr) signal input jack15. Video input jack16. Audio input jack17. Audio output jack18. Kensington anti-theft lock slot19. Adjuster feet20. Tripod socket
3
4
1
2
5
6
31
2
7
8
Front/upper side
9
10 1211 13 14 15 16 17
18
19
19
20
Rear/lower side
Introduction8
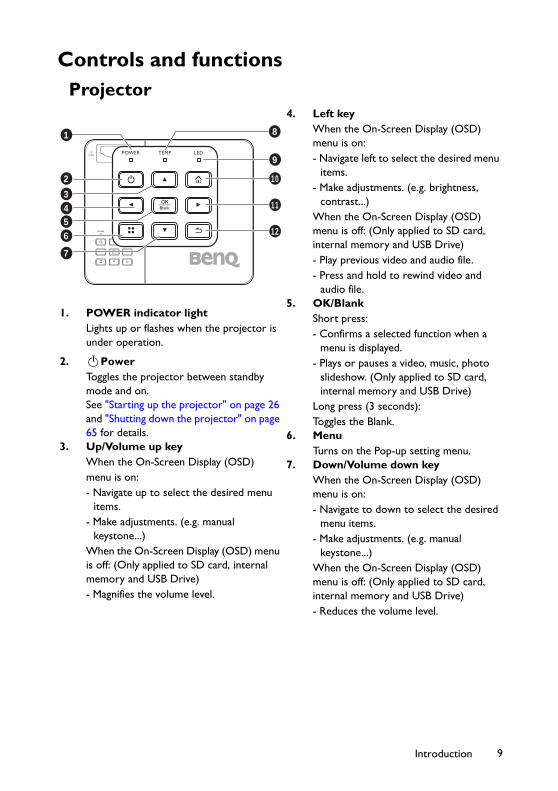
Controls and functionsProjector
4. Left key When the On-Screen Display (OSD) menu is on:- Navigate left to select the desired menu
items.- Make adjustments. (e.g. brightness,
contrast...)When the On-Screen Display (OSD) menu is off: (Only applied to SD card, internal memory and USB Drive)- Play previous video and audio file.- Press and hold to rewind video and
audio file.5. OK/Blank
Short press:- Confirms a selected function when a
menu is displayed.- Plays or pauses a video, music, photo
slideshow. (Only applied to SD card, internal memory and USB Drive)
Long press (3 seconds): Toggles the Blank.
6. MenuTurns on the Pop-up setting menu.
7. Down/Volume down keyWhen the On-Screen Display (OSD) menu is on:- Navigate to down to select the desired
menu items.- Make adjustments. (e.g. manual
keystone...)When the On-Screen Display (OSD) menu is off: (Only applied to SD card, internal memory and USB Drive)- Reduces the volume level.
1. POWER indicator lightLights up or flashes when the projector is under operation.
2. PowerToggles the projector between standby mode and on.See "Starting up the projector" on page 26 and "Shutting down the projector" on page 65 for details.
3. Up/Volume up keyWhen the On-Screen Display (OSD)menu is on:- Navigate up to select the desired menu
items.- Make adjustments. (e.g. manual
keystone...)When the On-Screen Display (OSD) menu is off: (Only applied to SD card, internal memory and USB Drive)- Magnifies the volume level.
2
4
10
3
65
7
9
81
11
12
II
Introduction 9

8. TEMPerature indicator lightLights up red if the projector's temperature becomes too high.
9. LED indicator lightIndicates the status of the light source. Lights up or flashes when the light source has developed a problem.
10. HomeDirectly returns to home screen from lower level of OSD.Exits application/pop-up message and back to home screen directly.
11. Right keyWhen the On-Screen Display (OSD) menu is on:- Navigate right to select the desired menu
items.- Make adjustments. (e.g. brightness,
contrast...)When the On-Screen Display (OSD) menu is off: (Only applied to SD card, internal memory and USB Drive)- Play next video and audio file.- Press and hold to fast forward video and
audio file.12. Back
Goes back to previous OSD menu, exits and saves menu settings.
Introduction10

Remote control
1. POWERToggles the projector between standby mode and on. See "Starting up the projector" on page 26 and "Shutting down the projector" on page 65 for details.
2. BlankToggles Blank on and off. See "Hiding the image" on page 28 for details.
3. Up/Volume up keyWhen the On-Screen Display (OSD) menu is on:- Navigate up to select the desired menu items.- Make adjustments. (e.g. manual keystone...)When the On-Screen Display (OSD) menu is off: (Only applied to SD card, internal memory and USB Drive)- Magnifies the volume level.
4. Left keyWhen the On-Screen Display (OSD) menu is on:- Navigate left to select the desired menu items.- Make adjustments. (e.g. brightness, contrast...)When the On-Screen Display (OSD) menu is off: (Only applied to SD card, internal memory and USB Drive)- Play previous video and audio file.- Press and hold to rewind video and audio file.
5. Down/Volume down keyWhen the On-Screen Display (OSD) menu is on:- Navigate to down to select the desired menu items.- Make adjustments. (e.g. manual keystone...)When the On-Screen Display (OSD) menu is off: (Only applied to SD card, internal memory and USB Drive)- Reduces the volume level.
6. BackReturns to upper level of OSD.Closes pop-up setting menu of OSD.Leave current application of OSD.
7. HomeDirectly returns to home screen from lower level of OSD.Exits application/pop-up message and back to home screen directly.
8. MuteToggles projector audio between on and off.
9. AutoAutomatically determines the best picture timings for the displayed computer image. See "Auto-adjusting the image" on page 27 for details.
1
2
3
5
7
4
6
8
9
10
12
11
II
Introduction 11

10. Right keyWhen the On-Screen Display (OSD) menu is on:- Navigate right to select the desired menu items.- Make adjustments. (e.g. brightness, contrast...)When the On-Screen Display (OSD) menu is off: (Only applied to SD card, internal memory and USB Drive)- Play next video and audio file.- Press and hold to fast forward video and audio file.
11. OKConfirms a selected function when a menu is displayed.Plays or pauses a video, music, photo slideshow. (Only applied to SD card, internal memory and USB Drive)
12. MenuTurns on the Pop-up setting menu.
Introduction12

Remote control effective rangeInfra-Red (IR) remote control sensor is located on the front of the projector. The remote control must be held at an angle within 15 degrees perpendicular to the projector's IR remote control sensor to function correctly. The distance between the remote control and the sensor should not exceed 7 meters (~ 23 feet).
Make sure that there are no obstacles between the remote control and the IR sensor on the projector that might obstruct the infra-red beam.
Replacing the remote control battery1. Pull out the battery holder.
Please follow the illustrated instructions. Push and hold the locking arm while pulling out the battery holder.
2. Insert the new battery in the holder. Note the positive polarity should face outward.
3. Push the holder into the remote control.
• Avoid excessive heat and humidity.
• There may be battery damage if the battery is incorrectly replaced.
• Replace only with the same or equivalent type recommended by the battery manufacturer.
• Dispose of the used battery according to the battery manufacturer’s instructions.
• Never throw a battery into a fire. There may be danger of an explosion.
• If the battery is dead or if you will not be using the remote control for a long time, remove the battery to prevent damage to the remote control from possible battery leakage.
Approx. 15°
Introduction 13

Positioning your projectorObtaining a preferred projected image size
The distance from the projector lens to the screen, the zoom setting (if available), and the video format each factors in the projected image size.
16:10 is the native aspect ratio of this projector.
The projector should always be placed horizontally level (like flat on a table), and positioned directly perpendicular (90° right-angle square) to the horizontal center of the screen. This prevents image distortion caused by angled projections (or projecting onto angled surfaces).
The modern digital projector does not project directly forward (like older style reel-to-reel film projectors did). Instead, digital projectors are designed to project at a slightly upward angle above the horizontal plane of the projector. This is so that they can be readily placed on a table and will project forward and upwards onto a screen positioned so that the bottom edge of the screen is above the level of the table (and everyone in the room can see the screen).
If the projector is mounted on a ceiling, it must be mounted upside-down so that it projects at a slightly downward angle.
You can see from the diagram on page 15, that this type of projection causes the bottom edge of the projected image to be vertically offset from the horizontal plane of the projector. When ceiling mounted, this refers to the top edge of the projected image.
If the projector is positioned further away from the screen, the projected image size increases, and the vertical offset also increases proportionately.
When determining the position of the screen and projector, you will need to account for both the projected image size and the vertical offset dimension, which are proportional to the projection distance.
BenQ has provided a table of screen size to assist you in determining the ideal location for your projector. Refer to "Projection dimensions" on page 15 depending on the projector you are using. There are two dimensions to consider, the perpendicular horizontal distance from the center of the screen (projection distance), and the vertical offset height of the projector from the horizontal edge of the screen (offset).
16:10 aspect image scaled to a 4:3 aspect display area
Positioning your projector14

Projection dimensionsRefer to "Dimensions" on page 70 for the center of lens dimensions of this projector before calculating the appropriate position.
All measurements are approximate and may vary from the actual sizes. BenQ recommends that if you intend to permanently install the projector, you should physically test the projection size and distance using the actual projector in situ before you permanently install it, so as to make allowance for this projector's optical characteristics. This will help you determine the exact mounting position so that it best suits your installation location.
Screen SizeProjection distance in mmDiagonal
W (mm) H (mm)Inches mm
30 762 646 404 75040 1016 862 538 100050 1270 1077 673 125060 1524 1292 808 150080 2032 1723 1077 2000100 2540 2154 1346 2500120 3048 2585 1615 3000150 3810 3231 2019 3750200 5080 4308 2692 5000220 5588 4739 2962 5500250 6350 5385 3365 6250300 7620 6462 4039 7500
1280:800 screen diagonal
Projection distance
Center of lens
Screen
Positioning your projector 15

ConnectionIn the connections shown below, some cables may not be included with the projector (see "Shipping contents" on page 7). They are commercially available from electronics stores.
Connecting the power1. Insert one end of the provided power cord into the AC IN terminal.2. Insert the plug on the power cord into a wall outlet. Check that the Power LED
indicator on the projector lights orange when using the AC adapter.
Connecting the DVD player1. Take the DVD player (optional) and connect it to the projector as illustrated below.2. Connect the projector power and insert the disc.3. Turn on the projector and press / to select DVD and press OK to connect.4. Use the remote control for the DVD player to operate the DVD player. 5. To disconnect the DVD player, remove the disc. And press the button on the front of
the DVD player while removing the DVD player from the projector.
• The projector automatically starts the disc when it is inserted.
• The DVD player supports hot-plugging function. You can connect or disconnect the DVD player while the projector is turned on.
Connection16

Connecting a computerThe projector provides a VGA input socket that allows you to connect it to both IBM® compatibles and Macintosh® computers. A Mac adapter is needed if you are connecting legacy version Macintosh computers.
To connect the projector to a notebook or desktop computer:• Using a VGA cable1. Take the supplied VGA cable and connect one end to the D-Sub output socket of the
computer.2. Connect the other end of the VGA cable to the COMPUTER socket on the
projector.3. If you wish to make use of the projector speaker, take a suitable audio cable and
connect one end of the cable to the audio output socket of the computer, and the other end to the audio input socket on the projector.
Many notebooks do not turn on their external video ports when connected to a projector. Usually a key combo like FN + F3 or CRT/LCD key turns the external display on/off. Locate a function key labeled CRT/LCD or a function key with a monitor symbol on the notebook. Press FN and the labeled function key simultaneously. Refer to your notebook's documentation to find your notebook's key combination.
Notebook or desktop computer
VGA cable
Audio cable
Connection 17
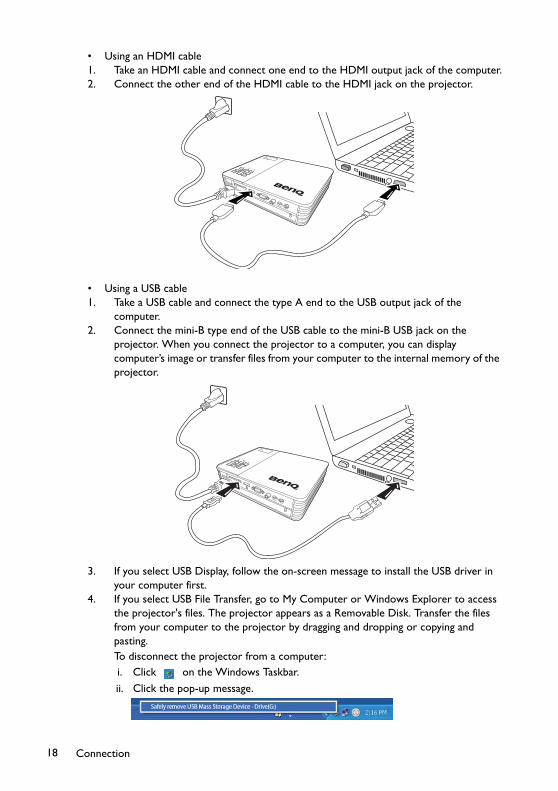
• Using an HDMI cable1. Take an HDMI cable and connect one end to the HDMI output jack of the computer.2. Connect the other end of the HDMI cable to the HDMI jack on the projector.
• Using a USB cable1. Take a USB cable and connect the type A end to the USB output jack of the
computer.2. Connect the mini-B type end of the USB cable to the mini-B USB jack on the
projector. When you connect the projector to a computer, you can display computer’s image or transfer files from your computer to the internal memory of the projector.
3. If you select USB Display, follow the on-screen message to install the USB driver in your computer first.
4. If you select USB File Transfer, go to My Computer or Windows Explorer to access the projector's files. The projector appears as a Removable Disk. Transfer the files from your computer to the projector by dragging and dropping or copying and pasting.To disconnect the projector from a computer:i. Click on the Windows Taskbar.
ii. Click the pop-up message.
Connection18

iii. Disconnect the USB cable only when the message says that it is safe to remove the hardware.
• Do not disconnect the USB cable while the files are being copied, as this could result in loss of data or damage to the projector.
• The connection will not end if you have projector files open on the computer. Close all projector files and try again.
• Other versions of Windows operate similarly. Follow the correct procedure for removing a USB device from your computer safely for your version of Windows.
Connecting Video source devicesYou need only connect the projector to a Video source device using just one of the above connecting methods, however each provides a different level of video quality. The method you choose will most likely depend upon the availability of matching terminals on both the projector and the Video source device as described below:
If the selected video image is not displayed after the projector is turned on and the correct video source has been selected, check that the Video source device is turned on and operating correctly. Also check that the signal cables have been connected correctly.
Terminal name Terminal appearance Picture quality
HDMI HDMI Best
Component Video VGA Better
Video Video Good
Connection 19

Connecting an HDMI source deviceThe projector provides a HDMI input jack that allows you to connect it to an HDMI source device like a Blu-Ray player, a DTV tuner or a display.HDMI (High-Definition Multimedia Interface) supports uncompressed video data transmission between compatible devices like DTV tuners, Blu-Ray player and displays over a single cable. It provides pure digital viewing and listening experience.Examine your Video source device to determine if it has a set of unused HDMI output jacks available:• If so, you can continue with this procedure.• If not, you will need to reassess which method you can use to connect to the device.
To connect the projector to an HDMI source device:1. Take an HDMI cable and connect one end to the HDMI output jack of the HDMI
source device.2. Connect the other end of the HDMI cable to the HDMI jack on the projector.
• The HDMI cable (shown in this example) for connection your video output device is not supplied as standard.
• The Apple Digital AV Adapter can be purchased from www.apple.com.
Connection20

Connecting a Component Video source deviceExamine your Video source device to determine if it has a set of unused Component Video output sockets available:
• If so, you can continue with this procedure.• If not, you will need to reassess which method you can use to connect to the device.To connect the projector to a Component Video source device:1. Take a Component Video to VGA (D-Sub) adaptor cable and connect the end with 3
RCA type connectors to the Component Video output sockets of the Video source device. Match the color of the plugs to the color of the sockets; green to green, blue to blue, and red to red.
2. Connect the other end to the COMPUTER socket on the projector.3. If you wish to make use of the projector speaker, take a suitable audio cable and
connect one end of the cable to the audio output sockets of the Video source device, and the other end to the audio input socket on the projector.
• When audio output jack is connected with the earphone or external speaker, the sound will not come out from the projector speaker.
• No sound will come out from the speaker or audio output jack if video signals are not input. Besides, the sound cannot be adjusted either.
Audio cable
AV device
Component Video to VGA (D-Sub) adaptor cable
Connection 21

Connecting a composite Video source deviceExamine your Video source device to determine if it has a set of unused composite Video output sockets available:
• If so, you can continue with this procedure.• If not, you will need to reassess which method you can use to connect to the device.
To connect the projector to a composite Video source device:1. Take a Video cable and connect one end to the composite Video output socket of
the Video source device.2. Connect the other end of the Video cable to the Video jack on the projector. 3. If you wish to make use of the projector speaker, take a suitable audio cable and
connect one end of the cable to the audio output sockets of the Video source device, and the other end to the audio input socket on the projector.
You need only connect to this device using a composite Video connection if Component Video input is unavailable for use. See "Connecting Video source devices" on page 19 for details.
Video cable
Audio cable
AV device
Connection22

Connecting an external speakerYou can hear sound through an external speaker instead of the internal speakers built into the projector.
To connect the projector to an external speaker source device:1. Connect an appropriate stereo cable to the external speaker and the audio output
jack on the projector.
When the audio cable is connected to the audio output jack, the speaker output is muted.
Connection 23

Connecting to an external memory deviceConnecting an SD card
To connect the projector to an SD card:1. Connect an SD card to the SD card slot on the projector.
• The maximum memory capacity supported for an SD(HC) card is 32 GB. (The maximum capacity supported for external memory is based on our factory test. Your experience may differ depending on the manufacturer of the memory device.)
• The projector may not be compatible with some SD cards.
Connecting a USB storage deviceTo connect the projector to a USB storage device:1. Plug the USB storage device into the Type A USB socket.
• This product supports USB memory device and HDD (Hard Disk Drive). Only one and only last one of partitions will be mounted. (The maximum capacity supported for external memory is based on our factory test. Your experience may differ depending on the manufacturer of the memory device.)
• This product does not support multi-card readers.
• This product does not work if the USB storage device is connected by a USB HUB.
• Some products which do not comply with standard USB specifications might not operate normally.
• A USB storage device with an automatic recognition application or its own driver might not operate normally.
USB flash drive
Connection24

• A USB storage device that uses only a designated driver might not be recognized.
• Recognition speed for USB storage device may vary by device.
• Do not turn off the product or pull a connected USB storage device out while the USB storage device is in use. Doing so may result in damage to the USB storage device or stored file.
• Use a USB storage device which contains normal files. Abnormal files can cause a malfunction or the files may not play.
• USB storages must be formatted in FAT16/FAT32/NTFS. FAT32 and NTFS are recommended for HDD (Hard Disk Drive).
• As the data in the USB storage device can be damaged, please back up important data to avoid loss. The user is responsible for data management. BenQ shall not be held liable for any data loss.
• File tree in USB storage should be as simple as possible. Too many or too many layers of folders will result in lag of access time.
• If an external memory device does not operate after you’ve connected it to the projector, try to connect it to a PC. If it still does not operate normally, contact the memory device’s manufacturer service center or related customer center.
Playing sound through the projectorYou can make use of the projector speaker in your presentations, and also connect separate amplified speakers to the audio output jack of the projector.
The table below describes the connection methods for different devices, and where the sound is from.
• The selected input signal determines which sound will be played by the projector speaker, and which sound will be output from the projector when audio output jack is connected.
• There’s no need to connect to an audio input jack because the projector can play the sound from an HDMI, external memory and iPhone/iPod source device. However, you can connect to an external device to play the sound.
• USB display doesn’t support audio function.
Device PC/Component video Video
Audio input jackAudio input (L/R)
AUDIO-INAudio input (L/R)
The projector can play the sound from...
Audio input (L/R)
AUDIO-INAudio input (L/R)
Audio output jack
Connection 25

OperationStarting up the projector
1. Connect the power using the power cord. The Power indicator turns into orange.
2. Press Power on the projector or remote control to start the projector. The Power indicator lights green when the projector is on.The start up procedure takes several seconds. In the later stage of start up, a startup logo is projected.(If necessary) Rotate the focus ring to adjust the image clearness.
3. If the projector is activated for the first time, select your OSD language following the onscreen instructions.
4. If you are prompted for a password, press the arrow keys to enter a six digit password. See "Utilizing the password function" on page 29 for details.
5. Switch all of the connected equipment on.6. The projector will display the home screen.
If the frequency/resolution of the input signal exceeds the projector's operating range, you will see the message 'Out of Range' displayed on a blank screen. Please change to an input signal which is compatible with the projector's resolution or set the input signal to a lower setting. See "Timing chart" on page 71 for details.
Switching input signalThe projector can be connected to multiple devices at the same time. However, it can only display one full screen at a time. Press / on the projector or remote control to select your desired input signal.
• The input signal type effects the options available for the Picture Mode. See "Selecting a picture mode" on page 32 for details.
• The native display resolution of this projector is in a 16:10 aspect ratio. For best display picture results, you should select and use an input signal which outputs at this resolution. Any other resolutions will be scaled by the projector depending upon the 'aspect ratio' setting, which may cause some image distortion or loss of picture clarity. See "Selecting the aspect ratio" on page 31 for details.
II
Operation26

Adjusting the projected imageAdjusting the image height
The projector is equipped with 2 adjuster feet. This adjusters change the image height. To adjust the projector:
1. Screw the adjuster feet to adjust the image height.
To retract the feet, screw the adjuster feet in a reverse direction.
If the projector is not placed on a flat surface or the screen and the projector are not perpendicular to each other, the projected image becomes trapezoidal. To correct this situation, see "Correcting keystone" on page 28 for details.
• Do not look into the lens while the lamp is on. The strong light from the lamp may cause damage to your eyes.
• Be careful when you screw the adjuster foot as it is close to the exhaust vent where hot air comes from.
Fine-tuning the image clarity1. Rotate the focus ring to sharpen the image.
Auto-adjusting the imageIn some cases, you may need to optimize the picture quality. • Using the remote controlPress AUTO.Within 3 seconds, the built-in Intelligent Auto Adjustment function will re-adjust the values of Frequency and Clock to provide the best picture quality.The current source information will be displayed in the upper left corner of the screen for 3 seconds. This function is only available when PC signal (analog RGB) is selected.
Operation 27
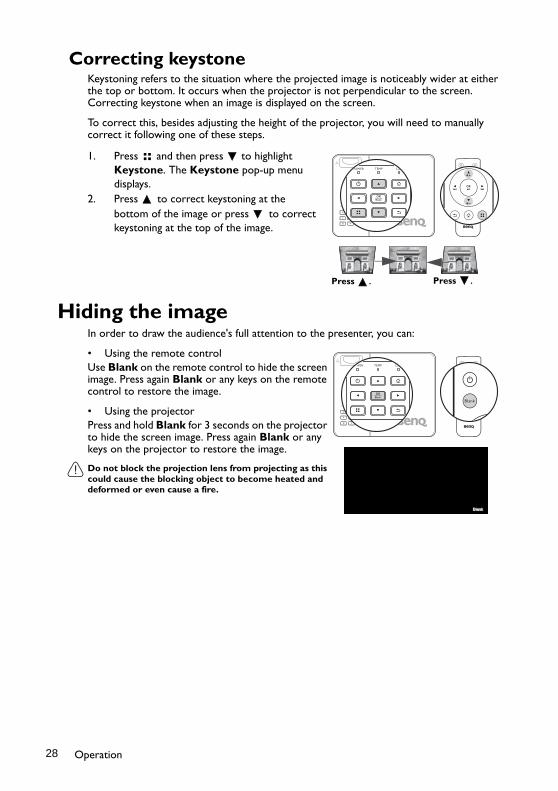
Correcting keystoneKeystoning refers to the situation where the projected image is noticeably wider at either the top or bottom. It occurs when the projector is not perpendicular to the screen. Correcting keystone when an image is displayed on the screen.
To correct this, besides adjusting the height of the projector, you will need to manually correct it following one of these steps.
1. Press and then press to highlight Keystone. The Keystone pop-up menu displays.
2. Press to correct keystoning at the bottom of the image or press to correct keystoning at the top of the image.
Hiding the imageIn order to draw the audience's full attention to the presenter, you can:
• Using the remote controlUse Blank on the remote control to hide the screen image. Press again Blank or any keys on the remote control to restore the image.
• Using the projectorPress and hold Blank for 3 seconds on the projector to hide the screen image. Press again Blank or any keys on the projector to restore the image.
Do not block the projection lens from projecting as this could cause the blocking object to become heated and deformed or even cause a fire.
Press .Press .
Operation28
Securing the projectorUtilizing the password function
For security purposes and to help prevent unauthorized use, the projector includes an option for setting up password security. The password can be set through the Settings menu.
You will be inconvenienced if you activate the power-on lock functionality and subsequently forget the password. Print out this manual (if necessary) and write the password you used in this manual, and keep the manual in a safe place for later recall.
Setting power on lock• Once a password has been set, the projector cannot be used unless the correct password is
entered every time the projector is started.
• When setting a password for the projector that its password function is used for the first time, enter the default password (1, 1, 1, 1, 1, 1) of the projector by pressing the arrow key five times if you are prompted for a password.
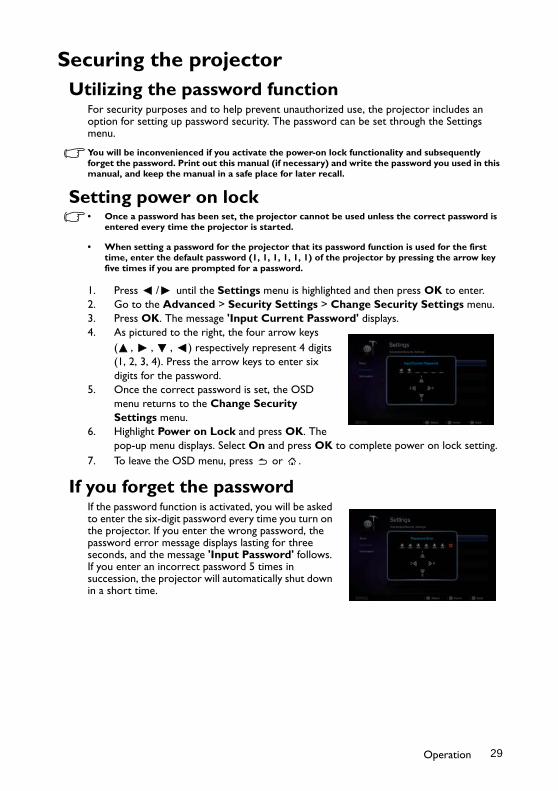
1. Press / until the Settings menu is highlighted and then press OK to enter.2. Go to the Advanced > Security Settings > Change Security Settings menu. 3. Press OK. The message 'Input Current Password' displays.4. As pictured to the right, the four arrow keys
( , , , ) respectively represent 4 digits (1, 2, 3, 4). Press the arrow keys to enter six digits for the password.
5. Once the correct password is set, the OSD menu returns to the Change Security Settings menu.
6. Highlight Power on Lock and press OK. The pop-up menu displays. Select On and press OK to complete power on lock setting.
7. To leave the OSD menu, press or .
If you forget the passwordIf the password function is activated, you will be asked to enter the six-digit password every time you turn on the projector. If you enter the wrong password, the password error message displays lasting for three seconds, and the message 'Input Password' follows. If you enter an incorrect password 5 times in succession, the projector will automatically shut down in a short time.
Operation 29

Entering the password recall procedure1. Press and hold on the remote control for 3
seconds. The projector will display a coded number on the screen.
2. Write down the number and turn off your projector.
3. Seek help from the local BenQ service center to decode the number. You may be required to provide proof of purchase documentation to verify that you are an authorized user of the projector.
Changing the password1. Go to the Settings > Advanced > Security Settings > Change password
menu.2. Press OK. The message 'Input Current Password' displays.3. Enter the old password.
• If the password is correct, another message 'Input New Password' displays.
• If the password is incorrect, the password error message displays lasting for three seconds, and the message 'Input Current Password' displays for your retry. You can press to cancel the change or try another password.
4. Enter a new password.
The digits being input will display as asterisks on-screen. Write your selected password down here in this manual in advance or right after the password is entered so that it is available to you should you ever forget it.
Password: __ __ __ __ __ __
Keep this manual in a safe place.
5. Confirm the new password by re-entering the new password.
6. You have successfully assigned a new password to the projector. Remember to enter the new password next time the projector is started.
7. To leave the OSD menu, press or .
Disabling the password functionTo disable password protection, go back to the Settings > Advanced > Security Settings > Power on Lock menu. Select Off and press OK. The message'Input Password'displays. Enter the current password.
• If the password is correct, the OSD menu returns to the Security Settings page with 'Off' shown in the row of Power on Lock. You will not have to enter the password next time you turn on the projector.
• If the password is incorrect, the password error message displays lasting for three seconds, and the message'Input Password'displays for your retry. You can press
to cancel the change or try another password.
Operation30
Though the password function is disabled, you need to keep the old password in hand should you ever need to re-activate the password function by entering the old password.
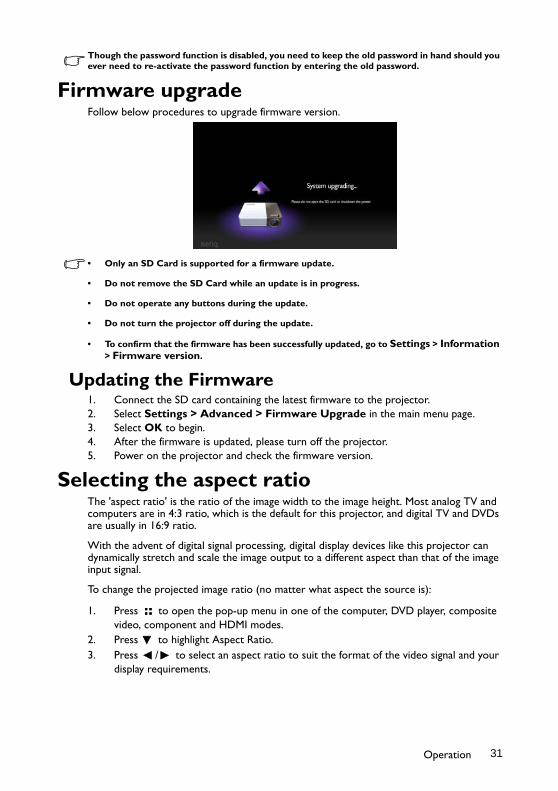
Firmware upgradeFollow below procedures to upgrade firmware version.
• Only an SD Card is supported for a firmware update.
• Do not remove the SD Card while an update is in progress.
• Do not operate any buttons during the update.
• Do not turn the projector off during the update.
• To confirm that the firmware has been successfully updated, go to Settings > Information > Firmware version.
Updating the Firmware1. Connect the SD card containing the latest firmware to the projector. 2. Select Settings > Advanced > Firmware Upgrade in the main menu page. 3. Select OK to begin. 4. After the firmware is updated, please turn off the projector. 5. Power on the projector and check the firmware version.
Selecting the aspect ratioThe 'aspect ratio' is the ratio of the image width to the image height. Most analog TV and computers are in 4:3 ratio, which is the default for this projector, and digital TV and DVDs are usually in 16:9 ratio.
With the advent of digital signal processing, digital display devices like this projector can dynamically stretch and scale the image output to a different aspect than that of the image input signal.
To change the projected image ratio (no matter what aspect the source is):
1. Press to open the pop-up menu in one of the computer, DVD player, composite video, component and HDMI modes.
2. Press to highlight Aspect Ratio.3. Press / to select an aspect ratio to suit the format of the video signal and your
display requirements.
Operation 31
Optimizing the imageSelecting a picture mode
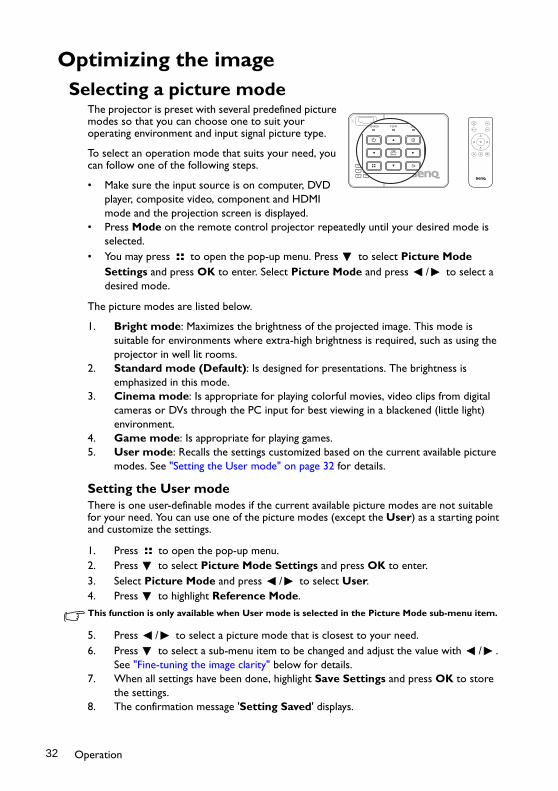
The projector is preset with several predefined picture modes so that you can choose one to suit your operating environment and input signal picture type.
To select an operation mode that suits your need, you can follow one of the following steps.
• Make sure the input source is on computer, DVD player, composite video, component and HDMI mode and the projection screen is displayed.
• Press Mode on the remote control projector repeatedly until your desired mode is selected.
• You may press to open the pop-up menu. Press to select Picture Mode Settings and press OK to enter. Select Picture Mode and press / to select a desired mode.
The picture modes are listed below.
1. Bright mode: Maximizes the brightness of the projected image. This mode is suitable for environments where extra-high brightness is required, such as using the projector in well lit rooms.
2. Standard mode (Default): Is designed for presentations. The brightness is emphasized in this mode.
3. Cinema mode: Is appropriate for playing colorful movies, video clips from digital cameras or DVs through the PC input for best viewing in a blackened (little light) environment.
4. Game mode: Is appropriate for playing games.5. User mode: Recalls the settings customized based on the current available picture
modes. See "Setting the User mode" on page 32 for details.
Setting the User modeThere is one user-definable modes if the current available picture modes are not suitable for your need. You can use one of the picture modes (except the User) as a starting point and customize the settings.
1. Press to open the pop-up menu.2. Press to select Picture Mode Settings and press OK to enter.3. Select Picture Mode and press / to select User.4. Press to highlight Reference Mode.
This function is only available when User mode is selected in the Picture Mode sub-menu item.
5. Press / to select a picture mode that is closest to your need.6. Press to select a sub-menu item to be changed and adjust the value with / .
See "Fine-tuning the image clarity" below for details.7. When all settings have been done, highlight Save Settings and press OK to store
the settings.8. The confirmation message 'Setting Saved' displays.
Operation32
Using Wall ColorIn the situation where you are projecting onto a colored surface such as a painted wall which may not be white, the Wall Color feature can help correct the projected picture’s color to prevent possible color difference between the source and projected pictures.
To use this function, press to open the pop-up menu in one of the computer, iPhone/iPod, composite video, component and HDMI modes. Select Wall Color and press /
to select a color which is the closest to the color of the projection surface. There are several precalibrated colors to choose from: Light Yellow, Pink, Light Green, Blue, and Blackboard.
Fine-tuning the image quality in user modeAccording to the detected signal type, there are some user-definable functions available when User mode is selected. Based on your needs, you can make adjustments tothese functions by highlighting them and pressing / on the projector or remote control
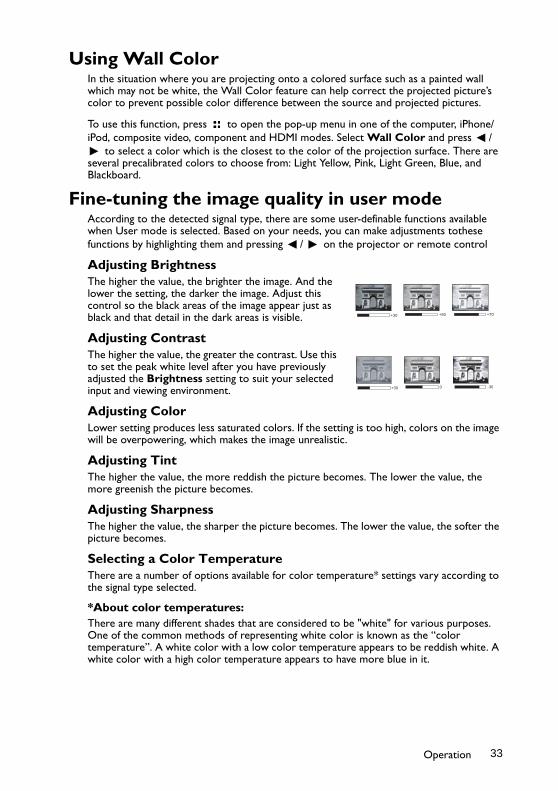
Adjusting BrightnessThe higher the value, the brighter the image. And the lower the setting, the darker the image. Adjust this control so the black areas of the image appear just as black and that detail in the dark areas is visible.
Adjusting ContrastThe higher the value, the greater the contrast. Use this to set the peak white level after you have previously adjusted the Brightness setting to suit your selected input and viewing environment.
Adjusting ColorLower setting produces less saturated colors. If the setting is too high, colors on the image will be overpowering, which makes the image unrealistic.
Adjusting TintThe higher the value, the more reddish the picture becomes. The lower the value, the more greenish the picture becomes.
Adjusting SharpnessThe higher the value, the sharper the picture becomes. The lower the value, the softer the picture becomes.
Selecting a Color TemperatureThere are a number of options available for color temperature* settings vary according to the signal type selected.
*About color temperatures:There are many different shades that are considered to be "white" for various purposes. One of the common methods of representing white color is known as the “color temperature”. A white color with a low color temperature appears to be reddish white. A white color with a high color temperature appears to have more blue in it.
+50+30 +70
0+30 -30
Operation 33

Operating in a high altitude environmentWe recommend you use the High Altitude Mode when your environment is between 1500 m –3000 m above sea level, and ambient temperature is between 0°C–30°C.
Do not use the High Altitude Mode if your altitude is between 0 m and 1499 m and ambient temperature is between 0°C and 35°C. The projector will be over cooled, if you turn the mode on under such a condition.
To activate the High Altitude Mode:
1. Hightlight Settings and press OK to enter.2. Go to Advanced > High Altitude Mode and press OK.3. Highlight On and press OK to confirm.4. To leave the OSD, press until the projector returns to the home screen, or press
to go back to the home screen directly.Operation under "High Altitude Mode" may cause a higher decibel operating noise level because of increased fan speed necessary to improve overall system cooling and performance.
If you use this projector under other extreme conditions excluding the above, it may display auto shut-down symptoms, which is designed to protect your projector from over-heating. In cases like this, you should switch to High Altitude mode to solve these symptoms. However, this is not to state that this projector can operate under any and all harsh or extreme conditions.
Adjusting the soundThe sound adjustments made as below will have an effect on the projector speaker(s). Be sure you have made a correct connection to the projector audio input. See "Connection" on page 16 for how the audio input is connected.
SRS HDActivating this function enables the SRS HD technology. The projector can provide a surround sound and restore natural sound.
1. Hightlight Settings and press OK to enter.2. Go to Advanced > Audio Settings and press
OK to enter.3. Highlight SRS HD and press OK to open the pop-
up menu.4. Highlight On and press OK to confirm.5. To leave the OSD, press until the projector
returns to the home screen, or press to go back to the home screen directly.
Muting the soundTo temporarily turn off the sound, press on the remote control, or:
Operation34

1. Hightlight Settings and press OK to enter.2. Go to Advanced > Audio Settings and press
OK to enter.3. Highlight Mute and press OK to open the pop-up
menu.4. Highlight On and press OK to confirm.5. To leave the OSD, press until the projector
returns to the home screen, or press to go back to the home screen directly.
Adjusting the sound levelTo adjust the sound level, press + or - on the remote control.
Turning off Power on/off ring toneTo turn off the Power on/off ring tone:
1. Repeat steps 1-2 above.2. Highlight Power on/off ring tone and press OK
to open the pop-up menu.3. Highlight Off and press OK to confirm.
The only way to change Power On/Off Ring Tone is setting On or Off here. Setting the sound mute or changing the sound level will not affect the Power On/Off Ring Tone.
Operation 35

Displaying images with PC and Video sourcedevices
You can connect your projector to a PC and various Video source devices. (e.g. HDMI, composite video, component video) However, you need only connect the projector to an input source device.
To display images:
1. Connect the projector to one of the above signal source.2. Turn on the power of the projector and your source device. The projector displays
the home screen.3. Press / on the projector or remote control to select the input signal and then
press OK to enter.
4. Press or to go back to home screen.
Operation36

Using PC/ Video pop-up menusThe projector has a multilingual OSD that allows you to make image adjustments and change a variety of settings. This menu is for the settings to be used in computer, DVD player, composite video, component and HDMI modes.
Using the menu1. To open the OSD menu, press on the projector or remote control when the
projection screen is displayed.2. When the OSD is displayed, press / to select the desired item and adjust the
settings by using / .3. To leave the OSD, press again.
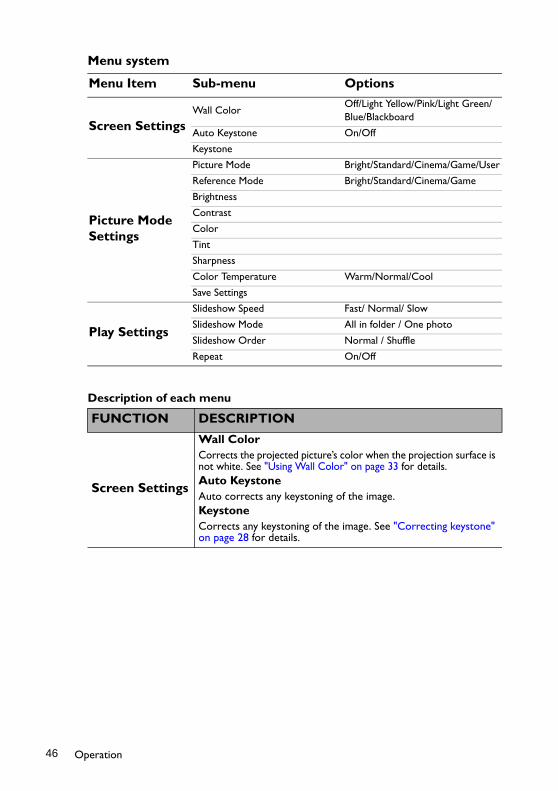
Menu system
Menu Item Sub-menu Options
Wall Color Off/Light Yellow/Pink/Light Green/Blue/Blackboard
Aspect Ratio Auto/Real/4:3/16:9/16:10
Auto Keystone On/Off
Keystone
Picture Mode Settings
Picture Mode Bright/Standard/Cinema/Game/User
Reference Mode Bright/Standard/Cinema/Game/User
Brightness
Contrast
Color
Tint
Sharpness
Color Temperature Normal/Cold/Warm
Save Settings
3D Sync Invert Disable/Invert
InformationSource
Resolution
Color System
Operation 37

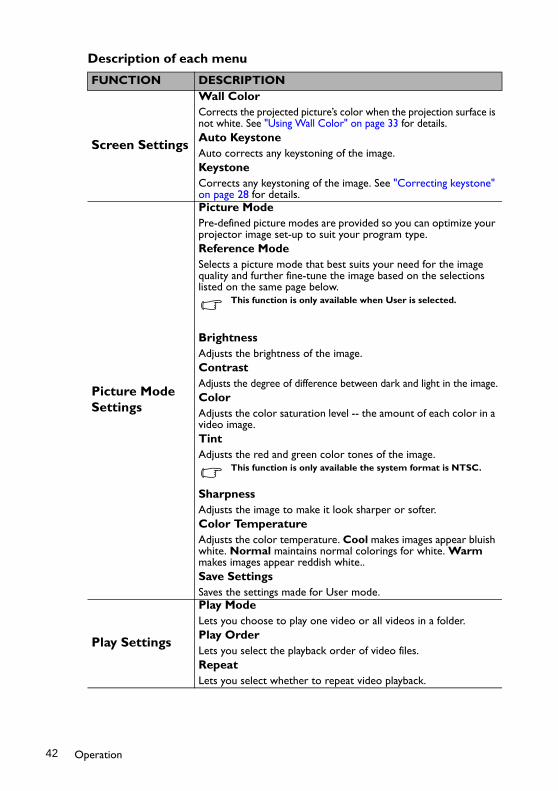
Description of each menu
FUNCTION DESCRIPTION
Wall Color Corrects the projected picture’s color when the projection surface is not white. See "Using Wall Color" on page 33 for details.
Aspect RatioThere are four options to set the image's aspect ratio depending on your input signal source. See "Selecting the aspect ratio" on page 31 for details.
Auto Keystone Auto corrects any keystoning of the image.
Keystone Corrects any keystoning of the image. See "Correcting keystone" on page 28 for details.
Picture Mode Settings
Picture ModeSee "Selecting a picture mode" on page 32 for details.
Reference ModeSee "Setting the User mode" on page 32 for details.
This function is only available when User is selected.
BrightnessSee "Adjusting Brightness" on page 33 for details.
ContrastSee "Adjusting Contrast" on page 33 for details.
ColorSee "Adjusting Color" on page 33 for details.TintSee "Adjusting Tint" on page 33 for details.
This function is only available the system format is NTSC.
SharpnessSee "Adjusting Sharpness" on page 33 for details.
Color TemperatureSee "Selecting a Color Temperature" on page 33 for details.
Save SettingsSaves the settings made for User mode.
3D Sync Invert When you discover the inversion of the image depth, enable this function to correct the problem.
Information
SourceShows the current signal source.
ResolutionShows the native resolution of the input signal.
Color SystemShows input system format, NTSC, PAL, SECAM, or RGB.
Operation38
Displaying files with internal memory, USBDrive and SD card
The projector can display files saved in internal memory or external storage like an SD card or a USB Drive when you have connected to projector.
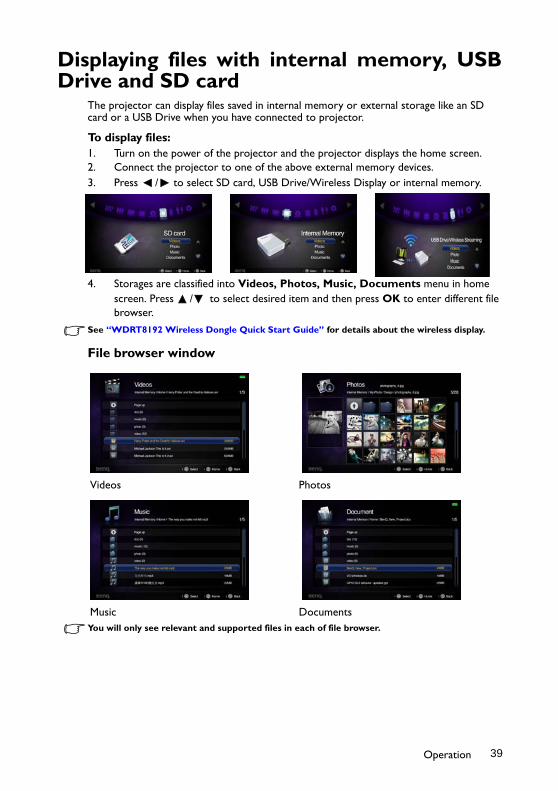
To display files:1. Turn on the power of the projector and the projector displays the home screen.2. Connect the projector to one of the above external memory devices.3. Press / to select SD card, USB Drive/Wireless Display or internal memory.
4. Storages are classified into Videos, Photos, Music, Documents menu in home screen. Press / to select desired item and then press OK to enter different file browser.
See “WDRT8192 Wireless Dongle Quick Start Guide” for details about the wireless display.
File browser window
You will only see relevant and supported files in each of file browser.
Videos Photos
Music Documents
Operation 39

When playing videos
Video player pop-up settings menuThe video player pop-up menu provides an on-screen display (OSD) for adjustments when playing videos.
Using the menu1. To open the OSD menu, press on the projector or remote control when the
projection screen is displayed.2. When the OSD is displayed, press / to select the desired item and adjust the
settings by using / .3. To exit the OSD, press on the projector or remote control again.
NAME DESCRIPTIONOK Play/Pause Plays or pauses a video.
/ Volume Volume up/down.
Prev
• Plays the previous video. • Press and hold to rewind the video.
- The rewind speed increases to x2, x4, x8 and x16 at 2-second intervals.
Next
• Plays the next video. • Press and hold to fast forward the video.
- The fast-forward speed increases to x2, x4, x8 and x16 at 2-second intervals.
Menu Open/close video pop-up settings menu.
Back
• Return to upper level of OSD. • Close video pop-up setting menu. • Leave current video player and back to video file
browser.Home Exit video player and go back to home screen.
Operation40

• See the table for supported subtitle file types. Refer to "Supported file formats" on page 50.
Menu system
Menu Item Sub-menu Options
Screen SettingsWall Color
Off/Light Yellow/Pink/Light Green/Blue/Blackboard
Auto Keystone On/Off
Keystone
Picture Mode Settings
Picture Mode Bright/Standard/Cinema/Game/User
Reference Mode Bright/Standard/Cinema/Game
Brightness
Contrast
Color
Tint
Sharpness
Color Temperature Warm/Normal/Cool
Save Settings
Play SettingsPlay Mode All in folder/One video
Play Order Normal/Shuffle
Repeat On/Off
Operation 41
Description of each menu
FUNCTION DESCRIPTION
Screen Settings
Wall ColorCorrects the projected picture’s color when the projection surface is not white. See "Using Wall Color" on page 33 for details.Auto KeystoneAuto corrects any keystoning of the image.KeystoneCorrects any keystoning of the image. See "Correcting keystone" on page 28 for details.
Picture Mode Settings
Picture ModePre-defined picture modes are provided so you can optimize your projector image set-up to suit your program type.Reference ModeSelects a picture mode that best suits your need for the image quality and further fine-tune the image based on the selections listed on the same page below.
This function is only available when User is selected.
BrightnessAdjusts the brightness of the image.ContrastAdjusts the degree of difference between dark and light in the image.ColorAdjusts the color saturation level -- the amount of each color in a video image.TintAdjusts the red and green color tones of the image.
This function is only available the system format is NTSC.
SharpnessAdjusts the image to make it look sharper or softer.Color TemperatureAdjusts the color temperature. Cool makes images appear bluish white. Normal maintains normal colorings for white. Warm makes images appear reddish white..Save SettingsSaves the settings made for User mode.
Play Settings
Play ModeLets you choose to play one video or all videos in a folder. Play OrderLets you select the playback order of video files. RepeatLets you select whether to repeat video playback.
Operation42

When playing music
Music player pop-up settings menuThe music player pop-up menu provides an on-screen display (OSD) for adjustments when playing music.
Using the menu1. To open the OSD menu, press on the projector or remote control when the
projection screen is displayed.2. When the OSD is displayed, press / to select the desired item and adjust the
settings by using / .3. To exit the OSD, press on the projector or remote control again.
NAME DESCRIPTIONOK Play/Pause Plays or pauses a music.
/ Volume Volume up/down.
Prev• Plays the previous music. • Press and hold to rewind the music.
Next • Plays the next music. • Press and hold to fast forward the music.
Menu Open/close music pop-up settings menu.
Back
• Return to upper level of OSD. • Close video pop-up setting menu. • Leave current music player and back to music file
browser.Home Exit music player and go back to home screen.
Operation 43

Menu system
Description of each menu
Menu Item Options
Play Mode All in folder/One music
Play Order Normal / Shuffle
Repeat On/Off
FUNCTION DESCRIPTION
Play Mode Lets you choose to play one music or all music in a folder.
Play Order Lets you select the playback order of music files.
Repeat Lets you select whether to repeat music playback.
Operation44

When viewing photos
Photo viewer pop-up settings menuThe photo view pop-up menu provides an on-screen display (OSD) for adjustments when viewing photos.
Using the menu1. To open the OSD menu, press on the projector or remote control when the
projection screen is displayed.2. When the OSD is displayed, press / to select the desired item and adjust the
settings by using / .3. To exit the OSD, press on the projector or remote control again.
NAME DESCRIPTIONOK Play/Pause Plays or pauses a slideshow.
Prev Previous photo. Next Next photo. Menu Open/close photo pop-up settings menu.
Back
• Return to upper level of OSD. • Close photo pop-up setting menu. • Leave current photo player and back to photo file
browser.Home Exit photo player and go back to home screen.
Operation 45
Menu system
Description of each menu
Menu Item Sub-menu Options
Screen SettingsWall Color
Off/Light Yellow/Pink/Light Green/Blue/Blackboard
Auto Keystone On/Off
Keystone
Picture Mode Settings
Picture Mode Bright/Standard/Cinema/Game/User
Reference Mode Bright/Standard/Cinema/Game
Brightness
Contrast
Color
Tint
Sharpness
Color Temperature Warm/Normal/Cool
Save Settings
Play Settings
Slideshow Speed Fast/ Normal/ Slow
Slideshow Mode All in folder / One photo
Slideshow Order Normal / Shuffle
Repeat On/Off
FUNCTION DESCRIPTION
Screen Settings
Wall ColorCorrects the projected picture’s color when the projection surface is not white. See "Using Wall Color" on page 33 for details.Auto KeystoneAuto corrects any keystoning of the image.KeystoneCorrects any keystoning of the image. See "Correcting keystone" on page 28 for details.
Operation46

Picture Mode Settings
Picture ModePre-defined picture modes are provided so you can optimize your projector image set-up to suit your program type.Reference ModeSelects a picture mode that best suits your need for the image quality and further fine-tune the image based on the selections listed on the same page below.
This function is only available when User is selected.
BrightnessAdjusts the brightness of the image.ContrastAdjusts the degree of difference between dark and light in the image.ColorAdjusts the color saturation level -- the amount of each color in a video image.TintAdjusts the red and green color tones of the image.
This function is only available the system format is NTSC.
SharpnessAdjusts the image to make it look sharper or softer.Color TemperatureAdjusts the color temperature. Cool makes images appear bluish white. Normal maintains normal colorings for white. Warm makes images appear reddish white..Save SettingsSaves the settings made for User mode.
Slideshow Speed
Lets you select slideshow speed.
Slideshow Mode
Lets you choose to slideshow one photo or all photos in a folder.
Slideshow Order
Lets you select the slideshow order of photo files.
Repeat Lets you select whether to repeat slideshow.
Operation 47

When viewing documents
• Loading time may be longer for large files.
• Document viewer may not work properly when a file does not comply with standards or it is damaged.
• Document viewer may not work when a file contains too much data to display on a screen. (For example, too much data on one sheet in an Excel file.)
• Document viewer supports only one font. If a screen uses other fonts, the image Media Play displays may be different than the original screen.
• For example:
• 1. The position of line breaks in a sentence might be dissimilar.
• 2. The position of page breaks in a MS Word document might be changed. In this case, the document might be shown incompletely according to the Layout properties for Picture or Shapes or Object in MS word . (Please refer to the manual of MS Word for more information on the Layout properties.)
• Some functions supported on your PC are not supported by the projector, such as these PowerPoint functions: Animation, 3D, Smart Art, Hyper Link, and Transparency and Gradation.
• This product does not support encrypted files (DRM).
NAME DESCRIPTION
OKEnter Enlarge the current page. Magnify the page with a further
press.Up 1. When the page is not enlarged:
/ : Move to the previous page./ : Move to the next page.
2. When the page is enlarged: / / / : Move to the top/down/left/right portion of the
page.
Down
Left
Right
Menu Bring out the pop-up menu.
Back Leave current document viewer and back to document file browser.
Home Exit document viewer and go back to home screen.
Operation48

Document viewer pop-up settings menuThe document view pop-up menu provides an on-screen display (OSD) for adjustments when viewing photos.
Using the menu1. To open the OSD menu, press on the projector or remote control when the
projection screen is displayed.2. When the OSD is displayed, press / to select the desired item and adjust the
settings by using / .3. To exit the OSD, press on the projector or remote control again..
Menu system
Description of each menu
Menu Item Options
Page Navigation
Aspect Ratio Fit to Width / Fit to Height
FUNCTION DESCRIPTION
Page Navigation
Goes directly to a specific page. Enter a page number using the / / / buttons, check the page number in the preview window on the upper right corner of the screen, and then select <Go> to move to that page.
Aspect Ratio
Fit to Width displays a document so that it fits the screen width.
Fit to Height displays a document so that it fits the screen height.
Operation 49

Supported file formats• Document, Photo, Music
• Video, Subtitles
Please visit BenQ.com to know more details about the latest supported formats.
ITEM FILE EXTENSION
Document
Adobe PDF 1.0~1.4 (PDF)MS PowerPoint 97~2010 (ppt, pptx)MS Excel 95~2010, Office XP (xls, xlsx)MS Word 95~2010, Office XP (doc, docx)
Photo JPG (.jpg, .jpeg) , BMP (.bmp)Music MP3, MP2, MP1, OGG, AAC, WAV
ITEM FILE EXTENSION DESCRIPTION
Video
AVI (Xvid, MJPEG), MKV (XVID), DVIX (MJPEG, XVID), DAT (MPEG1), MPG(MPEG1), MPEG(MPEG1)
Subtitles SRT (.srt)
• Subtitle files must be in the same directory as the video files.
• The name of subtitle files shall be the same as the name of video files.
• SRT only supports for UTF (unicode 8).
Bit rate range : If peak bit rate of a video file is larger than 10MB, it might cause video playback lag.
Operation50

Using USB streamingThe projector supports USB streaming for USB display and USB file transfer.
BenQ EZ USB displayThe projector can project computer screen via a USB cable instead of a VGA cable.
To use USB display:
1. Connect the projector to a computer using a USB cable.2. Turn on the power of the projector and your
source device. The projector displays the home screen.
3. Press / to select USB Streaming.4. Press / to select USB Display and then
press OK to enter.5. If your computer can automatically install USB
driver, you can see computer’s screen.6. If computer's screen can't be projected, please go to "My Computer", find the
“BenQUSB EZ Display” (same as using a flash disk drive), then run the “Autorun.exe” file.
7. Press or to leave computer projection screen and back to projector home screen.
System requirements
USB file transferYou can connect the projector to transfer files from your computer to the projetor. The files will be saved in the internal menory, and you can project images from the projector.
To use USB file transfer:
1. Connect the projector to a computer using a USB cable.
Windows
CPUIntel/AMD Dual Core 2 GHz or higher (ATOM not supported)
Graphic cardIntel, nVIDIA or AMD graphic card with 64MB VRAM or above
OSWindows XP Professional SP3, Vista SP3, Windows 7 SP2
DRAM 1 GB DDR
Mac
CPUIntel Dual Core 1.4 GHz or higher (PowerPC not supported)
Graphic cardIntel, nVIDIA or AMD graphic card with 64MB VRAM or above
OS Mac OS X 10.6.5 and aboveDRAM 1 GB DDR
Recommended ModelsMacBook after 2009-01-21All series of MacBook ProMacBook Air after 2010-06-08
Operation 51

2. Turn on the power of the projector and your source device. The projector displays the home screen.
3. Press / to select USB Streaming.4. Press / to select USB File Transfer and
then press OK to enter.5. If the connection is sucessful, you will see “It is
in USB file transfer mode.” message on the screen.
6. Look for a new “removable disk” icon. This “removable disk” is actually the internal memory in your projector.
7. Copy & Paste or Drag-N-Drop files from your computer to the removable disk.8. If you want to display those files, use / to select Internal Memory. See
"Displaying files with internal memory, USB Drive and SD card" on page 39 for details.
9. Press or to leave USB File Transfer mode and back to projector home screen.To disconnect the projector from a PC:
Make sure to end the connection properly to prevent damage to the projector or your data.
1. Click on the Windows Taskbar. 2. Click the pop-up message. 3. Disconnect the USB cable only when the message says that it is safe to remove the
hardware.
• Do not disconnect the USB cable while the files are being copied, as this could result in loss of data or damage to the projector.
• The connection will not end if you have projector files open on the PC. Close all projector files and try again.
• Other versions of Windows operate similarly. Follow the correct procedure for removing a USB device from your PC safely for your version of Windows.
Operation52

Using wireless streamingDisplay PC screen to projector wirelesslyBenQ EZ QPresenter is a power program to project your PC/NB screen to projector wirelessly. It also brings you extension display function so that you can show different content in the secondary display.
Follow the steps below to get it all set up in just a few minutes.
1. Connect the wireless dongle to the USB jack of the projector.
2. Select “USB Drive/Wireless Streaming” by pressing and press “OK” on
your projector. Choose “PC Display”.
Operation 53

3. You will be prompted to the “To install BenQ EZ QPresenter” page and follow the steps as instructed.
4. Select “BenQ GP10” as your WLAN connection on your computer (make sure your computer is equipped with wireless network
card).
5. Start a web browser and key in IP address 192.168.100.10 into the
address bar and press “Enter”.
Operation54

6. Select OS version and start downloading and installing BenQ EZ QPresenter by
following the on-screen instructions on you PC.
7. Open BenQ EZ QPresenter to start wireless projectioni. Select “BenQ GP10” from wireless access point menu of your PC/NB.ii. Open BenQ EZ QPresenter to start projection in mirror mode (default).
Tips:
• If you have installed BenQ EZ QPrensenter prior to step i., it will be connected to GP10 automatically.
• You can disable or enable audio streaming baed on your preferences.
Frequently Asked Questions• Q: Why does my CPU become busier after launching the BenQ EZ
QPrensenter?• A: BenQ EZ QPresenter counts on your PC CPU to encode the screen images to
reduce the data that needs to be transferred to the receiver. Hence there will be some overhead to your PC. In general, for a 4+ ranking PCs, it would need up to 30% of CPU overhead to perform wireless display.
• Q: Why can’t I project my screen?• A: BenQ EZ QPresenter needs to access the network connection at some point. As a
result, when your Anti-virus or network security software prompts you for permission to allow the sender software to access the network, please grant access to proceed, or choose “add rule” to the fire wall settings.
Operation 55

• Q: Why does my display frame rate slow down?• A: BenQ EZ QPresenter needs to encode display content while sending massive real-
time data to the projector.i. PC: A dual core PC (excluding Atom processors) or Mac is required to encode
the screen images at 30FPS (Frame Per Second) speed. However, if you would like to increase the FPS speed, you can:
a. Use better media players, such as GOM playerb. Close all unused appsc. Use a faster PC with Windows Experience Score higher than 4 (4+ recommended)ii. Network:Using 802.11n WiFia. Move your laptop closer to the projectorb. Disable the “Minimum Power Consumption” option from the “Advanced Tab” in your WiFi network Adopter Property settingc. Lower PC screen resolution
System Requirements for PC Wireless Display
Windows
CPU Intel/AMD Dual core 2 GHz or higher (ATOM not supported)
Graphic card Intel, NVIDIA or AMD graphic card with 64MB VRAM or above
OS Windows XP Professional SP3, Vista SP3, Windows 7 SP2
Wi-Fi 802.11n
Mac
CPU Intel Dual core 1.4 GHz or higher (PowerPC not supported)
Graphic card Intel, NVIDIA or AMD graphic card with 64MB VRAM or above
OS Mac OS X 10.6.5 and aboveRecommended Models
MacBook after 2009-01-21All series of Macbook ProMacbook Air after 2010-06-08
Wi-Fi 802.11n
Operation56

Display iPhone/iPAD content to projector wirelesslyBenQ GP10 QPresenter is an easy-to-use app which enables your mobile devices to project the display to BenQ GP10 Ultra Lite LED projector. You can display your photos/documents including PDF, MS-Office and iWorks.
Follow the steps below to get it all set up in just a few minutes.
1. Connect the wireless dongle to the USB jack of the projector.2. Select “USB Drive/Wireless Streaming” by pressing and press “OK” on
your projector. Choose “Mobile Display”.
3. You will be prompted to the “Mobile Display” welcome page.
Please download GP10 QPresenter in App store and install on your iPhone or iPad.
Operation 57

4. Connect your iPhone or iPad to NB/PC. Open iTunes and sync the documents from NB/PC to your iPhone or iPad. After it’s done, you can disconnect your iPhone/iPad.
5. Turn on your iPhone/iPad WiFi , find BenQ GP10 or the projector SSID you defined to projector and connect with it directly. After WiFi connection is established, you can execute BenQ GP10 QPresenter app on your iPhone/iPad, and you will be able to see the device’s IP address now. Click it to enjoy BenQ GP10 QPresenter’s complete functions!!
Features of GP10 QPresenter:i. View MS-Office files (Word, Excel, PowerPoint), Adobe PDF, Apple iWorks
(Pages, Numbers, Keynote), and it also supports Sketch function and save to photo roll.
ii. View local photo gallery and do sketch.
Supported device:i. iPhone 4 and iPhone 4S, iPhone 5ii. iPad 2, and New iPad (gen 3 iPad)
Supported file format:PDF: Adobe PDF 1.6 or later
Photo: JPEG/JPG/PNG
Office: MS Office 2003 or later
iWorks: iWorks’ 09 (Pages’ 09, Numbers’ 09, Keynote’ 09)
Not support:Animation and embedded object in MS-Office or iWorks
Operation58

Wi-Fi Dongle Specifications
Model Name WDRT8192Wireless Standard IEEE 802.11 b/g/nInterface USB 2.0Data Transfer Rate up to 300MbpsFrequency Band 2.4GHz ISM BandSecurity 64 bit/128 bit WEP, TKIP, AES, WPA, WPA2Supported OS Windows 2000/XP/Vista/7Minimum PC System Requirement CPU: 200MHz or above
RAM: 64MB RAM or above, 128MB recommended
Operation 59

Using settings menuThis menu is to set the projector’s operating environment.
Using the menu
1. To open the OSD menu, press / to select Settings icon in home screen.2. When the OSD is displayed, press / to select any item in the main menu.3. After selecting the desired main menu item, press OK to enter the feature settings
submenu.4. Press / to select the desired item and press OK to open the pop-up menu.5. Select the settings using / / / and press OK to confirm. Once the setting is
selected, the OSD menu returns to the selected item.6. Press to return to the main menu.
You may press to go back to home screen directly.7. Press again to go back to home screen.
Operation60

Menu system
Main menu Sub-menu Options
1. Basic
Language
LED Mode Normal/Eco
Wall ColorOff/Light Yellow/Pink/Light Green/Blue/Blackboard
Auto Keystone On/Off
Eye Protection On/Off
Auto Power OffDisable/5 min/10 min/15 min/20 min/25 min/30 min
Splash Screen BenQ/ Black/Blue
2. Advanced
High Altitude Mode On/Off
Audio Settings
SRS HD On/Off
Mute On/Off
Volume
Power on/off ring tone
On/Off
Menu Display Time 5 sec/10 sec/15 sec/20 sec/25 sec/30 sec
Security Settings
Change Password
Recall Password
Change Security Settings
Power On Lock On/Off
Closed CaptionClosed Caption Enable
On/Off
Caption Version CC1/CC2/CC3/CC4
Test Pattern
Firmware Upgrade
Reset All Settings
3. Information
Source
Picture Mode
Color System
Resolution
Memory / Internal Memory
DLP 3D
LED Lamp Life
Firmware Version
Operation 61
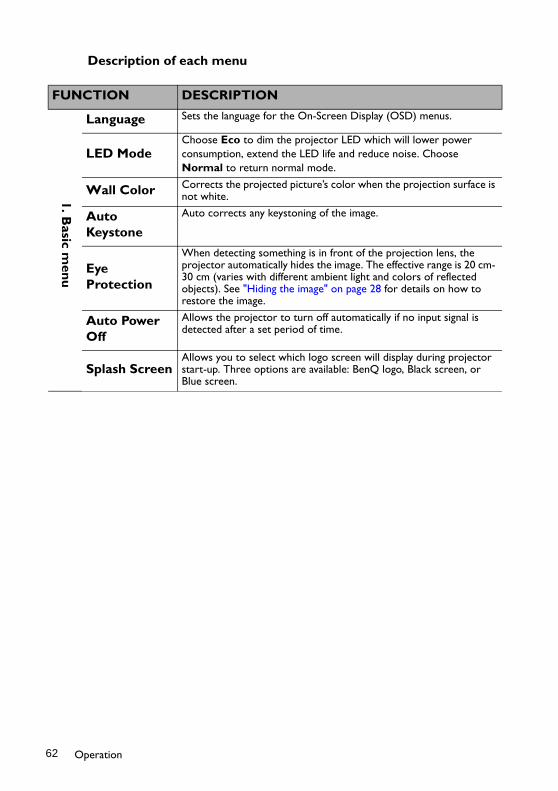
Description of each menu
FUNCTION DESCRIPTION
Language Sets the language for the On-Screen Display (OSD) menus.
LED ModeChoose Eco to dim the projector LED which will lower power consumption, extend the LED life and reduce noise. Choose Normal to return normal mode.
Wall Color Corrects the projected picture’s color when the projection surface is not white.
Auto Keystone
Auto corrects any keystoning of the image.
Eye Protection
When detecting something is in front of the projection lens, the projector automatically hides the image. The effective range is 20 cm- 30 cm (varies with different ambient light and colors of reflected objects). See "Hiding the image" on page 28 for details on how to restore the image.
Auto Power Off
Allows the projector to turn off automatically if no input signal is detected after a set period of time.
Splash ScreenAllows you to select which logo screen will display during projector start-up. Three options are available: BenQ logo, Black screen, or Blue screen.
1. Basic m
enu
Operation62

FUNCTION DESCRIPTION
High Altitude Mode
A mode for operation in high altitude areas. See "Operating in a high altitude environment" on page 34for details.
Audio Settings
See "Adjusting the sound" on page 34 for details.
Menu Display Time
Sets the length of time the OSD will remain active after your last key press. The range is from 5 to 30 seconds in 5-second increments.
Security Settings
See "Securing the projector" on page 29 for details.
Closed Caption
Closed Caption EnableActivates the function by selecting On when the selected input signal carries closed captions.
• Captions: An on-screen display of the dialogue, narration, and sound effects of TV programs and videos that are closed captioned (usually marked as "CC" in TV listings).
Caption VersionSelects a preferred closed captioning mode. To view captions, select CC1, CC2, CC3, or CC4 (CC1 displays captions in the primary language in your area).
Test PatternSelecting OK enables the function and the projector displays the grid test pattern. It helps you adjust the image size and focus and check that the projected image is free from distortion.
Firmware Upgrade
Updating the latest firmware are only allowed via an SD card.
Reset All Settings
Returns all settings to the factory preset values.2. A
dvan
ced m
enu
Operation 63

FUNCTION DESCRIPTION
Source Shows the current signal source.
Picture Mode Shows the selected mode.
Color System Shows input system format: RGB or YUV.
Resolution Shows the native resolution of the input signal.
Memory / Internal Memory
Shows the memory capacity status: Internal Memory.
DLP 3D Shows the DLP 3D status.
LED Lamp Life
Displays the number of hours the lamp has been used.
Firmware Version
Shows firmware version.
3. Info
rmatio
n m
enu
Operation64

Shutting down the projector1. Press Power and a confirmation message
displays prompting you. If you don't respond in a few seconds, the message will disappear.
2. Press Power a second time. 3. The Power LED indicator flashes orange
slowly and fans stop.4. Disconnect the power cord from the wall socket if the projector will not be used in
an extended period of time.
II
II
Operation 65

MaintenanceCare of the projector
Your projector needs little maintenance. The only thing you need to do on a regular basis is to keep the lens clean.
Never remove any parts of the projector. Contact your dealer if other parts need replacing.
Cleaning the lensClean the lens whenever you notice dirt or dust on the surface.
• Use a canister of compressed air to remove dust. • If there is dirt or smears, use lens-cleaning paper or moisten a soft cloth with lens
cleaner and gently wipe the lens surface.
Never rub the lens with abrasive materials.
Cleaning the projector caseBefore you clean the case, turn the projector off using the proper shutdown procedure as described in "Shutting down the projector" on page 65 and unplug the power cord.
• To remove dirt or dust, wipe the case with a soft, lint-free cloth.• To remove stubborn dirt or stains, moisten a soft cloth with water and a neutral pH
detergent. Then wipe the case.
Never use wax, alcohol, benzene, thinner or other chemical detergents. These can damage the case.
Storing the projectorIf you need to store the projector for an extended time, please follow the instructions below:
• Make sure the temperature and humidity of the storage area are within the recommended range for the projector. Please refer to "Specifications" on page 69 or consult your dealer about the range.
• Retract the adjuster feet.• Remove the battery from the remote control.• Pack the projector in its original packing or equivalent.
Transporting the projectorIt is recommended that you ship the projector with its original packing or equivalent.
Maintenance66

LED Indicators
Status / ProblemsLED indicators
LED BehaviorPower Fan Temp
StandbyOrange solid on
Off Off Power LED slow flash
Power warm upGreen
blanking
Power on Green Off OffLight solid on sequence: Power->Key->Ring & OK
CoolingOrange blanking
Off Off Power LED slow flash
Fan1 error Off On OffRing & OK LED flash first and
then key LED flash (1.5 seconds interval)
Temp error Off Off OnRing & OK LED and Key LED
flash at the same time (1.5 seconds interval for LED flash)
Maintenance 67

TroubleshootingThe projector does not turn on.
No picture
Blurred image
Remote control does not work
The password is incorrect
Cause Remedy
There is no power from the power cable.
Plug the AC adapter into the DC IN socket on the projector, plug the power cord into the AC inlet on the AC adapter, plug the power cord into the power outlet. If the power outlet has a switch, make sure that it is switched on.
Attempting to turn the projector on again during the cooling process.
Wait until the cooling down process has completed.
Cause Remedy
The source is not turned on or connected correctly.
Turn the source on and check that the signal cable is connected correctly.
The projector is not correctly connected to the input signal device.
Check the connection.
The input signal has not been correctly selected.
Select the correct input signal with the / key on the projector or remote control.
Cause Remedy
The projection lens is not correctly focused.
Adjust the focus of the lens using the focus ring.
The projector and the screen are not aligned properly.
Adjust the projection angle and direction as well as the height of the unit if necessary.
Cause Remedy
The battery is out of power. Replace the battery with new one.
There is an obstacle between the remote control and the projector.
Remove the obstacle.
You are too far away from the projector. Stand within 7 meters (23 feet) of the projector.
Cause Remedy
You do not remember the password.Please see "Entering the password recall procedure" on page 30 for details.
Troubleshooting68
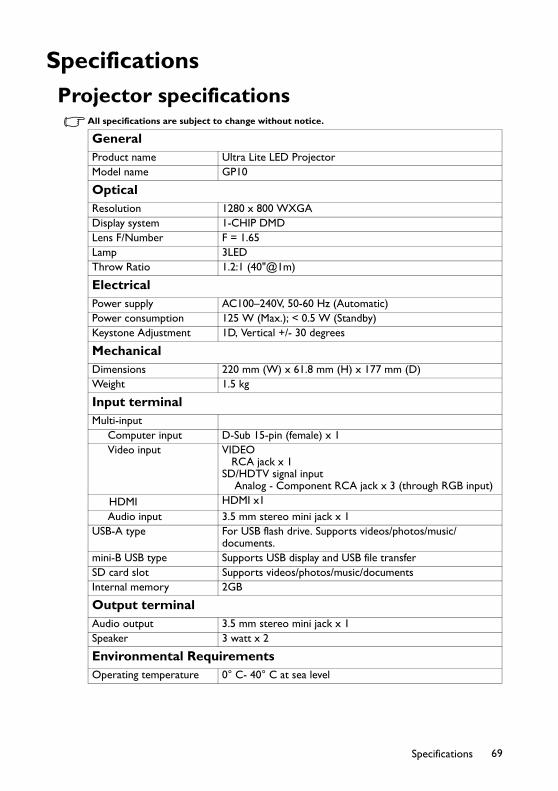
SpecificationsProjector specifications
All specifications are subject to change without notice.
GeneralProduct name Ultra Lite LED ProjectorModel name GP10
OpticalResolution 1280 x 800 WXGADisplay system 1-CHIP DMDLens F/Number F = 1.65 Lamp 3LEDThrow Ratio 1.2:1 (40"@1m)
ElectricalPower supply AC100–240V, 50-60 Hz (Automatic)Power consumption 125 W (Max.); < 0.5 W (Standby)Keystone Adjustment 1D, Vertical +/- 30 degrees
MechanicalDimensions 220 mm (W) x 61.8 mm (H) x 177 mm (D)Weight 1.5 kg
Input terminalMulti-input Computer input D-Sub 15-pin (female) x 1 Video input VIDEO
RCA jack x 1SD/HDTV signal input Analog - Component RCA jack x 3 (through RGB input)
HDMI HDMI x1 Audio input 3.5 mm stereo mini jack x 1USB-A type For USB flash drive. Supports videos/photos/music/
documents.mini-B USB type Supports USB display and USB file transferSD card slot Supports videos/photos/music/documentsInternal memory 2GB
Output terminalAudio output 3.5 mm stereo mini jack x 1Speaker 3 watt x 2
Environmental RequirementsOperating temperature 0° C- 40° C at sea level
Specifications 69
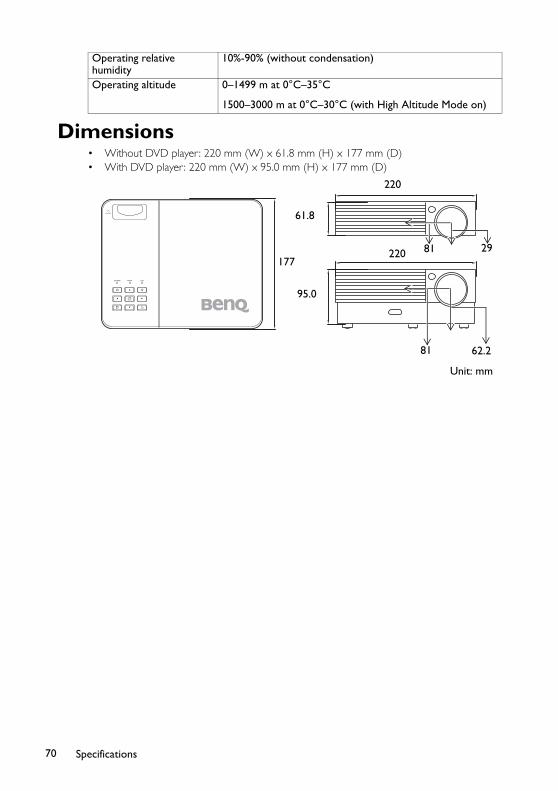
Dimensions• Without DVD player : 220 mm (W) x 61.8 mm (H) x 177 mm (D)• With DVD player : 220 mm (W) x 95.0 mm (H) x 177 mm (D)
Operating relative humidity
10%-90% (without condensation)
Operating altitude 0–1499 m at 0°C–35°C
1500–3000 m at 0°C–30°C (with High Altitude Mode on)
62.281
177220
61.8
Unit: mm
95.0
220
2981
Specifications70

Timing chartSupported timing for PC input
*Supported timing for 3D signal with frame sequential format.
Resolution ModeVertical Frequency (Hz)
Horizontal Frequency (kHz)
640 x 480
VGA_60 59.940 31.469VGA_72 72.809 37.861VGA_75 75.000 37.500VGA_85 85.008 43.269
720 x 400 720 x 400_70 70.087 31.469
800 x 600
SVGA_60 60.317 37.879SVGA_72 72.188 48.077SVGA_75 75.000 46.875SVGA_85 85.061 53.674
SVGA_120* 119.854 77.425
1024 x 768
XGA_60 60.004 48.363XGA_70 70.069 56.476XGA_75 75.029 60.023XGA_85 84.997 68.667
XGA_120* (Reduce Blanking)
119.989 97.551
1152 x 864 1152 x 864_75 75.00 67.500
1024 x 576BenQ Notebook
Timing60.0 35.820
1024 x 600BenQ Notebook
Timing64.995 41.467
1280 x 720 1280 x 720_60 60 45.000
1280 x 768 1280 x 768_60 59.870 47.776
1280 x 800
WXGA_60 59.810 49.702WXGA_75 74.934 62.795WXGA_85 84.880 71.554
WXGA_120* (Reduce Blanking)
119.909 101.563
1280 x 1024 SXGA_60 60.020 63.981SXGA_75 75.025 79.976
1280 x 960 1280 x 960_60 60.000 60.0001280 x 960_85 85.002 85.938
1360 x 768 1360 x 768_60 60.015 47.7121440 x 900 WXGA+_60 59.887 55.9351400 x 1050 SXGA+_60 59.978 65.3171680 x 1050 1680 x 1050_60 59.954 65.290640 x 480 @67Hz
MAC13 66.667 35.000
832 x 624@75Hz MAC16 74.546 49.7221024 x
768@75HzMAC19 75.020 60.241
1152 x 870@75Hz
MAC21 75.06 68.68
Specifications 71

Supported timing for HDMI inputPC timings:
*Supported timing for 3D signal with frame sequential format.
Resolution ModeVertical Frequency (Hz)
Horizontal Frequency (kHz)
640 x 480
VGA_60 59.940 31.469VGA_72 72.809 37.861VGA_75 75.000 37.500VGA_85 85.008 43.269
720 x 400 720 x 400_70 70.087 31.469
800 x 600
SVGA_60 60.317 37.879SVGA_72 72.188 48.077SVGA_75 75.000 46.875SVGA_85 85.061 53.674
SVGA_120* 119.854 77.425
1024 x 768
XGA_60 60.004 48.363XGA_70 70.069 56.476XGA_75 75.029 60.023XGA_85 84.997 68.667
XGA_120* (Reduce Blanking)
119.989 97.551
1152 x 864 1152 x 864_75 75.00 67.500
1024 x 576BenQ Notebook
Timing60.000 35.820
1024 x 600BenQ Notebook
Timing64.995 41.467
1280 x 720 1280 x 720_60 60 45.0001280 x 768 1280 x 768_60 59.870 47.776
1280 x 800
WXGA_60 59.810 49.702WXGA_75 74.934 62.795WXGA_85 84.880 71.554
WXGA_120* (Reduce Blanking)
119.909 101.563
1280 x 1024 SXGA_60 60.020 63.981SXGA_75 75.025 79.976
1280 x 960 1280 x 960_60 60.000 60.0001280 x 960_85 85.002 85.938
1360 x 768 1360 x 768_60 60.015 47.7121440 x 900 WXGA+_60 59.887 55.9351400 x 1050 SXGA+_60 59.978 65.3171680 x 1050 1680 x 1050_60 59.954 65.290
640 x 480@67Hz MAC13 66.667 35.000832 x 624@75Hz MAC16 74.546 49.772
1024 x 768@75Hz
MAC19 75.020 60.241
1152 x 870@75Hz
MAC21 75.06 68.68
Specifications72

Video timings:
Supported timing for Component-YPbPr input
Supported timing for Video input
Timing ResolutionVertical Frequency (Hz)
Horizontal Frequency (kHz)
480i 720 (1440) x 480 59.94 15.73480p 720 x 480 59.94 31.47576i 720 (1440) x 576 50 15.63576p 720 x 576 50 31.25
720/50p 1280 x 720 50 37.5720/60p 1280 x 720 60 45.001080/24P 1920 x 1080 24 271080/25P 1920 x 1080 25 28.131080/30P 1920 x 1080 30 33.751080/50i 1920 x 1080 50 28.131080/60i 1920 x 1080 60 33.751080/50P 1920 x 1080 50 56.251080/60P 1920 x 1080 60 67.5
Timing ResolutionVertical Frequency (Hz)
Horizontal Frequency (kHz)
480i 720 x 480 59.94 15.73480p 720 x 480 59.94 31.47576i 720 x 576 50 15.63576p 720 x 576 50 31.25
720/50p 1280 x 720 50 37.5720/60p 1280 x 720 60 45.001080/50i 1920 x 1080 50 28.131080/60i 1920 x 1080 60 33.751080/24P 1920 x 1080 24 271080/25P 1920 x 1080 25 28.131080/30P 1920 x 1080 30 33.751080/50P 1920 x 1080 50 56.251080/60P 1920 x 1080 60 67.5
Video modeVertical Frequency (Hz)
Horizontal Frequency (kHz)
NTSC 60 15.73PAL 50 15.63
SECAM 50 15.63PAL-M 60 15.73PAL-N 50 15.63PAL-60 60 15.73
NTSC4.43 60 15.73
Specifications 73

Warranty and Copyright information74
Warranty and Copyright informationPatents
This BenQ projector is covered by the following patents:
U.S. patents 6,837,608; 7,275,834; 7,181,318; TW patents 202690; 205470; I228635; I259932; China Patents ( 中国发明专利 ) ZL01143168.7; ZL03119907.0; ZL200510051609.2
Limited warrantyBenQ warrants this product against any defects in material and workmanship, under normal usage and storage.
Proof of purchase date will be required with any warranty claim. In the event this product is found to be defective within the warranty period, BenQ's only obligation and your exclusive remedy shall be replacement of any defective parts (labor included). To obtain warranty service, immediately notify the dealer from which you purchased the product of any defects.
Important: The above warranty shall be void if the customer fails to operate the product in accordance with BenQ's written instructions, especially the ambient humidity must be in-between 10% and 90%, temperature in-between 0°C and 35°C, altitude lower than 4920 feet, and avoiding to operate the projector in a dusty environment. This warranty gives you specific legal rights, and you may have other rights which vary from country to country.
For other information, please visit www.BenQ.com.
Copyright© 2012 BenQ Corp. Specification may vary by region, please visit your local stores for details. Actual product’s features and specifications are subject to change without notice. This material may include corporate names and trademarks of third parties which are the
properties of the third parties respectively. Apple, the Apple logo, iPad, iPhone, iPod, iPod classic, iPod nano, iPod shuffle, and iPod touch are trademarks of Apple Inc., registered in the U.S. and other countries.
DisclaimerBenQ Corporation makes no representations or warranties, either expressed or implied, with respect to the contents hereof and specifically disclaims any warranties, merchantability or fitness for any particular purpose. Further, BenQ Corporation reserves the right to revise this publication and to make changes from time to time in the contents hereof without obligation to notify any person of such revision or changes.
*DLP, Digital Micromirror Device and DMD are trademarks of Texas Instruments. Others are copyrights of their respective companies or organizations.