grade 2 scales · a guide to abrsm grade 2 scales page 1 scales in parallel motion (a) scales with...
TRANSCRIPT

Grade 2 ScalesA guide for students and teachers
for ABRSM Grade 2 scales by
FERGUS BLACK© Fergus Black 2012, rev. 2014
New topics at Grade 2There are a substantial number of new things to learn in Grade 2, if you are coming from Grade 1 - there are more keys to learn, of course, and also four new things:– • Scales in parallel motion (i.e. both hands together moving in the same direction) • Chromatic Scales • Arpeggios • New Broken Chord pattern

INDEXScales in Parallel Motion – (A) Scales with Standard Fingering – Introducing E major ............ page 1
Scales in Contrary motion (i) E major ........................................................................................ page 3
Scales in Parallel Motion – (A) Scales with Standard Fingering (i) E major .............................. page 4
Scales in Contrary Motion (ii) C major ...................................................................................... page 5
Thumbs ........................................................................................................................................ page 5
Scales in Parallel Motion – (A) Scales with Standard Fingering (ii) D Major ............................ page 6
Legato Playing ............................................................................................................................ page 6
The Brain ..................................................................................................................................... page 6
Speed ......................................................................................................................................... page 7
Fingering ..................................................................................................................................... page 7
Prompt Response ......................................................................................................................... page 7
More Scales in Parallel Motion – (A) Scales with Standard Fingering (iii) :– d minor and G major ....................................................................................................... page 8 g minor and A major ....................................................................................................... page 9 e minor .......................................................................................................................... page 10 Scales in Parallel Motion – (B) Scales with non-standard fingering (i) F Major ....................... page 10
Black Note Revision .................................................................................................................. page 11
Melodic Minor scales ................................................................................................................ page 11
Chromatic Scales (A) Right Hand ............................................................................................ page 12
Chromatic Scales (B) Left Hand .............................................................................................. page 13
Arpeggios – (i) All White Notes: G Majors, e and d Minors .................................................... page 14
Arpeggios – (ii) Second Note is Black: D and A Majors, g Minor ............................................ page 16
Broken Chords – Grade 1 Revision ........................................................................................... page 17
Broken Chords – (A) Right Hand - F major and e minor ........................................................ page 17
Broken Chords – (A) Left Hand - F major and e minor .......................................................... page 18
Practice Rota ............................................................................................................................. page 19

A Guide to ABRSM Grade 2 scales page 1
Scales in Parallel Motion(A) Scales with Standard Fingering Introducing E majorThe hardest thing to do is to play scales with hands together in parallel motion. I think of this as a milestone of achievement, when the student manages it, although they may need to be persuaded that it will become second nature in time.
I start with E major - you might think C major would be easier, but I would argue that E major has ‘guides’ - the black notes help with the pattern of fingering: 1 - 2 - 3 - 1 - 2 - 3 - 4. (Chopin used to start his students off with B major (right hand) because it helps establish that fingering pattern). E major in parallel motion is not in the Grade 2 ABRSM syllabus, but please bear with me.
So, the first thing to do, is learn the notes and patterns for the two hands separately for E major.
(up) E - F # - G
# - A - B - C # - D
# - E (down) E - D # - C
# - B - A - G # - F
# - E
I’d suggest that you begin with the right hand, one octave, noting that the 4th finger plays D #. This is one-to-one
correspondence: the 4th finger plays D #, and D
# is only played by the 4th finger. Be absolutely sure about this: it is possible to play scales with all manner of fingerings, but the important thing is to lay down a foundation for the future, and learn the standard pattern. I cannot emphasise this too much.
Say to yourself as you play:
“White Black Black - White White Black Black - White”
Note in passing: it is the same pattern going down.
Now play E major with the Right Hand - one octave, up and down.
Note (as you play) that the 4th finger plays the D #.
W B B W W B B W B B W W B B WE Major
The notes: (up) E - F # - G
# - A - B - C # - D
# - E (down) E - D # - C
# - B - A - G # - F
# - E
There are four sharps: F # - G
# – C # - D
#
Left Hand 4th finger on 2nd note: F# Right Hand 4th finger on 7th note: D #
The 3rd fingers go down together on the 3rd and 6th notes: G # and C#

A Guide to ABRSM Grade 2 scales page 2
Next, extend this pattern to two octaves. Make sure that the 4th finger plays the D# all four times - especially the last! Some people find it easier to find the notes if they can see a visual plan of the keyboard; others like to follow staff notation. In the long run, you should try to get used to reading the standard notation, to make the connexion between what you play and the key signature of four sharps.
Check that you know the notes by closing the keyboard (or looking away), and saying the note names up and down:–
(up) E - F # - G
# - A - B - C # - D
# - E (down) E - D # - C
# - B - A - G # - F
# - E
and know that the black notes are F # - G
# – C # - D
#
Then, do the same with the left hand:
Play a scale of E major with the Left Hand - one octave. Note that the 4th finger plays F #
When you extend this to two octaves, make sure the 4th finger plays the all the F #s, especially the last one! I’ve put a box
round it.
Again, this might be easier if you can see an image of the keyboard - some people learn in a more visual way:–
Start here and read to the left first, then back up to the right!
*

A Guide to ABRSM Grade 2 scales page 3
Scales in Contrary motion(i) E majorNext, to consolidate the feel of E major and the fingering that goes with it, try the scale in contrary motion. Detailed work at this early stage will pay dividends later. It is worthwhile spending time to get it right.
Start with one octave; both thumbs begin on the same note.
You will see that the colour of the notes is the same in both hands at the same time - if the right hand has a black note, then the left has a black note, too. (it is just that the gaps between the notes are different in the two hands).
Extend this pattern to two octaves. Try and visualise what the hands are doing. Try not to be like a table-tennis umpire, looking back and forward between the hands.
Next, turn the left hand upside down, and start from the lowest note - this is just like starting in the middle of the scale at the bottom of page 2, marked *.

A Guide to ABRSM Grade 2 scales page 4
The scale of E major, with the Left Hand alone looks like this. Remember: the 4th finger goes on F #.
o octave
Scales in Parallel Motion(A) Scales with Standard Fingering (i) E majorAre you ready? Try one octave hands together, parallel motion. PLAY THIS REALLY SLOWLY! Note that the
E Major
The notes: (up) E - F # - G
# - A - B - C # - D
# - E (down) E - D # - C
# - B - A - G # - F
# - E
There are four sharps: F # - G
# – C # - D
#
Left Hand 4th finger on 2nd note: F# Right Hand 4th finger on 7th note: D #
The 3rd fingers go down together on the 3rd and 6th notes: G # and C#
Finally, two octaves: Hopefully by now you know what the notes are, but I’ll tell you from experience that the note that is most likely to have the wrong fingering is the last D# in the right hand - I've put a box round it.
Look at the left hand when going up, and the right hand when coming down. Here's why: when playing up the scale (i.e. from left to right), it is the left hand that has questions to answer - "After each thumb note, is the next note played by the 3rd or the 4th finger?”
Coming down, that question is asked of the right hand, so when coming down (i.e. playing from right to left), look at the right hand.
Do your very best not to miss out fingers - so many people get into trouble playing 5-4-3-1 from the top in the RH.

A Guide to ABRSM Grade 2 scales page 5
Scales in Contrary Motion(ii) C majorIf you did Grade 1, then you already know C Major in contrary motion - now, however, it is two octaves in each direction.
C Major
The notes: (up) C - D - E - F - G - A - B - C (down) C - B - A - G - F - E - D - C
There are no sharps or flats
Left Hand 4th finger on 2nd note: D Right Hand 4th finger on 7th note: B
The 3rd fingers go down together on the 3rd and 6th notes: E and G
ThumbsStop learning scales for a moment, and concentrate on your thumbs
Take a scale - C major is as good as any, with the Right Hand. Look at your hand as you play. Look specifically at the thumb: the thumb should move in a smooth arc from the C to the F. There shouldn’t be a jerky, last-moment lunge for the F. Instead, as soon as you have played the C, and as you play the D and E, move the thumb in a smooth trajectory towards the F.
(Some people find this really difficult: their thumb moves the wrong way - as they play the D and E, the thumb moves to the left, not the right as it should. Are you one of them?)
Here are a couple of exercises to help (watch the fingering! - the thumb plays the first and fourth notes).
Start by playing only the first and fourth notes of each bar - with the second and third fingers gently touching the D and E notes. (You will note that this is not even possible if your fingers are not curved: curved fingers allow the thumb to pass freely under the hand)
(1) This Exercise is for the Right Hand:–
(2) This Exercise is for the Left Hand:–

A Guide to ABRSM Grade 2 scales page 6
Scales in Parallel Motion(A) Scales with Standard Fingering (ii) D MajorMany other scales have the same standard fingering as E major .
For Grade 2, every scale you need, (except F major) has that standard fingering pattern. Here, for example is D major, which should be known from Grade 1. Remind yourself of Fish and Chips - F
# and C # are the two accidentals. Make
sure the 3rd fingers of both hands go down together on the F # and the B. Look at the notes with the boxes round them,
and take especial care to play them with the 4th fingers.
If in any doubt, close the keyboard so you can’t see the notes, and say the names of the notes - both going up:
D Major
The notes: (up) D - E - F # - G -A -B - C
# - D (down) D - C # - B - A - G - F
# - E -D
There are two sharps: F # and C
#
Left Hand 4th finger on 2nd note: E Right Hand 4th finger on 7th note: C #
The 3rd fingers go down together on the 3rd and 6th notes: F # and B
Legato PlayingClearly, one would wish for mistake-free performance, but there is more to scales than mechanical repetition. Aim for an even legato (for the pianist, legato means joining the bottoms of the notes together).
Think of the notes in groups of 4: don’t hammer every note - think instead about smooth words, like glide and flow, If you count “1 and 2 and 3 and 4 and ” before you play, that will help.
Aim for the top note, making a gradual crescendo on the way up, and diminuendo on the way down.
C c

A Guide to ABRSM Grade 2 scales page 7
The BrainApparently, the part of the brain which lights up when you are making music, remains stubbornly unlit when you practise scales - in other words, the brain doesn’t see them as music. Please do everything you can to persuade yourself that you are making music: shape the scale up and down, vary what you are doing - rhythms and articulations.
In her book “On Teaching The Piano” (Novello, 1954), Hetty Bolton has a long and interesting list of different ways to play scales, which is hard to better. Here are some suggestions that I think are appropriate to this grade:–
Vary the dynamics: • Play the scale p (or F , or f );
Vary the articulation: • Play staccato; • Play detached;
Vary the rhythm: • Play in a dotted rhythm; • Play in a scotch snap rhythm.
• Crescendo on the upward scale from p to f , and back to p going down;
To which one might add: start at the top and go down and then up. Invariably, scales are worse coming down. They get far less practice than going up.
Speed The Handbook “These Music Exams”, published by the ABRSM, helpfully recommends minimum speeds for piano scales at Grade 2 as follows:
Scales q = 66
Arpeggios and Broken chords q= 63
Did you spot the word “minimum”?
Speed is not the most important thing here: accuracy is important, as are evenness, legato, and fluency.
FingeringWhy is fingering important? I could write a book! but largely there are three reasons:
(1) Learning patterns which can be applied in real music.
(2) Laying down a foundation for more advanced work. For example, if you try and play a grade 8 scale, such as D major in 6ths at a fast speed, you will come unstuck if the fingering isn’t right.
(3) The brain learns better if the same action is repeated. It works from gynmasts.
You have possibly heard that examiners are blind: in other words, they don’t look at fingering - so you might think you could play scales with any old fingering, even playing the odd note with your nose, if you can. However, examiners do listen, and uncertain fingering shows itself in the sound.
Prompt ResponseIn exams, respond quickly to the scale asked for. By all means think before you play, but try and get the thinking part over quickly - these scales need to be second nature.

A Guide to ABRSM Grade 2 scales page 8
More Scales in Parallel Motion(A) Scales with Standard Fingering (iii) G and A Majors: - e, d and g MinorsD minor
Students who did Grade 1, already know the next two scales:
D minor
The notes: (up) D - E - F - G - A - B b - C - D (down) D - C - B
b - A - G - F - E - D
The black note is B b
Left Hand 4th finger on 2nd note: E Right Hand 4th finger on 7th note: C
The 3rd fingers go down together on the 3rd and 6th notes: F and B b
G majorG Major
The notes: (up) G - A - B - C - D - E - F # - G (down) G - F
# - E - D - C - B - A- G
The black note is F #
Left Hand 4th finger on 2nd note: A Right Hand 4th finger on 7th note: F #
The 3rd fingers go down together on the 3rd and 6th notes: B and E
CHECK: pause on a B, and check that you are actually playing it with the 3rd finger in each hand.
A short note on minor scalesABRSM Grades 1 and 2 allow the student to choose one of three different forms of the minor scales. In order to keep things simple (and to avoid having to explain at this early stage why there are different forms of the minor scale), I suggest students learn only the natural minor. The student can immediately see that, say, E minor and G major are related, by virtue of having the same notes and key signature. (Rather oddly, the natural minor is the one option omitted in the ABRSM’s own scale book. Perhaps because it is quite a new option.)

A Guide to ABRSM Grade 2 scales page 9
The remaining scales in this section are new for students who did Grade 1 scales.
G minor G minor
The notes: (up) G - A- B b - C - D - E
b - F - G (down) G - F - E b - D - C - B
b - A - G
The black notes are B b and E
b
Left Hand 4th finger on 2nd note: A Right Hand 4th finger on 7th note: F
3rd fingers go down together on the 3rd and 6th notes: B b and E
b
A major
A Major
The notes: (up) A - B - C # - D - E - F
# - G # - A (down) A - G
# - F # - E - D - C
# - B - A
The black notes are C #, F
# and G #
Left Hand 4th finger on 2nd note: B Right Hand 4th finger on 7th note: G #
The 3rd fingers go down together on the 3rd and 6th notes: C # and F
#
A Guide to ABRSM Grade 2 scales page 10
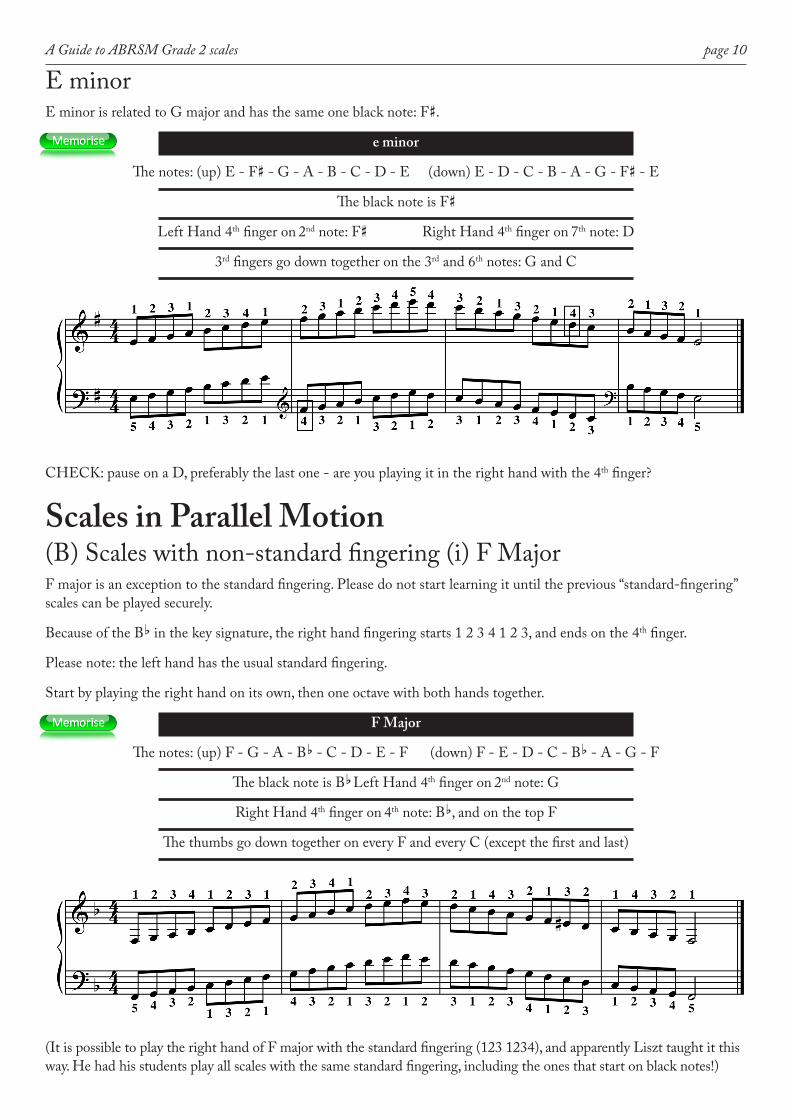
E minor E minor is related to G major and has the same one black note: F
#.
e minor
The notes: (up) E - F # - G - A - B - C - D - E (down) E - D - C - B - A - G - F
# - E
The black note is F #
Left Hand 4th finger on 2nd note: F # Right Hand 4th finger on 7th note: D
3rd fingers go down together on the 3rd and 6th notes: G and C
CHECK: pause on a D, preferably the last one - are you playing it in the right hand with the 4th finger?
Scales in Parallel Motion(B) Scales with non-standard fingering (i) F MajorF major is an exception to the standard fingering. Please do not start learning it until the previous “standard-fingering” scales can be played securely.
Because of the B b in the key signature, the right hand fingering starts 1 2 3 4 1 2 3, and ends on the 4th finger.
Please note: the left hand has the usual standard fingering.
Start by playing the right hand on its own, then one octave with both hands together.
F Major
The notes: (up) F - G - A - B b - C - D - E - F (down) F - E - D - C - B
b - A - G - F
The black note is B b Left Hand 4th finger on 2nd note: G
Right Hand 4th finger on 4th note: B b, and on the top F
The thumbs go down together on every F and every C (except the first and last)
(It is possible to play the right hand of F major with the standard fingering (123 1234), and apparently Liszt taught it this way. He had his students play all scales with the same standard fingering, including the ones that start on black notes!)

A Guide to ABRSM Grade 2 scales page 11
Black Note RevisionAt Grade 2, I don’t worry too much about the theory of why certain scales have certain black notes, and why some of them are in the key signature, and others aren’t. I don’t worry at this stage about keeping the accidentals in the order in which they appear in the key signature - there isn’t much point if the theory is not in place.
Since children are good at memorising, I simply get them to memorise which scales have which black notes. Here is a list to help:–
MAJORSC major has no sharps and no flats
G major has an F #
D major has F # and C
#
A major has a C #, an F
#, and a G #
F major has a B b
MINORSe minor has an F
#
d minor has a B b
g minor has a B b, and an E
b

A Guide to ABRSM Grade 2 scales page 12
Chromatic Scales(A) Right HandChromatic Scales are scales that are coloured - that's what 'chromatic' means - they have both black and white notes. Young students may need to be shown that there are twelve different notes, not seven.
Start on a mini-scale of F to B. Put the thumb on every white note and the 3rd finger on every black note.
Try not to let the hand rock forward and backward - move your fingers, and not your wrist. You could balance a coin on the back of your hand to check - if it falls off there is (I find an old UK penny best at 31mm and 9.4 grams. The 2p coin at 25.9mm and 7.12 grams is a bit small and light, but will do. In the USA, a half-dollar is good. I fear that if you are in the Eurozone, there isn’t a satisfactory coin to play with, unless you kept some pre-Euro coins!
Next, extend this Right Hand pattern to a wider selection of notes, making sure that when you get to two white notes together, that you play them with the 1st and 2nd fingers.
You’ll probably get the hang of this very quickly - it is easy with the right hand going up. But coming down, it is too easy to get wrong: make sure that the second finger and the thumb aren’t in the wrong order on the two adjacent white notes. It should be:
2nd finger on F - thumb on E
2nd finger on C - thumb on B

A Guide to ABRSM Grade 2 scales page 13
(For amusement, try starting on different notes)
Chromatic Scales(B) Left HandStart with the same mini-scale that you used for the Right Hand on page 12.
In the extended scale, for the Left Hand, the fingering problem happens on the way up:
2nd finger on E - thumb on F
2nd finger on B - thumb on D
A Guide to ABRSM Grade 2 scales page 14
Arpeggios(i) All White Notes: G Majors, e and d MinorsAnother of the major new technical exercises at Grade 2 is the Arpeggio
In the Olde Days, there were one octave arpeggios at Grade 1 that made a useful introduction to the two octave arpeggio demanded at Grade 2. Alas, they are no longer included.
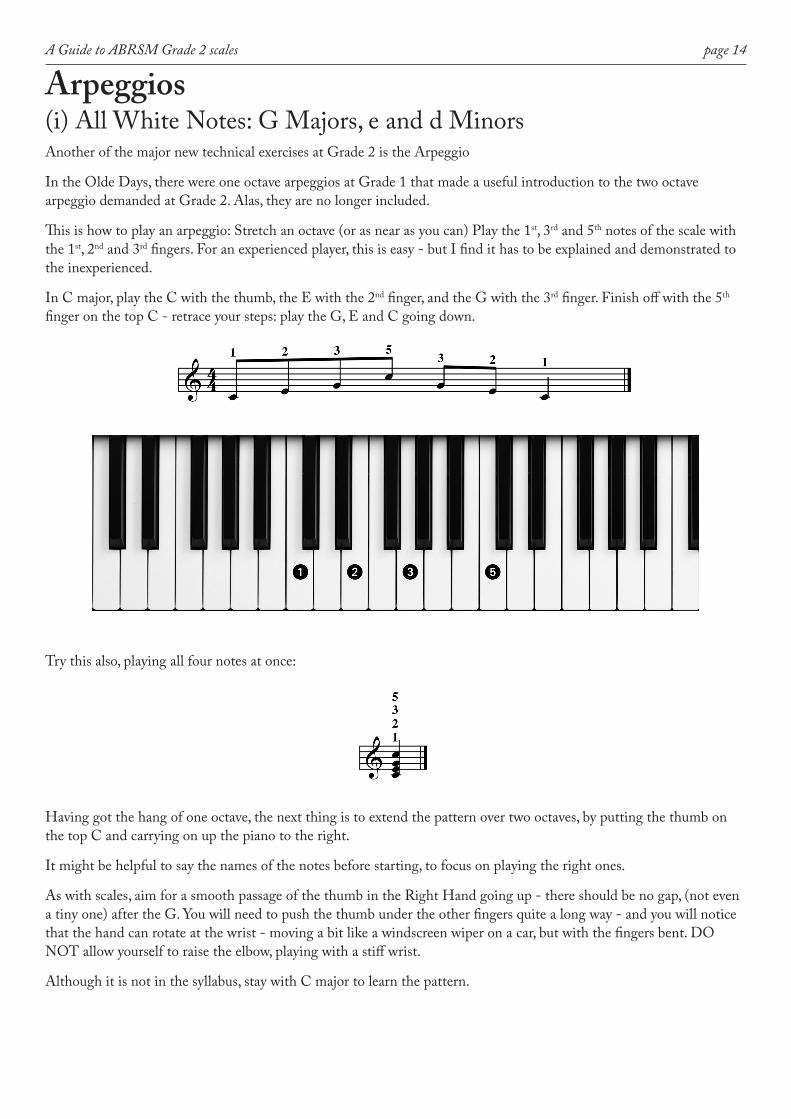
This is how to play an arpeggio: Stretch an octave (or as near as you can) Play the 1st, 3rd and 5th notes of the scale with the 1st, 2nd and 3rd fingers. For an experienced player, this is easy - but I find it has to be explained and demonstrated to the inexperienced.
In C major, play the C with the thumb, the E with the 2nd finger, and the G with the 3rd finger. Finish off with the 5th finger on the top C - retrace your steps: play the G, E and C going down.
Try this also, playing all four notes at once:
Having got the hang of one octave, the next thing is to extend the pattern over two octaves, by putting the thumb on the top C and carrying on up the piano to the right.
It might be helpful to say the names of the notes before starting, to focus on playing the right ones.
As with scales, aim for a smooth passage of the thumb in the Right Hand going up - there should be no gap, (not even a tiny one) after the G. You will need to push the thumb under the other fingers quite a long way - and you will notice that the hand can rotate at the wrist - moving a bit like a windscreen wiper on a car, but with the fingers bent. DO NOT allow yourself to raise the elbow, playing with a stiff wrist.
Although it is not in the syllabus, stay with C major to learn the pattern.

A Guide to ABRSM Grade 2 scales page 15
Other keysIt is time to apply the pattern to different keys, when you can play the arpeggio with your eyes closed.
G Major - Right HandFor G major, first of all remember that you are playing the 1st, 3rd and 5th notes of the scale with the 1st, 2nd and 3rd fingers. You know the scale of G major, so you know the notes are G, B and D.
“The arpeggio of G major has the notes G, B and D”
G Major - Left HandThe arpeggios at Grade 2 are played hands separately. The Left Hand plays the same notes as the Right Hand, but an octave lower.
(N.B. going down, there should be no gap after the B, before the G.)
Since the thumb is heavier than the other fingers, there is a natural tendency for the notes played by the thumb to be heavier. You can counteract that by thinking in 3/4 not 6/8.
A Guide to ABRSM Grade 2 scales page 16
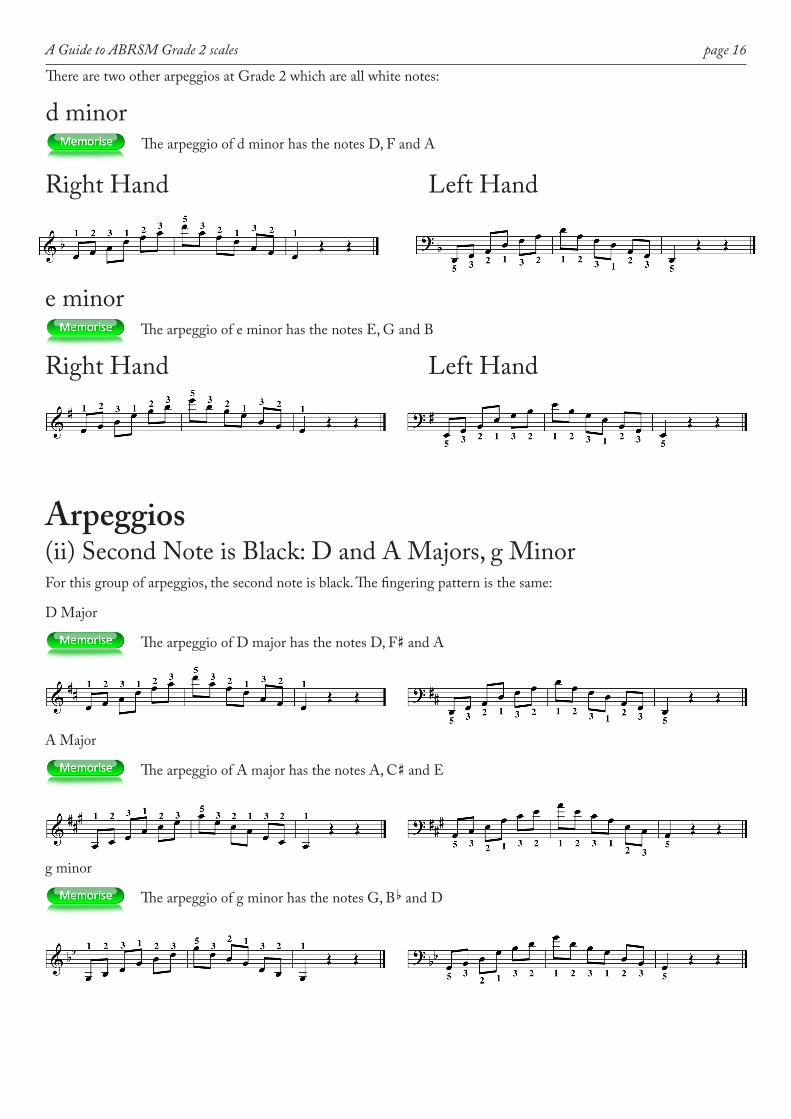
There are two other arpeggios at Grade 2 which are all white notes:
d minor The arpeggio of d minor has the notes D, F and A
Right Hand Left Hand
e minor The arpeggio of e minor has the notes E, G and B
Right Hand Left Hand
Arpeggios(ii) Second Note is Black: D and A Majors, g MinorFor this group of arpeggios, the second note is black. The fingering pattern is the same:
D Major
The arpeggio of D major has the notes D, F # and A
A Major
The arpeggio of A major has the notes A, C # and E
g minor
The arpeggio of g minor has the notes G, B b and D
A Guide to ABRSM Grade 2 scales page 17
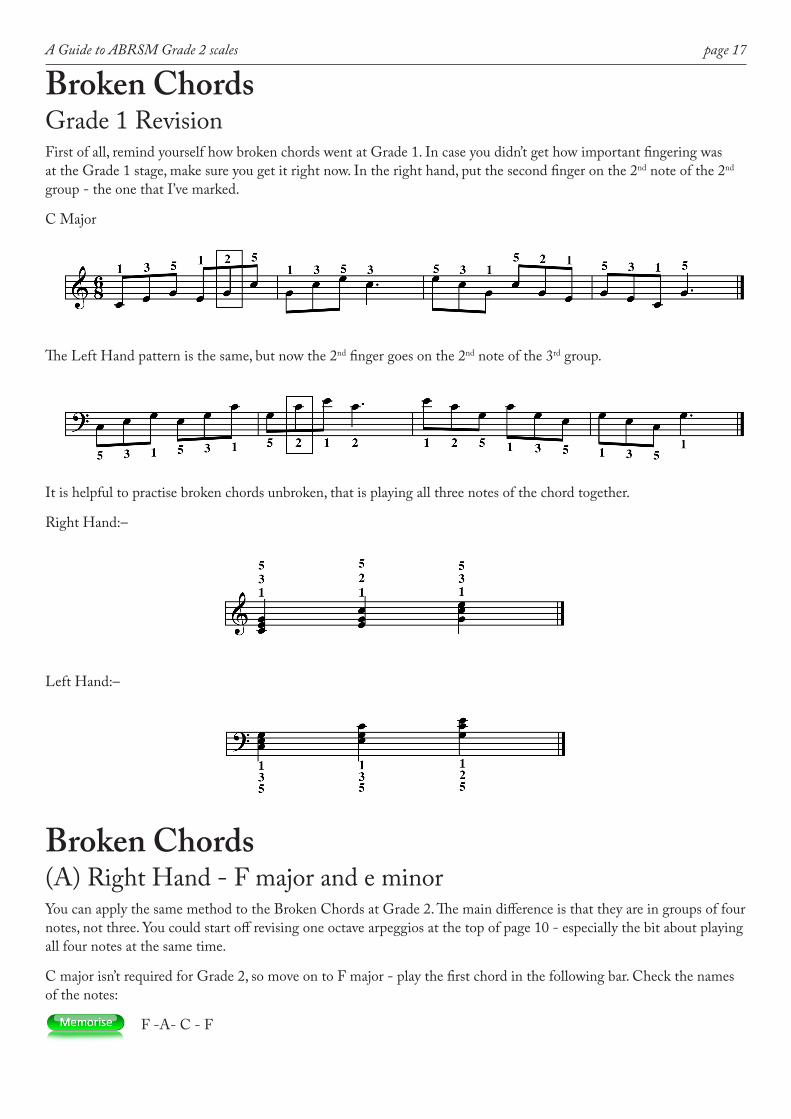
Broken ChordsGrade 1 RevisionFirst of all, remind yourself how broken chords went at Grade 1. In case you didn’t get how important fingering was at the Grade 1 stage, make sure you get it right now. In the right hand, put the second finger on the 2nd note of the 2nd group - the one that I’ve marked.
C Major
The Left Hand pattern is the same, but now the 2nd finger goes on the 2nd note of the 3rd group.
It is helpful to practise broken chords unbroken, that is playing all three notes of the chord together.
Right Hand:–
Left Hand:–
Broken Chords(A) Right Hand - F major and e minorYou can apply the same method to the Broken Chords at Grade 2. The main difference is that they are in groups of four notes, not three. You could start off revising one octave arpeggios at the top of page 10 - especially the bit about playing all four notes at the same time.
C major isn’t required for Grade 2, so move on to F major - play the first chord in the following bar. Check the names of the notes:
F -A- C - F
A Guide to ABRSM Grade 2 scales page 18
Play the other chords - N.B. all the chords have the same three notes, but in a different order. Note also, the change of fingering on the second chord. Please strive to get this right.
From here, it is relatively straightforward to play the chords broken:–
F C A F
F A C FAgain, I would encourage you to play this with your eyes closed, so that you get the feel of it: being able to visualise the keyboard is fundamental.
If you can play F major with your eyes closed, then e minor is exactly the same, but starting on E - (both Broken Chords at Grade 2 are all white notes.)
e minor
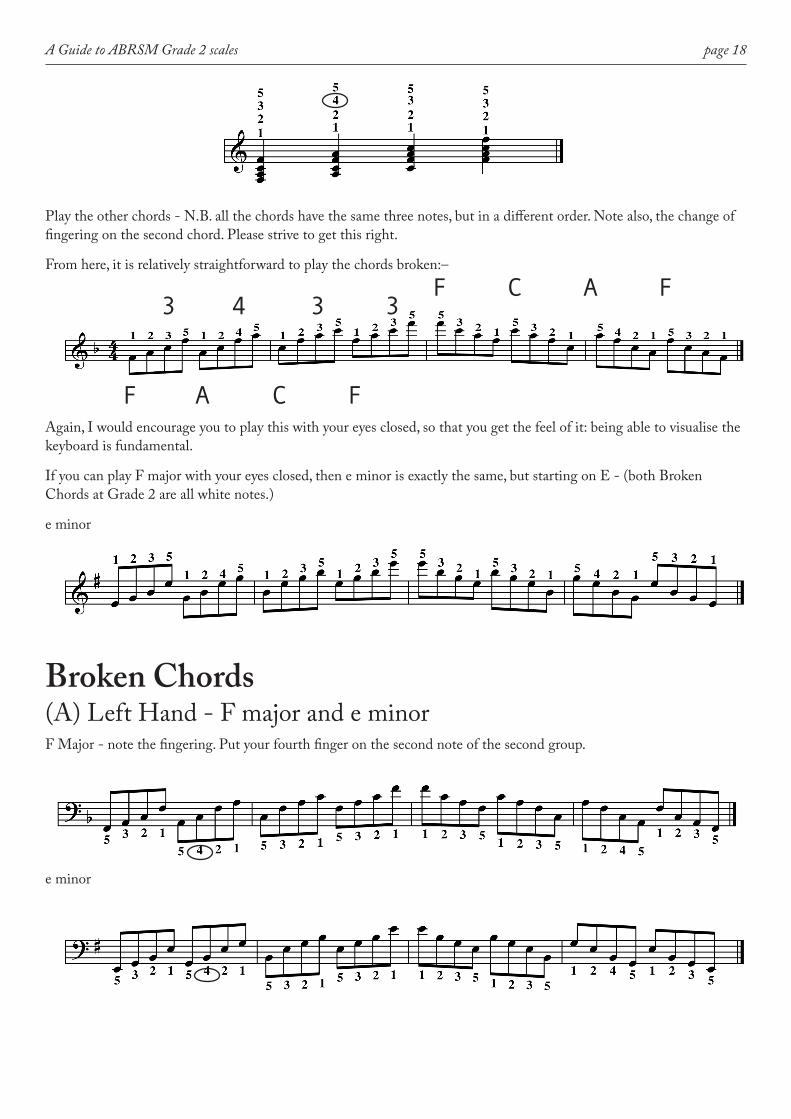
Broken Chords(A) Left Hand - F major and e minorF Major - note the fingering. Put your fourth finger on the second note of the second group.
e minor
IMAGE - Grade 2 broken chord of e minor left hand
3 4 3 3

A Guide to ABRSM Grade 2 scales page 19
Practice RotaFor use in the three or four weeks leading up to an exam (ABRSM Grade 2)
Mon
day
Tues
day
Wed
nesd
ayTh
ursd
ayFriday
Saturday
Sund
ay
Scal
es: r
ight
han
d (tw
o oc
tave
s):
G m
ajor
D m
ajor
A m
ajor
F m
ajor
e m
inor
g m
inor
d m
inor
Scal
es: l
eft h
and
(two
octa
ves)
G m
ajor
D m
ajor
A m
ajor
F m
ajor
e m
inor
g m
inor
d m
inor
Scal
es: h
ands
toge
ther
(tw
o oc
tave
s)G
maj
orD
maj
orA
maj
orF
maj
or
e m
inor
g m
inor
d m
inor
Scal
es: i
n co
ntra
ry m
otio
nE
maj
orC
maj
or
Chr
omat
ic s
cale
s st
artin
g on
DRi
ght H
and
Left
Han
dAr
pegg
ios:
righ
t han
d (tw
o oc
tave
s):
G m
ajor
D m
ajor
A m
ajor
g m
inor
d m
inor
Arpe
ggio
s: le
ft ha
nd (t
wo
octa
ves)
G m
ajor
D m
ajor
A m
ajor
g m
inor
d m
inor
Brok
en C
hord
s: ri
ght h
and
(two
octa
ves)
:e
min
orF
maj
or
Brok
en C
hord
s: le
ft ha
nd (t
wo
octa
ves)
e m
inor
F m
ajor
Scal
es (s
imila
r mot
ion)
!G
, D, A
, F m
ajor
s
E, D
, G m
inor
s !(n
atur
al o
r har
mon
ic o
r m
elod
ic a
t can
dida
te’s
choi
ce) !
hand
s tog
ethe
r and
se
para
tely
2
octa
ves
Con
trar
y-m
otio
n sc
ales
!C,
E m
ajor
s ha
nds b
egin
ning
on
the
key-
note
(uni
son)
, 2
octa
ves !
!
Chr
omat
ic sc
ale !
begi
nnin
g on
D
hand
s sep
arat
ely
1 oc
tave
!!
Arp
eggi
os !
G, D
, A m
ajor
s
D, G
min
ors
hand
s sep
arat
ely
2 oc
tave
s ! !
Brok
en c
hord
s !F
maj
or
E m
inor!
hand
s sep
arat
ely,
as
pat
tern
bel
ow
Syllabus
AB
RSM
Gra
de 2
pia
no s
cale
s (fr
om 2
011)