guia referencia asw hysys
DESCRIPTION
Guia HysysTRANSCRIPT

Aspen Simulation Workbook with Aspen Hysys Reference Guide
Aspen Simulation Workbook with Aspen Hysys Reference Guide
2
1. Add Variables and Create Table
A. Bringing a Simulation Model into ASW
1. Open Excel, enable Aspen Simulation Workbook
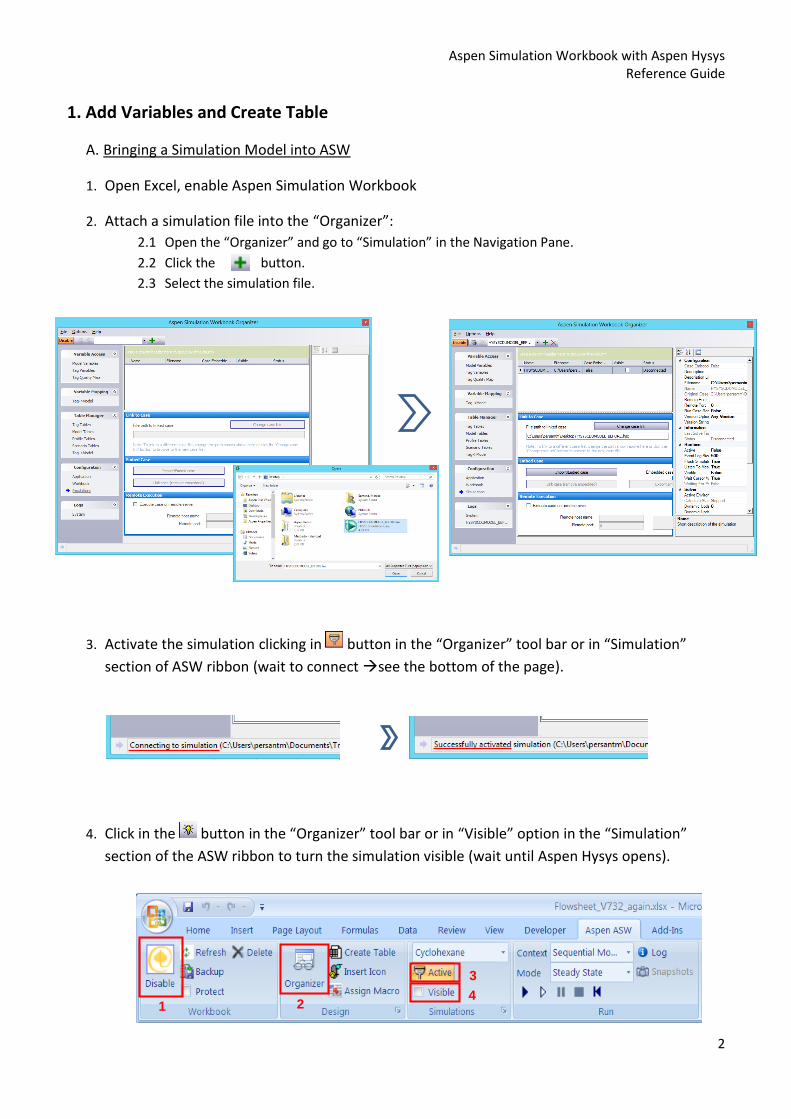
2. Attach a simulation file into the “Organizer”:
2.1 Open the “Organizer” and go to “Simulation” in the Navigation Pane.
2.2 Click the button.
2.3 Select the simulation file.
3. Activate the simulation clicking in button in the “Organizer” tool bar or in “Simulation”
section of ASW ribbon (wait to connect see the bottom of the page).
4. Click in the button in the “Organizer” tool bar or in “Visible” option in the “Simulation”
section of the ASW ribbon to turn the simulation visible (wait until Aspen Hysys opens).
1 2
3
4

Aspen Simulation Workbook with Aspen Hysys Reference Guide
3
B. Add Variable to the Organizer
1. Copy variables from simulation to the “Organizer” :
1.1 Select variable (s) in the simulation interface and copy (Control-C or Edit/Copy)
1.2 Return to the “Organizer” and go to “Model Variables” in Navigation Pane.
1.3 Right click on the Variable Grid and select “Paste Variables from Clipboard” or click in
button in the “Organizer” tool bar. (NOTE: The Control-V function does not work to paste
variables in the “Organizer”)
C. Create a Table
1. In Excel, click on "Organizer" under Aspen ASW ribbon.
2. Remove and add column header as desired.

Aspen Simulation Workbook with Aspen Hysys Reference Guide
4
3. Select the desired variables, then click on " or right click and select “Create Table"
4. Select the cell where the table is going to be added in the spreadsheet
5. The Simulation Workbook Table wizard will appear. User can use the wizard to customize the table format.
Aspen Simulation Workbook with Aspen Hysys Reference Guide
5
2. Add limits to Variables
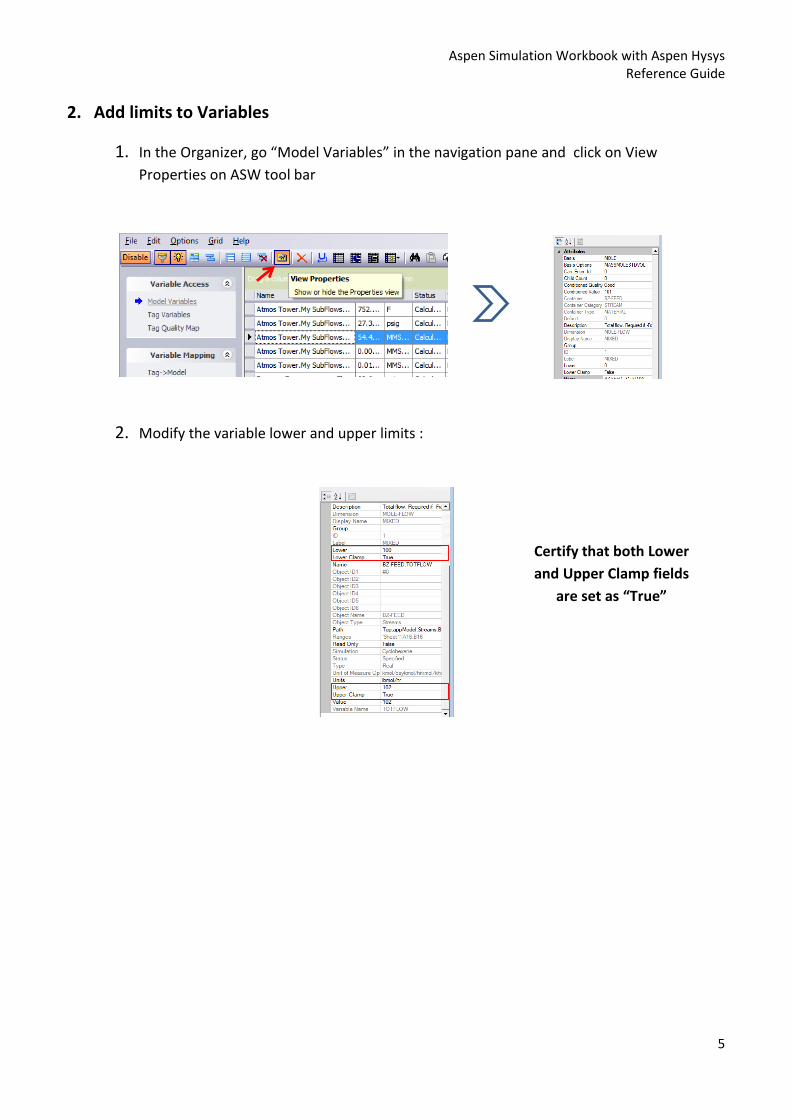
1. In the Organizer, go “Model Variables” in the navigation pane and click on View
Properties on ASW tool bar
2. Modify the variable lower and upper limits :
Certify that both Lower
and Upper Clamp fields
are set as “True”
Aspen Simulation Workbook with Aspen Hysys Reference Guide
6
3. Adding Detail to Interface
Improve the model adding Functions and Macros:
- Update plant data
- Synchronize models with tags
- Update plant data
- Synchronize models with tags
- Display current simulation status (converged, input, changed…)
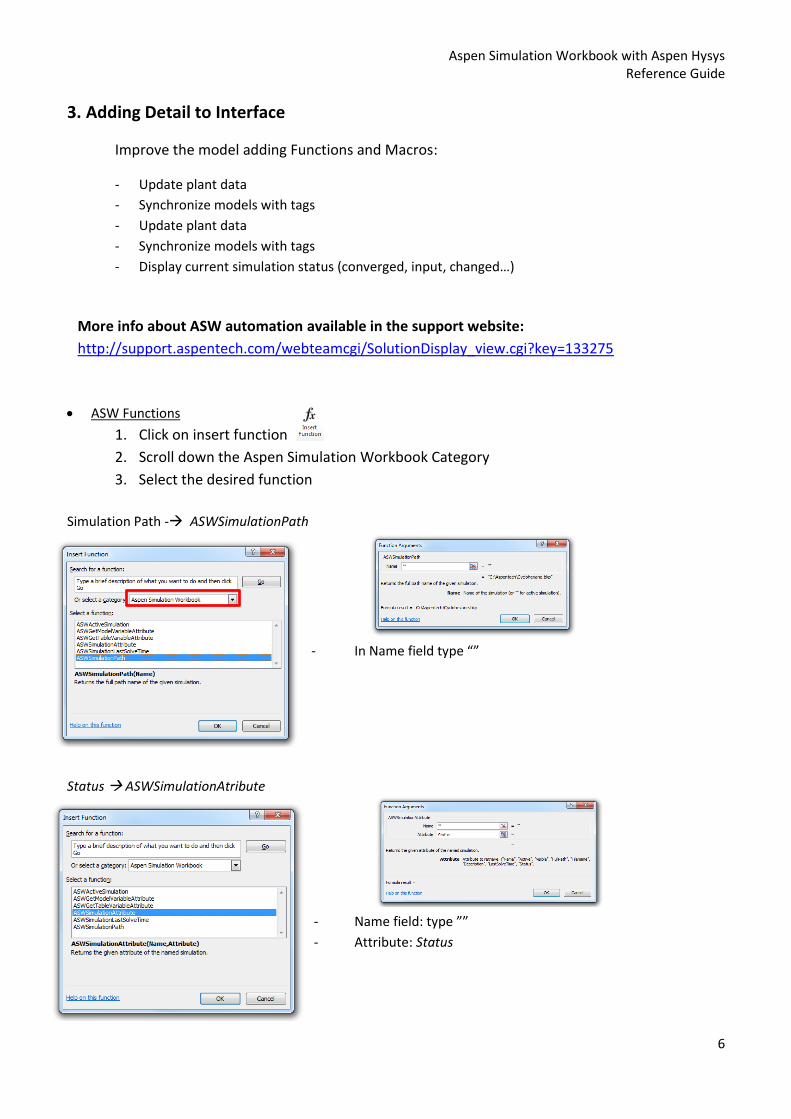
ASW Functions
1. Click on insert function
2. Scroll down the Aspen Simulation Workbook Category
3. Select the desired function
Simulation Path - ASWSimulationPath
- In Name field type “”
Status ASWSimulationAtribute
- Name field: type ””
- Attribute: Status
More info about ASW automation available in the support website:
http://support.aspentech.com/webteamcgi/SolutionDisplay_view.cgi?key=133275

Aspen Simulation Workbook with Aspen Hysys Reference Guide
7
Other Functions:
ASWActiveSimulation() Returns the name of the active simulation
ASWSimulationLastSolveTime(Name) Returns the time of the last solve of the named simulation (cell must have time formatting)
ASWGetModelVariableAttribute(Variable, Attribute)
Returns the given attribute of the referenced model variable
ASWGetTableVariableAttribute(Range, Attribute) Returns the given attribute of the variable referenced by the specified Excel range.
ASW Macro:
1. Enable the Developer ribbon in Excel as following, If it is not enabled:
- In File Menu select “Options”
- Go to “Customize Ribbon” and check the “Developer” box
2. Display the Forms Controls from the Developer ribbon Insert menu
Aspen Simulation Workbook with Aspen Hysys Reference Guide
8
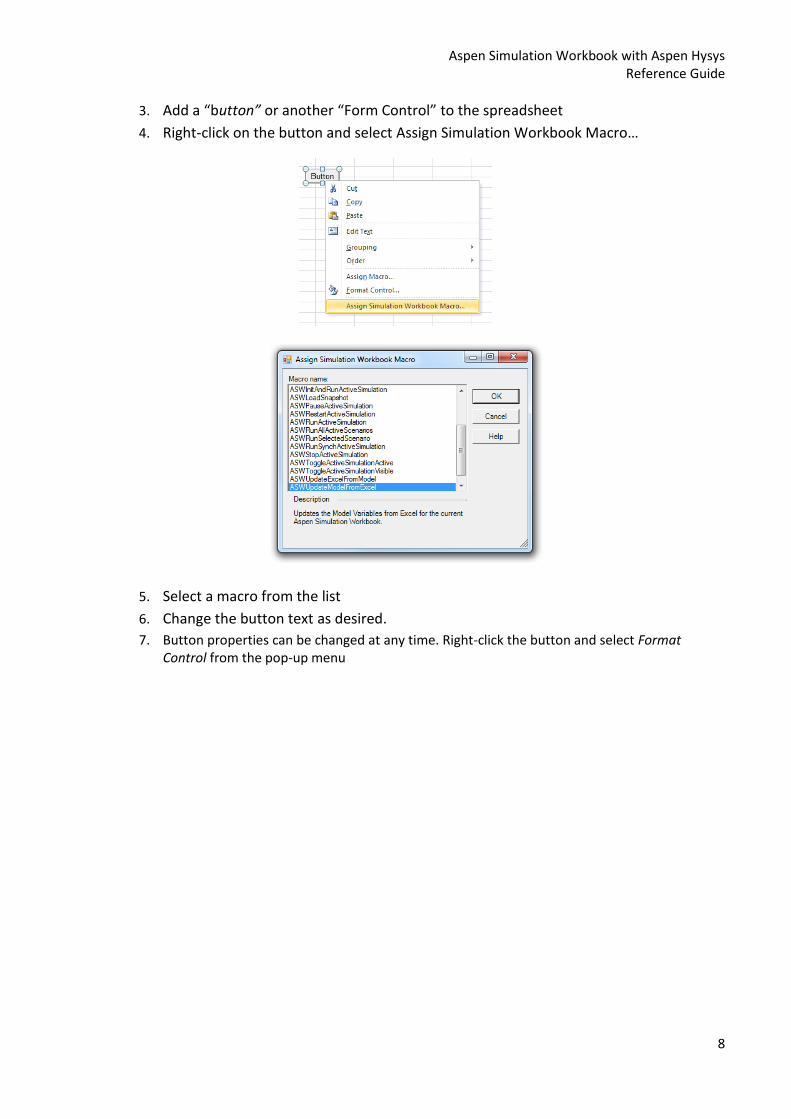
3. Add a “button” or another “Form Control” to the spreadsheet
4. Right-click on the button and select Assign Simulation Workbook Macro…
5. Select a macro from the list
6. Change the button text as desired.
7. Button properties can be changed at any time. Right-click the button and select Format Control from the pop-up menu
Aspen Simulation Workbook with Aspen Hysys Reference Guide
9
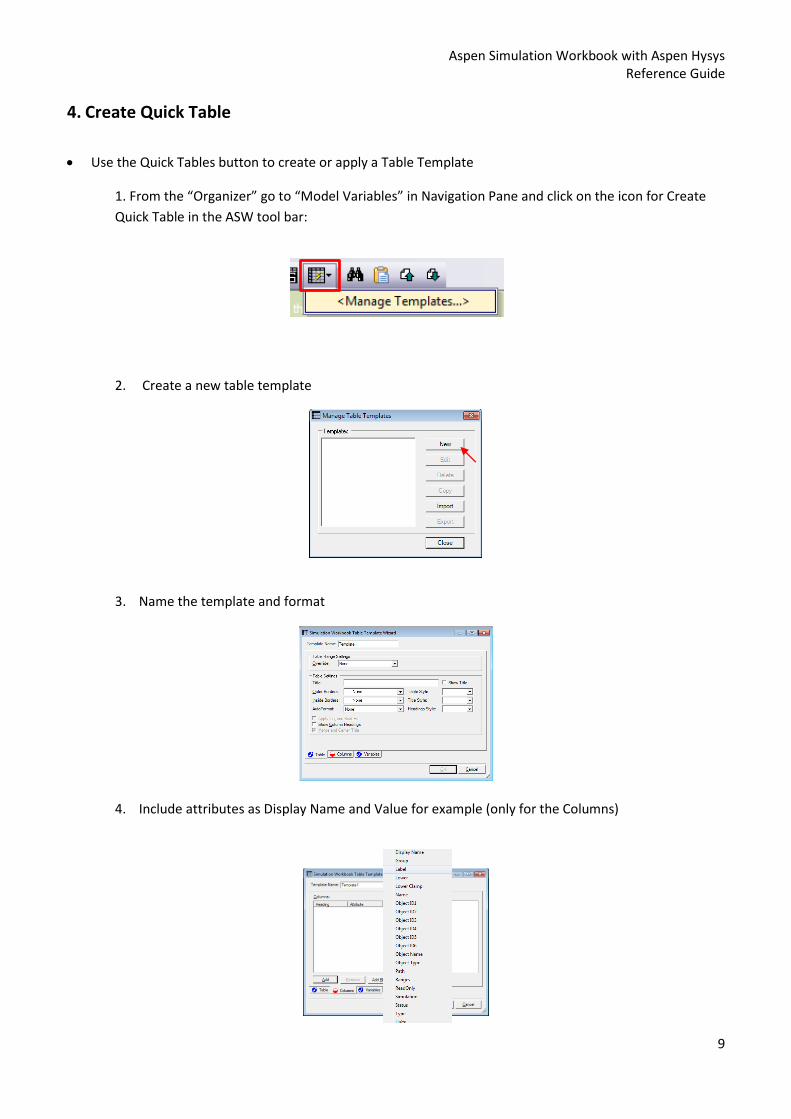
4. Create Quick Table
Use the Quick Tables button to create or apply a Table Template
1. From the “Organizer” go to “Model Variables” in Navigation Pane and click on the icon for Create
Quick Table in the ASW tool bar:
2. Create a new table template
3. Name the template and format
4. Include attributes as Display Name and Value for example (only for the Columns)
Aspen Simulation Workbook with Aspen Hysys Reference Guide
10
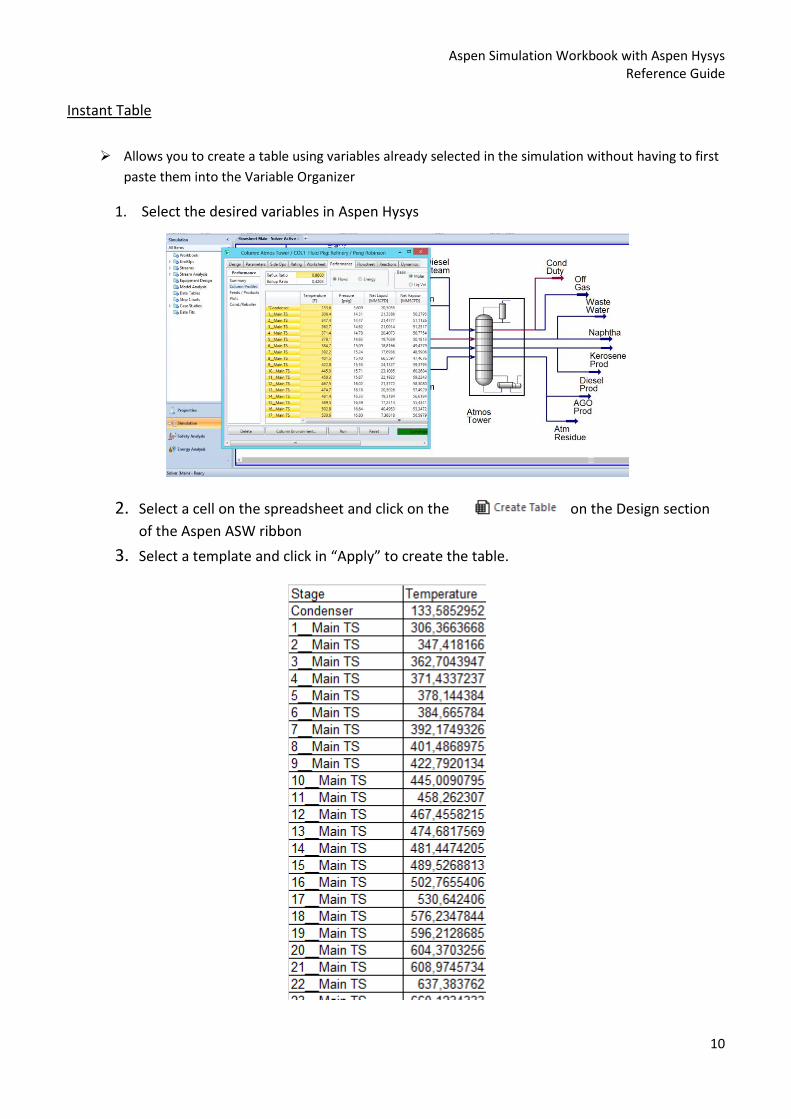
Instant Table
Allows you to create a table using variables already selected in the simulation without having to first
paste them into the Variable Organizer
1. Select the desired variables in Aspen Hysys
2. Select a cell on the spreadsheet and click on the on the Design section
of the Aspen ASW ribbon
3. Select a template and click in “Apply” to create the table.
Aspen Simulation Workbook with Aspen Hysys Reference Guide
11
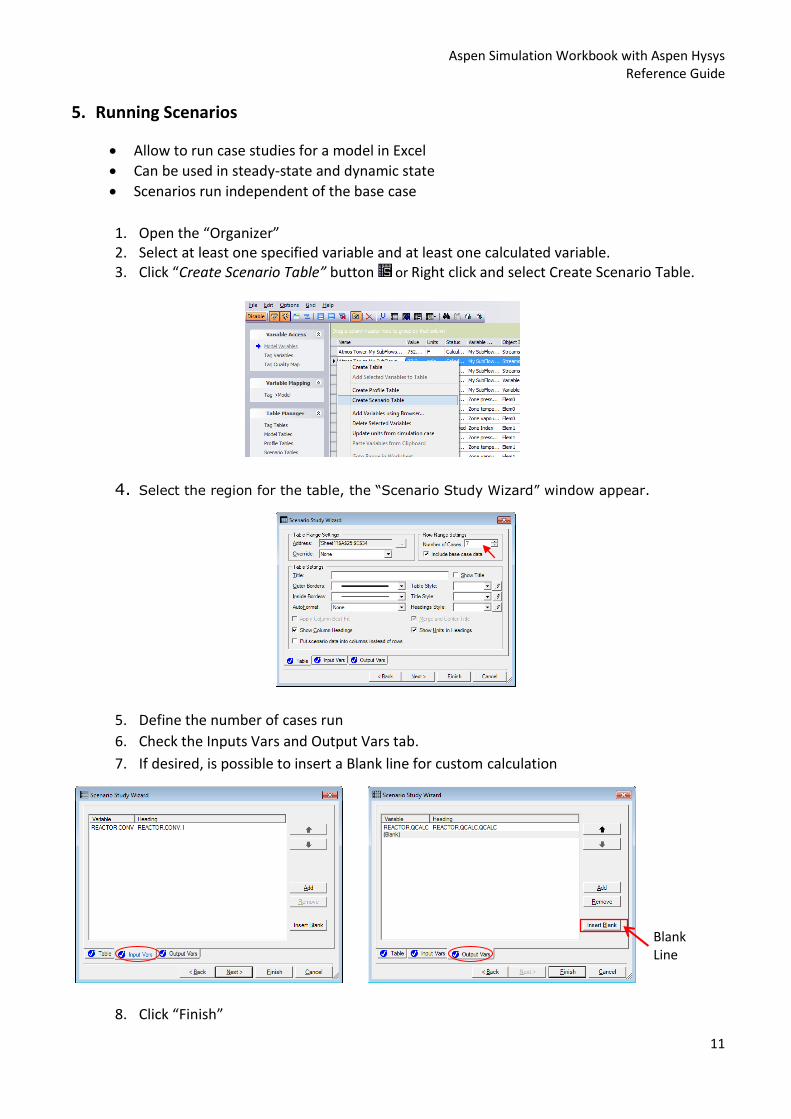
5. Running Scenarios
Allow to run case studies for a model in Excel
Can be used in steady-state and dynamic state
Scenarios run independent of the base case
1. Open the “Organizer” 2. Select at least one specified variable and at least one calculated variable. 3. Click “Create Scenario Table” button or Right click and select Create Scenario Table.
4. Select the region for the table, the “Scenario Study Wizard” window appear.
5. Define the number of cases run
6. Check the Inputs Vars and Output Vars tab.
7. If desired, is possible to insert a Blank line for custom calculation
8. Click “Finish”
Blank Line
Aspen Simulation Workbook with Aspen Hysys Reference Guide
12
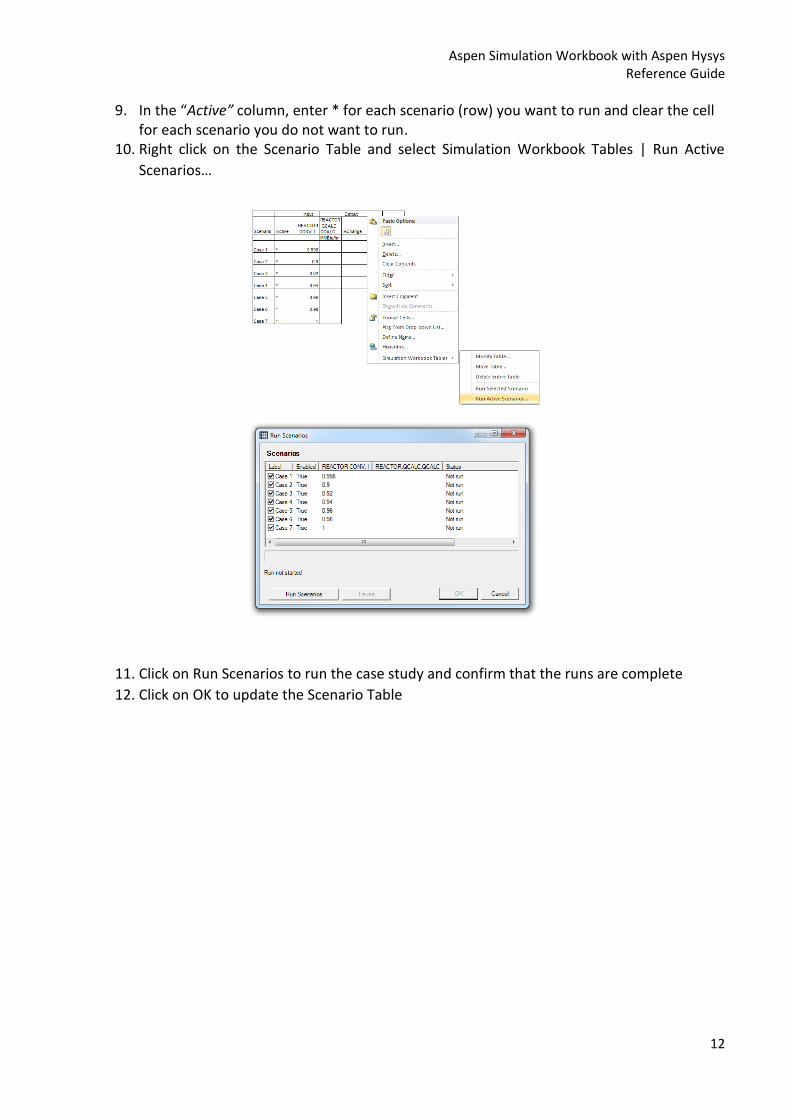
9. In the “Active” column, enter * for each scenario (row) you want to run and clear the cell for each scenario you do not want to run.
10. Right click on the Scenario Table and select Simulation Workbook Tables | Run Active
Scenarios…
11. Click on Run Scenarios to run the case study and confirm that the runs are complete
12. Click on OK to update the Scenario Table
Aspen Simulation Workbook with Aspen Hysys Reference Guide
13
6. Add Plant Data
Tags allow you to access information from other applications and link that information directly into your ASW Model.
Plant tags must be part of the Organizer
Use the Excel add-in tools provided with your plant data server software (such as Aspen InfoPlus.21) to create links between the Excel workbook and the plant data tags
Ideally, the tags should be laid out in a table, with the various tag attributes in the table columns and the rows of the table each corresponding to a single tag
o The tag table should include (as a minimum) the tag name, value, and units; a tag description and tag quality (status) parameters may also be included
Use your plant information software (i.e., Aspen InfoPlus.21®) Excel add-in tools to generate a table of plant data tags in the same ASW file as your Model variables
Usually, plant data tags can be automatically updated at specified time intervals using the Excel Add-In tools or OLE
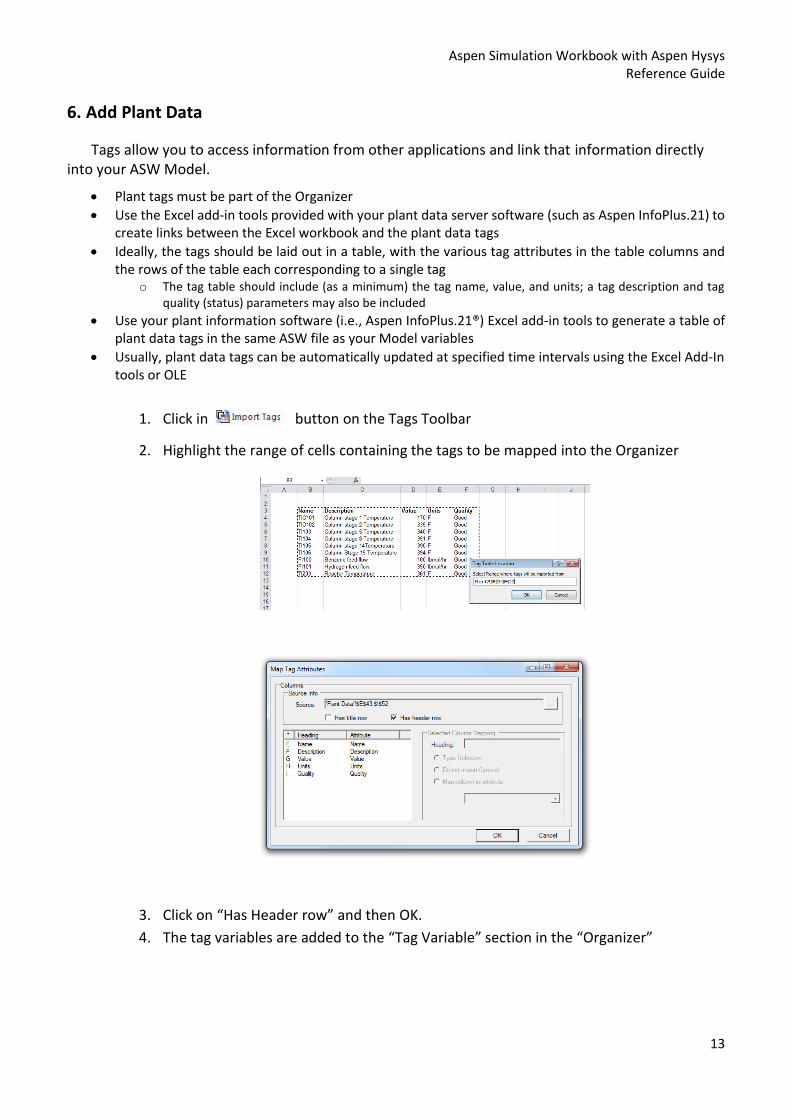
1. Click in button on the Tags Toolbar
2. Highlight the range of cells containing the tags to be mapped into the Organizer
3. Click on “Has Header row” and then OK.
4. The tag variables are added to the “Tag Variable” section in the “Organizer”

Aspen Simulation Workbook with Aspen Hysys Reference Guide
14
5. Go to “Tag>Model” in the Navigation Pane and then right click select “Add
Unreferenced Tags”:
6. Click on null for each tag and select the corresponding Model Variable.
5.1 Use the Path property to select the correct model stage temperature
7. Select all rows, right click and select Create a Table.

Aspen Simulation Workbook with Aspen Hysys Reference Guide
15
8. Select a cell to place the table
9. Continue through the Table Wizard to place the Plant vs. Models Variables table
10. Click in “Finish”
11. To update model with tag values, in right click and select “Update Model From Tag
Values”
11.1 Click on “Enable” check box to select the variables you want to update

Aspen Simulation Workbook with Aspen Hysys Reference Guide
16
Troubleshooting Common ASW Issues
ASW Installation Requirements
Versions 7.3, 8.2 and 8.4 are compatible with Microsoft Excel 2003 or higher.
Third-party Excel add-ins may interfere in ASW.
– KB 121898 e 120565
Different Versions of ASW can’t coexist in the same Excel sheet.
– It is possible to have different versions installed on the machine, but only one can be activated.
– The current version can be selected with Aspen Simulation Workbook Add-in Manager.
– It is recommended to uninstall previous versions before installing the current version.
ASW Ribbon does not appear
The ASW add in may be disabled:
In Excel, go to “Options” / “Add-Ins”
In “Manage” select “Disable Items” and then click in “Go”
If ASW add-in is listed, re-enable it.
If the ASW ribbon is not visible, ASW may have not been registered correctly and has
failed to load; this might be because Excel was open when ASW was installed; see
Support website for more details

Aspen Simulation Workbook with Aspen Hysys Reference Guide
17
Best Practices
Changing the location of a simulation:
Move the file to its new location
Open the “Organizer” and select “Simulation” and then point to the new location in
“Filename” property or in “Change case link”
Renaming model files:
Rename the file
Open the “Organizer” and in “Simulation” point to the renamed file in “Filename” property
or in “Change case link”
Never remove the file from the simulation list because the links will be broken permanently
Changing the model file:
In “Organizer” select “Simulation” and point to the new file in “Filename” property or in
“Change case link”. Do not add the new file in the "Organizer" and delete the current simulation. The links will be broken and
cannot be restored.
Updating
Variables changed in excel are not updated in Aspen Hysys:
– Close the form/dialog box in Aspen Hysys, and then open it back up.
ASW is not updated when a variable is changed in Aspen Hysys:
– Force the update by clicking "Refresh"
Edit/Delete tables
Always perform the modifications using the ASW tools:
To edit a table:
– Click any cell in the table
– Right click and select “Simulation Workbook Tables”
– From the submenu, choose "Modify Table“
Move or delete a cell or table
– Click with right button and select "Move Table", "Delete Variable from Table" or "Delete Entire Table“
Note: avoid insert rows or columns in existing tables
Aspen Simulation Workbook with Aspen Hysys Reference Guide
18
Tips
Do not edit a simulation while developing the ASW interface.
– Problems may occur if you change the paths or delete variables that are linked in ASW, and in turn, this may cause ASW links to stop working
Never save a simulation with a new name while it is open in ASW
– This will result in broken links the next time you open the ASW workbook.
Do not save an ASW workbook if its associated simulation crashed during a run.
– This could cause all ASW links to become broken.
Do not reinitialize a simulation if you have results variables in ASW.
– Reinitializing may cause the results variables to disappear and all associated ASW links to be lost.
Do not put formulas in ASW table cells used for results
– The formula takes precedence, so results will not get updated
– Formulas in tables will slow performance
– Excel runs many more calculations to ensure results are fully updated. When possible, put the formulas outside ASW tables
Do not put too many (e.g. 200+) variable tables in a workbook
– It is better to include a smaller number of tables with more variables per table.
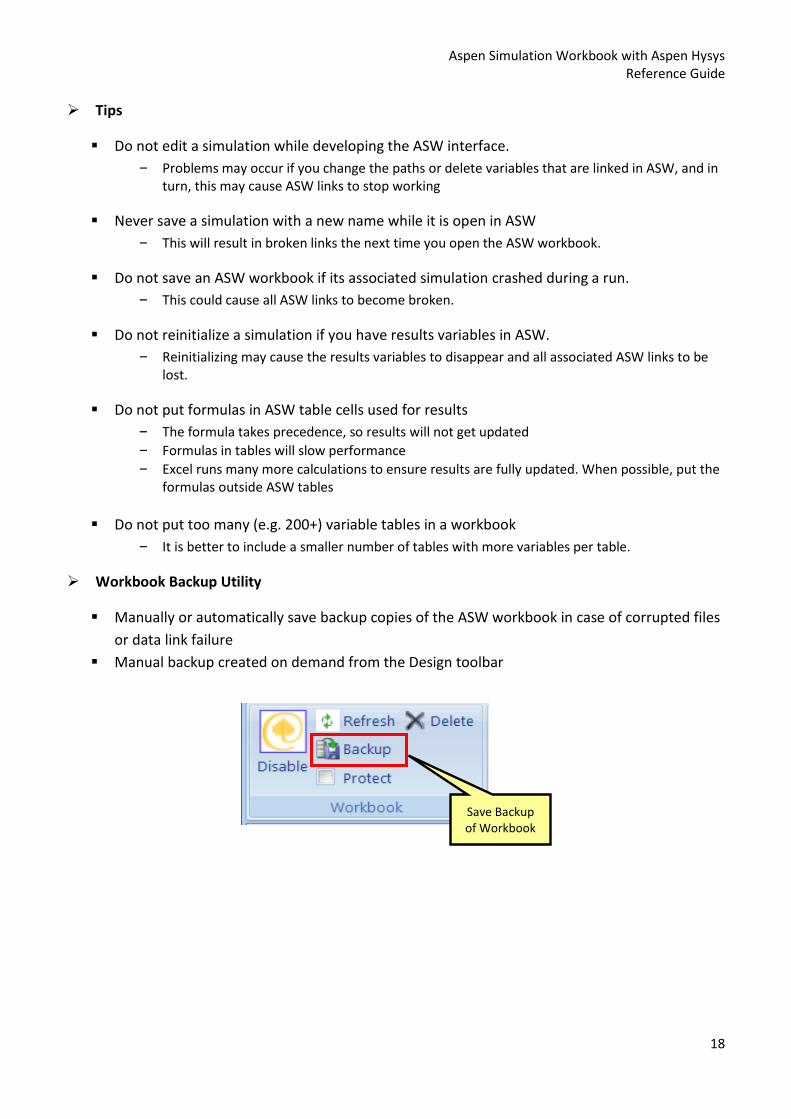
Workbook Backup Utility
Manually or automatically save backup copies of the ASW workbook in case of corrupted files
or data link failure
Manual backup created on demand from the Design toolbar
Save Backup of Workbook

Aspen Simulation Workbook with Aspen Hysys Reference Guide
19
How to Access Online Help for AspenTech Products
http://support.aspentech.com
Registered customers can:
– Access current product documentation and training material
– Search the Knowledge Base for tech tips, solutions, and FAQs
– Download application examples, service packs, and product updates
– Search for, submit, and track technical issues, deficiencies, and defects
– Attend web seminars
Registration is free for customers with a current license and SMS agreement