guide for students anglia learning and teachingthe vle space (from sharepoint). step 3a: choosing...
TRANSCRIPT
Learning Development Services
How to use a Wiki Guide for Students
Anglia Learning and Teaching Inspiring Academic Excellence September 2013
Anglia Learning and Teaching Inspiring Academic Excellence
How to use Wikis Page 2 August 2013
How to use a Wiki Guide for Students
Contents What is a Wiki? ..................................................................................................... 2
Section 1: Editing a Wiki Page .............................................................................. 3
Section 1a: Editing and formatting text ................................................................. 5
Section 1b: Inserting objects within a wiki page .................................................... 6
How to insert a Link ........................................................................... 6
How to insert a picture ....................................................................... 8
How to insert a Table ....................................................................... 10
Section 2: Creating Additional Pages ................................................................. 11
What is a Wiki? A wiki is a website that allows users (teachers and students) to work collaboratively on the same document. It is essentially a 'shared space' that can be accessed at any time via the Internet. It allows users to add and edit content simply by using their web browser and - importantly - to keep a record of entries. Within the VLE, the tutor for a module may choose to setup a student wiki (or wikis) available to students (or subgroups of the main student group) as part of a learning activity such as:
a collaborative group project;
creating a group document eg project report;
brainstorming ideas with students;
in-depth follow-up to a discussion board topic;
building a glossary;
creating a list of reference works for your course. The purpose of this document is to illustrate how to use the Editing Tools within a student wiki.

Anglia Learning and Teaching Inspiring Academic Excellence
How to use Wikis Page 3 August 2013
Section 1: Editing a Wiki Page Step 1: From the Navigation menu on the left hand side, click on the link that your tutor will have informed you about. This will display a wiki page which may have been setup some initial text by your tutor (as shown here) or may simply have some standard text that starts with the heading “Content”.
Step 2: In order to change the content of the wiki page, click on the Page tab at the top left of your screen - see right. Next, click on Check out & Edit.
Step 3: You will need to check out* the page. This means that nobody else can edit this particular page whilst you are working on it.
This message is displayed on the screen to remind you that you have the page checked out. Later, we will look at saving and checking in this page.
---------------------------------- * On the VLE, “Check Out” is a bit like checking a book out of a library. Nobody else can edit that page whilst you have it checked out (although they can still view the page as it was until you checked it out). When you check the page back in, it becomes available to other people to view your changes and to check it out themselves.

Anglia Learning and Teaching Inspiring Academic Excellence
How to use Wikis Page 4 August 2013
Step 4: The screen will show the Editing Tools toolbar (see below) with its two sub-tabs – Format Text tab and Insert tab. Using the Format Text tab, enter introductory content like the example below shows.
Step 5: When inputting new text for your main headings, use Markup Styles. These styles ensure that your headings look consistent across all your wiki pages and save you time from having to manually format the text of a heading with the font size, style etc. (Heading 1 is the biggest.) If you are copying text from another source, such as a Microsoft Word document, then Section 1a (see Page 5) will cover formatting this text.
Step 6: When you have finished editing your wiki page, click on the Check In & Save button on the Format Text tab – see right. If you navigate away from the page you are editing at any time without saving, you may lose your work. You may also leave the wiki page “Checked out” to you, thus preventing other students to make changes to the page.
Note the two sub-tabs
Click in this space to add content
Note the breadcrumbs
Anglia Learning and Teaching Inspiring Academic Excellence
How to use Wikis Page 5 August 2013
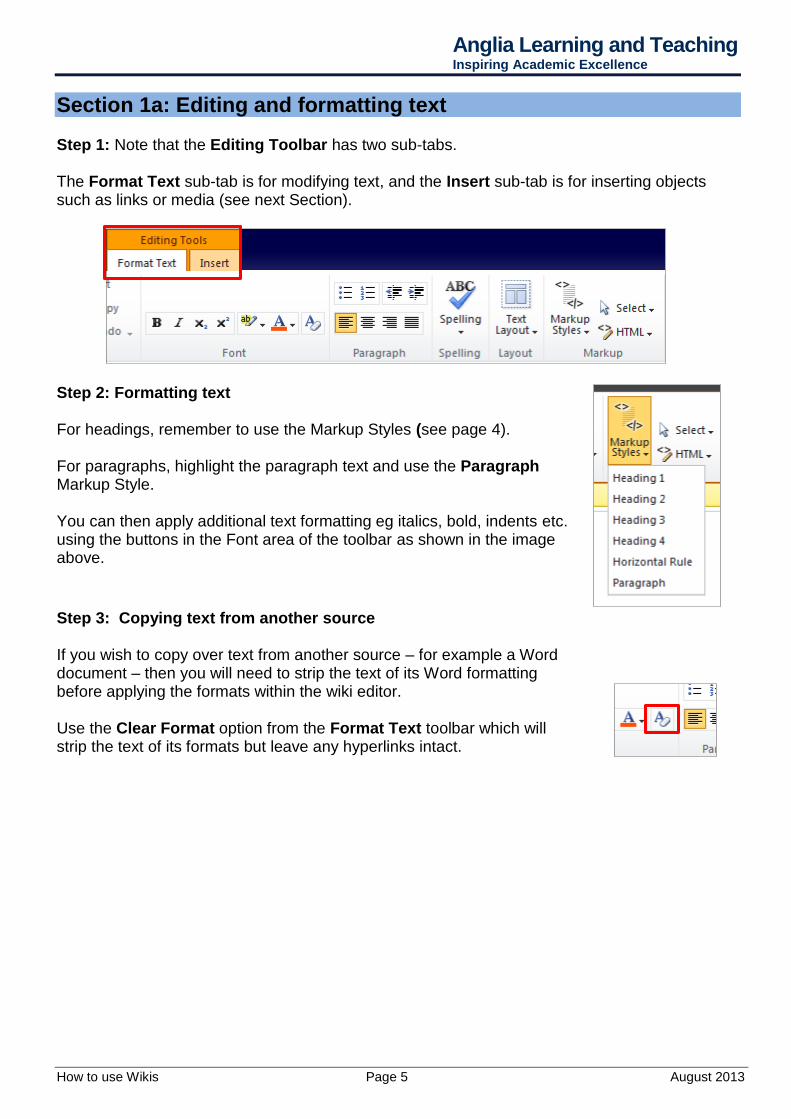
Section 1a: Editing and formatting text Step 1: Note that the Editing Toolbar has two sub-tabs. The Format Text sub-tab is for modifying text, and the Insert sub-tab is for inserting objects such as links or media (see next Section).
Step 2: Formatting text For headings, remember to use the Markup Styles (see page 4). For paragraphs, highlight the paragraph text and use the Paragraph Markup Style. You can then apply additional text formatting eg italics, bold, indents etc. using the buttons in the Font area of the toolbar as shown in the image above.
Step 3: Copying text from another source If you wish to copy over text from another source – for example a Word document – then you will need to strip the text of its Word formatting before applying the formats within the wiki editor. Use the Clear Format option from the Format Text toolbar which will strip the text of its formats but leave any hyperlinks intact.

Anglia Learning and Teaching Inspiring Academic Excellence
How to use Wikis Page 6 August 2013
Section 1b: Inserting objects within a wiki page Examples of objects are a table, an image, a weblink or a document on the VLE. The Insert sub-tab of the Editing Tools displays the options available.
Inserting an object may then activate additional Tabs and toolbars specific to that type of insertion. This section will look at the following objects:
Links Pictures
Tables
Audio/Visual Media
How to insert a Link Step 1: Click on the Page tab (top of screen) for the wiki page. Next, click on Check Out & Edit. From the Editing Tools Toolbar, click on the Insert sub-tab – see right.
Step 2: Click your cursor in the location at which you want to add a link or highlight any existing text that you want to use as a link. Next, click on the arrow head just below the Link icon and select whether you want to add a link to an external website (From Address) or to a feature within the VLE Space such as an uploaded document or a discussion board (From SharePoint)

Anglia Learning and Teaching Inspiring Academic Excellence
How to use Wikis Page 7 August 2013
Step 3a: If you choose “From Address”, a dialog box opens up and, if you had not already highlighted text on the page, you should type in the text you want to be associated with this link, and the address of the external Website. Click OK to create the link.
Step 3b: If you choose “From SharePoint”, this opens up a window that allows you to browse the learning space for features already setup in the site – documents, discussions, announcements. You can also upload a new document from another location to the Shared Documents folder (unless your tutor has made an additional student document area available.) Browse to and click on the feature you want to link to, then click OK.
Step 4: Either option on Step 3 will then open up the Link Tools toolbar. Enter text in the Description and decide whether or not you want to open the link in a new tab or window.
Step 5: Return to the Editing Tools toolbar, and click on the Format Text sub-tab. Click on Check in & Save.

Anglia Learning and Teaching Inspiring Academic Excellence
How to use Wikis Page 8 August 2013
How to insert a picture
Step 1: Click on the Page tab (top of screen) for the wiki page. Next, click on Check Out & Edit. From the Editing Tools Toolbar, click on the Insert sub-tab – see right.
Step 2: Click your cursor in the location at which you want to add an image then click on the arrow head just below the Picture icon. Select whether you want to add an image from the local Computer (From Computer), from an external website such as Flickr (From Address) or to an image already loaded within the VLE Space (From SharePoint).
Step 3a: Choosing from Computer opens up a dialog box to browse for a file on the local computer and upload it. It is a good idea to change the Upload to folder to a specific area (Shared Documents) in the VLE space. Click OK.
You will be offered the opportunity to add more detail about the file you are uploading but you can just press SAVE to complete the upload process.

Anglia Learning and Teaching Inspiring Academic Excellence
How to use Wikis Page 9 August 2013
Step 3b: Choosing From Address opens a dialog box for inserting the link to an image on another website. Enter some Alternative text describing the image (for use by screen-readers) and click OK. Note: Local security settings may prevent an
image from another website from being displayed.
Please remember to check copyright/creative commons licence on original image and attribute as necessary in your text.
Step 3c: Choosing From SharePoint opens a window to browse the SharePoint site for images. Click to select the image you want to use, then click OK. You can also upload a new image (into the Shared Documents folder) at this point.
Step 4: Whichever way you have chosen to insert the image, the “Picture Tools – Design” tab is visible (you may need to click on the tab to bring the toolbar into the foreground or click on the image itself).
You must enter some descriptive text in the Alt Text field for screen-readers. You can resize the image, position it relative to text and apply border formatting (using the Image Styles button). You can also add content to the wiki page by clicking on the Format sub-tab from the Editing Tools toolbar. Step 5: Return to the Editing Tools toolbar, and click on the Format Text sub-tab. Click on Check in & Save.
Picture Tools

Anglia Learning and Teaching Inspiring Academic Excellence
How to use Wikis Page 10 August 2013
How to insert a Table Step 1: Click on the Page tab (top of screen) for the wiki page. Next, click on Check Out & Edit. From the Editing Tools Toolbar, click on the Insert sub-tab – see right.
Step 2: Click your cursor in the location at which you want to insert a table. Click on the Table icon. Use the grid to highlight how many rows and columns you initially need for your table then click once on the highlighted area to insert the table into your text. You can change the number of rows and columns at a later date.
Step 3: You can start entering information into your table and you can use the Table Tools Layout and Design toolbars to alter the way the table displays. Note: You should enter some descriptive text in the Summary box (from the Layout toolbar) to provide information to screen readers about the table.
Step 5: Return to the Editing Tools toolbar, and click on the Format Text subtab. Click on Check in & Save.

Anglia Learning and Teaching Inspiring Academic Excellence
How to use Wikis Page 11 August 2013
Section 2: Creating Additional Pages The module tutor may have already setup additional pages on the student wiki(s). If not, and you need to make use of different pages to complete the activity, you can build your wiki by creating new pages and adding content to them. Step 1: Check out your wiki page (see Section 1: Editing a Wiki Page). Within your wiki page, enter the names of your new wiki pages and enclose them in double brackets – see right. In the example, “Project team” is both the link for the reader and the name of the linked wiki page. Click on Check In & Save to save your page.
Step 2: The new pages will then appear as temporary links (denoted by a dotted line below) Still in edit mode, click on any link with a dotted to continue.
Step 3: You will be prompted to confirm your request to create a new wiki page. Click on Create.
Step 4: Within the newly created wiki page, add content as before. You will need to add a link back to the wiki Start page - as the example shows. Click on Check In & Save. You can return to this wiki page to enter more text at a later stage.
Add content as before – example shown here
Insert link back to main Group Wiki page
Enter the name of each new page enclosed in double brackets. Keep names brief and avoid duplication.

Anglia Learning and Teaching Inspiring Academic Excellence
How to use Wikis Page 12 August 2013
Step 5: You can now view your newly created wiki page. Note that its link will also appear in the Breadcrumbs menu. Click the Start link at the foot of the page to return to the entry wiki page.
Step 6: The page you've just created will appear as a link. (Remember: a dotted line denotes a page not yet created) Repeat steps 2 to 6 to create the other linked pages.
Link to page you need to create – dotted line
The link to the new page appears here
The link to the main group wiki page appears here
Link to page you have created – no dotted line

Anglia Learning and Teaching Inspiring Academic Excellence
How to use Wikis Page 13 August 2013
Contact Anglia Learning and Teaching
Call: 0845 271 2639
Email: [email protected]
Web: www.anglia.ac.uk/lta
Author(s): Kate Outhwaite
Uwe Richter
Carol Everett
Version: 2.0 (September 2013)
Anglia Ruskin University 2013
Any part of this document may be reproduced without permission but with attribution to Anglia Ruskin University and the author(s) CC-BY-SA (share alike with attribution) http://creativecommons.org/licenses/by-sa/3.0