gurufocus user manual: the filingwiz€¦ · “filingwiz,” a portmanteau of the word...
TRANSCRIPT

GuruFocus User Manual: The FilingWiz

Contents
0. Introduction to FilingWiz
a. Brief overview
b. Access
1. The Search Query Toolbox
2. The Search Results Column
3. The Highlights Column
a. Highlights tab
b. Marks tab
c. Sections tab
4. Saving and loading previous queries
a. Saving queries
b. Loading previous queries
c. Miscellaneous
5. The Document View
6. TableViewer
a. Accessing the TableViewer
b. TableViewer features
7. FilingWiz Notes
a. Access
b. Features
8. Miscellaneous technical details
a. Changing the size of sections
b. Deleting queries, marks and notes
c. The “Clear” feature
9. Alternative ways of access
a. Selecting FilingWiz from a specific company’s summary page
b. Selecting a specific filing
10. FAQs

Section 0: Introduction to the FilingWiz
Techopedia, an online encyclopedia for technology terms, defines a wizard as any piece of software that
helps users accomplish their goals through a step-by-step process.
On March 1, 2018, GuruFocus launched a document reader that allows users to navigate company filings
from the U.S. Securities and Exchange Commission in a more efficient way. This feature is called the
“FilingWiz,” a portmanteau of the word “filing” and “Wiz,” short for “Wizard.”
Access
GuruFocus provides at least two ways to access the FilingWiz. One direct way is through our GuruFocus
ribbon as illustrated in Figure 0.1.
Figure 0.1
Click on the “FilingWiz” tab (or the FilingWiz item in the drop-down menu) to open a screen like the one
shown in Figure 0.2.
Figure 0.2
The color-coded numbers in Figure 0.2 illustrate the six steps to using the FilingWiz. This user manual
will detail each of the six steps in separate sections.

Section 1: The Search Query Toolbox
The “Search Query Toolbox” allows you to narrow the list of filings based on various parameters,
including sectors, time frame, filing type and section types. Figure 1.1 shows a sample screen shot of the
search query toolbox.
Figure 1.1
If you are interested in just a select few of stocks, you can enter the desired ticker symbols in the
“Stock” cell. Otherwise, you can open the “Sectors” drop-down menu and select the desired sectors and
industries.
The second cell in row 2 allows you to limit the time frame to one of the following periods: three
months, seven months, one year, three years, five years or all.
The middle cell in row 2 allows you to select the desired filing types. For example, you can set the
settings so that the FilingWiz only lists company 10-Ks and 10-Qs.
The fourth cell in row 2 allows you to sort the results by date or by relevance. Finally, the fifth cell in row
2 allows you to control which sections of the filing you wish to display. For example, you can set the
settings so that the FilingWiz only shows the company’s Management Discussion and Analysis section or
just the data tables.

Section 2: The Search Results Column
The “Search Results Column” lists the company filings that match the parameters set in Section 1. For
example, if you select 10-K, 5 Years and Sort by Date, the search results column will list all company 10-
Ks from the past five years. Figure 2.1 shows a sample screen shot of the search results column.
Figure 2.1
If you scroll down to the bottom, you might notice numbers in squares. Click on a numbered square to
go to that page.
Click on a specific filing from the list to view that filing in the Document View.

Section 3: The Highlights Column
The Highlights column contains three tabs: Highlights, Marks and Sections. Figure 3.1 shows a sample
screen shot of the Highlights column.
Highlights tab
Figure 3.1
Recall Figure 1.1 in Section 1. You can search for specific things like “results of operations” or “FFO
reconciliation” by entering the desired keywords in the “Search for” cell of the search query toolbox.
The highlights tab will parse the document for your keywords and populate them in the list. Click on a
specific item to go to that section of the document.
Marking the document for later
While reading the document, you might want to return to an interesting section of it later. The
FilingWiz’s “Marks” feature allows you to mark a section and save it. You can click on an item in
underneath the “Marks” tab to go to that portion of the document. Figure 3.2 shows a sample screen
shot of the “Marks” tab.

Figure 3.2
You can organize the marks by highlighting the sections in one of six colors: red, purple, sky blue,
turquoise, yellow and gray. For example, you might highlight things related to sales in one color and
expenses in a different color.
If you click on a specific color underneath the “Marks” tab in Figure 3.2 above, the FilingWiz will list only
the highlighted marks in that specific color. Click on “white” to list all highlighted marks in the
document. Figure 3.3 shows a sample screen shot with just the sky blue items listed.
Figure 3.3
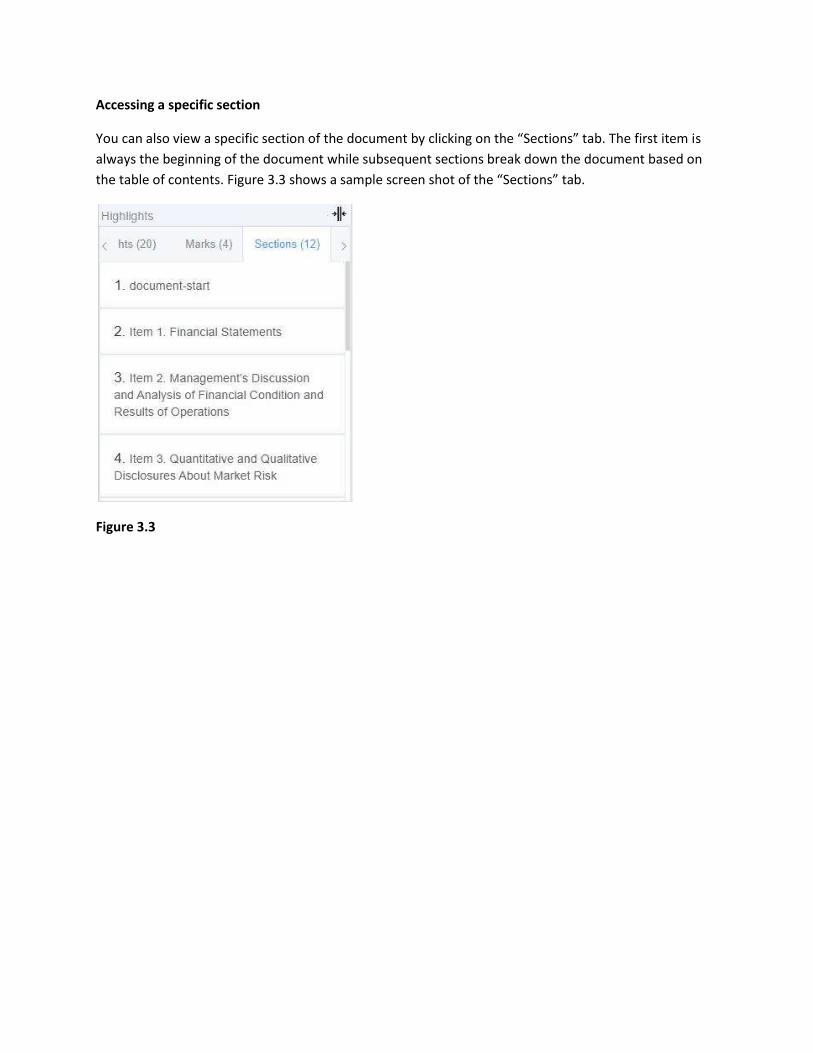
Accessing a specific section
You can also view a specific section of the document by clicking on the “Sections” tab. The first item is
always the beginning of the document while subsequent sections break down the document based on
the table of contents. Figure 3.3 shows a sample screen shot of the “Sections” tab.
Figure 3.3

Section 4: Saving and loading search queries
If you look closely in the bottom-right corner of the search query toolbox, you will see three items: save,
load and clear. Figure 4.1 repeats Figure 1.1 but with the above three items highlighted.
Figure 4.1
If you wish to access a specific combination of settings for later, you can save the settings by clicking the
“save” button and naming it. For example, if you always wish to find the results of operations section for
specific stocks, you can save that query to the list. Figure 4.2 shows a sample screen shot illustrating the
“load” list, which lists all saved queries.
Figure 4.2

Section 5: The Document View
Once you set the desired filters in Section 1 and open a specific filing in Section 2, the FilingWiz displays
the selected document in the Document View. Figure 5.1 shows a sample screen shot of the Document
View.
Figure 5.1
As you scroll through the document, you will notice a string of blue buttons labeled GuruFocus, Export
table to Excel and Combine past tables. If you hover your mouse over a specific table, the FilingWiz will
highlight that table in light blue. Click on the “Export table to Excel” button to download the selected
table as an Excel spreadsheet.
If you highlight specific words from the Document, the FilingWiz will pop-up a color box like the one
illustrated in Figure 5.2.

Figure 5.2
You can then click on one of the colors to highlight the words and add a mark as described in Section 3.
To return to a specific point in the document, click on the saved mark from the “Marks” tab.
If you click on the “Combine past tables” button in Figure 5.1 above, you will open the TableViewer,
probably the most important feature of our FilingWiz.

Section 6: The FilingWiz TableViewer
Accessing the TableViewer
As discussed in Section 5, you can access the TableViewer by clicking on any blue button titled “combine
past tables” on the document. The FilingWiz will then open a “TableViewer” tab that displays the
selected table and similar tables from past filings in two interactive tables.
TableViewer features
The TableViewer allows you to compare a specific data table between the current document and past
documents of the same type. For example, you can view Apple’s income statement from fourth-quarter
2017 and compare it to Apple’s income statement from fourth-quarter 2016. Figure 6.1 shows a sample
screen shot of the TableViewer.
Figure 6.1
As Figure 6.1 illustrates, the TableViewer presents two interactive tables: the table on the left
represents data from the current filing while the table on the right represents data from a previous
filing. You can select the comparison filing by clicking it among the tabs shown in Figure 6.2.
Figure 6.2
One key feature of the TableViewer is the row of option buttons illustrated in Figure 6.3. These options
allow you to interact with the two tables in various ways.

Figure 6.3
The first two buttons allow you to view the data as a table or a chart. Figure 6.4.1 shows a sample table
while Figure 6.4.2 shows a sample chart.
Figure 6.4.1 Figure 6.4.2
Click on one of the X’s in Figure 6.4.1 to remove a specific row or column from the table. You can also
add rows to the table by right clicking the table and select “insert rows above” or “insert rows below.”
(Such commands should be similar to those in Microsoft Excel or Google Spreadsheets.)
Too add additional bars to the chart in Figure 6.4.2, please select the desired items among the
checkboxes below the chart. You can remove bars by unchecking the desired item. If you right click on a
chart, you can either save that chart as an image or copy it.
(Back to the row of options)
You can sort the columns by quarter end (↓1/9) or by column title (↓Z/A) by clicking the respective
button.
If you click on the “document’ icon, the FilingWiz will show you the source document in a pop-up
window. Figure 6.5 shows a sample screen shot.

Figure 6.5
The final three buttons show a light down arrow with a bar, a wider down arrow with a thicker bar and a
broken square. Respectively, these buttons allow you to export the active table to Excel, export all
available tables to Excel or utilize the TableViewer in full screen.
Important: The row of options for the left table (see Figure 6.3) is not exactly the same as the row of
options for the right table (see Figure 6.6).
Figure 6.6
The final three buttons for the right table show two interlocking tables, a light down arrow with a bar
and a broken square. The latter two do the same thing that they do for the left table as described above.
However, the “two interlocking tables” button attaches the right table onto the left table. This feature
allows you to append the comparison tables to the current table.

Section 7: FilingWiz Notes
The FilingWiz Notes feature allows you to write your own notes and analysis about a document.
Access
You can access the FilingWiz Notes feature by clicking the “Note” item underneath the FilingWiz tab in
the GuruFocus ribbon. Please see Figure 7.1 for a sample screen shot.
Figure 7.1
A keen observer will notice that all of your saved marks (see Section 3) will be saved in the list of notes
column. Figure 7.2 shows a sample screen shot of the “list of notes.”
Figure 7.2

Creating and loading notes
You can create a new note by clicking the “+ New Note” item in the upper-right corner of Figure 7.2.
Alternatively, you can click on an existing note from the list to display it in the “Notes View.” Figure 7.3
shows a sample screen shot.
Figure 7.3
If you click on a note generated by the “Marks” feature discussed in Section 3, the FilingWiz will describe
the document and enter the text highlighted in the saved mark by default. The “Note” tab allows you
will write your notes and analysis about the document using a processor like Microsoft Word.
Adding comments
You can add comments on a specific note by clicking on the “Comments” tab. Figure 7.4 shows a sample
screen shot of the comments section.
Figure 7.4
You can add a comment by entering your comments into the “Add a comment” box and then click the
check mark at the right. FilingWiz will then display your comment below the box.

You can also access the document from the Notes
Click on the “Document” tab in Figure 7.3 above to view the document you made the specific mark in.
The FilingWiz will conveniently display the sections around your mark. You can then interact with the
document by downloading data tables from Excel or accessing the TableViewer as described in Sections
5 and 6 of this user manual.

Section 8: Miscellaneous Technical Features
The first seven sections of this user manual discussed the key features of the FilingWiz. Sections 8 and 9
will include some miscellaneous technical features and alternative ways to open the FilingWiz.
Changing the size of sections
Figure 8.1 shows the default FilingWiz.
Figure 8.1
If you look closely, you will see the “→║←” symbol throughout the FilingWiz. Click on this button to
shrink a section. For example, you might want to shrink both the search results column and the
highlights column so that you can view the document on a wider screen. Figure 8.2 shows a sample
screen shot.
Figure 8.2

To expand the section back to its default size, click the “←║→” symbol for that section. You can also
manually change the size of a section by dragging that column.
You can also click the “broken square” button to view the document in full screen. However, this might
bring back the “old-fashioned” way of reading a 10-K.
Deleting saved queries and notes
If you have saved queries from Section 1, you can delete a saved query by clicking the “X” next to that
query. Figure 8.3 repeats Figure 4.2 but with an arrow to illustrate deleting queries.
Figure 8.3
You can delete a note by clicking the word “delete” inside the desired note. The FilingWiz will ask you to
confirm the deletion as illustrated in Figure 8.4.
Figure 8.4
The “Clear” button
The Clear button in Figure 4.1 will erase all saved queries and marks on the active document. However,
it will not affect the notes saved in the “Notes” section.

Section 9: Alternative Ways to Open the FilingWiz
In Section 1, we discussed probably the most direct way to access the FilingWiz. However, there are
alternative ways.
Opening the FilingWiz using the gray ribbon
If you access a company’s summary page, you will notice that we have added a FilingWiz tab as
illustrated in Figure 9.1.
Figure 9.1
Click on the FilingWiz tab to access the Doc Reader for that stock. The search results column (see Section
2) will only include the filings for the stock listed in the gray ribbon as illustrated in Figure 9.2.
Figure 9.2
The Document View will automatically display the first item listed in the search results column. You can
then interact with the document as described in Sections 5 and 6.
Opening a specific filing
You can also open a specific company filing directly from the company’s summary page. If you scroll
down, you should see a section titled “Financial Reports.” Figure 9.3 shows a sample screen shot.
Figure 9.3
You can click on a specific filing from the list to view that filing in the FilingWiz.

Section 10: FilingWiz FAQs
What membership level do I need to use the FilingWiz?
o GuruFocus Premium members can purchase the FilingWiz as a separate region for
$1000 per year.
o The FilingWiz is included in the Premium Plus membership.
o However, we are giving all GuruFocus members a free 30-day trial of the FilingWiz for
March 2018.
Is the FilingWiz complicated to use?
o While it might seem complicated at first, it should be too hard to use.
o Once you get the hang of it, you will find that using the FilingWiz is easier and more
efficient than just reading directly from a 10-K.
What is the best way to use the FilingWiz?
o One key feature of the FilingWiz is that it allows you to compare a specific data table to
similar data tables from past filings. For example, you can view the detailed income
statements from each of the past fourth-quarters. Please see Section 6 of the user
manual for more details about the TableViewer, the feature that allows you to compare
data tables.
o You can also write your notes about a specific filing through the Notes section. Section 7
of this user manual discusses the details about “FilingWiz Notes.” Remember, the Notes
section is connected to the “Marks” feature discussed in Section 3 as the FilingWiz saves
a note when you create a mark in the document.