gxp mobile shear shear jaw armor™ - genesis … item 6 at the bottom of the upper jaw (see figure...
TRANSCRIPT

GXP Mobile ShearShear Jaw Armor™FIELD INSTALLATION MANUAL

© 2017 Genesis Attachments, LLCGenesis GXP Shear Jaw Armor™2
CONTACT INFORMATION
View and download all manuals: genesisattachments.com/products/manualsPatents: genesisattachments.com/products/patents
Asia Pacific Representative Office
24 Upper Serangoon View #12-28 Singapore 534205
Phone: +65 9673 9730
E-mail:[email protected]
Brazil
Avenida Araça, 1677Campinas - São Paulo
Phone: +55 19 9 9989-8803
E-mail:[email protected]
Europe/Africa/Middle EastGenesis GmbH
Teramostrasse 2387700 Memmingen, Germany
Phone: +49 83 31 9 25 98 0Fax: +49 83 31 9 25 98 80
genesis-europe.com
E-mail:[email protected]
Central & South America, The Caribbean
Cra 13A #89-38 / Ofi 613Bogota, Colombia
Phone: +57 1 610 8160 / 795 8747
E-mail: [email protected]
World HeadquartersGenesis Attachments
1000 Genesis DriveSuperior, WI 54880 USA
Toll Free: 888-SHEAR-IT(888-743-2748)
Phone: 715.395.5252
E-mail:[email protected]

© 2017 Genesis Attachments, LLC Genesis GXP Shear Jaw Armor™ 3
TABLE OF CONTENTSCONTACT INFORMATION 2NOMENCLATURE 4GENERAL WELDING GUIDELINES 6
Welding Ground Clamp 6Welding Rules 6Prepare the Surface 6
WELDING PRE-HEAT AND POST-HEAT 7Welding Pre-Heat 7Welding Post-Heat 7
DIMENSION AND WELDING SIZE KEY SHEET 8Side View 8Front View 10Detail Views 12
SET-UP AND TACK PROCEDURE 14Chin Front and Chin Top 14Lower Blade Side 16Lower Guide Side and Guide Blade Seat 17Upper 18Upper Front 19
NO WELD AREAS 20ROUTINE MAINTENANCE 21CONTACT INFORMATION 23

© 2017 Genesis Attachments, LLCGenesis GXP Shear Jaw Armor™4
NOMENCLATURE
5
7
1
6
3
4
2

© 2017 Genesis Attachments, LLC Genesis GXP Shear Jaw Armor™ 5
NOMENCLATUREITEM QTY DESCRIPTION
1 1 Plt Frmd Shear Jaw Armor Lower Blade Side2 1 Plt Frmd Shear Jaw Armor Lower Guide Side3 1 Plt Shear Jaw Armor Chin Front4 1 Plt Shear Jaw Armor Chin Top5 1 Plt Shear Jaw Armor Guide Blade Seat6 1 Plt Frmd Shear Jaw Armor Upper7 1 Plt Frmd Shear Jaw Armor Upper Front

© 2017 Genesis Attachments, LLCGenesis GXP Shear Jaw Armor™6
GENERAL WELDING GUIDELINESWhen welding around blade seats or the piercing tip tang area, maintain the factory machined seat radius. If the rounded grooves are welded up, use a die grinder with a carbide tool to recut these areas to their original profile. Leaving a squared edge will eventually cause structural crack-ing. The radius provides a broader area to absorb structural stress.
Welding Ground ClampDisconnect all battery ground cables or shut off master battery switch, if equipped. Failure to do so may cause excavator electrical problems, including permanent damage to onboard computer systems.
Connect ground clamp as close as possible to the area being welded without allowing current to pass through the pivot group, cylinder pin, cylinder, swivel, motor, gearbox or slewing ring.
If you are welding on the lower jaw, connect weld clamp to the lower. If you are welding on the upper jaw, connect to the upper but not to the cylinder clevis. If needed, weld a piece of steel to the area for the grounding clamp and cut the piece off when welding is completed.
Welding RulesBefore you begin:
• Remove adjacent blades, as preheating and welding may cause blade damage.• Wearing an approved respirator, grind the area to clean it, removing all existing
hard-surfacing.• Preheat area to 350˚ F (177˚ C). Maintain this temperature throughout the procedure. Do
not exceed 450˚ F (232˚ C) interpass temperature.
During welding:• Peen each weld pass to relieve stress and harden the welds.• Do not undercut the ends of the welds.• Do not start or stop welds directly above a bolt hole or in the apex of the jaw.
After welding maintenance is complete:• Cover the area with a heat blanket and allow it to cool slowly, approximately eight hours.• Do not put the shear into operation until the welds have been allowed to cool.
Prepare the SurfaceRemove all existing hard-surfacing from the upper and lower jaw areas to which the Jaw Armor is to be applied.
If required, build-up all areas of the upper and lower jaw parent material so they are flush with the top of the new blades.
The outer edge of these areas must be squared up The mating surfaces of the upper and lower jaws must also be built up to conform to the Jaw Armor profile.

© 2017 Genesis Attachments, LLC Genesis GXP Shear Jaw Armor™ 7
WELDING PRE-HEAT AND POST-HEATWelding Pre-HeatIt is critical that the parent material be pre-heated to 350º F (177º C) before welding the Jaw Armor. For good results, it is essential for the heating to be uniform around the joint area. The pre-heated area should extend a minimum of 6 inches in any direction away for the weld joint.
To ensure the proper temperature has been reached, using Temperature Indicating Crayons or an Infrared Thermometer is recommended.
Welding Post-HeatPost-heating is critical to relieve internal stress. It is important to slow the cooling process down as slowly as possible. A weld blanket works well. If not available, fiber-glass insulation wrapped generously around the weldment is a good substitute.

© 2017 Genesis Attachments, LLCGenesis GXP Shear Jaw Armor™8
DIMENSION AND WELDING SIZE KEY SHEET
1
3
5
7
6
Side View
A
DC
A
A
B B
E
F E
D
D

© 2017 Genesis Attachments, LLC Genesis GXP Shear Jaw Armor™ 9
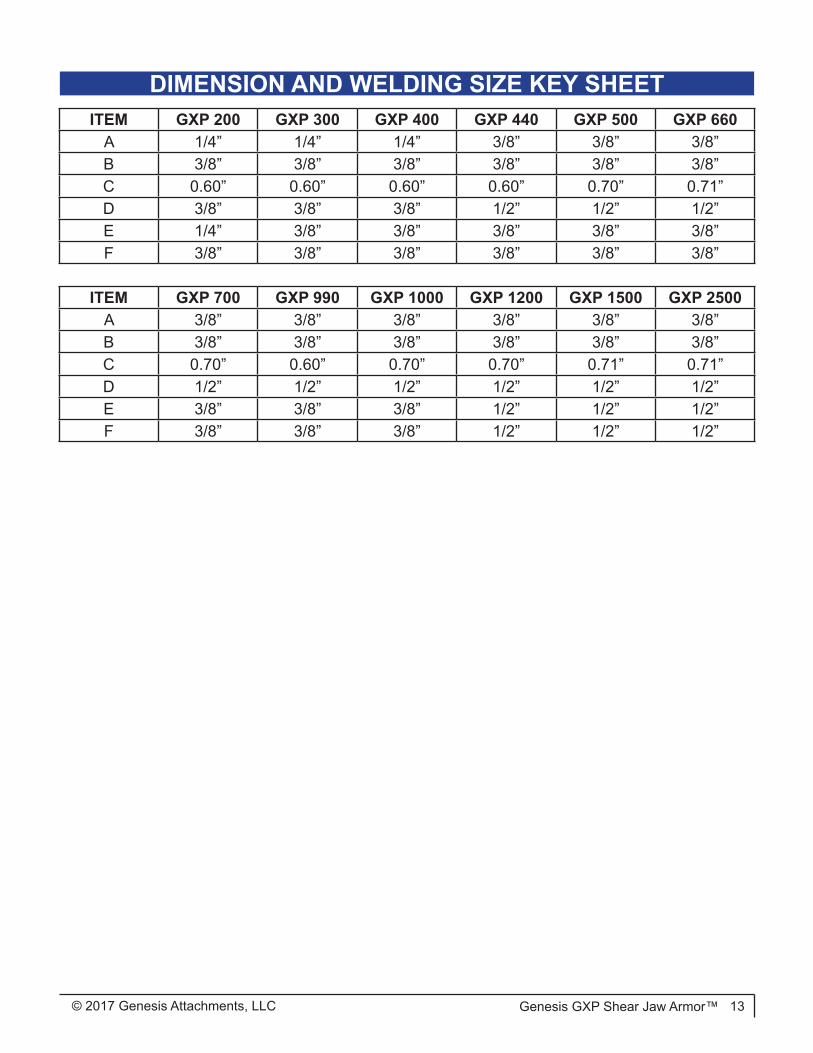
DIMENSION AND WELDING SIZE KEY SHEETITEM GXP 200 GXP 300 GXP 400 GXP 440 GXP 500 GXP 660
A 1/4” 1/4” 1/4” 3/8” 3/8” 3/8”B 3/8” 3/8” 3/8” 3/8” 3/8” 3/8”C 0.60” 0.60” 0.60” 0.60” 0.70” 0.71”D 3/8” 3/8” 3/8” 1/2” 1/2” 1/2”E 1/4” 3/8” 3/8” 3/8” 3/8” 3/8”F 3/8” 3/8” 3/8” 3/8” 3/8” 3/8”
ITEM GXP 700 GXP 990 GXP 1000 GXP 1200 GXP 1500 GXP 2500A 3/8” 3/8” 3/8” 3/8” 3/8” 3/8”B 3/8” 3/8” 3/8” 3/8” 3/8” 3/8”C 0.70” 0.60” 0.70” 0.70” 0.71” 0.71”D 1/2” 1/2” 1/2” 1/2” 1/2” 1/2”E 3/8” 3/8” 3/8” 1/2” 1/2” 1/2”F 3/8” 3/8” 3/8” 1/2” 1/2” 1/2”

© 2017 Genesis Attachments, LLCGenesis GXP Shear Jaw Armor™10
DIMENSION AND WELDING SIZE KEY SHEET
7
3
45
2
6
1
Front View
See Note
See Note
See Note
B
BA
AD
A
A
A
A
D B
A
D
D
D

© 2017 Genesis Attachments, LLC Genesis GXP Shear Jaw Armor™ 11
DIMENSION AND WELDING SIZE KEY SHEETITEM GXP 200 GXP 300 GXP 400 GXP 440 GXP 500 GXP 660
A 1/4” 1/4” 1/4” 3/8” 3/8” 3/8”B 3/8” 3/8” 3/8” 3/8” 3/8” 3/8”C 0.60” 0.60” 0.60” 0.60” 0.70” 0.71”D 3/8” 3/8” 3/8” 1/2” 1/2” 1/2”E 1/4” 3/8” 3/8” 3/8” 3/8” 3/8”F 3/8” 3/8” 3/8” 3/8” 3/8” 3/8”
ITEM GXP 700 GXP 990 GXP 1000 GXP 1200 GXP 1500 GXP 2500A 3/8” 3/8” 3/8” 3/8” 3/8” 3/8”B 3/8” 3/8” 3/8” 3/8” 3/8” 3/8”C 0.70” 0.60” 0.70” 0.70” 0.71” 0.71”D 1/2” 1/2” 1/2” 1/2” 1/2” 1/2”E 3/8” 3/8” 3/8” 1/2” 1/2” 1/2”F 3/8” 3/8” 3/8” 1/2” 1/2” 1/2”
Note: Extend welds 1.50” past the Jaw Armor. Then grind weld ends smooth, tapered to parent material.

© 2017 Genesis Attachments, LLCGenesis GXP Shear Jaw Armor™12
DIMENSION AND WELDING SIZE KEY SHEET
1
2
5
3
4
Detail Views
2
54
3
A
A
A
D
A
A
F
F
AF
No weld
© 2017 Genesis Attachments, LLC Genesis GXP Shear Jaw Armor™ 13
DIMENSION AND WELDING SIZE KEY SHEETITEM GXP 200 GXP 300 GXP 400 GXP 440 GXP 500 GXP 660
A 1/4” 1/4” 1/4” 3/8” 3/8” 3/8”B 3/8” 3/8” 3/8” 3/8” 3/8” 3/8”C 0.60” 0.60” 0.60” 0.60” 0.70” 0.71”D 3/8” 3/8” 3/8” 1/2” 1/2” 1/2”E 1/4” 3/8” 3/8” 3/8” 3/8” 3/8”F 3/8” 3/8” 3/8” 3/8” 3/8” 3/8”
ITEM GXP 700 GXP 990 GXP 1000 GXP 1200 GXP 1500 GXP 2500A 3/8” 3/8” 3/8” 3/8” 3/8” 3/8”B 3/8” 3/8” 3/8” 3/8” 3/8” 3/8”C 0.70” 0.60” 0.70” 0.70” 0.71” 0.71”D 1/2” 1/2” 1/2” 1/2” 1/2” 1/2”E 3/8” 3/8” 3/8” 1/2” 1/2” 1/2”F 3/8” 3/8” 3/8” 1/2” 1/2” 1/2”

© 2017 Genesis Attachments, LLCGenesis GXP Shear Jaw Armor™14
SET-UP AND TACK PROCEDUREChin Front and Chin TopPlace Item 3 against the front of the chin while maintaining dimensions “F” and clamp in place (See Figures 14a, 15a & 15b). Center Item 4 from side to side and maintain dimension “D”. Use spacers (See Figure 15a) if necessary to hold the dimension required between the plates to achieve the correct size welds (See Figures 14a & 14b).
4
3 Figure 14b
3
Figure 14a
A
F
F
F Typ.
A Typ.
D (
D

© 2017 Genesis Attachments, LLC Genesis GXP Shear Jaw Armor™ 15
SET-UP AND TACK PROCEDURE
Figure 15a
4
3
Optional set-up spacer
Optional set-up spacer
Clamp Item 3 in place
Figure 15b
3
4

© 2017 Genesis Attachments, LLCGenesis GXP Shear Jaw Armor™16
SET-UP AND TACK PROCEDURE
A
Lower Blade SideSet Item 1 onto the lower blade side, hold the offset dimension (See Figure 16d). Clamp down flush with the profile and tack weld into position.
1
1
A A (Figure 16a
A
A
No weld here
D
Figure 16b
Figure 16c
Figure 16d
Adjustable square
Extend welds 1.50” past the Jaw Armor. Then grind weld ends smooth and taper to parent metal.

© 2017 Genesis Attachments, LLC Genesis GXP Shear Jaw Armor™ 17
SET-UP AND TACK PROCEDURELower Guide Side and Guide Blade SeatSet Item 2 onto the lower guide side and hold the offset dimension (See Figure 17b). Clamp down flush with the profile and tack weld into position. Set Item 5 onto the guide blade seat and hold the offset dimension (See Figures 17a and b). Clamp down and tack weld into position.
Extend welds 1.50” past the Jaw Armor. Then grind weld ends smooth and taper to parent metal.
No Weld
2
5
A
D
Figure 17a
Figure 17c
Figure 17b
Figure 17d
A (
A
A
2
5
D

© 2017 Genesis Attachments, LLCGenesis GXP Shear Jaw Armor™18
SET-UP AND TACK PROCEDUREUpperPlace Item 6 at the bottom of the upper jaw (See Figure 18a). Make sure the plate has the required width on all sides for the correct size weld. Clamp flush to the jaw profile and tack weld in place.
Figure 18a
Extend welds 1.50” past the Jaw Armor. Then grind weld ends smooth and taper to parent metal.A
A
No weld
D B
6
6
6
C
Figure 18b
Figure 18c
Figure 18d

© 2017 Genesis Attachments, LLC Genesis GXP Shear Jaw Armor™ 19
SET-UP AND TACK PROCEDUREUpper FrontPlace Item 7 on the top of the upper jaw (See Figure 19a & 19b). Make sure the plate has the required width on all sides for the correct size weld. Clamp flush to the jaw profile and tack weld in place.
D
7A
D
7
Figure 19a
Figure 19bFigure 19c

© 2017 Genesis Attachments, LLCGenesis GXP Shear Jaw Armor™20
NO WELD AREAS
No weldNo weld
No weld
© 2017 Genesis Attachments, LLC Genesis GXP Shear Jaw Armor™ 21
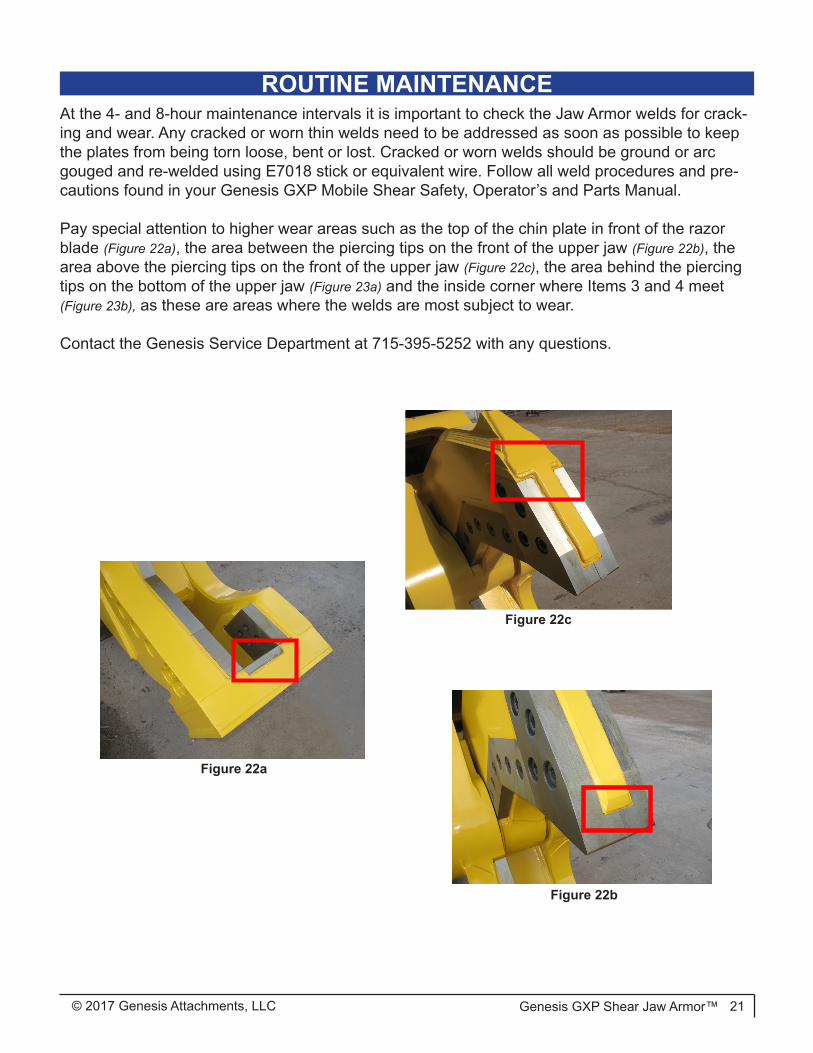
ROUTINE MAINTENANCEAt the 4- and 8-hour maintenance intervals it is important to check the Jaw Armor welds for crack-ing and wear. Any cracked or worn thin welds need to be addressed as soon as possible to keep the plates from being torn loose, bent or lost. Cracked or worn welds should be ground or arc gouged and re-welded using E7018 stick or equivalent wire. Follow all weld procedures and pre-cautions found in your Genesis GXP Mobile Shear Safety, Operator’s and Parts Manual.
Pay special attention to higher wear areas such as the top of the chin plate in front of the razor blade (Figure 22a), the area between the piercing tips on the front of the upper jaw (Figure 22b), the area above the piercing tips on the front of the upper jaw (Figure 22c), the area behind the piercing tips on the bottom of the upper jaw (Figure 23a) and the inside corner where Items 3 and 4 meet (Figure 23b), as these are areas where the welds are most subject to wear.
Contact the Genesis Service Department at 715-395-5252 with any questions.
Figure 22b
Figure 22a
Figure 22c

© 2017 Genesis Attachments, LLCGenesis GXP Shear Jaw Armor™22
ROUTINE MAINTENANCE
Figure 23a
Figure 23b

Asia Pacific Representative Office
24 Upper Serangoon View #12-28 Singapore 534205
Phone: +65 9673 9730
E-mail:[email protected]
Brazil
Avenida Araça, 1677Campinas - São Paulo
Phone: +55 19 9 9989-8803
E-mail:[email protected]
Europe/Africa/Middle EastGenesis GmbH
Teramostrasse 2387700 Memmingen, Germany
Phone: +49 83 31 9 25 98 0Fax: +49 83 31 9 25 98 80
genesis-europe.com
E-mail:[email protected]
Central & South America, The Caribbean
Cra 13A #89-38 / Ofi 613Bogota, Colombia
Phone: +57 1 610 8160 / 795 8747
E-mail: [email protected]
World HeadquartersGenesis Attachments
1000 Genesis DriveSuperior, WI 54880 USA
Toll Free: 888-SHEAR-IT(888-743-2748)
Phone: 715.395.5252
E-mail:[email protected]
CONTACT INFORMATION
View and download all manuals: genesisattachments.com/products/manualsPatents: genesisattachments.com/products/patents
Rev. F - 10-31-17