hammer and dolly use - tachrev.com · 5. (e) #351 finishing hammer: for shaping and adding a curve...
TRANSCRIPT

As the mass number of do it yourself restorers continue to grow, the demand for correcttechnique is strong. The following article will show you correct procedures to straightenout any dent and the right hammer, dolly and/or spoon for each application. We will behammering “on” the dolly, meaning the dolly will be directly under the panel where thehammer strikes and “off” the dolly meaning the dolly will be 1/4 to 1 inch to the side ofwhere the hammer strikes, just to name a few of the techniques in this booklet. THISBOOKLET HAS 23 PHOTOS
Here is an assortment of 15 hammers from the ALC Company or S & H Industries. These
are the basic hammers that are needed if you really want to straighten any type of dent.
The ALC Hammers are top quality yet affordable tools.
These spoons ( outside edge ) and dollies are needed as reinforcement for the hammers.The spoons lay down on top of the metal and when they are struck they give a more evensurface movement. The dolly goes behind the dented area which you will be tapping for
support and reshaping. For illustration purposes all tools are marked with a letter whichwill be used to describe the style and part number of each. (You can use your computer
magnifying option to view in close up detail if needed.)
HAMMER AND DOLLY USE

1. ( A ) Short Bumping Hammer (R) 501Slapping Spoon:
This fender is laying down with the outsideportion against a table. We are straighten-ing the fender from the backside. Thefender has a gradual wave and rather thanhammering it out, we use the SlappingSpoon. Strike the spoon with the shortbumping hammer, it has medium weight witha lot of control. This spoon helps to evenlyspread out the pressure of the blow withoutleaving any hammer marks in the panel.
2. (B) 5 Inch 331 Bullet Point:
During the course of body work a high spot
may be found. This needs to be flattened
very carefully. On the high spot we will use a
short pick hammer. Tap the metal easily, just
enough to flatten the high spot. Fill it with a
thin layer of filler and re-block the entire
area. Often you will need to back the panel
up with a dolly. You are only trying to lightly
tap small hi spots with this technique.
Remember, not too much or you may crack
the body filler!!!
3. (C) 356 Door skin Hammer: (J) Large
Heel Dolly :
This hammer has a slight curve and is very
useful in working out hard to reach areassuch as this wheel well. We back it up with
the Heel Dolly and put pressure on the edgebelow the dip. The 356 hammer has the
right contour to safely straighten this wheellip edge without touching the outer panel.

5. (E) #351 Finishing Hammer:
For shaping and adding a curve to different
pieces of metal use this hammer combined
with a lead shot filled bag which will “give”
slightly to the metal above it, allowing shape
to take place. Here we are using it to shape a
curved fender extension. This hammer is
rounded on both ends and is designed to
stretch and form metal.
6. (F) Finishing Double Hammer #354:To get a deck lid or door to fit evenly with
the panel next to it without leaving any marks on the body line use the spoon to
apply pressure. Tap the panel an inch above it using the #354 finishing hammer. Thishammer is a little longer and has more
weight but still won’t mar the metal whenused properly because it is rounded on the
edges slightly.
4. (D) 302 Medium Shrinking Hammer: (D)125 Large Loaf Dolly:
This hammer has a round end and a squareend for getting into tight corners. We arestraightening these edges to get them flatbefore putting the panel back on the car.When you have a large area of flat sheetmetal it will tend to get wavy so you needthis type of dolly to provide an adequate areaof support while using a balanced shrinkingfaced hammer. As this hammer strikes, itactually pulls the metal toward it because ofthe serrated teeth. This is called “ColdShrinking.” It works in the exact opposite ofwhat you would naturally think.

7. (G) #341 Straight Pick Pencil
During the alignment of fender to door,take a spoon and pry out the fender usingthe door for leverage. With one hand onthe spoon against the door use the other totap with the straight pick pencil hammer 2-3inches from the edge of the fender. The#341 hammer is great for flat surfaces withits big striking face. This tool is also verybalanced which helps you to control it.
8. (H) 375 Offset Bumping and Cross Ping
Hammer: (F) 108 Large Toe Dolly:
To straighten the bottom of a radiator support
which has a curve to it this dolly and hammer
work best. The hammer has a small curve to
it which really gives you control to tap out this
type of dent. The placing of the dolly is very
important, as seen in the photo. Work with
the dolly placement to become accurate!
9. (I) 368 Curved Finishing and Grooving Hammer:
This hammer is great for getting into awkward areas like the crease on this wheel well. The
hammer head has a curve shape which enables you to straighten the inside wheel edge butnever making contact with the outer edge. In addition the end is smoothed over to help
eliminate marks.

10. (J) 370 Straight Grooving and Shrinking Ham-mer: (H) 135 General Purpose Low Crown Dolly:
On damaged warped metal use the 370 hammerwhich has serrated teeth to move the metal.Hold the dolly behind the area as you strike withthe hammer, and the teeth will actually pull themetal out because of the force of the dollybehind it. This is similar to Caption #4 with adifferent shaped piece of metal using a moreaggressive dolly to back the metal.
11. (K) 7 inch medium curved Pick Pencil Hammer:#342
With this hammer you can get into really deep, hard to get places. For
instance, here we are working out a small dent located back inside a quarter
panel near the tail light housing.
12. (M) 369 Straight Finishing and Grooving
Hammer: (R) 107 Rubber Covered Dolly:
On this application we don’t want to chip thepaint on the valve cover. This dolly forms the
shape of the outside surface without chipping,while the hammer which has a straight end for
finishing is on the inside straightening the veryoutside skirt edge of the valve cover.

13. (N) 358 Dinging Hammer:
Here a door has been pushed too far in. Usingthe spoon again push down with your lefthand. This hammer has a square end so youcan come up to the edge of the panel withouthitting the quarter thus straightening iteffectively.
14. (0.) The 361 8 inch large straight pick
Hammer:
There is a dent from where the shock came
loose on this trunk floor. To reach this
effectively you need a long straight hammer
like the # 361.
15. (B) 106 Spoon Dolly :
This dolly can be used for areas that arehard to reach such as inside this tail lightsection and when your arm is too short or
isn’t small enough to go through a smallopening.
Dollies and Spoons

16. (C) 145 Fender Dolly:
This dolly is a strange shaped tool which willhelp to fit into some of those unusual placesin fenders and hoods. With this tool you canget in and support the whole area while youtap the metal back into shape with a regularfinishing hammer which has a smooth faceon it.
17. (D) Large Loaf Dolly: (D) #302 Medium
Hammer :
This panel has an edge which needs to be
straightened out. The #302 hammer has a
Square end which runs evenly with the panel
thus makes full contact with the surface you
are straightening.
18. (E) 118 High Low shrinking Dolly :
This Dolly has “edges” which support the metal on either side with a groove in the center.
“SEE FINGER” Simply place the groove against the metal and then tap the metal slightlyinside this groove. For illustration purposes we have it upside down for you to see.
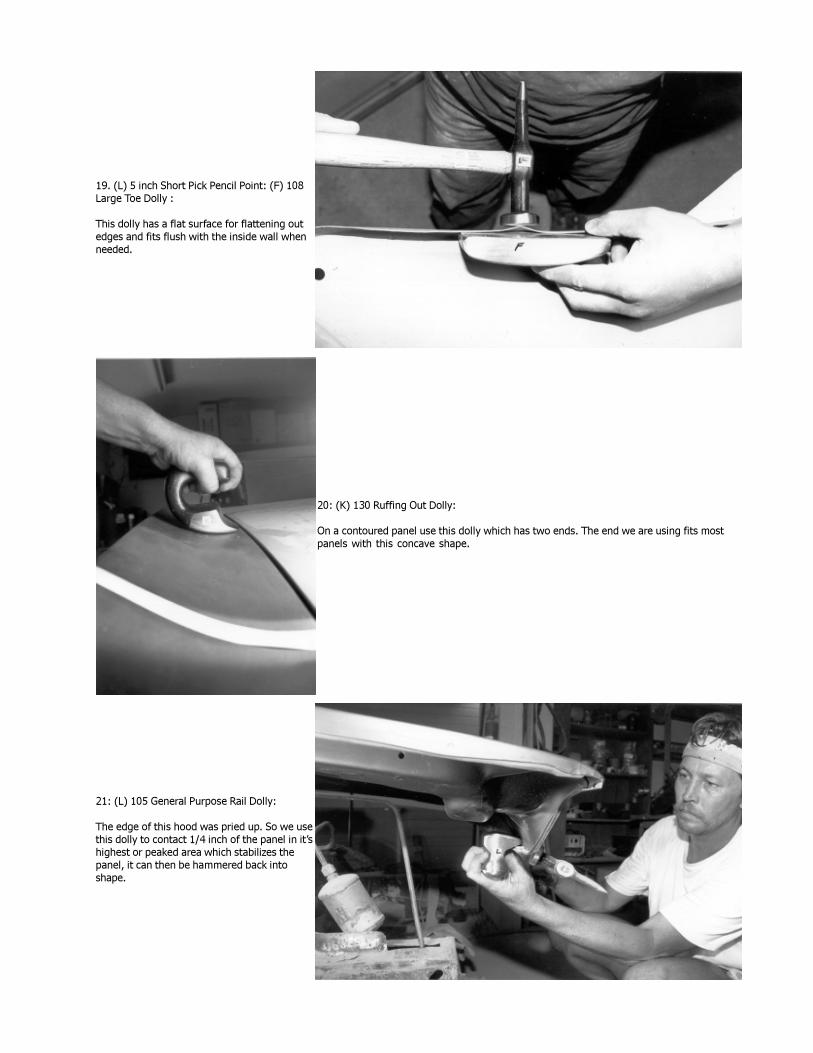
19. (L) 5 inch Short Pick Pencil Point: (F) 108Large Toe Dolly :
This dolly has a flat surface for flattening outedges and fits flush with the inside wall whenneeded.
20: (K) 130 Ruffing Out Dolly:
On a contoured panel use this dolly which has two ends. The end we are using fits most
panels with this concave shape.
21: (L) 105 General Purpose Rail Dolly:
The edge of this hood was pried up. So we use
this dolly to contact 1/4 inch of the panel in it’shighest or peaked area which stabilizes the
panel, it can then be hammered back intoshape.
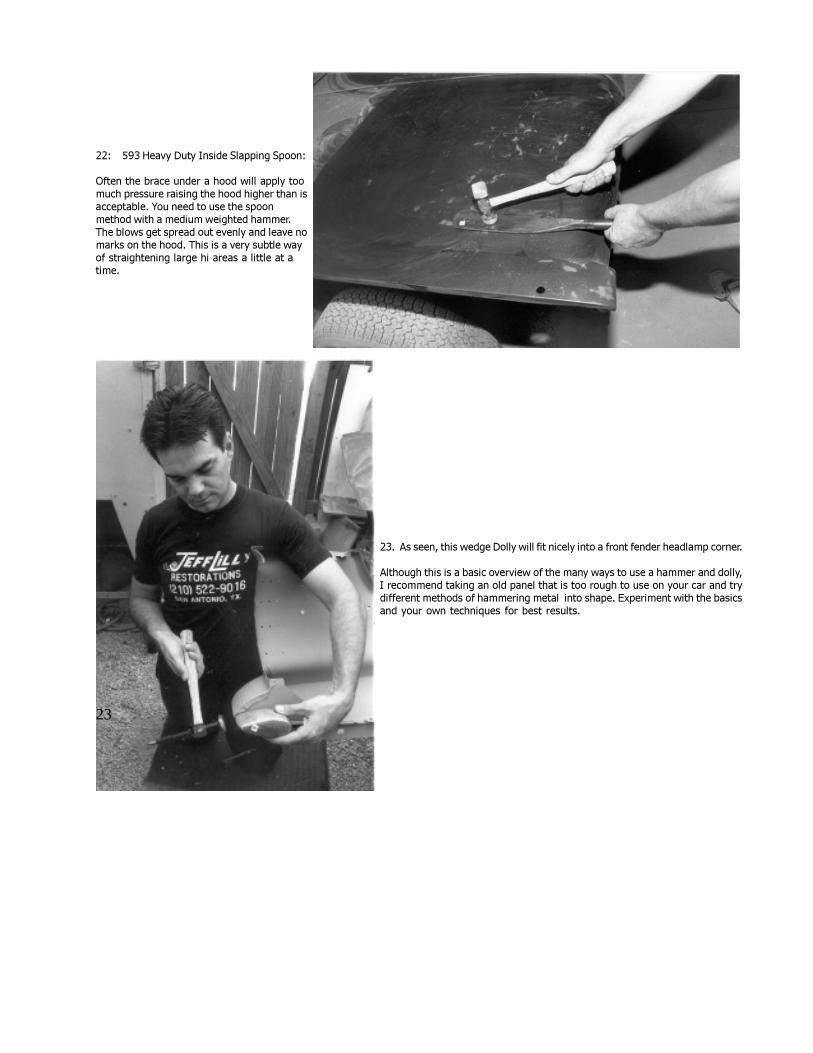
22: 593 Heavy Duty Inside Slapping Spoon:
Often the brace under a hood will apply toomuch pressure raising the hood higher than isacceptable. You need to use the spoonmethod with a medium weighted hammer.The blows get spread out evenly and leave nomarks on the hood. This is a very subtle wayof straightening large hi areas a little at atime.
23. As seen, this wedge Dolly will fit nicely into a front fender headlamp corner.
Although this is a basic overview of the many ways to use a hammer and dolly,
I recommend taking an old panel that is too rough to use on your car and try
different methods of hammering metal into shape. Experiment with the basics
and your own techniques for best results.
23
About the Sites Convenience1. Did you have any difficulty downloading or viewing our booklets?
Yes No if So, Why:2. Was Restoreityourself.com easy to navigate?
Yes No if Not, Why:3. Was our sample enough information for you to purchase it?
Yes No if Not, Why:
About This booklet4. Is our product priced fairly?
Yes No if Not, Why:5. Do you feel our booklet will help you with your project?
Yes No if Not, Why:
About Tools6. Would you buy your tools on-line and have them delivered to your Home or
Business?Yes No If Not, why?
About You & your Vehicle7. Will you be doing the work yourself or will you have a shop do the work for you?
Myself Shop8. What is your age group? 15-24 25-34 35-44 45-54 55-64 65+9. What Vehicle/s do you own?10. What Vehicle/s are you working on or having worked on?
In General11. How do you feel about On-line shopping?
Comfortable Uncomfortable but still do it Not comfortable at all12. Are you interested in becoming a member at restoreityourself.com for substantial savings?
Yes No13. Have you seen other sites providing Auto-Restoration booklets?
Yes No if yes, Where:14. Will you be a frequent visitor at restoreityourself.com?
Yes No Don't know
Please enter your email address if you would like us to contact you about the results of yoursurvey:
For any additional comments please type them in below: