hardware prototyping with arduino
TRANSCRIPT
HARDWARE PROTOTYPING WITH ARDUINO
…with an introduction to Raspberry Pi and ESP8266
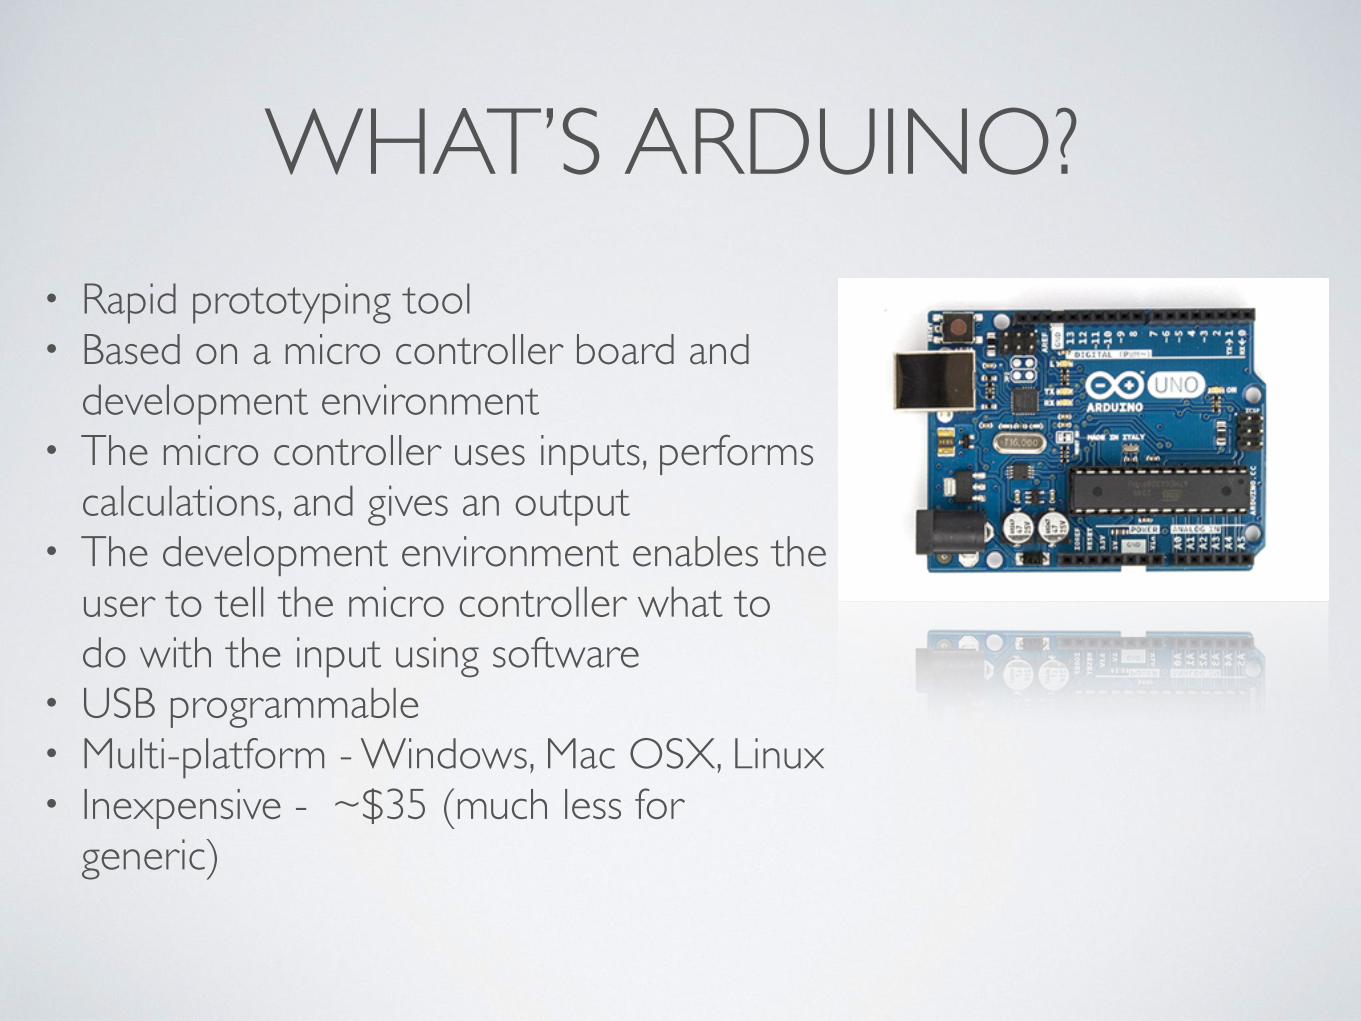
WHAT’S ARDUINO?• Rapid prototyping tool• Based on a micro controller board and
development environment• The micro controller uses inputs, performs
calculations, and gives an output• The development environment enables the
user to tell the micro controller what to do with the input using software
• USB programmable• Multi-platform - Windows, Mac OSX, Linux• Inexpensive - ~$35 (much less for
generic)
WHAT CAN I DO WITH AN ARDUINO BOARD?
• Depends….
• What components do you have?
• What do you want to do?
• https://www.youtube.com/watch?v=nz_tgDD8FNw
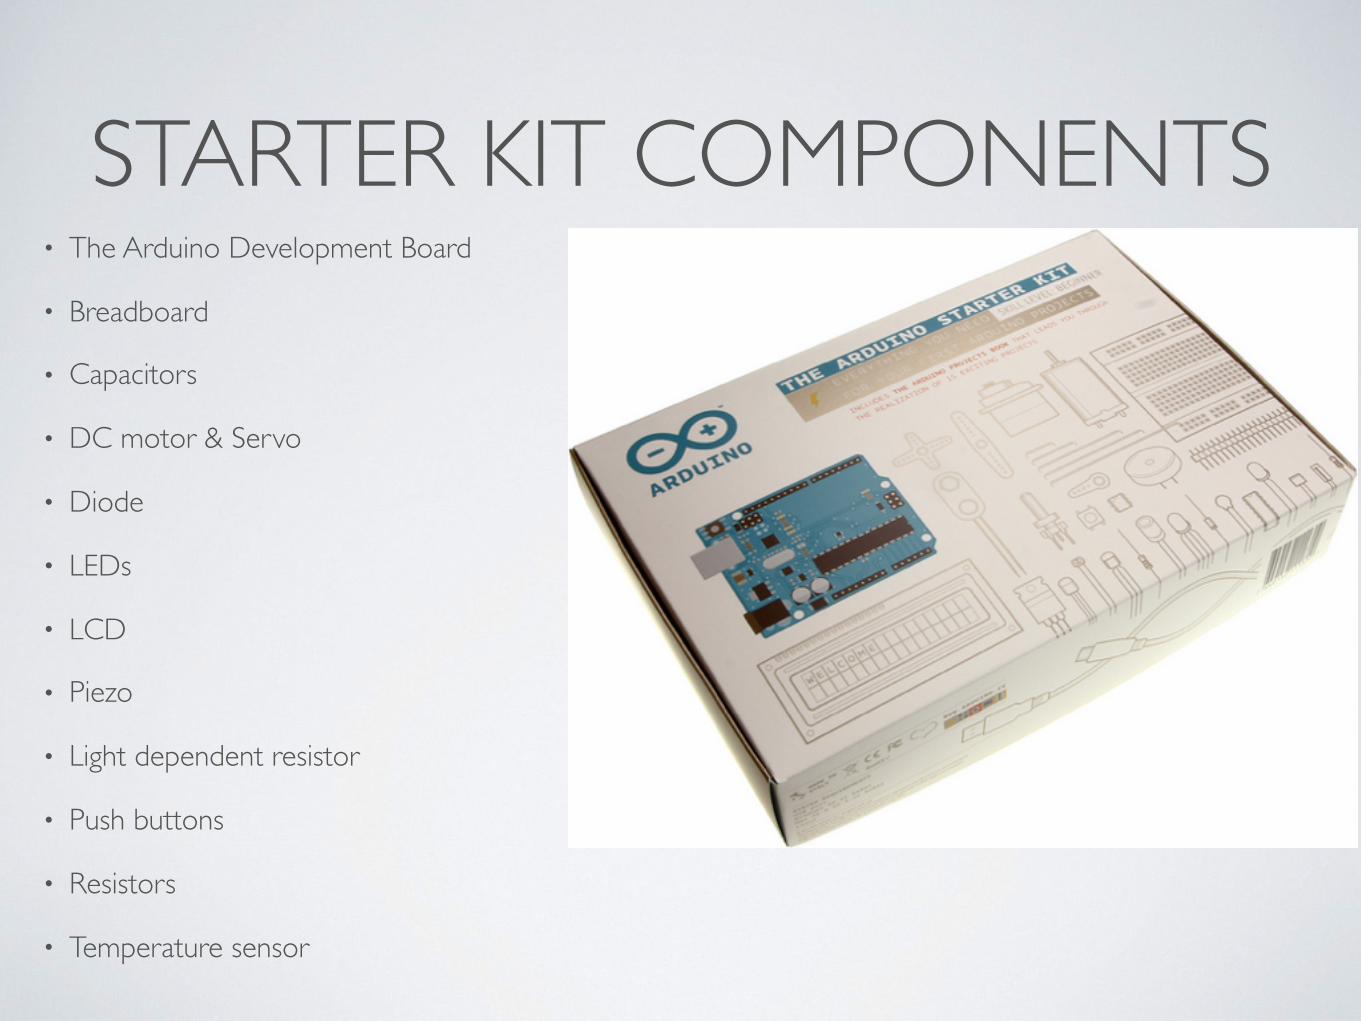
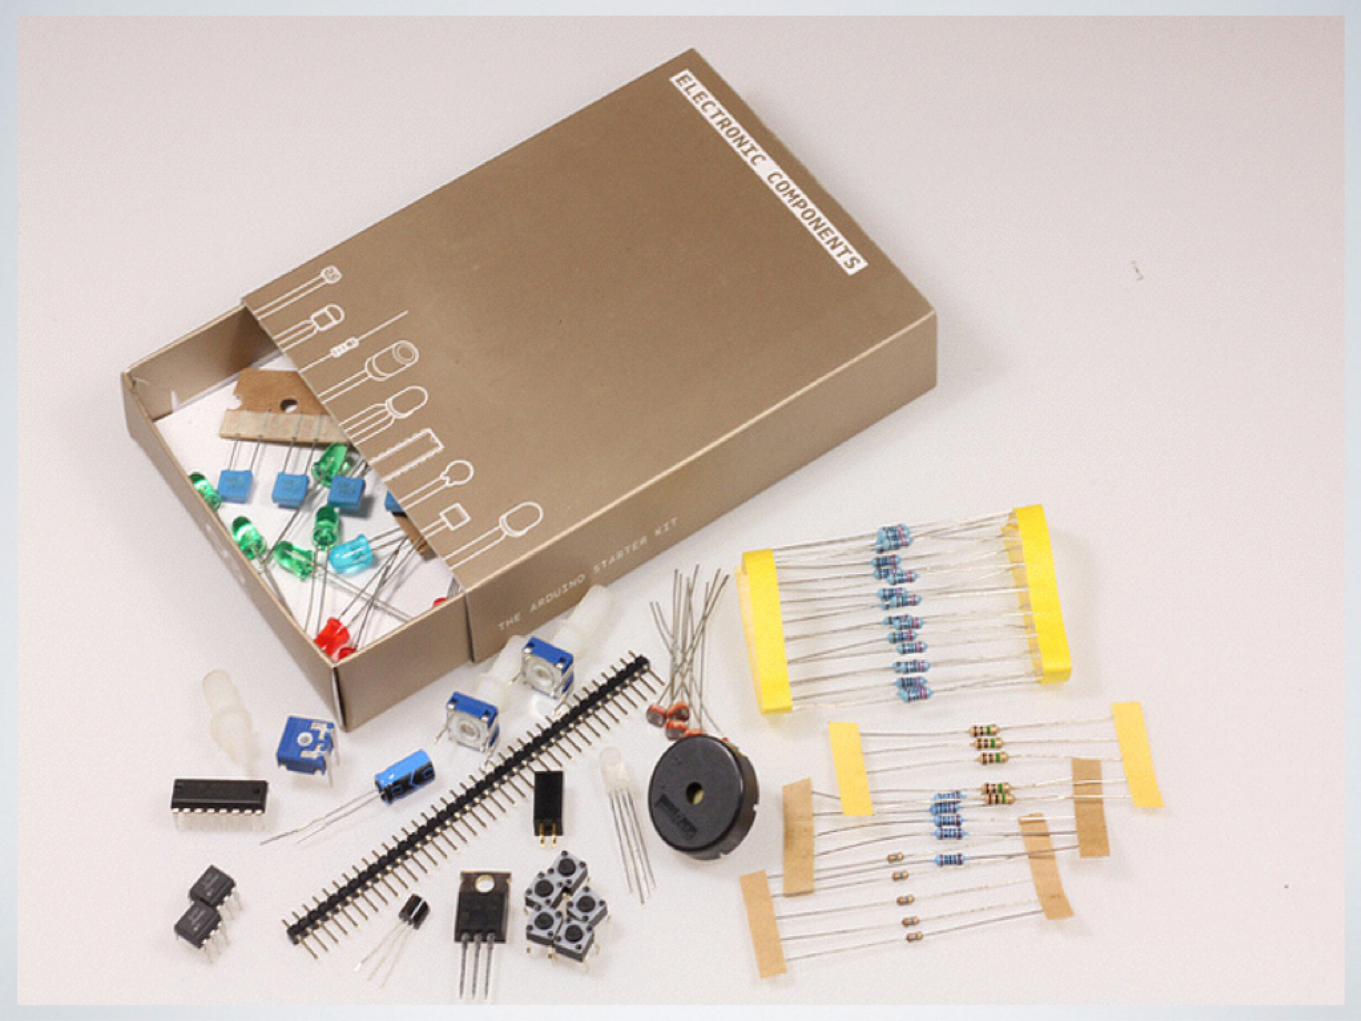
STARTER KIT COMPONENTS• The Arduino Development Board
• Breadboard
• Capacitors
• DC motor & Servo
• Diode
• LEDs
• LCD
• Piezo
• Light dependent resistor
• Push buttons
• Resistors
• Temperature sensor


THE ARDUINO BOARD1. USB (type B)
2. Barrel Jack
3. Ground
4. 5V supply
5. 3.3V supply
6. Analog input (Eg. temp sensor)
7. Digital input/output
8. Pulse Width Modulation
9. Analog Reference
10. Reset Button
11. Power LED
12. TX/RX LED
13. ATmega microcontroller
14. Voltage Regulator
15. Pin 13 LED
HTTPS://LEARN.SPARKFUN.COM/TUTORIALS/WHAT-IS-AN-ARDUINO

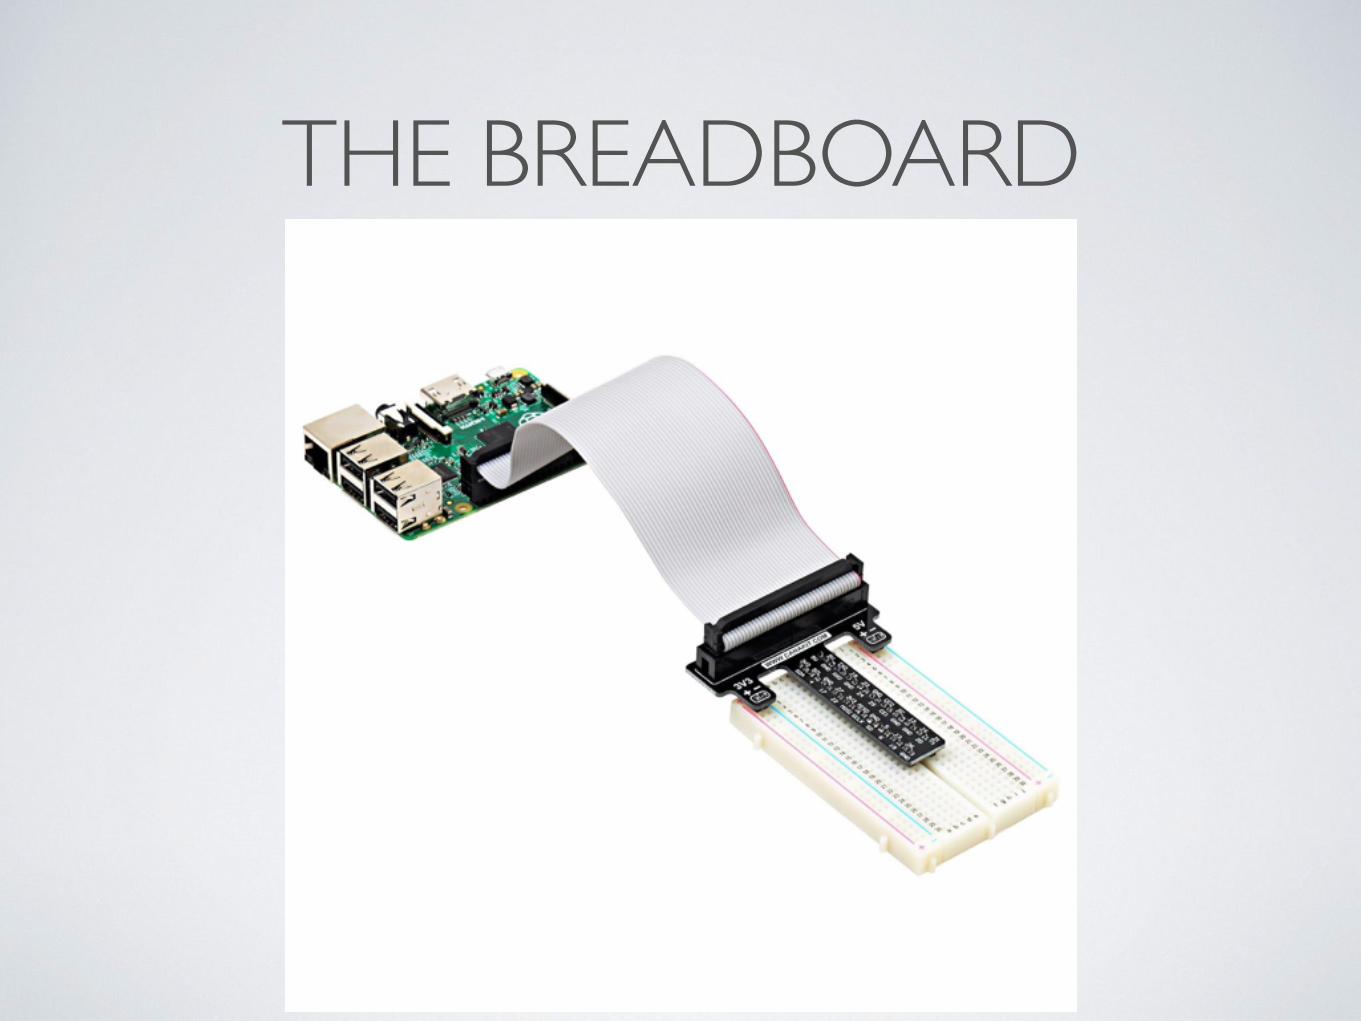
THE BREADBOARD

WHAT ELSE CAN I CONNECT?
Arduino can interface easily with a huge variety of external modules/devices:
• Thermometers
• Accelerometers
• GPS receivers
• Bluetooth transceivers
• Touch screens
• Cellular/GSM modules
• Other wireless modules (Xbee, Zwave, etc.)2w
• SD Card storage
• Relays
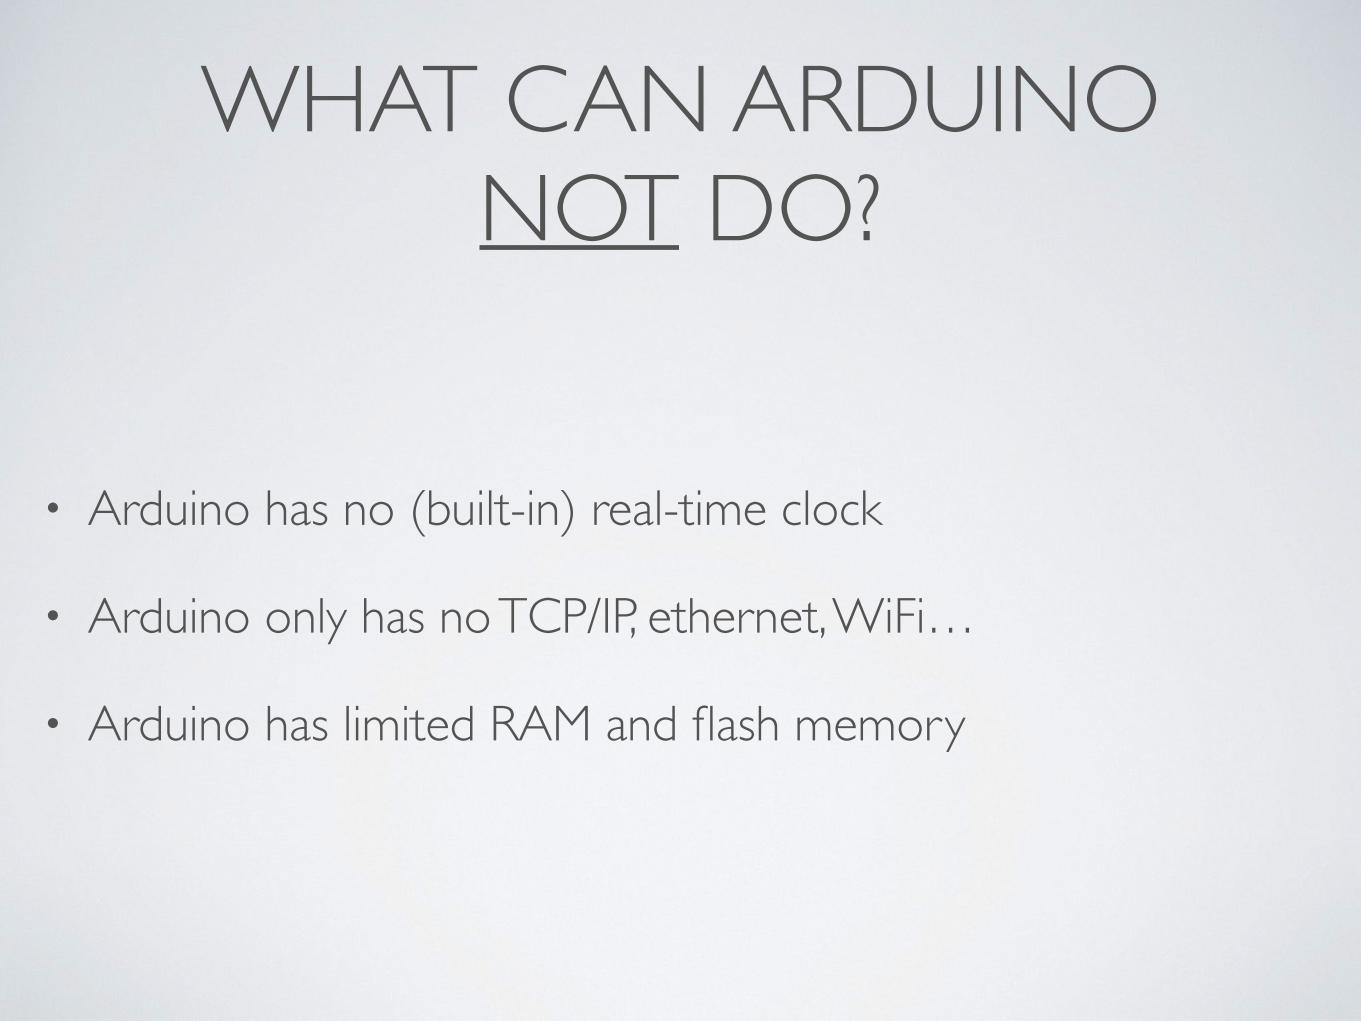
WHAT CAN ARDUINO NOT DO?
• Arduino has no (built-in) real-time clock
• Arduino only has no TCP/IP, ethernet, WiFi…
• Arduino has limited RAM and flash memory
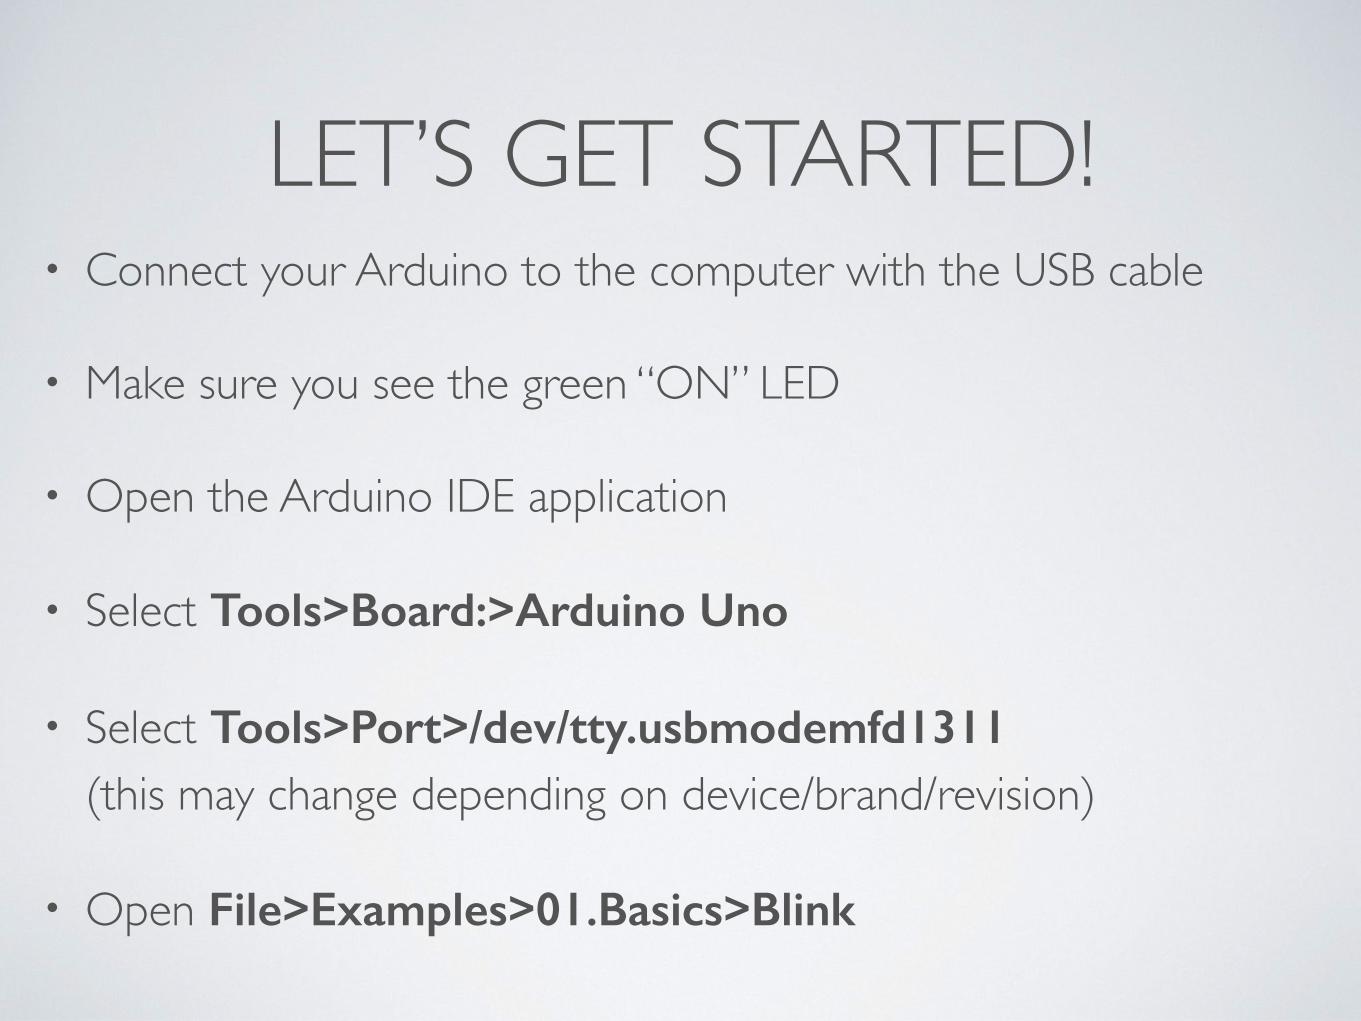
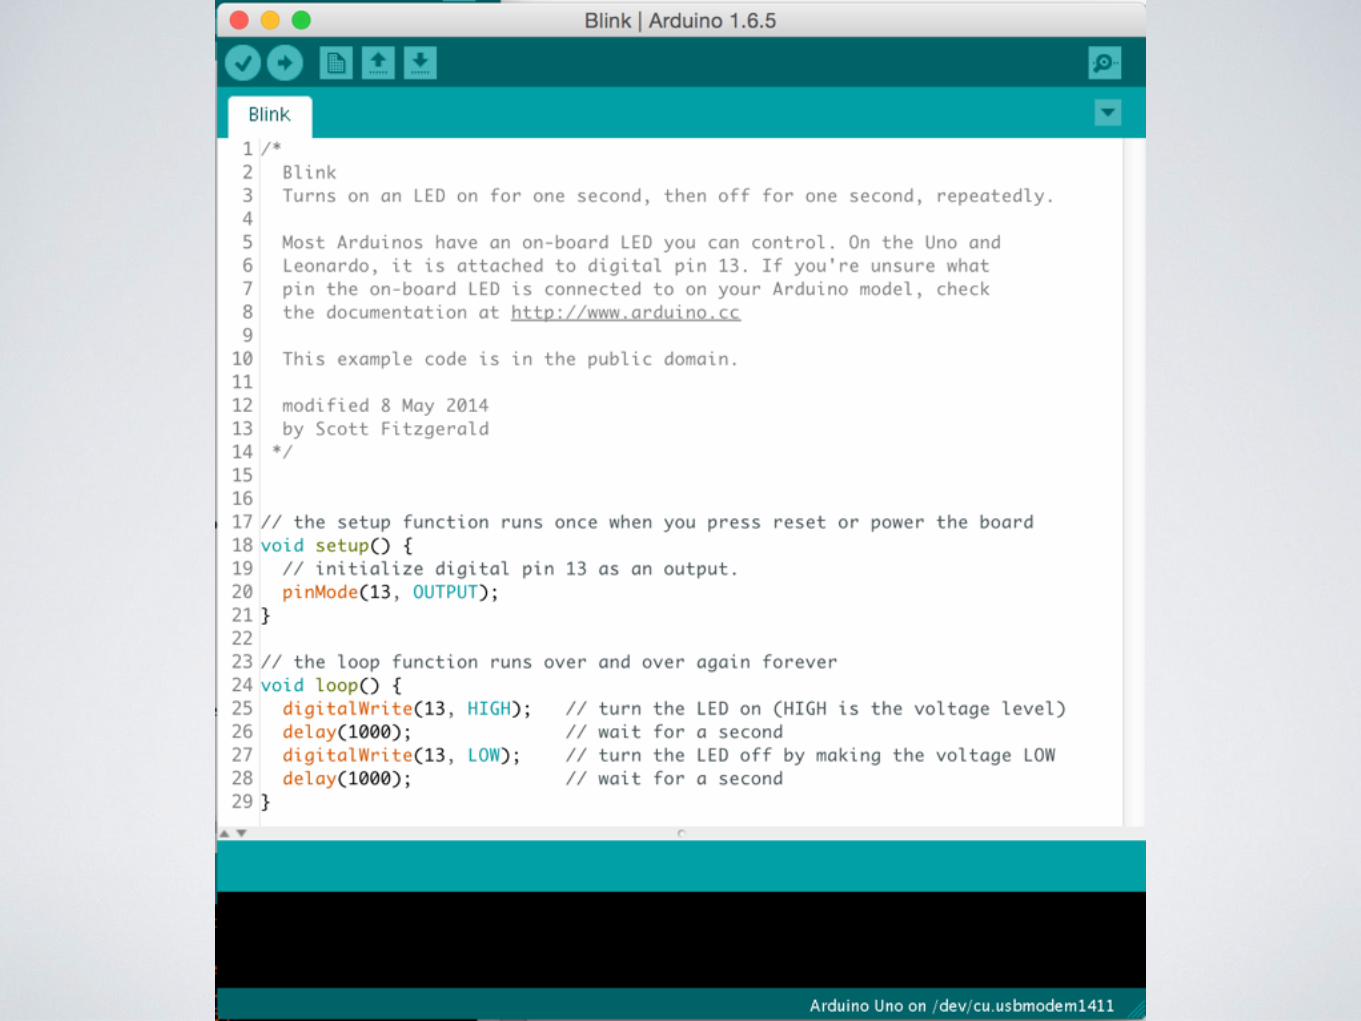
LET’S GET STARTED!• Connect your Arduino to the computer with the USB cable
• Make sure you see the green “ON” LED
• Open the Arduino IDE application
• Select Tools>Board:>Arduino Uno
• Select Tools>Port>/dev/tty.usbmodemfd1311 (this may change depending on device/brand/revision)
• Open File>Examples>01.Basics>Blink
EXAMPLE 2: LED FADE IN/OUT
• Open File>Examples>01.Basics>Fade
• Notice that pin number is now represented by a variable
• Change the digital pin connection to 9
• Click to compile and verify your code
• Click to upload to the board and run

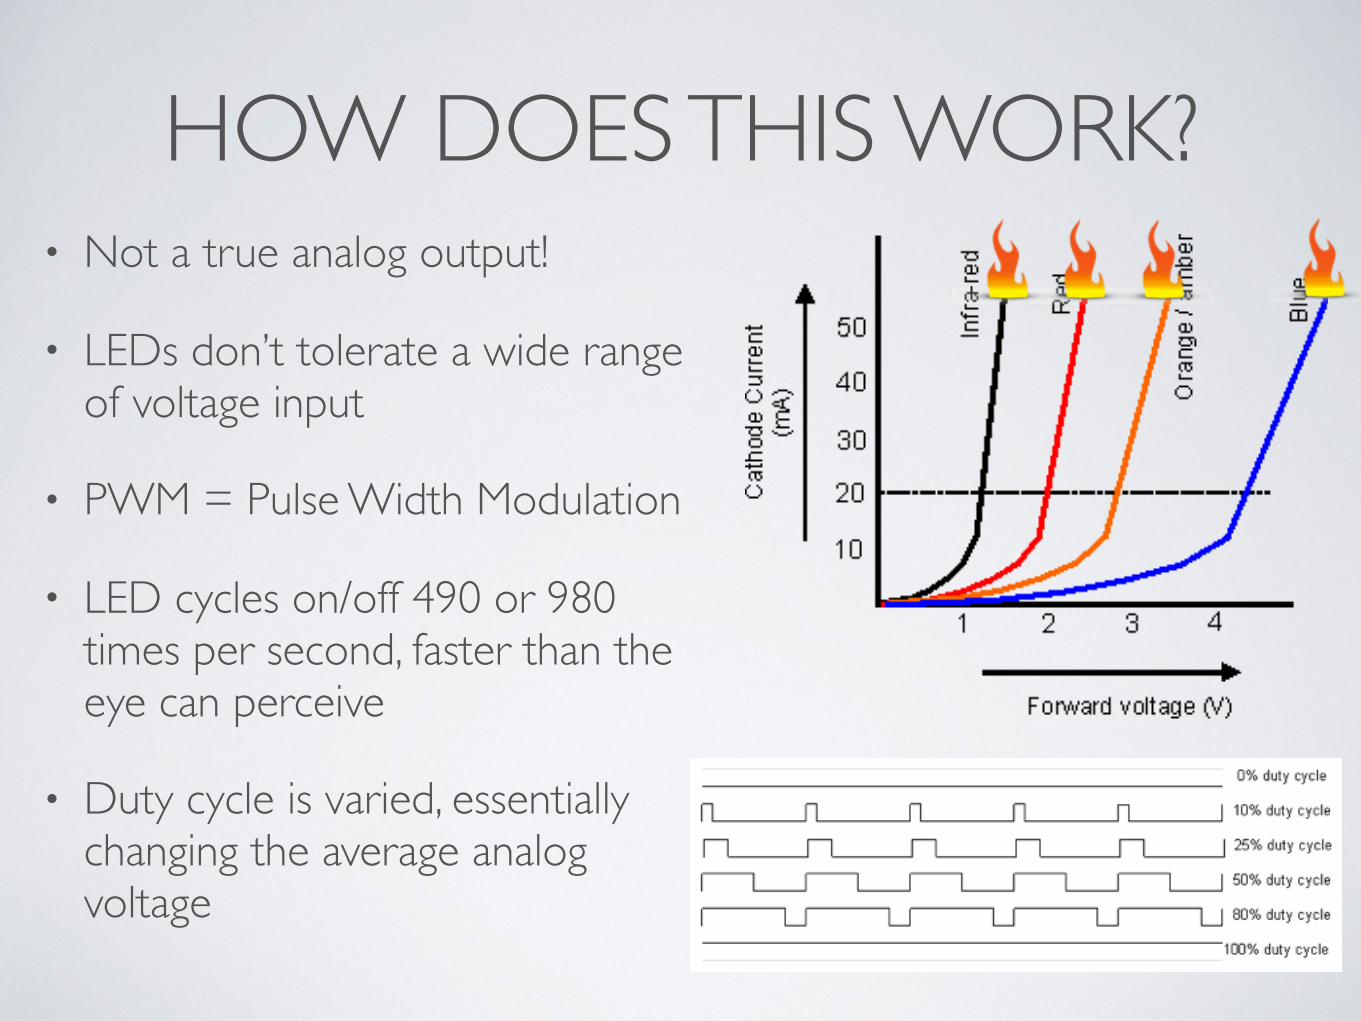
HOW DOES THIS WORK?• Not a true analog output!
• LEDs don’t tolerate a wide range of voltage input
• PWM = Pulse Width Modulation
• LED cycles on/off 490 or 980 times per second, faster than the eye can perceive
• Duty cycle is varied, essentially changing the average analog voltage

GENERAL CAVEATS FOR ELECTRONICS
• All electronics contain magic white smoke that makes things work. Don’t let the smoke out.
• Static electricity is fun, but it can let the smoke out
• Disconnect power when making wiring changes
• Be careful when interfacing devices that operate at different voltages!
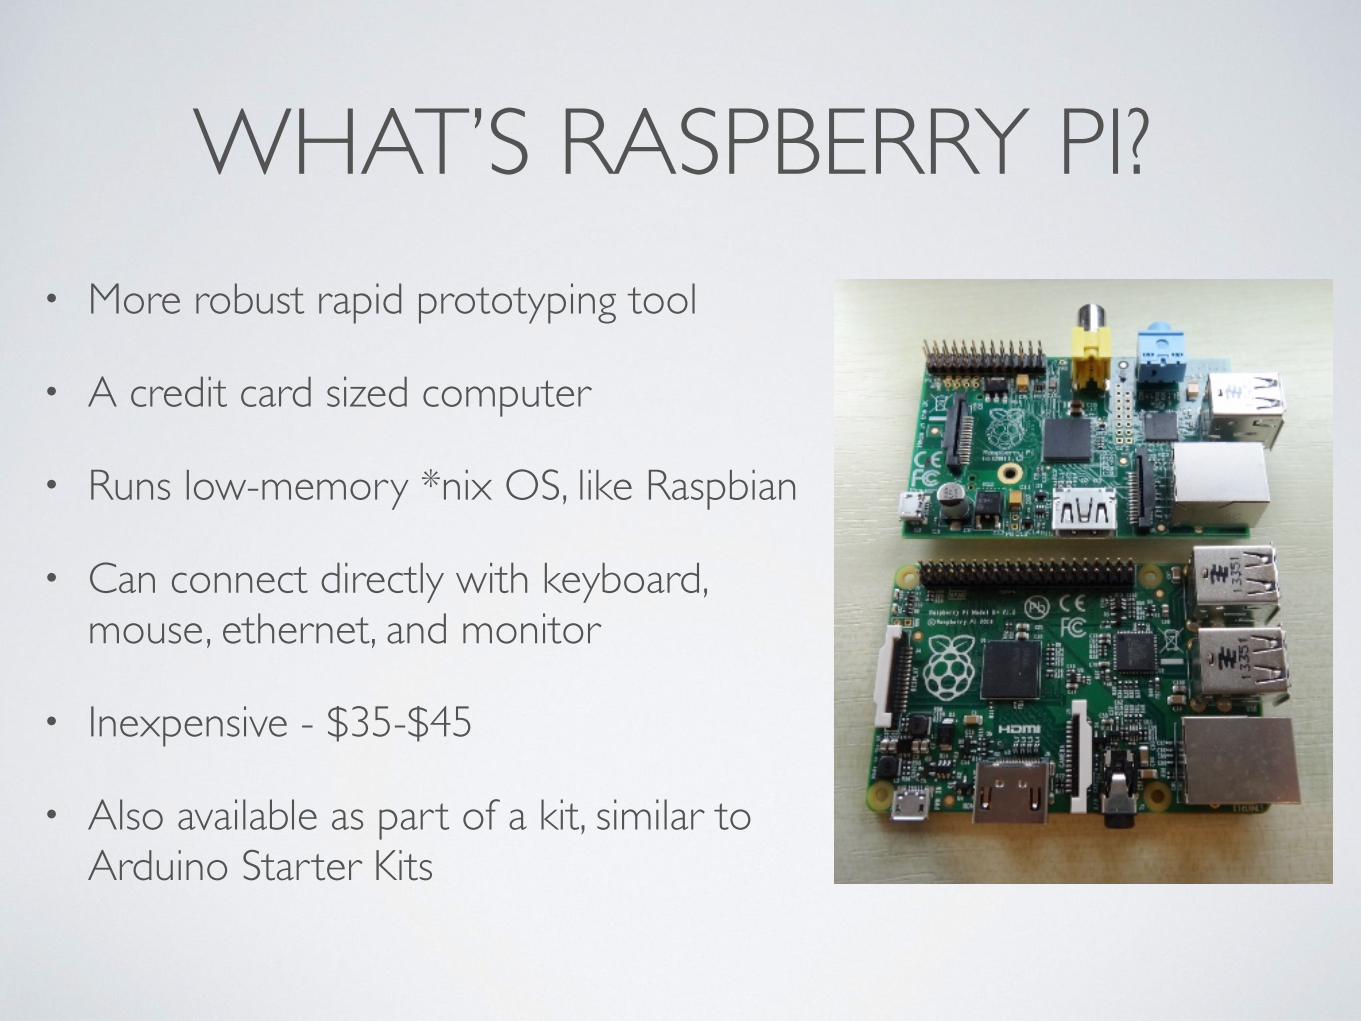
WHAT’S RASPBERRY PI?• More robust rapid prototyping tool
• A credit card sized computer
• Runs low-memory *nix OS, like Raspbian
• Can connect directly with keyboard, mouse, ethernet, and monitor
• Inexpensive - $35-$45
• Also available as part of a kit, similar to Arduino Starter Kits

WHAT CAN I DO WITH A RASPBERRY PI?
• Depends….
• What components do you have?
• What do you want to do?
• https://vimeo.com/90103691
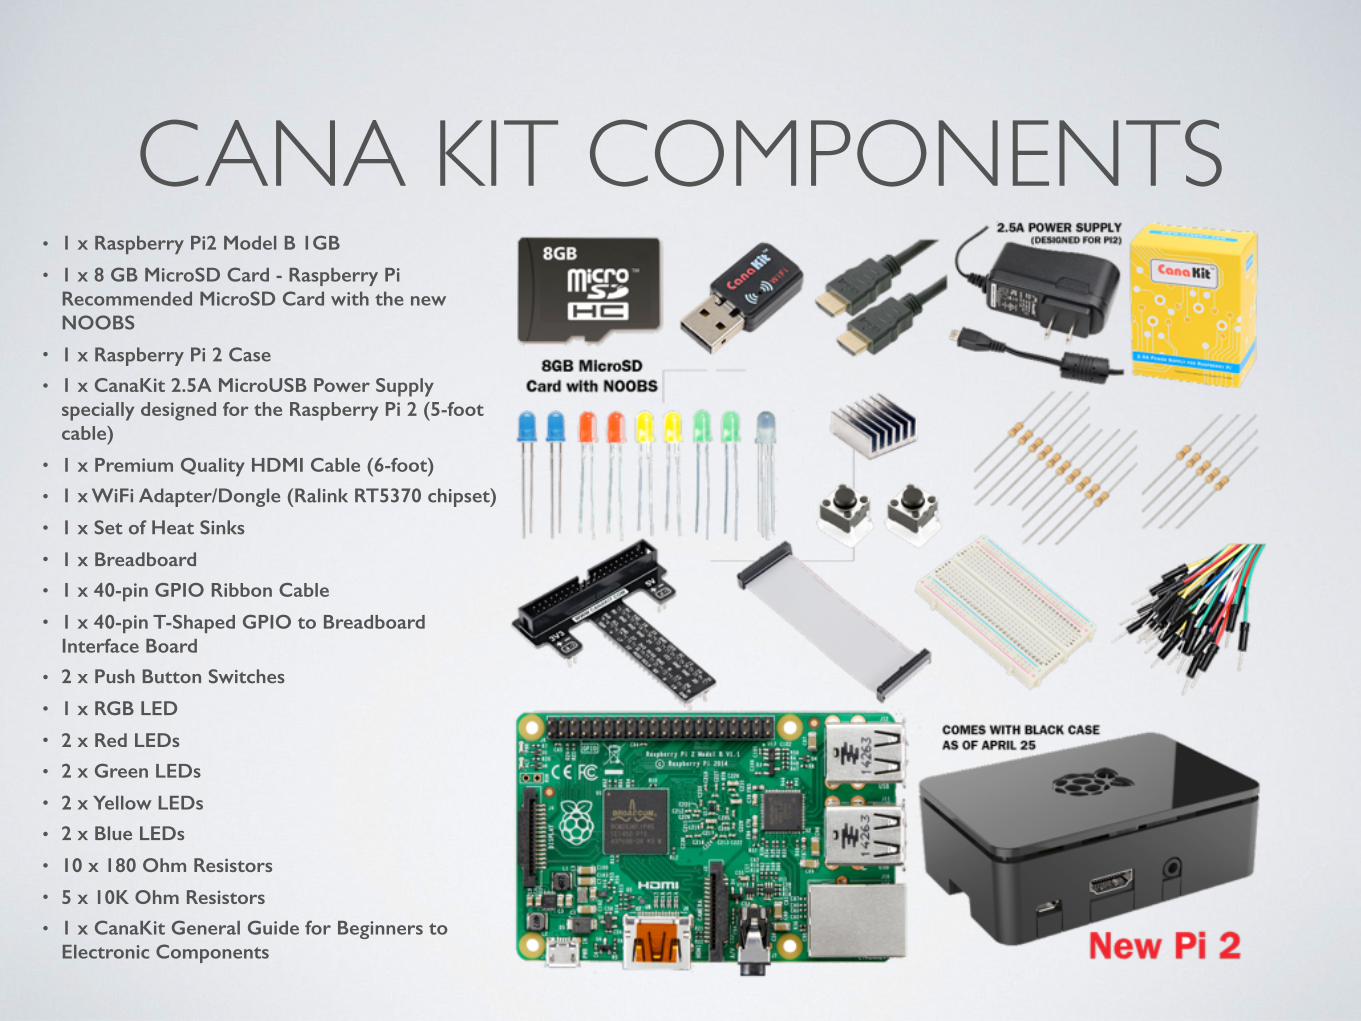
CANA KIT COMPONENTS• 1 x Raspberry Pi2 Model B 1GB
• 1 x 8 GB MicroSD Card - Raspberry Pi Recommended MicroSD Card with the new NOOBS
• 1 x Raspberry Pi 2 Case • 1 x CanaKit 2.5A MicroUSB Power Supply
specially designed for the Raspberry Pi 2 (5-foot cable)
• 1 x Premium Quality HDMI Cable (6-foot) • 1 x WiFi Adapter/Dongle (Ralink RT5370 chipset)
• 1 x Set of Heat Sinks
• 1 x Breadboard • 1 x 40-pin GPIO Ribbon Cable
• 1 x 40-pin T-Shaped GPIO to Breadboard Interface Board
• 2 x Push Button Switches
• 1 x RGB LED
• 2 x Red LEDs • 2 x Green LEDs
• 2 x Yellow LEDs • 2 x Blue LEDs
• 10 x 180 Ohm Resistors
• 5 x 10K Ohm Resistors • 1 x CanaKit General Guide for Beginners to
Electronic Components

UNDER THE CRUST
http://www.jameco.com/Jameco/workshop/circuitnotes/raspberry_pi_circuit_note.html
THE BREADBOARD

WHAT CAN RASP PI NOT DO?
• Does not support analog components, requires external ADC
• Has no integrated wifi, can use USB for wifi adapter
• No on-board pins, requires bread board for GPIO
• Not simply plug-and-play, no RaspPi app, like Arduino
MORE INFOAbout it https://www.raspberrypi.org/products/raspberry-pi-2-model-b/
Getting started https://www.raspberrypi.org/learning/
Project ideas https://hackaday.io/projects/tag/raspberry%20pi
Check out a kit from RNOC (App Lab) [email protected]