helix™ start-up guide - resolution...
TRANSCRIPT

Helix™ Start-up Guide The Helix Security and Automation Platform The Helix platform is a revolutionary new architecture in wireless security offerings. It combines the discreet, secure benefits of a
traditional security system, with the low cost installation and convenience elements of wireless systems. Helix is designed to leverage
the smart phone and tablet interfaces consumers are accustomed to using as the primary interface to the security system, allowing
Helix to connect to your customers life; not the wall.
By removing the user interface from the panel, Helix delivers a predictable, consistent, low cost installation by removing many of the
troublesome barriers faced by existing wireless systems. This architecture also ensures top RF performance by the Helix system,
delivering more than twice the range of other systems on the professional market and many times the range of DIY systems.
This document is intended to provide a brief overview of how to get started with the Helix system. The quick-start guide (QSG) on the
back of the box is sufficient to make the system operational. This document will walk you through the basic alarm and zone
configuration settings allowing Helix to provide your customers with security and home automation convenience for years to come.
What is included with the Helix system? Every Helix system provides full function security services, with industry leading RF performance. The base Helix system includes:
• Helix Panel
o 96 CryptiX™ Encrypted Wireless Security Zones
o 50 Users
o 433MHz CryptiX wireless receiver with over 1500’ open air range; ensuring coverage of large homes.
o Integrated Bluetooth® version 4.1 Wireless peripheral bus
o 10/100 Ethernet port providing connection to any broadband router/modem. This is used for interactive services as well as alarm reporting.
o Rechargeable battery delivering 24 hours of stand-by power during AC power disruptions
• 12V Power supply with quick-connect power adapter and optional “Plug Screw” security tab.
• 6’ Ethernet cable
• Desktop mounting base
o Note: There are optional wall mounting points in the Helix rear cover, with a break-away tab for wall tamper indications. To be utilized, Helix cover and wall tamper must be specifically enabled.
Optional Items The Helix platform provides 3 expansion slots allowing the system to be configured to meet the needs of the installation. Optional
features include (A full list of option cards can be found in our catalog. Contact [email protected] for a copy):
• Z-Wave Option Card: Part number RE934Z
This device can be plugged into slot 3 on the Helix panel (figure 1.0 below). This device provides connectivity to a broad
range of Z-Wave certified devices including light modules, door locks, thermostats, and more. Most Z-Wave compliant
devices will work with Helix. A complete list of tested Z-Wave devices is available by contacting
• Universal Translator Option Card: Part number RE934T
This device can be plugged into slot 3 of the Helix panel (figure 1.0 below). It enables Helix to receive signals from RF sensors
that were previously installed in a home. The installer will configure Helix to listen to sensors from Honeywell® 345MHz, DSC®
433MHz lines, GE® 319.5MHz Lines, or 2GIG® 345MHz product families. The translator is only able to receive signals from one
brand of sensors at a time, though the internal Helix CryptiX receiver will remain operational allowing you to add new sensors if
desired.
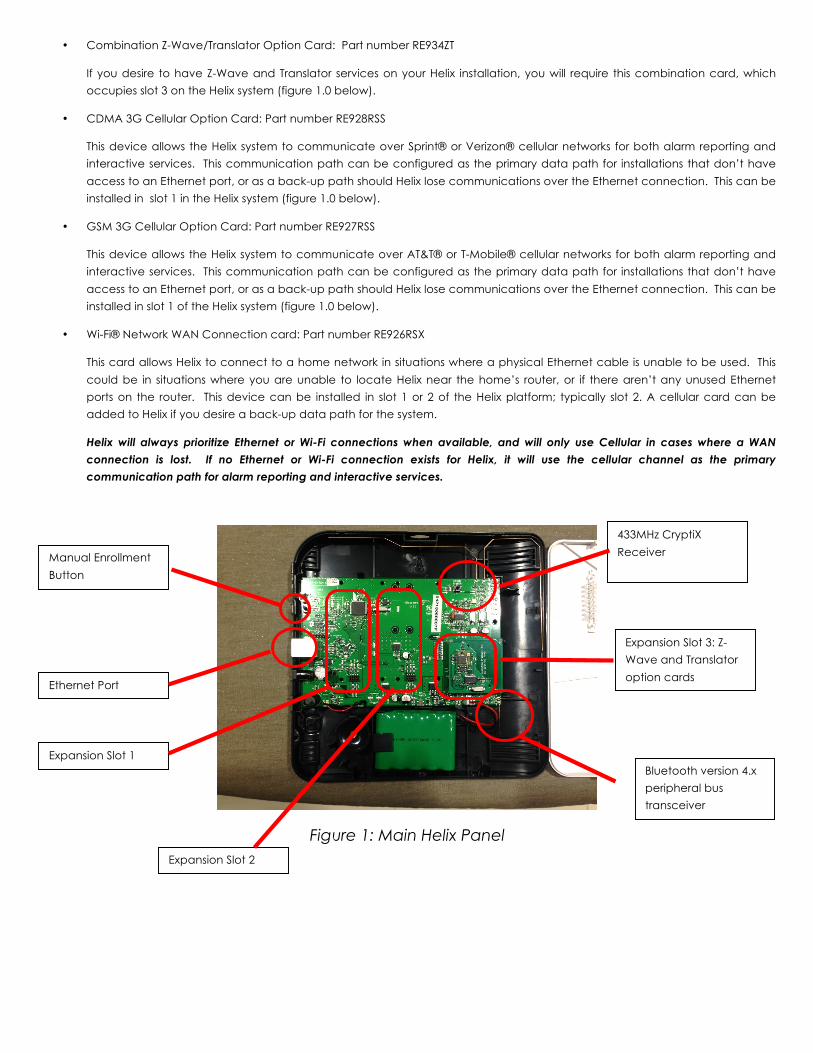
Manual Enrollment
Button
Ethernet Port
Expansion Slot 1
Expansion Slot 2
Expansion Slot 3: Z-
Wave and Translator
option cards
Bluetooth version 4.x
peripheral bus
transceiver
433MHz CryptiX
Receiver
• Combination Z-Wave/Translator Option Card: Part number RE934ZT
If you desire to have Z-Wave and Translator services on your Helix installation, you will require this combination card, which
occupies slot 3 on the Helix system (figure 1.0 below).
• CDMA 3G Cellular Option Card: Part number RE928RSS
This device allows the Helix system to communicate over Sprint® or Verizon® cellular networks for both alarm reporting and
interactive services. This communication path can be configured as the primary data path for installations that don’t have
access to an Ethernet port, or as a back-up path should Helix lose communications over the Ethernet connection. This can be
installed in slot 1 in the Helix system (figure 1.0 below).
• GSM 3G Cellular Option Card: Part number RE927RSS
This device allows the Helix system to communicate over AT&T® or T-Mobile® cellular networks for both alarm reporting and
interactive services. This communication path can be configured as the primary data path for installations that don’t have
access to an Ethernet port, or as a back-up path should Helix lose communications over the Ethernet connection. This can be
installed in slot 1 of the Helix system (figure 1.0 below).
• Wi-Fi® Network WAN Connection card: Part number RE926RSX
This card allows Helix to connect to a home network in situations where a physical Ethernet cable is unable to be used. This
could be in situations where you are unable to locate Helix near the home’s router, or if there aren’t any unused Ethernet
ports on the router. This device can be installed in slot 1 or 2 of the Helix platform; typically slot 2. A cellular card can be
added to Helix if you desire a back-up data path for the system.
Helix will always prioritize Ethernet or Wi-Fi connections when available, and will only use Cellular in cases where a WAN
connection is lost. If no Ethernet or Wi-Fi connection exists for Helix, it will use the cellular channel as the primary
communication path for alarm reporting and interactive services.
Figure 1: Main Helix Panel
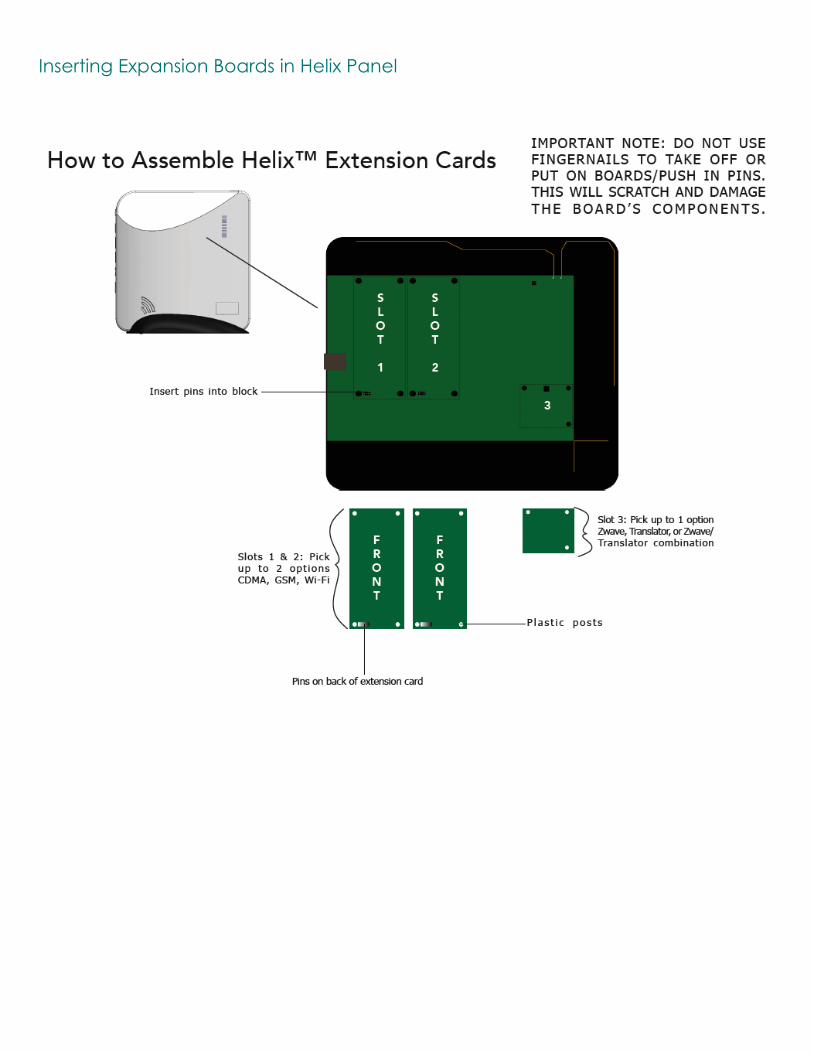
Inserting Expansion Boards in Helix Panel

Installing and Configuring a Helix Security and Automation Platform The Helix platform has been architected to provide a quick, easy and predictable installation for every home. This document will
outline the basic steps required to ensure your Helix platform provides your customer with the security and convenience they expect
from a professional grade security product.
1. The physical installation and powering of Helix is outlined in the 4 steps on the back of the Helix box, and on the attached
Quick-Start Guide (QSG).
a. Decide the location for Helix, ideally near the network router.
b. Plug the power cord into the back of Helix as shown, then insert the power supply into an AC outlet. Secure the
power supply with the locking screw to prevent accidental removal.
c. Connect the Helix to the home router using the Ethernet cord, or use the WPS buttons on the Helix and the home
router to connect to the Wi-Fi network (optional Wi-Fi card required).
d. Download and install the SmartLink application provided by SecureNet Technologies. Search for “SecureNet
SmartLink” in the Apple App Store or Google Play and download the application.
2. Using a laptop, tablet or computer – navigate to the SecureNet Technologies cloud server to configure the Helix system. This is
accomplished by:
a. Navigate in your browser to: http://cloud.securenettech.com/
b. Log-in using the dealer credentials provided by SecureNet Technologies.
Note: If you do not have a Dealer login for the SecureNet platform, please contact SecureNet technologies at xxx-xxx-
xxxx to begin the process of establishing a dealer account, and getting trained on the use of the configuration portal.
c. Create a new “Customer/User” account on the SecureNet service for the new panel.
d. Enter the MAC Address of the Helix system you are installing, and add the customer information required to complete
creation of the account.
Note: A complete guide to the SecureNet Dealer portal is part of the dealer packet provided SecureNet.
3. Enroll desired sensors and peripherals into the Helix system by:
a. Select the “Panel Settings” option on the SecureNet dealer portal. Go to the “Zones” tab.
b. Devices can be enrolled in two ways: directly into the panel through RF enrollment (go to steps c through e) or by
entering the serial number of the device into the “Add by Serial Number” form (go to step f).
c. If using RF enrollment, select the “Turn Sensor Enroll On” button on the Zones tab.
d. Remove the battery tab on the sensors you wish to enroll and follow the specific enrollment steps outlined in the
documentation for the desired sensors.
e. Once all sensors and peripherals have been enrolled, select the “Turn Sensor Enroll Off” button on the Zones tab. Go
to step g.
f. If using “Add by Serial Number form,” enter the desired zone name and the 8 character serial number from the
device into the form. Hit “Add Zone.”
g. For each sensor enrolled, you can now modify the default behaviors for the zones you desire to use, including active
arming levels, entry/exit delay times, reporting configurations, etc. Details on the possible default options are
included in Table 3 and 4 below.
Panel account number and reporting parameters will automatically be configured in the Helix control panel based on your SecureNet
dealer profile.
A list of all Helix panel and zone parameters, valid range, and default values is found in tables 1, 2 and 3 below.
Feature'Name' Feature'Description' Range' Default'
Entry'Delay' Standard'entry'delay'in'seconds' 301240'seconds' 30'
Long'Entry'Delay' Long'entry'delay'in'seconds' 301240'seconds' 60'
Exit'Delay' Standard'exit'delay'time'in'seconds' 451240'seconds' 45'Long'Exit'Delay' Long'exit'delay'time'in'seconds' 451240'seconds' 90'
Siren'Timeout' Siren'timeout'in'minutes' 1130'minutes' 4'
Sensor'Supervisory'Time:'Short' 'Sensor'Supervisory'times'in'hours.''The'time'before'a'supervisory'condition'is'reported.''Can'be'configured'per'zone.'
1148'hours' 4'
Sensor'Supervisory'Time:'Medium' 1148'hours' 12'
Sensor'Supervisory'Time:'Long' 1148'hours' 24'
Alarm'Audio'Volume' Siren'Sounder'control'in'the'panel' On/Off' On'
Status'Audio'Volume' Status'beep'sounder'volume' 017' 6'
Quick'Bypass' If'enabled,'allows'bypass'of'all'open'zones'during'arming'protest'with'a'
single'button'press'
On/Off' On'
Auto'Bypass'All' If'enabled,'allows'automatic'bypass'of'all'open'sensors'at'the'end'of'arming'protest'(user'did'not'bypass'during'
protest'period)'
On/Off' On'
Table 1 Panel Settings
Name' Inputs' Default'Zone'Profile'
'
Door/Window' '
Reed' Entry/Exit'Standard'
External'Input'1' Perimeter'
External'Input'2' Perimeter'
NanoMax'Door/Window'Sensor' Reed/External' Entry/Exit'Standard'
PIR'Motion'Sensor' Motion'Detected' Motion'Follower'
Reed/External' Interior'
Panic'Pendant' Panic' Panic'
Tilt'Sensor' Tilt'Detected' Entry/Exit'Long'
Smoke'Sensor' Smoke/Head'Detected' Fire'
CO'Sensor' CO'Limit'Reached' CO'
Generic' Primary'Alarm' Perimeter'
Momentary'Alarm' Interior'
Secondary'Input'1' Interior'
Secondary'Input'2' Interior'
Glass'Break' Glass'break'detected' Glassbreak'
Reed'Switch' Perimeter'
External'Input'1' Perimeter'
'Home'Disaster' Flood' Flood'Low'Temperature' Environmental'
High'Temperature' Environmental'
Temperature' Low'Temperature' Low'Temperature'
High'Temperature' Environmental'
8'Zone' External'Input'1' Perimeter'
External'Input'2' Perimeter'
External'Input'3' Perimeter'
External'Input'4' Perimeter'
External'Input'5' Perimeter'
External'Input'6' Perimeter'
External'Input'7' Perimeter'
External'Input'8' Perimeter'
' '
Table 2 Sensor Library
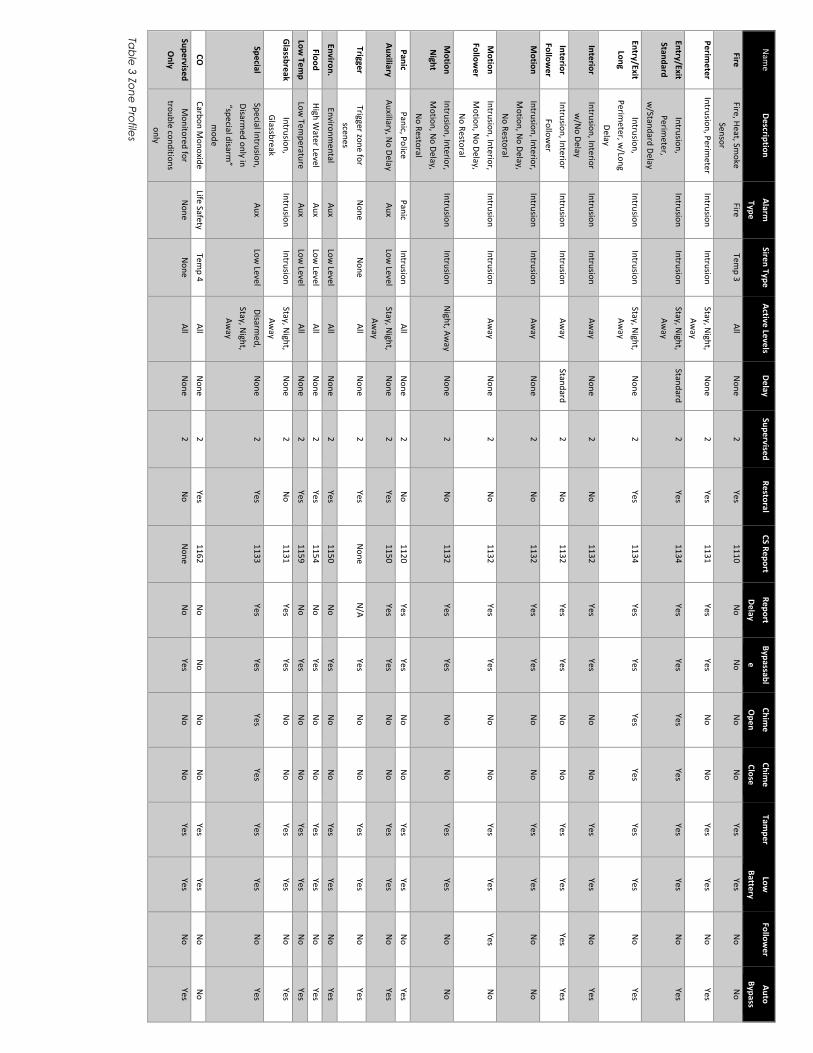
Nam
e%Description+
Alarm+
Type+Siren+Type+
Active+Levels+Delay+
Supervised+Restoral+
CS+Report+Report+Delay+
Bypassable+
Chime+
Open+
Chime+
Close+Tam
per+Low
+Battery+
Follower+
Auto+Bypass+
Fire+Fire,%H
eat,%Smoke%
Sensor%
Fire%Tem
p%3%All%
None%
2%Yes%
1110%No%
No%
No%
No%
Yes%Yes%
No%
No%
Perimeter+
Intrusion,%Perimeter%
Intrusion%Intrusion%
Stay,%Night,%
Away%
None%
2%Yes%
1131%Yes%
Yes%No%
No%
Yes%Yes%
No%
Yes%
Entry/Exit+Standard+
Intrusion,%
Perimeter,%
w/Standard%D
elay%
Intrusion%Intrusion%
Stay,%Night,%
Away%
Standard%2%
Yes%1134%
Yes%Yes%
Yes%Yes%
Yes%Yes%
No%
Yes%
Entry/Exit+Long+
Intrusion,%
Perimeter,%w
/Long%
Delay%
Intrusion%Intrusion%
Stay,%Night,%
Away%
None%
2%Yes%
1134%Yes%
Yes%Yes%
Yes%Yes%
Yes%No%
Yes%
Interior+Intrusion,%Interior%
w/N
o%Delay%
Intrusion%Intrusion%
Away%
None%
2%No%
1132%Yes%
Yes%No%
No%
Yes%Yes%
No%
Yes%
Interior+Follow
er+Intrusion,%Interior%
Follower%
Intrusion%Intrusion%
Away%
Standard%2%
No%
1132%Yes%
Yes%No%
No%
Yes%Yes%
Yes%Yes%
Motion+
Intrusion,%Interior,%
Motion,%N
o%Delay,%
No%Restoral%
Intrusion%Intrusion%
Away%
None%
2%No%
1132%Yes%
Yes%No%
No%
Yes%Yes%
No%
No%
Motion+
Follower+
Intrusion,%Interior,%
Motion,%N
o%Delay,%
No%Restoral%
Intrusion%Intrusion%
Away%
None%
2%No%
1132%Yes%
Yes%No%
No%
Yes%Yes%
Yes%No%
Motion+Night+
Intrusion,%Interior,%
Motion,%N
o%Delay,%
No%Restoral%
Intrusion%Intrusion%
Night,%A
way%
None%
2%No%
1132%Yes%
Yes%No%
No%
Yes%Yes%
No%
No%
Panic+Panic,%Police%
Panic%Intrusion%
All%
None%
2%No%
1120%Yes%
Yes%No%
No%
Yes%Yes%
No%
Yes%
Auxiliary+Auxiliary,%N
o%Delay%
Aux%
Low%Level%
Stay,%Night,%
Away%
None%
2%Yes%
1150%Yes%
Yes%No%
No%
Yes%Yes%
No%
Yes%
Trigger+Trigger%zone%for%
scenes%
None%
None%
All%
None%
2%Yes%
None%
N/A%
Yes%No%
No%
Yes%Yes%
No%
Yes%
Environ.+Environm
ental%Aux%
Low%Level%
All%
None%
2%Yes%
1150%No%
Yes%No%
No%
Yes%Yes%
No%
Yes%
Flood+High%W
ater%Level%Aux%
Low%Level%
All%
None%
2%Yes%
1154%No%
Yes%No%
No%
Yes%Yes%
No%
Yes%
Low+Tem
p+Low
%Temperature%
Aux%
Low%Level%
All%
None%
2%Yes%
1159%No%
Yes%No%
No%
Yes%Yes%
No%
Yes%
Glassbreak+
Intrusion,%
Glassbreak%
Intrusion%Intrusion%
Stay,%Night,%
Away%
None%
2%No%
1131%Yes%
Yes%No%
No%
Yes%Yes%
No%
Yes%
Special+Special%Intrusion,%
Disarm
ed%only%in%
“special%disarm”%
mode%
Aux%
Low%Level%
Disarm
ed,%
Stay,%Night,%
Away%
None%
2%Yes%
1133%Yes%
Yes%Yes%
Yes%Yes%
Yes%No%
Yes%
CO+
Carbon%Monoxide%
Life%Safety%Tem
p%4%All%
None%
2%Yes%
1162%No%
No%
No%
No%
Yes%Yes%
No%
No%
Supervised+Only+
Monitored%for%
trouble%conditions%
only%
None%
None%
All%
None%
2%No%
None%
No%
Yes%No%
No%
Yes%Yes%
No%
Yes%
Tab
le 3 Zo
ne
Pro
files