hitting drills drills.pdf1. like any hit and run play, the object is to have the ball hit through...
TRANSCRIPT

1
Hitting Drills
DRILL #1 – FROM THE TEE
DRILL #2 – GROUNDER, PO PUP, LINE DRIVE
DRILL #3 – BATTER STANCE
DRILL #4 – EYE ON THE SPOT
DRILL #5 – COLORED BALL TOSS
DRILL #6 – CONTACT AND FREEZE
DRILL #7 – BALLOON DRILL
DRILL #8 – BUNT DRILL
DRILL #9 – OPPOSITE FIELD/PULL HITTING
DRILL #10 – HIT AND RUN
DRILL #11 – RIGHT, MIDDLE, LEFT HITTING
DRILL #12 – SWING DOWN
DRILL #13 – HOLD YOUR SHIRT
DRILL #14 – FOLLOW THROUGH DRILL
DRILL #15 – INSIDE/OUTSIDE HITTING
DRILL #16 – PEPPER WITH BAT
DRILL #17 – TWO-HAND BAT
DRILL #18 – HIGH/LOW HITTING
DRILL #19 – FUNGO HITTING
DRILL #20 – TENNIS BALL DRILL
DRILL #21 – STICK BALL
DRILL #22 – BALL DROP DRILL
DRILL #23 – BLIND TEE DRILL

2
DRILL #1 – FROM THE TEE
Purpose:
Even professionals will go back to the basics of using a tee. It helps batters focus on the target area
to hit a baseball. In this drill, players use a tee to work on the fundamentals of hitting.
Setup:
You need a batter, a tee and several balls. If you want you can put players in the field to practice
fielding the hit balls.
Execution:
1. You can run this drill in a batting cage, against the backstop or with players in the field.
2. Raise or lower the tee to reflect the different heights in the strike zone.
3. This drill isn’t intended for a player to smash the ball, but to iron out kinks in the swing.
Coaching Tips:
• Have players focus on hitting on top of the ball, striding towards the field (not the ball),
swinging down on the ball and making solid contact.
This back to basics drill gets players focused on the basics of hitting instead of swinging for the fences. Above, the drill is run with fielders in place so they can also get fielding practice.

DRILL #2 – GROUNDER, POP UP, LINE DRIVE
Purpose:
Knowing how to hit each of these balls will give the batter a better idea of why they are supposed
to swing the bat the way they are instructed.
Setup:
You need a tee with a ball, batter (with helmet), and you can have a few fielders to shag balls.
Execution:
1. You can demonstrate to the younger players what happens when you hit certain areas of the ball.
2. Also, you can show the players what happens when you swing a certain way (up, down, level).
3. Give each player the opportunity to hit off the tee and see what happens when they hit certain parts of the ball. Further, allow them to experiment with different types of swings.
Coaching Tips:
• Many of your players will want to swing for the fences, because home runs are the cool thing to
do, but ensure them that once they can make contact on the ball wherever they want, then
hitting for the fences is just around the corner.
Batters work on hitting different types of balls – grounder, line drive and a fly.

DRILL #3 – BATTER STANCE
Purpose:
This drill helps players get in a proper and comfortable batting stance.
Setup:
A group of 6 batters (with helmets and bats). Line the players up evenly spaced along the 3rd base
line.
Execution:
1. Not as much a drill as it is a skill clinic, the coach will call out ‘stance!’ and all of the players will get into their batting stance.
2. The coach will then go through the line of players and make any adjustments the first few
times.
3. After doing it three or so times, the coach can then call ‘stance!’ and if any of the players still
need the same stance corrections, they are eliminated from the game.
Coaching Tips:
• Make sure players are balanced and comfortable and displaying good form. Repetition alone
will be good for the younger players but a good stance is a key foundational element for
successful hitting so also make sure players are focused on the drill at hand.

DRILL #4 – EYE ON THE SPOT
Purpose:
Gets kids to aim for a smaller target. Children typically see the ball as a target that
needs to be hit. When they aim for a bigger target, they have a larger room for
error. When they focus on a smaller target, they naturally assume a smaller margin
for error. This drill helps them build confidence in hitting the ball, and also
develops muscle memory when they are swinging.
Setup:
Set up a tee that is about waist height for the
player. Put a dime size dot on the backside of
the ball, just above the halfway circumference of
the ball. Always place the ball with the spot
facing toward the backstop.
. Execution:
1. This drill is designed to get players to keep their eye on a certain spot on the ball.
2. Once they focus on a target smaller than the ball itself, they can swing at the spot using the fundamentals they have been taught to this point.
Coaching Tips:
• Make sure players eyes are on the spot and that they use good hitting fundamental

6
DRILL #5 – COLORED BALL TOSS
Purpose:
Players work on pitch selection and reaction time.
Setup:
Two different colored baseballs and a net or fence.
Execution:
1. Coach tosses two balls to batter and calls the color that should be hit.
2. Batter focuses in on the correct ball and puts a good swing on it – driving the ball into the fence
or net.
Coaching Tips:
• Once you’ve done this drill a few times and the players are used to it, you can add in fake
tosses and change height and speed of the balls to further test the batter.

DRILL #6 – CONTACT AND FREEZE
Skill Level: Intermediate
Purpose:
Batters work on reaction time and on taking particular types of swings.
Setup:
Batters line up with enough room in-between them to comfortably swing. Coach stands in front of
the batters.
Execution:
1. Coach calls out a certain pitch (for example, low and outside, inside high,
down the middle, curve, slider, etc.) and batters immediately take the
appropriate swing and freeze where they would make contact with the ball.
2. Coach observes the swings and ending bat position and makes corrections if
necessary.
Coaching Tips:
• To make this drill more competitive, if a player takes
the wrong swing, they must drop for five pushups. If they mess
up a second time they are out of the game.

DRILL #7 – BALLOON DRILL
Purpose:
This drill teaches players the right stride length to take when they are hitting.
Setup:
Line up 6 batters with nearly filled balloons. Don’t fill the balloons up too much, as they will pop
too easily. All batters should have bats and helmets to start.
Execution:
1. The balloon cannot touch the ground.
2. It should be placed between the thighs of the batter and
then they should assume their batting stance.
3. When the batter strides forward on their swing, they need
to keep the balloon from falling to the ground.
Coaching Tips:
• Balance is extremely important in making solid contact with the ball and will help a player develop hitting consistency. Striding too far (dropping the balloon) throws that balance off-kilter and doesn’t allow for power hitting so watch for overstriding and correct it
.

DRILL #8 – BUNT DRILL
The bunt is one of baseball’s lost arts, but it can come in very handy. In this drill, your players will
learn to master this skill so that they can do it in a game when needed.
Setup:
The coach will pitch to the players for this drill. The batter will stay at home plate with a bat and
helmet.
Execution:
1. The coach can set up different point areas near the first and third baselines. For example, 5 pts for balls within 12 inches of the line, 3 pts within 24 inches and 1 pt within 36 inches.
2. Also, the ball should reach halfway down the baseline in order to collect points.
Coaching Tips:
• Stress to your players that if the ball is bunted too far, the third baseman has an easy out; likewise if it is too short, the catcher will be able to make the play.
• You can also add fielders to give your players practice fielding bunts.
Players work on getting the bunt
down.

© BaseballTutorials.com
DRILL #9 – OPPOSITE FIELD/PULL HITTING
Purpose:
Teaches players how body position and timing can affect the direction their ball will travel.
Helps them become better all-around hitters.
Setup:
This drill can be done with a tee, or with the coach pitching. The tee will help players with their
positioning, and the coach pitch will assist with timing.
Execution:
1. Have each batter, open their shoulders and stance (while staying in the batter’s box), and point it
toward the third base side of the field (pull for RH batters; opposite field for LH batters).
2. Then have them swing and watch the ball head to left field.
3. Then have the player close his stance and aim towards right field. They should practice hitting the ball to this field as well.
Coaching Tips:
• If you use a coach to pitch the ball to the players, have them swing slightly ahead of time to get ahead of the ball and pull it into left field
(right field for LH hitters). Conversely, you show them to wait for the ball to hit it later, and it will go to the opposite field.
Players learn to master directional hitting.
© BaseballTutorials.com
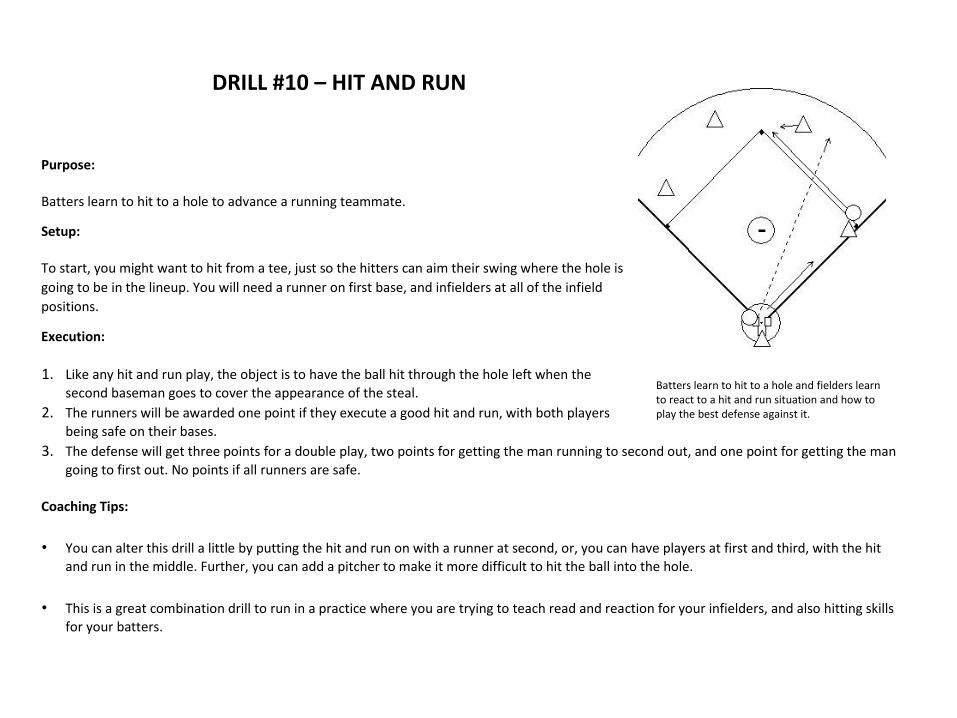
DRILL #10 – HIT AND RUN
Purpose:
Batters learn to hit to a hole to advance a running teammate.
Setup:
To start, you might want to hit from a tee, just so the hitters can aim their swing where the hole is
going to be in the lineup. You will need a runner on first base, and infielders at all of the infield
positions.
Execution:
1. Like any hit and run play, the object is to have the ball hit through the hole left when the
second baseman goes to cover the appearance of the steal.
2. The runners will be awarded one point if they execute a good hit and run, with both players
being safe on their bases.
3. The defense will get three points for a double play, two points for getting the man running to second out, and one point for getting the man
going to first out. No points if all runners are safe.
Coaching Tips:
• You can alter this drill a little by putting the hit and run on with a runner at second, or, you can have players at first and third, with the hit and run in the middle. Further, you can add a pitcher to make it more difficult to hit the ball into the hole.
• This is a great combination drill to run in a practice where you are trying to teach read and reaction for your infielders, and also hitting skills
for your batters.
Batters learn to hit to a hole and fielders learn to react to a hit and run situation and how to play the best defense against it.

DRILL #11 – RIGHT, MIDDLE, LEFT HITTING
Purpose:
This drill will help players learn to hit to any field when they need to. Hitting to opposite fields or other spots are
key to good offensive output.
Setup:
You can have the coach pitch to the players to start, but then you might want to include the pitchers in this drill.
You will just have a batter and the pitcher – and you can have fielders if you like, to shag the balls.
Execution:
1. When your batter is hitting the ball, he needs to start off by trying to hit a variety of pitches to right field.
2. Once they are able to do that, then they need to try and hit them to center field.
3. Then, of course, the next one is to hit to left field.
4. You can also have your players learn to hit line drives, fly balls and grounders. They can practice certain batting techniques that will allow
them to hit the ball where they need to when they need to.
Coaching Tips:
• Watch for proper hitting form with proper balance, even weight distribution, eyes on the ball and more.
Hitters learn to be more varied in their approach so that they can hit the ball where they need to when they need to.

DRILL #12 – SWING DOWN
Purpose:
Most coaches will teach their hitters to swing down on the ball. When you watch professionals in the batting circle, they are swinging down towards the ground. This drill helps prevent swinging upward and creating fly balls.
Setup:
Tee (or pitchers) and a batter with an infield.
Execution:
1. Either with a tee, or with a pitcher, balls are hit downward into the infield.
2. Each time a batter hits a grounder they get a point – up to 10 points. If they hit a line drive they get zero points, if they hit a pop up,
they lose all of their points and must start again. Coaching Tips:
• Watch for good hitting form and that players are keeping their eyes on the ball and then swinging down not level or up.
Players learn to swing down on the ball and reduce their number of pop ups.

DRILL #13 – HOLD YOUR SHIRT
Purpose:
Often time batters over extended themselves when they try to hit the ball. This drill helps prevent that by teaching players to keep their hands
in the proper position in relation to the ball.
Setup:
A tee, batters (with helmets) and the players should be wearing a loose shirt (one can be provided for players in this drill).
Execution:
1. A batter sets up next to the tee with the ball on top.
2. They grab their shirt and wrap it around the handle of the bat and get into the ready position to hit the ball, this begins helping to keep the
hands in line.
3. When the player goes to swing, while holding their shirt, they release the shirt upon contact with the ball.
4. If the contact point is solid, by holding the shirt, they will learn the proper proportion to have between the ball and the hands.
Coaching Tips:
• Look that players are holding onto the shirt and not releasing it until contact is made.

This drill helps players understand that they get the best contact and the most power if their hands stay at a certain distance from the contact point.

DRILL #14 – FOLLOW THROUGH DRILL
Players learn to follow through properly when batting. The follow through is important to get the most fluid and powerful swing.
Setup:
You need a tee for the batter to hit from, and you need a ball set up (either on a tee or other apparatus) that will be along the proper
follow through plane of the batter.
Execution:
1. When a batter swings through the ball, they will maintain their swing plane through the drill and first hit the ball on the tee in front of them, and then on the tee in their proper follow through plane.
2. If a player is not hitting the second ball then the coach must help them achieve the appropriate swing plane.
Coaching Tips:
• This is also a great drill to experiment with different swing planes and swing directions when teaching opposite field hitting.
Players work on keeping their swing plane level so that they can followthrough properly and maintain power in their swing.

DRILL #15 – INSIDE/OUTSIDE HITTING DRILL
This is a great drill that is going to help players hit both inside and outside pitches with the same stride and form.
Setup:
This is a pure hitter’s drill, as you just have a batter and two tees to work with.
Execution:
1. The hitter will stand at the plate and he will take their typical stance.
2. With one tee on the inside of the plate and one on the outside of the plate, the batter will take turns attempting to hit the ball on the
inside tee, then the outside tee
3. The batter should take the same stride towards the ball on both swings.
Coaching Tips:
• Place the inside tee toward the front of the strike zone, which will encourage players to make contact out in front and pull the ball
• Place the outside tee toward the back of the strike zone, which will encourage hitters to catch the ball deep and send it to the opposite
field
• It is important that the player stand at the plate the same way no matter what type of pitch they expect to receive.
• In order to make this drill a little different, you can make the height of the tee a little different, so it simulates pitches coming from different places in the strike zone.

DRILL #16 – PEPPER WITH BAT
Purpose:
Helps players develop bat control and a short, quick swing.
Setup:
Have the batter stand approximately 15 to 20 feet from three fielders, who are standing 2-5 feet apart from each
other.
Execution:
1. Fielder throws the ball to the batter.
2. Batter uses a short, quick, downward swing to hit the ball back to the fielders.
3. Batter should try to hit the inside pitch to the left fielder, the middle pitch to the middle fielder and the right pitch to the right fielder.
4. Fielder catches the ball and throws it back to the batter to hit again.
Coaching Tips:
• To increase the difficulty of this drill, add another baseball so that two are in play – this will help keep the fielders and hitter at full focus.

DRILL #17 – TWO-HAND BAT
Purpose:
Emphasizes the use of the top hand when batting.
Setup:
Coach (behind a screen) throws to batter at home plate, in batting cage or near fence or net.
Execution:
1. Coach throws the ball to the outside part of the plate.
2. Batter swings and attempts to hit the ball to the opposite field.
Coaching Tips:
• Make sure the batter is keeping the top hand on the bat and is emphasizing that hand during the swing.
.
DRILL #18 – HIGH/LOW HITTING
Purpose:
Players practice reacting to where the pitch is and then putting a good swing on the ball.

Setup:
Two balls, a batter (with helmet) and the coach. It is best to do this drill against the backstop or into a batting net.
Execution:
1. The player lines up facing the batting cage or the backstop, about 15 feet away.
2. The coach will kneel down (at a safe distance), but close enough to toss the balls for the Player.
3. The coach will toss up two balls, one right after the other. The coach will toss a high one, then a low one, and then shout which one he wants the hitter to hit.
4. The hitter must then hit the ball that is called.
Coaching Tips:
• This is one of the more advanced drills for batting, but it is a great one to help a player learn quick reaction. Watch for good form and
that the batter has his eyes on the ball when swinging.

DRILL #19 – FUNGO HITTING
Purpose:
Helps batters practice all of the following: hand action, weight shift, downward swing and follow-
through. Fielders also get work on fielding ground balls.
Setup:
You need a batter and a complete infield.
Execution:
1. Batter steps up to the plate and hits ground balls to each of the infield positions.
Coaching Tips:
• Make sure batter is taking a good, short, downward swing and is hitting the top half of the
baseball.
Batter works on bat control and on hitting ground balls in this drill that also provides infielders with fielding practice.

DRILL #20 – TENNIS BALL DRILL
Purpose:
Helps batters improve their timing and trigger.
Setup:
Coach (or fellow player) stands 6 feet to the side and 3 feet in front of the batter.
Execution:
1. Coach bounces a tennis ball into the strike zone.
2. Batter waits for the ball to reach its height apex and then swings and hits the ball.
Coaching Tips:
• Watch that the batter is sitting back and waiting for the ball to reach its height and then loads, triggers and swings – driving the
ball into the net or out into the field.


DRILL #21 – STICK BALL
Purpose:
Helps batters improve their focus and swing.
Setup:
You need a batter, a small plastic ball or Wiffle ball, a coach or teammate to throw the ball and a thin Wiffle
ball bat or a broomstick or hit stick.
Execution:
1. Coach triggers the batter to cock and load by dropping hand.
2. Coach then tosses the ball into strike zone.
3. Batter swings and hits the ball.
Coaching Tips:
• The smaller the ball and the thinner the bat the better as this drill is all about focus and concentration.
• At first, batters should swing at about 80-90 percent of their normal bat speed to work on form but can increase as they get more familiar with the drill.

DRILL #22 – BALL DROP DRILL
Purpose:
A great drill for improving hand speed.
Setup:
Batter, ball and a coach or partner. You may also need a chair or ladder.
Execution:
1. Batter assumes normal stance.
2. Coach stands to the side with ball held at shoulder height.
3. Batter says “drop.”
4. Coach drops ball (pulling arm up and away).
5. Batter swings and hits the ball.
Coaching Tips:
• The coach or partner can also stand on a chair or a ladder to make the drop more challenging for the batter.
Batters improve their hand speed and timing in the Ball Drop Drill.

DRILL #23 – BLIND TEE DRILL
Purpose:
A fun drill that emphasizes concentration and muscle memory.
Setup:
Batter, balls, batting tee and a blindfold.
Execution:
1. Batter hits 5-10 balls off the tee normally.
2. Then batter blindfolds himself and hits 5-10 more relying on his concentration and muscle memory.
3. Then repeat the process.
Coaching Tips:
• To make it even more fun for your players, you can group players into two teams and the team with the most hits wins
reward or the team with the least hits gets a punishment.
Players hit off the tee both normally and while blindfolded in this drill.