home appliances use and care - sears
TRANSCRIPT

Home Appliances
Use And CareG U I D E
MODEL SC8720ED
A Note to You ......................... 2
Cooktop Safety ................... 3-5
Getting to Know YourCooktop .................................. 6
Air shutter adjustment ........ 7LO flame adjustment .......... 8
Controls ................................. 9Using .................................. 9Caring for .......................... 11
Surface Burners .................. 12Installing .......................... 12Using ................................ 15Caring for ......................... 16
Grill ....................................... 18Installing ........................... 18Using ................................ 20Caring for .......................... 23
Griddle ................................. 25Installing ........................... 25Using ................................ 26Caring for .......................... 28
Vent ...................................... 29Using ................................ 29Caring for .......................... 30
Troubleshooting ................. 31
Requesting Assistance orService ................................. 33
Warranty .............................. 36
1-800-253-1301Call us with questions or comments.
30" GAS MODULAR DOWNDRAFTCOOKTOPTO THE INSTALLER: PLEASE LEAVE THISINSTRUCTION BOOK WITH THE UNIT.
TO THE CONSUMER: PLEASE READ ANDKEEP THIS BOOK FOR FUTURE REFERENCE.
PART NO. 209810B/4381592 Rev. A

2
A Note to YouThank you for buying a WHIRLPOOL® appliance.Because your life is getting busier and more complicated, WHIRLPOOL cooktops are easyto use, save time, and help you manage your home better. To ensure that you enjoy yearsof trouble-free operation, we developed this Use and Care Guide. It is full of valuable infor-mation about how to operate and maintain your appliance properly and safely. Please readit carefully.
Also, please complete and mail in the Product Registration Card provided with yourappliance. The card helps us notify you about any new information on your appliance.
Please record your model’s information.Whenever you call to request service foryour appliance, you need to know yourcomplete model number and serial number.You can find this information on the modeland serial number plate (see diagram onpage 6 for location of plate).
Please also record the purchase date ofyour appliance and your dealer’s name,address, and telephone number.
Keep this book and the sales slip together in a safe place for future reference.
Our Consumer Assistance Centernumber is toll-free 24 hours a day.
Model Number __________________________
Serial Number __________________________
Purchase Date __________________________
Dealer Name ___________________________
Dealer Address _________________________
Dealer Phone ___________________________
1-800-253-1301
WARNING: If the information in this manual is not followed exactly,a fire or explosion could result causing death, personal injury, orproperty damage.
Do not store or use gasoline or other flammable vapors and liquidsin the vicinity of this or any other appliance.
WHAT TO DO IF YOU SMELL GAS:
• Do not try to light any appliance.
• Do not touch any electrical switch; do not use any phone in yourbuilding.
• Immediately call your gas supplier from a neighbor’s phone.Follow the gas supplier’s instructions.
• If you cannot reach your gas supplier, call the fire department.
Installation and service must be performed by a qualified installer,service agency, or the gas supplier.
– SAVE THESE INSTRUCTIONS FOR FUTURE REFERENCE –

3
General• Install or locate the cooktop only in
accordance with the provided Installa-tion Instructions. The cooktop must beinstalled by a qualified installer. Thecooktop must be properly connected tothe proper gas supply and checked forleaks. The cooktop must also be prop-erly connected to electrical supply andgrounded.
• Gas fuels and their use in appliancescould cause minor exposures to ben-zene, formaldehyde, carbon monoxide,and soot, primarily from incompletecombustion. Significant exposure tothese substances could cause canceror reproductive harm. Properly adjustedburners with a blue, rather than ayellow, flame will minimize incompletecombustion. Venting with a hood or anopen window will further minimizeexposure.
• CAUTION: Do not store things childrenmight want above the cooktop. Childrencould be burned or injured while climb-ing on it.
• Do not leave children alone or unattend-ed in area where the cooktop is in use.They should never be allowed to sit orstand on any part of the cooktop. Theycould be burned or injured.
• Do not operate the cooktop if it isdamaged or not working properly.
• Do not use the cooktop for warming orheating the room. Persons could beburned or injured, or a fire could start.
• Use the cooktop only for its intendeduse as described in this manual.
• Do not touch grill and surface burnerareas, or perimeter trim around cooktop.During and after use, these areas maybe hot enough to cause burns. Avoidcontact with these areas by clothing orother flammable materials until theyhave had sufficient time to cool.
continued on next page
IMPORTANT SAFETY INSTRUCTIONS
wWARNINGThis symbol alerts you to suchdangers as fire, electrical shock,burns, and personal injury.
Cooktop SafetyYour safety is important to us.This guide contains safety statementsunder warning symbols. Please pay specialattention to these symbols and follow anyinstructions given. Here is a brief explanationof the use of the symbol.
IMPORTANT SAFETY INSTRUCTIONSREAD AND SAVE THESE INSTRUCTIONSGas cooktops have been thoroughly tested for safe and efficient operation. However, as withany appliance, there are specific installation and safety precautions which must be followedto ensure safe and satisfactory operation.
wWARNING To reduce the risk of fire, electrical shock, injury topersons, or damage when using the cooktop, followbasic precautions, including the following:

4
COOKTOP SAFETY
• Do not wear loose or hanging garmentswhen using the cooktop. They couldignite if they touch an open flame andyou could be burned.
• Use only dry pot holders. Moist or damppot holders on hot surfaces could resultin burns from steam. Do not let potholder touch an open flame. Do not usea towel or bulky cloth for a pot holder. Itcould catch on fire.
• Do not heat unopened containers. Theycould explode. The hot contents couldcause burns and container particlescould cause injury.
• Do not store flammable materials on ornear the cooktop. The fumes couldcreate an explosion and/or fire hazard.
• Do not use aluminum foil to line aerationtray, burner basin, or any other part ofthe cooktop. Use aluminum foil only asrecommended in this manual.
• A faint gas odor may indicate a gasleak. If a gas odor is detected, shut offthe gas supply to the cooktop. Call yourinstaller or local gas company to havethe possible leak checked. Never use amatch or other flame to locate a gasleak. Explosion and injury could result.
• Know where your main gas shutoff valveis located.
When using the cooktop• Make sure the utensils you use are
large enough to contain food and avoidboilovers and spillovers. Heavy splatter-ing or spillovers left on a cooktop couldignite and burn you. Pan size is espe-cially important in deep fat frying.
• Turn pan handles inward, but not overother surface burners. This will helpreduce the chance of burns, igniting offlammable materials, and spills due tobumping of the pan.
• Do not use decorative covers or trivetsover the surface burners.
Grease• Grease is flammable. Do not allow
grease to collect around cooktop. Wipespillovers immediately.
• Do not use water on grease fires. Neverpick up a flaming pan. Smother flamingpan by covering with a well-fitted lid,cookie sheet, or flat tray. Flaming greaseoutside of pan can be extinguished withbaking soda or, if available, a multi-purpose dry chemical or foam-typeextinguisher.
• Check to be sure glass cooking utensilsare safe for use on the cooktop. Onlycertain types of glass, glass-ceramic,ceramic, earthenware, or other glazedutensils are suitable for cooktopswithout breaking due to the suddenchange in temperature.
• Never leave surface burners unattendedat high heat settings. A boilover couldresult and cause smoking and greasyspillovers that could ignite.

5
COOKTOP SAFETY
Care and cleaning• Do not repair or replace any part of
the cooktop unless specifically recom-mended in this manual. All otherservicing should be referred to aqualified technician.
• Any additions, changes, or conversionsrequired in order for this appliance tosatisfactorily meet the application needsmust be made by a Whirlpool servicecompany or Qualified Agency.
• Disconnect the electrical supply and thegas supply at the shut-off valve near thecooktop before servicing the cooktop.
Additional safety precautions• Avoid pans that are unstable and easily
tipped. In choosing pans, look for easily-grasped handles that will stay cool.Pans that are too heavy when filled withfood can also be a hazard. If panhandles twist and cannot be tightened,discard the pan.
• Keep all controls “OFF” when cooktopis not in use.
• Keep vent ducts unobstructed.
• If the cooktop is installed near a window,proper precautions should be taken toprevent curtains from blowing overburners creating a FIRE HAZARD.
• Do not use cookware on the grill sectionof this appliance.
• Always allow hot pans to cool in a safeplace out of the reach of small children.
• Clean only parts listed in this manualand use procedures recommended.
• Flame size should be adjusted so itdoes not extend beyond the edge ofthe cookware, this instruction is basedon safety considerations.
• This appliance has been tested forsafe performance using conventionalcookware. Do not use any devices oraccessories that are not specificallyrecommended in this manual. Do notuse eyelid covers for the surface burnersor stovetop grills. The use of devices oraccessories that are not expresslyrecommended in this manual can createserious safety hazards, result in perfor-mance problems, and reduce the life ofthe components of the appliance.
– READ AND SAVE THESE INSTRUCTIONS –

6
Optional griddleaccessory(p.n. SCM40DB)(pp. 25-28)
Optional grillcover accessory(p.n. SCM50DB/Q)(pp. 21, 24)
Optional grillaccessory(p.n. SCM20DB)(pp. 18-24)
Optional surfaceburner accessory(p.n. SCM10DB/DW)(pp. 12-17)
Basin
Drain Jar
Control panel
Vent chamber
Control panel(pp. 9-11)
Surface burnersand grates(pp. 12-17)
Vent(pp. 29-30)
Vent fancontrol knob
(p. 29)
Right rearcontrol knob
(pp. 9-11)
Right frontcontrol knob
(pp. 9-11)
Model and serialnumber plate
Air grille
Left rearcontrol knob(pp. 9-11)
Left frontcontrol knob(pp. 9-11)
Getting to Know YourCooktopThis section contains captioned illustrations of your cooktop. Use them to become familiarwith the location and appearance of all parts and features. To help you find information onspecific parts and features quickly, page references are included.

7
GETTING TO KNOW YOUR COOKTOP
Air shutter adjustmentTo adjust grill burner airshutters or surface burner airshutters
The left air shutter controls the rear half ofthe grill burner. The right shutter controls thefront half.
Slide the air shutter backward or forward toincrease or decrease the size of the airopening. Air shutters fit snugly on the grillburner, so you may need a screwdriverblade to make the adjustment. Notice howthe flame changes as you move the airshutter. The adjustment is satisfactory whenyou get a clearly defined, even blue flame atthe HI flame setting. The snug fit of the airshutter will allow it to remain positionedcorrectly.
On any burner, closing the air shutter toofar will cause the flame to become soft andyellow tipped. Opening the air shutter toowide will cause the flame to blow away fromthe burner ports. Proper adjustment willproduce a sharp, clearly defined, evenblue flame.
To adjust surface burner airshutter (on some models)
Loosen the fastening screw with a phillipsscrewdriver and rotate the air shutter toincrease or decrease the size of the airopening. As you turn the shutter notice howthe flame changes. The adjustment issatisfactory when you get a clearly defined,even blue flame at the HI flame setting. Afterthe adjustment, tighten the screw.
Rotate airshutter onmixer headto make airadjustment
Air shutter
Screw
To closeTo open
Air openingTo close
To open
Insert screwdriver blade in slotand twist with slight pressure toallow air shutter to slide easily.
Air opening
Air shutter

8
GETTING TO KNOW YOUR COOKTOP
LO flame adjustmentThis appliance has been shipped from thefactory with LO and MED flame settingsadjusted for use with natural gas andaverage installations. There is a wide varietyof conditions caused by altitude and gasmixtures controlled by utility companieswhich will vary and affect the gas flame andperformance. Adjustments should be madeat time of installation. If conditions change,follow the procedures outlined below toadjust the LO setting.
1. Light the burner and set the control knobfor a low flame.
2. Remove the control knob from the valvestem.IMPORTANT: Never use a metal blade topry the knob off. If you cannot easilyremove the knob tuck the folds of a clothdishtowel under the knob skirt and pullthe towel upward with steady, evenpressure.
3. Insert a slender, thin-blade screwdriverinto the recess at the center of the valvestem and insert the blade in the slot of theadjusting screw.
Valve stem
Clockwise toreduce
flame size
Counterclockwiseto increase flamesize
4. Turn the center stem adjusting screwslightly to set the flame size.
NOTE: Turn clockwise to reduce or coun-terclockwise to increase the flame size.
5. Replace the control knob when you have completed the adjustment.
Proper adjustment will produce a stable,steady blue flame of minimum size. The finaladjustment should be checked by turning theknob from HI to LO several times withoutextinguishing the flame. This adjustment, atthe LO setting, will automatically provide theproper flame size at the MED setting.

9
USING YOUR RANGE
wWARNINGCarbon Monoxide Poisoning HazardDo not operate with a yellow flame.Doing so can result in death, heartattack, or convulsions.
Push down on control knob and turncounterclockwise to the LITE position. Theclicking sound is the ignitor sparking. Lookat the burner to make sure it has lit.
To stop the clicking sound after theburner lights, turn the control knob to thecook setting you want. The control knob hasthree cook settings. However, you can setthe control knob anywhere between HI and LO.
ControlswWARNING
Explosion HazardDo not store flammable materialssuch as gasoline near the cooktop.Doing so can result in death,explosion, fire, or burns.
UsingYour cooktop has electric ignitors. Electricignitors light the burners each time thecontrols are turned to LITE.
Turning the knobs
Cooking on the left sideThe LO setting is the lowest setting you canuse for the grill burner. However, when youuse surface burners on the left side of thecooktop you can turn the control knob lowerthan the LO setting.
Cooking on the right sideYou can only use surface burners on theright side of the cooktop. You cannot installeither the grill or the griddle on the right sideof the cooktop.

10
CONTROLS
wWARNING
Explosion HazardTurn the burners off if a flame goesout while cooking, or if there is astrong gas odor. Wait five minutesfor the gas odor to disappear beforerelighting burner. If gas odor is stillpresent, see safety note on page 2.Do not let the burner flame extendbeyond the edge of the pan.Turn off all control knobs when notcooking.Failure to do so can result in death,explosion, fire, or burns.
NOTES:• Do not leave an empty utensil, or one
which has boiled dry, on a hot surfaceburner. The utensil could overheat anddamage the utensil or cooking surface.
• Do not allow large pans to extend overthe control knobs. Heat trapped betweenlarge pans and control knobs couldpossibly damage the control knobs.
SETTING
LITE
HI(High)
Medium High
MED
Medium Low
LO
RECOMMENDED USE
• To light the burner.After the burner lights,turn control back to adesired setting to stopthe clicking of theignitor.
• To start foods cooking.
• To bring liquids to aboil.
• To hold a rapid boil.
• To fry chicken.
• For gravy, pudding,and most frying.
• To cook large amountsof vegetables.
• To keep food cooking.
• To poach and stew.
• To simmer.
• To keep food warmuntil ready to serve.
• To melt.
Until you get used to the settings, usethe following as a guide. For best results,start cooking at the high setting; then turnthe control knob down to continue cooking.
NOTE: Do not cook with the control set atLITE.
In case of a long power failureSurface burners can be lit by hand. Hold alit match near a burner and turn the controlknob to the LITE setting. After the burnerlights, turn the control knob to the settingyou want.
Do not use the grill during a power failure.The vent fan will not work.

11
CONTROLS
Caring for controlsNOTE: Do not use oven cleaners, bleach, or rust removers to clean any part of the cooktop.Use this chart to help you clean your control knobs and panel.
HOW TO CLEAN
• Turn knobs to OFF and pull straight up.
• Wash, rinse, and dry well. Do not soak.
• Do not use steel wool or grittycleansers. They may damage thefinish.
• Replace knobs. Make sure all knobspoint to OFF.
• Wash, wipe with clean water, and drywell.
• Do not use steel wool or grittycleansers. They may damage thefinish.
• Do not spray cleaner directly on panel.Spray cleaner on paper towel.
WHAT TO USE
Sponge and warm,soapy water
OR
Dishwasher
Sponge and warm,soapy water
ORPaper towel andmild liquid soap
PART
Control knobs
Control panel

12
Surface BurnerswWARNING
Explosion HazardDo not store flammable materialssuch as gasoline near the cooktop.Doing so can result in death,explosion, fire, or burns.
InstallingYou can install extra surface burners on theleft side of your cooktop. To get the surfaceburner accessory, order Part NumberSCM10DB/DW from a Whirlpool servicecompany or dealer (see Step 2 on page 33)or call the Whirlpool Consumer AssistanceCenter toll-free 1-800-253-1301.
NOTE: Do not take apart the surfaceburner accessory.
To install:
wWARNINGCarbon Monoxide Poisoning HazardDo not operate with a yellow flame.Doing so can result in death, heartattack, or convulsions.
1. Make sure the control knobs areturned off.
2. If the grill burner and grates are in place,remove them before installing surfaceburners. Clean out any grease that maybe in the burner basin. (See pages 19and 24 for more information.)

13
SURFACE BURNERS
Orifices
Flash tubes
Side openings
Supports
Ignitoropening
Mixer tube openings
Ignitor
Aeration tray
Prong
Burner basin
3. Set the surface burner accessory into place.Mixer tube openings should be pointedtoward the orifices. Slide the burnertoward the orifices until the opening for theignitor is over the ignitor. Lower into placeuntil the notches in the side of the burnerbracket rest on the burner supports, andthe ignitor is centered between the twoflash tubes. Be sure mixer tubes are overthe orifices.
5. Place burner grates on aeration tray.
4. Set the aeration tray into place. Insertthe prong at the end of the tray into theopening in the end of the burner basin.Lower the other end into the cooktop.

14
To remove:
SURFACE BURNERS
1. Make sure the control knobs are turnedoff and the cooktop is cool.
4. Hold the aeration tray by the sides andslide away to remove the prong from theopening and clear the surface burners.
Aeration tray
Prong
2. Remove burner grates.
3. Remove the aeration tray by lifting up thefront end on the right side (back end onthe left side). Lift until the top clears theopening of the cooktop by about fiveinches.
Bracket
5. Lift up on the sides of the surface burneraccessory bracket about two inches.Slide away from the orifices.
Orifices
15
UsingCookware tipsNo one brand of cookware is best for allpeople. Knowing something about panmaterials and construction will help youselect the correct cookware for your needs.• NOTE: For best results and greater fuel
efficiency, use only flat-bottomed cook-ware in good condition.
• The pan should have straight sides and atight-fitting lid.
• Choose medium to heavy gauge (thick-ness) pans that are fairly lightweight.
• The pan material (metal or glass) affectshow fast heat transfers from the surfaceburners through the pan material and howevenly heat spreads over the pan bottom.Choose pans that provide the best cookingresults.
• IMPORTANT: Do not allow large pans tocontact or extend over the control knobs.Heat trapped between large pans andcontrol knobs could possibly damage thecontrol knobs.
• IMPORTANT: Leave a minimum of 11⁄2"between the side of the pan and surround-ing surfaces, such as countertopbacksplash or side walls. This allows heatto escape, avoiding possible damage tothese areas.
• Handles should be made of a sturdy, heat-resistant material and be securely attachedto the pan.
• Pans should be easy to clean. Check tobe sure there are no crevices, roughedges, or areas where food might collect.
• Be sure pans do not tip, whether they arefull or empty.
• Use cookware only as it was intended tobe used. Follow pan instructions. This isvery important for glass cookware becausesome should be used only in the oven.Other pans are marked as flameware andmay be used on the surface burners.
Home canning informationThe larger diameter of most water-bath orpressure canners combined with high heatsettings for long periods of time can causedamage to the cooktop.
To protect your cooktop:• For best results, use a canner which can
be centered over the surface burner.• Do not place canner on two surface
burners at the same time. Too much heatwill build up and will damage the cooktop.
• Start with hot water. This reduces thetime the control is set on HI. Reduce heatsetting to lowest position needed to keepwater boiling.
• Refer to your canner manual for specificinstructions.
Energy saving tipsAlthough the energy used for cooking isusually a very small percentage of the totalenergy used in the home, cooking energycan be used efficiently. Here are some tipsto help you save energy when using yourcooking product:• Use pans with flat bottoms, straight sides,
and tight-fitting lids.• Cook with a minimum of liquid or fat to
help shorten cooking time.• Preheat pans only when recommended
and for the shortest time possible.• Start food on higher heat settings, then
set surface burner control on LO to finishcooking.
• Turn on the surface burner only afterplacing filled pan on the burner grate.
• Plan your meals for the most efficient useof the cooktop.
• Cover pans.
SURFACE BURNERS

16
Caring for surface burnersUse this chart to help you clean your surface burner accessory.
PART
Surface burnergrates
SURFACE BURNERS
HOW TO CLEAN
• In dishwasher, wash with other cookingutensils.
• Dry completely.
• Do not use gritty or harsh cleansers.They may damage the finish.
• Although the burner grate is durable, it willgradually lose its shine and/or discolor,regardless of the care you take of it. Thisis due to its exposure to the high tempera-ture of the gas flames. To preserve theporcelain enamel finish as long as pos-sible, have a pan on the grate before youturn on the burner, and lower the flamewhen the food reaches the desired cook-ing temperature.
Surface burners/exterior surfaces/area underburners/aeration tray
Ignitor capand stem
WHAT TO USE
Warm, soapy waterand a nonabrasive,plastic scrubbingpad
ORDishwasher
Warm, soapy waterand a sponge
Warm, soapy waterand a nonabrasive,plastic scrubbing pad
Warm, soapy waterand a nonabrasive,plastic scrubbing pad
Small brush
• Wipe off spills immediately after burnerhas cooled.
For cooked-on food:• Wash with warm, soapy water and a
plastic scrubbing pad.
• Rinse with clean water and dry well.
• If ports are clogged, clean with astraight pin. Do not enlarge or distortports. Do not use a wooden tooth-pick.
• Do not clean surface burner in dish-washer or self-cleaning oven.
• Do not use gritty or harsh cleansers.They may damage the finish.
NOTE: Do not allow foods containingacids (such as vinegar, tomato, or lemonjuice) to remain on surface. Acids mayremove the glossy finish. Also, wipe upmilk or egg spills when cooktop is cool.Remove sugar spills immediately.
• Wash, rinse, and dry well.
• The wire electrode inside the cap canbe cleaned with a small brush.

17
SURFACE BURNERS
Burner flame
wWARNINGCarbon Monoxide Poisoning HazardDo not operate with a yellow flame.Doing so can result in death, heartattack, or convulsions.
NOTE: Occasionally check the burnerflames for proper size and shape as shown.A good flame is blue in color. If flames lift offports, are yellow, or are noisy when turnedoff, you may need to clean the burners (seepage 16), or call a qualified technician foradjustment.
Flame shapeand size Setting

18
GrillwWARNING
Explosion HazardDo not store flammable materialssuch as gasoline near the cooktop.Doing so can result in death,explosion, fire, or burns.
InstallingThe grill is made up of two black grill gratesand a grill burner. Only install the grill on theleft side of your cooktop. To get the grillaccessory, order Part Number SCM20DBfrom a Whirlpool service company or dealer(see Step 2 on page 33) or call the WhirlpoolConsumer Assistance Center toll-free1-800-253-1301.
To install:
1. Make sure the control knobs are turnedoff.
wWARNINGCarbon Monoxide Poisoning HazardDo not operate with a yellow flame.Doing so can result in death, heartattack, or convulsions.
2. Set the grill burner accessory into place.Mixer tube openings should be pointedtoward the orifices. Slide the burnertoward the orifices until the ignitor is inbetween the front and rear grill sections.Lower into place until the notches in theside of the burner bracket rest on theburner support pins. Be sure mixer tubesare over the orifices.
Mixer tubeopenings
Orifices
Side openings
Support pins(not shown)

19
3. Place the grill grates on the top of thecooktop.
To remove:
1. Make sure the control knobs are turnedoff and the grill is cool.
2. Remove grill grates.
GRILL
3. Remove grill burner.

20
UsingBefore you use the grill for thefirst time:1. Heat the grill burner to remove the
protective shipping coating. Heat on HIfor 10 minutes. Use the vent system toremove any additional smoke duringcooling. When the grill burner stopssmoking, it is ready to use.
2. Wash with warm, soapy water. Rinseand dry. Never use a metal scrubbingpad or gritty cleanser on the grill; thesewill damage the nonstick surface.
3. After cleaning, lightly wipe the cookingsurface with cooking oil. This will preventthe food from sticking.
Grilling tipsChoosing meat• For best results, buy top grade meat.
Meat that is at least 3⁄4" thick will grill betterthan thinner cuts.
Preparing to grill• Meat that usually has a lot of fat will smoke
more when cooking and could cause flare-ups. However, fatty meat cooks faster thanlean meat. Trim fat from meat beforeplacing on the grill to prevent a largeamount of smoke or flare-ups.
• Remove the grill cover before heating thegrill. Because a heated grill cover wouldnot look hot, someone could be burned ifthey touched the cover. Heating the grillcover could also damage the finish.
• Precondition grates by brushing themwith vegetable oil or spraying them with anonstick coating prior to each use.
• Score fat on the edges of steak, butdo not cut into the meat. This will preventcurling while cooking.
• Preheat the grill on the HI setting for fiveto 10 minutes. Preheating makes meattaste and look better. It also lets youquickly sear the meat to help keepjuices in.
• The fan switch turns on by itself while youare using the grill. Do not use the grill if thefan does not go on.
• Do not cover the entire cooking surfacewith meat. Leave space between the fooditems to help smoke and steam clear awayquickly.
What to use while grilling• Use tongs with long handles or spatulas
for turning meats. Do not use forksbecause they make holes in the meat,letting juices run out.
What not to use in thegrill area• Do not use aluminum foil.• Do not use charcoal or wood chips.
While cooking• Before turning, let one side of meat cook
until it is as done as you want, or cook untiljuices appear on the top of the meat. Turnsteaks and hamburgers just once; turningand moving food causes it to lose juice.
• When basting meats or putting sauces onfood, remember that extra sauce winds upinside your grill and does not improve thefood’s flavor. Put on sauces during the last15-20 minutes of cooking unless the recipetells you to do it differently. If you put ontoo much of a sugary sauce, it will leave acaramel-like glaze on the grill grates. Thisglaze is hard to clean.
• There are many meat marinades whichwill help make less expensive cuts of meattender for cooking on the grill.
• Some foods, such as poultry and nonoilyfish, may need some extra fat. Brush withoil or melted butter from time to time whilegrilling.
• To help keep juices in meat, salt afterturning meat or after cooking is done.
GRILL

21
Grilling tips (continued)• If meat begins to cook too quickly, turn
the grill control knob to a lower setting.• Grease drippings will ignite occasionally
to produce harmless puffs of flame for asecond or two. This is normal while cook-ing. If you have too many flare-ups: youneed to clean the grill interior, you havenot trimmed the meat properly, or there istoo much fat in the meat.
What not to do while cooking• Do not leave the optional grill while it is
cooking.
After grilling• Clean the basin area after each use. Do
not allow the burner basin to becomeoverloaded with grease.
• Do not place the optional grill cover over aheated grill. Let the grill cool before puttingthe cover in place.
NOTES:• Do not set utensils or other items that
could cause scratches on the grill cover.Do not set very hot containers on thecover or handles, since these could maror change the color of the cover.
• Use the cover over the grill grates only.Do not place the cover over the griddle orsurface burner grates.
wWARNING
Fire HazardGrease can cause large flare-ups.To put out fire:Make sure vent system has beenswitched on.Turn grill control off, cover grill withlarge metal pan, and remove foodfrom grill.Do not put water on a grease fire.To prevent fire and burns:Do not light grill/griddle burnersduring a power failure.Do not use pots or pans on grill.They will become very hot.Failure to follow the above canresult in fire or burns.
NOTES:• The vent system will not work if there is
a power failure. Without the vent systemworking, the grill/griddle burners will notbe kept cool enough.
• Use only nylon or plastic utensils. The useof metal utensils could scratch the non-stick coating.
• When using nylon or plastic utensils, donot leave them on the grill. They could melt.
GRILL

22
GRILL
Grill chartPreheat on HI for 5 or 10 minutes for best flavor. Grilling times are guidelines only and mayneed to be adjusted to get the taste and/or doneness you want.
COMMENTS
Turn after half the time.Turn after half the time.Turn after half the time.
Turn after half the time.Turn after half the time.Turn after half the time.
Turn after half the time.
Turn occasionally.
Turn once. Glaze if desired.
Turn after half the time.
Turn occasionally. Brush withbarbecue sauce during last15 minutes.
Turn occasionally.Turn occasionally.
Turn occasionally.Turn after half the time.Pierce casing with a fork.Turn once.
Turn occasionally. Brush withglaze, if desired.
Turn occasionally.Turn occasionally.Turn occasionally.Turn occasionally.
SETTING
HIHIHI
HIHIHI
MED
MED
MED
MED
MED
HIHI
MEDMEDMED
MED
MEDMEDMED
MED
COOKING TIME(in minutes)
6-1010-1621-24
14-2418-3024-34
20-25
20-30
10-15
15-20
50-65
7-1213-16
15-2515-2025-30
20-30
35-5025-3525-35
35-45
FOOD
Steak (1⁄2-3⁄4")• Rare• Medium• Well-done
Steak (1-11⁄4")• Rare• Medium• Well-done
Hamburgers (3-4 oz)
Pork chopsFully cookedsmoked pork chopsHam slices (1⁄2")
Pork ribs
Fully cooked sausages• Hot dogs, brats• Polish
Fresh sausage• Links• Patties (3" diameter)• Italian sausage
Lamb chops
Chicken• Pieces: Bone-in• Boneless breasts• Wings
Cornish hen (halved)

23
PART
Grates
Drain jar(under cooktop)
FOOD
Fish• Small, whole (1")
• Steaks (1")
• Fillets (1⁄2") (with skin on)
• Shrimp (skewered)
Garlic breadHot dog andhamburger buns
COMMENTS
Brush with butter. Turn afterhalf the time.Brush with butter. Turn afterhalf the time.Start skin side down. Brushwith butter. Turn after halfthe time.Turn and brush with butteror marinade often.
Turn after half the time.
Turn after half the time.
COOKING TIME(in minutes)
15-20
20-25
10-15
10-20
4-6
1-2
SETTING
MED
MED
MED
MED
MED
MED
Caring for grillNOTE: Do not use bleach or rust removers to clean any part of the grill.
Cleaning your grill whenever spills or soiling occurs will help to keep it looking and workinglike new.
WHAT TO USE
Warm, soapy waterand a nonabrasive,plastic scrubbing padORDishwasher
Warm, soapy waterand a sponge or anonabrasive, plasticscrubbing padORDishwasher
HOW TO CLEAN
• Wash, rinse, and dry well.• For heavy soil soak in hot, soapy water
mixed with a cleanser, such as householdammonia.NOTE: Do not use metal brushes, abrasivescouring pads, or other scrubbers made toclean outdoor grills. These will remove thefinish as well as scratch the grates. Do notclean in a self-cleaning oven or use ovencleaners.
• Empty the jar from time to time to preventspillovers.
• Unscrew and remove the jar to empty it. Ifthe jar is broken replace it with any heat-tempered jar, such as a canning jar. The jarshould have a standard screw neck.
GRILL
continued on next page
24
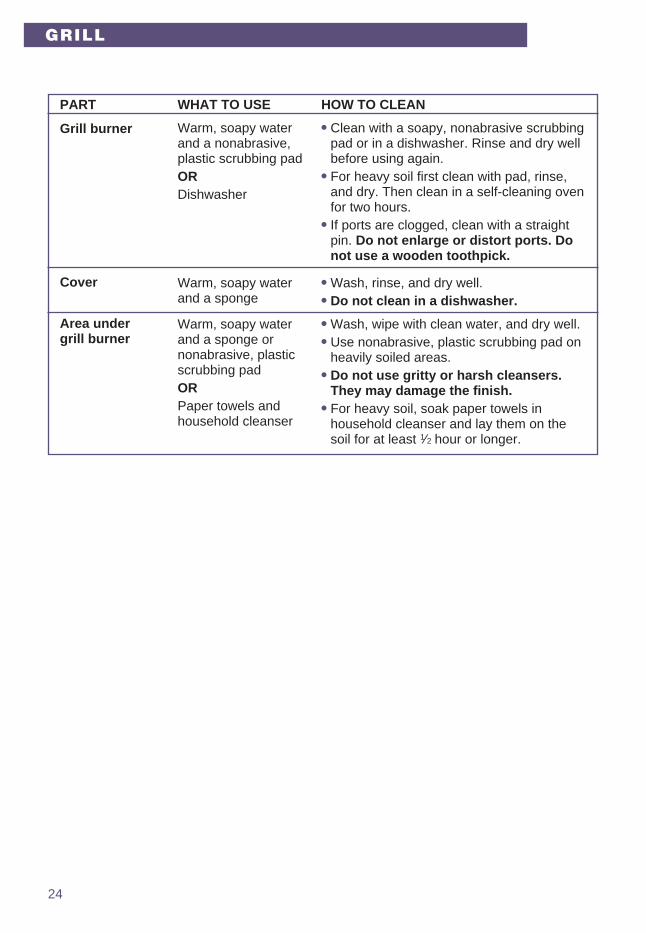
PART
Grill burner
Cover
Area undergrill burner
GRILL
WHAT TO USE
Warm, soapy waterand a nonabrasive,plastic scrubbing padORDishwasher
Warm, soapy waterand a sponge
Warm, soapy waterand a sponge ornonabrasive, plasticscrubbing padORPaper towels andhousehold cleanser
HOW TO CLEAN
• Clean with a soapy, nonabrasive scrubbingpad or in a dishwasher. Rinse and dry wellbefore using again.
• For heavy soil first clean with pad, rinse,and dry. Then clean in a self-cleaning ovenfor two hours.
• If ports are clogged, clean with a straightpin. Do not enlarge or distort ports. Donot use a wooden toothpick.
• Wash, rinse, and dry well.• Do not clean in a dishwasher.
• Wash, wipe with clean water, and dry well.• Use nonabrasive, plastic scrubbing pad on
heavily soiled areas.• Do not use gritty or harsh cleansers.
They may damage the finish.• For heavy soil, soak paper towels in
household cleanser and lay them on thesoil for at least 1⁄2 hour or longer.

25
Griddle
InstallingYou can install a griddle accessory on theleft side of your cooktop. To use this acces-sory you must have grill accessory PartNumber SCM20DB. To get the griddleaccessory, order Part Number SCM40DBfrom a Whirlpool service company or dealer(see Step 2 on page 33) or call the WhirlpoolConsumer Assistance Center toll-free1-800-253-1301.
wWARNINGCarbon Monoxide Poisoning HazardDo not operate with a yellow flame.Doing so can result in death, heartattack, or convulsions.
wWARNING
Explosion HazardDo not store flammable materialssuch as gasoline near the cooktop.Doing so can result in death,explosion, fire, or burns.
1. Make sure the grill burner is installed andthe control knobs are turned off.
2. If grill burner is not installed, setthe grill burner into place. Mixer tubeopenings should be pointed toward theorifices. Slide the burner toward the orificesuntil the ignitor is in between the front andrear grill sections. Lower into place until thenotches in the side of the burner bracketrest on the burner support pins.
NOTE: Do not use the grill grates.
Orifices
Mixer tube openings
Side openings
continued on next page

26
GRIDDLE
3. Place the griddle over the grill burner sothat the drain groove is in front. This willlet extra grease collect in the drain jar.
Drain groove
UsingBefore using the griddle forthe first time:1. Wash griddle in warm, soapy water.
Rinse and dry well.2. Preheat griddle for five minutes at the
settings shown in the “Griddle chart” onthis page.
3. After preheating, lightly wipe the top ofthe griddle with cooking oil. This preventssticking. Do not use shortening or butterto grease the griddle.NOTE: Do not preheat a seasonedgriddle. If the griddle is seasoned duringpreheat, oil changes its chemical compo-sition and forms a varnish-like finish,which is difficult to remove.
Griddling tips• Place food right on the cooking surface of
the griddle.• Turn off the grill burner when cooking is
finished. Leaving the burner on will dam-age the griddle.
• Do not use cookware on the griddle. Useonly plastic or nylon kitchen utensils on thegriddle. Metal could damage the nonstickcooking surface.
wWARNING
Fire HazardBe sure the griddle control is off andthe griddle is cool when not in use.Failure to do so can result in fireor burns.

27
GRIDDLE
Griddle chartPreheat for five minutes at the setting listed below. Griddling times are guidelines only andmay need to be adjusted to get the taste and/or doneness you want.
APPROXIMATE COOKING TIME (in minutes)FIRST SIDE
6
4-5
6-7
5
9
5
3-4
3-4
2
1-2
2
SECOND SIDE
4
3-4
5-6
4
9
5
2-3
2
1-2
1 or less
FOOD
Sausage patties
Bacon (slice)
Ham slice
Hamburgers
Fish sticks (frozen)
Hot dogs
Buns
French toast
Grilled cheesesandwiches
Pancakes
Eggs
GRIDDLE
CONTROLSETTING
MED
MED
MED
HI
MED
HI
MED
HI
HI
HI
MED

28
GRIDDLE
Caring for griddleYou must clean your griddle after each use to keep the finish in good shape.
PART
Griddle
Grill Burner
Area undergrill burner
WHAT TO USE
Warm, soapy waterand a nonabrasive,plastic scrubbing pad
Warm, soapy waterand a spongeORDishwasher
Warm, soapy waterand a spongeORPaper towels andhousehold cleanser
HOW TO CLEAN
• Wash once griddle has cooled. Do not put ahot griddle in cold water.
• For heavy soil, use a nonabrasive scrubbingpad.
NOTE: Do not wash in a dishwasher. Strongdetergents can remove some of the nonstickfinish.
• Clean with a soapy, nonabrasive scrubbingpad or in a dishwasher. Rinse and dry wellbefore using again.
• For heavy soil, first clean with pad, rinse, anddry. Then clean in a self-cleaning oven fortwo hours.
• If ports are clogged, clean with a straight pin.Do not enlarge or distort ports. Do notuse a wooden toothpick.
• Wash, wipe with clean water, and dry well.• Use nonabrasive, plastic scrubbing pad on
heavily soiled areas.• Do not use gritty or harsh cleansers. They
may damage the finish.• For heavy soil, soak paper towels in house-
hold cleanser and lay them on the soil for atleast 1⁄2 hour or longer.

29
VentUsingThe built-in vent system removes cookingvapors, odors, and smoke from foodsprepared on the cooktop, grill, and griddle.The vent system will go on by itself when thegrill burner is being used.
To turn on the vent systemyourself:
• Turn the fan knob in front of the air grilleto ON.
• You can manually control the vent fanonly when using the surface burners. Youcannot manually control the vent fan whileyou are using the grill or griddle.
• If the vent fan turns on automatically, itwill turn off automatically when you turnoff the grill or griddle. If you turn the ventfan on manually, you will need to shut itoff manually.
wWARNING
Cut HazardDo not put hands into vent when fanor controls are on.Doing so can result in serious cuts.

30
Caring for vent
wWARNING
Electrical Shock HazardDisconnect the electrical supplybefore servicing the cooktop.Turn fan and cooktop controls offbefore cleaning the vent system.Do not put hand in vent box whenfan or controls are on.Failure to follow these instructionscan result in death, electrical shock,or other serious injury.
To keep your vent system working well, clean it regularly using the chart below.
PART
Air grille
Filter
Vent
WHAT TO USE
Warm, soapy waterand a spongeORDishwasher
Warm, soapy waterand a spongeORDishwasher
Warm, soapy waterand a spongeORSpray glass cleanerand a paper towel
HOW TO CLEAN
• Wash, rinse, and dry well.
• Clean in sink or dishwasher when soiled.
NOTE: Do not run the ventilation systemwithout the filter. As you face the front of thecooktop, the top of the filter should restagainst the left side of the vent opening andthe bottom of the filter should rest against theright side of the ventilation chamber at thebottom. If the filter is flat against the fan wall,ventilation effectiveness is reduced.
• Clean whenever the chamber becomessoiled.
Air grille
Filter
Vent
Retainer clip(turn to remove filter)
VENT
NOTES:• The wall receptacle is located in the
cabinet beneath the cooktop.• The vent fan system turns on by itself
when the grill or griddle is used.

31
TroubleshootingMost cooking problems often are caused by little things you can find and fix without tools ofany kind. Check the lists below and on the next page before calling for assistance or service.If you still need help, see “Requesting Assistance or Service” on page 33.
If nothing operates, check the following:
Is the cooktop properly connected to gas and electrical supplies?(See Installation Instructions.)
▼
Have you blown a household fuse or tripped a circuit breaker?
▼
Is the control knob set correctly?
▼
Is the flow of combustion and/or ventilation air to the cooktop blocked?
▼
CAUSE
• Cooktop is not wired into a live circuit with theproper voltage.
• You have blown a household fuse or tripped a circuitbreaker.
• Burner ports are clogged. Clean with a straight pin.(See pages 17, 24, and 28.)
• Burner ports are clogged. Clean with a straight pin.(See pages 17, 24, and 28.)
• Flame setting may need to be adjusted.
PROBLEM
Burner fails to light
Burner flames areuneven
Other possible problems and their causes:
continued on next page

32
TROUBLESHOOTING
PROBLEM
Burner flames lift offports, are yellow,or are noisy whenturned off
Burner makes poppingnoise when on
Grill does not workproperly
Control knob(s) willnot turn
Venting results are notwhat you expected
Cooking results are notwhat you expected
CAUSE
• Air/gas mixture is incorrect. Contact an authorizedWhirlpool service technician to check air/gas mixture.
• Burner is wet from washing. Let dry.
• You have not left space between food items.• You have not preheated the grill for the proper amount of
time.• Food was partially frozen or very cold before grilling. This
will make cooking time longer.
• You are not pushing in before turning.
• Exhaust fan is not turned on.• Vent filters are not clean or are not in place.• Vent duct or outside opening is blocked.• There is a draft in room where cooktop is installed.• Meat is not well trimmed.• Vent system has not been installed according to the
Installation Instructions.
• The cooktop is not level.• The recipe you are using may need to be altered to
improve the taste or appearance of the food.• You are using a pan that is not the correct type or size.
Refer to a reliable cookbook or recipe for recommendedpan type and size.
• The flame size does not fit the cooking utensil being used.
If none of these items was causing your problem, see “Requesting Assistance or Service” onpage 33.

33
* When asking for help or service:
Please provide a detailed description of the problem, your appliance’s complete modeland serial numbers, and the purchase date. (See page 2.) This information will help usrespond properly to your request.
Requesting Assistance orServiceBefore calling for assistance or service, please check “Troubleshooting” on pages 31-32.It may save you the cost of a service call. If you still need help, follow the instructions below.
1. If you need assistance* …Call the Whirlpool Consumer Assistance
Center telephone number.Dial toll-free from anywherein the U.S.A.:1-800-253-1301and talk with one of our trained
consultants. The consultant can instruct youin how to obtain satisfactory operation fromyour appliance or, if service is necessary,recommend a qualified service company inyour area.
If you prefer, write to:
Whirlpool Brand Home AppliancesConsumer Assistance Centerc/o Correspondence Dept.414 N. Peters Rd.Knoxville, TN 37922
Please include a daytime phone number inyour correspondence.
2. If you need service* …Whirlpool has a nationwide network of
authorized Whirlpool servicecompanies. Whirlpool servicetechnicians are trained to fulfillthe product warranty andprovide after-warranty service,
anywhere in the United States. To locatethe authorized Whirlpool service companyin your area, call our Consumer AssistanceCenter telephone number (see Step 1) orlook in your telephone directory YellowPages under:
• APPLIANCE-HOUSEHOLD- • WASHING MACHINES &MAJOR, SERVICE & REPAIR DRYERS, SERVICE & REPAIR
- See: Whirlpool Appliances or - See: Whirlpool Appliances or Authorized Whirlpool Service Authorized Whirlpool Service (Example: XYZ Service Co.) (Example: XYZ Service Co.)
3. If you need FSP®
replacement parts …FSP is a registered trademark of WhirlpoolCorporation for quality parts. Look for thissymbol of quality whenever you need areplacement part for your WHIRLPOOL®
appliance. FSP replacement parts will fit rightand work right, because they are made to thesame exacting specifications used to buildevery new WHIRLPOOL appliance.
To locate FSP replacement parts in yourarea, refer to Step 2 or call the WhirlpoolConsumer Assistance Center numberin Step 1.
4. If you are not satisfiedwith how the problemwas solved …
• Contact the Major Appliance ConsumerAction Program (MACAP). MACAP is agroup of independent consumer expertsthat voices consumer views at the highestlevels of the major appliance industry.
• Contact MACAP only when the dealer,authorized servicer, and Whirlpool havefailed to resolve your problem.
Major Appliance Consumer Action Program20 North Wacker DriveChicago, IL 60606
• MACAP will in turn inform us of your action.

LENGTH OF WARRANTY
FULL ONE-YEARWARRANTYFrom Date of Purchase
WHIRLPOOL WILL PAY FOR
FSP® replacement parts and repair labor to correct defects inmaterials or workmanship. Service must be provided by anauthorized Whirlpool service company.
WHIRLPOOL WILL NOT PAY FOR
A. Service calls to:1. Correct the installation of your cooktop.2. Instruct you how to use your cooktop.3. Replace house fuses or correct house wiring or plumbing.
B. Repairs when your cooktop is used in other than normal, single-family household use.C.Pickup and delivery. Your cooktop is designed to be repaired in the home.D.Damage to your cooktop caused by accident, misuse, fire, flood, acts of God, or use of
products not approved by Whirlpool.E. Repairs to parts or systems caused by unauthorized modifications made to the
appliance.
WHIRLPOOL CORPORATION SHALL NOT BE LIABLE FOR INCIDENTAL OR CONSE-QUENTIAL DAMAGES. Some states do not allow the exclusion or limitation of incidental orconsequential damages, so this exclusion or limitation may not apply to you. This warrantygives you specific legal rights, and you may also have other rights which vary from state tostate.Outside the United States, a different warranty may apply. For details, please contactyour authorized Whirlpool dealer.If you need service, first see the “Troubleshooting” section of this book. After checking“Troubleshooting,” additional help can be found by checking the “Requesting Assistanceor Service” section, or by calling our Consumer Assistance Center telephone number,1-800-253-1301, from anywhere in the U.S.A.
7/95
WHIRLPOOL®
Gas Cooktop Warranty
PART NO. 209810B/4381592 Rev. A© 1996 Whirlpool Corporation ® Registered Trademark/TM Trademark of Whirlpool, U.S.A. Printed in U.S.A.
1/96