horno eléctrico · cepillos duros ni otros para lavar, para no raspar la superficie interior del...
TRANSCRIPT

M A N U A L D E U S U A R I O Y L E T R A D E G A R A N T Í A
Horno eléctrico

Manual de Instrucciones
ELEKTRO BACKOFENUT-BACKOFEN26
Muchas gracias por comprar este horno eléctrico de la serie BACKOFEN de la colección exclusiva German Konzept de Ursus Trotter.Le recomendamos que lea atentamente las instrucciones de funcionamiento antes de intentar utilizar la unidad.
INDENTIFICACIONES DE PARTES Y PIEZAS
1- Manilla 7- Luz indicadora2- Puerta de vidrio 8- Levanta-bandeja3- Cobertura de SS 9- Rejilla asadora4- Perill termostato 10- Bandeja esmaltada5- Perilla funcionalidad 11- Bandeja residuos6- Perilla timer
ESPECIFICACIONES
Modelo BACKOFEN26Poder 220V/50HZConsumo 1600WMedidas del packaging 52.5*46.0*37.4cmPeso neto 5.10KGS
PRECAUCIONES
INDICACIÓN ESPECIAL:La imagen del accesorio varía de diferentes modelos. Por favor, consulte el modelo que usted compra.
Siempre use el tenedor de comida al insertar o retirar la bandeja. Toque estos puede causar quemaduras graves.
Cuando esté caliente, no aplique agua en la ventana de vidrio, puede causar que el vidrio se rompa.
Cuando desconecte el cable, tome siempre el enchufe. Nunca tire del cable. Hacerlo podría romper los cables dentro del cable.
No coloque la unidad cerca de un quemador de gas u otra fuentes de alta temperatura o no dirija un ventilador eléctrico, etc., a la unidad durante el uso. Hacerlo podría evitar un control de temperatura correcto.
No moje el cable de alimentación ni maneje la unidad con las manos mojadas. Siempre desenchufe el cable después de usarlo, o cuando la unidad quede desatendida. Un mal funcionamiento mientras el enchufe se inserta en la toma podría causar un incendio.
Cuando se cocinan salpicaduras de aceite como el pollo asado, se recomienda colocar 2 hojas de papel de aluminio en una bandeja para disminuir las salpicaduras de aceite. Ponga uno en una bandeja. Entonces el aceite goteará a una brecha entre las láminas.
INDICACIONES
Indicación especial: las piezas y el accesorio varían de diferentes modelos. Refiera por favor la imagen al artículo verdadero que usted compra.Bandeja de alimentos y la red de hornear
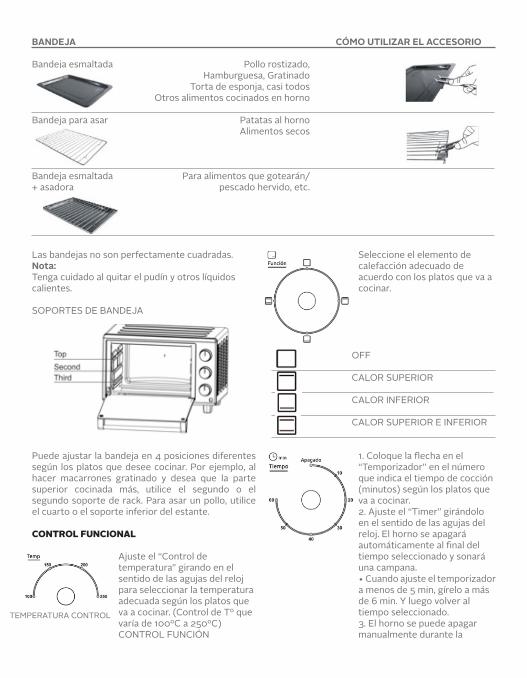
BANDEJA CÓMO UTILIZAR EL ACCESORIO
Bandeja esmaltada Pollo rostizado, Hamburguesa, Gratinado Torta de esponja, casi todos Otros alimentos cocinados en horno Bandeja para asar Patatas al horno Alimentos secos
Bandeja esmaltada Para alimentos que gotearán/+ asadora pescado hervido, etc.
Las bandejas no son perfectamente cuadradas.Nota:Tenga cuidado al quitar el pudín y otros líquidos calientes.
SOPORTES DE BANDEJA
Puede ajustar la bandeja en 4 posiciones diferentes según los platos que desee cocinar. Por ejemplo, al hacer macarrones gratinado y desea que la parte superior cocinada más, utilice el segundo o el segundo soporte de rack. Para asar un pollo, utilice el cuarto o el soporte inferior del estante.
CONTROL FUNCIONAL
Ajuste el “Control de temperatura” girando en el sentido de las agujas del reloj para seleccionar la temperatura adecuada según los platos que va a cocinar. (Control de Tº que varía de 100ºC a 250ºC) CONTROL FUNCIÓN
Seleccione el elemento de calefacción adecuado de acuerdo con los platos que va a cocinar.
OFF CALOR SUPERIOR CALOR INFERIOR CALOR SUPERIOR E INFERIOR
1. Coloque la flecha en el “Temporizador” en el número que indica el tiempo de cocción (minutos) según los platos que va a cocinar. 2. Ajuste el “Timer” girándolo en el sentido de las agujas del reloj. El horno se apagará automáticamente al final del tiempo seleccionado y sonará una campana. • Cuando ajuste el temporizador a menos de 5 min, gírelo a más de 6 min. Y luego volver al tiempo seleccionado. 3. El horno se puede apagar manualmente durante la
TEMPERATURA CONTROL

cocción girando el “temporizador” en sentido anti- reloj a la posición “OFF”. TIMER * Puede observar si los elementos están funcionando o no observando el indicador luminoso frontal.
METODO DE LIMPIEZA
Quite el enchufe y enfríe antes de limpiarlo.
Cuando limpie, lave la superficie interior y exterior, no utilice cepillos duros ni otros para lavar, para no raspar la superficie interior del horno, y para proteger la bandeja, la red y el tenedor de comida.
No utilice productos de limpieza tóxicos y abrasivos como gasolina, polvo de pulir, disolvente.
TIPO DE COMIDA TEMPERATURA SITIO TIEMPO
Pan 180 3 9-13Queques 180 2 25-35Pescado 250 2 10-15Pato/Pollo 220-250 2 30-45Panqueuques 160 1 7-10Carne 250 2 8-15Huevos 125-150 2 6-10Hot Dog 200 2 6-10Hamburguesa 240 2 10-14
INSTRUCCIONES DE OPERACION
Antes de utilizar la unidad por primera vez:Calentar el horno vacío.(1) Inserte la bandeja y la red de horneado.(2) Coloque el interruptor de funcionamiento del calentador en “UPPER & LOWER”, ajuste el dial de control de temperatura a “250 ºC” y caliente el horno vacío durante unos 10 minutos.
Nota:Puede haber algo de humo y un olor a quemado en el primer uso, pero esto no es un mal funcionamiento.Dial de control de temperatura:Ajuste el dial de control de temperatura para los platos que va a cocinar.
Interruptor de funcionamiento del calor:Seleccione “superior” “inferior” o “superior e inferior” de acuerdo con los platos que va a cocinar.Puede observar si los calentadores están funcionando o no, observando la luz indicadora frontal.
UPPER LOWER UPPER & LOWER
1. Coloque la flecha en el mando del temporizador en el número que indica el tiempo de cocción (minutos) según los platos que va a cocinar.2. Ajuste el temporizador girándolo en el sentido de las agujas del reloj.El horno se apagará automáticamente al final de la hora seleccionada y sonará una campana• Cuando ajuste el temporizador a menos de 5 minutos, gírelo a más de 6 min. Y luego volver al tiempo seleccionado.3. El horno se puede apagar manualmente durante la cocción girando el temporizador en sentido antihorario hasta la posición “0FF”.
Nota:Si el interior del horno está sucio, la cocción puede tardar un poco más de lo habitual.

PRECAUCIÓN
Si el horno está situado cerca de una pared, la pared se quemará o teñirá. Asegúrese de que la cortina, etc., no estén en contacto con el cuerpo. No coloque nada entre la parte inferior del cuerpo y la superficie sobre la que está colocado, un objeto así colocado podría ser quemado.
No ponga nada en el horno mientras lo usa, el calor podría causar deformación, grietas, etc.
Cualquier comida embotellada o enlatada no se puede calentar directamente como la botella o estaño se rompería y escaldar a la persona.
¡Ten cuidado! No se apoye usted mismo durante el uso o inmediatamente después del uso. Las piezas metálicas y la ventana de cristal de la puerta se vuelven extremadamente calientes durante el uso. Tenga cuidado de no tocarlos al abrir y cerrar la puerta.
La alimentación de CA debe tomarse de una toma de corriente correctamente cableada. Inserte el enchufe completamente en el zócalo. Si no lo es, podría llegar a ser anormalmente caliente. No utilice una toma de luz eléctrica. Nunca conecte varios enchufes a la misma salida.
MANTENIMIENTO1. Aparte de la limpieza mencionada en este manual de instrucciones, no se requiere mantenimiento o servicio adicional de este aparato.2. Las reparaciones, cuando sea necesario, deben realizarse en un centro de servicio autorizado.3. Este aparato está diseñado para uso doméstico y no para uso comercial o industrial.
ADVERTENCIA Si el cable de alimentación está dañado, el fabricante o su agente de servicio o una persona cualificada para evitar un incendio debe reemplazarlo.
ADVERTENCIA ESPECIAL
Símbolo de reciclaje, no deseche el producto con basura doméstica.
Precaución: La temperatura de la superficie accesible Puede ser alta cuando el aparato está funcionando.

Manual de Instrucciones
ELEKTRO BACKOFENUT-BACKOFEN26
Many thanks for purchasing this electric oven.We would particularly advise that you carefully read the operating instructions before attempting to operate the unit
PARTS IDENTIFICATION
1- Door handle 7- Indicator light2- Glass door 8- Food fork3- Door clip 9- Wire rack4- Thermostat knob 10- Food tray5- Function knob 11- Crumb tray6- Timer knob ESPECIFICACIONES
Model NO. BACKOFEN26Power supply 220V/50HZPower consume 1600WPackage measurement 52.5*46.0*37.4cmNet weight 5.10KGS
CAUTIONS
SPECIAL INDICATION:The accessory image varies from different models. Please refer to the actual model you buy
Always use the food fork when inserting or removing the tray. Touching these will cause severe burns. When hot, do not apply water to the glass window, it may cause the glass to break.
When unplugging the cord, always take hold of the plug itself. Never pull on the cord. Doing so could break the wires inside the cord.
Do not position the unit close to a gas burner or other source of high temperature or do not direct an electric fan, etc, at the unit during USE. Doing so could prevent correct temperature control.
Do not wet the power cord nor handle the unit with wet hands. Always unplug the cord after use, or whenever the unit is to be left unattended. A malfunction while plug is inserted into the outlet could cause a fire.
When cooking oil-splashing dishes such as roast chicken, it is recommended to put 2 sheets of aluminum foils on a tray in order to diminish oil splashing. Put one on a tray. Then oil will drip to a gap between foils.
USE INDICTION
Special indication: the parts and accessory varies from different models. Please refer the image to the real item you buy.

FOOD TRAY AND BAKING NET HOW TO USE
Food Tray Roast chicken, Hamburg steak, Gratin Sponge cake, Almost all other oven-cooked foods Wire rack Patatas al horno Alimentos secos
Bandeja esmaltada Para alimentos que gotearán/+ asadora pescado hervido, etc.
The trays are not perfectly square.Note:Be careful when removing pudding and other hot liquids.Rack Support
SOPORTES DE BANDEJA
You can adjust the tray at 4 different positions according to the dishes you want to cook. For instance, when making macaroni gratin and you want to have the top part cooked the most, use the second or the second rack support. For roasting a chicken, use the fourth or the bottom rack support.
FUNCTIONAL CONTROL Set the “Temperature Control” by turning clockwise to select the suitable temperature according to the dishes you are going to cook. (Temperature Control ranging from 100ºC to 250ºC)
FUNCTION CONTROL Select the suitable heating element according to the dishes you are going to cook.
OFF UPPER HEATING LOWER HEATING UPER & LOWER HEATING
1. Set the arrow on the “Timer” to the number which indicates the cooking time (minutes) according to the dishes you are going to cook. 2. Set the “Timer” by turning it clockwise. The oven will turn off automatically at the end of the selected time and a bell will ring. • When setting the Timer to less than 5 min, turn it to more than 6 min. and then back to the selected time.. 3. The oven can be turned off manually during cooking by turning the “Timer” anti- clockwise to the “OFF” position.TEMPERATURA CONTROL

*You can observe whether the heating elements are working or not by observing the front Indicator light. METODO DE LIMPIEZA
Take off the plug and cool down before cleaning.
When cleaning, wash the interior and exterior surface, trnot use hard brush or any others to wash, so as not to scrape the interior surface of the oven, and to protect the tray, the net and the food fork.
Do not use the toxic and abrasive cleaners such as gasoline, polishing powder, solvent.
TYP OF FOOD TEMPERTURE SITE TIME
Bread 180 3 9-13Cake 180 2 25-35Fish 250 2 10-15Chicken/Duck 220-250 2 30-45Pancake 160 1 7-10Beef 250 2 8-15Egg/Peanut 125-150 2 6-10Hot Dog 200 2 6-10Hamburger 240 2 10-14
OPERATING INSTRUCTIONS
Before using the unit for the first time:Heat the empty oven.(1) Insert the tray and baking net.(2)Set the heater operating switch to “UPPER & LOWER”, set the temperature control dial to “250ºC” and heat the empty oven for about 10 minutes.
Note:There may be some smoke and a burning smell at first use, but this is not a malfunction.Temperature control dial:Set the Temperature Control Dial for the dishes
which you are going to cook.Heat Operating Switch:Select “upper” “Lower” or “Upper and Lower” according to the dishes you are going to cook. You can observe whether the heaters are working or not by observing the front Indicator light.
UPPER LOWER UPPER & LOWER
1. Set the arrow on the timer knob to the number which indicates the cooking time(minutes) according to the dishes you are going to cook. 2. Set the Timer by turning it clockwise.The oven will turn off automatically at the end of the selected time and a bell will ring • When setting the Timer to less than 5 min., turn it to more than 6 min. and then back lo the selected time.3. The oven can be turned off manually during cooking by turning the Timer counter-clockwise to the “0FF” position.
Note:If the inside of the oven is dirty, cooking may take slightly longer than usual.
CAUTIONS
If the oven is positioned to close to a wall, the wall will be burned or stained. Be sure the curtain, etc., are not in contact with the body. Do not put anything between the bottom of the body and the surface on which it is set, an object so placed could be burned.
Do not put anything on the oven while using it, the heat could cause deformation, cracking, etc.
Any bottled or tinned food can not be heated directly as the bottle or tin would be broken out and scald the person.

Be careful! Not to bum yourself during use or immediately after use. The metal parts and glass window of the door become extremely hot during use. Be careful not to touch them when opening and closing the door. AC power must be taken from a properly wired outlet. Insert the plug completely into the socket. If it is not, it could become abnormally hot. Do not use an electric light outlet. Never connect multiple plugs to the same outlet.
MAINTENANCE1. Other than cleaning mentioned in this instruction manual, no additional maintenance or serving of this appliance is required.2. Repairs, when necessary, must be performed at an authorized service facility. 3. This appliance is intended for HOUSEHOLD USE ONLY and not for commercial or industrial use.
WARNING If the supply cord is damaged, the manufacturer or its service agent or a similarly qualified person in order to avoid a hazer must replace it.
SPECIAL WARNING
Recycling symbol, don’t dispose of the product with household refuse.
Caution: The temperature of the accessible surface may be high when the appliance is operation.

POLIZA GARANTIA 24 MESES 2014 CR.ai 1 07-03-14 14:59
URSUS TROTTER SMALL APPLIANCES S.A.Una empresa Chilena con precisión Alemana que da confianza
San Pablo 3770- Tel.:28383000 - Fax.: 28383005Casilla 3234- Santiago - Chile
[email protected] - www.ursustrotter.clSujeto a alteración sin previo aviso.

POLIZA GARANTIA 24 MESES 2014 CR.ai 2 07-03-14 14:59

ursustrotter.cl