hosted voice product training business group administrator
DESCRIPTION
Hosted Voice Product Training Business Group Administrator. Agenda. Logging In “Help” Tool Administrator Portal Lines ICON’s Phones MADN’s MLHG’s. Call Pick Up Groups Short Codes Extensions Departments Account Codes Call Logs Misc. Settings Music on Hold Contacts. - PowerPoint PPT PresentationTRANSCRIPT

1
Hosted Voice Product TrainingBusiness Group Administrator
2
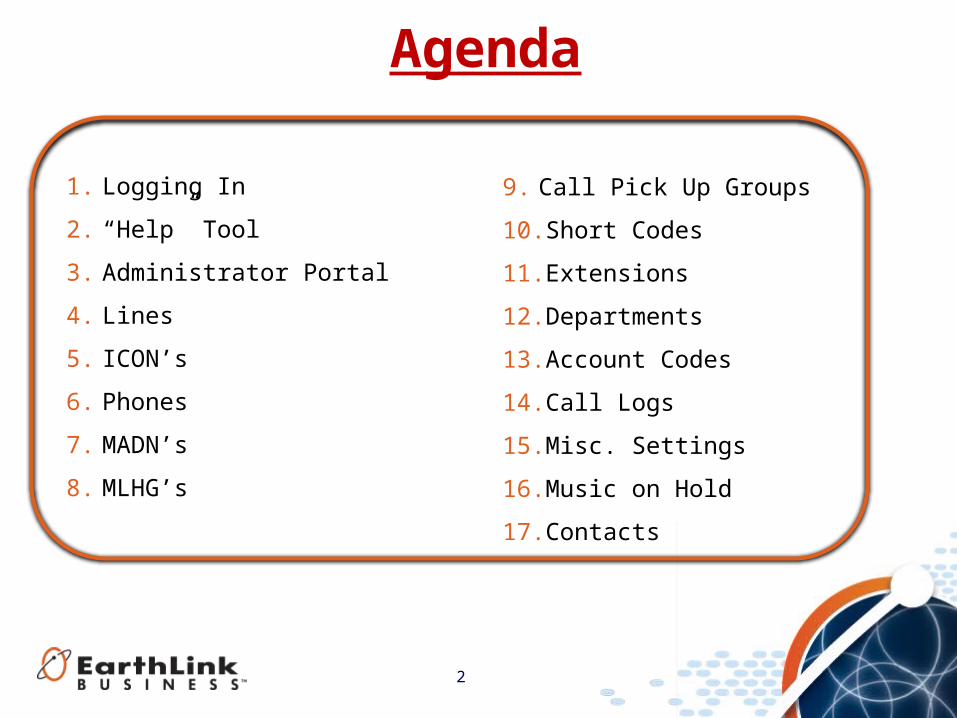
Agenda
1. Logging In2. “Help” Tool3. Administrator Portal4. Lines5. ICON’s6. Phones7. MADN’s8. MLHG’s
9. Call Pick Up Groups10.Short Codes11.Extensions12.Departments13.Account Codes14.Call Logs15.Misc. Settings16.Music on Hold17.Contacts

3
Resource Centerhttp://www.earthlinkbusiness.com/hostedvoice

4
Log In
Go to https://voip.elnk.us/bg
Open up a web browser
You will enter the following:
Number – This is your 10 digit telephone number. Please enter numbers only without dashes
Password– This will be the same password that you have for your voicemail
5
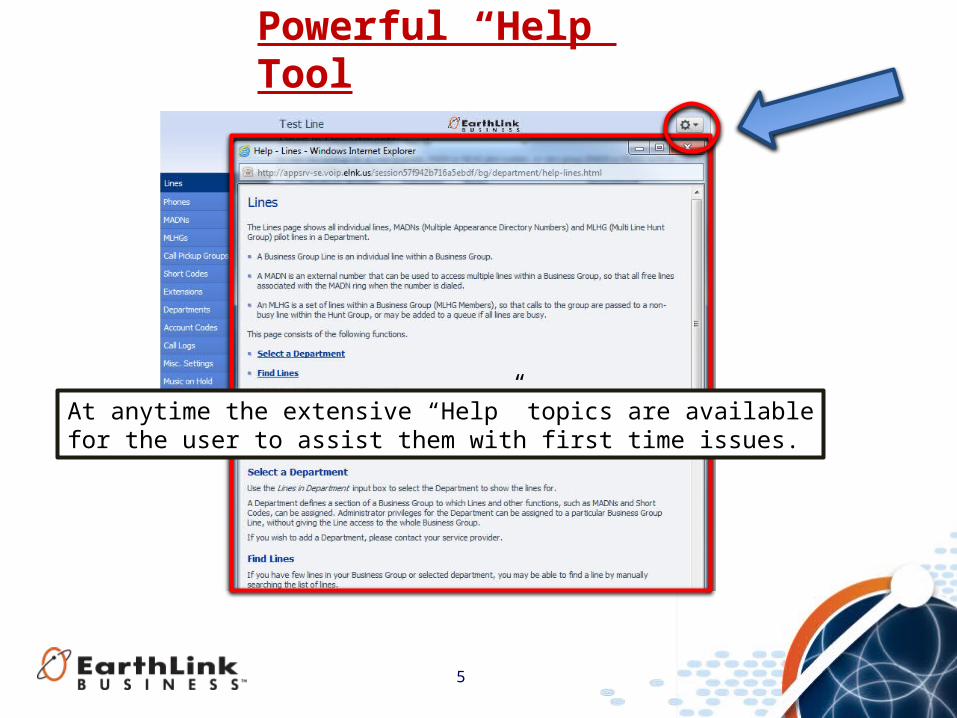
Powerful “Help” Tool
At anytime the extensive “Help” topics are availablefor the user to assist them with first time issues.

6
Administrator Portal
5
11
12
34
12
67
89
10
1. Lines: Shows all individual lines, MADN’s & MLHG’s.
2. Phones: Allows you to manage the phones in a business group.
3. MADN’s : Are external number that can be used to access multiple lines within a business group.
4. MLHG’s: A set of lines within a business group that allow calls to be passed to non busy lines within a hunt group
5. Call Pick Up Groups: defines a group of lines in which subscribers can answer each others incoming calls
6. Short Codes: A specific code that is tied to an external phone number
7. Extensions: Allows users to quickly dial another number within the business group
8. Departments: Divide your business into separately administrable groups.
9. Account Codes: Allows you to use a code of your choice when placing an outbound call.
10. Calls Logs: Allows you to download a report of all calls made to or from your business.
11. Misc. Settings: Gives access to the number blocks & external calls settings information.
12. Music on Hold: The ability to change the music on hold for your business.

7
Lines
Displays all the lines associated with your business group
8
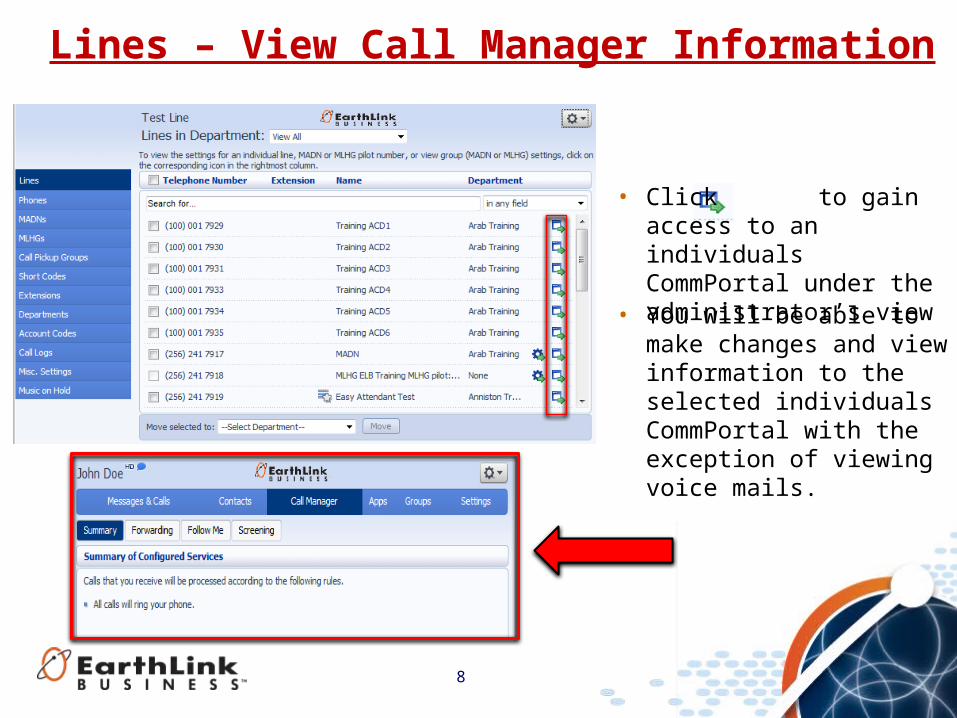
• Click to gain access to an individuals CommPortal under the administrator’s view
• You will be able to make changes and view information to the selected individuals CommPortal with the exception of viewing voice mails.
Lines – View Call Manager Information

9
Reset Account Information
• Go to Settings tab
• Click on the “Accounts” tab
• Click the “Reset Account” button
Note: This will reset all the information for back to the initial setup. You should ensure that all voice mail messages are retrieved prior to completing this action.

10
Changing Line Name
• Go to “Account“ tab• Click on the “Edit” link• Edit the name associated with
the line• Click the “Save” button

11
Creating Sub-Administrators
After you have created “departments” you may want to assign an individual as
a sub-administrator
• Go to Settings tab• Click on the “Account” tab
• Click the drop down box under “Admin”
• Click “Save” button
• Select the group you want to assign as an administrator
• Click on the “Edit” link

12
Lines – View MADN Information
Click to gain access to an MADN configuration

13
ICON’s
Standard or “Easy” Auto Attendant
Premium Auto Attendant
Administrator

14
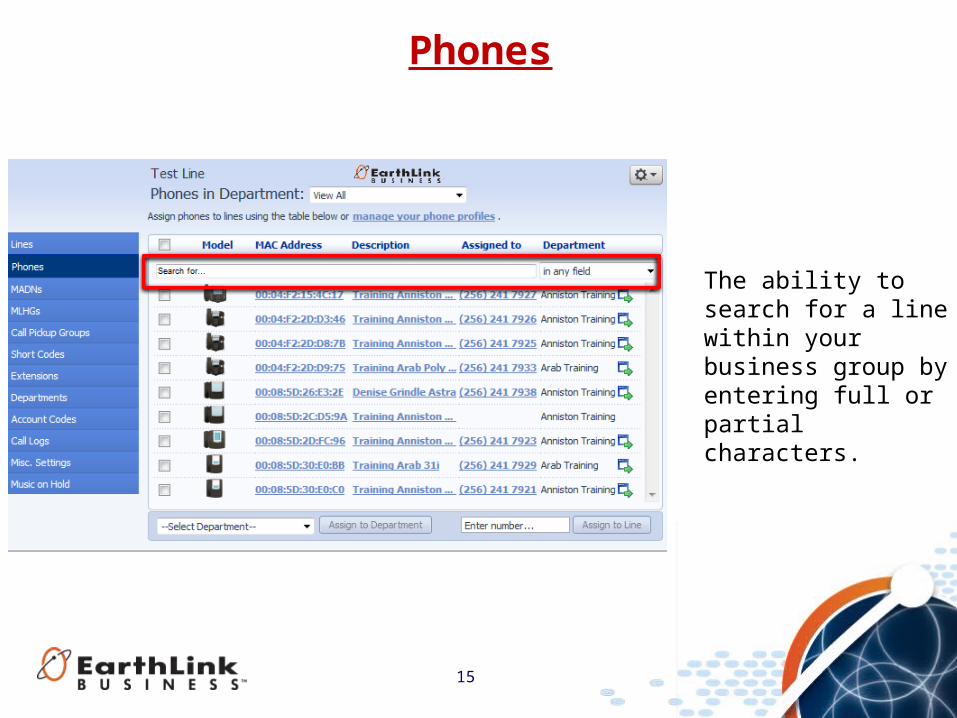
Phones
Ability to manage the phones within your business group and assign lines.
15
Phones
The ability to search for a line within your business group by entering full or partial characters.

16
Phones
• Click on either MAC Address, Description or Assigned To hyperlink
• Change the Description field
• Click “Apply”
To Change the Description Associated with Phone

17
Phones
• Place a check mark next to the phone.
• Select the department from the drop down box
• Click “Assign to Department”
Assign a Phone to a Department
• Place a check mark next to the phone.
• Enter the telephone number
• Click “Assign to Line”
Assign a Line to a Phone

18
MADN’s
A MADN or “Multiple Appearance Directory Number” displays all the lines set to ring when the MADN number is dialed.

19
MADN’s – Adding Lines
1. Click “Add Lines” Button
2. Numbers not assigned to the MADN group will be displayed
3. Select the number(s) you wish to add
4. Click “Add Selected” Button
Note: You may only have up to 32 lines within the group. Calls are limited to the number of lines programed on each users phone. For example-: If you only have 2 lines programed on the phone, you will only be allowed to have 2 simultaneous calls on that particular phone.

20
MADN’s – Removing Lines
1. Select the line(s) you want to remove
2. Click “Remove Selected”

21
MLHG’s
Displays the lines set to ring when the MLHG is configured

22
MLHG’s - Settings
Click to view the MLGH settings

23
You can optionally assign one or more MLHG Pilot Directory Numbers to the Hunt Group. These provide a contact number for the whole group that will always pick a free line, instead of being associated with a specific line within the Hunt Group.
MLHG Piolts

24
MLHG’s – Lines (Removing Lines)
1. Select the line(s) you want to remove
2. Click “Remove Selected”

25
MLHG’s – Lines (Changing Line Positions)
1. Click “Change Positions”
2. Use the arrows to move position up or down
3. Click “Apply”

26
MLHG’s – Lines (Adding Lines)
2. Select the line(s) you want to move
3. Click “Add Selected”
1. Click “Add Lines”

27
Call Pickup Groups
A Call Pickup Group defines a group of Business Group Lines within which the subscribers can use Call Pickup to answer each other's incoming calls.
Note: You must hear the other phone ringing in order to answer
Note: You may only have up to 32 lines within the group. Calls are limited to the number of lines programed on each users phone. For example-: If you only have 2 lines programed on the phone, you will only be allowed to have 2 simultaneous calls on that particular phone.

28
Call Pickup Groups Delete Groups
1. Select the group(s) you wish to
2. Click “Delete Selected”

29
Call Pickup Groups Add Groups
1. Click on “Add Group”
3. Click “Add”
2. Enter a group name

30
Call Pickup Groups - Configuration
Each row in the table shows the following for each line in
• Telephone number of the Business Group Line.
• Extension number of the line.
• Name of the line.
• The Department that the line is in.

31
Call Pickup Groups - Settings
1. Click on “Settings” tab
3. Click “Apply”
2. Enter a Call Pick Up Group name
Change the Call Pick Group Name

32
Short Codes
A specific code that is tied to an external phone number for all users within the business group to access.

33
Short Codes – Add a Single
1. Enter a code to be assigned as the “Short Code” (Usually between 1 & 4
digits).2. Enter the telephone
number to be assigned to the “Short Code”
3. Use the drop down arrow to select a department (Optional)
4. Click “Add”
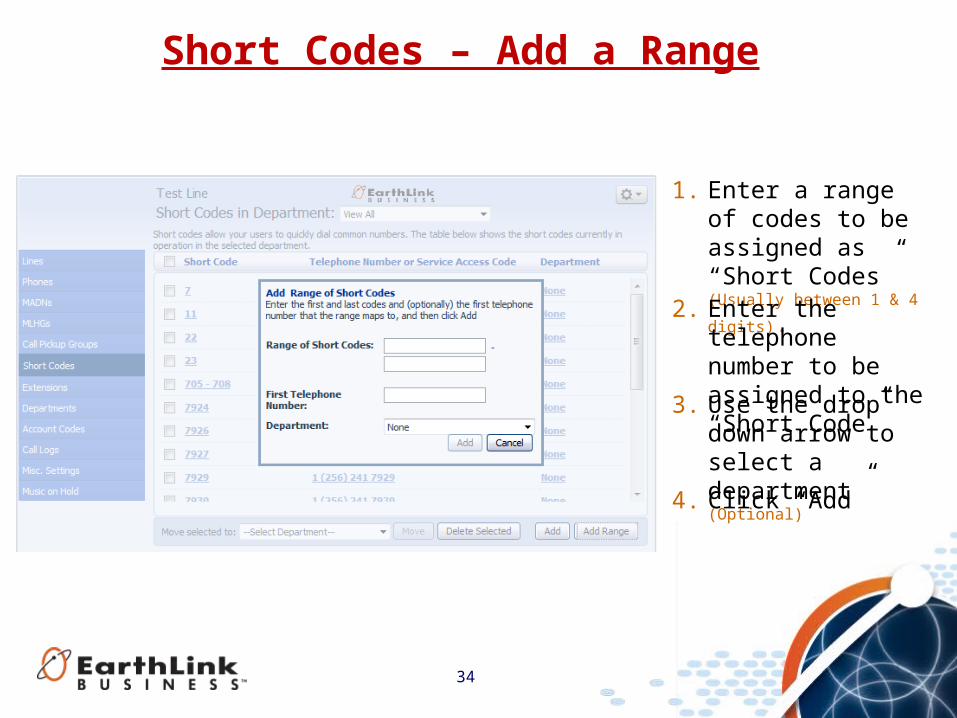
34
Short Codes – Add a Range
1. Enter a range of codes to be assigned as “Short Codes” (Usually
between 1 & 4 digits).2. Enter the telephone
number to be assigned to the “Short Code”
3. Use the drop down arrow to select a department (Optional)
4. Click “Add”
35
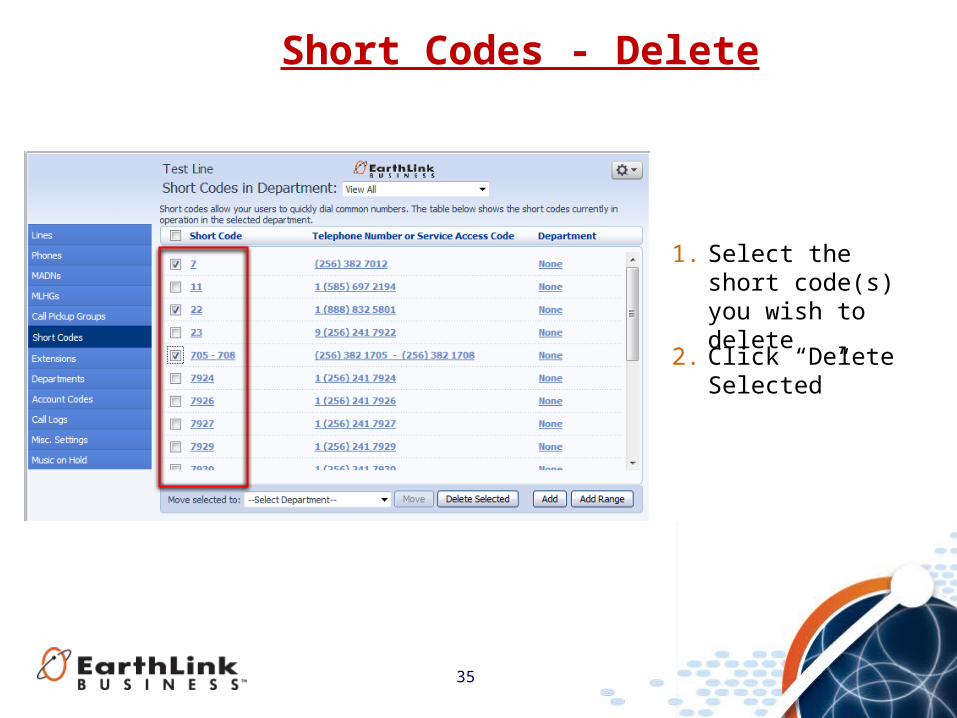
Short Codes - Delete
1. Select the short code(s) you wish to delete
2. Click “Delete Selected”

36
Extensions
Allows the Administrator to configure extensions within the business group for quick dialing

37
Extensions – Add Single
• Enter an extension number you wish to create.
• Enter an telephone number you want to associate the extension with when dialed.
• Click “Add”

38
Extensions – Add a Range
• Enter a range of extension numbers you wish to create.
• Enter an telephone number you want to associate the extension with when dialed.
• Click “Add”
39
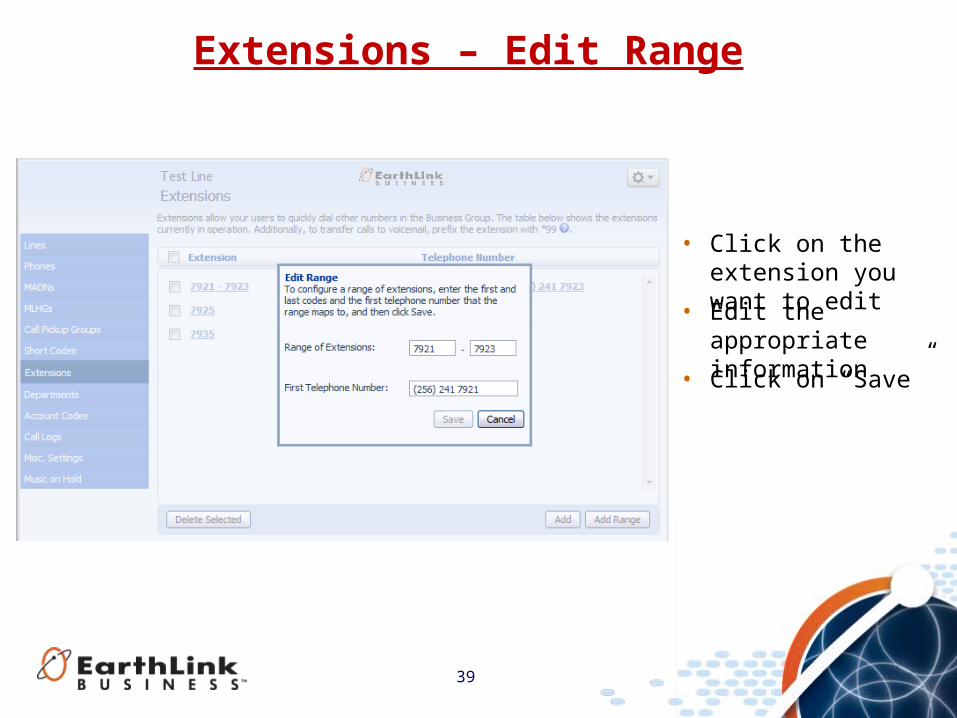
Extensions – Edit Range
• Click on the extension you want to edit
• Edit the appropriate information
• Click on “Save”
40
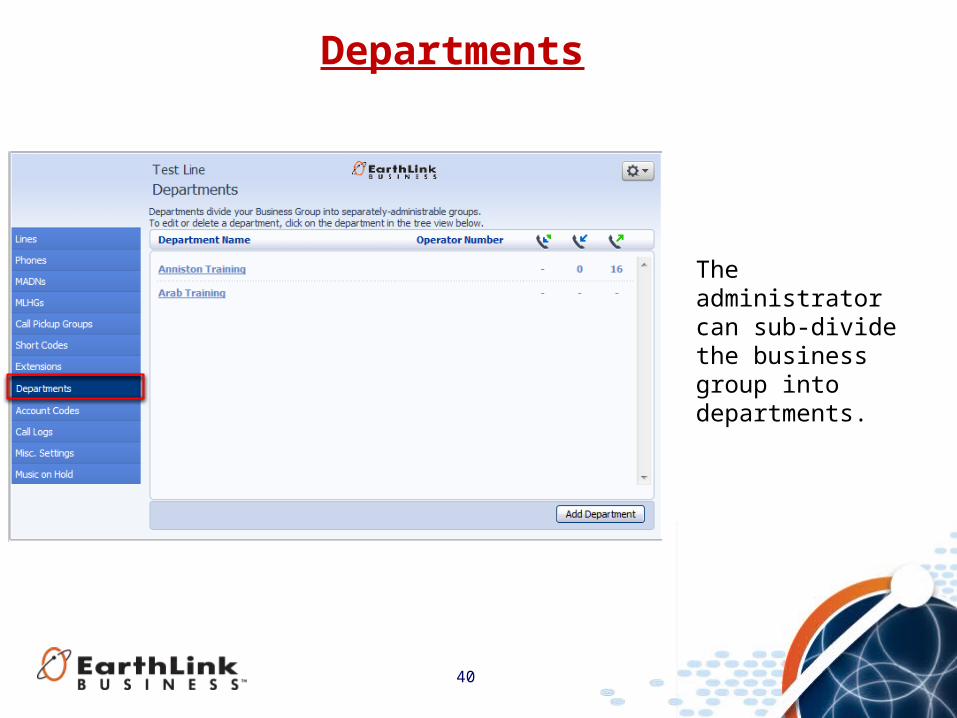
Departments
The administrator can sub-divide the business group into departments.

41
Departments - Add
2. Enter the appropriate information
3. Click “Apply” to save
1. Click on “Add Department” button

42
Departments - Edit
1. Click on the department you wish to edit
2. Edit the appropriate information
3. Click “Apply” to save
43
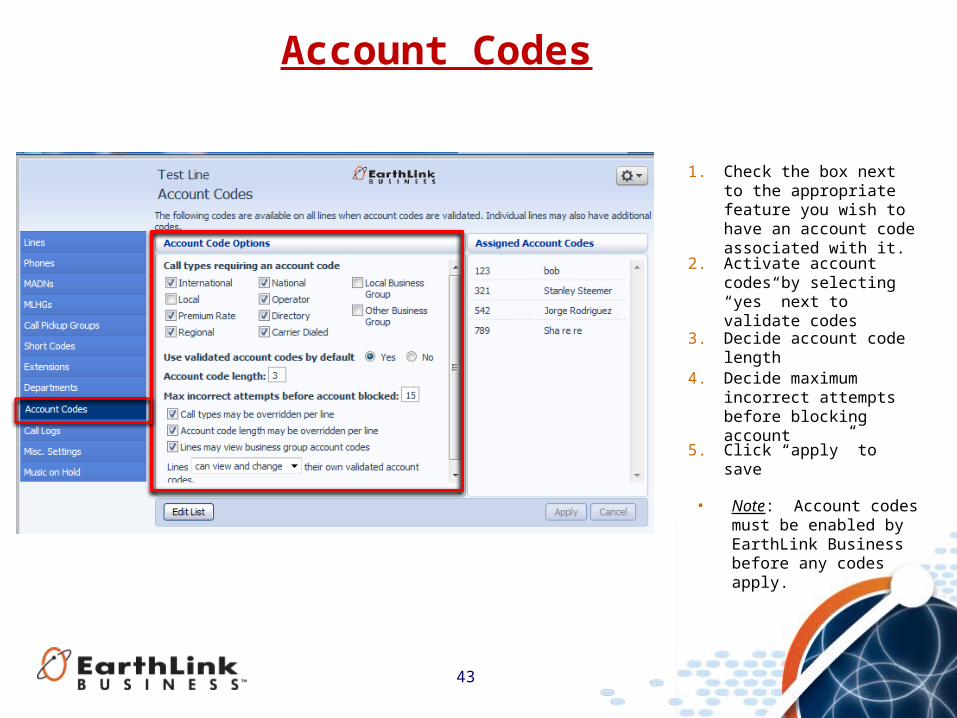
Account Codes
• Note: Account codes must be enabled by EarthLink Business before any codes apply.
1. Check the box next to the appropriate feature you wish to have an account code associated with it.
2. Activate account codes by selecting “yes” next to validate codes
3. Decide account code length
4. Decide maximum incorrect attempts before blocking account
5. Click “apply” to save
44
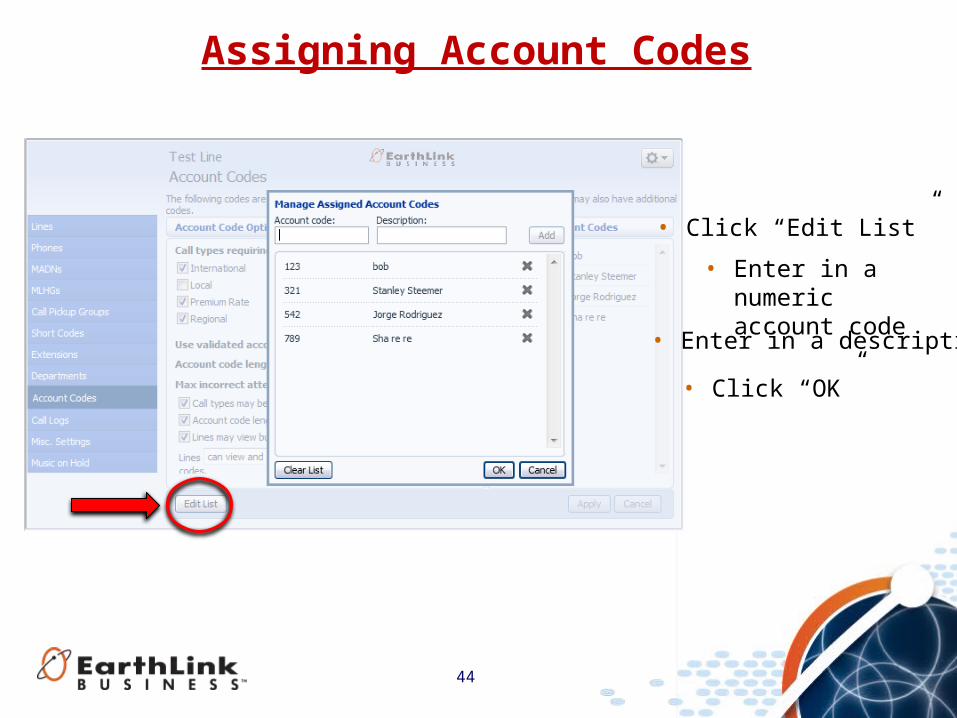
Assigning Account Codes
• Click “Edit List”
• Enter in a numeric account code
• Enter in a description
• Click “OK”
45
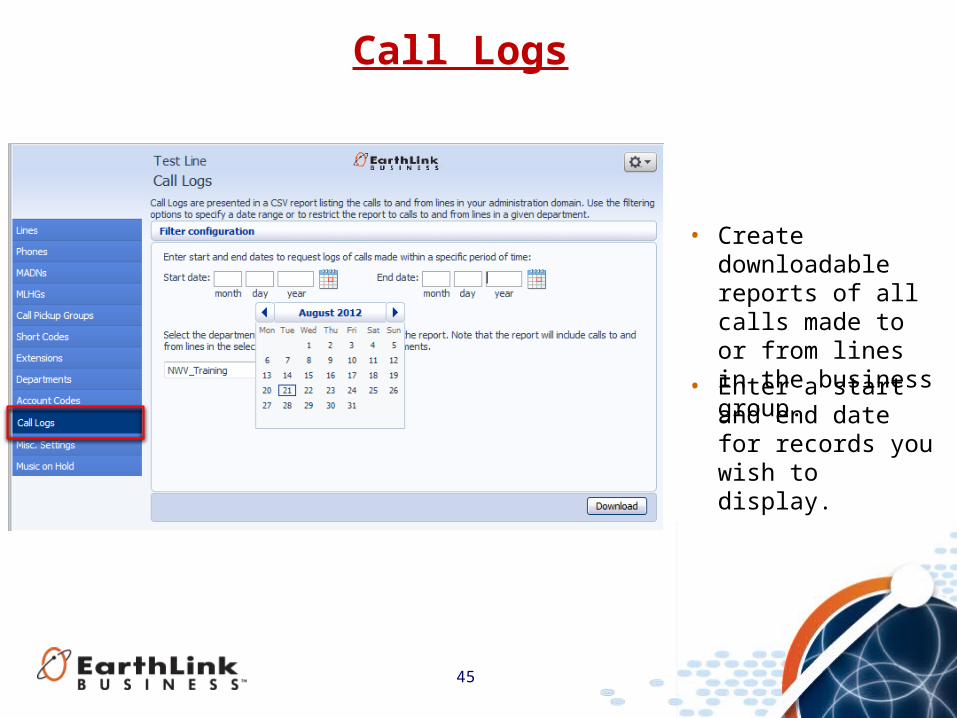
Call Logs
• Create downloadable reports of all calls made to or from lines in the business group.
• Enter a start and end date for records you wish to display.

46
Call Logs – Report (Example)
• Report displays a vast number of fields with call information.
• This will download a CSV (Comma Separated Variable) file which can be viewed in Microsoft Excel.
• You can now customize the report to display only what you need to view. You can hide columns, sort by fields or rows.

47
Misc. Settings – Other Settings
Prevents forwarding of voicemail messages to someone outside the business group
Displays extensions rather than directory numbers when possible
Changes the operator number for the business group
Restricted Subscriber Messaging
Use Internal Extensions
Internal Operator Number

48
Music on Hold - Mapping
Initial Resource – Initial choice of music to be played when a caller is place on hold.
Action – do you want the music to repeat or play only once during customer hold time.
Start Point– Where do you want the music to begin when a caller is placed on hold.
49
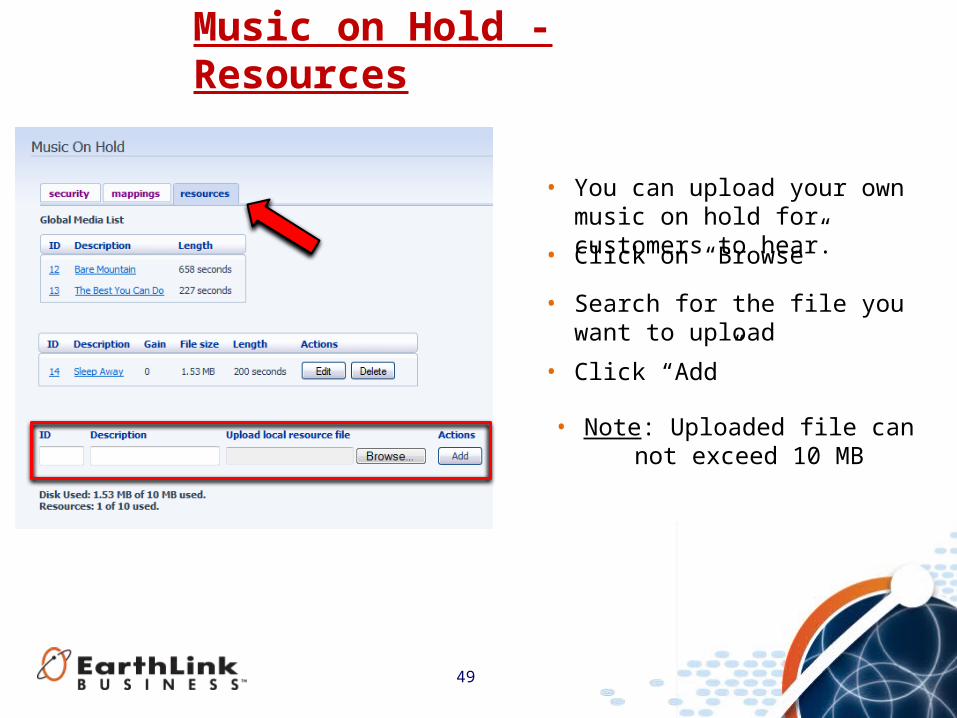
Music on Hold - Resources
• You can upload your own music on hold for customers to hear.
• Click on “Browse”
• Search for the file you want to upload
• Click “Add”
• Note: Uploaded file can not exceed 10 MB
50
For any questions or additional help, visit
http://www.earthlinkbusiness.com/hostedvoice - or -
Contact our Customer Care Specialists @1-855-352-2731

51
When you exit this training session, you will automatically be linked to “Survey Monkey”, a training survey evaluation.
This survey will help us improve the training content and effectiveness of our facilitators.
The survey is confidential and secure.
Please complete the survey and have a great day.