hot splicing of rubber conveyor belts with fabric plies
DESCRIPTION
Hot Splicing of Rubber Conveyor Belts With Fabric PliesTRANSCRIPT

7/16/2019 Hot Splicing of Rubber Conveyor Belts With Fabric Plies
http://slidepdf.com/reader/full/hot-splicing-of-rubber-conveyor-belts-with-fabric-plies 1/28
Hot Splicingof Rubber Conveyor Belts
with Fabric Plies
- Splicing Manual -
N o r t
h
A m e r i c a
n
E d i t i o n

7/16/2019 Hot Splicing of Rubber Conveyor Belts With Fabric Plies
http://slidepdf.com/reader/full/hot-splicing-of-rubber-conveyor-belts-with-fabric-plies 2/28
3
General recommendations
Storage of hot splicing products
Precautions
Appl icat ion range of hot spl ic ing produ cts
Standard conveyor belts
Splicing methods
Place / site
Products fo r hot spl icing of standard coveyor belts with fabric pl ies
Cure Chart for hot sp l icing of standard cov eyor belts with fabric pl ies
Tools and equiment
Condi t ions for hot s pl ic ing
Work place
Conveyor belt
Ambient conditions
Structure and dimensions of hot sp l ices
Splicing methods
Selection of step direction-The splice runs against the conveying direction
-The splice runs in the conveying direction
Length of steps and overlapping area
-Mono-ply belts - up to 500/1
-Two ply and multi-ply conveyor belts
Step splice layout drawings
Spl icing process
General preparation
Preparation of the lower part of the beltPreparation of the upper part of the belt
Joining of the splice
Vulcanizing the splice
Final measures
Job Report Forms
Contents Page
4
4
4
5
55
5
6
8
9
9
9
9
10
29
14
1821
22
10
1010
12
26
28
11
11
13
7

7/16/2019 Hot Splicing of Rubber Conveyor Belts With Fabric Plies
http://slidepdf.com/reader/full/hot-splicing-of-rubber-conveyor-belts-with-fabric-plies 3/28
4
Storage of hot sp l ic ing p roducts
The hot splicing products have to be stored in a dry and dark place, at a temperature between59 and 77°F (DIN 7716).
Please observe the expiration date on the box!
When unvulcanized splice materials are stored under unfavorable conditions their physical
and/or chemical characteristics change. Eventually these changes will render the unvulcanized
splice materials unsuitable for use. These effects result in changes in the curing behavior and/
or in the cured physical properties of the splice materials.
The harmful effects of these factors can be minimized by a careful choice of the followingstorage conditions.
1. Storage at 700 F will give a shelf life of 12 Months (higher temperatures shorten shelf life).
Storage at 500 F will give a shelf life of more than 12 Months. If material is stored at
extremely low temperatures (freezing is not recommended) the material should be allowed
to stand at 700 F for at least 48 hours before use to avoid condensation.
2. The relative humidity should preferably be below 60% for long term storage. Damp
conditions should be avoided since long term exposure to moisture can influence the
curing and crosslinking behavior of the materials.
3. Sunlight and artificial light which has a substantial content of ultraviolet light can adversely
affect the stability of unvulcanized rubber. Depending on the grade and the time span of
exposure, chain rupture and/or crosslinking may occur. In view of this, exposure to light
should be restricted to a minimum.
4. Where possible, unvulcanized rubber should be protected from excessive air circulation
and should not be stored near electrical equipment (motors) that could be a source of
ozone. For this reason it is advisable to keep the splice material boxes closed and sealed.
5. Unvulcanized rubber should be stored in an area which meets the usual standards of
cleanliness, even though the rolls are individually wrapped in polyethylene sheeting. All
direct contact with foreign materials, especially greases and oily contaminates of any type
should be avoided. It is recommended that the material be kept in its original packaging
until the moment it is used.
6. All though the REMA splice materials have a long shelf life they should not be stored for any
longer than is necessary. It is therefore recommended that the FIFO ( first in - first out )
stock rotation system be used.
General recommendations

7/16/2019 Hot Splicing of Rubber Conveyor Belts With Fabric Plies
http://slidepdf.com/reader/full/hot-splicing-of-rubber-conveyor-belts-with-fabric-plies 4/28
5
Standard co nveyor bel ts
Hot splicing of mono- and multi-ply conveyor belts with textile carcass (DIN 22102)and covers made of the following polymers
– Natural rubber NR*
– Styrene butadiene rubber SBR*
– Isoprene rubber IR*
– Butadiene rubber SBR*
– or a mixture of NR/SBR*
the above polymers, e.g.
In case of doubt, consult the supplier of the conveyor belt about the rubber quality.
For splicing other belt types, please contact your local TIP TOP agent.
Splicing method s
– bias (0.4 x belt width)
Place / site
– in a vulcanizing workshop or
– on site
* Abbreviation according to DIN ISO 1629
Application range of hot splicing products
Note:
Our recommendations result from field tests and long experience.
In view of different materials and working conditions beyond our control, we
recommend in any case doing enough tests locally.
We cannot assume any kind of liability resulting from these recommendations.

7/16/2019 Hot Splicing of Rubber Conveyor Belts With Fabric Plies
http://slidepdf.com/reader/full/hot-splicing-of-rubber-conveyor-belts-with-fabric-plies 5/28
7
Belt Thicknessmm Inches Cure Time
9.5 3/8" 30 min.
11.1 7/16" 35 min.
l2.7 1/2" 40 min.
l4.2 9/16" 45 min.
15.8 5/8" 50 min.
17.4 11/16" 55 min.
19.0 3/4" 60 min.
20.6 13/16" 65 min.
22.2 7/8" 70 min.
23.8 15/16" 75 min.
25.4 1" 80 min.
26.9 1 1/16" 85 min
28.5 1 1/8" 90 min
30.1 1 3/16" 95 min
31.7 1 1/4" 100 min
33.3 1 5/16" 105 min
34.9 1 3/8" 110 min
36.5 1 7/16" 115 min
38.1 1 1/2" 120 min
Cure Time
050100150
3/8"
7/16"
1/2"
9/16"
5/8"
11/16"
3/4"
13/16"
7/8"
15/16"
1"
1 & 1/16"
1 & 1/8"
1 & 3/16"
1 & 1/4"
1 & 5/16"
1 & 3/8"
1 & 7/16"
1 & 1/2"
Hot Splice Material Curing Chart (300 Deg F)

7/16/2019 Hot Splicing of Rubber Conveyor Belts With Fabric Plies
http://slidepdf.com/reader/full/hot-splicing-of-rubber-conveyor-belts-with-fabric-plies 6/28
8
Tools and Equipment
Safety Glasses
Tape Measure - 16' x 3/4" Blade
Angle squarePlumb line
White Mechanical Marking Pencil w/ Pocket Clip (Soft Crayon)
Claw hammer
Duplex belt nails
Smooth Flat Face Roller #50D - 2" x 2"
Smooth Flat Face Roller #50C - 1/2" x 2"
Corrugated Face Stitcher #50B - 1/4" x 2"
Corrugated Face Stitcher #50E - 1/8" x 2"
Needle Face Roller - 2” x 2”
Electric Stripping Cable Winch
Drying hood (not for use with Flammable Solvents & Cements)
Stainless Steel Stripping Frame or Grip tongs
Whetstone #68
Foxtail Hand Dust Brush
Curved Hand Rasp - #51
Drill Arbor for Wire Wheel
3" Rotary Wire Brush
Air buffer
Pincers - 250mm
Ply Lifter #78
Offset Knife #77Rubber Knife - 6" Long #72
Bevel Point Knife - 4" x 1"
Curve V-Trim Knife - 2 1/4" X 3/4"
Mill Knife Handle (Dull & Rounded Tip)
Off Set Single Ply Knife - .065 Cutting Depth
11.5" Heavy Duty Bent Handle Sicissors w / Grips
18mm Break Off Tip Cutter with Rubber Grip
Replacement Blades for 18mm Cutter - 50 Pack
Splice Kit
Rags
Cement brushWhite Marking Rubber
Belt Clamps
Come-a-longs
H.D. C-Clamps
Screw clamps
Vulcanizing press

7/16/2019 Hot Splicing of Rubber Conveyor Belts With Fabric Plies
http://slidepdf.com/reader/full/hot-splicing-of-rubber-conveyor-belts-with-fabric-plies 7/28
9
Work place
In order to ensure quality and durability of a hot splice, a clean work place and the carefuluse and application of the splicing products are essential.
Conveyor bel t
Only clean and dry conveyor belts can be spliced reliably.
Clean the conveyor belt, if necessary:
– Scrape off water-soluble contamination (e.g. salt, fertilizers) and rinse with water.
– Remove oily or greasy substances with TIP TOP Cleaning Solvents.
If necessary, dry the belt using the TIP TOP Drying Hood, Air Dryer or the pre-heated lower part of the vulcanizing press, before any further preparation work.*
Ambient cond i t ions
The ambient temperature and the temperature of the splicing products and the conveyor belt have to be between + 50°F to + 115 °F.
Any influence of humidity, e.g. formation of condensation water (due to temperature fallingbelow the dew point), must be absolutely avoided. Avoid loss of heat due to strong air current (wind).
Take appropriate precautions, if necessary, e.g.:
– Set up a tent to protect the working area against adverse ambient conditions(strong sunshine, rain, wind, dust).
– Warm up the splice area of the belt using the TIP TOP Drying Hood, Air Dryer or the pre-heated lower part of the vulcanizing press.*
Conditions for hot splicing
* Note:
Electrical equipment must not be left unattended, when operating (e.g. fire risk) or
exposed to humidity.

7/16/2019 Hot Splicing of Rubber Conveyor Belts With Fabric Plies
http://slidepdf.com/reader/full/hot-splicing-of-rubber-conveyor-belts-with-fabric-plies 8/28
10
Structure and Dimensions of Hot Splices
– overlap splices
(mono- and two-ply belts)
– step splices
(multi-ply belts)
A bias cut (0.4 x belt width) favourablyinfluences the durability of a splice.
Hot Splices Can Be Made As
We recommend this method, becauseit favourably influences the durability of
the splice, even in case of aggressive
scrapers.
Selection of Step Direction
Alternative method for belts subjected to high
tension and installations with relatively small
drum diameters (see the ISO 3684 standard).
The splice runs against the conveying direction
The splice runs in the conveying direction
Scraper
B ia s cut0.4 x B
B B = Belt width

7/16/2019 Hot Splicing of Rubber Conveyor Belts With Fabric Plies
http://slidepdf.com/reader/full/hot-splicing-of-rubber-conveyor-belts-with-fabric-plies 9/28

7/16/2019 Hot Splicing of Rubber Conveyor Belts With Fabric Plies
http://slidepdf.com/reader/full/hot-splicing-of-rubber-conveyor-belts-with-fabric-plies 10/28
13
Structure and dimensions of step hot splices
N u m b e r o f s t e p s = N u m b e r o f p l ie s 1n s t = n st ls + la = lv + lal =
la
B
l
lv
l
s
l
s
l
s
la
B elt le ngth re quired for a f unctiona l splicel =
S tep lengthl
s
=
S plice le ngthlv = B ias cu t 0 .4 x Bla =
S t ep sp li ces
lv = ls C onveyo r be lt w ith two p l i es ;
o n e s t ep s p l ic e
C onveyo r be lt w ith two p l i es ; t w o s t e p s p l ic e (ove r l app ing )
lsls
lv
lv
C onveyo r be lt w ith th ree p l i es ; t w o s t e p s p l ic e
lv
lsls C onveyo r be lt w ith fou r p l ies ; th ree s tep sp l i ce
2 inC arrying side
Pu lley s ide
R ub be r co ver F ab ric p ly J oin t g ap
B = B e lt w i dth
lsls
ls
2 in

7/16/2019 Hot Splicing of Rubber Conveyor Belts With Fabric Plies
http://slidepdf.com/reader/full/hot-splicing-of-rubber-conveyor-belts-with-fabric-plies 11/28
14
Splicing process
General preparation
Provide tools, equipment and splicing products.
If a new belt is installed, place a working platform at the head or tail of the conveyor.
Otherwise install it in the conveyor construction (remove carrying idlers, if necessary).
Position it in such a way that the conveyor belt lies on it even and straight without tension.
Overlap and step splice
ls
ls
ls

7/16/2019 Hot Splicing of Rubber Conveyor Belts With Fabric Plies
http://slidepdf.com/reader/full/hot-splicing-of-rubber-conveyor-belts-with-fabric-plies 12/28
15
Splicing process
The working platform (approx. 10 - 13 ft long) consists of three parts aligned in the direction of
the conveyor belt: the lower part of the vulcanizing press, which forms the central part, and two
working tables made of wooden boards or similar materials.
The free belt ends have to be secured (e.g. with belt clamps).
To splice the belt, pull the belt ends together, until the belt is tensioned. (Before this operation,
release any tension in the take up station!)
The belt ends have to be aligned in the direction of the conveyor belt in such a way that they
overlap each other on the lower part of the vulcanizing press and that the belt center lines areexactly superimposed.
The length of the overlapping area has to be splice length plus bias cut (lü).
Secure the belt ends in this position.

7/16/2019 Hot Splicing of Rubber Conveyor Belts With Fabric Plies
http://slidepdf.com/reader/full/hot-splicing-of-rubber-conveyor-belts-with-fabric-plies 13/28
16
On both belt ends establish and mark
- the belt center line
- the perpendicular square line and
- the belt cover transition lines.
Establish and mark center line of belt by measuring across width of belt at three points in length of each belt
end at a distance of approx. 6". At least two center markings on each belt end must be outside the splice
area.
Preparing the Belt Ends
The establishment of the center line is easiest done with two rulers. The three center markings on each belt
end are then connected by means of a chalk line which represents the belt center line.
This center line ensures exact alignment of the belt ends, which is indispensable for straight belt running.
The center line outside the splice area must be durable enough to remain evident throughout the entire
splicing operation!
Destroyed or missing belt edges must be considered. The width of the belt edge is established by measuring
the width of the belt at suitable areas of the undamaged belt ends.

7/16/2019 Hot Splicing of Rubber Conveyor Belts With Fabric Plies
http://slidepdf.com/reader/full/hot-splicing-of-rubber-conveyor-belts-with-fabric-plies 14/28
17
Establish a perpendicular square line across the upper belt end at the end of the splice area.
On narrow belts this can be done by placing a metal square onto the center line.
Preparing the Belt Ends
On wide belts it is recommended to establish the square lines as follows:
Near the end of the splice area select a point A on the center line. Mark points B
and C on the center line equidistant to point A (AB=AC).
Now describe a circle with the same radius around points B and C by means of a
plumb line and a pen. The points of intersection of both circles must still be on the
belt. These intersections are points D and E.
A line drawn between these two points will be perdendicular to the belt edges
and forms the square line, which should pass point A for additional control.
This square line will be the starting point from which the splice will be laid out.

7/16/2019 Hot Splicing of Rubber Conveyor Belts With Fabric Plies
http://slidepdf.com/reader/full/hot-splicing-of-rubber-conveyor-belts-with-fabric-plies 15/28
18
1. Fold back the upper part of the belt.
Make a bias cut on the lower belt part .
Splicing process
With an off-set knife, cut the rubber edges flush with the upper fabric ply.
2. Fold back the lower part of the belt and draw a line parallel to the bias cut on the pulley side,
at 1 inch from the belt end.
Also mark the belt rubber edges to be preserved.
Cut the rubber cover along that 1inch line with a dull &
rounded tip Mill Knife held at an angle (of approx.
45°), without damaging the top fabric ply.
Also cut the rubber cover along the marked rubber
edges with the mill knife held vertically, without
damaging the top fabric ply.
Preparat ion of the low er part of the bel t
Using pincers, strip the rubber cover (thus
preparing the future joint gap).
0.4 x Width

7/16/2019 Hot Splicing of Rubber Conveyor Belts With Fabric Plies
http://slidepdf.com/reader/full/hot-splicing-of-rubber-conveyor-belts-with-fabric-plies 16/28
19
3. Fold back the lower part of the belt again and mark
the splice length (lvaccording to the chart), step
length (ls) and rubber edges.
Draw another line 1inch parallel to the splice length
line.
Cut the rubber cover along this line with a dull tipped
Mill Knife held at an angle of approx. 45°.
Also cut the rubber edges with a Mill knife held
vertically.
Avoid damaging fabric plies!
Splicing process
Cut the rubber edges of the conveyor belt flush, using
an off-set knife.
4. Cut the rubber cover in narrow strips (approx. 1 -
1.5 inch wide) and strip them using pincers or grip
tongs.
ls
lv
lsls1 in

7/16/2019 Hot Splicing of Rubber Conveyor Belts With Fabric Plies
http://slidepdf.com/reader/full/hot-splicing-of-rubber-conveyor-belts-with-fabric-plies 17/28
20
5. Cut the top fabric ply with the one ply knife 1 in.
from the rubber cover, detach this ply using a ply
lifter and strip it with pincers or grip tongs.
Mark the subsequent fabric plies according to the
step length (ls), cut them and detach these plies
using a ply lifter and strip them off.
The last fabric ply has to be retained.
Using an off-set knife, cut the belt edges flush with
each fabric step.
Splicing process
5.1 Remove the rubber cover strip and detach this
ply using a ply lifter. Strip the upper ply and rubber
cover using the grip tongs.
Cut the rubber edges of the conveyor belt flush,
using an off-set knife.
OR

7/16/2019 Hot Splicing of Rubber Conveyor Belts With Fabric Plies
http://slidepdf.com/reader/full/hot-splicing-of-rubber-conveyor-belts-with-fabric-plies 18/28
21
Preparat ion of the u pper part of th e bel t
1. Superimpose the belt ends ensuring correct alignment. Secure both parts against
dislocation (e.g. with clamps).
Exactly transfer the cut edge of the top fabric ply of the lower part to the upper part.
Transfer the subsequent fabric steps of the lower part to the upper part (make the marks with
a marking crayon on both edges of the belt).
2. Cut off the excess length of the upper part put on the lower part.
3. Draw a line on the carrying side 1 inch from the cut.
Mark the rubber edges too.
Cut the rubber cover along the 1 inch line with a Mill knife held at an angle of 45°, withoutdamaging the top fabric ply.
Also cut the marked rubber edges with the Don Carlos knife held vertically.
Strip off the rubber cover with pincers (thus preparing the joint gap).
Cut the rubber edges flush using an off-set knife.
Splicing process
lslsls
7/16/2019 Hot Splicing of Rubber Conveyor Belts With Fabric Plies
http://slidepdf.com/reader/full/hot-splicing-of-rubber-conveyor-belts-with-fabric-plies 19/28
22
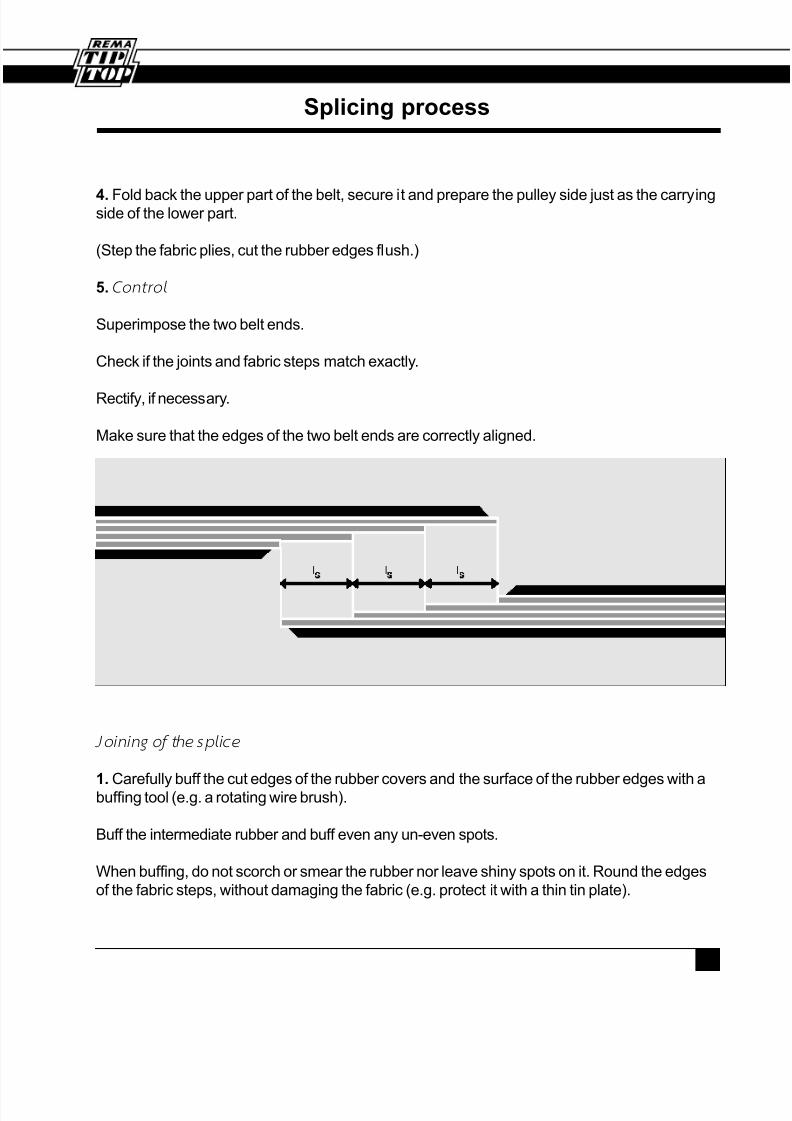
4. Fold back the upper part of the belt, secure it and prepare the pulley side just as the carryingside of the lower part.
(Step the fabric plies, cut the rubber edges flush.)
5. Contro l
Superimpose the two belt ends.
Check if the joints and fabric steps match exactly.
Rectify, if necessary.
Make sure that the edges of the two belt ends are correctly aligned.
Joining of the spl ice
1. Carefully buff the cut edges of the rubber covers and the surface of the rubber edges with abuffing tool (e.g. a rotating wire brush).
Buff the intermediate rubber and buff even any un-even spots.
When buffing, do not scorch or smear the rubber nor leave shiny spots on it. Round the edges
of the fabric steps, without damaging the fabric (e.g. protect it with a thin tin plate).
Splicing process

7/16/2019 Hot Splicing of Rubber Conveyor Belts With Fabric Plies
http://slidepdf.com/reader/full/hot-splicing-of-rubber-conveyor-belts-with-fabric-plies 20/28
23
Carefully remove the buffing dust with a dry brush.
2. Thoroughly stir the required quantity of splicing cement before use.
Attention:
The splicing cement should remain covered until use and then recovered to min thicking.
Apply two coats of the splicing cement to the whole splicing area and the joint gaps of both
belt ends.
Use a brush with short bristles.
Let the first coat dry completely (minimum: 30 min.)
Let the second coat dry (for approx. 30 mins. at 68°F), until it is just a little sticky (check with
the back of your finger).
Note:
The drying time will be shorter, if the conveyor belt is warmed up by means of the preheated
lower part of the vulcanizing press.
Splicing process
The fabric cement comes in two types.
STL-RF4 Cement (Flammable)
STL-RF Cement (Non-Flammable)

7/16/2019 Hot Splicing of Rubber Conveyor Belts With Fabric Plies
http://slidepdf.com/reader/full/hot-splicing-of-rubber-conveyor-belts-with-fabric-plies 21/28
24
Stitch the rubber to avoid air entrapment.
Cut the tie gum rubber flush with the belt edge.
Remove the protective foil.
4. Cover the rubber edges and fabric steps with an
approx. 1 inch wide strip of uncured tie gum rubber.
5. For the joint gap on the pulley side cut to size an
exactly fitting filler strip consisting of a strip
of uncured tie gum rubber, breaker fabric and
uncured cover rubber.
The applied filler strip must be 0.040 in thicker than
the rubber cover of the belt.
3. Cover the fabric steps of the lower belt part with uncured tie gum rubber.
Splicing process
.0402 inch
Tie Gum
Breaker Fabric
Cover rubber

7/16/2019 Hot Splicing of Rubber Conveyor Belts With Fabric Plies
http://slidepdf.com/reader/full/hot-splicing-of-rubber-conveyor-belts-with-fabric-plies 22/28
25
6. Superimpose the upper and lower belt ends, aligning them exactly using the center lineof each belt and avoiding air entrapment.
7. Apply one strip of uncured tie gum rubber to the
joint gap on the carrying side, then fill the gap with
uncured cover rubber and stitch vigorously.
Trim excess filling flush with the belt surface using
an off-set knife.
The splicing areas have to match exactly.
Do not superimpose fabric joints which are on the
same level (i.e.- overlapped plies).
Stitch or roll the whole splicing area from the
center outwards.
Apply a strip of uncured rubber cover, approx. 2.5
inch wide and 0.040 inch thick, to the filled
joint gap.
Stitch thoroughly and cover both joints with brown
release paper.
Splicing process

7/16/2019 Hot Splicing of Rubber Conveyor Belts With Fabric Plies
http://slidepdf.com/reader/full/hot-splicing-of-rubber-conveyor-belts-with-fabric-plies 23/28
26
Vulcanizing th e spl ice
1. Apply edge bars to either belt edge and press them against the edges of the splice, using
tightening clamps mounted outside of the area of the vulcanizing press.
Note: The edge bars have to be approx. .060 inch thinner than the unspliced belt.
Cover the whole splicing area with Brown Release Paper.
Level out uneven surface areas using Pressure Compensation Cloth (especially if parts of the
rubber cover are worn out or in case of overlap splices).
2. Apply and position the upper heating platens.
Position the upper cross arms, making sure that the two extreme cross arms are locatedoutside of the splicing area.
The heating platens have to cover an area which is on either side at least 4 inches longer than
the splice length and at least 2 inches wider than the belt width.
Splicing process

7/16/2019 Hot Splicing of Rubber Conveyor Belts With Fabric Plies
http://slidepdf.com/reader/full/hot-splicing-of-rubber-conveyor-belts-with-fabric-plies 24/28
27
Secure the upper and lower cross arms and generate pressure and heat according to the
operating instructions of the vulcanizing press:
3. After the curing cycle, switch off the curing system (unplug the press to cut off the power
supply).
Let the conveyor belt cool down under pressure to a temperature below 150°F, in the closed
vulcanizing press. Water cooling can also speed up the cool down process.
Then unlock the cross arms.Remove the upper cross arms, heating platens and Pressure
Compensation Cloth and/or Brown Release Paper.
Detach the edge bars and remove them.
* Note:
The curing time is calculated as of the moment when 300°F is reached on the belt surface.
At least 125 PSI for heavy fabric conveyor belts.
Splicing process
P r e s s u r e (S u r fa c e p r e s s u r e )
300 F – 5 F
5 m ins .
30 m ins.*M i n im u m c u r in g t i m e
C u r in g t im e p e r 1 /1 6 b e lt th i c kn e s s
C u r i n g t em p e r a t u r e
100 - 125 P S I

7/16/2019 Hot Splicing of Rubber Conveyor Belts With Fabric Plies
http://slidepdf.com/reader/full/hot-splicing-of-rubber-conveyor-belts-with-fabric-plies 25/28
28
Final measures
1. Check for correct vulcanization (e.g. Shore hardness, absence of porosity, elasticity and
thickness of the splice).
2. Remove material overflow (with knife, buffing tool) and cut even the belt edges.
3. If necessary, mark the splice:
– by using the
TIP TOP White Marking Rubber
– by using the
TIP TOP Rubber Cutter
– by using the
TIP TOP (electric) branding iron
Marking example according to the DIN 22102 part 1:
– Date of splicing (month / year)
– Manufacturer’s identification
– ID abbreviation of vulcanizer
– Number of the splice
4. Remove the lower part of the vulcanizing press and the working table / platform.
Reinstall the carrying idlers, if necessary.
Remove belt tensioners.
5. The conveyor belt can be put back into operation, after the splice has cooled down to
ambient temperature.
2115NN4/93
Splicing process

7/16/2019 Hot Splicing of Rubber Conveyor Belts With Fabric Plies
http://slidepdf.com/reader/full/hot-splicing-of-rubber-conveyor-belts-with-fabric-plies 26/28
29
1. JOB DETAILS
Customer: ................................... Contact Name: .................................. Job Card No.: ................................
Supervisor: ................................. Crew Names: ..................................................................................................
Date/Time: .................................. Scope of Work: ...............................................................................................
Special Instructions: ...................................................................................................................................................
.....................................................................................................................................................................................
2. SITE INFORMATION
Site Conditions: ........................................... Accessibility: ....................................................................................
Weather: ..................................................... Temperature: .................oF/oC Humidity: ......................%
Arrival/Dept.: .....................h/..................... h Reported to: .....................................................................................
Belt isolated/locked by: ................................ Waiting time: ....................................................................................
3. BELT DATA
Belt Manufacturer: ....................................... Belt Type:.................................. Belt Length: ................................
Cover Thickness: Bottom Cover: ............... Top Cover: .............................
Cover Grade: ............................................ Belt Condition: .........................................................................
Splice Length: .......................................... Step Length: ..........................
Thickness Left Side Right Side
Leading end (first belt end) .............. ................
Trailing end (second belt end) .............. ................
Alignment: 1 2 3
Width of first belt end (leading end) ......... ......... .........
Width of second belt end (trailing end) ......... ......... .........
4. MATERIALS USED
Splicing Product STL Cement Cover Stock Breaker Tie Gum
Manufacturing Date
Expiration Date

7/16/2019 Hot Splicing of Rubber Conveyor Belts With Fabric Plies
http://slidepdf.com/reader/full/hot-splicing-of-rubber-conveyor-belts-with-fabric-plies 27/28
30
Cooling down time to 150oF (60oC) Time started: .......h Time reached: ........ h
6. FINAL QUALITY CONTROL
Alignment: o Correct o Off center ...........................inchsEdge trimming: o Yes o No
Rubber Hardness (Shore A): Top Cover:............................. Bottom Cover: ........................................
Appearance of top and bottom cover surface: .......................... Splice marking: ......................................
Signature of Shift Leader: .......................................................... Date: .....................................................
7. CUSTOMER SATISFACTION
Professional Acceptable Unacceptable
Job organization o o o
Safety regulations o o o
Job performance / skills o o o
Tools and equipment o o o
Work force appearance o o o
Work finishing / cleanliness o o o
Time keeping o o o
Observations: .............................................................................................................................................
..............................................................................................................................................
Date: ............................... Site Manager: ............................................. Signature: ......................................
Curing Time Temperature oF (oC) Pressure (PSI)
Heating Platens No. 1 2 3 4 5 6 Gauge Lbs
20 mins
30 mins
40 mins
50 mins
60 mins70 mins
80 mins
90 mins
100 mins
110 mins
5. CURING PROCESS
Vulcanizing Press: Manufacturer: ................. Model: ...........................................
Pressure System: o Hydraulic o Air Bag o Mechanical
Heating Platens: o Rhombic (22o) o Rectangular
Number of pairs of traverses: ...................................... Calculated Curing Time: ................minsThickness of edge bars: ......................................
Heat up time to 300oF (145oC) Time started: ............h Time reached: ...............h

7/16/2019 Hot Splicing of Rubber Conveyor Belts With Fabric Plies
http://slidepdf.com/reader/full/hot-splicing-of-rubber-conveyor-belts-with-fabric-plies 28/28
Distributor: