how to create accessible word documents to...how to create accessible word (2016) documents heading...
TRANSCRIPT

How to Create Accessible Word (2016) Documents
Heading Styles
1. Create a uniform heading structure through use of Styles in Word under the Home ribbon.
a. Proper heading structure is necessary for screen readers to navigate a document and improves accessibility for everyone. The heading structure will also be carried over when converted to PDF.
b. Do NOT use font styles (bold, italics, underline, font size, etc.) in the Font tab under the Home ribbon to indicate heading structure.
Alternative Text for Images
1. Alternate Text is read by a screen reader and should convey the same information that a sighted person would get from the image. Imagine describing the image to someone over the phone.
a. Right-click on the image and choose Format Picture.
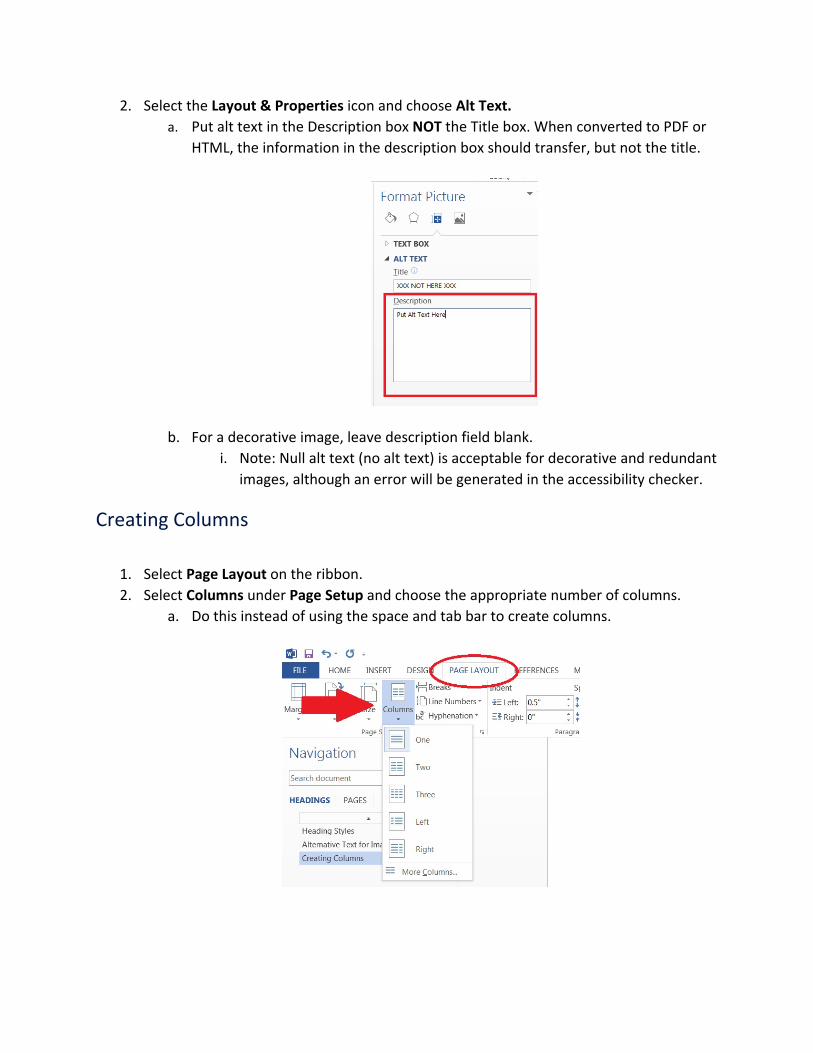
2. Select the Layout & Properties icon and choose Alt Text. a. Put alt text in the Description box NOT the Title box. When converted to PDF or
HTML, the information in the description box should transfer, but not the title.
b. For a decorative image, leave description field blank. i. Note: Null alt text (no alt text) is acceptable for decorative and redundant
images, although an error will be generated in the accessibility checker.
Creating Columns
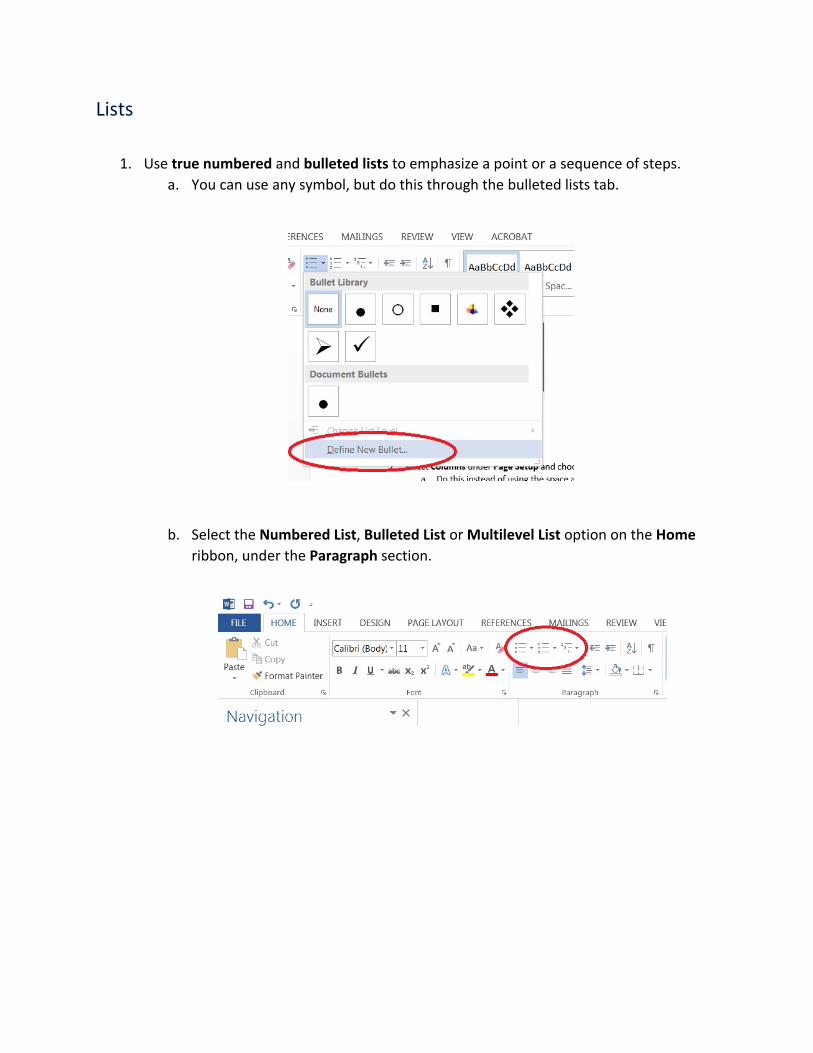
1. Select Page Layout on the ribbon. 2. Select Columns under Page Setup and choose the appropriate number of columns.
a. Do this instead of using the space and tab bar to create columns.
Lists
1. Use true numbered and bulleted lists to emphasize a point or a sequence of steps. a. You can use any symbol, but do this through the bulleted lists tab.
b. Select the Numbered List, Bulleted List or Multilevel List option on the Home ribbon, under the Paragraph section.
Links
1. Word automatically creates a hyperlink when a user pastes a full URL onto a page. However, these may not make sense to a screen reader, so a modification is necessary. A meaningful description of the hyperlink will make for a cleaner appearance as well.
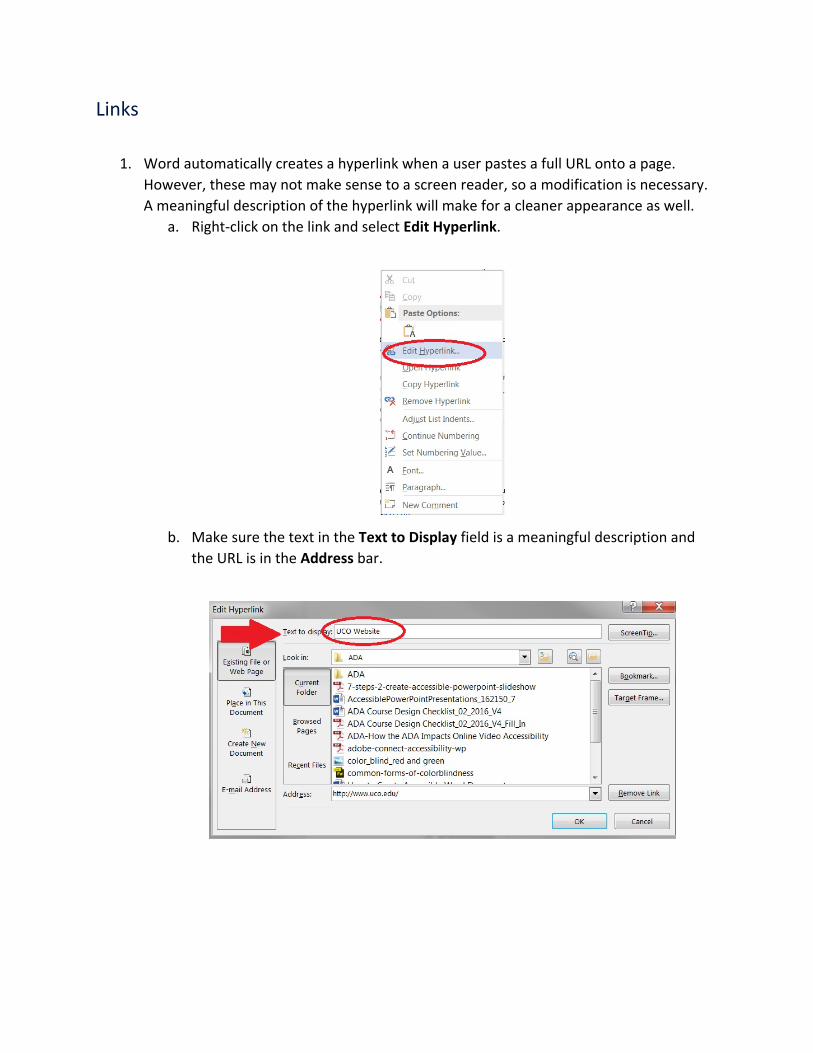
a. Right-click on the link and select Edit Hyperlink.
b. Make sure the text in the Text to Display field is a meaningful description and the URL is in the Address bar.
Data Tables
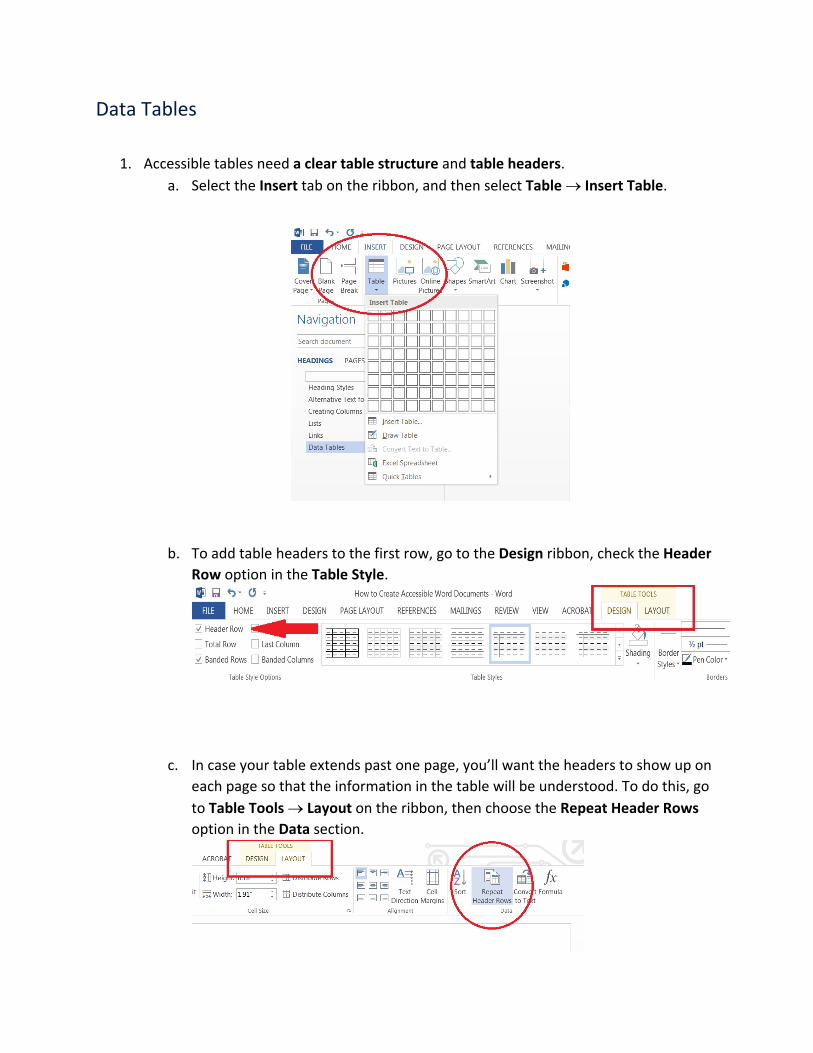
1. Accessible tables need a clear table structure and table headers. a. Select the Insert tab on the ribbon, and then select Table → Insert Table.
b. To add table headers to the first row, go to the Design ribbon, check the Header Row option in the Table Style.
c. In case your table extends past one page, you’ll want the headers to show up on each page so that the information in the table will be understood. To do this, go to Table Tools → Layout on the ribbon, then choose the Repeat Header Rows option in the Data section.
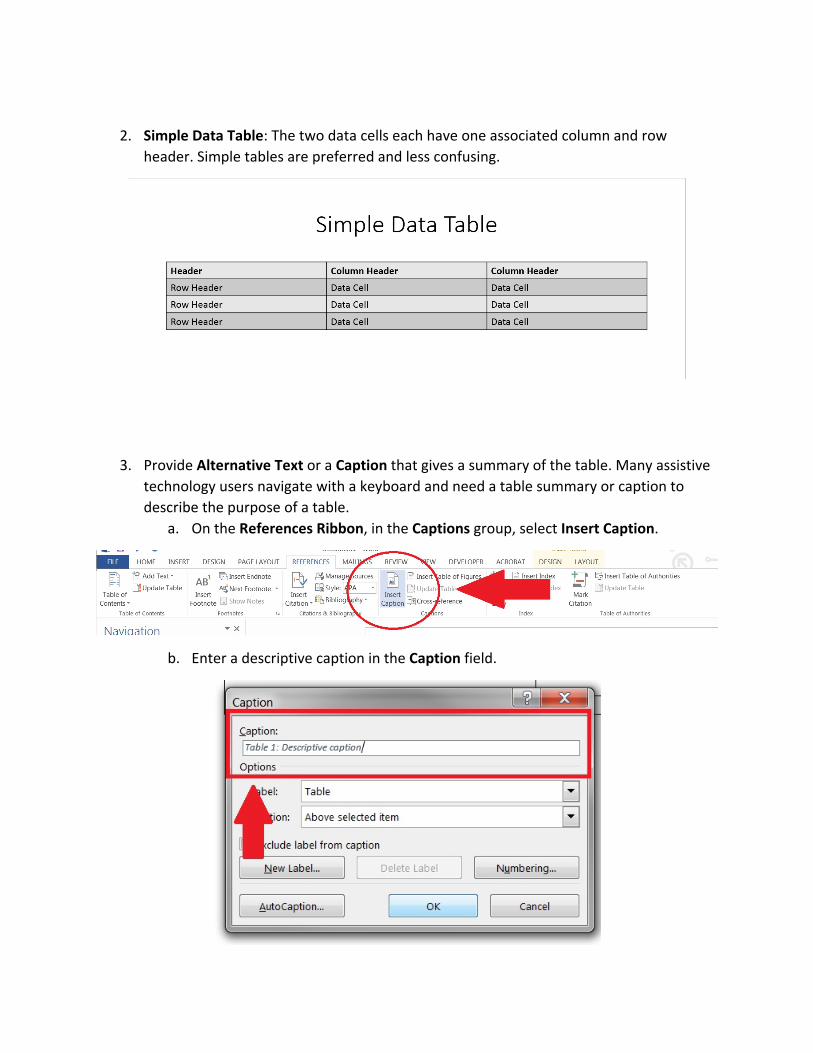
2. Simple Data Table: The two data cells each have one associated column and row header. Simple tables are preferred and less confusing.
3. Provide Alternative Text or a Caption that gives a summary of the table. Many assistive technology users navigate with a keyboard and need a table summary or caption to describe the purpose of a table.
a. On the References Ribbon, in the Captions group, select Insert Caption.
b. Enter a descriptive caption in the Caption field.
Accessibility Checker
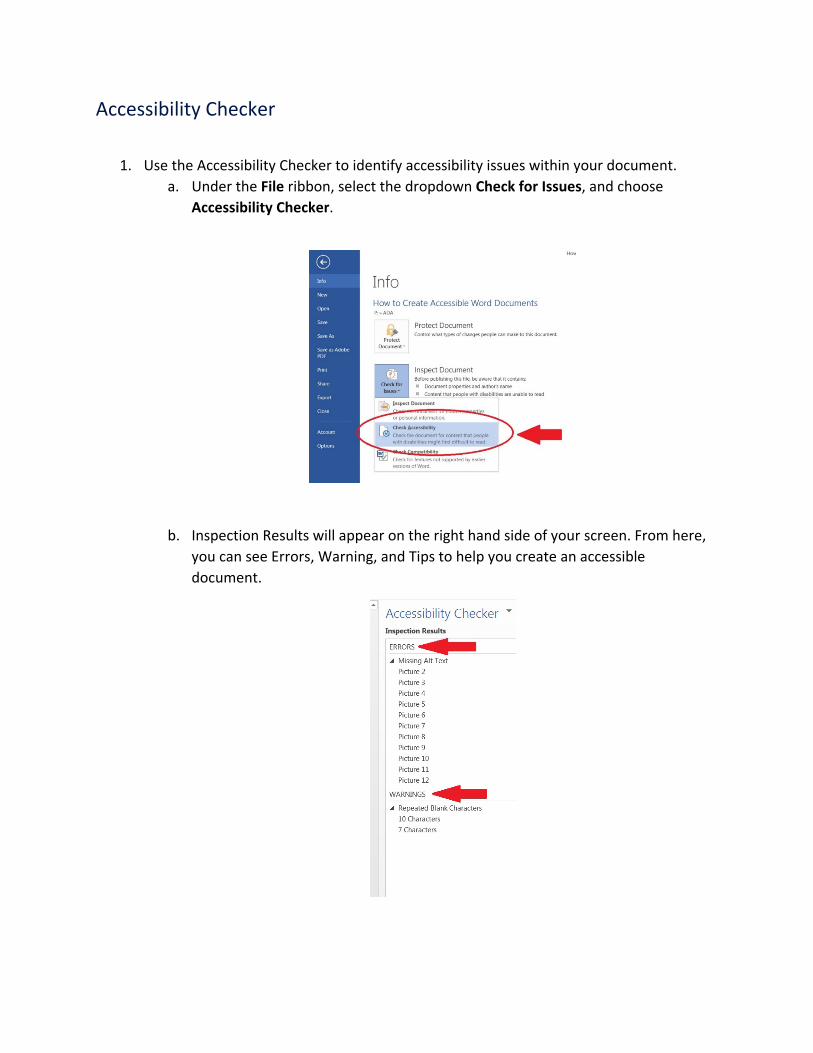
1. Use the Accessibility Checker to identify accessibility issues within your document. a. Under the File ribbon, select the dropdown Check for Issues, and choose
Accessibility Checker.
b. Inspection Results will appear on the right hand side of your screen. From here, you can see Errors, Warning, and Tips to help you create an accessible document.
Other Principles to Consider
1. Ensure that font size is sufficient, no smaller than 12 point. 2. Provide sufficient color contrast.
a. Light background with dark text or dark background with light text. 3. Do not use color as the only way to convey content. 4. Use readable, common serif or sans serif fonts.
a. Examples include: i. Arial
ii. Calibri iii. Helvetica iv. Verdana v. Times New Roman
vi. Tahoma vii. Georgia
viii. Courier New
Notes: ∗ Although these directions are for Word 2016, they should be very similar for other
versions. ∗ For Mac users, the Accessibility Checker is only available for Office Suite 2016.