how to make tie dye shirts, decor, and more: 18 tie dye
TRANSCRIPT


How To Make Tie Dye Shirts, Decor, and More: 18 Tie Dye Patterns
Get connected. Get Inspired. Get creative with ilovetocreate.com 2
How To Make Tie Dye Shirts, Decor, and More: 18 Tie Dye Patterns
Copyright 2012 by Prime Publishing LLC
All rights reserved. No part of this book may be reproduced or transmitted in any form or by any means,
electronic or mechanical, including photocopying, recording, or by any information storage or retrieval
system, without written permission from the publisher, except in the case of brief quotations embodied in
critical articles and reviews.
Trademarks are property of their respective holders. When used, trademarks are for the benefit of the
trademark owner only.
Published by Prime Publishing LLC, 3400 Dundee Road, Northbrook, IL 60062 – www.primecp.com
Free Craft Projects
Free Crochet Projects Free Knitting Projects Free Holiday Craft Projects
Free Sewing Projects Free Quilt Projects Free Jewelry Projects
Free Christmas Crafts Free Crochet Afghan Patterns Free Paper Crafts
Free DIY Wedding Ideas
Cover Images:
MAIN IMAGE-Eco-Centric Tie Dye Top from I Love to Create
Tie Dye Lunch Bags from I Love to Create
An Apron to Dye For from I Love to Create
Summer Lovin’ Crochet Pillow from I Love to Create

How To Make Tie Dye Shirts, Decor, and More: 18 Tie Dye Patterns
Get connected. Get Inspired. Get creative with ilovetocreate.com
3
Letter from the Editors
Inspired by fashion runways and designer collections from around the world, Tulip offers the
most comprehensive collection of premium color products that make it possible for fashion
artists to create couture fashion without breaking the bank.
Whether you’re covering your kicks in layers of luscious shimmer, showering fabrics in bold
hues of ombre dye or painting the ultimate canvas - you … one thing you’ll never have to worry
about is the quality of the Tulip product you are creating with.
Bold, beautiful and made to last, Tulip fashion art products are created with you in mind. For
every purpose, every occasion and every style, Tulip offers colors and products to fit, along with
the inspiration, education and tools to support your fashion art dreams.
The world isn’t black and white so color it with Tulip. Tulip is color and fashion loves color.
Rock one of the hottest trends with the Tulip One-Step Tie-Dye Kit, where you can create
vibrant, outrageous art on anything you can dye! And the process is in the name – one step
makes a fashion masterpiece! Just add tap water to bottle, shake and squirt on fabric.
The dyes are permanent and color-fast, so they won’t fade in the wash. And since the dyes are
mixable, you can create your own custom colors. It’s fashion art made EASY! You’ll find your
favorite color combinations at your local crafts store, and they’re also available at
ilovetocreate.com.
About ilovetocreate.com:
ilovetocreate.com celebrates the diversity of creativity with a broad portfolio of brands, creative
categories, sources of inspiration and methods for interaction. We believe that each creative
adventure is personal and unique…and usually best shared with fellow adventurers…that’s why
ilovetocreate.com promises to provide the greatest variety of projects, products and techniques
from the greatest variety of creative crafters, artists and designers. We love to embrace and
celebrate every creative style! Get connected…get inspired…get creative with ilovetocreate.com.

How To Make Tie Dye Shirts, Decor, and More: 18 Tie Dye Patterns
Get connected. Get Inspired. Get creative with ilovetocreate.com 4
How To Make Tie Dye Shirts, Decor, and More: 18 Tie Dye Patterns
eBook
Table of Contents
T-Shirts and Wearables .................. 5
3D Tie Dye Flower Top ................................. 5
An Apron to Dye For ..................................... 7
Captain America Tie Dye Tee ....................... 9
Desert Sunset Paradise Tee Shirt ................. 10
Double Rainbow Zazzle Top ....................... 11
Eco-Centric Tie Dye Top ............................. 12
Shibori Chic Tie Dye Tee ............................ 13
Summer Spangled Bullseye Tee .................. 14
Home Décor ................................... 16
Felted Swirl Wreath ..................................... 16
Field of Fireworks Beach Towel ................. 18
Summer Lovin’ Crochet Pillow ................... 19
Sunburst Blossom Pillow............................. 21
Tie Dye Lunch Bags .................................... 23
Tie Dye Techniques .......................26
Cobbled Bicolor Tie Dye Tee ...................... 26
Dappled Heart T-shirt .................................. 27
Impatient Plaid Tie Dye Tee ........................ 28
Scribble Scrabble Tee Shirt ......................... 29
Starfire Explosion Bullseye Tee .................. 30

How To Make Tie Dye Shirts, Decor, and More: 18 Tie Dye Patterns
Get connected. Get Inspired. Get creative with ilovetocreate.com
5
T-Shirts and Wearables
3D Tie Dye Flower Top
Make tie dye shirts that really pop with the tie
dye instructions for a 3D Tie Dye Flower Top.
These fun tie dye shirts make fun gifts and
fashionable accessories for spring and summer,
and the 3D flowers add a unique and bright
accent to the top!
Materials:
Aleen’s® Fabric Fusion® One-Step Tie-Dye
Kit™: Turquoise, Pink, and Lime dyes
Tulip® Glitter™ Spray Paint
Tulip® Fabric Fusion
Needle with thread to match
Low-tack masking tape
Sewing pins
2 White T-shirts--100% cotton Paper towels
Plastic wrap
Plastic tablecloth
Blow Dryer (optional)
Corrugated cardboard
Iron
Instructions:
1. Cover work surface with plastic tablecloth.
2. Prewash shirts in washer with small amount
of laundry soap. Do not dry. Place damp
shirts on work surface. Smooth one shirt flat.
Working from one side, pleat fabric across
to other side then press fabric together.
Tightly crumple fabric of other shirt,
following instruction sheet provided in kit if
needed.
3. Wearing plastic gloves from kit, fill dye
bottles with water to lines indicated on
bottles. Replace caps and shake until each is
thoroughly mixed.
4. Squeeze Turquoise dye onto top half of
pleated shirt and Lime onto bottom third,
leaving a section of white in between colors.
5. Squeeze Pink on crumpled shirt, squeezing
and turning fabric until completely covered.
6. Cover dyed shirts with plastic wrap to keep
damp. Let set 6 to 8 hours or longer for most
intense color.
7. Fully rinse dyed shirts under warm running
water until extra dye is removed and water
runs clear. Fill washer to large load setting
with hottest water suitable for T-shirt fabric
and a small amount of laundry soap. Wash
and dry separately. Iron both shirts smooth.
8. To create flowers, cut off hem from pink
shirt. Measure and cut 3”, 2½” and 1½”
wide fabric strips from bottom of shirt.
9. Starting with 3” strip, place fabric on
corrugated cardboard. Working in short
sections at a time, apply a thin bead of
Fabric Fusion along one cut edge. Begin
pleating fabric, pushing pins through pleats
to hold in place while they dry. Continue to
pleat length of fabric, creating a tight circle.
Let dry.

How To Make Tie Dye Shirts, Decor, and More: 18 Tie Dye Patterns
Get connected. Get Inspired. Get creative with ilovetocreate.com
6
10. Repeat pleating step for 2½” and 1½” wide
strips.
11. To cover flower centers, cut an irregular
shaped round of dyed pink fabric, add glue
to center of flower then crumple and press
fabric round into glue. Let dry.
12. Place flowers on paper towels. Test Glitter
Spray on a paper towel to get a feel for how
much to pump. Spray flowers and let dry – if
desired, a blow dryer will speed this step.
Add several more applications of Glitter
Spray to desired look. Let dry.
13. Apply Fabric Fusion to back of flowers and
pressing firmly in place where desired on
other T-shirt. Let dry.

How To Make Tie Dye Shirts, Decor, and More: 18 Tie Dye Patterns
Get connected. Get Inspired. Get creative with ilovetocreate.com
7
An Apron to Dye For
Protect your clothes from the perils of messy
crafting and cooking with a tie-dyed apron.
Follow these simple instructions for tie dye
aprons to make colorful gifts for friends and
family who love to craft and create. It's An
Apron to Dye For!
Materials:
Tulip® One-Step Tie-Dye Kit™ : Luau
Jerzees® T-shirt –100% cotton – White
Sewing machine
Scissors
Plastic tablecloth
Thread to match
White ribbon – ¾"
Instructions:
1. Prewash tee without fabric softener. Do not
dry.
2. Cover work surface with plastic tablecloth.
3. Lay tee flat on prepared work surface.
4. Apply dye in a straight line across tee as
shown. (Remember dye will gradually bleed
up so leave room for white to show through.)
5. Cover tee with plastic tablecloth and let set
for 6-8 hours.
6. Wash and dry following instructions on tie-
dye package.
7. Follow diagram to cut T-shirt into an apron:
Lay shirt flat with back facing up. Cut across
shoulders and up the back of the shirt.
8. Open the shirt and lay it out flat.
9. Fold the entire shirt in half, with the front of
the shirt on the fold.
10. Cut through both layers from the neck
opening, under the arm, and across to the
back of the shirt.
11. Unfold the shirt flat, to reveal the apron.
12. Lay ribbon on apron running from neck to
side to determine length including added
length for waist and neck ties.
13. Cut two equal pieces and sew to both sides
of apron to create apron string and ties at
neck.

How To Make Tie Dye Shirts, Decor, and More: 18 Tie Dye Patterns
Get connected. Get Inspired. Get creative with ilovetocreate.com
8

How To Make Tie Dye Shirts, Decor, and More: 18 Tie Dye Patterns
Get connected. Get Inspired. Get creative with ilovetocreate.com
9
Captain America Tie Dye Tee
Thumbs up, Soldier! Make tie dye shirts for
your superhero fan friends with this amazing
Captain American Tie Dye Tee. Learn how to
tie dye a shirt that looks like patriotic
superhero's vibranium shield!
Materials:
Tulip® Fabric Spray Paint™: Snow
Tulip® One-Step Tie-Dye Kit™:
Psychedelic
Tulip® Dye Zip Ties
Tulip® Surface Cover
White T-shirt--100% cotton Pencil or star printout
Freezer paper
Scissors or Craft Knife
Instructions:
1. Pinch the middle of shirt and pull up.
2. Apply Zip Ties as shown in the Bullseye
Technique and secure tightly. Zip Ties work
best for this because they grab the material
really tightly, oftentimes better than rubber
bands!
3. Rinse shirt in water and wring out. The
water helps the tie dye set!
4. Apply tie dye in between each of the binded
areas. You will want to saturate each section
and not leave any white.
5. Once finished dyeing wrap in plastic Surface
Cover. Let it set for 6-8 hours.
6. Now run your shirt under the water in the
sink until all the dye is out. The dye is out
when the water runs clear! Cut off Zip Ties
and place by itself in the washer and set to
large load. Put it on the hottest water suitable
for fabric and use a little laundry detergent.
Dry in dryer or line dry.
7. Next measure the middle bullseye area of the
shirt. Print out or hand draw a star to this
size on your freezer paper. Cut out star and
center it in the middle of the shirt. Use a hot
iron to press the design onto the shirt.
8. Use fabric spray paint to spray inside stencil.
The spray paint will give the star a more
distressed look. Use a hair dryer to speed up
drying time.
9. Once dry, peel off stencil to reveal star!
How To Make Tie Dye Shirts, Decor, and More: 18 Tie Dye Patterns
Get connected. Get Inspired. Get creative with ilovetocreate.com
10
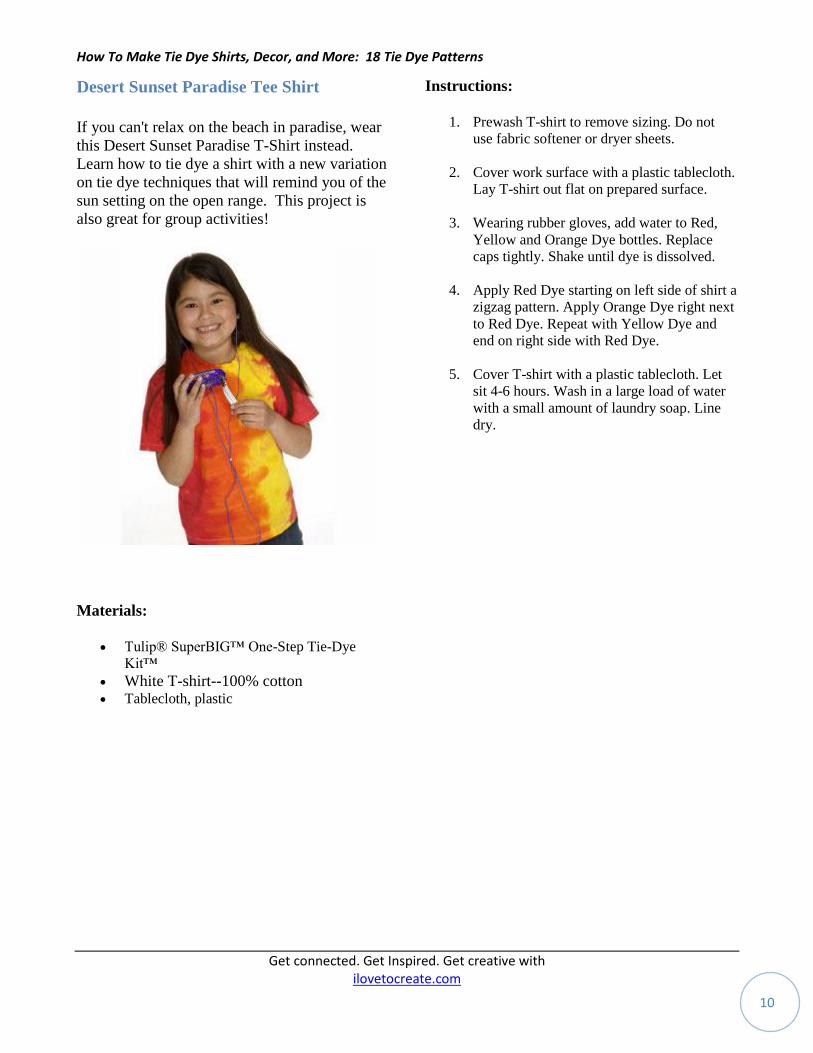
Desert Sunset Paradise Tee Shirt
If you can't relax on the beach in paradise, wear
this Desert Sunset Paradise T-Shirt instead.
Learn how to tie dye a shirt with a new variation
on tie dye techniques that will remind you of the
sun setting on the open range. This project is
also great for group activities!
Materials:
Tulip® SuperBIG™ One-Step Tie-Dye
Kit™
White T-shirt--100% cotton Tablecloth, plastic
Instructions:
1. Prewash T-shirt to remove sizing. Do not
use fabric softener or dryer sheets.
2. Cover work surface with a plastic tablecloth.
Lay T-shirt out flat on prepared surface.
3. Wearing rubber gloves, add water to Red,
Yellow and Orange Dye bottles. Replace
caps tightly. Shake until dye is dissolved.
4. Apply Red Dye starting on left side of shirt a
zigzag pattern. Apply Orange Dye right next
to Red Dye. Repeat with Yellow Dye and
end on right side with Red Dye.
5. Cover T-shirt with a plastic tablecloth. Let
sit 4-6 hours. Wash in a large load of water
with a small amount of laundry soap. Line
dry.

How To Make Tie Dye Shirts, Decor, and More: 18 Tie Dye Patterns
Get connected. Get Inspired. Get creative with ilovetocreate.com
11
Double Rainbow Dazzle Top
Make a Double Rainbow Dazzle Top for all of
your favorite rainbow enthusiasts. Keep an eye
out for a rainbow in the sky while you make tie
dye shirts in all shapes and sizes. Use these
rainbow tie dye techniques to adorn all of your
clothes with the bright colors of Roy G. Biv.
Materials:
Tulip® One-Step Tie-Dye Kit™: Primary
Tulip® Surface Cover
Scissors
White T-shirt--100% cotton
Instructions:
1. Prewash T-shirt to remove sizing; do not use
fabric softener.
2. Cover work surface with Surface Cover and
lay shirt flat on prepared surface. Scrunch
shirt into a tube shape and wrap eight rubber
bands from kit around shirt, creating nine
equally spaced sections.
3. Wearing plastic gloves, add water to all dye
bottles. Replace caps tightly then shake until
dye is dissolved.
4. Referring to photo, squeeze Red onto first
section (top) of shirt. Skip next section then
squeeze Blue onto third section. Moving
back up to the second section, at the same
time, squeeze both the Red and Blue dyes
onto the second section and use hands to
work in and mix dye, creating Purple.
5. Skip next section underneath Blue section
and squeeze Yellow onto fifth section as
shown. After applying Yellow, working at
the same time, squeeze Yellow and Blue
onto the section between Yellow and Blue
sections and use hands to work in and mix
dye, creating Green.
6. Skip section underneath Yellow section and
squeeze Red onto seventh section as shown.
After applying Red, working at the same
time, squeeze Red and Yellow dyes together
between Red and Yellow sections and use
hands to work in and mix dye, creating
Orange.
7. Leave a section underneath the Red section
and on the bottom section of shirt, squeeze
Blue as shown. After applying Blue,
working at the same time, squeeze Red and
Blue together between Red and Blue
sections and use hands to work in and mix
dye, creating Purple.
8. Cover shirt with Surface Cover to keep
damp and let set 6 to 8 hours or longer for
most intense colors. Fully rinse dyed shirt in
warm water until water runs clear, removing
rubber bands at this time. Fill washer to
large load setting with hottest water suitable
for T-shirt fabric and a small amount of
laundry soap. Wash and dry separately.

How To Make Tie Dye Shirts, Decor, and More: 18 Tie Dye Patterns
Get connected. Get Inspired. Get creative with ilovetocreate.com
12
Eco-Centric Tie Dye Top
Are you an environmental enthusiast? Do you
go for green and root for recycling? If so, this
Eco-Centric Tie Dye Top is a great way to make
tie dye shirts just for you! These tie dye
instructions are simple and fun to follow to
make fun tie dye t-shirts for friends, family and
yourself!
Materials:
Tulip® Fashion Form
One-Step Tie-Dye Kit™: Neon
Tulip® Fashion Art Resist™
White T-shirt--100% cotton Spray bottle
Plastic tablecloth
Paper towel
Patterns
Instructions:
1. Place Fashion Form inside shirt. Start flow
of Fashion Art Resist™ on paper towel
using an even pressure on bottle for a
smooth line, then freehand create the recycle
heart design as shown. Let resist dry then
remove Fashion Form.
2. Fill spray bottle with water, then spray water
on entire shirt to dampen.
3. Wearing gloves from dye box, fill all dye
bottles with water to indicated line, then
shake each until thoroughly mixed.
4. Squeeze dye in sections on shirt as shown,
letting colors blend together. Let set 4 to 6
hours.
5. Wash in washer with hot water to remove
resist – this may take several times
depending on thickness of resist. Dry in
dryer.

How To Make Tie Dye Shirts, Decor, and More: 18 Tie Dye Patterns
Get connected. Get Inspired. Get creative with ilovetocreate.com
13
Shibori Chic Tie Dye Tee
Shibori is the name for twisted tie dye
techniques, and this Shibori Chic Tie Dye Tee
looks phenomenal. Make tie dye shirts in the
shibori style for a summery, sassy look that will
turn heads on the beach and beyond!
Materials:
Tulip® One-Step Tie-Dye Kit™: Carousel
Tulip® Surface Cover
T-shirt - gray
PVC pipe
Instructions:
1. Prewash T-shirt to remove sizing. Do not
use fabric softener.
2. Cover work surface with Tulip® Surface
Cover. Lay damp shirt on prepared surface.
3. Wearing rubber gloves, add water to dye
bottles to lines indicated. Replace caps
tightly and shake until dye is dissolved.
4. Place the PVC pipe on top of the bottom left
corner of damp tee then roll corner up
around pipe and continue rolling shirt to
about the middle of shirt, leaving the top of
shirt laying out flat. Scrunch fabric around
pipe tightly. Squeeze Black dye onto
scrunched portion of shirt. Unwrap from
pipe.
5. Lay shirt out flat and squeeze out Blue dye
onto top right of shirt in a random fashion.
Refer to photo.
6. Cover fabric with Tulip® Surface Cover and
let sit 4 to 6 hours. Wash in a large load of
water with a small amount of laundry soap
and dry in dryer.

How To Make Tie Dye Shirts, Decor, and More: 18 Tie Dye Patterns
Get connected. Get Inspired. Get creative with ilovetocreate.com
14
Summer Spangled Bullseye Tee
You'll look like an ace in this Summer Spangled
Bullseye Tee. This bright, classic idea for fun tie
dye techniques is the perfect top for fun in the
sun. Learn how to tie dye shirts in the classic
method to make your own dazzling tee.
Materials:
Tulip® One-Step Tie-Dye Kit™: Bright
Tulip® Surface Cover
White T-shirt--100% cotton
Instructions:
1. Wash T-shirt to remove sizing. Do not use
fabric softener.
2. Cover work surface with Dye Surface Cover.
Lay damp shirt out flat on prepared surface.
3. Starting in the chest area of shirt, pull
section of shirt into a tube shape and wrap a
rubber band around it. Wrap another rubber
band around shirt a few inches down from
the first rubber band.
4. Wearing rubber gloves, add water to all dye
bottles to lines indicated on bottles. Replace
caps tightly and shake until dye is dissolved.
Squeeze Pink dye onto first rubber banded
section, then Lime onto second section next
to Pink. Squeeze Turquoise onto remaining
portion of shirt.
5. Cover shirt with Dye Surface Cover and let
sit 4 to 6 hours. Remove rubber bands and
wash shirt separately in washing machine in
a large load of water with a small amount of
laundry soap. Dry in dryer.

How To Make Tie Dye Shirts, Decor, and More: 18 Tie Dye Patterns
Get connected. Get Inspired. Get creative with ilovetocreate.com
15
1
How To Make Tie Dye Shirts, Decor, and More: 18 Tie Dye Patterns
Get connected. Get Inspired. Get creative with ilovetocreate.com
16
Home Décor
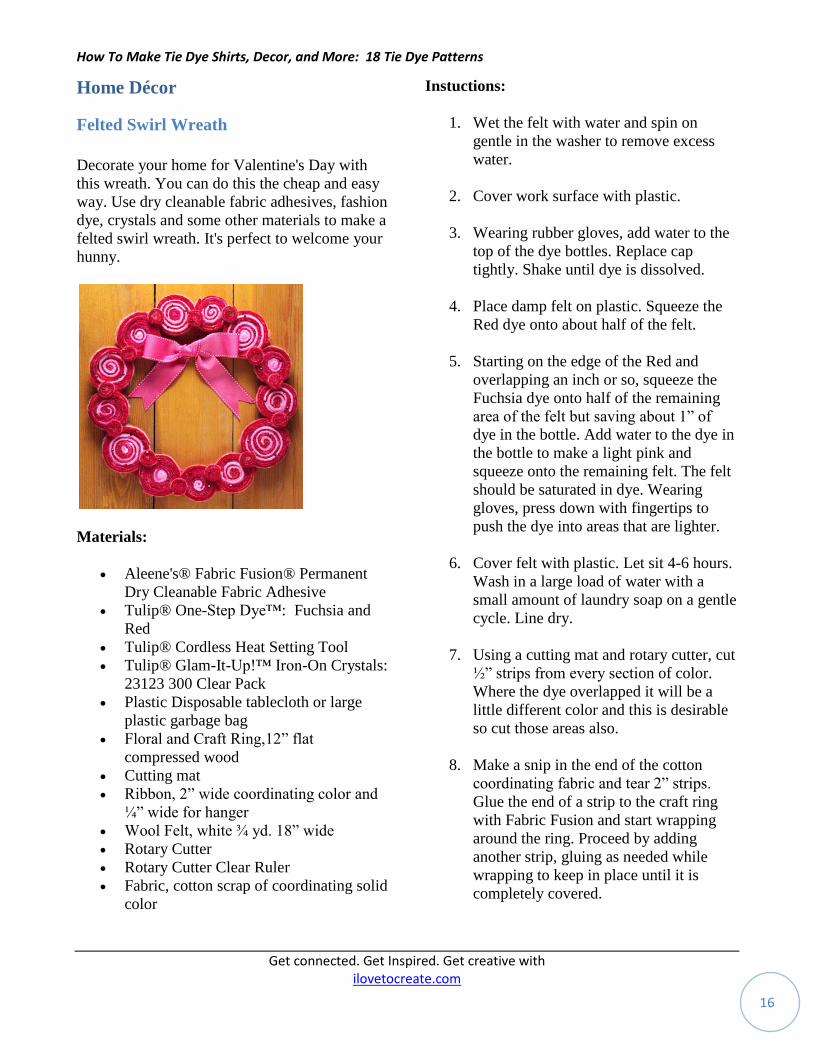
Felted Swirl Wreath
Decorate your home for Valentine's Day with
this wreath. You can do this the cheap and easy
way. Use dry cleanable fabric adhesives, fashion
dye, crystals and some other materials to make a
felted swirl wreath. It's perfect to welcome your
hunny.
Materials:
Aleene's® Fabric Fusion® Permanent
Dry Cleanable Fabric Adhesive
Tulip® One-Step Dye™: Fuchsia and
Red
Tulip® Cordless Heat Setting Tool
Tulip® Glam-It-Up!™ Iron-On Crystals:
23123 300 Clear Pack
Plastic Disposable tablecloth or large
plastic garbage bag
Floral and Craft Ring,12” flat
compressed wood
Cutting mat
Ribbon, 2” wide coordinating color and
¼” wide for hanger
Wool Felt, white ¾ yd. 18” wide
Rotary Cutter
Rotary Cutter Clear Ruler
Fabric, cotton scrap of coordinating solid
color
Instuctions:
1. Wet the felt with water and spin on
gentle in the washer to remove excess
water.
2. Cover work surface with plastic.
3. Wearing rubber gloves, add water to the
top of the dye bottles. Replace cap
tightly. Shake until dye is dissolved.
4. Place damp felt on plastic. Squeeze the
Red dye onto about half of the felt.
5. Starting on the edge of the Red and
overlapping an inch or so, squeeze the
Fuchsia dye onto half of the remaining
area of the felt but saving about 1” of
dye in the bottle. Add water to the dye in
the bottle to make a light pink and
squeeze onto the remaining felt. The felt
should be saturated in dye. Wearing
gloves, press down with fingertips to
push the dye into areas that are lighter.
6. Cover felt with plastic. Let sit 4-6 hours.
Wash in a large load of water with a
small amount of laundry soap on a gentle
cycle. Line dry.
7. Using a cutting mat and rotary cutter, cut
½” strips from every section of color.
Where the dye overlapped it will be a
little different color and this is desirable
so cut those areas also.
8. Make a snip in the end of the cotton
coordinating fabric and tear 2” strips.
Glue the end of a strip to the craft ring
with Fabric Fusion and start wrapping
around the ring. Proceed by adding
another strip, gluing as needed while
wrapping to keep in place until it is
completely covered.
How To Make Tie Dye Shirts, Decor, and More: 18 Tie Dye Patterns
Get connected. Get Inspired. Get creative with ilovetocreate.com
17
9. Feeling through the fabric, find one of
the small holes and push a pencil or
sharp object through to the back. Run the
small piece of ribbon through and tie in a
knot to use as a hanger.
10. Starting with the lightest color of felt,
add a small amount of Fabric Fusion to
the end of felt strip and roll into a
pinwheel. Glue another stip in a
different color to the end of the first strip
and continue rolling into a pinwheel.
Finish roll with a red strip of feld and
glue end in place on pinwheel.
11. Arrange the pinwheels on the ring until
they fit all the way around while
touching each other. Squeeze out Fabric
Fusion onto the ring under the area
where each pinwheel will sit pressing
pinwheel into the glue.
12. Cut ¼” strips of the red felt and roll into
small 1” pinwheels and glue on top of
each intersection where the large
pinwheels meet. Glue in place and press
down with fingertips. Let dry flat.
13. Attach the red and pink crystals with the
heat tool. Scatter them over the large and
small pinwheels. Pressure is not needed
when attaching the crystals as long as the
tip of the tool is touching the crystal.
14. Tie the 2” ribbon into a bow and glue the
backside of the loops at the top, onto the
pinwheels.

How To Make Tie Dye Shirts, Decor, and More: 18 Tie Dye Patterns
Get connected. Get Inspired. Get creative with ilovetocreate.com
18
Field of Fireworks Beach Towel
Celebrate with this Field of Fireworks Beach
Towel. Make tie dye projects like this for a fun
pool accessory or a nice comfy place to enjoy
the fireworks. This beach towel is one of the tie
dye projects kids will love to make the most.
Materials:
Tulip® One-Step Tie-Dye Kit™:
Carousel
White terrycloth towel, 100% natural
fabric
Large plastic bucket
Instructions:
1. Use rubber bands, found in the kit, and
pull up 4 inches of fabric into a tube
shape and place rubber band at the base
of the 4 inch mark. The larger amount of
fabric the larger the sunburst. Repeat
banding process randomly over the towel
to create the sunburst pattern.
2. Dampen towel and wring out the excess
water in the sink.
3. Wearing rubber gloves, add water to dye
bottle. Replace cap tightly. Shake until
dye is dissolved.
4. Place towel into bucket and randomly
squeeze dye colors. Use full-strength for
intense colors. For a lighter shade of
color, add more water using extra bottle
if needed. Check to make sure dye has
penetrated.
5. Wrap towel in plastic Surface Cover. Let
set 6 to 8 hours.
6. Rinse under faucet to remove all of the
dye until the water runs clear.
7. Remove rubber bands. Fill washer to
large load setting with hottest water
suitable for fabric and a small amount of
detergent. Wash separately for the first
few washes.

How To Make Tie Dye Shirts, Decor, and More: 18 Tie Dye Patterns
Get connected. Get Inspired. Get creative with ilovetocreate.com
19
Summer Lovin’ Crochet Pillow
We “heart” the way this Summer Lovin' Crochet
Pillow looks on the sofa during the summer.
Master the tie dye techniques for coloring your
own yarn with this fun crochet pillow pattern,
and learn how to tie die just about anything.
Materials:
Tulip® One-Step Tie-Dye Kit™: Luau
Pencil
Polyfil
Sewing pins
Crochet hook – 15.00 mm
Scissors
Plastic wrap
Needle and white thread
4 White T-shirts--100% cotton, L or XL
Plastic tablecloth
Newspaper
Fleece or felt yardage – white – ½ yard
Sewing machine
Instructions:
1. Wash shirts without fabric softener to
remove sizing. Cover work surface with
plastic tablecloth then place damp shirt
on surface. Following dye instruction
sheet, crumple each shirt.
2. Wearing gloves from kit, create dye
according to package instructions.
3. Squeeze ¾ bottle of Red dye on one
shirt, turning and squeezing fabric and
creating a mottled look. Repeat step,
dyeing one shirt Orange and one Violet.
Squeeze remainders of three dye bottles
on lasT-shirt. Cover dyed fabric with
plastic wrap to keep damp.
4. Follow instructions on guide included
with kit for dye set time and laundering
shirts.
5. To create strips for project, cut just under
sleeves across shirt then cut off hem,
forming a tube shape. Starting at one cut
edge, cut in an a slight angle then cut
about a 1” strip from tube creating one
long strip of fabric. Repeat with all
shirts. Roll fabric into a ball if desired.
Creating the heart:
1. Using purple strip, chain 20. Single
crochet into one side of chain stitch for
next eight. Crochet next three stitches
together to create dip of heart. Single
crochet in one side of stitch to end of
chain. Add two double crochet in last
chain, creating curve of heart. Single
crochet in one side of chain for nine
stitches then add two double crochet in
tenth chain to create point of heart.
Single crochet in one side up to last
stitch then add two double crochet in
last, creating curve of heart. Repeat

How To Make Tie Dye Shirts, Decor, and More: 18 Tie Dye Patterns
Get connected. Get Inspired. Get creative with ilovetocreate.com
20
steps, crocheting with purple until it is
used up, stopping or starting at tip. Tie
on next color and continue around heart,
adding Fuchsia strips last.
2. Edging: Use tricolor strip to create
scallop edge. Starting at tip of pillow,
single crochet in first stitch then sc, dc,
sc in next stitch then single crochet in
next. Repeat pattern around entire
pillow, ending at tip.
3. The heart can be blocking into shape if
needed by gently pressing, pulling and
stretching as needed.
Finishing Pillow:
1. Place pillow on newspaper, use pencil to
trace around, then cut out.
2. Pin pattern onto double thickness of felt
or fleece and cut out.
3. Sew around entire heart using a 1” or
larger border. Trim seam to ¼”.
4. Cut a 7” slit along lower edge on one
side of pillow. Fill with Polyfil to desired
size. Pin opening closed, overlapping cut
edges, then use needle and thread to sew
closed.
5. Place stuffed pillow to back of heart. Use
pins to attach pillow seam to crochet
stitches just under trim. Use needle and
thread to whipstitch together.

How To Make Tie Dye Shirts, Decor, and More: 18 Tie Dye Patterns
Get connected. Get Inspired. Get creative with ilovetocreate.com
21
Sunburst Blossom Pillow
A Sunburst Blossom Pillow is a vibrant example
of tie dye projects that make wonderful home
decorations and accent pieces. Add this bright
throw pillow to a drab sofa for some refreshing
pizzazz!
Materials:
Tulip® One-Step Tie-Dye Kit™:
Ultimate
3 Small condiment cups or equivalent
Plastic (shoebox size) container
Sewing machine
Plastic sheet or trash bags
Iron
Thread
Paintbrushes – No. 4 liner, No. 6 round
and a wide 1” brush
Pencil
2 100% cotton napkins – white – or –
white cotton fabric if larger pillow is
desired
Paper towels
Scissors
Fiberfill
Yardstick
Instructions:
1. Wearing rubber gloves, mix dyes as
directed on package.
2. Press one of the napkins and set aside for
dry-brush dye technique. Dampen the
remaining napkin and place in plastic
container.
3. Cover table with plastic sheet or trash
bags, followed by a layer of paper towels
where napkin will be laid out smoothly.
4. Pour a small amount of Fuchsia, Yellow
and Purple dyes into the condiment
containers.
5. Using the No. 6 brush, dip into Yellow
dye and brush in the Yellow center of
flower, brushing outward. Refer to photo
for placement. Apply dye a little heavier
in center of Yellow portion.
6. Using same brush, brush Fuchsia dye
around Yellow center, making sure
Fuchsia extends up to the yellow. Switch
to 1” wide brush and brush Fuchsia
outward for the remaining petals. Brush
strokes should be “loose” and not
confined to a strict petal shape.
7. Dip the No. 6 brush into the Purple dye
and make strokes of Purple around outer
edges of petals. Refer to photo.
8. With liner brush, make Fuchsia-colored
dots in center of Yellow. Let colors set 4
to 5 hours.
9. Scrunch remaining fabric in container
and soak with Fuchsia and dabs of
purple. Let set.

How To Make Tie Dye Shirts, Decor, and More: 18 Tie Dye Patterns
Get connected. Get Inspired. Get creative with ilovetocreate.com
22
10. Machine wash, dry and press dyed
napkins.
11. Stitch along seams, leaving a 4” to 5”
opening at bottom.
12. Fill with fiberfill and stitch together
opening.
Learn fabulous tie dye techniques from
I Love to Create!
How To Make Tie Dye Shirts, Decor, and More: 18 Tie Dye Patterns
Get connected. Get Inspired. Get creative with ilovetocreate.com
23
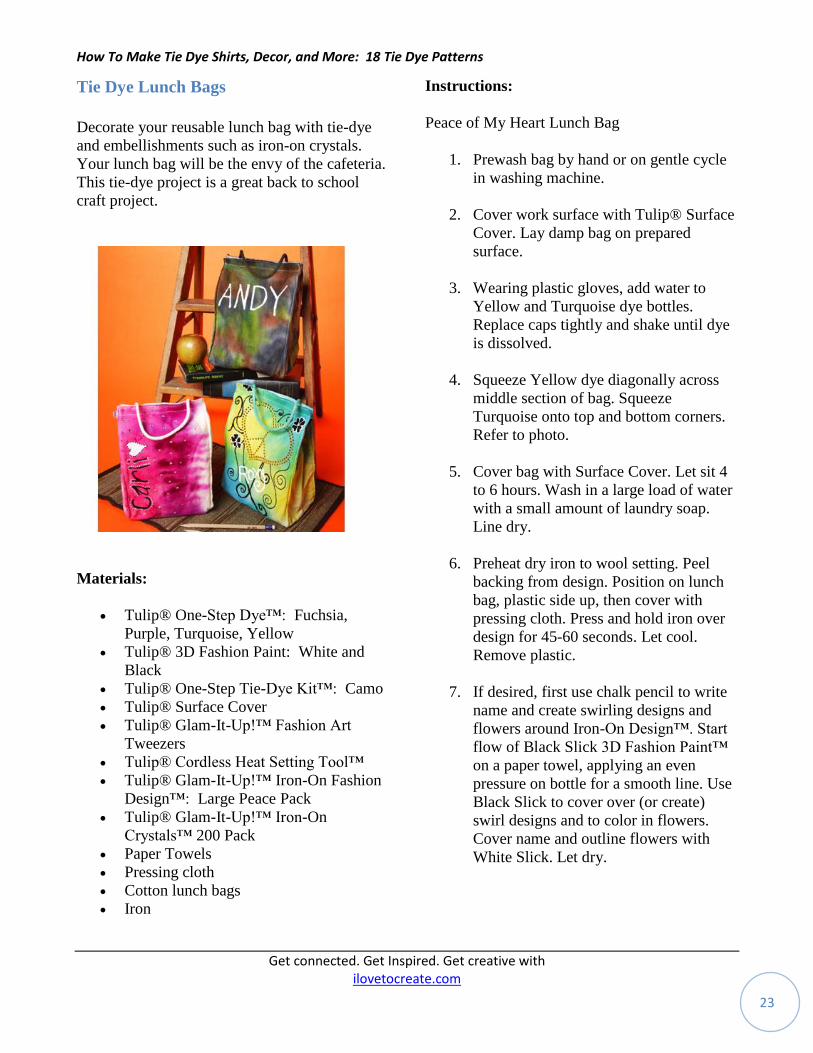
Tie Dye Lunch Bags
Decorate your reusable lunch bag with tie-dye
and embellishments such as iron-on crystals.
Your lunch bag will be the envy of the cafeteria.
This tie-dye project is a great back to school
craft project.
Materials:
Tulip® One-Step Dye™: Fuchsia,
Purple, Turquoise, Yellow
Tulip® 3D Fashion Paint: White and
Black
Tulip® One-Step Tie-Dye Kit™: Camo
Tulip® Surface Cover
Tulip® Glam-It-Up!™ Fashion Art
Tweezers
Tulip® Cordless Heat Setting Tool™
Tulip® Glam-It-Up!™ Iron-On Fashion
Design™: Large Peace Pack
Tulip® Glam-It-Up!™ Iron-On
Crystals™ 200 Pack
Paper Towels
Pressing cloth
Cotton lunch bags
Iron
Instructions:
Peace of My Heart Lunch Bag
1. Prewash bag by hand or on gentle cycle
in washing machine.
2. Cover work surface with Tulip® Surface
Cover. Lay damp bag on prepared
surface.
3. Wearing plastic gloves, add water to
Yellow and Turquoise dye bottles.
Replace caps tightly and shake until dye
is dissolved.
4. Squeeze Yellow dye diagonally across
middle section of bag. Squeeze
Turquoise onto top and bottom corners.
Refer to photo.
5. Cover bag with Surface Cover. Let sit 4
to 6 hours. Wash in a large load of water
with a small amount of laundry soap.
Line dry.
6. Preheat dry iron to wool setting. Peel
backing from design. Position on lunch
bag, plastic side up, then cover with
pressing cloth. Press and hold iron over
design for 45-60 seconds. Let cool.
Remove plastic.
7. If desired, first use chalk pencil to write
name and create swirling designs and
flowers around Iron-On Design™. Start
flow of Black Slick 3D Fashion Paint™
on a paper towel, applying an even
pressure on bottle for a smooth line. Use
Black Slick to cover over (or create)
swirl designs and to color in flowers.
Cover name and outline flowers with
White Slick. Let dry.

How To Make Tie Dye Shirts, Decor, and More: 18 Tie Dye Patterns
Get connected. Get Inspired. Get creative with ilovetocreate.com
24
Camo Time Lunchbag
1. Prewash bag by hand or on gentle cycle
in washing machine.
2. Cover work surface with Tulip® Surface
Cover. Lay damp bag on prepared
surface.
3. Wearing plastic gloves, add water to
Camo kit dye bottles. Replace caps
tightly and shake until dye is dissolved.
4. Squeeze out each color of dye randomly
onto damp bag. Refer to photo.
5. Cover bag with Surface Cover. Let sit 4
to 6 hours. Wash in a large load of water
with a small amount of laundry soap.
Line dry.
6. Use chalk pencil to write name on bag.
Start flow of White Slick 3D Fashion
Paint™ on a paper towel, applying an
even pressure on bottle for a smooth line.
Trace over name with paint. Let dry.
Scrumptious Sparkle Lunch Bag
1. Prewash bag by hand or on gentle cycle
in washing machine.
2. Cover work surface with Tulip® Surface
Cover. Lay damp bag on prepared
surface.
3. Wearing plastic gloves, add water to
Fuchsia and Purple dye bottles. Replace
caps tightly and shake until dye is
dissolved.
4. Squeeze Purple dye onto left side of bag,
then squeeze Fuchsia onto the middle
section. Leave the right side of bag
uncolored. Refer to photo.
5. Cover bag with Surface Cover and let sit
4 to 6 hours. Wash in a large load of
water with a small amount of laundry
soap. Line dry.
6. If desired, write name on bag where
desired with chalk pencil, then draw
heart or favorite design. Start flow of
Black Slick 3D Fashion Paint™ on a
paper towel, applying an even pressure
on bottle for a smooth line. Cover over
chalk pencil or freehand write name onto
bag. Use White Slick to create dots
around letters and to fill in heart. Outline
heart with Black Slick. Let dry.
7. Use Fashion Art Tweezers™ to place
crystals randomly on front of bag. Use
Cordless Heat-Setting Tool™ to adhere
crystals in place according to package
instructions.

How To Make Tie Dye Shirts, Decor, and More: 18 Tie Dye Patterns
Get connected. Get Inspired. Get creative with ilovetocreate.com
25

How To Make Tie Dye Shirts, Decor, and More: 18 Tie Dye Patterns
Get connected. Get Inspired. Get creative with ilovetocreate.com
26
Tie Dye Techniques
Cobbled Bicolor Tie Dye Tee
If you think all tie dye techniques are the same,
think again. Make tie dye shirts like this
Cobbled Bicolor Tie Dye Tee for a new spin on
a classic dyeing method that will result in a
fascinating spotted pattern like a cobblestone
path.
Materials:
Tulip® One-Step Tie-Dye Kit™:
Rainbow
White T-shirt--100% cotton
2 Foam plates
Craft sponge
Plastic tablecloth
Instructions:
1. Prewash T-shirt; do not use fabric
softener.
2. Cover work surface with a plastic
tablecloth and place damp shirt flat on
prepared work surface.
3. Wearing plastic gloves from kit, add
water to Red and Purple dye bottles and
shake until thoroughly mixed. Squeeze
each color of dye onto a separate foam
plate.
4. Dampen sponge then dip into Purple dye
and press onto top of shirt. Continue
process along top of shirt as shown.
5. Clean sponge and repeat on entire
bottom of shirt.
6. Cover shirt with plastic tablecloth and let
set 6-8 hours or longer for most intense
colors.
7. Rinse thoroughly in warm running water
until runoff is clear, then wash in a large
load of hottest water suitable for fabric
and a small amount of laundry soap. Dry
separately.

How To Make Tie Dye Shirts, Decor, and More: 18 Tie Dye Patterns
Get connected. Get Inspired. Get creative with ilovetocreate.com
27
Dappled Heart T-shirt
The tie dye techniques used to create a Dappled
HearT-shirt are a stunning way to make tie dye
shirts for everyone. Adorn a basic tee or top
with this explosively vivacious heart
emblazoned on the front.
Materials:
Tulip® One-Step Tie-Dye Kit™:
Ultimate
Plastic tablecloth
White T-shirt--100% cotton
Pencil
Instructions:
1. Prewash shirt to remove sizing. Do not
use fabric softener or dryer sheets.
2. Cover work surface with a plastic
tablecloth. Lay shirt onto prepared
surface.
3. Wearing rubber gloves, add water to dye
bottles. Replace caps tightly. Shake until
dye is dissolved.
4. Fold shirt in half lengthwise.
5. Draw half of a heart on fold, using
pencil.
6. Accordion fold fabric along heart
outline, forcing it into a straight line.
7. Secure with rubber band. Apply a second
rubber band about an inch away from the
first band (towards the body of the shirt).
This is an optional step but allows for an
additional color to be applied in the
middle banded area.
8. Squeeze Purple Dye onto center of heart.
Squeeze a line of Fuchsia Dye around
Purple Dye (between rubber bands).
Squeeze Fuchsia Dye onto rest of shirt.
9. Cover fabric with plastic tablecloth. Let
set 4 to 6 hours. Wash in a large load of
water with a small amount of laundry
soap. Line dry.

How To Make Tie Dye Shirts, Decor, and More: 18 Tie Dye Patterns
Get connected. Get Inspired. Get creative with ilovetocreate.com
28
Impatient Plaid Tie Dye Tee
Lovers of plaid will adore the ease and appeal of
this Impatient Plaid Tie Dye Tee. Adorn this top
in your favorite colors for a tie dye technique
that results in a casual tartan pattern for every
occasion. Learn how to tie dye a shirt that looks
like this to wear on a staycation.
Materials:
Tulip® One-Step Tie-Dye Kit™:
Moody Blues
Plastic table cover
Styrofoam plates – one per dye color
2 Paintbrushes: wide and fine
White T-shirt--100% cotton
Instructions:
1. Prewash T-shirt without fabric softener.
Do not dry.
2. Protect work surface with plastic table
cover.
3. Place damp T-shirt on protected work
surface.
4. Wearing gloves from dye kit, mix dye as
instructed on package.
5. Start with your widest brush. Dip it into
Blue dye and work vertically from the
bottom center of your shirt to the top.
Using thinner brush add Teal vertical
lines to the right of every other Blue line.
6. Add Teal and Green horizontal lines
randomly spaced apart.
7. Wrap T-shirt in plastic table cover and
let set for 6-8 hours.
8. Rinse shirt in running water until water
runs clear. Wash and dry shirt separately.

How To Make Tie Dye Shirts, Decor, and More: 18 Tie Dye Patterns
Get connected. Get Inspired. Get creative with ilovetocreate.com
29
Scribble Scrabble Tee Shirt
Don't worry about coloring inside the lines! Let
your imagination run free with a bright Scribble
Scrabble Tee Shirt. This bright beauty is sure to
look great on everyone, so learn how to tie dye a
shirt like this with a new variation on tie dye
techniques.
Materials:
Tulip® One-Step Tie-Dye Kit™:
Classic
White T-shirt--100% cotton
Plastic tablecloth
Insructions:
1. Prewash T-shirt; do not use fabric
softener.
2. Cover work surface with a plastic
tablecloth and place damp shirt flat on
prepared work surface.
3. Wearing plastic gloves from kit, add
water to Yellow and Fuchsia dye bottles
and shake until thoroughly mixed.
4. Starting at the top left corner of the shirt,
squeeze Fuchsia dye onto shirt in a
zigzag motion, working the color two-
thirds of the way down the shirt.
5. Repeat with the Yellow dye, starting at
the bottom right corner of the shirt and
moving two-thirds of the way up the
shirt. The colors should meet in the
middle of the shirt, creating a third color.
6. Cover shirt with plastic tablecloth and let
set 6-8 hours or longer for most intense
colors. Rinse thoroughly in warm
running water until runoff is clear, then
wash in a large load of hottest water
suitable for fabric and a small amount of
laundry soap. Dry separately.

How To Make Tie Dye Shirts, Decor, and More: 18 Tie Dye Patterns
Get connected. Get Inspired. Get creative with ilovetocreate.com
30
Starfire Explosion Bullseye Tee
Reach for the stars in this Starfire Explosion
Bullseye Tee. Learn how to tie dye a shirt with a
perfect bullseye pattern for some summer fun
with amazing and unusual directions to tie dye
your very own top.
Materials:
Tulip® One-Step Tie-Dye Kit™:
Primary
Tulip® Surface Cover
Scissors
Plastic
White T-shirt--100% cotton
Instructions:
1. Wash shirt in washer to remove sizing.
2. Cover work surface with plastic
tablecloth.
3. Place damp shirt on prepared surface and
smooth flat. To create bullseye design,
pinch front of shirt just above center then
lift fabric up and scrunch fabric into a
tube shape. Wrap a rubber band about 2”
from tip, wrapping several times until
tight. If using zip-ties, determine
placement then wrap and pull tightly.
Repeat every 2” or so along entire shirt.
4. Wearing gloves from dye box, fill a dye
bottle half with water. Replace cap and
shake until all dye is thoroughly mixed.
Remove lid, add more water to line
indicated on bottle, replace cap and
shake to mix.
5. Carefully squeeze Yellow dye on tip,
turning shirt until entire tip has dye.
6. Squeeze Red dye around center of next
section, letting it bleed toward rubber
bands. Insert tip of bottle into folds and
squeeze more dye as needed. Note: Try
not to squeeze too much dye next to
rubber bands to keep white areas
between colors. In the next section,
apply Blue. Squeeze dye on in the
following order: Yellow, Red, Blue until
all sections are dyed.
7. Let set 4 to 6 hours. Use scissors to
carefully cut off rubber bands or Zip
Ties.
8. Fill washer to a full load setting with a
small amount of laundry soap. Once
agitation starts, inserT-shirt. Dry in dryer
or line dry.

How To Make Tie Dye Shirts, Decor, and More: 18 Tie Dye Patterns
Get connected. Get Inspired. Get creative with ilovetocreate.com
31
How To Make Tie Dye Shirts, Decor, and More: 18 Tie Dye Patterns
In this eBook, you'll find a great collection of easy tie dye projects and techniques to help you
improve your skill. You'll learn how to make tee shirts, aprons, pillows, and even cute lunch
totes for the kids! With the skills and techniques you'll learn in creating these patterns, you'll be
able to create your own tie dye projects in no time!
You can find more free craft projects, product reviews, and product giveaways at
www.FaveCrafts.com. Get crafting and creating with these projects to inspire you and your
family and friends. Feel free to share this eBook, and be sure to sign up for our free eNewsletter
to get handmade inspiration right in your inbox.
Included in this eBook:
Captain America Tee
Summer Lovin’ Pillow
Impatient Plaid Tie Dye Tee