hrms user manual - rarome.com · user manual - hrms 2.1.job openings 44 2.2.recruitment form 46...
TRANSCRIPT

�
� User Manual – School Admin
Prepared by : Shuchita Mathur, Support Team, RAROME

USER MANUAL - HRMS �
Table of Contents
HRMS 4
Department 6
Roles 7
Employee 8
Bulk Import Employee 16
Profile 18
Payroll 20
Payroll Categories 20
Payroll Group 25
Generate Employee Payslip 27
Generate Payslip for Group 28
Payslip Report 29
Leaves 30
Leave Apply 30
Approve Leaves 32
HRMS 33
1. Appraisal 35
1.1.Applied Appraisals 35
1.2.Appraisal Applications 37
1.3.Final Appraisal Applications 39
1.4.Ratings 41
1.5.Goals 42
2. Recruitment 44
Suite 1015 Sharad Technologies LLC, ETA Star Al Manara Tower, Business Bay, Dubai, UAE | [email protected] Page � of � 2 58

USER MANUAL - HRMS �
2.1.Job Openings 44
2.2.Recruitment Form 46
2.3.Job Candidates 47
2.4.Job Interviews 50
2.5.Selected Candidates 55
Suite 1015 Sharad Technologies LLC, ETA Star Al Manara Tower, Business Bay, Dubai, UAE | [email protected] Page � of � 3 58
USER MANUAL - HRMS �
HRMS
You can manage all aspects of all the employees using the HRMS (Human Resource Management System) module of RAROME.
� (Figure 1)
� (Figure 2)
Let’s go through how HRMS works. When we click on menu option from top right side on login dashboard page(Figure 1), navigation will open which will show all modules, once user clicks on HRMS Tile in the menu (Figure2) , Following TILES (Figure 3) will be shown.
Suite 1015 Sharad Technologies LLC, ETA Star Al Manara Tower, Business Bay, Dubai, UAE | [email protected] Page � of � 4 58

USER MANUAL - HRMS �
�
(Figure 3)
Suite 1015 Sharad Technologies LLC, ETA Star Al Manara Tower, Business Bay, Dubai, UAE | [email protected] Page � of � 5 58

USER MANUAL - HRMS �
Department Navigation Path: HRMS>Department
Using this section, you can create and manage different departments of the school like Teaching, Administration, Accounts, Dormitory, etc., under which you can later assign staff. This page will have a list of the departments along with their Department Code and Description.
�
(Figure 4)
Create Department: You can add a new department by clicking on Create Department tab and entering details like Department Name, Code and Description
�
(Figure 5)
After entering the details, click on Create Department button to save the details. These details will now be listed under the Departments tab.
You can edit or delete a particular department’s details by clicking on the relevant icon.
Suite 1015 Sharad Technologies LLC, ETA Star Al Manara Tower, Business Bay, Dubai, UAE | [email protected] Page � of � 6 58

USER MANUAL - HRMS �
Roles Navigation Path: HRMS>Roles
In this section, you can create and manage different kinds for staff under various departments. This page lists the staff as per their roles with their department and number of leaves.
�
(Figure 6)
You can Edit or Delete details by clicking on the relevant icon.
Create Role: You can add a new role by clicking on Create Role tab and filling in details like Role, Description, Department and Leaves. Click on Create Role to save the details. This will now show the new role in Roles list.
�
(Figure 7)
Suite 1015 Sharad Technologies LLC, ETA Star Al Manara Tower, Business Bay, Dubai, UAE | [email protected] Page � of � 7 58

USER MANUAL - HRMS �
Employee Navigation Path: HRMS>Employee
This section is for managing all the employees working in the school. Here, you can see a list of the employees along with their email ID, Department, Role, Supervisor, whether they are supervisor, Type and Contact number, of a selected department.
�
(Figure 8)
You can select a different department from the dropdown list on the top left.
Add Employee
You can add an employee by clicking on the Plus sign on the top right. Here you will have to fill in 6 categories of details.
Information: The first is for basic information and is called Information.
�
(Figure 9)
Suite 1015 Sharad Technologies LLC, ETA Star Al Manara Tower, Business Bay, Dubai, UAE | [email protected] Page � of � 8 58

USER MANUAL - HRMS �
Enter the First Name, Last Name, Date of Birth, Gender, Email, Department, Role, Experience, Date of Joining, Supervisor and Employee Type, if applicable. The Employee ID is automatically generated in the numerical order of creation of employees. The Leaves are also automatically generated when you select the Role.
From the options given, select Yes if the employee is a Teacher, and No if not. Similarly, select Yes if the employee is a Supervisor, and No if not. An employee who is a supervisor will be managing other employees as well.
Every employee will have a supervisor, and you can select one from the already given list under Select Supervisor.
If the employee is a Principal or Vice-Principal, then choose this from the Employee type. Otherwise, leave it as it is. Then click on Next.
Contact: Here, enter the contact details of the employee like Mobile Nymber, Home Number, Address, Country, State/Region, City, Postal Code and Place of Birth. Click on Next.
�
(Figure 10)
Experience: If the employee has worked before joining your school, you can enter his/her previous experience details here like Company Name, Website, Designation, and From and To Dates of the Experience period.
�
(Figure 11)
Suite 1015 Sharad Technologies LLC, ETA Star Al Manara Tower, Business Bay, Dubai, UAE | [email protected] Page � of � 9 58

USER MANUAL - HRMS �
You can add more than one former company by clicking on the plus sign and enter similar details. If there is no previous experience, leave this page blank. Then click on Next.
Education: Here, enter education details of the employee like Course, Institute, Percentage obtained, and the From and To Dates of the course period.
�
(Figure 12)
You can add more than one course by clicking on the plus sign, and enter similar details. Then click on Next.
Salary: Here, enter details of salary and bank, like Bank Name, Bank Record Name, Bank Account Type, Bank Account Number, Bank Account Reference (IFSC, Swift IBAN) and the Salary and Expected Salary.
�
(Figure 13)
Then click on Next.
Photo: Here upload a picture of the employee in the formats specified.
Suite 1015 Sharad Technologies LLC, ETA Star Al Manara Tower, Business Bay, Dubai, UAE | [email protected] Page � of � 10 58

USER MANUAL - HRMS �
�
(Figure 14)
At any point, if you want to make changes to details added previously, click on Previous button and change the details. Once all the necessary details are filled and the photo uploaded, click on Add Employee and a message will be displayed, saying Employee Added Successfully.
�
(Figure 15)
This will create the employee’s details in the list.
Towards the right of the list, under the actions, you can View, Salary Update, Edit or Delete the details of an employee by clicking on the relevant icons.
�
Suite 1015 Sharad Technologies LLC, ETA Star Al Manara Tower, Business Bay, Dubai, UAE | [email protected] Page � of � 11 58

USER MANUAL - HRMS �
Clicking on the View icon gives you complete details of the employee.
�
(Figure 16)
The Salary Update icon lets you change the salary of the employee, for instance in cases of hikes. On Salary List tab, it will show current and previous salary details, with the last Update Date.
�
(Figure 17)
Suite 1015 Sharad Technologies LLC, ETA Star Al Manara Tower, Business Bay, Dubai, UAE | [email protected] Page � of � 12 58

USER MANUAL - HRMS �
To change the salary, click on Add Salary tab and enter the new salary.
�
(Figure 18)
Then click on Update Salary, which will generate message saying Salary Has Been Updated Successfully.
�
(Figure 19)
Suite 1015 Sharad Technologies LLC, ETA Star Al Manara Tower, Business Bay, Dubai, UAE | [email protected] Page � of � 13 58

USER MANUAL - HRMS �
The Edit option lets you change all the details of the employee.
�
(Figure 20)
Use the Plus sign to add more information under Company Detail and Academic’s Details.
Suite 1015 Sharad Technologies LLC, ETA Star Al Manara Tower, Business Bay, Dubai, UAE | [email protected] Page � of � 14 58

USER MANUAL - HRMS �
�
(Figure 21)
After making the necessary changes, click on Update button at the bottom to save the new details and a message will be displayed, saying Employee Edit Successfully (it should be SUCCESSFUL).
You can delete the employee details by clicking on the Delete icon and pressing Confirm when asked.
Suite 1015 Sharad Technologies LLC, ETA Star Al Manara Tower, Business Bay, Dubai, UAE | [email protected] Page � of � 15 58

USER MANUAL - HRMS �
Bulk Import Employee Navigation Path: Settings>Bulk Import
Using this feature, you can directly upload into RAROME all the data relating Employee which you had been maintaining earlier. This can be done using a simple Microsoft Excel file, whose format is given in the page under different sections.
�
(Figure 22)
How to upload the data
Read the instructions before importing any data. You can also click on the information icon for help.
RAROME allows bulk upload of different kinds of people like enquiry students, students, employees, class, subject, transport and dormitory.
First export the data using Export icon to download the template of the concerned group.
�
(Figure 23)
As you click on Export option, a dialog box appears where you can select how to download the file.
Suite 1015 Sharad Technologies LLC, ETA Star Al Manara Tower, Business Bay, Dubai, UAE | [email protected] Page � of � 16 58

USER MANUAL - HRMS �
�
(Figure 24)
Open the Template, and enter/copy the data, especially those marked in red. The other aspects are optional.
�
(Figure 25)
After entering all the data of all the persons in the group, save and upload the file using the Upload/Import button against the concerned group and click on Submit.
This generates a success message and the data gets entered into the respective fields of that group.
If the upload fails, you will be shown an error message, and errors must be rectified before uploading it all again.
Suite 1015 Sharad Technologies LLC, ETA Star Al Manara Tower, Business Bay, Dubai, UAE | [email protected] Page � of � 17 58

USER MANUAL - HRMS �
Profile Navigation Path: HRMS>My Profile You can manage your profile settings using this section. Clicking on Profile will display your profile with Email ID, Login Username and photo under the My Profile tab.
�
(Figure 26)
Manage Profile
You can change your Email ID, Login Username and photo using the Manage Profile tab.
�
(Figure 27)
After making changes, click on Update Profile and a message will be displayed, saying Profile Updated Successfully.
Suite 1015 Sharad Technologies LLC, ETA Star Al Manara Tower, Business Bay, Dubai, UAE | [email protected] Page � of � 18 58

USER MANUAL - HRMS �
�
(Figure 28)
Change Password
You can change your password using the Change Password tab.
�
(Figure 29)
Enter the current password and the new password twice to change the password. Then click on submit and your password will be updated. You will get a message on your phone number regarding the password change.
Suite 1015 Sharad Technologies LLC, ETA Star Al Manara Tower, Business Bay, Dubai, UAE | [email protected] Page � of � 19 58

USER MANUAL - HRMS �
Payroll Navigation Path: HRMS>Payroll Payroll helps you manage the payslip, salaries and other wage components of the school’s employees. Go to navigation menu and click on HRMS and the Payroll. This will show you 5 options — Payroll Categories, Payroll Groups, Generate Payslip for Individual, Generate Payslip for Group and Payslip Report.
�
(Figure 30)
Payroll Categories Navigation Path: HRMS>Payroll>Payroll Categories Payroll categories are components under which various wage emoluments are paid to employees. This will help you manage the categories in the payslip of an employee. This page shows the different categories under the Payroll Categories tab with details like Code, Type (earnings or deductions) and Value.
�
(Figure 31)
Suite 1015 Sharad Technologies LLC, ETA Star Al Manara Tower, Business Bay, Dubai, UAE | [email protected] Page � of � 20 58

USER MANUAL - HRMS �
Each payroll category is assigned a code (eg: BAS for Basic Pay). The code will be the unique identifier of a payroll category. Payroll categories can have variable values based on formulas created using other payroll category codes. (eg: Health Allowance = 10%BAS).
Category Value: The category value defines how the amount for the category is to be calculated. It can be one of the following:
Numeric – If the value is a numeric constant, use this option.
Formula – If the value of this category is based on other categories, use the codes of other categories and create a formula.
Conditions – If the value of the category is based on certain conditions.
Create Category
Click on Create Category tab and enter details like Category Name, Code, Type, Value Type, and Value.
�
(Figure 32)
For the Category Type, choose whether the payroll category will be Earnings or Deductions.
For the Value Type, there are 3 options: Numeric, Formula and Condition.
Suite 1015 Sharad Technologies LLC, ETA Star Al Manara Tower, Business Bay, Dubai, UAE | [email protected] Page � of � 21 58

USER MANUAL - HRMS �
Numeric: Select Numeric in Value Type and enter the amount in Value.
�
(Figure 33)
The codes of already created categories will be displayed on the left. This will help in defining condition and formula.
Suite 1015 Sharad Technologies LLC, ETA Star Al Manara Tower, Business Bay, Dubai, UAE | [email protected] Page � of � 22 58

USER MANUAL - HRMS �
Formula: Select Formula in Value Type and type a formula using a category code that has already been created. For example, the formula for Dearness Allowance can be BAS*20/100, where BAS is the code for Basic Pay.
�
(Figure 34)
Suite 1015 Sharad Technologies LLC, ETA Star Al Manara Tower, Business Bay, Dubai, UAE | [email protected] Page � of � 23 58

USER MANUAL - HRMS �
Condition: Select the Value Type as Condition. Then you can define a condition by using an already created category code in the If and selecting one of the five operators in the Operator section — Greater Than, Less Than, Greater Than Equal To, Less Than Equal To and Equal To — and then setting an amount in Condition and entering a formula in the Value section.
For example, Dearness Allowance can be set as 10% of Basic Pay on a condition that Basic Pay is greater than 10,000. To do this, type BAS in If section, then select Greater Than in Operator and 10,000 in Condition. Then type in the formula in the Value section.
�
(Figure 35)
After entering all the details, click on Create Category button to the save the details in the Payroll Categories tab.
Suite 1015 Sharad Technologies LLC, ETA Star Al Manara Tower, Business Bay, Dubai, UAE | [email protected] Page � of � 24 58

USER MANUAL - HRMS �
Payroll Group Navigation Path: HRMS>Payroll>Payroll Group
What is Payroll Group?
Payroll groups are used to manage employees of your institution with similar pay structure and pay categories. Go to navigation menu, click on HRMS, Payroll, and then Payroll Group. Here you can see a list of payroll groups which are the different departments of the school that you created in the HRMS > Departments.
�
(Figure 36)
With the recent update, all your existing payroll categories and employees are linked to their default payroll groups.
Assign Payroll Categories to Payroll Groups
To assign earning or deduction categories to a payroll group/department, click on the View icon in the action column. In the window that opens, select the payroll categories that you want for the department. Then click on Update button.
Suite 1015 Sharad Technologies LLC, ETA Star Al Manara Tower, Business Bay, Dubai, UAE | [email protected] Page � of � 25 58

USER MANUAL - HRMS �
�
(Figure 37)
Suite 1015 Sharad Technologies LLC, ETA Star Al Manara Tower, Business Bay, Dubai, UAE | [email protected] Page � of � 26 58

USER MANUAL - HRMS �
Generate Employee Payslip Navigation Path: HRMS>Payroll>Generate Employee Payslip
This option lets you generate a payslip for an individual employee. Go to navigation menu, click on HRMS, Payroll, Generate Payslip for Individual. This will show a list of employees for a selected month along with details like their Department and Role.
�
(Figure 38)
To generate a payslip for an individual employee, first select the month. Then select the employee, whose payslip is to be generated and click on Generate button.
�
(Figure 39)
You can take a printout of the same by clicking on Click Here to Print.
Suite 1015 Sharad Technologies LLC, ETA Star Al Manara Tower, Business Bay, Dubai, UAE | [email protected] Page � of � 27 58

USER MANUAL - HRMS �
Generate Payslip for Group
Navigation Path: HRMS>Payroll>Generate Payslip For Group
You can generate payslips for an entire payroll group or school department by using this option. Go to navigation menu, click on HRMS, Payroll, and Generate Payslip for Group. This will show you a list of departments and their descriptions.
�
(Figure 40)
Select the month and the group for which you wish to generate the payslip. Then click on the Generate button. This will show a message saying Payslips Have Been Generated for the selected month.
Now you can view the payslip in the payslip report.
Suite 1015 Sharad Technologies LLC, ETA Star Al Manara Tower, Business Bay, Dubai, UAE | [email protected] Page � of � 28 58

USER MANUAL - HRMS �
Payslip Report
Navigation Path: HRMS>Payroll> Payslip Report
This section will generate payslips of employees according to their department. Go to navigation menu, click on HRMS, Payroll, then Payslip Report. Here, select the year and month and the department. Then, it will show a list of employees of the department along with their net salary.
�
(Figure 41)
To see individual payslips, click on View Payslip icon on the left of the particular employee’s name and it will show you the payslip.
�
(Figure 42)
On clicking Print option, you can take print of the payslip.
Suite 1015 Sharad Technologies LLC, ETA Star Al Manara Tower, Business Bay, Dubai, UAE | [email protected] Page � of � 29 58

USER MANUAL - HRMS �
Leaves Navigation Path: HRMS>Leaves
It consists of two sections
�
(Figure 43)
Leave Apply Navigation Path: HRMS>Leaves> Leave Apply
In this Leave Apply page you can see all the past Applied Leaves.
�
(Figure 44)
You can see all the details of applied leaves like Dates, Total Leaves available, count of leaves applied, Description (Reason) of the leaves. You can edit or delete the leaves applied from
Suite 1015 Sharad Technologies LLC, ETA Star Al Manara Tower, Business Bay, Dubai, UAE | [email protected] Page � of � 30 58

USER MANUAL - HRMS �
action. If you want to apply for a leave you can click on the Blue colored Plus Button on Top-Right Corner to apply for a new leave.
Apply for a Leave
�
(Figure 45)
On apply for a leave page your available leaves are shown. You can select the date from when you are taking the leave in From and till when you’ll be on leave in To text boxes. Mention the Reason for the leave(s) and Number of Days for leave and click on Submit button to apply.
Suite 1015 Sharad Technologies LLC, ETA Star Al Manara Tower, Business Bay, Dubai, UAE | [email protected] Page � of � 31 58
USER MANUAL - HRMS �
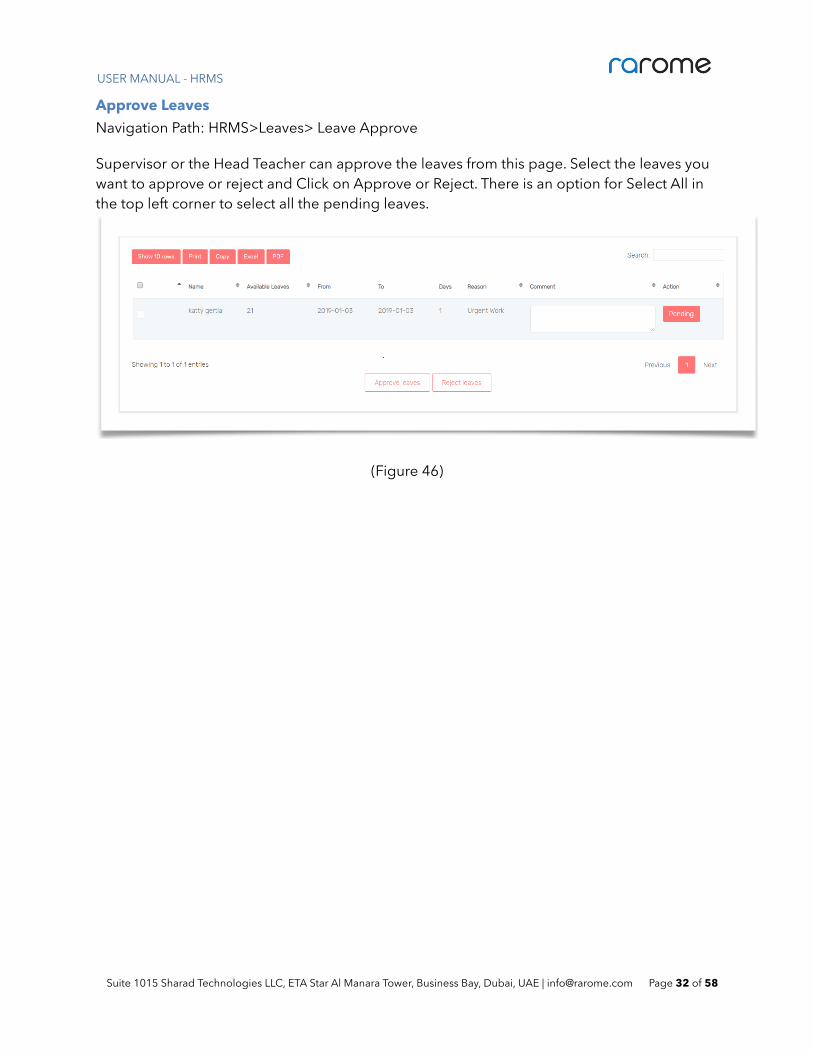
Approve Leaves Navigation Path: HRMS>Leaves> Leave Approve
Supervisor or the Head Teacher can approve the leaves from this page. Select the leaves you want to approve or reject and Click on Approve or Reject. There is an option for Select All in the top left corner to select all the pending leaves.
�
(Figure 46)
Suite 1015 Sharad Technologies LLC, ETA Star Al Manara Tower, Business Bay, Dubai, UAE | [email protected] Page � of � 32 58

USER MANUAL - HRMS �
HRMS You can manage all aspects of all the employees using the HRMS (Human Resource Management System) module of RAROME.
� (Figure 1)
� (Figure 2)
Let’s go through how HRMS works. When we click on menu option from top right side on login dashboard page(Figure 1), navigation will open which will show all modules, once user clicks on HRMS Tile in the menu
Suite 1015 Sharad Technologies LLC, ETA Star Al Manara Tower, Business Bay, Dubai, UAE | [email protected] Page � of � 33 58

USER MANUAL - HRMS �
(Figure2) , Following TILES (Figure 3) will be shown.
�
(Figure 3)
Suite 1015 Sharad Technologies LLC, ETA Star Al Manara Tower, Business Bay, Dubai, UAE | [email protected] Page � of � 34 58

USER MANUAL - HRMS �
1. Appraisal Navigation Path : HRMS > Appraisal
�(Figure 4)
1.1.Applied Appraisals Navigation Path : HRMS > Appraisal > Applied Appraisals
It contains two tabs – Apply for Appraisal – An Employee can apply for an appraisal in this tab. Select the Goal for which you are applying from the dropdown. Select Rating from the dropdown. Enter additional comment in the Comment text box. Click on Apply for Appraisal to apply.
�
(Figure 5)
Suite 1015 Sharad Technologies LLC, ETA Star Al Manara Tower, Business Bay, Dubai, UAE | [email protected] Page � of � 35 58

USER MANUAL - HRMS �
There is a Red Plus button on Top Right which is used when one wants to apply for multiple appraisals.
�
(Figure 6)
There is Red delete button on the Top Right if there are multiply rows to delete the row.
Applied Appraisals In this tab you can see your already applied appraisals.
�
(Figure 7)
You can see the details of the appraisal like Supervisor(s) Rating and if Hike awarded or not. You can edit or delete the applied appraisal.
Suite 1015 Sharad Technologies LLC, ETA Star Al Manara Tower, Business Bay, Dubai, UAE | [email protected] Page � of � 36 58

USER MANUAL - HRMS �
1.2.Appraisal Applications Navigation Path : HRMS > Appraisal > Appraisal Applications
In this section HR can see all the applications submitted for appraisal by his or her Subordinates.
�
(Figure 8)
List shows Employee name, Goals for which they have applied. You can see and update the application submitted by the subordinates by clicking on eye button. A pop up will appear. Select Feedback rating from the dropdown , enter additional comment. Select Overall Rating from the drop down, provide overall feedback and click on Update button to update the Application.
Suite 1015 Sharad Technologies LLC, ETA Star Al Manara Tower, Business Bay, Dubai, UAE | [email protected] Page � of � 37 58

USER MANUAL - HRMS �
�
(Figure 9)
Suite 1015 Sharad Technologies LLC, ETA Star Al Manara Tower, Business Bay, Dubai, UAE | [email protected] Page � of � 38 58
USER MANUAL - HRMS �
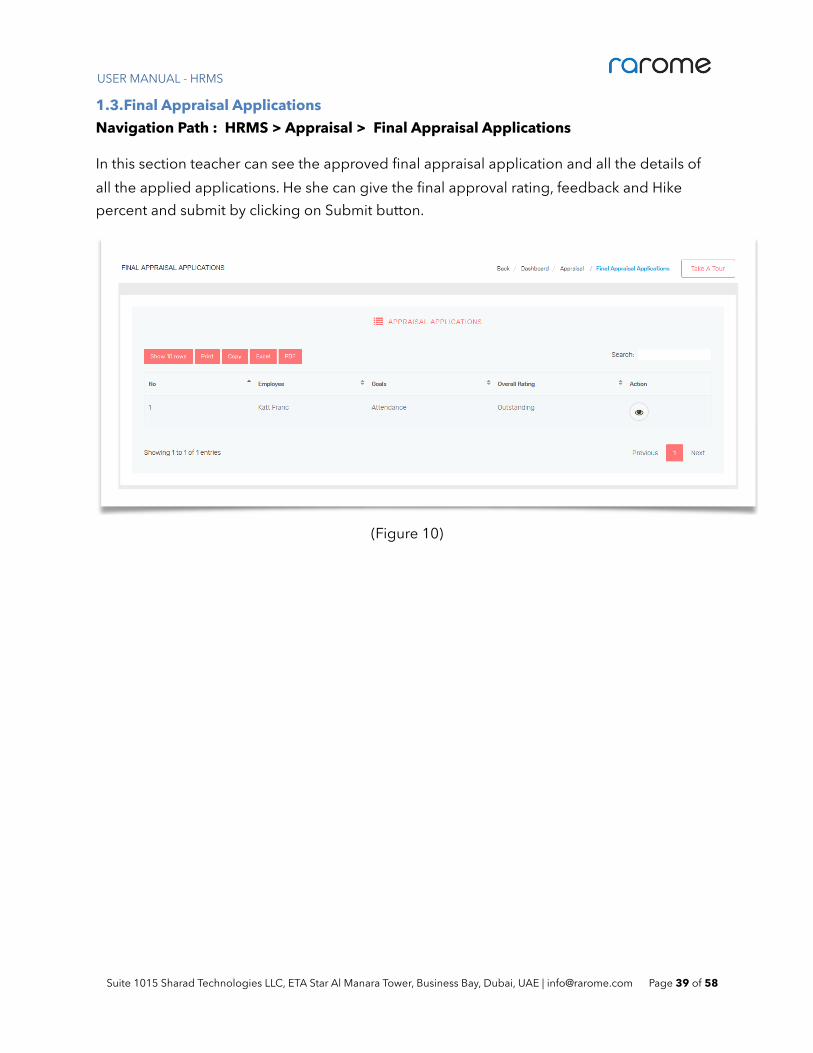
1.3.Final Appraisal Applications Navigation Path : HRMS > Appraisal > Final Appraisal Applications
In this section teacher can see the approved final appraisal application and all the details of all the applied applications. He she can give the final approval rating, feedback and Hike percent and submit by clicking on Submit button.
�(Figure 10)
Suite 1015 Sharad Technologies LLC, ETA Star Al Manara Tower, Business Bay, Dubai, UAE | [email protected] Page � of � 39 58

USER MANUAL - HRMS �
�
(Figure 11)
Suite 1015 Sharad Technologies LLC, ETA Star Al Manara Tower, Business Bay, Dubai, UAE | [email protected] Page � of � 40 58

USER MANUAL - HRMS �
1.4.Ratings Navigation Path : HRMS > Appraisal > Ratings
HR or School Admin can manage different Ratings used in Appraisal. Ratings can be added or deleted by using Edit and Delete action buttons.
�
(Figure 12)
Create Ratings You can create new ratings for appraisal from this page. Just give Name and Description and click on Create Rating button. A new rating will be added.
�
(Figure 13)
Suite 1015 Sharad Technologies LLC, ETA Star Al Manara Tower, Business Bay, Dubai, UAE | [email protected] Page � of � 41 58

USER MANUAL - HRMS �
1.5.Goals Navigation Path : HRMS > Appraisal > Goals
HR or School admin can manage different Goals used for Appraisal from this page. You can see all the Goals listed here as shown in figure 14.
Goals can be added or deleted by using Edit and Delete action buttons.
�
(Figure 14)
Create Goal – You can create a new goal from Create Goal tab screen. Just Select Rating from drop down, give a Title and Description and click on Create Goal button.
Suite 1015 Sharad Technologies LLC, ETA Star Al Manara Tower, Business Bay, Dubai, UAE | [email protected] Page � of � 42 58

USER MANUAL - HRMS �
�
(Figure 15)
Suite 1015 Sharad Technologies LLC, ETA Star Al Manara Tower, Business Bay, Dubai, UAE | [email protected] Page � of � 43 58

USER MANUAL - HRMS �
2. Recruitment Navigation HRMS>Recruitment
HR can recruit new Staff from Recruitment.
�
(Figure 16)
2.1.Job Openings Navigation HRMS>Recruitment>Job Openings
HR or School admin can manage all the Job openings from here.
Job Openings can be added or deleted by using Edit and Delete action buttons.
�
Suite 1015 Sharad Technologies LLC, ETA Star Al Manara Tower, Business Bay, Dubai, UAE | [email protected] Page � of � 44 58

USER MANUAL - HRMS �
(Figure 17)
Create Job Opening New job opening can be created from here. Provide Job Role, Job code, Select Department from dropdown, Minimum Experience, Salary Offered and Description. Now click on Create Job Opening to create a job opening.
�
(Figure 18)
Suite 1015 Sharad Technologies LLC, ETA Star Al Manara Tower, Business Bay, Dubai, UAE | [email protected] Page � of � 45 58

USER MANUAL - HRMS �
2.2.Recruitment Form Navigation HRMS>Recruitment> Recruitment Form Recruitment form can be submitted from this page.
�
(Figure 19)
Suite 1015 Sharad Technologies LLC, ETA Star Al Manara Tower, Business Bay, Dubai, UAE | [email protected] Page � of � 46 58

USER MANUAL - HRMS �
2.3.Job Candidates Navigation HRMS>Recruitment> Job Candidates All the Job candidates can be seen here. Candidates can be filtered according to the post they have applied for. Candidate can be deleted by clicking on Delete button.
�
(Figure 20)
Candidates Resume can be viewed and downloaded by View and Download buttons.
Suite 1015 Sharad Technologies LLC, ETA Star Al Manara Tower, Business Bay, Dubai, UAE | [email protected] Page � of � 47 58

USER MANUAL - HRMS �
�
(Figure 21)
Candidate’s profile can be viewed by clicking on View button.
Suite 1015 Sharad Technologies LLC, ETA Star Al Manara Tower, Business Bay, Dubai, UAE | [email protected] Page � of � 48 58

USER MANUAL - HRMS �
�
(Figure 22)
Suite 1015 Sharad Technologies LLC, ETA Star Al Manara Tower, Business Bay, Dubai, UAE | [email protected] Page � of � 49 58

USER MANUAL - HRMS �
To select candidate for interview process click on Submit button candidate will be selected for interview process.
2.4.Job Interviews Navigation HRMS>Recruitment> Job Interviews Here all the candidates selected for interview process can be seen. Candidates can be filtered according to the post by using the dropdown.
� (Figure 23)
When candidate is selected first time for interview process he’ll have to go through 3 rounds of interview process.
� (Figure 24)
Suite 1015 Sharad Technologies LLC, ETA Star Al Manara Tower, Business Bay, Dubai, UAE | [email protected] Page � of � 50 58

USER MANUAL - HRMS �
Round 1 – When you click on Round 1 a pop up will be shown.
�
(Figure 25)
If you click on Schedule Interview pop will be expanded and few more controller will be visible see figure 26.
Suite 1015 Sharad Technologies LLC, ETA Star Al Manara Tower, Business Bay, Dubai, UAE | [email protected] Page � of � 51 58

USER MANUAL - HRMS �
�
(Figure 26)
Here you can select Interviewer, Interview time and mention the Place for interview. If you click on Forward To Next Round candidate will be forwarded to next round. If you click on Selection candidate will be selected directly. Once you click on Submit button. Candidate’s status will be changed as shown in figure 27.
� (Figure 27)
Suite 1015 Sharad Technologies LLC, ETA Star Al Manara Tower, Business Bay, Dubai, UAE | [email protected] Page � of � 52 58

USER MANUAL - HRMS �
When you click on Forward To Next Round status will be changed in following manner as shown in figure 28.
�(Figure 28)
Same process will be for Round 2 and Round 3.
When a candidate is forwarded to Round 3 and when you click on Round 3 button following screen will be shown.
�
Suite 1015 Sharad Technologies LLC, ETA Star Al Manara Tower, Business Bay, Dubai, UAE | [email protected] Page � of � 53 58

USER MANUAL - HRMS �
(Figure 29)
� (Figure 30)
Once the Candidate is selected in Interview process status will be changed in following manner.
� (Figure 31)
Suite 1015 Sharad Technologies LLC, ETA Star Al Manara Tower, Business Bay, Dubai, UAE | [email protected] Page � of � 54 58
USER MANUAL - HRMS �
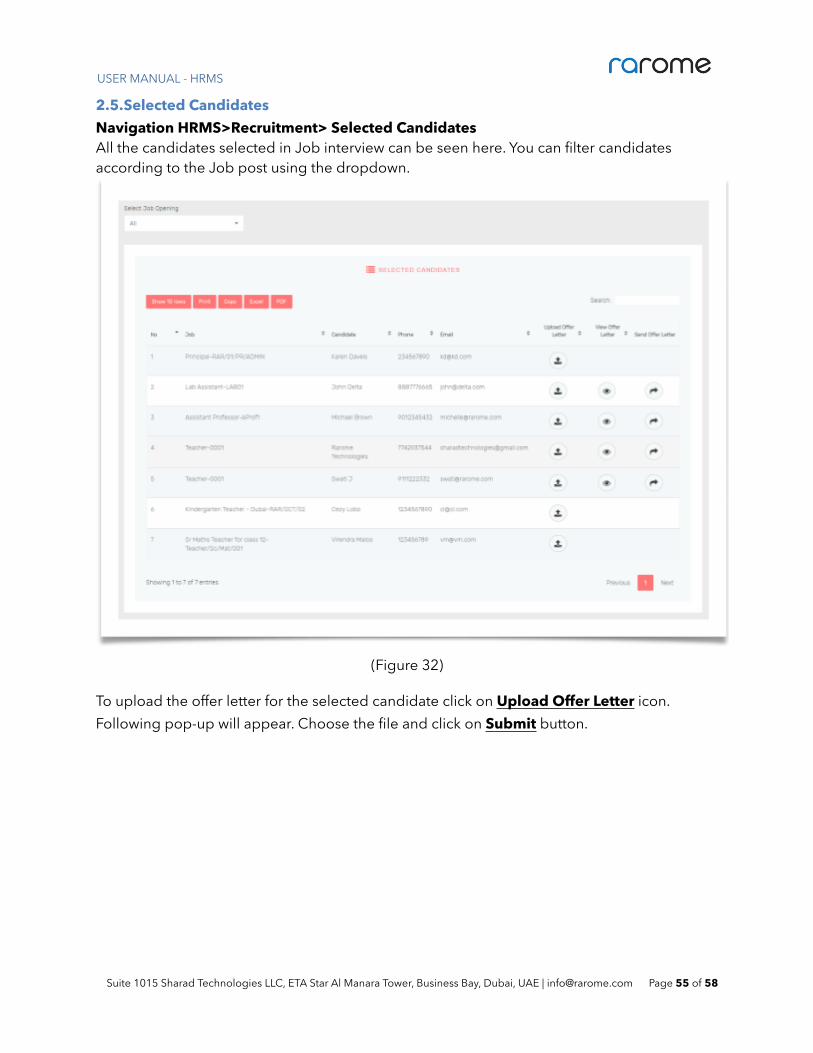
2.5.Selected Candidates Navigation HRMS>Recruitment> Selected Candidates All the candidates selected in Job interview can be seen here. You can filter candidates according to the Job post using the dropdown.
�(Figure 32)
To upload the offer letter for the selected candidate click on Upload Offer Letter icon. Following pop-up will appear. Choose the file and click on Submit button.
Suite 1015 Sharad Technologies LLC, ETA Star Al Manara Tower, Business Bay, Dubai, UAE | [email protected] Page � of � 55 58

USER MANUAL - HRMS �
�
(Figure 33)
To view the offer letter, click on View icon. To send the offer letter, click on Send icon.
Suite 1015 Sharad Technologies LLC, ETA Star Al Manara Tower, Business Bay, Dubai, UAE | [email protected] Page � of � 56 58

USER MANUAL - HRMS �
�
(Figure 34)
Suite 1015 Sharad Technologies LLC, ETA Star Al Manara Tower, Business Bay, Dubai, UAE | [email protected] Page � of � 57 58

USER MANUAL - HRMS �
Thank you!
Suite 1015 Sharad Technologies LLC, ETA Star Al Manara Tower, Business Bay, Dubai, UAE | [email protected] Page � of � 58 58