hydraw library manager 2019 user manual - vestusa.com · library manager 2019 vest, inc. 3250 w,...
TRANSCRIPT


HyDraw® Library Manager 2019
VEST, Inc. 3250 W, Big Beaver Road, Suite 440, Troy, MI 48084 USA
Tel: +1 248 649 9550 Email: [email protected] Visit: www.VESTusa.com

HyDraw® Library Manager 2019 User Manual v180623 © VEST, Inc. 2002 -2018. All rights reserved.
VEST, Inc.
HyDraw® Library Manager 2019 Software Product License Agreement
Notice: Read this before installing the software.
Carefully read the terms and conditions of this agreement before opening the product package. Opening the package indicates your acceptance of these terms and conditions. If you do not agree with the terms and conditions of this Agreement, promptly return the package unopened to the place where you obtained it.
Definitions
The Software Product is licensed (not sold) to you. The Software product includes all copies of the Software Product and its related supporting materials.
License
VEST, Inc. (we, our, us) grants you a personal, non-transferable, and non-exclusive license to use the Software Product in the specified quantity only.
You may not:
1. distribute, sublicense or copy any portion of the Licensed Software product:
2. modify or prepare derivative works from the Licensed Software Product:
3. transmit the Licensed Software product electronically by any means: or
4. Use the Licensed Software product in multiple computer for multiple user arrangements unless that use is covered by individual license for each computer or user.
You agree that the Licensed Software product belongs to us and you agree to keep confidential and use your best efforts to prevent and protect the contents of the Licensed Software Product from unauthorized disclosure. Limited
1. For 90 days from the date of shipment, we warrant that the media (for example, CD) on which the Licensed Software Product is contained will be free from defects in materials and workmanship. The warranty does not cover damage caused by viruses, improper use or neglect. We do not warrant the contents of the Licensed Software Product (it is furnished "AS IS" and without warranty as to the performance or results you may obtain by using the Licensed Software Product) or that it will be error free.
2. You assume the entire risk as to the results and performance of the Licensed Software Product. To get media warranty service during the 90-day warranty period, you may return the Product (postage paid) with a description of the problem to the place where you obtained it. The defective media on which the Licensed Software Product is contained will be replaced at no additional charge to you.
3. If you do not receive media that is free from defects in materials and workmanship during the 90-day warranty period, you will receive a refund or credit to your account for the amount you paid for the Licensed Software Product returned.
Disclaimer of Warranty
YOU UNDERSTAND AND AGREE AS FOLLOWS:
1. Warranties in this agreement replace all other warranties, express or implied, including any warranties of merchantability or fitness for a particular purpose. We disclaim and exclude all other warranties.
2. We will not be liable for any loss or damage caused by delay in furnishing a Licensed Software Product or any other performance under this Agreement.
3. Our entire liability and your exclusive remedies for our liability of any kind (including liability for negligence except liability for personal injury caused solely by our negligence) for the Licensed Software Product covered by the Agreement and all other performance or non-performance by us under or related to this Agreement are limited to the remedies specified by this Agreement.
4. In no event will our liability of any kind include any special incidental or consequential damages, even if we have knowledge of the potential loss or damage.
5. Special notice to consumers: some states do not allow the exclusion of implied warranties so the above exclusion may not apply to you. The warranty gives you special legal rights, and you may also have other rights, which vary from state to state.
Termination
This Agreement is effective until terminated. You may terminate it any time by destroying the Licensed Software Product. It will also terminate if you do not comply with any term or condition of this Agreement. You agree upon termination to destroy the Licensed Software Product.
General
You are responsible for installation, management and operation of the Licensed Software Product.

HyDraw® Library Manager 2019
Contents
1. Introduction ................................................................................ 1 2. Installation .................................................................................. 2 3. HyDraw Library Manager Menu bar ............................................ 3 4. Update Symbol Library ................................................................ 4 5. Options ........................................................................................ 8
Components ............................................................... 13 6. Components - Symbol View ...................................................... 14 7. Components - Model Data View ............................................... 31 8. Documents ................................................................................ 40 9. CAD Files ................................................................................... 42 10. Components - Model Properties ............................................... 44 11. Components - Design Properties ............................................... 48 12. Components - Display Formats ................................................. 51 13. Components - Component Types .............................................. 55 14. Manage List ............................................................................... 63
Accessories ................................................................ 69 15. Accessories ................................................................................ 70 16. Documents ................................................................................ 73 17. CAD Files ................................................................................... 74 18. Accessories - Model Properties ................................................. 75 19. Accessories - Component Types ................................................ 76 20. Manage List ............................................................................... 79
External Ports ............................................................. 80 21. External Ports ............................................................................ 81 22. External Ports - Model Properties ............................................. 84 23. External Ports - Design Properties ............................................. 86
24. External Ports - Display Formats ............................................... 88
Connections ............................................................... 91 25. Connections .............................................................................. 92 26. Connections - Model Properties ................................................ 95 27. Connections - Design Properties ............................................... 98 28. Connections - Display Formats ................................................ 100 29. Connections - Connection Lines .............................................. 103 30. Connections - Connectors ....................................................... 105
Sub-Systems ............................................................ 109 31. Sub-Systems - Symbol View .................................................... 110 32. Sub-Systems - Model Data View ............................................. 123 33. Documents .............................................................................. 128 34. CAD Files ................................................................................. 129 35. Sub-Systems - Model Properties ............................................. 130 36. Sub-Systems - Design Properties ............................................. 134 37. Sub-Systems - Display Formats................................................ 137 38. Sub-Systems - Sub-System Types ............................................ 141
Miscellaneous .......................................................... 149 39. Migrating Library ..................................................................... 150 40. HyDraw Update From Excel Interface Manager ...................... 151 41. HyDraw Import Library ............................................................ 154

VEST, Inc. HyDraw® Library Manager 2019 1
1. Introduction HyDraw® Library Manager 2019 makes symbol and component library management easy.
Fast and easy component building and maintenance.
Edit components to your specific need.
Assign components with the related accessories, documents, and CAD files (2D/3D component image/video).
Component design and model properties parameters are included to design customized component model and sub-system.
Exhaustive list of external ports and cavity/footprint of different manufacturers included.
Search command to find symbol or component with required properties.
Both Imperial and Metric units. Conversion from imperial to metric and vice- versa.
GUI interface with helpful icons and tool tips.
Context menu quick access to relevant commands.
Protection against accidental deletion of essential component properties.
Network enabled, enhances productivity of the design and engineering team.
Multiple users within a local area network can share a common HyDraw library and database.
Import Component Model Data and ERP data from Excel into HyDraw.
HyDraw Library Manager Home Page

VEST, Inc. HyDraw® Library Manager 2019 2
2. Installation The HyDraw® installation program installs the HyDraw Library Manager 2019 on your computer system.
System Requirements
▪ Windows 7/8.1/10
▪ Microsoft .NET Framework version 4.5 or higher
▪ Adobe Reader 10.0 or higher
▪ HyDraw CAD 2019
▪ *Microsoft Excel 2013 or higher
*Required only for importing Model data into HyDraw Library
Installation
1. Run the self-extracting exe, HyDraw Library Manager 2019.0.0.1 R x64 EN Setup.exe/HyDraw Library Manager 2019.0.0.1 R x64 IT Setup.exe from the Downloaded installation and Unzip or run the Setup.exe from the DVD.
The installation program starts and guides you through the installation process.
2. Read the Readme from the download page or from the DVD, if required.
HyDraw Library Manager 2019 is installed on the system and displayed in the Windows Start > All Apps > VEST
Installation Wizard

VEST, Inc. HyDraw® Library Manager 2019 3
3. HyDraw Library Manager Menu bar
Library Manager Menu bar
Components
Manage Components
Home
Click to open the Home page.
Accessories
Manage Accessories
Update Symbol Library
Click to update local library with new or modified symbols available on FluidPowerTools.com.
External Ports
Manage External Ports
Options
Click to set the Unit, Library path and Internet settings.
Connections
Manage Connections
User Manual
Click to open the HyDraw Library Manager User Manual.
Sub-Systems
Manage Sub-Systems
About HyDraw Library Manager
Click to view the Version and Build number of the installed HyDraw Library Manager.
Exit
Click to exit the HyDraw Library Manager.

VEST, Inc. HyDraw® Library Manager 2019 4
4. Update Symbol Library Update your local library with new or modified symbols available on the FluidPowerTools.com website.
1. Click the Update Symbol Library icon on the menu bar to update the symbol library.
The HyDraw® Update Symbol Library dialog box displays.
2. Select the required library.
3. Click Check for Updates.
The program downloads the list of new symbols and modified symbols.
HyDraw Update Symbol Library

VEST, Inc. HyDraw® Library Manager 2019 5
Add New Symbols
The New Symbols tab displays the tree view of the symbol folders in the left pane. When a folder is selected, the Available Symbols are displayed in the right pane.
1. Click the Add All Symbols button to download all the new symbols from the FluidPowerTools.com website and update the local library.
2. Click Select All to select all the symbols displayed in the right pane.
3. Click Add Selected Symbols to update the currently selected symbols to the local library
You can select a single symbol or multiple symbols by drag select or Use Ctrl + C to select multiple symbols.
HyDraw Update Symbol Library – New Symbols

VEST, Inc. HyDraw® Library Manager 2019 6
Replace Modified Symbols
The Modified Symbols tab shows the tree view of the symbol folders in the left pane. When a folder is selected, Available Symbols are displayed in the right pane.
1. Select the Exclude Symbols: Modified checkbox, if you do not want to list the current library symbol(s) modified.
2. Click the Replace All Symbols button to replace all the modified symbols from the FluidPowerTools.com website and update the local library.
3. Click Select All to select all the symbols displayed in the right pane.
You can select a single symbol or multiple symbols by drag select or Use Ctrl + C to select multiple symbols.
4. Click Replace Selected Symbols to replace currently selected symbols to the local library.
HyDraw Update Symbol Library – Modified Symbols

VEST, Inc. HyDraw® Library Manager 2019 7
Compare Symbols View and compare a symbol in My Local Library and the modified symbol available in the FluidPowerTools.com website.
Click Details to view the modified symbol property of a symbol in My Library and the modified symbol available in the FluidPowerTools.com Library.
Compare Symbols
Modified Symbol Property

VEST, Inc. HyDraw® Library Manager 2019 8
5. Options Set Units, Library Path and Internet Settings.
Click , the Options icon, on the menu bar to set Units, Library Path and Internet Settings.
The HyDraw Library Manager Options dialog box displays.
HyDraw Library Manager Options

VEST, Inc. HyDraw® Library Manager 2019 9
Units
1. Click the Units tab.
2. Select the Current units system you want to work with.
If you change the unit system in the library, the data, which is already available in the drawing and library will not be converted automatically.
3. Click the Edit Units button.
The Define Units dialog box displays.
4. Select the Unit category.
5. Set the Imperial unit.
6. Set the Metric unit.
7. Set the decimal precision.
8. Click Save.
If required, change the Category name and click Save As New to add the new Unit category.
Options dialog box – Units tab
Define Units dialog box

VEST, Inc. HyDraw® Library Manager 2019 10
Library Path
1. Click the Library Path tab.
2. Click Browse… to navigate to the folder, where the HyDraw® Library data is installed.
3. Similarly browse for the Symbol library and Sub-Systems.
4. Click OK.
All the HyDraw Library paths are configured.
Note:
The Library path can be configured to the common network path.
Set Library Path

VEST, Inc. HyDraw® Library Manager 2019 11
Internet Settings Configure the Internet settings of the HyDraw Library Manger 2019 to access FluidPowerTools.com.
Click the Internet Settings tab to configure the Internet settings.
Automatic Settings Detection
If your computer is connected to the Internet through a direct LAN connection, then select the configuration, Automatically detect settings.
Internet Settings – Automatically detect settings
Proxy Connection
If your computer is connected to the Internet through a web proxy server, then select Use proxy server.
Configure the proxy settings.
1. Enter Address.
2. Enter the Port number.
3. Enter authentication details, if required.
You may refer to the settings that may be already defined in your web browser.
4. Click OK to save. Internet Connection Settings – Use Proxy Server

VEST, Inc. HyDraw® Library Manager 2019 12
About HyDraw Library Manager
Click the About Library Manager icon on the menu bar to display the version and build number of the installed HyDraw Library Manager.
About HyDraw Library Manager

VEST, Inc. HyDraw® Library Manager 2019 13
Components
Manage symbols, model data, documents, CAD files, component models and their properties, linked accessories and lists.
6 Symbol View
7 Model Data View
8 Documents
9 CAD Files
10 Model Properties
11 Design Properties
12 Display Formats
13 Component Types
14 Manage Lists
VEST, Inc. HyDraw® Library Manager 2019 14
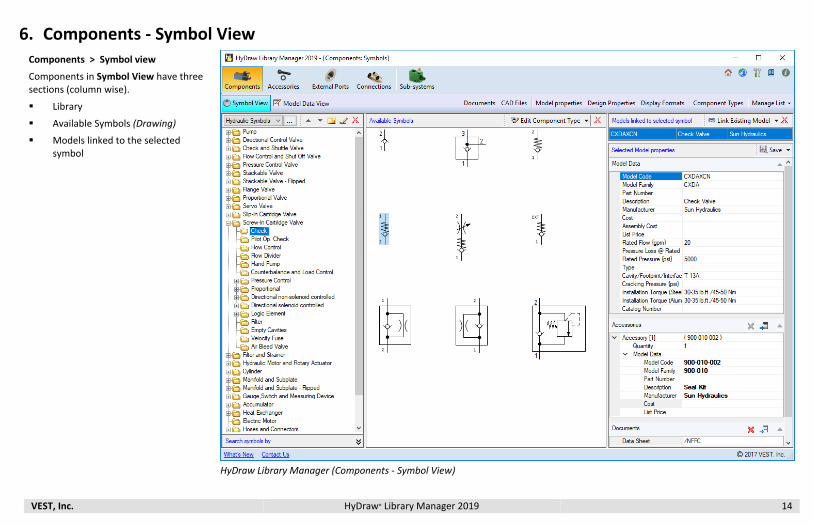
6. Components - Symbol View Components > Symbol view
Components in Symbol View have three sections (column wise).
▪ Library
▪ Available Symbols (Drawing)
▪ Models linked to the selected symbol
HyDraw Library Manager (Components - Symbol View)

VEST, Inc. HyDraw® Library Manager 2019 15
Library Section
The Library section displays a logically structured tree-view library.
Click the required folder to display the symbols in the Drawing section.
You can:
▪ Create a new library
▪ Create a new folder
▪ Rename an existing folder
▪ Delete a folder
▪ Move a folder up or down to customize the tree view
When you delete a folder, it deletes all its sub folders along with the symbols.
The commands are displayed as icons on the caption bar and in the context menu.
Library tree view

VEST, Inc. HyDraw® Library Manager 2019 16
Add New Folder
1. Right click the required folder in the library folder section and select Add New from the context menu. Or
Click button on the caption bar.
The Add New Folder dialog box displays.
2. Enter the name of the new folder and click OK. The new folder is created.
Library context menu
Add New Folder dialog box
Folder created under selected category

VEST, Inc. HyDraw® Library Manager 2019 17
Create New Custom Symbol Library
Create a new custom Symbol library from scratch.
1. Click .
The Manage Symbol Library dialog box displays.
2. Enter Library name.
3. Select the None option from the Parent library drop down.
4. Click Add New.
5. Click Close.
Note: The user-created libraries can be
▪ Renamed by clicking the Rename button.
▪ Deleted by clicking the Delete button.
CAUTION!
The deleted libraries cannot be recovered.
Manage Symbol Library

VEST, Inc. HyDraw® Library Manager 2019 18
Create New Child Symbol Library
Create a new child Symbol library from any of the three parent libraries: Hydraulic symbols, Pneumatic symbols, and Electrical symbols.
1. Click .
The Manage Symbol Library dialog box displays.
2. Enter Library Name.
3. Select the required option from the Parent library drop down: Hydraulic Symbols/Pneumatic Symbols/Electric Symbols.
4. Click Add New.
5. Click Close.
Note: The user-created libraries can be
▪ Renamed by clicking the Rename button.
▪ Deleted by clicking the Delete button.
CAUTION!
The deleted libraries cannot be recovered.
Manage Symbol Library

VEST, Inc. HyDraw® Library Manager 2019 19
Add Symbols to Child Symbol Library from Parent Library
Add New Folder
1. Right click the required folder in the library folder section and select Add New from the context menu.
or Click button on the caption bar.
The Add New Folder dialog box displays.
2. Select the Import Symbol option from the middle section caption bar drop-down.
The Import Symbol from Parent Library dialog box displays.
3. Traverse through the library on the left pane and select the required folder.
The available symbols are listed in the middle pane.
4. Click Select All to select all the symbols.
or Click the symbol to select or Press Ctrl + symbol to select more symbols.
5. Click the Add button.
The selected symbols are listed in the right pane.
6. Review and remove the symbols that are not required by clicking the Remove button.
7. Click OK to import the symbols.
Add New Folder dialog box Symbols Context Menu
Import Symbols from Parent Library

VEST, Inc. HyDraw® Library Manager 2019 20
Component Library

VEST, Inc. HyDraw® Library Manager 2019 21
Search symbols by
Search symbols, per parameters: Date modified, Component type, Model Code and Model description.
Search symbols by

VEST, Inc. HyDraw® Library Manager 2019 22
Edit Component Type
1. Select the symbol in the drawing to edit the component type.
2. Click Edit Component Type on the caption bar.
The Edit Component Type dialog box displays.
3. Select the required application and the component type.
4. Click OK.
The specified component type is saved to the selected component.
Edit Component Type
Delete symbol
Select , the delete icon on the caption bar to delete the selected symbol.
The symbol is deleted from the library.

VEST, Inc. HyDraw® Library Manager 2019 23
Models linked to selected symbol
The Models linked to selected symbol section displays models, accessories, documents, and CAD files linked to the selected symbol.
Three functionalities:
• Link Existing Model
• Create New Model and Link
• Import Model Data and Link
Model Properties Section
VEST, Inc. HyDraw® Library Manager 2019 24
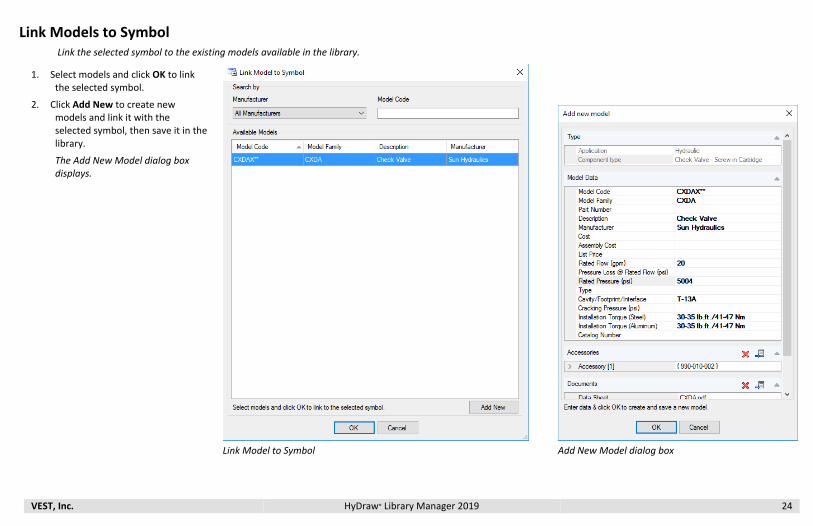
Link Models to Symbol Link the selected symbol to the existing models available in the library.
1. Select models and click OK to link the selected symbol.
2. Click Add New to create new models and link it with the selected symbol, then save it in the library.
The Add New Model dialog box displays.
Link Model to Symbol
Add New Model dialog box

VEST, Inc. HyDraw® Library Manager 2019 25
Accessories
1. Link Component as accessories
Link existing components as accessory available in the library to the selected model.
Link Component as Accessory
2. Link Accessories
Link selected model to the existing accessories available in the library.
Link Accessory
VEST, Inc. HyDraw® Library Manager 2019 26
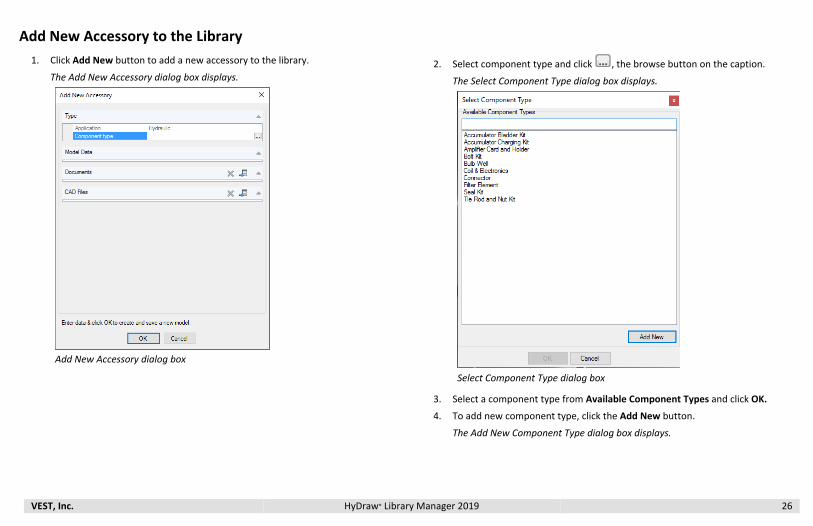
Add New Accessory to the Library
1. Click Add New button to add a new accessory to the library.
The Add New Accessory dialog box displays.
Add New Accessory dialog box
2. Select component type and click , the browse button on the caption.
The Select Component Type dialog box displays.
Select Component Type dialog box
3. Select a component type from Available Component Types and click OK.
4. To add new component type, click the Add New button.
The Add New Component Type dialog box displays.

VEST, Inc. HyDraw® Library Manager 2019 27
Add New Component Type
5. Enter the Name of the component type.
6. Select Component Group.
The Select Model Properties dialog box displays.
Select Model Properties
7. Click Add New property.
8. Select the required model properties to add to your accessories.
9. Click OK.
Note:
Refer Chapter 10, Components – Model Properties for Add New

VEST, Inc. HyDraw® Library Manager 2019 28
Documents
Link the selected model to the existing documents available in the local library.
Link Documents
Add a new document and link it to the selected model.
Add New Document

VEST, Inc. HyDraw® Library Manager 2019 29
CAD Files
Link a selected model to existing CAD files available in the library.
Link CAD File
Add a new CAD file and link it to the selected model.
Add New CAD File – From LAN
Add New CAD File - From Web

VEST, Inc. HyDraw® Library Manager 2019 30
Create New Model and Link
1. Create a new model for the selected symbol and link.
2. Enter model data, link accessories, documents and CAD files.
3. Click OK to link the selected symbol.
Create New Model
Import Model Data and Link
The Import command imports model data in the Microsoft Excel Sheet into HyDraw Library and links it to the selected symbol. Refer Chapter 7, Components – Model Data view, Section Import, Page No. 34.

VEST, Inc. HyDraw® Library Manager 2019 31
7. Components - Model Data View View all the available components and their properties.
Components > Model Data View
Model Data Manager has three sections (column wise):
• Search by
• Available Models
• Selected Model Properties
HyDraw Library Manager – (Components - Model Data View)

VEST, Inc. HyDraw® Library Manager 2019 32
Search by
Search for model or all models of a particular component type, manufacturer, or models of any component type of any manufacturer.
Search by Section

VEST, Inc. HyDraw® Library Manager 2019 33
Available Models
The Available Models section displays four mandatory properties: Model Code, Model Family, Description, and Manufacturer.
Import model data from the Excel sheet, Create a New model or Delete an existing model by selecting the icons on the caption bar. Note:
▪ You can also delete a single model or multiple models; right click and then select Delete Model(s) from the context menu.
▪ Link documents or CAD files either to a single model or multiple models from the Link Documents and Link CAD Files options in the context menu.
▪ Link accessories either to a single model or multiple models from the Link Accessories option in the context menu.
Available Models Section

VEST, Inc. HyDraw® Library Manager 2019 34
Import
Import model data from Microsoft Excel / your ERP system into the HyDraw library
Update properties, such as list price, cost, and assembly cost of the models in the HyDraw library with the changes made in your ERP data.
Note:
1. Manually Export model data from your ERP system into Microsoft Excel.
2. Manually link models to the following items after importing the data into the library.
Symbol, CAD file, Documents, Accessories
3. To add more data in addition to the properties available in your ERP, add the data into the Microsoft Excel sheet before importing into the HyDraw library.
Import Model Data from Excel
1. Click Import.
The Import Model Data from Excel dialog box displays.
2. Browse and select the Excel file with the model data.
The program populates the Select sheet to import the drop-down list with the sheet names.
3. Select the sheet you want to import.
4. Select the Import options.
Select the Add new models option or Select the Update existing models option to update the properties in the HyDraw library.
5. Click Next to continue.
The Select columns to import page displays with a list of columns in the selected sheet.
Import Model Data from Excel

VEST, Inc. HyDraw® Library Manager 2019 35
6. Select the My data has headers option, if there are headers for columns in the Excel sheet.
The column names in the list changes to the column headers.
7. Click Next to continue.
The Map Properties page appears with the list of columns selected to import.
Import Model Data from Excel – Select Columns to import
Note:
▪ Use the Select All option to select all the items in the list. This is a toggle button. When you click on the button, the text will toggle ‘Select All/None’.
▪ The last used columns are selected by default, the next time you run the command.
The Column name for HyDraw property mapping will be saved in the library and equivalent properties will be assigned automatically, the next time you run the command.
If the mapping information is not available in the library, then the program will automatically assign the equivalent property, if the column name is same as the property name.
8. Select the My data contains component types option.
9. Click to select the column containing the component types.
Use this option, if you have component types available in the Excel sheet for each model.
Import Model Data from Excel – Map Properties

VEST, Inc. HyDraw® Library Manager 2019 36
Map Property
1. Select the column name and click Map Property.
The Select Equivalent Property dialog box displays.
2. Select the property and click OK.
3. Repeat the above steps and assign equivalent property for all the columns.
4. Click Next to continue.
The Available Model Data page displays with all the models in the selected sheet.
Note:
1. The data in Excel must have all mandatory properties, such as Model Code, Model Family, Manufacturer, and Description. You will not be able to continue, if any of these four items are missing.
2. If Part Number is selected to find the existing model, then Part Number also becomes a mandatory field.
3. If component types are not entered in the Excel sheet, then you can specify the component type from the last page of this wizard.
Select Equivalent Property
VEST, Inc. HyDraw® Library Manager 2019 37
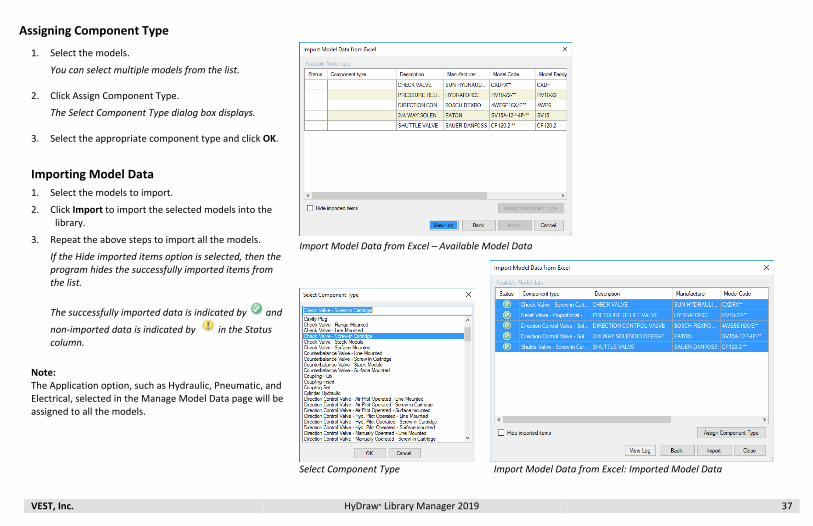
Assigning Component Type
1. Select the models.
You can select multiple models from the list.
2. Click Assign Component Type.
The Select Component Type dialog box displays.
3. Select the appropriate component type and click OK.
Importing Model Data
1. Select the models to import.
2. Click Import to import the selected models into the library.
3. Repeat the above steps to import all the models.
If the Hide imported items option is selected, then the program hides the successfully imported items from the list.
The successfully imported data is indicated by and
non-imported data is indicated by in the Status column.
Note: The Application option, such as Hydraulic, Pneumatic, and Electrical, selected in the Manage Model Data page will be assigned to all the models.
Import Model Data from Excel – Available Model Data
Select Component Type Import Model Data from Excel: Imported Model Data

VEST, Inc. HyDraw® Library Manager 2019 38
Selected Model properties The Selected Model properties section displays the properties of the selected model. Change the property of the model in the Model Data section.
1. Enter new properties and click Save to save the model properties.
2. Click Save As to save it as a new model.
You can also link accessories, documents, CAD files and symbols to the selected model.
Note:
You can link a single accessory or multiple accessories from library to the selected model. Drag select, then click OK in the Link Accessory dialog box.
Selected Model properties Section

VEST, Inc. HyDraw® Library Manager 2019 39
Link Symbol
1. Click in the Symbols linked to selected mode section.
The Linked Symbol dialog box displays.
2. Browse through the folders in the first pane.
3. View the Available Symbols in the selected folder.
4. Select the symbol to link and click Add in the Selected symbols pane.
5. Click OK to link the selected symbols.
Click to traverse through the linked symbols.
Click to delete the linked symbols.
Linked Symbol dialog box
VEST, Inc. HyDraw® Library Manager 2019 40
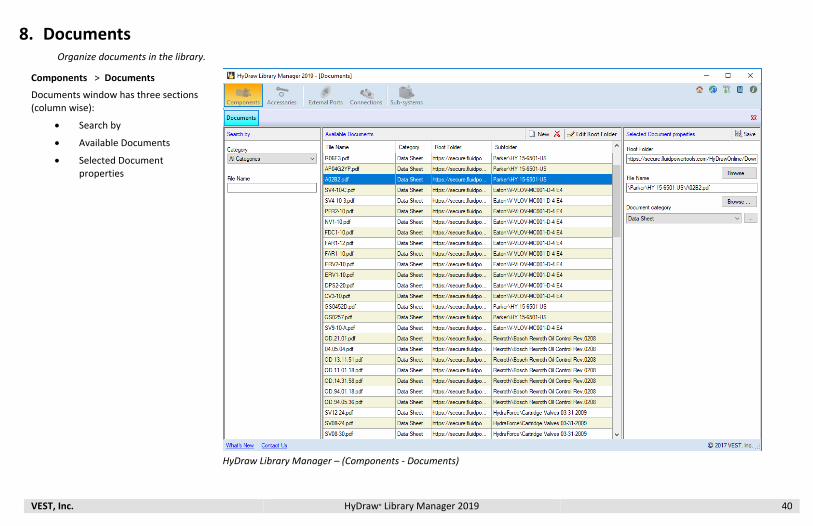
8. Documents Organize documents in the library.
Components > Documents
Documents window has three sections (column wise):
• Search by
• Available Documents
• Selected Document properties
HyDraw Library Manager – (Components - Documents)

VEST, Inc. HyDraw® Library Manager 2019 41
Search by
Search for a particular document belonging to a category.
Search by Section
Available Documents
The Available Documents section displays all the available documents for a category or all categories.
Create a new document or delete a document by selecting the required icon on the caption bar.
• Click Edit Root Folder to edit the path of the folder containing the document.
Available Documents Section
Selected Document properties
The Selected Documents properties section displays the category, path of the root folder, and the file of the selected document.
• Click Browse to change the root folder path and the file name.
• Click Save document to save the changes made to the document.
Selected Document properties Section

VEST, Inc. HyDraw® Library Manager 2019 42
9. CAD Files Organize CAD files in the library.
Components > CAD Files
CAD Files window has three sections (column wise):
• Search by
• Available CAD files
• Selected CAD file properties
HyDraw Library Manager – (Components - CAD files)
VEST, Inc. HyDraw® Library Manager 2019 43
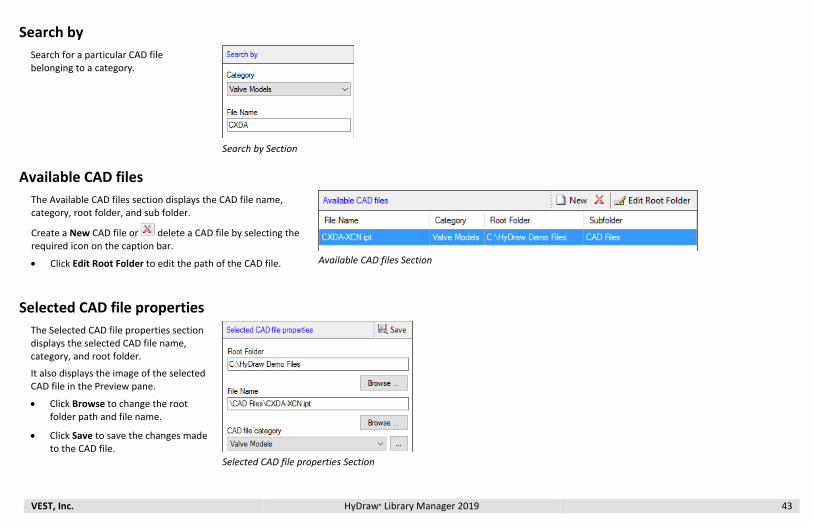
Search by
Search for a particular CAD file belonging to a category.
Search by Section
Available CAD files
The Available CAD files section displays the CAD file name, category, root folder, and sub folder.
Create a New CAD file or delete a CAD file by selecting the required icon on the caption bar.
• Click Edit Root Folder to edit the path of the CAD file.
Available CAD files Section
Selected CAD file properties
The Selected CAD file properties section displays the selected CAD file name, category, and root folder.
It also displays the image of the selected CAD file in the Preview pane.
• Click Browse to change the root folder path and file name.
• Click Save to save the changes made to the CAD file.
Selected CAD file properties Section
VEST, Inc. HyDraw® Library Manager 2019 44
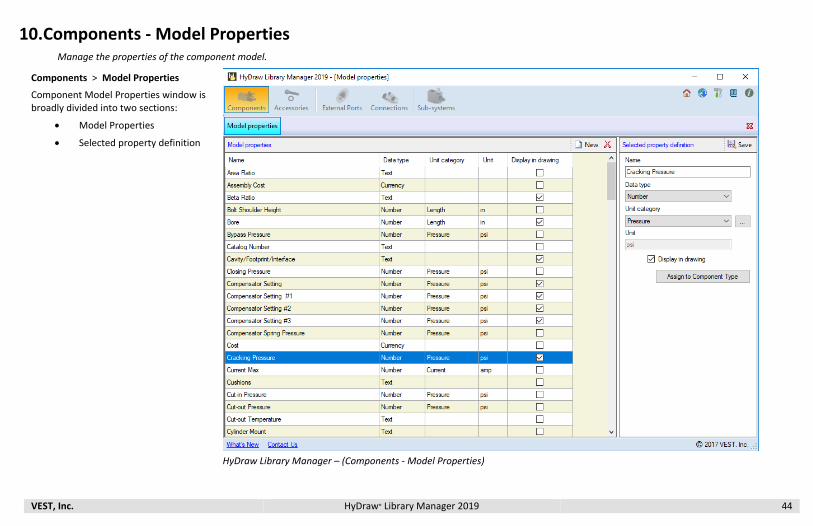
10. Components - Model Properties Manage the properties of the component model.
Components > Model Properties
Component Model Properties window is broadly divided into two sections:
• Model Properties
• Selected property definition
HyDraw Library Manager – (Components - Model Properties)

VEST, Inc. HyDraw® Library Manager 2019 45
Model Properties Manage Model properties, their data type, and unit category.
Create a New model property or
delete one by selecting the icons on the caption bar.
Model properties section

VEST, Inc. HyDraw® Library Manager 2019 46
Selected property definition Edit the name of the model property, data type, unit category, and unit.
1. Select Display in drawing to display the property in the drawing.
2. Click Assign to Component Type to assign the selected property to one or more component types.
3. Click Save to save the changes of the property.
Note:
▪ Essential model properties cannot be deleted; therefore,
remains inactive on selection of such essential properties.
▪ remains inactive, if Text,Currency, or Yes/No is selected in the Unit category box.
Selected property definition Section

VEST, Inc. HyDraw® Library Manager 2019 47
Assign Property to Component Type
1. Click Assign to Component Type in the Selected property definition section.
The Assign Property to Component Type dialog box displays.
2. Select Application.
3. Select the available Component types to include the property.
Or Click the Select All button to select all the component types.
On the basis of the selected component properties, the Common properties are displayed in the listing on the right.
4. Select any one of the Insert options, As last property/Below selected property.
5. Click OK to apply and exit.
Assign Property to Component Type

VEST, Inc. HyDraw® Library Manager 2019 48
11. Components - Design Properties Manage the design properties of the component model.
Components > Design Properties
Design Properties has two sections:
• Design Properties
• Selected property definition
HyDraw Library Manager (Components - Design Properties)

VEST, Inc. HyDraw® Library Manager 2019 49
Design Properties
Manage Design properties, their data type, category and unit.
You can also create a New design
property or delete one by selecting the required icon on the caption bar.
Design Properties section

VEST, Inc. HyDraw® Library Manager 2019 50
Selected property definition
Edit the name of the model property, data type, unit category, and unit.
1. Select Display in drawing to display the property in the drawing.
2. Click Assign to Component Type to assign the selected property to one or more component types.
The Assign Property to Component Type dialog box displays.
3. Select Application.
4. Select the available Component types to include the property.
Or Click the Select All button to select all the component types.
On the basis of the selected component properties. the Common properties are displayed in the listing on the right.
5. Select Insert, As last property/Below selected property.
Click OK to apply and exit.
6. Click Save to save the changes to the property.
Note:
▪ Essential model properties cannot be deleted; therefore,
remains inactive on selection of such essential properties.
▪ remains inactive, if Text,Currency, or Yes/No is selected in the Unit category box.
Selected property definition Section
Assign Property to Component Type

VEST, Inc. HyDraw® Library Manager 2019 51
12. Components - Display Formats Assign Display formats for components to display properties with prefix and/or suffix.
Display compound properties using the display format.
Components > Display Formats
Manage Display Formats window has two sections:
• Available Display Formats
• Selected Display Format
HyDraw Library Manager (Components - Display Formats)

VEST, Inc. HyDraw® Library Manager 2019 52
Available Display Formats
▪ The Available Display Formats section displays all the formats and properties that are marked with the display in the drawing.
▪ Create New Display Format or delete by selecting the required icon on the caption bar.
Available Display Formats Section

VEST, Inc. HyDraw® Library Manager 2019 53
Selected Display Format Assign Display Format: Name, Linked Property1, Linked Property 2 and Linked Property 3 and their Display Unit, Prefix and Suffix.
Define Display Property
1. Enter Name of the display format.
For the Linked property 1
2. Click
The Select Property dialog box displays.
i. Select Model Property/Design Property.
Note:
The properties that are marked, Display in drawing, are visible.
ii. Select a property from the available properties.
iii. Click OK to apply and exit.
iv. Select Display Unit, if available.
v. Enter Prefix.
vi. Enter Suffix.
Repeat the same procedure for Linked Property 2 and Linked Property 3.
3. Click Assign to Component Type.
The Assign Display Format to Component Type dialog box displays.
Selected Display format Section
Select Property

VEST, Inc. HyDraw® Library Manager 2019 54
4. Select Application.
5. Select one or more listed component types
6. Click Select All to select all component types.
7. Click OK to apply and exit.
8. Click Save.
Assign Display Format to Component Type

VEST, Inc. HyDraw® Library Manager 2019 55
13. Components - Component Types View all available component types and their properties.
Components > Component Types
Component Types window has three sections:
▪ Search by
▪ Available Component Types
▪ Selected Component Type properties
HyDraw Library Manager – (Components - Component Types)

VEST, Inc. HyDraw® Library Manager 2019 56
Search by
Search for a particular application, component type or all component types.
Search by Section
Available Component Types
The Available Component Types section displays all available component types.
Create a New component type or delete a component type by selecting the required icon on the caption bar.
Available Component Types Section

VEST, Inc. HyDraw® Library Manager 2019 57
Selected Component Type properties The Selected Component Type properties section displays
▪ General Properties
▪ Design Properties
▪ Model Properties
▪ Display Formats
Save the properties of the component type after making changes.
Or
Save As a new component type. Save commands are available on the caption bar.
Selected Component Type properties section

VEST, Inc. HyDraw® Library Manager 2019 58
General Properties
This section displays the name of the Component Type, Component Group and the Component Code.
Design Properties
This section displays the available design properties. You can also add new design properties.
1. Click on the Design properties caption bar to display the Select Design Property dialog box.
2. Select any property checkbox to display them in the Design Property section.
3. Click Add New to display the Define Component Properties dialog box.
Select Design Property dialog box
VEST, Inc. HyDraw® Library Manager 2019 59
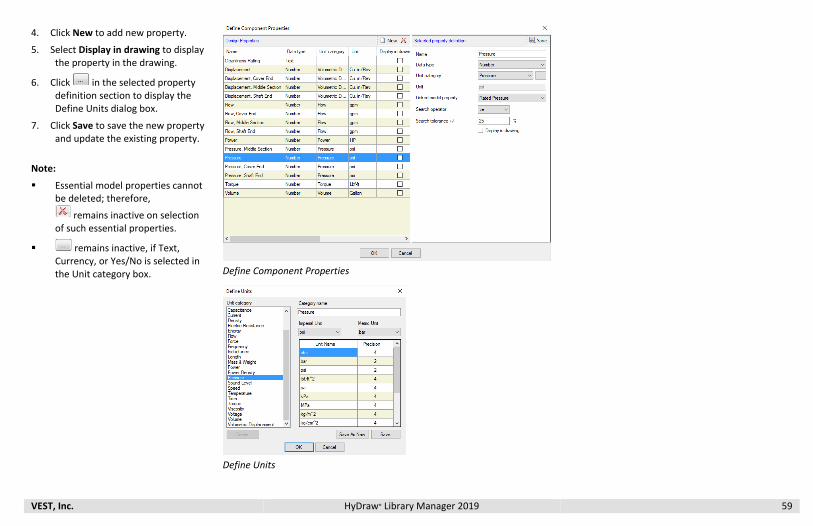
4. Click New to add new property.
5. Select Display in drawing to display the property in the drawing.
6. Click in the selected property definition section to display the Define Units dialog box.
7. Click Save to save the new property and update the existing property.
Note:
▪ Essential model properties cannot be deleted; therefore,
remains inactive on selection of such essential properties.
▪ remains inactive, if Text, Currency, or Yes/No is selected in the Unit category box.
Define Component Properties
Define Units

VEST, Inc. HyDraw® Library Manager 2019 60
Model Properties
This section displays the available model properties. You can also add new model properties.
1. Click on the Model properties caption bar to display the Select Model Properties dialog box.
2. Select any property checkbox to display it in the Model Property section.
3. Click Add New to display the Define Component Properties dialog box.
4. Click New to add new property.
5. Click in the Selected property definition section to display the Define Units dialog box.
6. Select the Display in drawing checkbox to display the model property in the drawing.
7. Click Save to save the new property or update the existing property.
Select Model Properties dialog box
Define Component Properties
Note:
▪ Essential model properties cannot be deleted; therefore,
remains inactive on selection of such essential properties.
▪ remains inactive, if Text, Currency, or Yes/No is selected in the Unit category box.

VEST, Inc. HyDraw® Library Manager 2019 61
Define Units
View/Edit units.
1. Select Unit Category.
2. Edit Category name, if required.
3. Select Imperial unit.
4. Select Metric unit.
5. Select Unit Name.
6. Enter the precision up to four decimal places.
7. Click Save As New to add a new category.
8. Click Save to update an existing category.
Define Units dialog box

VEST, Inc. HyDraw® Library Manager 2019 62
Display Formats
View/Edit display formats.
1. Click on the Display Formats caption bar to display the Select Display Formats dialog box.
2. Select any property checkbox to display it in the Display Formats section.
3. Click OK.
4. You can also click to delete an existing display format.
Display Formats section
Select Display Format dialog box

VEST, Inc. HyDraw® Library Manager 2019 63
14. Manage List Manage Manufacturer, Cavity/Footprint/Interface, Catalog Number, Cushions, Cylinder Mount, Frequency, Nominal Size, Pilot Valve Interface, Pump Mount, Rod End, Type and Voltage.

VEST, Inc. HyDraw® Library Manager 2019 64
Manufacturer View all available manufacturers. You can also create a new manufacturer, and delete a manufacturer.
Components > Manage List > Manufacturer
Manufacturer has two sections:
• Available manufacturer
• Selected manufacturer property
HyDraw Library Manager 2019 – [Manage List: Manufacturer]

VEST, Inc. HyDraw® Library Manager 2019 65
Cavity/Footprint/Interface Search a specific cavity/footprint or cavities/footprints of all categories.
Components > Manage List
> Cavity/Footprint/Interface
Cavity/Footprint/Interface has three sections:
• Search by
• Available Cavities/Footprints
• Selected Cavity/Footprint properties
HyDraw Library Manager – (Components - Manage List - Cavity/Footprint/Interface)

VEST, Inc. HyDraw® Library Manager 2019 66
Search by
Search for a cavity/footprint in a category or cavities/footprints in all categories.
Search by Section
Available Cavities/Footprints
The Available Cavities/Footprints section displays the cavities/footprints and the category to which it belongs.
You can also create a New or delete a cavity/footprint by selecting the required icon on the caption bar.
Available Cavities/Footprints Section

VEST, Inc. HyDraw® Library Manager 2019 67
Selected Cavity/Footprint properties
The Selected Cavity/Footprint properties section displays the Cavity/Footprint name and category of the selected cavity.
1. Select the Cavity/Footprint name or edit, if required.
2. Enter a new category or select an existing category.
3. Click Save or Save As, as required.
Note:
▪ Manage the Master Properties list of Cushions, Cylinder Mounts, Frequency, Nominal Size, Pilot Valve Interface, Pump Mount, Rod End Type, and Voltage; similarly, as you manage the list of manufacturers.
Selected Cavity/Footprint properties Section

VEST, Inc. HyDraw® Library Manager 2019 68
Available manufacturer
The Available manufacturer section displays the list of all manufacturers available in the library.
You can create a New manufacturer and
delete any manufacturer by selecting the required icon on the caption bar.
Available manufacturer Section
Selected manufacturer Property
Add New
1. Click New to add a new manufacturer.
2. Click Save.
Edit
1. Select the existing manufacturer name.
2. Edit the manufacturer name.
3. Click Save.
Selected manufacturer property

VEST, Inc. HyDraw® Library Manager 2019 69
Accessories
Manage Accessories, Documents, CAD File, Model properties, Component Types, and Manage List.
15 Accessories
16 Documents
17 CAD Files
18 Model Properties
19 Component Types
20 Manage List

VEST, Inc. HyDraw® Library Manager 2019 70
15. Accessories Manage Accessories, Documents, CAD File, Model properties, Component Types, and List.
Accessories Library has three sections (column wise).
▪ Search by
▪ Available Models
▪ Selected Model properties
HyDraw Library Manager – (Accessories)

VEST, Inc. HyDraw® Library Manager 2019 71
Search by
Search for a particular accessory by application, component type, manufacturer and model code of a particular component type.
Available Models
The Available models section displays all the accessories for the selected component type of a manufacturer or all manufacturers.
Create a New model or delete a model by selecting the icons on the caption bar. The Import option enables you to import accessory data from Microsoft Excel.
Note:
• You can delete model either one by one or drag select to delete multiple models.
• From right click context menu, you can link Docs/CAD files either one by one or drag select to link multiple Docs/CAD files.
• Refer Chapter 7, Components – Model Data view, Section Import, Page No. 29.
Search by Section
Available Models Section

VEST, Inc. HyDraw® Library Manager 2019 72
Selected Model properties
View/Edit the model properties of the selected model accessory.
Link documents and CAD files to the selected model.
Click Save or Save As, as required.
Selected Model properties section
VEST, Inc. HyDraw® Library Manager 2019 73
16. Documents Select and link documents from the library or delete the linked documents.
Note: Refer Chapter 8, Documents for detailed usage.

VEST, Inc. HyDraw® Library Manager 2019 74
17. CAD Files Select and link CAD files from the library or delete the linked CAD files.
Note: Refer Chapter 9, CAD Files for details.

VEST, Inc. HyDraw® Library Manager 2019 75
18. Accessories - Model Properties Manage the Model properties of accessories. These properties are common to components, accessories, and sub-systems.
Note: Refer Chapter 10, Components – Model Properties for details.

VEST, Inc. HyDraw® Library Manager 2019 76
19. Accessories - Component Types Component Types window has three sections (column wise):
• Search by
• Available Component Type
• Selected Component Type properties
HyDraw Library Manager – (Accessories - Component Types)

VEST, Inc. HyDraw® Library Manager 2019 77
Search by
Search by application and for a particular component or all component types of accessory.
Search by section
Available Component Types
The Available Component Types section displays all available component types.
You can also create a New component
type or delete a component type by selecting the required icon on the caption bar.
Available Component Types Section
VEST, Inc. HyDraw® Library Manager 2019 78
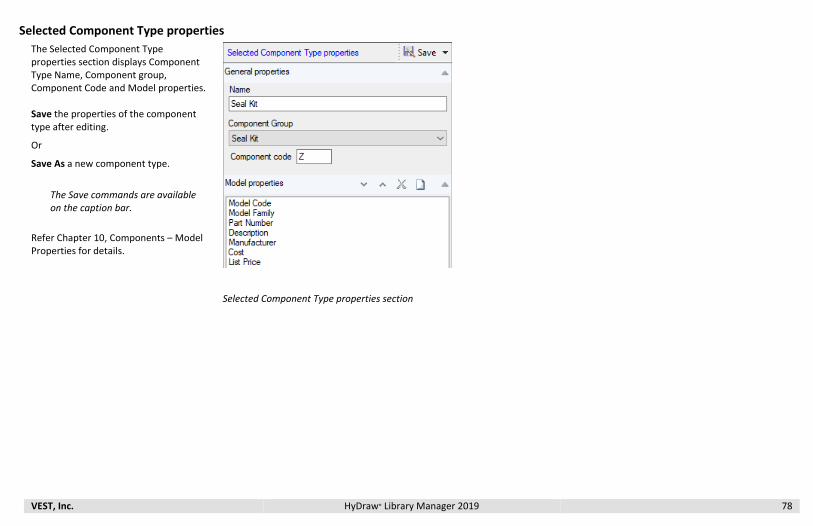
Selected Component Type properties
The Selected Component Type properties section displays Component Type Name, Component group, Component Code and Model properties. Save the properties of the component type after editing.
Or
Save As a new component type.
The Save commands are available on the caption bar.
Refer Chapter 10, Components – Model Properties for details.
Selected Component Type properties section

VEST, Inc. HyDraw® Library Manager 2019 79
20. Manage List Note: Refer Chapter 14, Manage List.

VEST, Inc. HyDraw® Library Manager 2019 80
External Ports
21 External Ports
22 Model Properties
23 Design Properties
24 Display Formats

VEST, Inc. HyDraw® Library Manager 2019 81
21. External Ports Manage External ports: Model properties, Design properties and Display formats.
External Ports window has three sections (column wise):
• Search by
• Available Ports
• Selected Port properties
HyDraw Library Manager – (External Ports)

VEST, Inc. HyDraw® Library Manager 2019 82
Search by
Search for a particular external port type and port size.
Search by Section
Available Ports
The Available Ports section displays all the available ports based on the search criteria.
Create a New port or delete a port by selecting the required icon on the caption bar.
Available Ports Section

VEST, Inc. HyDraw® Library Manager 2019 83
Selected Port properties
The Selected Port properties section displays the properties of the selected port.
▪ Click Save on the caption bar to save port properties.
▪ Click Save As on the caption bar to save as a new port.
Selected Port properties

VEST, Inc. HyDraw® Library Manager 2019 84
22. External Ports - Model Properties Manage properties of the external port models.
External Port Model Properties window has two sections:
▪ Model Properties
▪ Selected property definition
HyDraw Library Manager (External Ports - Model Properties)

VEST, Inc. HyDraw® Library Manager 2019 85
Model Properties Display all available model properties, their data type, category, and unit.
Create a New model property or delete by selecting the required icon on the caption bar.
Model Properties Section
Selected property definition Edit the name of the model property, data type, unit category, and unit.
1. Select Display in drawing to display the property in the drawing.
2. Click Save to save the changes to the property.
Note:
▪ Essential model properties cannot be deleted; therefore,
remains inactive on selection of such essential properties.
▪ remains inactive, if Text, Currency, or Yes/No is selected in the Unit category box.
Selected property definition section

VEST, Inc. HyDraw® Library Manager 2019 86
23. External Ports - Design Properties Manage the design properties of the external port.
External Ports Design Properties window has two sections:
▪ Design Properties
▪ Selected property definition
HyDraw Library Manager (External Ports - Design Properties)

VEST, Inc. HyDraw® Library Manager 2019 87
Design Properties Display all design properties, their data type, category, and unit.
Create a new design property or delete one by selecting the required icon on the caption bar.
Design Properties Section
Selected property definition
Edit the name of the model property, data type, unit category, and unit.
Select Display in drawing to display the property in the drawing.
Click Save to save the changes to the property.
Note:
▪ Essential model properties cannot be deleted; therefore,
remains inactive on selection of such essential properties.
▪ remains inactive, if Text, Currency, or Yes/No is selected in the Unit category box.
Selected property definition Section

VEST, Inc. HyDraw® Library Manager 2019 88
24. External Ports - Display Formats Assign Display formats to external ports and display properties with prefix and/or suffix. Display compound properties using the display format.
Display Formats window has two sections:
▪ Available Display Formats
▪ Selected Display Format
HyDraw Library Manager – (External Ports - Display Formats)

VEST, Inc. HyDraw® Library Manager 2019 89
Available Display Formats
▪ The Available Display Formats section displays all formats and properties that are marked with the display in the drawing.
▪ Create a New Display format or
delete by selecting the required icon on the caption bar.
Available Display Formats Section
VEST, Inc. HyDraw® Library Manager 2019 90
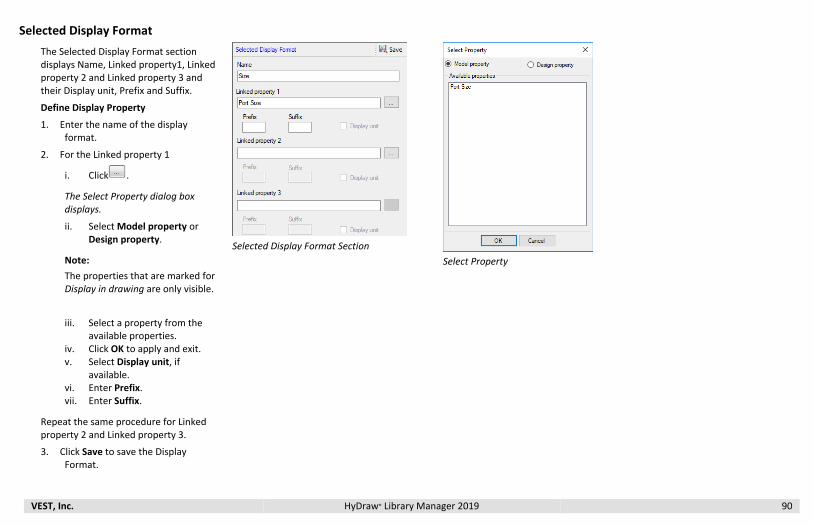
Selected Display Format
The Selected Display Format section displays Name, Linked property1, Linked property 2 and Linked property 3 and their Display unit, Prefix and Suffix.
Define Display Property
1. Enter the name of the display format.
2. For the Linked property 1
i. Click .
The Select Property dialog box displays.
ii. Select Model property or Design property.
Note:
The properties that are marked for Display in drawing are only visible.
iii. Select a property from the available properties.
iv. Click OK to apply and exit. v. Select Display unit, if
available. vi. Enter Prefix. vii. Enter Suffix.
Repeat the same procedure for Linked property 2 and Linked property 3.
3. Click Save to save the Display Format.
Selected Display Format Section
Select Property

VEST, Inc. HyDraw® Library Manager 2019 91
Connections View all the available connections (pipes, tubes and hoses), model properties, design properties, display formats, connection lines and connectors.
25 Connections
26 Model Properties
27 Design Properties
28 Display Formats
29 Connection Lines
30 Connectors
VEST, Inc. HyDraw® Library Manager 2019 92
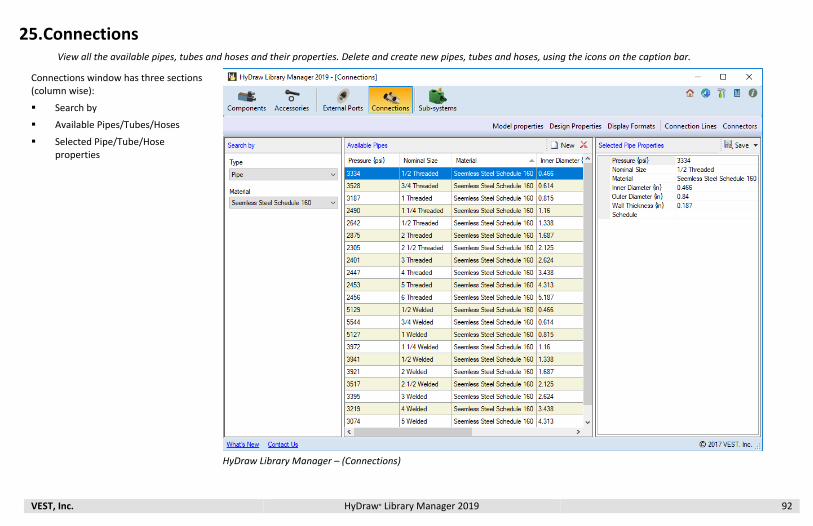
25. Connections View all the available pipes, tubes and hoses and their properties. Delete and create new pipes, tubes and hoses, using the icons on the caption bar.
Connections window has three sections (column wise):
▪ Search by
▪ Available Pipes/Tubes/Hoses
▪ Selected Pipe/Tube/Hose properties
HyDraw Library Manager – (Connections)

VEST, Inc. HyDraw® Library Manager 2019 93
Search by
Filter the selection on the Type i.e. Pipe/Tube/Hose and Material.
Search by Section
Available Pipes, Tubes & Hoses
The Available Pipes, Tubes & Hoses section displays all the pipes, tubes and hoses available for the selected Type and Material.
▪ Create a New pipe/tube/hose.
▪ Delete an existing pipe/tube/hose.
Available Pipes Section
Available Tubes Section

VEST, Inc. HyDraw® Library Manager 2019 94
Selected Pipe/Tube/Hose properties
The Selected Pipe/Tube/Hose properties section displays the properties of the selected pipe/tube/hose.
Click Save to update the existing pipe/tube/hose data.
Click Save As to create a new pipe/tube/hose data.
Selected Pipe properties Section

VEST, Inc. HyDraw® Library Manager 2019 95
26. Connections - Model Properties Manage properties of the connections.
Connections Model Properties window has two sections:
▪ Model Properties
▪ Selected property definition
HyDraw Library Manager – (Connections - Model Properties)

VEST, Inc. HyDraw® Library Manager 2019 96
Model Properties
The Model Properties section displays all available connection model properties, their data type, category, and unit.
Create a New model property
or delete one, by selecting the required icon on the caption bar.
Model Properties Section

VEST, Inc. HyDraw® Library Manager 2019 97
Selected property definition
Edit the name of the connection model property, data type, unit category, and unit.
Select Display in drawing to display the property in the drawing.
Click Save Property.
Note:
▪ Essential model properties cannot be deleted; therefore,
remains inactive on selection of such essential properties.
▪ remains inactive, if Text, Currency, or Yes/No is selected in the Unit category box.
Selected property definition Section

VEST, Inc. HyDraw® Library Manager 2019 98
27. Connections - Design Properties Manage design properties of the connections.
Connections Design Properties window has two sections:
▪ Design Properties
▪ Selected property definition
HyDraw Library Manager – (Connection - Design Properties)

VEST, Inc. HyDraw® Library Manager 2019 99
Design Properties The Design Properties section displays all design properties, their data type, category, and unit.
Create a New connection design
property or delete by selecting the required icon on the caption bar.
Design Properties section
Selected property definition
Edit the name of the design property, data type, unit category, and unit.
Select Display in drawing to display the property in the drawing.
Click Save.
Note:
▪ Essential model properties cannot be deleted; therefore,
remains inactive on selection of such essential properties.
▪ remains inactive, if Text, Currency, or Yes/No is selected in the Unit category box.
Selected property definition section

VEST, Inc. HyDraw® Library Manager 2019 100
28. Connections - Display Formats Assign display formats to connection lines display properties with suffix and/or prefix.
Display compound properties using the display format.
Manage Display Formats has two sections:
▪ Display Formats
▪ Selected Display Format
HyDraw Library Manager 2019 - (Connections - Display Formats)

VEST, Inc. HyDraw® Library Manager 2019 101
Display Formats
▪ The Display Formats section displays all formats and properties that are marked with the display in the drawing.
▪ Create a New Display Format
or delete by selecting the required icon on the caption bar.
Display Formats Section

VEST, Inc. HyDraw® Library Manager 2019 102
Selected Display Format Assign Display formats: Name, Linked property1, Linked property 2, and Linked property 3 and their Display unit, Prefix and Suffix.
Define Display Property
1. Enter the name of the display format.
2. Click browse for the linked property 1.
The Select Property dialog box displays.
3. Select Model property/Design property.
Note:
Properties that are marked for Display in drawing are only visible.
The properties that are defined as Display in the drawing do not appear automatically in the drawing; you need to add the Display Formats to the Connectors.
• Select a property from the available properties.
• Click OK to apply and exit.
• Select Display Unit, if available.
• Enter Prefix.
• Enter Suffix.
4. Repeat the same procedure for Linked property 2 and Linked property 3.
5. Click Save Display Format.
Selected Display Format Section
Select Property

VEST, Inc. HyDraw® Library Manager 2019 103
29. Connections - Connection Lines Add, modify or delete connections. Customize application, layer, connection’s color, line weight and line type.
Connection Lines window has two sections (column wise):
▪ Available Connections
▪ Selected Connection properties
HyDraw Library Manager – (Connections - Connection Lines)
VEST, Inc. HyDraw® Library Manager 2019 104
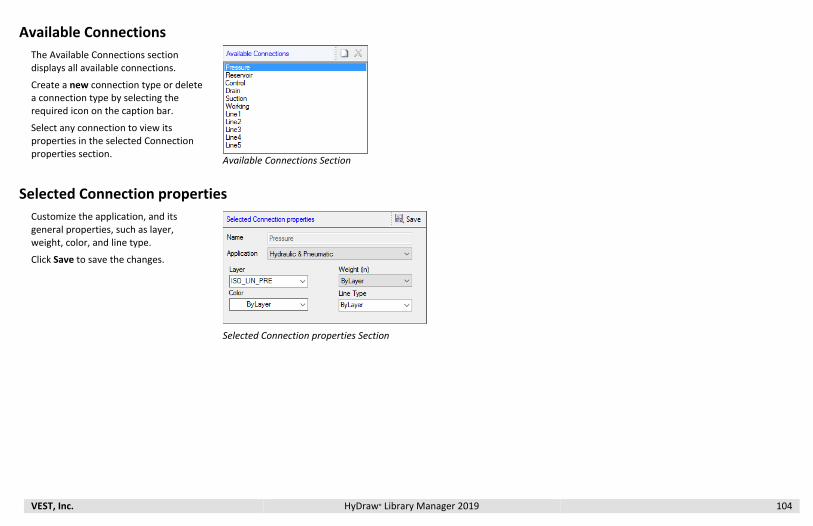
Available Connections
The Available Connections section displays all available connections.
Create a new connection type or delete a connection type by selecting the required icon on the caption bar.
Select any connection to view its properties in the selected Connection properties section.
Available Connections Section
Selected Connection properties
Customize the application, and its general properties, such as layer, weight, color, and line type.
Click Save to save the changes.
Selected Connection properties Section
VEST, Inc. HyDraw® Library Manager 2019 105
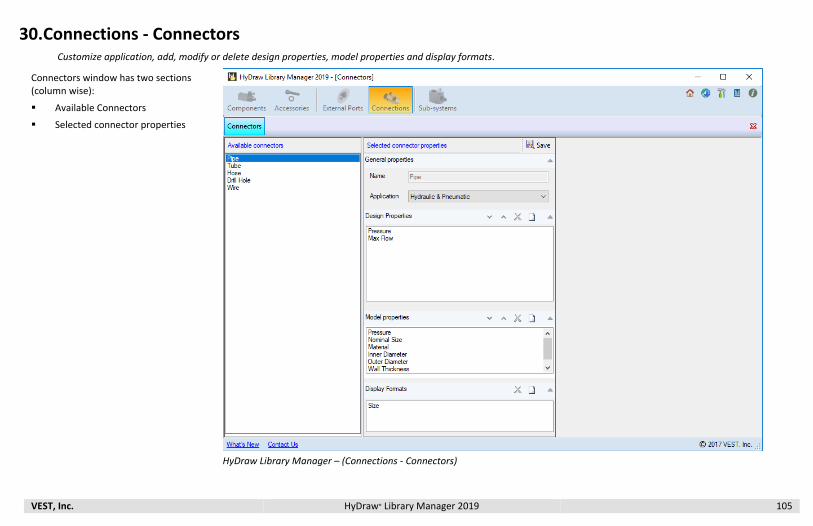
30. Connections - Connectors Customize application, add, modify or delete design properties, model properties and display formats.
Connectors window has two sections (column wise):
▪ Available Connectors
▪ Selected connector properties
HyDraw Library Manager – (Connections - Connectors)

VEST, Inc. HyDraw® Library Manager 2019 106
Available Connectors
The Available Connectors section displays all available connectors.
Select any connector to view its properties in the selected connector properties section.
Note:
You cannot add or delete connectors.
Available Connectors Section
Selected connectors properties
The Selected connectors properties section displays:
• General Properties
• Design Properties
• Model Properties
• Display Formats
General properties
Customize the application type of connector.
Click Save to save the changes.
Selected Connection properties Section
VEST, Inc. HyDraw® Library Manager 2019 107
Design Properties
The Design Properties section displays the available design properties. You can also add new design properties, similar to components.
Model Properties
The Model Properties section displays the available model properties. You can also add new model properties, similar to components.

VEST, Inc. HyDraw® Library Manager 2019 108
Display Formats
The Display Formats section displays the available Display formats.
1. Click on the Display Formats caption bar.
The Select Display Format dialog box displays.
2. Select any format checkbox and click OK to display it in the Display formats section.
3. Click to delete the selected format.
Select Display Format

VEST, Inc. HyDraw® Library Manager 2019 109
Sub-Systems
Manage group of symbols, ports, connections and their model data. Assign sub-system models properties, link accessories, documents and CAD files.
31 Symbol View
32 Model Data View
33 Documents
34 CAD Files
35 Model Properties
36 Design Properties
37 Display Formats
38 Sub-System Types

VEST, Inc. HyDraw® Library Manager 2019 110
31. Sub-Systems - Symbol View Sub-Systems > Symbol View
Sub-System in Symbol View has three sections (column wise).
▪ Library
▪ Available Symbols (of Sub-System)
▪ Models linked to the selected symbol
HyDraw Library Manager (Sub-System - Symbol View)

VEST, Inc. HyDraw® Library Manager 2019 111
Library Section
The Library section displays a logically structured tree-view library.
Click the required folder to display the symbol in the drawing section.
You can:
▪ Create a new library
▪ Create a new folder
▪ Rename an existing folder
▪ Delete a folder
▪ Move a folder up or down to customize the tree view
When you delete a folder, it deletes all its sub folders along with the symbols.
The commands are displayed as icons on the caption bar and in the context menu.
Library tree view

VEST, Inc. HyDraw® Library Manager 2019 112
Add New Folder
1. Right click the required folder in the library folder section and select Add New from the context menu. Or
Click button on the caption bar.
The Add New Folder dialog box displays.
2. Enter the name of the new folder and click OK.
The new folder is created.
Library context menu
Add New Folder dialog box

VEST, Inc. HyDraw® Library Manager 2019 113
Rename Folder
1. Right click the required folder in the library folder section and select Rename from the context menu. Or
Click button on the caption bar.
The Rename Folder dialog box displays.
2. Enter the name of the folder and click OK.
The folder is renamed.
Rename Folder dialog box
Delete Folder
1. Right click the required folder in the library folder section and select Delete from the context menu.
Or
Click button on the caption bar.
The HyDraw Library Manager dialog box displays.
Click Yes to delete the folder and its contents.
Caution! The deleted folder and its contents cannot be recovered.

VEST, Inc. HyDraw® Library Manager 2019 114
Available Symbols
The Available Symbols section displays the symbols for selected folder.
You can:
▪ Edit Sub-System Type
▪ Delete a Symbol
The commands are displayed as icons on the caption bar and in the context menu.
Note:
HyDraw CAD users browse to the Drawing application > Library Explorer > Sub-System to add a new symbol.
Available Symbols
Edit Sub-System Type
1. Select the symbol in the drawing to edit the sub-system type.
2. Click Edit Sub-System Type on the caption bar.
The Edit Sub-System Type dialog box displays.
3. Select the required application and the sub-system type.
4. Click OK.
The specified sub-system type is saved to the selected symbol.
Edit Sub-System Type
Delete Symbol
Select the icon on the caption bar to delete the selected symbol.
The selected symbol is deleted from the library.

VEST, Inc. HyDraw® Library Manager 2019 115
Models linked to selected symbol
The Models linked to selected symbol section displays models, accessories, documents, and CAD files.
Two functionalities:
• Link Existing Model
• Create New Model and Link
Model linked to selected symbol

VEST, Inc. HyDraw® Library Manager 2019 116
Link Models to Symbol Link the selected symbol to the existing models available in the library.
1. Select models and click OK to link the selected symbol.
2. Click Add New to create new models and link it with the selected symbol, then save it in the library.
The Add New Model dialog box displays.
Link Model to Symbol
Add New Model dialog box
VEST, Inc. HyDraw® Library Manager 2019 117
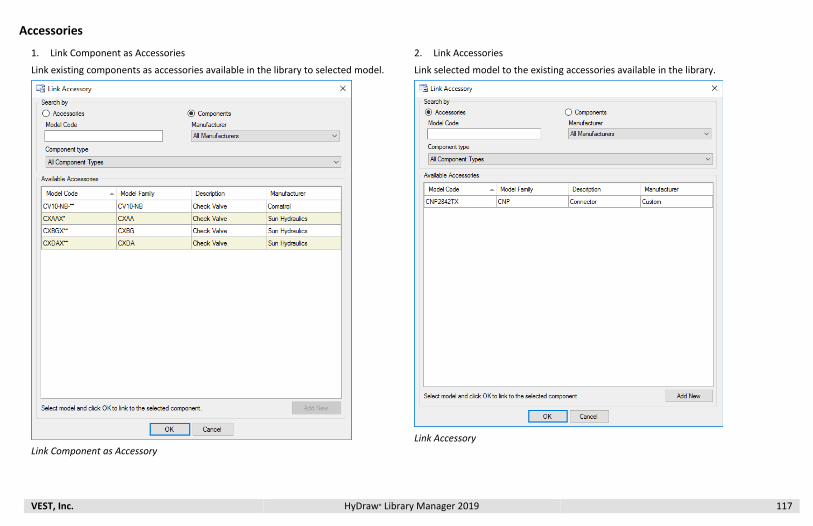
Accessories
1. Link Component as Accessories
Link existing components as accessories available in the library to selected model.
Link Component as Accessory
2. Link Accessories
Link selected model to the existing accessories available in the library.
Link Accessory

VEST, Inc. HyDraw® Library Manager 2019 118
Add New Accessory to the Library
3. Click the Add New button to add a new accessory to the library.
The Add New Accessory dialog box displays.
Add New Accessory dialog box
4. Select component type and click , the browse button on the caption bar.
The Select Component Type dialog box displays.
Select Component Type dialog box
5. Select a component type from Available Component Types and click OK.
6. To add new component type, click the Add New button.
The Add New Component Type dialog box displays.

VEST, Inc. HyDraw® Library Manager 2019 119
Add New Component Type
7. Enter the Name of the component type.
8. Select Component Group.
The Select Model Properties dialog box displays.
Select Model Properties
9. Click Add New property.
10. Select the required model properties to add to your accessories.
11. Click OK.
Note:
Refer Chapter 34, Sub-Systems – Model Properties for Add New

VEST, Inc. HyDraw® Library Manager 2019 120
Documents
Link the selected model to the existing documents available in the local library.
Link Documents
Add a new document and link it to the selected model.
Add New Document
VEST, Inc. HyDraw® Library Manager 2019 121
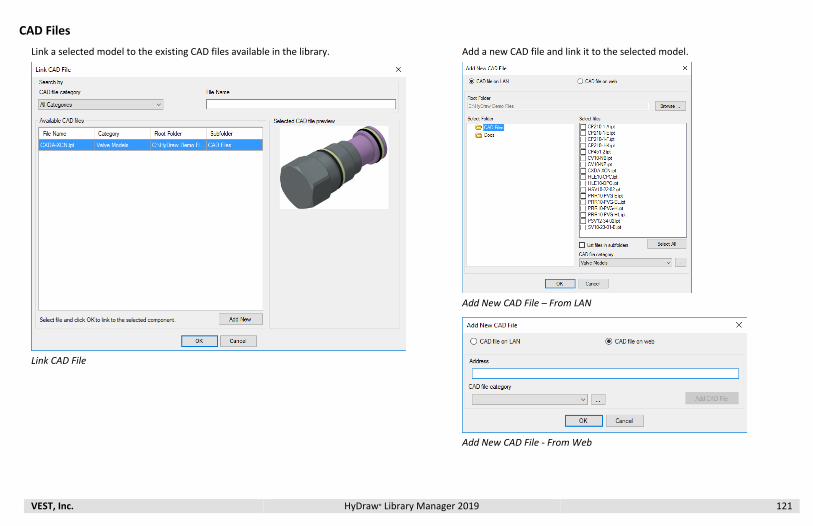
CAD Files
Link a selected model to the existing CAD files available in the library.
Link CAD File
Add a new CAD file and link it to the selected model.
Add New CAD File – From LAN
Add New CAD File - From Web

VEST, Inc. HyDraw® Library Manager 2019 122
Create New Model and Link
1. Create a new model for the selected symbol and link.
2. Enter model data, link accessories, documents and CAD files.
3. Click OK to link the selected symbol.
Create New Model

VEST, Inc. HyDraw® Library Manager 2019 123
32. Sub-Systems - Model Data View View all the available components and their properties. Sub-Systems > Model Data View
Model Data Manager has three sections (column wise):
• Search by
• Available Models
• Selected Model properties
HyDraw Library Manager – (Sub-Systems - Model Data View)

VEST, Inc. HyDraw® Library Manager 2019 124
Search by
Search for model or all models of a particular sub-system type, manufacturer, or models of any sub-system type of any manufacturer.
Search by Section

VEST, Inc. HyDraw® Library Manager 2019 125
Available Models
The Available Models section displays four mandatory properties: Model Code, Model Family, Description, and Manufacturer.
Create a New model or Delete an existing model by selecting the icons on the caption bar. Note:
▪ You can also delete a single model or multiple models; Right click and then select Delete Model(s) from the context menu.
▪ Link documents or CAD files either to a single model or multiple models from the Link Documents and Link CAD Files options in the context menu.
▪ Link accessories either to a single model or multiple models from the Link Accessories in the context menu.
Available Models Section

VEST, Inc. HyDraw® Library Manager 2019 126
Selected Model properties The Selected Model properties section displays the properties of the selected model. Change the property of the model in the Model Data section.
1. Enter new properties and click Save to save the model properties.
2. Click Save As to save it as a new model.
You can also link accessories, documents, CAD files and symbol to the selected model.
Note:
You can link a single accessory or multiple accessories from library: Drag select, and then click OK in the Link Accessory dialog.
Selected Model properties Section

VEST, Inc. HyDraw® Library Manager 2019 127
Link Symbol
1. Click in the Symbol linked to selected mode top section.
The Linked Symbol dialog box displays.
2. Browse through the folders in the first pane.
3. View the Available Symbols in the selected folder.
4. Select the symbol to link and click Add in the Available Symbols pane.
5. Click OK to link the selected symbol.
Click to traverse through the linked symbol.
Click to delete the linked symbol.
Linked Symbol dialog box

VEST, Inc. HyDraw® Library Manager 2019 128
33. Documents Select and link documents from the library or delete the linked documents.
Note: Refer Chapter 8, Documents for detailed usage.

VEST, Inc. HyDraw® Library Manager 2019 129
34. CAD Files Select and link CAD files from the library or delete the linked CAD files.
Note: Refer Chapter 9, CAD Files for details.
VEST, Inc. HyDraw® Library Manager 2019 130
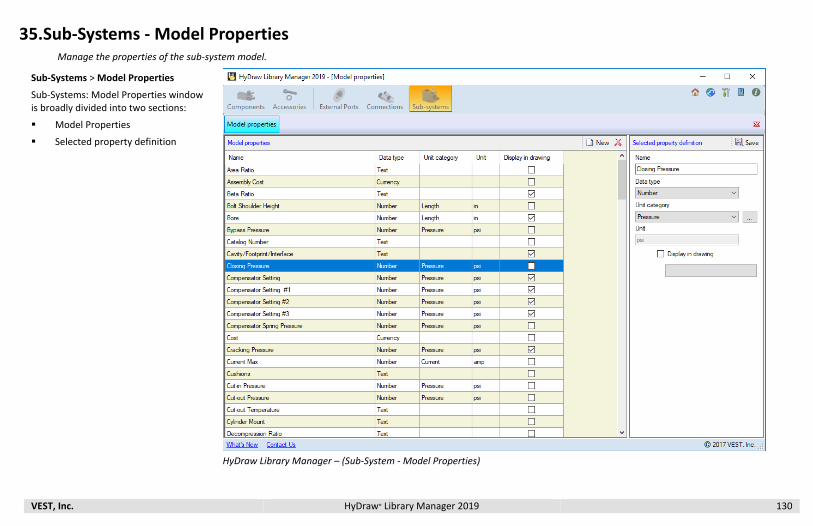
35. Sub-Systems - Model Properties Manage the properties of the sub-system model.
Sub-Systems > Model Properties
Sub-Systems: Model Properties window is broadly divided into two sections:
▪ Model Properties
▪ Selected property definition
HyDraw Library Manager – (Sub-System - Model Properties)

VEST, Inc. HyDraw® Library Manager 2019 131
Model Properties The Model Properties section displays all model properties, their data type, and unit category.
Create a New model property or
delete one by selecting the icons on the caption bar.
Model properties section

VEST, Inc. HyDraw® Library Manager 2019 132
Selected property definition Edit the name of the model property, data type, unit category, and unit.
1. Select Display in drawing to display the property in the drawing.
2. Click Assign to Sub-System Type to assign the selected property to one or more sub-system types.
3. Click Save to save the changes of the property.
Note:
▪ Essential model properties cannot be deleted; therefore,
remains inactive on selection of such essential properties.
▪ remains inactive, if Text,Currency, or Yes/No is selected in the Unit category box.
Selected property definition Section
VEST, Inc. HyDraw® Library Manager 2019 133
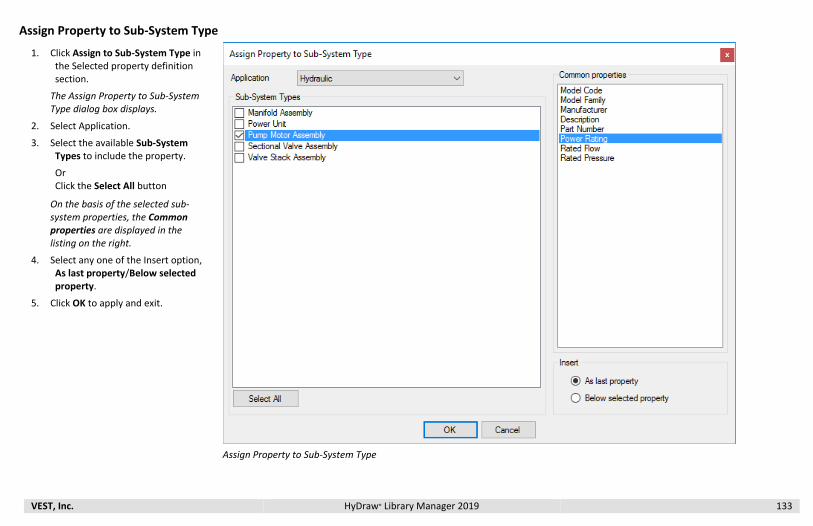
Assign Property to Sub-System Type
1. Click Assign to Sub-System Type in the Selected property definition section.
The Assign Property to Sub-System Type dialog box displays.
2. Select Application.
3. Select the available Sub-System Types to include the property.
Or Click the Select All button
On the basis of the selected sub-system properties, the Common properties are displayed in the listing on the right.
4. Select any one of the Insert option, As last property/Below selected property.
5. Click OK to apply and exit.
Assign Property to Sub-System Type

VEST, Inc. HyDraw® Library Manager 2019 134
36. Sub-Systems - Design Properties Manage the design properties of the sub-system model.
Sub-Systems > Design Properties
Design Properties has two sections:
▪ Design Properties
▪ Selected property definition
HyDraw Library Manager (Sub-Systems - Design Properties)

VEST, Inc. HyDraw® Library Manager 2019 135
Design Properties
The Design Properties section displays all design properties, their data type, category and unit.
You can also create a New design
property or delete one by selecting the required icon on the caption bar.
Design Properties section

VEST, Inc. HyDraw® Library Manager 2019 136
Selected property definition
Edit the name of the model property, data type, unit category, and unit.
1. Select Display in drawing to display the property in the drawing.
2. Click Assign to Sub-System Type to assign the selected property to one or more sub-system types.
The Assign Property to Sub-System Type dialog box displays.
3. Select Application.
4. Select the available Sub-System types to include the property. Or Click the Select All button to select all the sub-system types.
On the basis of the selected sub-system properties. the Common properties are displayed in the listing on the right.
5. Select Insert, As last property/Below selected property.
Click OK to apply and exit.
6. Click Save to save the changes to the property.
Note:
▪ Essential model properties cannot be deleted; therefore,
remains inactive on selection of such essential properties.
▪ remains inactive, if Text,Currency, or Yes/No is selected in the Unit category box
Selected property definition Section
Assign Property to Sub-System Type

VEST, Inc. HyDraw® Library Manager 2019 137
37. Sub-Systems - Display Formats Assign Display formats for sub-system to display properties with prefix and/or suffix.
Display sub-system properties using the display format.
Sub-Systems → Display Formats
Manage Display Formats window has two sections:
▪ Available Display Formats
▪ Selected Display Format
HyDraw Library Manager (Sub-Systems - Display Formats)

VEST, Inc. HyDraw® Library Manager 2019 138
Available Display Formats
▪ The Available Display Formats section displays all the formats and properties that are marked with the display in the drawing.
▪ Create New display format or delete by selecting the required icon on the caption bar.
Available Display Formats Section

VEST, Inc. HyDraw® Library Manager 2019 139
Selected Display Format Assign Display Format: Name, Linked Property1, Linked Property 2 and Linked Property 3 and their Display Unit, Prefix and Suffix.
Define Display Property
1. Enter Name of the display format.
For the Linked property 1.
2. Click .
The Select Property dialog box displays.
i. Select Model Property/Design Property.
Note: The properties that are marked, Display in drawing, are visible.
ii. Select a property from the available properties.
iii. Click OK to apply and exit.
iv. Select Display Unit, if available.
v. Enter Prefix.
vi. Enter Suffix.
Repeat the same procedure for Linked property 2 and Linked property 3.
3. Click Assign to Sub-System Type.
The Assign Display Format to Sub-System Type dialog box displays.
Selected Display Format Section
Select Property

VEST, Inc. HyDraw® Library Manager 2019 140
In the Assign Display Format to Sub-System Type dialog box -
4. Select Application.
5. Select one or more listed sub-system types or Click Select All to select all sub-system types.
6. Click OK to apply and exit.
7. Click Save.
Assign Display Format to Sub-System Type
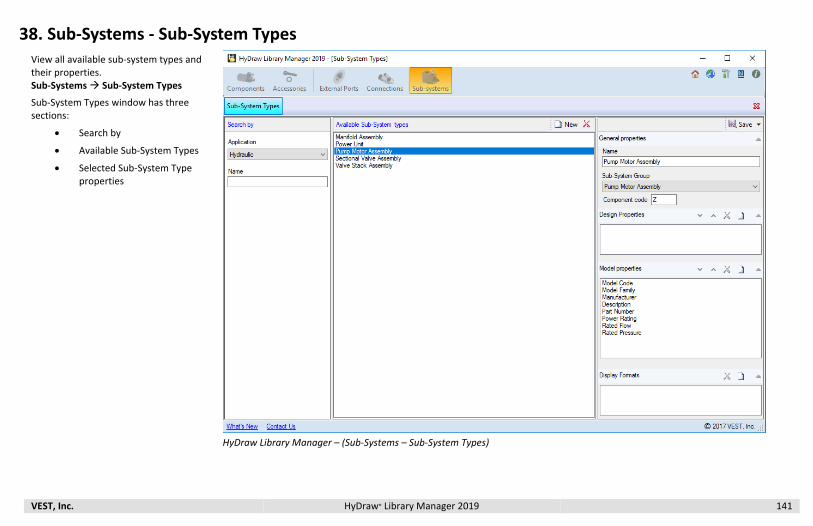
VEST, Inc. HyDraw® Library Manager 2019 141
38. Sub-Systems - Sub-System Types View all available sub-system types and their properties. Sub-Systems → Sub-System Types
Sub-System Types window has three sections:
• Search by
• Available Sub-System Types
• Selected Sub-System Type properties
HyDraw Library Manager – (Sub-Systems – Sub-System Types)

VEST, Inc. HyDraw® Library Manager 2019 142
Search by
Search for a particular application, sub-system type or all sub-system types.
Search by Section
Available Sub-System Types The Available Sub-System Types
section displays all available Sub-System types.
Create a New Sub-System type or delete a sub-system type by selecting the required icon on the caption bar.
Available Sub-System Types Section

VEST, Inc. HyDraw® Library Manager 2019 143
Selected Sub-System Type properties The Selected Sub-System Type properties section displays
• General Properties
• Design Properties
• Model Properties
• Display Formats
Save the properties of the sub-system type after making changes.
Or
Save As a new sub-system type. Save commands are available on the caption bar.
Selected Sub-System Type properties section

VEST, Inc. HyDraw® Library Manager 2019 144
General Properties
This section displays the name of the Sub-System Type, Sub-System Group and the Component Code.
Design Properties
This section displays the available design properties. You can also add new design properties.
1. Click on the Design properties caption bar to display the Select Design Property dialog box.
2. Select any property checkbox to display them in the Design Property section.
3. Click Add New to display the Define Component Properties dialog box.
Select Design Property dialog box

VEST, Inc. HyDraw® Library Manager 2019 145
4. Click New to add new property.
5. Select Display in drawing to display the property in the drawing.
6. Click in the selected property definition section to display the Define Units dialog box.
7. Click Save to save the new property and update the existing properties.
Note:
1. You cannot delete essential design
properties; hence remains inactive on selection of essential model properties.
2. remains inactive if Text, Currency, or Yes/No is selected in the Data type box.
Define Component Properties
Define Units

VEST, Inc. HyDraw® Library Manager 2019 146
Model Properties
This section displays the available model properties. You can also add new model properties.
1. Click on the Model Properties caption bar to display the Select Model Properties dialog box.
2. Select any property checkbox to display it in the Model Property section.
3. Click Add New to display the Define Component Properties dialog box.
4. Click New to add a new property.
5. Click in the selected property definition section to display the Define Units dialog box.
6. Select the Display in drawing checkbox to display the model property in the drawing.
7. Click Save to save the new property or update the existing property.
Select Model Properties dialog box
Define Component Properties
Note:
▪ Essential model properties cannot be deleted; therefore, remains inactive on selection of such essential properties.
▪ remains inactive, if Text,Currency, or Yes/No is selected in the Unit category box.

VEST, Inc. HyDraw® Library Manager 2019 147
Define Units
The Define Units dialog box display details of the selected Unit category.
1. Select Unit Category.
2. Edit Category name, if required.
3. Select Imperial Unit.
4. Select Metric Unit.
5. Select Unit Name.
6. Enter the Precision up to four decimal places.
7. Click Save As New to add a new category.
8. Click Save to update an existing category.
Define Units dialog box

VEST, Inc. HyDraw® Library Manager 2019 148
Display Formats
This section displays the available display formats.
1. Click on the Display Formats caption bar to display the Select Display Format dialog box.
2. Select any property checkbox to display it in the Display Format section.
3. Click OK.
4. You can also click to delete an existing display format.
Display Formats section
Select Display Format dialog box

VEST, Inc. HyDraw® Library Manager 2019 149
Miscellaneous
39 Migrating Library
40 HyDraw Update from Excel Interface Manager
41 HyDraw Import Library

VEST, Inc. HyDraw® Library Manager 2019 150
39. Migrating Library Migrate your existing HyDraw Library to the new HyDraw Library format. (Migration of HyDraw Library 2018 or older versions)
1. Run the HyDraw Library Manager 2019 Start > All Apps > VEST > HyDraw Library Manager 2019
The Set library path displays.
2. Enter the Data library path or Click Browse… and select the previous version of the HyDraw Library Path for the Data, Symbol, and Sub-systems library.
3. Click OK.
If the HyDraw library is 2018 version or older version, the Migrate Data Library dialog box displays.
The Create a backup before migrating option is selected by default.
▪ In the HyDraw Library backup path, click Browse… and select the alternate backup path, if required.
▪ Click OK to migrate the library.
On successful migration, “Your data library migrated successfully” message box displays.
4. Click OK to exit.
Set library path Migrate Data Library
Migrate Data Library – Success Message

VEST, Inc. HyDraw® Library Manager 2019 151
40. HyDraw Update From Excel Interface Manager Configure the Excel data settings XML file through this utility. This is an admin utility and only the administrator can use this configurator.
Run the HyDraw Update From Excel Interface Manager Start > All Apps > VEST > HyDraw Update From Excel Interface Manager
The HyDraw Update From Excel Interface Manager dialog box displays.
1. Select the Excel file by clicking the Browse button.
All columns of the selected sheet populates in the data grid.
2. Select columns to include in the ERP Data settings XML and click Next.
Update from Excel Interface Manager with Columns

VEST, Inc. HyDraw® Library Manager 2019 152
The map properties data grid populates.
Automatically, the equivalent HyDraw properties will be assigned based on the Column name of the Excel file.
3. Manually map the unassigned property using the Map Property button.
4. Click the OK button after assigning all the properties.
5. Click the Map Property button to select the equivalent HyDraw property.
6. Click OK to assign the equivalent HyDraw property.
Update from Excel Interface Configurator with data

VEST, Inc. HyDraw® Library Manager 2019 153
The data is stored in the XML file saved in the same location as the Excel data file.
The XML file is named, ERPServiceConfiguration.xml.
Map Property dialog

VEST, Inc. HyDraw® Library Manager 2019 154
41. HyDraw Import Library Import symbols, components, accessories, documents and CAD files from the source library to the destination library.
1. Access HyDraw Import Library 2019 from Start > All Apps > VEST > HyDraw Import Library 2019
2. Click Browse…
The Browser For Folder dialog box displays.
3. Navigate to the required folder in the Browse for Folder dialog box.
4. Click OK.
The Selected Library displays in the Source Library.
5. Click OK.
Note:
Source Library Path selection should be the root library folder.
(For example, C:\VEST\HyDraw Library 2018)
HyDraw Import Library

VEST, Inc. HyDraw® Library Manager 2019 155
Symbols Import a symbol library from the source library to the destination library.
1. Click Symbols.
The Symbol Library page displays.
2. Select the required library.
3. Click Check for Updates.
The program downloads the list of new symbols and modified symbols.
HyDraw Import Library – Symbols

VEST, Inc. HyDraw® Library Manager 2019 156
Import New Symbols The New Symbols tab displays the tree view of the symbol folders in the left pane. When a folder is selected, the Available Symbols are displayed in the right pane.
1. Click the Import All Symbols button to import all the new symbols from the source library and update the destination library.
2. Click Select All to select all the symbols displayed in the right pane.
You can select a single symbol or multiple symbols by drag select or Use Ctrl + C to select multiple symbols.
3. Click Import Selected Symbols to import the selected symbols to the destination library.
HyDraw Import Library – Import New Symbols

VEST, Inc. HyDraw® Library Manager 2019 157
Import Modified Symbols The Modified Symbols tab shows the tree view of the symbol folders in the left pane. When a folder is selected, Available Symbols are displayed in the right pane.
1. Select Exclude Symbols: Modified checkbox, if you don’t want to list the destination library symbols modified by you.
2. Click the Import All Symbols button to copy all the modified symbols from the source library and update the destination library.
3. Click Select All to select all the symbols displayed in the right pane.
You can select single symbol or multiple symbols by drag select or Use Ctrl + C to select the symbols.
4. Click Import Selected Symbols to update the selected symbols to the destination library.
HyDraw Import Library – Import Modified Symbols
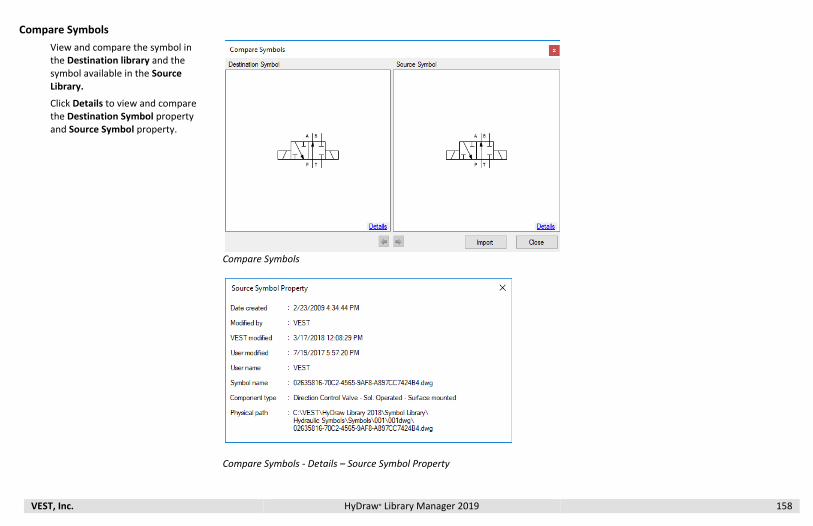
VEST, Inc. HyDraw® Library Manager 2019 158
Compare Symbols
View and compare the symbol in the Destination library and the symbol available in the Source Library.
Click Details to view and compare the Destination Symbol property and Source Symbol property.
Compare Symbols
Compare Symbols - Details – Source Symbol Property
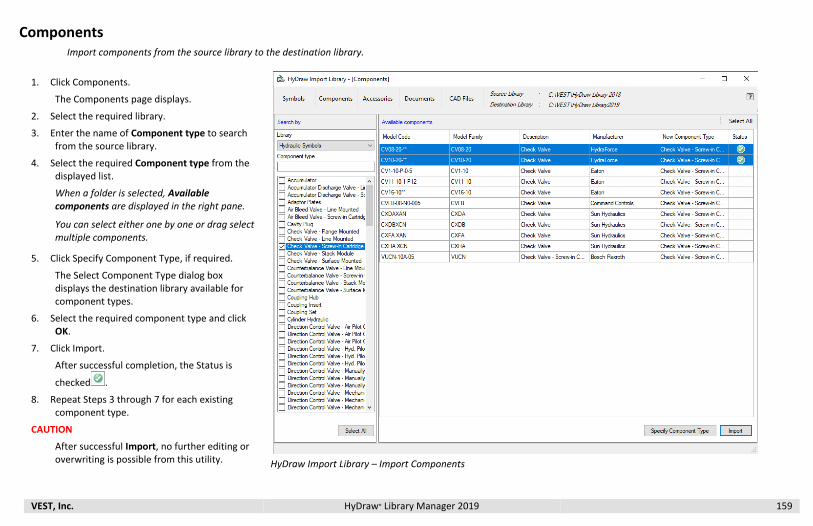
VEST, Inc. HyDraw® Library Manager 2019 159
Components Import components from the source library to the destination library.
1. Click Components.
The Components page displays.
2. Select the required library.
3. Enter the name of Component type to search from the source library.
4. Select the required Component type from the displayed list.
When a folder is selected, Available components are displayed in the right pane.
You can select either one by one or drag select multiple components.
5. Click Specify Component Type, if required.
The Select Component Type dialog box displays the destination library available for component types.
6. Select the required component type and click OK.
7. Click Import.
After successful completion, the Status is
checked .
8. Repeat Steps 3 through 7 for each existing component type.
CAUTION
After successful Import, no further editing or overwriting is possible from this utility.
HyDraw Import Library – Import Components

VEST, Inc. HyDraw® Library Manager 2019 160
Accessories Import accessories from the source library to the destination library.
1. Click Accessories.
The Accessories page displays.
2. Select the required library.
3. Enter the name of Accessories type to search from the source library.
4. Select the required accessory type from the Accessories list.
When a folder is selected, Available Accessories are displayed in the right pane.
You can select either one by one or drag select multiple accessories.
5. Click Specify Component Type, if required.
The Select Component Type dialog box displays the destination library available for Accessories type.
6. Select the required accessory type and click OK.
7. Click Import.
After successful completion, the Status is
checked .
8. Repeat Steps 3 through 7 for each existing component type.
CAUTION
After successful Import, no further editing or overwriting is possible from this utility.
HyDraw Import Library – Import Accessories

VEST, Inc. HyDraw® Library Manager 2019 161
Documents Import documents from the source library to the destination library.
1. Click Documents.
The Documents page displays.
2. Select the required document(s) from the displayed Categories.
When a folder is selected, Available Documents are displayed in the right pane.
You can select either one by one or drag select multiple documents.
3. Click Specify Path, if required.
The Specify Path dialog box displays.
4. Select Document on LAN.
▪ Click Browse… button to select the Root Folder.
▪ The Browse For Folder dialog box displays.
▪ Select the root folder and click OK.
▪ Click Browse… button to select the Sub Folder.
▪ The Browse For Folder dialog box displays.
▪ Select the sub folder and click OK.
Or
▪ Select Document on Web.
▪ Select existing URL or specify the root folder name in the Root Folder text box.
▪ Specify sub folder name in the Sub Folder text box.
▪ Click OK.
HyDraw Import Library – Import Documents

VEST, Inc. HyDraw® Library Manager 2019 162
5. Click Import.
After successful completion, the Status is
checked .
6. Repeat Steps 2 through 5 for each category.
CAUTION
After successful Import, no further editing or overwriting is possible from this utility.

VEST, Inc. HyDraw® Library Manager 2019 163
CAD Files Import CAD files from the source library to the destination library.
1. Click CAD Files.
The CAD Files page displays.
2. Select the required CAD files from the list of displayed Categories.
When a folder is selected, Available CAD files are displayed in the right pane.
You can select either one by one or drag select multiple CAD files.
3. Click Specify Path, if required.
The Specify Path dialog box displays.
4. Select CAD File on LAN.
▪ Click Browse… button to select the Root Folder.
▪ The Browse For Folder dialog box displays.
▪ Select the root folder and click OK.
▪ Click Browse… button to select the Sub Folder.
▪ The Browse For Folder dialog box displays.
▪ Select the sub folder and click OK.
Or HyDraw Import Library – Import CAD Files

VEST, Inc. HyDraw® Library Manager 2019 164
▪ Select CAD File on Web.
▪ Select existing URL or specify root folder name in the Root Folder text box.
▪ Specify sub folder name in the Sub Folder text box.
▪ Click OK.
5. Click Import.
After successful completion, the
Status is checked .
6. Repeat Steps 2 through 5 for each category.
CAUTION
After successful Import, no further editing or overwriting is possible from this utility.

VEST, Inc. HyDraw® Library Manager 2019 165
Index
A
About HyDraw Library Manager, 12 Accessories, 25, 69, 117, 160 Accessories – Component Types, 76 Accessories – Model Properties, 75 Accessories Library, 70 Add New Accessory to the Library, 26, 118 Add New Folder, 16, 112 Add New Symbols, 5 Add Symbols to Child Symbol Library from Parent
Library, 19 Assign Property to Component Type, 47, 133 Assigning Component Type, 37 Automatic Settings Detection, 11 Available CAD files, 43 Available Cavities/Footprints, 67 Available Component Types, 56, 77 Available Connections, 104 Available Connectors, 106 Available Display Formats, 52, 89, 138 Available Documents, 41 Available manufacturer, 65 Available Models, 33, 71, 125 Available Pipes, Tubes & Hoses, 93 Available Ports, 82 Available Sub-System Types, 142 Available Symbols, 114
C
CAD files, 163
CAD Files, 29, 42, 74, 121, 129 Cavity/Footprint/Interface, 66 Compare Symbols, 7, 158 Component - Design Properties, 48 Component Design Properties, 134 Component Model Properties, 44 Components, 13, 159 Components - Component Types, 55 Components - Display Formats, 51 Components - Model Data View, 31 Components – Symbol View, 14 Connection Model Properties, 96 Connections, 91, 92 Connections – Connection Lines, 103 Connections - Design Properties, 98 Connections – Display Formats, 100 Connections - Model Properties, 95 Create New Child Symbol Library, 18 Create New Custom Symbol Library, 17 Create New Model and Link, 122 Create New Model and Link, 30
D
Define Units, 61, 147 Delete Folder, 113 Delete symbol, 22 Delete Symbol, 114 Design Properties, 49, 58, 107, 135, 144 Design Properties - Connection, 99 Design Properties - External Port, 87 Display Formats, 62, 108, 148 Display Formats - Connections, 101 Documents, 28, 40, 73, 120, 128, 161
E
Edit Component Type, 22 Edit Sub-System Type, 114 External Ports, 80, 81 External Ports - Design Properties, 86 External Ports – Display Formats, 88 External Ports - Model properties, 84
G
General properties, 106 General Properties, 58, 144
H
HyDraw ERP Interface Manager, 151 HyDraw Import Library, 154
I
Import, 34 Import Model Data and Link, 30 Import Modified Symbols, 157 Importing Model Data, 37 Installation, 2 Internet Settings, 11 Introduction, 1

VEST, Inc. HyDraw® Library Manager 2019 166
L
Library Manager Menu bar, 3 Library Path, 10 Library Section, 15, 111 Link Models to Symbol, 24, 116 Link Symbol, 39, 127
M
Manage Lists, 63, 79 Manufacturer, 64 Map Property, 36 Migrating Library, 150 Model Properties, 45, 60, 107, 131, 146 Model Properties – External Ports, 85 Models linked to selected symbol, 23, 115
O
Options, 8
P
Proxy Connection, 11
R
Rename Folder, 113 Replace Modified Symbols, 6
S
Search by, 32, 41, 43, 56, 67, 71, 124, 142 Search by Application or Name, 77 Search by Connection Type or Material, 93 Search by Port Type or Size, 82 Search symbols by, 21 Selected CAD file properties, 43 Selected Cavity/Footprint properties, 68 Selected Component Type properties, 57 Selected Component Type -properties, 78 Selected Connection properties, 104 Selected connectors properties, 106 Selected Display Format, 53, 90, 102, 139 Selected Document properties, 41
Selected manufacturer Property, 65 Selected Model properties, 38, 72, 126 Selected Pipe/Tube Properties, 94 Selected Port properties, 83 Selected property definition, 97 Selected property definition, 46, 50, 85, 87 Selected property definition, 132 Selected property definition, 136 Selected property definition - Connection, 99 Selected Sub-System Type properties, 143 Sub systems, 109 Sub-System - Model Properties, 130 Sub-system - Sub System Types, 141 Sub-Systems - Model Data View, 123 Sub-Systems – Symbol View, 110 Sub-Sytems - Display Formats, 137 Symbols, 155 System Requirements, 2
U
Units, 9 Update Symbol Library, 4
