hyperion enterprise release 6.5.1.1.000 installation guide - oracle
TRANSCRIPT

Hyperion® Enterprise®
Installation Guide
RELEASE 6.5.1.1.000

Hyperion Enterprise Installation Guide, 6.5.1.1.000
Copyright © 1991, 2012, Oracle and/or its affiliates. All rights reserved.
Authors: EPM Information Development Team
Oracle and Java are registered trademarks of Oracle and/or its affiliates. Other names may be trademarks of their respectiveowners
This software and related documentation are provided under a license agreement containing restrictions on use anddisclosure and are protected by intellectual property laws. Except as expressly permitted in your license agreement orallowed by law, you may not use, copy, reproduce, translate, broadcast, modify, license, transmit, distribute, exhibit,perform, publish, or display any part, in any form, or by any means. Reverse engineering, disassembly, or decompilationof this software, unless required by law for interoperability, is prohibited.
The information contained herein is subject to change without notice and is not warranted to be error-free. If you findany errors, please report them to us in writing.
If this is software or related documentation that is delivered to the U.S. Government or anyone licensing it on behalf ofthe U.S. Government, the following notice is applicable:
U.S. GOVERNMENT RIGHTS:
Programs, software, databases, and related documentation and technical data delivered to U.S. Government customersare "commercial computer software" or "commercial technical data" pursuant to the applicable Federal AcquisitionRegulation and agency-specific supplemental regulations. As such, the use, duplication, disclosure, modification, andadaptation shall be subject to the restrictions and license terms set forth in the applicable Government contract, and, tothe extent applicable by the terms of the Government contract, the additional rights set forth in FAR 52.227-19, CommercialComputer Software License (December 2007). Oracle America, Inc., 500 Oracle Parkway, Redwood City, CA 94065.
This software or hardware is developed for general use in a variety of information management applications. It is notdeveloped or intended for use in any inherently dangerous applications, including applications that may create a risk ofpersonal injury. If you use this software or hardware in dangerous applications, then you shall be responsible to take allappropriate fail-safe, backup, redundancy, and other measures to ensure its safe use. Oracle Corporation and its affiliatesdisclaim any liability for any damages caused by use of this software or hardware in dangerous applications.
This software or hardware and documentation may provide access to or information on content, products, and servicesfrom third parties. Oracle Corporation and its affiliates are not responsible for and expressly disclaim all warranties of anykind with respect to third-party content, products, and services. Oracle Corporation and its affiliates will not be responsiblefor any loss, costs, or damages incurred due to your access to or use of third-party content, products, or services.

Contents
Documentation Accessibility . . . . . . . . . . . . . . . . . . . . . . . . . . . . . . . . . . . . . . . . . . . . . . . . . . . . . . . . . . . 9
Chapter 1. Installation Overview . . . . . . . . . . . . . . . . . . . . . . . . . . . . . . . . . . . . . . . . . . . . . . . . . . . . . . . . 11
Introduction . . . . . . . . . . . . . . . . . . . . . . . . . . . . . . . . . . . . . . . . . . . . . . . . . . . . . . . . . 11
Components . . . . . . . . . . . . . . . . . . . . . . . . . . . . . . . . . . . . . . . . . . . . . . . . . . . . . . . . . 11
Chapter 2. Planning the Installation . . . . . . . . . . . . . . . . . . . . . . . . . . . . . . . . . . . . . . . . . . . . . . . . . . . . . 13
System Requirements . . . . . . . . . . . . . . . . . . . . . . . . . . . . . . . . . . . . . . . . . . . . . . . . . . 13
Windows Client Workstation Requirements . . . . . . . . . . . . . . . . . . . . . . . . . . . . . . . 13
File Server Requirements (Without Data Server) . . . . . . . . . . . . . . . . . . . . . . . . . . . . 15
File Server Requirements (With Data Server) . . . . . . . . . . . . . . . . . . . . . . . . . . . . . . 15
Hyperion Enterprise Web Client . . . . . . . . . . . . . . . . . . . . . . . . . . . . . . . . . . . . . . . 16
Hyperion Enterprise Web Server . . . . . . . . . . . . . . . . . . . . . . . . . . . . . . . . . . . . . . . 16
Application Server Requirements for Hyperion Enterprise . . . . . . . . . . . . . . . . . . . . . 17
Message Server Requirements for Hyperion Enterprise . . . . . . . . . . . . . . . . . . . . . . . 18
Hyperion Enterprise Smart View Provider Requirements . . . . . . . . . . . . . . . . . . . . . . 19
Prerequisites . . . . . . . . . . . . . . . . . . . . . . . . . . . . . . . . . . . . . . . . . . . . . . . . . . . . . . . . . 19
Additional Prerequisites . . . . . . . . . . . . . . . . . . . . . . . . . . . . . . . . . . . . . . . . . . . . . . . . 21
Hyperion Enterprise Application Server . . . . . . . . . . . . . . . . . . . . . . . . . . . . . . . . . . 21
Using Hyperion Enterprise Application Server on Windows 2008 32 or 64-bit . . . . . . 21
Statutory Consolidation Engine . . . . . . . . . . . . . . . . . . . . . . . . . . . . . . . . . . . . . . . . 21
Hyperion Enterprise Servers . . . . . . . . . . . . . . . . . . . . . . . . . . . . . . . . . . . . . . . . . . 22
Hyperion Enterprise Web Server . . . . . . . . . . . . . . . . . . . . . . . . . . . . . . . . . . . . . . . 23
Hyperion Enterprise Smart View Provider . . . . . . . . . . . . . . . . . . . . . . . . . . . . . . . . 25
Components and Their Directories . . . . . . . . . . . . . . . . . . . . . . . . . . . . . . . . . . . . . 25
Installation Tasks . . . . . . . . . . . . . . . . . . . . . . . . . . . . . . . . . . . . . . . . . . . . . . . . . . 26
Compatible Products . . . . . . . . . . . . . . . . . . . . . . . . . . . . . . . . . . . . . . . . . . . . . . . 27
Port Numbers Used by Hyperion Products . . . . . . . . . . . . . . . . . . . . . . . . . . . . . . . . . . . 27
Chapter 3. Quick Install and Silent Mode Installation . . . . . . . . . . . . . . . . . . . . . . . . . . . . . . . . . . . . . . . . . 29
Installation Methods . . . . . . . . . . . . . . . . . . . . . . . . . . . . . . . . . . . . . . . . . . . . . . . . . . . 29
Performing a Quick Install . . . . . . . . . . . . . . . . . . . . . . . . . . . . . . . . . . . . . . . . . . . . . . 29
Silent Installation . . . . . . . . . . . . . . . . . . . . . . . . . . . . . . . . . . . . . . . . . . . . . . . . . . . . . 31
Contents iii

Performing a Silent Mode Installation . . . . . . . . . . . . . . . . . . . . . . . . . . . . . . . . . . . 31
Driver Count Settings . . . . . . . . . . . . . . . . . . . . . . . . . . . . . . . . . . . . . . . . . . . . . . . . . . 32
Chapter 4. Installing Hyperion Enterprise . . . . . . . . . . . . . . . . . . . . . . . . . . . . . . . . . . . . . . . . . . . . . . . . . 33
Setup Options . . . . . . . . . . . . . . . . . . . . . . . . . . . . . . . . . . . . . . . . . . . . . . . . . . . . . . . . 33
Performing a Complete Installation . . . . . . . . . . . . . . . . . . . . . . . . . . . . . . . . . . . . . . . . 33
Beginning a Complete Installation . . . . . . . . . . . . . . . . . . . . . . . . . . . . . . . . . . . . . . 34
Setting Up Server Components . . . . . . . . . . . . . . . . . . . . . . . . . . . . . . . . . . . . . . . . 45
Installing Common Security Services (CSS) . . . . . . . . . . . . . . . . . . . . . . . . . . . . . . . 53
Finishing a Complete Installation . . . . . . . . . . . . . . . . . . . . . . . . . . . . . . . . . . . . . . . 56
Performing a Workstation Setup Installation . . . . . . . . . . . . . . . . . . . . . . . . . . . . . . . . . 57
Verifying Your Path . . . . . . . . . . . . . . . . . . . . . . . . . . . . . . . . . . . . . . . . . . . . . . . . . . . 66
Driver Count Setting . . . . . . . . . . . . . . . . . . . . . . . . . . . . . . . . . . . . . . . . . . . . . . . . . . . 66
Chapter 5. Additional Installation Procedures . . . . . . . . . . . . . . . . . . . . . . . . . . . . . . . . . . . . . . . . . . . . . . 69
Setting Up Hyperion Retrieve . . . . . . . . . . . . . . . . . . . . . . . . . . . . . . . . . . . . . . . . . . . . 69
Setting Up Hyperion Retrieve for Microsoft Excel . . . . . . . . . . . . . . . . . . . . . . . . . . . 69
Creating a Customized Setup Program . . . . . . . . . . . . . . . . . . . . . . . . . . . . . . . . . . . . . . 69
Installing Hyperion Enterprise Using the Customized Setup Program . . . . . . . . . . . . . . . 71
Configuring Hyperion Enterprise Web Server . . . . . . . . . . . . . . . . . . . . . . . . . . . . . . . . . 71
Prerequisites . . . . . . . . . . . . . . . . . . . . . . . . . . . . . . . . . . . . . . . . . . . . . . . . . . . . . . 71
Configuring the Hyperion Enterprise Web Application . . . . . . . . . . . . . . . . . . . . . . . 72
Disabling Access to Hyperion Enterprise Web Applications . . . . . . . . . . . . . . . . . . . . . . . 73
About Hyperion Home . . . . . . . . . . . . . . . . . . . . . . . . . . . . . . . . . . . . . . . . . . . . . . . . . 74
Changing the Hyperion Home Location . . . . . . . . . . . . . . . . . . . . . . . . . . . . . . . . . . 74
Chapter 6. Converting Your Application to Hyperion Enterprise Release 6.5.1.1.000 . . . . . . . . . . . . . . . . . . . . 75
Feature Comparison with Hyperion Enterprise SE Release 4.x . . . . . . . . . . . . . . . . . . . . . 75
Compatibility of Earlier Hyperion Enterprise SE and Hyperion Enterprise 6.5.1.1.000Releases . . . . . . . . . . . . . . . . . . . . . . . . . . . . . . . . . . . . . . . . . . . . . . . . . . . . . . . . . . . . 79
Performing Eliminations When Substructures are Used . . . . . . . . . . . . . . . . . . . . . . . 79
Assigning Formulas to Subaccounts by Equating Major Accounts . . . . . . . . . . . . . . . 80
Calculating Formulas . . . . . . . . . . . . . . . . . . . . . . . . . . . . . . . . . . . . . . . . . . . . . . . 80
Entering Intercompany Transactions . . . . . . . . . . . . . . . . . . . . . . . . . . . . . . . . . . . . 80
Tracking Acquired and Disposed Dates . . . . . . . . . . . . . . . . . . . . . . . . . . . . . . . . . . 81
Universal Naming Convention . . . . . . . . . . . . . . . . . . . . . . . . . . . . . . . . . . . . . . . . 81
System Load File Behavior . . . . . . . . . . . . . . . . . . . . . . . . . . . . . . . . . . . . . . . . . . . . 81
Requirements Comparison with Hyperion Enterprise SE . . . . . . . . . . . . . . . . . . . . . . . . . 83
Hyperion Enterprise SE Architecture . . . . . . . . . . . . . . . . . . . . . . . . . . . . . . . . . . . . 84
Hyperion Enterprise Release 6.5.1.1.000 Architecture . . . . . . . . . . . . . . . . . . . . . . . . 84
iv Contents

Hyperion Enterprise Conversion Utilities . . . . . . . . . . . . . . . . . . . . . . . . . . . . . . . . . . . . 86
Converting Applications . . . . . . . . . . . . . . . . . . . . . . . . . . . . . . . . . . . . . . . . . . . . . . . . 87
Application Conversion 4.7 Through 6.4.0.0.000 to 6.5.1.1.000 Conversion Utility . . . 87
Application Conversion from SE to 6.5.1.1.000 Conversion Utility . . . . . . . . . . . . . . . 87
Hyperion Enterprise SE System Extract and Logic Conversion Utilities . . . . . . . . . . . . 88
Installing the Conversion Utilities . . . . . . . . . . . . . . . . . . . . . . . . . . . . . . . . . . . . . . . . . 88
Application Conversion 4.7 Through 6.4.0.0.000 to 6.5.1.1.000 Conversion Utility . . . . . . 88
Hyperion Enterprise XA Conversion Considerations . . . . . . . . . . . . . . . . . . . . . . . . . 90
Converting a Hyperion Enterprise Release 4.7 Through Release 6.4.0.0.000 Applicationto Release 6.5.1.1.000 . . . . . . . . . . . . . . . . . . . . . . . . . . . . . . . . . . . . . . . . . . . . . . . 91
Application Conversion SE to Hyperion Enterprise 6.5.1.1.000 Conversion Utility . . . . . . 94
Before You Convert . . . . . . . . . . . . . . . . . . . . . . . . . . . . . . . . . . . . . . . . . . . . . . . . 95
Gathering Data to Test Your Conversion . . . . . . . . . . . . . . . . . . . . . . . . . . . . . . . . . 97
Converting Hyperion Enterprise SE Applications to Hyperion Enterprise Release6.5.1.1.000 . . . . . . . . . . . . . . . . . . . . . . . . . . . . . . . . . . . . . . . . . . . . . . . . . . . . . . . . . . 97
Postconversion Tasks and Considerations . . . . . . . . . . . . . . . . . . . . . . . . . . . . . . . . . . . 102
System Extract and Logic Conversion Utilities . . . . . . . . . . . . . . . . . . . . . . . . . . . . . . . 104
Application Load File Conversion Considerations . . . . . . . . . . . . . . . . . . . . . . . . . . 104
Converting System Extract and Load Files . . . . . . . . . . . . . . . . . . . . . . . . . . . . . . . 105
Loading Converted System Files . . . . . . . . . . . . . . . . . . . . . . . . . . . . . . . . . . . . . . . 106
Converting Logic Files . . . . . . . . . . . . . . . . . . . . . . . . . . . . . . . . . . . . . . . . . . . . . . . . . 106
Resetting Your Dynamic Account List Criteria . . . . . . . . . . . . . . . . . . . . . . . . . . . . . . . 108
Setting Your Point of View in Hyperion Enterprise . . . . . . . . . . . . . . . . . . . . . . . . . . . . 108
Chapter 7. Uninstalling Hyperion Enterprise . . . . . . . . . . . . . . . . . . . . . . . . . . . . . . . . . . . . . . . . . . . . . . 109
Uninstalling Hyperion Enterprise . . . . . . . . . . . . . . . . . . . . . . . . . . . . . . . . . . . . . . . . 109
Chapter 8. Upgrading Hyperion Enterprise . . . . . . . . . . . . . . . . . . . . . . . . . . . . . . . . . . . . . . . . . . . . . . . . 111
Upgrading Methods . . . . . . . . . . . . . . . . . . . . . . . . . . . . . . . . . . . . . . . . . . . . . . . . . . 111
Upgrading by Installing . . . . . . . . . . . . . . . . . . . . . . . . . . . . . . . . . . . . . . . . . . . . . . . . 111
Upgrading by Modifying . . . . . . . . . . . . . . . . . . . . . . . . . . . . . . . . . . . . . . . . . . . . . . . 114
Upgrading by Repairing . . . . . . . . . . . . . . . . . . . . . . . . . . . . . . . . . . . . . . . . . . . . . . . 116
Appendix A. Manual Configuration of Web Environment . . . . . . . . . . . . . . . . . . . . . . . . . . . . . . . . . . . . . . . 117
Installing and Configuring Microsoft IIS . . . . . . . . . . . . . . . . . . . . . . . . . . . . . . . . . . . 117
Verifying the IIS Installation . . . . . . . . . . . . . . . . . . . . . . . . . . . . . . . . . . . . . . . . . 118
Prerequisites for configuring IIS . . . . . . . . . . . . . . . . . . . . . . . . . . . . . . . . . . . . . . . 118
Checking IIS Configuration . . . . . . . . . . . . . . . . . . . . . . . . . . . . . . . . . . . . . . . . . . 119
Performance Tuning . . . . . . . . . . . . . . . . . . . . . . . . . . . . . . . . . . . . . . . . . . . . . . . . . . 120
Contents v

Appendix B. Hyperion Enterprise Documentation . . . . . . . . . . . . . . . . . . . . . . . . . . . . . . . . . . . . . . . . . . . 123
Browser-Based Help for Hyperion Enterprise Windows 32–bit client and Web . . . . . . . . 123
Accessing Browser-Based Help for Hyperion Enterprise Windows 32–bit client . . . . 123
Accessing Browser-Based Help . . . . . . . . . . . . . . . . . . . . . . . . . . . . . . . . . . . . . . . . 124
Viewing and Printing PDF Files . . . . . . . . . . . . . . . . . . . . . . . . . . . . . . . . . . . . . . . . . . 124
PDF Files for Hyperion Enterprise . . . . . . . . . . . . . . . . . . . . . . . . . . . . . . . . . . . . . 124
Appendix C. Program Files Inventory . . . . . . . . . . . . . . . . . . . . . . . . . . . . . . . . . . . . . . . . . . . . . . . . . . . . 125
Windows System Files . . . . . . . . . . . . . . . . . . . . . . . . . . . . . . . . . . . . . . . . . . . . . . . . . 125
Windows Registry Files . . . . . . . . . . . . . . . . . . . . . . . . . . . . . . . . . . . . . . . . . . . . . . . . 126
Windows Crystal Files . . . . . . . . . . . . . . . . . . . . . . . . . . . . . . . . . . . . . . . . . . . . . . . . . 127
Windows Crescent Files . . . . . . . . . . . . . . . . . . . . . . . . . . . . . . . . . . . . . . . . . . . . . . . 128
Appendix D. Product Inventory . . . . . . . . . . . . . . . . . . . . . . . . . . . . . . . . . . . . . . . . . . . . . . . . . . . . . . . 129
Hyperion Enterprise . . . . . . . . . . . . . . . . . . . . . . . . . . . . . . . . . . . . . . . . . . . . . . . . . . 129
Hyperion Enterprise API Reference Guide . . . . . . . . . . . . . . . . . . . . . . . . . . . . . . . . . . 129
Hyperion Allocations . . . . . . . . . . . . . . . . . . . . . . . . . . . . . . . . . . . . . . . . . . . . . . . . . 129
Hyperion LedgerLink . . . . . . . . . . . . . . . . . . . . . . . . . . . . . . . . . . . . . . . . . . . . . . . . . 130
Statutory Consolidation Engine (SCE) . . . . . . . . . . . . . . . . . . . . . . . . . . . . . . . . . . . . . 130
Hyperion Retrieve . . . . . . . . . . . . . . . . . . . . . . . . . . . . . . . . . . . . . . . . . . . . . . . . . . . . 130
Hyperion AutoPilot . . . . . . . . . . . . . . . . . . . . . . . . . . . . . . . . . . . . . . . . . . . . . . . . . . 130
Application Conversion SE to 6.5.1.1.000 Conversion Wizard . . . . . . . . . . . . . . . . . . . . 130
Application Conversion 4.7 Through 6.3.0.0.000 to 6.5.1.1.000 . . . . . . . . . . . . . . . . . . . 130
Load File Conversion Utility . . . . . . . . . . . . . . . . . . . . . . . . . . . . . . . . . . . . . . . . . . . . 131
Logic File Conversion Utility . . . . . . . . . . . . . . . . . . . . . . . . . . . . . . . . . . . . . . . . . . . . 131
Hyperion Home Migration Utility . . . . . . . . . . . . . . . . . . . . . . . . . . . . . . . . . . . . . . . . 131
Appendix E. Ports . . . . . . . . . . . . . . . . . . . . . . . . . . . . . . . . . . . . . . . . . . . . . . . . . . . . . . . . . . . . . . . . . 133
About Default Ports . . . . . . . . . . . . . . . . . . . . . . . . . . . . . . . . . . . . . . . . . . . . . . . . . . 133
Shared Services Ports . . . . . . . . . . . . . . . . . . . . . . . . . . . . . . . . . . . . . . . . . . . . . . . . . 133
Essbase – System 9 Ports . . . . . . . . . . . . . . . . . . . . . . . . . . . . . . . . . . . . . . . . . . . . . . . 134
Essbase Ports . . . . . . . . . . . . . . . . . . . . . . . . . . . . . . . . . . . . . . . . . . . . . . . . . . . . 134
Administration Services Ports . . . . . . . . . . . . . . . . . . . . . . . . . . . . . . . . . . . . . . . . 135
Provider Services Ports . . . . . . . . . . . . . . . . . . . . . . . . . . . . . . . . . . . . . . . . . . . . . 136
Smart Search Command Line Utility Ports . . . . . . . . . . . . . . . . . . . . . . . . . . . . . . . 137
Reporting and Analysis Ports . . . . . . . . . . . . . . . . . . . . . . . . . . . . . . . . . . . . . . . . . . . . 137
Foundation Ports . . . . . . . . . . . . . . . . . . . . . . . . . . . . . . . . . . . . . . . . . . . . . . . . . 137
Financial Reporting Ports . . . . . . . . . . . . . . . . . . . . . . . . . . . . . . . . . . . . . . . . . . . 138
Interactive Reporting Ports . . . . . . . . . . . . . . . . . . . . . . . . . . . . . . . . . . . . . . . . . . 139
Web Analysis Ports . . . . . . . . . . . . . . . . . . . . . . . . . . . . . . . . . . . . . . . . . . . . . . . . 139
vi Contents

EPM Workspace Ports . . . . . . . . . . . . . . . . . . . . . . . . . . . . . . . . . . . . . . . . . . . . . 140
Application Builder for J2EE Ports . . . . . . . . . . . . . . . . . . . . . . . . . . . . . . . . . . . . . 141
Application Builder for .NET Ports . . . . . . . . . . . . . . . . . . . . . . . . . . . . . . . . . . . . 141
Financial Performance Management Applications Ports . . . . . . . . . . . . . . . . . . . . . . . . 141
Financial Management Ports . . . . . . . . . . . . . . . . . . . . . . . . . . . . . . . . . . . . . . . . . 142
Performance Scorecard Ports . . . . . . . . . . . . . . . . . . . . . . . . . . . . . . . . . . . . . . . . . 142
Planning Ports . . . . . . . . . . . . . . . . . . . . . . . . . . . . . . . . . . . . . . . . . . . . . . . . . . . 143
Strategic Finance Ports . . . . . . . . . . . . . . . . . . . . . . . . . . . . . . . . . . . . . . . . . . . . . 143
Performance Management Architect Ports . . . . . . . . . . . . . . . . . . . . . . . . . . . . . . . 144
Data Management Ports . . . . . . . . . . . . . . . . . . . . . . . . . . . . . . . . . . . . . . . . . . . . . . . 146
Data Integration Management Ports . . . . . . . . . . . . . . . . . . . . . . . . . . . . . . . . . . . 146
Translation Manager Ports . . . . . . . . . . . . . . . . . . . . . . . . . . . . . . . . . . . . . . . . . . 147
FDM Ports . . . . . . . . . . . . . . . . . . . . . . . . . . . . . . . . . . . . . . . . . . . . . . . . . . . . . . 148
Data Relationship Management Ports . . . . . . . . . . . . . . . . . . . . . . . . . . . . . . . . . . . 148
Index . . . . . . . . . . . . . . . . . . . . . . . . . . . . . . . . . . . . . . . . . . . . . . . . . . . . . . . . . . . . . . . . . . . . . . . . . 151
Contents vii

viii Contents

Documentation Accessibility
For information about Oracle's commitment to accessibility, visit the Oracle Accessibility Program website athttp://www.oracle.com/pls/topic/lookup?ctx=acc&id=docacc.
Access to Oracle SupportOracle customers have access to electronic support through My Oracle Support. For information, visit http://www.oracle.com/pls/topic/lookup?ctx=acc&id=info or visit http://www.oracle.com/pls/topic/lookup?ctx=acc&id=trs if you are hearing impaired.
9

10 Documentation Accessibility

1Installation Overview
In This Chapter
Introduction... . . . . . . . . . . . . . . . . . . . . . . . . . . . . . . . . . . . . . . . . . . . . . . . . . . . . . . . . . . . . . . . . . . . . . . . . . . . . . . . . . . . . . . . . . . . . . .11
Components ... . . . . . . . . . . . . . . . . . . . . . . . . . . . . . . . . . . . . . . . . . . . . . . . . . . . . . . . . . . . . . . . . . . . . . . . . . . . . . . . . . . . . . . . . . . . . .11
IntroductionOracle's Hyperion® Enterprise® is an advanced management, reporting, and consolidationsystem. This guide describes the hardware and software requirements and installationprocedures for installing Hyperion Enterprise.
Hyperion Enterprise handles a wide range of financial management tasks in a graphical, user-friendly environment. You can use Hyperion Enterprise to collect, consolidate, analyze, andreport on business and financial information. With Hyperion Enterprise, your file-basedapplications can be Web-enabled, giving users access to an application onsite or at a remote siteusing the Internet or an intranet. The system administrator controls which applications are Web-enabled.
External authentication may be used to configure users in Hyperion Enterprise. You can use anyor all of the following authentication types: Microsoft Windows NT LAN Manager (NTLM),Lightweight Directory Access Protocol (LDAP), or Microsoft Active Directory (MSAD).Information about the selected authentication service is configured by the administrator afterthe installation. Multiple providers may be added, if required. For further information aboutexternal authentication and single sign-on, see chapter—Configuring External Authenticationin the Hyperion Enterprise Administrator’s Guide.
ComponentsThe Hyperion Enterprise installation program installs the following products, based on theoptions that you select:
Hyperion Enterprise Release 6.5.1.1.000
l External Security Services
l Hyperion Statutory Consolidation Engine
l Hyperion Enterprise Application Server
l Hyperion Enterprise Data Server
Introduction 11

l Hyperion Enterprise Web Server
l Hyperion Enterprise Conversion Utilities
l Hyperion Allocations®
l Hyperion AutoPilot TM
l Hyperion LedgerLink®
l Hyperion Message Server
l Hyperion SmartView provider
l Hyperion Enterprise Extraction Utility
For information about the enhancements and considerations for this release of HyperionEnterprise, see the Hyperion Enterprise Release 6.5.1.1.000 Readme document.
Note: If you have Hyperion Enterprise release 6.4.0.0.000 or earlier installed on your system,you should uninstall the previous versions as outlined in Chapter 7, “UninstallingHyperion Enterprise.” Hyperion Enterprise release 6.5.1.1.000 supports upgradeinstallation of release 6.4.1.0.000 or higher.
12 Installation Overview

2Planning the Installation
In This Chapter
System Requirements ... . . . . . . . . . . . . . . . . . . . . . . . . . . . . . . . . . . . . . . . . . . . . . . . . . . . . . . . . . . . . . . . . . . . . . . . . . . . . . . . . . .13
Prerequisites.. . . . . . . . . . . . . . . . . . . . . . . . . . . . . . . . . . . . . . . . . . . . . . . . . . . . . . . . . . . . . . . . . . . . . . . . . . . . . . . . . . . . . . . . . . . . . . .19
Additional Prerequisites .. . . . . . . . . . . . . . . . . . . . . . . . . . . . . . . . . . . . . . . . . . . . . . . . . . . . . . . . . . . . . . . . . . . . . . . . . . . . . . . . . .21
Port Numbers Used by Hyperion Products.. . . . . . . . . . . . . . . . . . . . . . . . . . . . . . . . . . . . . . . . . . . . . . . . . . . . . . . . . . . . . .27
System RequirementsThis section provides configuration requirements and recommendations for the HyperionEnterprise Release 6.5.1.1.000 client workstation, Web server, file server, database, applicationserver, and message server. The following specifications cover Hyperion Enterprise Release6.5.1.1.000 software and related applications only. Your particular installation might needadditional memory, space, and processing capabilities, depending on the requirements of youroperating system and any other software you might be running.
Windows Client Workstation RequirementsTable 1 lists configuration requirements and recommendations for a Hyperion EnterpriseRelease 6.5.1.1.000 client workstation. The size and complexity of your applications may impactthe workstation requirements.
Table 1 Client Workstation Requirements
Component Requirements
Processorl Minimum - Pentium 200
l Recommended - Pentium 500 or faster
Memoryl Minimum - 512 MB
l Recommended - 1 GB or greater, particularly for system administration
Disk spacel 10 MB if system files and application data reside on a file server (recommended)
l 75 MB, plus space for application data as needed, if system and data files reside locally
System Requirements 13

Component Requirements
Operating systems Operating System for Both 32-bit and 64-bit.
l Windows XP Professional (with Service Pack 3)
l Windows Vista
l Windows 7
Web browsers Web browsers 32-bit:
l Internet Explorer 6.0, 7.0, and 8.0.
l FireFox 3.5.x and 3.6.x
Web browsers 64-bit:
l Internet Explorer 7.0
l Internet Explorer 8.0
RAM (client) and swapfile
l RAM - 512 MB minimum
l Swap file–Up to 2.5 times the size of physical memory if required.
Note: Refer to the Microsoft documentation for exact figures and additional information.
Spreadsheet add-ins Microsoft Excel XP, 2003, 2007, or 2010
Note: All spreadsheet add-ins are only supported in 32-bit.
Monitors and otherperipherals
l Minimum - SVGA 1024 x 768 resolution
Color Settings 16 bit (High Color), or preferably 24 bit (True Color)
Network connectionl Hyperion Enterprise Release 6.5.1.1.000 File-Based: Use whatever protocol is necessary to support your
network file server. We recommend using a single protocol.
Database connectivityl Hyperion Enterprise Release 6.5.1.1.000 File-Based: Not applicable
Paging file size Configure for the client operating system as recommended by Microsoft Corporation.
Databasel Oracle 10.2.0.3.
l Oracle 11g (Fusion)
l SQL Server 2005 and 2008
These database are used only to record event logs.
Essbasel E*S 7.1.x to System 9
l Runtime Client 7.1.x to System 9
The disk space requirement for a complete installation assumes that you install the componentsselected by default by the setup program. Changing the default selections changes the amountof disk space required. For more information on the default setup selections, see “Performing aComplete Installation” on page 33.
The disk space requirement for a workstation installation reflects the total size of Windowssystem files that are copied to your system.
14 Planning the Installation

File Server Requirements (Without Data Server)Table 2 lists configuration requirements and recommendations for a Hyperion EnterpriseRelease 6.5.1.1.000 file server.
Table 2 File Server Requirements
Component Requirement
Processor Pentium II - IV (500 MHz or faster)
Memoryl Minimum - 512 MB
l Recommended - 1 GB or more
Novell Netware Version 4.12, 5.x, or later
Disk spacel Minimum - 100 MB
l Typical range: 100 to 500 MB, depending on the size of the applications, including system files
l System files: 75 MB, including all add-on modules
Operating systems Server Operating System 32-bit
l Windows 2003 Server Service Pack 2 (Standard, Enterprise and Web Edition)
l Windows 2003 R2 Server Service Pack 2
l Windows 2008 Server Service Pack 1
l Must provide file service support to the client workstation.
Server Operation System 64-bit (x64 based Only)
l Windows 2003 Server Service Pack 2 x64
l Windows 2008 Server Service Pack 1 x64
l Windows 2008 R2 Server
Dedicated file server Not required.
Networkcommunicationssoftware
l Windows 2003 Server (with Service Pack 2)
l Windows 2008 Server (with Service Pack 1)
Wide area networks Hyperion Enterprise Release 6.5.1.1.000 is best used in a distributed environment, and thus large wide areanetwork (WAN) performance decreases. To improve performance, use Citrix Presentation server, HyperionEnterprise Web Server, or Hyperion Enterprise® Reporting - Web Server, which are designed to allow remoteaccess to Hyperion Enterprise Release 6.5.1.1.000 data.
File Server Requirements (With Data Server)Table 3 lists configuration requirements and recommendations for a Hyperion EnterpriseRelease 6.5.1.1.000 file server that utilizes Hyperion Enterprise Data Server:
System Requirements 15

Table 3 File Server Requirements (with Data Server)
Component Recommended
Processor Pentium II - IV (500 MHz or faster, depending on number of users and size of application)
Memory 1 GB minimum (depending on the size of the application)
Operating system Server Operating System 32-bit
l Windows 2003 Server Service Pack 2 (Standard, Enterprise and Web Edition)
l Windows 2003 R2 Server Service Pack 2
l Windows 2008 Server Service Pack 1
l Must provide file service support to the client workstation.
Server Operation System 64-bit (x64 based Only)
l Windows 2003 Server Service Pack 2 x64
l Windows 2008 Server Service Pack 1 x64
l Windows 2008 R2 Server
File server Recommended:
l A dedicated file server for the Application Server
l A dedicated file server for the Hyperion Enterprise Application and Data Servers
Networkcommunicationsoftware
l Windows 2003 Server (with Service Pack 2)
l Windows 2008 Server (with Service Pack 1)
Swap file Up to 2.5 times the size of the physical memory. Follow Microsoft recommendations if physical memory resourcesbecome an issue.
Hyperion Enterprise Web ClientThere are no special operating system requirements for the Web client. Hyperion Enterpriseusers can load data, perform consolidations, and work on journals through a Web-based userinterface. You can use Web browsers (32-bit) such as: Microsoft Internet Explorer 6.0, 7.0 and8.0 or Firefox 3.5.x and 3.6.x.
We also support 64-bit Web browsers such as: Microsoft Internet Explorer 7.0 and 8.0.
Table 4 Web Server Requirements
Component Requirements
Virtual Machine and User Interface Design Frameworkl Java 1.6.20 or higher is required
Hyperion Enterprise Web ServerThe Hyperion Enterprise administrator builds and maintains the application on a x86 server.Table 5 shows the requirements for Hyperion Enterprise Web Server.
16 Planning the Installation
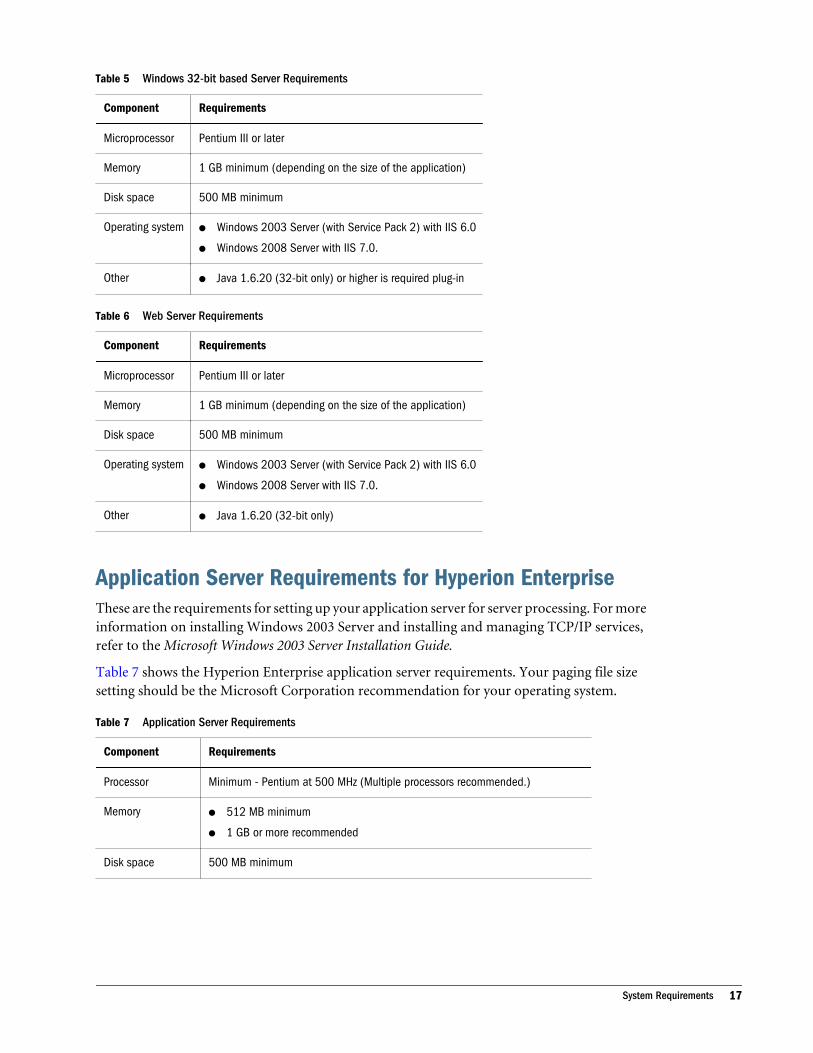
Table 5 Windows 32-bit based Server Requirements
Component Requirements
Microprocessor Pentium III or later
Memory 1 GB minimum (depending on the size of the application)
Disk space 500 MB minimum
Operating systeml Windows 2003 Server (with Service Pack 2) with IIS 6.0
l Windows 2008 Server with IIS 7.0.
Otherl Java 1.6.20 (32-bit only) or higher is required plug-in
Table 6 Web Server Requirements
Component Requirements
Microprocessor Pentium III or later
Memory 1 GB minimum (depending on the size of the application)
Disk space 500 MB minimum
Operating systeml Windows 2003 Server (with Service Pack 2) with IIS 6.0
l Windows 2008 Server with IIS 7.0.
Otherl Java 1.6.20 (32-bit only)
Application Server Requirements for Hyperion EnterpriseThese are the requirements for setting up your application server for server processing. For moreinformation on installing Windows 2003 Server and installing and managing TCP/IP services,refer to the Microsoft Windows 2003 Server Installation Guide.
Table 7 shows the Hyperion Enterprise application server requirements. Your paging file sizesetting should be the Microsoft Corporation recommendation for your operating system.
Table 7 Application Server Requirements
Component Requirements
Processor Minimum - Pentium at 500 MHz (Multiple processors recommended.)
Memoryl 512 MB minimum
l 1 GB or more recommended
Disk space 500 MB minimum
System Requirements 17

Component Requirements
Operating system Server Operating System 32-bit
l Windows 2003 Server Service Pack 2 (Standard, Enterprise and Web Edition)
l Windows 2003 R2 Server Service Pack 2
l Windows 2008 Server Service Pack 1
l Must provide file service support to the client workstation.
Server Operating System 64-bit (x64 based Only)
l Windows 2003 Server Service Pack 2 x64
l Windows 2008 Server Service Pack 1 x64
l Windows 2008 R2 Server
Performance tuning See “Performance Tuning” on page 120
Message Server Requirements for Hyperion EnterpriseThese are the requirements for setting up your message server for server processing. For moreinformation on installing Windows 2003 Server and installing and managing TCP/IP services,refer to the Microsoft Windows 2003 Server Installation Guide.
The Message Server for Hyperion Enterprise is available in Windows 32-bit Message Server andWeb-based Message Server.
Table 8 shows the Hyperion Enterprise Window 32-bit message server requirements. Yourpaging file size setting should be the Microsoft Corporation recommendation for your operatingsystem.
Table 8 Window 32-bit Message Server Requirements
Component Requirements
Processor Minimum - Pentium at 500 MHz (Multiple processors recommended.)
Memoryl 512 MB minimum
l 1 GB or more recommended
Disk space 500 MB minimum
Operating systeml Windows 2003 Server (with Service Pack 2)
l Windows 2008 Server
l Installed TCP/IP
Table 9 shows the Hyperion Enterprise Web based message server requirements.
Table 9 Web-based Message Server Requirements.
Component Requirements
Processor Minimum - Pentium at 500 MHz (Multiple processors recommended.)
18 Planning the Installation
Component Requirements
Memoryl 512 MB minimum
l 1 GB or more recommended
Disk space 500 MB minimum
Operating systeml Windows 2003 Server (with Service Pack 2) with IIS 6.0 installed. Any version of IIS above 6.0 will not install on
the Windows 2003 Server operating system.
l Windows 2008 Server (with Service Pack 1) with IIS 7.0 installed.
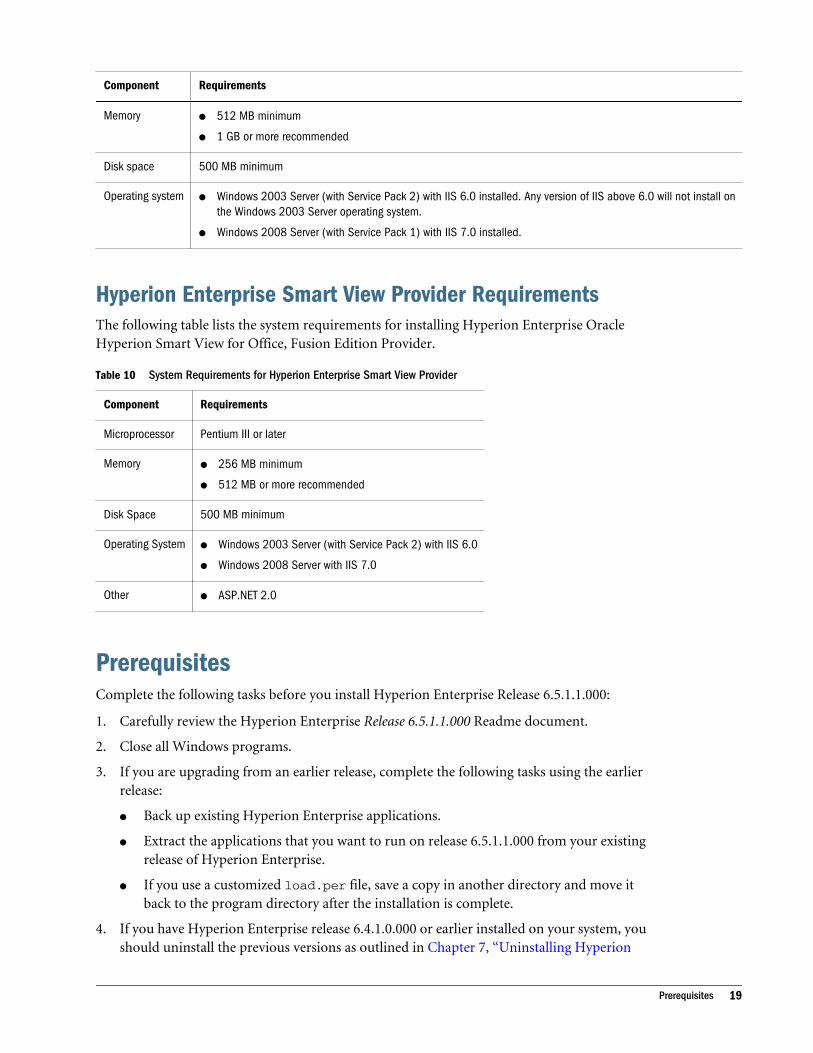
Hyperion Enterprise Smart View Provider RequirementsThe following table lists the system requirements for installing Hyperion Enterprise OracleHyperion Smart View for Office, Fusion Edition Provider.
Table 10 System Requirements for Hyperion Enterprise Smart View Provider
Component Requirements
Microprocessor Pentium III or later
Memoryl 256 MB minimum
l 512 MB or more recommended
Disk Space 500 MB minimum
Operating Systeml Windows 2003 Server (with Service Pack 2) with IIS 6.0
l Windows 2008 Server with IIS 7.0
Otherl ASP.NET 2.0
PrerequisitesComplete the following tasks before you install Hyperion Enterprise Release 6.5.1.1.000:
1. Carefully review the Hyperion Enterprise Release 6.5.1.1.000 Readme document.
2. Close all Windows programs.
3. If you are upgrading from an earlier release, complete the following tasks using the earlierrelease:
l Back up existing Hyperion Enterprise applications.
l Extract the applications that you want to run on release 6.5.1.1.000 from your existingrelease of Hyperion Enterprise.
l If you use a customized load.per file, save a copy in another directory and move itback to the program directory after the installation is complete.
4. If you have Hyperion Enterprise release 6.4.1.0.000 or earlier installed on your system, youshould uninstall the previous versions as outlined in Chapter 7, “Uninstalling Hyperion
Prerequisites 19

Enterprise.” Hyperion Enterprise release 6.5.1.1.000 supports upgrade installation of release6.4.1.0.000 or higher.
Note: If you have Hyperion Enterprise release 6.4.1.0.000 or higher installed on your system,you can skip step 5.
5. Uninstall Hyperion Enterprise Application Server and Hyperion Enterprise Data Server, ifthey are installed:
a. To uninstall Hyperion Enterprise Application Server and Hyperion Application DataServer, select Start > Settings > Control Panel.
b. Double-click Add or Remove Program.
c. Select Hyperion Enterprise and click Change/Remove.
The Setup Type dialog box is displayed.
d. Select Modify the Installation and click Next.
The Select Component dialog box is displayed.
e. Select Hyperion Enterprise Application Server and Hyperion Enterprise Data Server.
f. Click Next to uninstall.
6. If you use Novell Client 32, set File Cache Level to 0 (zero).
7. If you use a 100 MB Ethernet connection, hard code the speed and duplex settings; do notuse the autonegotiate option. However, if you are using Citrix or Terminal Servers, thendisable autonegotiate on the Citrix and Terminal servers.
8. Make sure that you have Modify access to the following directories:
l Your Windows system directory; for example, c:\windows\system
l Your temporary directory; for example, c:\temp
l Your Hyperion Solutions applications directory; for example, c:\program files\Hyperion Solutions\
l Your Hypent Home directory; for example c:\hypent_home
9. If you are installing in a Windows 2003 or Windows 2008 environment, make sure that youhave administrator rights.
10. If you have Hyperion Enterprise Reporting installed, refer to the Hyperion EnterpriseReporting Installation Guide for compatibility requirements and make sure that your pathincludes the Hyperion Enterprise Reporting directory.
11. If you are installing Hyperion Enterprise for the first time or converting from HyperionEnterprise SE Release 1.8.2, convert your reports and books. To obtain the HyperionEnterprise Release 1.8.2 Report Conversion Utility, contact your local Client Support office.This utility is not included in the installation media for this release.
12. If you are installing the Hyperion Enterprise Web Server, verify that you have Microsoft IISand the required Java plug-in installed. For more information, see “Hyperion EnterpriseWeb Server” on page 23.
20 Planning the Installation

13. Make sure that all users accessing the same application map to the same drive and path oruse UNC notation.
14. Be aware of the functional changes between releases of Hyperion Enterprise. For moreinformation, see the Hyperion Enterprise Readme document.
Additional PrerequisitesThe following topics describe prerequisites for installing Statutory Consolidation Engine, Settingup Hyperion Enterprise Servers, Setting up Security Rights, Setting up Hyperion Enterprise WebServers, Installing and configuring Microsoft IIS, Hyperion Enterprise Application Server,Hyperion Enterprise Smart View Provider, and listing the Components and their directories.
Hyperion Enterprise Application ServerIf Hyperion Enterprise Application Server is installed on the computer that is selected for updateand Windows 2008 is also installed, then follow these steps prior to installing HyperionEnterprise:
Create a Registry Key named Sources of type REG_ MULTI_SZ, under the registry entry:HEKEY_LOCAL_MACHINE\System\CurrentControlSet\Services\EventLog
\Application
Using Hyperion Enterprise Application Server on Windows2008 32 or 64-bit
ä To change the Windows registry prior to installing Enterprise on Windows 2008 32 or 64-bit, perform the following steps:
1 From the Start Menu, run Regedit.
2 Find the registry key : HKEY_LOCAL_MACHINE\System\CurrentControlSet\Services\EventLog\Application
3 Right click on Application.
4 Select New > Multi-String Value.
5 Name the string "Sources".
6 Confirm the Type value is REG_MULTI_SZ.
7 Close the registry and reboot.
Statutory Consolidation EngineYou must have Modify rights to all Statutory Consolidation Engine (SCE) directories.
Additional Prerequisites 21

Hyperion Enterprise ServersBefore installing and using Hyperion Enterprise Application Server, Hyperion Enterprise DataServer, Hyperion Enterprise Web Server, and Hyperion Enterprise Message Server you mustverify TCP/IP connectivity and set up security rights.
Verifying TCP/IP Connectivity
ä To verify TCP/IP connectivity:
1 Make sure that both the server and the client workstations have TCP/IP installed and that each computeris uniquely identifiable by way of a TCP/IP address.
2 If dynamic resolution is not supported, make sure that the IP address of the server is resolved in thehosts file located in the system32\drivers\etc\ subdirectory for Windows 2003.
3 Verify connectivity between the client workstation and server:
a. From a Command Prompt line on the client workstation, type the following command:ping servername.
b. Press Enter.
A reply from the server indicates that connectivity has been validated.
Setting Up Security RightsBefore you install and set up the Hyperion Enterprise Data Server, you must ensure that theWindows 2003, or Windows 2008 user ID that is used to install and start the service has theproper Windows 2003 or Window 2008 administrator permissions.
Rights to take these actions are required:
l Log on as a service.
l Log on locally.
l Act as part of the operating system.
For more detailed information on Windows 2003, or Windows 2008 administrator permissions,refer to the Windows 2003, or Windows 2008 documentation.
The Web Virtual Directory, Session Manager, and Task Server all require a system (Windows2003 or 2008) user ID and password; the same user ID should be used for all three. The usermust have read/write access to the file server (where the Hyperion Enterprise applications andexecutables are located), the Web Server directory, and the file upload location on the task server.
In addition to the required Windows 2003 or Windows 2008 administrator permissions, theuser must have administrator permissions to access the network and administrator access to theHyperion Enterprise application.
ä To set up Windows 2003 or Windows 2008 security rights:
1 From the Windows Start menu:
22 Planning the Installation

a. In Windows 2003, select Programs > Administrative Tools > Local Security Policy .
b. In Windows 2008, select Control Panel > Administrative Tools > Local SecurityPolicy.
2 Select Local Policies > User Rights Assignment.
3 Click Log on as a service.
4 Click Add to assign this right to a user ID or group.
5 Select the user ID or group, click Add, then click OK.
6 Click Act as part of the operating system and repeat steps 4 and 5.
7 Click Log on locally and repeat steps 5 and 6.
8 Click OK and exit the program.
9 Reboot the computer.
Hyperion Enterprise Web ServerIf you are installing the Hyperion Enterprise Web Server for Web-based consolidations, dataloads, and journals access with Hyperion Enterprise Release 6.5.1.1.000, you must installMicrosoft IIS on the Hyperion Enterprise Web Server computer first. Please note that theapplication metadata must be loaded before you can use the Web Service.
For instructions, see Chapter 4, “Installing Hyperion Enterprise.”
Installing and Configuring Microsoft IIS
Installing IIS on Windows 2008 64-bit Operating System
ä If you plan to use Hyperion Enterprise Web, then follow these steps prior to installingHyperion Enterprise:
1 Install IIS7.0, including the Application Development options:
l Select Start > Administrative Tools > Server Manager > Roles.
l Right-click on Roles and select Add Roles.
l Select Web Server (IIS) and click Next.
l An introduction to the Web Server page is displayed. Click Next to continue.
l Select Application Development, IIS 6 Management Compatibility options and ManagementService in the role services panel to install IIS and click Next.
l Confirm installation selections for Web server (IIS) and click Install.
2 After installation, run the following command from the either the command or Windows Run promptverbatim (you may copy this command into notepad and then paste the same into the Command or Runprompt):
Additional Prerequisites 23

%windir%\system32\inetsrv\appcmd set config -
section:applicationPools -
applicationPoolDefaults.enable32BitAppOnWin64:true
3 Perform Hyperion Enterprise complete installation on Windows 2008 64 bit operating system.
ä If Hyperion Enterprise Web is already installed on the computer that is selected for update,then follow these steps:
1 Disable all Data Server enabled applications and then shutdown all processes.
2 Uninstall Hyperion Enterprise and reboot.
3 Uninstall IIS7.0 and reboot.
4 Install IIS7.0 , “see the Installing IIS on Windows 2008 64 bit Operating System”
5 After installation, run the following command from the either the command or Windows run promptverbatim (you may copy this command into notepad and then paste the same into the Command or Runprompt):
%windir%\system32\inetsrv\appcmd set config -
section:applicationPools -
applicationPoolDefaults.enable32BitAppOnWin64:true
6 Perform Hyperion Enterprise complete installation on Windows 2008 64-bit operating system.
For information on installing and configuring Microsoft IIS, see Appendix A, “ManualConfiguration of Web Environment.”
Prerequisites for Installing Hyperion Enterprise Release 6.5.1.1.000 on Windows 2003 64-bit Operating System
Prerequisites: Ensure IIS 6 64-bit is installed.
Note: If Hyperion Enterprise is not installed on the computer. Please follow these steps prior toinstalling Hyperion Enterprise.
ä To install Hyperion Enterprise Release 6.5.1.1.000 on Windows Server 2003 64-bitOperating System.
1 Run the following command from a command prompt:
cscript %SYSTEMDRIVE%\inetpub\adminscripts\adsutil.vbs SET W3SVC/
AppPools/Enable32bitAppOnWin64 1
2 Download both the 32 bit and 64 bit installs for JRE from the website www.java.com.
3 Install the 32 bit version of JRE (this must be installed first).
4 Install the 64 bit version of JRE (this must be installed after installing the 32 bit version).
5 Ensure that the 32 bit version of ASP.NET version 2.0.50727 is set to Allowed in the Web ServiceExtensions list in Internet Information Services Manager.
24 Planning the Installation

6 Install Hyperion Enterprise 6.5.1.1.000 and Hyperion Enterprise Reporting 6.5.1.1.000.
Note: If Hyperion Enterprise is already installed on the computer that is selected for update,then follow these steps.
ä To upgrade the Hyperion Enterprise Release 6.5.1.1.000 on Windows 2003 Server 64-bitenvironment
1 Uninstall both Hyperion Enterprise and Hyperion Enterprise Reporting.
2 Select Start > Control Panel > System and then select the Environment Variables button on theAdvanced tab.
3 Remove references to Hyperion Enterprise in the Path.
4 Reboot the system.
5 Run the following command from a command prompt:
cscript %SYSTEMDRIVE%\inetpub\adminscripts\adsutil.vbs SET W3SVC/
AppPools/Enable32bitAppOnWin64 1
6 Download both the 32 bit and 64 bit installs for JRE from the website www.java.com.
7 Install the 32 bit version of JRE (this must be installed first).
8 Install the 64 bit version of JRE (this must be installed after installing the 32 bit version).
9 Ensure that the 32 bit version of ASP.NET version 2.0.50727 is set to Allowed in the Web ServiceExtensions list in Internet Information Services Manager.
10 Install Hyperion Enterprise Release 6.5.1.1.000 and Hyperion Enterprise Reporting Release6.5.1.1.000.
Hyperion Enterprise Smart View ProviderYou must perform these prerequisites to install Hyperion Enterprise Smart View Provider.
1. You must install Hyperion Enterprise Release 6.5.1.1.000 with the Hyperion Enterprise Webcomponent before installing Hyperion Enterprise Smart View provider to work with SmartView.
2. You must have a valid license agreement to run Oracle Hyperion Smart View for Office,Fusion Edition.
Components and Their DirectoriesWhen you run the setup program, you can install Hyperion Enterprise Release 6.5.1.1.000 eitherin the default directory suggested by the setup program or you can specify other directory.
Note: The string “HE” cannot be used as a directory name when installing Hyperion Enterprise.
Additional Prerequisites 25

Table 11 shows location where components are installed:
Table 11 Location of Components Installed
Components Installation Locations
Hyperion Enterprise Release 6.5.1.1.000
Note: Hyperion Retrieve is automatically installed with Hyperion Enterprise Release 6.5.1.1.000
Hyperion Enterprise Office Provider
Hyperion Statutory Consolidation Engine (SCE)
Hyperion Enterprise Application Server
Hyperion Enterprise Data Server
Hyperion Enterprise Message Server
Hyperion Enterprise Web Server
Hyperion Enterprise Conversion Utilities
Hyperion Allocations
Hyperion LedgerLink
Hyperion AutoPilot
Hyperion SmartView provider
Hyperion Enterprise Extraction Utility
Drive:\program files\ hyperionsolutions\ hyperion enterprise
Note: In releases of Hyperion Enterprise earlier than Release 6.0, the default program directorywas hypent. This installation does not overwrite or delete any existing hypent directory.Manually update your autoexec.bat file or environment variable to remove the oldreference to the hypent directory from your path statement.
Installation TasksWhen installing Hyperion Enterprise, you may need to perform the following tasks:
l Check the system requirements. For more information, see “System Requirements” on page13.
l Select one of these installation methods: Quick Install, Silent Mode Install, or a Regularinstall. For more information, see Chapter 3, “Quick Install and Silent Mode Installation,”or Chapter 4, “Installing Hyperion Enterprise.”
l Install add-ons for Hyperion Enterprise. For more information, see Chapter 5, “AdditionalInstallation Procedures.”
l Convert your current application to a newer version of Hyperion Enterprise. For moreinformation, see Chapter 6, “Converting Your Application to Hyperion Enterprise Release6.5.1.1.000.”
l Configure Microsoft IIS to deploy Hyperion Enterprise for the Web environment. For moreinformation, see Appendix A, “Manual Configuration of Web Environment.”
26 Planning the Installation

l Review available documentation accompanying this release. For more information, seeAppendix B, “Hyperion Enterprise Documentation.”
l Review a list of program files installed in your Windows system directories duringinstallation. For more information, see Appendix C, “Program Files Inventory.”
l Review descriptions of the products and add-ons available in this release. For moreinformation, see Appendix D, “Product Inventory .”
Compatible ProductsIf you have Hyperion Enterprise Reporting installed, refer to the Hyperion Enterprise ReportingInstallation Guide for compatibility requirements.
Port Numbers Used by Hyperion ProductsSee Appendix E, “Ports”
Port Numbers Used by Hyperion Products 27

28 Planning the Installation

3Quick Install and Silent Mode
Installation
In This Chapter
Installation Methods ... . . . . . . . . . . . . . . . . . . . . . . . . . . . . . . . . . . . . . . . . . . . . . . . . . . . . . . . . . . . . . . . . . . . . . . . . . . . . . . . . . . . .29
Performing a Quick Install . . . . . . . . . . . . . . . . . . . . . . . . . . . . . . . . . . . . . . . . . . . . . . . . . . . . . . . . . . . . . . . . . . . . . . . . . . . . . . . . .29
Silent Installation ... . . . . . . . . . . . . . . . . . . . . . . . . . . . . . . . . . . . . . . . . . . . . . . . . . . . . . . . . . . . . . . . . . . . . . . . . . . . . . . . . . . . . . . .31
Driver Count Settings ... . . . . . . . . . . . . . . . . . . . . . . . . . . . . . . . . . . . . . . . . . . . . . . . . . . . . . . . . . . . . . . . . . . . . . . . . . . . . . . . . . . .32
This chapter describes the most direct way to perform a Hyperion Enterprise installation.
Installation MethodsQuick Install and Silent Mode installation use the default selections of the installation program.Use Quick Install and Silent Mode only if the following statements is true:
l You want to install only core Hyperion Enterprise and none of its components.
l You want to install all files on a local or network drive, then run Hyperion Enterprise fromthat drive.
If your situation does not meet these conditions or if you want to install a different set of products,see Chapter 4, “Installing Hyperion Enterprise” for instructions on installing this release.
Note: When uninstalling an earlier release of Hyperion Enterprise, you must exit HyperionEnterprise application, Hyperion Enterprise Data Server, Hyperion Enterprise WebServer, and Hyperion Enterprise Application Server. Failure to close these programsproduces a message stating that a component move data error has occurred. Oracle'sHyperion recommends that you remove any earlier release of Hyperion Enterprise beforeupgrading to a new release. Hyperion Enterprise release 6.5.1.1.000 supports upgradeInstallations from 6.4.0.0.000 only.
Performing a Quick InstallThe Quick Install procedure does not install Hyperion Enterprise Data Server, HyperionEnterprise Application Server, Hyperion Enterprise Message Server, Web Server, StatutoryConsolidation Engine, Hyperion LedgerLink, Allocations, Hyperion AutoPilot, or the HyperionEnterprise conversion utilities.
Installation Methods 29

Before you use the Quick Install procedure, refer to Chapter 2, “Planning the Installation.”
ä To perform a Quick Install:
1 From the Windows Start menu, run path\install.exe where path is the path to the HyperionEnterprise installation directory.
The Select Install Language screen is displayed.
2 In the Select Install Language dialog box, select a language, then click OK.
Note: The default language is set to English.
The Welcome screen is displayed.
3 In the Welcome screen, click Next.
The Hyperion Enterprise agreement dialog box is displayed.
4 Click Yes to continue.
The Hyperion Enterprise Setup dialog box is displayed.
5 Select the type of setup that you want to install and click Next.
The Retrieve Version Selection dialog box is displayed.
6 Select the required version of Hyperion retrieve and click Next.
The Choose Destination dialog box is displayed.
7 Specify the directory in which to install Hyperion Enterprise:
l To accept the default installation directory, click Next.
l To select an installation directory other than the default, click the Browse button andnavigate to that directory, then click Next.
The Select Component dialog box is displayed.
8 Select the components that you want to install and click Next.
The Select Program Folder dialog box is displayed.
9 Specify the program folder where Hyperion Enterprise program icons will be stored:
l To accept the default program folder, click Next.
l To store the icons in a program folder other than the default, click the directory namein the Existing Folders list and then click Next.
10 Review your current installation settings, then click Next.
11 Click Finish to close the Hyperion Enterprise installation.
30 Quick Install and Silent Mode Installation
Note: With the installation of Hyperion Enterprise you can create applications and performtasks as outlined in the Hyperion Enterprise Administrator’s Guide and the HyperionEnterprise User’s Guide. However, in order to work with reports you need to installHyperion Enterprise Reporting. For more information on installing HyperionEnterprise Reporting refer the Hyperion Enterprise Reporting Installation Guide.
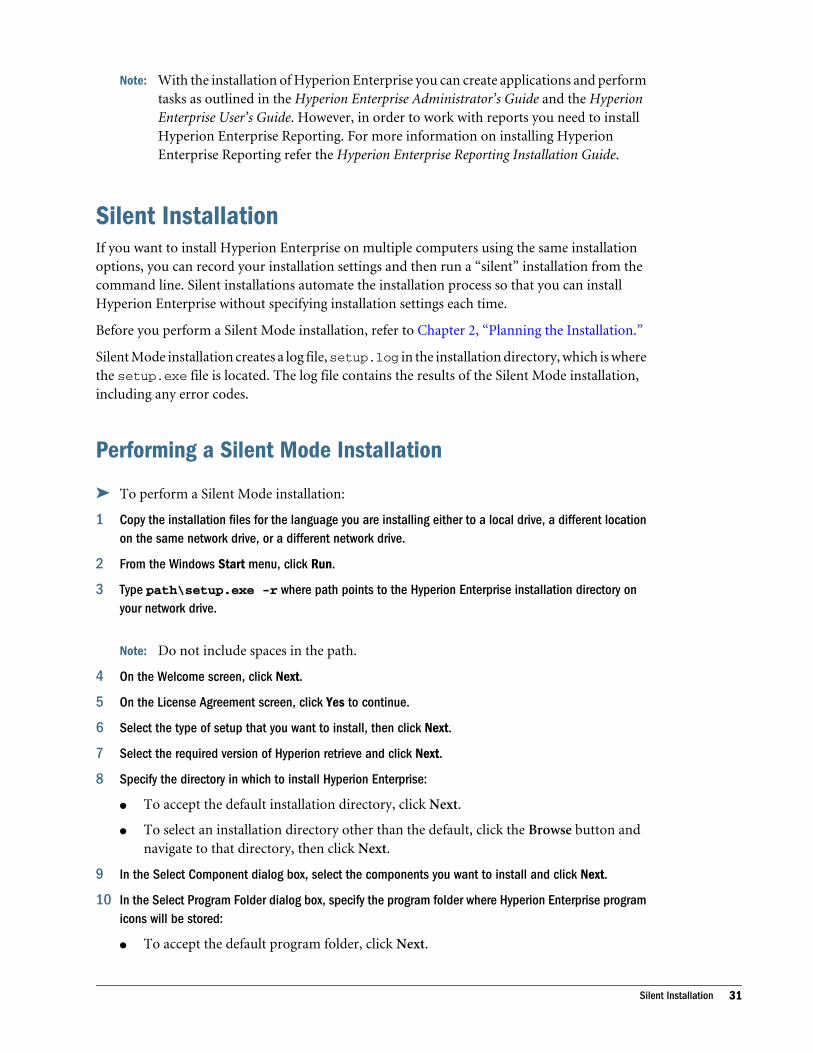
Silent InstallationIf you want to install Hyperion Enterprise on multiple computers using the same installationoptions, you can record your installation settings and then run a “silent” installation from thecommand line. Silent installations automate the installation process so that you can installHyperion Enterprise without specifying installation settings each time.
Before you perform a Silent Mode installation, refer to Chapter 2, “Planning the Installation.”
Silent Mode installation creates a log file, setup.log in the installation directory, which is wherethe setup.exe file is located. The log file contains the results of the Silent Mode installation,including any error codes.
Performing a Silent Mode Installation
ä To perform a Silent Mode installation:
1 Copy the installation files for the language you are installing either to a local drive, a different locationon the same network drive, or a different network drive.
2 From the Windows Start menu, click Run.
3 Type path\setup.exe -r where path points to the Hyperion Enterprise installation directory onyour network drive.
Note: Do not include spaces in the path.
4 On the Welcome screen, click Next.
5 On the License Agreement screen, click Yes to continue.
6 Select the type of setup that you want to install, then click Next.
7 Select the required version of Hyperion retrieve and click Next.
8 Specify the directory in which to install Hyperion Enterprise:
l To accept the default installation directory, click Next.
l To select an installation directory other than the default, click the Browse button andnavigate to that directory, then click Next.
9 In the Select Component dialog box, select the components you want to install and click Next.
10 In the Select Program Folder dialog box, specify the program folder where Hyperion Enterprise programicons will be stored:
l To accept the default program folder, click Next.
Silent Installation 31
l To select a program folder other than the default, click the Browse button and navigateto that program folder, then click Next.
11 Review your current installation settings, then click Next.
12 Click Finish to close the Hyperion Enterprise installation.
The installation process creates a setup.iss file in your Windows directory.
13 Copy the setup.iss file to the network directory where the Hyperion Enterprise setup.exe file islocated.
14 To install Hyperion Enterprise on another computer using Silent Mode, run path\setup.exe -s where pathpoints to the Hyperion Enterprise installation directory on your network drive.
The log file for the main setup, setup.log, is in the directory where the main response fileis located.
Driver Count SettingsIf the driver count HPDRVCNT in the hypent.ini file does not equal the number of HPDRVnlines, an error message might be displayed. To resolve this, you must enter the appropriateadditional HPDRVn line in the hypent.ini file, as in the following examples:
l File-based version of Hyperion Enterprise:
HPDRV1=HEFile,HEFileUI,File-based Application
32 Quick Install and Silent Mode Installation

4Installing Hyperion Enterprise
In This Chapter
Setup Options ... . . . . . . . . . . . . . . . . . . . . . . . . . . . . . . . . . . . . . . . . . . . . . . . . . . . . . . . . . . . . . . . . . . . . . . . . . . . . . . . . . . . . . . . . . . .33
Performing a Complete Installation ... . . . . . . . . . . . . . . . . . . . . . . . . . . . . . . . . . . . . . . . . . . . . . . . . . . . . . . . . . . . . . . . . . . .33
Performing a Workstation Setup Installation ... . . . . . . . . . . . . . . . . . . . . . . . . . . . . . . . . . . . . . . . . . . . . . . . . . . . . . . . . .57
Verifying Your Path ... . . . . . . . . . . . . . . . . . . . . . . . . . . . . . . . . . . . . . . . . . . . . . . . . . . . . . . . . . . . . . . . . . . . . . . . . . . . . . . . . . . . . . .66
Driver Count Setting ... . . . . . . . . . . . . . . . . . . . . . . . . . . . . . . . . . . . . . . . . . . . . . . . . . . . . . . . . . . . . . . . . . . . . . . . . . . . . . . . . . . . .66
Setup OptionsYou use the setup program to install this release of Hyperion Enterprise. You can select fromthree setup options:
l Complete Setup–Installs the products that you select to a local or network drive. You thenrun those products from that drive.
l Workstation Setup–Installs a minimal number of files on a workstation. You then run theinstalled products from the network. Therefore, you must perform the Complete Setupoption to install Hyperion Enterprise on a network drive before you can perform theWorkstation Setup option.
l Modify Selectable Installation Components–Enables you to customize a copy of the setupprogram if you want to eliminate one or more product components from subsequentinstallations for security reasons.
This chapter describes the Complete Setup and Workstation Setup procedures. For informationabout the Modify Selectable Installation Components option, see “Creating a Customized SetupProgram” on page 69.
Performing a Complete InstallationDuring a complete installation, the Hyperion products that you select are installed on a local ornetwork drive. You can then run those products from that drive.
If you are installing Hyperion Enterprise on a computer that has a server operating system, youcan select options to install the Application Server, Data Server, Web Server, and Message Servercomponents. If you do select those options, the complete installation process includes steps for
Setup Options 33

setting up those components. The steps for beginning and finishing a complete installation arethe same regardless of the computer’s operating system.
Beginning a Complete InstallationThe beginning steps of a complete installation of Hyperion Enterprise are the same for allcomputers, regardless of their operating systems.
ä To begin performing a complete installation of the Hyperion Enterprise software:
1 Take one of these actions:
l If you downloaded the Hyperion Enterprise software from the Oracle E-Delivery site,take one of these steps:
m Navigate to the directory where you downloaded the installation program, thendouble-click install.exe.
m From the Windows Start menu, select Run, type the following command in theRun dialog box, and click OK:
Drive\directory\install.exe
where Drive and directory are the location of the Hyperion Enterprise installer.
The Select Install Language dialog box is displayed.
34 Installing Hyperion Enterprise

2 In the Select Install Language, select a language, then click OK.
Note: The default language is set to English.
A message is displayed to say that the setup program is being prepared:
When the setup program is ready, its Welcome screen is displayed:
Performing a Complete Installation 35

3 Click Next.
The License Agreement dialog box is displayed.
36 Installing Hyperion Enterprise

4 Read the license agreement carefully and select one of the following:
l To view the previous screen, select Back.
l To continue with the installation, select Yes.
l To exit installation, select No.
If you selected Yes in the License Agreement dialog box, then the Hyperion EnterpriseSetup dialog box is displayed.
5 Select Complete Setup, then click Next.
The Retrieve Version Selection dialog box opens.
Performing a Complete Installation 37
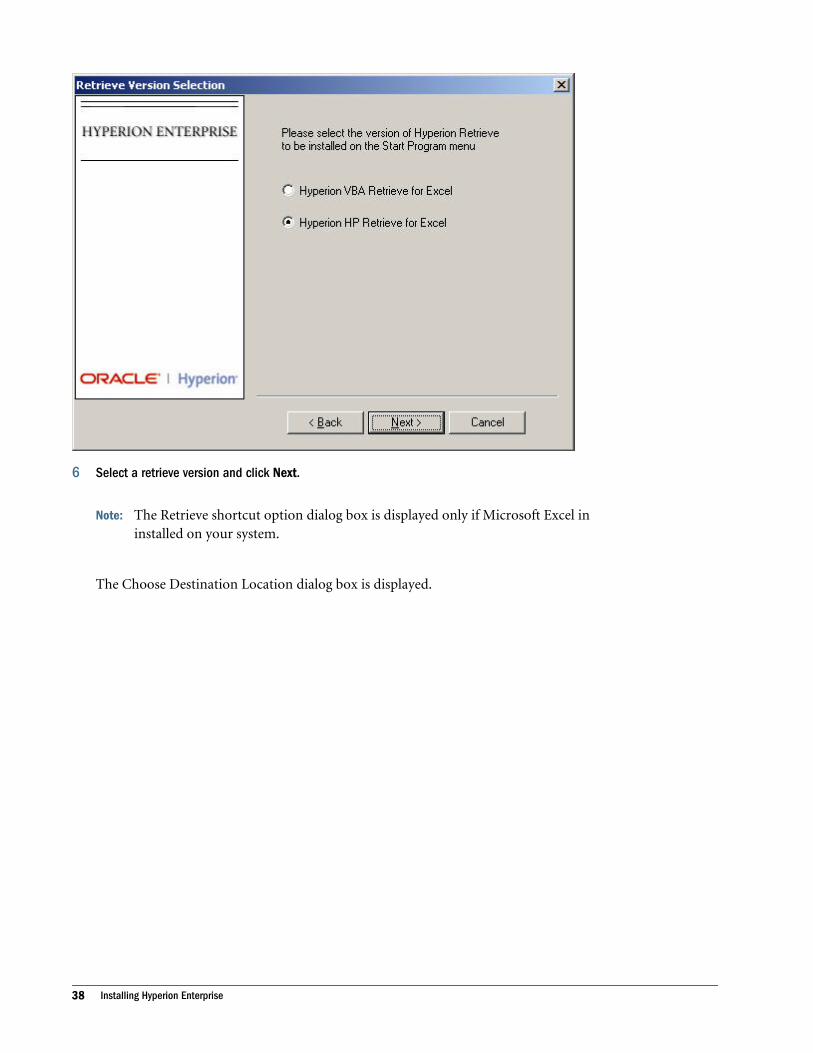
6 Select a retrieve version and click Next.
Note: The Retrieve shortcut option dialog box is displayed only if Microsoft Excel ininstalled on your system.
The Choose Destination Location dialog box is displayed.
38 Installing Hyperion Enterprise

7 Click Next. to install Hyperion Enterprise in the default folder. To select an installation directory otherthan the default:
a. Click the Browse button.
The Choose Folder dialog box is displayed:
b. Select the directory where you want to install Hyperion Enterprise.
c. Click OK to return to the Choose Destination Location dialog box.
Performing a Complete Installation 39

d. Click Next.
The Hyperion Enterprise Home Path dialog box is displayed.
User Account Control in Windows Vista and Windows 2008 Server improves the safetyand security of your computer by preventing potentially insecure software from makingchanges to your computer without your explicit authority.
To support the User Account Control (UAC) feature, the HYPENT_HOME folder is createdduring Installation; this folder contains the Hyperion Enterprise system INI files:hypent.ini and repeng.ini. The location of HYPENT_HOME can be defined duringthe installation routine. As a result of the new security enhancement in Windows Vistaand Windows 2008 Server, these two Hyperion Enterprise system INI files are movedfrom the WINDOWS system folder to the HYPENT_HOME folder.
The <application>.ini file is present in the application folder.
Note: To use the User Access Control feature, during installation; for specifying locationof system–wide files, select either the default : <Install Drive\hypent_home> or specify a custom location. Do not select either the ProgramFiles folder or the Windows folder.
To install the Hyperion Enterprise Home in the default path or if you want to install theHyperion Home other than the default selected then do these tasks:
i. Click the Browse button:
ii. To select a different installation path:
40 Installing Hyperion Enterprise

The Choose Folder dialog box is displayed:
iii. Select the directory where you want to install Hyperion Enterprise, or type in adirectory name. The folder will be created.
iv. Click OK
v. Click Next.
The Select Components dialog box is displayed. The Destination Folder box identifies theinstallation directory that you specified:
Performing a Complete Installation 41

Note: If you are installing Hyperion Enterprise on a computer with a server operatingsystem, the list of components includes the Hyperion Enterprise Application Server,Hyperion Enterprise Data Server, Hyperion Enterprise Message Server, HyperionEnterprise Web Server components, and Hyperion Enterprise Extraction Utility.Otherwise, the list does not include these options.
8 Specify which Hyperion Solutions products you want to install:
a. Select the check boxes for all the products and utilities that you want to install, and clearthe check boxes for any products that you do not want to install.
Note: External Security Services is a utility that enables you to use the Windows domainsecurity instead of core Hyperion Enterprise Security.
b. If the Space Required number is greater than the Space Available number, select a diskdrive that has sufficient space for the installation:
i. Click the Disk Space button.
The Available Space dialog box is displayed:
ii. From the Drive drop-down list, select a disk drive where the space available equalsor exceeds the space required.
iii. Click OK to return to the Select Components dialog box.
c. To install Hyperion Enterprise in a directory other than the one you selected earlier,which you need to do if you have selected a different disk drive:
i. Click the Browse button:
The Choose Folder dialog box is displayed:
42 Installing Hyperion Enterprise

ii. Select the directory where you want to install Hyperion Enterprise, or type in adirectory name. The folder will be created .
iii. Click OK to return to the Select Components dialog box.
d. Click Next.
e. At the background the setup installs the MSXML6 component. The MSXML6 windowdialog box is displayed
f. The Select Program Folder dialog box is displayed:
Performing a Complete Installation 43

9 Specify the program folder for storing Hyperion Enterprise program icons:
l To accept the default program folder, click Next.
Note: If you selected the option for installing the Hyperion Enterprise ApplicationServer, Hyperion Enterprise Data Server, Hyperion Enterprise Message Server,or Hyperion Enterprise Web Server component, see “Setting Up ServerComponents” on page 45.
l To store the icons in a program folder other than the default, Enter a name or click thedirectory name in the Existing Folders list and then click Next.
44 Installing Hyperion Enterprise

10 Review your installation settings and take one of the following steps:
a. If any setting is incorrect, click Back and return to the dialog box where you can changeit.
b. If the settings are correct, click Next.
A message is displayed to tell you that the setup program is installing HyperionEnterprise:
11 See one of these topics for instructions on continuing with the complete installation:
l If you did not select the option for installing the Application Server, Data Server, or WebServer component, see “Finishing a Complete Installation” on page 56.
l If you selected the option for installing External Security Services, see “InstallingCommon Security Services (CSS)” on page 53.
Setting Up Server ComponentsIf you are installing Hyperion Enterprise on a computer with a server operating system and youselected an option for installing the Application Server, Data Server, Message Server, or Web
Performing a Complete Installation 45
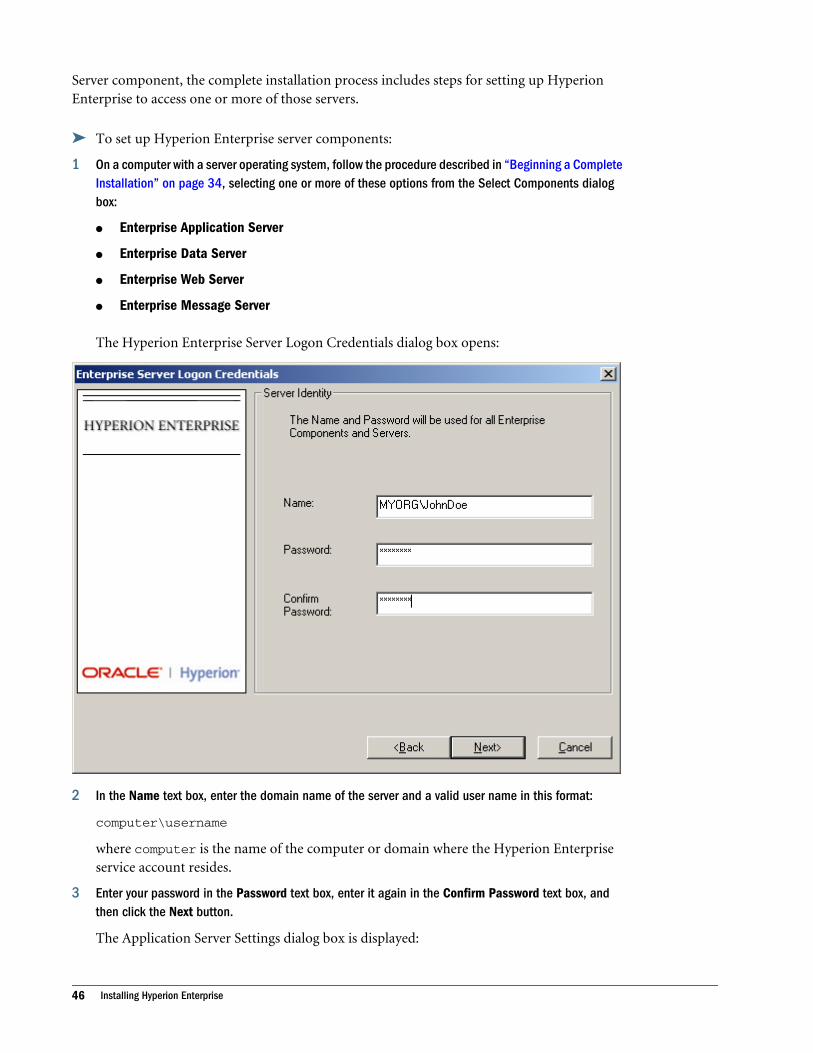
Server component, the complete installation process includes steps for setting up HyperionEnterprise to access one or more of those servers.
ä To set up Hyperion Enterprise server components:
1 On a computer with a server operating system, follow the procedure described in “Beginning a CompleteInstallation” on page 34, selecting one or more of these options from the Select Components dialogbox:
l Enterprise Application Server
l Enterprise Data Server
l Enterprise Web Server
l Enterprise Message Server
The Hyperion Enterprise Server Logon Credentials dialog box opens:
2 In the Name text box, enter the domain name of the server and a valid user name in this format:
computer\username
where computer is the name of the computer or domain where the Hyperion Enterpriseservice account resides.
3 Enter your password in the Password text box, enter it again in the Confirm Password text box, andthen click the Next button.
The Application Server Settings dialog box is displayed:
46 Installing Hyperion Enterprise

4 To set up the Hyperion Enterprise Application Server component, the Hyperion Enterprise Data Servercomponent, or both:
a. To assign a port number other than the default, change the entry in the Port Numbertext box.
b. If you do not want the Application server connection to start automatically, clear theAuto Start check box.
c. To change the path in either Database Path or Log File text box:
i. Click the Browse button.
The Choose Folder dialog box is displayed:
Performing a Complete Installation 47

ii. Click the directory that you want to use.
iii. Click OK to return to the Application Server Settings dialog box.
d. Select Append Current Session or Overwrite Current Session, then click Next.
Note: If the HEServers.xml file is not present, then the dialog box prompting you tocreate this file is displayed, click Yes.
If you selected the option for installing the Hyperion Enterprise Web Server component,the Hyperion Enterprise Web Server Setup dialog box is displayed:
48 Installing Hyperion Enterprise

5 In the Physical text box, specify a physical directory. To select a physical directory other than the default:
a. Click the Browse button.
The Choose Folder dialog box is displayed:
b. Click the directory that you want to specify.
Performing a Complete Installation 49
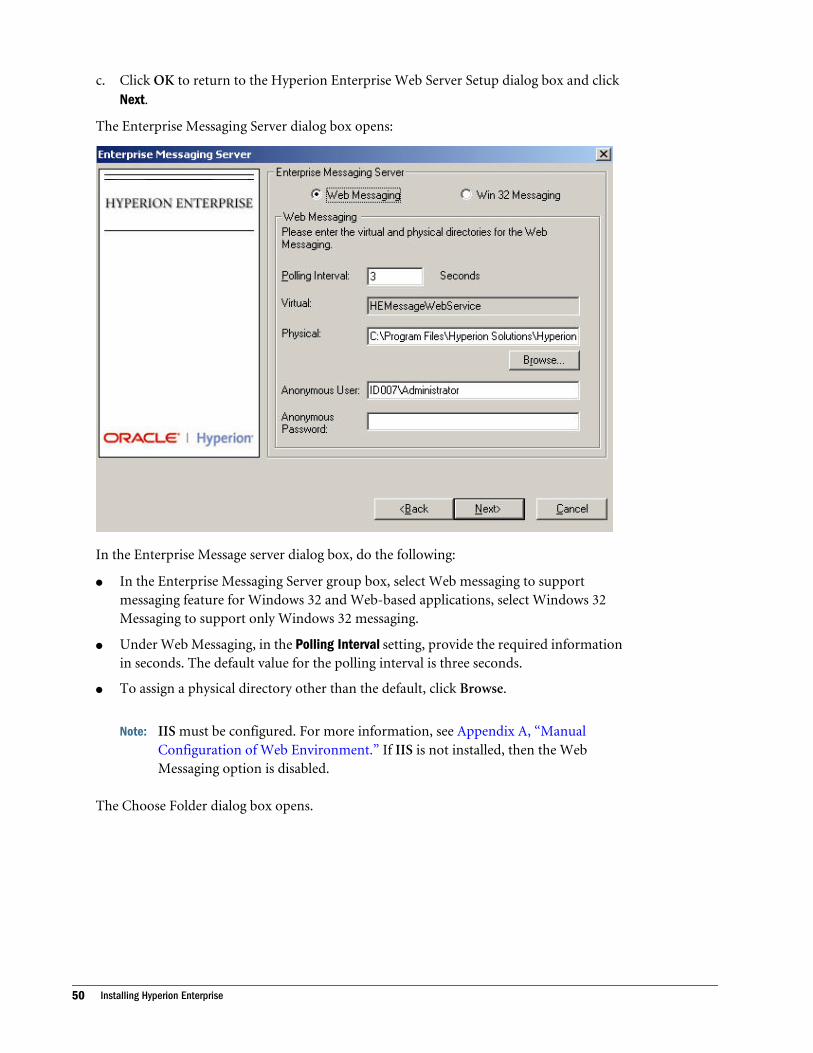
c. Click OK to return to the Hyperion Enterprise Web Server Setup dialog box and clickNext.
The Enterprise Messaging Server dialog box opens:
In the Enterprise Message server dialog box, do the following:
l In the Enterprise Messaging Server group box, select Web messaging to supportmessaging feature for Windows 32 and Web-based applications, select Windows 32Messaging to support only Windows 32 messaging.
l Under Web Messaging, in the Polling Interval setting, provide the required informationin seconds. The default value for the polling interval is three seconds.
l To assign a physical directory other than the default, click Browse.
Note: IIS must be configured. For more information, see Appendix A, “ManualConfiguration of Web Environment.” If IIS is not installed, then the WebMessaging option is disabled.
The Choose Folder dialog box opens.
50 Installing Hyperion Enterprise

a. Select the directory you want to assign.
b. Click OK to return to the Hyperion Enterprise Smart View Provider Setting dialog box.
c. In the Anonymous User text box, enter user's name to access server.
d. In the Anonymous Password text box, enter the password.
e. Click Next to continue.
The Hyperion Enterprise Smart View Provider Setting dialog box opens.
Performing a Complete Installation 51

To set up Smart View Provider:
To assign a physical directory other than the default, click Browse.
Note: You cannot change the virtual directory.
The Choose Folder dialog box opens.
52 Installing Hyperion Enterprise

a. Select the directory you want to assign.
b. Click OK to return to the Hyperion Enterprise Smart View Provider Setting dialog box.
c. In the Anonymous User text box, enter user's name to access server.
d. In the Anonymous Password text box, enter the password.
e. Click Next to continue.
The Start Copying Files dialog box opens.
6 Review your installation settings and take one of the following steps:
a. If any setting is incorrect, click Back and return to the dialog box where you can changeit.
b. If the settings are correct, click Next.
A message is displayed to tell you that the setup program is installing HyperionEnterprise:
7 If you selected the option for installing External Security Services, see “Installing Common SecurityServices (CSS)” on page 53.
Note: For more information about extracting Hyperion Enterprise applications to alternateconsolidation products, see the Hyperion Enterprise Extraction Utility Guide.
Installing Common Security Services (CSS)If you are installing Hyperion Enterprise and you selected an option for installing the externalsecurity services, the complete installation process includes steps for installing the commonsecurity services.
ä To set up Hyperion Home directory:
1 Follow the procedure described in “Beginning a Complete Installation” on page 34, select ExternalSecurity Services option from the Select Components dialog box, if you have not started the installer.
Note: If Hyperion Home directory is detected, then CSS is installed to that directory.
Performing a Complete Installation 53
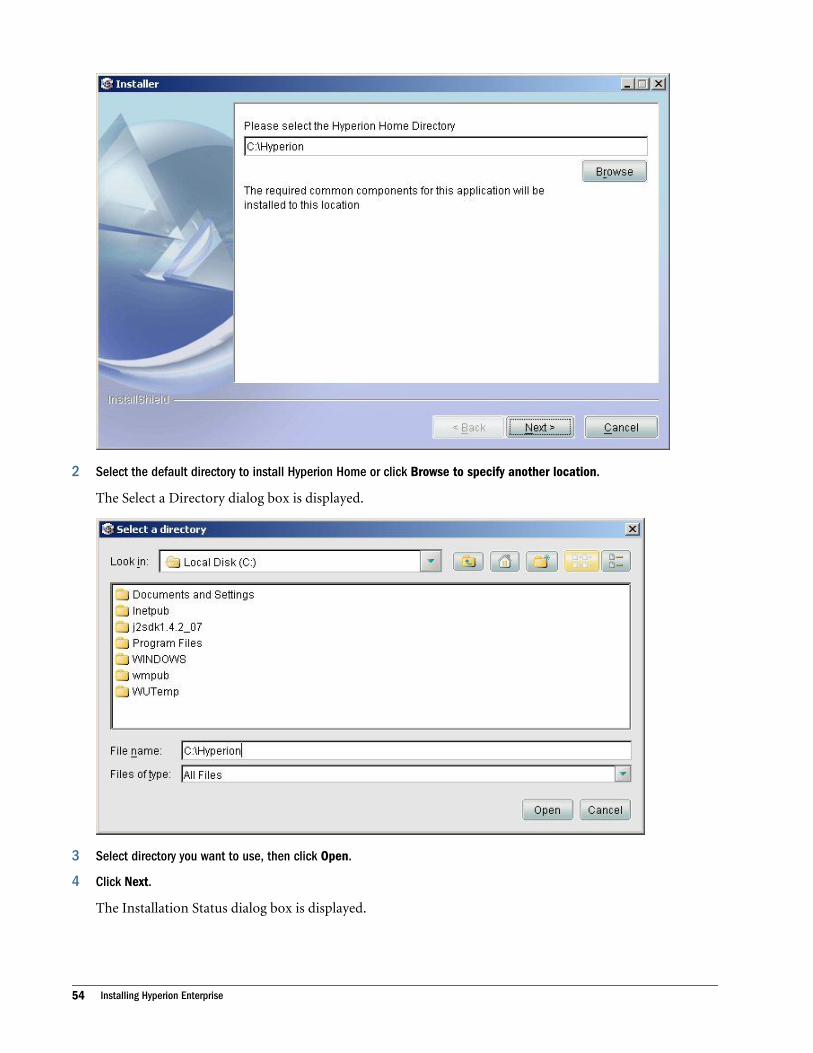
2 Select the default directory to install Hyperion Home or click Browse to specify another location.
The Select a Directory dialog box is displayed.
3 Select directory you want to use, then click Open.
4 Click Next.
The Installation Status dialog box is displayed.
54 Installing Hyperion Enterprise

On successful installation, the Summary Information dialog box is displayed.
5 Click Finish.
Performing a Complete Installation 55

Finishing a Complete InstallationThe steps for finishing a complete installation are the same for all computers, regardless of theiroperating systems or the Hyperion Enterprise components you selected when you began theinstallation.
ä To finish a complete installation:
1 Follow the procedure described in “Beginning a Complete Installation” on page 34.
2 If you selected the option for installing the Hyperion Enterprise Application Server, Data Server, WebServer, or Message Server components, follow the procedure described in “Setting Up ServerComponents” on page 45.
3 If you selected the option for installing external security services, follow the procedure described in“Installing Common Security Services (CSS)” on page 53.
Note: With the installation of Hyperion Enterprise you can create applications and performtasks as outlined in the Hyperion Enterprise Administrator’s Guide and the HyperionEnterprise User’s Guide. However, in order to work with reports you need to installHyperion Enterprise Reporting. For more information on installing HyperionEnterprise Reporting refer the Hyperion Enterprise Reporting Installation Guide.
After you perform the preceding steps, the setup program displays a prompt asking whetheryou want to restart your computer:
56 Installing Hyperion Enterprise

4 Select Yes to restart your computer or No to continue working in another application, then clickFinish.
If you are running an upgrade install on the computer that has the prior release of theapplication server components, then the upgrade installation program will automaticallyupgrade the application server components to this release.
Performing a Workstation Setup InstallationDuring a workstation installation, the setup program installs certain program files locally on aworkstation so that the workstation user can access Hyperion Enterprise programs that areinstalled on the network. Review the following considerations before you begin a workstationinstallation:
l A Complete Setup installation must have been performed on a network server before youcan perform a workstation installation.
l No users should be logged on to the system when you perform a Workstation installation.
ä To perform a workstation installation of Hyperion Enterprise:
1 Take one of these actions:
l If you downloaded the Hyperion Enterprise software from the Oracle E-Delivery site,complete one of these steps:
m Navigate to the directory where you downloaded the installation program, thendouble-click install.exe.
m From the Windows Start menu, select Run, type the following command in theRun dialog box, and click OK:
Drive\directory\install.exe
where Drive and directory are the location of the Hyperion Enterpriseinstallation program.
The Select Install Language dialog box is displayed.
Performing a Workstation Setup Installation 57

2 In the Select Install Language dialog box, select a language, then click OK.
The setup program’s Welcome screen is displayed:
58 Installing Hyperion Enterprise

3 Click Next.
The License Agreement dialog box is displayed.
Performing a Workstation Setup Installation 59

4 Read the license agreement carefully and select one of the following:
l To view the previous screen, select Back.
l To continue with the installation, select Yes.
l To exit installation, select No.
If you selected Yes in the License Agreement dialog box, then the Hyperion EnterpriseSetup dialog box is displayed.
5 Select Workstation Setup, and click Next.
Note: The Modify Selectable Installation Components option is used to install componentsthat were not installed during the initial installation.
The Retrieve Version Selection dialog box opens.
60 Installing Hyperion Enterprise

6 Select a retrieve version and click Next.
Note: The Retrieve shortcut option dialog box is displayed only if Microsoft Excel ininstalled on your system.
The Choose Destination Location dialog box is displayed.
Performing a Workstation Setup Installation 61

7 Using one of the following methods, specify the directory on the server that contains the subdirectorieswhere the network’s Hyperion Enterprise program files are located, then click Next:
l Enter the directory name in the text box.
l Use the Browse button to navigate to the directory:
The Select Components dialog box is displayed. The Destination Folder box identifiesthe network installation directory that you specified.
62 Installing Hyperion Enterprise

8 Select the components that you want to install and the workstation drive where you want to installHyperion Enterprise, then click Next:
a. Select the check boxes for all the products and utilities that you want to install, and clearthe check boxes for any products that you do not want to install.
Note: External Security Services is a utility that enables you to use the Windows domainsecurity instead of the core Hyperion Enterprise Security.
b. Use the Browse button to select the workstation drive where you want to installHyperion Enterprise.
c. If the Space Required number is greater than the Space Available number, select a diskdrive that has sufficient space for the installation:
Note: The amount of required disk space that is displayed is the amount for the completeinstallation. The actual disk space required for a workstation installation is less.
i. Click the Disk Space button.
The Available Space dialog box is displayed:
Performing a Workstation Setup Installation 63

ii. From the Drive drop-down list, select a disk drive where the space available equalsor exceeds the space required.
iii. Click OK to return to the Select Components dialog box.
iv. Select the directory where you want to install Hyperion Enterprise, and click OKto return to the Select Components dialog box.
The Select Program Folder dialog box is displayed:
9 Specify the directory where Hyperion Enterprise program icons will be stored:
l To accept the default directory, click Next.
l To store the icons in a directory other than the default, click the directory name in theExisting Folders list and then click Next.
The Start Copying Files dialog box is displayed.
64 Installing Hyperion Enterprise

10 Review your installation settings and take one of the following steps:
l If any settings is incorrect, click Back and return to the dialog box where you can changeit.
l If the settings are correct, click Next.
11 Click Next.
The setup program displays a prompt asking whether you want to restart your computer.
Performing a Workstation Setup Installation 65

12 Select a restarting option, then click Finish.
If you are running an upgrade install on the computer that has the prior release of theapplication server components, then the upgrade installation program will automaticallyupgrade the application server components to this release.
13 Click Finish.
For information on configuring Hyperion Enterprise Workstation installation for externalauthentication, see chapter—Configuring External Authentication in the HyperionEnterprise Administrator’s Guide.
Verifying Your PathIf you did not install all products to the same directory, the folder containing the HyperionEnterprise program executables must be in your path. If you are running a logon script, youmust update it with the main program directory that you selected during installation. For moreinformation on file locations, see “Components and Their Directories” on page 25.
Driver Count SettingIf the driver count HPDRVCNT in the hypent.ini file does not equal the number of HPDRVnlines, an error message might be displayed. To resolve this, you must manually enter theappropriate additional HPDRVn line in the hypent.ini file. See the following examples:
l File-based version of Hyperion Enterprise:
66 Installing Hyperion Enterprise

HPDRV1=HEFile,HEFileUI,File-based Application
Driver Count Setting 67

68 Installing Hyperion Enterprise
5Additional Installation
Procedures
In This Chapter
Setting Up Hyperion Retrieve ... . . . . . . . . . . . . . . . . . . . . . . . . . . . . . . . . . . . . . . . . . . . . . . . . . . . . . . . . . . . . . . . . . . . . . . . . . .69
Creating a Customized Setup Program.... . . . . . . . . . . . . . . . . . . . . . . . . . . . . . . . . . . . . . . . . . . . . . . . . . . . . . . . . . . . . . . .69
Installing Hyperion Enterprise Using the Customized Setup Program .... . . . . . . . . . . . . . . . . . . . . . . . . . . . . .71
Configuring Hyperion Enterprise Web Server .. . . . . . . . . . . . . . . . . . . . . . . . . . . . . . . . . . . . . . . . . . . . . . . . . . . . . . . . . . .71
Disabling Access to Hyperion Enterprise Web Applications... . . . . . . . . . . . . . . . . . . . . . . . . . . . . . . . . . . . . . . . . .73
About Hyperion Home ... . . . . . . . . . . . . . . . . . . . . . . . . . . . . . . . . . . . . . . . . . . . . . . . . . . . . . . . . . . . . . . . . . . . . . . . . . . . . . . . . . .74
Setting Up Hyperion RetrieveHyperion Retrieve is a spreadsheet add-in that must be used with either Microsoft Excel 2003,2007, or 2010. You must install one of these products before you can build a spreadsheet.Hyperion Retrieve is automatically installed when you install Hyperion Enterprise.
Setting Up Hyperion Retrieve for Microsoft ExcelIf you use Microsoft Excel, you can create an icon that loads one or more add-ins and that canload Microsoft Excel, depending on what you enter in the command line of the icon. You canalso use the Manage Add-ins feature to load a fixed set of add-ins any time that Excel is launched.Setting up Hyperion Retrieve involves the following tasks:
l Creating the HPPAPP.DAT File for Hyperion Retrieve
l Creating an icon for loading Hyperion Retrieve
l Loading the Hyperion Retrieve Add-in for Microsoft Excel
For more information on Hyperion Retrieve, see the Hyperion Retrieve chapter of the HyperionEnterprise User’s Guide.
Creating a Customized Setup ProgramYou can customize the Hyperion Enterprise setup program to prevent users who performsubsequent installations from installing specified components.
Setting Up Hyperion Retrieve 69

When you customize the setup program, you retain the original program and distribute thecustomized version.
ä To customize the Hyperion Enterprise setup program:
1 If you are installing from a network drive, copy the directory for the language you are installing to a localdrive, a different location on the same network drive, or a different network drive.
2 From the language directory you copied in step 1, run the Setup.exe file.
The Hyperion Enterprise Setup dialog box is displayed.
3 Select Modify the Installation, then click Next.
The Select Components dialog box opens.
4 In the Modify the Installation dialog box, select the components to be included in the customized setupprogram and clear the check boxes for any components that you do not want to include in it, then clickNext.
Note: Selecting the Allow Further Modification of Components option enables users of thecustomized setup program to make their own changes to the list of availablecomponents.
5 Click Finish to exit the setup program.
70 Additional Installation Procedures

Installing Hyperion Enterprise Using the CustomizedSetup ProgramAfter you have created a customized Setup Program, see “Creating a Customized Setup Program”on page 69. You can install Hyperion Enterprise with the components you selected while creatinga customized setup program. Only the components that you selected while creating a customizedsetup program will be available for installation.
ä To install Hyperion Enterprise using the customized setup program:
1 Browse to the language directory that you customized and click Setup.exe.
Install Hyperion Enterprise by providing information as requested by the installer.
2 Click Finish to exit the setup program.
Configuring Hyperion Enterprise Web ServerHyperion Enterprise Web Server contains the following components:
l Task Server–Used to off-load large processes relating to the Web-based applications. Taskserver enables installation on multiple servers to share the tasks that are submitted throughthe Web.
l Session Manager–Tracks the following Hyperion Enterprise Web application information:
m Users logged on
m Tasks that are currently running
m POVs and status.
l Web Application–Used to set up or enable a Hyperion Enterprise application for the Web.
PrerequisitesBefore you configure Hyperion Enterprise Web Application, do the following:
1. Refer to Chapter 2, “Planning the Installation.”
2. In addition to completing the tasks outlined in the Planning the Installation chapter, do thefollowing:
a. Hyperion Enterprise has to be installed on a computer with a server operating system.For more information, see Chapter 4, “Installing Hyperion Enterprise.”
b. The applications must be registered in Hyperion Enterprise. For more information, seethe Hyperion Enterprise Administrator’s Guide.
c. IIS must be configured. For more information, see Appendix A, “Manual Configurationof Web Environment.”
Installing Hyperion Enterprise Using the Customized Setup Program 71

Configuring the Hyperion Enterprise Web ApplicationConfigure the Hyperion Enterprise Web application to allow user access to applications inHyperion Enterprise from multiple locations using a Web-based environment. Users with accessto configured Hyperion Enterprise applications can work with consolidations, data loads, andjournals on the Web.
ä To configure Hyperion Enterprise Web applications, do the following:
1 Open a Web browser window and enter the following information in the Address text box:
http://<Web Server>/<Virtual Directory>/Default.aspx, for example:http://myserver/HEWeb/default.aspx
The Logon page is displayed.
2 In the global selection frame select Tasks > Administration.
The tasks you can perform in the Administration module are displayed in the local selectionframe.
3 In the local selection frame select Application Setup.
The Web Application Setup page is displayed.
Note: You can complete the following steps for all the applications that you want to Web-enable and submit the completed information.
4 Select an application to be configured for the Web from the Application drop-down list, then selectWeb Enabled.
5 In the User ID and Password text boxes, enter the Hyperion Enterprise administrative user ID andpassword.
6 You must specify the server name where the Task Server and Session Manager are installed.
7 Type Server name or IP address for Session Manager and Task Servers.
72 Additional Installation Procedures

8 Specify the directory on the Web or Task server where the files should be uploaded for data loads in theFile Upload Location text box.
9 Optional: If Hyperion Enterprise Reporting is installed, then type Server name or IP address for HyperionEnterprise Reporting Web Server.
10 Type Server name or IP address for Web Application controller.
11 Enter the number of connections in the Number of Connections text box.
By default Hyperion Enterprise Web application supports 12 connections.
12 From the Select Language drop-down list, select the language you want to deploy the application with.
13 Click Submit.
The Web Administration Results page containing information on status of application loadis displayed.
14 Click Logon to Enterprise.
15 For subsequent logon enter the following URL in the Web browser:
http://<Web Server>/<Virtualdirectory>/default.aspx, for example: http://myserver/HEWeb/default.aspx
Disabling Access to Hyperion Enterprise WebApplicationsComplete the following procedure in Hyperion Enterprise Web to prevent users from accessingspecific Web applications.
ä To disable access without restarting the Web Server:
1 Make sure all Web users are logged off from the Hyperion Enterprise Web application.
Tip: To ensure all users are logged off, see the Active Web User List page. From theApplication Web module, select Hyperion EnterpriseTasks>Logging to View ActiveWeb Users.
2 Open a Web browser window and enter the following information in the Address text box:
http://<Web Server>/<Virtual Directory>/Default.aspx, for example:http://myserver/HEWeb/default.aspx
The Web Application Setup page is displayed.
3 In the Web Application Setup page, from the Application drop down list, select the application that youwant to disable.
4 Deselect the Web Enabled option.
5 Enter your user name and password.
6 Click Submit.
Disabling Access to Hyperion Enterprise Web Applications 73

About Hyperion HomeWhen multiple Hyperion products are installed on the same computer, common internal andthird-party components used by the products are installed to a central location, called HyperionHome. The Hyperion Home location is defined in the system environment variable calledHYPERION_HOME.
The Hyperion Enterprise installer prompts you to define the location for Hyperion Home. Thedefault location is C:\Hyperion. The installer searches for the HYPERION_HOME environmentvariable on the computer to which you are installing. If the location has been previously definedfor another Hyperion product, the installation uses that location and the Hyperion Homelocation cannot be changed through the installer. If this is the first Hyperion installation on thecomputer, and you have not already specified the location for Hyperion Home, you can specifythe location during installation.
Prior to installing Enterprise, you must have Modify rights to the directory HYPERION_HOME
Changing the Hyperion Home LocationAfter Hyperion Home has been defined through any product installation, you must run twoseparate migration utilities to change the Hyperion Home location. The first utility moves thefiles installed in Hyperion Home to the new location, and the second utility fixes all internalreferences to the old Hyperion Home location. Both utilities are provided with the HyperionEnterprise installation.
ä To change the Hyperion Home location:
1 Launch the first utility by executing the following file from the current Hyperion Home location:
Windows: HYPERION_HOME/common/utilities/HyperionHomeTool/1.0.0/bin/run.exe
The migration utility is launched.
2 Step through the screens, and when prompted, enter the new Hyperion Home location or clickBrowse to navigate to the desired location. The migration utility copies the entire Hyperion Homedirectory to the new location and replaces the value of the current HYPERION_HOME environmentvariable.
74 Additional Installation Procedures

6Converting Your Application toHyperion Enterprise Release 6.5.
1.1.000
In This Chapter
Feature Comparison with Hyperion Enterprise SE Release 4.x . . . . . . . . . . . . . . . . . . . . . . . . . . . . . . . . . . . . . . . .75
Compatibility of Earlier Hyperion Enterprise SE and Hyperion Enterprise 6.5.1.1.000 Releases... . . . . . . . . . . . . . . . . . . . . . . . . . . . . . . . . . . . . . . . . . . . . . . . . . . . . . . . . . . . . . . . . . . . . . . . . . . . . . . . . . . . . . . . . . . . . . . . . . . . . . . . . . . . .79
Requirements Comparison with Hyperion Enterprise SE ... . . . . . . . . . . . . . . . . . . . . . . . . . . . . . . . . . . . . . . . . . . . .83
Hyperion Enterprise Conversion Utilities .. . . . . . . . . . . . . . . . . . . . . . . . . . . . . . . . . . . . . . . . . . . . . . . . . . . . . . . . . . . . . . . .86
Converting Applications ... . . . . . . . . . . . . . . . . . . . . . . . . . . . . . . . . . . . . . . . . . . . . . . . . . . . . . . . . . . . . . . . . . . . . . . . . . . . . . . . .87
Installing the Conversion Utilities.. . . . . . . . . . . . . . . . . . . . . . . . . . . . . . . . . . . . . . . . . . . . . . . . . . . . . . . . . . . . . . . . . . . . . . . .88
Application Conversion 4.7 Through 6.4.0.0.000 to 6.5.1.1.000 Conversion Utility . . . . . . . . . . . . . . .88
Application Conversion SE to Hyperion Enterprise 6.5.1.1.000 Conversion Utility . . . . . . . . . . . . . . . . . .94
Converting Hyperion Enterprise SE Applications to Hyperion Enterprise Release 6.5.1.1.000... . . . . . . . . . . . . . . . . . . . . . . . . . . . . . . . . . . . . . . . . . . . . . . . . . . . . . . . . . . . . . . . . . . . . . . . . . . . . . . . . . . . . . . . . . . . . . . . . . . . . . . . . . . . .97
Postconversion Tasks and Considerations... . . . . . . . . . . . . . . . . . . . . . . . . . . . . . . . . . . . . . . . . . . . . . . . . . . . . . . . . . . 102
System Extract and Logic Conversion Utilities.. . . . . . . . . . . . . . . . . . . . . . . . . . . . . . . . . . . . . . . . . . . . . . . . . . . . . . . . 104
Converting Logic Files.. . . . . . . . . . . . . . . . . . . . . . . . . . . . . . . . . . . . . . . . . . . . . . . . . . . . . . . . . . . . . . . . . . . . . . . . . . . . . . . . . . . 106
Resetting Your Dynamic Account List Criteria .. . . . . . . . . . . . . . . . . . . . . . . . . . . . . . . . . . . . . . . . . . . . . . . . . . . . . . . . 108
Setting Your Point of View in Hyperion Enterprise... . . . . . . . . . . . . . . . . . . . . . . . . . . . . . . . . . . . . . . . . . . . . . . . . . . 108
This chapter provides all the information you need to convert applications from an earlier releaseof Hyperion Enterprise to Hyperion Enterprise Release 6.5.1.1.000. It discusses the differencesbetween Hyperion Enterprise Release 6.5.1.1.000 and Hyperion Enterprise SE Release 4.x, andit describes software implementation prerequisites and considerations. It also describes eachconversion utility in detail. Please read through this chapter carefully before converting yourapplication to Hyperion Enterprise Release 6.5.1.1.000.
Feature Comparison with Hyperion Enterprise SERelease 4.xHyperion Enterprise Release 6.5.1.1.000 is more flexible than Hyperion Enterprise SE whentranslating data to Euros or storing historical data in original input currency and Euros.Hyperion Enterprise Release 6.5.1.1.000 can handle larger applications and report in multiplecurrencies, and it has many other additional functions that make converting your application
Feature Comparison with Hyperion Enterprise SE Release 4.x 75

and storing additional data easier. Table 12 lists major differences between Hyperion EnterpriseSE and Hyperion Enterprise Release 6.5.1.1.000.
Table 12 Feature Comparison with Hyperion Enterprise SE
Module FeatureHyperion EnterpriseSE Release 4.4
Hyperion EnterpriseRelease 6.5.1.1.000
Accounts Maximum number of accounts 16,000 up to 8,000,0001
Accounts Maximum account description length 20 per level 40 per level
Accounts Intercompany table supported at second level No Yes
Accounts Sub-account attribute definition supported No Yes
Accounts Dynamic default intercompany table feature No Yes
Accounts Control first level sub-account table attachment onlysupported
No Yes
Accounts Intercompany applied to a substructure No Yes
Accounts Support for shared sub-account signatures No Yes
AutoPilot2 16-bit version available Yes No
AutoPilot 32-bit version available Yes Yes
AutoPilot Pause option available No Yes
Categories Maximum number of categories 32,000 no limit
Categories Monthly rollovers supported No Yes
Consolidation Support of consolidation of entities with data only No Yes
Consolidation Statutory Consolidation Engine (SCE) included No Yes
Consolidation Can perform server-based consolidations No Yes
Consolidation Can cancel the consolidation process No Yes3
Database Option to extract derived data available4 Yes Yes
Database Suppress no data option during extract available5 Yes Yes
Database Mathematical calculations supported during load No Yes
Database Extract DSM information supported No Yes
Database Option to lock data using server-based processing. No Yes
Database Mathematical calculations supported during extract No Yes
IntercompanyProcessing
User-defined intercompany logic supported No Yes
76 Converting Your Application to Hyperion Enterprise Release 6.5.1.1.000

Module FeatureHyperion EnterpriseSE Release 4.4
Hyperion EnterpriseRelease 6.5.1.1.000
IntercompanyProcessing
Customized intercompany matching report available No Yes
Journals Control for future period posting behavior supported No Yes
Journals Criteria for reporting selection available No Yes
Journals Auto-numbering option available (You must select this optionwhen setting up.)
No Yes6
Journals Ability to post periodic in YTD category No Yes
Journals Ability to perform server based extract and load journals No Yes
Journals Ability to access journal detail in Hyperion Retrieve No Yes
Journals Support for parent level adjustments (you must choose thisoption when setting up)
No Yes
Journals Ability to force balancing in entity before posting No Yes
Logic Recalculation of dynamic view accounts based on view andfrequency
No Yes
Logic Additional logic functions N/A Yes
Logic Compiled logic indicator by method No Yes
Logic Support for graphical logic No Yes
Names/Entities Maximum number of organizations no limit no limit
Names/Entities Maximum number of names/entities 16,000 No limit7
Names/Entities Maximum number of dependents per parent no limit up to 8,000,000
Names/Entities Maximum entity label length 8 characters per level 20 per level
Names/Entities Maximum entity description length 8 characters per level 40 per level
Names/Entities Ability to define organizations by period and category No Yes
Names/Entities Ability to assign translation methods by period No Yes
Names/Entities Ability to assign consolidation methods by period No Yes
Names/Entities Ability to track percent ownership, percent control, andpercent consolidated
No Yes
Names/Entities Storage of shared information between entities No Yes
Names/Entities Support for user-defined intercompany eliminations No Yes
Names/Entities Support for entity codes by period No Yes
Feature Comparison with Hyperion Enterprise SE Release 4.x 77
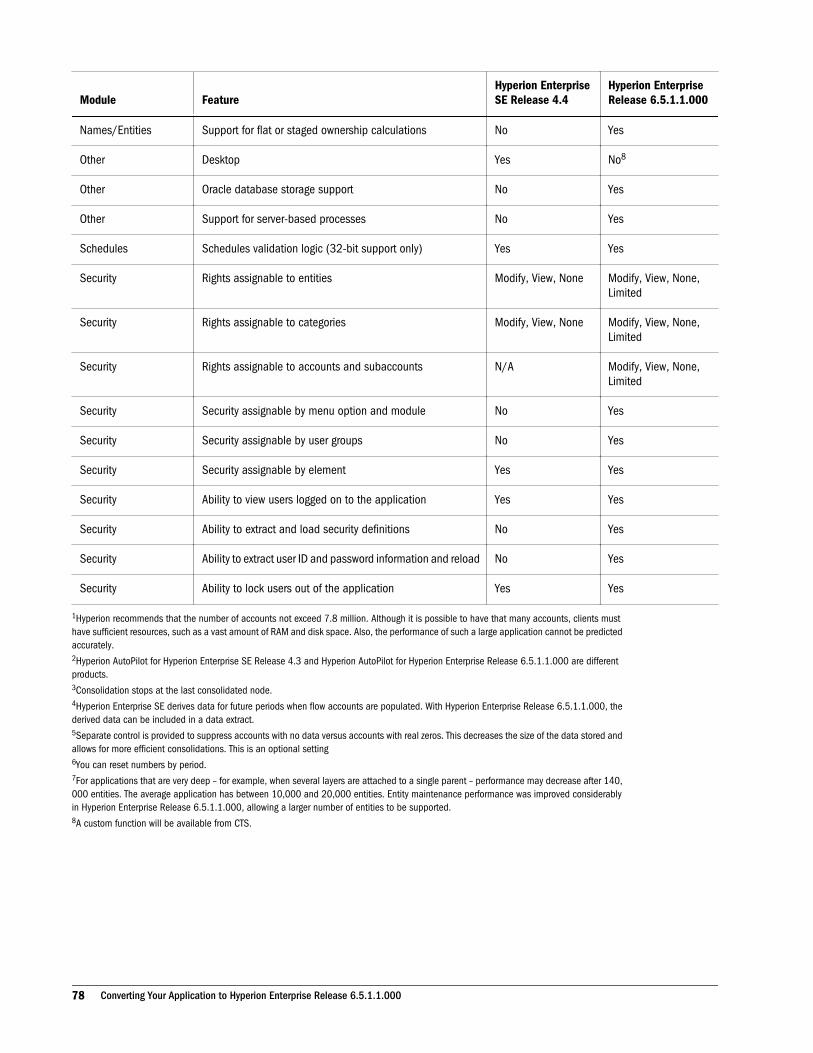
Module FeatureHyperion EnterpriseSE Release 4.4
Hyperion EnterpriseRelease 6.5.1.1.000
Names/Entities Support for flat or staged ownership calculations No Yes
Other Desktop Yes No8
Other Oracle database storage support No Yes
Other Support for server-based processes No Yes
Schedules Schedules validation logic (32-bit support only) Yes Yes
Security Rights assignable to entities Modify, View, None Modify, View, None,Limited
Security Rights assignable to categories Modify, View, None Modify, View, None,Limited
Security Rights assignable to accounts and subaccounts N/A Modify, View, None,Limited
Security Security assignable by menu option and module No Yes
Security Security assignable by user groups No Yes
Security Security assignable by element Yes Yes
Security Ability to view users logged on to the application Yes Yes
Security Ability to extract and load security definitions No Yes
Security Ability to extract user ID and password information and reload No Yes
Security Ability to lock users out of the application Yes Yes
1Hyperion recommends that the number of accounts not exceed 7.8 million. Although it is possible to have that many accounts, clients musthave sufficient resources, such as a vast amount of RAM and disk space. Also, the performance of such a large application cannot be predictedaccurately.2Hyperion AutoPilot for Hyperion Enterprise SE Release 4.3 and Hyperion AutoPilot for Hyperion Enterprise Release 6.5.1.1.000 are differentproducts.3Consolidation stops at the last consolidated node.4Hyperion Enterprise SE derives data for future periods when flow accounts are populated. With Hyperion Enterprise Release 6.5.1.1.000, thederived data can be included in a data extract.5Separate control is provided to suppress accounts with no data versus accounts with real zeros. This decreases the size of the data stored andallows for more efficient consolidations. This is an optional setting6You can reset numbers by period.7For applications that are very deep – for example, when several layers are attached to a single parent – performance may decrease after 140,000 entities. The average application has between 10,000 and 20,000 entities. Entity maintenance performance was improved considerablyin Hyperion Enterprise Release 6.5.1.1.000, allowing a larger number of entities to be supported.8A custom function will be available from CTS.
78 Converting Your Application to Hyperion Enterprise Release 6.5.1.1.000
Compatibility of Earlier Hyperion Enterprise SE andHyperion Enterprise 6.5.1.1.000 ReleasesThere are seven major features that differ between Hyperion Enterprise SE and HyperionEnterprise Release 6.5.1.1.000:
l How intercompany eliminations are performed when substructures are used
l How the system equates accounts when writing formulas
l How the system calculates formulas
l How intercompany transactions are entered
l How acquired and disposed dates are tracked
l Universal naming convention
l System load behavior
Performing Eliminations When Substructures are UsedIn Hyperion Enterprise SE, the system creates an intercompany subaccount for each subentityattached to an intercompany entity. The system eliminated this data at a level above thesubstructure while the value in the intercompany entity is consolidated up through theorganization.
In Hyperion Enterprise Release 6.5.1.1.000, the system does not create an intercompanysubaccount for subentities that are attached to intercompany entities. The reason is thatintercompany subaccounts are permitted as second-level subaccounts and an additional levelwould require that the system handle three levels of subaccounts.
The system performs intercompany eliminations for the intercompany entity as a whole, not bysub-entity detail.
If you convert an application that uses intercompany sub-entity accounts from an earlier releaseof Hyperion Enterprise SE, these intercompany subaccounts are not created for the subentities.All intercompany data is retained at the intercompany entity subaccount level only. Therefore,before you convert an application that has intercompany subnames, you must complete thefollowing tasks in the original application:
1. Create an intercompany name for each intercompany sub-name.
2. Extract the data from the original intercompany subaccounts.
3. Load the data into the new intercompany subaccounts that you just created.
4. Remove the intercompany sub-names.
Note: Before you change any settings in your original application to facilitate the conversionprocess, you should back up your application and its data.
Compatibility of Earlier Hyperion Enterprise SE and Hyperion Enterprise 6.5.1.1.000 Releases 79

Assigning Formulas to Subaccounts by Equating MajorAccountsIn Hyperion Enterprise SE, you can assign the formulas created for one set of subaccounts toanother set of subaccounts by equating the second major account to the first major account. Forexample, if you define formulas for subaccounts for ACCOUNT1 that you want to also use forthe ACCOUNT2 subaccounts, you can use this formula:
#ACCOUNT2=#ACCOUNT1
In applications built with Hyperion Enterprise SE, you can do this even if the sub-account tablesattached to the major accounts are different. For this to work correctly, the signature order ofthese subaccounts can never change. However, when you add or delete accounts, the signatureorder of the chart of accounts might change, which can produce unpredictable and incorrectresults.
In Hyperion Enterprise Release 6.5.1.1.000, you can define your application to use a uniquesignature for subaccounts that have the same ID. If you use unique sub-account signatures,assigning formulas by equating major accounts does not work. If you equate major accounts,the system displays a warning when you check formulas and does not create formulas for thedestination subaccounts. However, if you use shared sub-account signatures, the system createsformulas for the destination subaccounts that have the same ID as the source subaccounts. Thisoccurs even if the IDs of the sub-account tables attached to the two major accounts are different.
If you want to use unique signatures in a Hyperion Enterprise Release 6.5.1.1.000 application,you must write formulas for each sub-account that you want to create.
Calculating FormulasIn Hyperion Enterprise SE, the system calculates all range totaling functions (including TOT,DTO, DSU, SUB) that are defined in chart logic (called chart methods in Hyperion Enterprise)using the category-to-date values for all accounts, regardless of the data view for the category.All other formula functions calculate according to the default view of the data category.
In Hyperion Enterprise Release 6.5.1.1.000, the system calculates all formulas defined in chartmethods using the data view of the category. This can produce different results than in earlierreleases if the application contains periodic categories. The behavior was changed so that chartmethod formulas are calculated more consistently with the category data view definition.
Entering Intercompany TransactionsIn Hyperion Enterprise SE, the system does not allow input into an intercompany entity’s ownintercompany sub-account. In Hyperion Enterprise Release 6.5.1.1.000, you can enter data intothe intercompany entity’s own intercompany sub-account. The system eliminates this balanceas it would any other intercompany balance.
80 Converting Your Application to Hyperion Enterprise Release 6.5.1.1.000

Tracking Acquired and Disposed DatesIn Hyperion Enterprise SE, you can specify dates for the acquisition and disposal of a name inan organization. In Hyperion Enterprise Release 6.5.1.1.000, you can select the VaryOrganization by Category and Period application setting to track changes in your organizationover time. If any name in your original application uses acquired and disposed dates in theorganization structure, you must select the Vary Organization By Category and Periodapplication setting when you convert the application to create the period-specific organizationaccording to the acquired and disposed dates. For more information, see the Hyperion EnterpriseAdministrator’s Guide.
Caution! If you do not select the Vary Organization by Category and Period setting when theapplication is converted, all acquired and disposed date information is lost.
Universal Naming ConventionHyperion Enterprise Release 6.5.1.1.000 stores file names internally in Universal NamingConvention (UNC) format so that users can select their own drive mappings. Supporting UNCpaths allows an application to work seamlessly in a network environment. UNC paths allowlogical connections to network devices without the need to specifically reference a network driveletter. The system can locate the network server and path with the UNC name even over a modemconnection. The UNC describes network servers and share points on those servers.
UNC names start with two backslashes (\\) followed by the server name. All other fields in thename are separated by a single backslash. For example, \\USER1\C:\filename.dat refers tothe filename.dat file on the C drive on the USER1 computer.
UNC is used in the Hyperion Enterprise Add Application dialog box and in Load and Extractdialog boxes such as Load and Extract Applications, Load and Extract Journals, Load and ExtractFormulas, Load and Extract Security, Load and Extract Shares, and Load and Extract Data.
You can enter file locations in either UNC format or mapped drive notation. The system convertsthe mapped drive notation to UNC format. However, if you are creating an application on yourlocal computer that you want other workstations to access, you must enter the UNC path, orspecify a shared directory, rather than a drive-mapped path, as a path for the new application.
System Load File BehaviorYou should be aware of the differences in loading data and metadata between HyperionEnterprise SE and Hyperion Enterprise Release 6.5.1.1.000. You can see the difference bycomparing Table 13 and Table 14.
Table 13 lists the system load file behavior for each table in Hyperion Enterprise SE.
Table 13 Hyperion Enterprise SE System Load Behaviors
Section Behavior
[ACCTLIST] Lists append, line items in a fixed list append.
Compatibility of Earlier Hyperion Enterprise SE and Hyperion Enterprise 6.5.1.1.000 Releases 81

Section Behavior
[ACONV] Tables append, line items overwrite.
[BOOK] Overwrite.
[CATEGORY] Overwrite.
[CURRENCY] Overwrite.
[FORMAT] Overwrite.
[GROUP] Groups append, accounts in a group overwrite.
[INTCACCT] Overwrite.
[LOGIC] Append.
[NAME] Overwrite.
[NAMELIST] Lists append, line items in a fixed list append.
[NCONV] Tables append, line items overwrite.
[ORGANIZATION] Append.
[OWNERSHIP] Overwrite.
[ROLLOVER] Overwrite.
[SCHEDULE] Overwrite.
[SET] Sets append, line items (reports) overwrite.
[SUBACCT] Tables append, line items overwrite.
[SUBNAME] Overwrite.
[SUBOWN] Overwrite.
[SUBSTRUCTURE] Append.
Table 14 lists the system load behavior for each table in Hyperion Enterprise Release 6.5.1.1.000.
Table 14 Hyperion Enterprise Release 6.5.1.1.000 System Load Behaviors
Section Behavior
[ACCTLIST] Lists append, line items in a fixed list append.
[ACONV] Tables append, line items overwrite.
[APPLICATION] Overwrite.
[BOOKSET] Sets append, line items (books) overwrite.
[CATEGORY] Overwrite.
82 Converting Your Application to Hyperion Enterprise Release 6.5.1.1.000

Section Behavior
[CODES] Overwrite.
[CONSOLASSIGN] Overwrite.
[CURRENCY] Overwrite.
[ECONV] Tables append, line items overwrite.
[ENTITY] Overwrite.
[ENTITYCODE] Overwrite.
[ENTITYLIST] Lists append, line items in a fixed list append.
[FORMAT] Overwrite.
[FORMULAS] Overwrite.
[GROUP] Groups append, accounts in a group overwrite.
[ICDEPEND] Overwrite.
[INTCACCT] Tables append, line items overwrite.
[ORGANIZATION] Overwrite.
[OWNERSHIP] Overwrite.
[REPORTSET] Sets append, line items (reports) overwrite.
[ROLLSET] Tables append, line items overwrite.
[SCHEDULE] Overwrite.
[SUBACCT] Overwrite.
[SUBENTITY] Overwrite.
[SUBOWN] Overwrite.
[SUBSTRUCTURE] Overwrite.
[SUBTABLE] Appends.
Requirements Comparison with Hyperion Enterprise SEThe requirements for Hyperion Enterprise SE and Hyperion Enterprise Release 6.5.1.1.000 differsignificantly.
Requirements Comparison with Hyperion Enterprise SE 83

Hyperion Enterprise SE ArchitectureHyperion Enterprise SE is available in a 16-bit and 32-bit architecture with a proprietary file-based data format. All add-ons are available in a 32-bit version of Hyperion Enterprise SE Release4.4.
Hyperion Enterprise Release 6.5.1.1.000 ArchitectureHyperion Enterprise Release 6.5.1.1.000 is available in a 32-bit architecture with the followingoptions:
l Hyperion Enterprise Release 6.5.1.1.000 Base–32-bit architecture, proprietary file-baseddata format, with or without an Application Server, Data Server, Message Server, and WebServer
l Hyperion Enterprise Release 6.5.1.1.000 Application Server–A configuration option thatallows certain processes to be run on an Application Server
l Hyperion Enterprise Release 6.5.1.1.000 Data Server–A configuration option that improvesperformance in your file-based application
l Hyperion Enterprise Web Server–A configuration options that allows you to Web enableyour file-based applications
l Hyperion Enterprise Message Server–A configuration option that allows you to sendmessages to Hyperion Enterprise application users
Table 15 lists the requirements for Hyperion Enterprise SE and Hyperion Enterprise Release6.5.1.1.000.
Table 15 Requirements
Hyperion Enterprise SE Hyperion Enterprise Release 6.5.1.1.000
Client Workstation
Processorl Minimum - 486 33 MHz
l Recommended - 486 66 MHz or faster
l Minimum - Pentium 133
l Recommended - Pentium 200 or faster
Memoryl Minimum - 16 MB
l Recommended - 32 MB
l Minimum - 256 MB
l Recommended - 512 MB or greater, particularly forsystem administration
Disk spacel 1 MB if system files and application data
reside on a file server (recommended)
l 15-35 MB, plus space for application dataas needed, if system and data files residelocally
l 10 MB if system files and application data reside on afile server (recommended)
l 75 MB, plus space for application data as needed, ifsystem and data files reside locally
84 Converting Your Application to Hyperion Enterprise Release 6.5.1.1.000

Hyperion Enterprise SE Hyperion Enterprise Release 6.5.1.1.000
Operating systeml Windows 3.1x
l Windows 95
l Windows 2003 Server (with Service Pack 2)
l Windows XP Professional (with Service Pack 2)
l Windows 2008 Server
l Windows Vista
Monitors and otherperipherals
l Minimum - VGA
l Recommended - SVGA 600x800
l Minimum - SVGA 1024 x 768 resolution
Network transportprotocol
Any protocol that supports your network fileserver
l Hyperion Enterprise Release 6.5.1.1.000 Base: Anyprotocol that supports the network file server. Hyperionrecommends a single protocol.
l Hyperion Enterprise Release 6.5.1.1.000 Server: TCP/IP
Database connectivity Not applicablel Hyperion Enterprise Release 6.5.1.1.000 Base: Not
Applicable
File Server
Dedicated Not required Not required
Processor A processor that provides file service support tothe client workstation
Pentium II - IV (500 MHz or faster)
Operating systems A network operating system that provides fileservice support to the client workstation
l Windows 2003 Server (with Service Pack 2)
l Windows 2008 Server
l Novell Netware 4.12 and 5.x or later
l Must provide file service support to the client workstation.
Networkcommunicationssoftware
l Windows 2003 Terminal Server
l Windows 2008 Server or Advanced Server (Service Pack4)
l Windows 2008 Terminal Server
l Novell Netware 4.12 or 5.x or later
Memoryl Minimum - 32 MB
l Recommended - 64 MB
l Minimum - 256 MB
l Recommended - 512 MB
Disk spacel Typical Range: 100 MB to 500 MB,
depending on the size of the applications,including system files
l System Files: 15 MB to 35 MB, dependingupon add-in modules installed
l Minimum - 100 MB
l Recommended - 100 to 500 MB, depending on the sizeof the applications, including system files
l System files - 75 MB, including all add-on modules
Database
Databases supported Purpose-builtl Base - Purpose-built
Processor A processor that provides file service support tothe client workstation
l Base - Same processor as for file server
Requirements Comparison with Hyperion Enterprise SE 85

Hyperion Enterprise SE Hyperion Enterprise Release 6.5.1.1.000
Operating system A network operating system that provides fileservice support to the client workstation
l Base - Same operating system as for file server
Memoryl 32 MB minimum
l 64 MB recommended
l Base - Same memory as for file server
Disk spacel Typical range: 100 MB to 500 MB,
depending on the size of the applications,including system files
l System files: 15 MB to 35 MB, dependingupon add-in modules installed
l 100 MB Minimum
l Typical range: 100 MB to 1000 MB, depending on thesize of the applications, including system files. Refer tothe guidelines set by your file server vendor
l System files: 75 MB, including all add-in modules
Network transportprotocol
Any protocol necessary to support your networkfile server
l Base - Whatever protocol is necessary to support yournetwork file server
Database vendorconnectivity software
Not applicablel Base: Not applicable
Performance tuningrequirements
Not applicablel Base – Not applicable
Application server Not applicable Optional (XA Server)
Processor Not applicablel Pentium processor minimum
l 200 MHz recommended
Operating system Not applicablel TCP/IP
Memory Not applicablel 128 MB minimum
l 256+ MB recommended
Disk space Not applicable 500 MB minimum1
1A larger amount of disk space is recommended. For optimum performance, Hyperion recommends putting your applications on multiple drivesand disk controls.
Hyperion Enterprise Conversion UtilitiesHyperion Enterprise Release 6.5.1.1.000 includes utilities that convert applications created inearlier releases for use in Hyperion Enterprise Release 6.5.1.1.000. Hyperion Enterprise Release6.5.1.1.000 includes the following conversion utilities:
l Application Conversion SE to 6.5.1.1.000 Conversion Utility, which converts an applicationcreated in Hyperion Enterprise SE to Hyperion Enterprise Release 6.5.1.1.000.
l Application Conversion 4.7 through 6.4.0.0.000 to 6.5.1.1.000 Conversion Utility, whichconverts an application created in Hyperion Enterprise XA 4.7 through 6.2.2 to HyperionEnterprise Release 6.5.1.1.000.
l System Extract from SE to 6.5.1.1.000 Conversion Utility, which converts HyperionEnterprise SE system extracts for use in Hyperion Enterprise Release 6.5.1.1.000.
86 Converting Your Application to Hyperion Enterprise Release 6.5.1.1.000

l Logic Conversion from SE to 6.5.1.1.000 Conversion Utility, which converts HyperionEnterprise SE logic files for use in Hyperion Enterprise Release 6.5.1.1.000.
Note: You need to rebuild Hyperion Enterprise 4.6x applications or convert them toHyperion Enterprise XA 4.7, 5.0, 5.1, 5.5, 6.0, 6.1.1, or 6.2.2 applications and thenconvert the applications to Hyperion Enterprise Release 6.5.1.1.000.
Converting Applications
Note: To convert an application, you first need to try to add it to the hypent.ini file. If you donot do this, you cannot reference it in the conversion utility.
Application Conversion 4.7 Through 6.4.0.0.000 to6.5.1.1.000 Conversion UtilityUse the Application Conversion 4.7 through 6.4.0.0.000 to 6.5.1.1.000 Conversion Utility onlyif you want to convert an application created in Hyperion Enterprise Release 4.7 through Release6.4.0.0.000 to Hyperion Enterprise Release 6.5.1.1.000.
Application Conversion from SE to 6.5.1.1.000 ConversionUtilityDeciding which conversion tool to use depends on what you want to accomplish after converting.For example, you should use one conversion tool if you want to convert your application onlyand not reorganize your application to make use of the new Hyperion Enterprise Release6.5.1.1.000 features. A different conversion tool and a full or partial redesign of your oldapplication are needed if you want to make use of some or all of the new Hyperion EnterpriseRelease 6.5.1.1.000 features. Use the Application Conversion from SE to 6.5.1.1.000 ConversionUtility if you want an exact replica of your Hyperion Enterprise SE application and want toconvert your financial data for use in Hyperion Enterprise Release 6.5.1.1.000.
This conversion utility creates a new application that is structured exactly as it was in HyperionEnterprise SE; therefore, you cannot use many of the new features of Hyperion Enterprise Release6.5.1.1.000.
For example, the values in the Percent Ownership table in Hyperion Enterprise SE have the samerole as the values in the Percent Consolidation table in Hyperion Enterprise Release 6.5.1.1.000.The data from the Percent Ownership table in Hyperion Enterprise SE is copied to the PercentConsolidation table in Hyperion Enterprise Release 6.5.1.1.000. The other tables in HyperionEnterprise Release 6.5.1.1.000 that determine the consolidation method and percentage, whichare the Percent Ownership and Percent Control tables, are populated with the default value of100 percent when you use this conversion utility. If you want to replicate your HyperionEnterprise SE application both physically and functionally, and you do not want to use any newfeatures, you would use this conversion utility.
Converting Applications 87

If you do use this conversion utility, the values of the Percent Ownership field in HyperionEnterprise SE are transferred to the Percent Control, Percent Ownership, and PercentConsolidation fields in Hyperion Enterprise Release 6.5.1.1.000. The values are copied to allfields because of the relationship between the Percent Ownership and Percent Consolidation inHyperion Enterprise Release 6.5.1.1.000 applications.
Hyperion Enterprise SE System Extract and Logic ConversionUtilitiesUse the System Extract and Logic Conversion utilities if you plan to redesign your applicationto take advantage of the new Hyperion Enterprise Release 6.5.1.1.000 features and capabilities.The System Extract and Logic conversion utilities create a set of files that you can load into anew application. You must create the new application before loading the new files.
Note: If you use these utilities to create your Hyperion Enterprise Release 6.5.1.1.000application, you need to set your application attributes. This information is not carriedover from your Hyperion Enterprise SE application.
Installing the Conversion UtilitiesThe conversion utilities are not installed by default when you install Hyperion Enterprise Release6.5.1.1.000. You must select the conversion utilities during the installation process.
ä To install the conversion utilities:
1 Complete Step 1 through Step 8 of the procedure “Performing a Complete Installation” on page 33.
2 In the Select Components dialog box, select the Enterprise Conversion Utilities option along with anyother components that you want to install.
3 Finish the installation procedure by following steps 8 through 11.
Application Conversion 4.7 Through 6.4.0.0.000 to6.5.1.1.000 Conversion UtilityYou use the Application Conversion 4.7 through 6.4.0.0.000 to 6.5.1.1.000 utility to convert file-based applications from releases 4.7 through 6.4.0.0.000 to 6.5.1.1.000.
You can also convert your Statutory Consolidation Engine (SCE) Release 4.7 through Release6.4.0.0.000 application to Release 6.5.1.1.000 using the conversion utility. The HyperionEnterprise conversion utility does not recompile SCE. You must open the SCE Admin andcompile the Default CONSOL and TRANS methods.
88 Converting Your Application to Hyperion Enterprise Release 6.5.1.1.000

Note: After you convert an SCE application, the old file names for the SCE methods are savedin the SCE admin module and in the Hyperion Enterprise Formulas module. You cancompile the old file names using the SCE admin module or the Hyperion EnterpriseFormulas module.
It is especially important that you observe these requirements:
l If you are converting your application from Hyperion Enterprise XA Release 4.7, you mustverify that you have sufficient memory and disk space. You need sufficient space for yourbackup of the application that being converted, extract files, and the new application.Hyperion recommends that you have a minimum of 1.5 times the disk space of your existingapplication.
l Prior to converting your SCE application, if your SCE methods are stored in a directorynamed ACE, you must rename this directory to SCE.
When you convert applications, you have the original application files and the convertedapplication files. You can delete the old application files at your discretion. Hyperionrecommends that you archive the original application before deleting it.
The conversion utility writes error messages to the error.log file for the application. You canrefer to the error log for details about errors you may encounter during the conversion. Receivingan error message during conversion does not always mean that the conversion failed. You mighthave elements of an application that create error messages, but the conversion in its entirety hasnot failed. For example, deleted members may prevent fixed Account and Entity Lists fromconverting. In this instance, you can examine each error message in the log file, edit theapplication, and perform the conversion again.
If the conversion fails, you must perform the conversion again. Delete the partially convertedapplication before performing the conversion again. Applications that have intercompanyaccounts attached to sub-account tables are not converted and a specific error message isdisplayed in the error log.
The conversion utility creates several types of extract files from the Hyperion Enterprise XA 4.7application. Table 16 describes each extract file that is created in the converted applicationdirectory:
Table 16 Extract Files Created in the Converted Application Directory
File Name Extensions File Description
.sce SCE extract. Created only if the application uses SCE.
.all Allocation extract. Created only if application includes Allocation files.
.app Application extract. Always created.
.bar Books and reports extract. Created only if the application contains books or reports.
.cda Data extract. Always created.
Note: There is one .cda file created for each category in the application.
Application Conversion 4.7 Through 6.4.0.0.000 to 6.5.1.1.000 Conversion Utility 89

File Name Extensions File Description
.llk LedgerLink extract. Always created.
Hyperion Enterprise XA Conversion ConsiderationsConsider the following items when deciding to convert from Hyperion Enterprise XA:
l There is no utility available for converting your application from Hyperion Enterprise XARelease 4.5 to Hyperion Enterprise Release 6.5.1.1.000 You must rebuild your applicationcompletely, using Hyperion Enterprise Release 6.5.1.1.000.
Note: You need to rebuild Hyperion Enterprise Release 4.6x applications or convert themto Hyperion Enterprise XA 4.7, 5.x, or 6.x applications and then convert theapplications to Hyperion Enterprise Release 6.5.1.1.000.
l When converting from Hyperion Enterprise XA Release 4.7 to Hyperion Enterprise Release6.5.1.1.000, consider these points:
m Security, logic, and rules have changed significantly in Hyperion Enterprise Release6.5.1.1.000. For more information, see the Hyperion Enterprise Administrator’s Guideand “Converting Logic Files” on page 106.
m If your application uses the Organization by Period and Intercompany Dependentsfeatures, you should check that the values in the Ownership table contain the same valuesas the Intercompany Dependents table when appropriate. In earlier releases, thesynchronization of Percent Control, Percent Consol, Percent Ownership, and Method,which should exist between the Ownership and Intercompany Dependents tables, wasnot always precise. The tables may gotten out of sync, for example: if you loaded theIntercompany Dependents section from an ASCII load file and did not load theOwnership section at the same time. Only changes made directly through the userinterface were completely reliable. Although this is no longer an issue, you shouldcomplete the following activities to ensure that your tables are synchronized. If you areunclear as to whether your tables are synchronized, extract your Ownership andIntercompany Dependents tables and compare values to ensure that they match.
m Hyperion recommends that the administrator perform the following tasks when thereare no other users on the system:
m Extract the Entity Ownership section.
m Search the extract file for the values !-1.#R! or a negative value in the Percent Consol,Percent Owned, or Percent Control fields. If you find any of these values, you mustcorrect it by entering the appropriate value.
m Reload the Entity Ownership section.
m Extract the Intercompany Dependents section.
m Reload the Intercompany Dependents section.
m Check the error log. If the application encountered a value that is not valid, a line numberis displayed indicating the line of the extract or load file that must be corrected prior to
90 Converting Your Application to Hyperion Enterprise Release 6.5.1.1.000
completing a successful load. You must enter the appropriate value or a blank if no valueis desired.
ExampleBefore:
1!12!CORP !DIV1 ! !-1.#R!-1.#R!-1.#R
After:
1!12!CORP !DIV1 ! !50!50!50
or
1!12!CORP !DIV1 ! !!!
l You must have an entry in your hypent.ini file for any Hyperion Enterprise XA Release4.7 through Release 6.4.0.0.000 application that you want to convert. The conversion utilityreads this application information to provide you with the names of XA Release 4.7applications available for conversion.
l Status and settings such as consolidation status or locked periods within your applicationsare preserved when converted. Hyperion recommends that the data in all applications havea status of OK prior to conversion.
l For org-by-period applications using SCE, Hyperion strongly advises converting anapplication when all statuses are OK. If you convert an application with statuses other thanOK, you must run a Consolidate All with Data or a Consolidate All after the conversion.
Converting a Hyperion Enterprise Release 4.7 ThroughRelease 6.4.0.0.000 Application to Release 6.5.1.1.000Before converting your Hyperion Enterprise Release 4.7 through Release 6.4.0.0.000 applicationto Hyperion Enterprise Release 6.5.1.1.000, you must ensure that you haves sufficient disk space.Also, review the preconversion considerations in “Hyperion Enterprise XA ConversionConsiderations” on page 90.
After you convert an SCE application, the old file names for the SCE methods are saved in theSCE admin module and in the Hyperion Enterprise Formulas module. You can compile the oldfile names using the SCE admin module or the Hyperion Enterprise Formulas module.
If you have Hyperion LedgerLink installed, the conversion utility expands the label column sizefor category IDs and user IDs from eight to 20 characters to make them compatible with thestandard label length in Hyperion Enterprise.
If you use SCE, the Hyperion Enterprise conversion utility does not recompile SCE. You mustopen the SCE Admin and compile the Default CONSOL and TRANS methods.
If you want the new application to have the same name it had before the conversion, you musteither delete the original application after the conversion, move the original application to aseparate directory, or create the converted application in a new directory.
Application Conversion 4.7 Through 6.4.0.0.000 to 6.5.1.1.000 Conversion Utility 91
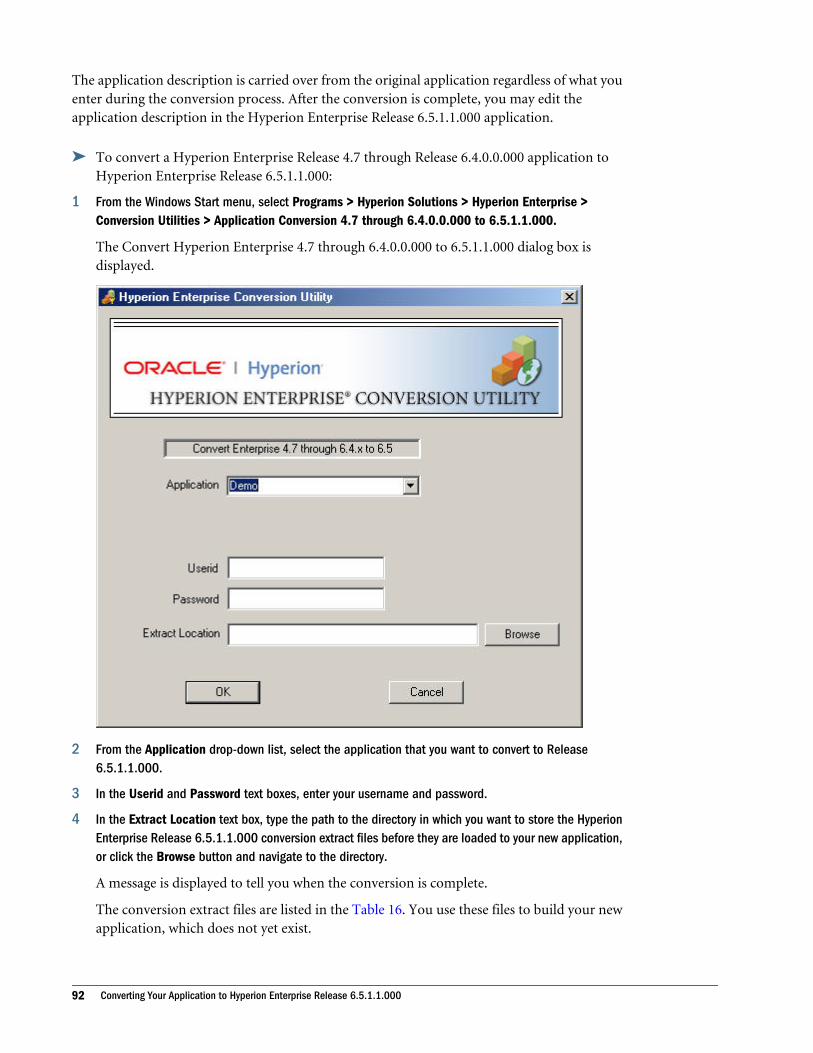
The application description is carried over from the original application regardless of what youenter during the conversion process. After the conversion is complete, you may edit theapplication description in the Hyperion Enterprise Release 6.5.1.1.000 application.
ä To convert a Hyperion Enterprise Release 4.7 through Release 6.4.0.0.000 application toHyperion Enterprise Release 6.5.1.1.000:
1 From the Windows Start menu, select Programs > Hyperion Solutions > Hyperion Enterprise >Conversion Utilities > Application Conversion 4.7 through 6.4.0.0.000 to 6.5.1.1.000.
The Convert Hyperion Enterprise 4.7 through 6.4.0.0.000 to 6.5.1.1.000 dialog box isdisplayed.
2 From the Application drop-down list, select the application that you want to convert to Release6.5.1.1.000.
3 In the Userid and Password text boxes, enter your username and password.
4 In the Extract Location text box, type the path to the directory in which you want to store the HyperionEnterprise Release 6.5.1.1.000 conversion extract files before they are loaded to your new application,or click the Browse button and navigate to the directory.
A message is displayed to tell you when the conversion is complete.
The conversion extract files are listed in the Table 16. You use these files to build your newapplication, which does not yet exist.
92 Converting Your Application to Hyperion Enterprise Release 6.5.1.1.000

5 Start Hyperion Enterprise Release 6.5.1.1.000, select File > New Application, enter your user ID andpassword, and click Next.
The Application Setup dialog box is displayed.
6 Complete these steps and then click Next:
a. In the Application and Description text boxes, enter the application name anddescription, respectively.
b. Type the name of the conversion extract file, or use the Browse button to navigate to it.This is the filename with the .app extension that is located in the directory that youcreated in step 2.
c. Select an error log option.
The Driver Setup dialog box is displayed:
Application Conversion 4.7 Through 6.4.0.0.000 to 6.5.1.1.000 Conversion Utility 93

7 Enter the appropriate path information, then click Finish.
The system loads the files of your new application.
Note: The amount of time that the system takes to load your converted files depends on thenumber of files the application contains and the size of these files.
Application Conversion SE to HyperionEnterprise 6.5.1.1.000 Conversion UtilityYou can convert a Hyperion Enterprise SE 1.8 or Hyperion Enterprise Release 4.x applicationby either of the following methods:
l Use the Application Conversion from SE to Hyperion Enterprise Release 6.5.1.1.000Conversion Utility to convert all application elements except for reports and books.
l Use the System Extract Conversion Utility to convert extracted application load files, andthe Logic File conversion utility to convert logic files. For more information, see “SystemExtract and Logic Conversion Utilities” on page 104.
Use the Application Conversion from SE to 6.5.1.1.000 Conversion Utility if you want a replicaof your Hyperion Enterprise SE application. In this case, it is extremely unlikely that the PercentControl and Percent Ownership fields will be used within the application, and it probably makesmore sense to just update these fields with the application defaults. The Percent ownership fieldin SE populates only the Percent control field in Release 6.5.1.1.000; Percent Control and PercentOwnership default to 100 percent.
94 Converting Your Application to Hyperion Enterprise Release 6.5.1.1.000

Before You ConvertPerform the following tasks before converting your application to Hyperion Enterprise Release6.5.1.1.000:
l Back up the application prior to conversion.
l Ensure that you have the minimum recommended hardware requirements.
l Ensure all computers are 32-bit and have a minimum of 128 MB RAM.
l Ensure that there is sufficient disk space (at least 1.5 times the size of the existing application).
l Check for sufficient memory and swap file size (2.5 times the size of your application).
l Make note of your custom functions.
l Ensure that no names/labels that are 'reserved' in Hyperion Enterprise Release 6.5.1.1.000are being used in the Hyperion Enterprise SE application. For example, CURR (often usedby Hyperion Enterprise SE users as a label for their currency table) and Intercompany (oftenused as a label for a sub-account table that is used for Intercompany purposes in HyperionEnterprise SE) are reserved names in Hyperion Enterprise Release 6.5.1.1.000. The HyperionEnterprise Administrator’s Guide includes a list of reserved names.
l Disable screen saver programs.
l Optional: If you are acquiring business units in the future or changing their reportingstructure, select the Org-by-Period option during application setup.
l Optional: If ownership of entities changes, select the Org-by-Period option duringapplication setup.
l Optional: If you have a complex application with low data density, use SCE.
l If you do not plan to use any of the standard load.per files, you must copy your customizedfile from the Hyperion Enterprise SE program directory into the Hyperion EnterpriseRelease 6.5.1.1.000 program directory.
l Determine the options that you want to take advantage of in Hyperion Enterprise Release6.5.1.1.000 that are not available in Hyperion Enterprise SE.
l If you are not renaming the new application, store the old application in a separate directory.You might not be able to access both of your applications if you have them in the samedirectory and they have the same name.
l Be aware of the many functional changes between releases, including new features, how datais stored, and how an existing feature may work differently. For more information, see“Feature Comparison with Hyperion Enterprise SE Release 4.x” on page 75. For example,be aware of how logic is executed differently in Hyperion Enterprise SE than in HyperionEnterprise Release 6.5.1.1.000.
l Rebuild security elements and passwords as needed. The conversion utility converts onlyuser IDs, passwords, and user groups from the security application. All groups are assignedthe default security class Maximum.
l Because compiled logic files (.lgx) are not supported in Hyperion Enterprise, you mustcheck logic in the existing application to ensure that you convert the most recent logic filesbefore running the System Extract Conversion Utility.
Application Conversion SE to Hyperion Enterprise 6.5.1.1.000 Conversion Utility 95

l In earlier releases of Hyperion Enterprise, you could compile logic statements that containeda double plus sign ( ++ ), and the double plus sign had no effect on the result of the statement;for example, #CASH++#PETTY_CASH. These statements do not compile correctly when youcheck formulas in Hyperion Enterprise Release 6.5.1.1.000. If double plus signs ( ++ ) arein a method, edit the file in the application before running the Conversion Utility. To dothis, open each logic file, search for the double plus sign and replace with a single plus sign,and then convert.
l In earlier releases of Hyperion Enterprise, you could compile logic statements that containeda plus sign ( + ) after a division sign ( / ), and the plus sign ( + ) had no effect on the resultof the statement; for example, #INCOME/+#INCOME2. These statements do not compilecorrectly when you check formulas in Hyperion Enterprise Release 6.5.1.1.000. If thiscombination of signs is in a method, edit the file in the application before running theConversion Utility. To do this, open each logic file, search for a plus sign after a divisionsign, replace with the division sign, and then convert.
l In earlier releases of Hyperion Enterprise, you could compile logic statements that containedan ampersand ( & ) in the comment section, for example, filename & CHART logic. Thesestatements do not compile correctly when you check formulas in Hyperion EnterpriseRelease 6.5.1.1.000. You must delete all ampersands within the comment section in theapplication before running the Conversion Utility. To do this, open each logic file, searchfor the ampersand in the comment section, and replace it with the word, and then convert.
l The Conversion Utility builds a Hyperion Enterprise Release 6.5.1.1.000 applicationregardless of the existence of the Hyperion Enterprise-specific setup options selected. Theconverted application includes all accounts, names (which are called entities in HyperionEnterprise Release 6.5.1.1.000), categories, logic (which is called methods in HyperionEnterprise Release 6.5.1.1.000), data, journals, security groups, security IDs, and statuses forconsolidation and methods. You then must use the Report Conversion Utility to convert allreports and books.
l Periodic Consolidation is the only option selected by default on the Setup Options screen.When you convert an application using the default settings on the Setup Options screen,the consolidation and method statuses remain the same. If you select any of the followingoptions, data is impacted in the new Hyperion Enterprise Release 6.5.1.1.000 applicationfor all unlocked periods, and you must reconsolidate after converting the application. If youchange one of the options and you do not want to consolidate prior periods, you must lockthe prior periods. Any periods that you do not lock before converting must be consolidatedin the new application.
m You deselect the Periodic Consolidation option to use Category-To-DateConsolidation.
m You select Translation Detail.
m You select Proportion and Elimination Detail.
m You select Use Child Rate Accounts.
l If the application that you are converting has a custom Application Calendar file, then youmust copy the .per file into the new Hyperion Enterprise Release 6.5.1.1.000 applicationdirectory before converting the application.
96 Converting Your Application to Hyperion Enterprise Release 6.5.1.1.000
You should also consider this information before converting:
l If you plan to merge applications into a single new application you may need more diskspace, memory, and so on.
l Journal information in the Journal History Report is not retained in the convertedapplication.
l The conversion utility converts all user-defined functions created using the DEF logicfunction to custom functions. These custom functions are then available to all methods inthe application.
l You must have Admin rights to convert an application. If you do not have Admin rights,the Conversion Utility aborts and an error message is displayed.
l When you convert reports and books, their names cannot have more than eight characters.
l If you select Shared Signatures when you convert the application and you have equated twomajor accounts to assign formulas to subaccounts, these formulas will not work in theconverted application. For more information, see the Assigning Formulas to Subaccountsby Equating Major Accounts topic in the Setting Up Your System chapter of the HyperionEnterprise Administrator's Guide.
Gathering Data to Test Your ConversionHere are some tests you can perform to ensure that your conversion was successful:
Note: Ensure all statuses are OK prior to performing any test that involves a data extract.
l Perform a data extract at the parent level before converting, then report this procedureexactly after you have converted and consolidated.
l Perform a data extract at the base level before converting, then report this procedure exactlyafter you have converted and consolidated.
l Run the Journal’s Canned Report on the same range of journals before and after convertingand compare details. Remember there are more details included in the Hyperion EnterpriseRelease 6.5.1.1.000 canned reports.
l Run a report using Hyperion Retrieve (not Retrieve for Hyperion Enterprise Reporting)before and after your conversion.
l Perform a partial system extract and review the metadata in a Microsoft Access databasebefore and after converting.
Converting Hyperion Enterprise SE Applications toHyperion Enterprise Release 6.5.1.1.000The Application Conversion from SE to 6.5.1.1.000 Conversion Utility retains all statuses in theapplication and converts the application automatically. If you use the System Extract and Logic
Converting Hyperion Enterprise SE Applications to Hyperion Enterprise Release 6.5.1.1.000 97

Conversion Utilities, status is not retained, and you must reconsolidate all data after creatingthe Hyperion Enterprise application.
Note: All errors encountered during the conversion process are written to the conversion logfile, error.log, which is located in the Hyperion Enterprise program directory.
ä To convert a Hyperion Enterprise SE Application to Hyperion Enterprise Release6.5.1.1.000:
1 From the Start menu, select Programs > Hyperion Solutions > Hyperion Enterprise > ConversionUtilities > Application Conversion SE to 6.5.1.1.000.
The Hyperion Enterprise Conversion Wizard is displayed:
2 Click Next.
The Hyperion Conversion Wizard - Logon dialog box is displayed:
98 Converting Your Application to Hyperion Enterprise Release 6.5.1.1.000

3 From the Existing Standard Edition Application drop-down list, select the application to convert, thenenter your username and password in the User ID and Password text boxes and click Next.
The Hyperion Conversion Wizard - Hyperion Enterprise 6.5.1.1.000 Setup dialog box isdisplayed:
Converting Hyperion Enterprise SE Applications to Hyperion Enterprise Release 6.5.1.1.000 99

4 Select the appropriate settings for the new application.
The Hyperion Conversion Wizard - Hyperion Enterprise 6.5.1.1.000 Driver Setup dialogbox is displayed:
100 Converting Your Application to Hyperion Enterprise Release 6.5.1.1.000

5 Select the appropriate setup options, then click Next.
The Hyperion Conversion Wizard - Hyperion Enterprise 6.5.1.1.000 Setup Options dialogbox is displayed:
Converting Hyperion Enterprise SE Applications to Hyperion Enterprise Release 6.5.1.1.000 101

6 Select the appropriate setup options, then click Finish.
Postconversion Tasks and ConsiderationsAfter you convert an application, you must perform the following tasks:
l If you select the DSM option when you convert the application, you must perform aConsolidate All or Consolidate All With Data to populate the DSM detail.
l If you stored translation detail in your application using sub-entities but now use the DSM,delete the sub-entities after converting your application to avoid redundant data storage.
l Check your Hyperion Enterprise error log.
l Verify that all statuses carried over correctly and all necessary locks are still active; forexample, journal and data locks.
l Verify that all journals and appropriate details were converted.
l Set up security.
l Verify that IDs and passwords are still valid.
102 Converting Your Application to Hyperion Enterprise Release 6.5.1.1.000

Note: Hyperion Enterprise SE IDs and passwords were not-case sensitive. For example, ifyou were set up with an ID of Jsmith and password of HeLLo, you could log on toHyperion Enterprise SE successfully as jsmith with a password of hello. HyperionEnterprise Release 6.5.1.1.000 security is case-sensitive, and it requires you to enteryour ID and password exactly as created.
l Check all accounts and entity codes.
l If you are using Hyperion Reporting 2.6 or higher and want to use reports for HyperionEnterprise Release 6.5.1.1.000, you must recompile your reports prior to using them. Reportscreated in earlier releases of Hyperion Reporting should be converted with the ReportingConversion Utility.
l If you converted a Hyperion Enterprise SE application to an organization-by-periodapplication in Hyperion Enterprise Release 6.5.1.1.000, reconsolidate after converting andrun a report on the first period in the new application. Compare the results to the samereport run on the final period in the Hyperion Enterprise SE application with a view of YTD.The opening balances of the first period in your new application should match your oldclosing balances. This report will be valid only if you have left ownership at 100 percent forentities with data for categories that existed in the old application.
l When you convert an application from Hyperion Enterprise SE, reports and books are notautomatically converted. After you convert your application, copy the report and book filesfrom your Hyperion Enterprise SE application to the Report directory of the HyperionEnterprise Release 6.5.1.1.000 application. Recompile the report and book files in HyperionEnterprise Release 6.5.1.1.000 before running them.
Note: If you converted from Hyperion Enterprise SE 1.8.2, you must obtain the HyperionEnterprise 1.8.2 Report Conversion Utility by contacting Client Support prior toinstalling Release 6.5.1.1.000. This utility is not included in the installation media forHyperion Enterprise Release 6.5.1.1.000. It is important that you convert your reportsand books prior to installing Hyperion Enterprise Release 6.5.1.1.000.
You should also consider this information after you complete the conversion:
l Hyperion Enterprise SE has only consolidation logic. Hyperion Enterprise Release6.5.1.1.000 divides consolidation and translation logic separately. If there is translation logicin the consolidation logic in Hyperion Enterprise SE, then all logic is placed under translationlogic in Hyperion Enterprise Release 6.5.1.1.000 and needs to be divided manually.
l A DEF function in Hyperion Enterprise SE is automatically converted to a custom functionin Hyperion Enterprise Release 6.5.1.1.000.
l When you convert a Hyperion Enterprise SE application that contains a dynamic viewaccount list to Hyperion Enterprise Release 6.5.1.1.000, and you specify that the system notinclude Detail, the converted application contains subaccounts as well as major accounts.To avoid this, deselect first-level and second-level subaccounts, select major accounts, andrefresh the list.
l If you do not select Periodic Consolidation in the Hyperion Enterprise SE application’s setupoptions when you convert the application, the application’s journal locks will not appear in
Postconversion Tasks and Considerations 103

the converted application. To work around this, unpost then repost the journal to reapplythe journal lock.
l After converting a Hyperion Enterprise SE application, the application paths in theapplication.ini file are hard-coded. To keep the paths flexible so that they are updatedautomatically if you move the application, manually replace the path to the Data, Inbox,Outbox, and Report directories in the application.ini using “@APP.” For example,change the line:
APP_DATA=“E:\apps\Data” to APP_DATA=“@APP\Data.”
System Extract and Logic Conversion UtilitiesUse the System Extract and Logic conversion utilities if you want to redesign your applicationto take advantage of the new Hyperion Enterprise Release 6.5.1.1.000 features and capabilities.This is the best method for converting your application if you redesign your existing applicationbut still want to maintain the common elements such as information in the system file and logic.For example, if you want to make use of the ownership features with Hyperion Enterprise Release6.5.1.1.000, you should use these conversion utilities.
Application Load File Conversion ConsiderationsBefore converting an application from load files, consider the following information:
l You must convert system extract and load ASCII files and all logic files individually.
l You must extract data and journals and load them manually into the converted application.
l You do not need to convert data or journals before they are loaded into the convertedapplication. However, you can extract data and journals from only one category at a time.
l You must consolidate after you convert the application.
l When you extract data, the data file should include all journal companies and any otherinput entities. Depending on the application logic, some parent entities may have inputaccounts.
l You cannot load locked data.
l Before you load journals into the converted application, you must load the data for theentities impacted by journals. Hyperion Enterprise allows posted journals to be loaded. Ifyou load journals first, the data does not load to the impacted entities.
l Before you can load auto-reversing journals into the converted application, you must editthe journal load file using a text editor. To do this, open the load file in any text editor,change the identifier for auto-reversing journals from R for regular journal to AR for auto-reversing journal.
l You cannot extract security from earlier releases of Hyperion Enterprise; therefore, securityelements cannot be converted unless you use the conversion wizard. If you convert yourapplication using load and extract files, you must rebuild all security elements.
104 Converting Your Application to Hyperion Enterprise Release 6.5.1.1.000

Converting System Extract and Load FilesBefore you convert a system extract and load file, make sure that no account and account groupin the file have identical labels. For example, the file cannot have an account group with the labelIncome and an account with the label Income. If you convert a file with duplicate labels,Hyperion Enterprise writes an error message to the error log. If you find duplicate labels,Hyperion recommends adding characters to the end of the file name, such as _GRP to the endof the account group label or something that easily allows you to identify the new label.
ä To convert a system extract or load file:
1 From the Start menu, select Programs > Hyperion Solutions > Hyperion Enterprise > ConversionUtilities > System Extract Conversion from SE to 6.5.1.1.000.
The Convert Hyperion Extract File dialog box is displayed:
2 Enter the source and destination paths for the system file in the Source file and Destination file textboxes. You can use the Browse buttons to navigate to the files.
3 Click Convert.
4 Take one of these actions:
l To convert another file, repeat steps 2 and 3.
l To exit the utility, select Exit.
5 To create an application that has organizations that vary by category and period, use a text editor tomove the CATEGORY header and its information before the ENTITY header. For information about theformat of the Ownership section for applications that have organizations that change over time, seeasciifmt.xls, or call your consultant.
For more information about the Hyperion Enterprise Release 6.5.1.1.000 system file syntax, seethe File Formats appendix of the Hyperion Enterprise Administrator’s Guide.
System Extract and Logic Conversion Utilities 105

Loading Converted System FilesAfter converting the system files, you must load them into your new Hyperion Enterprise Release6.5.1.1.000 application.
ä To load converted system files:
1 Create the new application in Hyperion Enterprise Release 6.5.1.1.000. Be sure to select the correctapplication calendar (.per) file. To verify which application calendar file was used to build your originalapplication, open the Category module in the application, and highlight the first empty row. The defaultmonth that appears in Start Period is the application calendar file used to create the application. Forexample, if the month is January, the application calendar file is loadjan.per. If you used a customload.per file, you must load your new application manually.
2 Perform a system load in the new application within the Application module and load the converted1.8.1 or SE System Load (.asc) file. For more information, see “Converting System Extract and LoadFiles” on page 105. You should examine each error message during the application load process. Forexample, an error is displayed if you have a fixed account list or fixed name list that includes deletedaccounts or names.
Note: In the FORMULAS section of the load file, carefully list the methods referenced withthe USE function before all other methods in your application.
3 Import each converted chart and consolidation method (.log file) into Hyperion Enterprise Release6.5.1.1.000.
Note: Any consolidation logic file in Hyperion Enterprise 1.8.1 that uses the PVA, VAL, orLOC translation functions should be loaded into the Hyperion Enterprise Release6.5.1.1.000 application as a translation method and not as a consolidation method.
4 Check (recompile) each method, if required.
5 Convert reports using the Hyperion Enterprise Reporting Conversion Utility, then compile them in theconverted application.
6 Import data from your Hyperion Enterprise SE or 1.8.x application.
7 Import journals from your Hyperion Enterprise SE or 1.8.x application. If your system does not convertcorrectly, try to analyze problem areas with your assigned Quality Engineer or Consultant.
Note: Journal information that appears in the Journals history reporting in the originalapplication is not retained in the new application.
Converting Logic FilesBefore converting logic files, consider the following information:
l The logic file converter cannot process .log files that are larger than 64K. To convert a filelarger than 64K, split the file into separate files that are less than 64K. Convert each file, thencombine each into a single file after conversion.
106 Converting Your Application to Hyperion Enterprise Release 6.5.1.1.000

l Because this method of conversion requires a reconsolidation of all periods after loadingdata into the converted application, the data from the application might change afterconversion if the logic or any application attribute has changed. To prevent this, after youconvert the logic files and load them into the converted application, make all methodscategory-specific. Calculate formulas for only the historical periods in which you want datato change. Make sure only the system administrators have input rights to those categories.Lock the categories in the converted Hyperion Enterprise application.
l All comments in .log files must appear to the right of the statement and must be precededby an exclamation point if you want them to be imported into the converted HyperionEnterprise application.
l In Hyperion Enterprise, the DEF function is replaced by the custom functions feature. If theDEF function was in chart or consolidation logic in your application, it is converted to acustom function for either the chart or consolidation method. Consolidation logic fromearlier releases of Hyperion Enterprise are converted into translation methods. If the DEFfunction uses the LOC, PVA, or VAL functions, which only work in translation methods,an error message is displayed when you recompile methods.
ä To correct problems recompiling methods with the DEF function:
1 Access the Hyperion Enterprise Formulas module and open any method.
2 Select Task > Custom Function.
3 In the Type area, click only Consolidation.
4 Click Translation, then save the function and exit.
ä To convert a logic file:
1 From the Start menu, select Programs > Hyperion Solutions > Hyperion Enterprise > ConversionUtilities > Logic Conversion from SE to 6.5.1.1.000.
The convert Hyperion Enterprise Standard Edition Logic to Hyperion Enterprise 6.5.1.1.000Logic dialog box is displayed:
Converting Logic Files 107

2 Enter the source and destination paths for the logic file in the Source File and Destination File textboxes. You can use the Browse buttons to navigate to the files.
3 Select one of the logic options:
l To convert a chart logic file, select Chart Logic.
l To convert a consolidation logic file, select Consol Logic.
Note: During conversion, most consolidation logic files are converted to translationmethods. That is because most files contain a translation statements, so theconversion utility assumes that they are translation methods.
4 To clear all custom functions that may have been created if you ran this utility previously, select theClear Custom Function File check box.
Note: The custom function file, customfn.log, contains a custom function for each DEFfunction in your logic files. Hyperion Enterprise creates this file in the same directoryas the destination file. If you have not created any DEF functions in your application,this file is still created but does not contain any custom functions.
5 Click Convert.
6 Take one of these actions:
l To convert another file, repeat steps 2 through 5.
l To exit the utility, click Exit.
Resetting Your Dynamic Account List CriteriaHyperion Enterprise Release 6.5.1.1.000 contains significant changes regarding the manner inwhich dynamic account list criteria operate. You may have to reset your dynamic account listcriteria in order to receive the same results in the converted application since this does not occurduring the conversion process. New applications that are built from scratch will also exhibit thisnew behavior.
Hyperion Enterprise Release 6.5.1.1.000 checks the account list criteria settings for each of thethree possible levels of accounts–major accounts, first level subaccounts, and second levelsubaccounts. In prior releases, if the criteria did not match at a higher level, Hyperion Enterprisedid not check for a criteria match at the lower account levels. For more information aboutaccount lists, see the Hyperion Enterprise User’s Guide.
Setting Your Point of View in Hyperion EnterpriseAfter you install Hyperion Enterprise and convert any applications, load files, logic files, reports,and books from prior releases, you should set your point of view. You cannot access the Reportsand Books modules without setting a complete point of view. For instructions on setting yourpoint of view, see the Hyperion Enterprise User’s Guide.
108 Converting Your Application to Hyperion Enterprise Release 6.5.1.1.000

7Uninstalling Hyperion
Enterprise
In This Chapter
Uninstalling Hyperion Enterprise... . . . . . . . . . . . . . . . . . . . . . . . . . . . . . . . . . . . . . . . . . . . . . . . . . . . . . . . . . . . . . . . . . . . . . 109
This chapter provides information on uninstalling Hyperion Enterprise.
Uninstalling Hyperion EnterpriseYou should uninstall Hyperion Enterprise in any of these situations:
l You receive an error message during installation.
l You want to change the location of Hyperion Enterprise program files.
l You want to remove an earlier release of Hyperion Enterprise. You must remove any earlierrelease of Hyperion Enterprise before upgrading to Release 6.5.1.1.000. Only Release 6.4.xsupports upgrade to Release 6.5.1.1.000.
Note: Before you uninstall or install Hyperion Enterprise, it is strongly recommended thatyou stop the Hyperion Enterprise Application Server, Data Server, and Web Server.If the Data Server is not stopped, an error message states that a component move dataerror has occurred.
Note: When uninstalling Oracle's Enterprise Performance Management products, pleaseuninstall Hyperion Enterprise and Enterprise Reporting first. If the EnterprisePerformance Management products are uninstalled first, you will not be able toremove Hyperion Enterprise and Enterprise Reporting.
ä To uninstall Hyperion Enterprise:
1 From Windows desktop, select Start > Settings > Control Panel > Add/Remove Programs.
2 In Add or Remove Programs, select Hyperion Enterprise, and click Change/Remove.
The Setup Type dialog box is displayed.
Uninstalling Hyperion Enterprise 109

3 Select Remove Enterprise and all its components, and Click Next.
4 In the Confirm uninstallation message box, Click OK.
Note: The Hyperion Enterprise folder is not removed after an uninstall. The HyperionEnterprise folder contains the HSvrCtrl.dat file and two log files. This folder must bemanually removed.
110 Uninstalling Hyperion Enterprise

8Upgrading Hyperion Enterprise
In This Chapter
Upgrading Methods ... . . . . . . . . . . . . . . . . . . . . . . . . . . . . . . . . . . . . . . . . . . . . . . . . . . . . . . . . . . . . . . . . . . . . . . . . . . . . . . . . . . . 111
Upgrading by Installing ... . . . . . . . . . . . . . . . . . . . . . . . . . . . . . . . . . . . . . . . . . . . . . . . . . . . . . . . . . . . . . . . . . . . . . . . . . . . . . . . 111
Upgrading by Modifying ... . . . . . . . . . . . . . . . . . . . . . . . . . . . . . . . . . . . . . . . . . . . . . . . . . . . . . . . . . . . . . . . . . . . . . . . . . . . . . . 114
Upgrading by Repairing... . . . . . . . . . . . . . . . . . . . . . . . . . . . . . . . . . . . . . . . . . . . . . . . . . . . . . . . . . . . . . . . . . . . . . . . . . . . . . . . 116
Upgrading MethodsWith this release of Hyperion Enterprise, you can upgrade 6.4.0.0.000 releases of HyperionEnterprise quickly and seamlessly. This capability enables Hyperion Solutions Corporation tooffer effective and efficient service fixes for earlier software releases.
You can modify installations by adding components that you did not choose to install earlier.
Also, you can repair installations.
Choose from the following Installation methods to upgrade Hyperion Enterprise:
1. Installing
2. Modifying
3. Repairing
Upgrading by InstallingUpgrading by Installing updates only Hyperion Enterprise Release 6.4.0.0.000 and later. Onlythe Hyperion Enterprise components that you had installed earlier are upgraded. You can runa complete install to upgrade these types of installations:
1. Workstation installation
2. Installation of Hyperion Enterprise Windows 32 bit, with any of these components:
a. Application Server
b. Data Server
c. Web Server
d. Message Server
e. Add-On Module
Upgrading Methods 111

f. Utility
g. Combination of Application Server, Data Server, Web Server, Message Server, Add-OnModule, or Utility
Note: You can upgrade to a later version only if you have Hyperion Enterprise 6.4.0.0.000 orlater installed on your system. If you have an earlier version installed on your system, youmust uninstall and install Hyperion Enterprise on your system.
ä To install Hyperion Enterprise:
1 Take one of these actions:
l If you downloaded the Hyperion Enterprise software from the Oracle E-Delivery, takeone of these steps:
m Navigate to the directory where you downloaded the installation program, thendouble-click install.exe.
m From the Windows Start menu, select Run, type the following command in theRun dialog box, and click OK:
Drive\directory\install.exe
where Drive and directory are the location of the Hyperion Enterprise installer.
The Select Install Language dialog box is displayed.
112 Upgrading Hyperion Enterprise

2 In the Select Install Language dialog box, select a language, then click OK.
Note: The default language is set to English.
A message is displayed to say that the setup program is being prepared:
When the setup program is ready, its Welcome screen is displayed:
Upgrading by Installing 113

3 Click Next.
A message is displayed to tell you that the setup program is installing Hyperion Enterprise:
Note: The Hyperion Enterprise Web Server Setup dialog opens if you have a 6.4.0.0.000 orlater release of Hyperion Enterprise Web server installed. Provide the path and userinformation and click OK. to complete the installation.
4 Provide information as requested by the installer to complete the upgrade.
Upgrading by ModifyingYou can modify installations of Hyperion Enterprise. But, before you modify, you shouldupgrade.
To upgrade, see “Upgrading by Installing” on page 111.
114 Upgrading Hyperion Enterprise

ä To modify Hyperion Enterprise installations:
1 From the Windows desktop, Select Start > Settings > Control Panel.
2 In Control Panel, select Add or Remove Programs.
3 In Add or Remove Programs, under Hyperion Enterprise, click Change/Remove.
4 Select Modify the Installation, and click Next.
The Select Components dialog box is displayed.
Upgrading by Modifying 115

5 Select components and click Next.
If you select Enterprise Application Server, Data Server, and Web Server, see “Setting UpServer Components” on page 45.
Upgrading by RepairingYou can repair installations. But, before repairing, you should upgrade.
To upgrade, see “Upgrading by Installing” on page 111.
ä To repair Hyperion Enterprise installations:
1 From the Windows desktop, Select Start > Settings > Control Panel.
2 In Control Panel, select Add or Remove Programs.
3 In Add or Remove Programs, under Hyperion Enterprise, click Change/Remove.
4 Select Repair the Installation and click Next.
5 Select a restarting option, and click Finish.
116 Upgrading Hyperion Enterprise
AManual Configuration of Web
Environment
In This Appendix
Installing and Configuring Microsoft IIS .. . . . . . . . . . . . . . . . . . . . . . . . . . . . . . . . . . . . . . . . . . . . . . . . . . . . . . . . . . . . . . . 117
Performance Tuning... . . . . . . . . . . . . . . . . . . . . . . . . . . . . . . . . . . . . . . . . . . . . . . . . . . . . . . . . . . . . . . . . . . . . . . . . . . . . . . . . . . . 120
This chapter provides information on manual Web deployment procedures.
Installing and Configuring Microsoft IISTo use Hyperion Enterprise Release 6.5.1.1.000 on the Web, you must configure the MicrosoftInternet Information Server (IIS) 6.0 or later on the Hyperion Enterprise Web Server. If you areusing a separate, dedicated computer to run the Web Server components of Hyperion Enterprise,you must configure IIS on that computer.
The Hyperion Enterprise Web Server is supported on Windows 2003 and Windows 2008 servers.After you have installed IIS on the Web Server, you can install the Web Application component.
Note: You can install IIS only on Windows 2003 or Windows 2008 Server computers. Whenyou install Windows 2003 Web Edition or Enterprise Edition, IIS is installed andconfigured automatically. If you are using Windows 2008 Standard Edition, IIS will haveto be installed separately, but the ASP.NET and IIS 6 Management Compatibility has tobe enabled.
ä To install and configure IIS for the Hyperion Enterprise Web Server:
1 Make sure that your World Wide Web Publishing Service is running. To check this, select Start > Settings> Control Panel > Services and make sure that this service has a Started status.
2 Depending on the Windows operating system that you are using, Select either of these options:
l For Windows 2003 Server, if Active Server Pages are not already installed, select Start >Control Panel > Add Or Remove Programs > Add / Remove Windows Components >Application Server > Internet Information Services (IIS) > World Wide Web Service > InstallActive Server Pages.
l For Windows 2008 Server, to check the status of Internet Information Services (IIS),perform these tasks:
a. Select Start > Administrative Tools > Server Manager > Roles.
Installing and Configuring Microsoft IIS 117

b. Right-click on Roles and select Add Roles.
c. Select Web Server (IIS) and click Next.
d. Introduction of Web Server page is displayed and click Next to continue.
e. Select ASP.NET, and IIS 6 Management Compatibility options in the role servicespanel to install Web server (IIS) and click Next.
f. Confirm installation selection for Web server (IIS) and click Install and close thewindow.
Verifying the IIS Installation
ä To verify the IIS installation :
1 Depending on the Windows Operation system that you are using, select either of these options:
l From the Windows 2008 Server Start menu, select Start > Administrative Tools > ServerManager > Configuration.
l From the Windows 2003 Start menu, select Programs > Administrative Tools.
2 Double-click the Services icon.
The Services dialog box is displayed.
3 From the Services list, select IIS Admin Service.
4 Take one of these actions:
l If the status is started, click Stop. Click OK in the dialog box to stop the listed services.When the IIS Admin Service is stopped, click Start.
l If the status is not started, click Start.
Note: Stopping the IIS Admin Service automatically stops the FTP Publishing Service,Microsoft SMTP Service, and the World Wide Web Publishing Services.
5 Repeat Steps 3 through 4 for World Wide Web Publishing Service.
6 Click Close to close the Services dialog box.
7 Close the Control Panel.
Prerequisites for configuring IISComplete the following prerequisites to configure IIS:
l User and password information for anonymous user must be specified.
For more information on specifying directories and user values, see “Setting Up ServerComponents” on page 45.
l The anonymous user must be a part of the local administrator’s group.
l Metadata must be already loaded into the application
118 Manual Configuration of Web Environment

Checking IIS ConfigurationFor configuring Hyperion Enterprise Web Server to access Hyperion Enterprise andHyperionEnterprise Reporting, see “Configuring the Hyperion Enterprise Web Application” on page 72.
ä To check IIS configuration on Windows 2003 Server, do the following:
1 From the Windows desktop, select Start > Run, in the Open text box type inetmgr.
The Internet Information Services (IIS) Manager dialog box is displayed.
2 In the left pane in the Internet Information Services dialog box, traverse to HEWeb virtual directory orthe virtual directory specified during the installation of Hyperion Enterprise.
3 Right-click virtual directory and from drop-down menu select Properties.
The <virtual directory name> Properties dialog box is displayed.
4 On the Virtual Directory tab:
a. Select the Read check box.
b. In the Application Settings group box enter the name of the virtual directory you havespecified in the Application Name field.
c. In the Execute Permissions drop-drown list, select Scripts Only.
Note: Do not set the Execute Permissions drop-down list value to None.
d. In the Application Protection drop-down list, select Low (IIS Process).
5 On the Directory Security tab:
a. In the Authentication and access control group box, select Edit.
The Authentication Methods dialog box is displayed.
b. In the Authentication Methods dialog box, select the Enable anonymous access checkbox.
The User name and Password text boxes in the Enable Anonymous Access group boxare now editable.
c. In the Enable Anonymous Access group box, enter username or click Browse.
The Select User dialog box is displayed.
d. In the Select User dialog box, select username from the Select User dialog box, then typepassword.
e. Click OK to save values in Authentication Methods dialog box.
6 Click Apply, then click OK in the <virtual directory name> Properties dialog box.
ä To check IIS configuration on Windows 2008 Server, complete the following tasks:
1 From the Windows desktop, select Start > Run, in the Open text box type inetmgr.
The Internet Information Services (IIS) Manager dialog box is displayed.
Installing and Configuring Microsoft IIS 119

2 In the left pane in the Internet Information Services dialog box, traverse to HEWeb virtual directory orthe virtual directory specified during the installation of Hyperion Enterprise.
3 In the right pane of the virtual directory, under IIS section, double-click on the Handler Mappings icon.
The Handler Mappings dialog box is displayed.
4 Under the action pane, select Edit Feature Permissions link.
5 Select the Read, Script and Execute check boxes and click OK.
6 In the right pane of the virtual directory, under IIS section, double-click on the Authentication icon.
The Authentication dialog box is displayed.
7 In the Authentication dialog box, select the Anonymous Authentication.
8 To enable the Anonymous Authentication, complete this task:
Under the action pane, select Enable option for the Anonymous Authentication.
9 To edit the Anonymous Authentication details, perform these tasks:
a. Under the action pane, select Edit.
The Edit Anonymous Authentication Credentials dialog box is displayed.
b. Select Specific user option and click Set.
The User name and Password text boxes in the Set Credentials box are now editable.
c. In the Set Credentials box, enter username and password.
d. Click OK to save values in Authentication dialog box.
e. Click OK to close the Edit Anonymous Authentication Credentials dialog box.
Performance TuningIt is recommended that you adjust the performance tuning for the server in Windows. Thisadjustment reduces the internal system priority of foreground applications.
ä To adjust performance:
1 From the Windows Start menu, select Settings > Control Panel.
2 From the Control Panel, double-click the System icon.
3 From the System Properties dialog box, select the Performance tab.
4 Drag the Application Performance slider bar to None.
Consider following server updates for improved performance:
l RAID controller should be set to 50/50 read/write.
l Hyperthreading should be turned off.
l If Terminal Services\Citrix is being used with a backend file server, NICs on all the serversshould be set to Full Duplex.
120 Manual Configuration of Web Environment

l Anti-virus software real-time scan should exclude application and program folders.Alternatively disable real-time scanning and run full system scans at scheduled down-times.
Performance Tuning 121

122 Manual Configuration of Web Environment

BHyperion Enterprise
Documentation
In This Appendix
Browser-Based Help for Hyperion Enterprise Windows 32–bit client and Web ... . . . . . . . . . . . . . . . . . 123
Viewing and Printing PDF Files.. . . . . . . . . . . . . . . . . . . . . . . . . . . . . . . . . . . . . . . . . . . . . . . . . . . . . . . . . . . . . . . . . . . . . . . . . 124
Hyperion Enterprise documentation includes online browser-based help for HyperionEnterprise Windows 32–bit client and Web, and portable document format (PDF) files. Thisappendix provides information about the documentation and its use.
Browser-Based Help for Hyperion Enterprise Windows32–bit client and WebBrowser-Based Help for Hyperion Enterprise Windows 32–bit client and Web give youimmediate answers to many common questions. If you want information about a specific dialogbox or Web page, make sure the dialog box or Web page is open and active.
Accessing Browser-Based Help for Hyperion EnterpriseWindows 32–bit clientEach Hyperion Enterprise product is installed with browser-based help.
The browser-based help contains the following types of information:
l Procedural information that you need to complete tasks in Hyperion Enterprise
l Window and dialog box explanations
ä To access the online help, use any of these methods:
l Select Help > Contents while using the product.
l Press F1 while in the product.
l Click the Help button in a dialog box.
Browser-Based Help for Hyperion Enterprise Windows 32–bit client and Web 123

Accessing Browser-Based Help
ä To access the browser-based help, click the Help button at the top of the Web page.
ä To print a browser-based help topic, display the topic, then right click in the topic and clickPrint.
Viewing and Printing PDF FilesPDF files are electronic versions of Hyperion Enterprise documentation. They containconceptual and procedural information, as well as examples, to assist you in using HyperionEnterprise.
You use Adobe Acrobat Reader to view and print PDF documents. The PDF documents in thisinstallation are compatible only with Adobe Acrobat Reader 7.0 and later. If you have an earlierrelease of Acrobat Reader on your computer, you must install later releases from the Adobe Website at http://www.adobe.com.
ä To view and print a PDF file:
1 Open the file by one of these methods:
l From the Windows, start Acrobat Reader icon, then open a PDF file from your HyperionSolutions directory.
l To access the PDF files for Hyperion Enterprise Getting Started Guide, Hyperion EnterpriseAdministrator’s Guide, Hyperion Enterprise User’s Guide, Hyperion Enterprise APIReference Guide, and Statutory Consolidation Engine User’s Guide, see Oracle'sTechnology Network (OTN).
2 To print the document, select File > Print, specify which pages you want to print and the number ofcopies, then click OK.
PDF Files for Hyperion EnterpriseThe setup program installs the Hyperion Enterprise PDF files shown in Table 17.
Table 17 PDF Files for Hyperion Enterprise
File Name Document
Ace.pdf Hyperion Enterprise Statutory Consolidation Engine Guide
Admin.pdf Hyperion Enterprise Administrator’s Guide
Api.pdf Hyperion Enterprise API Reference Guide
GetStart.pdf Hyperion Enterprise Getting Started Guide
User.pdf Hyperion Enterprise User’s Guide
124 Hyperion Enterprise Documentation

CProgram Files Inventory
In This Appendix
Windows System Files .. . . . . . . . . . . . . . . . . . . . . . . . . . . . . . . . . . . . . . . . . . . . . . . . . . . . . . . . . . . . . . . . . . . . . . . . . . . . . . . . . . 125
Windows Registry Files .. . . . . . . . . . . . . . . . . . . . . . . . . . . . . . . . . . . . . . . . . . . . . . . . . . . . . . . . . . . . . . . . . . . . . . . . . . . . . . . . . 126
Windows Crystal Files.. . . . . . . . . . . . . . . . . . . . . . . . . . . . . . . . . . . . . . . . . . . . . . . . . . . . . . . . . . . . . . . . . . . . . . . . . . . . . . . . . . . 127
Windows Crescent Files .. . . . . . . . . . . . . . . . . . . . . . . . . . . . . . . . . . . . . . . . . . . . . . . . . . . . . . . . . . . . . . . . . . . . . . . . . . . . . . . . 128
This appendix shows the program files installed in your Windows system directories duringinstallation. The files you receive are dependent on your operating system.
Windows System FilesFilename Date Time Size Version
Vbscript.dll 09/13/1999 07:59:34 426,256 5.0.0.3715
Cmpsfx32.dll 10/12/2000 11:12:48 75,264 4.0.0.26
Co2c40en.dll 11/18/1996 00:00:00 748,160 4.6.3.106
Comppl32.dll 10/12/2000 11:12:48 239,616 4.1.0.9
Crpe32.dll 06/21/1999 05:00:00 5,797,888 7.0.100.15
Implode.dll 11/18/1996 00:00:00 18,944 1.0.0.1
Mfcans32.dll 10/12/2000 11:12:50 133,904 3.2.2.0
Mfcuia32.dll 07/11/1995 09:50:00 5,632 3.0.0.0
msvcirt.dll 06/17/1998 12:00:00 77,878 6.0.8168.0
Msvcrt.dll 02/02/1999 12:00:00 266,293 6.0.8397.0
msvcrt20.dll 10/12/2000 11:12:50 253,952 2.11.0.0
msvcrt40.dll 02/08/1999 12:00:00 326,656 4.22.0.0
P2bbnd.dll 11/18/1996 00:00:00 36,352 4.6.3.106
P2bdao.dll 11/20/1996 00:00:00 87,040 4.6.3.112
P2ctdao.dll 11/18/1996 00:00:00 50,176 4.6.3.106
P2irdao.dll 11/18/1996 00:00:00 54,272 4.6.3.106
Windows System Files 125
P2sodbc.dll 11/18/1996 00:00:00 131,072 4.6.3.106
Pg32.dll 11/18/1996 00:00:00 979,456 1.0.0.11
qpro32.dll 10/12/2000 11:12:52 118,272 4.20.0.0
vbamap32.dll 10/12/2000 11:12:52 14,848 2.1.0.0
Vb5stkit.dll 01/16/1997 00:00:00 29,696 5.0.37.16
vbajet32.dll 01/22/1999 12:00:00 30,992 6.0.1.8268
Asycfilt.dll 10/12/2000 11:12:48 147,728 2.40.4275.1
Book.abx 10/12/2000 11:12:48 1,558
Mapsm32x.dll 10/12/2000 11:12:50 921,600 2.0.0.5
Mavim32x.dll 10/12/2000 11:12:50 505,344 2.0.0.5
Cp5dll32.dll 10/12/2000 11:12:48 216,064 5.0.0.112
Roboex32.dll 10/27/1998 11:08:04 317,952 7.0.142.0
Msvcp60.dll 06/17/1998 12:00:00 401,462 6.0.8168.0
Apigid32.dll 10/12/2000 11:12:48 113,664 4.0.0.0
Compobj.dll 10/12/2000 11:12:48 30,400 2.10.35.35
Dzip32.dll 10/12/2000 11:12:48 124,416 3.0.0.15
Gapi32.dll 10/12/2000 11:12:48 98,304 5.5.1960.0
Idsnotes.dll 10/12/2000 11:12:50 45,056 1.0.0.1
Ole2.dll 10/12/2000 11:12:50 39,744 2.10.35.35
Ole2disp.dll 10/12/2000 11:12:50 169,520 2.10.3029.1
Ole2nls.dll 10/12/2000 11:12:52 153008 2.10.3029.1
Stdole2.tlb 10/12/2000 11:12:52 17,920 2.40.4275.1
Storage.dll 10/12/2000 11:12:52 4,208 2.10.35.35
Typelib.dll 10/12/2000 11:12:52 177,856 2.10.3029.1
Windows Registry FilesFilename Date Time Size Version
Wrapmail.ocx 10/12/2000 11:12:58 398,848 1.1.0.36
Comcat.dll 10/12/2000 11:12:52 22,288 4.71.1441.1
Comct232.ocx 07/19/1997 16:00:18 155,920 5.1.43.19
Comctl32.ocx 07/19/1997 16:00:28 604,432 5.1.43.19
Comdlg32.ocx 05/07/1999 12:00:00 140,288 6.0.84.18
Dao2535.tlb 12/05/1996 00:00:00 73,184
126 Program Files Inventory

Spr32x30.ocx 09/21/1999 02:32:10 992,968 3.0.0.16
Mfc40.dll 04/29/1999 12:04:00 924,432 4.1.0.6140
Mfc42.dll 04/27/1999 12:00:00 995,383 6.0.8447.0
Mscomm32.ocx 06/24/1998 12:00:00 103,744 6.0.81.69
Msvbvm50.dll 07/19/1997 15:55:40 1,347,344 5.1.43.19
Oleaut32.dll 10/12/2000 11:12:56 598,288 2.40.4275.11
Olepro32.dll 10/12/2000 11:12:56 164,112 5.0.4275.1
Ss32x25.ocx 10/12/2000 11:12:56 703,984 2.5.0.20
Stdole2.tlb 03/08/1999 12:02:26 17,920 2.40.4275.1
Tdbg6.ocx 10/12/2000 11:12:58 819,688 6.0.0.235
Threed32.ocx 10/12/2000 11:12:58 200,704 1.0.41.0
Vsocx32.ocx 10/12/2000 11:12:58 151,552 5.0.5.50
Atl.dll 03/25/1999 07:42:10 73,785 3.0.8449.0
Cp5ocx32.ocx 10/12/2000 11:12:52 93,696 5.0.0.105
Tabctl32.ocx 05/07/1999 12:00:00 209,408 6.0.84.18
Mscomct2.ocx 05/07/1999 12:00:00 645,616 6.0.84.18
Mscomctl.ocx 05/13/1999 12:00:00 1,064,456 6.0.84.98
Msvbvm60.dll 05/10/1999 12:00:00 1,384,448 6.0.84.95
Dssock32.ocx 10/12/2000 11:12:54 48,640 1.65.0.1
Filename Date Time Size Version
Dzocx32.ocx 10/12/2000 11:12:54 73,216 1.0.0.5
Oc30.dll 10/12/2000 11:12:56 640,512 3.20.0.0
Olemsg32.dll 10/12/2000 11:12:56 285,968 5.0.1460.8
Idsmai32.exe 10/12/2000 11:12:54 1,161,728 6.3.0.0
Windows Crystal FilesFilename Date Time Size Version
U2fxls.dll 11/18/1996 00:00:00 69,632 4.6.3.106
U2ddisk.dll 11/18/1996 00:00:00 45,056 4.6.3.106
U2dmapi.dll 11/18/1996 00:00:00 124,256 4.6.3.106
U2fcr.dll 11/18/1996 00:00:00 97,489 4.6.3.106
U2fdif.dll 11/18/1996 00:00:00 49,152 4.6.3.106
U2fhtml.dll 11/18/1996 00:00:00 109,568 4.6.3.106
Windows Crystal Files 127

U2frec.dll 11/18/1996 00:00:00 49,152 4.6.3.106
U2frtf.dll 11/18/1996 00:00:00 153,761 4.6.3.106
U2fsepv.dll 11/18/1996 00:00:00 53,248 4.6.3.106
U2ftext.dll 11/18/1996 00:00:00 53,248 4.6.3.106
U2fwks.dll 11/18/1996 00:00:00 53,248 4.6.3.106
U2fwordw.dll 11/18/1996 00:00:00 69,632 4.6.3.106
Crxlat32.dll 11/18/1996 00:00:00 39,936 4.6.3.106
Windows Crescent FilesFilename Date Time Size Version
csvlst32.ocx 07/08/1999 16:44:54 91,648 4.40.0.0
cschk32.ocx 07/08/1999 16:44:22 100,864 4.40.0.0
cscmd32.ocx 07/08/1999 16:47:04 100,864 4.41.0.0
cscomb32.ocx 07/08/1999 16:44:22 111,104 4.40.0.0
csform32.ocx 07/08/1999 16:44:22 91,136 4.40.0.0
cslist32.ocx 07/08/1999 16:44:38 83,456 4.40.0.0
csmete32.ocx 07/08/1999 16:44:38 68,608 4.40.0.0
csopt32.ocx 07/08/1999 16:44:38 96,768 4.40.0.0
cspict32.ocx 07/08/1999 16:44:54 81,408 4.40.0.0
csplst32.ocx 07/08/1999 16:44:54 100,864 4.40.0.0
csspin32.ocx 07/08/1999 16:44:54 79,360 4.40.0.0
cstext32.ocx 05/28/1999 10:43:40 399,360 4.42.0.0
Crystl32.ocx 06/21/1999 05:00:00 993,996 6.3.0.609
128 Program Files Inventory

DProduct Inventory
In This Appendix
Hyperion Enterprise ... . . . . . . . . . . . . . . . . . . . . . . . . . . . . . . . . . . . . . . . . . . . . . . . . . . . . . . . . . . . . . . . . . . . . . . . . . . . . . . . . . . . 129
Hyperion Enterprise API Reference Guide ... . . . . . . . . . . . . . . . . . . . . . . . . . . . . . . . . . . . . . . . . . . . . . . . . . . . . . . . . . . 129
Hyperion Allocations ... . . . . . . . . . . . . . . . . . . . . . . . . . . . . . . . . . . . . . . . . . . . . . . . . . . . . . . . . . . . . . . . . . . . . . . . . . . . . . . . . . . 129
Hyperion LedgerLink ... . . . . . . . . . . . . . . . . . . . . . . . . . . . . . . . . . . . . . . . . . . . . . . . . . . . . . . . . . . . . . . . . . . . . . . . . . . . . . . . . . . 130
Statutory Consolidation Engine (SCE) ... . . . . . . . . . . . . . . . . . . . . . . . . . . . . . . . . . . . . . . . . . . . . . . . . . . . . . . . . . . . . . . 130
Hyperion Retrieve ... . . . . . . . . . . . . . . . . . . . . . . . . . . . . . . . . . . . . . . . . . . . . . . . . . . . . . . . . . . . . . . . . . . . . . . . . . . . . . . . . . . . . . 130
Hyperion AutoPilot .. . . . . . . . . . . . . . . . . . . . . . . . . . . . . . . . . . . . . . . . . . . . . . . . . . . . . . . . . . . . . . . . . . . . . . . . . . . . . . . . . . . . . . 130
Application Conversion SE to 6.5.1.1.000 Conversion Wizard ... . . . . . . . . . . . . . . . . . . . . . . . . . . . . . . . . . . . 130
Application Conversion 4.7 Through 6.3.0.0.000 to 6.5.1.1.000 ... . . . . . . . . . . . . . . . . . . . . . . . . . . . . . . . 130
Load File Conversion Utility . . . . . . . . . . . . . . . . . . . . . . . . . . . . . . . . . . . . . . . . . . . . . . . . . . . . . . . . . . . . . . . . . . . . . . . . . . . . . 131
Logic File Conversion Utility . . . . . . . . . . . . . . . . . . . . . . . . . . . . . . . . . . . . . . . . . . . . . . . . . . . . . . . . . . . . . . . . . . . . . . . . . . . . . 131
Hyperion Home Migration Utility . . . . . . . . . . . . . . . . . . . . . . . . . . . . . . . . . . . . . . . . . . . . . . . . . . . . . . . . . . . . . . . . . . . . . . . . 131
This appendix describes the products that are shipped with this release.
Hyperion EnterpriseHyperion Enterprise is an advanced financial management reporting and consolidation system.Hyperion Enterprise consolidates data from multiple sources and diverse general ledgers withinan enterprise to provide a consistent, global view of information.
Hyperion Enterprise API Reference GuideThe Hyperion Enterprise API Reference Guide provides a set of functions that allow high-levelaccess to the Hyperion Enterprise application program interface (API) from any program.
Hyperion AllocationsHyperion Allocations provides a set of allocation methods to manipulate data directly withinyour Hyperion Enterprise application. It handles allocations across entities, periods, and
Hyperion Enterprise 129

accounts and enables the designer to define allocation rules and methods using a graphicalallocation builder.
Hyperion LedgerLinkHyperion LedgerLink automates the process of translating and importing data into HyperionEnterprise. It integrates third-party general ledger and additional feeder system data by usingtemplates applicable to specific vendor applications.
Statutory Consolidation Engine (SCE)SCE is an add-on product that works with Hyperion Enterprise to improve consolidationperformance and functionality for statutory applications.
Hyperion RetrieveHyperion Retrieve is an add-in to Microsoft Excel and is used to move data between the HyperionEnterprise product applications and Excel worksheets. For example, when working in an Excelworksheet, you can retrieve data from a Hyperion Enterprise application to include in theworksheet.
Hyperion AutoPilotHyperion AutoPilot is a graphical tool for automating Hyperion Solutions’ product tasks, suchas loading data files, consolidating, and running a book or reports, by grouping them into asingle task flow.
Application Conversion SE to 6.5.1.1.000 ConversionWizardThis wizard converts applications built in Hyperion Enterprise SE to Release 6.5.1.1.000.
Application Conversion 4.7 Through 6.3.0.0.000 to6.5.1.1.000There is no longer a conversion wizard for Release 4.6 through Release 5.x. You must eitherrebuild the Release 4.6 application in Release 6.5.1.1.000 or convert the Release 4.6 applicationto Release 4.7 using the Release 4.7 conversion utility and then use the Release 4.7 through Release6.5.1.1.000 conversion utility that is available in Release 6.5.1.1.000.
130 Product Inventory

Load File Conversion UtilityThe Load File Conversion Utility converts load files from Hyperion Enterprise SE Release 1.8.xor Hyperion Enterprise SE Release 4.x to Release 6.3.0.0.000
Logic File Conversion UtilityThe Logic File Conversion Utility converts logic files from Hyperion Enterprise SE Release 1.8.xor Oracle's Hyperion® Enterprise® SE Release 4.x to Release 6.5.1.1.000.
Hyperion Home Migration UtilityWith Hyperion Home Migration Utility you can move the location of the common directoryHyperion Home.
Load File Conversion Utility 131

132 Product Inventory

EPorts
In This Appendix
About Default Ports .. . . . . . . . . . . . . . . . . . . . . . . . . . . . . . . . . . . . . . . . . . . . . . . . . . . . . . . . . . . . . . . . . . . . . . . . . . . . . . . . . . . . . 133
Shared Services Ports .. . . . . . . . . . . . . . . . . . . . . . . . . . . . . . . . . . . . . . . . . . . . . . . . . . . . . . . . . . . . . . . . . . . . . . . . . . . . . . . . . . 133
Essbase – System 9 Ports.. . . . . . . . . . . . . . . . . . . . . . . . . . . . . . . . . . . . . . . . . . . . . . . . . . . . . . . . . . . . . . . . . . . . . . . . . . . . . . 134
Reporting and Analysis Ports .. . . . . . . . . . . . . . . . . . . . . . . . . . . . . . . . . . . . . . . . . . . . . . . . . . . . . . . . . . . . . . . . . . . . . . . . . . 137
Financial Performance Management Applications Ports .. . . . . . . . . . . . . . . . . . . . . . . . . . . . . . . . . . . . . . . . . . . . 141
Data Management Ports .. . . . . . . . . . . . . . . . . . . . . . . . . . . . . . . . . . . . . . . . . . . . . . . . . . . . . . . . . . . . . . . . . . . . . . . . . . . . . . . 146
About Default PortsDuring Oracle Hyperion Enterprise Performance Management System product deployments,default port numbers for application servers are automatically populated. During configuration,you can change the default numbers. Each port number must be unique. If an error messagesimilar to “port already in use” or “bind error” is displayed, a port number conflict might exist.
If the default port number is not changed, the software is configured with the default values.
Shared Services Ports
Table 18 Shared Services Web Application Ports
Port Type Default Port Number Where Configurable
Listen port 58080 Oracle's Hyperion Enterprise Performance Management System Configurator
SSL listen port NA Application server administration console (configure manually)
Shutdown Port for Apache Tomcat 58081 Application server administration console (configure manually)
AJP connector port 58082 Application server administration console (configure manually)
Table 19 Shared Services Default Service Ports
Service Default PortNumber
Where Configurable
Oracle's Hyperion®Remote
58000 Oracle's Hyperion® Remote Authentication Module installation program
About Default Ports 133

Service Default PortNumber
Where Configurable
AuthenticationModule
Additionaldynamic port (1)
Not configurable
OpenLDAP 58089l UNIX: <HSS_HOME>/openLDAP/startOpenLDAP.sh
l Windows: Run slapd -d 1 -f slapd.conf -h ldap://hostname:portnumber
l UNIX and Windows: CSS.xml:
<hub location=http://localhost:HSS Port>
<dirPort>openLDAP Port</dirPort>
</hub>
Essbase – System 9 Portsl “Essbase Ports” on page 134.
l “Administration Services Ports” on page 135.
l “Provider Services Ports” on page 136.
l “Smart Search Command Line Utility Ports” on page 137.
Essbase PortsTable 20 Essbase Default Service Ports
Service Default PortNumber
Where Configurable
Oracle EssbaseAgent
1423l EPM System Configurator
l Essbase configuration file (ARBORPATH\bin\Essbase.cfg)
Modify the file to include AgentPort.
For instructions, see the Essbase Technical Reference, “Essbase.cfg Configuration Settings.”
Essbase serverapplications(ESSSVR)
32768–33768 (twoports perprocess)
Oracle Essbase configuration file (ARBORPATH\bin\Essbase.cfg)
To limit the range and set the increment for these ports, modify the file to include these settings:ServerPortBegin, ServerPortEnd, PortInc
For instructions, see the Essbase Technical Reference, “Essbase.cfg Configuration Settings.”
Oracle EssbaseIntegrationServices Server
3388 <AIS_HOME>/bin/ais.cfg
Add -Pportnumber
134 Ports

Administration Services PortsTable 21 Administration Services Web Application Ports
Port Type Default PortNumber
Where Configurable
Listen port 10080l EPM System Configurator
l Default Tomcat deployment: <aas_home>/deployments/tomcat/5.0.2.8/conf/server.xml
Parameter: Connector port
l Deployed Tomcat deployment (via EPM System Configurator): <Hyperion_Home>/deployments/<AppServNameAndVersion>/aas/conf/server.xml
Parameter: Connector port
l WebLogic and WebSphere: Application server administration console
SSL listenport
10090l Default Tomcat deployment: <aas_home>/deployments/tomcat/5.0.28/conf/
server.xml
Parameter: Connector port
l Deployed Tomcat deployment (via EPM System Configurator): <Hyperion_Home>/deployments/<AppServNameAndVersion>/aas/conf/server.xml
Parameter: Connector port
l WebLogic and WebSphere: Application server administration console
Shutdownport forApacheTomcat
10081
For defaultTomcatdeployment only:10005
l Deployed Tomcat deployment (via EPM System Configurator): <Hyperion_Home>/deployments/<AppServNameAndVersion>/aas/conf/server.xml
Parameter: Connector port
l Default Tomcat deployment: <aas_home>/deployments/tomcat/5.0.28/conf/server.xml
Parameter: Connector port
l WebLogic and WebSphere: Application server administration console
AJPconnectorport
10082
For defaultTomcatdeployment only:NA
l Deployed Tomcat deployment (via EPM System Configurator): <Hyperion_Home>/deployments/<AppServNameAndVersion>/aas/conf/server.xml
Parameter: Connector port
l Default Tomcat deployment: NA
l WebLogic and WebSphere: Application server administration console
Essbase – System 9 Ports 135

Provider Services PortsTable 22 Provider Services Web Application Ports
Port Type Default PortNumber
Where Configurable
Listen port 13080l EPM System Configurator
l Default Tomcat deployment: <aps_home>/deployments/tomcat/5.0.28/conf/server.xml
Parameter: Connector port
l Deployed Tomcat deployment (via EPM System Configurator): <Hyperion_Home>/deployments/<AppServNameAndVersion>/aps/conf/server.xml
Parameter: Connector port
l WebLogic and WebSphere: Application server administration console
SSL listenport
13090l Default Tomcat deployment: <aps_home>/deployments/tomcat/5.0.28/conf/
server.xml
Parameter: Connector port
l Deployed Tomcat deployment (via EPM System Configurator): <Hyperion_Home>/deployments/<AppServNameAndVersion>/aps/conf/server.xml
Parameter: Connector port
l WebLogic and WebSphere: Application server administration console
Shutdownport forApacheTomcat
13081
For defaultTomcatdeployment only:13005
l Deployed Tomcat deployment (via EPM System Configurator): <Hyperion_Home>/deployments/<AppServNameAndVersion>/aps/conf/server.xml
Parameter: Connector port
l Default Tomcat deployment: <aps_home>/deployments/tomcat/5.0.28/conf/server.xml
Parameter: Connector port
l WebLogic and WebSphere: Application server administration console
AJPconnectorport
13082
For defaultTomcatdeployment only:NA
l Deployed Tomcat deployment (via EPM System Configurator): <Hyperion_Home>/deployments/<AppServNameAndVersion>/aps/conf/server.xml
Parameter: Connector port
l Default Tomcat deployment: NA
l WebLogic and WebSphere: Application server administration console
136 Ports

Smart Search Command Line Utility PortsTable 23 Smart Search Command Line Utility Web Application Ports
Port Type Default PortNumber
Where Configurable
Listen port 16080 Default Tomcat deployment: <Hyperion_Home>/deployments/tomcat5/conf/server.xml
Parameter: Connector port
SSL listen port NA NA
Shutdown port forApache Tomcat
16081 Default Tomcat deployment: <Hyperion_Home>/deployments/tomcat5/conf/server.xml
Parameter: Server port
AJP connector port NA NA
Reporting and Analysis Portsl “Foundation Ports” on page 137.
l “Financial Reporting Ports” on page 138.
l “Interactive Reporting Ports” on page 139.
l “Web Analysis Ports” on page 139.
l “EPM Workspace Ports” on page 140.
l “Application Builder for J2EE Ports” on page 141.
l “Application Builder for .NET Ports” on page 141.
Foundation PortsTable 24 Reporting and Analysis Default Service Ports
Service Default PortNumber
Where Configurable
Foundation 6790 — 6810 See below for detail on each port.
Global Services Manager(GSM)
6800l EPM System Configurator
l <BIPLUS_HOME>/common/config/server.xml
<host>machine.domain</host>
<port>portNumber</port>
Core Service 6801
Reporting and Analysis Ports 137

Service Default PortNumber
Where Configurable
Name Service 6798l EPM System Configurator
l Remote Service Configurator. See the Hyperion Workspace Administrator's Guide.
l <BIPLUS_HOME>/common/config/config.dat
Parameter: Port
See the Hyperion Workspace Administrator's Guide.
l Service Broker
l Job Service
l Event Service
l Repository Service
l 6797
l 6796
l 6794
l 6795
Remote Service Configurator
See the Hyperion Workspace Administrator's Guide.
Table 25 Reporting and Analysis Web Server Port
Server Default Server Port Where Configurable
Apache and IBM 19000 <APACHE_HOME>/conf/httpd.conf
IIS and Oracle HTTP Server 80 Microsoft Internet Information Services (IIS) Manager Console. (Change the TCP portvalue setting.)
Financial Reporting Ports
Table 26 Financial Reporting Web Application Ports
Port Type DefaultPortNumber
Where Configurable
Listen port 8200 EPM System Configurator
SSL listenport
NA Application server administration console (configure manually)
Shutdownport forApacheTomcat
8201 Application server administration console (configure manually).
Note: The port number depends on the listen port (listen port + 1).
AJPconnectorport
8202 <HYPERION_HOME>/common/httpserver/Apache/2.0.52/conf/HYSLWorkers.properties
worker.Financial_Reporting.host=hostname.company.com
worker.Financial_Reporting.port=portNumber
worker.Financial_Reporting.type=ajp13
Note: The port number depends on the listen port (listen port + 2).
138 Ports

Table 27 Financial Reporting Default Service Ports
Service Default Port Number Where Configurable
Oracle Hyperion Financial Reporting, FusionEdition Report Service
Dynamic (2) <BIPLUS_HOME>/lib/fr_repserver.properties
Parameters: HRRepSvrPort1, HRRepSvrPort2
Financial Reporting Scheduler Service Dynamic <BIPLUS_HOME>/lib/fr_scheduler.properties
Parameter: HRSchdSvrPort
Financial Reporting Print Service Dynamic <BIPLUS_HOME>/lib/fr_printserver.properties
Parameter: HRPrintSvrPort
Oracle Hyperion Financial Reporting, FusionEdition Communication Service
8299 <BIPLUS_HOME>/lib/fr_global.properties
Parameter: RMIPort
Additional dynamicport (1)
Not configurable
Interactive Reporting PortsTable 28 Interactive Reporting Default Service Ports
Service Default Port Number Where Configurable
Data Access Service (DAS) 6811, 6812 <BIPLUS_HOME>/common/config/irmconfig.xml
Default Ports = portNumber,portNumber
Oracle's Hyperion® Interactive Reporting Service 6813, 6814 <BIPLUS_HOME>/common/config/irmconfig.xml
Default Ports = portNumber,portNumber
Job Service 6815 <BIPLUS_HOME>/common/config/irmconfig.xml
Default Ports = portNumber
Log Service 6810 <BIPLUS_HOME>/common/config/irmconfig.xml
Default Ports = portNumber
Web Analysis PortsTable 29 Web Analysis Web Application Ports
Port Type DefaultPortNumber
Where Configurable
Listen port 16000 EPM System Configurator
Additionallisten ports(2)
Dynamic Not configurable
Reporting and Analysis Ports 139

Port Type DefaultPortNumber
Where Configurable
SSL listenport
NA Application server administration console (configure manually)
Shutdownport forApacheTomcat
16001 Application server administration console (configure manually).
Note: The port number depends on the listen port (listen port + 1).
AJPconnectorport
16002 <HYPERION_HOME>/common/httpserver/Apache/2.0.52/conf/HYSLWorkers.properties
worker.Web_Analysis.host=hostname.company.com
worker.Web_Analysis.port=portNumber
worker.Web_Analysis.type=ajp13
Note: The port number depends on the listen port (listen port + 2).
EPM Workspace PortsTable 30 EPM Workspace Web Application Ports
Port Type DefaultPortNumber
Where Configurable
Listen port 45000 EPM System Configurator
Additionallisten port (1)
Dynamic Not configurable
SSL listenport
NA Application server administration console (configure manually)
Shutdownport forApacheTomcat
45001 <BIPLUS_HOME>/AppServer/InstalledApps/Tomcat/5.0.28/Workspace/conf/server.xml
<Server port=portNumber shutdown=SHUTDOWN>
Note: The port number depends on the listen port (listen port + 1).
AJPconnectorport
45002 <HYPERION_HOME>/common/httpserver/Apache/2.0.59/conf/HYSLWorkers.properties
worker.Workspace.host=hostname.company.com
worker.Workspace.port=portNumber
worker.Workspace.type=ajp13
Note: The port number depends on the listen port (listen port + 2).
140 Ports

Application Builder for J2EE PortsTable 31 Application Builder for J2EE Web Application Ports
Port Type Default PortNumber
Where Configurable
Listen port 22080 Application server administration console (configure manually)
SSL listen port 22090 Application server administration console (configure manually)
Shutdown port forApache Tomcat
22005 <HAB_INSTALL_DIR>/AppServer/InstalledApps/Tomcat/5.0.28/ApplicationBuilder/conf/server.xml
<Server port=”portNumber” shutdown=”SHUTDOWN”>
AJP connector port NA NA
Application Builder for .NET PortsTable 32 Application Builder for .NET Web Application Ports
Port Type Default Port Number Where Configurable
Listen port 22080 EPM System Configurator
SSL listen port 22082 Application server administration console (configure manually)
Shutdown port for Apache Tomcat 22081 Application server administration console (configure manually)
AJP connector port NA NA
Financial Performance Management ApplicationsPortsl “Financial Management Ports” on page 142.
l “Performance Scorecard Ports” on page 142.
l “Planning Ports” on page 143.
l “Strategic Finance Ports” on page 143.
l “Performance Management Architect Ports” on page 144.
Financial Performance Management Applications Ports 141

Financial Management Ports
Table 33 Financial Management Default Service Port
Service Default PortNumber
Where Configurable
Oracle HyperionFinancialManagement,Fusion EditionApplication Server
135 plusephemeralhigh-rangeports (1024–65536)
Windows settings—Fix DCOM ephemeral ports.
See the Microsoft support article describing how to set the ports used by DCOM: http://support.microsoft.com. Search for “restrict DCOM port.”
Table 34 Financial Management Web Server Port
Web Server Port Where Configurable
80 (HTTP) or 443 (when SSL is enabled) In Microsoft Internet Information Services (IIS) Manager Console, change the TCP port valuesetting.
Performance Scorecard Ports
Table 35 Performance Scorecard Web Application Ports
Port Type Default Port Number Where Configurable
Listen port 18080l EPM System Configurator
l Application server administration console (configure manually)
SSL listen port NA Application server administration console (configure manually)
Shutdown port for Apache Tomcat 18081l EPM System Configurator
l Application server administration console (configure manually)
Note: The port number depends on the listen port (listen port + 1).
AJP connector port 18082 EPM System Configurator
Note: The port number depends on the listen port (listen port + 2).
Table 36 Performance Scorecard Alerter Web Application Ports
Port Type Default Port Number Where Configurable
Listen port 18090l EPM System Configurator
l Application server administration console
SSL listen port NA Application server administration console (configure manually)
Shutdown port for Apache Tomcat 18091l EPM System Configurator
l Application server administration console (configure manually)
Note: The port number depends on the listen port (listen port + 1).
142 Ports

Port Type Default Port Number Where Configurable
AJP connector port 18092 EPM System Configurator
Note: The port number depends on the listen port (listen port + 2).
Planning Ports
Table 37 Planning Web Application Ports
Port Type Default Port Number Where Configurable
Listen port 8300 EPM System Configurator
Additional listen port (1) Dynamic Not configurable
SSL listen port 8303 Application server administration console (configure manually)
Shutdown port for Apache Tomcat 8301 Application server administration console (configure manually)
AJP connector port 8302 Application server administration console (configure manually)
Table 38 Planning Default Service Port
Service DefaultPortNumber
Where Configurable
OracleHyperionPlanning,FusionEdition RMIServer
11333 <HYPERION_HOME>/common/RMI/1.0.0/HyperionRMI_Port.properties
Parameter: registryPort
Note: If you change the port, you must run uninstallHyperionNTServiceRMI.cmd and then runinstallHyperionNTServiceRMI.cmd.
Strategic Finance Ports
Table 39 Strategic Finance Default Service Port
Service DefaultPortNumber
Where Configurable
OracleHyperionStrategicFinance,FusionEditionServer
7750 Oracle Hyperion Strategic Finance, Fusion Edition administration tool
The default port value is in the registry. The key is in HKEY_LOCAL_MACHINE\Software\HyperionSolutions\HSFService\RPCPort. The value is a string item that contains the port number as text. Eachclient program includes a registry item (accessible with the Connect dialog box) to set port numbers for eachcontacted machine. The key for a client program connection to a server is HKEY_CURRENT_USER\Software\Hyperion Solutions\Hyperion Strategic Finance Servers\<machinename>\NetworkPort. It is also a string that contains a numeric value.
Financial Performance Management Applications Ports 143

Performance Management Architect Ports
Table 40 Performance Management Architect Web Application Ports
Port Type Default PortNumber
Where Configurable
Oracle Hyperion EPM Architect, Fusion Edition UI
Listen port 19091 (canbe configuredfor SSL)
EPM System Configurator
SSL listenport
19094 <HYPERION_HOME>/deployments/Tomcat5/EPMAWebTier/conf/server.xml
<Connector port=”<ssl_port>portNumber” disableUploadTimeout=”true”acceptCount=”100” debug=”0” scheme=”https” secure=”true”clientAuth=”false” sslProtocol=”TLS” algorithm=”“ keystoreFile=”“keystorePass=”JKS” keystoreType=”“/>
Parameters:
l algorithm: certificate algorithm
l keystoreFile: fully qualified path to the keystore file
l keystorePass: keystore password
l keystoreType: type of keystore, JKS is usually the default
Shutdownport forApacheTomcat
19092l EPM System Configurator
l <HYPERION_HOME>/deployments/Tomcat5/EPMAWebTier/conf/server.xml
For parameters, see the application server documentation.
AJPconnectorport
19093l EPM System Configurator
l <HYPERION_HOME>/Deployments/Tomcat5/EPMAWebTier/conf/server.xml
<Connector port=”<ajp_port>portNumber” protocol=”AJP/1.3”
enableLookups=”false” debug=”0” />
Note: The connector tag should be added as a child of Server->Service tag.
Data Synchronizer Web Service (Performance Management Architect)
Listen port 19101 (canbe configuredfor SSL)
EPM System Configurator
SSL listenport
19104 <HYPERION_HOME>/deployments/Tomcat5/EPMADataSynchronizer/conf/server.xml
<Connector port=”<ssl_port>portNumber” disableUploadTimeout=”true”acceptCount=”100” debug=”0” scheme=”https” secure=”true”clientAuth=”false” sslProtocol=”TLS” algorithm=”“ keystoreFile=”“keystorePass=”JKS” keystoreType=”“/>
Parameters:
l algorithm: certificate algorithm
l keystoreFile: fully qualified path to the keystore file
l keystorePass: keystore password
l keystoreType: type of keystore, JKS is usually the default
144 Ports

Port Type Default PortNumber
Where Configurable
Shutdownport forApacheTomcat
19102l EPM System Configurator
l <HYPERION_HOME>/deployments/Tomcat5/EPMADataSynchronizer/conf/server.
xml
For parameters, see the application server documentation.
AJPconnectorport
19103l EPM System Configurator
l <HYPERION_HOME>/deployments/Tomcat5/EPMADataSynchronizer/conf/server.
xml
<Connector port=”<ajp_port>portNumber” protocol=”AJP/1.3”
enableLookups=”false” debug=”0” />
Note: The connector tag should be added as a child of Server->Service tag.
Table 41 Performance Management Architect Dimension Server Default Service Ports
Services DefaultPortNumber
Where Configurable
Server Manager 49500 BPMA_Server_Config.xml
<ServerManagerPort>portNumber</ServerManagerPort>
ProcessManager
49501 BPMA_Server_Config.xml
<Port>portNumber</Port>
EventSubscription
49502 BPMA_Server_Config.xml
<EventSubscriptionPort>portNumber</EventSubscriptionPort>
Event Manager 49503 BPMA_Server_Config.xml
<EventManagerPort>portNumber</EventManagerPort>
Job Manager 49504 BPMA_Server_Config.xml
<JobManagerPort>portNumber</JobManagerPort>
Engineinstances
51000–51999
BPMA_Server_Config.xml
<MinEnginePort>portNumber</MinEnginePort>
<MaxEnginePort>portNumber</MaxEnginePort>
Data AccessLayer (DB2only)
Dynamic BPMA_Server_Config.xml
Note: Performance Management Architect does not control which port DB2 uses. However, the portthat is used by DB2 can be specified in BPMA_Server_Config.xml so that Oracle Hyperion EPMArchitect, Fusion Edition can connect to the database.
Table 42 Performance Management Architect Web Server Port
Web Server Port Where Configurable
80 Microsoft Internet Information Services (IIS) Manager Console. (Change the TCP port value setting.)
Financial Performance Management Applications Ports 145

Data Management Portsl “Data Integration Management Ports” on page 146.
l “Translation Manager Ports” on page 147.
l “FDM Ports” on page 148.
l “Data Relationship Management Ports” on page 148.
Data Integration Management PortsTable 43 Data Integration Management Web Services Hub Ports
Port Type DefaultPortNumber
Where Configurable
Listen port 7333 <WSH_HOME>, update the following files:
l config/WSHConfig.xml
<HubPortNumber>portNumber</HubPortNumber>
l WSH.wsdl
<wsdlsoap:address location=http://TCHIGATE1:portNumber/PowerCenter/services/Metadata/>
<wsdlsoap:address location=http://TCHIGATE1:portNumber/PowerCenter/services/DataIntegration/>
l jboss-3.2.1/server/default/deploy/jbossweb-tomcat.sar/META-INF/jboss-
service.xml
Parameter:
A HTTP/1.1 Connector on port portNumber
Note: See WebServicesProviderGuide.pdf, which is installed in /WSHub/docs.
SSL listenport
NA jboss-3.2.1/server/default/deploy/jbossweb-tomcat.sar/META-INF/jboss-service.xml
Parameter: SSL/TLS Connector configuration
Shutdownport forApacheTomcat
NA NA
AJPconnectorport
8009 jboss-3.2.1/server/default/deploy/jbossweb-tomcat.sar/META-INF/jboss-service.xml
Parameter: AJP 1.3 Connector on port nnnn
146 Ports

Table 44 Data Integration Management Default Service Ports
Service Default Port Number Where Configurable
Oracle'sHyperion®DataIntegrationManagementServer
4001l EPM System Configurator (if PowerCenter Server component is installed)
l INFA Workflow Manager (installed with the PowerCenter Client component)
l Native INFA PowerCenter Server Configuration Utility:
m Windows: <DIM_HOME>\Server\binpmsetup.exe (saves server configuration toWindows registry)
m UNIX: <DIM_HOME>/Server/binpmconfig (saves server configuration to the<DIM_HOME>/Server/bin/pmserver.cfg file)
Oracle'sHyperion®DataIntegrationManagementRepositoryServer
5001
Separate port(between5002-65535) foreach repository in theRepository Server
l EPM System Configurator
l INFA PowerCenter Repository Server Configuration Utility:
m Windows: <DIM_HOME>\RepositoryServer\bin\PmRsSetup.exe (savesserver configuration to Windows registry)
m UNIX: <DIM_HOME>/RepositoryServer/binpmrsconfig (saves serverconfiguration to the <DIM_HOME>/RepositoryServer/bin/pmrepserver.cfg file)
Translation Manager PortsTable 45 Translation Manager Web Application Ports
Port Type Default PortNumber
Where Configurable
Listen port 14080 EPM System Configurator
SSL listen port 14090 <TranslationManager_Home>/AppServer/InstalledApps/Tomcat/5.0.28/HTMServer/conf/server.xml
Parameter: Connector port
Shutdown port forApache Tomcat
14005 Application server administration console (configure manually)
AJP connector port NA Application server administration console (configure manually)
Table 46 Translation Manager Default Service Port
Service Default PortNumber
Where Configurable
Oracle's Hyperion®Translation ManagerRMI Server
11333l Oracle's Hyperion Enterprise Performance Management System Configurator
l <HYPERION_HOME>/common/RMI/1.0.0/HyperionRMI_Port.properties
Parameter: registryPort
Data Management Ports 147

FDM Ports
Table 47 FDM Default Service Ports
Service Default PortNumber
Where Configurable
Oracle HyperionFinancial DataQualityManagement,Fusion Editionload balancerOracle HyperionFinancial DataQualityManagement,Fusion Editionapplicationserver
135 plusephemeralhigh-rangeports (1024–65536)
Windows settings—Fix DCOM ephemeral ports.
For more information, see the Microsoft support article describing how to set the ports used by DCOM:http://support.microsoft.com. Search for “restrict DCOM port.”
File sharing 137–139,445
Controlled by the operating system. Enable file sharing between all WebLink application servers andthe data server and set port numbers:
l NetBIOS Datagram Service = port 138
l NetBIOS Name Resolution = port 137
l NetBIOS Session Service = port 139
If NetBIOS is turned OFF, then use SMB = port 445
Firewall 135 plusephemeralhigh-rangeports (1024–65536)
Windows settings—Fix DCOM ephemeral ports.
For more information, see the Microsoft support article describing how to set the ports used by DCOM:http://support.microsoft.com. Search for “restrict DCOM port.”
Table 48 FDM Web Server Port
Web Server Port Where Configurable
80 (HTTP) or 443 (HTTPS) Microsoft Internet Information Services (IIS) Manager Console. (Change the TCP port value setting.)
Data Relationship Management Ports
Table 49 Data Relationship Management Default Service Port
Service Default PortNumber
Where Configurable
Oracle HyperionDataRelationshipManagement,Fusion Edition
135 plusephemeralhigh-rangeports (1024–65536)
l config.xml using the Data Relationship Management Console
l Windows settings—Fix DCOM ephemeral ports.
For more information, see the Microsoft support article describing how to set the ports used byDCOM: http://support.microsoft.com. Search for “restrict DCOM port.”
148 Ports

Table 50 Data Relationship Management Web Server Ports
Web Server Ports Where Configurable
80 (HTTP) Microsoft Internet Information Services (IIS) Manager Console. (Change the TCP port value setting.)
443 (HTTPS)
Data Management Ports 149

150 Ports

Index
Aaccount list, dynamic, 108Administration Services
default ports, 135API Reference Guide, 129Application Builder J2EE, default ports, 141Application Builder.NET, default ports, 141application conversion wizards, 130application server
system requirements, 17applications
compatibility between releases, 79conversion utilities, 86point of view, resetting, 108requirements comparisons, between releases, 79resetting dynamic account list criteria, 108
Cclient workstations
requirements, 13compatibility
application, 79products, 27
complete installation, 33conversion
utilities, 86Crescent files, Windows, 128Crystal files, Windows, 127customized installation program, 69
DData Integration Management
default ports, 146Data Management
default ports, 146Data Relationship Management
default ports, 148
databasesserver requirements, 15
default directories, installing to, 26directories
component, 25documentation
included in the installation, 123dynamic account list, 108
EEssbase
default ports, 134Essbase – System 9
default ports, 134
FFDM
default ports, 148feature comparison, Hyperion Enterprise, 75file server requirements, 15files
converting, 106Crescent, 128Crystal, 127HOSTS, 22HPAPP.DAT
creating for Hyperion Retrieve, 69LOAD.PER
saving before installation, 19logic, converting, 106program, 125–128registry, 126Windows system, 125
Financial Managementdefault ports, 142
Financial Performance Management Applicationsdefault ports, 141
A C D E F H I L M N P Q R S T U W
Index 151
Financial Reportingdefault ports, 138
Foundation Servicesdefault ports, 133
Hhelp
Browser-Based Help for Hyperion EnterpriseWindows 32–bit client, 123
Browser-Based Help for Hyperion EnterpriseWindows 32–bit client and Web, 123
Web, 124HOSTS file, 22HPAPP.DAT file
creating for Hyperion Retrieve, 69Hyperion Allocations, 129Hyperion AutoPilot
not included in silent mode install, 31overview, 130
Hyperion Enterprise Web Client system requirements,16
Hyperion Enterprise Web Serverprerequisites, 23system requirements, 16
Hyperion LedgerLink, 130Hyperion Retrieve
icon, creating, 69Microsoft Excel, setting up with, 69overview, 130setting up, 69
Iicon, creating for Hyperion Retrieve, 69ID
Windows user, 22installation
additional procedures, 69complete, 33customized, 69Microsoft IIS Server, 23, 117quick and silent mode, 29regular, 33silent, 31uninstallation of current release, 109workstation, 57
Interactive Reporting
default ports, 139inventory, product, 129
Lload file conversion utility, 131LOAD.PER file
saving before installation, 19logic conversion utilities, 104logic file conversion utility, 131logic files, converting, 106
MMicrosoft Excel, setting up with Hyperion Retrieve,
69Microsoft IIS Server, installing, 23, 117
Nnotes
for quick and silent installations, 32
PPerformance Management Architect
default ports, 144Performance Scorecard
default ports, 142performance tuning, 120Planning
default ports, 143point of view, resetting, 108ports
Administration Services, 135Application Builder J2EE, 141Application Builder.NET, 141Data Integration Management, 146Data Management, 146Data Relationship Management, 148Essbase, 134Essbase – System 9, 134FDM, 148Financial Management, 142Financial Performance Management Applications,
141Financial Reporting, 138Interactive Reporting, 139Performance Management Architect, 144
A C D E F H I L M N P Q R S T U W
152 Index

Performance Scorecard, 142Planning, 143Provider Services, 136Reporting and Analysis, 137Shared Services, 133Smart Search Command Line Utility, 137Strategic Finance, 143Translation Manager, 147Web Analysis, 139EPM Workspace, 140
prerequisitesHyperion Enterprise Web Server, 23quick installation, 19
procedures, additional for installation, 69products
compatibility, 27inventory, 129
program filesinventory, 125–128
Provider Servicesdefault ports, 136
Qquick installation, 29
Rregistry files, Windows, 126regular installation, 33–67Reporting and Analysis
default ports, 137requirements comparison, application, 79
Ssecurity rights, setting up, 22servers
databasesserver requirements, 15
file server requirements, 15security rights, setting up, 22system requirements, 17TCP/IP connectivity, verifying, 22
Shared Servicesdefault ports, 133
silent installation, 31Smart Search Command Line Utility
default ports, 137
Statutory Consolidation Engine (SCE)overview, 130prerequisites for installation, 21
Strategic Financedefault ports, 143
system extract conversion utilities, 104system files, Window, 125system requirements
application server, 17client workstation, 13database server, 15file server, 15Hyperion Hyperion Enterprise, 13Hyperion Enterprise Web Client, 16Hyperion Enterprise Web Server, 16
TTCP/IP connectivity, verifying, 22Translation Manager
default ports, 147tuning
performance, 120
Uuninstallation
current release, 109utilities
conversion, 131logic conversion, 104system extract, 104
WWeb Analysis
default ports, 139Web help, 124Windows
Crescent files, 128Crystal files, 127registry files, 126system files, 125user IDs, 22
wizards, application conversion, 130EPM Workspace
default ports, 140workstations
client requirements, 13
A C D E F H I L M N P Q R S T U W
Index 153

installation, 57
A C D E F H I L M N P Q R S T U W
154 Index