hyperion® reporting and analysis … hyperion financial reporting, ... oracle's hyperion®...
TRANSCRIPT
H Y P E R I O N ® R E P O R T I N G A N D A N A L Y S I SM I G R A T I O N U T I L I T Y
R E L E A S E 1 1 . 1 . 1
M I G R A T I O N P L A N N I N G G U I D E L I N E S

Reporting and Analysis Migration Utility Migration Planning Guidelines, 11.1.1
Copyright © 2002, 2008, Oracle and/or its affiliates. All rights reserved.
Authors: EPM Information Development Team
This software and related documentation are provided under a license agreement containing restrictions on use anddisclosure and are protected by intellectual property laws. Except as expressly permitted in your license agreement orallowed by law, you may not use, copy, reproduce, translate, broadcast, modify, license, transmit, distribute, exhibit,perform, publish or display any part, in any form, or by any means. Reverse engineering, disassembly, or decompilationof this software, unless required by law for interoperability, is prohibited.
The information contained herein is subject to change without notice and is not warranted to be error-free. If you findany errors, please report them to us in writing.
If this software or related documentation is delivered to the U.S. Government or anyone licensing it on behalf of the U.S.Government, the following notice is applicable: U.S. GOVERNMENT RIGHTS: Programs, software, databases, and relateddocumentation and technical data delivered to U.S. Government customers are "commercial computer software" or"commercial technical data" pursuant to the applicable Federal Acquisition Regulation and agency-specific supplementalregulations. As such, the use, duplication, disclosure, modification, and adaptation shall be subject to the restrictions andlicense terms set forth in the applicable Government contract, and, to the extent applicable by the terms of the Governmentcontract, the additional rights set forth in FAR 52.227-19, Commercial Computer Software License (December 2007).Oracle USA, Inc., 500 Oracle Parkway, Redwood City, CA 94065.
This software is developed for general use in a variety of information management applications. It is not developed orintended for use in any inherently dangerous applications, including applications which may create a risk of personalinjury. If you use this software in dangerous applications, then you shall be responsible to take all appropriate fail-safe,backup, redundancy and other measures to ensure the safe use of this software. Oracle Corporation and its affiliates disclaimany liability for any damages caused by use of this software in dangerous applications.
This software and documentation may provide access to or information on content, products and services from thirdparties. Oracle Corporation and its affiliates are not responsible for and expressly disclaim all warranties of any kind withrespect to third party content, products and services. Oracle Corporation and its affiliates will not be responsible for anyloss, costs, or damages incurred due to your access to or use of third party content, products or services.
Contents
Chapter 1. Migration Overview . . . . . . . . . . . . . . . . . . . . . . . . . . . . . . . . . . . . . . . . . . . . . . . . . . . . . . . . . . 5
Overview of Reporting and Analysis . . . . . . . . . . . . . . . . . . . . . . . . . . . . . . . . . . . . . . . . . 5
Migrating to Reporting and Analysis . . . . . . . . . . . . . . . . . . . . . . . . . . . . . . . . . . . . . . . . 5
Migration Variables . . . . . . . . . . . . . . . . . . . . . . . . . . . . . . . . . . . . . . . . . . . . . . . . . 6
Migration Scope . . . . . . . . . . . . . . . . . . . . . . . . . . . . . . . . . . . . . . . . . . . . . . . . . . . . 6
Reporting and Analysis Migration Utility . . . . . . . . . . . . . . . . . . . . . . . . . . . . . . . . . . 7
Migration Scenarios . . . . . . . . . . . . . . . . . . . . . . . . . . . . . . . . . . . . . . . . . . . . . . . . . 7
Migration End Result . . . . . . . . . . . . . . . . . . . . . . . . . . . . . . . . . . . . . . . . . . . . . . . 15
Chapter 2. Performing Migration . . . . . . . . . . . . . . . . . . . . . . . . . . . . . . . . . . . . . . . . . . . . . . . . . . . . . . . 17
About Performing Migration . . . . . . . . . . . . . . . . . . . . . . . . . . . . . . . . . . . . . . . . . . . . . 17
Migration Process Checklist . . . . . . . . . . . . . . . . . . . . . . . . . . . . . . . . . . . . . . . . . . . . . . 17
Creating the Test Environment . . . . . . . . . . . . . . . . . . . . . . . . . . . . . . . . . . . . . . . . . . . 18
Environment Prerequisites . . . . . . . . . . . . . . . . . . . . . . . . . . . . . . . . . . . . . . . . . . . 19
Setting Up the Source System . . . . . . . . . . . . . . . . . . . . . . . . . . . . . . . . . . . . . . . . . 20
Setting Up the Target Test System . . . . . . . . . . . . . . . . . . . . . . . . . . . . . . . . . . . . . . 22
Setting Up Hosts . . . . . . . . . . . . . . . . . . . . . . . . . . . . . . . . . . . . . . . . . . . . . . . . . . . 22
Setting up Authentication . . . . . . . . . . . . . . . . . . . . . . . . . . . . . . . . . . . . . . . . . . . . 23
Validating the Test Environment . . . . . . . . . . . . . . . . . . . . . . . . . . . . . . . . . . . . . . . . . . 23
Migrating the Test Server . . . . . . . . . . . . . . . . . . . . . . . . . . . . . . . . . . . . . . . . . . . . . . . 24
Order of Migration . . . . . . . . . . . . . . . . . . . . . . . . . . . . . . . . . . . . . . . . . . . . . . . . 24
Migration Test Checklist . . . . . . . . . . . . . . . . . . . . . . . . . . . . . . . . . . . . . . . . . . . . . 27
Evaluating Test Results . . . . . . . . . . . . . . . . . . . . . . . . . . . . . . . . . . . . . . . . . . . . . . . . . 28
Using the Migration Log Files . . . . . . . . . . . . . . . . . . . . . . . . . . . . . . . . . . . . . . . . . 29
Checking the Components Within the System . . . . . . . . . . . . . . . . . . . . . . . . . . . . . 29
Migrating the Production Server . . . . . . . . . . . . . . . . . . . . . . . . . . . . . . . . . . . . . . . . . . 30
Manual Migration Steps . . . . . . . . . . . . . . . . . . . . . . . . . . . . . . . . . . . . . . . . . . . . . . . . 30
Components Requiring Pre-migration Steps . . . . . . . . . . . . . . . . . . . . . . . . . . . . . . . 31
Components Requiring Post-migration Steps . . . . . . . . . . . . . . . . . . . . . . . . . . . . . 32
Mapping Access Privileges to Reporting and Analysis . . . . . . . . . . . . . . . . . . . . . . . . . . . 32
Role Mapping . . . . . . . . . . . . . . . . . . . . . . . . . . . . . . . . . . . . . . . . . . . . . . . . . . . . 33
Access Control Mapping . . . . . . . . . . . . . . . . . . . . . . . . . . . . . . . . . . . . . . . . . . . . . 33
Contents iii
Chapter 3. Validating Migration Results . . . . . . . . . . . . . . . . . . . . . . . . . . . . . . . . . . . . . . . . . . . . . . . . . . 35
About Validating Migration Results . . . . . . . . . . . . . . . . . . . . . . . . . . . . . . . . . . . . . . . . 35
Validating Brio Portal Migration . . . . . . . . . . . . . . . . . . . . . . . . . . . . . . . . . . . . . . . . . . 35
Validating Access Control on Job Output Runs . . . . . . . . . . . . . . . . . . . . . . . . . . . . . 37
Validating Brio Intelligence Migration . . . . . . . . . . . . . . . . . . . . . . . . . . . . . . . . . . . . . . 41
Validating OnDemand Server (ODS) Migration . . . . . . . . . . . . . . . . . . . . . . . . . . . . 42
Validating Broadcast Server (BCS) Migration . . . . . . . . . . . . . . . . . . . . . . . . . . . . . . 43
Validating Hyperion Analyzer Migration . . . . . . . . . . . . . . . . . . . . . . . . . . . . . . . . . . . . 44
Validating Hyperion Reports Migration . . . . . . . . . . . . . . . . . . . . . . . . . . . . . . . . . . . . . 44
Validating Hyperion Performance Suite Migration . . . . . . . . . . . . . . . . . . . . . . . . . . . . . 45
General Post Migration Steps . . . . . . . . . . . . . . . . . . . . . . . . . . . . . . . . . . . . . . . . . . . . . 45
Appendix A. Sample Migration Project Plan . . . . . . . . . . . . . . . . . . . . . . . . . . . . . . . . . . . . . . . . . . . . . . . . 47
Identifying Tasks and Deliverables . . . . . . . . . . . . . . . . . . . . . . . . . . . . . . . . . . . . . . . . . 47
Identifying Project Staff . . . . . . . . . . . . . . . . . . . . . . . . . . . . . . . . . . . . . . . . . . . . . . . . . 49
Breaking Down the Workload . . . . . . . . . . . . . . . . . . . . . . . . . . . . . . . . . . . . . . . . . . . . 50
Appendix B. Limitations . . . . . . . . . . . . . . . . . . . . . . . . . . . . . . . . . . . . . . . . . . . . . . . . . . . . . . . . . . . . . 51
About Limitations . . . . . . . . . . . . . . . . . . . . . . . . . . . . . . . . . . . . . . . . . . . . . . . . . . . . . 51
General . . . . . . . . . . . . . . . . . . . . . . . . . . . . . . . . . . . . . . . . . . . . . . . . . . . . . . . . . . . . 51
Hyperion Analyzer . . . . . . . . . . . . . . . . . . . . . . . . . . . . . . . . . . . . . . . . . . . . . . . . . . . . 52
Hyperion Reports . . . . . . . . . . . . . . . . . . . . . . . . . . . . . . . . . . . . . . . . . . . . . . . . . . . . . 53
Hyperion Performance Suite . . . . . . . . . . . . . . . . . . . . . . . . . . . . . . . . . . . . . . . . . . . . . 54
Carry Forward from Hyperion Performance Suite 8.3 . . . . . . . . . . . . . . . . . . . . . . . . . . . 59
Index . . . . . . . . . . . . . . . . . . . . . . . . . . . . . . . . . . . . . . . . . . . . . . . . . . . . . . . . . . . . . . 63
iv Contents
1Migration Overview
In This Chapter
Overview of Reporting and Analysis .. . . . . . . . . . . . . . . . . . . . . . . . . . . . . . . . . . . . . . . . . . . . . . . . . . . . . . . . . . . . . . . . . . . . . . . . . . . . . . . . . . . . . . . . . . . . . . 5
Migrating to Reporting and Analysis .. . . . . . . . . . . . . . . . . . . . . . . . . . . . . . . . . . . . . . . . . . . . . . . . . . . . . . . . . . . . . . . . . . . . . . . . . . . . . . . . . . . . . . . . . . . . . 5
Overview of Reporting and AnalysisOracle's Hyperion Reporting and Analysis is a modular business intelligence platform providingmanagement reporting, query and analysis capabilities for a wide variety of data sources in asingle coordinated environment.
A single zero-footprint thin client provides the user with access to the following content:
● Oracle Hyperion Financial Reporting, Fusion Edition —Scheduled or on-demand highlyformatted financial and operational reporting from almost any data source includingHyperion Planning and Hyperion Financial Management.
● Oracle's Hyperion® Interactive Reporting—Ad hoc relational query, self-service reportingand dashboards against any ODBC data source.
● Oracle's Hyperion® SQR® Production Reporting—High volume enterprise-wideproduction reporting.
● Oracle's Hyperion® Web Analysis—Interactive ad hoc analysis, presentation, and reportingof multidimensional data.
Reporting and Analysis, which includes Analytic Services, is part of a comprehensive BusinessPerformance Management (BPM) system that integrates this business intelligence platform withHyperion financial applications and Hyperion Performance Scorecard.
Migrating to Reporting and AnalysisMigration involves migrating information from the source system to Oracle's Hyperion® SharedServices and the Reporting and Analysis Repository.
Customers who want to take advantage of the new and upgraded features in Reporting andAnalysis must migrate from their current Brio Portal, Brio Intelligence, BrioOne, HyperionPerformance Suite 8, Hyperion Analyzer, or Hyperion Reports implementation.
Overview of Reporting and Analysis 5
A migration involves hosting both currently deployed components and Reporting and Analysissoftware in a new implementation environment. The migration to Reporting and Analysiswarrants careful analysis of your current product deployment.
The migration process, which is outlined in this document, emphasizes tasks that identify newrequirements and infrastructure as a part of any new Reporting and Analysis solution. Migratingto Reporting and Analysis involves collecting essential project information, identifying orproducing pertinent documentation, and conducting various reviews important to a successfulupgrade.
Review the following sections for information on:
● Migration Variables
● Migration Scope
● Reporting and Analysis Migration Utility
● Migration Scenarios
● Migration End Result
Migration VariablesIndividual installations vary in size, configuration, security requirements, and business solutionsundertaken. Correspondingly, migration to Reporting and Analysis varies from one installationto another. Some aspects of your migration may require manual procedures. The amount ofmanual migration required depends on your current installation, customizations, and thecapabilities that you want to implement in Reporting and Analysis.
Migration ScopeThe migration process involves assessing the current product deployment, planning yourmigration, and running test migrations. It also means preparing a QA release package for theReporting and Analysis production deployment and incorporating operational procedures tomaintain a high level of service.
To migrate successfully to Reporting and Analysis , your organization needs to complete thefollowing activities:
● Document and assess your current environment.
❍ List components installed. Include an architectural diagram that shows how the corecomponents and web servers are distributed and the size of the installation.
❍ Identify your user load and job processing trends by hours of the day.
❍ Describe your users’ roles with respect to accessing the system’s reports, analyzing data,preparing documents, scheduling reports, and managing users.
❍ Perform appropriate infrastructure planning to address capacity and performance-related concerns. For detailed information on capacity planning, refer to the capacity-planning white papers located at http://www.hyperion.com/products/whitepapers. For
6 Migration Overview
further assistance in hardware planning, contact your local Hyperion ConsultingServices representative or local partner.
❍ Identify your authentication (login) and authorization (access rights to content) securityrequirements so that you can incorporate these into the migration plan.
● Review the capabilities of Reporting and Analysis in conjunction with your requirementsand prepare a detailed plan for migration.
● Test and validate the migration.
It is recommended that you perform and validate migrations on a test server. This providesthe smoothest possible migration of your production system with the least impact on youroverall business operations.
In addition, you may decide to run the final migration on your test server rather than onthe production system. This can save time and resources, and it enables your current systemand the new system to run in parallel until the new Reporting and Analysis server is readyfor general use.
Reporting and Analysis Migration UtilityHyperion is committed to the success of its new and existing customers. As such, Hyperionprovides a migration utility to help existing customers migrate to Reporting and Analysis.
The Oracle's Hyperion® Reporting and Analysis Migration Utility is a comprehensive softwaretoolkit available to customers to facilitate their migrations. The Reporting and AnalysisMigration Utility takes a specified set of data from supported versions of existing Hyperionproducts and transfers that data to a working Reporting and Analysis installation. Hyperionoffers the Reporting and Analysis Migration Utility at no charge to existing maintenance payingcustomers. The Reporting and Analysis Migration Utility automates the migration process to acertain extent, but larger and more complex installations or installations with heavycustomizations do require manual steps to migrate successfully.
Migration ScenariosThe automation of the migration process depends on the type of product implementation andthe number of customizations in your source system. There are six basic scenarios for migratingto Reporting and Analysis, and customizations can change each scenario. Each scenario has adifferent level of manual steps. These steps are outlined in Chapter 2, “PerformingMigration.” The number and type of additional manual steps depends on customizations inyour source system.
This document provides information on planning and assessing the typical solutionrequirements. Depending on the complexity of your migration, you may want to include localor Hyperion consulting support.
Review the following sections for information on:
● Migrating from Brio Portal
● Migrating from BrioONE
Migrating to Reporting and Analysis 7
● Migrating from Brio Intelligence
● Migrating from Hyperion Analyzer
● Migrating from Hyperion Reports
● Migrating from Hyperion Performance Suite 8.x
● Migrating a Customized Environment
● Other Migration Considerations
Migrating from Brio PortalFor Brio Portal customers, migrating to Reporting and Analysis is similar to an upgrade inprevious Brio Portal releases except that content is copied from one physical installation to acompletely different installation environment.
Because the content is migrated to a new environment, you must complete some pre-migrationsteps, such as installing Reporting and Analysis, setting up authentication, and configuring hostsin the target environment. See Chapter 2, “Performing Migration” for environment prerequisitesand pre-migration steps.
A migration from Brio Portal is the most straightforward migration and requires the fewestmanual steps.
Table 1 describes the Brio Portal items that are automatically migrated, the items that you mustmanually migrate, and the items that are not migrated to Reporting and Analysis.
Table 1 Items Migrated/Not Migrated from Brio Portal
Automatically Migrated ● Folders
● SQR jobs
● Generic jobs
● Documents
● Personal pages
● Subscriptions
● Favorite items
● Users
● Groups
Manually Migrated ● Custom forms
See “Migrating the Test Server” on page 24 for the steps involved in migrating customforms.
Note that SmartForms are migrated as is; however, you must modify them post-migration in order to use them for the target environment.
● External authentication of users and groups
You do not have to recreate users and groups in the target system. See “ComponentsRequiring Pre-migration Steps” on page 31 for an overview of the steps required toset up external authentication in Reporting and Analysis and to migrate user and groupattributes from the source system to the target system.
8 Migration Overview
Not Migrated ● Custom forms
● Knowledge Server files
Not supported in Reporting and Analysis.
● Personal channels
Not supported in Reporting and Analysis.
● External authentication systems
You must set up any external authentication systems in the target environment priorto migration.
● WebClient templates
The Reporting and Analysis environment uses a combination of JSP and templates.The Reporting and Analysis Migration Utility does not migrate WebClient templatesand their customizations.
Migrating from Brio IntelligenceYou can use the Oracle's Hyperion® Reporting and Analysis Migration Utility for OnDemandServer (ODS) and Broadcast Server (BCS) migrations. Both components have their ownrepository database and associated documents. ODS can run as a stand-alone component or asa Portal service. When run as a Portal service, the users, groups, and folders are part of the PortalRepository.
Table 2 describes the Brio Intelligence items that are automatically migrated, the items that youmust manually migrate, and the items that are not migrated to Reporting and Analysis.
Table 2 Items Migrated/Not Migrated from Brio Intelligence
From ODS From BCS
Automatically Migrated ● Adaptive States
● Custom SQL variable limits
● Documents
● Folders
● OCEs
● Passthrough for Query Map
● Section OCE mapping
● User/Group attributes
● Users/Groups
● Username and password inside OCEs
● Calendars
● Directories and printers
● Documents
● External events
● Job cycles
● Job intervals
● Job parameters
● Jobs
● Location of output files
● OCEs
● Section OCE mapping
● User/Group attributes
● Users/Groups
Manually Migrated ● Content requiring special information such aspassword-protected documents and BQY documentswith detail section reports.
Migrating to Reporting and Analysis 9
From ODS From BCS
See “Migrating the Test Server” on page 24 for adescription of the steps involved in manually movingBrio Intelligence components to Reporting andAnalysis.
Not Migrated ● Inactive users
In Reporting and Analysis, inactivating a user isessentially deleting a user.
● Multiple ODS/BCS installations
The Migration Utility does not support multipleinstallations of ODS/BCS as part of a networkedenvironment where users on one host are accessingcontent located in a directory on another serverinstallation. You must migrate additional installationsof ODS and BCS separately.
● Automatic distributed refresh (ADR)
Reporting and Analysis does not support automaticdistributed refresh for BQY jobs.
● HTML template customizations
Migrating from BrioONEFor a BrioONE implementation that has Brio Intelligence with ODS, BCS, or ODS running asa Portal service, you must run the Portal migration first, and then run the Brio Intelligencemigration.
For a BrioONE implementation, the migration is similar to a conversion where content fromproduct A is transformed and merged with content in product B. Migrating from BrioONE isessentially the same as migrating from Brio Intelligence and Portal.
Migrating from BrioONE requires more manual steps than a stand-alone migration because youneed to decide what to migrate or not migrate and how to handle duplicate content; determinethe target folders in the Repository; verify data sources; convert BCS/ODS documents, jobs, andjob output to Reporting and Analysis jobs and job output; and so forth. These manual steps aredescribed in “Migrating the Test Server” on page 24.
Migrating from Hyperion AnalyzerHyperion Analyzer has a repository that contains the users, groups, folders, reports, books andbatches. Table 3 describes the Hyperion Analyzer items that are automatically migrated, theitems that you must manually migrate, and the items that are not migrated to Reporting andAnalysis.
Table 3 Items Migrated/Not Migrated from Hyperion Analyzer
Automatically Migrated ● Folders
● Reports
10 Migration Overview
● User Preferences
● Database Connections
● Presentations
● Folder Shortcut UI
● File Permissions
● Users
● Groups
Manually Migrated ● External authentication of users and groups
You do not have to re-create users and groups in the target system. See “ComponentsRequiring Pre-migration Steps” on page 31 for an overview of the steps required toset up external authentication in Reporting and Analysis and to migrate user and groupattributes from the source system to the target system.
Not Migrated ● Custom pages or Analyzer API programs
Custom pages and Analyzer API programs must be rewritten to reflect the System 9.0Web Analysis API.
Migrating from Hyperion ReportsHyperion Reports has a repository that contains the users, groups, folders, reports, books andbatches. Table 4 describes the Hyperion Reports items that are automatically migrated, the itemsthat you must manually migrate, and the items that are not migrated to Reporting and Analysis.
Table 4 Items Migrated/Not Migrated from Hyperion Reports
Automatically Migrated ● Folders
● Reports
● Books
● Batches
● Templates
● Database Connections
● SnapShot
● Users
● Groups
Manually Migrated ● External authentication of users and groups
You do not have to re-create users and groups in the target system. See “ComponentsRequiring Pre-migration Steps” on page 31 for an overview of the steps required toset up external authentication in Reporting and Analysis and to migrate user and groupattributes from the source system to the target system.
Not Migrated ● Command line programs
Command line programs need to be updated for changes in the System 9.0 WebAnalysis API.
● Batch scheduling
Only batches are migrated to the repository.
Migrating to Reporting and Analysis 11
Migrating from Hyperion Performance Suite 8.xTable 5 describes the Hyperion Performance Suite items that are automatically migrated, theitems that you must manually migrate, and the items that are not migrated to Reporting andAnalysis.
Table 5 Items Migrated/Not Migrated from Hyperion Performance Suite
Automatically Migrated ● Folders
● SQR jobs
● Generic jobs
● Documents
● Personal pages
● Subscriptions
● Favorite items
● Users
● Groups
● BQY Documents and Jobs
● Custom SQL variable limits
● OCEs
● Passthrough for Query Map
● Section OCE mapping
● Calendars
● Directories and printers
● External events
● Job cycles
● Job parameters
● ACLs
Manually Migrated N/A
Not Migrated ● Custom forms
● External authentication systems
You must set up any external authentication systems in the target environment priorto migration.
● Inactive users
In Reporting and Analysis, inactivating a user is essentially deleting a user.
● WebClient Customizations
The Reporting and Analysis environment uses a combination of JSP and templates.The Migration Utility does not migrate WebClient templates and their customizations.
Migrating a Customized EnvironmentYou may need to contact a local consulting partner or Hyperion Solutions for support if youwant to migrate any of the following customizations:
12 Migration Overview
● Bulk functionality
For example, bulk load scheduled jobs in a Job Factory, bulk load/edit/delete users andgroups, and bulk import/edit report properties.
● Customized security
For example, two levels of security checking or an API that performs routine synchronizationwith a security database.
● Altered Brio Intelligence schemas
● Customized web templates
Other Migration ConsiderationsIn addition to understanding the general migration process and reviewing the migrationprerequisites, review the following topics for some additional issues to consider beforemigration.
● Special Symbols in Users and Groups
● Invalid Characters in EPM Workspace
● SmartCuts
● Migrating SAP Database Connections
Special Symbols in Users and Groups
There are certain symbols in a user’s first name, a user’s last name, a user’s login ID, and a groupname that are not allowed in Reporting and Analysis. If the Migration Utility encounters any ofthese symbols, it replaces them with an acceptable symbol. Table 6 shows the symbol in thesource system and the symbol it is replaced with in Reporting and Analysis.
Note:
These symbols also apply to roles migrated from the Hyperion Performance Suite 8 sourcesystem.
Table 6 Special Symbols
Symbol in Source System Symbol in Reporting and Analysis
, _
= -
+ *
< [
> ]
Migrating to Reporting and Analysis 13
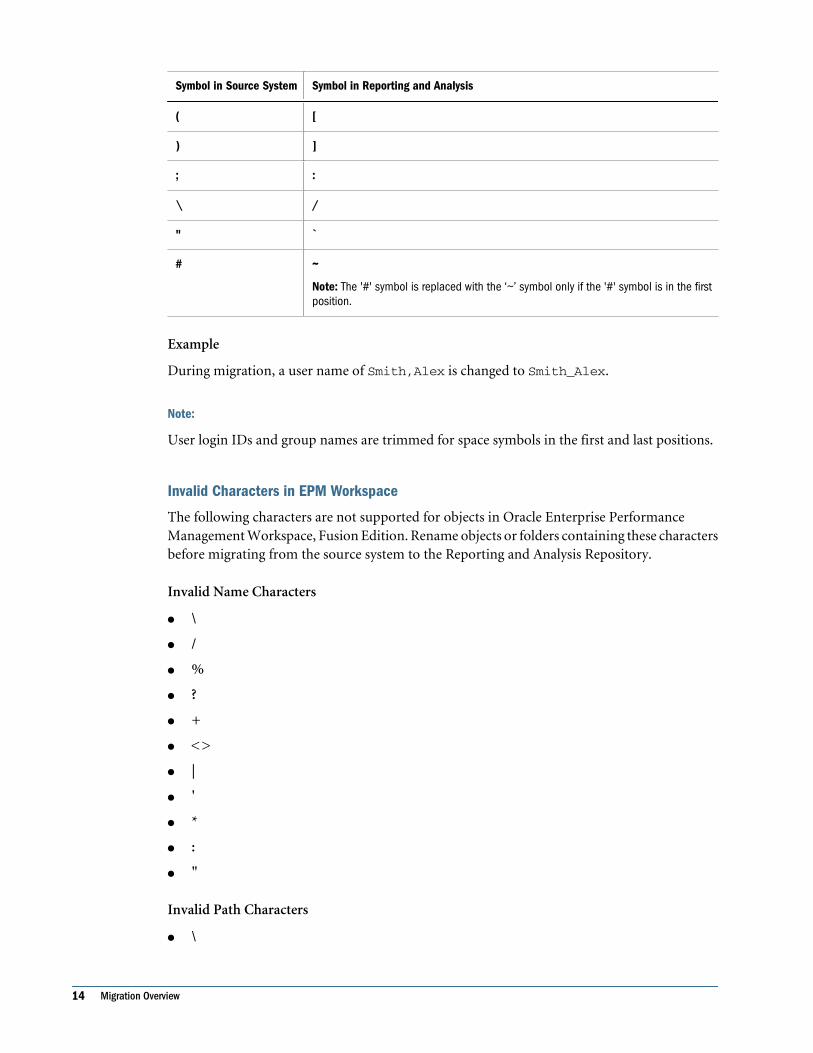
Symbol in Source System Symbol in Reporting and Analysis
( [
) ]
; :
\ /
" `
# ~
Note: The '#' symbol is replaced with the ‘~’ symbol only if the '#' symbol is in the firstposition.
Example
During migration, a user name of Smith,Alex is changed to Smith_Alex.
Note:
User login IDs and group names are trimmed for space symbols in the first and last positions.
Invalid Characters in EPM Workspace
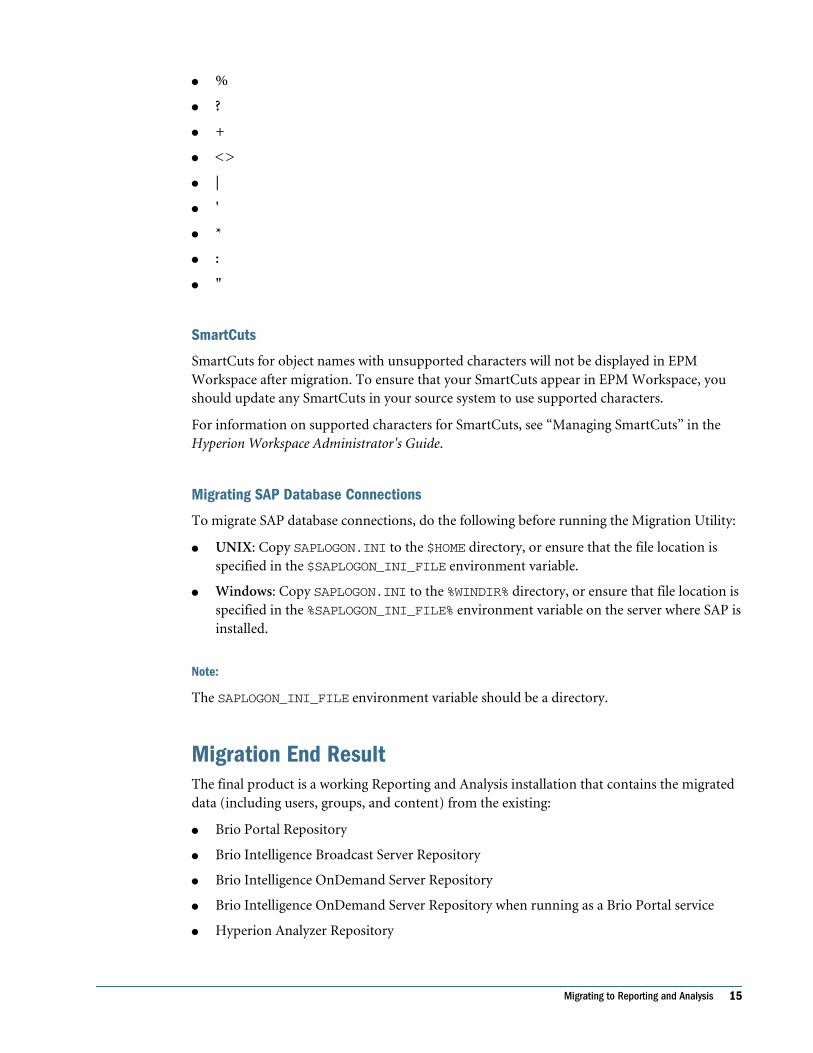
The following characters are not supported for objects in Oracle Enterprise PerformanceManagement Workspace, Fusion Edition. Rename objects or folders containing these charactersbefore migrating from the source system to the Reporting and Analysis Repository.
Invalid Name Characters
● \
● /
● %
● ?
● +
● <>
● |
● '
● *
● :
● "
Invalid Path Characters
● \
14 Migration Overview
● %
● ?
● +
● <>
● |
● '
● *
● :
● "
SmartCuts
SmartCuts for object names with unsupported characters will not be displayed in EPMWorkspace after migration. To ensure that your SmartCuts appear in EPM Workspace, youshould update any SmartCuts in your source system to use supported characters.
For information on supported characters for SmartCuts, see “Managing SmartCuts” in theHyperion Workspace Administrator's Guide.
Migrating SAP Database Connections
To migrate SAP database connections, do the following before running the Migration Utility:
● UNIX: Copy SAPLOGON.INI to the $HOME directory, or ensure that the file location isspecified in the $SAPLOGON_INI_FILE environment variable.
● Windows: Copy SAPLOGON.INI to the %WINDIR% directory, or ensure that file location isspecified in the %SAPLOGON_INI_FILE% environment variable on the server where SAP isinstalled.
Note:
The SAPLOGON_INI_FILE environment variable should be a directory.
Migration End ResultThe final product is a working Reporting and Analysis installation that contains the migrateddata (including users, groups, and content) from the existing:
● Brio Portal Repository
● Brio Intelligence Broadcast Server Repository
● Brio Intelligence OnDemand Server Repository
● Brio Intelligence OnDemand Server Repository when running as a Brio Portal service
● Hyperion Analyzer Repository
Migrating to Reporting and Analysis 15

● Hyperion Reports Repository
16 Migration Overview
2Performing Migration
In This Chapter
About Performing Migration ... . . . . . . . . . . . . . . . . . . . . . . . . . . . . . . . . . . . . . . . . . . . . . . . . . . . . . . . . . . . . . . . . . . . . . . . . . . . . . . . . . . . . . . . . . . . . . . . . . . . .17
Migration Process Checklist . . . . . . . . . . . . . . . . . . . . . . . . . . . . . . . . . . . . . . . . . . . . . . . . . . . . . . . . . . . . . . . . . . . . . . . . . . . . . . . . . . . . . . . . . . . . . . . . . . . . . . .17
Creating the Test Environment .. . . . . . . . . . . . . . . . . . . . . . . . . . . . . . . . . . . . . . . . . . . . . . . . . . . . . . . . . . . . . . . . . . . . . . . . . . . . . . . . . . . . . . . . . . . . . . . . . . .18
Validating the Test Environment .. . . . . . . . . . . . . . . . . . . . . . . . . . . . . . . . . . . . . . . . . . . . . . . . . . . . . . . . . . . . . . . . . . . . . . . . . . . . . . . . . . . . . . . . . . . . . . . . .23
Migrating the Test Server .. . . . . . . . . . . . . . . . . . . . . . . . . . . . . . . . . . . . . . . . . . . . . . . . . . . . . . . . . . . . . . . . . . . . . . . . . . . . . . . . . . . . . . . . . . . . . . . . . . . . . . . . .24
Evaluating Test Results .. . . . . . . . . . . . . . . . . . . . . . . . . . . . . . . . . . . . . . . . . . . . . . . . . . . . . . . . . . . . . . . . . . . . . . . . . . . . . . . . . . . . . . . . . . . . . . . . . . . . . . . . . . .28
Migrating the Production Server .. . . . . . . . . . . . . . . . . . . . . . . . . . . . . . . . . . . . . . . . . . . . . . . . . . . . . . . . . . . . . . . . . . . . . . . . . . . . . . . . . . . . . . . . . . . . . . . . .30
Manual Migration Steps ... . . . . . . . . . . . . . . . . . . . . . . . . . . . . . . . . . . . . . . . . . . . . . . . . . . . . . . . . . . . . . . . . . . . . . . . . . . . . . . . . . . . . . . . . . . . . . . . . . . . . . . . .30
Mapping Access Privileges to Reporting and Analysis.. . . . . . . . . . . . . . . . . . . . . . . . . . . . . . . . . . . . . . . . . . . . . . . . . . . . . . . . . . . . . . . . . . . . . . . . .32
About Performing MigrationPerforming migrations on a test server provides the smoothest possible migration of yourproduction system with the least impact on your overall business operations. In addition, youmay decide to run the final migration on the test server rather than on the production system.This can save time and resources and enables the current system and the new system to run inparallel until the new Reporting and Analysis server is ready for general use. The best practicefor testing and final migration involves qualified personnel working with a dedicated testenvironment that can be restored to its original state.
The person performing the test and final migrations must be highly familiar with your currentproducts as well as Reporting and Analysis administration tools and processes. In addition tothe documentation available with the installation, many courses are available through HyperionEducation Services. Optionally, local consulting partners or Hyperion consulting can help withperforming the testing, validation, and final migration process.
Migration Process ChecklistTable 7 provides a brief outline of the tasks involved in migration. The following sections providemore details about each phase.
Table 7 Migration Process Checklist
Migration Steps Details
About Performing Migration 17
Set up a test server on the target system Performing migration on a test server provides the smoothest possible migration ofyour production system with the least impact on your overall business operations.
See “Creating the Test Environment” on page 18 for a detailed description oftesting.
Fulfill prerequisites See “Prerequisites for Using the Migration Utility” in the Migration Guide for adetailed list.
Perform manual premigration steps Some items are not automatically migrated by the Migration Utility; instead, theyrequire pre-migration or post-migration steps to get transferred to the new system.See “Migrating the Test Server” on page 24 for a list of manually migrated itemsand how to migrate them.
Migrate in pre-migration test mode Review the log files for any initial problems. Use the findings to adjust your plan asnecessary.
Test the migration Take extensive notes about every aspect of the initial test migration. The findingsprovide a tool for making adjustments to your plan. See “Migrating the Test Server”on page 24 for more details.
Perform manual post-migration steps See “Manual Migration Steps” on page 30 for a list of manually migrated itemsand how to migrate them.
Evaluate test results Review the log files and the target system content according to your migration plan.Use your findings to adjust your plan if necessary.
Reset the test server to the original system Use the original system copies to restore the test server to its original state. The nextround of migration testing uses this “pristine” system to validate your updatedmigration plan.
Test the migration again When you think your migration plan covers all contingencies, try the migration onemore time. Validate the migration. If the migration is not complete, perform thenecessary changes and migrate again until the test results are clean.
Migrate the production server When your plan is finished, use it to perform a rapid migration of the productionserver. You may want to do this during off-peak hours such as evenings or over aweekend.
Note:
The testing phase generally includes what the Migration Utility can migrate automatically.Evaluate what you need to manually migrate during the source system assessment and mapsolution strategies for those manual tasks. See “Manual Migration Steps” on page 30 for stepson transferring items you must manually migrate. See “Mapping Access Privileges to Reportingand Analysis” on page 32 for a list of automatic and manual steps to allow users proper accessReporting and Analysis content.
Creating the Test EnvironmentYou can set up your test environment on either one or two computers. If you have the resourcesto set up two systems, follow the environment prerequisites listed in the following section. Ifyou prefer to setup one test box for both source and target environments, ensure that the third-party hardware and software used is compliant with Reporting and Analysis requirements.
18 Performing Migration
The test environment must host both a source system—with Brio Portal, Brio Intelligence,Hyperion Analyzer, or Hyperion Reports installed—and target servers with Reporting andAnalysis installed. If necessary, you can perform migration testing using remote session tools.
Review the following sections for information on:
● Environment Prerequisites
● Setting Up the Source System
● Setting Up the Target Test System
● Setting Up Hosts
● Setting up Authentication
Environment PrerequisitesReview the following sections to assess your source and target system hardware and softwareagainst the prerequisites for migration.
Supported Source Environments in the Existing InstallationThe Migration Utility supports migration from the following product versions:
● Brio Portal 7.0.5
● BrioONE (Brio Portal 7.0.5 or later and the OnDemand Server 6.6.4 or later)
● Brio Intelligence Server 6.6.4 (OnDemand Server 6.6.4 or later and Broadcast Server 6.6.4or later)
● Hyperion Analyzer 6.5, 7.0.1, 7.2, 7.2.1
● Hyperion Performance Suite 8.x
● Hyperion Reports 7.0.x or 7.2.x
Note:
The Migration Utility does not support the Macintosh operating system or any customizedoperating systems.
Supported Target EnvironmentsFor migration from a database or platform no longer supported in Reporting and Analysis youmust switch to a supported database or platform before running the Migration Utility. See theReporting and Analysis Support Matrix on the Customer Support site for a list of supportedoperating systems, databases, Web servers, servlet engines, and browsers.
Note:
If you do not have a supported product release installed in your source environment, you mustupgrade to a supported release prior to migration. You can then install Reporting and Analysis
Creating the Test Environment 19

and migrate the installation. If necessary, please contact your local consulting partner orHyperion for assistance.
Setting Up the Source SystemTo set up the source test system properly, host the current production system in a testenvironment. The source test server should mirror the following aspects of the existing system:
● Server configuration—Use the same directory structure for the test system, as the one usedin the current production system.
● Data files—Move all documents to the test environment. Use binary copies whereappropriate.
If you have a functional test source system, you can delete all the objects that will not be migratedaccording to your migration plan from the test environment. This task is optional.
The checklists in the following sections describe the general aspects of creating a source testsystem. Steps may vary for each implementation. UNIX systems may require the use of binaryfile transfer. For information on hardware and software requirements, see “EnvironmentPrerequisites” on page 19.
Creating a Source Test System for Brio Portal/Brio IntelligenceTable 8 describes the general aspects of creating a source test system for Brio Portal/BrioIntelligence.
Table 8 Brio Portal/Brio Intelligence Source Test Server Checklist
Install/upgrade the test server operating system for assessment as required. See “Environment Prerequisites”on page 19 for operating system requirements.
Open and save all repository BQYs to Brio Enterprise or Brio Intelligence 6.2.2 or later.
Copy Brio Repository tables from the production database to the test database.
Convert any Detail sections in your BQY documents to Report sections. (Reporting and Analysis does notrecognize Detail sections and will not be able to open documents that contain these sections.)
Copy Brio Server INI files and the ODS password (for Windows 6.2.x versions and all UNIX installations) or definethe setting, such as printers. Brio Servers (6.5) INI settings are maintained in the Windows registry. You mustexport the registry entry from the production system and import it into the test server registry.
Install Brio Enterprise or Brio Intelligence 6.2.2 or later on the test server to connect to the test Repository.Modify Repository and server configuration files (for BrioONE and Portal) to use the test server name.
Copy converted files created prior to Brio Enterprise 6.2.2 to the test server. This could take considerable timedepending on the size of the ODS and BCS document directories.
Copy OCE files to the test server. Any OCE that is setup to use database drivers not compliant with Reportingand Analysis should be opened, updated, and republished to the Brio Enterprise or Brio Intelligence 6.2.2 orlater prior to migration.
20 Performing Migration

Copy customized HTML files to the test server. Requirements for Brio Portal and Brio Intelligence Web interfacecustomizations should be reanalyzed for Reporting and Analysis deployment.
Test logging into the test server with customized Web pages.
Download, copy, and install the Migration Utility. See the Hyperion Reporting and Analysis Migration UtilityGuide for information on using the Migration Utility.
Creating a Source Test System for Hyperion AnalyzerTable 9 describes the general aspects of creating a source test system for Hyperion Analyzer.
Table 9 Hyperion Analyzer Source Test Server Checklist
Install/upgrade the test server operating system for assessment as required. See “Environment Prerequisites”on page 19 for operating system requirements.
Backup the Hyperion Analyzer Repository.
Copy Hyperion Reports Repository tables from the production database to a test database.
Install the version of Hyperion Analyzer that corresponds to the Production server.
Download, copy, and install the Migration Utility. See the Hyperion Reporting and Analysis Migration UtilityGuide for information on using the Migration Utility.
Creating a Source Test System for Hyperion ReportsTable 10 describes the general aspects of creating a source test system for Hyperion Reports.
Table 10 Hyperion Reports Source Test Server Checklist
Install/upgrade the test server operating system for assessment as required. See “Environment Prerequisites”on page 19 for operating system requirements.
Backup the Hyperion Reports Repository.
Copy Hyperion Reports Repository tables from the production database to a test database.
Install the version of Hyperion Reports that corresponds to the Production server.
Configure the Hyperion Reports server for the Hyperion Reports Repository.
Connect Hyperion Reports to the Production Repository.
Download, copy, and install the Migration Utility. See the Hyperion Reporting and Analysis Migration UtilityGuide for information on using the Migration Utility.
Creating the Test Environment 21
Setting Up the Target Test SystemAfter you set up the source test server, you can set up the target test server. You do not need toset up your target system exactly as you have your Reporting and Analysis system implementedand distributed for production use. This is because you can perform final Reporting and Analysisconfiguration after migration. However, you must have the correct hardware and software asspecified in “Environment Prerequisites” on page 19. You can set up the Reporting and Analysisinstallation directory according to your site’s best practice.
While your Reporting and Analysis architecture may match current product deploymentinfrastructure in size and number of systems, the Reporting and Analysis solutions areconfigured with server names different from the current production box. It is best to performthis configuration prior to migration. Plan for the appropriate IT resources to create the properenvironment with new network DSN settings for the Reporting and Analysis productioninstance.
The checklists in the following sections describe the general aspects of creating a target testsystem. Steps may vary for each implementation.
Table 11 describes the general aspects of creating a target test system.
Table 11 Target Test Server Checklist
Set up all supported hardware and software according to the Reporting and Analysis requirements. See““Environment Prerequisites” on page 19 for information on hardware and software requirements for the targetsystem.
Download, copy, and install Reporting and Analysis .
For a Brio Portal migration, configure your hosts (including those that you use as data sources) so that yourservices are distributed exactly the same way that they are distributed in the source system. See “Setting UpHosts” on page 22 for more information on proper host configuration.
For a Brio Portal migration, set up your authentication appropriately. See “Setting up Authentication” on page23 for more information on authentication in the target system.
Download, copy, and install the Migration Utility.
Verify that the performance of your test environment is comparable your production environment and that theappropriate output is produced.
Make a backup of the test server files, directories, and databases after the initial setup. This way, you do nothave to reinstall Reporting and Analysis after each test migration.
Setting Up HostsWhen performing a Portal or BrioOne migration, define the mapping for the Source and Targethosts. Using the Migration Utility, map the source host to the target host by entering names ofthe source and target hosts in the Source-Target Host Mappings screen in the Migration Utilitywizard. For example, you must map each source job factory to a target host job factory.
22 Performing Migration
For the BrioOne and Intelligence Server migration, you will be prompted for configurationinformation for the Target system, including the Target Host, Target Port, Username andPassword.
For Reports Migration, you will need the Reports Administrator and the Global Administratoruser ID and password.
Setting up AuthenticationSetting up authentication involves configuring external authentication for Shared Services. Toset up authentication, configure Shared Services with whatever properties are needed to accessthe external directory services (NTLM, Microsoft AD, or LDAP).
For detailed information on setting up external authentication for Shared Services , see theHyperion System 9 Shared Services Installation Guide.
Validating the Test EnvironmentBefore testing, validate the functionality of the test environment. Table 12 lists the general stepsinvolved in validating the test environment. The table assumes that appropriate high-levelplanning and system requirements have been fulfilled. For information on environmentprerequisites and other migration steps, see “Environment Prerequisites” on page 19 and“Migrating the Test Server” on page 24.
Table 12 Test Environment Validation Checklist
Validation Steps Details
Validate source system setup To validate the source system setup, run the Migration Utility in the pre-migration test mode. TheMigration Utility automatically confirms that all source system settings are properly mapped andthat the Repository database is accessible. You can use the log files generated by the MigrationUtility for troubleshooting if necessary.
Validate target system setup Bring up the new Reporting and Analysis system at least one time to ensure that the products areinstalled and configured properly.
Use the sample content, which is provided with the Reporting and Analysis installation to validatethat the server is functional.
Note: Administrators should not log into the target system as a user that is being migrated. Instead,administrators should create a new native user (in the Oracle's Hyperion® Shared ServicesConsole), provision the user with any necessary roles, and log into the system as the new user.
Validate the source repository Before validating the source repository, you may want to delete all objects that will not be migrated.Validating the source repository involves testing the source Repository content for issues such asillegal document and folder names, unsupported document types like ADR managed documents,and so on.
Validating the Test Environment 23
Migrating the Test ServerYou can begin migration testing after you set up and validate the test environment and createan initial plan (see “Validating the Test Environment” on page 23). In many cases, the testmigration is not much different from the final migration, so you can use the guidelines discussedin this section as a basis for the final migration.
Caution!
Do not publish documents in Reporting and Analysis until you successfully migrate the sourcesystem. In addition, do not change the content of the ODS and BCS repositories duringmigration. Make sure that jobs are not changed, no new documents are registered, and nophysical resources (printers or directories), groups, users, or OCEs are added or modified.
Order of Migration It is recommended that you run the migration in a “staged” process (one type of object at atime). When using the Migration Utility it is possible to migrate all components in one run orto migrate components incrementally; however, you must migrate all components in the orderdisplayed in the Migration Utility. Back up your data after each successful migration instanceto ensure easy restoration if you need to repeat the process.
Review the following sections for information on:
● Brio Portal Migration Order
● Brio Intelligence Server Migration Order
● Hyperion Analyzer Migration Order
● Hyperion Reports Migration Order
● Hyperion Performance Suite Migration Order
Brio Portal Migration OrderWhen you migrate from Brio Portal or BrioONE, follow this sequence:
1. Brio Portal pre-migration check—Use the Migration Utility in pre-migration test mode toidentify possible migration problems.
2. Brio Portal migration—The Migration Utility copies the metadata for the RepositoryService and Event Service and maps it into the Reporting and Analysis database schema.Whether or not you choose to migrate the following components all at once or separately,you must migrate them in the order shown:
● Users—Account owners identified by a user ID and user name.
● Groups—Named collections of users.
● User Preferences—User-specific settings.
24 Performing Migration
● Repository Metadata—Descriptions of the repository data. For example, the metadatacould display the name of the content, permissions, etc.
● Events—User subscriptions and notifications of events involving subscriptions, jobs,parameter lists for jobs, and exceptions.
● Authorization—Access control information for folders, documents, and resources.
● Repository Content—The content of the system, folders, and files. Repository contentsis the largest object to migrate.
Brio Intelligence Server Migration OrderWhen you migrate from Brio Intelligence, follow this sequence:
1. Brio Intelligence Server pre-migration check—Use the Migration Utility in pre-migrationtest mode to identify possible migration problems.
2. Brio Intelligence Server migration—Whether or not you choose to migrate the followingcomponents all at once or separately, you must migrate them in the order shown:
● ODS Objects
Users—Account owners identified by a user ID and user name.
Groups—A named collections of users.
Folders—Items are organized into folders. Folders are similar to the directories orfolders of your operating system, and are arranged in a hierarchical structure. A foldercan contain subfolders, items, or both.
OCE Files—Files that encapsulate and store connection information used to connectHyperion applications to a database. OCE files specify the database API (ODBC,SQL*Net, etc.), database software, the network address of the database server, and yourdatabase user name. Once created, a user can specify the OCE file and database passwordand logon. An OCE file is required for a Hyperion Intelligence document to use adatabase, the file extension is .oce.
BQY Documents—Files created by Hyperion Intelligence and published into theRepository as files or as jobs.
Row Level Security Data—Data containing row-level security. Row-level security givesusers access to only the information they need to make informed decisions. For example,managers need payroll information on their direct reports. Managers do not need toknow payroll information for other departments within the organization. When youselect this object, the next page in the Migration Utility wizard prompts you to configurethe target row level security repository.
● BCS Objects
Users—Account owners identified by a user ID and user name.
Groups—A named collection of users.
Calendars—Calendars used to schedule jobs in the Broadcast Server.
Events —Events in the Broadcast Server.
Migrating the Test Server 25
Printer Paths—Printer path definitions in the Broadcast Server.
Paths—Path definitions in the BroadCast Server.
OCE Files—Files that encapsulate and store connection information used to connectHyperion applications to a database. OCE files specify the database API (ODBC,SQL*Net, etc.), database software, the network address of the database server, and yourdatabase user name. Once created, a user can specify the OCE file and database passwordand logon. An OCE file is required for a Hyperion Intelligence document to use adatabase, the file extension is .oce.
BQY Jobs —Jobs created by Hyperion Intelligence and published into the Repository.
Hyperion Analyzer Migration OrderWhen you migrate from Hyperion Analyzer, follow this sequence
1. Hyperion Analyzer pre-migration check—Use the Migration Utility in pre-migration testmode to identify possible migration problems. The test mode is only available for users andgroups. You cannot run a pre-migration test on repository content.
2. Hyperion Analyzer migration—The Migration Utility copies the Repository and maps itinto the Reporting and Analysis database schema. Whether or not you choose to migratethe following components all at once or separately, you must migrate them in the ordershown:
● Users and Groups-—Users are account owners identified by a user ID and user name.Groups incorporate named collections of users.
● Repository Content— The content of the system, namely: folders, files, jobs, URLs, andshortcuts and their metadata (properties). The content resides in the repository, whichconsists of file in the native file system and metadata for each object in a database in aRelational Database Management System (RDBMS). Repository content is the largestobject to migrate.
Hyperion Reports Migration OrderWhen you migrate from Hyperion Reports, follow this sequence:
1. Hyperion Reports pre-migration check—Use the Migration Utility in pre-migration testmode to identify possible migration problems. The test mode is only available for users andgroups. You cannot run a pre-migration test on repository content.
2. Hyperion Reports migration—The Migration Utility copies the Repository and maps it intothe Reporting and Analysis database schema. Whether or not you choose to migrate thefollowing components all at once or separately, you must migrate them in the order shown:
● Users—Account owners identified by a user ID and user name.
● Groups—A named collection of users.
● Repository Content—The content of the system, namely: folders, files, jobs, URLs, andshortcuts, and their metadata (properties). The content resides in the Repository, whichconsists of files in the native file system and metadata for each object in a database in a
26 Performing Migration
Relational Database Management System (RDBMS). Repository content is the largestobject to migrate.
Hyperion Performance Suite Migration OrderWhen you migrate user provisioning information from Hyperion Performance Suite, follow thissequence:
1. Hyperion Performance Suite pre-migration check—Use the Migration Utility in pre-migration test mode to identify possible migration problems.
2. Hyperion Performance Suite migration—Whether or not you choose to migrate thefollowing components all at once or separately, you must migrate them in the order shown:
● Users Defined Roles—The roles defined for the users in the Hyperion performanceSuite 8.x system.
● Users—Account owners identified by a user ID and user name.
● Groups—Named collections of users.
● User Preferences—User-specific settings (such as an email address).
● Repository Metadata—Descriptions of the repository data. For example, the metadatacould display the name of the content, permissions etc.
● Repository Files—The content of the system, folders, and files. Repository content isthe largest object to migrate.
● Events—User subscriptions and notifications of events involving subscriptions, jobs,parameter lists for jobs, and exceptions.
● Authorization—Access control information for folders, documents, and resources.
Migration Test ChecklistTable 13 shows the basic steps involved in testing a migration, which may vary for each productimplementation.
Table 13 Migration Test Checklist
Migration Test Steps Details
Migrate in pre-migration test mode First, run the Migration Utility in pre-migration test mode. When run in pre-migration testmode, the Migration Utility performs all steps necessary to run an automated migrationbut does not actually move files from the source system to the target system or move datato the Repository tables.
Next, review the log files for possible complications. Correct any issues before running theactual migration without having to reset the target environment.
For additional information on how to run the Migration Utility in pre-migration test mode,follow the instructions in the Hyperion Reporting and Analysis Migration Utility Guide
Note: Running the Migration Utility in pre-migration test mode does not uncover all issues.Additional errors may arise in the actual migration, so try this process on a test serverbefore initiating it on the production environment. If the test server is to become the
Migrating the Test Server 27
production Reporting and Analysis instance, then your test migration is your productionsystem. In this case, the migration process is shorter but should have the same emphasison incremental backups throughout the process.
Evaluate pre-migration test run log files Evaluate the log files to determine which aspects of the source system need modificationbefore you perform the final pre-migration test run. Modify the source system accordingto the log messages.
See “Using the Migration Log Files ” on page 29 for more information.
Migrate the test server After you get a clean pre-migration test run, perform an actual migration on the test server.Take notes about every aspect of what you encounter during this initial test migration.Also, log the time it takes to complete the automated process.
Validate your test Analyze the migration log files for important messages, and check all components of themigrated system. Check that all users, groups, files, directories, and properties migratedproperly. Check job schedules, OCEs, and e-mail notifications. Run some jobs. Bothperformance and data validation are important components of validating your testmigration.
See “Validating the Test Environment” on page 23 for more information on the validationprocess. Use your findings to adjust your migration plan if necessary.
Reset the test server Reset the target test server to the original system. Use the backup copies of the originalsystem to restore the test server to its original state. The next round of migration testinguses this “pristine” system to validate the updated migration plan.
Re-test the migration When you think your migration plan covers all contingencies, try the migration one moretime. Make sure that you can perform a complete and successful migration using only themigration plan. Take extensive notes again. If you cannot migrate with total success, usethose notes to modify the migration plan further. Keep repeating this test, reset and retestcycle until you get a totally clean migration.
During this final test migration, keep track of the time it takes from start to finish, so youcan plan the scheduling of the production system migration accordingly. Keep track of allthe resources you used as well. Resource tracking should include both computer resourcesand personnel. You need a complete picture of everything it takes for a smooth migrationof the production system.
Note:
While migrating the production system, users need to be locked out of the system until migrationand validation are complete.
Evaluating Test ResultsAfter completing the test migration, ensure that all components migrated correctly by checkingcomponents in the system and using the migration log files. As a result of the analysis, your teamcan identify the migrated content and the content that you need to recreate for Reporting andAnalysis. Successful testing requires a working knowledge of Reporting and Analysis.
28 Performing Migration
Using the Migration Log Files The Migration Utility produces log files, which contain error messages, whenever it is run ineither pre-migration test mode or for the actual migration in run mode.
The Migration Utility produces log files for each migration. The log files produced depend onwhich products you selected in the Migration Utility wizard.
For each product migrated, you select the level of the error messages and the location of the logfiles in the Migration Utility wizard.
The Migration Utility saves each log produced with a time/date stamp inserted beforethe .log extension. This makes it easy to compare the outcomes of the migrations. For example:
migration_0811041139.log
Checking the Components Within the System Confirm that all required components and objects correctly migrate to the Reporting andAnalysis test environment. Table 14 includes some post-migration validation tasks:
Table 14 Post-migration Validation Tasks
Verify users and groups in the target system with a particular emphasis on permissions and group membership.
Verify folder structure and documents in the target system with particular emphasis on document location andfolder ownership.
Verify OnDemand Server content in the target system with particular emphasis on documents and processingconnections.
Verify Broadcast Server content in the target system with particular emphasis on jobs and events.
Verify Job Factories and jobs in the target system with particular emphasis on SQR jobs, databases, and hosts.
Verify that all jobs run according to schedule. Schedule an infrastructure review with Hyperion Consulting Servicesor your local partner to address performance concerns.
Verify that all jobs produce the appropriate output.
Tip:
You can use the Hyperion Intelligence inventory BQY to determine source system counts forthe various items migrated.
Tip:
See Chapter 3, “Validating Migration Results” for an expanded list of migration validation andgeneral post-migration steps.
Evaluating Test Results 29

Migrating the Production ServerAfter you thoroughly test your migration plan in a test environment, you can perform the finalmigration either on the same test server or on the production server. Performing the finalmigration on the test server can often save time and resources and may enable the current systemand the new system to run in parallel until the new Reporting and Analysis server is ready forgeneral use.
The final migration should follow the same process as that used for testing. You can use theprevious sections of this chapter as a reference for both test and final migration.
Note:
During the final migration process, it is critical that you have a plan for change control or thatyou do not make any changes until you complete the migration and validation of the productionserver. Failure to implement a change control process or prevent changes will most likely leadto undesired results.
After you validate the successful migration of content using the Migration Utility, you canperform system configuration and customizations as necessary according to your migrationplan.
An example of system configuration is finalizing the production server according to theReporting and Analysis architecture, which may include deleting obsolete Brio Portal JobFactories (Hosts) and data sources, installing and configuring new Job Service hosts andassociated data sources, and editing affected jobs.
Allow a grace period to verify that all jobs are running according to schedule and thatcomponents are working properly in the new system. After you set up the Reporting and Analysisserver to suit the needs of your organization, users can begin working with the new system.
Manual Migration StepsOnce you meet the migration prerequisites, determine which system components need to bemanually migrated. Depending on your current product solution, you may need to performfewer manual migration steps. The Migration Utility migrates most repository content,including items such as users, groups, and their attributes, documents, folders, OCEs and so on.Because of the complexity of some items, they may require manual migration steps, which arecompleted either prior to or after you run the Migration Utility. Other components cannot bemigrated because Reporting and Analysis does not support them.
Review the following sections for information on:
● Components Requiring Pre-migration Steps
● Components Requiring Post-migration Steps
30 Performing Migration
Note:
You can contact your local consulting support or Hyperion for help with migrating itemsthat are not fully supported by the Migration Utility.
Components Requiring Pre-migration StepsTable 15 lists the pre-migration steps for components that the Migration Utility does notautomatically migrate. After you perform these pre-migration steps, you can use the MigrationUtility to automate migration for the remainder of the components.
Table 15 Pre-migration Steps for Items Not Automatically Migrated by the Migration Utility
Components Manually Migrated Pre-migration Step Source System
BQY documents with detail section reports Convert BQY documents with detail section reports (left overfrom 5.5) into report sections. Then save the documents in BrioEnterprise or Brio Intelligence 6.2.2 or later and delete thedetail section.
Intelligence Server
Externally authenticated users and groups The Migration Utility does not migrate users and groups thatwere imported into Portal from an external source. As a result,you should set up Shared Services to import users and groupsfrom the same external source you used to import them intoPortal. Perform this step prior to Portal migration."
Portal
MAPI email addresses MAPI email addresses are not supported in Reporting andAnalysis. Convert MAPI email addresses to SMTP addressesprior to migration.
Intelligence Server
Password protected documents Remove password protection to migrate these documents Intelligence Server
Group and folder names with special characters There are certain symbols in a user’s first name, a user’s lastname, a user’s login ID, and a group name that are not allowedin Reporting and Analysis. If the Migration Utility encountersany of these symbols, it replaces them with an acceptablesymbol.
See “Special Symbols in Users and Groups” in the HyperionReporting and Analysis Migration Utility Guide. for informationon the symbols are replaced after migration to Reporting andAnalysis
General source system cleanup You may want to remove source system content that is nolonger used or referenced such as: invalid or unused OCEs,expired reports, irrelevant jobs, users no longer with thecompany, outdated groups, etc.
N/A
Note:
If you configured row-level security (RLS) parameters in your Reporting and Analysisinstallation prior to migration, the Reporting and Analysis automatically migrates theseparameters. After migration, make sure that RLS is enabled in the new system.
Manual Migration Steps 31
Components Requiring Post-migration Steps Table 16 lists the post-migration steps for migrating components that the Migration Utility doesnot automatically migrate. See “Validating Hyperion Performance Suite Migration” on page45 for more information.
Table 16 Post-migration Steps for Items Not Automatically Migrated by the Migration Utility
Components Not Migrated Post-migration Step Migration Utility
Alternate metadata OCEs Alternate metadata OCEs are not migrated. Aftermigration, you must reestablish the link to the alternatemetadata OCE.
Intelligence Server
Append Job ID and Report Cycle Name to File Name toEnsure Uniqueness job parameter.
The Append Job ID and Report Cycle Name To File Nameto Ensure Uniqueness action parameter is not migrated.You must modify the Append Unique Identifier toFilename parameter in Reporting and Analysis aftermigration.
Intelligence Server
Locally saved documents The Migration Utility does not migrate locally saveddocuments, but the “source” document from which thelocally saved document originated is migrated.
After migration, if users want to work with locally saveddocuments online, they must manually enter the URL ofthe new servlet in the Connection Dialog box. The usermust choose Edit on the dialog box and change the servercomputer name in the URL to that of the new system.
For example, the user must replace the bracketedinformation in the following URL to connect:
http://< server machine name>/Brio/dataaccess/browse?
By editing the URL, users reestablish the link betweenthe local and the published copy of the document. Aftera user saves a document with the new URL, the user isno longer prompted to enter the new URL when workingwith that document online.
Note: You can allow users to publish their documents tothe server by giving them appropriate rights to a personaldirectory.
Intelligence Server
SmartForms (custom forms) The custom forms for SQR are now created with JSP (JavaServer Page) technology; previous versions were createdwith HTML. SmartForms must be re-created or edited withJSP to work in Reporting and Analysis.
Portal
Web client customizations Web client customizations are not migrated. They mustbe redone after migration.
Intelligence Server
Mapping Access Privileges to Reporting and AnalysisReporting and Analysis uses roles as a way of granting users and groups access to businessfunctions. For example, the job publisher role grants the privilege to run or publish a job. Before
32 Performing Migration
migrating, make a detailed plan for applying roles and access privileges in the Reporting andAnalysis system, based on the Migration Utility generic system for granting roles and accessprivileges.
Review the following sections for information on:
● Role Mapping
● Access Control Mapping
Role Mapping To preserve the functions assigned to certain users and groups in the old system, the MigrationUtility maps these users and groups to new roles in Reporting and Analysis. In some cases theMigration Utility automatically assign roles at the group or user level, but in other cases youmust assign roles as a post-migration step.
See Migrating Roles in the Hyperion Reporting and Analysis Migration Utility Guide forinformation on how legacy roles in the source system are mapped to new roles in Reporting andAnalysis.
Access Control Mapping BQY documents and scheduled jobs in the Brio Intelligence repositories do not have accesscontrol like that in Portal and Reporting and Analysis. The Migration Utility uses the guidelinesin Table 17 to apply access to migrated components.
Table 17 Access Control on Migrated Components
Server Components Access Privilege
ODS Folders All ODS groups get View access control on ODS folders. The Content Publisherrole gets Modify access on ODS folders.
BI_Migrate.ini provides a parameter value that enables you to assign all ODSgroups to one default ODS group. If you have many ODS groups, having this“parent” group makes assigning access control privileges on folders much moreefficient than having to assign access control privileges to many groupsindividually.
OCEs The owner of ODS OCEs is the Administrator (the user who performs themigration). The Content Publisher role is assigned View access privilege to ODSOCEs.
Documents After migration, there is no change in the adaptive states on ODS-registereddocuments. However, the corresponding access privileges are added. Considerthese examples:
● If the Sales Group has View adaptive state in the source system, it has Viewaccess to documents and View adaptive state access on jobs in Reportingand Analysis.
● If the Marketing Group has View and Analyze adaptive state in the sourcesystem, then it has View access to the document and View and Analyzeadaptive state access on jobs in Reporting and Analysis.
Mapping Access Privileges to Reporting and Analysis 33
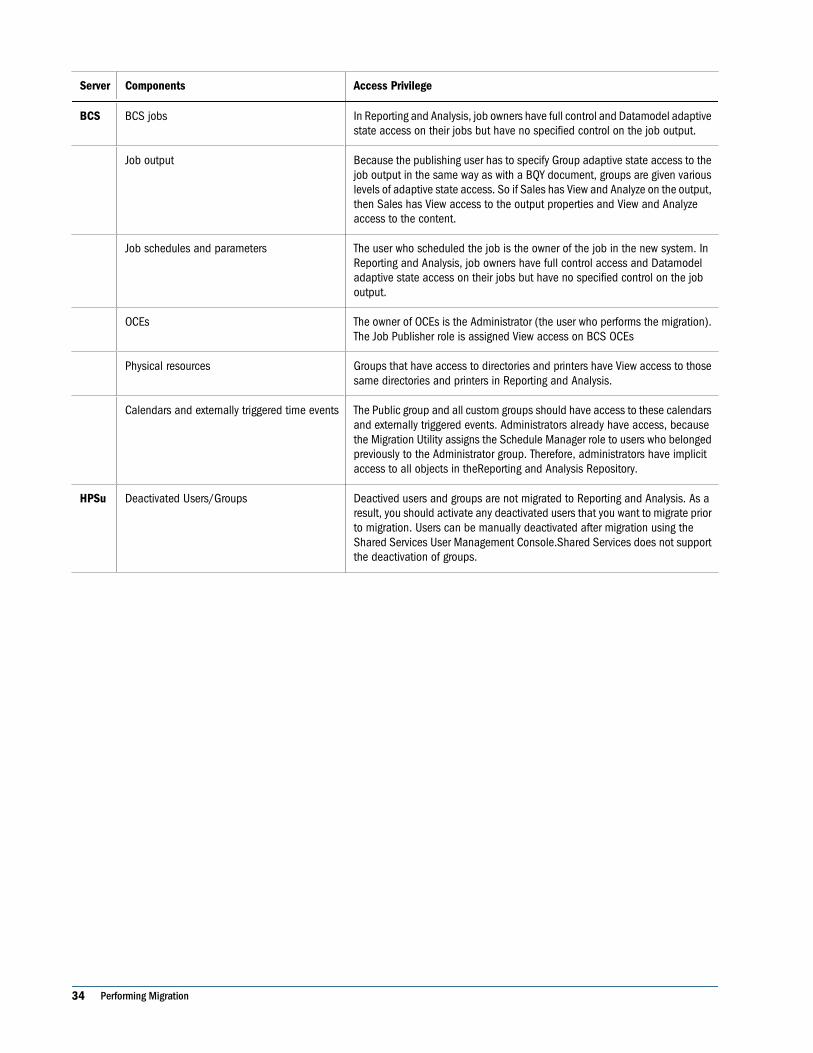
Server Components Access Privilege
BCS BCS jobs In Reporting and Analysis, job owners have full control and Datamodel adaptivestate access on their jobs but have no specified control on the job output.
Job output Because the publishing user has to specify Group adaptive state access to thejob output in the same way as with a BQY document, groups are given variouslevels of adaptive state access. So if Sales has View and Analyze on the output,then Sales has View access to the output properties and View and Analyzeaccess to the content.
Job schedules and parameters The user who scheduled the job is the owner of the job in the new system. InReporting and Analysis, job owners have full control access and Datamodeladaptive state access on their jobs but have no specified control on the joboutput.
OCEs The owner of OCEs is the Administrator (the user who performs the migration).The Job Publisher role is assigned View access on BCS OCEs
Physical resources Groups that have access to directories and printers have View access to thosesame directories and printers in Reporting and Analysis.
Calendars and externally triggered time events The Public group and all custom groups should have access to these calendarsand externally triggered events. Administrators already have access, becausethe Migration Utility assigns the Schedule Manager role to users who belongedpreviously to the Administrator group. Therefore, administrators have implicitaccess to all objects in theReporting and Analysis Repository.
HPSu Deactivated Users/Groups Deactived users and groups are not migrated to Reporting and Analysis. As aresult, you should activate any deactivated users that you want to migrate priorto migration. Users can be manually deactivated after migration using theShared Services User Management Console.Shared Services does not supportthe deactivation of groups.
34 Performing Migration
3Validating Migration Results
In This Chapter
About Validating Migration Results.. . . . . . . . . . . . . . . . . . . . . . . . . . . . . . . . . . . . . . . . . . . . . . . . . . . . . . . . . . . . . . . . . . . . . . . . . . . . . . . . . . . . . . . . . . . . . .35
Validating Brio Portal Migration... . . . . . . . . . . . . . . . . . . . . . . . . . . . . . . . . . . . . . . . . . . . . . . . . . . . . . . . . . . . . . . . . . . . . . . . . . . . . . . . . . . . . . . . . . . . . . . . .35
Validating Brio Intelligence Migration ... . . . . . . . . . . . . . . . . . . . . . . . . . . . . . . . . . . . . . . . . . . . . . . . . . . . . . . . . . . . . . . . . . . . . . . . . . . . . . . . . . . . . . . . . .41
Validating Hyperion Analyzer Migration ... . . . . . . . . . . . . . . . . . . . . . . . . . . . . . . . . . . . . . . . . . . . . . . . . . . . . . . . . . . . . . . . . . . . . . . . . . . . . . . . . . . . . . . .44
Validating Hyperion Reports Migration ... . . . . . . . . . . . . . . . . . . . . . . . . . . . . . . . . . . . . . . . . . . . . . . . . . . . . . . . . . . . . . . . . . . . . . . . . . . . . . . . . . . . . . . . .44
Validating Hyperion Performance Suite Migration ... . . . . . . . . . . . . . . . . . . . . . . . . . . . . . . . . . . . . . . . . . . . . . . . . . . . . . . . . . . . . . . . . . . . . . . . . . . .45
General Post Migration Steps... . . . . . . . . . . . . . . . . . . . . . . . . . . . . . . . . . . . . . . . . . . . . . . . . . . . . . . . . . . . . . . . . . . . . . . . . . . . . . . . . . . . . . . . . . . . . . . . . . .45
About Validating Migration ResultsAfter you complete the migration, ensure that all components migrated properly. This processincludes checking the components in your system and using the log files to validate migration.You may have migrated some or all of the following components:
● Brio Portall 7.0.5
● BrioONE (Brio Portal 7.0.5 or later and the OnDemand Server 6.6.4 or later)
● Brio Intelligence Server 6.6.4 (OnDemand Server 6.6.4 or later and Broadcast Server 6.6.4or later)
● Hyperion Analyzer 6.5, 7.0.1, 7.2, 7.2.1
● Hyperion Performance Suite 8.x
● Hyperion Reports 7.0.x, or 7.2.x
After you validate the migration, you need to perform post-migration steps to ensure properfunctionality of yourReporting and Analysis system. The various components should functionwith the same level of effectiveness in your new environment as they do in your existing system.
Validating Brio Portal MigrationUse Table 18 as a checklist to confirm that all required Brio Portal components and objects havecorrectly migrated to the new Reporting and Analysis environment.
About Validating Migration Results 35
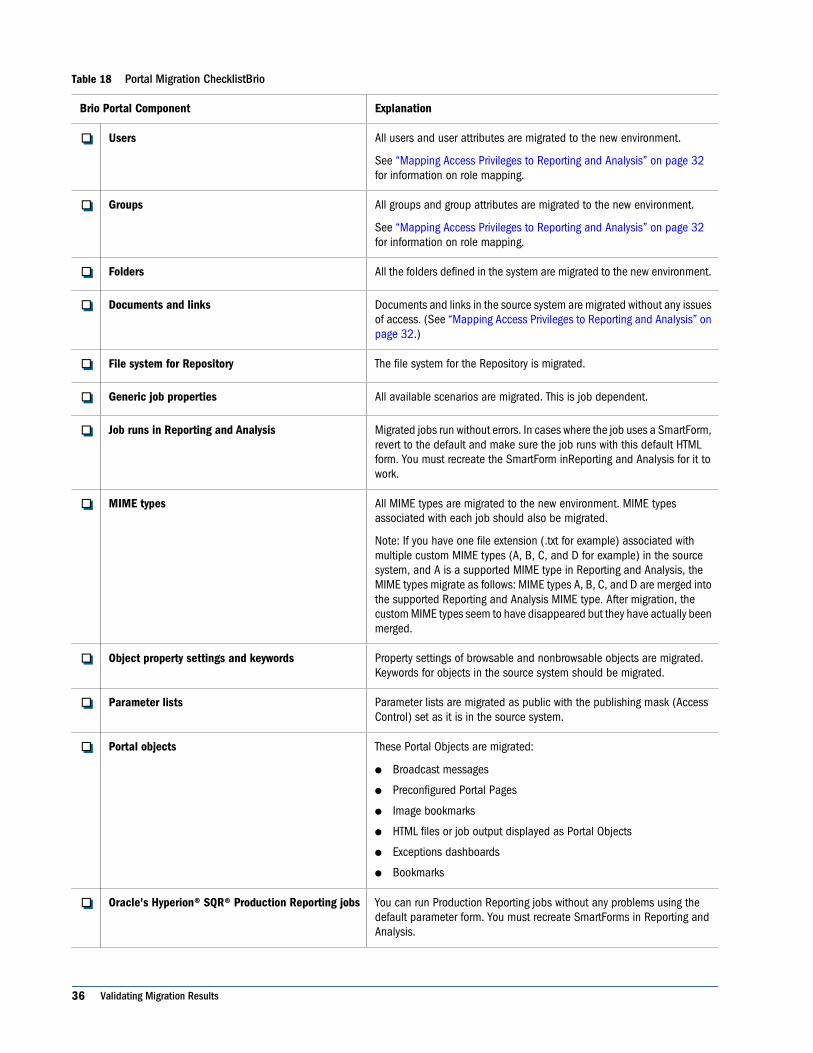
Table 18 Portal Migration ChecklistBrio
Brio Portal Component Explanation
Users All users and user attributes are migrated to the new environment.
See “Mapping Access Privileges to Reporting and Analysis” on page 32for information on role mapping.
Groups All groups and group attributes are migrated to the new environment.
See “Mapping Access Privileges to Reporting and Analysis” on page 32for information on role mapping.
Folders All the folders defined in the system are migrated to the new environment.
Documents and links Documents and links in the source system are migrated without any issuesof access. (See “Mapping Access Privileges to Reporting and Analysis” onpage 32.)
File system for Repository The file system for the Repository is migrated.
Generic job properties All available scenarios are migrated. This is job dependent.
Job runs in Reporting and Analysis Migrated jobs run without errors. In cases where the job uses a SmartForm,revert to the default and make sure the job runs with this default HTMLform. You must recreate the SmartForm inReporting and Analysis for it towork.
MIME types All MIME types are migrated to the new environment. MIME typesassociated with each job should also be migrated.
Note: If you have one file extension (.txt for example) associated withmultiple custom MIME types (A, B, C, and D for example) in the sourcesystem, and A is a supported MIME type in Reporting and Analysis, theMIME types migrate as follows: MIME types A, B, C, and D are merged intothe supported Reporting and Analysis MIME type. After migration, thecustom MIME types seem to have disappeared but they have actually beenmerged.
Object property settings and keywords Property settings of browsable and nonbrowsable objects are migrated.Keywords for objects in the source system should be migrated.
Parameter lists Parameter lists are migrated as public with the publishing mask (AccessControl) set as it is in the source system.
Portal objects These Portal Objects are migrated:
● Broadcast messages
● Preconfigured Portal Pages
● Image bookmarks
● HTML files or job output displayed as Portal Objects
● Exceptions dashboards
● Bookmarks
Oracle's Hyperion® SQR® Production Reporting jobs You can run Production Reporting jobs without any problems using thedefault parameter form. You must recreate SmartForms in Reporting andAnalysis.
36 Validating Migration Results
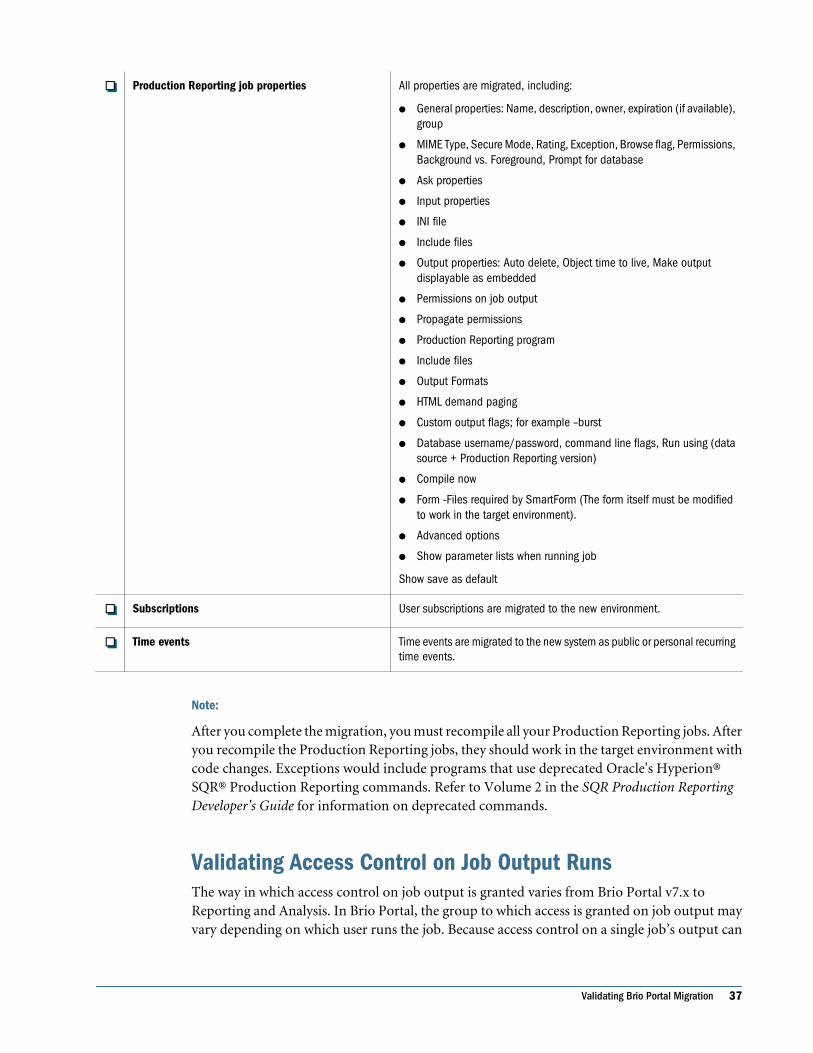
Production Reporting job properties All properties are migrated, including:
● General properties: Name, description, owner, expiration (if available),group
● MIME Type, Secure Mode, Rating, Exception, Browse flag, Permissions,Background vs. Foreground, Prompt for database
● Ask properties
● Input properties
● INI file
● Include files
● Output properties: Auto delete, Object time to live, Make outputdisplayable as embedded
● Permissions on job output
● Propagate permissions
● Production Reporting program
● Include files
● Output Formats
● HTML demand paging
● Custom output flags; for example –burst
● Database username/password, command line flags, Run using (datasource + Production Reporting version)
● Compile now
● Form -Files required by SmartForm (The form itself must be modifiedto work in the target environment).
● Advanced options
● Show parameter lists when running job
Show save as default
Subscriptions User subscriptions are migrated to the new environment.
Time events Time events are migrated to the new system as public or personal recurringtime events.
Note:
After you complete the migration, you must recompile all your Production Reporting jobs. Afteryou recompile the Production Reporting jobs, they should work in the target environment withcode changes. Exceptions would include programs that use deprecated Oracle's Hyperion®SQR® Production Reporting commands. Refer to Volume 2 in the SQR Production ReportingDeveloper's Guide for information on deprecated commands.
Validating Access Control on Job Output RunsThe way in which access control on job output is granted varies from Brio Portal v7.x toReporting and Analysis. In Brio Portal, the group to which access is granted on job output mayvary depending on which user runs the job. Because access control on a single job’s output can
Validating Brio Portal Migration 37
vary depending on who ran the job in the source system, the way in which the Migration Utilityapplies access control on job output run in Reporting and Analysis may vary as well.
Use the jobPublishingMasksCreated.xml file, located in the same directory as theMigration Utility, to verify that the proper access control is given to job output run in Reportingand Analysis. This XML file lists the access control information for the job output of each jobmigrated to the new system.
Note:
The syntax of XML (Extensible Markup Language) requires that each element have an openingtag <element tag> and closing tag </element tag>. XML elements are nested to create a hierarchyof elements.
Table 19 defines the tags used in the jobPublishingMasksCreated.xmlfile. Refer toSample JobPublishingMasksCreated.xml following this table to view the format of thejobPublishingMasksCreated.xml file.
Table 19 jobPublishingMasksCreated.xml Tag Definitions
Tag Definition
<JOBMASKS> Begins the document. The closing tag </JOBMASKS> appears at the end of thedocument.
<JOB> Begins a specific job. The closing tag </JOB> ends each job.
<JOBNAME> Specifies the job name.
<PATH> Specifies the location of the job in Browse module.
<JOBPUBLISHINGMASK defined='true/false'> Specifies whether the administrator defined a publishing mask for this job in the sourcesystem. If defined=TRUE, the Migration Utility used the publishing mask specified inthe old system. If defined=FALSE, the Migration Utility used the publishing mask of theuser who runs the job. In the latter case, an additional list of elements is included foryour information:
<GROUPREAD>
<GROUPWRITE>
<GROUPEXECUTE>
<WORLDREAD>
<WORLDWRITE>
<WORLDEXECUTE>
These elements can have a value of 1 or 0, where 1 indicates that access is grantedand 0 indicates that access is denied.
Notice the difference between the two jobs in SampleJobPublishingMasksCreated.xml. The second job, job2, has a specified jobpublishing mask—the element is defined as TRUE, so these extra elements are included.
<JOBPUBLISHING- MASKACCESSORS> Begins the list of users and groups that can access the job output in Reporting andAnalysis. It includes the following sub-elements: <ACCESSOR> and <ROLE>, where
38 Validating Migration Results
Tag Definition
<ACCESSOR> specifies a user or group that has access on the job output in Reportingand Analysis, and <ROLE> specifies the access privilege the preceding accessor hason the job output. In the following example the user ADMINISTRATOR and world grouphave Modify access privilege on the job output:
<PUBLISHINGMASKACCESSORS>
<ACCESSOR>ADMINISTRATOR</ACCESSOR>
<ROLE>MODIFY</ROLE>
<ACCESSOR>world</ACCESSOR
<ROLE>MODIFY</ROLE>
</PUBLISHINGMASKACCESSORS>
Note the first accessor listed, which may be the accessor created from the defaultgroup. The Migration Utility chooses the default group of the job owner. However, thegroup the utility chooses may not match the one to which you want to assign defaultaccess in the new system, so modify the access as necessary.
In the case of external authentication with externally managed groups, this defaultgroup may not exist.
<DATEPUBLISHED> Specifies the date the job was published.
<FOLDERGROUP> Specifies the group associated with the permissions of the folder where the job outputwas published in the source system.
<FOLDERPERMISSIONS> Begins the list of user and group permissions on the folder that contains the job in thesource system. It includes the following sub-elements:
<GROUPREAD>
<GROUPWRITE>
<GROUPEXECUTE>
<WORLDREAD>
<WORLDWRITE>
<WORLDEXECUTE>
These elements can have a value of 1 or 0, where 1 indicates that access is grantedand 0 indicates that access is denied.
<JOBOWNER> Indicates the owner of the job.
<JOBACCESSORS> Begins the list of users and groups that can run the actual job in Reporting and Analysis.It includes the following sub-elements: <ACCESSOR> and <ROLE>, where<ACCESSOR> specifies a user or group that has access on the job in the target system,and <ROLE> specifies the access privilege the preceding accessor has on the job. Inthe following example the user administrator and the world group have Modify and Runaccess privilege on the job:
<JOBACCESSORS>
<ACCESSOR>ADMINISTRATOR</ACCESSOR>
<ROLE>MODIFY AND RUN</ROLE>
<ACCESSOR>world</ACCESSOR>
<ROLE>MODIFY AND RUN</ROLE>
Validating Brio Portal Migration 39
Tag Definition
</JOBACCESSORS>
<JOBUUID> Indicates the UUID of the job.
Sample JobPublishingMasksCreated.xml includes only two jobs: one jobwith a specified publishing mask and a second job without a specified publishing mask.
Sample JobPublishingMasksCreated.xml<JOBMASKS><JOB><JOBNAME>job1</JOBNAME><PATH>/genericjobs/</PATH><JOBPUBLISHINGMASK defined='false'></JOBPUBLISHINGMASK> <PUBLISHINGMASKACCESSORS> <ACCESSOR>ADMINISTRATOR</ACCESSOR> <ROLE>MODIFY</GROUP> <ACCESSOR>world</ACCESSOR> <ROLE>MODIFY</GROUP> </PUBLISHINGMASKACCESSORS> <DATEPUBLISHED>2003-01-14 14:29:18.0</DATEPUBLISHED> <FOLDERGROUP>ADMINISTRATOR</FOLDERGROUP> <FOLDERPERMISSIONS> <GROUPREAD>1</GROUPREAD> <GROUPWRITE>1</GROUPWRITE> <GROUPEXECUTE>1</GROUPEXECUTE> <WORLDREAD>1</WORLDREAD> <WORLDWRITE>1</WORLDWRITE> <WORLDEXECUTE>1</WORLDEXECUTE> </FOLDERPERMISSIONS> <JOBOWNER>administrator</JOBOWNER> <JOBACCESSORS> <ACCESSOR>ADMINISTRATOR</ACCESSOR> <ROLE>MODIFY AND RUN</ROLE> <ACCESSOR>world</ACCESSOR> <ROLE>MODIFY AND RUN</ROLE> </JOBACCESSORS> <JOBUUID>F0RFYLF0ENFHCCFIECDLDRRP_ZhinZr-CRRP_EHINER</JOBUUID> </JOB><JOB> <JOBNAME>job2</JOBNAME> <PATH>/SampleContent/Human_Resources/Employees/</PATH> <JOBPUBLISHINGMASK defined='true'> <GROUPREAD>1</GROUPREAD> <GROUPWRITE>1</GROUPWRITE>
40 Validating Migration Results
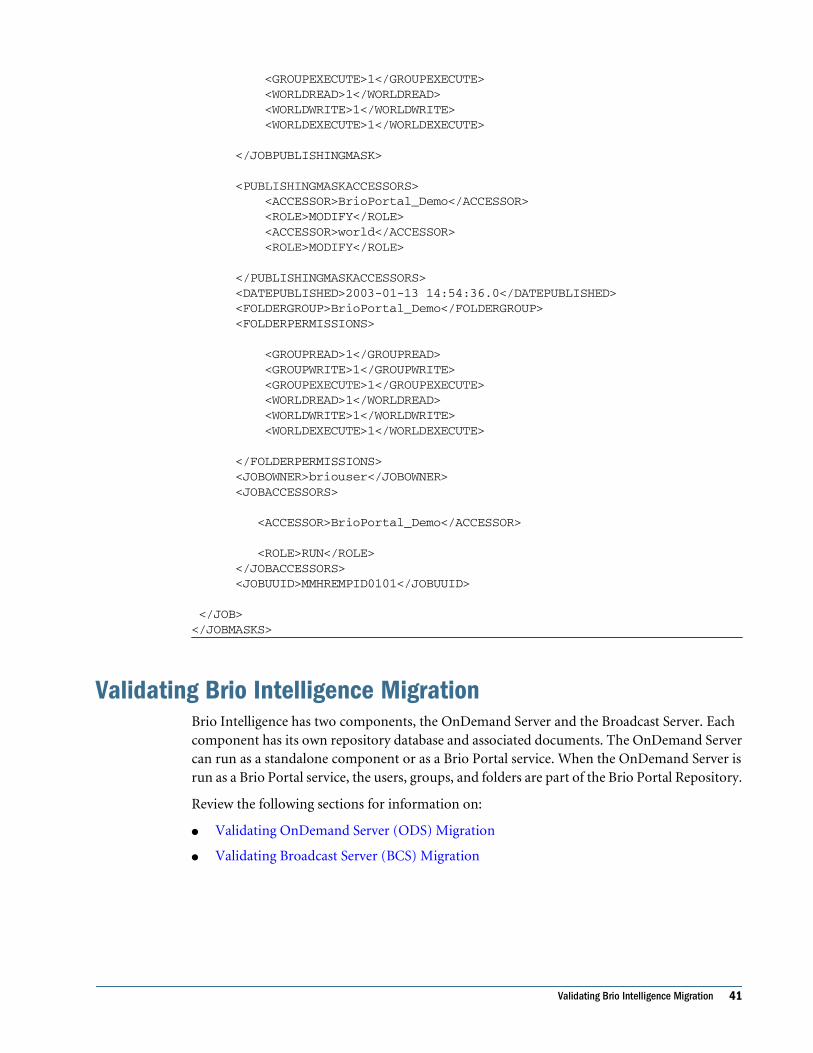
<GROUPEXECUTE>1</GROUPEXECUTE> <WORLDREAD>1</WORLDREAD> <WORLDWRITE>1</WORLDWRITE> <WORLDEXECUTE>1</WORLDEXECUTE> </JOBPUBLISHINGMASK> <PUBLISHINGMASKACCESSORS> <ACCESSOR>BrioPortal_Demo</ACCESSOR> <ROLE>MODIFY</ROLE> <ACCESSOR>world</ACCESSOR> <ROLE>MODIFY</ROLE> </PUBLISHINGMASKACCESSORS> <DATEPUBLISHED>2003-01-13 14:54:36.0</DATEPUBLISHED> <FOLDERGROUP>BrioPortal_Demo</FOLDERGROUP> <FOLDERPERMISSIONS> <GROUPREAD>1</GROUPREAD> <GROUPWRITE>1</GROUPWRITE> <GROUPEXECUTE>1</GROUPEXECUTE> <WORLDREAD>1</WORLDREAD> <WORLDWRITE>1</WORLDWRITE> <WORLDEXECUTE>1</WORLDEXECUTE> </FOLDERPERMISSIONS> <JOBOWNER>briouser</JOBOWNER> <JOBACCESSORS> <ACCESSOR>BrioPortal_Demo</ACCESSOR> <ROLE>RUN</ROLE> </JOBACCESSORS> <JOBUUID>MMHREMPID0101</JOBUUID> </JOB></JOBMASKS>
Validating Brio Intelligence MigrationBrio Intelligence has two components, the OnDemand Server and the Broadcast Server. Eachcomponent has its own repository database and associated documents. The OnDemand Servercan run as a standalone component or as a Brio Portal service. When the OnDemand Server isrun as a Brio Portal service, the users, groups, and folders are part of the Brio Portal Repository.
Review the following sections for information on:
● Validating OnDemand Server (ODS) Migration
● Validating Broadcast Server (BCS) Migration
Validating Brio Intelligence Migration 41
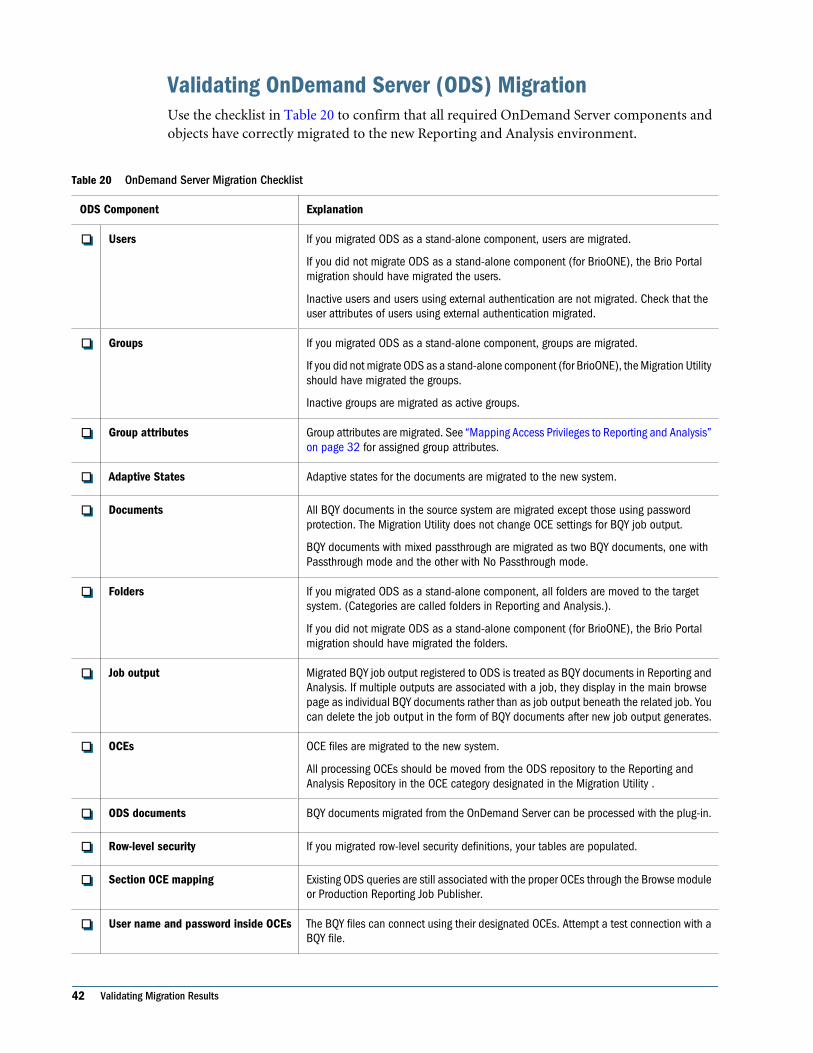
Validating OnDemand Server (ODS) Migration Use the checklist in Table 20 to confirm that all required OnDemand Server components andobjects have correctly migrated to the new Reporting and Analysis environment.
Table 20 OnDemand Server Migration Checklist
ODS Component Explanation
Users If you migrated ODS as a stand-alone component, users are migrated.
If you did not migrate ODS as a stand-alone component (for BrioONE), the Brio Portalmigration should have migrated the users.
Inactive users and users using external authentication are not migrated. Check that theuser attributes of users using external authentication migrated.
Groups If you migrated ODS as a stand-alone component, groups are migrated.
If you did not migrate ODS as a stand-alone component (for BrioONE), the Migration Utilityshould have migrated the groups.
Inactive groups are migrated as active groups.
Group attributes Group attributes are migrated. See “Mapping Access Privileges to Reporting and Analysis”on page 32 for assigned group attributes.
Adaptive States Adaptive states for the documents are migrated to the new system.
Documents All BQY documents in the source system are migrated except those using passwordprotection. The Migration Utility does not change OCE settings for BQY job output.
BQY documents with mixed passthrough are migrated as two BQY documents, one withPassthrough mode and the other with No Passthrough mode.
Folders If you migrated ODS as a stand-alone component, all folders are moved to the targetsystem. (Categories are called folders in Reporting and Analysis.).
If you did not migrate ODS as a stand-alone component (for BrioONE), the Brio Portalmigration should have migrated the folders.
Job output Migrated BQY job output registered to ODS is treated as BQY documents in Reporting andAnalysis. If multiple outputs are associated with a job, they display in the main browsepage as individual BQY documents rather than as job output beneath the related job. Youcan delete the job output in the form of BQY documents after new job output generates.
OCEs OCE files are migrated to the new system.
All processing OCEs should be moved from the ODS repository to the Reporting andAnalysis Repository in the OCE category designated in the Migration Utility .
ODS documents BQY documents migrated from the OnDemand Server can be processed with the plug-in.
Row-level security If you migrated row-level security definitions, your tables are populated.
Section OCE mapping Existing ODS queries are still associated with the proper OCEs through the Browse moduleor Production Reporting Job Publisher.
User name and password inside OCEs The BQY files can connect using their designated OCEs. Attempt a test connection with aBQY file.
42 Validating Migration Results
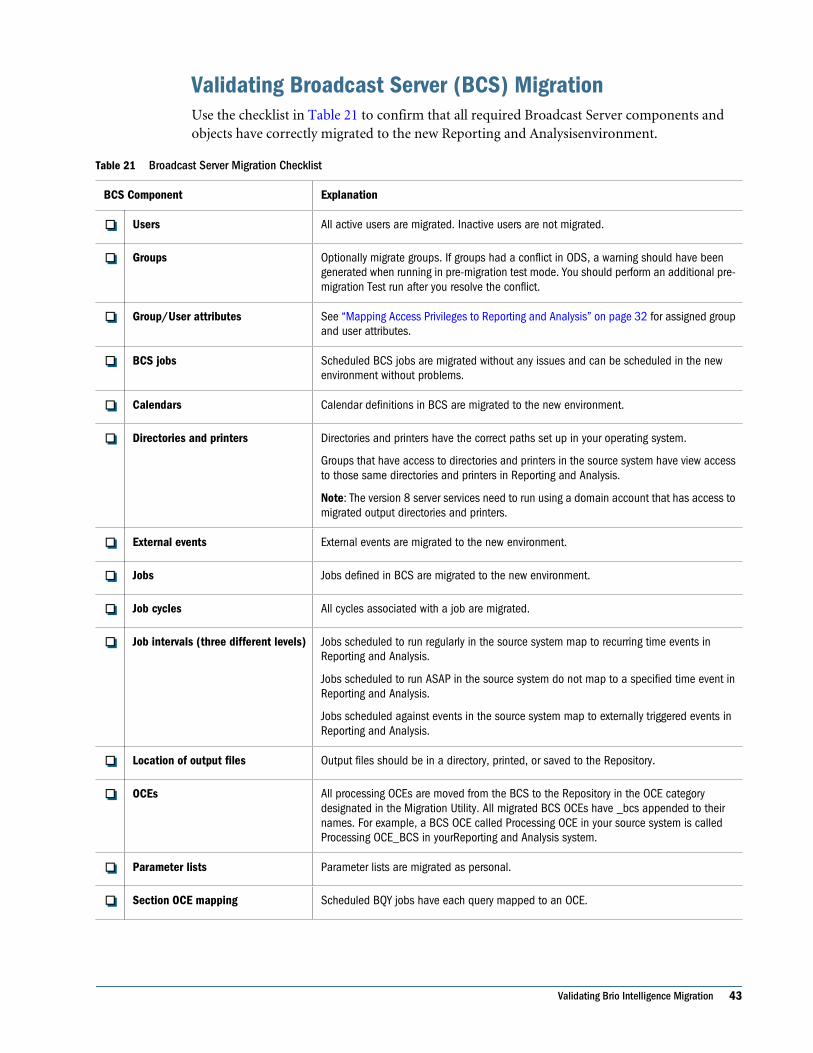
Validating Broadcast Server (BCS) MigrationUse the checklist in Table 21 to confirm that all required Broadcast Server components andobjects have correctly migrated to the new Reporting and Analysisenvironment.
Table 21 Broadcast Server Migration Checklist
BCS Component Explanation
Users All active users are migrated. Inactive users are not migrated.
Groups Optionally migrate groups. If groups had a conflict in ODS, a warning should have beengenerated when running in pre-migration test mode. You should perform an additional pre-migration Test run after you resolve the conflict.
Group/User attributes See “Mapping Access Privileges to Reporting and Analysis” on page 32 for assigned groupand user attributes.
BCS jobs Scheduled BCS jobs are migrated without any issues and can be scheduled in the newenvironment without problems.
Calendars Calendar definitions in BCS are migrated to the new environment.
Directories and printers Directories and printers have the correct paths set up in your operating system.
Groups that have access to directories and printers in the source system have view accessto those same directories and printers in Reporting and Analysis.
Note: The version 8 server services need to run using a domain account that has access tomigrated output directories and printers.
External events External events are migrated to the new environment.
Jobs Jobs defined in BCS are migrated to the new environment.
Job cycles All cycles associated with a job are migrated.
Job intervals (three different levels) Jobs scheduled to run regularly in the source system map to recurring time events inReporting and Analysis.
Jobs scheduled to run ASAP in the source system do not map to a specified time event inReporting and Analysis.
Jobs scheduled against events in the source system map to externally triggered events inReporting and Analysis.
Location of output files Output files should be in a directory, printed, or saved to the Repository.
OCEs All processing OCEs are moved from the BCS to the Repository in the OCE categorydesignated in the Migration Utility. All migrated BCS OCEs have _bcs appended to theirnames. For example, a BCS OCE called Processing OCE in your source system is calledProcessing OCE_BCS in yourReporting and Analysis system.
Parameter lists Parameter lists are migrated as personal.
Section OCE mapping Scheduled BQY jobs have each query mapped to an OCE.
Validating Brio Intelligence Migration 43
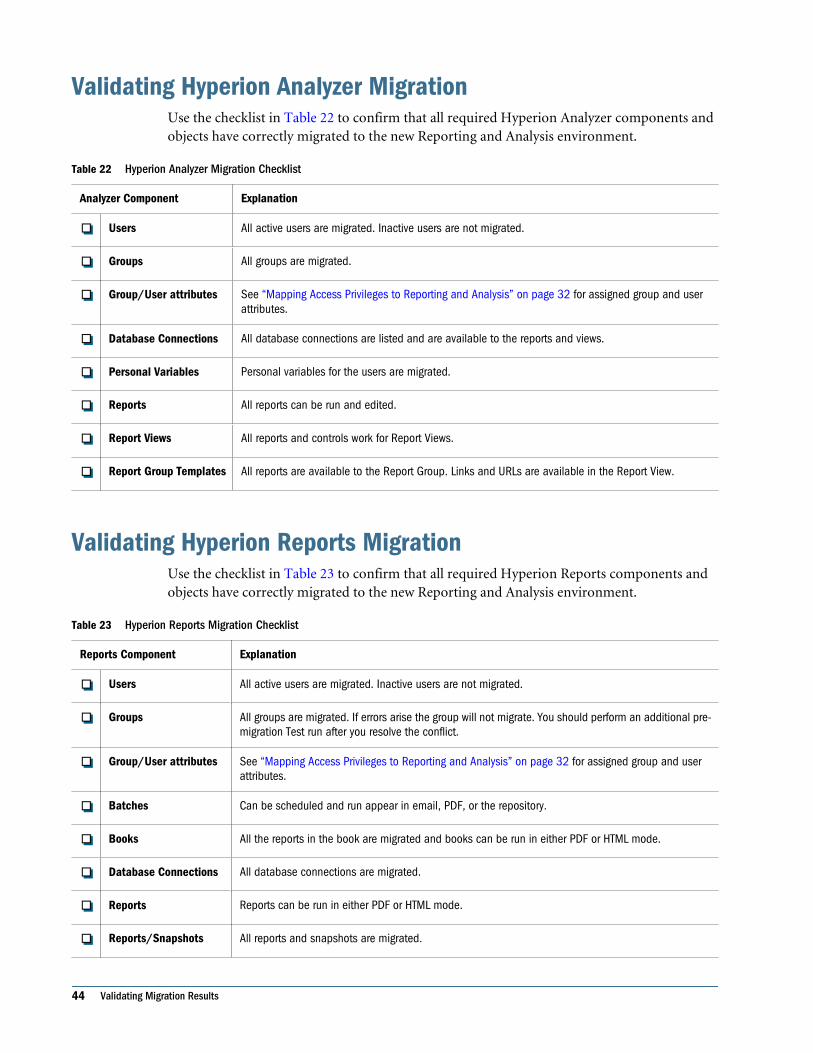
Validating Hyperion Analyzer MigrationUse the checklist in Table 22 to confirm that all required Hyperion Analyzer components andobjects have correctly migrated to the new Reporting and Analysis environment.
Table 22 Hyperion Analyzer Migration Checklist
Analyzer Component Explanation
Users All active users are migrated. Inactive users are not migrated.
Groups All groups are migrated.
Group/User attributes See “Mapping Access Privileges to Reporting and Analysis” on page 32 for assigned group and userattributes.
Database Connections All database connections are listed and are available to the reports and views.
Personal Variables Personal variables for the users are migrated.
Reports All reports can be run and edited.
Report Views All reports and controls work for Report Views.
Report Group Templates All reports are available to the Report Group. Links and URLs are available in the Report View.
Validating Hyperion Reports MigrationUse the checklist in Table 23 to confirm that all required Hyperion Reports components andobjects have correctly migrated to the new Reporting and Analysis environment.
Table 23 Hyperion Reports Migration Checklist
Reports Component Explanation
Users All active users are migrated. Inactive users are not migrated.
Groups All groups are migrated. If errors arise the group will not migrate. You should perform an additional pre-migration Test run after you resolve the conflict.
Group/User attributes See “Mapping Access Privileges to Reporting and Analysis” on page 32 for assigned group and userattributes.
Batches Can be scheduled and run appear in email, PDF, or the repository.
Books All the reports in the book are migrated and books can be run in either PDF or HTML mode.
Database Connections All database connections are migrated.
Reports Reports can be run in either PDF or HTML mode.
Reports/Snapshots All reports and snapshots are migrated.
44 Validating Migration Results

Row/Column Templates Row/Column templates are migrated and are added to the correct reports.
Validating Hyperion Performance Suite MigrationUse the checklist in Table 24 to confirm that Hyperion Performance Suite 8.x information hascorrectly migrated to the new Reporting and Analysis environment.
Table 24 Hyperion Performance Suite Migration Checklist
Hyperion Performance Suite Component Explanation
Users All active users are migrated. Inactive users are not migrated. (Active users must have theiraction set to migrate in the Migration Utility. See “Setting the Migration Action” in the HyperionReporting and Analysis Migration Utility Guide for information on how to set the migrationaction for users.)
User properties (first name, last name, description, email address) are correct for usersmapped to new native users.
Users are provisioned with the correct roles.
Groups All active groups are migrated. Inactive groups are not migrated. (Active groups must havetheir action set to migrate in the Migration Utility. See “Setting the Migration Action” in theHyperion Reporting and Analysis Migration Utility Guide for information on how to set themigration action for groups.)
Group descriptions and user/group membership is correct for groups mapped to new nativegroups.
Groups are provisioned with the correct roles.
User Defined Roles User-defined roles must be manually created and manually assigned to users and groups.
Repository Metadata All repository metadata migrated to the new environment.
Repository Files The content of the system, folders, and files migrated to the new environment.
Events User subscriptions, notifications of events involving subscriptions, jobs, parameter lists forjobs, and exceptions migrated to the new environment.
Authorization Access control information for folders, documents, and resources is migrated correctly.
General Post Migration StepsAfter you complete the migration, perform the tasks described in Table 25 to ensure properfunctionality in your newReporting and Analysis system.
Table 25 Post-migration Checklist
Task Explanation
Validating Hyperion Performance Suite Migration 45

Enable publisher ratings for migrated Brio Portal jobs Ratings are migrated, but they cannot be seen unless the Enablepublisher ratings parameter is set in the Reporting and Analysis systemproperties.
Review access control Set access control on users, groups, and other resources according toyour migration plan. Make sure to assign the Content Publisher role toany user who needs to view, modify, or publish in Reporting and Analysis.
Check that the proper access control is given on job output. Use thejobPublishingMasksCreated.xml file produced by the MigrationUtility to check that the proper access control is set on job output in thenew system. See Example for a sample file.
Modify the default Insight role If you set a default Insight role in the BI_Migrate.ini file during migration,modify the Insight role to reflect the roles you want to give to users andgroups in your new system. It is recommended that you apply roles atthe group level instead of the user level.
Set up email for jobs If you did not convert MAPI email addresses to SMTP addresses beforemigrating, you must do so now. MAPI email addresses are not supportedin Reporting and Analysis.
You may need to set up an email server if you did not do so while installingReporting and Analysis.
Set OCE attributes Give appropriate access control to users who need to view, modify, andor publish OCEs. See “Mapping Access Privileges to Reporting andAnalysis” on page 32 for detail on ownership of migrated OCEs.
Because alternate metadata OCEs are not migrated, reestablish the linksto alternate metadata OCEs.
Turn on RLS If you migrated Row Level Security (RLS), you must manually turn it onin your new system.
46 Validating Migration Results
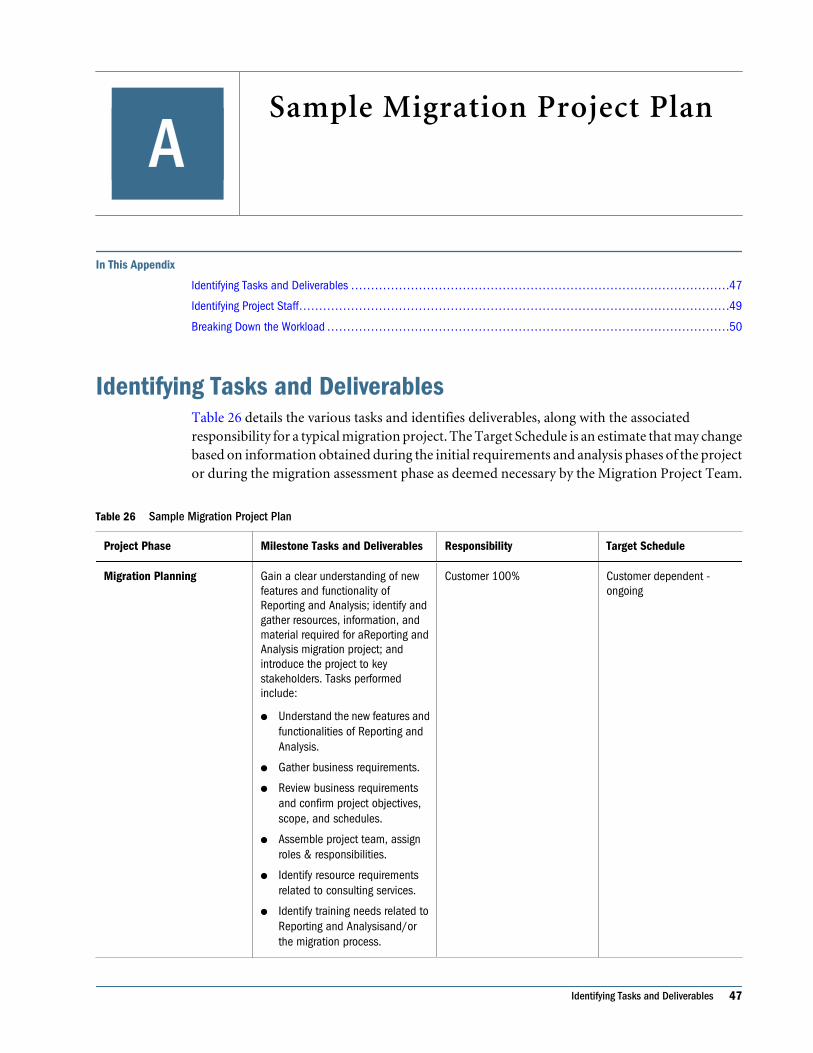
ASample Migration Project Plan
In This Appendix
Identifying Tasks and Deliverables ... . . . . . . . . . . . . . . . . . . . . . . . . . . . . . . . . . . . . . . . . . . . . . . . . . . . . . . . . . . . . . . . . . . . . . . . . . . . . . . . . . . . . . . . . . . . .47
Identifying Project Staff. . . . . . . . . . . . . . . . . . . . . . . . . . . . . . . . . . . . . . . . . . . . . . . . . . . . . . . . . . . . . . . . . . . . . . . . . . . . . . . . . . . . . . . . . . . . . . . . . . . . . . . . . . . .49
Breaking Down the Workload ... . . . . . . . . . . . . . . . . . . . . . . . . . . . . . . . . . . . . . . . . . . . . . . . . . . . . . . . . . . . . . . . . . . . . . . . . . . . . . . . . . . . . . . . . . . . . . . . . . .50
Identifying Tasks and DeliverablesTable 26 details the various tasks and identifies deliverables, along with the associatedresponsibility for a typical migration project. The Target Schedule is an estimate that may changebased on information obtained during the initial requirements and analysis phases of the projector during the migration assessment phase as deemed necessary by the Migration Project Team.
Table 26 Sample Migration Project Plan
Project Phase Milestone Tasks and Deliverables Responsibility Target Schedule
Migration Planning Gain a clear understanding of newfeatures and functionality ofReporting and Analysis; identify andgather resources, information, andmaterial required for aReporting andAnalysis migration project; andintroduce the project to keystakeholders. Tasks performedinclude:
● Understand the new features andfunctionalities of Reporting andAnalysis.
● Gather business requirements.
● Review business requirementsand confirm project objectives,scope, and schedules.
● Assemble project team, assignroles & responsibilities.
● Identify resource requirementsrelated to consulting services.
● Identify training needs related toReporting and Analysisand/orthe migration process.
Customer 100% Customer dependent -ongoing
Identifying Tasks and Deliverables 47
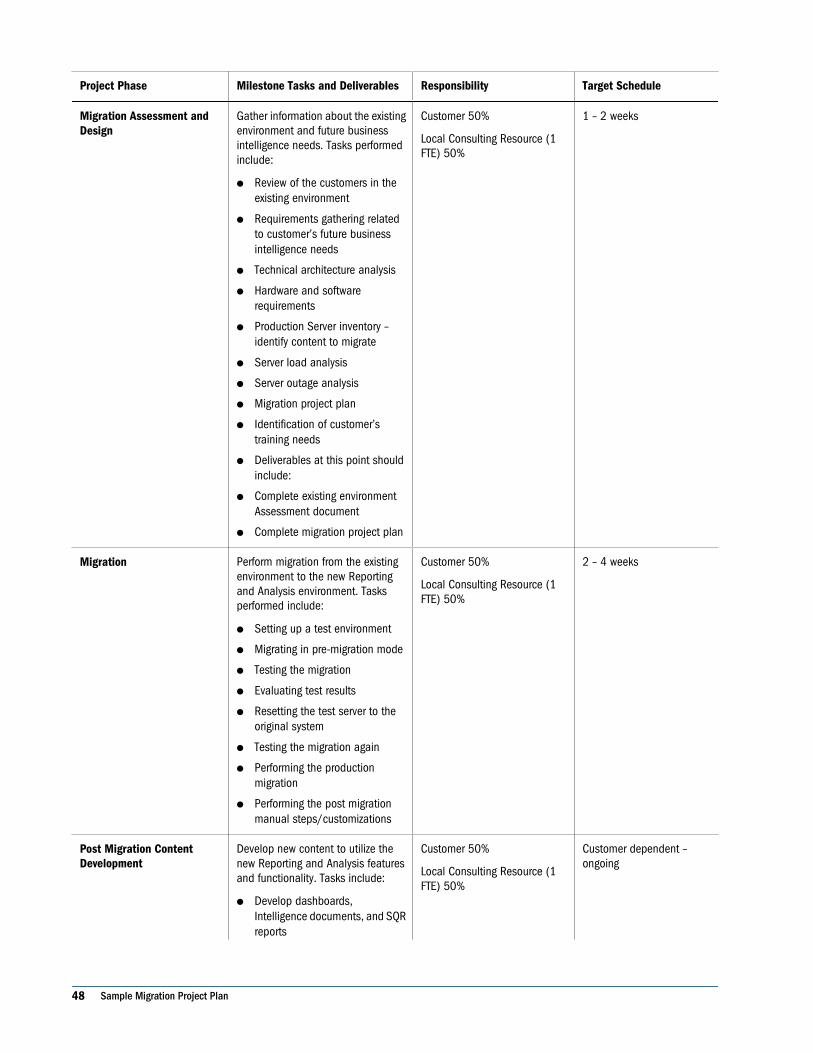
Project Phase Milestone Tasks and Deliverables Responsibility Target Schedule
Migration Assessment andDesign
Gather information about the existingenvironment and future businessintelligence needs. Tasks performedinclude:
● Review of the customers in theexisting environment
● Requirements gathering relatedto customer’s future businessintelligence needs
● Technical architecture analysis
● Hardware and softwarerequirements
● Production Server inventory –identify content to migrate
● Server load analysis
● Server outage analysis
● Migration project plan
● Identification of customer’straining needs
● Deliverables at this point shouldinclude:
● Complete existing environmentAssessment document
● Complete migration project plan
Customer 50%
Local Consulting Resource (1FTE) 50%
1 – 2 weeks
Migration Perform migration from the existingenvironment to the new Reportingand Analysis environment. Tasksperformed include:
● Setting up a test environment
● Migrating in pre-migration mode
● Testing the migration
● Evaluating test results
● Resetting the test server to theoriginal system
● Testing the migration again
● Performing the productionmigration
● Performing the post migrationmanual steps/customizations
Customer 50%
Local Consulting Resource (1FTE) 50%
2 – 4 weeks
Post Migration ContentDevelopment
Develop new content to utilize thenew Reporting and Analysis featuresand functionality. Tasks include:
● Develop dashboards,Intelligence documents, and SQRreports
Customer 50%
Local Consulting Resource (1FTE) 50%
Customer dependent –ongoing
48 Sample Migration Project Plan
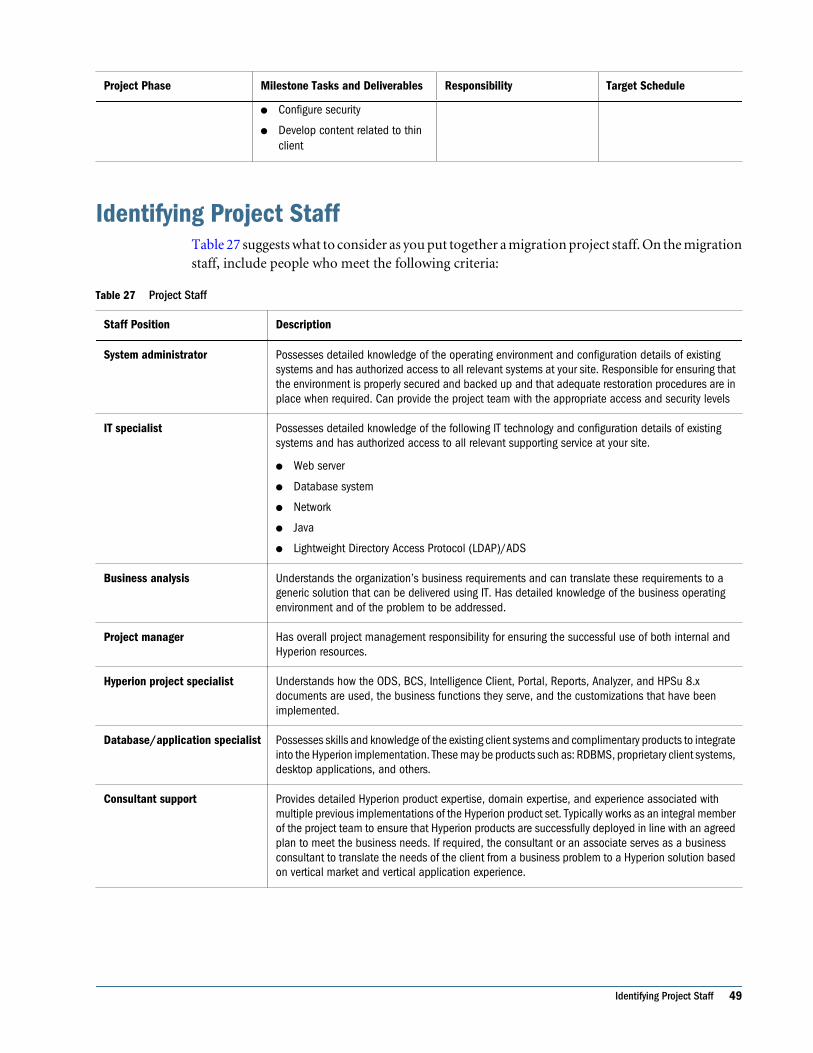
Project Phase Milestone Tasks and Deliverables Responsibility Target Schedule
● Configure security
● Develop content related to thinclient
Identifying Project StaffTable 27 suggests what to consider as you put together a migration project staff. On the migrationstaff, include people who meet the following criteria:
Table 27 Project Staff
Staff Position Description
System administrator Possesses detailed knowledge of the operating environment and configuration details of existingsystems and has authorized access to all relevant systems at your site. Responsible for ensuring thatthe environment is properly secured and backed up and that adequate restoration procedures are inplace when required. Can provide the project team with the appropriate access and security levels
IT specialist Possesses detailed knowledge of the following IT technology and configuration details of existingsystems and has authorized access to all relevant supporting service at your site.
● Web server
● Database system
● Network
● Java
● Lightweight Directory Access Protocol (LDAP)/ADS
Business analysis Understands the organization’s business requirements and can translate these requirements to ageneric solution that can be delivered using IT. Has detailed knowledge of the business operatingenvironment and of the problem to be addressed.
Project manager Has overall project management responsibility for ensuring the successful use of both internal andHyperion resources.
Hyperion project specialist Understands how the ODS, BCS, Intelligence Client, Portal, Reports, Analyzer, and HPSu 8.xdocuments are used, the business functions they serve, and the customizations that have beenimplemented.
Database/application specialist Possesses skills and knowledge of the existing client systems and complimentary products to integrateinto the Hyperion implementation. These may be products such as: RDBMS, proprietary client systems,desktop applications, and others.
Consultant support Provides detailed Hyperion product expertise, domain expertise, and experience associated withmultiple previous implementations of the Hyperion product set. Typically works as an integral memberof the project team to ensure that Hyperion products are successfully deployed in line with an agreedplan to meet the business needs. If required, the consultant or an associate serves as a businessconsultant to translate the needs of the client from a business problem to a Hyperion solution basedon vertical market and vertical application experience.
Identifying Project Staff 49
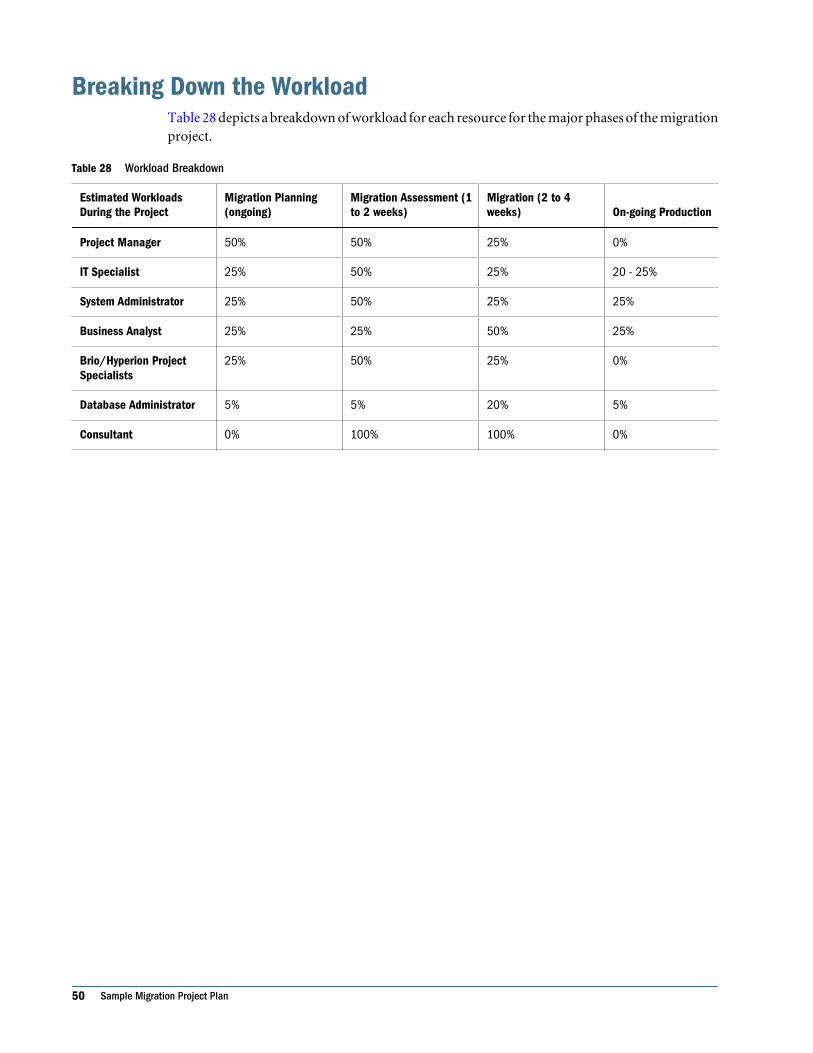
Breaking Down the WorkloadTable 28 depicts a breakdown of workload for each resource for the major phases of the migrationproject.
Table 28 Workload Breakdown
Estimated WorkloadsDuring the Project
Migration Planning(ongoing)
Migration Assessment (1to 2 weeks)
Migration (2 to 4weeks) On-going Production
Project Manager 50% 50% 25% 0%
IT Specialist 25% 50% 25% 20 - 25%
System Administrator 25% 50% 25% 25%
Business Analyst 25% 25% 50% 25%
Brio/Hyperion ProjectSpecialists
25% 50% 25% 0%
Database Administrator 5% 5% 20% 5%
Consultant 0% 100% 100% 0%
50 Sample Migration Project Plan
BLimitations
In This Appendix
About Limitations ... . . . . . . . . . . . . . . . . . . . . . . . . . . . . . . . . . . . . . . . . . . . . . . . . . . . . . . . . . . . . . . . . . . . . . . . . . . . . . . . . . . . . . . . . . . . . . . . . . . . . . . . . . . . . . . .51
General. . . . . . . . . . . . . . . . . . . . . . . . . . . . . . . . . . . . . . . . . . . . . . . . . . . . . . . . . . . . . . . . . . . . . . . . . . . . . . . . . . . . . . . . . . . . . . . . . . . . . . . . . . . . . . . . . . . . . . . . . . . . . .51
Hyperion Analyzer .. . . . . . . . . . . . . . . . . . . . . . . . . . . . . . . . . . . . . . . . . . . . . . . . . . . . . . . . . . . . . . . . . . . . . . . . . . . . . . . . . . . . . . . . . . . . . . . . . . . . . . . . . . . . . . . . .52
Hyperion Reports.. . . . . . . . . . . . . . . . . . . . . . . . . . . . . . . . . . . . . . . . . . . . . . . . . . . . . . . . . . . . . . . . . . . . . . . . . . . . . . . . . . . . . . . . . . . . . . . . . . . . . . . . . . . . . . . . . .53
Hyperion Performance Suite .. . . . . . . . . . . . . . . . . . . . . . . . . . . . . . . . . . . . . . . . . . . . . . . . . . . . . . . . . . . . . . . . . . . . . . . . . . . . . . . . . . . . . . . . . . . . . . . . . . . . .54
Carry Forward from Hyperion Performance Suite 8.3 ... . . . . . . . . . . . . . . . . . . . . . . . . . . . . . . . . . . . . . . . . . . . . . . . . . . . . . . . . . . . . . . . . . . . . . . . .59
About LimitationsThis appendix discusses functionality that was present in prior versions that has no equivalentmethod in Reporting and Analysis.
GeneralTable 29 describes the general limitations as a result of migrating to Reporting and Analysis.
Table 29 General
Limitation System Affected Workaround
● No password migration from nativeauthentication systems
Unlike the previous Migration Utility,passwords will not be migrated for nativeauthentication systems. Instead they will beset to a default or randomly-generatedpassword depending on the configurablesetting in the Migration Utility. The passwordalgorithm for Shared Services is not thesame as in the prior versions (Reports,Analyzer, HPSU etc.). As a result, theencrypted passwords from the previousversion are not readable by the new nativeauthentication system; namely, OpenLDAP.
Native authentication systems in previousversions
Map users to an external provider.
Note: Deployments that wish to continuewith a native authentication system canchoose to randomly generate passwords tobe stored in a password file. Users mustthen be notified about the new passwords.A sample program is provided with theMigration Utility that reads the passwordfile and sends out notifications to affectedusers. Based on the sample,administrators can use any language tocreate their own program.
● No administration API for userprovisioning
Hyperion Analyzer, Hyperion Reports, orHyperion Performance Suite
None at present.
About Limitations 51
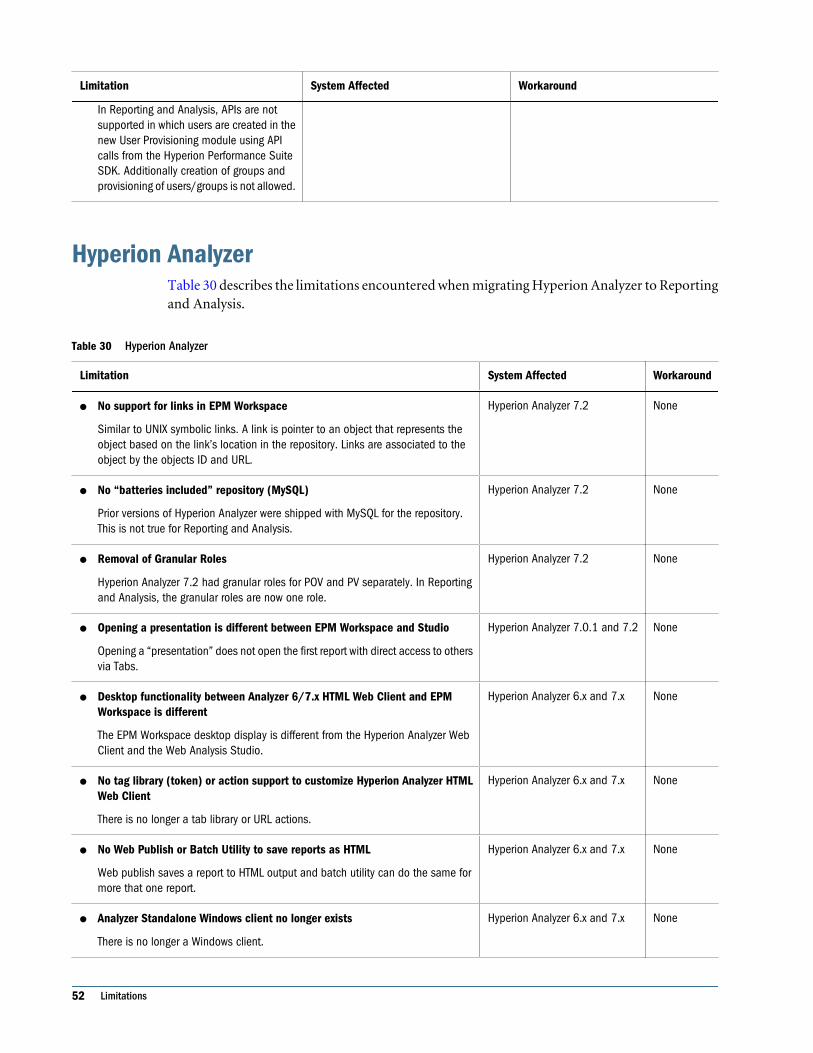
Limitation System Affected Workaround
In Reporting and Analysis, APIs are notsupported in which users are created in thenew User Provisioning module using APIcalls from the Hyperion Performance SuiteSDK. Additionally creation of groups andprovisioning of users/groups is not allowed.
Hyperion AnalyzerTable 30 describes the limitations encountered when migrating Hyperion Analyzer to Reportingand Analysis.
Table 30 Hyperion Analyzer
Limitation System Affected Workaround
● No support for links in EPM Workspace
Similar to UNIX symbolic links. A link is pointer to an object that represents theobject based on the link’s location in the repository. Links are associated to theobject by the objects ID and URL.
Hyperion Analyzer 7.2 None
● No “batteries included” repository (MySQL)
Prior versions of Hyperion Analyzer were shipped with MySQL for the repository.This is not true for Reporting and Analysis.
Hyperion Analyzer 7.2 None
● Removal of Granular Roles
Hyperion Analyzer 7.2 had granular roles for POV and PV separately. In Reportingand Analysis, the granular roles are now one role.
Hyperion Analyzer 7.2 None
● Opening a presentation is different between EPM Workspace and Studio
Opening a “presentation” does not open the first report with direct access to othersvia Tabs.
Hyperion Analyzer 7.0.1 and 7.2 None
● Desktop functionality between Analyzer 6/7.x HTML Web Client and EPMWorkspace is different
The EPM Workspace desktop display is different from the Hyperion Analyzer WebClient and the Web Analysis Studio.
Hyperion Analyzer 6.x and 7.x None
● No tag library (token) or action support to customize Hyperion Analyzer HTMLWeb Client
There is no longer a tab library or URL actions.
Hyperion Analyzer 6.x and 7.x None
● No Web Publish or Batch Utility to save reports as HTML
Web publish saves a report to HTML output and batch utility can do the same formore that one report.
Hyperion Analyzer 6.x and 7.x None
● Analyzer Standalone Windows client no longer exists
There is no longer a Windows client.
Hyperion Analyzer 6.x and 7.x None
52 Limitations
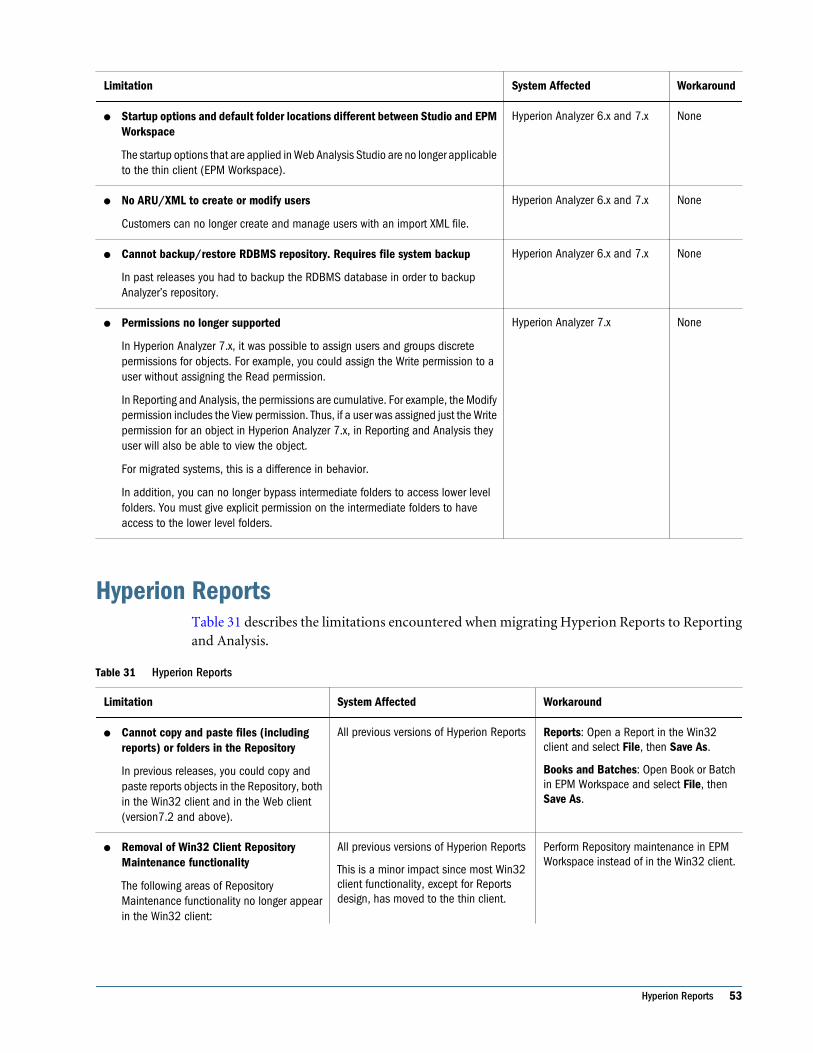
Limitation System Affected Workaround
● Startup options and default folder locations different between Studio and EPMWorkspace
The startup options that are applied in Web Analysis Studio are no longer applicableto the thin client (EPM Workspace).
Hyperion Analyzer 6.x and 7.x None
● No ARU/XML to create or modify users
Customers can no longer create and manage users with an import XML file.
Hyperion Analyzer 6.x and 7.x None
● Cannot backup/restore RDBMS repository. Requires file system backup
In past releases you had to backup the RDBMS database in order to backupAnalyzer’s repository.
Hyperion Analyzer 6.x and 7.x None
● Permissions no longer supported
In Hyperion Analyzer 7.x, it was possible to assign users and groups discretepermissions for objects. For example, you could assign the Write permission to auser without assigning the Read permission.
In Reporting and Analysis, the permissions are cumulative. For example, the Modifypermission includes the View permission. Thus, if a user was assigned just the Writepermission for an object in Hyperion Analyzer 7.x, in Reporting and Analysis theyuser will also be able to view the object.
For migrated systems, this is a difference in behavior.
In addition, you can no longer bypass intermediate folders to access lower levelfolders. You must give explicit permission on the intermediate folders to haveaccess to the lower level folders.
Hyperion Analyzer 7.x None
Hyperion ReportsTable 31 describes the limitations encountered when migrating Hyperion Reports to Reportingand Analysis.
Table 31 Hyperion Reports
Limitation System Affected Workaround
● Cannot copy and paste files (includingreports) or folders in the Repository
In previous releases, you could copy andpaste reports objects in the Repository, bothin the Win32 client and in the Web client(version7.2 and above).
All previous versions of Hyperion Reports Reports: Open a Report in the Win32client and select File, then Save As.
Books and Batches: Open Book or Batchin EPM Workspace and select File, thenSave As.
● Removal of Win32 Client RepositoryMaintenance functionality
The following areas of RepositoryMaintenance functionality no longer appearin the Win32 client:
All previous versions of Hyperion Reports
This is a minor impact since most Win32client functionality, except for Reportsdesign, has moved to the thin client.
Perform Repository maintenance in EPMWorkspace instead of in the Win32 client.
Hyperion Reports 53
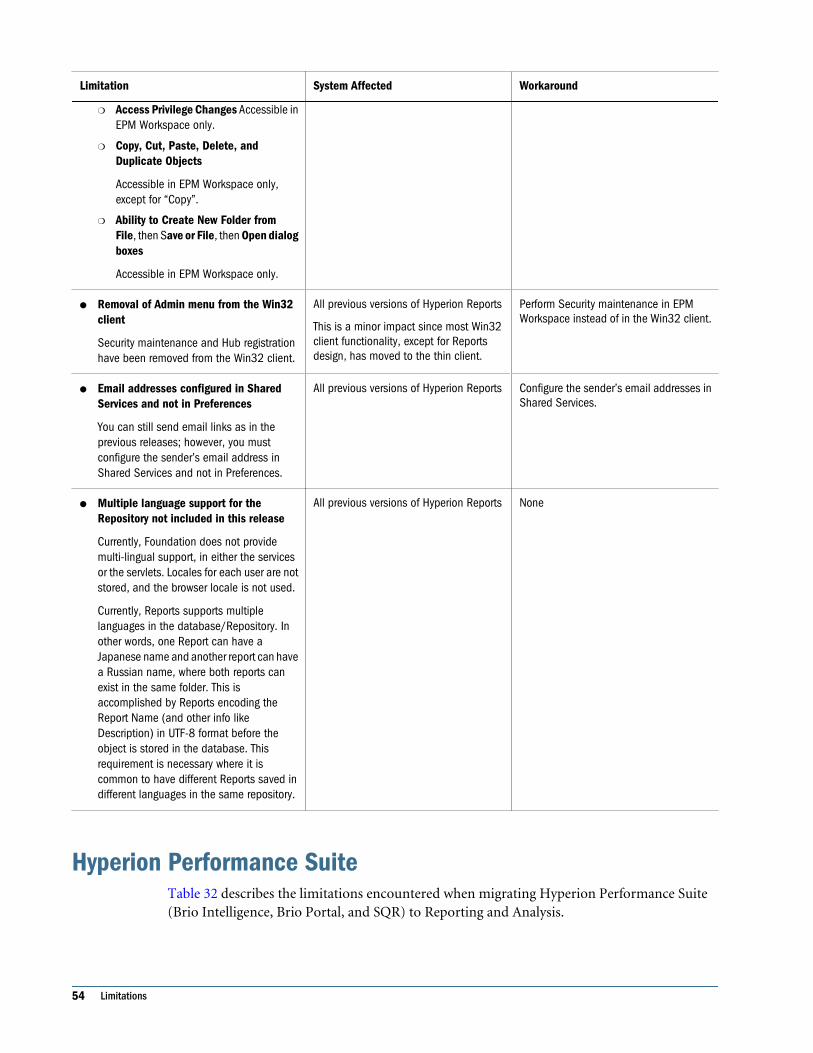
Limitation System Affected Workaround
❍ Access Privilege Changes Accessible inEPM Workspace only.
❍ Copy, Cut, Paste, Delete, andDuplicate Objects
Accessible in EPM Workspace only,except for “Copy”.
❍ Ability to Create New Folder fromFile, then Save or File, then Open dialogboxes
Accessible in EPM Workspace only.
● Removal of Admin menu from the Win32client
Security maintenance and Hub registrationhave been removed from the Win32 client.
All previous versions of Hyperion Reports
This is a minor impact since most Win32client functionality, except for Reportsdesign, has moved to the thin client.
Perform Security maintenance in EPMWorkspace instead of in the Win32 client.
● Email addresses configured in SharedServices and not in Preferences
You can still send email links as in theprevious releases; however, you mustconfigure the sender’s email address inShared Services and not in Preferences.
All previous versions of Hyperion Reports Configure the sender’s email addresses inShared Services.
● Multiple language support for theRepository not included in this release
Currently, Foundation does not providemulti-lingual support, in either the servicesor the servlets. Locales for each user are notstored, and the browser locale is not used.
Currently, Reports supports multiplelanguages in the database/Repository. Inother words, one Report can have aJapanese name and another report can havea Russian name, where both reports canexist in the same folder. This isaccomplished by Reports encoding theReport Name (and other info likeDescription) in UTF-8 format before theobject is stored in the database. Thisrequirement is necessary where it iscommon to have different Reports saved indifferent languages in the same repository.
All previous versions of Hyperion Reports None
Hyperion Performance SuiteTable 32 describes the limitations encountered when migrating Hyperion Performance Suite(Brio Intelligence, Brio Portal, and SQR) to Reporting and Analysis.
54 Limitations
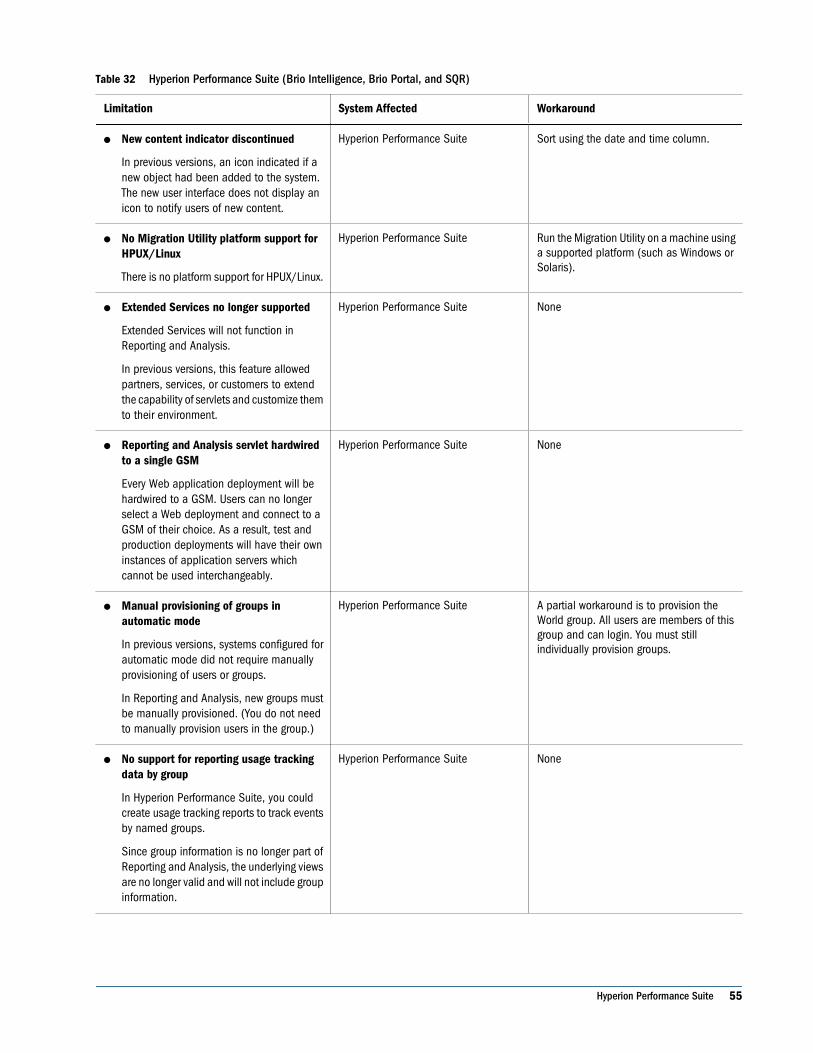
Table 32 Hyperion Performance Suite (Brio Intelligence, Brio Portal, and SQR)
Limitation System Affected Workaround
● New content indicator discontinued
In previous versions, an icon indicated if anew object had been added to the system.The new user interface does not display anicon to notify users of new content.
Hyperion Performance Suite Sort using the date and time column.
● No Migration Utility platform support forHPUX/Linux
There is no platform support for HPUX/Linux.
Hyperion Performance Suite Run the Migration Utility on a machine usinga supported platform (such as Windows orSolaris).
● Extended Services no longer supported
Extended Services will not function inReporting and Analysis.
In previous versions, this feature allowedpartners, services, or customers to extendthe capability of servlets and customize themto their environment.
Hyperion Performance Suite None
● Reporting and Analysis servlet hardwiredto a single GSM
Every Web application deployment will behardwired to a GSM. Users can no longerselect a Web deployment and connect to aGSM of their choice. As a result, test andproduction deployments will have their owninstances of application servers whichcannot be used interchangeably.
Hyperion Performance Suite None
● Manual provisioning of groups inautomatic mode
In previous versions, systems configured forautomatic mode did not require manuallyprovisioning of users or groups.
In Reporting and Analysis, new groups mustbe manually provisioned. (You do not needto manually provision users in the group.)
Hyperion Performance Suite A partial workaround is to provision theWorld group. All users are members of thisgroup and can login. You must stillindividually provision groups.
● No support for reporting usage trackingdata by group
In Hyperion Performance Suite, you couldcreate usage tracking reports to track eventsby named groups.
Since group information is no longer part ofReporting and Analysis, the underlying viewsare no longer valid and will not include groupinformation.
Hyperion Performance Suite None
Hyperion Performance Suite 55
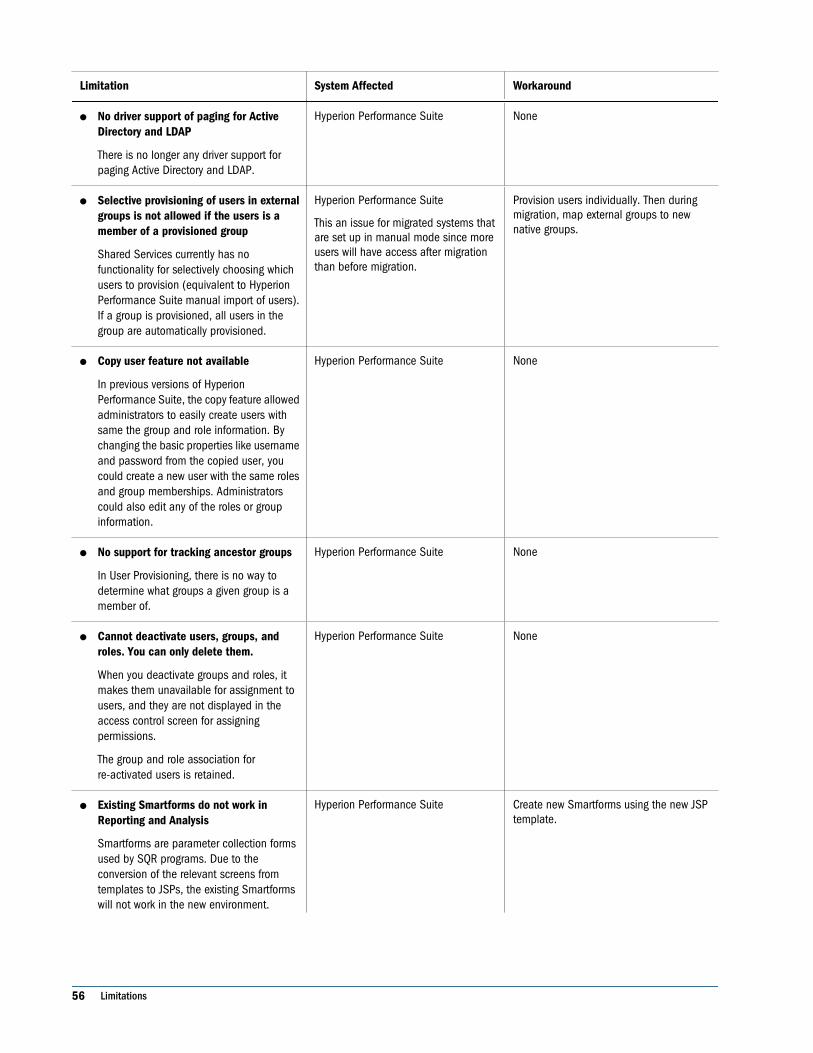
Limitation System Affected Workaround
● No driver support of paging for ActiveDirectory and LDAP
There is no longer any driver support forpaging Active Directory and LDAP.
Hyperion Performance Suite None
● Selective provisioning of users in externalgroups is not allowed if the users is amember of a provisioned group
Shared Services currently has nofunctionality for selectively choosing whichusers to provision (equivalent to HyperionPerformance Suite manual import of users).If a group is provisioned, all users in thegroup are automatically provisioned.
Hyperion Performance Suite
This an issue for migrated systems thatare set up in manual mode since moreusers will have access after migrationthan before migration.
Provision users individually. Then duringmigration, map external groups to newnative groups.
● Copy user feature not available
In previous versions of HyperionPerformance Suite, the copy feature allowedadministrators to easily create users withsame the group and role information. Bychanging the basic properties like usernameand password from the copied user, youcould create a new user with the same rolesand group memberships. Administratorscould also edit any of the roles or groupinformation.
Hyperion Performance Suite None
● No support for tracking ancestor groups
In User Provisioning, there is no way todetermine what groups a given group is amember of.
Hyperion Performance Suite None
● Cannot deactivate users, groups, androles. You can only delete them.
When you deactivate groups and roles, itmakes them unavailable for assignment tousers, and they are not displayed in theaccess control screen for assigningpermissions.
The group and role association forre-activated users is retained.
Hyperion Performance Suite None
● Existing Smartforms do not work inReporting and Analysis
Smartforms are parameter collection formsused by SQR programs. Due to theconversion of the relevant screens fromtemplates to JSPs, the existing Smartformswill not work in the new environment.
Hyperion Performance Suite Create new Smartforms using the new JSPtemplate.
56 Limitations
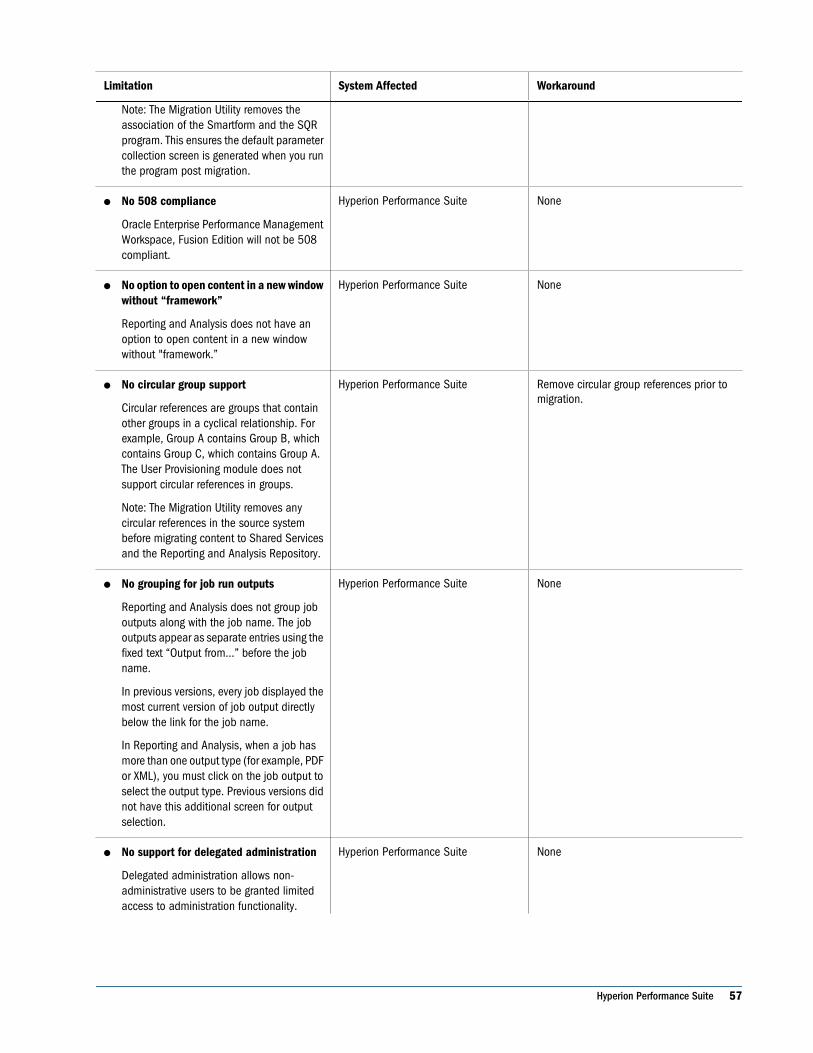
Limitation System Affected Workaround
Note: The Migration Utility removes theassociation of the Smartform and the SQRprogram. This ensures the default parametercollection screen is generated when you runthe program post migration.
● No 508 compliance
Oracle Enterprise Performance ManagementWorkspace, Fusion Edition will not be 508compliant.
Hyperion Performance Suite None
● No option to open content in a new windowwithout “framework”
Reporting and Analysis does not have anoption to open content in a new windowwithout "framework.”
Hyperion Performance Suite None
● No circular group support
Circular references are groups that containother groups in a cyclical relationship. Forexample, Group A contains Group B, whichcontains Group C, which contains Group A.The User Provisioning module does notsupport circular references in groups.
Note: The Migration Utility removes anycircular references in the source systembefore migrating content to Shared Servicesand the Reporting and Analysis Repository.
Hyperion Performance Suite Remove circular group references prior tomigration.
● No grouping for job run outputs
Reporting and Analysis does not group joboutputs along with the job name. The joboutputs appear as separate entries using thefixed text “Output from…” before the jobname.
In previous versions, every job displayed themost current version of job output directlybelow the link for the job name.
In Reporting and Analysis, when a job hasmore than one output type (for example, PDFor XML), you must click on the job output toselect the output type. Previous versions didnot have this additional screen for outputselection.
Hyperion Performance Suite None
● No support for delegated administration
Delegated administration allows non-administrative users to be granted limitedaccess to administration functionality.
Hyperion Performance Suite None
Hyperion Performance Suite 57
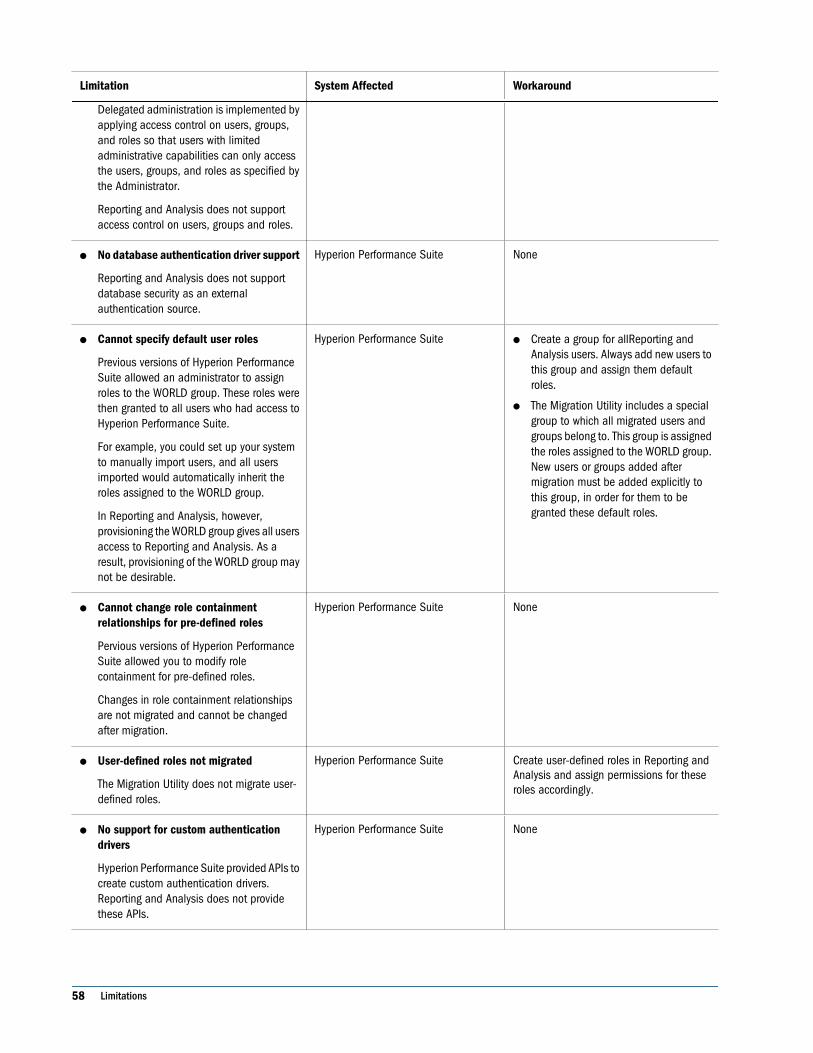
Limitation System Affected Workaround
Delegated administration is implemented byapplying access control on users, groups,and roles so that users with limitedadministrative capabilities can only accessthe users, groups, and roles as specified bythe Administrator.
Reporting and Analysis does not supportaccess control on users, groups and roles.
● No database authentication driver support
Reporting and Analysis does not supportdatabase security as an externalauthentication source.
Hyperion Performance Suite None
● Cannot specify default user roles
Previous versions of Hyperion PerformanceSuite allowed an administrator to assignroles to the WORLD group. These roles werethen granted to all users who had access toHyperion Performance Suite.
For example, you could set up your systemto manually import users, and all usersimported would automatically inherit theroles assigned to the WORLD group.
In Reporting and Analysis, however,provisioning the WORLD group gives all usersaccess to Reporting and Analysis. As aresult, provisioning of the WORLD group maynot be desirable.
Hyperion Performance Suite ● Create a group for allReporting andAnalysis users. Always add new users tothis group and assign them defaultroles.
● The Migration Utility includes a specialgroup to which all migrated users andgroups belong to. This group is assignedthe roles assigned to the WORLD group.New users or groups added aftermigration must be added explicitly tothis group, in order for them to begranted these default roles.
● Cannot change role containmentrelationships for pre-defined roles
Pervious versions of Hyperion PerformanceSuite allowed you to modify rolecontainment for pre-defined roles.
Changes in role containment relationshipsare not migrated and cannot be changedafter migration.
Hyperion Performance Suite None
● User-defined roles not migrated
The Migration Utility does not migrate user-defined roles.
Hyperion Performance Suite Create user-defined roles in Reporting andAnalysis and assign permissions for theseroles accordingly.
● No support for custom authenticationdrivers
Hyperion Performance Suite provided APIs tocreate custom authentication drivers.Reporting and Analysis does not providethese APIs.
Hyperion Performance Suite None
58 Limitations

Limitation System Affected Workaround
● No support for NIS drivers
Hyperion Performance Suite supported NISdrivers for external authentication. Reportingand Analysis does not support these drivers.
Hyperion Performance Suite Use supported external providers or nativedrivers for OpenLDAP.
● Primary group no longer retrieved forMSAD users
The Hyperion Performance Suite MSADAuthentication Driver returned a user’sprimary group.
The Oracle's Hyperion® Shared Servicesdriver does not return the primary group. Thismay affect existing roles and access level.
Hyperion Performance Suite None
Carry Forward from Hyperion Performance Suite 8.3Table 33 describes the limitations carried forward from Hyperion Performance Suite 8.3.
Table 33 Carry Forward from Hyperion Performance Suite 8.3
Limitation System Affected Workaround
● Cannot publish password-protected BQYfiles
You can no longer password protect BQY files.
Brio Intelligence 6.x Remove password protection beforepublishing.
● Cannot have cascading limit values inscheduled jobs
The job limits screen in Hyperion PerformanceSuite and Reporting and Analysis does notallow users to provide cascading limits even ifthey are defined in the BQY document.
Example: Show cities based on Stateselected. If limit 1 is State, and you selectCalifornia, the available choices for limit 2should be the cities of California such as SanFrancisco, Los Angeles etc.
Brio Intelligence 6.x None
● No job support for MAPI/Exchange as a mailserver
The MAPI/Exchange server is not supportedfor sending emails from the Job Service.Currently, only SMTP/ASMTP servers aresupported.
Brio Intelligence 6.x None
● Broadcast Server Customized Limit promptsdo not appear
Brio Intelligence 6.x None
Carry Forward from Hyperion Performance Suite 8.3 59
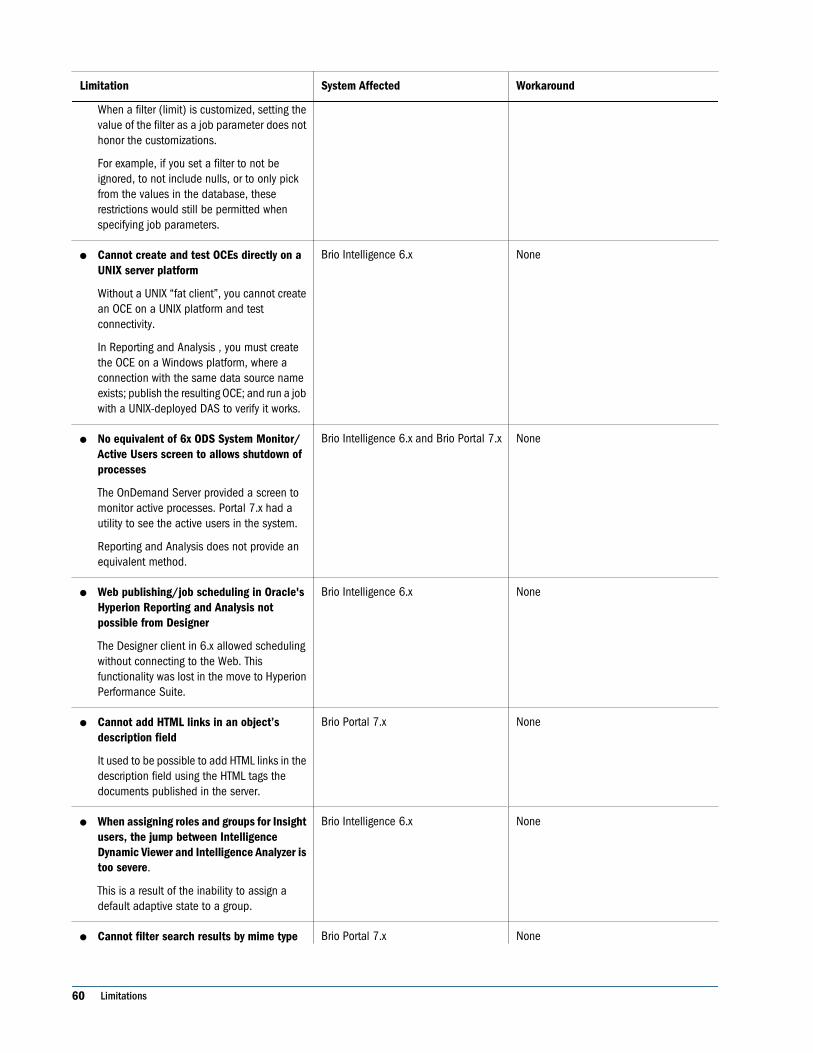
Limitation System Affected Workaround
When a filter (limit) is customized, setting thevalue of the filter as a job parameter does nothonor the customizations.
For example, if you set a filter to not beignored, to not include nulls, or to only pickfrom the values in the database, theserestrictions would still be permitted whenspecifying job parameters.
● Cannot create and test OCEs directly on aUNIX server platform
Without a UNIX “fat client”, you cannot createan OCE on a UNIX platform and testconnectivity.
In Reporting and Analysis , you must createthe OCE on a Windows platform, where aconnection with the same data source nameexists; publish the resulting OCE; and run a jobwith a UNIX-deployed DAS to verify it works.
Brio Intelligence 6.x None
● No equivalent of 6x ODS System Monitor/Active Users screen to allows shutdown ofprocesses
The OnDemand Server provided a screen tomonitor active processes. Portal 7.x had autility to see the active users in the system.
Reporting and Analysis does not provide anequivalent method.
Brio Intelligence 6.x and Brio Portal 7.x None
● Web publishing/job scheduling in Oracle'sHyperion Reporting and Analysis notpossible from Designer
The Designer client in 6.x allowed schedulingwithout connecting to the Web. Thisfunctionality was lost in the move to HyperionPerformance Suite.
Brio Intelligence 6.x None
● Cannot add HTML links in an object’sdescription field
It used to be possible to add HTML links in thedescription field using the HTML tags thedocuments published in the server.
Brio Portal 7.x None
● When assigning roles and groups for Insightusers, the jump between IntelligenceDynamic Viewer and Intelligence Analyzer istoo severe.
This is a result of the inability to assign adefault adaptive state to a group.
Brio Intelligence 6.x None
● Cannot filter search results by mime type Brio Portal 7.x None
60 Limitations
Limitation System Affected Workaround
You can no longer use mime types to performa search.
Carry Forward from Hyperion Performance Suite 8.3 61

62 Limitations
Index
Aaccess control
mapping, 33validating, 37
access privileges, mapping, 32authentication, setting up, 23
BBrio Intelligence
migrating from, 9order of migration, 25supported versions, 19, 35validating migration, 41
Brio Portalmigrating from, 8migration checklist, 36order of migration, 24supported versions, 19, 35validating migration, 35
BrioONEmigrating from, 10supported versions, 19, 35
Broadcast Servermigration checklist, 43, 45supported versions, 19, 35validating migration, 43
Cchecklist
Brio Portal, 36Broadcast Server, 43, 45Hyperion Analyzer, 44Hyperion Performance Suite, 45Hyperion Reports, 44migration plan, 23OnDemand Server, 42post-migration, 45
post-migration validation, 29test server, source, 20, 21, 22test server, target, 22
componentschecking within the system, 29requiring post-migrations steps, 32requiring pre-migration steps, 31
Eenvironment
creating the test environment, 18prerequisites, 19supported source environments, 19supported target environments, 19
Ggroups, special symbols in, 13
Hhosts, setting up, 22Hyperion Analyzer
migrating from, 10migration checklist, 44order of migration, 26supported versions, 19, 35validating migration, 44
Hyperion Performance Suitemigrating from, 12order of migration, 27supported versions, 19, 35validing migration, 45
Hyperion Reportsmigrating from, 11migration checklist, 44order of migration, 26supported versions, 19, 35
A B C E G H J L M O P R S T U V W
Index 63
validating migration, 44
Jjob output runs, validating access control on, 37
Llog files, using for migration, 29
Mmanual migration steps, 30mapping
access control, 33access privileges, 32roles, 33
migratingfrom Brio Intelligence, 9from Brio Portal, 8from BrioONE, 10from Hyperion Analyzer, 10from Hyperion Performance Suite, 12from Hyperion Reports, 11the production server, 18, 30the test server, 24
migrationbreaking down the workload, 50Broadcast Server checklist, 43, 45end result, 15identifying project staff, 49identifying tasks and deliverables, 47manual steps, 30OnDemand Server checklist, 42order of, 24plan checklist, 23post-migration steps, 45scenarios, 7scope, 6test checklist, 27validating Brio Intelligence, 41validating Brio Portal, 35validating Broadcast Server, 43validating ODS, 42variables, 6
OOnDemand Server
migration checklist, 42supported versions, 19, 35validating migration, 42
order of migration, 24
Ppost-migration
checklist, 45components requiring, 32steps, 45
pre-migration, components requiring, 31prerequisites, environment, 19production server, migrating, 30project staff, identifying, 49
Rrole mapping, 33
Ssetting up
authentication, 23hosts, 22the source system, 20the target test system, 22
SmartCuts, 15source environments, supported versions, 19source repository, validating the setup, 23source system
setting up, 20validating the setup, 23
special symbols, in users and groups, 13
Ttarget environment, supported versions, 19target system
setting up, 22validating the setup, 23
tasks and deliverables, identifying, 47test environment
creating, 18validating, 23
test results, evaluating, 28test server
migrating, 24source checklist, 20, 21
A B C E G H J L M O P R S T U V W
64 Index
test system validation checklist , 23
Uusers, special symbols in, 13
Vvalidating
access control, 37Brio Intelligence migration, 41Brio Portal migration, 35Broadcast Server migration, 43ODS migration, 42the test environment, 23
Wworkload, breaking down for migration, 50
A B C E G H J L M O P R S T U V W
Index 65

A B C E G H J L M O P R S T U V W
66 Index