i. create the application workspace and project · diagram the page flow iii. create the login and...
TRANSCRIPT

Practice 1: Create JSF Pages
© 2011 Peter Koletzke 1
PRACTICE 1: CREATE JSF PAGES This hands-on practice and the next one demonstrate how to use JDeveloper to create a pair of simple JSF pages shown in Figure 1-1 that emulate login and home page screens. This is really just an enhanced version of the standard “Hello World” application you would code when learning any new language.
Note: Throughout these practices, chapter references point to related material in the Oracle JDeveloper 11g Handbook (Oracle Press 2009) by Mills, Koletzke, and Roy-Faderman.
Figure 1-1: Login and Home pages
To allow the example to focus on JDeveloper gestures for creating JSF files, this application does not connect to a database or pay much attention to real-world security needs. You will build this application to implement the following features:
• A login page with user name and password fields marked as required. • Validation of the user name and password fields. Both are required, and can be from one to 20
characters long. However, the only valid password is “JSF.” This password is hard-coded in the application, although it would normally be authenticated using security services of the application server as discussed in Chapter 21. Error messages are displayed for invalid or missing entries.
• Additional logic on the login page to display the password after three unsuccessful attempts. Of course, real-world applications would not show the password but would instead take some action such as logging the repeated attempts or locking the user account.
• A Login button that submits the form to the server, which will validate the data and pass control to the home page if validation succeeds.
• A Home page that displays the user name and a welcome message. • A Logout button on the home page that returns to the login.
The first practice in the series that creates these pages consists of the following phases:
I. Create the application workspace and project
II. Diagram the page flow
III. Create the login and home pages
IV. Review the JSF pages
I. Create the Application Workspace and Project In this phase of the practice, you create the JDeveloper code containers—an application and projects. As a review, the JDeveloper application is a container for projects that allows you to work on many projects as a unit; a JDeveloper project is a functionally-related set of files. Application deployments are usually performed on the project level.
1. Open JDeveloper. Additional Information: In Windows, look in the Programs menu for Oracle Fusion Middleware 11.1.1.3.0 | JDeveloper Studio 11.1.1.3.0 or a shortcut on your desktop.

Practice 1: Create JSF Pages
© 2011 Peter Koletzke 2
2. In the Application Navigator, click New Application (if the selection appears) or select New Application from the application name pulldown. The Create Generic Application dialog will appear, as shown here:
Note: As mentioned, these practices comply with American typesetting standards, which place a sentence- or clause-ending punctuation mark inside the quotes. Do not type this punctuation mark into the value unless instructed to do so.
3. Fill in Application Name as “LoginJSF,” and Directory as C:\JDeveloper11gClass\LoginJSF.” Change the Application Package Prefix to “login” and select “Generic Application” in the Application Template pane. Additional Information: The “Generic Application” option creates a project that is not assigned any specific technology (also called “technology scope”)—a selection of libraries oriented to a specific type of development, such as ADF BC or JSF. Some technology scope selections create specific project names in specific directories. However, if you select “Generic Application,” JDeveloper will prompt you for a project name and directory. You will add technologies in another step so that you can see how the process works. This selection is useful for demonstration purposes, such as this simple application, but for production applications, you would select a template (such as “Fusion Web Application (ADF)”) that contains projects with specific technologies, such as ADF Business Components.
4. Click Next. On the project page, enter the project name as “ViewController.” The directory name will be rewritten to include the new project name (for example, “C:\JDeveloper11gClass\LoginJSF\ViewController”). Leave this directory name.
5. In the Project Technologies region, select ADF Faces and click “>” to move it to the Selected area. Additional Information: Notice that technologies for Java; JSF; and JSP and Servlets were automatically added when you added the ADF Faces technology because ADF Faces work requires those technologies as well. You can add technologies to a project later using the Project Properties dialog (a right-click menu option on the project node). However, adding technologies now will appropriately filter the selections available in the New Gallery. You can always view all choices, regardless of the selected technologies, by clicking the All Technologies tab of the New Gallery.

Practice 1: Create JSF Pages
© 2011 Peter Koletzke 3
6. Click Finish. The application and project will appear in the navigator. Notice that several standard configuration files required for JSF projects will appear under the ViewController project as shown here:
Additional Information: The WEB-INF node contains faces-config.xml (the application configuration resource, also called application configuration file), and web.xml (the web module deployment descriptor). The Web Content node also contains a Page Flows node that again displays the same faces-config.xml file.
Note: The faces-config.xml file appears under two nodes in the Application Navigator because it is applicable to both categories (WEB-INF and Page Flows). It is the same file.
What Did You Just Do? You just created the JDeveloper application that organizes the projects you are working on. You also created a project that is used to store the application files. For this example, you just needed a single project, so you used the “Generic Application” template when creating the application. This option does not automatically create a project or assign technologies, so you then created a project and configured it for the ADF Faces technology. To verify the technology selections, double click the ViewController project node to display the Project Properties dialog. Select the Technology Scope node and notice that the Project Technologies tab contains ADF Faces, Java, JSF, and Java and Servlets in the Selected region. Click Cancel to close the dialog.
Note: Double clicking the project node is a shortcut for selecting Project Properties from the right-click menu on the project node.
What Could You Do Next? Spend a couple of minutes examining the files that were created: web.xml and faces-config.xml. You will see that JDeveloper initialized these files with default content but there is clearly more work to be done.
II. Diagram the Page Flow Since this application contains only two pages, you will define a very simple page flow. This phase will demonstrate how to design the page flow in the JSF Navigation Diagram before adding any code for the pages. The application you develop later will demonstrate a slightly more complex page flow, but for this example, you only need navigation from the login page to the home page and from the home page back to the login page.
1. Open the faces-config.xml file, if it is not already open (double click faces-config.xml under WEB-INF in the Application Navigator). Click the Diagram tab (if it is not already selected) to display the empty diagram page.
2. Drag a JSF Page component from the Components panel of the Component Palette to the diagram. (If the Component Palette is not visible, select it from the View menu.) After you drop it onto the page,

Practice 1: Create JSF Pages
© 2011 Peter Koletzke 4
the name will become editable. Change the name to “login” and press ENTER. JDeveloper will add a “/” prefix, so the page icon will appear as follows:
Additional Information: The icon contains a box drawn partially with a dotted line to indicate that no file has been associated with this diagram element.
3. Click the Source tab to examine the code in faces-config.xml. Notice that nothing has been added since you looked before, because no file has been linked to the diagrammed page element. Up to this point, you have only interacted with the diagram in design mode.
4. Click the Diagram tab again. Drop another JSF Page from the Component Palette to the right of the login symbol. Enter the name as “home” and press ENTER. As before, JDeveloper will add a “/” prefix to the file name.
5. In the Diagram view of the faces-config.xml file, click JSF Navigation Case in the Component Palette, click the login symbol, and click the home symbol to draw the navigation case line. Click the navigation case name, and change it to “goHome.” Press ENTER to complete the edit mode. Additional Information: Navigation cases define the flow of control from one page to another. Navigation cases are named “success” by default, but it is a best practice to rename them so that you can more easily distinguish between them within your code.
6. Under the navigation case line, draw another navigation case from home to login in the same way. Name the navigation case “logout.”
7. Click the orthogonal button (the third button to the right of the Show pulldown) in the diagram toolbar and rearrange the objects to roughly match the following illustration:
Additional Information: JDeveloper draws connecting lines in an orderly way using three line styles: direct (straight lines without angled bends or “doglegs”), polyline (angled bends that you define), and orthogonal (right-angle bends). Clicking the relevant button in the diagram toolbar (to the right of the Show pulldown displayed in the preceding illustration) sets the line style for that diagram.

Practice 1: Create JSF Pages
© 2011 Peter Koletzke 5
Tip: After setting the line style, change the position of a page symbol so that you can see how JDeveloper redraws the lines using that line style.
8. Be sure the Structure window is displayed. This usually appears in the lower-left corner of the JDeveloper window, but you can display it using View | Structure if it is not visible.
9. Notice that the navigation cases are also displayed in the Structure window. The Structure window contains a hierarchical view of the diagrammed elements. Additional Information: Small diagrams like this do not need navigation assistance. For larger diagrams, you can use the Thumbnail window (View | Thumbnail if the window is not already visible) to display part of the diagram in the editor window. You can also use the zoom buttons or pulldown in the diagram toolbar to change the size of the diagram view.
Note: A yellow triangle information icon attached to the navigation case indicates that the page at the (arrow) end of the navigation has not yet been created.
10. Notice that the faces-config.xml document tab shows the file name in italics, which indicates that the file has been modified.
11. Click Save All . The file name will “stand up” (convert back to roman) indicating that the file has been saved.
What Did You Just Do? You used the JSF Navigation Diagram to depict the two pages and the flows between them. This example application starts with page design. Alternatively, you could start by coding the page (.jspx) files and then drop them onto the navigation diagram afterwards. The finished navigation diagram will show each page symbol with associated page file. It doesn’t matter whether you create the page file code or diagram the pages first. In fact, since design and development are often performed iteratively, you will probably find yourself working in both ways to complete an application.
What Could You Do Next? Some code was added to faces-config.xml, Click the Source tab and review the navigation code that was added to the file.
The information in this file exists in an property-oriented form in the Overview tab. Browse around in this tab and get a feeling for its contents. Notice that if you click a From View ID name like “/home,” the Navigation Case information below it will appear. This tab offers the easiest way to set the Redirect property (so the page flow is a redirect or a forward) as shown here:

Practice 1: Create JSF Pages
© 2011 Peter Koletzke 6
III. Create the Login and Home Pages You are now ready to create the JSF files. You can start the Create JSF Page dialog from the New Gallery (Web Tier\JSF category) to create a file, and add that file to the JSF Navigation Diagram afterwards. Alternatively, you can start the Create JSF Page dialog from the JSF Navigation Diagram by double clicking a page symbol that has no page associated with it. JSF code is usually contained in a JSP file and you can code JSP files in two styles: the JSP page and the JSP document. This practice uses the JSP document style (.jspx files).
The following steps create files corresponding to the page symbols you dropped onto the diagram.
1. Click the Diagram tab of the JSF Navigation Diagram editor. Double click the /login page icon. The Create JSF Page dialog will appear.
2. Ensure that the Create as XML Document (*.jspx) checkbox is selected. This setting will add to the default page name (login) a “.jspx” extension. Leave the other defaults; for example, do not specify a page template.
Note: Notice (but do not select) the “Render in Mobile Device” checkbox. This setting allows you to configure the file to use libraries that support a wireless (PDA or cellphone) client in case the file needs to be displayed on such a device.
3. Click the plus (“+”) symbol next to Page Implementation to expand the implementation region. Select “Automatically Expose UI Components in a New Managed Bean” and leave the default in Name as “backing_login” and Class as “Login.” Change Package from its default (application package plus “backing” package) to “login.view.backing.” This package assignment will allow you to place other files in the view root package if needed but still keep the backing beans in a separate package (view.backing). Additional Information: The backing bean is created from this dialog selection, but you can alternatively create it later and associate it with the JSF file using the Overview tab (Managed Beans page) of the faces-config.xml file. The backing bean will also hold the event methods for buttons and other logic needed to process the page.
Note: You can write the code for more than one page inside a single managed bean. Some developers prefer this style because it allows for a centralized point for all action code.
4. Click OK to create the JSF file. Click Save All. Additional Information: The JSP file will open in the visual editor. The nodes in the Application Navigator will display the login.jspx file and its backing bean file, Login.java, as shown here:
5. In the Diagram tab of the faces-config.xml file, notice that the page symbol within login.jspx is now
made of solid lines, indicating that a real JSF page file is available for navigation. In addition, the

Practice 1: Create JSF Pages
© 2011 Peter Koletzke 7
page icon shows the file extension (“.jspx”). The information triangle has also been removed from the logout navigation case because the target file for that flow now exists.
6. Double click the /home symbol on the diagram to start the process again for the home page. Check that the default values in the dialog fields are correct (file name, directory, and .jspx type). Do not click OK yet.
7. Expand the Page Implementation area. Notice that the managed bean option is preselected because you selected it for the login.jspx page. (JDeveloper remembers the previous preference.) Change Package to “login.view.backing” (you might be able to select it from the pulldown that appears when you click inside this field).
Tip: The Page Implementation region heading contains a hint that appears when the region is collapsed. This hint (shown next) identifies the state of the managed bean radio group selection that is displayed when you expand the region.
8. Now Click OK. The file will be created and will be visible in the navigator as well as in the visual
editor.
9. Click Save All.
What Did You Just Do? You used the JSF Navigation Diagram to create two JSF page files. The process of creating each file linked it to a separate backing bean, which will hold processing logic and data access logic for the page.
IV. Review the JSF Pages This section shows the contents of the files you just created and demonstrates some JDeveloper code editing techniques.
As before spend some time time reviewing the contents and style of code in one of the JSF document (.jspx) files (the other contains similar elements), the application configuration resource (faces-config.xml), and one of the backing bean files (Login.java or Home.java). Use the following notes as a guide.
1. The home.jspx file should already be open in the JSP/HTML Visual Editor. If it is not, double click it in the Application Navigator and be sure the Design tab is selected. Additional Information: This view of the file shows the visual and some nonvisual elements on the page. At this point, you have not added anything to the page, but you will see a blue, dotted lines forming a rectangle on the page—this indicates the page’s form (af:form) component.
2. Roll the mouse over the page, crossing these lines, and you will see labels appear for the components that would be selected if you clicked the mouse. Find the Form component in this way and click it.
3. Notice that the breadcrumbs area in the status bar of the editor displays the name and location (tag hierarchy) of the component as shown here:
4. Select the pulldown next to the af:document tag in the breadcrumbs area. This is another way to
select a component embedded inside another component.

Practice 1: Create JSF Pages
© 2011 Peter Koletzke 8
Additional Information: This status line indicates that the selected component is af:form, which is nested within the jsp:root, f:view, and af:document tags as shown in the Structure window snippet here:
Note: You can ignore any warnings shown in the Structure window for now. You will fix these warnings later.
5. Click the Source tab and review the file contents. Consider that you would like to view the documentation for the af:document tag. You can use several methods to view help for a code element in JDeveloper.
6. For component-type file such as this, position the mouse cursor inside a tag (anywhere between the tag’s “<” and “>” and press F1. The help page for that tag will appear in a separate window.
7. Open Login.java. For Java files such this, position the cursor in a class name (such as RichForm) or method name (although no Javadoc exists for this class yet) and select Go to Javadoc from the right-click menu.
8. Select Go to Declaration in that same menu to show where the code element is defined (master class or variable declaration). Try this for RichForm.
9. Type in the following import into Login.java: import java.lang.String;
Additional Information: Note that you are just practicing techniques. Normally, you would not need to import this language class.
10. In the java.lang.String code, select Quick Javadoc in the right-click menu to display a popup window containing an excerpt from the class’ Javadoc.
11. Click the document tab for the faces-config.xml file. You may need to select it from the pulldown in the top-right corner of the editor window.
12. On the faces-config.xml document tab, select Close Others from the right-click menu. Click Yes to the Save Files dialog
13. Click the Source tab if it is not already open. Notice that the managed-bean elements have been added to register the new backing beans.
14. Click the Overview tab and navigate to the Managed Beans page. These beans are also visible in this page, This is the easiest way to set the scope of a bean file as shown next:
15. Select the History tab. This view shows the changes that have been made in this JDeveloper session
(and before). Select the first (lowest) version with a description of “New.”

Practice 1: Create JSF Pages
© 2011 Peter Koletzke 9
Note: The History tab will also display the source code management versioning changes as well as changes made locally.
16. You will see the additions made to the file highlighted on the right as shown here:
17. Locate the navigation-rule entry for login.jspx as shown above. Highlight that block of code and press
Ctrl-C to copy it to the clipboard (as a backup).
18. Click Save All.
19. Click the X icon in the left margin next to that block of code. Click the Source tab in the editor and confirm that the code has been removed.
20. Press Ctrl-Z to revert that change. The code block should reappear in the editor window. If not, paste it back into the file from the clipboard.
21. Return to the History tab and copy another block of code as a backup. Remove it with the X icon next to that block of code.
22. Now for a different method of restoring the file, Close the editor tab (click the X icon in its tab). A dialog will appear asking if you want to save changes. Deselect the checkbox next to the faces-config,xml file and click OK.
23. Reopen faces-config.xml and verify that the code you deleted has been restored. (Whew!)
24. Open web.xml. Notice that the Overview tab is the default view of this file. It has a similar property-oriented interface to the faces-config.xml file, but with different properties and tabs, of course.
25. Click the Source tab. Locate a block of code (such as the servlet-mapping for FacesConfig) and see if you can find its representation in the Overview tab (in the Servlets page maybe?). Additional Information: Notice that if you click the mouse in a section of code in the Source tab, then navigate to the Overview tab, the appropriate properties page for that code will be displayed. The reverse is true, too (selecting a property in the Overview tab selects the code in the Source tab).
What Did You Just Do? You spent time in this section looking through the files created up to this point and, along the way, practicing techniques for working with code files in JDeveloper.
Practice 2: Add Components to the Pages
© 2011 Peter Koletzke 10
PRACTICE 2: ADD COMPONENTS TO THE PAGES This practice demonstrates how to add containers, messages, fields, and a button to the login page. In this practice, you select components from the Component Palette. These components are not automatically bound to data sources, so you need to add mechanisms to load data into and read data from the components.
Applications that require database access normally contain one or more Model projects that represent tables. When Model code is available, you select components from the Data Controls panel instead of the Component Palette. This action adds ADF Faces components that are automatically bound to the Model layer objects. Other labs demonstrate adding components using the Data Controls panel.
This practice follows these phases:
I. Add components to the login page • Add the layout containers • Add the visual components • Test the page
II. Add components to the home page • Remove Automatic Backing Bean updates • Add JSF components • Set the af:outputText value as an expression • Set component properties and test the page
III. Add navigation and validation logic to the application • Add the navigation and validation code • Test the validation and navigation logic
I. Add Components to the Login Page When designing a screen layout, it is important to consider the arrangement of layout containers and their child components. When starting with ADF Faces, it is important to find appropriate layout containers and other components. You would then create a page template that you could use to supply a common look-and-feel to all the pages. Although this example ignores the template step, you will usually use them for real-world applications.
Add the Layout Containers In this section, you add layout containers that will hold other objects. The steps in this example use the Structure window to position components. A JSF or ADF Faces file (and even a standard HTML file) is laid out hierarchically so the Structure window is a good way to insure that the page results in the desired layout.
1. Open the login.jspx file, or select its tab in the editor, if it is already open. Be sure the Design tab is selected.
2. Be sure the Component Palette is accessible. If not, display it using View | Component Palette. Additional Information: We prefer positioning the Property Inspector Palette in the same area as the Log window so that wide property values are easier to read.
3. Select the ADF Faces page from the Component Palette pulldown if it that page is not visible. Locate the Panel Header component in the Layout panel of the Component Palette. Drag and drop the Panel Header component on top of the af:form tag in the Structure window, as shown here:

Practice 2: Add Components to the Pages
© 2011 Peter Koletzke 11
Additional Information: The Structure window should now appear as follows:
Note: The label for your af:panelHeader component may be slightly different. JDeveloper generates default labels and names for components you drop into the editor based on the component name and an index number that increments for each new component of the same type in the same file.
4. If your Structure window nodes do not appear in the same order as the illustration, use drag-and-drop operations to rearrange them until they match. Click the Design tab if it is not in focus. This editor is called the “JSP/HTML Visual Editor.”
Tip: You can correct a drag-and-drop operation by selecting Edit | Undo (CTRL-Z) or by dragging components around in the Structure window.
Additional Information: The af:panelHeader component is an ADF Faces layout container that displays a heading and can contain stacked child components. It has no other inherent layout capabilities.
Tip: One way to reorder the components inside another component is to drag the child component on top of the parent component. Components nested in this way always appear below all other child components at the same level. You can practice that now with the af:panelHeader but restore it under the af:form when you are done.
5. The af:panelHeader tag should now appear nested under an af:form tag. Be sure the af:panelHeader is selected. Be sure the Property Inspector is visible (select View | Property Inspector if it is not).
6. Change the Text property to “Enter Login Information” and press ENTER. This text will now appear as the main heading for the page. Additional Information: We will not change the Id property of this component because we do not need to reference it in code.
Tip: You can also type some text changes such as this directly in the JSP/HTML Visual Editor. However, you will probably find it faster and easier to use the Property Inspector.
7. You now need a layout container to hold the form’s objects. ADF Faces offers an af:panelFormLayout component that stacks fields and keeps their prompts aligned. Drag Panel Form Layout from the Layout panel of the Component Palette, and drop it on top of the af:panelHeader tag in the Structure window.
8. Expand the panel tags and you will see the following arrangement:

Practice 2: Add Components to the Pages
© 2011 Peter Koletzke 12
Additional Information: Some ADF Faces containers, such as af:panelFormLayout in this example, offer facets—predefined areas into which you can place child objects. Usually, the child component appears in a specific location on the page within the parent component. In this case, a facet exists for footer elements. When you place a component inside this facet, it will automatically be placed at the bottom of all child components.
9. Click Save All.
Add the Visual Components You are now ready to add the form fields, button, and a footer message. ADF Faces offers af:inputText, an improvement on the standard JSF input field, h:inputText. The ADF Faces component adds a prompt, a richer set of validators, and default messages to the JSF component. ADF Faces also supplies an af:commandButton component used to submit the form. All components use a default style defined in the ADF Faces libraries, and you do not need to apply styles manually although you can change the application’s skin, common style sheets, to apply changes to all components.
The form tag (af:form) must surround the fields and buttons it submits to the server.
1. Select the af:panelFormLayout tag in the Structure window. In the Common Components panel of the ADF Faces page in the Component Palette, click (do not drag and drop) Input Text. (This is an alternative layout technique to the drag-and-drop operation you have used before.) A field and label will appear in the editor, and the tag will be nested under the af:panelFormLayout component in the Structure window. Additional Information: af:inputText allows the user to enter data that will be submitted when the form is submitted. This field will hold the user’s name.
2. To demonstrate another technique for adding components, click the af:inputText node in the Structure window and press CTRL-C (to copy the component). Click the af:panelFormLayout node and press CTRL-V (to paste a copy of the component under this node). Another field and label will appear in the visual editor. This field will hold the login password.
Tip: Yet another way to create duplicate objects is to press CTRL after selecting the component to copy, then drop the selection and release CTRL on the node or area where the copies should appear (such as the af:panelFormLayout component). Practice that now if you wish, but be sure to leave only two text items under the form panel.
3. Drag and drop a Button (from the Common Components panel) on top of the af:panelFormLayout node of the Structure window. A command button will appear in the visual editor. This button will be used to submit the login values. Additional Information: The Structure window af:panelHeader node should now appear as follows:

Practice 2: Add Components to the Pages
© 2011 Peter Koletzke 13
Tip: You can hold the mouse cursor above a Component Palette item, such as Button, to view a tooltip containing a description of the component as well as its ADF Faces name.
4. Data entry in both af:inputText fields will be required. You can make changes to both fields at the same time. Select the two fields by clicking one and CTRL clicking the other in the Structure window. (You may need to wait a couple of seconds for the Property Inspector to merge the properties.) In the Property Inspector, expand the Behavior region (or click the Behavior tab) and set the Required property to “true.” Additional Information: Setting the Required property to “true” for an ADF Faces field causes an asterisk to display in the label. For example, the field label for the first field now appears as “* Label 1.” This suggests to the user that this field requires input.
5. With both fields still selected, set the following properties. (Be sure to press ENTER after entering each value so JDeveloper can register the change.) MaximumLength in the Behavior region as “20” (the limit of the number of characters a user can type in the field) Columns in the Appearance region as “15” (the width on the page) RequiredMessageDetail in the Appearance region as “is required” (this text will appear as an error message if the user submits the form without a value in this field)
6. In the Design tab of the visual editor, click the page outside of a field to deselect the two fields.
7. From the Common Components panel of the ADF Faces page in the Component Palette, drag an Output Text component and drop it on top of the footer tag in the JSP/HTML Visual Editor. (This is yet another way to add components to the page.) The object will replace the placeholder for the footer facet and the Structure window will appear as shown in Figure 2-1.
Figure 2-1: Structure window excerpt after all components are in place

Practice 2: Add Components to the Pages
© 2011 Peter Koletzke 14
8. Click Save All.
9. Click the Design tab if it is not already active. You can now fine-tune more properties on each component. Select the topmost af:inputText item in the Structure window. You have set some of its properties already. Now set Id in the Common region as “usernameField”
Note: You may have noticed that a dialog appeared indicating that some processing occurred when you changed the ID property. If you look at Login.java, you will see that the accessor methods and variables have been renamed (for example, from setIt1() to setUsernameField()). This is due to a page synchronization preference that was set when you created the page. You will disable this preference later on.
10. In the Design tab for login.jspx, set the following properties (pressing ENTER after each setting LabelAndAccessKey in the Appearance region as “&Username” Label in the Appearance region as blank. Remove the value so the preceding property will take effect. ShortDesc in the Appearance region as “Your name” (this appears as popup hint text)
Tip: You can search for a property by name using the search field in the top-right corner of the Property Inspector.
Additional Information: The LabelAndAccessKey property combines a field prompt with an access key assignment. (An AccessKey property just assigns the access key.) The access key allows the user to navigate to a field by pressing <CONTROL.-<LETTER>, where “<CONTROL>” is a browser-specific key (ALT in Internet Explorer and ALT-SHIFT in Mozilla Firefox and Safari) and “<LETTER>” is the letter that appears in the label after an ampersand character. For example, the LabelAndAccessKey value “&Username” will be displayed as “*Username.”
The letter following the ampersand (“U”) is underscored to signify that the user can press ALT-U (Internet Explorer) to move the cursor to that field. The access key need not be the first letter in the label, but it does need to appear in the label.
Tip: You can view help for properties by displaying the right-click menu in a property as shown here for ShortDesc:
11. Select the second field and set its properties as follows: Id as “passwordField” (press ENTER. This change will be written into the backing bean.) Secret in the Appearance region as “true” (This setting will convert the characters the user enters in this field to dots so that an onlooker cannot see the password.) Label as no text. (Remove the value.) LabelAndAccessKey as “&Password” ShortDesc as “Just Something Fun”
Tip: Get into the habit of pressing ENTER after typing a property so that the value will register before you navigate the cursor to a different place. This keypress is not required for values set using pulldown lists or popup dialogs.

Practice 2: Add Components to the Pages
© 2011 Peter Koletzke 15
12. Select the af:commandButton component and set its properties as follows. Be sure to press ENTER after changing a value.) Id as “loginButton” (This change will be written into the backing bean.) Text as blank (Remove the value.) TextAndAccessKey as “&Login”
13. Select the af:outputText item and set its Value property (Common region) as “* indicates a required field.”
14. Additional Information: The page should appear in the visual editor as follows:
15. Click Save All.
Test the Page Although the logic to process input and navigate to the home page is not in place, you can run this page in the Integrated WLS Server to view its appearance in the browser.
Alternatively, you can look at the page in a web browser without running the server by using the right-click menu option Preview in Browser on any page.
As a third alternative, the Preview tab of the editor window shows the page’s components without running the server. Both of these previewers provide an approximation of the runtime appearance of the page but do not allow you to test any of the functionality. Running the page in using the JDeveloper Integrated WLS Server is the best way to test the final appearance of the page as well as try out the functionality/
1. Be sure the login.jspx file is active (click its document tab in the editor if you are not certain). Select Run from the right-click menu in the editor. You can alternatively press CTRL-F11 when the page is active.
2. The server will start, the application will be deployed, and the page will appear in your browser. Without entering data, click Login to submit the form. Since you did not fill in mandatory fields, the following dialog will appear:
3. Notice that the dialog contains the field labels from the LabelAndAccessKey property and the text
from the RequiredMessageDetail property. Additional Information: You may also notice that this dialog did not require a round-trip request to the server; you can usually tell if the page submits to the server because part or all of the page is redrawn. In this case, JavaScript on the page checked the values before submitting the page to the

Practice 2: Add Components to the Pages
© 2011 Peter Koletzke 16
server. JSF reference implementation (RI) components allow you to set the Required property, but that setting requires a round-trip to the server.
4. Click OK to dismiss the validation error dialog.
5. Click in the Username field. (An error message callout containing the error text for this field will appear.) Type your name and press TAB to move the cursor to the Password field value; the error message for the first field will appear and another error message callout will appear for second field. Click Login again; the second field’s error message will reappear.
Additional Information: You do not need to click anything to enter data in the field, although you can click the window background to hide the message.
6. Enter some text in the Password field. Notice that the Secret property setting changes the input to dots. Click Login. The error message does not appear. Nothing happens because you have not coded any action.
• Press ALT-P and ALT-U (for Internet Explorer or ALT-SHIFT-P and ALT-U for Firefox or Safari) to test the navigation to the fields based on the access key. You will see the Short Desc (hint) text appear as balloons when the cursor enters the fields. This navigation aid is helpful to assisting users who prefer or require keyboard navigation. ALT-L (ALT-SHIFT-L) navigates to the button and activates it as if you clicked it. Additional Information: Nothing will occur if you click this button, because you have not handled the submit action yet.
7. Close the browser window. Click the red Terminate button in IDE toolbar and select the application name (LoginJSF) from the button’s pulldown as shown here:
Additional Information: This action undeploys the application but does not stop the default server. Selecting Default Server from this pulldown will stop the Integrated WLS Server. You do not need to undeploy the application or stop the server each time you test the application, but doing so ensures that no information or error states are held in server memory between test runs. Also, in the following labs, changes you make to database access code (using ADF Business Components) may not take effect until the application is undeployed and the server is restarted to clear out any objects cached in memory.
What Did You Just Do? In this phase, you added ADF Faces layout containers to the login JSF file. These layout containers abstract the HTML layout so that you do not need to worry about coding HTML structures such as tables and rows. Some ADF Faces containers also offer facets—prebuilt slots into which you can add components. You placed the output text component into the footer facet of the panel form layout; this facet maintains the output text’s position regardless of the browser window size.
In addition, you added components to the login page and set their properties; then you tested the page. Many properties you set for the ADF Faces field items (such as LabelAndAccessKey, Required, Columns, Secret, and MaximumLength) may already be familiar if you have a experience in other development tools. The property set offered by ADF Faces is richer than most other Java EE–oriented component sets, including the JSF RI components.
You changed the ID properties of some of the components to make backing bean code you will write later easier to read.

Practice 2: Add Components to the Pages
© 2011 Peter Koletzke 17
What Could You Do Next? Remember that all ADF Faces components will be run through the HTML render kit and sent as HTML to the web browser (or in another markup language to other display device such as a PDA). For the HTML display, layout containers will create HTML tables with specific properties. Components such as af:inputText and af:commandButton will create HTML form elements such as fields and buttons, respectively.
You can run this file and view its HTML source in the browser; then, save the source to an HTML file using View | Source (Internet Explorer) or View | Page Source (Firefox). Open this file in JDeveloper (File | Open). After reformatting the text, you will end up with over 260 lines of code with HTML tables nested three levels deep as shown in the following Structure window snippet.
The JSF file contains 43 lines of code with no HTML and fewer levels of nested containers. In other words, using JSF and ADF Faces tags supplies a large amount of HTML output, which provides sophisticated layouts. In addition, you do not code any HTML; the JSF code—or, more correctly, the HTML render kit—is responsible for generating HTML to the browser. Spend a bit more time familiarizing yourself with the components in the source code for login.jspx. Identify the property values you set in the Property Inspector. Remember that you can always view the help page for a component by clicking inside the tag in the Code Editor and pressing F1.
II. Add Components to the Home Page In this section, you build the home page.
Remove Automatic Backing Bean Updates JDeveloper triggers the automatic synchronization of JSF file and backing bean by the use of comments in faces-config.xml and the JSF file. An example, from the login.jspx file follows.
<!--oracle-jdev-comment:auto-binding-backing-bean-name:backing_login-->
The corresponding line in faces-config.xml follows. <!--oracle-jdev-comment:managed-bean-jsp-link:1login.jspx-->
This synchronization feature is handy when learning about backing beans. However, for production-level work, you would normally choose to turn off this feature because it creates variables and accessors that you will never use. In fact, you may not even need a backing bean file at all for many JSF files you create.
Since the home page does not require backing bean support, the steps in this section disables this synchronization feature.
Practice 2: Add Components to the Pages
© 2011 Peter Koletzke 18
1. Click the home.jspx file tab if the file is already open. (Double click the home.jspx node in the navigator if the home.jspx file is not already open.) Click the Design tab if it is not already selected.
2. Select Design | Page Properties and click the Component Binding tab. Deselect Auto Bind. Click OK. Additional Information: This action will remove the comment lines in home.jspx and faces-config.xml file. Examine the source code for these files to confirm this update.
Note: Restoring the Auto Bind selection will re-establish the automatic update support. You might want to turn this feature on when adding components that require backing bean support and turn it off for other components.
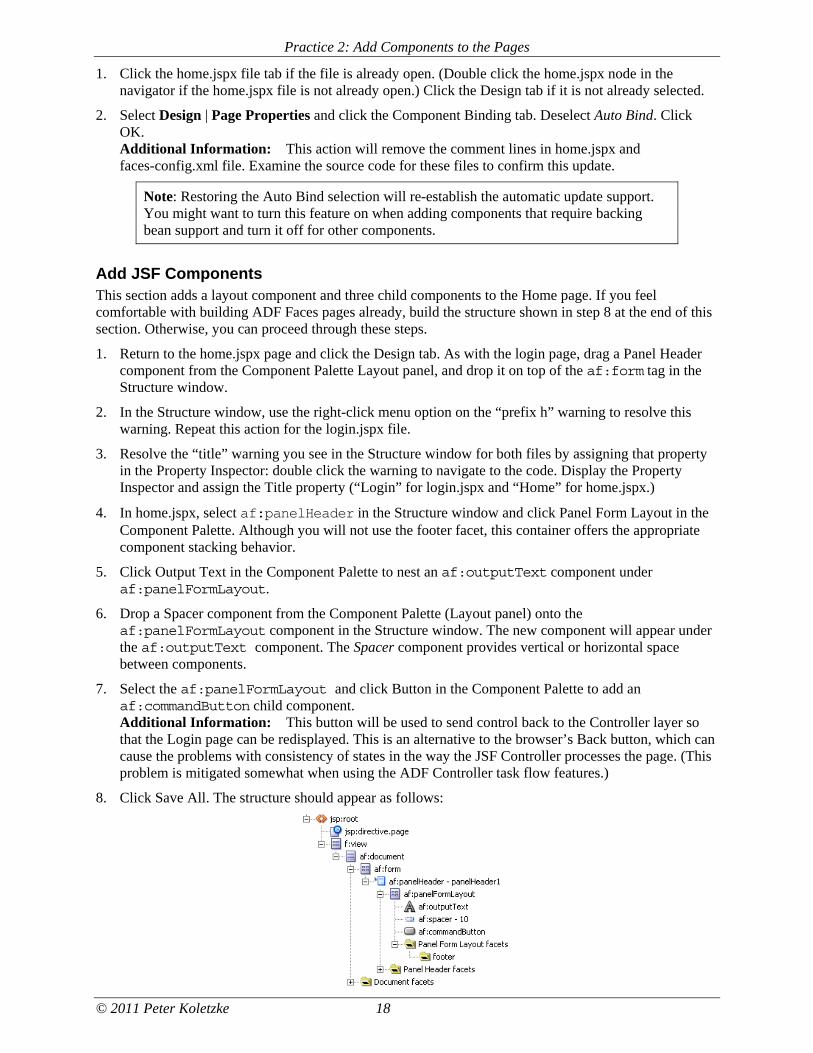
Add JSF Components This section adds a layout component and three child components to the Home page. If you feel comfortable with building ADF Faces pages already, build the structure shown in step 8 at the end of this section. Otherwise, you can proceed through these steps.
1. Return to the home.jspx page and click the Design tab. As with the login page, drag a Panel Header component from the Component Palette Layout panel, and drop it on top of the af:form tag in the Structure window.
2. In the Structure window, use the right-click menu option on the “prefix h” warning to resolve this warning. Repeat this action for the login.jspx file.
3. Resolve the “title” warning you see in the Structure window for both files by assigning that property in the Property Inspector: double click the warning to navigate to the code. Display the Property Inspector and assign the Title property (“Login” for login.jspx and “Home” for home.jspx.)
4. In home.jspx, select af:panelHeader in the Structure window and click Panel Form Layout in the Component Palette. Although you will not use the footer facet, this container offers the appropriate component stacking behavior.
5. Click Output Text in the Component Palette to nest an af:outputText component under af:panelFormLayout.
6. Drop a Spacer component from the Component Palette (Layout panel) onto the af:panelFormLayout component in the Structure window. The new component will appear under the af:outputText component. The Spacer component provides vertical or horizontal space between components.
7. Select the af:panelFormLayout and click Button in the Component Palette to add an af:commandButton child component. Additional Information: This button will be used to send control back to the Controller layer so that the Login page can be redisplayed. This is an alternative to the browser’s Back button, which can cause the problems with consistency of states in the way the JSF Controller processes the page. (This problem is mitigated somewhat when using the ADF Controller task flow features.)
8. Click Save All. The structure should appear as follows:

Practice 2: Add Components to the Pages
© 2011 Peter Koletzke 19
Set the af:outputText Value as an Expression You can base the text that appears in the af:outputText component on an Expression Language expression that refers to the username field on the Login page so that the username typed into the Login page will appear in the text. This section sets up this functionality.
1. Select the af:outputText component and find the Value property in the Property Inspector. From the pulldown on the right side of the Value property field, select “Expression Builder . . .” (shown next).
2. The Expression Builder dialog shown in Figure 2-2 will appear. This dialog assists in building an
expression used to supply a value to this property. Delete the contents of the Expression field and type “Welcome ” (including the trailing space). In the next step, you will fill in that phrase with an expression that contains the value of the Username field on the login page.
Figure 2-2: The Expression Builder dialog for the Value property
Additional Information: Since the username value is loaded into a field on the Login page and that field is controlled by a backing bean with accessors for the field’s value, you can build an expression that will call the accessor for that field. This dialog will help you build a proper expression, so you do not need to master EL right away.
3. You need to select something that will represent the value of the Username field, which has an Id property of “usernameField” in login.jspx. Remember that the data for login.jspx is supplied by a managed bean, known to the controller as backing_login. These clues will lead you to the correct expression. Start the search by expanding the JSF Managed Beans node.
4. Find the backing_login node and expand it. You will see a node for the usernameField element. Expand that node and scroll down until you find the value node. Select the value node. The

Practice 2: Add Components to the Pages
© 2011 Peter Koletzke 20
expression “#{backing_login.usernameField.value}” will load into the Expression field in the dialog. Additional Information: Reading backward in the object hierarchy, the value property is supplied for the usernameField element contained in the managed bean backing_login (as defined in faces-config.xml). If that backing bean contains a getter for the field (getUsernameField()), the expression will call that getter. If the getter does not exist, the expression will call a generic get() method in the managed bean class (or any class from which it inherits).
5. Click OK. The expression and literal text will appear in the Value property and also in the visual editor as shown here:
Note: The Structure window will display a warning about a reference value not found. This relates to the value expression for the af:outputText component because the value from the login page will be filled in at runtime. You can ignore this warning.
Set Component Properties and Test the Page This section starts by setting some properties of the components you have added to the page.
ADF Faces components render using a default set of style sheets. You can override the default appearance of a component by applying visual characteristics (using the subtabs in the Style region of the Property Inspector) or by applying a new Cascading Style Sheets (CSS) selector that is available in the ADF Faces set of styles. This section chooses the latter strategy because applying a style selector means you will rely on a common style sheet for the interpretation of the selector. Then you will test this page.
1. With the af:spacer tag selected, set the Height property to “20.” (This value represents pixels.)
2. With the af:panelHeader tag selected, set the Text property as “Home.”
3. Select the af:outputText component and in the Style region, select Edit from the pulldown for the StyleClass property. The following dialog will appear:
Additional Information: The Available Classes list shows all CSS selectors available to this ADF Faces component.
4. Type “orae” to scroll the list to names starting with those letters. Select “OraErrorNameText” and click “>”to move the style name to the Selected Classes list. Click OK. The text will turn to a bold red font. Additional Information: Naturally, if you are certain of the selector name and its spelling, you can just type it into the Property Inspector field and bypass the dialog.
5. Set the following properties for the af:commandButton component. Id as “logoutButton” Text as blank TextAndAccessKey as “&Logout”
6. Click Save All.

Practice 2: Add Components to the Pages
© 2011 Peter Koletzke 21
7. Although you have not connected this page to the login page, you can now run this page to check its visual elements. Click the mouse cursor in the home.jspx editor window and select Run from the right-click menu in the editor. Additional Information: The home page will appear in your browser without the user name and password. As before, the button will not work yet.
8. Close the browser. Stop the application and stop the Default Server using the Terminate button in the IDE toolbar.
What Did You Just Do? You added components to the home page show the user name, a page heading, and a button to return to the login page. With the assistance of the Expression Builder for the Value property, you defined the af:outputText value using an EL expression. You also changed the default style for the output text component by selecting an existing ADF Faces CSS selector. Then you ran the JSP pages to check that they appear correctly. You will specify the navigation and logic to check and process values entered by the user in the next phase.
What Could You Do Next? Examine the home.jspx file’s code to identify its elements. Notice that the EL data bindings appear as property values, as you would expect, because you entered the expressions in the Property Inspector.
III. Add Navigation and Validation Logic to the Application This phase specifies the page navigation and adds logic in the backing bean for the validation and other required functionality.
Add the Navigation and Validation Code If you have no code to run for a particular navigation, you can define navigation in the action property for an af:commandButton (or af:commandLink). We show how to use this technique for the navigation from the home page back to the login page. No additional logic in the backing bean code or elsewhere is required for this type of navigation.
The Login button click requires conditional event logic. Event logic is coded in a managed bean listener method named, by convention, “<component>_action,” where “<component>” is the name (Id property value) of the JSF component, such as the command button.
For example, you would use a method called “loginButton_action” to run code when the user clicks the af:commandButton component with an Id property of “loginButton.” JDeveloper can add a method stub for this event, as you will see in this section. This method serves as a place to enter any code that applies to the navigation. We will use this technique to define the navigation from the login page to the home page, because we need to check the number of logins and to validate the password.
The event code validates the user name and password values and returns a value to the controller. If the login is successful, the event code will return “goHome” (the name of the navigation case in the faces-config.xml file) and the home.jspx page will load. If the login is unsuccessful, the event code will return null, a message will be added to the FacesContext message area, and control will remain on the login page.
As you saw earlier, error messages for required values are displayed in a JavaScript alert. The code you will add in this section issues error messages that will be shown on the page. Loading the messages component requires a bit of backing bean code, as explained in the sidebar “About Messages in FacesContext.”

Practice 2: Add Components to the Pages
© 2011 Peter Koletzke 22
About Messages in FacesContext The JSF life cycle adds messages to the FacesContext memory area. You can programmatically add messages to this area as well. To access the FacesContext area, you create a FacesContext object that represents the current instance of the context using code similar to the following: FacesContext messageContext = FacesContext.getCurrentInstance();
You can then load messages into the context area using the addMessage() method. The string passed to addMessage() must be inside a FacesMessage object. You can combine these requirements into a single line of code that calls addMessage() on the current context object and that passes it a new FacesMessage object loaded with the desired text. The following shows an example of how you would place the “Hello JSF World” message into the FacesContext area so that it will be displayed in the standard ADF Faces message area (in this case, an error dialog): messageContext.addMessage(null, new FacesMessage("Hello JSF World"));
1. Display the Design page of the home.jspx file. Click the Logout button. In the Action property in the Common region (Button Action section) of the Property Inspector, select “logout” from the pulldown. Additional Information: The Action pulldown contains a list of all navigation cases you have defined from this page. In this case, you only defined one navigation case called “logout,” so that is the only value preloaded into the property’s pulldown. You do not need any conditional or validation logic for this navigation, because the framework performs the navigation based on the Action property setting.
2. Click Save All.
3. Display the Design tab of the login.jspx file. Double click the Login button. A Bind Action Property dialog will appear; you use this dialog to identify the managed bean name and method name for this button. The defaults will work, so click OK. The Login.java file will appear in the editor, and the cursor will navigate to a newly added method, loginButton_action().
4. Delete the following lines in this method stub: // Add event code here... return null;
5. In their place, enter the code below. As before, the line numbers are for reference purposes and should not appear in the code text. As you type in class names that are not yet available, JDeveloper will detect missing import statements and try to resolve them. Additional Information: For example, when you type in the FacesContext line, a popup message will show that JDeveloper is resolving the missing import. When it is finished, look for the added import. If JDeveloper is not able to resolve the reference, you can press ALT-ENTER to display a selection list of possible classes that would work.
Note: To try out code templates, type “ife” and press CTRL-ENTER. This action will place a code stub for the if conditional structure.
01: FacesContext messageContext = FacesContext.getCurrentInstance(); 02: 03: String returnResult = "goHome"; 04: loginAttempts++; 05: 06: if (!passwordField.getValue().toString().equals("JSF")) 07: { 08: returnResult = null; 09: if (loginAttempts >= 3) 10: { 11: // message displayed in the FacesContext dialog 12: messageContext.addMessage(null, new FacesMessage("You seem " + 13: " to have forgotten that the password is \"JSF.\"")); 14: }

Practice 2: Add Components to the Pages
© 2011 Peter Koletzke 23
15: else 16: { 17: messageContext.addMessage(null, 18: new FacesMessage("Incorrect login. Try again.")); 19: } 20: } 21: else 22: { 22: loginAttempts = 0; 23: passwordField.setValue(null); 24: } 25: 26: return returnResult;
6. In addition, outside of this and any other method (at the top of the class where the private variables are declared), declare the variable to hold the number of login attempts as follows: private int loginAttempts = 0;
Additional Information: We will explain how this code works a little later.
7. Select Make from the right-click menu in the Code Editor to compile the class file. Fix any syntax errors that the compiler finds.
8. Click Save All.
9. The variable that stores the number of login attempts, loginAttempts, needs to be incremented across multiple requests (command button clicks). The scope for the backing bean is set to “request” by default, but this would reset the value each time the page is submitted. You need to change this scope to “session.” Select the Overview tab of the faces-config.xml file.
Note: Normally, backing beans are left at their default scope of “request.” By convention, you would normally use a managed bean that is shared among pages to code functionality required across requests (application or session scopes). For simplicity in illustrating the concept of scope, this example sets the backing bean’s scope directly and does not create a separate managed bean.
10. On the Managed Beans page, in the backing_login row, change the Scope pulldown to “session.” This action resets the scope of the backing bean so that the login attempts counter will persist across requests.
11. Click Save All.
12. Select the Login.java backing bean file tab in the editor to examine the code you just entered. This block of code performs the following actions:
• Line 01 creates the context object that represents messages you will display.
• Line 03 declares and initializes a return variable with the value “gohome.” Returning this value will instruct the controller to forward to the Home page. The code reassigns this variable to null if the validation fails. In that case, the controller will not forward to the home page.
• Line 04 increments the login counter variable, loginAttempts. This variable is retained throughout the user session but is reset to zero if a login attempt is successful (in line 22).
• Lines 06–15 test if the password is not “JSF.” The getValue() method calls the getter method for the component’s variable in the backing bean. For example, the value of the passwordField component is accessed in the Login.java backing bean using the getPasswordField() method, declared by the following method signature: public RichInputText getPasswordField() Notice that getPasswordField() returns a RichInputText type. However, the getValue() method that calls getPasswordField() returns an Object type. To compare this Object type with a null string, you need to convert it to a string (using the toString() method available to all Objects). Finally, a null pointer exception can result from a comparison

Practice 2: Add Components to the Pages
© 2011 Peter Koletzke 24
with a null string, so you need to use the equals() method to compare the value with the desired password. (If this Java expression seems complex, there is no need to worry; you will soon be able to construct expressions like this faster than you can explain them.)
• Line 08 sets the return variable to null if the password is not “JSF” so that the controller will not forward to the home page.
• Lines 09–14 check if the user has attempted three or more logins. If so, it sets a message into the context area in Lines 12–13 using addMessage(). This message shows the user the password (although you would never show a password in a real-world situation). The error message shows the user’s correct password inside quotes; the backslash characters in the string escape the double quotes that follow, so they can appear as a literal inside the string delimited by double quotes. For example, "\"JSF.\"" will appear as "JSF." on the page.
• Lines 15–19 are reached if the number of login attempts is fewer than three. This code sets a message indicating an unsuccessful login.
• Lines 22–24 are reached if the password is correct (“JSF”).
• Line 22 resets the number of login attempts to zero in case the user returns to the login page to attempt another login.
• Line 23 clears the password field in case the user returns to the login page. The password must be reentered each time the login page appears.
• Line 26 returns the value that has been set in the logic before it. If all validation succeeds, the value will still be set to “goHome,” which causes the controller to forward to the Home page. If any validation fails, the return value passed to the controller will be null and no page navigation will occur.
Test the Validation and Navigation Logic This section tests the validation and navigation code you just created.
1. Before testing the login.jspx file again, be sure the faces-config.xml Diagram tab is active, and, on the login.jspx icon, select Set as Default Run Target from the right-click menu. Additional Information: This will set the welcome-file property in web.xml that will cause the server to find login.jspx whenever a file other than a JSP file in the project is run. Notice that a green “halo” appears behind the login.jspx file symbol in the diagram, indicating that it is the default run target. Now, whenever you run any non-JSP file in the ViewController project, JDeveloper will automatically run login.jspx.
2. Press F11 to run the project or select Run from the right-click menu on the ViewController project node. (JDeveloper will automatically save all modified files when you run the application.) The login.jspx file will display. (If it does not, stop the application and server and try again.)
3. You have already tested the error alert that indicates whether either field is blank when you click Login, but you may test other combinations of null values if you wish.
4. Enter a user name. Enter a password other than “JSF.” Click Login and the messages dialog will appear, indicating that the login is incorrect, as shown here:

Practice 2: Add Components to the Pages
© 2011 Peter Koletzke 25
5. This dialog is not modal, but click OK to dismiss it. Then try logging in two more times without the correct password. The third unsuccessful login attempt will show a different message and display the required password. Dismiss the dialog.
6. Enter the password as “JSF” (using uppercase) and be sure the user name is still filled in. Click Login and the home page will load with a title containing the user’s name.
7. Click Logout to return to the login page. The login page will reappear with no messages and no password (although the user name will be retained).
8. Close the browser. Stop the application (but leave the Default Server running).
What Did You Just Do? In this phase, you defined the page navigation from login to home and from home to login. Both navigation cases were triggered by button clicks. The former navigation case required validating the user name and password fields and returning success if the values were valid; returning “goHome” caused the controller to follow the navigation case and forward to the home page. The logic returned null and displayed a message on the login page if the password was invalid.
The home page Logout button is connected to the navigation case “logout” through the action property, and this navigation will occur regardless of data values. Therefore, clicking Logout will always redisplay the login page.
Extra Credit 2A: Access a Message Bundle with EL JSF offers the ability to store messages—text such as prompts, errors and warnings, button labels, and tab labels as text strings inside a message bundle, a Java file or properties file that contains key-value pairs defining the text displayed to users. You can access this file programmatically in the backing bean (or other Controller) code as well as declaratively within EL expressions. The benefits of message bundles are as follows:
• They centralize messages. That way, you can change any message in the application by editing a single file.
• They allow you to internationalize (localize) the application. You can create separate message bundle files for each language you need to support. Each message bundle would contain all messages used in the application translated into the local language. These language files share the same file name prefix and a suffix indicating the language. The JSF runtime engine retrieves the locale information from the browser’s settings and uses the appropriate file to supply messages to the application.
• They make it easy to replace default validation messages. The JSF framework allows you to code validators for each component by embedding a child tag—such as f:validateLength minimum="8" maximum="20"—inside the opening and closing tags of the component (for example, af:inputText). This validator calls default functionality and displays a default error message under the component (such as a field). You can replace the default error message using message bundles. The sidebar “Using a Message Bundle for JSF Error Messages” describes this a bit more.
Using a Message Bundle for JSF Error Messages Default JSF messages are not completely user-friendly. For example, the standard JSF message for a required field (and InputText component with the Required property set to “true”), which the user has left blank, is “Validation Error: Value is required.” This message does not indicate the problem field name, and the wording may not be as descriptive as you might like.
To replace messages such as these, you create entries with predefined names (keys) in the message bundle file. For example, naming the message “javax.faces.component.UIInput.REQUIRED” will cause the JSF runtime to replace the default error message for required text with whatever you have assigned to that message. You can find the JSF error message names in an article on java.sun.com; search for

Practice 2: Add Components to the Pages
© 2011 Peter Koletzke 26
“Customizing a Standard Validator Message” (with or without quotes). This technique will only redefine the default message that the framework provides. Extra Credit 4B shows how to programmatically insert messages into the FacesContext object so they can be displayed as part of the page processing.
The Steps The simplest example of (and easiest way to work with) message bundle files uses Expression Language expressions in property values. This technique does not require writing Java code. You first register the message file with the project. Then you create expressions in EL that reference the variable and, at the same time, create the message tokens in the message bundle file. The following steps demonstrate how this method works.
1. Double click ViewController in the Application Navigator and select the Resource Bundle page as shown in the following illustration . Be sure the One Bundle Per Project radio button is selected and change Default Project Bundle Name to “login.resources.LoginJSF.” Additional Information: These settings indicate the location and name of the file you will use to contain messages.
2. Be sure the Resource Bundle Type is “Properties Bundle” and click OK. If a confirmation dialog
appears, click Yes.
3. In the Design tab of the home.jspx file, select the af:outputText component. In the Property Inspector, select Select Text Resource from the pulldown in the Value property. The dialog shown in Figure 2-3 will appear:
4. Notice that the LoginJSF resource bundle name appears in the top of this dialog. Enter Display Value as “Welcome Home.” The Key value will automatically fill in as “WELCOME_HOME.” Fill in Description as “English welcome message” and click Save and Select.
5. A new EL expression will appear in the Value property and the message will be displayed in the visual editor. The message you just set up was written to a new file, LoginJSF.properties. Expand the ViewController\Application Sources\ login.resources nodes and double click LoginJSF.properties to display it in the editor. Additional Information: You will see the key, WELCOME_HOME, and the message text and comment you typed into the Select Text Resource dialog.
6. In the home.jspx editor window’s Design tab, select the af:outputText component again and add the reference to the login name again after the welcome message. Additional Information: Select Expression Builder from the pulldown in the Value property.

Practice 2: Add Components to the Pages
© 2011 Peter Koletzke 27
Navigate to the JSF Managed Beans\backing_login\usernameField\value node and select it. The expression will appear after the message bundle expression. Type a space between expressions and click OK. The expression in the Value property should now be the following: #{viewcontrollerBundle.WELCOME_HOME} #{backing_login.usernameField.value}
Figure 2-3: Text Resource dialog
7. Once the message appears in the message bundle, it is available in the Expression Builder as well. To verify how this works, open the Expression Builder (from the pulldown next to the Value property) and navigate to JSP Objects. (It is not a managed bean and so it will not appear under the JSF Managed Beans node.) You will see one or more nodes for viewControllerBundle and under them, your message. Click Cancel.
8. Click Save All. Run the application. Test successful navigation to the Home page and verify that the new Welcome Home message is displayed correctly.
What Did You Just Do? This practice showed how to create a message bundle message and refer to it using an EL expression in the Value property. You can add messages directly to the message file (instead of using the Select Text Resource dialog) and those messages will be available in the Expression Builder. You can also use the Select Text Resource dialog to create expressions for existing messages in the message bundle.
Tip: If you just want to construct EL for an existing message in the message bundle, Select Text Resource is easier because you don’t need to navigate a hierarchy to find the value.
Extra Credit 2B: Access a Message Bundle with Java You can try out the concept of referring to message bundle messages by using the code in this practice. This example adds messages to the message bundle you created in the preceding practice. It also adds the code to extract the messages in the backing bean. If your application requires international support, you can create additional message files in the same way, using the same message key names. The exercise of creating additional files is left to you, but it follows the same pattern as the next steps.

Practice 2: Add Components to the Pages
© 2011 Peter Koletzke 28
This example will demonstrate how to use the properties (text) file you created containing key-value pairs for the message. Alternatively, you can create a Java file that loads key-value pairs into a collection object. The last option is to create an XML Localization Interchange File Format (XLIFF) file, which also contains key-value pairs and can also be localized but which is formatted in XML.
Note: The JDeveloper Help Center topic “Internationalizing and Localizing Pages” describes more about the options and techniques for changing messages based on the user’s language.
1. In the Application Navigator, double click the LoginJSF.properties file under ViewController\Application Sources\login.resources. The file will open in the editor. Add the following lines of code at the end of the file: # login attempt messages incorrectLogin=Incorrect login. Try again. loginHint=You seem to have forgotten that the password is "JSF."
2. Lines starting with “#” are comment lines. Click Save All.
3. You can now add code to read these messages. You need to add an object that represents the contents of the message bundle file. Then you can programmatically reference specific messages from that bundle. Open Login.java in the editor.
4. In the loginButton_action() method, in the blank line under the declaration of messageContext (Line 01 in the listing shown earlier in this practice), add the following code: ResourceBundle messageBundle = ResourceBundle.getBundle( "login.resources.LoginJSF", messageContext.getViewRoot().getLocale());
Additional Information: This statement declares a message bundle object of type ResourceBundle. It references the LoginJSF.properties file you just created in the login.resources directory and specifies that you need to obtain the locale from the context area. (Notice that you do not need to enter the file extension “.properties.”) The context area stores information about the session, including the user’s preferred language.
Locale specifies a language and includes the concept that a language may be used in one way by a certain region and in another way by another region. For example, the English language can be used in UK or U.S. form, and that form (the region) would be stored as a user preference available to the browser. Message bundle files can use a locale suffix of language (for example, LoginJSF_en.properties) or a locale suffix of both language and region (for example, LoginJSF_en_us.properties). If your application only offers one message file, that file will be used regardless of the user’s locale preference.
5. A wavy red line will appear under ResourceBundle until JDeveloper creates the import. Additional Information: Automatically adding imports is defined by selecting the Code Insight property, Automatically Add Import When Completing a Fully-Qualified Class Name in the Preferences dialog page Code Editor\Java\Code Insight (Tools | Preferences).
Tip: If JDeveloper does not automatically resolve the class name imports, hold the cursor over the class name and press ALT-ENTER to add the import (for example, java.util.ResourceBundle).
6. Replace the addMessage() call that displays the message “You seemed to have forgotten…” (in Lines 12 and 13 of the earlier listing) with the following: messageContext.addMessage(null, new FacesMessage(messageBundle. getString("loginHint")));
Additional Information: This code refers to the loginHint key in the message bundle file (the file is now represented as the messageBundle object in the code).

Practice 2: Add Components to the Pages
© 2011 Peter Koletzke 29
7. Replace the addMessage() call that displays the message “Incorrect login…” (Lines 17 and 18 in the earlier listing) with this: messageContext.addMessage(null, new FacesMessage(messageBundle. getString("incorrectLogin")));
8. Click Save All.
9. Run the application and login incorrectly to see the two login error messages stored in the message bundle file. Additional Information: If you would like more experience with this concept, work on replacing the “Home” and “Enter Login Information” strings with text in the Messages.properties file.
10. Close the browser, stop the application, and stop the server process.
What Did You Just Do? This practice showed how to create a message bundle file and access its messages in a backing bean Java file. Programmatic access is a handy feature, but the EL method described in the preceding practice is much easier and quicker if you just need a message for a property value.
###
About the Author Peter Koletzke is a technical director and principal instructor for the Enterprise e-Commerce Solutions practice at Quovera, in Mountain View, California, and has 27 years of industry experience. Peter has presented at various Oracle users group conferences more than 280 times and has won awards such as Pinnacle Publishing's Technical Achievement, ODTUG Editor's Choice (twice), ODTUG Best Speaker, ECO/SEOUC Oracle Designer Award, ODTUG Volunteer of the Year, and NYOUG Editor’s Choice (three times). He is an Oracle Certified Master, Oracle ACE Director, and coauthor (variously with Dr. Paul Dorsey, Avrom Roy-Faderman, and Duncan Mills) of eight Oracle Press development tools books including Oracle JDeveloper 11g Handbook (from which some of the material in this set of hands-on practices is taken).