ibm maximo asset management: installation guide · pdf file · 2016-03-17product...
TRANSCRIPT

IBM Maximo Asset ManagementVersion 7 Release 5
Installation Guide(Oracle WebLogic Server)
���

NoteBefore using this information and the product it supports, read the information in “Notices” on page 261.
This edition applies to version 7, release 5, modification 0 of IBM Maximo Asset Management and to all subsequentreleases and modifications until otherwise indicated in new editions.
© Copyright IBM Corporation 2007, 2011.US Government Users Restricted Rights – Use, duplication or disclosure restricted by GSA ADP Schedule Contractwith IBM Corp.

Contents
Chapter 1. Installation overview . . . . 1Installing IBM Maximo Asset Management . . . . 1
System architecture and components . . . . . 1Product information . . . . . . . . . . . . 2
Prerequisite hardware and software. . . . . . 2Supported languages . . . . . . . . . . 3
Chapter 2. Planning to deploy . . . . . 5Deployment topologies . . . . . . . . . . . 5
Administrative workstation . . . . . . . . 6Single server deployment . . . . . . . . . 6Multiple server deployment . . . . . . . . 7
Planning for security . . . . . . . . . . . 8Planning for serviceability . . . . . . . . . . 9Planning language support . . . . . . . . . 10Installation program log information . . . . . . 10
Chapter 3. Preparing for installation . . 11Deployment scenario road maps . . . . . . . 11Installation options . . . . . . . . . . . . 12
Middleware configuration options . . . . . . 14Simple or custom option . . . . . . . . . 15
Software installation images . . . . . . . . . 16Before you begin . . . . . . . . . . . . 16
Programmatically verifying prerequisites . . . 17Checking port availability . . . . . . . . 21AIX tar command requirements . . . . . . 22AIX font requirements . . . . . . . . . . 22Enabling asynchronous I/O on AIX . . . . . 22Checking for required libraries on Linux . . . 23Configuring the JRE in Linux . . . . . . . 23Setting the ulimit . . . . . . . . . . . 24Setting the swap size . . . . . . . . . . 24Setting shared memory . . . . . . . . . 24Remote configuration enablement . . . . . . 25System password policy settings . . . . . . 26Backing up the Deployment Engine database . . 26
Launchpad . . . . . . . . . . . . . . 27Starting the launchpad . . . . . . . . . 27
Chapter 4. Deploying with automaticmiddleware configuration (Scenario 1) . 29Middleware installation . . . . . . . . . . 31
Middleware installation program workspace . . 32Middleware installation program middlewaredeployment plan overview . . . . . . . . 33Installing and configuring middleware using themiddleware installation program . . . . . . 34
Middleware installation program logs . . . 44Configuring IBM Tivoli Directory Server userand group strings . . . . . . . . . . 51
Uninstalling middleware . . . . . . . . . 52Manually configuring WebLogic Server . . . . . 54
Creating the MAXIMOSERVER domain . . . . 54
Configuring JMS options for integrationframework . . . . . . . . . . . . . 55Configuring JMS for the email listener inWebLogic Server. . . . . . . . . . . . 56
Installation program overview . . . . . . . . 58Running the installation program . . . . . . 60Create a maxdemo database during installation 70
Post installation for Oracle WebLogic Serverdeployments . . . . . . . . . . . . . . 71Deploying ear files . . . . . . . . . . . . 73Setting the Oracle WebLogic Server host name. . . 74Language deployment after database updatedeferral . . . . . . . . . . . . . . . . 74
Manually deploying languages after databaseupdate deferral . . . . . . . . . . . . 75
Chapter 5. Deploying automaticallyreusing existing middleware (Scenario2) . . . . . . . . . . . . . . . . . 77Reusing middleware using the middlewareinstallation program . . . . . . . . . . . 79
Configuring an existing DB2 with themiddleware installation program . . . . . . 81Verifying an existing IBM Tivoli Directory Serverusing the middleware installer . . . . . . . 82Preparing Microsoft Active Directory for reuse . 83
Manually configuring WebLogic Server . . . . . 85Creating the MAXIMOSERVER domain . . . . 86Configuring JMS options for integrationframework . . . . . . . . . . . . . 86Configuring JMS for the email listener inWebLogic Server. . . . . . . . . . . . 88
Installation program overview . . . . . . . . 90Running the installation program . . . . . . 91Create a maxdemo database during installation 102
Post installation for Oracle WebLogic Serverdeployments . . . . . . . . . . . . . 102Deploying ear files . . . . . . . . . . . 104Setting the Oracle WebLogic Server host name . . 105Language deployment after database updatedeferral . . . . . . . . . . . . . . . 106
Manually deploying languages after databaseupdate deferral . . . . . . . . . . . . 106
Chapter 6. Deploying manuallyreusing existing middleware (Scenario3) . . . . . . . . . . . . . . . . 109Maximo Asset Management installation withmanual middleware configuration . . . . . . 112
Manually configuring the database server . . . 112Manually configuring DB2 9.x . . . . . . 112Manually configuring Oracle 11g . . . . . 114Manually configuring Oracle 10g . . . . . 117Manually configuring Microsoft SQL Server 119
© Copyright IBM Corp. 2007, 2011 iii

Manually configuring the directory server . . . 121Manually configuring IBM Tivoli DirectoryServer . . . . . . . . . . . . . . 122Manually configuring Microsoft ActiveDirectory . . . . . . . . . . . . . 126
Manually configuring the J2EE server . . . . 129Manually configuring WebLogic Server. . . 129
Running the installation program withoutmiddleware autoconfiguration. . . . . . . . 133Create a maxdemo database during installation . . 142Post installation for Oracle WebLogic Serverdeployments . . . . . . . . . . . . . 143Deploying ear files . . . . . . . . . . . 144Setting the Oracle WebLogic Server host name . . 146Language deployment after database updatedeferral . . . . . . . . . . . . . . . 146
Manually deploying languages after databaseupdate deferral . . . . . . . . . . . . 146
Chapter 7. Silent installation . . . . . 149Installing Maximo Asset Management silently . . 149Silent installation properties . . . . . . . . 151
Chapter 8. Programmatically verifyingthat the installation was successful . . 165
Chapter 9. Verifying the installationmanually . . . . . . . . . . . . . 169
Chapter 10. Post installation tasks 171Initial data configuration . . . . . . . . . 171
Signing in using a default user ID . . . . . 171Configuring SMTP . . . . . . . . . . 171Create currency codes . . . . . . . . . 172Create item and company sets . . . . . . . 172Create an organization . . . . . . . . . 173Create a general ledger account component . . 173Applying changes to the database . . . . . 174Create a general ledger account . . . . . . 174Update General Ledger Component TypeAuthorization . . . . . . . . . . . . 175Update Company-Related Accounts . . . . . 175Create default insert site. . . . . . . . . 175Create worktypes . . . . . . . . . . . 176Signing out and signing in . . . . . . . . 177
Synchronizing users and groups . . . . . . . 177Create a maxdemo database after installation. . . 177Understanding and configuring security . . . . 179
Chapter 11. Uninstalling the product 181Uninstalling an automatically configureddeployment . . . . . . . . . . . . . . 181
Running the product uninstall program forautomatically configured middleware . . . . 182
Uninstalling a manually configured deployment 183Running the product uninstall program formanually configured middleware. . . . . . 183Database configuration recovery . . . . . . 184
Restoring the DB2 database server . . . . 184
Restoring the Oracle database . . . . . . 185Restoring the Microsoft SQL Server database 186
Uninstalling the product without the uninstallationprogram . . . . . . . . . . . . . . . 187
Uninstall program recovery tool . . . . . . 187Using the uninstallation program recoverytool. . . . . . . . . . . . . . . 187
Manual uninstallation . . . . . . . . . 189Removing files from the system . . . . . 189
Chapter 12. Starting and stoppingmiddleware . . . . . . . . . . . . 191Restarting middleware on Windows . . . . . . 191Restarting middleware on UNIX . . . . . . . 192
Chapter 13. Advanced installationtopics. . . . . . . . . . . . . . . 193Installation program tasks . . . . . . . . . 193Manual middleware configuration for expert users 195Configuring and managing Oracle WebLogicServer . . . . . . . . . . . . . . . . 202
Starting Oracle WebLogic Server . . . . . . 203Stopping the Oracle WebLogic Server . . . . 203
Changing the middleware installation programconfiguration parameters . . . . . . . . . 204Deploying EAR files . . . . . . . . . . . 204
Building EAR files. . . . . . . . . . . 205Manually uninstalling applications from OracleWebLogic Server . . . . . . . . . . . 205
Manually uninstalling applications fromOracle WebLogic Server . . . . . . . . 205
Performing multiple product installations on oneadministrative workstation . . . . . . . . . 205
Chapter 14. Middleware on Solarisand HP-UX . . . . . . . . . . . . 207Operating system preparation . . . . . . . . 207
Solaris . . . . . . . . . . . . . . . 207HP-UX . . . . . . . . . . . . . . 207
Installing the components . . . . . . . . . 208Installing DB2 . . . . . . . . . . . . 208Installing IBM Tivoli Directory Server on Solaris 210
Chapter 15. Backup and restoration 213Backing up the administrative workstation . . . 213Restoring the administrative workstation . . . . 214Installation properties . . . . . . . . . . 214
Updating environment data . . . . . . . 224
Chapter 16. Troubleshooting . . . . . 227Troubleshooting the middleware installer . . . . 227
Middleware installation programtroubleshooting feature . . . . . . . . . 227
Using the middleware installation programtroubleshooting feature . . . . . . . . 227
Segmentation fault . . . . . . . . . . 228Encountering error ACUINI0044E . . . . . 229Incorrect db2admin password . . . . . . . 229Password expiration for db2admin . . . . . 231
iv IBM Maximo Asset Management: Installation Guide (Oracle WebLogic Server)

Improper configuration of DB2 or IBM TivoliDirectory Server . . . . . . . . . . . 231Incorrect idsccmdb user password . . . . . 233Incorrect service pack requirement for AIX . . 235Failure when system directories cannot berenamed . . . . . . . . . . . . . . 235Invalid DB2 password value . . . . . . . 237Recovering from DB2 installation failure on AIX 238Troubleshooting middleware uninstall . . . . 240
Troubleshooting the product installation program 240General troubleshooting of the productinstallation program . . . . . . . . . . 240
Common deployment failures . . . . . . 244Troubleshooting the product uninstallationprogram . . . . . . . . . . . . . . 249
Error CTG00001 when performing anuninstall . . . . . . . . . . . . . 249
Appendix A. Planning worksheet forproduct installation . . . . . . . . . 251
Appendix B. Planning worksheets formiddleware installation . . . . . . . 253
Notices . . . . . . . . . . . . . . 261Trademarks . . . . . . . . . . . . . . 262
Index . . . . . . . . . . . . . . . 265
Contents v

vi IBM Maximo Asset Management: Installation Guide (Oracle WebLogic Server)

Chapter 1. Installation overview
Installing IBM® Maximo® Asset Management requires system administrator rightsand privileges.
Use this information to plan the installation, prepare your environment, and installMaximo Asset Management by using a deployment scenario that fits yourrequirements.
Installing IBM Maximo Asset Management
System architecture and components
Maximo Asset Management requires multiple software servers that are referred toas middleware. The middleware components can run on one or more computers.The following diagram shows the components that are used in a typical MaximoAsset Management installation.
HTTP Server
AdministrativeWorkstation
DatabaseServer
ApplicationServer
DirectoryServer
End User withweb browser
JDBC
HTTP/HTTPS
A Maximo Asset Management installation has the following required components:
Database
The Maximo database stores all information about assets, such as theirconditions, their locations, and related records. You can store thisinformation on the IBM DB2 database that is provided in the productinstallation image, or you can use any of the other supported databases. Alist of supported databases is provided in the prerequisites topic in thechapter that helps you prepare for the installation.
Application serverThe application server manages the Maximo Asset Management JavaServerPages (JSPs), XML, and business logic components. Maximo AssetManagement uses a commercial Java™ 2 Enterprise Edition (J2EE™)application server: either IBM WebSphere® Application Server or OracleWebLogic Server.
© Copyright IBM Corp. 2007, 2011 1

Administrative workstation
The administrative workstation is used to install Maximo AssetManagement. The administrative workstation must be installed on aMicrosoft Windows system. After the installation, use the administrativeworkstation to make updates or changes to the configuration.
Web browser
Users access the Maximo Asset Management applications by using a Webbrowser, connected over a company network or over the Internet.
In addition to the required components, you can use the following optionalcomponents with Maximo Asset Management:
HTTP serverYou can configure a separate, dedicated HTTP server to work with theJ2EE application server.
Directory serverYou can configure a directory server to provide identity management andauthentication for the J2EE server.
Product informationBefore you install Maximo Asset Management, review the product installationinformation.
Review the following information in the Quick Start download and in the IBMMaximo Asset Management Information Center.
Quick Start GuideProvides brief information to help you get started. The Quick Startdownload and the web information center contain copies of the Quick StartGuide in several languages.
Download documentDescribes how to download the product installation images if you do nothave a product DVD. For more information, see theIBM Maximo AssetManagement 7.5 Download Document (www.ibm.com/support/docview.wss?uid=swg24029458).
Product support siteThe IBM Software Support website (www.ibm.com/support/entry/portal/Overview/Software/Tivoli/Maximo_Asset_Management) gives you accessto the latest fixes and technical notes.
Upgrade GuideFor information about upgrading to version 7.5, see the Upgrade Guide, IBMMaximo Products V7.1 to V7.5 on the Maximo Upgrade Resources website(www.ibm.com/support/docview.wss?rs=3214&uid=swg21266217).
Prerequisite hardware and softwareReview the prerequisite hardware and software and ensure that your environmentmeets the minimum standards before you perform the installation.
The Maximo Asset Management installation and middleware installation programsinstall and configure IBM products that make up the Maximo Asset Managementarchitecture. Previously installed IBM products can be configured to be part of theMaximo Asset Management system. These existing resources must meet minimum
2 IBM Maximo Asset Management: Installation Guide (Oracle WebLogic Server)

release level requirements. In some cases, the Maximo Asset Managementinstallation programs can configure previously deployed products from othervendors to be used with Maximo Asset Management.
For information about the hardware, software, and network requirements forMaximo Asset Management, see the Overview and Planning page on the MaximoAsset Management wiki (www.ibm.com/developerworks/wikis/display/maximo/Overview+and+Planning).
Prerequisites that are listed for non-IBM products were valid at the time ofpublication. For the most up-to-date information about non-IBM productprerequisites, see the product documentation for each individual product.
Supported languagesThis section describes the languages supported by Maximo Asset Management.
The following are the supported languages:v Arabicv Brazilian Portuguesev Croatianv Czechv Danishv Dutchv Englishv Finnishv Frenchv Germanv Hebrewv Hungarianv Italianv Japanesev Koreanv Norwegianv Polishv Russianv Simplified Chinesev Slovenianv Spanishv Swedishv Traditional Chinesev Turkish
Note: While Maximo Asset Management itself supports the Turkish language, theinstallation program does not support Turkish. Furthermore, the administrativeworkstation must not be set to the Turkish locale before or after installing MaximoAsset Management. After Maximo Asset Management has been installedsuccessfully, Turkish can be deployed as either the base or as an additional
Chapter 1. Installation overview 3

language using the language pack installation program. The administrativeworkstation must remain set to a non-Turkish locale to accommodate futureproduct deployment actions.
4 IBM Maximo Asset Management: Installation Guide (Oracle WebLogic Server)

Chapter 2. Planning to deploy
Planning for a Maximo Asset Management installation is critical to a successfuldeployment.
Use this information to understand and effectively deploy Maximo AssetManagement in your environment to suit your business needs. Once you arecomfortable with deployment concepts and planning material, you can useplanning worksheets found at the end of this information to record values you useduring the installation process.
Deployment topologiesDetermine the best deployment option for your environment and business needs.
From a topology standpoint, a Maximo Asset Management deployment consists ofan administrative system working with various middleware servers that have beenconfigured to work together as Maximo Asset Management components. AMaximo Asset Management deployment requires an administrative system, adatabase server, and a J2EE server. It might also include optional components. Forexample , depending on how you decide to configure security, an LDAP servercould optionally be configured as part of the deployment.
Maximo Asset Management works with a variety of database and J2EE serversoftware, all of which are listed in the hardware and software prerequisiteinformation. Maximo Asset Management includes a middleware installationprogram which you can use to install IBM middleware products such as IBMDB2®. You can also reuse existing resources in your environment. This mightinclude supported versions of both IBM and non-IBM software middleware,including Microsoft SQL Server, Oracle WebLogic Server, and Oracle. Adeployment can include a mix of new and existing servers consisting of both IBMand non-IBM middleware. Although IBM middleware software is included withMaximo Asset Management, you can deploy Maximo Asset Management usingnon-IBM middleware exclusively.
There are two primary strategies to deploy Maximo Asset Management withinyour enterprise.
Single-serverThe single-server topology consists of loading all Maximo AssetManagement components, including all Maximo Asset Managementmiddleware, the Maximo Asset Management administrative system,process managers, and so on, onto one server. This deployment is typicalfor proof-of-concept purposes, as a demonstration, or as a learningenvironment. For managing enterprise assets and processes, you wouldtypically implement a multi-server topology.
Multi-serverThe multi-server topology consists of splitting Maximo Asset Managementcomponents across several different servers. This is beneficial as itoptimizes resource use and decreases the workload for each system. Thistype of deployment would be typical for production use within anenterprise.
© Copyright IBM Corp. 2007, 2011 5

When contemplating your deployment strategy, determine whether itincludes systems already established in your network. If you plan to reuseor migrate resources that exist in your network, adjust your rollout plan toallow time for things such as bringing the existing resources to versionlevels that are compatible with Maximo Asset Management.
In a disparate environment, the collection of computers in this deploymentcould be a mixture of Windows and UNIX computers.
Your Oracle WebLogic Server configuration minimally requires a singleadministration server on a single computer.
A typical deployment life cycle might begin with a single-server topology thatwould progress with phases of demonstration, functional proof-of-concept, andtesting integration within the existing environment, and then gradually movetoward a pilot multi-server environment before finally implementing a productiondeployment within the enterprise.
Maximo Asset Management, like all ISM products, is built upon the processautomation engine. The process automation engine is a core set of functions usedby all ISM products. It serves as a common base for shared services andapplications inherited by all Maximo-based products. Process managers areworkflow-based applications that enable the creation of executable process flows.Process managers provide a user interface used to perform process procedures,gather information from various sources, interact with external tools, utilize andupdate information in a database, and provide information to monitoring, analysis,and reporting tools. In addition, process managers provide capabilities to trackexecution metrics and provide dashboards and reports that allow organizations toidentify bottlenecks and improve organizational productivity.
Administrative workstationYou install Maximo Asset Management from a Windows workstation designated asthe administrative workstation. This workstation is where the Maximo AssetManagement EAR files are built and later deployed to the application server.
For daily operations, the administrative workstation is not required after the initialinstallation and configuration of Maximo Asset Management. You use theadministrative workstation to install program fixes, product upgrades, newapplications, new process managers, and additional language packs. So, while nottypically used on a day-to-day basis, the administrative workstation is used in allphases of the product life cycle. This workstation is an important Maximo AssetManagement support component.
Single server deploymentA topology consisting of deploying IBM Maximo Asset Management on a singleserver is frequently used as a proof-of-concept, educational, or demonstrationconfiguration.
The following figure illustrates Maximo Asset Management deployed on a singlesystem that both serves as the Maximo Asset Management administrative systemand hosts middleware used with Maximo Asset Management.
6 IBM Maximo Asset Management: Installation Guide (Oracle WebLogic Server)

Related concepts:“Installation program overview” on page 58The Maximo Asset Management installation program provides an interface forinstalling and deploying Maximo Asset Management, which includes the processautomation engine and process managers.
Multiple server deploymentThis section details deploying IBM Maximo Asset Management across multipleservers.
When deciding your deployment strategy, you must determine if it will includesystems already established in your network. Implementing Maximo AssetManagement by installing all new components using the Maximo AssetManagement middleware installation program can simplify the deployment. If youplan to reuse resources that already exist in your network, make adjustments toyour rollout plan to allow time for things such as bringing the existing resources toversion levels that are compatible with Maximo Asset Management.
Components for Maximo Asset Management: the database and LDAP servers, theJ2EE server and process managers, and the Maximo Asset Managementadministrative system are all installed on different servers. Maximo AssetManagement components can also be grouped logically and installed on the samesystem. In some instances, you will want to avoid the sharing of resources. Forexample, it is not recommended use the same DB2 database instance betweenMaximo Asset Management and IBM Tivoli® Directory Server. During theinstallation, the database instance is restarted, which can disrupt the availability ofIBM Tivoli Directory Server to your enterprise. If you are using the automatedinstallation programs, separate instances are created for use by Maximo AssetManagement and IBM Tivoli Directory Server.
In a disparate environment, the collection of servers in this deployment can be amixture of Windows and UNIX servers.
Within Oracle WebLogic Server you can create deployment managers that providecentralized administration of managed application servers. Oracle WebLogic Serverprovides basic caching support, including work balancing, performanceoptimization, and centralized management and monitoring.
Figure 1. Single server deployment
Chapter 2. Planning to deploy 7

Planning for securityPlanning for security includes choosing a security option and deciding which userswork with each application in Maximo Asset Management.
Maximo Asset Management can be configured to manage users and theirmemberships in security groups.
When you install Maximo Asset Management, you must choose a method formanaging users and groups. This method applies to all products that you installtogether. If you are installing Maximo Asset Management with another productalready installed, the choice you made when installing the first product is used forMaximo Asset Management as well.
If you are using Oracle WebLogic Server, security is defaulted to using Maximointernal authentication. With this option, a directory server is not required. Youcreate and manage users and groups in the Users and Security Groupsapplications, separately from any corporate user data you might have.
Choosing a security option
The security option you choose determines how your system performsauthentication, which is the validation of a user signing in to Maximo AssetManagement, and authorization, which uses security groups to control which userscan work with each application.
Choose one of these security options:
Database
Optional: LDAP
�
�
�
�
�
DB2OracleSQL Server
ITDSMicrosoft ActiveDirectory
J2EE Server�
�
WebSphereWebLogic
Installnew orreuseexisting
Administrativeworkstation(Windows OS only)
Figure 2. Maximo Asset Management
8 IBM Maximo Asset Management: Installation Guide (Oracle WebLogic Server)

Use application server and LDAP for authentication and user/groupmanagement
With this option, you create all your users and security groups in yourdirectory (LDAP) server. The information from the directory server isupdated in your Maximo database by using a cron task. With this option,you can create additional security groups and assign group membershipsin Maximo. All users must be added in the directory - adding users is notallowed in Maximo. Information entered in Maximo is never propagated toyour directory.
Use application server and LDAP for authentication onlyWith this option, you can create your users and groups in the directory(LDAP) server or in Maximo. The information from the directory server isupdated in your Maximo database by using a cron task. With this option,you can create additional users, security groups and assign groupmemberships in Maximo. Information entered in Maximo is neverpropagated to your directory.
Use Maximo internal authenticationWith this option, a directory server is not required. You create and manageusers and groups in the Users and Security Groups applications, separatelyfrom any corporate user data you might have.
Planning for serviceabilityServiceability refers to problem analysis from a central point, using data collectedfrom a wide range of sources.
Serviceability has changed from the method used in the previous version of theproduct. Serviceability is supported in Maximo Asset Management 7.5 through theuse of the IBM Support Assistant Workbench. The workbench is a free utility thatyou can configure to work with many different products.
Log files for the middleware installation program can be found in the workspacedirectory you defined when you ran the installation program. These files can beanalyzed by the Log Analyzer tool.
Log files for the Maximo Asset Management installation program are on theadministrative system in the following directories, where install_home equalsC:\IBM\SMP.
Table 1. Log file directories
Log file directory Details
install_home\logs
install_home\solutions\logs
install_home\maximo\tools\logs
install_home\CTG_DE
The ACULogger.properties anddeexlogger.properties files contain *fileDirkeys whose values provide the location forthe log files. The properties files can befound in
install_home\CTG_DE..
Log files are generated here if a problemoccurs during the validation sequence of theinstallation program.
Chapter 2. Planning to deploy 9

After installation, during normal usage of Maximo Asset Management, it can beuseful to examine the logs generated for the MXServer application server.
For more information about log information and the IBM Support AssistantWorkbench, refer to the troubleshooting section of the Maximo Asset Managementinformation center.
Planning language supportPlan the language support in the product user interface.
Maximo Asset Management includes language support for languages supported byUTF-8 and UCS-2.
When deployed using Microsoft SQL Server, Maximo Asset Management does notsupport UTF-8. Language support is limited to those languages supported by thecurrent Windows system code page. Supported language set choices are either allLatin one languages and English or one double-byte character set language andEnglish.
Important: If you plan to add language support to Maximo Asset Management,you must use the Maximo Asset Management product installation program todefine the base language to use before you perform post installation steps. You canadd additional languages at a later date, but the base language must be set eitherduring or directly after the Maximo Asset Management installation.
Chapter 10, “Post installation tasks,” on page 171There are several post installation tasks required in order to complete theMaximo Asset Management deployment.
Installation program log informationLog files generated by the Maximo Asset Management installation program canprovide details on completed installation tasks and any installation errors thatmight occur.
Maximo Asset Management installation program log locations
Logs can be found in the following locations:v install_home\logs
v install_home\solutions\logs
v install_home\maximo\tools\logs
v install_home\CTG_DE\logs
If you encounter an error during a validation task, logs can also be located withinthe home directory of the user that started the installation program. For example,C:\Documents and Settings\Administrator.
In addition, if you receive an error credited to the J2EE server, examine the logs inthe log directories for the application server.
When engaging IBM product support services, be prepared to provide these logfiles in an archive file. The LogZipper utility provided in the install_home\scripts directory can be used for this task. If you use the LogZipper utility, allrelevant log files are archived in install_home/debug/YYYYMMDD_hhmmss.zip.
10 IBM Maximo Asset Management: Installation Guide (Oracle WebLogic Server)

Chapter 3. Preparing for installation
These topics provide information about product media, preinstallationconsiderations, overview of the installation procedure, and instructions on usingthe Maximo Asset Management launchpad.
Use the preparatory information to familiarize yourself with the overall process ofa Maximo Asset Management deployment.
Deployment scenario road mapsDeployment scenario road maps are summaries consisting of product deploymenttasks.
The installation information provided with Maximo Asset Management 7.5describes three deployment scenarios.
Scenario 1 focuses on using the middleware installation program to install newIBM middleware, including the optional IBM Tivoli Directory Server, and allowingthe Maximo Asset Management installation program to automatically configurethat middleware.
Scenario 2 describes reusing middleware that you already have installed in yourenvironment, for example DB2 or Oracle, and allowing the Maximo AssetManagement installation program to automatically configure that middleware.
Scenario 3 describes reusing middleware that you already have installed in yourenvironment that you want to manually configure for use with Maximo AssetManagement. In this scenario, the middleware installation program is not used atall and you do not want Maximo Asset Management installation program toautomatically configure middleware.
The following series of road maps provide procedural summaries of Maximo AssetManagement deployment scenarios. The steps contained in each deploymentscenario road map briefly describe the overall task and then provide links to moredetailed information about that task.
The deployment scenarios provided include the following situations:
Deploying with automatic middleware configuration (Scenario 1)You want to establish Maximo Asset Management in a new environment.You intend to use Maximo Asset Management installation programs andtools to install and automatically configure new installations of middlewareand Maximo Asset Management. Oracle WebLogic Server must still beconfigured manually, but you can use the middleware installation programto install DB2, for example, and use the Maximo Asset Managementinstallation program to automatically configure it.
This scenario is particularly useful for setting up a demonstrationenvironment for Maximo Asset Management. You want to use MaximoAsset Management installation programs and tools to automatically installand configure middleware and deploy Maximo Asset Management.
© Copyright IBM Corp. 2007, 2011 11

Note: The middleware installation program does not support the HP-UXand Oracle Solaris platforms, however, installable images for DB2 and IBMTivoli Directory Server are provided with Maximo Asset Management. Youcan install this software individually using information in this guide if youwant to deploy Maximo Asset Management using this middleware onthose platforms.
Deploying automatically reusing existing middleware (Scenario 2)You want to deploy Maximo Asset Management using middleware thatexists in your enterprise. You want to use Maximo Asset Managementinstallation programs and tools to automatically configure yourmiddleware. Again, Oracle WebLogic Server must still be configuredmanually, but you can use the Maximo Asset Management installationprogram to automatically configure an existing database, for example.
This scenario would be applicable in situations where you already haveexisting middleware resources established in your enterprise. You want touse Maximo Asset Management installation programs and tools toautomatically configure that middleware.
Deploying manually reusing existing middleware (Scenario 3)You want to deploy Maximo Asset Management using middleware thatexists in your enterprise, and you want to manually configure thatmiddleware for use by Maximo Asset Management.
This scenario would be applicable to those situations in which you haveexisting middleware resources. You want to use these resources withMaximo Asset Management. You have particular company-sanctionedprocesses and regulations that restrict your use of automated configurationtools when deploying a new application in your enterprise. In thisscenario, you do not use the middleware installation program at any timeduring the deployment. All manual middleware configuration informationis contained in this scenario.
Chapter 4, “Deploying with automatic middleware configuration (Scenario 1),”on page 29Use this information to use product installation programs and tools to installand automatically configure a Maximo Asset Management deployment withinyour enterprise.Chapter 5, “Deploying automatically reusing existing middleware (Scenario 2),”on page 77Use this information to use Maximo Asset Management installation programsand tools to automatically configure existing middleware within your enterpriseduring the Maximo Asset Management deployment process.Chapter 6, “Deploying manually reusing existing middleware (Scenario 3),” onpage 109Use this information if you intend to deploy Maximo Asset Management byreusing existing middleware servers and manually configuring them to workwith Maximo Asset Management.
Installation optionsSeveral middleware installation options are available in your deployment.
You can reuse existing middleware installations as Maximo Asset Managementcomponents. For example, you might have an instance of DB2 or Oracle in anexisting database server farm which already has established access policies,redundancy measures, and backup plans in place.
12 IBM Maximo Asset Management: Installation Guide (Oracle WebLogic Server)

If you plan to reuse existing middleware, ensure that they are at the levelsupported by Maximo Asset Management. The Maximo Asset Managementmiddleware and Maximo Asset Management installation programs do not providea mechanism for updating servers using unsupported versions of middleware, nordo these programs provide remote prerequisite checks to ensure that they are atthe correct level. Use the prerequisite checking tool provided with the product.
If you intend to reuse existing Maximo Asset Management middleware serverswith Maximo Asset Management, they must be configured before running theMaximo Asset Management installation program. This reuse can be accomplishedin two ways.
Configure existing middleware for use with Maximo Asset Management usingthe middleware installation program and the Maximo Asset Managementinstallation program
In this scenario, you are using the installation programs supplied withMaximo Asset Management to configure existing middleware for you. Insome cases, you are required to perform a set or subset of manualconfiguration steps if you intend to reuse middleware that is notconfigurable with the middleware installation program.
Manually configuring existing middleware for use with Maximo AssetManagement
In this scenario, you are committing to configure existing middleware foruse with Maximo Asset Management manually. You are not using themiddleware installation program, and you are not using the Maximo AssetManagement installation program to auto-configure middleware resourceswhen prompted during the Maximo Asset Management installationprocess.
In some instances, you want to avoid the sharing of resources. For example, mostdeployments do not use the same DB2 database instance between Maximo AssetManagement and IBM Tivoli Directory Server. During the installation, the databaseinstance is restarted, which can disrupt the availability of IBM Tivoli DirectoryServer to your enterprise. If you are using the automated installation programs,separate instances are created for use by Maximo Asset Management and IBMTivoli Directory Server.
Chapter 3. Preparing for installation 13

Related concepts:“Reusing middleware using the middleware installation program” on page 79If you intend to reuse existing middleware servers with Maximo AssetManagement, they must be configured before running the Maximo AssetManagement installation program.Related tasks:“Running the installation program” on page 60Install Maximo Asset Management and automatically configure middleware onmultiple servers, using default values.“Running the installation program without middleware autoconfiguration” onpage 133Maximo Asset Management can be deployed with middleware that has beenpreviously configured. You might not want to have the Maximo Asset Managementinstallation program automatically configure middleware. If your organization hasspecific policies and procedures that govern how you create databases, databaseinstances, and users within your organization, use these instructions.“Programmatically verifying prerequisites” on page 17You can use the prerequisite verification utility to verify that installation programprerequisites are present on a system. Use this utility before starting themiddleware and product installation programs.Related information:“Maximo Asset Management installation with manual middleware configuration”on page 112Manually configured installations involve configuring middleware components, thedatabase server, the directory server, and the J2EE server, to work with MaximoAsset Management before using the Maximo Asset Management installationprogram.
Middleware configuration optionsThere are two options available for configuring Maximo Asset Managementmiddleware.
If the middleware has been either been installed by the middleware installationprogram or you have identified an existing middleware resource you intend to use,you have two options of configuring the servers for use with Maximo AssetManagement. You have the option of the Maximo Asset Management installationprogram automatically configuring middleware, or manually configuringmiddleware. If you choose to manually configure middleware, it must be donebefore running the installation program.
Auto-configureThe Maximo Asset Management installation program automaticallyconfigures middleware to work together with Maximo AssetManagement. Use this option if you are installing new instances ofmiddleware components using the middleware installation program. Alsouse this option if you have existing middleware instances that are notgoverned by policies that restrict programmatic configuration.
If you are using Oracle WebLogic Server, you could still automaticallyconfigure the database in your Maximo Asset Management deployment.
ManualYou can manually configure middleware that either exists in yourenvironment, or has been installed by the middleware installation program.This configuration must be completed before running the Maximo Asset
14 IBM Maximo Asset Management: Installation Guide (Oracle WebLogic Server)
Management installation program. You might choose this deployment pathif you have policies in place that dictate certain procedures and guidelineswhen configuring systems in your environment.
When deploying Maximo Asset Management on Oracle WebLogic Server,you must manually configure it.
Related concepts:“Reusing middleware using the middleware installation program” on page 79If you intend to reuse existing middleware servers with Maximo AssetManagement, they must be configured before running the Maximo AssetManagement installation program.Related tasks:“Running the installation program” on page 60Install Maximo Asset Management and automatically configure middleware onmultiple servers, using default values.“Running the installation program without middleware autoconfiguration” onpage 133Maximo Asset Management can be deployed with middleware that has beenpreviously configured. You might not want to have the Maximo Asset Managementinstallation program automatically configure middleware. If your organization hasspecific policies and procedures that govern how you create databases, databaseinstances, and users within your organization, use these instructions.Related information:“Maximo Asset Management installation with manual middleware configuration”on page 112Manually configured installations involve configuring middleware components, thedatabase server, the directory server, and the J2EE server, to work with MaximoAsset Management before using the Maximo Asset Management installationprogram.
Simple or custom optionEarly in the installation, you can choose which type of installation you want,simple, or custom.
Maximo Asset Management can be installed in one of two ways:
SimpleSelect simple if you want to deploy all Maximo Asset Managementcomponents on a single system using all IBM middleware. Thisdeployment option is typically only used for demonstration,proof-of-concept, or training purposes.
CustomSelect custom if you want to deploy Maximo Asset Managementcomponents across several systems. This deployment option is typicallyused in a production environment. If you are deploying Maximo AssetManagement on Oracle WebLogic Server, you must choose this option.
Chapter 3. Preparing for installation 15

Related tasks:“Running the installation program” on page 60Install Maximo Asset Management and automatically configure middleware onmultiple servers, using default values.
Software installation imagesYou access the IBM Maximo Asset Management product software from IBMPassport Advantage or from the product DVD if you requested a product DVD.
The installation images that you download from Passport Advantage can comprisemultiple downloadable files. Download all files in the package to a single directoryand extract the files for execution.
For instructions and a full list of installation images, see the IBM Maximo AssetManagement 7.5 Download Document (www.ibm.com/support/docview.wss?uid=swg24029458).
Before you beginA set of tasks must be completed before installing Maximo Asset Management. Insome cases, to perform the steps, you must be logged in as a user withadministrator privileges on Windows. Some processes, such as anti-virus programs,can negatively affect Maximo Asset Management installation on the system. Youmust temporarily shut down any noncritical processes before running the MaximoAsset Management installation program.
Most tasks must be completed for middleware installed on UNIX systems,regardless of whether you intend to use the middleware installation program toinstall and configure Maximo Asset Management middleware. These tasks must becompleted for any UNIX systems hosting middleware you intend to use withMaximo Asset Management.
Note: Make a copy of the image of the system, database, and application server onwhich you are planning to install the product.
Note: IBM publishes updates to the middleware installation program. Before usingit, visit the IBM Support Portal http://www.ibm.com/support/entry/portal/Overview/Software/Tivoli/Maximo_Asset_Management to see whether there is anupdated copy of the installation program available for your use.
Ensure that you have adequate disk space for the future on the systems being usedfor the Maximo Asset Management deployment. Filling up the disk space on aMaximo Asset Management deployment system can cause problems with MaximoAsset Management operations.
Fully qualified host names provided to the installation programs must resolvebetween systems involved in the product deployment. Ensure all IP addressesconfigured for systems targeted for the product deployment are reachable usingthe ping command from the administrative workstation.
“Checking port availability” on page 21You need to ensure that certain ports are available before using the productinstallation programs.“AIX tar command requirements” on page 22
16 IBM Maximo Asset Management: Installation Guide (Oracle WebLogic Server)

“Enabling asynchronous I/O on AIX” on page 22IBM Tivoli Directory Server requires asynchronous I/O be enabled on AIX®
systems. Without asynchronous I/O, DB2 and Oracle database instances cannotbe started successfully.“Checking for required libraries on Linux” on page 23The Maximo Asset Management deployment requires certain Linux systemlibraries.“Configuring the JRE in Linux” on page 23In some cases, the middleware installation program fails on Red Hat EnterpriseLinux 5 systems, or other systems with Security-Enhanced Linux (SELinux)enabled.“Setting the ulimit” on page 24This section details how to set the ulimit in Linux, which is used to define usersystem and process resource limits.“Setting the swap size” on page 24Maximo Asset Management can be a resource-intensive application. Configureand tune your system for maximum performance. This section details how toset the size of the swap space used in Linux systems.“Setting shared memory” on page 24This section details how to set a minimum shared memory value in Linux.“Remote configuration enablement” on page 25The Maximo Asset Management installation program can automaticallyconfigure middleware. You must enable a remote access protocol for eachsystem on which you intend to install the middleware.“System password policy settings” on page 26Be familiar with the password policies of systems you are using as part of aMaximo Asset Management deployment.“Backing up the Deployment Engine database” on page 26These instructions are for backing up the Deployment Engine database.Backups are used to restore the database to the state it was before installing.“Programmatically verifying prerequisites”You can use the prerequisite verification utility to verify that installationprogram prerequisites are present on a system. Use this utility before startingthe middleware and product installation programs.
Programmatically verifying prerequisitesYou can use the prerequisite verification utility to verify that installation programprerequisites are present on a system. Use this utility before starting themiddleware and product installation programs.
About this task
The prerequisite verification utility checks the following items:v Operating system requirements, including fix packs.v Hardware requirements, including memory and hard disk space.v Port availability.v Middleware requirements such as software packages, library files, directory
permissions, host names, and installation locations.
Note: This utility cannot be used to check Oracle WebLogic Server.
Chapter 3. Preparing for installation 17

You can start the prerequisite verification utility from the product installationlaunchpad or from the command line. When started from the launchpad, the utilityruns in interactive mode. When started from the command line, the prerequisiteverification utility accepts various parameters. The prerequisite verification utilitymust be run on the system hosting the prerequisite being checked. You cannot usethis utility to check prerequisites on a remote system.
Table 2. System verification parameters
Parameters Details
-component Specifies the type of component being verified. At least one component must beused with the prerequisite verification utility.
dbserverUse the dbserver parameter to have the prerequisite verification utility checkfor DB2 prerequisites.
dirserverUse the dirserver parameter to have the prerequisite verification utility checkfor IBM Tivoli Directory Server prerequisites.
bsiUse the bsi parameter to have the prerequisite verification utility check forprerequisites required by the product installation program. Run theprerequisite verification utility with the bsi parameter on the administrativeworkstation.
Syntax example:
tpae_req_check.bat -component dbserver
If you do not use the -component parameter, you are prompted to specifycomponents when using the utility.
Multiple components can be specified as comma-separated values.
-input The prerequisite verification utility can accept a property file as input. The utilityverifies property values found in the file. For example, the default DB2 server portparameter is DB2_SERVER_PORT=50000. The prerequisite verification utility verifiesthat this port is available on the DB2 server host.
The default input property file is tpae.properties, and is found on themiddleware installation media in the SystemRequirements directory. There are alsoseveral sample property files found in the SystemRequirements\sample_property_files. These sample property files contain custom valuesdefined for particular operating systems. You can copy these property files to thesystem and modify them, or create your own, before running the prerequisiteverification utility.
Syntax example:
tpae_req_check.bat -component dbserver -input path to the property file
If you do not use the input parameter when you run the prerequisite verificationutility, the utility is run in interactive mode. You are prompted for individualvalues to be verified.
18 IBM Maximo Asset Management: Installation Guide (Oracle WebLogic Server)

Table 2. System verification parameters (continued)
Parameters Details
-mode The prerequisite verification utility can be run in silent or interactive mode.
interactiveBy default, the prerequisite verification utility is run in interactive mode. Ifyou do not specify the -mode parameter, the utility defaults to running ininteractive mode. When started from the launchpad, the utility runs ininteractive mode.
silentIf you use the silent qualifier, you can also use the input parameter andsupply a property file. If an input file not provided, default property valuesare used. The output must also be directed to a file to view the results.
Syntax example:
tpae_req_check.bat-component dbserver-mode silent-input path to the property file > prereqresults.log
-lang Parameter used to specify the locale of the system being verified.
Syntax example:
tpae_req_check.bat-component dbserver-lang en
Results are produced in the language of the locale specified.
This is an optional parameter.
By default, the language set in the system locale is used. If the resource bundle isnot found for the system locale, or, the system locale language is not supported,messages are displayed in English.
-trace Parameter used to specify trace output statements while the utility is running.
NoneSelecting this qualifier results in no trace information being generated whilethe utility is running.
VerboseSelecting this qualifier results in detailed trace information being generatedwhile the utility is running.
NormalSelecting this qualifier results in default trace information being generatedwhile the utility is running.
Syntax example:
tpae_req_check.bat-component dbserver-trace None
Procedure1. Log on to the system you are checking for prerequisites with a user ID that has
permission to run scripts on the system. Ensure that the middlewareinstallation media is mounted or otherwise available to the system. Thisexample procedure uses values found in the default tpae.properties file toverify that a system is suitable to host DB2 for a Maximo Asset Managementdeployment.
Chapter 3. Preparing for installation 19

2. Open a command-line window and change directory to the SystemRequirementsdirectory of the middleware installation media.
3. Run the prerequisite verification utility. Specify the component being checkedand the property file to use.tpae_req_check.bat-component dbserver-input d:\SystemRequirements\tpae.properties
In this example, the tpae.properties file is located in the same directory as thetpae_req_check.bat script.
Results
After the prerequisite verification utility has completed successfully, results areprinted to the screen.
CTGIN8117I : The Tivoli Pre-requisite Scanner has been launched.CTGIN8118I : The Tivoli Pre-requisite Scanner exited with the return codeIBM Prerequisite Scanner
Version : 1.0.34Build : 20101109OS Name : Microsoft Windows Server 2003, Enterprise Edition Service Pack 2User Name: Administrator
Machine InfoMachine name : MYMACHINESerial Number: KKKKKK0OS Serial : 66666-666-6666666-66666
PAE [not defined] [version 07500000]:Property Result Found Exp...======== ====== ===== ===...os.totalPhysicalMemory PASS 2.00GB 1.90GBnetwork.hasFQDN FAIL False TrueDisk#1 (C:\ibm\tivoli\mwi\workspace) PASS 27.99GB 300MBDisk#2 (C:\Temp\1) PASS 27.99GB 1000MBDisk#3 (C:\Temp\1) PASS 27.99GB 250MBnetwork.availablePorts.db2 PASS 135,445,1025,2967,3389,5800,5900,139 50000network.availablePorts.ctginst PASS 135,445,1025,2967,3389,5800,5900,139 50005Disk#4 (C:\Program Files\IBM\SQLLIB) PASS 27.99GB 1.40GB
ALL COMPONENTS :Property Result Found Exp...======== ====== ===== ===...C: PASS 27.99GB 2.91GB
Prereq Scanner Overall Result: FAILprereq_checker.bat 1
These values can also be redirected to a file when starting the command from thecommand line.
If any of the verification steps report a failure, resolve the issue and rerun theverification utility before installing Maximo Asset Management components.
Table 3 contains a list of the properties checked. Use this information to analyzeprerequisite verification utility results.
Table 3. Prerequisite verification utility properties
Property Description
CpuArchitecture Verifies the machine architecture is supported.
20 IBM Maximo Asset Management: Installation Guide (Oracle WebLogic Server)

Table 3. Prerequisite verification utility properties (continued)
Property Description
disk(rw permissions) Checks read/write permissions of required directories.
network.availablePorts.* Verifies required ports are available.
The following example checks to ensure a port required by DB2 is available.
network.availablePorts.db2inst=50000
network.dns Verifies there is a DNS entry for the system on the DNS server.
network.fqdn Verifies that the system host name is fully qualified.
os.architecture Verifies the operating system architecture is supported.
os.dir.tmp/home Verifies required permissions for the system directories
os.FreePagingSpace Verifies adequate free paging space is available on the system.
os.iodevicestatus Verifies the I/O device status of the system.
os.lib.ksh Checks the ksh library.
os.lib.libstdc++.so.5 Verifies a prerequisite library is available on the system.
os.lib.xlC.rte=xlC.rte.9.0.0.8+ Verifies a prerequisite library is available on the system.
os.mountcheck Checks for the existence of nosuid on the file system.
os.package.rpm Verifies prerequisite packages are available on the system.
os.RAMSize Reports system RAM available.
os.SELinux Determines if selinux is enabled.
os.servicePack Verifies required service packs are installed on the system.
os.shell.default Determines the default shell for users.
os.space.* Determines disk space availability for various file systems.
The following example shows the check made for the middleware installationprogram workspace.
os.space.root=[dir:root=/root/ibm/tivoli/mwi/workspace,unit:MB]300
os.totalPhysicalMemory Reports physical RAM available to the operating system.
os.ulimit Identifies user limits configured on the system.
os.Version Reports the operating system type and version.
Checking port availabilityYou need to ensure that certain ports are available before using the productinstallation programs.
About this task
You must check to see if ports are in use and accepting connections for the systemyou are using to host middleware. For example, port 50000 must be made availablefor DB2. Port 7001 must be made available for Oracle WebLogic Server. If youintend to use these default port values, ensure that the port is not already assignedbefore you run installation programs.
You can either use the prerequisite verification utility to check for port availability,or you can check manually.
Chapter 3. Preparing for installation 21

Procedure1. Open the appropriate port checking utility on the host system. If present, check
firewall rules for the system.2. Check the availability of ports required by Maximo Asset Management. If you
find that port already assigned, ensure that you choose another value whenprompted by the middleware installation program.“Programmatically verifying prerequisites” on page 17You can use the prerequisite verification utility to verify that installationprogram prerequisites are present on a system. Use this utility before startingthe middleware and product installation programs.
AIX tar command requirements
Both the native UNIX tar command and the GNU version of the tar command arerequired by the middleware installation program. Because the native utility doesnot support long file names, ensure that GNU tar version 1.14 or higher isinstalled. GNU tar version 1.14 ensures that installation files can be extracted.
Verify that the system path variable contains both native UNIX tar and GNU tarpaths. The GNU tar path must be defined before the native UNIX tar path. Forexample, the native tar utility is installed in /usr/bin and the GNU tar utility isinstalled in /opt/freeware/bin/tar.
If you have set a symbolic link to overwrite the native UNIX tar command withthe GNU tar command an error occurs.
http://www.ibm.com/systems/p/os/aix/linux/toolbox/download.html
AIX font requirementsAIX requires specific fonts in order to produce reports.
About this task
When producing reports from AIX systems, TrueType fonts must be available onthe system.
Procedure1. Install TrueType fonts on the AIX system.2. Ensure the fonts-path environment variable refers to the location of the fonts.
Enabling asynchronous I/O on AIXIBM Tivoli Directory Server requires asynchronous I/O be enabled on AIX systems.Without asynchronous I/O, DB2 and Oracle database instances cannot be startedsuccessfully.
About this task
Enabling asynchronous I/O on AIX is an installation requirement, so this stepmust be run before running the middleware installation program. You only need toperform this step if the system hosts the IBM Tivoli Directory Server.
To turn on asynchronous I/O follow these steps:
22 IBM Maximo Asset Management: Installation Guide (Oracle WebLogic Server)
Procedure1. Log in to the system as root.2. Open a terminal and run the following command:
smit chgaio
3. From the System Management Interface Tool (SMIT) dialog box, change STATEto be configured at system restart from defined to available.
4. Click OK.5. Exit SMIT.6. Run the following command from the command line:
smit aio
7. In the System Management Interface Tool (SMIT) dialog box, select ConfigureDefined Asynchronous I/O, and then click Enter.
8. Reboot the system to enable the changes.
Checking for required libraries on LinuxThe Maximo Asset Management deployment requires certain Linux systemlibraries.
Procedure1. Locate the libstdc+.so.5 library in the /usr/lib/ directory. If this library is not
installed, the middleware installation program throws an error when runningthe middleware installation program in graphical mode. If you cannot locatethis library on your system, locate the RPM package for your system thatcontains this library and install the package.
2. Ensure that you have the libstdc++33-32bit-3.3.3-11.9.x86_64.rpm packageinstalled before running the product installation program. SUSE LinuxEnterprise Server 10 64-bit systems hosting manually configured middlewaremust host this package.
Configuring the JRE in LinuxIn some cases, the middleware installation program fails on Red Hat EnterpriseLinux 5 systems, or other systems with Security-Enhanced Linux (SELinux)enabled.
About this task
In one scenario, the middleware installation program fails with an error statingthat the Java Runtime Environment (JRE) cannot be found. In another scenario, themiddleware installation program fails stating that it cannot find the VM.
Complete the following steps to avoid these problems:
Procedure1. Temporarily disable SELinux by using the setenforce 0 command.2. Run the middleware installation program.3. Re-enable SELinux by using the setenforce 1 command.4. Manually issue the chcon -R -t textrel_shlib_t install_home/jvm/jre> command.
Chapter 3. Preparing for installation 23
Results
The middleware installation program is now able to locate the JRE. Alternatively,you can edit the /etc/selinux/config file and set SELINUX to either permissive ordisabled for a more permanent fix. This solution, however, affects the level ofsecurity for the entire system.
Setting the ulimitThis section details how to set the ulimit in Linux, which is used to define usersystem and process resource limits.
About this task
For Linux systems, you must set the ulimit for the system before using themiddleware installation program.
If you set the ulimit in .profile for root, the ulimit setting applies to all processes.
To set the ulimit, complete the following steps:
Procedure1. From a command line, type ulimit -f unlimited
2. From a command line, type ulimit -n 8192
Setting the swap sizeMaximo Asset Management can be a resource-intensive application. Configure andtune your system for maximum performance. This section details how to set thesize of the swap space used in Linux systems.
About this task
Typically, the swap size for Linux is set to twice the amount of physical RAM inthe server. See the product documentation for your Linux distribution for moreinformation.
Additional swap space can be made available to the system by:
Procedurev increasing the size of the existing swap partitionv creating a new, additional swap partitionv creating a swap file
Setting shared memoryThis section details how to set a minimum shared memory value in Linux.
About this task
For Linux systems, you must set a minimum shared memory value for the systembefore using the middleware installer.
To set the minimum shared memory value, complete the following steps:
24 IBM Maximo Asset Management: Installation Guide (Oracle WebLogic Server)

Procedure1. From a command line, type sysctl kernel.shmmax and determine if the value is
less than 268435456 bytes (256 Mb).2. If you must increase the value, from a command line, type sysctl -w
kernel.shmmax=268435456.3. Update the value in /etc/sysctl.conf.
Remote configuration enablementThe Maximo Asset Management installation program can automatically configuremiddleware. You must enable a remote access protocol for each system on whichyou intend to install the middleware.
Use SSH for logging on to and configuring remote Linux and UNIX systems. UseWindows SMB for logging on to and configuring remote Windows systems.Windows SMB is a Windows protocol. The IBM JRE on the administrativeworkstation includes SSH.
Before you start the installation program, ensure that you can log on to any remoteservers with the protocols that you intend to use. Use the credentials that you planto supply to the installation program.
For remote Windows systems, ensure that the following requirements are metbefore installing the software:v The user name that you provide to the installation program must exist as a local
account on the remote system. This user must be a member of the WindowsAdministrators group.
v The following Windows services must be started on the remote system beforeyou begin a remote installation and configuration:– winmgmt (Windows Management Instrumentation)– RemoteRegistry (Remote Registry)– lanmanserver (Service)
v The SMB protocol must be enabled and configured to send NetBIOS overTCP/IP, by choosing to use port 139. Alternatively, you can configure SMB touse TCP/IP as the transport protocol, without NetBIOS, by configuring it to useport 445.
v Ensure that any ports that you use for remote protocols are not blocked byfirewalls or security policies, including ports 137 and 139. Port 139 is used ifSMB is configured to run on NetBIOS over TCP/IP. Port 445 is used if SMB isrun directly on TCP/IP, without NetBIOS.
v To disable simple file sharing, start Windows Explorer. Click Tools > FolderOptions, and clear the Use Simple File Sharing check box.
v The Windows administrative share (C$) and the interprocess communications(IPC$) folder must be shared.
v For Microsoft Windows Server 2008 systems that support password-protectedsharing, disable password-protection. Shares must be shared for the Guest orEveryone accounts.
v For Windows systems that have User Account Control (UAC) enabled, it mustbe disabled before software can be remotely installed and configured.
v If Cygwin is installed on the remote Windows system the SSH daemon (sshd)must be uninstalled or disabled.
Chapter 3. Preparing for installation 25
For remote Linux or UNIX systems, ensure that the following requirements are metbefore installing the software:v For AIX systems, set the following SSH parameters located in the
/etc/ssh/sshd_config file:– ClientAliveInterval 900– ClientAliveCountMax 10
Stop the SSH daemon using the stopsrc -s sshd command and then restart itusing the startsrc -s sshd command.
v For AIX systems, set the TMOUT and TIMEOUT variables in the user profilescript to 0. This setting prevents the user from idling out and being logged offthe remote system during the installation.
v The user name that you provide to the installation program must exist as aprivileged account (for example, root) on the remote systems.
v Ensure that a current version of OpenSSH is installed and running. Do not useOpenSSH 4.7.0.5302.
v For Oracle Solaris systems, the remote access protocols require the use ofinternal shell scripts that must be run within the korn (ksh) shell. The methodsneed ksh, even if the user ID that you use to log on to the remote system isconfigured to use a different shell. Consequently, Oracle Solaris systems musthave the ksh environment installed and properly configured.
v If you plan to remotely configure software on remote Linux or UNIX computers,ensure that SSH is installed.
Remote configuration does not support accessing network drives on the local orremote system.
System password policy settingsBe familiar with the password policies of systems you are using as part of aMaximo Asset Management deployment.
Your organization might have password policy regulations enforced on systems onyour network. Before deploying Maximo Asset Management, be sure that you arefamiliar with the password policies of systems used in the deployment, or youmight experience errors during installation.
For example, Microsoft Windows Server 2008 systems have a stricter set ofpassword requirements than previous versions configured by default. If you arenot familiar with these stronger password requirements, you might experience anerror during the installation of Maximo Asset Management. This error occurswhen creating users on a Microsoft Windows Server 2008 system.
Password values that you provide during the Maximo Asset Managementinstallation must be compliant with the password policies set for the target system.Passwords are not validated against the password policies of target systems at thetime you enter them on the installation program panels. If your passwords do notconform to the password policies of systems used to deploy the product, errorsoccur when the installation program attempts to create these passwords during theconfiguration step,
Backing up the Deployment Engine databaseThese instructions are for backing up the Deployment Engine database. Backupsare used to restore the database to the state it was before installing.
26 IBM Maximo Asset Management: Installation Guide (Oracle WebLogic Server)

Before you begin
Back up the Deployment Engine database of the system before and after applyingany updates to an existing deployment. Use backups to recover from partialinstallation attempts.
About this task
To back up the Deployment Engine database, complete the following steps:
Procedure1. Set up the environment using the following command:
Windowsc:\install_home\ctg_DE\acsi\setenv.cmd
2. Run the command to back up the Deployment Engine registry:
Windowsc:\install_home\ctg_DE\acsi\bin\backupdb.cmd backup file name
Use a meaningful name for backup file name to reflect the fact that it contains thestate of the registry after your installation of Maximo Asset Management. Forexample, DEBackupAfterInstall.
LaunchpadThe IBM Maximo Asset Management launchpad serves as a centralized interfacefor launching a collection of installation programs and product information.
The launchpad application assists you in choosing which product installationprograms you must install and indicates the order in which they must be installed.
Use the Maximo Asset Management launchpad to:v start the middleware installation program.v start the prerequisite checker utility.v start the Maximo Asset Management installation program.v access the Maximo Asset Management information center, including information
used to plan the Maximo Asset Management installation and deployment.
Just before starting the launchpad, ensure that you meet the middlewareprerequisites. Ensure that you have the correct service pack levels for yourenvironments and always use fully qualified domain names when entering valuesfor the installation program.
Starting the launchpadUse the following information to start the Maximo Asset Management launchpad
Before you begin
Launchpad generated messages are captured in a hidden log frame while thelaunchpad is running. To show the log frame on the bottom of the launchpadpanels, hold the CTRL key while simultaneously clicking the banner frame of thelaunchpad. Messages that are generated while the launchpad is running are notautomatically saved on the hard disk drive. You can manually save the messagesfrom a session by clicking Save at the bottom of the log frame and then specifyingwhere you want to save the file.
Chapter 3. Preparing for installation 27

About this task
To start the IBM Maximo Asset Management launchpad, complete the followingsteps:
Procedure1. Log on to an account with system administration privileges on the computer
where you want Maximo Asset Management components to be installed.2. Start the launchpad from the root directory of the installation image:
v Windows: Start the launchpad by using the launchpad.exe program.Appendix B, “Planning worksheets for middleware installation,” on page 253Before you start the installation, use the planning worksheets to record valuesto specify when installing the components you choose for your deployment.Appendix A, “Planning worksheet for product installation,” on page 251These tables list the values for settings you supply when using the MaximoAsset Management installation program. Values you enter depend on thecomponents you select for the deployment.
28 IBM Maximo Asset Management: Installation Guide (Oracle WebLogic Server)

Chapter 4. Deploying with automatic middleware configuration(Scenario 1)
Use this information to use product installation programs and tools to install andautomatically configure a Maximo Asset Management deployment within yourenterprise.
Before you begin
Ensure you have reviewed the following information:v Chapter 2, “Planning to deploy,” on page 5v Chapter 3, “Preparing for installation,” on page 11
About this task
This information provides a high-level overview or road map of tasks you need tocomplete in order to deploy Maximo Asset Management with automaticmiddleware configuration. Use the information provided in the Concepts list tofamiliarize yourself with the ideas behind each step, and then refer to the Tasks listand perform the tasks listed in order to complete the step.
In this scenario, you use the middleware installation program to install andautomatically configure new instances of DB2 and IBM Tivoli Directory Server andthen use the product installation program to perform further middlewareconfiguration tasks automatically before finally deploying the product itself. OracleWebLogic Server must always be configured manually, but you can use themiddleware installation program to install DB2, for example, and use the MaximoAsset Management installation program to automatically configure it.
© Copyright IBM Corp. 2007, 2011 29

Procedure1. Install and configure middleware using the middleware installation program.
The middleware installation program is used to install and automaticallyconfigure middleware used by Maximo Asset Management.
Concepts“Middleware installation” on page 31
Tasks “Installing and configuring middleware using the middlewareinstallation program” on page 34
2. Configure an existing Oracle WebLogic Server.
Concepts“Manually configuring WebLogic Server” on page 54
Tasks
a. “Creating the MAXIMOSERVER domain” on page 54b. “Configuring JMS options for integration framework” on page 55c. “Configuring JMS for the email listener in WebLogic Server” on
page 563. Install Maximo Asset Management and complete further middleware
configuration tasks using the Maximo Asset Management installation program.
Concepts“Installation program overview” on page 58
Tasks “Running the installation program” on page 604. Complete post-installation tasks
Concepts
Install middleware using the middlewareinstallation program
Install IBM Maximo Asset Managementand automatically configure middleware
Verify the installation
Perform post-installation tasks
Figure 3. Deploying Maximo Asset Management using automatic middleware configuration
30 IBM Maximo Asset Management: Installation Guide (Oracle WebLogic Server)

v Chapter 10, “Post installation tasks,” on page 171
Tasks
a. “Initial data configuration” on page 171b. “Synchronizing users and groups” on page 177c. “Understanding and configuring security” on page 179
What to do next
After you have completed the deployment process, you can optionally perform thefollowing tasks:v Create startup scripts for middleware.
You can create startup scripts that will automatically start Maximo AssetManagement middleware services upon a system reboot.
Middleware installationBefore you can install the Maximo Asset Management, there are several MaximoAsset Management middleware products that can be deployed, or, if you intend toreuse existing resources, configured either manually or using the Maximo AssetManagement installation programs
The middleware installation program provides an interface for installing anddeploying Maximo Asset Management middleware in a reliable and repeatablefashion. The middleware installation program records choices you make aboutyour Maximo Asset Management deployment and configuration parametersassociated with those choices, and then installs and deploys Maximo AssetManagement middleware based upon the information you entered.
The middleware includes the following software:v Database server
Maximo Asset Management uses the Maximo database to store details about theattributes and history of each configuration item and the details about therelationships between configuration items. A database is a required componentfor deploying Maximo Asset Management.You have the choice of installing a new instance of DB2 9.7 using themiddleware installation program, or using a preexisting instance of DB2 9.5, orDB2 9.7. You can also choose to use Microsoft SQL Server or Oracle for yourMaximo Asset Management deployment, but you must install and configurethem manually.
v Directory serverThe directory server is an optional component that can be used to secureMaximo Asset Management if you choose to use an LDAP server for security.You have the choice of installing a new instance of IBM Tivoli Directory Server6.3 for Windows and UNIX, or using a preexisting IBM Tivoli Directory Serveror Microsoft Active Directory server. If you choose to install a new version ofIBM Tivoli Directory Server, you must choose to install a new DB2 instance orreuse a an existing DB2 server. Alternatively, you can use the Maximo AssetManagement database server for the DB2 data store if the Maximo AssetManagement database server uses DB2. If you choose to install the directoryserver but not the database server, the middleware installation program attemptsto locate an existing database instance to use. If it fails to locate an existing
Chapter 4. Deploying with automatic middleware configuration (Scenario 1) 31

instance, it installs a database for use with the directory server. If you choose touse Microsoft Active Directory Server for your directory server, you must installand configure it separately.
The middleware installation program does not install Oracle WebLogic Server andthe Maximo Asset Management installation program does not have the option toautomatically configure it. Oracle WebLogic Server is a manual configuration effort.
The middleware installation program deploys software on a single server. Todeploy Maximo Asset Management middleware on multiple servers, themiddleware installation program must be started on each server in the topologyconfiguration you have chosen. Ensure that you have a strategy for deployingMaximo Asset Management middleware for each system you plan to use in yourMaximo Asset Management deployment. If you deploy a Maximo AssetManagement component using the middleware installation program on a system,for example, DB2, and then later decide you would also like to add IBM TivoliDirectory Server to that same system, you must undeploy DB2 before redeployingit in the same middleware installation program deployment plan that includedIBM Tivoli Directory Server. When installing Maximo Asset Managementmiddleware on a system, you must install all of the middleware intended for thatsystem at one time.
A process ID is generated each time the middleware installation program is usedto install or uninstall a set of middleware products. The process ID appears on thefile system in various places related to logs and generated files, such as file names,directory names, and log messages. The process ID is used to group logs and othergenerated files that are related to the same invocation of the middlewareinstallation program. It also separates logs and other generated files that arerelated to different invocations of the middleware installation program. The processID is a string of the format [operation_MMdd_HH.mm], where operation is astring indicating the operation being performed, such as "INSTALL" or"UNINSTALL", MM is a two-digit number (1-12) indicating the current month, ddis a two-digit number (1-31) indicating the current day in the month, HH is atwo-digit number (0-23) indicating the current hour, and mm is a two-digit number(0-59) indicating the current minute. Here are some examples of process ID values:v [INSTALL_0924_15.45]
An installation started on September 24 at 3:45pmv [UNINSTALL_1216_09.59]
An uninstallation started on December 16 at 9:59am
Note: The middleware installation program does not support the HP-UX andOracle Solaris platforms, however, installable images for DB2 and IBM TivoliDirectory Server are provided with Maximo Asset Management. You can installthis software individually using information in this guide if you want to deployMaximo Asset Management using this middleware on those platforms.
Middleware installation program workspaceThe middleware installation program is designed to record the options you selectduring installation in a directory known as the workspace, and then configure thecomponents selected as a single deployed application.
After a plan has been deployed, the middleware installation program cannotdeploy additional features and products onto the system at a later time. The
32 IBM Maximo Asset Management: Installation Guide (Oracle WebLogic Server)

existing plan must first be undeployed with the middleware installation programbefore a different set of features and products can be deployed.
The composition and details of the deployment and any logs generated by themiddleware installation program process are located in the workspace.
By default, the middleware installation program workspace is defined as:
WindowsC:\ibm\tivoli\mwi\workspace
AIX /ibm/tivoli/mwi/workspace
Linux /root/ibm/tivoli/mwi/workspace
The workspace can be defined on a shared resource that is made available to allthe systems that run the middleware installation program. Locating the workspaceon a shared resource avoids the need to copy files such as the topology filemanually from one system to another.
The workspace contains the following items:
Deployment PlanThe deployment plan is a collection of installation steps, configurationparameters for those steps, and target system information. It is generatedby the middleware installation program and is located in the workspacedirectory.
When deployment steps are changed, the existing deployment plan isdeleted and replaced with the new deployment plan.
The deployment plan configuration files contain information about thedeployment plan itself. Whenever a deployment plan is modified, whichincludes reconfiguring existing deployment choices, the deployment planconfiguration files are deleted. These files are regenerated when thedeployment plan is redeployed.
Topology FileThe topology file is a properties file that describes the configurationparameters of the Maximo Asset Management middleware deployment.This file is created and then updated after every deployment orundeployment. If you have not defined a workspace that is centrallylocated and accessible to all the systems receiving Maximo AssetManagement middleware, this file must be copied to the workspace ofeach system where Maximo Asset Management middleware is beingdeployed. The contents of this file can be used by the Maximo AssetManagement installation program to populate its panels with meaningfuldefault values.
This file is saved in workspace/topology.xml.
Logs Log files that contain information about the deployment can be found inthe workspace directory. In addition, log files native to the Maximo AssetManagement middleware itself are also contained in this directory.
Middleware installation program middleware deployment planoverview
The deployment plan resides in the workspace directory and is generated fromdeployment choices selected in the middleware installation program.
Chapter 4. Deploying with automatic middleware configuration (Scenario 1) 33

The plan is a series of deployment steps and configuration parameters. Each step isresponsible for installing and uninstalling one portion of the middleware. Whendeployment choices are changed, the existing deployment plan is deleted andreplaced with the new deployment plan.
Installing and configuring middleware using the middlewareinstallation program
This procedure explains how to use the middleware installation program to createa deployment plan that is responsible for installing and configuring prerequisitemiddleware products.
Before you begin
These instructions are for the installation on a single computer of a complete set ofmiddleware for use with Maximo Asset Management, based on default values.This deployment scenario is suitable for demonstration, test, or training purposes.For a production environment, installing middleware on multiple computersimproves performance. To deploy middleware on multiple computers, you mustrun the middleware installation program on each computer, choosing whichmiddleware component to install on each.
If you want to configure existing middleware products for use with Maximo AssetManagement, follow the instructions for that deployment scenario.
Remember that the middleware installation program does not install OracleWebLogic Server and the Maximo Asset Management installation program cannotautomatically configure it. The middleware installation program is used to installcomponents that can be used with Oracle WebLogic Server, like DB2
In some cases, information about the middleware installation program screens isnot correctly displayed when installing through a remote session. To avoid such aproblem, run the middleware installation program locally on the system that is tohost the middleware. If you do encounter the problem, first minimize and thenmaximize the installation wizard to redisplay the screen.
Do not install multiple middleware products into the same custom directory. Forexample, when installing DB2 and IBM Tivoli Directory Server on the samecomputer, you cannot install them all in a C:\ISM_middleware directory. You can,however, install them in C:\ISM_middleware\DB2 and C:\ISM_middleware\ITDS. Youalso cannot install one middleware product in a custom directory and then installanother middleware product in a subdirectory of that custom directory. Forexample, if you install DB2 into C:\ISM_middleware, you cannot then install IBMTivoli Directory Server into C:\ISM_middleware\ITDS.
Do not use localhost for host name values in the installation program. Specify thefully qualified host name or IP address of the system on which you are installing.For Linux or UNIX systems, if the hostname -f command does not return a fullyqualified host name, consult the system documentation for assistance. ForWindows systems, to establish a fully qualified host name, complete the followingsteps:1. On the desktop, right-click My Computer.2. Select Properties.
The System Properties panel is displayed.3. From the Computer Name tab, click Change.
34 IBM Maximo Asset Management: Installation Guide (Oracle WebLogic Server)

The Computer Name Changes panel is displayed.4. Enter your fully qualified host name in the Computer name field, and then
click Enter.Alternatively, you can provide the IP address for the system.The DNS Suffix and NetBIOS Computer Name panel is displayed.
5. Verify that the Primary DNS suffix field displays a domain name, and thenclick OK.
6. From the Computer Name Changes panel, click OK.7. Click Apply and close the System Properties panel.
You can force the use of alphanumeric host name use within the middlewareinstallation program by starting it from the command line and using theforceHostname=true parameter. For example:mwi-console -V forceHostname=true
When installing and configuring middleware in the middleware installationprogram and the Maximo Asset Management installation program, consider thefollowing special characters restrictions:
Table 4. Middleware object naming conventions
Header Header
DB2 naming conventions for group names,user names, and user IDs.
Group names and user IDs on Linux andUNIX operating systems can contain up toeight characters and must consist oflowercase characters only.
Group names and user names on Windowscan contain up to 30 characters.
Names and IDs cannot be any of thefollowing values: USERS, ADMINS,GUESTS, PUBLIC, LOCAL, or anySQL-reserved word.
Names and IDs cannot begin with IBM,SQL, or SYS. They must also not begin withthe underscore (_) character.
DB2 naming conventions for DB2 instances. Instance names can have up to 8 characters.
On Windows, no instance can have the samename as a service name.
DB2 naming conventions for passwords. For UNIX systems, passwords can be amaximum of 8 characters.
For Windows systems, passwords can be amaximum of 14 characters.
Chapter 4. Deploying with automatic middleware configuration (Scenario 1) 35

Table 4. Middleware object naming conventions (continued)
Header Header
IBM Tivoli Directory Server conventions fordatabases and database aliases.
Database names must be unique within thelocation in which they are cataloged. ForLinux and UNIX, this location is a directorypath. For Windows it is a logical disk.
Database alias names must be unique withinthe system database directory. When a newdatabase is created, the alias defaults to thedatabase name. As a result, you cannotcreate a database using a name that exists asa database alias, even if there is no databasewith that name.
Database and database alias names can haveup to 8 characters.
Be mindful that the special characters @, #,and $ are not common to all keyboards.Avoid using these characters when creatinga database name.
IBM Tivoli Directory Server conventions forusers, groups, databases, and instances
Values cannot be longer than 8 characters.
Do not use any of the following values:USERS, ADMINS, GUESTS, PUBLIC,LOCAL, or idsldap.
Values cannot begin with IBM, SQL, or SYS.
Values cannot include accented characters.
Values can include characters A through Z, athrough z, and 0 through 9.
Values must begin with characters Athrough Z or a through z.
Double-byte characters cannot be used inadministrator passwords values.
Passwords cannot contain the followingspecial characters: ` ' \ " |
Middleware installation program The middleware installation program doesnot validate that your password is compliantwith the operating system of the target host.Ensure that the password values youprovide are valid for your environment.
You cannot use the '%' character onWindows or !, $, #, % characters on UNIX.
The middleware installation program doesnot check for accented characters in username values. The use of accented characterscan cause errors.
Do not include the underscore character (_)when entering host names. Using thischaracter causes an error during middlewareinstallation.
36 IBM Maximo Asset Management: Installation Guide (Oracle WebLogic Server)

Important: When entering LDAP values for Maximo Asset Managementinstallation panel fields, entries in LDIF files, or values you enter directly into adirectory instance using the tools of the directory server, be aware of theproduct-specific syntax rules for using special characters in an LDAP string. Inmost cases, special characters must be preceded by an escape character to makethem readable by the directory server. Failing to escape special characterscontained in an LDAP string used with Maximo Asset Management result inMaximo Asset Management errors.
Many directory server products consider a blank space as a special character that ispart of the LDAP string. If you enter an LDAP string that contains a blank in afield, you encounter Maximo Asset Management errors that are difficult totroubleshoot. You must precede any blank characters with an escape character. Seethe product documentation for your directory server for more information aboutspecial characters in LDAP strings.
If the middleware installation program reports that you have insufficient diskspace to install middleware, you must increase the available disk space on thesystem. When disk space has been increased, restart the middleware installationprogram.
When you run the middleware installation program, you are prompted for userIDs to initiate the installation of DB2 and IBM Tivoli Directory Server. You caneither supply an existing system user ID, or allow the middleware installationprogram to create a user ID. The installation can fail on Linux and UNIX operatingsystems if you specify an existing user account to install DB2 or IBM TivoliDirectory Server and that user account is not located under the /home directory.
If you run the middleware installation program from a Linux or UNIX terminalwindow, you must be logged in as a user with administrative authority (root).Using the su command causes errors during the installation ofIBM Tivoli DirectoryServer. During installation, the middleware installation program sets environmentalvariables that must be set for the administrative user.
If you encounter the following error, it indicates that you are attempting to use the64-bit middleware installation program (mwi-AMD64.exe) on a 32-bit Windowssystem.CreateProcess failed ==> The image file %1 is valid, but for a machine typeother than the current machine
The appropriate middleware installation program for 32-bit Windows systems ismwi.exe. Alternatively, run the following command to automatically select theappropriate program for the system:setupwin.bat /l
IBM Tivoli Directory Server v6.3 starts in configuration mode when paired withDB2 v9.7. While this condition is resolved for DB2 v9.7 FP2, a startup script isprovided to start IBM Tivoli Directory Server v6.2 on Microsoft Windows Server2008 systems. The startITDS.bat file is used to start IBM Tivoli Directory Servernormally after a reboot of the host system. The script starts the server using theidsslapd command from the command line.
Chapter 4. Deploying with automatic middleware configuration (Scenario 1) 37

The startITDS.bat script is located on the Launchpad for all Platforms productmedia, located in the MWI directory. Copy this script to the host in order to modifyit.
By default, the startITDS.bat script starts the server using default values used bythe middleware installer:C:\Program Files\IBM\ldap\V6.3\sbin\idsslapd -I idsccmdb -p 389 -s 636
You can change these values by editing the following variables in the script:set ITDSHome="C:\Program Files\IBM\ldap\V6.3"set InstanceName=idsccmdb set Port=389set SecurePort=636
Alternatively, you can also pass these values as the command line parameters tothe script when you run it:startITDS.bat -l ITDS-Home -I instance-name -p Port No -s secure-port
The script opens a new minimized console window to start IBM Tivoli DirectoryServer. Do not close the console window.
About this task
To install the prerequisite middleware products for IBM Maximo AssetManagement, follow these steps. These steps describe how to install DB2, and IBMTivoli Directory Server. If you do not choose to install one or more of these, you donot see panels in the middleware installation program for that software. Themiddleware installation program does not install Oracle WebLogic Server. Themiddleware installation program is used to install components that can be usedwith Oracle WebLogic Server, like DB2.
Procedure1. Log in as a user with administrative authority.2. Launch the middleware installation program from the launchpad.
a. Start the launchpad.
WindowsFrom the downloaded installation image, browse to the rootdirectory and run the following command: launchpad.exe.
Linux and UNIXFrom the downloaded installation image, browse to the rootdirectory and run the following command: launchpad.sh.
When starting the middleware installation program from the launchpad,installation program files are copied to a temporary directory on thesystem. You can use the following setup scripts to start the middlewareinstallation program directly and prevent the installer from copying thefiles to the system.
Windowslaunchpad\Install\MWIsetupwin.bat /l
Linux and UNIXlaunchpad\Install\MWIsetupUNIX.sh -l
The following errors can occur when using the setup scripts.
38 IBM Maximo Asset Management: Installation Guide (Oracle WebLogic Server)

Table 5. Middleware installation program setup script error codes
ErrorCode Error Description
11 Unsupported operating system The middleware installation programor one of the middleware productscannot run on this operating system.
12 Unsupported Linux distribution The middleware installation programor one of the middleware products isnot supported on this Linux kernel.Currently only Red Hat and SuSE aresupported.
13 Unsupported kernel bit mode The middleware installation program issupported on Linux 32/64 bit modeand on AIX 64 bit mode.
14 Unsupported Processor architecture The middleware installation programor one of the middleware products isnot supported on this processorarchitecture. Currently only x86 andAMD64 architecture are supported.
21 Env variablemwi_launchpadroot(UNIX) /LaunchPadBatchPath(Win) is not set
The environment variable must be setto the middleware installation programinstall files location:
WindowsLaunchPadBatchPath
Linux and UNIXmwi_launchpadroot
22 The middleware installation programfile not found
The middleware installation programinstall file is missing or not accessible.Check to ensure that the specified fileexists in the current directory.
31 Host name is not a fully qualifieddomain name.
The middleware installation programor one of the middleware productsrequires a fully qualified host namedefined.
Alternatively, you can provide the IPaddress for the system.
32 SELinux is enabled or set in Enforcingmode
Middleware product installation failswith the following error:
JRE could not be found on the system
Disable SELinux using one of thefollowing methods:v setenforce 0
v Add the following entry to the/etc/system file:
set fmac_enforcing = 0
Chapter 4. Deploying with automatic middleware configuration (Scenario 1) 39

Table 5. Middleware installation program setup script error codes (continued)
ErrorCode Error Description
33 The library libstdc++.so.5 (64-bit) isnot installed.
The installer requires libstdc++.so.5(64-bit), which is located in/usr/lib64/libstdc++.so.5. If thesystem does not have this libraryinstalled, search for an RPM package(64-bit) compatible with system thatcontains this library and install it.
34 The library libstdc++.so.5 is notinstalled.
The installer requires libstdc++.so.5,which is located in/usr/lib/libstdc++.so.5. If the systemdoes not have this library installed,search for an RPM package compatiblewith system that contains this libraryand install it.
b. From the launchpad, click the link to install middleware.3. Select a language for the installation and click OK.4. In the Welcome panel, click Next.5. In the middleware installation program license agreement window, read the
license information, select I accept both the IBM and the non-IBM terms ifyou agree with the terms, and then click Next.
6. In the Choose Workspace panel, specify the directory used as the middlewareinstallation program workspace, and then click Next. The default location forthe workspace is the last workspace location used by this user, as specified inthe middleware user preferences node. If no previous workspace locationexists in the middleware user preferences node, then the default location forthe workspace is C:\ibm\tivoli\mwi\workspace for Windows,/root/ibm/tivoli/mwi/workspace for Linux, and /ibm/tivoli/mwi/workspacefor AIX.If the selected directory does not exist, it is created.After deployment, the middleware installation program also generates atopology file in this directory. This topology file can be manually copied bythe user to the workspace of the next system in the topology. Informationabout the deployment of middleware is available to the middlewareinstallation program when it is used on the next system.
7. In the Install IBM Autonomic Deployment Engine panel, click Next to installthe IBM Autonomic Deployment Engine.
8. In the Deployment Choices panel, select the features to deploy on this system,and then click Next.
Database ServerThe DB2 database is used to store information about configurationitems and how they relate to each other.
Directory ServerA directory server is an optional component that can be used to secureMaximo Asset Management. Check this option if want to either installor reuse IBM Tivoli Directory Server. You can clear this option if youare reusing a remote directory server.
9. In the Deployment Plan Summary window, click Next to configure theparameters displayed. The deployment plan is generated and you areprovided details about the plan.
40 IBM Maximo Asset Management: Installation Guide (Oracle WebLogic Server)

10. In the Configurable Host Name panel, if you want to manually specify thehost name of the system you are running the installation from, select theOverride the local machine hostname option and enter a host name value inthe Hostname field, and then click Next. Select this option only if you want tomanually specify the host name of the system instead of having theinstallation program programmatically detect it. This option is useful whenthere is more than a single host name assigned to the system. This situation ispresent when a system has more than one network interface, or it isconfigured to support virtual IP addresses. When this option is selected, youare required to provide a resolvable host name. You cannot clear this optionafter it has been selected, however, you are able to change the value of theHostname field. If you launched the middleware installation program fromthe command line using the forceHostname=true parameter, then you arerequired to provide an alphanumeric value in the Hostname field. An IPaddress results in an error message. After this option has been selected, youcannot able to clear it. However, you can change the value you enter in theHostname field.
11. In the password reuse panel, you can optionally select Use this password asthe value for all subsequent passwords. You then enter a password value andthen click Next. This option allows you to use the same password as thedefault user password value in all panels of the middleware installationprogram. If you do not want to use this option, ignore the Use this passwordas the value for all subsequent passwords option, and click Next.
12. Enter the following configuration parameters for DB2 Enterprise EditionServer and then click Next.
Install locationEnter the location to install DB2.
Windows:Default is C:\Program Files\IBM\SQLLIB
Linux: Default is /opt/IBM/db2/V9.7
AIX: Default is /opt/IBM/db2/V9.7
DB2 Administration Server usernameEnter the DB2 administrative account name.
Windows:Default is db2admin
Linux: Default is dasusr1
AIX: Default is dasusr1
DB2 Administration Server passwordEnter the password for the DB2 administrative account.
Fenced user (Linux and AIX only)Enter a system user ID that can be used as a DB2 fenced user account.
Default fenced user is db2fenc1
Note: During installation, the middleware installation program creates thefollowing default DB2 instances automatically:
WindowsDB2
Linux and UNIXdb2inst1
Chapter 4. Deploying with automatic middleware configuration (Scenario 1) 41
The password for the default instance is the same password provided for theDB2 Administration Server password (DAS)
13. Enter the following configuration parameters for the default database instance,and then click Next.
Default Instance NameEnter the name of the default database instance.
Default for all platforms is db2inst1.
Default Instance PortEnter the port that the default database instance uses
Default for all platforms is 50000.
Default Instance UsernameEnter the user name for the default database instance.
Windows:Default is db2admin
Linux and UNIX:Default is db2inst1
Default Instance Username PasswordEnter the password for the default database instance user name.
14. Enter the following configuration parameters for the Maximo AssetManagement database instance, and then click Next.
Instance nameEnter the name of the Maximo Asset Management database instance.
Default for all platforms is ctginst1.
Port Enter the port that the Maximo Asset Management database instanceuses.
Default for all platforms is 50005.
Instance usernameEnter the user name for the Maximo Asset Management databaseinstance.
Windows:Default is db2admin
Linux and UNIX:Default is ctginst1
Instance username passwordEnter the password for the Maximo Asset Management databaseinstance user name.
15. Enter information about the DB2 user groups:
DB2 administrators groupEnter the name of the DB2 administrators group.
Windows:Default is DB2ADMNS
Linux and UNIX:Default is db2grp1
DB2 users group (Windows only)Enter the name of the DB2 users group.
42 IBM Maximo Asset Management: Installation Guide (Oracle WebLogic Server)

Default is DB2USERS16. Enter the following configuration parameters for IBM Tivoli Directory Server,
and then click Next.
Install locationEnter the location to install IBM Tivoli Directory Server.
Windows:Default is C:\Program Files\IBM\LDAP\V6.3
Linux and UNIX:Default is /opt/IBM/ldap/V6.3
Administrator distinguished nameEnter the distinguished name of the IBM Tivoli Directory Serveradministrator.
Default for all platforms is cn=root.
Administrator passwordEnter the password for the IBM Tivoli Directory Server administrator.
17. Enter the following configuration parameters for IBM Tivoli Directory Server,and then click Next.
Organizational unitEnter the name of the IBM Tivoli Directory Server organizational unitto use with Maximo Asset Management.
Default for all platforms is ou=SWG.
Organization and country suffixEnter the name of the IBM Tivoli Directory Server organization andcountry suffix to use with Maximo Asset Management.
Default for all platforms is o=IBM,c=US.
Directory server portEnter the port number of the IBM Tivoli Directory Server.
Default for all platforms is 389.
Directory server secure portEnter the secure port number of the IBM Tivoli Directory Server.
Default for all platforms is 636.
Administration portEnter the administration port number of the IBM Tivoli DirectoryServer.
Default for all platforms is 3538.
Administration secure portEnter the secure administration port number of the IBM TivoliDirectory Server.
Default for all platforms is 3539.18. Enter the following configuration parameters for IBM Tivoli Directory Server
database instance, and then click Next.
Database nameEnter the name of the DB2 database you are using to hold IBM TivoliDirectory Server data.
Default for all platforms is security.
Chapter 4. Deploying with automatic middleware configuration (Scenario 1) 43

Instance nameEnter the name of the IBM Tivoli Directory Server database instance.
Default for all platforms is idsccmdb.
Instance user passwordEnter the password for the instance user ID.
19. Specify the location of the Maximo Asset Management middleware images,and then click Next.
Copy the middleware install images from the source media to a specifieddirectory
Select this option to copy the middleware images from the productmedia to a specified directory.
Specify a directory containing all the required middleware install imagesSelect this option if you intend to specify a file system directory thatalready contains the middleware installation images.
20. If you selected the option to copy installation images from the source media,specify the source and destination directories, and then click Next. If youselected the option to specify a directory that already contained themiddleware images, specify that directory, and then click Next. There is anoption for checksum validation for the middleware images. Select this optionif you want to confirm the integrity of the images before deploying themiddleware. If the checksum operation fails, click Back and recopy theimages before proceeding. If you do not select this option and the middlewareimages are corrupted or otherwise inaccessible from the directory specified, anerror occurs. If you encounter this error, you must replace the corruptedmiddleware image and then restart the middleware installation program.
21. Specify a directory to use for middleware installation program temporary filesand extracted middleware installation images, and then click Next.
22. In the Deployment Plan Operation panel, select Deploy the plan, and thenclick Next. You can also elect to change the deployment plan or parametersyou have previously configured from this panel.
23. In the Deployment Plan and Parameter Configuration summary panel, reviewthe contents of the summary. Click Deploy to initiate the installation andconfiguration of the middleware you selected.
24. After the deployment completes successfully, click Finish to exit.
Middleware installation program logsMiddleware installation program log files are located in the workspace directorythat was defined in the middleware installation program.
There are several types of log files.
User interface logsThe logs generated by the middleware installation program user interfaceare located in the workspace directory.
The middleware installation program logs all information in<workspace_loc>/mwi.log: Default workspace locations for all platforms areas follows:
WindowsC:\ibm\tivoli\mwi\workspace
Linux /root/ibm/tivoli/mwi/workspace
AIX /ibm/tivoli/mwi/workspace
44 IBM Maximo Asset Management: Installation Guide (Oracle WebLogic Server)

The mwi.log file is the high-level log file that was generated by the mostrecent invocation of the middleware installation program. If an erroroccurs, examine this log file first. An entry in this log file might direct youto a lower-level log file.
Log files named mwi.logX, where X is a number, are copies of the mwi.logfile from earlier invocations of the middleware installation program. So, forexample, mwi.log0 is produced after the first invocation of the middlewareinstallation program. mwi.log1 is produced after the second invocation ofthe middleware installation program.
Logs for steps run by the user interfaceIn addition to collecting input from the user, the user interface of themiddleware installation program also performs several system checks.Examples of system checks run by the user interface runs include:v dependency checking to ensure that the operating system meets the
deployment requirementsv inventorying the software on the system to locate existing instances of
middleware products deployed by the middleware installation programv checking the available disk space to ensure that there is enough for the
deployment
Each of these checks is produced in the form of a step so that it can also berun as part of the deployment plan. When the user interface runs a step, itcopies the step into a subdirectory of the workspace directory. The log filesgenerated by a step are located in the same subdirectory. These files followthe same pattern as a step that is run as part of the deployment plan.
Logs for the deployment planThe deployment plan is located in the directory <WorkspaceDirectory>/host name/deploymentPlan, where host name is the host nameof the current system. Each time the deployment plan is used to install oruninstall middleware products, a process ID is assigned and log files aregenerated.
The log files for the deployment plan are located in the subdirectorylogs/processID. The primary log file for the deployment plan isDeploymentPlan.log, a high-level log file that lists the steps started as partof the deployment plan.
Logs for the workstation planThe machine plan is located in the directory <Workspace Directory>/hostname/deploymentPlan/MachinePlan_host name. The log files for the machineplan are located in the logs subdirectory. The primary log files for themachine plan are named MachinePlan_host name_processID. These log filescontain the output generated by Apache ANT when running the machineplan ANT script.
Logs for steps in the deployment planEach step in the deployment plan is located in a directory named<Workspace Directory>/host name/deploymentPlan/MachinePlan_hostname/stepNum_stepID, where stepNum is the sequence number of this stepin installation processing order of the deployment plan and stepIDidentifies the step. The log files for the step are located in the logssubdirectory.
Some steps might provide a message log file namedstepID_processID.message, which contains a few entries that summarizethe result of starting the step. All steps provide a trace log file named
Chapter 4. Deploying with automatic middleware configuration (Scenario 1) 45

stepID_processID.log, which contains many entries, typically includinginformation about the input parameters and the substeps started.
Logs for substepsEach step contains one or more substeps. The substeps perform the actualinstallation, uninstall, and checking work for the middleware installationprogram.
Each substep is located in the directory <Workspace Directory>/hostname/deploymentPlan/MachinePlan_host name/stepNum_stepID/operation/substepNum_substepID, where operation is the ANT target in the step ANTscript that starts this substep. substepNum is the sequence number of thissubstep in the processing order of the step, and substepID identifies thesubstep. Typical values for operation are install, uninstall, and check.
The log files for the substep are typically located in a subdirectory namedprocessID/logs.
Log files generated by the native middleware installation programs arealso kept here.
As an example, the log file generated by the middleware installation programduring DB2 installation on a UNIX system would be found in the followingdirectory: <workspace>/<machine_name>/deploymentPlan/MachinePlan_<machine_name>/000XX_DB2_9.7/install/01_BASE/<Time_Stamp>/logs/db2setup.log
Middleware installation program log reference:
The following logs are produced during the use of the middleware installationprogram.
DB2 Installation Step
DB2 installation logs can be found in the following locations:
DB2 baseThe following DB2 base log files can be found in the <workspace>/<machine_name>/deploymentPlan/MachinePlan_<machine_name>/000XX_DB2_9.7/install/01_BASE/<Time_Stamp>/logs directory:v DB2_ESE_InstallProduct_<TimeStamp>.err
v DB2_ESE_InstallProduct_<TimeStamp>.log
v DB2_ESE_MoveDB2InstallLogsToLogsLoc_<TimeStamp>.err
v DB2_ESE_MoveDB2InstallLogsToLogsLoc_<TimeStamp>.log
v DB2_ESE_Register_DB_<TimeStamp>.err
v DB2_ESE_Register_DB_<TimeStamp>.log
v DB2_ESE_Verify_DB2_Level_<TimeStamp>.err
v DB2_ESE_Verify_DB2_Level_<TimeStamp>.log
v db2setup.log
v de_processreq.log
v de_processreq.log_utf8
v de_trace.log
For Windows, the following additional files will be available:v DB2_ESE_Verify_DB2_Service_20080805_063132GMT.err
v serviceList.log
46 IBM Maximo Asset Management: Installation Guide (Oracle WebLogic Server)

The de_processreq.log contains status information. This log file providesdetails on which action has failed. The failed action log can be examinedfor more information. The db2setup.log file is the native product log forDB2. This log contains DB2 installation information.
DB2 fix packThe following DB2 fix pack log files can be found in the<workspace>/<machine_name>/deploymentPlan/MachinePlan_<machine_name>/000XX_DB2_XX/install/02_FP/<Time_Stamp>/logs directory:v DB2_ESE_FP2MoveDB2LogsToLogsLoc_<Time_Stamp>.err
v DB2_ESE_FP2MoveDB2LogsToLogsLoc_<Time_Stamp>.log
v DB2_ESE_InstallDB2Fixpack_<Time_Stamp>.err
v DB2_ESE_InstallDB2Fixpack_<Time_Stamp>.log
v DB2_ESE_ListDB2FPAdmin_<Time_Stamp>.err
v DB2_ESE_ListDB2FPAdmin_<Time_Stamp>.log
v DB2_ESE_ListDB2FPinstance_<Time_Stamp>.err
v DB2_ESE_ListDB2FPinstance_<Time_Stamp>.log
v DB2_ESE_StartDB2FPAdminInstance_<Time_Stamp>.err
v DB2_ESE_StartDB2FPAdminInstance_<Time_Stamp>.log
v DB2_ESE_StopDB2FPAdminInstance_<Time_Stamp>.err
v DB2_ESE_StopDB2FPAdminInstance_<Time_Stamp>.log
v DB2_ESE_UpdateDB2_<Time_Stamp>.err
v DB2_ESE_UpdateDB2_<Time_Stamp>.log
v DB2_ESE_Verify_DB2_FP_Level_<Time_Stamp>.err
v DB2_ESE_Verify_DB2_FP_Level_<Time_Stamp>.log
v de_processreq.log
v de_processreq.log_utf8
v de_trace.log
v installFixPack.log
The de_processreq.log contains status information. This log file providesdetails on which action has failed. The failed action log can be examinedfor more information. The installFixPack.log file is the native log for thefix pack. This log contains DB2 fix pack installation information.
No fix pack logs are available on Windows systems.
If you encounter a failure wrapper failure, more information can be found in the$(_TempLocation) directory in the <Time_Stamp> folder. This directory contains thelogs related to DB2 installation
DB2 Configuration Step
The following DB2 configuration logs can be found in <workspace>/<machine_name>/deploymentPlan/MachinePlan_<machine_name>/000XX_DB2_Configuration/install/01_CONFIG/<Time_Stamp>/logs:v checkpasswdCreated.log
v createuser.log
v etcgroupfile.log
v etcpasswdfile.log
Chapter 4. Deploying with automatic middleware configuration (Scenario 1) 47

v setUserPassword.log
For Linux, including Linux on IBM System z®, the following additional files areproduced:v permissions.log
v catalogLocalNode.log (produced in the 02_CONFIG folder)v catalogLocalNode.log (produced in the 02_CONFIG folder)v startDB2.log
For Windows, the following additional files are produced:v createDB2instance.log
v localEnvVariables.log
v setTCPIPCommForDB2instance.log
v setTCPIPPortForDB2instance.log
v setWindowsServiceToAutoStart.log
For UNIX, including Linux, Linux on IBM System z, and AIX, the followingadditional files are produced:v createinstance.log
v SetTCPIPCOMM.log
v stopDB2.log
v updatePort.log
IBM Tivoli Directory Server DB2 for Maximo Asset Management Step
The following IBM Tivoli Directory Server DB2 for Maximo Asset Managementlogs can be found in <workspace>/<machine_name>/deploymentPlan/MachinePlan_<machine_name>/000XX_ITDS_DB2_CCMDB/check/01_CHECKS/<Time_Stamp>/logs:v etcgroupfile.log
v etcpasswdfile.log
IBM Tivoli Directory Server Installation Step
IBM Tivoli Directory Server installation logs can be found in the followinglocations:
GSKITThe following IBM Tivoli Directory Server installation log files can befound in the <workspace>/<machine_name>/deploymentPlan/MachinePlan_<machine_name>/000XX_ITDS_6.3/install/01_GSKIT/<Time_Stamp>/logs directory.v de_processreq.log
v de_trace.log
For Windows and Linux, including Linux on IBM System z, the followingadditional files are produced:v GSKit_Install_GSKit_<Time_Stamp>.log
v GSKit_Install_GSKit_<Time_Stamp>.err
For 32-bit Windows systems, the following additional file is produced:v gskInstall.log
48 IBM Maximo Asset Management: Installation Guide (Oracle WebLogic Server)

For 32-bit Windows systems, the following additional files are produced:v ISScript_Install.log
v gskInstall.log
For AIX systems, the following additional files are produced:v GSKit_Install_JS_RTE_20080721_084044GMT-06.00.log
v GSKit_Install_SA_RTE_20080721_084044GMT-06.00.log
v vGSKit_Install_TA_RTE_20080721_084044GMT-06.00.log
v rteList.log
The de_processreq.log contains status information. This log file providesdetails on which action has failed. The failed action log can be examinedfor more information.
IBM Tivoli Directory Server baseThe following IBM Tivoli Directory Server base log files can be found inthe <workspace>/<machine_name>/deploymentPlan/MachinePlan_<machine_name>/000XX_ITDS_6.3/install/02_BASE/<Time_Stamp>/logs directory:v de_processreq.log
v de_trace.log
For Windows, the following additional files are available:v ldapinst.log
v registryList.log
For Linux, including Linux on IBM System z, the following additional filesare produced:v ITDS6.3_CheckRPMEntry_<Time_Stamp>.err
v ITDS6.3_CheckRPMEntry_<Time_Stamp>.log
v rpmList.log
For AIX systems, the following additional files are produced:v ITDS6.3_CheckRTEEntry_<Time_Stamp>.log
v ITDS6.3_CheckRTEEntry_<Time_Stamp>.err
v rteList.log
The de_processreq.log contains status information. This log file providesdetails on which action has failed. The failed action log can be examinedfor more information.
IBM Tivoli Directory Server fix packThe following IBM Tivoli Directory Server fix pack log files can be foundin the <workspace>/<machine_name>/deploymentPlan/MachinePlan_<machine_name>/000XX_ITDS_6.3/install/02A_FP/<Time_Stamp>/logs directory:v de_processreq.log
v de_trace.log
For Windows, the following additional file are available:v ldapinst.log
For Linux, the following additional files are produced:v ITDS6.3_CheckRPMEntry_<Time_Stamp>.err
v ITDS_InstallFixpack_<Time_Stamp>.log
Chapter 4. Deploying with automatic middleware configuration (Scenario 1) 49

v rpmList.log
For AIX systems, the following additional files are produced:v ITDS_InstallFixpack_<Time_Stamp>.err
v ITDS_InstallFixpack_<Time_Stamp>.log
v ITDS6.3_CheckRTEEntry_<Time_Stamp>.log
v ITDS6.3_CheckRTEEntry_<Time_Stamp>.err
v rteList.log
The de_processreq.log contains status information. This log file providesdetails on which action has failed. The failed action log can be examinedfor more information.
IBM Tivoli Directory Server language packThe following IBM Tivoli Directory Server language pack log files can befound in the <workspace>/<machine_name>/deploymentPlan/MachinePlan_<machine_name>/000XX_ITDS_6.3/install/03_LP/<Time_Stamp>/logs directory:v de_processreq.log
v de_trace.log
For Windows, the following additional files are available:v ldapLP_inst.log
v registryList.log
For Linux, including Linux on IBM System z, the following additional fileis produced:v checkIfRPMEntryExists_<Time_Stamp>.log
For AIX systems, the following additional files are produced:v checkIfRTEEntryExists_<Time_Stamp>.log
v checkIfRTEEntryExists_<Time_Stamp>.err
IBM Tivoli Directory Server Configuration Step
The following IBM Tivoli Directory Server configuration logs can be found in<workspace>/<machine_name>/deploymentPlan/MachinePlan_<machine_name>/000XX_ITDS_Configuration/install/01_CONFIG/logs:v createUsers.log
v netUserCheck.log
For Windows, the following additional files are produced:v PasswdNeverExpires.log
v configureDB.log (produced in the 02_CONFIG folder)v configureDNPassword.log (produced in the 02_CONFIG folder)v configureSuffix.log (produced in the 02_CONFIG folder)v startInstanceTool.log (produced in the 02_CONFIG folder)v startServer.log (produced in the 02_CONFIG folder)v audit.log (produced in the C:\idsslapd-idsccmdb\logs folder)
v bulkload.log (produced in the C:\idsslapd-idsccmdb\logs folder)
v db2clicmds.log (produced in the C:\idsslapd-idsccmdb\logs folder)
v lostandfound.log (produced in the C:\idsslapd-idsccmdb\logs folder)
v traceibmslapd.log (produced in the C:\idsslapd-idsccmdb\logs folder)
50 IBM Maximo Asset Management: Installation Guide (Oracle WebLogic Server)

v adminaudit.log (produced in the C:\idsslapd-idsccmdb\logs folder)
v ibmdiradm.log (produced in the C:\idsslapd-idsccmdb\logs folder)
v db2cli.log (produced in the C:\idsslapd-idsccmdb\logs folder)
v perftune_stat.log (produced in the C:\idsslapd-idsccmdb\logs folder)
v idstools.log (produced in the C:\idsslapd-idsccmdb\logs folder)
For UNIX, including Linux,Linux on IBM System z, and AIX, the followingadditional files are produced:v permissions.log
v ITDS_LDAP_Config.encrypted.ldif (produced in the 03_CONFIG folder)v addLDIFData.log (produced in the 03_CONFIG/logs folder)v idsadm.log (produced in the /var/idsldap/V6.3 folder)
v idsadmdb2.log (produced in the /var/idsldap/V6.3 folder)
v idsadmdb2cmds.log (produced in the /var/idsldap/V6.3 folder)
Configuring IBM Tivoli Directory Server user and group stringsUse this information to configure directory server user and group strings, onsystems that only host IBM Tivoli Directory Server.
Before you begin
If you install IBM Tivoli Directory Server by itself on a single server, you cannotchange the default user and group definitions. However, you can manually createuser and group strings for IBM Tivoli Directory Server during installation.
About this task
If you configure directory server user and group strings for a system that hosts theIBM Tivoli Directory Server only, it is necessary to manually create properties inthe input.properties file of the ITDS_CONFIGURATION step of the deploymentplan.
Procedure1. Edit the input.properties file located in the directory server folder
at:<Workspace>\machine name\deploymentPlan\MachinePlan_machineshortname\00006_ITDS_Configuration
WindowsFor example, in Windows, if the workspace is located at:C:\ibm\tivoli\workspace and the system name is mymachine, then theinput.properties would be located in: C:\ibm\tivoli\mwi\workspace\mymachine.ibm.com\deploymentPlan\MachinePlan_mymachine\00006_ITDS_Configuration
Linux For example, in Linux, if the workspace is located at:/root/ibm/tivoli/mwi/workspace and the system name is mymachine,then the input.properties would be located in: /root/ibm/tivoli/mwi/workspace/mymachine.ibm.com/deploymentPlan/MachinePlan_mymachine.ibm.com/00006_ITDS_Configuration
AIX For example, in AIX, if the workspace is located at:/ibm/tivoli/mwi/workspace, the system name is mymachine, then theinput.properties would be located in: /ibm/tivoli/mwi/workspace/mymachine.ibm.com/deploymentPlan/MachinePlan_mymachine.ibm.com/00006_ITDS_Configuration
Chapter 4. Deploying with automatic middleware configuration (Scenario 1) 51

2. Create properties in the input.properties file similar to the following sampleproperties:was_nd.secure.GroupSuffix=ou\=groups,ou\=SWG,o\=IBM,c\=USwas_nd.secure.UserSuffix=ou\=users,ou\=SWG,o\=IBM,c\=US
These group and user strings are default strings. These strings can becustomized.
Example
For example, if you want to change the strings groups to grupos and users tousarious, then the properties are similar to the following sample strings:was_nd.secure.GroupSuffix=ou\=grupos,ou\=SWG,o\=IBM,c\=USwas_nd.secure.UserSuffix=ou\= usarious,ou\=SWG,o\=IBM,c\=US
So, in the configuration parameters panel for IBM Tivoli Directory Server, if youhave given custom values instead of default values for Organizational unit, such asou=SWG1 and an Organization country suffix such as o=IBM1,c=US1 then youmust manually replace all the occurrences of ou=SWG with ou=SWG1 ando=IBM,c=US with o=IBM1,c=US1 in the input.properties file.
In this example, the properties are similar to the following sample properties:was_nd.secure.GroupSuffix=ou\= grpous,ou\=SWG1,o\=IBM1,c\=US1was_nd.secure.UserSuffix=ou\= usarious,ou\=SWG1,o\=IBM1,c\=US1
Uninstalling middlewareUninstalling IBM Maximo Asset Management middleware consists of running themiddleware installation program and using it to undeploy the previously deployeddeployment plan.
Before you begin
If you chose to deploy using a directory server ensure that it is active.
About this task
You must use the middleware installation program to uninstall any Maximo AssetManagement middleware installed by the middleware installation program. Themiddleware installation program creates a registry when installing Maximo AssetManagement middleware. Using the native middleware uninstall programs causesthis registry to be out of sync with what is deployed. You receive errors when youreinstall middleware using the middleware installation program.
Note: During the uninstall process, the middleware installation program uninstallprogress bar might appear to pause. This behavior is normal. In most cases, themiddleware installation program uninstall progress bar will resume shortly afterpausing. If you suspect your uninstall process has experienced an error, refer to themiddleware installation program log files.
Note: If you reinstall middleware, provide the same value used previously for theDB2 administrators group during the reinstallation. The middleware installationprogram creates a default instance for DB2 and adds the owner of the defaultinstance to the DB2 administrator group specified. When DB2 is uninstalled, usersand groups are not removed. If a different DB2 administrators group value issupplied, DB2 attempts to associate the owner of the default instance with this
52 IBM Maximo Asset Management: Installation Guide (Oracle WebLogic Server)
new group. This attempt fails because the owner already belongs to the groupspecified during the initial installation. To specify a new DB2 administrators group,remove the existing instance owner and DB2 administrator group. This task mustbe done before rerunning the middleware installation program.
Note: In most cases, the middleware installation program does not fail or reportfailures during the uninstall process. In order to verify that middleware productswere properly uninstalled, you need to examine deployment plan step logs. Thelog files for the deployment plan are located in the subdirectory WorkspaceDirectory/host name/deploymentPlan/logs/processID. The primary log file for thedeployment plan is DeploymentPlan.log, a high-level log file that lists the stepsinvoked as part of the deployment plan.
Note: To undeploy middleware, complete the following steps before using themiddleware uninstaller:1. Stop the IBM Tivoli Directory Server (IBM Tivoli Directory Server v6.3 -
idsccmdb).2. Stop the IBM Tivoli Directory Server daemon (IBM Tivoli Directory Admin
Server v6.3 - idsccmdb).3. Start DB2.4. Start the idsccmdb DB2 instance (DB2 - DB2COPY1 - IDSCCMDB).5. Start the IBM Tivoli Directory Server daemon (IBM Tivoli Directory Admin
Server v6.3 - idsccmdb)
To undeploy Maximo Asset Management middleware, complete the followingsteps:
Procedure1. Log in as Administrator on Windows and root on Linux and AIX.2. Launch the middleware installation program from the launchpad.
a. Start the launchpad:
WindowsNavigate to the root directory of the downloaded installationimage. Run the following command: launchpad.exe.
Linux Navigate to the root directory of the downloaded installationimage. Run the following command: launchpad.sh.
AIX Navigate to the root directory of the downloaded installationimage. Run the following command: launchpad.sh.
b. In the launchpad navigation pane, click Install the product.c. In the Middleware section, click Install the middleware.
3. Select a language for the installation and click OK.4. From the Welcome panel, click Next. The middleware installation program
license agreement window is displayed.5. Read the license information and select I accept both the IBM and the
non-IBM terms if you agree with the terms. Click Next.6. From the Choose Workspace panel, specify the workspace directory containing
the currently deployed plan, and then click Next. The default location for theworkspace is the last workspace location specified. The default location for theworkspace is c:\ibm\tivoli\mwi\workspace
7. In the Select Operation panel, select Undeploy the plan, and then click Next.
Chapter 4. Deploying with automatic middleware configuration (Scenario 1) 53

8. From the undeployment preview panel, click Next to undeploy the plan.9. From the successful undeployment panel, click Next to select a new operation,
such as redeploying components, or click Cancel to exit the middlewareinstallation program.
10. On UNIX systems, remove all DB2 references from the /etc/services file. Theentries that need to be removed are:v db2c_db2insxy 50001/tcpv db2c_db2inst1 50000/tcp
11. Reboot the system if you intend to reinstall middleware on this system usingthe middleware installation program.
Manually configuring WebLogic ServerWebLogic Server can be used with Maximo Asset Management if it is manuallyconfigured.
About this task
You can use a WebLogic Server as your J2EE server. The Maximo AssetManagement installation process prepares EAR files on the Maximo AssetManagement administrative workstation. These files are then manually deployedto your WebLogic Server. The Maximo Asset Management installation programdoes not automatically configure a WebLogic Server environment It does not installor otherwise deploy Maximo Asset Management applications into a WebLogicServer server.
Manually configuring WebLogic Server consists of the following tasks:
Procedure1. “Creating the MAXIMOSERVER domain”2. “Configuring JMS options for integration framework” on page 553. “Configuring JMS for the email listener in WebLogic Server” on page 56
Creating the MAXIMOSERVER domainThis section details how to create the MAXIMOSERVER domain within WebLogicServer.
About this task
To create the MAXIMOSERVER domain within WebLogic Server, complete thefollowing steps:
Procedure1. Launch the Configuration wizard tool.
v For Windows systems, select Start > Programs > BEA Products > Tools >Configuration Wizard.
v For UNIX systems, launch the Configuration wizard using the config.shcommand located in <WebLogic_Home>/weblogic10/common/bin.
2. From the welcome panel, select Create a new WebLogic Server domain, andthen click Next.
3. From the Select a Domain Source panel, select Generate a domain configuredautomatically to support the following products, and then click Next.
54 IBM Maximo Asset Management: Installation Guide (Oracle WebLogic Server)

4. From the Specify Domain Name and Location panel, name the domainMAXIMOSERVER, and then click Next
5. From the Configure Administrator Username and Password panel, enter anadministrator user ID and password, and then click Next.
6. From the Configure Server Start Mode and JDK panel, enter the followinginformation, and then click Next.
WebLogic Server Domain Startup ModeSelect Production.
Selecting this option requires that you provide a user ID and passwordin order to deploy applications.
JDK SelectionSelect a JDK with a version number 1.6.0 or greater from the suppliedJDKs.
7. Proceed through the next few panels until you reach the CustomizeEnvironment and Services Settings panel. From the Customize Environmentand Services Settings panel, select the default option No, and then click Next.
8. From the Create WebLogic Server Domain panel, change the Domain Namevalue to MaximoServer, and then click Create to create the domain.
9. Once the domain has been created, ensure that the Start Admin Server optionis cleared, and then click Done to close the Configuration wizard. On UNIXsystems, this option is not displayed.
Configuring JMS options for integration frameworkThis procedure provides details on steps to configure JMS queues.
Before you begin
You need to be familiar with the Oracle WebLogic Server Administration Consoleto complete the following procedure. See your Oracle WebLogic Serverdocumentation on how to navigate through the Oracle WebLogic ServerAdministration Console.
Procedure1. Launch Internet Explorer and open the MAXIMOSERVER Administration Console
by typing the following URL:http://host_name:7001/console
2. Sign in by entering your user ID and password.3. Create three persistent file stores with the following configuration parameters:
Option Description
File Store Name sqinstore, sqoutstore, cqinstore
File Store Target MAXIMOSERVER
File Store Directory C:\WebLogic, or another directory of your choice
File stores have better performance in general. However, you can choose tocreate database-based stores. To choose between file stores and database-basedstores, consult your Oracle WebLogic Server documentation.
4. Create three JMS servers with the following configuration parameters:
Option Description
Properties Name sqinserver, sqoutserver, cqinserver
Chapter 4. Deploying with automatic middleware configuration (Scenario 1) 55

Option Description
Server Target MAXIMOSERVER
Bytes Maximum 20% or below of the allotted JVM heap size
It is recommended that you configure the Bytes Maximum for the JMS serversto a value of 20% or below of the allotted JVM heap size to prevent the OracleWebLogic Server from running out of memory.
5. Create a JMS system module named intjmsmodule with MAXIMOSERVER asthe target server.
6. Add a connection factory resource to the JMS module:
Option Description
Name intjmsconfact
JNDI Name jms/maximo/int/cf/intcf
Target MAXIMOSERVER
7. Add three queue resources to the JMS Module:a. Create the queue resource type.b. Create a new subdeployment with the same name as the queue.c. Assign the subdeployment_nameserver server target to the subdeployment.
Option Description
Queue 1 Name: sqin JNDI Name: jms/maximo/int/queues/sqin
Queue 2 Name: sqout JNDI Name: jms/maximo/int/queues/sqout
Queue 3 Name: cqin JNDI Name: jms/maximo/int/queues/cqin
Template None
8. Enable the JMS connection factory for integration framework:a. Select the intjmsconfact link.b. From the Transactions tab, check the XA Connection Factory Enabled
check box.c. Set the Maximum Messages per Session to -1.
9. Save and activate the changes.
What to do next
You need to stop and restart the MAXIMOSERVER application server for the update totake effect.
Configuring JMS for the email listener in WebLogic Server
About this task
You use the email listeners application to receive and process requests throughemail in the form of email messages.
To configure JMS queues for the WebLogic Server, complete the following steps:
56 IBM Maximo Asset Management: Installation Guide (Oracle WebLogic Server)

Procedure1. Log in to the WebLogic Server administration console.2. Create a persistent store.
a. In the Domain Structure panel, expand Services and then click PersistentStores.
b. Click New and select the option to create a file store.c. Enter lsnrstore for the name of the file store and c:\wls10 as the directory,
and then click Finish.3. Create a JMS Server
a. In the Domain Structure panel, under Services > Messaging , click JMSServers, enter the following information, and then click Next.
Name Enter a name for a new JMS server, for example, lsnrserver.
Persistent StoreSelect lsnrstore.
b. For the Target, select AdminServer, and then click Finish.4. Create a JMS System Module
a. In the Domain Structure panel, under Services > Messaging , click JMSModules, and then click New.
b. Enter a value for the Name field, such as lsnrjmsmodule, and then clickNext.
c. Select the option for AdminServer, and then click Next.d. Select the option for Would you like to add resources to the JMS system
module?, and then click Finish.5. Add a connection factory to the JMS module.
a. From the Summary of Resources table of the lsnrjmsmodule module, clickNew to add a resource.
b. Select the Connection Factory option, and then click Next.c. From the Connection Factory Properties panel, enter the following
information, and then click Next.
Name Enter a name for the new connection factory. For example,lsnrconnfact.
JNDI NameEnter jms/mro/lsnr/lsnrcf.
d. Ensure AdminServer is selected, and then click Finish
6. Add a queue to the JMS module.a. From the Summary of Resources table of the lsnrjmsmodule module, click
New to add a resource.b. Select the Queue option, and then click Next.c. From the JMS Destination Properties panel, enter the following information,
and then click Next.
Name Enter a name for the new queue. For example, lsnrqueue.
JNDI NameEnter jms/mro/lsnr/qin.
TemplateNo template is necessary.
d. Click Create a new Subdeployment, select lsnrserver, and then clickFinish.
Chapter 4. Deploying with automatic middleware configuration (Scenario 1) 57

7. Set the XA option for the connection factory.a. Select lsnrconnfact, and then select the Transactions tab.b. Ensure that the XA Connection Factory Enabled option is selected, and then
click Save.8. Click Activate Changes to save and activate all changes.9. To enable an email listener to use JMS queues, a Message Driven Bean is
configured through a deployment descriptor file that is part of the installation.You configure the Message Driven Bean by removing comment lines fromsections within the deployment descriptor files. Edit the ejb-jar.xml andweblogic-ejb-jar.xml files.a. Open the install_dir\applications\maximo\mboejb\ejbmodule\META-INF\
ejb-jar.xml file in an editor, uncomment the following sections, and thensave the file:Email Listener JMS is not deployed by default<message-driven id="MessageDriven_LSNRMessageBean"><ejb-name>LSNRMessageBean</ejb-name>ejb-class>psdi.common.emailstner.LSNRMessageBean</ejb-class>transaction-type>Container</transaction-type><message-destination-type>javax.jms.Queue</messagedestination-type></message-driven>
Email Listener JMS is not deployed by default<container-transaction><method><ejb-name>LSNRMessageBean</ejb-name><method-name>*</method-name></method><trans-attribute>Required</trans-attribute></container-transaction>
b. Open the c:\ibm\smp\maximo\applications\maximo\mboejb\ejbmodule\META-INF\weblogic-ejb-jar.xml file in an editor, uncomment the followingsection, and then save the file:Email Listener JMS is not deployed by default<weblogic-enterprise-bean><ejb-name>LSNRMessageBean</ejb-name><message-driven-descriptor><destination-jndi-name>jms/mro/lsnr/qin</destination-jndiname><connection-factory-jndi-name>jms/mro/lsnr/lsnrcf</connection-factory-jndi-name></message-driven-descriptor><transaction-descriptor><trans-timeout-seconds>600</trans-timeout-seconds></transaction-descriptor><jndi-name>LSNRMessageBean</jndi-name></weblogic-enterprise-bean>
Installation program overviewThe Maximo Asset Management installation program provides an interface forinstalling and deploying Maximo Asset Management, which includes the processautomation engine and process managers.
The Maximo Asset Management installation program records choices you makeabout your Maximo Asset Management deployment and configuration parametersassociated with those choices, and then installs and deploys Maximo AssetManagement based upon the information you entered.
58 IBM Maximo Asset Management: Installation Guide (Oracle WebLogic Server)

There are two installation paths available to you when installing Maximo AssetManagement.
SimpleA simple deployment consists of installing Maximo Asset Managementmiddleware on one system. You do not have the option of using existingmiddleware within your organization with Maximo AssetManagement. All middleware used with Maximo Asset Management musthave been installed on the system using the middleware installationprogram using default values. Maximo Asset Management is installedusing default values provided by the middleware installation program andMaximo Asset Management installation program.
If you intend to override default values used by the simple deploymentpath, you must use the custom deployment path instead.
If you are deploying using Oracle WebLogic Server, you cannot choose thisoption.
CustomA custom deployment typically involves deploying Maximo AssetManagement across several systems, some of which might already hostmiddleware products that you want to use with your Maximo AssetManagement deployment. Deploying using the custom installation pathalso allows you to modify default installation values.
This deployment option does not require you to spread the Maximo AssetManagement deployment across several systems. You can enter the nameof the local host as the destination for all Maximo Asset Managementcomponents that are installed using the middleware installation programand the Maximo Asset Management installation program.
If you are deploying using Oracle WebLogic Server, you must choose thisoption.
The Maximo Asset Management installation program can automate theconfiguration of some middleware for use with Maximo Asset Management. Itcannot automate the configuration of Oracle WebLogic Server. If you choose not tohave the Maximo Asset Management installation program automatically configuremiddleware, you must configure that piece of middleware manually before theinstallation of Maximo Asset Management.
Important: When entering LDAP values for Maximo Asset Managementinstallation panel fields, entries in LDIF files, or values you enter directly into adirectory instance using the directory server tools, be aware of the product-specificsyntax rules for using special characters in an LDAP string. In most cases, specialcharacters must be preceded by an escape character in order to make it readable bythe directory server. Failing to escape special characters contained in an LDAPstring used with Maximo Asset Management results in Maximo Asset Managementerrors.
Many directory server products consider a blank space as a special character that ispart of the LDAP string. If you mistakenly enter an LDAP string that contains ablank, at the end of a field value, for example, and you do not precede the blankcharacter with an escape character, you encounter Maximo Asset Managementerrors that are difficult to troubleshoot.
See the product documentation for your directory server for more informationabout special characters in LDAP strings.
Chapter 4. Deploying with automatic middleware configuration (Scenario 1) 59

Information that you enter into the Maximo Asset Management installationprogram is stored in the maximo.properties and install.properties files and theMaximo database. These values are populated into the panel fields of the MaximoAsset Management installation program on subsequent uses of the program. If youcancel the installation program after entering values across several installationpanels, the installation program recalls most values the next time you start theMaximo Asset Management installation program. Values excluded from beingsaved in this manner are the Maximo Asset Management installation directory andthe shortcut option chosen during the installation. You can restore the defaultvalues in the Maximo Asset Management installation program by deleting<Maximo_Home>/applications/maximo/properties/maximo.properties and<Maximo_Home>/etc/install.properties. If you cannot locate themaximo.properties file in the <Maximo_Home> directory, look for it in the systemtemp file directory.
Running the installation programInstall Maximo Asset Management and automatically configure middleware onmultiple servers, using default values.
Before you begin
The instructions provided are for a multiple server installation using default values.If any errors are encountered, a dialog box detailing the error appears. You cannotcontinue the installation until the errors are resolved.
Ensure that you have addressed the following prerequisite conditions:v You have already manually configured Oracle WebLogic Server.v Ensure that all middleware servers and services are started and active.v On the administrative workstation, temporarily shut down any non-critical
processes that can have a negative effect on the installation, such as anti-virussoftware.
v Ensure that the Windows DEP setting does not prevent the launchpad fromrunning, by selecting Start > Settings > Control Panel > System > Advanced >Performance > Settings > Data Execution Prevention. Select Turn on DEP foressential Windows programs and services only and click Apply. You may beasked to reboot the server.
v For Linux and UNIX systems with middleware installed, the command hostname-f must return a fully qualified host name. If necessary, consult thedocumentation for your operating system.Alternatively, you can provide the IP address for the system.
v When you are installing the product, enter the fully qualified host name of thesystem for all host name values. Alternatively, you can provide the IP addressfor the system.
v Enable a remote execution and access service on every system with middlewareinstalled. Each remote system must support a remote access protocol and acceptremote logins from a user name and password configured on the target server.Remote access protocols include SSH and Windows SMB. If the remote system isa Windows server, you must configure remote execution and access to use SMB.
v Perform the following tasks to prepare the DB2 database:– If DB2 is installed on a Linux or UNIX system, you must create the instance
user and the home directory for the user on the DB2 server.– The database instance owner home directory must have 8 GB of space
available regardless of whether a database is installed in that location.
60 IBM Maximo Asset Management: Installation Guide (Oracle WebLogic Server)

– The user ID for the DB2 instance administrator must have SYSADM(administration) authority. You enter this user ID on the DB2 Administrationscreen and on the Remote Access Authorization screen of the Maximo AssetManagement installation program. See the DB2 product documentation forinformation about creating a user with SYSADM (administration) authority onthe DB2 server. You must add root to a group with SYSADM authority forUNIX systems.
– If you are plan to install Maximo Asset Management in a language other thanEnglish, you must accept the default values for database table space size andindex table space size and these values are displayed as null during theinstallation. If you want to customize the table space sizes, you have threeoptions. Run the Maximo Asset Management installation program in English,manually configure the database, or modify the table space sizes afterinstallation.
v Database users and database instance names for DB2 and Oracle cannot containspaces.
v Avoid using an installation path that includes non-English characters.v You can create a maxdemo database during the installation of Maximo Asset
Management and populate the database with sample data. Refer to Create amaxdemo database during installation for more information.
Procedure1. Log in on the administrative system.2. Ensure the database server, directory server, and application server services
are running.3. Start the Maximo Asset Management installation program from the launchpad.
a. Start the launchpad. Browse to the root directory of the downloadedinstallation image, and run the following command:
Windowslaunchpad.exe
b. In the launchpad navigation pane, click Install.c. Click Install Maximo Asset Management 7.5.Alternatively, you can start the Maximo Asset Management installationprogram directly. On the downloaded installation image, browse to\Install\mam\, and run the following command
Windows
v install.exe
v install_win64.exe
4. Select a language for the installation and click OK.5. In the Introduction panel, click Next.6. In the Choose Installation folder panel, enter the path to install Maximo Asset
Management. By default, this value is C:\IBM\SMP for Windows systems. Thepath you enter must not contain spaces.Click Edit description and enter a description for the current installation. Thisdescription is useful for differentiating between multiple installations hostedon the same administrative workstation.
7. Review the information presented in the Verify installation location panel, andthen click Next. The Verify installation location panel reports previousinstallation information, if any, that was found based upon the installation
Chapter 4. Deploying with automatic middleware configuration (Scenario 1) 61

directory you chose in the previous panel. Once you advance past this panel,you cannot go back and change the installation directory for this installation.
8. In the Package Summary panel, review the package deployment actions, andthen click Next. This panel lists version information for both new and existingpackages on the system. Target package version information indicates thepackage version being currently deployed. In certain upgrade scenarios, aquestion mark can be displayed alongside a package listed. This symbolserves as a reminder that there might be an updated version of this packageavailable. It does not indicate a failure of the installer.
9. In the software license agreement panel, read the license information andselect I accept both the IBM and the non-IBM terms. if you agree with theterms, and then click Next.
10. In the Choose Deployment panel, select the Custom deployment topology,and then click Next.
SimpleA simple installation deploys all Maximo Asset Managementcomponents on a single system. This deployment option is typicallyused for demonstration, proof-of-concept, or training purposes only.
CustomA custom installation can deploy Maximo Asset Managementcomponents across several systems, and can reuse existingmiddleware components. This deployment option is typically used ina production environment.
11. In the Import Middleware Configuration Information panel, indicate that youwant to use the field values that you used with the middleware installationprogram. These values are used as default values for those same fields in theMaximo Asset Management installation program. Click Next.
Import middleware configuration informationSelect this check box to allow the Maximo Asset Managementinstallation program to reuse values specified in the middlewareinstallation program.
If you select the Simple deployment path, the middleware defaultinformation is not used.
Host nameEnter the host name of the system where the middleware installationprogram was run.
User IDEnter the user ID that was used to run the middleware installationprogram.
PasswordEnter the password of the user ID that was used to run themiddleware installation program.
Workspace locationEnter the location of the topology file that contains the values enteredfor the middleware installation program. This file is found in theworkspace that was defined during the middleware installation task.For example, C:\ibm\tivoli\mwi\workspace for Windows and/root/ibm/tivoli/mwi/workspace for UNIX.
12. In the Database Type panel, select the software to use for the Maximodatabase, and then click Next.
62 IBM Maximo Asset Management: Installation Guide (Oracle WebLogic Server)

DB2 Select this choice to use DB2 as the Maximo database.
Select the Disable non-English-language support option to preventthe process automation engine from deploying languages other thanEnglish when the database type is DB2. This option enhances databaseperformance, but excludes non-English-language support for thedeployment. If you select this option, you cannot deploy additionallanguages at a later time.
Oracle Select this choice to use Oracle as the Maximo database.
Microsoft SQL ServerSelect this choice to use Microsoft SQL Server as the Maximodatabase.
Each database has its own unique set of configurable parameters and values.13. In the Database panel, enter configuration information about the database,
and then click Next.
DB2
Host nameEnter the fully qualified host name of the server hosting DB2.
Alternatively, you can provide the IP address for the system.
Port Enter the port being used by the DB2 instance.
The default is 50005.
Database nameEnter the name of the database to use with Maximo.
The default database name is maxdb75. The database iscreated if it does not exist.
InstanceEnter the name of the database instance to be used withMaximo.
The default instance name is ctginst1. This instance is createdif it does not exist, however, the user and its associated homedirectory must exist on the DB2 server.
Schema nameEnter the schema name for the database.
The name of the DB2 database schema. This value can be thesame value as the owner of the table spaces defined or adifferent value. For example, maximo.
Database user IDEnter the user ID used for the product to access DB2.
Default for all platforms is maximo.
This user ID is created if it does not exist.
This user ID cannot be the same one used as the instanceadministrator user ID.
Database passwordEnter the password for the user ID used to access DB2.
Oracle
Chapter 4. Deploying with automatic middleware configuration (Scenario 1) 63

Host nameEnter the host name of the server hosting Oracle.
The host name must be fully qualified.
Port Enter the port being used by Oracle.
The default is 1521.
InstanceEnter the name of the database instance to be used withMaximo.
The default instance name is ctginst1. The instance name islimited to eight characters.
Database user IDEnter the user ID used for Maximo to access Oracle.
Default for all platforms is maximo.
This user ID is created if it does not exist.
Database passwordEnter the password for the user ID used to access Oracle.
Microsoft SQL Server
Host nameEnter the host name of the server hosting Microsoft SQLServer.
The host name must be fully qualified.
Port Enter the port being used by Microsoft SQL Server.
The default is 1433.
Database nameEnter the name of the database to use with Maximo.
The default database name is maxdb75.
Database user IDEnter the user ID used to access Microsoft SQL Server.
Default for all platforms is maximo.
This user ID is created if it does not exist.
Database passwordEnter the password for the user ID used to access MicrosoftSQL Server.
After you have specified configuration information for the database that wasselected, the Maximo Asset Management installation program connects to thedatabase server to validate the information you have specified.
14. In the Automate Database Configuration panel, select Automate databasecreation and configuration, and then click Next.This option allows the Maximo Asset Management installation program toautomatically configure the database for use by Maximo Asset Management.Examples of automated tasks include creating table spaces, creating databasetables, creating database schemas, creating users, and other tasks.
15. In the Remote Access Authorization panel, enter authorization information forthe automatic database configuration feature, and then click Next.
64 IBM Maximo Asset Management: Installation Guide (Oracle WebLogic Server)

User IDEnter a valid user ID that allows the Maximo Asset Managementinstallation program to access the system that is hosting the databaseto be used with Maximo Asset Management.
This user ID must have administrative rights on the server you areaccessing.
For Windows OS, this user must be a member of the DB2ADMNSgroup.
For Linux or UNIX, this user must be root and a member of a groupwith SYSADM authority for the database instance.
PasswordEnter the password for the user ID.
See the Remote configuration enablement topic in the Preparing to installMaximo Asset Management information for configuring remote accessinstructions.
16. In the Database Administration panel, enter configuration information aboutthe database, and then click Next.
DB2
Installation directoryEnter the directory where DB2 is installed.
WindowsOn Windows, this value might be C:\ProgramFiles\IBM\SQLLIB
Linux or UNIXOn Linux or UNIX, this value might be/opt/IBM/db2/V9.7
Instance administrator user IDEnter the user ID for the administrator of the DB2 instance.
WindowsOn Windows, this value might be Sys.
Linux or UNIXOn Linux or UNIX, this value might be ctginst1.
This user ID cannot be the same one as is as the database userID.
Instance administrator passwordEnter the password for the user ID of the administrator fortheDB2 instance.
Windows service user IDEnter the user ID used to start the DB2 service on Windows.
The default is db2admin. This user ID must haveadministrative authority on the system.
Windows service passwordEnter the password for the user ID used to start the DB2service on Windows.
Oracle
Chapter 4. Deploying with automatic middleware configuration (Scenario 1) 65

Installation directoryEnter the directory where Oracle is installed.
WindowsOn Windows, this value might beC:\oracle\product\10.2.0\db_1
Linux or UNIXOn Linux or UNIX, this value might be/opt/app/oracle/product/10.2.0/db_1
Administrator user IDEnter the user ID of the administrator for Oracle.
For all platforms, the default is Sys.
Administrator PasswordEnter the password for the user ID of the administrator forOracle.
Oracle Software Owner IDEnter the user ID of the user that was used to install Oracle.
For all platforms, the default is oracle.
Oracle Software Owner PasswordEnter the password for the user ID of the user that was usedto install Oracle.
Microsoft SQL Server
SQL Server administratorEnter the user ID for the administrator of the Microsoft SQLServer.
Default is sa.
SQL Server administrator passwordEnter the password for the user ID of the administrator for theMicrosoft SQL Server.
Data file nameEnter the name of the Microsoft SQL Server data file.
Default value is maxdb75_dat.
Data file initial sizeSelect the initial size of the Microsoft SQL Server data file.
Default is set to Medium (1000 Mb).
Log file nameEnter the name for the Microsoft SQL Server log file.
Default is maxdb75_log.17. In the Database Tablespace panel, enter information about the table space of
the database, and then click Next.
DB2
Data tablespace nameEnter the name of the table space that is created in DB2 forMaximo.
For all platforms, the default is MAXDATA.
If the table space does not exist, it is created.
66 IBM Maximo Asset Management: Installation Guide (Oracle WebLogic Server)

Data tablespace sizeEnter a size, in megabytes, for the data table space.
Temporary tablespace nameEnter the name for the temporary table space to be created forDB2.
Temporary table spaces hold data during sorting or collatingactions.
For all platforms, the default is MAXTEMP.
If the table space does not exist, it is created.
Temporary tablespace size (Mb)Enter a size for the temporary table space. The default value is1000 Mb.
Index tablespace nameEnter a name for the index table space.
For all platforms, the default is MAXDATA.
Index tablespace sizeEnter a size, in megabytes, for the index table space.
Oracle
Instance base directoryEnter a path for the database instance.
WindowsOn Windows, this value might beC:\oracle\product\10.2.0\db_1\dbs
Linux or UNIXOn Linux or UNIX, this value might be/opt/app/oracle/product/10.2.0/db_1
Data table space nameEnter the name of the table space to be created in Oracle forthe product..
For all platforms, the default is maxdata.
Data table space size (Mb)Enter a size, in megabytes, for the data table space. Thedefault value is 1000 Mb.
Temporary table space nameEnter the name for the temporary table space to be created forOracle.
Temporary table spaces hold data during sorting or collatingactions.
For all platforms, the default is MAXTEMP.
Temporary table space size (Mb)Enter a size for the temporary table space. The default value is100 Mb.
Index table space nameEnter a name for the index table space.
For all platforms, the default is MAXDATA.
Chapter 4. Deploying with automatic middleware configuration (Scenario 1) 67

Index table space sizeEnter a size, in megabytes, for the index table space. Thedefault value is 500 Mb.
The Maximo Asset Management installation program now connects to thedatabase server and validates the information you specified.
18. Once the database validation task has completed, in the Application ServerType panel, select Oracle WebLogic Server for the Maximo Asset Managementdeployment, and then click Next.
Oracle WebLogic ServerSelect this option to configure WebLogic Server as the J2EE server touse with Maximo Asset Management.
If you select WebLogic Server, you do not have the option ofconfiguring it automatically through the Maximo Asset Managementinstallation program. You must manually configure WebLogic Serverand manually deploy application files.
19. In the Enter Maximo users panel, enter the following information, and thenclick Next.
Maximo administration userProduct administrator user ID used for initial configuration andadding users. Default value is maxadmin.
PasswordPassword for the Maximo administration user.
Maximo system registration userUser ID used for the self registration of users. Default value is maxreg.
PasswordPassword for the Maximo system registration user.
Maximo system integration userUser ID used with enterprise adapters. Default value is mxintadm.
PasswordPassword for the Maximo system integration user.
Custom Maximo user ID and password values are stored in the Maximodatabase. The default Maximo user IDs of maxadmin, maxreg, and maxintadmare also created as users in the Maximo database. Creation of the default userIDs is done for internal processing purposes. If you use Maximo security forauthentication and authorization, the default user IDs can be used to log in tothe application. If you view this condition as a security risk, you can modifythe passwords for these default user IDs. Passwords for these user IDs can bemodified through the Users application.
20. In the SMTP Configuration panel, enter SMTP configuration information usedby workflows to communicate with workflow participants, and then clickNext.
SMTP serverEnter the fully qualified host name of the SMTP server that sendsmessages to participants.
Alternatively, you can provide the IP address for the system.
Administrator emailEnter a valid email address. This address is to send messages.
68 IBM Maximo Asset Management: Installation Guide (Oracle WebLogic Server)

You can defer SMTP configuration at this time by not providing anyinformation for this panel and clicking through to the next panel. However,you must configure these parameters through the product interface as a postinstallation task.
21. From the Base-language selection panel, select a language from the list andthen click Next.
22. From the Additional language selection panel, you can optionally select one ormore languages from the list and then click Next.
23. From the Run Configuration Step panel, decide how you would like toperform the configuration step of the installation, and then click Next. If youdo not select any options, when you click Next, the configuration stepproceeds. You can optionally create a maxdemo database from the RunConfiguration Step panel. Refer to Create a maxdemo database duringinstallation for more information.
Copy files now, but perform the installation configuration step later.Select this option if you would like to copy files from the installationsource to the administrative workstation. You must perform theconfiguration step at a later time to complete the deployment. It isimportant that you not install another product before completing theconfiguration step of the original installation. Installing anotherproduct before running the configuration step for this installationoverwrites the taskstore, which prevents the original installation fromever being deployed.
The configuration values that you enter are stored in theinstall_home\maximo\applications\maximo\properties\maximo.properties and install_home\etc\install.properties files.You run the configuration steps outside of the Maximo AssetManagement installation program by using the taskrunner utility, inthe install_home\scripts directory. Run the taskrunner utility fromthe command line, and it uses the configuration values stored in themaximo.properties and install.properties files to configure MaximoAsset Management.install_home\scripts\taskrunner [CONTINUE <STOPONERROR|NOSTOPONERROR>]
If you run taskrunner with the NOSTOPONERROR parameter, thetaskrunner continues despite errors. . If you run taskrunner with theSTOPONERROR parameter, the taskrunner stops when it encounters anerror. If you used STOPONERROR you can rectify the conditions thatcaused the error, and then resume the installation at the point wherethe last successfully completed task was recorded in the previousattempt by starting taskrunner with the CONTINUE parameter.
Defer the Update of the Maximo database.Select this option if you would like to manually run the databaseupdate task for the product deployment. You must manually run theupdatedb command to write data to the Maximo database in order tocomplete the deployment. The installation program is limited tocopying files to the administrative system and registering productprocess solution packages. This option can be used in cases wherethere is a fix pack available that addresses known issues with theupdatedb script. In this scenario, you choose the Defer the update ofthe Maximo database option, apply the fix pack, and then run theupdatedb -v1 command manually.
24. In the Choose Shortcut Folder panel, select the type of shortcut you wouldlike to arrange for Maximo Asset Management, and then click Next.
Chapter 4. Deploying with automatic middleware configuration (Scenario 1) 69

In a new Program GroupSelect this option and enter the name of a new program group if youwould like to create Maximo Asset Management shortcuts in a newprogram group.
In an existing Program GroupSelect this option and choose the name of an existing program groupto store Maximo Asset Management shortcuts.
In the Start MenuSelect this option to create shortcuts for Maximo Asset Management inthe Start menu.
In order to use the Start menu shortcut with Internet Explorer, add theMaximo Asset Management URL to the trusted sites web content zoneand disable the option of requiring server verification for all sites inthe zone.
On the DesktopSelect this option to create shortcuts for Maximo Asset Managementon the desktop.
In the Quick Launch BarThis option must not be used. Do not select this option. Selecting thisoption does not create a shortcut in the Quick Launch bar.
Other Select this option and use Choose... to select another location to createMaximo Asset Management shortcuts.
Don't create iconsSelect this option if you do not want any Maximo Asset Managementshortcuts created.
Create Icons for All UsersSelect this option if you would like Maximo Asset Managementdesktop icons to appear on the desktop for all system users.
25. In the Input Summary panel, review the information you have provided to theMaximo Asset Management installation program, and then click Next.Use Previous to return to previous panels to change values.
26. In the Pre-Installation Summary panel, review the installation informationpresented, and then click Install.The installation task begins. Progress can be monitored by viewing messagesdisplayed above the progress bar.
27. In the Install Complete panel, click Done.“Restarting middleware on Windows” on page 191This procedure describes how to restart middleware on Windows, if you mustrestart any middleware services.“Restarting middleware on UNIX” on page 192Middleware services on Linux and AIX platforms occasionally must berestarted, such as when a reboot occurs. Middleware servers and services mustbe active before running the Maximo Asset Management installation program.
Create a maxdemo database during installationYou can create a maxdemo database during the installation of Maximo AssetManagement and populate the database with sample data.
70 IBM Maximo Asset Management: Installation Guide (Oracle WebLogic Server)

Procedure1. In the Run Configuration Step screen in the installation wizard, select the Copy
files now, but perform the installation configuration later option.2. When the installation finishes, exit the installation wizard.3. Rename the C:\IBM\SMP\Maximo\tools\maximo\en\maximo.<dbtype> file.4. Copy the C:\IBM\SMP\Maximo\tools\maximo\en\maxdemo.<dbtype> file to
C:\IBM\SMP\Maximo\tools\maximo\en\maximo.<dbtype>, where en is thelanguage folder and the dbtype is ora/sqs/db2.
5. Open a command window and browse to C:\IBM\SMP\scripts and run thefollowing command: taskrunner.bat CONTINUE STOPONERROR
6. When taskrunner finishes running, rename the files back to their originalnames. Note: Do not restart the computer before you run the taskrunnercommand. The taskrunner utility does not create a persistent store ofinformation and data can be lost.
Post installation for Oracle WebLogic Server deploymentsThere is a post installation step required for Oracle WebLogic Server deployments.
About this task
When using Oracle WebLogic Server as the application server for your MaximoAsset Management deployment, the installation program produces an EAR file.You must then manually deploy that file to Oracle WebLogic Server.
When using Oracle WebLogic Server, you must modify the weblogic.xml file andrebuild the maximo.ear file before deploying it.
Procedure1. Install the updated JDK 1.6 program.
a. Obtain the latest JDK program with a version number 1.6.0 SR7 or greater,from http://www.oracle.com/technetwork/java/index.html.
b. Start the installation program.c. Accept the license agreement.d. Change the installation destination path to your Oracle home folder, and
click OK , then Next.e. Accept any additional prompts to install the JDK program so that the
installation process can complete successfully.2. If you are using an Oracle database, copy the oraclethin.jar file.
a. Copy the oraclethin.jar file from the administrative workstation to theserver where you installed Oracle WebLogic Server. Use any file transferprotocol that is available.
b. The oraclethin.jar file is in the install_home\maximo\applications\maximo\lib directory. The default install_home directory isC:\IBM\SMP\Maximo\Applications\Maximo\lib. Copy the oraclethin.jar fileto the J2EE server and into the wls11g/server/lib directory. For example,C:/Oracle/wls11g/server/lib.
3. Edit the domain configuration file for proper Java settings.a. Navigate to Install_dir\user_projects\domains\mydomain\bin.b. Right-click and edit (do not double-click) setDomainEnv.cmd (Windows) or
setDomainEnv.sh (UNIX).
Chapter 4. Deploying with automatic middleware configuration (Scenario 1) 71

c. Using your text editor, search for and replace jdk entries with entries thatconfigure Oracle WebLogic Server to use the updated JDK program. Twoinstances must be replaced.
d. (Oracle only) Search for PRE_CLASSPATH. Set the parameter as follows:set PRE_CLASSPATH=%WL_HOME%\server\lib\oraclethin.jar (Windows)PRE_CLASSPATH={WL_HOME}/server/lib/oraclethin.jar (UNIX)
Note: This step is required for connecting to Oracle databases from OracleWebLogic Server.
e. Increase the Java Heap parameters by searching for MEM_ARGS and settingthe parameter as follows:set MEM_ARGS=-Xms512m -Xmx1024m -XX:MaxPermSize=512m (Windows)MEM_ARGS=-Xms512m -Xmx1024m -XX:MaxPermSize=512m (UNIX)
These parameters are case sensitive. Ensure to include the minus (-) signbefore each parameter and to include the m after each value.
f. Search for set JAVA_OPTIONS=%JAVA_OPTIONS% %JAVA_PROPERTIES%. Insert anoption right after this string as follows:-Dcom.sun.xml.namespace.QName.useCompatibleSerialVersionUID=1.0
The entry looks like this when complete:set JAVA_OPTIONS=%JAVA_OPTIONS% %JAVA_PROPERTIES%-Dcom.sun.xml.namespace.QName.useCompatibleSerialVersionUID=1.0-Dwlw.iterativeDev=%iterativeDevFlag% -Dwlw.testConsole=%testConsoleFlag%-Dwlw.logErrorsToConsole=%logErrorsToConsoleFlag%
g. Save and close the setDomainEnv.cmd file.4. Edit the \IBM\SMP\maximo\applications\maximo\maximouiweb\webmodule\WEB-
INF\weblogic.xml file and add the following entries:<session-descriptor><cookie-http-only>false</cookie-http-only></session-descriptor>
5. Start the server without being prompted for user name and password. If youare working in Production mode and do not want to be prompted for theOracle WebLogic Server user name and password, create a boot.propertiesfile. This procedure stores the user name and password in an encrypted format.Place the following two lines in a text file:username=<administrator username>password=<administrator password>
The user name and password values must match an existing user account inthe Authentication provider for the default security realm. If you save the fileas boot.properties and locate it in the mydomain folder (for example,C:\BEA\User_projects\domains\mydomain), the server automatically uses this fileduring its subsequent startup cycles. The first time you use this file to start aserver, the server reads the file and then overwrites it with an encryptedversion of the user name and password.
6. Verify settings by starting Oracle WebLogic Server. To ensure that the edits thatyou made to the previous Oracle WebLogic Server files were accurate, start theOracle WebLogic Server.
7. Rebuild the maximo.ear file.\IBM\SMP\maximo\deployment\buildmaximoear
8. Deploy the maximo.ear file to Oracle WebLogic Server.
72 IBM Maximo Asset Management: Installation Guide (Oracle WebLogic Server)

Deploying ear filesYou are now ready to deploy the EAR files from the Oracle WebLogic ServerAdministration Console. Deploying the EAR files starts the Maximo ApplicationServer.
Before you begin
Windows WindowsIf MAXIMOSERVER is not running, start it from a command prompt.
UNIX UNIXEnsure that the Oracle WebLogic Server daemon is running.
About this task
In order to view the Oracle WebLogic Server Administration Console, you need toalso install a Java Virtual Machine (JVM). Newer versions of Windows might notship with JVM.
Procedure1. Change to the my_domain directory:
Windows WindowsFrom a command prompt, change directory path to:drive_name:\weblogic_install_dir\user_projects\domain\my_domain
UNIX UNIXOpen a Terminal window (or a command prompt, if you are telnetingfrom a Windows computer) and change directory as follows:cd /home/mxadmin/weblogic_install_dir/user_projects/domains/my_domain
2. Type
Windows WindowsstartWebLogic.cmd
UNIX UNIX./startWebLogic.sh
and press Enter. Once the phrase: Server started in RUNNING mode displays,the Oracle WebLogic Server is running.
3. Start the MAXIMOSERVER Oracle WebLogic Server Administration Console bytyping the following URL in the address bar of your browser:http://host_name:7001/console
4. Log in to the administrative console with the administrative user name andpassword.
5. In the left pane, click the Lock&Edit button in the Change Center section toset the server to edit mode.
6. In the left pane, click the Deployments link in the Domain Structure section.7. In the Summary of Deployments section, click the Install button. The Install
Application Assistant opens.8. Click the upload your file(s) link.9. Click the Browse button next to the Deployment Archive field. Browse to
where you have maximo.ear file installed (c:/ibm/smp/maximo/deployment/default/ of the administrative workstation), select the file and click Open.
Chapter 4. Deploying with automatic middleware configuration (Scenario 1) 73

10. Click Next to upload the file to the Oracle WebLogic Server server.11. Click the radio button next to the maximo.ear file, and Next to continue the
deployment.12. Accept the default value “Install this deployment as an application” and click
Next to continue the deployment.13. Accept all other default values and click Finish to start the deployment
process.14. When the deployment process is complete, click the Activate Changes button
in the Change Center to apply the changes. The following message displays:All changes have been activated. No restarts are necessary.
15. Repeat Steps 8 on page 73 through 14 to deploy maximoiehs.ear.16. Click the checkbox next to the maximo application.17. Click the dropdown arrow of the Start button and select Servicing all
requests. The Start Application Assistant displays.18. Click Yes to start the system.
Setting the Oracle WebLogic Server host nameSetting the Oracle WebLogic Server host name manually to access application helpinformation.
About this task
By default, the property used to store the host name for the Maximo AssetManagement help system is set to localhost. The fully qualified host name of theOracle WebLogic Server must be configured in the help system property to viewMaximo Asset Management application help topics. Complete this step after youhave deployed Maximo Asset Management EAR files to the Oracle WebLogicServer.
Procedure1. Log in to the Maximo Asset Management console as maxadmin.2. Browse to Go To > System Configuration > Platform Configuration > System
Properties
3. Using the Filter feature, search for the mxe.help.host Property Name.4. Expand the mxe.help.host property and set the attribute to the fully qualified
host name of the Oracle WebLogic Server.5. Select the mxe.help.host record check box.6. Click the Live Refresh icon in the toolbar.7. From the Live Refresh dialog, click OK.
Results
You are now able to access application help topics in the Maximo AssetManagement user interface.
Language deployment after database update deferralSelecting the option to defer the update of the Maximo database when installingthe product, affects how you deploy languages.
74 IBM Maximo Asset Management: Installation Guide (Oracle WebLogic Server)
During installation, you have the option to defer the database update task. Thisoption prevents writing data to the database during the installation. Theinstallation program is limited to copying files to the administrative system andregistering product process solution packages. You add languages by completingthe installation, manually updating the database, and then updating languagesmanually.
“Manually deploying languages after database update deferral”Languages must be deployed manually if you defer database updates by theinstallation program.
Manually deploying languages after database update deferralLanguages must be deployed manually if you defer database updates by theinstallation program.
Before you begin
You must have run updatedb command before manually configuring languages forPSI packages.
About this task
To manually configure languages for PSI packages, complete the following steps:
Procedure
Update language support for the Maximo core components.Files for the language selections you made during the installation are extracted tothe C:\IBM\SMP\Maximo\Tools\Maximo\locale\xliff\ directory on the system.1. To update a language as the base language to use for the product, run the
following command:install_home\maximo\tools\maximo\TDToolkit.bat-IMPORT-SLEN-TLlocale-maxmessfix
2. To add one or more languages as additional languages for use with theproduct, run the following command for each language you want to add:install_home\maximo\tools\maximo\TDToolkit.bat-ADDLANGlocale-maxmessfix
Chapter 4. Deploying with automatic middleware configuration (Scenario 1) 75

76 IBM Maximo Asset Management: Installation Guide (Oracle WebLogic Server)

Chapter 5. Deploying automatically reusing existingmiddleware (Scenario 2)
Use this information to use Maximo Asset Management installation programs andtools to automatically configure existing middleware within your enterprise duringthe Maximo Asset Management deployment process.
Before you begin
Ensure you have reviewed the following information:v Chapter 2, “Planning to deploy,” on page 5v Chapter 3, “Preparing for installation,” on page 11
About this task
This information provides a high-level overview or road map of tasks you need tocomplete in order to deploy Maximo Asset Management automatically, usingmiddleware already established in your enterprise. Use the information providedin the Concepts list to familiarize yourself with the ideas behind each step, andthen refer to the Tasks list and perform the tasks listed in order to complete thestep.
In this scenario, you use the middleware installation program and the MaximoAsset Management installation program to automatically configure existingmiddleware resources automatically before finally deploying the product itself.Oracle WebLogic Server must always be configured manually, but you can use theinstallation programs to automatically configure an existing DB2 server in yourenvironment, for example.
© Copyright IBM Corp. 2007, 2011 77
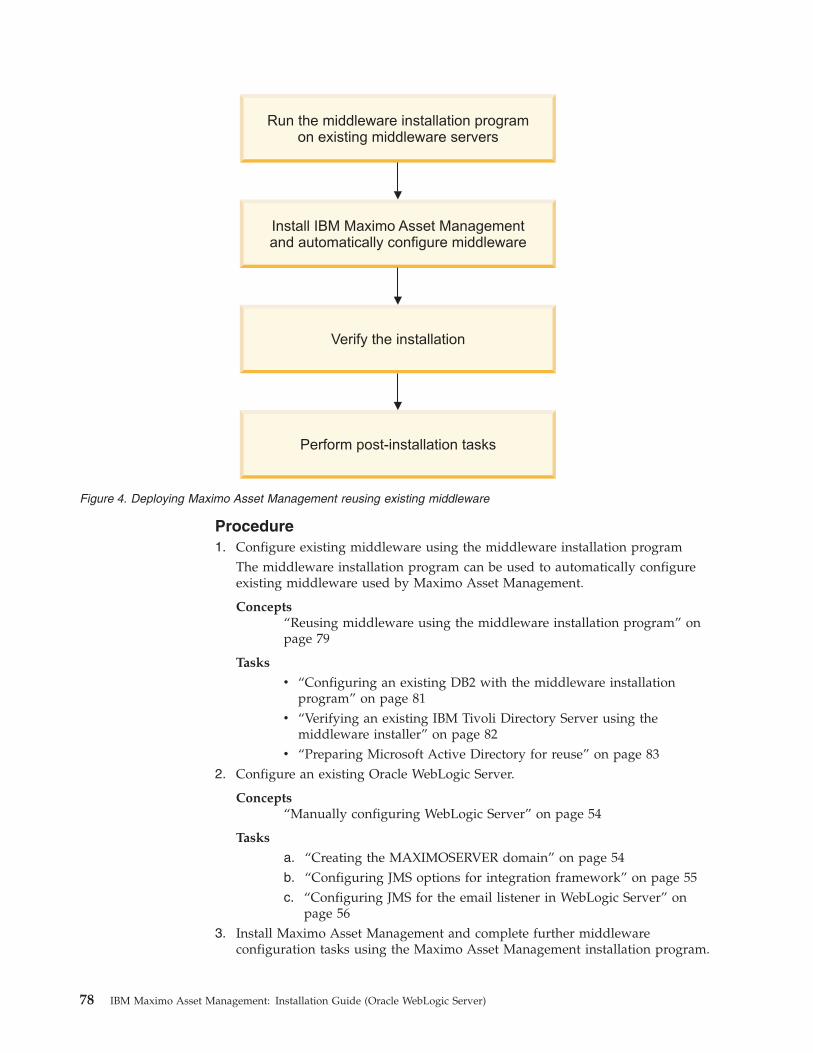
Procedure1. Configure existing middleware using the middleware installation program
The middleware installation program can be used to automatically configureexisting middleware used by Maximo Asset Management.
Concepts“Reusing middleware using the middleware installation program” onpage 79
Tasks
v “Configuring an existing DB2 with the middleware installationprogram” on page 81
v “Verifying an existing IBM Tivoli Directory Server using themiddleware installer” on page 82
v “Preparing Microsoft Active Directory for reuse” on page 832. Configure an existing Oracle WebLogic Server.
Concepts“Manually configuring WebLogic Server” on page 54
Tasks
a. “Creating the MAXIMOSERVER domain” on page 54b. “Configuring JMS options for integration framework” on page 55c. “Configuring JMS for the email listener in WebLogic Server” on
page 563. Install Maximo Asset Management and complete further middleware
configuration tasks using the Maximo Asset Management installation program.
Run the middleware installation programon existing middleware servers
Install IBM Maximo Asset Managementand automatically configure middleware
Verify the installation
Perform post-installation tasks
Figure 4. Deploying Maximo Asset Management reusing existing middleware
78 IBM Maximo Asset Management: Installation Guide (Oracle WebLogic Server)

The Maximo Asset Management installation program is used to perform furtherconfiguration on middleware and to deploy Maximo AssetManagement-specific components.
Concepts“Installation program overview” on page 58
Tasks “Running the installation program” on page 604. Complete post-installation tasks
Concepts
v Chapter 10, “Post installation tasks,” on page 171
Tasks
a. “Initial data configuration” on page 171b. “Synchronizing users and groups” on page 177c. “Understanding and configuring security” on page 179
What to do next
After you have completed the deployment process, you can optionally perform thefollowing tasks:v Create startup scripts for middleware.
You can create startup scripts that will automatically start Maximo AssetManagement middleware services upon a system reboot.
Reusing middleware using the middleware installation programIf you intend to reuse existing middleware servers with Maximo AssetManagement, they must be configured before running the Maximo AssetManagement installation program.
This section contains information about configuring existing DB2, IBM TivoliDirectory Server and Microsoft Active Directory servers for use with Maximo AssetManagement using the middleware installation program. You cannot use themiddleware installation program to configure existing Oracle, Oracle WebLogicServer, or Microsoft SQL Server.
Ensure that all of your middleware is at supported levels for Maximo AssetManagement.
When installing and configuring middleware in the middleware installationprogram and the Maximo Asset Management installation program, consider thefollowing special characters restrictions:
Chapter 5. Deploying automatically reusing existing middleware (Scenario 2) 79

Table 6. Middleware object naming conventions
Naming Convention Details
DB2 naming conventions for Group names,User names, and User IDs.
Group names and user IDs on Linux andUNIX operating systems can contain up to 8characters and must consist of lowercasecharacters only.
Group names and user names on Windowscan contain up to 30 characters.
Names and IDs cannot be any of thefollowing values: USERS, ADMINS,GUESTS, PUBLIC, LOCAL or anySQL-reserved word.
Names and IDs cannot begin with IBM, SQLor SYS. They must also not begin with theunderscore (_) character.
DB2 naming conventions for DB2 instances. Instance names can have up to eightcharacters.
On Windows, no instance can have the samename as a service name.
DB2 naming conventions for passwords. For UNIX systems, passwords can be amaximum of eight characters.
For Windows systems, passwords can be amaximum of 14 characters.
IBM Tivoli Directory Server conventions fordatabases and database aliases.
Database names must be unique within thelocation in which they are cataloged. ForLinux and UNIX , this location is a directorypath. For Windows it is a logical disk.
Database alias names must be unique withinthe system database directory. When a newdatabase is created, the alias defaults to thedatabase name. As a result, you cannotcreate a database using a name that exists asa database alias, even if there is no databasewith that name.
Database and database alias names can haveup to eight characters.
Be mindful that the special characters @, #,and $ are not common to all keyboards andshould be avoided when creating a databasename.
80 IBM Maximo Asset Management: Installation Guide (Oracle WebLogic Server)

Table 6. Middleware object naming conventions (continued)
Naming Convention Details
IBM Tivoli Directory Server conventions forusers, groups, databases and instances
Values should not be longer than eightcharacters.
Values cannot be any of the following:USERS, ADMINS, GUESTS, PUBLIC,LOCAL, or idsldap
Values cannot begin with IBM, SQL, or SYS.
Values should not include accentedcharacters.
Values can include characters A through Z, athrough z, and 0 through 9.
Values must begin with characters Athrough Z or a through z.
Double-byte characters cannot be used inadministrator passwords values.
Passwords may not contain the followingspecial characters: ` ' \ " |
The middleware installation program The middleware installation program doesnot validate that your password is compliantwith the operating system of the target host,so ensure the password values you provideare valid for your environment.
The middleware installation program doesnot allow the use of the '%' character onWindows and the use of the !, $, #, %characters on UNIX.
The middleware installation program doesnot check for accented characters in username values. The use of accented characterscan cause errors.
Configuring an existing DB2 with the middleware installationprogram
An existing DB2 server can be configured using the middleware installationprogram.
Before you begin
If you plan to configure an existing DB2 server with the middleware installationprogram, a set of users and groups must exist. These users and groups are used bythe middleware installation program during configuration.
Default values for users and groups include:
Users
v db2adminv dasusr1 (UNIX)
Chapter 5. Deploying automatically reusing existing middleware (Scenario 2) 81

v db2fenc1 (UNIX)
Groups
v db2admns (Windows)v dasadm1 (UNIX)v dbgrp1 (UNIX)v db2fgrp1 (UNIX)
These values are default user and group values. These values can be customized ifthe values provided to the middleware installation program match the valuesfound on the system. Again, if these users do not exist on the system, you mustcreate them before running the installation program.
About this task
If you have an existing DB2 installation that you would like to reuse for MaximoAsset Management, you can run the middleware installation program on thesystem to configure it. The middleware installation program identifies instances ofmiddleware that exist on the system that are compatible with Maximo AssetManagement, and it configures the existing instance for use with Maximo AssetManagement.
To have the middleware installation program configure an existing DB instance forreuse with Maximo Asset Management, complete the following steps:
Procedure1. Log in as a user with administrative authority.2. Start the middleware installation program from the launchpad.3. Complete the middleware installation program panels until you reach the
Deployment Choices panel.4. From the Deployment Choices panel, select Database Server, and then click
Next. The middleware installation program displays any instances of DB2found on the system.
5. From the Installation menu, select the appropriate instance to reuse, and thenclick Next.
6. Complete the remainder of the middleware installation program panels.“Installing and configuring middleware using the middleware installationprogram” on page 34This procedure explains how to use the middleware installation program tocreate a deployment plan that is responsible for installing and configuringprerequisite middleware products.
Verifying an existing IBM Tivoli Directory Server using themiddleware installer
If you have an existing IBM Tivoli Directory Server installation that you would liketo reuse for Maximo Asset Management, you can verify that it works with MaximoAsset Management using the middleware installer.
About this task
The middleware installer validates the following items:v The version of IBM Tivoli Directory Server is compatible with Maximo Asset
Management.
82 IBM Maximo Asset Management: Installation Guide (Oracle WebLogic Server)

v The IBM Tivoli Directory Server is running.v The Base DN information that you supply in the middleware installer panels are
present in the IBM Tivoli Directory Server you are using.The middleware installer does not create an instance of IBM Tivoli DirectoryServer for use with Maximo Asset Management. If you want to reuse an existinginstance of IBM Tivoli Directory Server, supply the correct AdministratorDistinguished Name and password, LDAP BASE DN, directory server port, andthe administration port information for that instance on the middleware installerpanels when prompted. If you intend to host a new instance on your existingIBM Tivoli Directory Server, you must create it before running the middlewareinstaller.
Note: While you can technically share a DB2 instance between Maximo AssetManagement and the one required by IBM Tivoli Directory Server, it is not arecommended practice. During the installation, the database instance is restarted,which could disrupt the availability of IBM Tivoli Directory Server in yourenterprise. If you are using the automated installers, separate instances arecreated for use by Maximo Asset Management and IBM Tivoli Directory Server.
To have the middleware installer verify an existing instance of IBM Tivoli DirectoryServer for reuse with Maximo Asset Management, complete the following steps.
Procedure1. Log in to the system as a user with administrative authority.2. Start the middleware installer from the product launchpad.3. Navigate the middleware installer panels up to the point where you reach the
deployment choices panel.4. In the deployment choices panel, select Directory Server, and then click Next.
The middleware installer displays any instances of IBM Tivoli Directory Serverdiscovered on the system.
5. In the Installation menu, select the appropriate instance to reuse, and then clickNext.
6. Complete the installation by navigating the rest of the middleware installerpanels.“Manually configuring the directory server” on page 121These topics provide details on manually configuring a directory server for useby Maximo Asset Management“Installing and configuring middleware using the middleware installationprogram” on page 34This procedure explains how to use the middleware installation program tocreate a deployment plan that is responsible for installing and configuringprerequisite middleware products.
Preparing Microsoft Active Directory for reuseThe middleware installation program can be used to validate Microsoft ActiveDirectory configuration information.
Before you begin
Before running the installation program, manually create the users. You canperform this task after you run the middleware installation program, but you mustcomplete it before you run the Maximo Asset Management installation program.
Chapter 5. Deploying automatically reusing existing middleware (Scenario 2) 83

About this task
The middleware installation program prompts you for LDAP configurationparameters.
To validate Microsoft Active Directory configuration information using themiddleware installation program use, complete the following steps:
Procedure1. Log in as a user with administrative authority.2. Start the middleware installation program from the launchpad.3. Proceed through the middleware installation program panels until you reach
the Deployment Choices panel.4. From the Deployment Choices panel, clear the Directory Server deployment
option, and then click Next. In the next panel, you are given the choice ofselecting an existing instance of IBM Tivoli Directory Server or MicrosoftActive Directory.
5. In the Deployment Plan Summary window, click Next to configureparameters. The deployment plan is generated and you are provided detailsabout the plan.
6. In the Configurable Host Name panel, you can manually specify the hostname of the system you are running the installation from. Select the Overridethe local machine hostname option and enter a host name value in theHostname field. Select this option only if you want to manually specify thehost name of the system instead of having the installation programprogrammatically detect it. This option is useful when there is more than onehost name assigned to the system. This configuration occurs when a systemhas more than one network interface, or it is configured to support virtual IPaddresses. When this option is selected, you are required to provide aresolvable host name. You cannot clear this option after it has been selected.However, you can still change the value of the Hostname field. If you startedthe middleware installation program from the command line using theforceHostname=true parameter, then you are required to provide analphanumeric value in the Hostname field. Use of an IP address causes errormessage. When this option has been selected, you are not able to clearit. However, you can change the value you enter in the Hostname field.
7. In the password reuse panel, you can optionally select Use this password asthe value for all subsequent passwords. This option allows you to use thesame password as the default user password value in all panels of themiddleware installation program. If you do not want to use this option, ignorethe Use this password as the value for all subsequent passwords option, andclick Next.
8. Select Secure with Microsoft Active Directory, and click Next.9. Configure the following values for security, and then click Next.
LDAP Host nameEnter the fully qualified name of the server hosting Microsoft ActiveDirectory.
LDAP base entryEnter the LDAP base entry of the instance. For example,DC=ism75,DC=com
84 IBM Maximo Asset Management: Installation Guide (Oracle WebLogic Server)

User suffixEnter the user suffix for the instance. For example,OU=Users,OU=SWG,DC=ism75,DC=com
Group suffixEnter the group suffix for the instance. For example,OU=Groups,OU=SWG,DC=ism75,DC=com
Organization container suffixEnter the organization container suffix for the instance. For example,DC=ism75,DC=com
In this example. ism75 is the domain name. You must replace ism75with the name of your own domain.
10. Supply the following configuration values for security, and then click Next.
Bind distinguished nameEnter the bind distinguished name for the instance. For example,CN=Administrator,CN=Users,DC=ism75,DC=com
This value assumes that the Administrator user is already a memberof the ism75 domain. You must replace ism75 with the name of yourown domain.
Bind passwordEnter the password for the Administrator user on the system hostingMicrosoft Active Directory.
11. Finish the installation by completing the remainder of the middlewareinstallation program panels.
“Installing and configuring middleware using the middleware installationprogram” on page 34This procedure explains how to use the middleware installation program tocreate a deployment plan that is responsible for installing and configuringprerequisite middleware products.“Manually configuring Microsoft Active Directory” on page 126You can manually configure Microsoft Active Directory for use with MaximoAsset Management.
Manually configuring WebLogic ServerWebLogic Server can be used with Maximo Asset Management if it is manuallyconfigured.
About this task
You can use a WebLogic Server as your J2EE server. The Maximo AssetManagement installation process prepares EAR files on the Maximo AssetManagement administrative workstation. These files are then manually deployedto your WebLogic Server. The Maximo Asset Management installation programdoes not automatically configure a WebLogic Server environment It does not installor otherwise deploy Maximo Asset Management applications into a WebLogicServer server.
Manually configuring WebLogic Server consists of the following tasks:
Chapter 5. Deploying automatically reusing existing middleware (Scenario 2) 85

Procedure1. “Creating the MAXIMOSERVER domain” on page 542. “Configuring JMS options for integration framework” on page 553. “Configuring JMS for the email listener in WebLogic Server” on page 56
Creating the MAXIMOSERVER domainThis section details how to create the MAXIMOSERVER domain within WebLogicServer.
About this task
To create the MAXIMOSERVER domain within WebLogic Server, complete thefollowing steps:
Procedure1. Launch the Configuration wizard tool.
v For Windows systems, select Start > Programs > BEA Products > Tools >Configuration Wizard.
v For UNIX systems, launch the Configuration wizard using the config.shcommand located in <WebLogic_Home>/weblogic10/common/bin.
2. From the welcome panel, select Create a new WebLogic Server domain, andthen click Next.
3. From the Select a Domain Source panel, select Generate a domain configuredautomatically to support the following products, and then click Next.
4. From the Specify Domain Name and Location panel, name the domainMAXIMOSERVER, and then click Next
5. From the Configure Administrator Username and Password panel, enter anadministrator user ID and password, and then click Next.
6. From the Configure Server Start Mode and JDK panel, enter the followinginformation, and then click Next.
WebLogic Server Domain Startup ModeSelect Production.
Selecting this option requires that you provide a user ID and passwordin order to deploy applications.
JDK SelectionSelect a JDK with a version number 1.6.0 or greater from the suppliedJDKs.
7. Proceed through the next few panels until you reach the CustomizeEnvironment and Services Settings panel. From the Customize Environmentand Services Settings panel, select the default option No, and then click Next.
8. From the Create WebLogic Server Domain panel, change the Domain Namevalue to MaximoServer, and then click Create to create the domain.
9. Once the domain has been created, ensure that the Start Admin Server optionis cleared, and then click Done to close the Configuration wizard. On UNIXsystems, this option is not displayed.
Configuring JMS options for integration frameworkThis procedure provides details on steps to configure JMS queues.
86 IBM Maximo Asset Management: Installation Guide (Oracle WebLogic Server)

Before you begin
You need to be familiar with the Oracle WebLogic Server Administration Consoleto complete the following procedure. See your Oracle WebLogic Serverdocumentation on how to navigate through the Oracle WebLogic ServerAdministration Console.
Procedure1. Launch Internet Explorer and open the MAXIMOSERVER Administration Console
by typing the following URL:http://host_name:7001/console
2. Sign in by entering your user ID and password.3. Create three persistent file stores with the following configuration parameters:
Option Description
File Store Name sqinstore, sqoutstore, cqinstore
File Store Target MAXIMOSERVER
File Store Directory C:\WebLogic, or another directory of your choice
File stores have better performance in general. However, you can choose tocreate database-based stores. To choose between file stores and database-basedstores, consult your Oracle WebLogic Server documentation.
4. Create three JMS servers with the following configuration parameters:
Option Description
Properties Name sqinserver, sqoutserver, cqinserver
Server Target MAXIMOSERVER
Bytes Maximum 20% or below of the allotted JVM heap size
It is recommended that you configure the Bytes Maximum for the JMS serversto a value of 20% or below of the allotted JVM heap size to prevent the OracleWebLogic Server from running out of memory.
5. Create a JMS system module named intjmsmodule with MAXIMOSERVER asthe target server.
6. Add a connection factory resource to the JMS module:
Option Description
Name intjmsconfact
JNDI Name jms/maximo/int/cf/intcf
Target MAXIMOSERVER
7. Add three queue resources to the JMS Module:a. Create the queue resource type.b. Create a new subdeployment with the same name as the queue.c. Assign the subdeployment_nameserver server target to the subdeployment.
Option Description
Queue 1 Name: sqin JNDI Name: jms/maximo/int/queues/sqin
Queue 2 Name: sqout JNDI Name: jms/maximo/int/queues/sqout
Queue 3 Name: cqin JNDI Name: jms/maximo/int/queues/cqin
Template None
Chapter 5. Deploying automatically reusing existing middleware (Scenario 2) 87

8. Enable the JMS connection factory for integration framework:a. Select the intjmsconfact link.b. From the Transactions tab, check the XA Connection Factory Enabled
check box.c. Set the Maximum Messages per Session to -1.
9. Save and activate the changes.
What to do next
You need to stop and restart the MAXIMOSERVER application server for the update totake effect.
Configuring JMS for the email listener in WebLogic Server
About this task
You use the email listeners application to receive and process requests throughemail in the form of email messages.
To configure JMS queues for the WebLogic Server, complete the following steps:
Procedure1. Log in to the WebLogic Server administration console.2. Create a persistent store.
a. In the Domain Structure panel, expand Services and then click PersistentStores.
b. Click New and select the option to create a file store.c. Enter lsnrstore for the name of the file store and c:\wls10 as the directory,
and then click Finish.3. Create a JMS Server
a. In the Domain Structure panel, under Services > Messaging , click JMSServers, enter the following information, and then click Next.
Name Enter a name for a new JMS server, for example, lsnrserver.
Persistent StoreSelect lsnrstore.
b. For the Target, select AdminServer, and then click Finish.4. Create a JMS System Module
a. In the Domain Structure panel, under Services > Messaging , click JMSModules, and then click New.
b. Enter a value for the Name field, such as lsnrjmsmodule, and then clickNext.
c. Select the option for AdminServer, and then click Next.d. Select the option for Would you like to add resources to the JMS system
module?, and then click Finish.5. Add a connection factory to the JMS module.
a. From the Summary of Resources table of the lsnrjmsmodule module, clickNew to add a resource.
b. Select the Connection Factory option, and then click Next.
88 IBM Maximo Asset Management: Installation Guide (Oracle WebLogic Server)

c. From the Connection Factory Properties panel, enter the followinginformation, and then click Next.
Name Enter a name for the new connection factory. For example,lsnrconnfact.
JNDI NameEnter jms/mro/lsnr/lsnrcf.
d. Ensure AdminServer is selected, and then click Finish
6. Add a queue to the JMS module.a. From the Summary of Resources table of the lsnrjmsmodule module, click
New to add a resource.b. Select the Queue option, and then click Next.c. From the JMS Destination Properties panel, enter the following information,
and then click Next.
Name Enter a name for the new queue. For example, lsnrqueue.
JNDI NameEnter jms/mro/lsnr/qin.
TemplateNo template is necessary.
d. Click Create a new Subdeployment, select lsnrserver, and then clickFinish.
7. Set the XA option for the connection factory.a. Select lsnrconnfact, and then select the Transactions tab.b. Ensure that the XA Connection Factory Enabled option is selected, and then
click Save.8. Click Activate Changes to save and activate all changes.9. To enable an email listener to use JMS queues, a Message Driven Bean is
configured through a deployment descriptor file that is part of the installation.You configure the Message Driven Bean by removing comment lines fromsections within the deployment descriptor files. Edit the ejb-jar.xml andweblogic-ejb-jar.xml files.a. Open the install_dir\applications\maximo\mboejb\ejbmodule\META-INF\
ejb-jar.xml file in an editor, uncomment the following sections, and thensave the file:Email Listener JMS is not deployed by default<message-driven id="MessageDriven_LSNRMessageBean"><ejb-name>LSNRMessageBean</ejb-name>ejb-class>psdi.common.emailstner.LSNRMessageBean</ejb-class>transaction-type>Container</transaction-type><message-destination-type>javax.jms.Queue</messagedestination-type></message-driven>
Email Listener JMS is not deployed by default<container-transaction><method><ejb-name>LSNRMessageBean</ejb-name><method-name>*</method-name></method><trans-attribute>Required</trans-attribute></container-transaction>
b. Open the c:\ibm\smp\maximo\applications\maximo\mboejb\ejbmodule\META-INF\weblogic-ejb-jar.xml file in an editor, uncomment the followingsection, and then save the file:
Chapter 5. Deploying automatically reusing existing middleware (Scenario 2) 89

Email Listener JMS is not deployed by default<weblogic-enterprise-bean><ejb-name>LSNRMessageBean</ejb-name><message-driven-descriptor><destination-jndi-name>jms/mro/lsnr/qin</destination-jndiname><connection-factory-jndi-name>jms/mro/lsnr/lsnrcf</connection-factory-jndi-name></message-driven-descriptor><transaction-descriptor><trans-timeout-seconds>600</trans-timeout-seconds></transaction-descriptor><jndi-name>LSNRMessageBean</jndi-name></weblogic-enterprise-bean>
Installation program overviewThe Maximo Asset Management installation program provides an interface forinstalling and deploying Maximo Asset Management, which includes the processautomation engine and process managers.
The Maximo Asset Management installation program records choices you makeabout your Maximo Asset Management deployment and configuration parametersassociated with those choices, and then installs and deploys Maximo AssetManagement based upon the information you entered.
There are two installation paths available to you when installing Maximo AssetManagement.
SimpleA simple deployment consists of installing Maximo Asset Managementmiddleware on one system. You do not have the option of using existingmiddleware within your organization with Maximo AssetManagement. All middleware used with Maximo Asset Management musthave been installed on the system using the middleware installationprogram using default values. Maximo Asset Management is installedusing default values provided by the middleware installation program andMaximo Asset Management installation program.
If you intend to override default values used by the simple deploymentpath, you must use the custom deployment path instead.
If you are deploying using Oracle WebLogic Server, you cannot choose thisoption.
CustomA custom deployment typically involves deploying Maximo AssetManagement across several systems, some of which might already hostmiddleware products that you want to use with your Maximo AssetManagement deployment. Deploying using the custom installation pathalso allows you to modify default installation values.
This deployment option does not require you to spread the Maximo AssetManagement deployment across several systems. You can enter the nameof the local host as the destination for all Maximo Asset Managementcomponents that are installed using the middleware installation programand the Maximo Asset Management installation program.
If you are deploying using Oracle WebLogic Server, you must choose thisoption.
90 IBM Maximo Asset Management: Installation Guide (Oracle WebLogic Server)

The Maximo Asset Management installation program can automate theconfiguration of some middleware for use with Maximo Asset Management. Itcannot automate the configuration of Oracle WebLogic Server. If you choose not tohave the Maximo Asset Management installation program automatically configuremiddleware, you must configure that piece of middleware manually before theinstallation of Maximo Asset Management.
Important: When entering LDAP values for Maximo Asset Managementinstallation panel fields, entries in LDIF files, or values you enter directly into adirectory instance using the directory server tools, be aware of the product-specificsyntax rules for using special characters in an LDAP string. In most cases, specialcharacters must be preceded by an escape character in order to make it readable bythe directory server. Failing to escape special characters contained in an LDAPstring used with Maximo Asset Management results in Maximo Asset Managementerrors.
Many directory server products consider a blank space as a special character that ispart of the LDAP string. If you mistakenly enter an LDAP string that contains ablank, at the end of a field value, for example, and you do not precede the blankcharacter with an escape character, you encounter Maximo Asset Managementerrors that are difficult to troubleshoot.
See the product documentation for your directory server for more informationabout special characters in LDAP strings.
Information that you enter into the Maximo Asset Management installationprogram is stored in the maximo.properties and install.properties files and theMaximo database. These values are populated into the panel fields of the MaximoAsset Management installation program on subsequent uses of the program. If youcancel the installation program after entering values across several installationpanels, the installation program recalls most values the next time you start theMaximo Asset Management installation program. Values excluded from beingsaved in this manner are the Maximo Asset Management installation directory andthe shortcut option chosen during the installation. You can restore the defaultvalues in the Maximo Asset Management installation program by deleting<Maximo_Home>/applications/maximo/properties/maximo.properties and<Maximo_Home>/etc/install.properties. If you cannot locate themaximo.properties file in the <Maximo_Home> directory, look for it in the systemtemp file directory.
Running the installation programInstall Maximo Asset Management and automatically configure middleware onmultiple servers, using default values.
Before you begin
The instructions provided are for a multiple server installation using default values.If any errors are encountered, a dialog box detailing the error appears. You cannotcontinue the installation until the errors are resolved.
Ensure that you have addressed the following prerequisite conditions:v You have already manually configured Oracle WebLogic Server.v Ensure that all middleware servers and services are started and active.
Chapter 5. Deploying automatically reusing existing middleware (Scenario 2) 91

v On the administrative workstation, temporarily shut down any non-criticalprocesses that can have a negative effect on the installation, such as anti-virussoftware.
v Ensure that the Windows DEP setting does not prevent the launchpad fromrunning, by selecting Start > Settings > Control Panel > System > Advanced >Performance > Settings > Data Execution Prevention. Select Turn on DEP foressential Windows programs and services only and click Apply. You may beasked to reboot the server.
v For Linux and UNIX systems with middleware installed, the command hostname-f must return a fully qualified host name. If necessary, consult thedocumentation for your operating system.Alternatively, you can provide the IP address for the system.
v When you are installing the product, enter the fully qualified host name of thesystem for all host name values. Alternatively, you can provide the IP addressfor the system.
v Enable a remote execution and access service on every system with middlewareinstalled. Each remote system must support a remote access protocol and acceptremote logins from a user name and password configured on the target server.Remote access protocols include SSH and Windows SMB. If the remote system isa Windows server, you must configure remote execution and access to use SMB.
v Perform the following tasks to prepare the DB2 database:– If DB2 is installed on a Linux or UNIX system, you must create the instance
user and the home directory for the user on the DB2 server.– The database instance owner home directory must have 8 GB of space
available regardless of whether a database is installed in that location.– The user ID for the DB2 instance administrator must have SYSADM
(administration) authority. You enter this user ID on the DB2 Administrationscreen and on the Remote Access Authorization screen of the Maximo AssetManagement installation program. See the DB2 product documentation forinformation about creating a user with SYSADM (administration) authority onthe DB2 server. You must add root to a group with SYSADM authority forUNIX systems.
– If you are plan to install Maximo Asset Management in a language other thanEnglish, you must accept the default values for database table space size andindex table space size and these values are displayed as null during theinstallation. If you want to customize the table space sizes, you have threeoptions. Run the Maximo Asset Management installation program in English,manually configure the database, or modify the table space sizes afterinstallation.
v Database users and database instance names for DB2 and Oracle cannot containspaces.
v Avoid using an installation path that includes non-English characters.v You can create a maxdemo database during the installation of Maximo Asset
Management and populate the database with sample data. Refer to Create amaxdemo database during installation for more information.
Procedure1. Log in on the administrative system.2. Ensure the database server, directory server, and application server services
are running.3. Start the Maximo Asset Management installation program from the launchpad.
92 IBM Maximo Asset Management: Installation Guide (Oracle WebLogic Server)

a. Start the launchpad. Browse to the root directory of the downloadedinstallation image, and run the following command:
Windowslaunchpad.exe
b. In the launchpad navigation pane, click Install.c. Click Install Maximo Asset Management 7.5.Alternatively, you can start the Maximo Asset Management installationprogram directly. On the downloaded installation image, browse to\Install\mam\, and run the following command
Windows
v install.exe
v install_win64.exe
4. Select a language for the installation and click OK.5. In the Introduction panel, click Next.6. In the Choose Installation folder panel, enter the path to install Maximo Asset
Management. By default, this value is C:\IBM\SMP for Windows systems. Thepath you enter must not contain spaces.Click Edit description and enter a description for the current installation. Thisdescription is useful for differentiating between multiple installations hostedon the same administrative workstation.
7. Review the information presented in the Verify installation location panel, andthen click Next. The Verify installation location panel reports previousinstallation information, if any, that was found based upon the installationdirectory you chose in the previous panel. Once you advance past this panel,you cannot go back and change the installation directory for this installation.
8. In the Package Summary panel, review the package deployment actions, andthen click Next. This panel lists version information for both new and existingpackages on the system. Target package version information indicates thepackage version being currently deployed. In certain upgrade scenarios, aquestion mark can be displayed alongside a package listed. This symbolserves as a reminder that there might be an updated version of this packageavailable. It does not indicate a failure of the installer.
9. In the software license agreement panel, read the license information andselect I accept both the IBM and the non-IBM terms. if you agree with theterms, and then click Next.
10. In the Choose Deployment panel, select the Custom deployment topology,and then click Next.
SimpleA simple installation deploys all Maximo Asset Managementcomponents on a single system. This deployment option is typicallyused for demonstration, proof-of-concept, or training purposes only.
CustomA custom installation can deploy Maximo Asset Managementcomponents across several systems, and can reuse existingmiddleware components. This deployment option is typically used ina production environment.
11. In the Import Middleware Configuration Information panel, indicate that youwant to use the field values that you used with the middleware installationprogram. These values are used as default values for those same fields in theMaximo Asset Management installation program. Click Next.
Chapter 5. Deploying automatically reusing existing middleware (Scenario 2) 93

Import middleware configuration informationSelect this check box to allow the Maximo Asset Managementinstallation program to reuse values specified in the middlewareinstallation program.
If you select the Simple deployment path, the middleware defaultinformation is not used.
Host nameEnter the host name of the system where the middleware installationprogram was run.
User IDEnter the user ID that was used to run the middleware installationprogram.
PasswordEnter the password of the user ID that was used to run themiddleware installation program.
Workspace locationEnter the location of the topology file that contains the values enteredfor the middleware installation program. This file is found in theworkspace that was defined during the middleware installation task.For example, C:\ibm\tivoli\mwi\workspace for Windows and/root/ibm/tivoli/mwi/workspace for UNIX.
12. In the Database Type panel, select the software to use for the Maximodatabase, and then click Next.
DB2 Select this choice to use DB2 as the Maximo database.
Select the Disable non-English-language support option to preventthe process automation engine from deploying languages other thanEnglish when the database type is DB2. This option enhances databaseperformance, but excludes non-English-language support for thedeployment. If you select this option, you cannot deploy additionallanguages at a later time.
Oracle Select this choice to use Oracle as the Maximo database.
Microsoft SQL ServerSelect this choice to use Microsoft SQL Server as the Maximodatabase.
Each database has its own unique set of configurable parameters and values.13. In the Database panel, enter configuration information about the database,
and then click Next.
DB2
Host nameEnter the fully qualified host name of the server hosting DB2.
Alternatively, you can provide the IP address for the system.
Port Enter the port being used by the DB2 instance.
The default is 50005.
Database nameEnter the name of the database to use with Maximo.
The default database name is maxdb75. The database iscreated if it does not exist.
94 IBM Maximo Asset Management: Installation Guide (Oracle WebLogic Server)

InstanceEnter the name of the database instance to be used withMaximo.
The default instance name is ctginst1. This instance is createdif it does not exist, however, the user and its associated homedirectory must exist on the DB2 server.
Schema nameEnter the schema name for the database.
The name of the DB2 database schema. This value can be thesame value as the owner of the table spaces defined or adifferent value. For example, maximo.
Database user IDEnter the user ID used for the product to access DB2.
Default for all platforms is maximo.
This user ID is created if it does not exist.
This user ID cannot be the same one used as the instanceadministrator user ID.
Database passwordEnter the password for the user ID used to access DB2.
Oracle
Host nameEnter the host name of the server hosting Oracle.
The host name must be fully qualified.
Port Enter the port being used by Oracle.
The default is 1521.
InstanceEnter the name of the database instance to be used withMaximo.
The default instance name is ctginst1. The instance name islimited to eight characters.
Database user IDEnter the user ID used for Maximo to access Oracle.
Default for all platforms is maximo.
This user ID is created if it does not exist.
Database passwordEnter the password for the user ID used to access Oracle.
Microsoft SQL Server
Host nameEnter the host name of the server hosting Microsoft SQLServer.
The host name must be fully qualified.
Port Enter the port being used by Microsoft SQL Server.
The default is 1433.
Chapter 5. Deploying automatically reusing existing middleware (Scenario 2) 95

Database nameEnter the name of the database to use with Maximo.
The default database name is maxdb75.
Database user IDEnter the user ID used to access Microsoft SQL Server.
Default for all platforms is maximo.
This user ID is created if it does not exist.
Database passwordEnter the password for the user ID used to access MicrosoftSQL Server.
After you have specified configuration information for the database that wasselected, the Maximo Asset Management installation program connects to thedatabase server to validate the information you have specified.
14. In the Automate Database Configuration panel, select Automate databasecreation and configuration, and then click Next.This option allows the Maximo Asset Management installation program toautomatically configure the database for use by Maximo Asset Management.Examples of automated tasks include creating table spaces, creating databasetables, creating database schemas, creating users, and other tasks.
15. In the Remote Access Authorization panel, enter authorization information forthe automatic database configuration feature, and then click Next.
User IDEnter a valid user ID that allows the Maximo Asset Managementinstallation program to access the system that is hosting the databaseto be used with Maximo Asset Management.
This user ID must have administrative rights on the server you areaccessing.
For Windows OS, this user must be a member of the DB2ADMNSgroup.
For Linux or UNIX, this user must be root and a member of a groupwith SYSADM authority for the database instance.
PasswordEnter the password for the user ID.
See the Remote configuration enablement topic in the Preparing to installMaximo Asset Management information for configuring remote accessinstructions.
16. In the Database Administration panel, enter configuration information aboutthe database, and then click Next.
DB2
Installation directoryEnter the directory where DB2 is installed.
WindowsOn Windows, this value might be C:\ProgramFiles\IBM\SQLLIB
Linux or UNIXOn Linux or UNIX, this value might be/opt/IBM/db2/V9.7
96 IBM Maximo Asset Management: Installation Guide (Oracle WebLogic Server)

Instance administrator user IDEnter the user ID for the administrator of the DB2 instance.
WindowsOn Windows, this value might be Sys.
Linux or UNIXOn Linux or UNIX, this value might be ctginst1.
This user ID cannot be the same one as is as the database userID.
Instance administrator passwordEnter the password for the user ID of the administrator fortheDB2 instance.
Windows service user IDEnter the user ID used to start the DB2 service on Windows.
The default is db2admin. This user ID must haveadministrative authority on the system.
Windows service passwordEnter the password for the user ID used to start the DB2service on Windows.
Oracle
Installation directoryEnter the directory where Oracle is installed.
WindowsOn Windows, this value might beC:\oracle\product\10.2.0\db_1
Linux or UNIXOn Linux or UNIX, this value might be/opt/app/oracle/product/10.2.0/db_1
Administrator user IDEnter the user ID of the administrator for Oracle.
For all platforms, the default is Sys.
Administrator PasswordEnter the password for the user ID of the administrator forOracle.
Oracle Software Owner IDEnter the user ID of the user that was used to install Oracle.
For all platforms, the default is oracle.
Oracle Software Owner PasswordEnter the password for the user ID of the user that was usedto install Oracle.
Microsoft SQL Server
SQL Server administratorEnter the user ID for the administrator of the Microsoft SQLServer.
Default is sa.
Chapter 5. Deploying automatically reusing existing middleware (Scenario 2) 97

SQL Server administrator passwordEnter the password for the user ID of the administrator for theMicrosoft SQL Server.
Data file nameEnter the name of the Microsoft SQL Server data file.
Default value is maxdb75_dat.
Data file initial sizeSelect the initial size of the Microsoft SQL Server data file.
Default is set to Medium (1000 Mb).
Log file nameEnter the name for the Microsoft SQL Server log file.
Default is maxdb75_log.17. In the Database Tablespace panel, enter information about the table space of
the database, and then click Next.
DB2
Data tablespace nameEnter the name of the table space that is created in DB2 forMaximo.
For all platforms, the default is MAXDATA.
If the table space does not exist, it is created.
Data tablespace sizeEnter a size, in megabytes, for the data table space.
Temporary tablespace nameEnter the name for the temporary table space to be created forDB2.
Temporary table spaces hold data during sorting or collatingactions.
For all platforms, the default is MAXTEMP.
If the table space does not exist, it is created.
Temporary tablespace size (Mb)Enter a size for the temporary table space. The default value is1000 Mb.
Index tablespace nameEnter a name for the index table space.
For all platforms, the default is MAXDATA.
Index tablespace sizeEnter a size, in megabytes, for the index table space.
Oracle
Instance base directoryEnter a path for the database instance.
WindowsOn Windows, this value might beC:\oracle\product\10.2.0\db_1\dbs
98 IBM Maximo Asset Management: Installation Guide (Oracle WebLogic Server)

Linux or UNIXOn Linux or UNIX, this value might be/opt/app/oracle/product/10.2.0/db_1
Data table space nameEnter the name of the table space to be created in Oracle forthe product..
For all platforms, the default is maxdata.
Data table space size (Mb)Enter a size, in megabytes, for the data table space. Thedefault value is 1000 Mb.
Temporary table space nameEnter the name for the temporary table space to be created forOracle.
Temporary table spaces hold data during sorting or collatingactions.
For all platforms, the default is MAXTEMP.
Temporary table space size (Mb)Enter a size for the temporary table space. The default value is100 Mb.
Index table space nameEnter a name for the index table space.
For all platforms, the default is MAXDATA.
Index table space sizeEnter a size, in megabytes, for the index table space. Thedefault value is 500 Mb.
The Maximo Asset Management installation program now connects to thedatabase server and validates the information you specified.
18. Once the database validation task has completed, in the Application ServerType panel, select Oracle WebLogic Server for the Maximo Asset Managementdeployment, and then click Next.
Oracle WebLogic ServerSelect this option to configure WebLogic Server as the J2EE server touse with Maximo Asset Management.
If you select WebLogic Server, you do not have the option ofconfiguring it automatically through the Maximo Asset Managementinstallation program. You must manually configure WebLogic Serverand manually deploy application files.
19. In the Enter Maximo users panel, enter the following information, and thenclick Next.
Maximo administration userProduct administrator user ID used for initial configuration andadding users. Default value is maxadmin.
PasswordPassword for the Maximo administration user.
Maximo system registration userUser ID used for the self registration of users. Default value is maxreg.
Chapter 5. Deploying automatically reusing existing middleware (Scenario 2) 99

PasswordPassword for the Maximo system registration user.
Maximo system integration userUser ID used with enterprise adapters. Default value is mxintadm.
PasswordPassword for the Maximo system integration user.
Custom Maximo user ID and password values are stored in the Maximodatabase. The default Maximo user IDs of maxadmin, maxreg, and maxintadmare also created as users in the Maximo database. Creation of the default userIDs is done for internal processing purposes. If you use Maximo security forauthentication and authorization, the default user IDs can be used to log in tothe application. If you view this condition as a security risk, you can modifythe passwords for these default user IDs. Passwords for these user IDs can bemodified through the Users application.
20. In the SMTP Configuration panel, enter SMTP configuration information usedby workflows to communicate with workflow participants, and then clickNext.
SMTP serverEnter the fully qualified host name of the SMTP server that sendsmessages to participants.
Alternatively, you can provide the IP address for the system.
Administrator emailEnter a valid email address. This address is to send messages.
You can defer SMTP configuration at this time by not providing anyinformation for this panel and clicking through to the next panel. However,you must configure these parameters through the product interface as a postinstallation task.
21. From the Base-language selection panel, select a language from the list andthen click Next.
22. From the Additional language selection panel, you can optionally select one ormore languages from the list and then click Next.
23. From the Run Configuration Step panel, decide how you would like toperform the configuration step of the installation, and then click Next. If youdo not select any options, when you click Next, the configuration stepproceeds. You can optionally create a maxdemo database from the RunConfiguration Step panel. Refer to Create a maxdemo database duringinstallation for more information.
Copy files now, but perform the installation configuration step later.Select this option if you would like to copy files from the installationsource to the administrative workstation. You must perform theconfiguration step at a later time to complete the deployment. It isimportant that you not install another product before completing theconfiguration step of the original installation. Installing anotherproduct before running the configuration step for this installationoverwrites the taskstore, which prevents the original installation fromever being deployed.
The configuration values that you enter are stored in theinstall_home\maximo\applications\maximo\properties\maximo.properties and install_home\etc\install.properties files.
100 IBM Maximo Asset Management: Installation Guide (Oracle WebLogic Server)

You run the configuration steps outside of the Maximo AssetManagement installation program by using the taskrunner utility, inthe install_home\scripts directory. Run the taskrunner utility fromthe command line, and it uses the configuration values stored in themaximo.properties and install.properties files to configure MaximoAsset Management.install_home\scripts\taskrunner [CONTINUE <STOPONERROR|NOSTOPONERROR>]
If you run taskrunner with the NOSTOPONERROR parameter, thetaskrunner continues despite errors. . If you run taskrunner with theSTOPONERROR parameter, the taskrunner stops when it encounters anerror. If you used STOPONERROR you can rectify the conditions thatcaused the error, and then resume the installation at the point wherethe last successfully completed task was recorded in the previousattempt by starting taskrunner with the CONTINUE parameter.
Defer the Update of the Maximo database.Select this option if you would like to manually run the databaseupdate task for the product deployment. You must manually run theupdatedb command to write data to the Maximo database in order tocomplete the deployment. The installation program is limited tocopying files to the administrative system and registering productprocess solution packages. This option can be used in cases wherethere is a fix pack available that addresses known issues with theupdatedb script. In this scenario, you choose the Defer the update ofthe Maximo database option, apply the fix pack, and then run theupdatedb -v1 command manually.
24. In the Choose Shortcut Folder panel, select the type of shortcut you wouldlike to arrange for Maximo Asset Management, and then click Next.
In a new Program GroupSelect this option and enter the name of a new program group if youwould like to create Maximo Asset Management shortcuts in a newprogram group.
In an existing Program GroupSelect this option and choose the name of an existing program groupto store Maximo Asset Management shortcuts.
In the Start MenuSelect this option to create shortcuts for Maximo Asset Management inthe Start menu.
In order to use the Start menu shortcut with Internet Explorer, add theMaximo Asset Management URL to the trusted sites web content zoneand disable the option of requiring server verification for all sites inthe zone.
On the DesktopSelect this option to create shortcuts for Maximo Asset Managementon the desktop.
In the Quick Launch BarThis option must not be used. Do not select this option. Selecting thisoption does not create a shortcut in the Quick Launch bar.
Other Select this option and use Choose... to select another location to createMaximo Asset Management shortcuts.
Chapter 5. Deploying automatically reusing existing middleware (Scenario 2) 101

Don't create iconsSelect this option if you do not want any Maximo Asset Managementshortcuts created.
Create Icons for All UsersSelect this option if you would like Maximo Asset Managementdesktop icons to appear on the desktop for all system users.
25. In the Input Summary panel, review the information you have provided to theMaximo Asset Management installation program, and then click Next.Use Previous to return to previous panels to change values.
26. In the Pre-Installation Summary panel, review the installation informationpresented, and then click Install.The installation task begins. Progress can be monitored by viewing messagesdisplayed above the progress bar.
27. In the Install Complete panel, click Done.“Restarting middleware on Windows” on page 191This procedure describes how to restart middleware on Windows, if you mustrestart any middleware services.“Restarting middleware on UNIX” on page 192Middleware services on Linux and AIX platforms occasionally must berestarted, such as when a reboot occurs. Middleware servers and services mustbe active before running the Maximo Asset Management installation program.
Create a maxdemo database during installationYou can create a maxdemo database during the installation of Maximo AssetManagement and populate the database with sample data.
Procedure1. In the Run Configuration Step screen in the installation wizard, select the Copy
files now, but perform the installation configuration later option.2. When the installation finishes, exit the installation wizard.3. Rename the C:\IBM\SMP\Maximo\tools\maximo\en\maximo.<dbtype> file.4. Copy the C:\IBM\SMP\Maximo\tools\maximo\en\maxdemo.<dbtype> file to
C:\IBM\SMP\Maximo\tools\maximo\en\maximo.<dbtype>, where en is thelanguage folder and the dbtype is ora/sqs/db2.
5. Open a command window and browse to C:\IBM\SMP\scripts and run thefollowing command: taskrunner.bat CONTINUE STOPONERROR
6. When taskrunner finishes running, rename the files back to their originalnames. Note: Do not restart the computer before you run the taskrunnercommand. The taskrunner utility does not create a persistent store ofinformation and data can be lost.
Post installation for Oracle WebLogic Server deploymentsThere is a post installation step required for Oracle WebLogic Server deployments.
About this task
When using Oracle WebLogic Server as the application server for your MaximoAsset Management deployment, the installation program produces an EAR file.You must then manually deploy that file to Oracle WebLogic Server.
102 IBM Maximo Asset Management: Installation Guide (Oracle WebLogic Server)

When using Oracle WebLogic Server, you must modify the weblogic.xml file andrebuild the maximo.ear file before deploying it.
Procedure1. Install the updated JDK 1.6 program.
a. Obtain the latest JDK program with a version number 1.6.0 SR7 or greater,from http://www.oracle.com/technetwork/java/index.html.
b. Start the installation program.c. Accept the license agreement.d. Change the installation destination path to your Oracle home folder, and
click OK , then Next.e. Accept any additional prompts to install the JDK program so that the
installation process can complete successfully.2. If you are using an Oracle database, copy the oraclethin.jar file.
a. Copy the oraclethin.jar file from the administrative workstation to theserver where you installed Oracle WebLogic Server. Use any file transferprotocol that is available.
b. The oraclethin.jar file is in the install_home\maximo\applications\maximo\lib directory. The default install_home directory isC:\IBM\SMP\Maximo\Applications\Maximo\lib. Copy the oraclethin.jar fileto the J2EE server and into the wls11g/server/lib directory. For example,C:/Oracle/wls11g/server/lib.
3. Edit the domain configuration file for proper Java settings.a. Navigate to Install_dir\user_projects\domains\mydomain\bin.b. Right-click and edit (do not double-click) setDomainEnv.cmd (Windows) or
setDomainEnv.sh (UNIX).c. Using your text editor, search for and replace jdk entries with entries that
configure Oracle WebLogic Server to use the updated JDK program. Twoinstances must be replaced.
d. (Oracle only) Search for PRE_CLASSPATH. Set the parameter as follows:set PRE_CLASSPATH=%WL_HOME%\server\lib\oraclethin.jar (Windows)PRE_CLASSPATH={WL_HOME}/server/lib/oraclethin.jar (UNIX)
Note: This step is required for connecting to Oracle databases from OracleWebLogic Server.
e. Increase the Java Heap parameters by searching for MEM_ARGS and settingthe parameter as follows:set MEM_ARGS=-Xms512m -Xmx1024m -XX:MaxPermSize=512m (Windows)MEM_ARGS=-Xms512m -Xmx1024m -XX:MaxPermSize=512m (UNIX)
These parameters are case sensitive. Ensure to include the minus (-) signbefore each parameter and to include the m after each value.
f. Search for set JAVA_OPTIONS=%JAVA_OPTIONS% %JAVA_PROPERTIES%. Insert anoption right after this string as follows:-Dcom.sun.xml.namespace.QName.useCompatibleSerialVersionUID=1.0
The entry looks like this when complete:set JAVA_OPTIONS=%JAVA_OPTIONS% %JAVA_PROPERTIES%-Dcom.sun.xml.namespace.QName.useCompatibleSerialVersionUID=1.0-Dwlw.iterativeDev=%iterativeDevFlag% -Dwlw.testConsole=%testConsoleFlag%-Dwlw.logErrorsToConsole=%logErrorsToConsoleFlag%
g. Save and close the setDomainEnv.cmd file.
Chapter 5. Deploying automatically reusing existing middleware (Scenario 2) 103

4. Edit the \IBM\SMP\maximo\applications\maximo\maximouiweb\webmodule\WEB-INF\weblogic.xml file and add the following entries:<session-descriptor><cookie-http-only>false</cookie-http-only></session-descriptor>
5. Start the server without being prompted for user name and password. If youare working in Production mode and do not want to be prompted for theOracle WebLogic Server user name and password, create a boot.propertiesfile. This procedure stores the user name and password in an encrypted format.Place the following two lines in a text file:username=<administrator username>password=<administrator password>
The user name and password values must match an existing user account inthe Authentication provider for the default security realm. If you save the fileas boot.properties and locate it in the mydomain folder (for example,C:\BEA\User_projects\domains\mydomain), the server automatically uses this fileduring its subsequent startup cycles. The first time you use this file to start aserver, the server reads the file and then overwrites it with an encryptedversion of the user name and password.
6. Verify settings by starting Oracle WebLogic Server. To ensure that the edits thatyou made to the previous Oracle WebLogic Server files were accurate, start theOracle WebLogic Server.
7. Rebuild the maximo.ear file.\IBM\SMP\maximo\deployment\buildmaximoear
8. Deploy the maximo.ear file to Oracle WebLogic Server.
Deploying ear filesYou are now ready to deploy the EAR files from the Oracle WebLogic ServerAdministration Console. Deploying the EAR files starts the Maximo ApplicationServer.
Before you begin
Windows WindowsIf MAXIMOSERVER is not running, start it from a command prompt.
UNIX UNIXEnsure that the Oracle WebLogic Server daemon is running.
About this task
In order to view the Oracle WebLogic Server Administration Console, you need toalso install a Java Virtual Machine (JVM). Newer versions of Windows might notship with JVM.
Procedure1. Change to the my_domain directory:
Windows WindowsFrom a command prompt, change directory path to:drive_name:\weblogic_install_dir\user_projects\domain\my_domain
104 IBM Maximo Asset Management: Installation Guide (Oracle WebLogic Server)

UNIX UNIXOpen a Terminal window (or a command prompt, if you are telnetingfrom a Windows computer) and change directory as follows:cd /home/mxadmin/weblogic_install_dir/user_projects/domains/my_domain
2. Type
Windows WindowsstartWebLogic.cmd
UNIX UNIX./startWebLogic.sh
and press Enter. Once the phrase: Server started in RUNNING mode displays,the Oracle WebLogic Server is running.
3. Start the MAXIMOSERVER Oracle WebLogic Server Administration Console bytyping the following URL in the address bar of your browser:http://host_name:7001/console
4. Log in to the administrative console with the administrative user name andpassword.
5. In the left pane, click the Lock&Edit button in the Change Center section toset the server to edit mode.
6. In the left pane, click the Deployments link in the Domain Structure section.7. In the Summary of Deployments section, click the Install button. The Install
Application Assistant opens.8. Click the upload your file(s) link.9. Click the Browse button next to the Deployment Archive field. Browse to
where you have maximo.ear file installed (c:/ibm/smp/maximo/deployment/default/ of the administrative workstation), select the file and click Open.
10. Click Next to upload the file to the Oracle WebLogic Server server.11. Click the radio button next to the maximo.ear file, and Next to continue the
deployment.12. Accept the default value “Install this deployment as an application” and click
Next to continue the deployment.13. Accept all other default values and click Finish to start the deployment
process.14. When the deployment process is complete, click the Activate Changes button
in the Change Center to apply the changes. The following message displays:All changes have been activated. No restarts are necessary.
15. Repeat Steps 8 on page 73 through 14 on page 74 to deploy maximoiehs.ear.16. Click the checkbox next to the maximo application.17. Click the dropdown arrow of the Start button and select Servicing all
requests. The Start Application Assistant displays.18. Click Yes to start the system.
Setting the Oracle WebLogic Server host nameSetting the Oracle WebLogic Server host name manually to access application helpinformation.
Chapter 5. Deploying automatically reusing existing middleware (Scenario 2) 105

About this task
By default, the property used to store the host name for the Maximo AssetManagement help system is set to localhost. The fully qualified host name of theOracle WebLogic Server must be configured in the help system property to viewMaximo Asset Management application help topics. Complete this step after youhave deployed Maximo Asset Management EAR files to the Oracle WebLogicServer.
Procedure1. Log in to the Maximo Asset Management console as maxadmin.2. Browse to Go To > System Configuration > Platform Configuration > System
Properties
3. Using the Filter feature, search for the mxe.help.host Property Name.4. Expand the mxe.help.host property and set the attribute to the fully qualified
host name of the Oracle WebLogic Server.5. Select the mxe.help.host record check box.6. Click the Live Refresh icon in the toolbar.7. From the Live Refresh dialog, click OK.
Results
You are now able to access application help topics in the Maximo AssetManagement user interface.
Language deployment after database update deferralSelecting the option to defer the update of the Maximo database when installingthe product, affects how you deploy languages.
During installation, you have the option to defer the database update task. Thisoption prevents writing data to the database during the installation. Theinstallation program is limited to copying files to the administrative system andregistering product process solution packages. You add languages by completingthe installation, manually updating the database, and then updating languagesmanually.
“Manually deploying languages after database update deferral” on page 75Languages must be deployed manually if you defer database updates by theinstallation program.
Manually deploying languages after database update deferralLanguages must be deployed manually if you defer database updates by theinstallation program.
Before you begin
You must have run updatedb command before manually configuring languages forPSI packages.
About this task
To manually configure languages for PSI packages, complete the following steps:
106 IBM Maximo Asset Management: Installation Guide (Oracle WebLogic Server)

Procedure
Update language support for the Maximo core components.Files for the language selections you made during the installation are extracted tothe C:\IBM\SMP\Maximo\Tools\Maximo\locale\xliff\ directory on the system.1. To update a language as the base language to use for the product, run the
following command:install_home\maximo\tools\maximo\TDToolkit.bat-IMPORT-SLEN-TLlocale-maxmessfix
2. To add one or more languages as additional languages for use with theproduct, run the following command for each language you want to add:install_home\maximo\tools\maximo\TDToolkit.bat-ADDLANGlocale-maxmessfix
Chapter 5. Deploying automatically reusing existing middleware (Scenario 2) 107

108 IBM Maximo Asset Management: Installation Guide (Oracle WebLogic Server)

Chapter 6. Deploying manually reusing existing middleware(Scenario 3)
Use this information if you intend to deploy Maximo Asset Management byreusing existing middleware servers and manually configuring them to work withMaximo Asset Management.
Before you begin
Ensure you have reviewed the following information:v Chapter 2, “Planning to deploy,” on page 5v Chapter 3, “Preparing for installation,” on page 11v “Maximo Asset Management installation with manual middleware
configuration” on page 112
About this task
This information provides a high-level overview or road map of tasks you need tocomplete in order to deploy Maximo Asset Management automatically, usingmiddleware already established in your enterprise. Use the information providedin the Concepts list to familiarize yourself with the ideas behind each step, andthen refer to the Tasks list and perform the tasks listed in order to complete thestep.
In this scenario, you manually configure existing middleware resources beforerunning the Maximo Asset Management installation program.
© Copyright IBM Corp. 2007, 2011 109

Procedure1. Configure the database
The database must be configured before running the Maximo AssetManagement installation program. Refer to the instructions appropriate foryour database.
Concepts“Manually configuring the database server” on page 112
Perform post-installation tasks
Verify the installation
Complete post product installation processmanager tasks
Install Maximo Asset Management usingmanual middleware configuration option
Manually configure the J2EE server
Optional: Manually configure the directoryserver
Manually configure the database
Figure 5. Deploying Maximo Asset Management with manual middleware configuration
110 IBM Maximo Asset Management: Installation Guide (Oracle WebLogic Server)

Tasks
v “Manually configuring DB2 9.x” on page 112v “Manually configuring Oracle 11g” on page 114v “Manually configuring Oracle 10g” on page 117v “Manually configuring Microsoft SQL Server” on page 119
2. Configure the directory server if used for security.The directory server must be configured before running the Maximo AssetManagement installation program if you are using it for security. Refer to theinstructions appropriate for your directory server.
Concepts“Manually configuring the directory server” on page 121
Tasks
v “Manually configuring IBM Tivoli Directory Server” on page 122v “Manually configuring Microsoft Active Directory” on page 126
3. Configure an existing Oracle WebLogic Server.
Concepts“Manually configuring WebLogic Server” on page 54
Tasks
a. “Creating the MAXIMOSERVER domain” on page 54b. “Configuring JMS options for integration framework” on page 55c. “Configuring JMS for the email listener in WebLogic Server” on
page 564. Install Maximo Asset Management using the Maximo Asset Management
installation program.While using the Maximo Asset Management installation program to deployMaximo Asset Management, select the options that indicate you have manuallypre-configured your middleware for Maximo Asset Management.
Concepts“Installation program overview” on page 58
Tasks “Running the installation program without middlewareautoconfiguration” on page 133
5. Complete post-installation tasks
Concepts
v Chapter 10, “Post installation tasks,” on page 171
Tasks
a. “Initial data configuration” on page 171b. “Synchronizing users and groups” on page 177c. “Understanding and configuring security” on page 179
What to do next
After you have completed the deployment process, you can optionally perform thefollowing tasks:v Create startup scripts for middleware.
You can create startup scripts that will automatically start Maximo AssetManagement middleware services upon a system reboot.
Chapter 6. Deploying manually reusing existing middleware (Scenario 3) 111

Maximo Asset Management installation with manual middlewareconfiguration
Manually configured installations involve configuring middleware components, thedatabase server, the directory server, and the J2EE server, to work with MaximoAsset Management before using the Maximo Asset Management installationprogram.
You can elect to have one or more Maximo Asset Management middlewarecomponents configured automatically by the Maximo Asset Managementinstallation program. Alternatively, you can choose to manually configure one ormore of the middleware servers to work with Maximo Asset Management.
The information contained in this section provides details on how to manuallyconfigure Maximo Asset Management middleware before running the MaximoAsset Management installation program.
Before you begin, ensure you have addressed the following prerequisite conditions:v You have designated a Windows or UNIX-based server to start the Maximo
Asset Management installation program.
You must complete the manual configuration of each server you plan to notconfigure using the autoconfigure feature of the Maximo Asset Managementinstallation program before you actually use the Maximo Asset Managementinstallation program to install Maximo Asset Management.
Ensure that all of your middleware is at supported version levels.
Manually configuring the database serverYou have the option of manually configuring the database server used in MaximoAsset Management deployment. the Manual configuration of the database servermust be completed before you use the Maximo Asset Management installationprogram.
For DB2 on UNIX and Linux systems, ensure you have a minimum of 8 gigabytes(binary) free of space in the DB2 database instance home directory(/home/ctginst1) in order to meet the default table space disk space requirementsof the DB2 install. For DB2 on Windows, ensure you have a minimum of 8gigabytes of free space in the DB2 installation directory.
Manually configuring DB2 9.xThis section contains instructions for manually configuring DB2 9.x servers for useby Maximo Asset Management.
About this task
To configure an existing DB2 9.x server for use with Maximo Asset Management,complete the following steps before starting the Maximo Asset Managementinstallation program:
Procedure1. Log in to the system as a user that has administrative permissions on the
system.2. Create system users if they do not exist on the system.
112 IBM Maximo Asset Management: Installation Guide (Oracle WebLogic Server)

v Windows– db2admin– maximo
v Linux or UNIX– db2admin– maximo– ctgfenc1– ctginst1
The ctginst1 user ID must be assigned to the db2iadm1 group.3. Open a console window and setup the DB2 environment:
v Windowsdb2cmd
v Linux or UNIXEnsure that the /opt/ibm/db2/V9.7/bin, /opt/ibm/db2/v9.7/instance, and/opt/ibm/db2/V9.7/adm directories are added to your PATH.
4. Create the DB2 instance:v Windows
db2icrt -s ese -u db2admin,myPassword -r 50005,50005 ctginst1set db2instance=ctginst1db2startdb2 update dbm config using SVCENAME 50005 DEFERREDdb2stopdb2set DB2COMM=tcpipdb2start
v Linux orUNIXdb2icrt -s ese -u db2fenc1 -p 50005 ctginst1. /home/ctginst1/sqllib/db2profiledb2startdb2 update dbm config using SVCENAME 50005 DEFERREDdb2stopdb2set DB2COMM=tcpipdb2start
5. Create the database.db2 create db ’maxdb75’ ALIAS ’maxdb75’ using codeset UTF-8 territory US pagesize 32 Kdb2 connect to ’maxdb75’db2 GRANT DBADM ON DATABASE TO USER db2admin (windows only)db2 GRANT SECADM ON DATABASE TO USER db2admin (windows only)db2 connect reset
6. Configure the database.db2 update db cfg for maxdb75 using SELF_TUNING_MEM ONdb2 update db cfg for maxdb75 using APP_CTL_HEAP_SZ 16384 DEFERREDdb2 update db cfg for maxdb75 using APPLHEAPSZ 2048 AUTOMATIC DEFERREDdb2 update db cfg for maxdb75 using AUTO_MAINT ON DEFERREDdb2 update db cfg for maxdb75 using AUTO_TBL_MAINT ON DEFERREDdb2 update db cfg for maxdb75 using AUTO_RUNSTATS ON DEFERREDdb2 update db cfg for maxdb75 using AUTO_REORG ON DEFERREDdb2 update db cfg for maxdb75 using AUTO_DB_BACKUP ON DEFERREDdb2 update db cfg for maxdb75 using CATALOGCACHE_SZ 800 DEFERREDdb2 update db cfg for maxdb75 using CHNGPGS_THRESH 40 DEFERREDdb2 update db cfg for maxdb75 using DBHEAP AUTOMATICdb2 update db cfg for maxdb75 using LOCKLIST AUTOMATIC DEFERREDdb2 update db cfg for maxdb75 using LOGBUFSZ 1024 DEFERREDdb2 update db cfg for maxdb75 using LOCKTIMEOUT 120 DEFERREDdb2 update db cfg for maxdb75 using LOGPRIMARY 20 DEFERREDdb2 update db cfg for maxdb75 using LOGSECOND 100 DEFERREDdb2 update db cfg for maxdb75 using LOGFILSIZ 8192 DEFERREDdb2 update db cfg for maxdb75 using SOFTMAX 1000 DEFERREDdb2 update db cfg for maxdb75 using MAXFILOP 200 DEFERREDdb2 update db cfg for maxdb75 using PCKCACHESZ AUTOMATIC DEFERREDdb2 update db cfg for maxdb75 using STAT_HEAP_SZ AUTOMATIC DEFERREDdb2 update db cfg for maxdb75 using STMTHEAP AUTOMATIC DEFERREDdb2 update db cfg for maxdb75 using UTIL_HEAP_SZ 10000 DEFERREDdb2 update db cfg for maxdb75 using DATABASE_MEMORY AUTOMATIC DEFERREDdb2 update alert cfg for database on maxdb75 using db.db_backup_req SET THRESHOLDSCHECKED YESdb2 update alert cfg for database on maxdb75 using db.tb_reorg_req SET THRESHOLDSCHECKED YESdb2 update alert cfg for database on maxdb75 using db.tb_runstats_req SET THRESHOLDSCHECKED YESdb2 update dbm cfg using PRIV_MEM_THRESH 32767 DEFERREDdb2 update dbm cfg using KEEPFENCED NO DEFERREDdb2 update dbm cfg using NUMDB 2 DEFERREDdb2 update dbm cfg using RQRIOBLK 65535 DEFERRED## Windows: AGENT_STACK_SZ 1000# Unix : AGENT_STACK_SZ 1000#db2 update dbm cfg using AGENT_STACK_SZ 1000 DEFERREDdb2 update dbm cfg using MON_HEAP_SZ AUTOMATIC DEFERREDdb2set DB2_SKIPINSERTED=ONdb2set DB2_INLIST_TO_NLJN=YESdb2set DB2_MINIMIZE_LISTPREFETCH=Y
Chapter 6. Deploying manually reusing existing middleware (Scenario 3) 113

db2set DB2_EVALUNCOMMITTED=YESdb2set DB2_FMP_COMM_HEAPSZ=65536db2set DB2_SKIPDELETED=ONdb2set DB2_USE_ALTERNATE_PAGE_CLEANING=ON
7. For Linux orUNIX log in as the ctginst1 user and then restart the DB2command-line environmensu - ctginst1db2
8. Restart DB2.db2stop forcedb2start
9. Reconnect to the database.db2 connect to ’maxdb75’
10. Grant authority to maximo.db2 GRANT DBADM,CREATETAB,BINDADD,CONNECT,CREATE_NOT_FENCED_ROUTINE,IMPLICIT_SCHEMA,LOAD,CREATE_EXTERNAL_ROUTINE,QUIESCE_CONNECT,SECADM ON DATABASE TO USER MAXIMO
db2 GRANT USE OF TABLESPACE MAXTDATA TO USER MAXIMO
db2 GRANT CREATEIN,DROPIN,ALTERIN ON SCHEMA MAXIMO TO USER MAXIMO
db2 create schema maximo authorization maximo
11. Create a buffer pool.db2 CREATE BUFFERPOOL MAXBUFPOOL IMMEDIATE SIZE 4096 AUTOMATIC PAGESIZE 32 K
12. Create table spaces.db2 CREATE REGULAR TABLESPACE MAXDATA PAGESIZE 32 K MANAGED BY AUTOMATIC STORAGE INITIALSIZE 5000 M BUFFERPOOL MAXBUFPOOLdb2 CREATE TEMPORARY TABLESPACE MAXTEMP PAGESIZE 32 K MANAGED BY AUTOMATIC STORAGE BUFFERPOOL MAXBUFPOOLdb2 GRANT USE OF TABLESPACE MAXDATA TO USER MAXIMO
13. Break the database connection.db2 connect reset
14. Exit the DB2 command-line environment15. Install the appropriate fix pack indicated in the prerequisites topic in the
chapter that describes how to prepare for the installation. Ensure that youreview and complete all the installation and post-installation tasks containedwithin the fix pack readme file. Failure to do so can potentially cause theMaximo Asset Management installation to fail. See the appropriate productsupport page for more information.
Manually configuring Oracle 11gUse the following instructions to manually configure Oracle 11g for use withMaximo Asset Management.
Before you begin
Oracle instance names must be limited to eight characters in length. For Oracledatabases, the schema owner must use the same user ID as the database user.
About this task
To configure an existing Oracle 11g server for use with Maximo AssetManagement, complete the following steps before starting the Maximo AssetManagement installation program:
Procedure1. Log in as the Oracle software user. Typically this user is named oracle.2. Create the database listener. The listener manages requests to connect to the
database. This step is only required if you do not already have an existinglistener in place.a. Open the Oracle Network Configuration Assistant application.b. From the Welcome panel, select Listener configuration, and then click Next.
114 IBM Maximo Asset Management: Installation Guide (Oracle WebLogic Server)

c. From the action panel, select Add, and then click Next.d. Enter a name for the listener or accept the default value, and then click
Next.e. Accept the default Selected Protocols listed by clicking Next.f. From the port panel, select Use the standard port of 1521, and then click
Next.g. Select No to indicate that you are finished configuring listeners, and then
click Next.h. From the Listener Configuration Done panel, click Next.i. Click Finish.
3. Create a database for use by Maximo Asset Management.a. Open the Oracle Database Configuration Assistant.b. Click Next.c. Select Create a Database, and then click Next.d. Select General Purpose or Transaction Processing, and then click Next.e. Enter ctginst1 for both the Global Database Name value and the SID value,
and then click Next.f. Leave the defaults selected, and click Next.g. Ensure Use the Same Administrative Password for All Accounts is
selected, enter a password for Oracle users, and then click Next.h. Ensure File System is selected as the storage mechanism to use for the
database, and Use Database File Locations from Template is selected as thevalue to use for database file location, and then click Next.
i. Leave defaults selected for the database recovery options panel, and thenclick Next.
j. From the Sample Schemas panel, click Next.k. From the Initialization Parameters panel, on the Memory tab, select Custom
and provide the following values (measured in Mb):
Memory ManagementSet this value to Manual Shared Memory Management.
Shared PoolSet this value to 152.
Buffer CacheSet this value to 36.
Java PoolSet this value to 32.
Large PoolSet this value to 8.
PGA SizeSet this value to 36.
l. From the Character Sets tab, select Use Unicode (AL32UTF8).m. Click All Initialization Parameters....n. Click Show Advanced Parameters.o. Locate the following parameters, change them to the values indicated, and
then click Close.
nls_length_semanticsChange this value to CHAR.
Chapter 6. Deploying manually reusing existing middleware (Scenario 3) 115

open_cursorsChange this value to 1000.
cursor_sharingSet this value to FORCE.
p. From the Initialization Parameters panel, click Next.q. From the Database Storage panel, click Next.r. From the Creation Options panel, click Finish.s. Click Exit to exit the Database Configuration Assistant. The database has
been successfully created.
Note: The Oracle Database Configuration Assistant executes theORACLE_HOME/ctx/admin/defaults/drdefus.sql script as part of theconfiguration of the CTXSYS user. You must execute this script manually if theOracle Database Configuration Assistant is not used.
4. Create a table space using the following command in SQL*Plus:Create tablespace maxdata datafile’C:\oracle\product\11.1.0\db_1\dbs\maxdata.dbf’size 1000M autoextend on;
Change the directory specified in the example to the database location. If thedirectory does not exist, this command fails.
5. Create a temporary table space using the following command in SQL*Pluscreate temporary tablespace maxtemp tempfile’C:\oracle\product\11.1.0\db_1\dbs\maxtemp.dbf’size 1000M autoextend on maxsize unlimited;
Change the directory specified in the example to the database location. If thedirectory does not exist, this command fails.
6. Create the maximo user and grant permissions using the following commandin SQL*Plus:create user maximo identified by maximo default tablespace maxdata temporarytablespace maxtemp;grant connect to maximo;grant create job to maximo;grant create trigger to maximo;grant create session to maximo;grant create sequence to maximo;grant create synonym to maximo;grant create table to maximo;grant create view to maximo;grant create procedure to maximo;grant alter session to maximo;grant execute on ctxsys.ctx_ddl to maximo;alter user maximo quota unlimited on maxdata;
If you created a separate table space for indexing, you must also grant access tothat index table space to the maximo user. For example, use the followingcommand if you created a separate table space for indexing calledTSI_MAM_OWN.":alter user maximo quota unlimited on TSI_MAM_OWN
These instructions assume that you did not modify default role sets assigned tothe Oracle DBA user or user IDs created to connect to the database. If yourestricted the default privileges granted to user IDs, you must explicitly grantthem to the maximo user. For example, if you do not grant a role such as theselect_catalog_role role, you must explicitly grant that role to the maximouser. This assignment can be done by running this SQL*Plus command:grant select_catalog_role to maximo
116 IBM Maximo Asset Management: Installation Guide (Oracle WebLogic Server)

Manually configuring Oracle 10gOracle 10g can be manually configured for use with Maximo Asset Management.
Before you begin
If you are using Oracle 10g Rel2, ensure the Oracle 10g Rel2 patch 3 is installed.
Oracle instance names must be limited to eight characters in length. For Oracledatabases, the schema owner must use the same user ID as the database user.
About this task
To configure an existing Oracle 10g server for use with Maximo AssetManagement, complete the following steps before starting the Maximo AssetManagement installation program:
Procedure1. Log in as the Oracle software user. Typically this user is named oracle.2. Create the database listener. The listener manages requests to connect to the
database.a. Open the Oracle Network Configuration Assistant application.b. From the Welcome panel, select Listener configuration, and then click Next.c. From the action panel, select Add, and then click Next.d. Enter a name for the listener or accept the default value, and then click
Next.e. Accept the default Selected Protocols listed by clicking Next.f. From the port panel, select Use the standard port of 1521, and then click
Next.g. Select No to indicate that you are finished configuring listeners, and then
click Next.h. From the Listener Configuration Done panel, click Next.i. Click Finish.
3. Create a database for Maximo Asset Management.a. Open the Oracle Database Configuration Assistant.b. Click Next.c. Select Create a Database, and then click Next.d. Select General Purpose, and then click Next.e. Enter ctginst1 for both the Global Database Name value and the SID value,
and then click Next.f. Leave the defaults selected, and click Next.g. Ensure Use the Same Password for All Accounts is selected, enter a
password for Oracle users, and then click Next
h. Ensure File System is selected as the storage mechanism to use for thedatabase, and then click Next.
i. Ensure Use Database File Locations from Template is selected as the valueto use for database file location, and then click Next.
j. Leave defaults selected for the database recovery options panel, and thenclick Next.
k. From the Sample Schemas panel, click Next.
Chapter 6. Deploying manually reusing existing middleware (Scenario 3) 117

l. From the memory allocation panel, select Custom, provide the followingvalues (measured in bytes), and then click Next.
Shared Memory ManagementSet this value to Manual.
Shared PoolSet this value to 152.
Buffer CacheSet this value to 36.
Java PoolSet this value to 32
Large PoolSet this value to 8.
PGA SizeSet this value to 36.
m. From the Character Sets tab, select Use Unicode (AL32UTF8),
n. Click All Initialization Parameters....o. Click Show Advanced Parameters.p. Locate the following parameters, change them to the values indicated, and
then click Close.
nls_length_semanticsChange this value to CHAR
open_cursorsChange this value to 1000
cursor_sharingSet this value to FORCE.
q. From the Initialization Parameters panel, click Next.r. From the Database Storage panel, click Next.s. From the Creation Options panel, click Finish.t. After the database has been successfully created, click Password
Management.u. Unlock the CTXSYS account by clearing the check mark in the Lock
Account? column for that entry, enter a password for the account, and thenclick OK.
v. Click Exit to exit the Database Configuration Assistant. The database hasbeen successfully created.
Note: The Oracle Database Configuration Assistant uses theORACLE_HOME/ctx/admin/defaults/drdefus.sql script as part of theconfiguration of the CTXSYS user. This script must be used manually if theOracle Database Configuration Assistant is not used.
4. Create a table space using the following command in SQL*Plus:Create tablespace maxdata datafile’C:\oracle\product\10.2.0\oradata\ctginst1\maxdata.dbf’size 1000M autoextend on;
The directory specified in the example must be changed to the installationlocation of the database. If the directory does not exist, this command fails.
5. Create a temporary table space.
118 IBM Maximo Asset Management: Installation Guide (Oracle WebLogic Server)

6. Create the maximo user and grant permissions using the following commandin SQL*Plus:create user maximo identified by maximo default tablespace maxdata temporarytablespace maxtemp;grant connect to maximo;grant create job to maximo;grant create trigger to maximo;grant create session to maximo;grant create sequence to maximo;grant create synonym to maximo;grant create table to maximo;grant create view to maximo;grant create procedure to maximo;grant alter session to maximo;grant execute on ctxsys.ctx_ddl to maximo;alter user maximo quota unlimited on maxdata;
If you have elected to create a separate table space for indexing, you must alsogrant the maximo user access to that index table space. For example, you mustperform the following additional SQL*plus command if you had created aseparate table space for indexing called TSI_CMDB_OWN:alter user maximo quota unlimited on TSI_CMDB_OWN
These instructions assume that you have not modified the default role sets thatare assigned to the Oracle DBA user or other database connection user IDs. Ifyou have restricted the default privileges granted to user IDs, you mustexplicitly grant them to the maximo user. For example, the select_catalog_rolerole is required for user IDs connecting to the database. To deploy MaximoAsset Management successfully, you must explicitly grant that role to themaximo user by using the SQL*Plus command:grant select_catalog_role to maximo
Manually configuring Microsoft SQL ServerYou can manually configure Microsoft SQL Server for use with Maximo AssetManagement.
Before you begin
Because Microsoft SQL Server does not support UTF-8, Maximo Asset Managementdoes not have multilingual support when deployed with Microsoft SQL Server.
Microsoft SQL Server collation settings must be set to the following options:v Dictionary orderv Case-insensitivev For use with 1252 Character set
About this task
To configure an existing Microsoft SQL Server for use with Maximo AssetManagement, perform the following steps before starting the Maximo AssetManagement installation program:
Procedure1. Configure the listener port.
If The default instance of the Microsoft SQL Server Database Engine listens onTCP port 1433. Named instances of the Microsoft SQL Server Database Engineand Microsoft SQL Server Compact Edition are configured for dynamic ports,which means they select any available port when the service starts. When
Chapter 6. Deploying manually reusing existing middleware (Scenario 3) 119

connecting to a named instance across a firewall, configure the Database Engineto listen on a specific port, to open this port in the firewall.a. Open Programs > Microsoft SQL Server 2008 > Configuration Tools >
SQL Server Configuration Manager
b. From the Microsoft SQL Server Configuration Manager navigation pane,expand SQL Server Network Configuration > Protocols for <instancename>, and then double-click TCP/IP.
c. In the TCP/IP Properties dialog box, click the IP addresses tab.d. For each IP address listed, ensure that the TCP Dynamic Ports field is blank.
If the TCP Dynamic Ports field contains a value of 0, that IP address isusing dynamic ports. Since Maximo Asset Management requires MicrosoftSQL Server to listen on a static port, this field must be blank.
e. For each IP address listed, enter 1433 for the TCP Port field.f. Click OK.g. From the SQL Server Configuration Manager navigation pane, click SQL
Server Services.h. Right-click SQL Server (<instance name>) and then click Restart, to stop,
and restart Microsoft SQL Server.i. Verify the Microsoft SQL Server instance is running, and then close SQL
Server Configuration Manager.2. Verify that you enabled the Full-text Search setting during the installation of
Microsoft SQL Server 2008. To determine if Full-text Search is installed on yourexisting Microsoft SQL Server database, perform the following steps:a. Open SQL Server Management Studio, select SQL Server Authentication as
the authentication type, and enter the credentials for the sa user ID, andthen click Connect.
b. Click New Query.c. Type the following command:
select FULLTEXTSERVICEPROPERTY ( ’IsFulltextInstalled’ )
If you did not install Full-text Search (the resulting value is zero), you mustdo so at this time. To install Full-text Search, insert the Microsoft SQL Server2008 product media into the system and start the installation wizard.Navigate through the wizard and enable the Full-Text Search option locatedon the Custom portion of the Setup Type dialog box. To finish theinstallation process, restart the server.
3. Create a Microsoft SQL Server Database.a. Open SQL Server Management Studio (Start > Programs > Microsoft SQL
Server 2008 > SQL Server Management Studio)b. Right-click the Databases folder from the navigation tree , and select New
Database.c. In the Database name entry field, specify a unique database name (for
example maxdb75)d. For the maxdb75 Logical Name, change the Initial Size (MB) attribute to 500
(MB), and also set the value of the Autogrowth field to By 1MB,unrestricted growth.
e. If you prefer, modify the log settings to accommodate your productionenvironment.
f. Click OK.4. Create the Maximo User for Microsoft SQL Server.
120 IBM Maximo Asset Management: Installation Guide (Oracle WebLogic Server)

a. Open Microsoft SQL Server Management Studio (Start > Programs >Microsoft SQL Server 2008 > SQL Server Management Studio)
b. Click New Query.c. Select the Maximo Asset Management database (maxdb75) from the Available
Databases menu,d. Enter the following script to create the Maximo database user MAXIMO with a
password of MAXIMO.sp_addlogin MAXIMO,MAXIMOgo
This value is case-sensitive.e. Click Execute.f. Enter the following script to change the database owner to maximo.
sp_changedbowner MAXIMOgo
g. Click Execute.
What to do next
If you add additional logical names to the database and set their file group to avalue other than PRIMARY, you must complete the following steps after you setup the database and create the Maximo user:1. Run the Maximo Asset Management installation program and choose the Do
not run the configuration step now option.2. Add the following property to the install_home\etc\install.properties file:
Database.SQL.DataFilegroupName=<your logical name>
3. Run the configuration steps outside of the Maximo Asset Managementinstallation program by using the taskrunner utility, located in theinstall_home\scripts directory.
Complete these additional steps only if you added additional logical names to thedatabase and set their file group to a value other than PRIMARY.
Manually configuring the directory serverThese topics provide details on manually configuring a directory server for use byMaximo Asset Management
There are several methods you can use to secure Maximo Asset Management.Ifwant to use a directory server to secure Maximo Asset Management, you mustcomplete the manual configuration of the directory server before you use theMaximo Asset Management installation program. Manual configuration isnecessary if you choose to not have the Maximo Asset Management installationprogram perform configuration.
Note: The base dn, bind user, and other various node values listed in thesesections are defaults. These values are replaced with values applicable to existingLDAP hierarchies within your organization.
Important: When entering LDAP values for Maximo Asset Managementinstallation panel fields, entries in LDIF files, or values you enter directly into adirectory instance using directory server tools, be aware of the product-specificsyntax rules for using special characters in an LDAP string. In most cases, specialcharacters must be preceded by an escape character in order to make it readable by
Chapter 6. Deploying manually reusing existing middleware (Scenario 3) 121

the directory server. Failing to escape special characters contained in an LDAPstring used with Maximo Asset Management results in Maximo Asset Managementerrors.
Many directory server products consider a blank space as a special character that ispart of the LDAP string. If you mistakenly enter an LDAP string that contains ablank, at the end of a field value, for example, and you do not precede the blankcharacter with an escape character, you encounter Maximo Asset Managementerrors that are difficult to troubleshoot.
See the product documentation for your directory server for more informationabout special characters in LDAP strings.
Manually configuring IBM Tivoli Directory ServerUse the following instructions to manually configure IBM Tivoli Directory Serverfor use with Maximo Asset Management.
About this task
To configure IBM Tivoli Directory Server before starting the Maximo AssetManagement installation program, you must create an instance of IBM TivoliDirectory Server.
Note: While you can technically share a DB2 instance between Maximo AssetManagement and the one needed by IBM Tivoli Directory Server, it might lead toproblems. During the installation, the database instance is restarted, which mightdisrupt the availability of IBM Tivoli Directory Server to your enterprise. If you areusing the automated installation programs, separate instances are created for useby Maximo Asset Management and IBM Tivoli Directory Server.
Procedure1. Using your preferred method, create a user on the system and assign it to the
appropriate group.
WindowsCreate the user db2admin and make it a member of the followinggroups:v Windows Administratorsv DB2ADMNSv DB2USERS
UNIX Create the user idsccmdb and make it a member of the followinggroups:v dasadmn1v idsldapv dbsysadm
The root user must also be a member of the dasadm1, idsldap, anddbsysadm groups.
2. If the Instance Administration tool is not already started, ensure that you arelogged in as an administrator on the system, and then start the tool
WindowsSelect Programs > IBM Tivoli Directory Server 6.3 > InstanceAdministration Tool.
UNIX Type ./opt/IBM/ldap/V6.3/sbin/idsxinst at the command line.
122 IBM Maximo Asset Management: Installation Guide (Oracle WebLogic Server)

3. In the Instance Administration tool, click Create an instance.4. In the Create a new instance window, click Create a new directory server
instance, and then click Next.5. From the Instance details window, enter values for the following fields, and
then click Next.
User nameSelect idsccmdb as the system user ID of the user who owns theinstance. This name is also the name of the instance.
Install locationEnter the location where the instance files are stored.
Encryption seed stringType a string of characters that are used as an encryption seed. Thisvalue must be a minimum of 12 characters.
Instance descriptionEnter a brief description of the instance.
6. In the DB2 instance details panel, enter idsccmdb as the value for the DB2instance name field, and then click Next.
7. In the TCP/IP settings for multihomed hosts panel, select Listen on allconfigured IP addresses, and then click Next.
8. In the TCP/IP port settings panel, complete the following fields, and thenclick Next.
Server port numberEnter 389 as the contact port for the server.
Server secure port numberEnter 636 as the secure port for the server.
Admin daemon port numberEnter 3538 as the administration daemon port.
Admin daemon secure port numberEnter 3539 as the administration daemon secure port.
9. In the Option steps panel, leave the following options selected, and then clickNext.
Configure admin DN and passwordYou want to configure the administrator DN and password for theinstance now.
Configure databaseYou want to configure the database for the directory server now.
10. In the Configure administrator DN and password window panel, complete thefollowing fields, and then click Next.
Administrator DNEnter cn=root for the administrator distinguished name.
Administrator PasswordEnter a password for the Administrator DN.
11. From the Configure database panel, complete the following fields, and thenclick Next.
Database user nameEnter idsccmdb as the database user.
Chapter 6. Deploying manually reusing existing middleware (Scenario 3) 123

PasswordEnter the password for the idsccmdb user.
Database nameEnter idsccmdb as the database to be used with this directory instance.
12. In the Database options panel, complete the following fields, and then clickNext.
Database install locationType the location for the database.
WindowsFor Windows platforms, this value must be a drive letter.
UNIX For non-Windows platforms, the location must be a directoryname, such as /home/ldapdb.
Ensure that you have at least 80 MB of free hard disk space in thelocation you specify. Additional disk space must be available toaccommodate growth as new entries are added to the directory.
Character-set optionLeave the Create a universal DB2 database (UTF-8/UCS-2) optionselected.
13. In the Verify settings panel, review the instance creation details provided, andthen click Finish to create the idsccmdb instance.
14. Click Close to close the window and return to the main window of theInstance Administration tool.
15. Click Close to exit the Instance Administration tool.16. Start the IBM Tivoli Directory Server Configuration tool:
WindowsSelectPrograms > IBM Tivoli Directory Server 6.3 > InstanceAdministration Tool.
UNIX Type ./opt/IBM/ldap/V6.3/sbin/idsxcfg at the command line.17. Select Manage suffixes.18. In the Manage suffixes panel, type the following suffix, and then click Add.
o=IBM,c=US
19. Click OK.20. Create and save an LDIF file.
Add the DN information, for example:v ou=SWG,o=IBM,c=USv ou=users
Note: ou=SWG,o=IBM,c=US in this example is an organization unit calledSWG. SWG houses the OU=Users organization units to place the userscreated for Maximo Asset Management. DC=IBM and DC=COM wouldindicate a domain forest of ibm.com®. You can replace the example with thedirectory structure of your own organization.Define the following users and their positions within the ou=users DN's youcreated. These users are defined in order for Virtual Member Manager to beused to secure Maximo Asset Management.
Important: Before you begin this procedure, ensure that you have thefollowing users created in the root of your LDAP repository:
124 IBM Maximo Asset Management: Installation Guide (Oracle WebLogic Server)

Table 7. Base Maximo Asset Management required users
User
maxadmin
mxintadm
maxreg
Here is an example of the default base LDIF data:dn: o=ibm,c=usobjectClass: topobjectClass: organizationo: IBM
dn: ou=SWG, o=ibm,c=usou: SWGobjectClass: topobjectClass: organizationalUnit
dn: ou=users,ou=SWG, o=ibm,c=usou: usersobjectClass: topobjectClass: organizationalUnit
dn: uid=maxadmin,ou=users,ou=SWG, o=ibm,c=ususerPassword: maxadminuid: maxadminobjectClass: inetorgpersonobjectClass: topobjectClass: personobjectClass: organizationalPersonsn: maxadmincn: maxadmin
dn: uid=mxintadm,ou=users,ou=SWG, o=ibm,c=ususerPassword: mxintadmuid: mxintadmobjectClass: inetorgpersonobjectClass: topobjectClass: personobjectClass: organizationalPersonsn: mxintadmcn: mxintadm
dn: uid=maxreg,ou=users,ou=SWG, o=ibm,c=ususerPassword: maxreguid: maxregobjectClass: inetorgpersonobjectClass: topobjectClass: personobjectClass: organizationalPersonsn: maxregcn: maxreg
Note: If you create the LDIF file on Windows, ensure that you remove the ^Mcharacters from the file before using.
Note: Before you can import an LDIF file on UNIX systems, you must runthe dos2unix command to format the file.
21. In the IBM Tivoli Directory Server Configuration Tool, click Import LDIF data.22. Click Browse to locate the LDIF file.23. Click Import.
Chapter 6. Deploying manually reusing existing middleware (Scenario 3) 125

24. Close the IBM Tivoli Directory Server Configuration Tool and restart theserver.
Manually configuring Microsoft Active DirectoryYou can manually configure Microsoft Active Directory for use with Maximo AssetManagement.
Before you begin
Use this procedure to manually create users and groups within Microsoft ActiveDirectory.
Important: The users and passwords you create in the following steps must matchthis exact configuration for the deployment to succeed. It is sometimes necessary totemporarily alter theMicrosoft Active Directory security policy to create theseaccounts in the required format. After installation, you can change these defaultpasswords to conform to a stricter security policy.
About this task
Before starting theMaximo Asset Management installation program, configureMicrosoft Active Directory. Complete the following steps
Procedure1. Select Start > Control Panel > Administrative Tools > Microsoft Active
Directory Users and Computers and then select the domain that you areworking with.
2. Edit the functional level of the domain by selecting Action > Raise DomainFunctional Level. The Raise Domain Functional Level dialog box is displayed.
3. Select Microsoft Windows Server 2008 from the Select an available domainfunctional level menu, and then click Raise. An alert dialog box is displayed.
4. Click OK.5. When the domain raise task has completed, click OK.6. In the Microsoft Active Directory Users and Computers interface, right-click
the domain to work with. Select New > Organizational Unit.7. Enter a name for the new Organizational Unit (OU), for example, SWG, and
then click OK.8. Create a groups object under the SWG organizational unit:
a. Right-click the SWG OU, and select New > Organizational Unit.b. Enter Groups as the name for the new OU then click OK.
9. Create a users object under the SWG organizational unit:a. Right-click the SWG OU, and select New > Organizational Unit.b. Enter Users as the name for the new OU then click OK.
10. Create an administrator user, for example maxadmin:a. Right click the Users OU and select New > User.b. From the New Object - User dialog, enter the following values, and then
click Next:
First nameEnter maxadmin.
InitialsLeave this field blank.
126 IBM Maximo Asset Management: Installation Guide (Oracle WebLogic Server)

Last nameLeave this field blank.
Full nameEnter maxadmin.
User login nameEnter maxadmin in the first field. Leave the default value of thesecond field.
User login name (pre-Microsoft Windows 2000)This field is populated with the same value (maxadmin) enteredfor the User login name.
c. From the next panel, enter the following information, and then click Next:
PasswordEnter maxadmin as the password for the maxadmin user.
User must change password at next logonEnsure this check box is cleared.
User cannot change passwordEnsure this check box is selected.
Password never expiresEnsure this check box is selected.
Account is disabledEnsure this check box is cleared.
The preceding values are examples. Enter values that comply with thepassword policy of your organization.
d. Review the password settings in the summary panel, and click Finish.11. Create the mxintadm user:
a. Right click the Users OU and select New > User.b. From the New Object - User dialog, enter the following values, and then
click Next:
First nameEnter mxintadm.
InitialsLeave this field blank.
Last nameLeave this field blank.
Full nameEnter mxintadm.
User login nameEnter mxintadm in the first field. Leave the default value of thesecond field.
User login name (pre-Microsoft Windows 2000)This field is displayed with the same value (mxintadm) entered forthe User login name.
c. From the next panel, enter the following information, and then click Next:
PasswordEnter a value as the password for the mxintadm user.
Chapter 6. Deploying manually reusing existing middleware (Scenario 3) 127

User must change password at next logonEnsure this check box is cleared.
User cannot change passwordEnsure this check box is selected.
Password never expiresEnsure this check box is selected.
Account is disabledEnsure this check box is cleared.
The preceding values are examples. You must set these fields to valuesthat comply with the password policy of your organization.
d. Review the password settings in the summary panel, and click Finish.12. Create the maxreg user:
a. Right click the Users OU and select New > User.b. From the New Object - User dialog, enter the following values, and then
click Next:
First nameEnter maxreg.
InitialsLeave this field blank.
Last nameLeave this field blank.
Full nameEnter maxreg.
User login nameEnter maxreg in the first field. Leave the default value of thesecond field.
User login name (pre-Microsoft Windows 2000)This field is filled with the same value (maxreg) entered for theUser login name.
c. From the next panel, enter the following information, and then click Next:
PasswordEnter a value as the password for the maxreg user.
User must change password at next logonEnsure this check box is cleared.
User cannot change passwordEnsure this check box is selected.
Password never expiresEnsure this check box is selected.
Account is disabledEnsure this check box is cleared.
The preceding values are examples. Enter values that comply with thepassword policy of your organization.
d. Review the password settings in the summary panel, and click Finish.13. You can now exit the Microsoft Active Directory Users and Computers tool.
128 IBM Maximo Asset Management: Installation Guide (Oracle WebLogic Server)

What to do next
Microsoft Active Directory configuration is finished and you are now ready toinstall the remaining Maximo Asset Management middleware and configure theJ2EE server to use Microsoft Active Directory.
Manually configuring the J2EE serverThis section contains instructions for manually configuring an existing J2EE serverfor use by Maximo Asset Management.
You must complete the manual configuration of the J2EE server before you use theMaximo Asset Management installation program if you choose to deploy MaximoAsset Management using Oracle WebLogic Server.
Manually configuring WebLogic ServerWebLogic Server can be used with Maximo Asset Management if it is manuallyconfigured.
About this task
You can use a WebLogic Server as your J2EE server. The Maximo AssetManagement installation process prepares EAR files on the Maximo AssetManagement administrative workstation. These files are then manually deployedto your WebLogic Server. The Maximo Asset Management installation programdoes not automatically configure a WebLogic Server environment It does not installor otherwise deploy Maximo Asset Management applications into a WebLogicServer server.
Manually configuring WebLogic Server consists of the following tasks:
Procedure1. “Creating the MAXIMOSERVER domain” on page 542. “Configuring JMS options for integration framework” on page 553. “Configuring JMS for the email listener in WebLogic Server” on page 56
Creating the MAXIMOSERVER domain:
This section details how to create the MAXIMOSERVER domain within WebLogicServer.
About this task
To create the MAXIMOSERVER domain within WebLogic Server, complete thefollowing steps:
Procedure
1. Launch the Configuration wizard tool.v For Windows systems, select Start > Programs > BEA Products > Tools >
Configuration Wizard.v For UNIX systems, launch the Configuration wizard using the config.sh
command located in <WebLogic_Home>/weblogic10/common/bin.2. From the welcome panel, select Create a new WebLogic Server domain, and
then click Next.
Chapter 6. Deploying manually reusing existing middleware (Scenario 3) 129

3. From the Select a Domain Source panel, select Generate a domain configuredautomatically to support the following products, and then click Next.
4. From the Specify Domain Name and Location panel, name the domainMAXIMOSERVER, and then click Next
5. From the Configure Administrator Username and Password panel, enter anadministrator user ID and password, and then click Next.
6. From the Configure Server Start Mode and JDK panel, enter the followinginformation, and then click Next.
WebLogic Server Domain Startup ModeSelect Production.
Selecting this option requires that you provide a user ID and passwordin order to deploy applications.
JDK SelectionSelect a JDK with a version number 1.6.0 or greater from the suppliedJDKs.
7. Proceed through the next few panels until you reach the CustomizeEnvironment and Services Settings panel. From the Customize Environmentand Services Settings panel, select the default option No, and then click Next.
8. From the Create WebLogic Server Domain panel, change the Domain Namevalue to MaximoServer, and then click Create to create the domain.
9. Once the domain has been created, ensure that the Start Admin Server optionis cleared, and then click Done to close the Configuration wizard. On UNIXsystems, this option is not displayed.
Configuring JMS options for integration framework:
This procedure provides details on steps to configure JMS queues.
Before you begin
You need to be familiar with the Oracle WebLogic Server Administration Consoleto complete the following procedure. See your Oracle WebLogic Serverdocumentation on how to navigate through the Oracle WebLogic ServerAdministration Console.
Procedure
1. Launch Internet Explorer and open the MAXIMOSERVER Administration Consoleby typing the following URL:http://host_name:7001/console
2. Sign in by entering your user ID and password.3. Create three persistent file stores with the following configuration parameters:
Option Description
File Store Name sqinstore, sqoutstore, cqinstore
File Store Target MAXIMOSERVER
File Store Directory C:\WebLogic, or another directory of your choice
File stores have better performance in general. However, you can choose tocreate database-based stores. To choose between file stores and database-basedstores, consult your Oracle WebLogic Server documentation.
4. Create three JMS servers with the following configuration parameters:
130 IBM Maximo Asset Management: Installation Guide (Oracle WebLogic Server)

Option Description
Properties Name sqinserver, sqoutserver, cqinserver
Server Target MAXIMOSERVER
Bytes Maximum 20% or below of the allotted JVM heap size
It is recommended that you configure the Bytes Maximum for the JMS serversto a value of 20% or below of the allotted JVM heap size to prevent the OracleWebLogic Server from running out of memory.
5. Create a JMS system module named intjmsmodule with MAXIMOSERVER asthe target server.
6. Add a connection factory resource to the JMS module:
Option Description
Name intjmsconfact
JNDI Name jms/maximo/int/cf/intcf
Target MAXIMOSERVER
7. Add three queue resources to the JMS Module:a. Create the queue resource type.b. Create a new subdeployment with the same name as the queue.c. Assign the subdeployment_nameserver server target to the subdeployment.
Option Description
Queue 1 Name: sqin JNDI Name: jms/maximo/int/queues/sqin
Queue 2 Name: sqout JNDI Name: jms/maximo/int/queues/sqout
Queue 3 Name: cqin JNDI Name: jms/maximo/int/queues/cqin
Template None
8. Enable the JMS connection factory for integration framework:a. Select the intjmsconfact link.b. From the Transactions tab, check the XA Connection Factory Enabled
check box.c. Set the Maximum Messages per Session to -1.
9. Save and activate the changes.
What to do next
You need to stop and restart the MAXIMOSERVER application server for the update totake effect.
Configuring JMS for the email listener in WebLogic Server:
About this task
You use the email listeners application to receive and process requests throughemail in the form of email messages.
To configure JMS queues for the WebLogic Server, complete the following steps:
Chapter 6. Deploying manually reusing existing middleware (Scenario 3) 131

Procedure
1. Log in to the WebLogic Server administration console.2. Create a persistent store.
a. In the Domain Structure panel, expand Services and then click PersistentStores.
b. Click New and select the option to create a file store.c. Enter lsnrstore for the name of the file store and c:\wls10 as the directory,
and then click Finish.3. Create a JMS Server
a. In the Domain Structure panel, under Services > Messaging , click JMSServers, enter the following information, and then click Next.
Name Enter a name for a new JMS server, for example, lsnrserver.
Persistent StoreSelect lsnrstore.
b. For the Target, select AdminServer, and then click Finish.4. Create a JMS System Module
a. In the Domain Structure panel, under Services > Messaging , click JMSModules, and then click New.
b. Enter a value for the Name field, such as lsnrjmsmodule, and then clickNext.
c. Select the option for AdminServer, and then click Next.d. Select the option for Would you like to add resources to the JMS system
module?, and then click Finish.5. Add a connection factory to the JMS module.
a. From the Summary of Resources table of the lsnrjmsmodule module, clickNew to add a resource.
b. Select the Connection Factory option, and then click Next.c. From the Connection Factory Properties panel, enter the following
information, and then click Next.
Name Enter a name for the new connection factory. For example,lsnrconnfact.
JNDI NameEnter jms/mro/lsnr/lsnrcf.
d. Ensure AdminServer is selected, and then click Finish
6. Add a queue to the JMS module.a. From the Summary of Resources table of the lsnrjmsmodule module, click
New to add a resource.b. Select the Queue option, and then click Next.c. From the JMS Destination Properties panel, enter the following information,
and then click Next.
Name Enter a name for the new queue. For example, lsnrqueue.
JNDI NameEnter jms/mro/lsnr/qin.
TemplateNo template is necessary.
d. Click Create a new Subdeployment, select lsnrserver, and then clickFinish.
132 IBM Maximo Asset Management: Installation Guide (Oracle WebLogic Server)

7. Set the XA option for the connection factory.a. Select lsnrconnfact, and then select the Transactions tab.b. Ensure that the XA Connection Factory Enabled option is selected, and then
click Save.8. Click Activate Changes to save and activate all changes.9. To enable an email listener to use JMS queues, a Message Driven Bean is
configured through a deployment descriptor file that is part of the installation.You configure the Message Driven Bean by removing comment lines fromsections within the deployment descriptor files. Edit the ejb-jar.xml andweblogic-ejb-jar.xml files.a. Open the install_dir\applications\maximo\mboejb\ejbmodule\META-INF\
ejb-jar.xml file in an editor, uncomment the following sections, and thensave the file:Email Listener JMS is not deployed by default<message-driven id="MessageDriven_LSNRMessageBean"><ejb-name>LSNRMessageBean</ejb-name>ejb-class>psdi.common.emailstner.LSNRMessageBean</ejb-class>transaction-type>Container</transaction-type><message-destination-type>javax.jms.Queue</messagedestination-type></message-driven>
Email Listener JMS is not deployed by default<container-transaction><method><ejb-name>LSNRMessageBean</ejb-name><method-name>*</method-name></method><trans-attribute>Required</trans-attribute></container-transaction>
b. Open the c:\ibm\smp\maximo\applications\maximo\mboejb\ejbmodule\META-INF\weblogic-ejb-jar.xml file in an editor, uncomment the followingsection, and then save the file:Email Listener JMS is not deployed by default<weblogic-enterprise-bean><ejb-name>LSNRMessageBean</ejb-name><message-driven-descriptor><destination-jndi-name>jms/mro/lsnr/qin</destination-jndiname><connection-factory-jndi-name>jms/mro/lsnr/lsnrcf</connection-factory-jndi-name></message-driven-descriptor><transaction-descriptor><trans-timeout-seconds>600</trans-timeout-seconds></transaction-descriptor><jndi-name>LSNRMessageBean</jndi-name></weblogic-enterprise-bean>
Running the installation program without middlewareautoconfiguration
Maximo Asset Management can be deployed with middleware that has beenpreviously configured. You might not want to have the Maximo Asset Managementinstallation program automatically configure middleware. If your organization hasspecific policies and procedures that govern how you create databases, databaseinstances, and users within your organization, use these instructions.
Chapter 6. Deploying manually reusing existing middleware (Scenario 3) 133

Before you begin
The instructions provided are for a multiple server installation using default values.If any errors are encountered, a dialog box detailing the error appears. You cannotcontinue the installation until the errors are resolved.
Ensure that you have addressed the following prerequisite conditions:v Ensure that all middleware servers and services detailed in “Restarting
middleware on Windows” on page 191 and “Restarting middleware on UNIX”on page 192 are started and active.
v On the administrative workstation, temporarily shut down any non-criticalprocesses that can have a negative effect on the installation, such as anti-virussoftware.
v Ensure that the Windows DEP setting does not prevent the launchpad fromrunning, by selecting Start > Settings > Control Panel > System > Advanced >Performance > Settings > Data Execution Prevention. Select Turn on DEP foressential Windows programs and services only and click Apply. You may beasked to reboot the server.
v For Linux and UNIX systems with middleware installed, the command hostname-f must return a fully qualified host name. If necessary, consult thedocumentation for your operating system.Alternatively, you can provide the IP address for the system.
v When you are installing the product, enter the fully qualified host name of thesystem for all host name values. Alternatively, you can provide the IP addressfor the system.
v Enable a remote execution and access service on every system with middlewareinstalled. Each remote system must support a remote access protocol and acceptremote logins from a user name and password configured on the target server.Remote access protocols include SSH and Windows SMB. If the remote system isa Windows server, you must configure remote execution and access to use SMB.
v Perform the following tasks to prepare the DB2 database:– If DB2 is installed on a Linux or UNIX system, you must create the instance
user and the home directory for the user on the DB2 server.– The database instance owner home directory must have 8 GB of space
available regardless of whether a database is installed in that location.– The user ID for the DB2 instance administrator must have SYSADM
(administration) authority. You enter this user ID on the DB2 Administrationscreen and on the Remote Access Authorization screen of the Maximo AssetManagement installation program. See the DB2 product documentation forinformation about creating a user with SYSADM (administration) authority onthe DB2 server. You must add root to a group with SYSADM authority forUNIX systems.
– To avoid high system memory usage by DB2, you can set the following DB2property and then restart the DB2 server:db2 update dbm cfg using KEEPFENCED NO
– If you are plan to install Maximo Asset Management in a language other thanEnglish, you must accept the default values for database table space size andindex table space size and these values are displayed as null during theinstallation. If you want to customize the table space sizes, you have threeoptions. Run the Maximo Asset Management installation program in English,manually configure the database, or modify the table space sizes afterinstallation.
134 IBM Maximo Asset Management: Installation Guide (Oracle WebLogic Server)

v Database users and database instance names for DB2 and Oracle cannot containspaces.
v Avoid using an installation path that includes non-English characters.v If you use DB2 on UNIX systems with Maximo Asset Management, you must
add root to a group with SYSADM authority for the database instance. Thismembership must be in place before starting the Maximo Asset Managementinstallation program.
v Complete the following tasks for Oracle WebLogic Server:– Configure JMS options for integration framework– Create the domain.– Setup JMS for e-mail listener.
v You can create a maxdemo database during the installation of Maximo AssetManagement and populate the database with sample data. Refer to Create amaxdemo database during installation for more information.
About this task
To install Maximo Asset Management, follow these steps:
Procedure1. Log in on the administrative system.2. Ensure the database server, directory server, and application server services
are running.3. Start the Maximo Asset Management installation program from the launchpad.
a. Start the launchpad. From the downloaded product installation image,browse to the root directory, and run the following command:
Windowslaunchpad.exe
b. In the launchpad navigation pane, click Install The Product.c. Click Install IBM Maximo Asset Management 7.5.Alternatively, you can start the Maximo Asset Management installationprogram directly. On the downloaded installation image, browse to\Install\mam\, and run the following command
Windows
v install.exe
v install_win64.exe
4. Select a language for the installation and click OK.5. In the Introduction panel, click Next.6. In the Choose Installation folder panel, enter the path to install Maximo Asset
Management. By default, this value is C:\IBM\SMP for Windows systems. Thepath you enter must not contain spaces.Click Edit description and enter a description for the current installation. Thisdescription is useful for differentiating between multiple installations hostedon the same administrative workstation.
7. Review the information presented in the Verify installation location panel, andthen click Next. The Verify installation location panel reports previousinstallation information, if any, that was found based upon the installationdirectory you chose in the previous panel. Once you advance past this panel,you cannot go back and change the installation directory for this installation.
Chapter 6. Deploying manually reusing existing middleware (Scenario 3) 135

8. In the Package Summary panel, review the package deployment actions, andthen click Next. This panel lists version information for both new and existingpackages on the system. Target package version information indicates thepackage version being currently deployed. In certain upgrade scenarios, aquestion mark can be displayed alongside a package listed. This symbolserves as a reminder that there might be an updated version of this packageavailable. It does not indicate a failure of the installer.
9. In the software license agreement panel, read the license information andselect I accept both the IBM and the non-IBM terms. if you agree with theterms, and then click Next.
10. In the Choose Deployment panel, select the Custom deployment topology,and then click Next.
SimpleA simple installation deploys all Maximo Asset Managementcomponents on a single system. This deployment option is typicallyused for demonstration, proof-of-concept, or training purposes only.
CustomA custom installation can deploy Maximo Asset Managementcomponents across several systems, and can reuse existingmiddleware components. This deployment option is typically used ina production environment.
11. In the Import Middleware Configuration Information panel, indicate that youwant to use the field values that you used with the middleware installationprogram. These values are used as default values for those same fields in theMaximo Asset Management installation program. Click Next.
Import middleware configuration informationSelect this check box to allow the Maximo Asset Managementinstallation program to reuse values specified in the middlewareinstallation program.
The middleware default information is not used if you select theSimple deployment path.
Host nameEnter the host name of the system where the middleware installationprogram was run.
User IDEnter the user ID that was used to run the middleware installationprogram.
PasswordEnter the password of the user ID that was used to run themiddleware installation program.
Workspace locationEnter the location of the topology file that contains the values enteredfor the middleware installation program. This file is found in theworkspace that was defined during the middleware installation task.For example, C:\ibm\tivoli\mwi\workspace for Windows and/root/ibm/tivoli/mwi/workspace for UNIX.
12. In the Database Type panel, select the software to use for the Maximodatabase, and then click Next.
DB2 Select this choice to use DB2 as the Maximo database.
136 IBM Maximo Asset Management: Installation Guide (Oracle WebLogic Server)

Select the Disable non-English-language support option to preventthe process automation engine from deploying languages other thanEnglish when the database type is DB2. This option enhances databaseperformance, but excludes non-English-language support for thedeployment. If you select this option, you cannot deploy additionallanguages at a later time.
Oracle Select this choice to use Oracle as the Maximo database.
Microsoft SQL ServerSelect this choice to use Microsoft SQL Server as the Maximodatabase.
Each database has its own unique set of configurable parameters and values.13. In the Database panel, enter configuration information about the database,
and then click Next.
DB2
Host nameEnter the fully qualified host name of the server hosting DB2.
Alternatively, you can provide the IP address for the system.
Port Enter the port being used by the DB2 instance.
The default is 50005.
Database nameEnter the name of the database to use with Maximo.
The default database name is maxdb75. The database iscreated if it does not exist.
InstanceEnter the name of the database instance to be used withMaximo.
The default instance name is ctginst1. This instance is createdif it does not exist, however, the user and its associated homedirectory must exist on the DB2 server.
Schema nameEnter the schema name for the database.
The name of the DB2 database schema. This value can be thesame value as the owner of the table spaces defined or adifferent value. For example, maximo.
Database user IDEnter the user ID used for the product to access DB2.
Default for all platforms is maximo.
This user ID is created if it does not exist.
This user ID cannot be the same one used as the instanceadministrator user ID.
Database passwordEnter the password for the user ID used to access DB2.
Oracle
Host nameEnter the host name of the server hosting Oracle.
Chapter 6. Deploying manually reusing existing middleware (Scenario 3) 137

The host name must be fully qualified.
Port Enter the port being used by Oracle.
The default is 1521.
InstanceEnter the name of the database instance to be used withMaximo.
The default instance name is ctginst1.
Database user IDEnter the user ID used for Maximo to access Oracle.
Default for all platforms is maximo.
This user ID is created if it does not exist.
Database passwordEnter the password for the user ID used to access Oracle.
Microsoft SQL Server
Host nameEnter the host name of the server hosting Microsoft SQLServer.
The host name must be fully qualified.
Port Enter the port being used by Microsoft SQL Server.
The default is 1433.
Database nameEnter the name of the database to use with Maximo.
The default database name is maxdb75.
Database user IDEnter the user ID used to access Microsoft SQL Server.
Default for all platforms is maximo.
This user ID is created if it does not exist.
Database passwordEnter the password for the user ID used to access MicrosoftSQL Server.
After you have specified configuration information for the database that wasselected, the Maximo Asset Management installation program connects to thedatabase server to validate the information you have specified.
14. In the Automate Database Configuration panel, select The database hasalready been created and configured, and then click Next.This step assumes that you have already created a database instance, adatabase, table spaces, a user, and schema for use with Maximo AssetManagement. See “Manually configuring the database server” on page 112. Ifyou have not manually configured the database before selecting The databasehas already been created and configured you are prompted to complete thembefore restarting the installation program.
15. In the Database Tablespace panel, enter information about the table space ofthe database, and then click Next.
DB2
138 IBM Maximo Asset Management: Installation Guide (Oracle WebLogic Server)

Data tablespace nameEnter the name of the table space that is created in DB2 forMaximo.
For all platforms, the default is MAXDATA.
If the table space does not exist, it is created.
Temporary tablespace nameEnter the name for the temporary table space to be created forDB2.
Temporary table spaces hold data during sorting or collatingactions.
For all platforms, the default is MAXTEMP.
If the table space does not exist, it is created.
Index tablespace nameEnter a name for the index table space.
For all platforms, the default is MAXDATA.
Oracle
Data table space nameEnter the name of the table space to be created in Oracle forthe product..
For all platforms, the default is maxdata.
Temporary table space nameEnter the name for the temporary table space to be created forOracle.
Temporary table spaces hold data during sorting or collatingactions.
For all platforms, the default is MAXTEMP.
Index table space nameEnter a name for the index table space.
For all platforms, the default is MAXDATA.The Maximo Asset Management installation program now connects to thedatabase server and validates the information you specified.
16. Once the database validation task has completed, in the Application ServerType panel, select Oracle WebLogic Server for the Maximo Asset Managementdeployment, and then click Next.
Oracle WebLogic ServerSelect this option to configure WebLogic Server as the J2EE server touse with Maximo Asset Management.
If you select WebLogic Server, you do not have the option ofconfiguring it automatically through the Maximo Asset Managementinstallation program. You must manually configure WebLogic Serverand manually deploy application files.
17. In the Enter Maximo users panel, enter the following information, and thenclick Next.
Maximo administration userProduct administrator user ID used for initial configuration andadding users. Default value is maxadmin.
Chapter 6. Deploying manually reusing existing middleware (Scenario 3) 139

PasswordPassword for the Maximo administration user.
Maximo system registration userUser ID used for the self registration of users. Default value is maxreg.
PasswordPassword for the Maximo system registration user.
Maximo system integration userUser ID used with enterprise adapters. Default value is mxintadm.
PasswordPassword for the Maximo system integration user.
Custom Maximo user ID and password values are stored in the Maximodatabase. The default Maximo user IDs of maxadmin, maxreg, and maxintadmare also created as users in the Maximo database. Creation of the default userIDs is done for internal processing purposes. If you use Maximo security forauthentication and authorization, the default user IDs can be used to log in tothe application. If you view this condition as a security risk, you can modifythe passwords for these default user IDs. Passwords for these user IDs can bemodified through the Users application.
18. In the SMTP Configuration panel, enter SMTP configuration information usedby workflows to communicate with workflow participants, and then clickNext.
SMTP serverEnter the fully qualified host name of the SMTP server that sendsmessages to participants.
Alternatively, you can provide the IP address for the system.
Administrator emailEnter a valid email address. This address is to send messages.
You can defer SMTP configuration at this time by not providing anyinformation for this panel and clicking through to the next panel. However,you must configure these parameters through the product interface as a postinstallation task.
19. From the Base-language selection panel, select a language from the list andthen click Next.
20. From the Additional language selection panel, you can optionally select one ormore languages from the list and then click Next.
21. From the Run Configuration Step panel, decide how you would like toperform the configuration step of the installation, and then click Next. If youdo not select any options, when you click Next, the configuration stepproceeds. If you do not select any options, when you click Next, theconfiguration step proceeds. You can optionally create a maxdemo databasefrom the Run Configuration Step panel. Refer to Create a maxdemo databaseduring installation for more information.
Copy files now, but perform the installation configuration step later.Select this option if you would like to copy files from the installationsource to the administrative workstation. You must perform theconfiguration step at a later time to complete the deployment. It isimportant that you not install another product before completing theconfiguration step of the original installation. Installing another
140 IBM Maximo Asset Management: Installation Guide (Oracle WebLogic Server)

product before running the configuration step for this installationoverwrites the taskstore, which prevents the original installation fromever being deployed.
The configuration values that you enter are stored in theinstall_home\maximo\applications\maximo\properties\maximo.properties and install_home\etc\install.properties files.You run the configuration steps outside of the Maximo AssetManagement installation program by using the taskrunner utility, inthe install_home\scripts directory. Run the taskrunner utility fromthe command line, and it uses the configuration values stored in themaximo.properties and install.properties files to configure MaximoAsset Management.install_home\scripts\taskrunner [CONTINUE <STOPONERROR|NOSTOPONERROR>]
If you run taskrunner with the NOSTOPONERROR parameter, thetaskrunner continues despite errors. . If you run taskrunner with theSTOPONERROR parameter, the taskrunner stops when it encounters anerror. If you used STOPONERROR you can rectify the conditions thatcaused the error, and then resume the installation at the point wherethe last successfully completed task was recorded in the previousattempt by starting taskrunner with the CONTINUE parameter.
Defer the update of the Maximo database.Select this option if you would like to manually run the databaseupdate task for the product deployment. You must manually run theupdatedb command to write data to the Maximo database in order tocomplete the deployment. The installation program is limited tocopying files to the administrative system and registering productprocess solution packages. This option can be used in cases wherethere is a fix pack available that addresses known issues with theupdatedb script. In this scenario, you choose the Defer the update ofthe Maximo database option, apply the fix pack, and then run theupdatedb -v1 command manually.
22. In the Choose Shortcut Folder panel, select the type of shortcut you wouldlike to arrange for Maximo Asset Management, and then click Next.
In a new Program GroupSelect this option and enter the name of a new program group if youwould like to create Maximo Asset Management shortcuts in a newprogram group.
In an existing Program GroupSelect this option and choose the name of an existing program groupto store Maximo Asset Management shortcuts.
In the Start MenuSelect this option to create shortcuts for Maximo Asset Management inthe Start menu.
In order to use the Start menu shortcut with Internet Explorer, add theMaximo Asset Management URL to the trusted sites Web content zoneand disable the option of requiring server verification for all sites inthe zone.
On the DesktopSelect this option to create shortcuts for Maximo Asset Managementon the desktop.
Chapter 6. Deploying manually reusing existing middleware (Scenario 3) 141

In the Quick Launch BarThis option must not be used. Do not select this option. Selecting thisoption does not create a shortcut in the Quick Launch bar.
Other Select this option and use Choose... to select another location to createMaximo Asset Management shortcuts.
Don't create iconsSelect this option if you do not want any Maximo Asset Managementshortcuts created.
Create Icons for All UsersSelect this option if you would like Maximo Asset Managementdesktop icons to appear on the desktop for all system users.
23. In the Input Summary panel, review the information you have provided to theMaximo Asset Management installation program, and then click Next.Use Previous to return to previous panels to change values.
24. In the Pre-Installation Summary panel, review the installation informationpresented, and then click Install.The installation task begins. Progress can be monitored by viewing messagesdisplayed above the progress bar.
25. In the Install Complete panel, click Done.
What to do next
Complete post installation tasks required for non-automated middlewareconfiguration installation. You must now deploy the maximo.ear andmaximoiehs.ear files.
“Deploying EAR files” on page 204This section contains information about deploying Maximo Asset ManagementEAR files manually into Oracle WebLogic Server.
Create a maxdemo database during installationYou can create a maxdemo database during the installation of Maximo AssetManagement and populate the database with sample data.
Procedure1. In the Run Configuration Step screen in the installation wizard, select the Copy
files now, but perform the installation configuration later option.2. When the installation finishes, exit the installation wizard.3. Rename the C:\IBM\SMP\Maximo\tools\maximo\en\maximo.<dbtype> file.4. Copy the C:\IBM\SMP\Maximo\tools\maximo\en\maxdemo.<dbtype> file to
C:\IBM\SMP\Maximo\tools\maximo\en\maximo.<dbtype>, where en is thelanguage folder and the dbtype is ora/sqs/db2.
5. Open a command window and browse to C:\IBM\SMP\scripts and run thefollowing command: taskrunner.bat CONTINUE STOPONERROR
6. When taskrunner finishes running, rename the files back to their originalnames. Note: Do not restart the computer before you run the taskrunnercommand. The taskrunner utility does not create a persistent store ofinformation and data can be lost.
142 IBM Maximo Asset Management: Installation Guide (Oracle WebLogic Server)

Post installation for Oracle WebLogic Server deploymentsThere is a post installation step required for Oracle WebLogic Server deployments.
About this task
When using Oracle WebLogic Server as the application server for your MaximoAsset Management deployment, the installation program produces an EAR file.You must then manually deploy that file to Oracle WebLogic Server.
When using Oracle WebLogic Server, you must modify the weblogic.xml file andrebuild the maximo.ear file before deploying it.
Procedure1. Install the updated JDK 1.6 program.
a. Obtain the latest JDK program with a version number 1.6.0 SR7 or greater,from http://www.oracle.com/technetwork/java/index.html.
b. Start the installation program.c. Accept the license agreement.d. Change the installation destination path to your Oracle home folder, and
click OK , then Next.e. Accept any additional prompts to install the JDK program so that the
installation process can complete successfully.2. If you are using an Oracle database, copy the oraclethin.jar file.
a. Copy the oraclethin.jar file from the administrative workstation to theserver where you installed Oracle WebLogic Server. Use any file transferprotocol that is available.
b. The oraclethin.jar file is in the install_home\maximo\applications\maximo\lib directory. The default install_home directory isC:\IBM\SMP\Maximo\Applications\Maximo\lib. Copy the oraclethin.jar fileto the J2EE server and into the wls11g/server/lib directory. For example,C:/Oracle/wls11g/server/lib.
3. Edit the domain configuration file for proper Java settings.a. Navigate to Install_dir\user_projects\domains\mydomain\bin.b. Right-click and edit (do not double-click) setDomainEnv.cmd (Windows) or
setDomainEnv.sh (UNIX).c. Using your text editor, search for and replace jdk entries with entries that
configure Oracle WebLogic Server to use the updated JDK program. Twoinstances must be replaced.
d. (Oracle only) Search for PRE_CLASSPATH. Set the parameter as follows:set PRE_CLASSPATH=%WL_HOME%\server\lib\oraclethin.jar (Windows)PRE_CLASSPATH={WL_HOME}/server/lib/oraclethin.jar (UNIX)
Note: This step is required for connecting to Oracle databases from OracleWebLogic Server.
e. Increase the Java Heap parameters by searching for MEM_ARGS and settingthe parameter as follows:set MEM_ARGS=-Xms512m -Xmx1024m -XX:MaxPermSize=512m (Windows)MEM_ARGS=-Xms512m -Xmx1024m -XX:MaxPermSize=512m (UNIX)
These parameters are case sensitive. Ensure to include the minus (-) signbefore each parameter and to include the m after each value.
Chapter 6. Deploying manually reusing existing middleware (Scenario 3) 143

f. Search for set JAVA_OPTIONS=%JAVA_OPTIONS% %JAVA_PROPERTIES%. Insert anoption right after this string as follows:-Dcom.sun.xml.namespace.QName.useCompatibleSerialVersionUID=1.0
The entry looks like this when complete:set JAVA_OPTIONS=%JAVA_OPTIONS% %JAVA_PROPERTIES%-Dcom.sun.xml.namespace.QName.useCompatibleSerialVersionUID=1.0-Dwlw.iterativeDev=%iterativeDevFlag% -Dwlw.testConsole=%testConsoleFlag%-Dwlw.logErrorsToConsole=%logErrorsToConsoleFlag%
g. Save and close the setDomainEnv.cmd file.4. Edit the \IBM\SMP\maximo\applications\maximo\maximouiweb\webmodule\WEB-
INF\weblogic.xml file and add the following entries:<session-descriptor><cookie-http-only>false</cookie-http-only></session-descriptor>
5. Start the server without being prompted for user name and password. If youare working in Production mode and do not want to be prompted for theOracle WebLogic Server user name and password, create a boot.propertiesfile. This procedure stores the user name and password in an encrypted format.Place the following two lines in a text file:username=<administrator username>password=<administrator password>
The user name and password values must match an existing user account inthe Authentication provider for the default security realm. If you save the fileas boot.properties and locate it in the mydomain folder (for example,C:\BEA\User_projects\domains\mydomain), the server automatically uses this fileduring its subsequent startup cycles. The first time you use this file to start aserver, the server reads the file and then overwrites it with an encryptedversion of the user name and password.
6. Verify settings by starting Oracle WebLogic Server. To ensure that the edits thatyou made to the previous Oracle WebLogic Server files were accurate, start theOracle WebLogic Server.
7. Rebuild the maximo.ear file.\IBM\SMP\maximo\deployment\buildmaximoear
8. Deploy the maximo.ear file to Oracle WebLogic Server.
Deploying ear filesYou are now ready to deploy the EAR files from the Oracle WebLogic ServerAdministration Console. Deploying the EAR files starts the Maximo ApplicationServer.
Before you begin
Windows WindowsIf MAXIMOSERVER is not running, start it from a command prompt.
UNIX UNIXEnsure that the Oracle WebLogic Server daemon is running.
144 IBM Maximo Asset Management: Installation Guide (Oracle WebLogic Server)

About this task
In order to view the Oracle WebLogic Server Administration Console, you need toalso install a Java Virtual Machine (JVM). Newer versions of Windows might notship with JVM.
Procedure1. Change to the my_domain directory:
Windows WindowsFrom a command prompt, change directory path to:drive_name:\weblogic_install_dir\user_projects\domain\my_domain
UNIX UNIXOpen a Terminal window (or a command prompt, if you are telnetingfrom a Windows computer) and change directory as follows:cd /home/mxadmin/weblogic_install_dir/user_projects/domains/my_domain
2. Type
Windows WindowsstartWebLogic.cmd
UNIX UNIX./startWebLogic.sh
and press Enter. Once the phrase: Server started in RUNNING mode displays,the Oracle WebLogic Server is running.
3. Start the MAXIMOSERVER Oracle WebLogic Server Administration Console bytyping the following URL in the address bar of your browser:http://host_name:7001/console
4. Log in to the administrative console with the administrative user name andpassword.
5. In the left pane, click the Lock&Edit button in the Change Center section toset the server to edit mode.
6. In the left pane, click the Deployments link in the Domain Structure section.7. In the Summary of Deployments section, click the Install button. The Install
Application Assistant opens.8. Click the upload your file(s) link.9. Click the Browse button next to the Deployment Archive field. Browse to
where you have maximo.ear file installed (c:/ibm/smp/maximo/deployment/default/ of the administrative workstation), select the file and click Open.
10. Click Next to upload the file to the Oracle WebLogic Server server.11. Click the radio button next to the maximo.ear file, and Next to continue the
deployment.12. Accept the default value “Install this deployment as an application” and click
Next to continue the deployment.13. Accept all other default values and click Finish to start the deployment
process.14. When the deployment process is complete, click the Activate Changes button
in the Change Center to apply the changes. The following message displays:All changes have been activated. No restarts are necessary.
15. Repeat Steps 8 on page 73 through 14 on page 74 to deploy maximoiehs.ear.
Chapter 6. Deploying manually reusing existing middleware (Scenario 3) 145

16. Click the checkbox next to the maximo application.17. Click the dropdown arrow of the Start button and select Servicing all
requests. The Start Application Assistant displays.18. Click Yes to start the system.
Setting the Oracle WebLogic Server host nameSetting the Oracle WebLogic Server host name manually to access application helpinformation.
About this task
By default, the property used to store the host name for the Maximo AssetManagement help system is set to localhost. The fully qualified host name of theOracle WebLogic Server must be configured in the help system property to viewMaximo Asset Management application help topics. Complete this step after youhave deployed Maximo Asset Management EAR files to the Oracle WebLogicServer.
Procedure1. Log in to the Maximo Asset Management console as maxadmin.2. Browse to Go To > System Configuration > Platform Configuration > System
Properties
3. Using the Filter feature, search for the mxe.help.host Property Name.4. Expand the mxe.help.host property and set the attribute to the fully qualified
host name of the Oracle WebLogic Server.5. Select the mxe.help.host record check box.6. Click the Live Refresh icon in the toolbar.7. From the Live Refresh dialog, click OK.
Results
You are now able to access application help topics in the Maximo AssetManagement user interface.
Language deployment after database update deferralSelecting the option to defer the update of the Maximo database when installingthe product, affects how you deploy languages.
During installation, you have the option to defer the database update task. Thisoption prevents writing data to the database during the installation. Theinstallation program is limited to copying files to the administrative system andregistering product process solution packages. You add languages by completingthe installation, manually updating the database, and then updating languagesmanually.
“Manually deploying languages after database update deferral” on page 75Languages must be deployed manually if you defer database updates by theinstallation program.
Manually deploying languages after database update deferralLanguages must be deployed manually if you defer database updates by theinstallation program.
146 IBM Maximo Asset Management: Installation Guide (Oracle WebLogic Server)

Before you begin
You must have run updatedb command before manually configuring languages forPSI packages.
About this task
To manually configure languages for PSI packages, complete the following steps:
Procedure
Update language support for the Maximo core components.Files for the language selections you made during the installation are extracted tothe C:\IBM\SMP\Maximo\Tools\Maximo\locale\xliff\ directory on the system.1. To update a language as the base language to use for the product, run the
following command:install_home\maximo\tools\maximo\TDToolkit.bat-IMPORT-SLEN-TLlocale-maxmessfix
2. To add one or more languages as additional languages for use with theproduct, run the following command for each language you want to add:install_home\maximo\tools\maximo\TDToolkit.bat-ADDLANGlocale-maxmessfix
Chapter 6. Deploying manually reusing existing middleware (Scenario 3) 147

148 IBM Maximo Asset Management: Installation Guide (Oracle WebLogic Server)

Chapter 7. Silent installation
Maximo Asset Management provides the option of installing silently.
The Maximo Asset Management silent installation option allows you to interfacewith the Maximo Asset Management installation program using a commandprompt (not the Maximo Asset Management launchpad), and a response file.
Installing Maximo Asset Management silentlyMaximo Asset Management can be installed silently through the use of aninstallation response file.
Before you begin
You must complete a successful Maximo Asset Management installation in order toproduce a response file to use with a silent installation operation. Alternatively,you can use one of the sample response files provided on the product media andmodify it according to your needs.
You must verify that all response file paths are formatted correctly. If this path iscontained in a response file that is used with a Windows administrative system, anerror occurs. The Windows equivalent in this example must be formatted for aWindows system:USER_INSTALL_DIR=K:\\IBM\\max_dev
Note: You can use a silent installation response file to populate Maximo AssetManagement installation program fields during an attended installation. Removethe INSTALLER_UI=silent property from the response file before using it with theMaximo Asset Management installation program. The installation program usesdefault values by reading from the response file. The Maximo Asset Managementinstallation program uses the response file automatically if it is namedinstaller.properties or install.properties and is located in the same directory.You do not have to specify the response file name when starting the Maximo AssetManagement installation program.
Note: This response file can also be used with the Maximo Asset Managementuninstallation program in order to uninstall Maximo Asset Management silently.
About this task
To install Maximo Asset Management silently, complete the following steps:
Procedure1. Make configuration choices using the Maximo Asset Management installation
program, and record those choices in a response file:a. Start the Maximo Asset Management installation program from the product
image. Use the following command for 32–bit systems:install.exe -r <response file path and name>
For 64–bit systems, use the following command:install_win64.exe -r <response file path and name>
© Copyright IBM Corp. 2007, 2011 149

The Maximo Asset Management installation program executable files arelocated in the Maximo Asset Management directory of the Maximo AssetManagement 7.5 product image.Response files must have a file extension of .properties, for example,response.properties.You must include the full path when specifying the response file.
b. Proceed through the Maximo Asset Management installation program,making configuration choices.
c. Exit the Maximo Asset Management installation program after MaximoAsset Management has been successfully installed.
There are several sample response files provided on the IBM Maximo AssetManagement 7.5 product image.
Table 8. Maximo Asset Management installation program sample silent response files
File Description
simple_response.properties This file contains a sample response file thatwould be used to install a simpledeployment of Maximo Asset Management.
custom_response_win.properties This file contains a sample response file thatwould be used to install a customdeployment of Maximo Asset Managementon Windows.
These files are located in the Maximo Asset Management\samples directory of theproduct image.If the response file is created by recording an actual installation, you must addan entry for LICENSE_ACCEPTED=true. If you are using a sample responsefile, you must change the entry from false to true. If a silent installation isstarted and this entry is not included in the response file then the install endsimmediately. No messages or log file are created.If you plan to deploy Maximo Asset Management using middleware hosted onboth Windows and UNIX operating systems, your response file contains bothWindows and UNIX values. These values include directory paths andexecutable file names. In some cases, the response file is not generated becausethe user starting the installation program does not have write access to thetarget directory. In this scenario, the installation program does not report anerror. The response file is not written to the target directory and the log file isnot produced in the ibm\smp\logs directory, To resolve this issue, ensure theuser invoking the installation program has write access to the target directorybefore running the installation program to produce a response file.
2. Open the response file in a text editor and change the INSTALLER_UI propertyto INSTALLER_UI=silent. Passwords are stored in clear text format. You mustedit the CONFIRM_PASSWORD fields contained in the response file to matchits corresponding password value used for each task. For example, ensure thatCONFIRM_PASSWORD matches RXA_PASSWORD in the following example:#Middleware Server Information#-----------------------------MIDDLEWARE_SERVER=myserver.mydomain.comRXA_USER_ID=rootRXA_PASSWORD=mypasswordCONFIRM_PASSWORD=mypassword
3. Copy the response file to the target system.4. Start the Maximo Asset Management installation program silently and identify
the response file to be used.
150 IBM Maximo Asset Management: Installation Guide (Oracle WebLogic Server)

install.exe -f <response file path and name>
You must include the full path when specifying the response file and it must belocated on the C:\ drive of your system.
Results
The installation proceeds silently, using the values provided in the response file.
Response files that include fields for Oracle configuration must be edited toremove extraneous backslashes. A response file that includes Oracle as adeployment option is generated with fields like the following excerpt:DB_INSTALL_DIR=C\:/oracle/product/10.2.0/db_1INSTANCE_LOCATION=C\:/oracle/product/10.2.0/db_1/dbsUSER_INSTALL_DIR=C\:/IBM/USER_SHORTCUTS=C\:/Documents and Settings/All Users/Start Menu/Programs/process automation engineMAXIMO_INSTALL_DIR=C\:/IBM/maximo
Remove the backslash that appears directly after the drive letter. After editing theprevious example, your response file looks like the following excerpt:DB_INSTALL_DIR=C:/oracle/product/10.2.0/db_1INSTANCE_LOCATION=C:/oracle/product/10.2.0/db_1/dbsUSER_INSTALL_DIR=C:/IBM/USER_SHORTCUTS=C:/Documents and Settings/All Users/Start Menu/Programs/process automation engineMAXIMO_INSTALL_DIR=C:/IBM/maximo
If you attempt to install Maximo Asset Management silently, and the installationUI appears, check inside the response file and be sure that it contains this line:INSTALLER_UI=silent
Silent installation propertiesSilent installation properties are recorded in an installation response file. Silentinstallation response files are generated when the installation program is startedwith the parameters described in the silent installation procedure. Alternatively, asilent installation response file can be created and populated manually.
Common silent installation properties
The following properties are common to all deployments.
Table 9. Common silent installation response file properties
Category Property Definition
File header INSTALLER_UI=SILENT This property must be set so the file can beused with the product installation program.
Package deployment set INSTALL_SOME_PACKAGES=0 If only a subset of packages can beinstalled, set this value to 1. This allowsthe product installation program tocontinue.
License Agreement LICENSE_ACCEPTED=TRUE Set this value to true to accept the licenseagreement or false to reject it.
Installation folder USER_INSTALL_DIR=installation path Set an installation path. For example, forWindows, C:\\IBM\\SMP.
Installation description INSTALLATION_DESCRIPTION Description of the installation location.
Chapter 7. Silent installation 151

Table 9. Common silent installation response file properties (continued)
Category Property Definition
Deployment type SIMPLE=0 Installation is set to a type of SIMPLE. Setto 0 to disable. Set to 1 to enable. IfSIMPLE is enabled, ADVANCED must bedisabled.
ADVANCED=1 Installation is set to a type of ADVANCED,which is a Custom installation. Set to 0 todisable. Set to 1 to enable. If ADVANCEDis enabled, SIMPLE must be disabled.
Middleware ServerInformation (only usedfor Simple installations)
MIDDLEWARE_SERVER=host name Set the host name of the system hosting allmiddleware.
RXA_USER_ID=user name Set the user ID for accessing the systemhosting all middleware.
RXA_PASSWORD=password Set a password for the user ID foraccessing the system hosting allmiddleware.
Import MiddlewareInstallation ProgramInformation
MWI_IMPORT_DATA=0 Set this parameter to import configurationdata from the middleware installationprogram.
Set to 0 to disable. Set to 1 to enable.
MWI_HOSTNAME=host name Set the host name of the system hosting themiddleware installation programworkspace.
MWI_USER_ID=user name Set a user ID used to access the systemhosting the middleware installationprogram workspace. For example, root.
MWI_PASSWORD=passsword Set a password for the user ID used toaccess the system hosting the middlewareinstallation program workspace.
MWI_LOCATION=path Set a path for the location of themiddleware installation programworkspace. For example, for Windows,C:\\ibm\\tivoli\\mwi\\workspace.
SMTP Configuration SMTP_SERVER=host name Set the name of the system hosting theSMTP server responsible for distributingadministration messages to the MaximoAsset Management administrator.
ADMIN_EMAIL=email address Set the email address for the Maximo AssetManagement administrator.
Run Configuration Step RUN_CONFIG_NO=0 Set the behavior of the run configurationstep.
Set to 0 to disable (run the configurationstep at install time). Set to 1 to enable(defer the configuration step).
DEPLOY_EAR_NO=0 Set the behavior of the EAR deploymentstep.
Set to 0 to disable (deploy the EAR atinstall time). Set to 1 to enable (deferdeployment of the EAR).
152 IBM Maximo Asset Management: Installation Guide (Oracle WebLogic Server)

Table 9. Common silent installation response file properties (continued)
Category Property Definition
DEFER_DB_UPDATE=0 Set the behavior of the database updatestep.
Set to 0 to disable (run updateDB at installtime). Set to 1 to enable (defer updateDB).
Shortcut Folder USER_SHORTCUTS=path Set a path for shortcuts. For example, forWindows, C:\\Documents andSettings\\Administrator\\Desktop\\process automation engine.
Users silent installation properties
The following properties are for users created by or identified to the installationprogram.
Table 10. Users silent installation properties
Category Property Definition
User Information MAXADMIN_USER_NAME=user name Set a user name for the Maximoadministrator. For example, maxadmin.
MAXADMIN_PASSWORD=password Set a password for the Maximoadministrator. For example, maxadmin.
MAXREG_USER_NAME=user name Set a user name for the self registrationuser. This user is responsible for theprocess by which users can create theirown accounts. For example, maxreg.
MAXREG_PASSWORD=password Set a password for the self registrationuser. For example, maxreg.
MXINTADM_USER_NAME=user name Set a user name for the internal user. Forexample, mxintadm.
MXINTADM_PASSWORD=password Set a password for the internal user. Forexample, mxintadm.
Common database silent installation properties
The following properties contain common information about the database used forthe deployment.
Table 11. Common database silent installation response file properties
Category Property Definition
Database Type DB_TYPE_DB2=1 Set the database type to DB2. Set to 0 todisable. Set to 1 to enable. Only oneDatabase Type can be enabled.
DB_TYPE_ORACLE=0 Set the database type to Oracle. Set to 0 todisable. Set to 1 to enable. Only oneDatabase Type can be enabled.
DB_TYPE_SQLSERVER=0 Set the database type to Microsoft SQLServer. Set to 0 to disable. Set to 1 to enable.Only one Database Type can be enabled.
Database DB_HOST_NAME=host name Set the host name of the database server.
Chapter 7. Silent installation 153

Table 11. Common database silent installation response file properties (continued)
Category Property Definition
DB_PORT=port Set the database port. For example, 50005.
DB_NAME=name Set a name for the database. For example,maxdb75.
DB2 and SQL SERVER
DB_INSTANCE=instance Set a name for the database instance to usewith the product. For example, ctginst1.
DB2 and Oracle only.
DB_USER=user name Set the name of the user ID to access thedatabase. For example, maximo.
DB_PASSWORD=password Set a password for the database user ID. Forexample, maximo.
DatabaseConfigurationAutomation
AUTOMATE_DB=1 Configure the automatic configuration of thedatabase by the installation program. Set to 0to disable. Set to 1 to enable. EitherAUTOMATE_DB orDO_NOT_AUTOMATE_DB can be enabledat one time.
DO_NOT_AUTOMATE_DB=0 Configure the automatic configuration of thedatabase by the installation program. Set to 0to disable. Set to 1 to enable. EitherAUTOMATE_DB orDO_NOT_AUTOMATE_DB can be enabledat one time.
Remote AccessAuthorization
DB_RXA_USER=user name Set the name of the user ID to access theremote database server system. For example,root.
Only required if AUTOMATE_DB wasenabled.
Oracle or DB2 only.
DB_RXA_PASSWORD=password Set a password for the remote access userID.
Only required if AUTOMATE_DB wasenabled.
Oracle or DB2 only.
DatabaseAdministration
DB_INSTALL_DIR=path Enter the database server installation path.For example,
UNIX /opt/IBM/db2/V9.7
/opt/oracle/product/11.2.0/db_1
WindowsC:\Program Files\oracle\product\11.2.0\db_1
Only required if AUTOMATE_DB wasenabled.
Oracle or DB2 only.
154 IBM Maximo Asset Management: Installation Guide (Oracle WebLogic Server)

Table 11. Common database silent installation response file properties (continued)
Category Property Definition
DB_ADMIN_USER=user name Set the name of the database administrator.For example, db2admin or Sys.
Oracle or DB2 only.
DB_ADMIN_PASSWORD=password Set a password for the remote accessdatabase administrator.
Oracle or DB2 only.
Database TableSpace
DB_TABLE_SPACE_NAME=table space name Set the name of the database table space. Forexample, MAXDATA.
DB2 and Oracle only.
DB_TABLE_SPACE_SIZE=table space size in Mb Set the size of the database table space, inMb. For example, 5000. y.
Only required if AUTOMATE_DB wasenabled.
DB_TEMP_TABLE_SPACE_NAME=temporarytable space name
Set the name of the database temporary tablespace. For example, MAXTEMP.
DB2 and Oracle only.
DB_TEMP_TABLE_SPACE_SIZE=temporarytable space size in Mb
Set the size of the temporary database tablespace, in Mb. For example, 1000.
Only required if AUTOMATE_DB wasenabled.
DB2 and Oracle only.
DB_INDEX_TABLE_SPACE_NAME=index tablespace name
Set the name of the database index tablespace. For example, MAXDATA.
DB2 and Oracle only.
DB_INDEX_TABLE_SPACE_SIZE=index tablespace size in Mb
Set the size of the index database table space,in Mb. For example, 5000.
Only required if AUTOMATE_DB wasenabled.
DB2 and Oracle only.
DB2 silent installation properties
The following properties contain information about an DB2 database used for thedeployment. These properties are only necessary if you are using a DB2 databasefor deployment.
Table 12. DB2 silent installation response file properties
Category Property Definition
DB2 DB_SCHEMA=schema Designate the database schema. Forexample, maximo.
Chapter 7. Silent installation 155

Table 12. DB2 silent installation response file properties (continued)
Category Property Definition
DB_WIN_SERVICE_USER=user name Set the name of the database service ownerin Windows. For example, ctginst1.
Only required if AUTOMATE_DB wasenabled.
DB_WIN_SERVICE_PASSWORD=password Set a password for the database serviceowner in Windows.
Only required if AUTOMATE_DB wasenabled.
DB2_VARCHAR=0 Configure varchar or vargraphic in thedatabase by the installation program. Set to0 to use vargraphic formatting. Set to 1 touse varchar.
varchar formatting supports English only.
Oracle silent installation properties
The following properties contain information about an Oracle database used forthe deployment. These properties are only necessary if you are using an Oracledatabase for deployment.
Table 13. Oracle silent installation response file properties
Category Property Definition
Oracle ORACLE_OWNER_ID=user name Set the Oracle software owner user ID. Forexample, oracle.
Only required if AUTOMATE_DB wasenabled.
ORACLE_OWNER_PASSWORD=password Set the Oracle software owner password.
Only required if AUTOMATE_DB wasenabled.
INSTANCE_LOCATION=instance location Set the Oracle database instancelocation. For example, /opt/oracle/product/11.2.0/db_1.
Only required if AUTOMATE_DB wasenabled.
Microsoft SQL Server silent installation properties
The following properties contain information about a Microsoft SQL Serverdatabase used for the deployment. These properties are only necessary if you areusing a Microsoft SQL Server database for deployment.
156 IBM Maximo Asset Management: Installation Guide (Oracle WebLogic Server)

Table 14. Microsoft SQL Server silent installation response file properties
Category Property Definition
Microsoft SQL Server SQL_DATA_FILE_NAME=data file name Set the file name for the Microsoft SQLServer data source. For example,maxdb75_dat.
Only required if AUTOMATE_DB wasenabled.
DB_TABLE_SPACE_SIZE=data source size inMb
Set the size of the Microsoft SQL Serverdata source, in Mb. For example, 1000.
Only required if AUTOMATE_DB wasenabled.
SQL_ADMIN=user name Set the name of the Microsoft SQL Serveradministrator. For example, sa.
Only required if AUTOMATE_DB wasenabled.
SQL_ADMIN_PW=password Set a password for the Microsoft SQLServer administrator.
Only required if AUTOMATE_DB wasenabled.
SQL_LOG_FILE_NAME Microsoft SQL Server log name. Forexample, maxdb75_log
Only required if AUTOMATE_DB wasenabled.
Common application server silent installation properties
The following properties contain common information about the application serverused for the deployment.
Table 15. Common application server silent installation response file properties
Category Property Definition
Application Server Type APPLICATION_SERVER_TYPE_WAS=1 Configure the application server used forthe deployment. Set to 0 to disable. Set to 1to enable.
Only one Application Server Type can beenabled.
APPLICATION_SERVER_TYPE_BEA=0 Configure the application server used forthe Maximo Asset Managementdeployment. Set to 0 to disable. Set to 1 toenable.
Only one Application Server Type can beenabled.
Chapter 7. Silent installation 157

Security silent installation properties
The following properties are used to configure security.
Table 16. Security silent installation response file properties
Category Property Definition
Security LDAP_OPTION1=1 Configure security so that an LDAP resourceis used for user authorization andauthentication.
Set to 0 to disable. Set to 1 to enable.
Only one LDAP_OPTION parameter can beenabled at one time.
If LDAP_OPTION1 is enabled, then theVMM_USER_RDN, VMM_GROUP_RDNand CREATE_DEFAULT_USERS propertiesare also required to have valid values.
LDAP_OPTION2=0 Configure security so that an LDAP resourceis used for user authentication only. Groupmanagement is managed from the MaximoAsset Managementapplication. Authorization data is stored inthe database.
Set to 0 to disable. Set to 1 to enable.
Only one LDAP_OPTION parameter can beenabled at one time.
LDAP_OPTION3=0 Configure security so that userauthentication and authorization are bothmanaged from the Maximo AssetManagement application. Authenticationand authorization data is stored in thedatabase.
Set to 0 to disable. Set to 1 to enable.
Only one LDAP_OPTION parameter can beenabled at one time.
VMM_USER_RDN=user RDN Set a relative distinguished name for usersfor VMM. For example,ou=users,ou=SWG,o=IBM,c=US.
VMM_GROUP_RDN=group RDN Set a relative distinguished name for groupsfor VMM. For example,ou=groups,ou=SWG,o=IBM,c=US.
CREATE_DEFAULT_USERS=1 Have the Maximo Asset Managementinstallation program create default usersautomatically.
Set to 0 to disable. Set to 1 to enable.
158 IBM Maximo Asset Management: Installation Guide (Oracle WebLogic Server)

Language silent installation properties
The following properties are used to configure languages.
Table 17. Language silent installation response file properties
Category Property Definition
Base Language BASE_ARABIC=0 Set this language as the base language usedby the Maximo Asset Managementapplication.
Set to 0 to disable. Set to 1 to enable.
BASE_BRAZILIAN_PORTUGUESE=0 Set this language as the base language usedby the Maximo Asset Managementapplication.
Set to 0 to disable. Set to 1 to enable.
BASE_CROATIAN=0 Set this language as the base language usedby the Maximo Asset Managementapplication.
Set to 0 to disable. Set to 1 to enable.
BASE_CZECH=0 Set this language as the base language usedby the Maximo Asset Managementapplication.
Set to 0 to disable. Set to 1 to enable.
BASE_DANISH=0 Set this language as the base language usedby the Maximo Asset Managementapplication.
Set to 0 to disable. Set to 1 to enable.
BASE_DUTCH=0 Set this language as the base language usedby the Maximo Asset Managementapplication.
Set to 0 to disable. Set to 1 to enable.
BASE_ENGLISH=1 Set this language as the base language usedby the Maximo Asset Managementapplication.
Set to 0 to disable. Set to 1 to enable.
BASE_FINNISH=0 Set this language as the base language usedby the Maximo Asset Managementapplication.
Set to 0 to disable. Set to 1 to enable.
BASE_FRENCH=0 Set this language as the base language usedby the Maximo Asset Managementapplication.
Set to 0 to disable. Set to 1 to enable.
BASE_GERMAN=0 Set this language as the base language usedby the Maximo Asset Managementapplication.
Set to 0 to disable. Set to 1 to enable.
Chapter 7. Silent installation 159

Table 17. Language silent installation response file properties (continued)
Category Property Definition
BASE_HEBREW=0 Set this language as the base language usedby the Maximo Asset Managementapplication.
Set to 0 to disable. Set to 1 to enable.
BASE_HUNGARIAN=0 Set this language as the base language usedby the Maximo Asset Managementapplication.
Set to 0 to disable. Set to 1 to enable.
BASE_ITALIAN=0 Set this language as the base language usedby the Maximo Asset Managementapplication.
Set to 0 to disable. Set to 1 to enable.
BASE_JAPANESE=0 Set this language as the base language usedby the Maximo Asset Managementapplication.
Set to 0 to disable. Set to 1 to enable.
BASE_KOREAN=0 Set this language as the base language usedby the Maximo Asset Managementapplication.
Set to 0 to disable. Set to 1 to enable.
BASE_NORWEGIAN=0 Set this language as the base language usedby the Maximo Asset Managementapplication.
Set to 0 to disable. Set to 1 to enable.
BASE_POLISH=0 Set this language as the base language usedby the Maximo Asset Managementapplication.
Set to 0 to disable. Set to 1 to enable.
BASE_RUSSIAN=0 Set this language as the base language usedby the Maximo Asset Managementapplication.
Set to 0 to disable. Set to 1 to enable.
BASE_SIMPLIFIED_CHINESE=0 Set this language as the base language usedby the Maximo Asset Managementapplication.
Set to 0 to disable. Set to 1 to enable.
BASE_SLOVAK=0 Set this language as the base language usedby the Maximo Asset Managementapplication.
Set to 0 to disable. Set to 1 to enable.
BASE_SLOVENIAN=0 Set this language as the base language usedby the Maximo Asset Managementapplication.
Set to 0 to disable. Set to 1 to enable.
160 IBM Maximo Asset Management: Installation Guide (Oracle WebLogic Server)

Table 17. Language silent installation response file properties (continued)
Category Property Definition
BASE_SPANISH=0 Set this language as the base language usedby the Maximo Asset Managementapplication.
Set to 0 to disable. Set to 1 to enable.
BASE_SWEDISH=0 Set this language as the base language usedby the Maximo Asset Managementapplication.
Set to 0 to disable. Set to 1 to enable.
BASE_TRADITIONAL_CHINESE=0 Set this language as the base language usedby the Maximo Asset Managementapplication.
Set to 0 to disable. Set to 1 to enable.
BASE_TURKISH=0 Set this language as the base language usedby the Maximo Asset Managementapplication.
Set to 0 to disable. Set to 1 to enable.
Additional Languages ADD_ARABIC=0 Set this language as an additional languageused by the Maximo Asset Managementapplication.
Set to 0 to disable. Set to 1 to enable.
ADD_BRAZILIAN_PORTUGUESE=0 Set this language as an additional languageused by the Maximo Asset Managementapplication.
Set to 0 to disable. Set to 1 to enable.
ADD_CROATIAN=0 Set this language as an additional languageused by the Maximo Asset Managementapplication.
Set to 0 to disable. Set to 1 to enable.
ADD_CZECH=0 Set this language as an additional languageused by the Maximo Asset Managementapplication.
Set to 0 to disable. Set to 1 to enable.
ADD_DANISH=0 Set this language as an additional languageused by the Maximo Asset Managementapplication.
Set to 0 to disable. Set to 1 to enable.
ADD_DUTCH=0 Set this language as an additional languageused by the Maximo Asset Managementapplication.
Set to 0 to disable. Set to 1 to enable.
ADD_ENGLISH=0 Set this language as an additional languageused by the Maximo Asset Managementapplication.
Set to 0 to disable. Set to 1 to enable.
Chapter 7. Silent installation 161
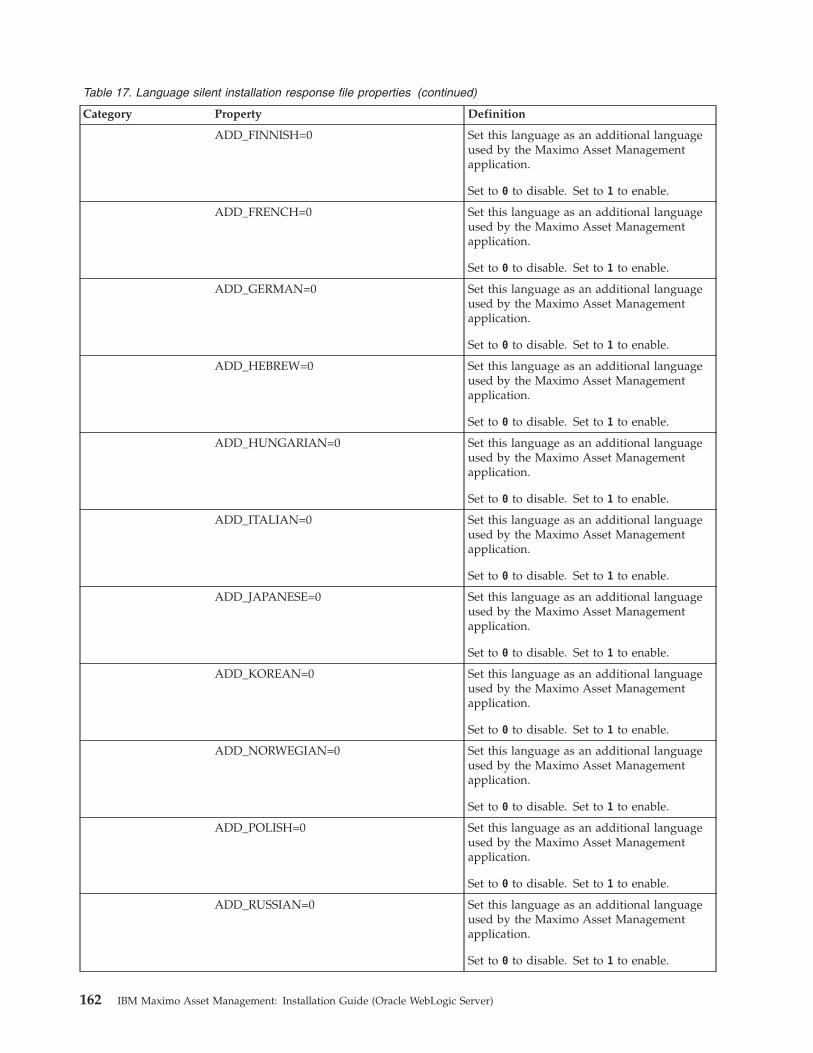
Table 17. Language silent installation response file properties (continued)
Category Property Definition
ADD_FINNISH=0 Set this language as an additional languageused by the Maximo Asset Managementapplication.
Set to 0 to disable. Set to 1 to enable.
ADD_FRENCH=0 Set this language as an additional languageused by the Maximo Asset Managementapplication.
Set to 0 to disable. Set to 1 to enable.
ADD_GERMAN=0 Set this language as an additional languageused by the Maximo Asset Managementapplication.
Set to 0 to disable. Set to 1 to enable.
ADD_HEBREW=0 Set this language as an additional languageused by the Maximo Asset Managementapplication.
Set to 0 to disable. Set to 1 to enable.
ADD_HUNGARIAN=0 Set this language as an additional languageused by the Maximo Asset Managementapplication.
Set to 0 to disable. Set to 1 to enable.
ADD_ITALIAN=0 Set this language as an additional languageused by the Maximo Asset Managementapplication.
Set to 0 to disable. Set to 1 to enable.
ADD_JAPANESE=0 Set this language as an additional languageused by the Maximo Asset Managementapplication.
Set to 0 to disable. Set to 1 to enable.
ADD_KOREAN=0 Set this language as an additional languageused by the Maximo Asset Managementapplication.
Set to 0 to disable. Set to 1 to enable.
ADD_NORWEGIAN=0 Set this language as an additional languageused by the Maximo Asset Managementapplication.
Set to 0 to disable. Set to 1 to enable.
ADD_POLISH=0 Set this language as an additional languageused by the Maximo Asset Managementapplication.
Set to 0 to disable. Set to 1 to enable.
ADD_RUSSIAN=0 Set this language as an additional languageused by the Maximo Asset Managementapplication.
Set to 0 to disable. Set to 1 to enable.
162 IBM Maximo Asset Management: Installation Guide (Oracle WebLogic Server)

Table 17. Language silent installation response file properties (continued)
Category Property Definition
ADD_SIMPLIFIED_CHINESE=0 Set this language as an additional languageused by the Maximo Asset Managementapplication.
Set to 0 to disable. Set to 1 to enable.
ADD_SLOVAK=0 Set this language as an additional languageused by the Maximo Asset Managementapplication.
Set to 0 to disable. Set to 1 to enable.
ADD_SLOVENIAN=0 Set this language as an additional languageused by the Maximo Asset Managementapplication.
Set to 0 to disable. Set to 1 to enable.
ADD_SPANISH=1 Set this language as an additional languageused by the Maximo Asset Managementapplication.
Set to 0 to disable. Set to 1 to enable.
ADD_SPANISH=1 Set this language as an additional languageused by the Maximo Asset Managementapplication.
Set to 0 to disable. Set to 1 to enable.
ADD_TRADITIONAL_CHINESE=0 Set this language as an additional languageused by the Maximo Asset Managementapplication.
Set to 0 to disable. Set to 1 to enable.
ADD_TURKISH=0 Set this language as an additional languageused by the Maximo Asset Managementapplication.
Set to 0 to disable. Set to 1 to enable.
Chapter 7. Silent installation 163

164 IBM Maximo Asset Management: Installation Guide (Oracle WebLogic Server)

Chapter 8. Programmatically verifying that the installation wassuccessful
After you have exited the Maximo Asset Management installation program withoutencountering any errors, you can verify that the installation completed successfully.The installation is programmatically verified through the use of post installationvalidation utilities.
Before you begin
The JAVA_HOME environment variable must be set on the system before you canuse the verification utilities.
About this task
During installation, the Maximo Asset Management installation program performsa simple health check. This health check consists of logging in to the application toverify availability. This health check might not be sufficient to verify a successfulinstallation in all deployment scenarios. For example, if, during installation, youselect the option to deploy the application EAR file at a later date, this healthcheck cannot verify the installation. This simple health check is also insufficient forverifying an upgrade.
Two post installation validation utilities are available after the product has beendeployed. The middlewareValidate utility is used to verify the middleware. TheinstallValidation utility is used to validate the product installation. Thesecommand-line utilities are used to verify the installation and configuration of theproduct in a more complete manner. These utilities can also be used to verify anexisting deployment after changes in the environment, such as changes to hostnames, user IDs, and passwords.
Results of the installValidation utility are logged ininstallValidationTrace00.log. This log is found in the \ibm\smp\logs directoryon the administrative workstation.
Procedure1. Log in to the server using the user ID that was used to run the installation
program. If you intend to use the installValidation utility, log in to theadministrative workstation. If you intend to use the middlewareValidate utility,log in to the server hosting the middleware.
2. Ensure the JAVA_HOME environment variable is set properly to the location ofa JRE 1.6 installation.
3. To verify middleware installation, from the middleware image, update themiddleware.properties file with the installation parameter values formiddleware components to be verified, change directory to \HealthCheck andrun the middlewareValidate.[sh|bat] command. To verify product installation,from the administrative workstation, change directory to \ibm\smp\scripts andrun the installValidation.bat command. For either command, use theparameters described below:
© Copyright IBM Corp. 2007, 2011 165

Table 18. Verification utilities parameters
Program Syntax parameters Input
installValidation.bat -action Use -action validate to start thevalidation of the product installation.
The -action parameter is the onlymandatory parameter when using theinstallValidation utility.
-trace Verification progress information iswritten to the screen during theverification process. You can modifythe output using the -tracingparameter.
v minimal
Progress information is limited toerror information.
v normal
Information includes individualtest progress, individual testresults, and overall progress of theentire verification process.
This is the default mode of tracing.
v verbose
In addition to providing normalprogress information, verbosetracing includes the test classname, test method name, andcorrective action information.
-confirm You are prompted before each test isstarted. You must confirm each testto be performed. There is no inputfor this parameter.
-component You can provide a comma-delimitedlist of directories containing the testobjects to limit testing to a specificset of tests.
These test objects must be located inthe \ibm\smp\HealthValidation\directory. For the product installationprogram, only the CTGIN folder isprovided.
-dbuser Provide the user ID used to accessthe database.
-dbpwd Provide the password of the user IDused to access the database.
-maxuser Provide the Maximo AssetManagement administrator userID. For example, maxadmin.
-maxpwd Provide the password for theMaximo Asset Managementadministrator user ID.
166 IBM Maximo Asset Management: Installation Guide (Oracle WebLogic Server)

Table 18. Verification utilities parameters (continued)
Program Syntax parameters Input
middlewareValidate.[sh|bat] -middlewareproperties Use
-middlewareproperties file
where file is the location of themiddleware.properties file. Bydefault, this file is found on themiddleware installation media in the\HealthCheck directory.
The middleware.properties containsthe middleware installationproperties, such as installationlocations and ports. User names andpasswords are not stored in thisplain-text file. Some of the propertiescommon to all platforms have beendefined default values, butplatform-specific properties likeinstallation locations need to beupdated in this file before startingthe middlewareValidate utility.
The -middlewarepropertiesparameter is the only mandatoryparameter when using themiddlewareValidate utility.
-trace Verification progress information iswritten to the screen during theverification process. You can modifythe output using the -traceparameter.
v minimal
Progress information is limited toerror information.
v normal
Information includes individualtest progress, individual testresults, and overall progress of theentire verification process.
v verbose
In addition to providing normalprogress information, verbosetracing includes the test classname, test method name, andcorrective action information.
If this option is not provided, bydefault, no output displayed.
Chapter 8. Programmatically verifying that the installation was successful 167

Table 18. Verification utilities parameters (continued)
Program Syntax parameters Input
-component Specify the middleware components:
v DBSERVER - verify installation ofthe IBM DB2 server.
v DIRSERVER - verify installation ofthe optional IBM Tivoli DirectoryServer.
v LDAPSERVER - verifyconfiguration of the optional IBMTivoli Directory Server.
One or more of these keywords canbe specified as comma separated list.If this argument is skipped, the toolassumes all the components areselected to verify.
-bindUser Provide the bind user.
Required to verify LDAPSERVER, thebind user credentials, bindDistinguished Name and bindpassword are required to be specifiedwith the -bindUser and -bindPassoptions.
-bindPass Provide the password for the binduser.
Required to verify LDAPSERVER, thebind user credentials, bindDistinguished Name and bindpassword are required to be specifiedwith the -bindUser and -bindPassoptions.
For example,installValidation.bat -action validate
Results
The installValidation.bat validation utility results are logged inctginstallvalidationtrace00.log. This log is found in the \ibm\smp\logsdirectory on the administrative workstation.
The middlewareValidate.[sh|bat] validation utility results are logged inCTGInstallValidationTrace.log. This log is found in the HealthCheck directory.
168 IBM Maximo Asset Management: Installation Guide (Oracle WebLogic Server)
Chapter 9. Verifying the installation manually
After you have exited the Maximo Asset Management installation program withoutencountering any errors, you can further verify that the installation completedsuccessfully. The installation is manually verified by locating key artifacts andperforming a few simple tasks.
Before you begin
The product installation program performs installation verification, or a healthcheck, by logging in to the product before exiting the installation. The productinstallation program returns a success message if all installation steps, includingthe product log in task, are successful. If the health check task is unsuccessful, aHealthCheckFailed error is thrown for the getUrlContentString function. Thiserror is located in the install_home\logs\CTGInstallTraceXX.log file, where XX isa two-digit number such as 00.
About this task
To further verify that the Maximo Asset Management installation was completedsuccessfully, perform the following verification procedures:
Procedure1. Examine the CTGInstallTrace00.log file for success messages.
The following success messages are found in the CTGInstallTrace00.log fileand can be used to verify which phases of the installation were successful:v CTGIN2114I: The database was created successfullyv CTGIN2135I: Tablespace maxdata created successfullyv CTGIN2135I: Tablespace maxtemp created successfullyv CTGIN2079I: process automation engine database configuration completed
successfully (This message indicates that maxinst finished successfully.)v CTGIN2253I: buildmaximoear.cmd completed successfullyv CTGIN2253I: buildhelpear.cmd completed successfullyv CTGIN2208I: runConfigurationStep completed successfullyv CTGIN2370I: The installation finished successfullySearch the CTGInstallTrace00.log file for the following message, whichindicates that the maxinst task completed successfully:CTGIN2079I, maxinst.*completed
2. Compare the packages chosen for installation with the packages that wereinstalled. The Package Summary panel of the Maximo Asset Managementinstallation program provides a summary of all the packages to be installed.You can compare the contents of that panel with a listing of what was installedon the system. Use the solutioninstaller command to list installed packages:install_home\bin\setupPSIenv.batinstall_home\bin\solutionInstaller.bat -action showInstalled -type all
The resulting list matches the packages listed in the Package Summary panel.3. Log in to the product and verify that applications are present. Being able to log
in to the product manually is a good indicator that the installation was
© Copyright IBM Corp. 2007, 2011 169

successful. Once you have logged in, navigate through the GoTo menu toverify that it has been populated with the applications you expect. If youexperience problems accessing the product, clear the cache of your browser andtry again.
170 IBM Maximo Asset Management: Installation Guide (Oracle WebLogic Server)

Chapter 10. Post installation tasks
There are several post installation tasks required in order to complete the MaximoAsset Management deployment.
Initial data configuration
After you have successfully installed and configured Maximo Asset Managementcomponents, there are several data configuration tasks you must complete beforeusing Maximo Asset Management.
Signing in using a default user IDUser management can be managed through the Maximo application or though thedirectory server you have configured to use with Maximo Asset Management
Before you begin
When first installed, Maximo Asset Management contains the following defaultuser IDs:
Important: Before you begin this procedure, if you are using a directory server aspart of your deployment, ensure that you have the following users created in yourLDAP repository:
Table 19. Maximo Asset Management users
User
maxadmin
mxintadm
maxreg
Note: User names and passwords are case-sensitive. The defaultuser names arelowercase.
About this task
To sign in, complete the following steps:
Procedure1. Open a browser window.2. Navigate to the Maximo Asset Management login URL. For example:
http://host name:port/maximo.3. Enter the user name maxadmin (lower case).4. Enter the password you entered during the installation, and click Enter. The
default start center for maxadmin is displayed.
Configuring SMTPInstallation panels provide an opportunity to configure an SMTP server to send anadministrator, or other users, e-mail notifications of system events. If you skip
© Copyright IBM Corp. 2007, 2011 171

these panels when you install Maximo Asset Management, you can use theMaximo Asset Management interface to configure SMTP parameters.
Before you begin
This task must be completed before you apply changes to the database.
About this task
To configure SMTP for Maximo Asset Management, complete the following steps.
Procedure1. Log in to the console as maxadmin.2. Navigate to Go To > System Configuration > Platform Configuration >
System Properties
3. Using the Filter feature, search for the mail.smtp.host Property Name.4. Expand the mail.smtp.host property and set the Global Value attribute to
your SMTP host.5. Select the mail.smtp.host record check box.6. Click the Live Refresh icon in the toolbar.7. From the Live Refresh dialog, click OK.8. Using the Filter feature, search for the mxe.adminEmail Property Name.9. Expand the mxe.adminEmail property and set the Global Value attribute to
your e-mail address.10. Select the mxe.adminEmail record check box.11. Click the Live Refresh icon in the toolbar.12. From the Live Refresh dialog, click OK.
“Applying changes to the database” on page 174When you create a general ledger account component, it must be applied to theMaximo database.
Create currency codesYou must define a currency code for an organization.
About this task
To define a currency code for an organization, complete the following steps.
Procedure1. Open the Currency Code application for Users by selecting Goto > Financial >
Currency Code
2. Click New Row.3. Enter a currency name. For example, USD.4. Click the Save icon.
Create item and company setsYou must define item and company sets for an organization.
About this task
To define item and company sets for an organization, complete the following steps:
172 IBM Maximo Asset Management: Installation Guide (Oracle WebLogic Server)

Procedure1. Open the Sets application for Users by selecting Goto > Administration > Sets.2. Click New Row.3. Enter an item name. For example, IT Items.4. Enter ITEM in the Type field.5. Click New Row.6. Enter a company set name. For example, IT Comps.7. Enter COMPANY in the Type field.8. Click the Save icon.
Create an organizationYou must define at least one organization for Maximo Asset Management.
About this task
To define an organization, complete the following steps.
Procedure1. Open the Organizations application by selecting Goto > Administration >
Organizations.2. Click the New Organization icon in the toolbar.3. Enter an organization name in the Organization field. For example, ENGLENA.4. Enter the base currency you defined in the Base Currency 1 field. For
example, USD.5. Enter the item set you defined in the Item Set field. For example, IT Items.6. Enter the company set you defined in the Company Set field. For example,
IT Comps.7. Enter the default item status of PENDING in the Default Item Status field.8. Click theSites tab.9. Click New Row.
10. Enter a site name in the Site field. For example, B901.11. Click the Save icon.
Create a general ledger account componentYou must create a general ledger account component for Maximo AssetManagement.
About this task
To create a general ledger account component, complete the following steps.
Procedure1. Open the Database Configuration application by selecting Goto > System
Configuration > Platform Configuration > Database Configuration.2. Select GL Account Configuration from the Select Action drop-down menu.3. Click New Row.4. Enter a component name in the Component field. For example, MYCOMPONENT.5. Enter a numeric length for the component. For example, 5.6. Enter a type for the component. For example, ALN.
Chapter 10. Post installation tasks 173

7. Click OK.
Applying changes to the databaseWhen you create a general ledger account component, it must be applied to theMaximo database.
About this task
To apply configuration changes to the Maximo database, complete the followingsteps.
Procedure1. Log in to the Maximo console as maxadmin2. Select Go To > System Configuration > Platform Configuration > Database
Configuration. Every object that must be updated in the Maximo database hasa status of To Be Added.
3. On the Select Action drop-down list, select Manage Admin Mode.4. Click Turn Admin Mode ON, and then click OK when prompted. This task
takes several minutes to complete. You can use the Refresh Status button toview progress.
5. After Admin Mode has been enabled, select Apply Configuration Changes, toapply the changes to the Maximo database. To Be Changed must not appear inthe status column for objects listed.
6. Turn Admin Mode OFF.a. Select Go To > System Configuration > Platform Configuration >
Database Configuration.b. From the Select Action drop-down list, select Manage Admin Mode.c. Click Turn Admin Mode OFF, and then click OK when prompted. Failing
to turn off Admin Mode within the application causes cron tasks to fail.
Create a general ledger accountYou must create a general ledger account for Maximo Asset Management.
About this task
To create a general ledger account, complete the following steps:
Procedure1. Open the Chart of Accounts application by selecting Goto > Financial > Chart
of Accounts.2. Click the name of your organization to select it. For example, click
ENGLENA.3. Select GL Component Maintenance from the Select Action menu.4. Click New Row.5. Add a GL Component value and a description and then click OK. For
example, 1234.6. Click New Row.7. Select your General Ledger Account.8. Click Save.
174 IBM Maximo Asset Management: Installation Guide (Oracle WebLogic Server)

9. Open the Organizations application by selecting Goto > Administration >Organizations\.
10. Click the organization name you created. For example, ENGLENA.11. From the Clearing Account field, select the General Ledger Account you just
created.12. Select Active.13. Click the Save icon.
Update General Ledger Component Type AuthorizationYou must update the general ledger component type authorization for MaximoAsset Management.
About this task
To authorize a Security Group to change a general ledge component type, completethe following steps:
Procedure1. Open the Security Groups application by selecting Go To > Security > Security
Groups.2. Select the Group that provides authorization (for example, PMSCOA).3. Click the GL Components tab.4. Click the Authorized check box for each GL Component.5. Click Save
Update Company-Related AccountsYou must update the company-related accounts for Maximo Asset Management.
About this task
To update the company-related accounts, complete the following steps:
Procedure1. Open the Chart of Accounts application by selecting Go To > Financials >
Chart of Accounts.2. From the action menu, select Company-Related Accounts.3. On the dialog click New Row.4. Select company type 'C'.5. Set the RBNI Account, AP Suspense Account, and AP Control Account to the
components you created.6. Click OK.7. From the action menu, select Update Database.8. Click OK.
Create default insert siteYou must create a default insert site for Maximo Asset Management.
About this task
To create a default insert site, complete the following steps.
Chapter 10. Post installation tasks 175

If you encounter an error message that indicates that the record is being updatedby another user, log out as maxadmin and then log back in.
Procedure1. Open the Users application by selecting Goto > Security > Users.2. Search for maxadmin and then select it to open the record for maxadmin.3. Enter the site you created earlier in the Default Insert Site field. For example,
B901.4. Enter the site you created earlier in the Storeroom Site for Self-Service
Requisitions field. For example, B901.5. Click Save.
Create worktypesYou must create worktypes for Maximo Asset Management.
About this task
To create a worktype, complete the following steps.
Procedure1. Open the Organizations application by selecting Goto > Administration >
Organizations.2. Search for the organization you created. For example, ENGLENA.3. Click the name of the organization to open the record for that organization.4. Select Work Order Options > Work Type from the Select Action menu.5. Click New Row.6. Select a Work Order class.7. Set the Work Type as AR.8. Set Start Status as INPRG.9. Set Complete Status as COMP.
10. Click New Row.11. Select a Work Order class.12. Set the Work Type as UR.13. Set Start Status as INPRG.14. Set Complete Status as COMP.15. Click New Row.16. Select CHANGE as the Work Order class.17. Set the Work Type to a value that describes a type of change that is created.
For example, you might set a Work Type as MAJOR to designate a majorchange. You can define as many Work Types for the CHANGE Work Orderclass as you would like. For example, you might define the MINOR WorkType for a minor change, and a SIG Work Type for a significant change.
18. Set Start Status as INPRG.19. Set Complete Status as COMP.20. Click OK.21. Click Save.22. Restart the MXServer application server.
176 IBM Maximo Asset Management: Installation Guide (Oracle WebLogic Server)

Signing out and signing inWhen you change a security group that includes your user ID, you must sign outand sign in to see the changes. For example, even though you have granted agroup permission to create start center templates, the actions are not visible untilyou sign in again.
Procedure1. Sign out as maxadmin.2. Sign in as maxadmin.
Synchronizing users and groupsWhen you select application server security, the scheduled synchronization of usersand groups that occurs between LDAP repositories and Maximo AssetManagement is governed by the federated repositories.
Before you begin
View the cron task configuration information in the Administering Maximo AssetManagement section of the Maximo Asset Management information center.
About this task
LDAP repositories are synchronized with Oracle WebLogic Server using the LDAPcron task.
To configure the synchronization schedule between LDAP repositories and MaximoAsset Management, complete the following steps:
Procedure1. Open a web browser and point to http://host name:port/maximo.2. Log in to Maximo Asset Management using the maxadmin user ID.3. From the Maximo Asset Management interface, navigate to Go To > System
Configuration > Platform Configuration > Cron Task Setup.4. Search for the appropriate cron task in the Cron Task field and configure it as
instructed in the Managing cron tasks section of the Maximo AssetManagement information center.
5. Set the task to active.
What to do next
By default, the cron task performs its task every 5 minutes. Change the Schedulefield of the cron task if you want to change the interval.
Create a maxdemo database after installationYou can create a maxdemo database and additional databases after you haveinstalled Maximo Asset Management and you can populate the database withsample data. You use the maxinst program to create additional databases.
Chapter 10. Post installation tasks 177

Before you begin
The maxinst program does not provide default values for table space parameters.Specify the data and index table space names to ensure that your installation runssmoothly.
About this task
If you created a database either automatically or manually during the installation,you can use maxinst to optionally create a maxdemo database in that databaseinstance. If the maxinst program fails, you must recreate the Maximo databaseschema before running the maxinst program again.
Procedure1. Open a command window and change directory to C:IBM\SMP\Maximo\tools\
maximo.2. You can create an additional database in one of the following ways:
v To create an empty Maximo database, run the following command:maxinst -imaximo
v To create a maxdemo database, run the following command:maxinst -s<tablespacename> -t<tablespacename>
For example, type maxinst -sMAXIMO -tMAXIMO.
The system reads the maximo.properties file for database connectivityinformation. The maximo.properties file is located in the C:IBM\SMP\Maximo\Applications\Maximo\Properties directory. The system connects to thedatabase through the JDBC connection and creates a maxdemo database.
3. You can populate the additional database by running commands with specificparameter values. The following table lists the maxinst database parameters:
Parameter Description
-a Database alias. If not specified, the aliasmxe.db.url.property is used.
-d Log file directory. If you are using the -lparameter, the log file is sent to the specifieddirectory. Otherwise, the log file is sent tothe log directory, for exampleC:\IBM\SMP\Maximo\tools\maximo\lo.
-e Runs the SQL. This parameter is requiredand already present in the maxinst.bat file.
-f File name for the properties file. If notspecified, maximo.properties is used.
-i File name of the input file (without path orextension). If not specified, the default filename Unlcvt is used.
-k Directory of the properties file.
-l Creates a detailed log file. This parameter isalready present in the maxinst.bat file.
-o If you are using the -l parameter, the -oparameter specifies the file name for the logfile.
178 IBM Maximo Asset Management: Installation Guide (Oracle WebLogic Server)

Parameter Description
-p Password for the database connection. If notspecified, the mxe.db.password property orMAXIMO is used. If MAXIMO is used, it must beentered in uppercase letters.
-s Required: Table space for index storage.
-t Required: Table space for table storage.
-u User name for database connection. If notspecified, the mxe.db.user property orMAXIMO is used. If MAXIMO is used, it must beentered in uppercase letters.
-x Required for UNIX: Fixes the doclink fileseparators in UNIX environments. Note: If aUNIX environment is deployed withoutusing this parameter, the attacheddocuments do not function properly.
4. Add the installation-related properties to the database from theinstall.properties file. The install.properties file is located in theC:\IBM\SMP\ETC folder. You can add these properties to the database from theSystem Properties application.
Understanding and configuring securityYou must configure security to ensure that only authorized users can log on toMaximo Asset Management. You must also ensure that the appropriate users haveaccess to their applications and configuration items.
The Security information contained in the Maximo Asset Management informationcenter provides an overview of the following information:v How security is implemented.v The steps you perform to configure security.
Chapter 10. Post installation tasks 179

180 IBM Maximo Asset Management: Installation Guide (Oracle WebLogic Server)

Chapter 11. Uninstalling the product
Uninstalling Maximo Asset Management 7.5 is dependant upon how it wasdeployed.
The procedures and instructions provided here are based upon a scenario in whichthe Maximo Asset Management installation program has experienced an error orfailure.
Maximo Asset Management uninstallation is a comprehensive procedure and doesnot support partial removal of individual components or process managers,including process managers deployed by other products. Process managers ofpreviously deployed products are also removed when you uninstall Maximo AssetManagement.
The Maximo Asset Management uninstallation program can only be run once. Ifthere are errors, messages are generated that indicate conditions that you mustresolve manually before attempting a reinstall. Resolution includes manuallyremoving files from the administrative workstation.
Maximo Asset Management can only be uninstalled using the Maximo AssetManagement uninstallation program as directed. Do not use other methods toattempt to uninstall Maximo Asset Management, such as using the Add/RemovePrograms panel.
The uninstall procedure you follow depends on the type of Maximo AssetManagement deployment you are uninstalling. For uninstallation purposes,Maximo Asset Management deployments falls into one of the following categories:
Fully-automated configurationIn this scenario, you selected the option to allow the Maximo AssetManagement installation program to automatically configure middlewareduring deployment.
Manual configurationIn this scenario, you selected the option to manually configure middleware.You did not allow the Maximo Asset Management installation program toautomatically configure middleware during deployment.
After the Maximo Asset Management uninstall process is complete, you canreinstall Maximo Asset Management by restarting the Maximo Asset Managementinstallation program.
“Uninstalling an automatically configured deployment”Uninstalling a Maximo Asset Management deployment that was deployedusing the automatic middleware configuration options is an automated process.“Uninstalling a manually configured deployment” on page 183Uninstalling a Maximo Asset Management deployment that was deployed withmiddleware that you configured manually includes additional manual tasks.
Uninstalling an automatically configured deploymentUninstalling a Maximo Asset Management deployment that was deployed usingthe automatic middleware configuration options is an automated process.
© Copyright IBM Corp. 2007, 2011 181
Deployments consisting of automatic middleware configuration can be uninstalledusing automated methods.
Running the product uninstall program for automaticallyconfigured middleware
Running the Maximo Asset Management uninstall program reverts theadministrative system and middleware servers back to their previous state.
Before you begin
Ensure that all applicable services are running and all middleware servers areaccessible.
The Maximo Asset Management uninstall program must be able to access thedatabase used with Maximo Asset Management to fetch installation properties andconfiguration data. If the uninstall program cannot access an unavailable,corrupted, or otherwise inaccessible database, it removes files from theadministrative workstation. It then informs you that some manual recovery mightbe required before another Maximo Asset Management installation can besuccessful.
The uninstall program uses values entered during the initial installation duringuninstall. If credentials used to access the database and J2EE server are still valid,you are not prompted to enter them again. If the uninstall program is unable tovalidate these credentials you are prompted to supply the updated information.The uninstall program would not be able to validate credentials if you updatedpasswords since the original installation.
Procedure1. To run the Maximo Asset Management uninstall program, from the
administrative workstation, open a command prompt and issue the followingcommand:
Windowsinstall_home\_uninstall\uninstall.bat
2. From the application server information panel, enter the following informationand then click Next.
Remote user IDEnter a user ID in order to access the system hosting the applicationserver. The remote user ID must be able to access the server using theremote access protocol enabled on that system.
Remote passwordEnter a password for the remote user ID.
User IDEnter the password for the application server administrator.
PasswordEnter the password for the application server administrator user ID.
3. From the database administration panel, for DB2, enter the followinginformation and then click Next.
Remote user IDEnter a user ID in order to access the system hosting the database. The
182 IBM Maximo Asset Management: Installation Guide (Oracle WebLogic Server)

remote user ID must be able to access the server using the remoteaccess protocol enabled on that system.
Remote passwordEnter a password for the remote user ID.
Instance administrator user IDEnter the database instance administrator user ID that you enteredduring the installation.
Instance administrator passwordEnter the password for the database instance administrator user ID.
For Oracle databases, you can supply the credentials for the Administrator userID and the Oracle software owner ID. For Microsoft SQL Server databases, youcan supply the SQL Server administrator user ID and password.
4. Review the components that are listed in the uninstall summary panel, andthen click Uninstall.
5. After the uninstall process has completed, specify whether you want to restartthe computer now or later, and click Done to exit the program.
6. Remove the Maximo Asset Management installation directory, for example,c:\ibm\smp. You must manually remove this directory before you proceed tothe reinstallation process.
Uninstalling a manually configured deploymentUninstalling a Maximo Asset Management deployment that was deployed withmiddleware that you configured manually includes additional manual tasks.
Uninstalling a manually configured Maximo Asset Management deploymentconsists of two tasks:v Running the Maximo Asset Management uninstallation programv Manually dropping and recreating the database you intend to use with the
reinstall process
Running the product uninstall program for manuallyconfigured middleware
Running the Maximo Asset Management uninstall program reverts theadministrative system and middleware servers back to a state where you can rerunthe Maximo Asset Management installation program.
Before you begin
Ensure that all applicable services are running and all middleware servers areaccessible.
The Maximo Asset Management uninstall program must be able to access thedatabase used with Maximo Asset Management to fetch installation properties andconfiguration data. If the uninstall program cannot access an unavailable,corrupted, or otherwise inaccessible database, it removes files from theadministrative workstation. It then informs you that some manual recovery mightbe required before another Maximo Asset Management installation can besuccessful.
Chapter 11. Uninstalling the product 183

The uninstall program uses values entered during the initial installation duringuninstall. If credentials used to access the database and J2EE server are still valid,you are not prompted to enter them again. If the uninstall program is unable tovalidate these credentials you are prompted to supply the updated information.The uninstall program would not be able to validate credentials if you updatedpasswords since the original installation.
Procedure1. To run the Maximo Asset Management uninstall program, from the
administrative workstation, open a command prompt and issue the followingcommand:
Windowsinstall_home\_uninstall\uninstall.bat
2. From the Introduction panel, read the introductory information and then clickNext.
3. From the application server information panel, enter the following informationand then click Next.
User IDEnter the password for the application server administrator.
PasswordEnter the password for the application server administrator user ID.
4. Review the components that are listed in the uninstall summary panel, andthen click Uninstall.
5. After the uninstall process has completed, click Done to exit the program.6. Remove the Maximo Asset Management installation directory, for example,
c:\ibm\smp. You must manually remove this directory before you proceed tothe reinstallation process.
What to do next
You can now proceed with recovery of your manually configured database.
Database configuration recoveryDatabase objects created before running the Maximo Asset Managementinstallation program must be deleted after a failed installation before the MaximoAsset Management installation program is run again.
Before rerunning the Maximo Asset Management installation program, you mustdrop the Maximo Asset Management database and recreate it.
Note: Alternatively, if you want to preserve the instance, you can examine thedatabase for objects (tables, views, and procedures, for example) that were createdby the maxadmin user. You can then drop those objects individually.
Restoring the DB2 database serverIn order to rerun the Maximo Asset Management installation program, you mustfirst restore the DB2 database server to the same state as before Maximo AssetManagement was installed.
184 IBM Maximo Asset Management: Installation Guide (Oracle WebLogic Server)

About this task
To restore the DB2 database server to its previous state, drop the Maximo AssetManagement database that you manually created. You then recreate it beforererunning the Maximo Asset Management installation program.
To restore the Maximo Asset Management database, complete the following steps:
Procedure1. Log on to the system hosting the DB2 server.2. Start a DB2 command session or run db2cmd from the command prompt.3. First list and then force all applications connected to the database to close using
the following commands:a. To list applications, type this command:
db2 list applications
You might see output like the following sample output:Auth Id Application Appl. Application Id DB # of
Name Handle Name Agents-------- ----------- ------- ---------------------------- ------- -----CTGINST1 db2taskd 507 *LOCAL.DB2.071113150237 MAXDB75 1CTGINST1 db2stmm 506 *LOCAL.DB2.071113150236 MAXDB75 1CTGINST1 db2bp 504 *LOCAL.ctginst1.071113150234 MAXDB75 1
b. If any connections exist, close the connect application using a command likethe following sample command:db2 force application ’( 507,506,504 )’
4. Drop the Maximo Asset Management database (MAXDB75, by default):db2 drop database MAXDB75
5. Manually recreate the maxdb75 database.“Manually configuring DB2 9.x” on page 112This section contains instructions for manually configuring DB2 9.x servers foruse by Maximo Asset Management.
Restoring the Oracle databaseIn order to rerun the Maximo Asset Management installation program, you mustfirst restore the Oracle database server to the same state as before Maximo AssetManagement was installed.
Before you begin
The MXServer application server must be stopped before deleting the database.
About this task
Drop the Maximo Asset Management database schema user to restore the Oracledatabase server to its previous state. This task must be completed before rerunningthe Maximo Asset Management installation program.
To restore the Maximo Asset Management database, complete the following steps:
Procedure1. Log in to the Oracle database server as the Oracle software owner.
Chapter 11. Uninstalling the product 185

2. Log in to the Oracle instance using SQLPlus as a DBA user: The Oracle SID fora clean installation is ctginst1. If you are using an existing Oracle instance withMaximo Asset Management, use the Oracle SID associated with the existinginstance.
AIX, Linux, HP-UX, Solaris
a. Set the environment variable from the command line:ORACLE_SID=<your sid>export ORACLE_SID
b. Start SQLPlus from the command line:sqlplus /nolog
c. Log in to SQLPlus as a DBA user:connect sys/<sys password> as sysdba
Windows
a. Set the environment variable from the command line:set ORACLE_SID=<your sid>
b. Invoke SQLPlus from the command line:sqlplus /nolog
c. Log in to SQLPlus as a DBA user:connect sys/<sys password> as sysdba
3. Delete the Maximo Asset Management database user (maximo, by default)using an SQL command like the following sample command:drop user maximo cascade;
Do not disconnect from the database. If you receive an error that you cannotdrop a currently connected user, issue the following commands and use theSQL drop command:shutdown immediate;startup;
4. Manually recreate the database.“Manually configuring Oracle 11g” on page 114Use the following instructions to manually configure Oracle 11g for use withMaximo Asset Management.“Manually configuring Oracle 10g” on page 117Oracle 10g can be manually configured for use with Maximo AssetManagement.
Restoring the Microsoft SQL Server databaseIn order to rerun the Maximo Asset Management installation program, you mustfirst restore the Microsoft SQL Server database server to the same state as beforeMaximo Asset Management was installed.
Before you begin
Stop the MXServer application server before deleting the database.
About this task
To restore the Microsoft SQL Server database server to its previous state, drop theMaximo Asset Management database that you manually created. You then recreateit before rerunning the Maximo Asset Management installation program.
To restore the Maximo Asset Management database, complete the following steps:
186 IBM Maximo Asset Management: Installation Guide (Oracle WebLogic Server)

Procedure1. Open the Microsoft SQL Server Management Studio.2. Log in to the instance of Microsoft SQL Server that is used by Maximo Asset
Management installation using the sa user ID, and then click Connect.3. Expand the instance tree down to the databases node. Right-click the database
name you created during installation (MAXDB75 for example). Click Delete todelete the database.
4. In the Delete Object window, select Delete backup and restore historyinformation for databases and Close existing connections, and then click OK.
5. Manually recreate the maxdb75 database.“Manually configuring Microsoft SQL Server” on page 119You can manually configure Microsoft SQL Server for use with Maximo AssetManagement.
Uninstalling the product without the uninstallation programUninstalling the product when a failed installation does not produce anuninstallation program.
If the installation program has experienced a failure that causes it to not producethe product uninstallation program, you must perform alternative uninstallationtasks.
If uninstallation program was not produced, you must complete one of thefollowing tasks in order to uninstall the product:v Run the uninstallation recovery tool described in “Uninstall program recovery
tool.”v Complete the uninstallation manually using the following steps:
1. Recover the database as described in “Database configuration recovery” onpage 184.
2. Manually remove files from the system as described in “Removing files fromthe system” on page 189.
Uninstall program recovery toolThe uninstall program recovery tool is used to automatically uninstall MaximoAsset Management when the installation program fails to produce the productuninstallation program.
The uninstall program recovery tool is run on the administrative workstationfollowing a failed installation. This tool performs the same functions of theMaximo Asset Management uninstallation program. This tool is intended to restorethe administrative workstation and middleware servers so the Maximo AssetManagement installation can be run again. The uninstall program recovery tool isavailable on the product media and also from the product support site.
Using the uninstallation program recovery toolUse the uninstallation program recovery tool to restore the administrativeworkstation and middleware servers so the Maximo Asset Management installationcan be run again.
Chapter 11. Uninstalling the product 187

About this task
The uninstallation program recovery tool is a command line tool that prompts youfor input. This information is used as input for a collection of scripts that are runserially. These scripts perform the steps necessary to restore the administrativeworkstation and middleware servers so the installation program can be rerun. Ifyou choose to skip any of the uninstallation program recovery tool tasks, you canrun the tool at a later time to perform that task.
The uninstallation program recovery tool must be run on each system that hosts acomponent of the Maximo Asset Management deployment. For example, toremove the database associated with the deployment, you must run the programon the server hosting the database.
Procedure1. Open a command prompt on the administrative workstation and start the
uninstallation program recovery tool.v For Windows, use cleanupPAE.bat.
2. Provide input for the scripts responsible for recovering the database serverused in the deployment.v DB2
a. Supply information for the database used in the deployment.1) At the Would you like to cleanup the database? [y/n]: prompt,
select y.2) At the Which database type would you like to cleanup? [DB2,
Oracle, SQLServer (BAT only)]: prompt, select DB2.3) At the Enter database name: prompt, enter the name of the database
used in the deployment.4) At the Enter database instance administrator user ID: prompt,
enter the database instance administrator user ID.5) At the Enter database instance administrator password: prompt,
enter the password for the database instance administrator user ID.6) At the Enter database instance name: prompt, enter the name of the
database instance.b. Confirm you want to drop the database.
1) At the Are you sure you would like to drop the <database name>database? [y/n]: prompt, select y.
2) Verify the database was dropped.v Oracle
a. Supply information for the database used in the deployment.1) At the Would you like to cleanup the database? [y/n]: prompt,
select y.2) At the Which database type would you like to cleanup? [DB2,
Oracle, SQLServer (BAT only)]: prompt, select Oracle.3) At the Enter the SID of the Oracle instance: prompt, enter the
Oracle System ID of the Oracle instance used in the deployment.4) At the Enter the Oracle install directory: prompt, enter the
Oracle installation path.b. Supply user information.
1) At the Enter the SYSDBA user: prompt, enter the SYSDBA user ID.
188 IBM Maximo Asset Management: Installation Guide (Oracle WebLogic Server)

2) At the Enter the SYSDBA password: prompt, enter the password forthe SYSDBA user ID.
3) At the Enter database user: prompt, enter the Oracle database userID.
4) At the Would you like to delete the <database user name>database user? [y/n]: prompt, select y.
c. Delete the Oracle table spaces and the Oracle instance.1) At the Would you like to delete the 'maxdata', 'maxtemp', and
'maxindex' tablespaces? [y/n]: prompt, select y.2) At the Would you like to delete the oracle instance? [y/n]:
prompt, select y.v Microsoft SQL Server
a. At the Enter database name: prompt, enter the name of the databaseused in the deployment.
b. At the Are you sure you would like to drop the <database name>database? [y/n]: prompt, select y.
3. Provide input for the scripts responsible for recovering the administrativeworkstation used in the deployment.a. At the Would you like to cleanup the administrator workstation?
[y/n]: prompt, select y.b. At the Would you like to enter a custom install directory? [y/n]:
prompt, select n if you installed Maximo Asset Management in the defaultdirectory. If you installed Maximo Asset Management in a custom directory,you are prompted to enter that directory.
c. At the Are you sure you would like to cleanup the following directory:<install directory>? [y/n]: prompt, select y.
Manual uninstallationManual uninstallation steps are sometimes necessary to uninstall Maximo AssetManagement when the installation program fails to produce the productuninstallation program.
Manual uninstallation steps are performed following a failed installation. Thesesteps are used to remove the same objects as the Maximo Asset Managementuninstallation program. These steps are intended to restore the administrativeworkstation and middleware servers so the Maximo Asset Management installationcan be run again.
Removing files from the systemIf an uninstallation program is unavailable due to failed installation, product filesmust be manually removed from the system.
About this task
Remove files from the system by completing the following steps:
Procedure1. Ensure that you are logged in to the system with the same user ID used to start
the product installation program.2. Manually delete the Maximo Asset Management home directory. For Windows,
the default location of this directory is C:\IBM\SMP.
Chapter 11. Uninstalling the product 189

190 IBM Maximo Asset Management: Installation Guide (Oracle WebLogic Server)

Chapter 12. Starting and stopping middleware
Use this information to start and stop middleware when necessary.
There might be occasions when you have to stop or restart middleware.
Restarting middleware on WindowsThis procedure describes how to restart middleware on Windows, if you mustrestart any middleware services.
About this task
To properly start middleware products on Windows, use the following scripts inthe order in which they are listed:
Procedure1. Log in as a user with Administrative permissions.2. If you installed DB2, start ctginst1.
a. Click Start, and select Run.b. Type services.msc, and click OK.c. Select DB2 - DB2COPY1 - CTGINST1-0, and click Start the service.
Alternatively, you can use the db2start command from a command line to startCTGINST1.
3. If you installed IBM Tivoli Directory Server, start the IBM Tivoli DirectoryServer Admin Daemon.a. Click Start, and select Run.b. Type services.msc, and click OK.c. Select IBM Tivoli Directory Admin Daemon V6.3 - idsccmdb, and click Start
the service.
Alternatively, you can use the following command from the command line tostart the IBM Tivoli Directory Server admin daemon:idsdiradm -I idsccmdb
4. If you installed IBM Tivoli Directory Server, start the IBM Tivoli DirectoryServer instance.a. Click Start, and select Run.b. Type services.msc, and click OK.c. Select IBM Tivoli Directory Server Instance V6.3 - idsccmdb, and click
Start the service.
Alternatively, you can use the following command to start the IBM TivoliDirectory Server instance:idsslapd -I idsccmdb
Important: The IBM Tivoli Directory Server Instance must remain as a manualstartup type. It must be started manually to synchronize correctly with thedatabase in the context of Maximo Asset Management.
© Copyright IBM Corp. 2007, 2011 191

Restarting middleware on UNIXMiddleware services on Linux and AIX platforms occasionally must be restarted,such as when a reboot occurs. Middleware servers and services must be activebefore running the Maximo Asset Management installation program.
About this task
To properly start middleware products on UNIX, perform the following steps:
Procedure1. Log in as root.2. Start servers by using the following scripts in the order in which they are
listed:
If you installed DB2, start ctginst1 instancesu - ctginst1 -c db2start
If you installed IBM Tivoli Directory Server, start IBM Tivoli DirectoryServer Admin Daemon
<ITDS_HOME>/sbin/idsdiradm -I idsccmdb
If you installed IBM Tivoli Directory Server, start IBM Tivoli DirectoryServer daemon
<ITDS_HOME>/sbin/idsslapd -I <instancename>
So this command would look like the following example:<ITDS_HOME>/sbin/idsslapd -I idsccmdb
Important: The instance of IBM Tivoli Directory Server must remain asa manual startup type. It must be started manually to synchronizecorrectly with the database in the context of Maximo AssetManagement.
192 IBM Maximo Asset Management: Installation Guide (Oracle WebLogic Server)

Chapter 13. Advanced installation topics
This section contains information useful for advanced Maximo Asset Managementdeployment scenarios.
Refer to this information for installation and configuration information in advanceddeployments.
Installation program tasksThe Maximo Asset Management installation program performs a series ofconfiguration and deployment tasks when you instruct it to automaticallyconfigure middleware.
The following list details the steps taken by the Maximo Asset Managementinstallation program during a typical installation. This information is provided soit can be reviewed in order to ensure that the Maximo Asset Managementinstallation program is compliant with your corporate application deploymentpolicy.
For applicable tasks, links are provided to manual configuration instructions if youplan to opt out of the automatic middleware configuration provided by theMaximo Asset Management installation program. In this case, these tasks must becompleted before running the Maximo Asset Management installation program
Table 20. Maximo Asset Management installation program tasks
Task CategoryAutomatedInstallation Action Description Manual Instructions
Access Database usercreated for DB2
A system user named maximo bydefault is created on the DB2server that are used to access theMaximo database. This defaultvalue can be modified.
You can manually create thissystem user on the DB2 serverbefore running the Maximo AssetManagement installation programusing the methods prescribed byyour organization.
Database Create a databaseinstance
A new database instance is createdfor Maximo Asset Management onDB2 and Oracle if one does notexist.
You can either reuse an existingdatabase instance or create adatabase instance. Instructions formanually creating a databaseinstance for DB2 and Oracle can befound in the following topics:
v “Manually configuring DB2 9.x”on page 112
v “Manually configuring Oracle11g” on page 114
v “Manually configuring Oracle10g” on page 117
© Copyright IBM Corp. 2007, 2011 193

Table 20. Maximo Asset Management installation program tasks (continued)
Task CategoryAutomatedInstallation Action Description Manual Instructions
Create a database A new database is created forMaximo Asset Management forDB2 and Microsoft SQL Server.
Instructions for manually creatinga database for DB2 and MicrosoftSQL Server can be found in thefollowing topics:
v “Manually configuring DB2 9.x”on page 112
v “Manually configuring MicrosoftSQL Server” on page 119
Database usercreated for Oracle orMicrosoft SQLServer.
A database user named maximo bydefault is created for Oracle orMicrosoft SQL Server that is usedto access the Maximo database.This default value can be modified.
You can manually create thissystem user on Oracle or MicrosoftSQL Server before running theMaximo Asset Managementinstallation program using themethods prescribed by yourorganization.
For Microsoft SQL Server, this usermust be the owner of thedatabase.
Granting permissions to the userfor Oracle is covered in “Manuallyconfiguring Oracle 11g” on page114 and “Manually configuringMicrosoft SQL Server” on page 119
Create table spaces Table spaces are created for thenew DB2 or Oracle database.
Instructions for manually creatingtable spaces for DB2 and Oraclecan be found in the followingtopics:
v “Manually configuring DB2 9.x”on page 112
v “Manually configuring Oracle11g” on page 114
v “Manually configuring Oracle10g” on page 117
Deploy the Maximodatabase schema
The Maximo database schema isdeployed into the newly createddatabase.
The name of the database schemais required to be the same value asthe owner of the table spacesdefined.
The maxinstcommand is run
maxinst deploys database tablesand required data.
Create a database If you opt to persist JMS messagesin a database, a new database iscreated on DB2.
A new database for persisting JMSmessages can be manually createdusing the standard procedures ofyour organization.
If you are using Oracle orMicrosoft SQL Server, andassuming that you do not intendto reuse existing resources, youmust manually create a databasefor message persistence.
194 IBM Maximo Asset Management: Installation Guide (Oracle WebLogic Server)

Table 20. Maximo Asset Management installation program tasks (continued)
Task CategoryAutomatedInstallation Action Description Manual Instructions
IntegrationFramework Adapteris enabled.
Users created withinthe LDAP repository.
The following default users andgroups created in the LDAPrepository.
Users
v wasadmin
v maxadmin
v mxintadm
v maxreg
More information is contained inthe topic “Manually configuringthe directory server” on page 121
Process managersdeployed.
The Maximo Asset Managementcomponents are deployed using theProcess Solution installationprogram.
updatedb commandrun
The updatedb command is run toupdate the Maximo database.
As described in “Installation options” on page 12, you have the option of manuallycompleting these tasks. You would then select the option to not automaticallyconfigure middleware servers Maximo Asset Management installation program.
Manual middleware configuration for expert usersExpert users can use this information to quickly prepare their existing middlewarefor a Maximo Asset Management deployment.
In the Maximo Asset Management deployment scenario that includes reusingexisting middleware in your enterprise, there are several configuration tasks thatyou must complete on that middleware before you use the Maximo AssetManagement installation program. Comprehensive steps for manually configuringexisting middleware are provided in “Maximo Asset Management installation withmanual middleware configuration” on page 112. However, you might have policiesand procedures mandated by your organization that affect how you performcommon application deployment tasks. This set of information in this topic mustbe used if you plan to manually configure existing middleware and you do notintend to use the middleware installation program.
Important: There are several important pre-installation tasks that must beconsidered before beginning the Maximo Asset Management deploymentprocedure. Be sure that you have reviewed and performed relevant taskscontained in “Before you begin” on page 16.
You can use the following tables as checklists for configuring your middlewareusing the procedures sanctioned by your organization. Complete the tasks in eachtable that is appropriate to the type of server you are reusing for the Maximo Asset
Chapter 13. Advanced installation topics 195

Management deployment. You might also find the middleware planning worksheetprovided in Appendix B, “Planning worksheets for middleware installation,” onpage 253 helpful.
Table 21. System user creation task
MiddlewareComponent Server type Task Value Platform
Database v DB2
v Oracle
v Microsoft SQLServer
Create the maximouser and assign togroups.
This value is theuser used to accessthe maximodatabase.
User maximo
This value iscustomizable.
Groups
v Users
v Administrators
v Windows
v AIX
v Linux
v DB2 Create the systemuser used as thedatabase instanceowner on UNIXplatforms.
User ctginst1
This value iscustomizable.
Groups
v Users group
v Administratorsgroup
ctginst1 must bea member of theinstanceadministratorsgroup, forexample,db2grp1.
v AIX
v Linux
v Solaris
v HP-UX
DB2 Create system userused as the fenceduser ID for DB2default instance onUNIX platforms.
User db2fenc1
This value iscustomizable.
Groupsdb2fgrp1
This value iscustomizable.
v AIX
v Linux
v Solaris
v HP-UX
DB2 Create system userused as the fenceduser ID for DB2server on UNIXplatforms.
User ctgfenc1
This value iscustomizable.
Groupsctgfgrp1
This value iscustomizable.
196 IBM Maximo Asset Management: Installation Guide (Oracle WebLogic Server)

Table 21. System user creation task (continued)
MiddlewareComponent Server type Task Value Platform
Directory Server IBM TivoliDirectory Server
Create the IBMTivoli DirectoryServer user andassign to groups.
User idsccmdb
This value iscustomizable.
Groups
v Windows
– Users
–Administrators
v UNIX
– root (primary)
– idsldap
– db2iadm1
v Windows
v AIX
v Linux
Chapter 13. Advanced installation topics 197

Table 22. Database tasks
Server type Task Subtask
DB2 Create a database instancenamed ctginst1. This value iscustomizable.
Set the listening port to 50005. This value iscustomizable.
Set the instance service to start automatically.
Start the database instance.
Create a database namedmaxdb75. This value iscustomizable.
Enable database for XML (UTF-8)
Set the page size value to 32k
Configure the maxdb75 database. Set LOGFILSIZ to 4096.
Set APP_CTL_HEAP_SZ to 1024.
Set APPLHEAPSZ to 1024.
Set LOCKLIST to 30000.
Set LOGSECOND to 4.
Stop and restart the instance.
Add the maximo user to thedatabase.
Configure the user maximo with Grant Allpermissions.
Create a table space namedMAXDATA. This value iscustomizable.
Specify MAXBUFPOOL as a new buffer pool.
Change the Page size value to 32
Change the Size in 32 KB pages value to 4096.
For the Container, set the Type to File
Set the Size to 5000 Mb.
Set the File name to CTGDAT.
For UNIX, enter /home/ctginst1 as the locationof the file.
Enable the dropped table recovery option.
Create a temporary table spacenamed MAXTEMP. This value iscustomizable.
Specify MAXBUFPOOL as the buffer pool.
For the Container, set the Type to File
Set the Size to 3000 Mb.
Set the File name to CTGTMP.
For UNIX, enter /home/ctginst1 as the locationof the file.
Grant permissions for theMAXDATA table space.
Permit the user maximo to access the MAXDATAtable space.
Create a schema.
This name must be the same aswas used for the Database userID.
This schema is named maximowhen created by the productinstallation program.
Grant permissions for themaximo schema.
Permit the user maximo to access the maximoschema.
198 IBM Maximo Asset Management: Installation Guide (Oracle WebLogic Server)

Table 22. Database tasks (continued)
Server type Task Subtask
Oracle
These instructions assume thatyou have not modified thedefault role sets that areassigned to the Oracle DBA useror user ID's created to connectto the database. If you haverestricted the default privilegesgranted to user ID's, you mustexplicitly grant them to themaximo user. So, for example, ifyou do not by default grant arole such as theselect_catalog_role role to userIDs connecting to the database,in order to deploy MaximoAsset Management successfully,you must explicitly grant thatrole to the maximo user byusing the SQL*Plus command:
grant select_catalog_roleto maximo
Create a database. Enter ctginst1 for both the Global DatabaseName value and the SID value. The databasename value is customizable.
Set Shared Memory Management to Manual
Set Shared Pool to 157286400
For Oracle 9i Rel2 use 150
Set Buffer Cache to 36000000
For Oracle 9i Rel2 use 36
Set Large Pool to 8388608
For Oracle 9i Rel2 use 8
Set PGA Size to 37748736
For Oracle 9i Rel2 use 36
Use the Unicode (AL32UTF8) character set.
Set nls_length_semantics to CHAR
Set cursor_sharing to SIMILAR.
Set open_cursors to 1000
Unlock the CTXSYS account.
Create a table space namedMAXDATA. This value iscustomizable.
Set the size to 1000 Mb.
Set autoextend to on.
Create a temporary table spacenamed MAXTEMP. This value iscustomizable.
Set the size to 1000 Mb.
Set autoextend to on.
Set maxsize to unlimited.
Grant permissions to the maximouser.
If you have elected to create aseparate table space forindexing, you must also grantthe maximo user access to thatindex table space. For example,you perform the followingadditional SQL*plus commandif you had created a separatetable space for indexing calledTSI_CMDB_OWN:
alter user maximo quotaunlimited on TSI_CMDB_OWN
Run the following command:
create user maximo identified bymaximo default tablespace maxdatatemporary tablespace maxtemp;
Grant the following permissions:
v connect
v create job (Oracle 10 only)
v create trigger
v create session
v create sequence
v create synonym
v create table
v create view
v create procedure
v alter session
v execute on ctxsys.ctx_ddl
Run the following command:
alter user maximo quotaunlimited on maxdata;
Chapter 13. Advanced installation topics 199
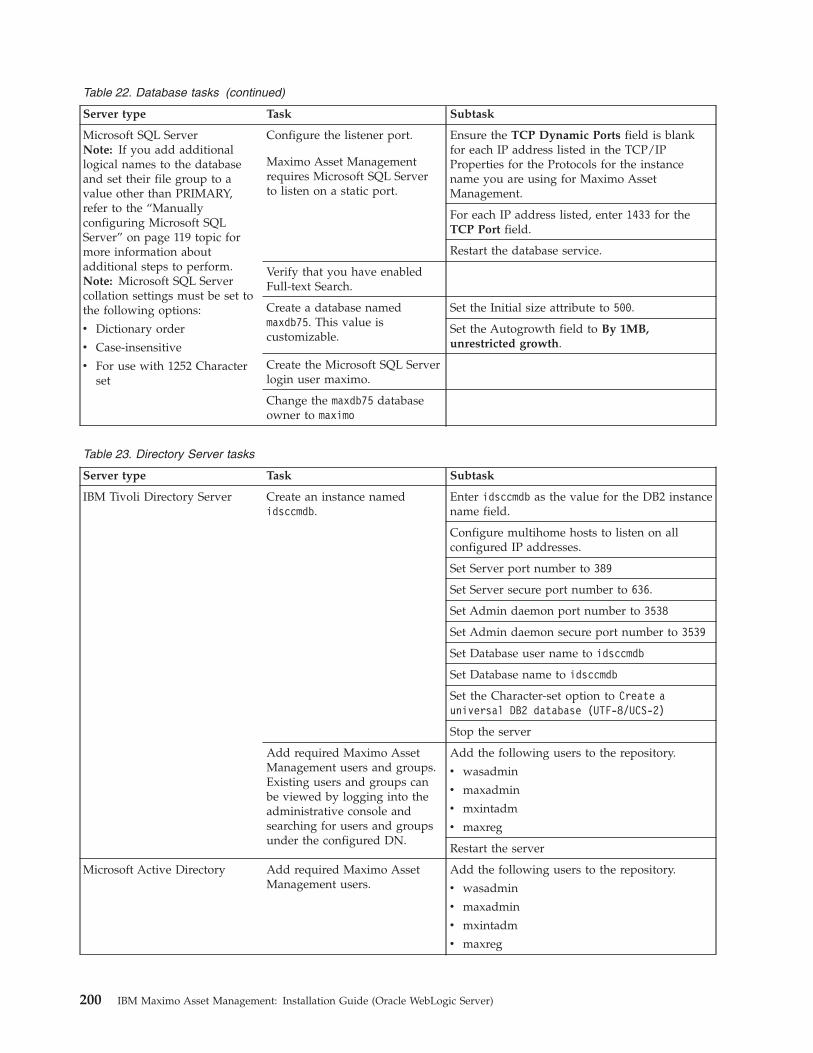
Table 22. Database tasks (continued)
Server type Task Subtask
Microsoft SQL ServerNote: If you add additionallogical names to the databaseand set their file group to avalue other than PRIMARY,refer to the “Manuallyconfiguring Microsoft SQLServer” on page 119 topic formore information aboutadditional steps to perform.Note: Microsoft SQL Servercollation settings must be set tothe following options:
v Dictionary order
v Case-insensitive
v For use with 1252 Characterset
Configure the listener port.
Maximo Asset Managementrequires Microsoft SQL Serverto listen on a static port.
Ensure the TCP Dynamic Ports field is blankfor each IP address listed in the TCP/IPProperties for the Protocols for the instancename you are using for Maximo AssetManagement.
For each IP address listed, enter 1433 for theTCP Port field.
Restart the database service.
Verify that you have enabledFull-text Search.
Create a database namedmaxdb75. This value iscustomizable.
Set the Initial size attribute to 500.
Set the Autogrowth field to By 1MB,unrestricted growth.
Create the Microsoft SQL Serverlogin user maximo.
Change the maxdb75 databaseowner to maximo
Table 23. Directory Server tasks
Server type Task Subtask
IBM Tivoli Directory Server Create an instance namedidsccmdb.
Enter idsccmdb as the value for the DB2 instancename field.
Configure multihome hosts to listen on allconfigured IP addresses.
Set Server port number to 389
Set Server secure port number to 636.
Set Admin daemon port number to 3538
Set Admin daemon secure port number to 3539
Set Database user name to idsccmdb
Set Database name to idsccmdb
Set the Character-set option to Create auniversal DB2 database (UTF-8/UCS-2)
Stop the server
Add required Maximo AssetManagement users and groups.Existing users and groups canbe viewed by logging into theadministrative console andsearching for users and groupsunder the configured DN.
Add the following users to the repository.
v wasadmin
v maxadmin
v mxintadm
v maxreg
Restart the server
Microsoft Active Directory Add required Maximo AssetManagement users.
Add the following users to the repository.
v wasadmin
v maxadmin
v mxintadm
v maxreg
200 IBM Maximo Asset Management: Installation Guide (Oracle WebLogic Server)

Table 24. Oracle WebLogic Server Server tasks
Server type Task Subtask
Oracle WebLogic Server Create an application server, forexample, MAXIMOSERVER.
Create three JMS servers withthe following configurationparameters:
Properties Namesqinserver,sqoutserver,cqinserver
Server TargetMAXIMOSERVER
Bytes Maximum20% or below of theallotted JVM heap size
Chapter 13. Advanced installation topics 201

Table 24. Oracle WebLogic Server Server tasks (continued)
Server type Task Subtask
Create a JMS system module intjmsmodule withMAXIMOSERVER as the target server.
Add a connection factory resource to the JMSmodule:
Name intjmsconfact
JNDI Namejms/maximo/int/cf/intcf
Target MAXIMOSERVER
Add three queue resources to the JMS Module:
Queue 1Name: sqin JNDI Name:jms/maximo/int/queues/sqin
Queue 2Name: sqout JNDI Name:jms/maximo/int/queues/sqout
Queue 3Name: cqin JNDI Name:jms/maximo/int/queues/cqin
TemplateNone
Enable the JMS connection factory forintegration framework.
Save and restart Oracle WebLogic Server.
Create the MAXIMOSERVERdomain.
Select a JDK with a version number 1.6.0 orgreater.
Configuring JMS for the emaillistener in WebLogic Server.
Create a persistent store called lsnrstore.
Create a JMS Server called lsnrserver with atarget of AdminServer.
Create a JMS System Module calledlsnrjmsmodule.
Add a connection factory to the JMS modulecalled lsnrconnfact with a JNDI Name ofjms/mro/lsnr/lsnrcf.
Add a queue to the JMS module calledlsnrqueue with a JNDI Name ofjms/mro/lsnr/qin.
Set the XA option for the connection factory forlsnrconnfact.
Enable an email listener to use JMS queues byediting the ejb-jar.xml andweblogic-ejb-jar.xml files.
Configuring and managing Oracle WebLogic ServerThis section describes common tasks on configuring and administering the OracleWebLogic Server.
202 IBM Maximo Asset Management: Installation Guide (Oracle WebLogic Server)

For more comprehensive information on running and administering OracleWebLogic Server visit the Oracle Web site.
Starting Oracle WebLogic ServerStarting the Oracle WebLogic Server.
About this task
To start the MAXIMOSERVER application, complete the following steps:
Procedure1. Open a command prompt window and change the directory to :
Windows Windows:C:\bea\user_projects\domains\mydomain
UNIX UNIX:weblogic_install_dir/user_projects/domains/mydomain
2. Launch:
Windows Windows:startWebLogic.cmd
UNIX UNIX:./startWebLogic.sh
3. If prompted, type the administrator user name and password. Once you see thephrase: server started in RUNNING Mode or Started weblogic Admin ServerMAXIMOSERVER for domain mydomain running in production mode (dependingon your operating system), the Oracle WebLogic Server is running.
Stopping the Oracle WebLogic ServerYou can use the Administrative Console to stop the Oracle WebLogic Server.
About this task
To stop the MAXIMOSERVER from the Administrative Console, complete thefollowing steps:
Procedure1. Open a browser window and enter the URL: http://localhost:7001/console This
URL is the administration URL for Oracle WebLogic Server domain youcreated.
2. Log in to the Administration Console with the administrator user name andpassword.
3. In the Domain Structure section, click Environment > Servers.4. In the main section of the console, click the AdminServer link.5. Click the Control tab.6. Click Shutdown and then Force Shutdown Now. The MAXIMOSERVER is
stopped.
Chapter 13. Advanced installation topics 203

Changing the middleware installation program configurationparameters
You can change the configuration parameters you have entered for a deploymentplan before deploying the plan. You would use this option if you chose to cancelthe deployment of the deployment plan you developed by exiting the middlewareinstallation program. Configuration parameters for a plan can be changed onlybefore deploying the deployment plan.
About this task
These instructions assume that you have developed a deployment plan, enteredconfiguration parameters for the plan, and then exited the middleware installationprogram before actually deploying the deployment plan.
Procedure1. Relaunch the middleware installation program from the launchpad and
advance along the installation program panels until you reach the ChooseWorkspace panel.
2. From the Choose Workspace panel, specify the directory you previously usedas the middleware installation program workspace, and then click Next.
3. Select Edit the configuration parameters, and then click Next.4. Advance along the middleware installation program panels and make changes.5. When you reach the Deployment Plan Operation panel, select Deploy the plan,
and then click Next.6. From the Deployment Plan and Parameter Configuration summary panel,
review the contents of the summary, and then click Next to initiate theinstallation and configuration of the middleware you selected.
7. From the Select Middleware Image Directories panel, enter the location forcompressed images for the middleware contained in the deployment plan, anda directory to use to hold the uncompressed images. After you have entered thetwo locations, click Next. During deployment, the middleware images areuncompressed onto the system.
8. Click Finish to exit.
Deploying EAR filesThis section contains information about deploying Maximo Asset ManagementEAR files manually into Oracle WebLogic Server.
The following instructions are used to manually deploy the Maximo AssetManagement maximo.ear and maximoiehs.ear files into Oracle WebLogic Server.v If you modify any database connection parameters in the maximo.properties file
after the initial installation, you must rebuild of the maximo.ear file, and thenredeploy it in Oracle WebLogic Server. In this scenario, you would likely onlyrebuild and redeploy the maximo.ear file. You would not be required to rebuildand redeploy the maximoiehs.ear file.
v If you have installed Maximo Asset Management into a developmentenvironment, you might at some point like to migrate the deployment into a testor production environment. In this scenario, you must deploy both the maximoand maximo help applications into the new environment.
204 IBM Maximo Asset Management: Installation Guide (Oracle WebLogic Server)
Building EAR filesYou can manually build Maximo Asset Management EAR files if, for example, youmodify a database connection parameter in the maximo.properties file after theinitial installation.
About this task
To manually build Maximo Asset Management EAR files, complete the followingsteps:
Procedure1. Build the maximo EAR file:
Windowsinstall_home\maximo\deployment\buildmaximoear.cmd
2. Build the maximo help system EAR file:
Windowsinstall_home\maximo\deployment\buildmxiehsear.cmd
Manually uninstalling applications from Oracle WebLogicServer
This section contains information about uninstalling Maximo Asset Managementapplications from Oracle WebLogic Server.
Manually uninstalling applications from Oracle WebLogic ServerProcedure1. Log into the Administration Console. For example, http://<server>:<port>/
console2. Click Lock & Edit.3. Click Deployments.4. Select the application for the EAR to uninstall.5. Click Delete.
Performing multiple product installations on one administrativeworkstation
You can use a single computer to deploy multiple instances of the product. Forexample, you can use the same computer to deploy a test environment, adevelopment environment, and a training environment.
About this task
One administrative workstation can support several Maximo Asset Managementdeployments. While installing Maximo Asset Management 7.5, you specify theinstallation directory from the Choose Installation folder panel for that particulardeployment. After a successful installation, you can install another instance ofMaximo Asset Management 7.5 on the same administrative workstation byentering a new installation path.
Each instance of Maximo Asset Management requires a dedicated databaseinstance and a dedicated JVM. You cannot share these resources betweendeployments.
Chapter 13. Advanced installation topics 205

When performing follow-up installation actions or software life cycle operations,complete them for a single installation before carrying them out for the next. Thispractice applies to using the future installation actions with the process solutioninstaller, the product installation program, or applying fix packs. This practicehelps to avoid any potential confusion that can arise when running severalinstances of these programs concurrently.
If you use Windows Remote Desktop Connection to log in to the Windows systemusing the new development user ID, you must add it to the Remote Desktop Usersgroup.
Procedure1. Start the product installation program.2. Proceed through the installation program panels as directed. When you get to
the Choose Installation folder panel, use a meaningful directory name thatrepresents the purpose of this deployment. You can optionally click Editdescription and enter a description for the current installation. If you haveinstalled the product previously using the same user ID, use the drop-downmenu to select any of the previously used installation directories to target it foran upgrade.
3. Complete the installation as normal.
Results
The product is now installed. Repeat these steps for each subsequent installationon the same workstation, using a different installation directory.
To perform an uninstall, you must change directory to install_home\_uninstalland then run the uninstall.bat script to uninstall that instance of the product.
206 IBM Maximo Asset Management: Installation Guide (Oracle WebLogic Server)

Chapter 14. Middleware on Solaris and HP-UX
Middleware versions that are not installable by the middleware installer programare installed by using graphical installation programs that are provided with eachmiddleware product.
The procedures in this document can be used to manually install the followingproducts on the following operating systems:
Solaris 11 SPARC and HP-UX 11i v2+3 64 bit
v IBM DB2 Enterprise Server Edition 9.7v IBM Tivoli Directory Server 6.3.
IBM Tivoli Directory Server 6.3 is only supported for Solaris 11.
Operating system preparationSome operating system default configuration settings must be change to providean environment that can host middleware operations.
The steps needed to prepare each newly supported operating system are operatingsystem dependent.
Perform the operating system preparation steps before installing any middleware.
SolarisSome of the default kernel configuration parameters on Solaris might not besufficient to run IBM DB2 9.7.
Ensure that your Solaris system has required kernel parameters in place byrunning the db2osconf utility after you install IBM DB2, but before you create anydatabase objects.Related information:
http://publib.boulder.ibm.com/infocenter/db2luw/v9r7/index.jsp
HP-UXIn order for IBM DB2 9.7 to run correctly on HP-UX, certain group membershiprequirements must be addressed following the installation of IBM DB2.
After IBM DB2 9.7 has been installed, you must ensure that the root user has beenassigned as a member of the db2iadm1 group.
In order to ensure that your HP-UX system has required kernel parameters inplace, you will need to run the db2osconf utility after you install IBM DB2, butbefore you create any database objects.
© Copyright IBM Corp. 2007, 2011 207

Related information:
http://publib.boulder.ibm.com/infocenter/db2luw/v9r7/index.jsp
Installing the componentsAfter the operating system is configured as needed, install the middlewarecomponents.
Middleware components are installed in the following order:1. IBM DB22. IBM Tivoli Directory Server3. IBM HTTP Server
Note: The media or web site you use to install middleware has directory-specificlocations for each supported operating system. The directory structure isos/product.
These commands display the contents of the os/product directory.cd osls
Within each os subdirectory are the installation directories for each middlewareproduct.ls solarisDB2-ESE_9.7_FP3aTIV-DirectoryServer_6.3
Installing DB2Run the db2setup program to install DB2.
Before you begin
Before you install DB2, review the requirements.
There are a number of things you must check to ensure a successful installation.Before you start the DB2 setup wizard, consider the following prerequisiteconditions:v If you choose to automate database configuration when you install Maximo
Asset Management, the user maximo is typically created for you on the systemhosting the database server. For Solaris and HP-UX systems, you must manuallycreate the user even if the Maximo Asset Management installation programconfigures the database automatically. Ensure that you have created the maximouser on the database server before installing Maximo Asset Management.
v db2setup starts a wizard installer so X Window System must be installed andrunning before you start the DB2 installer program. Export your display:export DISPLAY= your_ip_address:0
v If NIS, NIS+, or similar security software is used in your environment, you mustmanually create the required DB2 users, before you start the DB2 setup program.See the centralized user-management considerations topic in the DB2information center, before you begin.
208 IBM Maximo Asset Management: Installation Guide (Oracle WebLogic Server)

v In general, you can choose to defer some installation activities. For example, ifyou choose to not set up email notifications of database events at installationtime. If you want to defer specific installation activities, select that option, andconfigure them later.
v Some middleware products have specific requirements or conventions foraccount names and other settings. Override the installation defaults as shown ifthe defaults provided are not satisfactory. On panels that prompt for passwords,both the password and its confirmation entry must be specified before theinstaller can continue to the next panel.
About this task
This procedure describes how to perform a typical installation of DB2 on a singlecomputer. If you want to install DB2 components on multiple computers, see theDB2 information center for those instructions.
Databases must contain a single partition and Unicode data (UTF-8).
DB2 is installed, by default, in the /opt/IBM/db2/V9.7 directory.
The /opt/IBM/db2/V9.7/logs directory contains a db2install.history file. This filecontains the installation settings used, and errors that occurred during theinstallation process. The vmrfis.history file contains information aboutmaintenance that has been applied to DB2, such as fix packs that have beeninstalled.
The db2setup.log file captures all DB2 installation information including errors.The db2setup.err file captures any error output that is returned by Java (forexample, exceptions and trap information). By default, both logs are created in the/tmp directory unless you change that location during the installation process.
Procedure1. Log in as root.2. Copy the DB2 Enterprise Server Edition tar file to a writable disk.
For SolarisCopy solaris/DB2-ESE_9.7_FP3a/v9.7fp3a_sun64_server.tar.gz
For HP-UXCopy hpux-ia64/DB2-ESE_9.7_FP3a/v9.7fp3a_hpipf64_server.tar.gz
3. Change to the directory where you copied the compressed file anduncompress it.
4. Extract the file DB2_Enterp_Svr_OEM_Activation.zip into an appropriatedirectory. For example, for Solaris, solaris/DB2-ESE_9.7/
5. Start the installer. Type ./db2setup.6. From the launchpad, select Install a Product.7. Click Install New.8. Accept the license agreement.9. In general, accept all defaults, except where you must provide custom values.
For example, the email address of the recipient of email notifications ofdatabase events defaults to host name@local_server_name. This value must bechanged to a valid email address if you choose to enable SMTP notifications.This value can also be changed at a later time.
Chapter 14. Middleware on Solaris and HP-UX 209

10. Leave the check boxes for the GUI and UID options selected; the systemassigns them for you.
11. On the Start copying files and create response file panel, click Finish to initiatethe installation.
12. Start the DB2 instance.13. Register the DB2 server license:
a. Extract the license file.b. Use the DB2 license management tool command to apply the license:
DB2_HOME/adm/db2licm -a full path to the license file
The license file can be found in the appropriate folder for your operatingsystem. For Solaris, the license file is located in solaris/DB2-ESE_9.7/DB2_Enterp_Svr_OEM_Activation/db2/license/db2ese_o.lic.
c. Stop and then restart the DB2 instance using the db2stop and db2startcommands.
d. Verify that the license was installed successfully:DB2_HOME/adm/db2licm -l
This command results in output like the following:Product name: "DB2 Enterprise Server Edition"License type: "Restricted"Expiry date: "Permanent"Product identifier: "db2ese"Version information: "9.7"
http://publib.boulder.ibm.com/infocenter/db2luw/v9r7/index.jsp
http://publib.boulder.ibm.com/infocenter/db2luw/v9r7/topic/com.ibm.db2.luw.qb.server.doc/doc/r0007059.html
Installing IBM Tivoli Directory Server on SolarisIBM Tivoli Directory Server is typically installed on a computer that is not hostingother middleware products.
Procedure1. Log in as root.2. Copy the tar files for IBM Tivoli Directory Server to a writable disk. For
Solaris, copy the tds63-solaris-sparc-base.tar and tds63-solaris-sparc-gskit.tar files from solaris64/TIV-DirectoryServer_6.3.
3. Unpack the files:tar -xvf tds63-solaris-sparc-base.tartar -xvf tds63-solaris-sparc-gskit.tar
4. Change to the /tdsV6.3/tds directory and then type ./install_tds.bin
If you prefer, you can specify a temporary directory other than the systemtemporary directory. Change to the appropriate directory and type thefollowing command at a command prompt:./install_tds.bin -is:tempdir directory
. The variable directory is the directory you want to use for temporary space.Be sure that you have at least 400 MB of free space in this directory. Forexample:./install_tds.bin -is:tempdir /opt/tmp
210 IBM Maximo Asset Management: Installation Guide (Oracle WebLogic Server)

5. When the installation wizard starts, select a language to use for theinstallation process, accept the license agreement, and choose a Custominstallation.
6. Select the Proxy Server, Server, C Client, Java Client, and WebAdministration Tool options, and then click Next.
7. Select Do not specify. I will manually deploy at a later time, then click Next.8. Click Install.9. Close the Instance Administration tool.
10. Click Finish.11. Create the idsccmdb instance. Refer to “Manually configuring IBM Tivoli
Directory Server” on page 122 for details.12. Start the directory server, type the following commands:
a. /opt/ibm/ldap/V6.3/sbin/idsdiradm -I idsccmdb
b. /opt/ibm/ldap/V6.3/sbin/idsdirctl -D admin user ID -w admin userpassword
Chapter 14. Middleware on Solaris and HP-UX 211

212 IBM Maximo Asset Management: Installation Guide (Oracle WebLogic Server)

Chapter 15. Backup and restoration
Like all important business data, it is a good idea to establish a process andschedule for backing up Maximo Asset Management data.
Back up and restore middleware application data using the methods described inthe documentation for that product is important. Also establish a process forbacking up data contained on the Maximo Asset Management administrativeworkstation.
The default installation directory on the Maximo Asset Management administrativeworkstation is C:\ibm. This directory contains the critical files for your MaximoAsset Management deployment, which includes all class files and customizationsthat have been performed in your environment, the current Enterprise Archive(EAR) file that was deployed in Oracle WebLogic Server, and the properties filesand installation tools used for your environment. Plan to back up Maximo AssetManagement administrative workstation data just after initial deployment andschedule periodic backups on an ongoing basis.
Backing up the administrative workstationIt is recommended that you back up all Maximo Asset Management middlewareapplications and Maximo Asset Management administrative workstation on aregular basis.
About this task
The default installation directory on the administrative workstation is C:\ibm. Thisdirectory contains the critical files for your Maximo Asset Managementdeployment.
Specifically, the administrative workstation contains the following items:v Class files and customizations performed in your environment.v The current Enterprise Archive (EAR) file.v The properties files and installation tools used for your environment.
It is important to make a back up of the database at the same time that you backup the administrative workstation. During restoration, you restore the databaseback up at the same time you restore the administrative workstation back up itwas paired with.
To back up critical Maximo Asset Management information, complete the followingsteps:
Procedure1. Back up the Maximo Asset Management database, J2EE server, and
authentication server information using the instructions provided by yourmiddleware vendors.
2. Create a backup of the installation directory. By default, this directory isC:\IBM\SMP. Ensure that all file permissions are preserved.
© Copyright IBM Corp. 2007, 2011 213

Restoring the administrative workstationThis section details how to restore previously backed up Maximo AssetManagement administrative workstation information to a Windows workstation.This information can be used to return an existing Maximo Asset Managementadministrative workstation to a previous state.
Before you begin
It is important to restore the back up of the database that was made when youbacked up the administrative workstation. A database back up should be restoredwith the administrative workstation back up it was paired with.
About this task
To restore Maximo Asset Management information to an administrativeworkstation, complete the following steps:
Procedure1. Restore the database back up that was paired with the administrative
workstation back up you are restoring.2. Log on to the target administrative system with the same user ID that was used
to install the product on the existing administrative workstation.3. Copy the Maximo Asset Management installation files and directories to the file
system of the target administrative system. You must maintain the directorystructure of the original installation. For example, if the Maximo AssetManagement installation directory on the existing administrative system isC:\IBM\SMP, you cannot copy those files to a C:\NewAdminWS\IBM\SMP directoryon the target administrative workstation.
Installation propertiesInstallation properties are recorded in properties files during a deployment and areused as input by future install-related actions. Installation properties are found inthe install.properties and maximo.properties files as well as the database. Youshould only modify properties found in the install.properties file that arerelated to host names or user IDs. Changing values for other properties canseverely impact your ability to perform future installation actions, upgrades and fixpack installations.
Table 25. Installation properties
Category Property Definition
MAXIMO Properties Maximo.InstallLocation Install location of the maximo directory.
For example, C:\\IBM\\SMP\\maximo
mxe.db.user Database user that the server uses to attachto the database server.
For example, maximo
mxe.db.schemaowner Owner of the database schema.
For example, maximo
This value must be dbo for Microsoft SQLServer.
214 IBM Maximo Asset Management: Installation Guide (Oracle WebLogic Server)

Table 25. Installation properties (continued)
Category Property Definition
mxe.db.password Password for the database user name.
mail.smtp.host SMTP host server.
mxe.workflow.admin E-mail account of the workflowadministrator.
mxe.adminEmail Valid e-mail address used by workflows tocommunicate with workflow participants.
mxe.name Name to bind the MXServer server object toin the RMI registry.
For example, mxserver.
mxe.hostname Name of the machine and port hostingMXServer.
mxe.rmi.port RMI communication port. If set at zero, RMIuses any available port. You can selectanother available port number.
mxe.registry.port The port number used to bind RMI/JRMPcommunications.
For example, 13400.
The RMI registry is started by the firstinstance of the maximo application to run.An environment could have multipleinstances of the product application running.This registry coordinates these instances.There is a single central RMI registry server.This value is the port available for the otherapplication instances to communicate withthe central server.
mxe.allowLocalObjects Set to true in production environments, toimprove system performance. Set to false fordevelopment work, or for customapplications.
The default is false.
mxe.useAppServerSecurity Indicates whether to use LDAP or nativeauthentication. Setting this value to 1indicates you are using LDAP for security.
mxe.MLCacheLazyLoad By default, the multi-language metadatacache loads one object at a time. Set this flagto 1 to load all objects simultaneously forone language.
mxe.UserLicenseKey The product enabler (license key) is usedduring installation. If the product enablerchanges this value must be updated.
mxe.adminuserid The administrative user. Used by the serverfor administrative tasks and to run crontasks. This user must have access to all Sitesin the system.
mxe.adminuserloginid Defines the default login user ID for theproduct application.
The default value is maxadmin.
Chapter 15. Backup and restoration 215

Table 25. Installation properties (continued)
Category Property Definition
mxe.adminPasswd The password for the mxe.adminuserloginiduser.
mxe.system.reguser Self registration user. This user isresponsible for the process by which userscan create their own accounts.
The default value is maxreg.
mxe.system.regpassword User registration login password. This valueis the password for the user listed formxe.system.reguser.
mxe.email.charset The character set for e-mail notifications sentfrom the product.
When this property is defined, it is thecharset that is used to encode the subjectand message when an e-mail notification issent.
mxe.reorder.previewtimeout The reorder preview time out period (inminutes). This value must be set to the samevalue as the Web server session time out.
The default value is 30 minutes.
mxe.security.provider The security provider is obtained from thepolicy file, which is normallycom.sun.crypto.provider.SunJCE.
To use a different provider, you can specifya value for this parameter.
mxe.mbocount Displays the number of business objectscreated by the server.
The default is 1. Changing the value to 0disables this feature.
mxe.esig.defaultuserid Set this flag to true if you want theEsignature login dialog to default to thelogin ID.
The default value is true.
maximo.min.required.db.version Defines what the minimum level of databaseis required for an upgrade. An examplevalue would be 7100.
mxe.encrypted Property used by the application todetermine if property files are encrypted.
This value is set to true if the file isencrypted.
mxe.LDAPUserMgmt Indicates whether LDAP owns usermanagement whenmxe.userAppServerSecurity = 1.
The default value is 1.
Maximo AssetManagement specificProperties
CCMDB.InstallLocation Product install location.
For example, C:\\IBM\\SMP.
216 IBM Maximo Asset Management: Installation Guide (Oracle WebLogic Server)

Table 25. Installation properties (continued)
Category Property Definition
CCMDB.JREInstallLocation JRE install location.
For example, C:\\IBM\\SMP\\JRE.
CCMDB.SDKInstallLocation SDK install location.
For example, C:\\IBM\\SMP\\SDK.
CCMDB.PMP Unused property.
CCMDB.Locale The locale setting of the administrativeworkstation system.
For example, en.
CCMDB.BaseLanguage Base language that was set for the product.
For example, en.
CCMDB.AdditionalLanguages Additional languages installed for theproduct.
CCMDB.DeploySampleData Binary value that determines whethersample data is to be loaded during theinstallation.
For example, false.
CCMDB.UserShortcuts Location of the menu for process solutioninstaller and the product console shortcuts.
CCMDB.InstallType Type of installation, which includes fix pack,upgrade, or new installation.
For example, Install.
CCMDB.DeployEar Binary value that indicates if EAR files aredeployed during the installation.
For example, true.
process automationengine specificproperties
BASE.DeployOptionalContent Binary value that indicates if optionalcontent is deployed during the installation.
For example, true.
BASE.DeployOptionalContentSet Indicates whether you selected to deployoptional content during the initial upgrade.This value, once set, is a fixed value andcannot be changed. This value will be usedfor all future upgrades and fix packs.
BASE.VersionUpgradingFrom The previous version of process automationengine that was installed.
LDAP Server-specificProperties
LDAP.AutomateConfig Binary value that indicates whether theinstallation program automaticallyconfigures the directory server.
For example, true.
LDAP.Vendor The type of LDAP repository.
LDAP.ServerHostName Host name of the LDAP system host.
LDAP.AdminDN Administrator distinguished name.
For example, cn=root.
Chapter 15. Backup and restoration 217

Table 25. Installation properties (continued)
Category Property Definition
LDAP.AdminPassword Password for user ID named inLDAP.AdminDN.
LDAP.ServerPort Port listening for connection requests.
For example, 389.
LDAP.InstallLocation Install location of the directory server.
For example, C:\ProgramFiles\IBM\LDAP\V6.2.
Database-specificProperties
Database.AutomateConfig Binary value that indicates whether theinstallation program automaticallyconfigures the database.
For example, true.
Database.Vendor Database type.
For example, DB2.
Database.RemoteAccessUserName Database server system user ID that is usedfor configure the database remotely.
Database.RemoteAccessPassword Password for user ID named inDatabase.RemoteAccessUserName.
mxe.db.driver Java class name of the JDBC driver.
For example, com.ibm.db2.jcc.DB2Driver,oracle.jdbc.OracleDriver, orcom.inet.tds.TdsDriver.
mxe.db.url JDBC URL of the database.
For example,
jdbc:db2://mymachine.mydomain.com:50005/maxdb75
jdbc:inetdae7a:mymachine.mydomain.com:1433?database=maxdb75&language=us_english&nowarnings=true&mars=false
jdbc:oracle:thin:@mymachine.mydomain.com:1521:ctginst1
mxe.db.initialConnections Number of database connections to createwhen the application server is started.
For example, 8.
mxe.db.maxFreeConnections Maximum number of free databaseconnections available in the connection pool.
For example, 8.
218 IBM Maximo Asset Management: Installation Guide (Oracle WebLogic Server)

Table 25. Installation properties (continued)
Category Property Definition
mxe.db.minFreeConnections Minimum number of free databaseconnections needed in the connection poolin order for more connections to beallocated.
For example, 5.
mxe.db.newConnectionCount Number of new connections to be createdwhen the minimum free connections areavailable in the connection pool.
For example, 3.
mxe.db.transaction_isolation The system install sets the value to:TRANSACTION_READ_COMMITTED.
This value cannot be modified.
mxe.db.format.upper This value defines the database uppercasefunction for the system.
This value cannot be modified.
mxe.db.autocommit This value sets the autocommit mode usedfor the Write connections. Can be either trueor false. The default is false.
This value cannot be modified.
mxe.db.systemdateformat System date format.
For DB2, the value is current timestamp.
For Oracle, the value is sysdate, and thedefault value cannot be edited.
For Microsoft SQL Server, the value isgetdate().
mxe.db.format.nullvalue The database-specific format of the nullvalue function.
For DB2 the value is COALESCE, and thedefault value cannot be edited.
The value for Oracle is NVL, and the defaultvalue cannot be edited.
The value for Microsoft SQL Server must beset to ISNULL.
mxe.db.sqlserverPrefetchRows Setting to reduce lock contention.
Optimal setting is 200 rows. Setting a valuelarger than 500 can degrade performance.
The default value is 0.
This value is only valid for SQL Server.
Chapter 15. Backup and restoration 219

Table 25. Installation properties (continued)
Category Property Definition
mxe.db.logSQLTimeLimit The system logs the SQL statements thattake longer than the specified time limit. Thetime is measured in milliseconds(thousandths of a second).
The default value is 1000 milliseconds.
To disable, edit the file to read:mxe.db.logSQLTimeLimit=0.
mxe.db.fetchResultLogLimit When this setting is enabled, a stack trace isprinted in the log for every business objectset that fetches beyond the set limit of rows.The stack trace log is also repeated for everymultiple of such fetches.
The default is 200 rows.
To disable, edit the file to read:mxe.db.fetchResultLogLimit=0.
Oracle Properties Database.Oracle.InstanceName Oracle instance name.
Database.Oracle.SoftwareOwner Owner of the software installation.
For example, oracle.
Database.Oracle.SoftwareOwnerPassword Password for the user ID listed inDatabase.Oracle.SoftwareOwner.
Database.Oracle.InstallLocation Oracle installation location. For example,/opt/app/oracle/product/10.2.0/db_1.
Database.Oracle.DataTablespaceName Oracle table space name for the productdatabase.
For example, maxdata.
Database.Oracle.InstanceLocation Oracle instance location.
For example, /opt/app/oracle/product/10.2.0/db_1.
Database.Oracle.DataTablespaceLocation Location of Oracle database table space.
Database.Oracle.DataTablespaceSize Tablespace size, measured in Mb.
For example, 1000.
Database.Oracle.DataTablespaceMaxSize Maximum size of the table space, measuredin Mb.
For example, 8000.
Database.Oracle.TempTablespaceName Temporary table space name.
For example, maxtemp.
Database.Oracle.TempTablespaceLocation Location of temporary table space.
Database.Oracle.TempTablespaceSize Temporary table space size, measured in Mb.
For example, 1000.
220 IBM Maximo Asset Management: Installation Guide (Oracle WebLogic Server)

Table 25. Installation properties (continued)
Category Property Definition
Database.Oracle.TempTablespaceMaxSize Maximum size of the temporary table space,measured in Mb.
For example, 8000.
Database.Oracle.IndexTablespaceName Index table space name.
For example, maxdata.
Database.Oracle.IndexTablespaceLocation Location of index table space.
Database.Oracle.IndexTablespaceSize Index table space size, measured in Mb.
For example, 1000.
Database.Oracle.IndexTablespaceMaxSize Maximum size of the index table space,measured in Mb.
For example, 8000.
mxe.db.schemaowner Owner of the database schema.
Database.Oracle.SchemaPassword Password for user listed inmxe.db.schemaowner.
Database.Oracle.ServerHostName Host name of the Oracle server.
Database.Oracle.ServerPort Port number used by Oracle.
For example, 1521.
Database.DBAUserName Oracle DBA user name.
For example, sys.
Database.DBAPassword Password for user ID listed forDatabase.DBAUserName.
DB2 Properties mxe.db.schemaowner Owner of the database schema.
Database.DB2.ServerHostName Host name of the DB2 server.
For example, mymachine.mydomain.com.
Database.DB2.ServerPort Database server port.
For example, 50005.
Database.DB2.InstanceName Name of the database instance.
For example, ctginst1.
Database.DB2.DatabaseName Name of the database.
For example, maxdb75.
Database.DB2.InstallLocation Install location of the database.
For example, /opt/IBM/db2/V9.7
Database.DB2.LogFileSize Set the size for transaction logs.
For example, 4096
Database.DB2.AppCtlHeapSize Application control heap size.
For example, 1024
Chapter 15. Backup and restoration 221

Table 25. Installation properties (continued)
Category Property Definition
Database.DB2.ApplHeapSize Application heap size.
For example, 1024
Database.DB2.LockListSize Size allocated to the lock list.
For example, 30000
Database.DB2.LogSecond Number of secondary log files allowed.
For example, 4
Database.DB2.ServiceUser User ID used to autostart.
Database.DB2.ServicePassword Password for Database.DB2.ServiceUser.
Database.DB2.PageSize Page size setting.
Measured in kb. For example, 32
Database.DB2.ExtentSize Number of pages per extent (group ofpages).
For example, 32
Database.DB2.FencedUser Fenced user ID for DB2 on Linux or UNIXsystems.
For example, db2fenc1.
Database.DB2.AuthType Method DB2 uses to authenticate users.
For example, server.
Database.DB2.DataTablespaceName DB2 table space name for the productdatabase.
For example, maxdata.
Database.DB2.BufferPoolName DB2 buffer pool name.
For example, MAXBUFPOOL.
Database.DB2.BufferPoolLocation Location of the buffer pool.
Database.DB2.BufferPoolSize Size of the buffer pool.
For example, 32
Database.DB2.DataTablespaceLocation Location of DB2 database table space.
Database.DB2.DataTablespaceSize Tablespace size, measured in Mb.
For example, 1000.
Database.DB2.DataTablespaceMaxSize Maximum size of the table space, measuredin Mb.
For example, 8000.
Database.DB2.TempTablespaceName Temporary table space name.
For example, maxtemp.
Database.DB2.TempTablespaceLocation Location of temporary table space.
Database.DB2.TempTablespaceSize Temporary table space size, measured in Mb.
For example, 1000.
222 IBM Maximo Asset Management: Installation Guide (Oracle WebLogic Server)

Table 25. Installation properties (continued)
Category Property Definition
Database.DB2.TempTablespaceMaxSize Maximum size of the table space, measuredin Mb.
For example, 8000.
Database.DB2.IndexTablespaceName Index table space name.
For example, maxdata.
Database.DB2.IndexTablespaceLocation Location of index table space.
Database.DB2.IndexTablespaceSize Temporary table space size, measured in Mb.
For example, 1000.
Database.DB2.IndexTablespaceMaxSize Maximum size of the index table space,measured in Mb.
For example, 8000.
Database.DB2.InstanceAdminUserName Administrative user or the database instance.
Database.DB2.InstanceAdminPassword Password for the user ID specified forDatabase.DB2.InstanceAdminUserName
Microsoft SQL ServerProperties
mxe.db.schemaowner Owner of the database schema.
Database.SQL.DatabaseName Name of the database.
For example, maxdb75.
Database.SQL.InstallLocation Microsoft SQL Server installationlocation. For example,C:\\ProgramFiles\\Microsoft SQL Server\\90.
Database.SQL.DataFileLocation Location for database data file
Database.SQL.DataFileName A way to specify the name of the data fileused for the database. For example,maxdb75_dat.
Database.SQL.DataFileMaxSize Maximum size for data file for database.
Database.SQL.DataFileSize Initial size for data file for database.
Database.SQL.LogFileName A way to specify the name for the databasetransaction log file. For example,maxdb75_log.
Database.SQL.LogFileSize Microsoft SQL Server Database transactionlog file size.
Database.SQL.DataFilegroupName Database logical name file group. Forexample, PRIMARY.
Database.SQL.ServerHostName Host name of the database server. Forexample, myhost.mydomain.com.
Database.SQL.ServerPort Database server port. For example, 1433.
Database.SQL.InstanceAdminUserName Administrative user for the Microsoft SQLServer instance. used during install forcreating database, creating database user,and modifying the database.
Database.SQL.InstanceAdminPassword Administrative users password.
ADE (DE) Properties DE.InstalllLocation Location of the deployment engine.
Chapter 15. Backup and restoration 223

Table 25. Installation properties (continued)
Category Property Definition
Application ServerType Properties
ApplicationServer.Vendor Indicates which application server waschosen during installation. For example,WebLogic.
Updating environment dataWhen you install a second product on the same administrative workstation, orotherwise upgrade a single existing product, the installation program uses valuesrecorded from the previous deployment. These values are stored on theadministrative system in the install.properties and maximo.properties files, andalso in the database. If you have made any environmental changes to any of thesystems used for the original deployment, they must be recorded in theinstall.properties and maximo.properties files, and updated in the database.Typically these types of changes would include such as changing a host name orupdating a password, for example
Before you begin
During a follow up installation task, the installation program uses values found inthe install.properties and maximo.properties files to complete the upgrade orinstallation of an additional product. Pending successful use of these credentials,you are not prompted to provide them again. If the installation program fails tolog in to the system using the credentials from the properties files, you areprompted to supply current credentials. These values are then written to theappropriate property file.
This method of updating credential information in property files has one exception.Database connection and credential information must always be current before youattempt an upgrade operation. Information for the database connection andcredentials are stored in the maximo.properties file. Any changes to thisinformation from the time of the original deployment must be manually recordedin the maximo.properties file before you upgrade.
Passwords will be encrypted within properties files. Update encrypted values inproperties files with clear text values and then re-encrypt the property file.
Procedure1. Update the property value in the database by using the System Properties
application in Maximo. See the System Administrator Guide for details.2. Complete the following steps to update database properties within the
maximo.properties file:a. Change directory to Product_Home\maximo\applications\maximo\
properties\
b. Make a backup of the maximo.properties file.c. Delete the maximo.properties file.d. Change directory to Product_Home\etc
e. Make a backup of the maximo.properties_orig found in the directory. Thisbackup is a permanent backup that can be copied from when you need toupdate properties in the future.
f. Rename the unencrypted file named maximo.properties_orig tomaximo.properties
224 IBM Maximo Asset Management: Installation Guide (Oracle WebLogic Server)

g. Copy the maximo.properties file to Product_Home\maximo\applications\maximo\properties\
h. Edit the maximo.properties file and update the credential or connectioninformation for the database server.
i. Save the file.j. Run the encryptproperties.bat file located in Product_Home\maximo\tools\
maximo\ directory against the file to encrypt it.3. Complete the following steps to update properties within the
install.properties file: The install.properties file contains most propertiesused by the installation program, including non-connection related propertiesfor the database. These values must be up to date before you apply a fix packor other upgrade operation. If these values have changed from the previousdeployment, you must first manually update them.a. Change directory to Product_Home\etc\
b. Edit the install.properties file and make updates. Do not changeencrypted properties (prefixed by [enc]). You are prompted for updatedvalues during the update operation. These values are written to theinstall.properties file.
c. Save the file.
Results
After you have completed these updates, you will be able to upgrade, install a fixpack, or install another product using the corrected values.
Chapter 15. Backup and restoration 225

226 IBM Maximo Asset Management: Installation Guide (Oracle WebLogic Server)

Chapter 16. Troubleshooting
If you encounter issues using the product or middleware installation programs,review the troubleshooting information for answers to common problems.
Once errors have been corrected, reattempt the installation
Troubleshooting the middleware installerThis section provides information about troubleshooting the middleware installer.
Use the information contained in this section to troubleshoot errors encounteredwhen using the middleware installer.
This section contains both general troubleshooting advice and solutions to specificerrors encountered when using the middleware installer.
Middleware installation program troubleshooting featureThe middleware installation program includes a feature that improves your abilityto troubleshoot installation errors.
The middleware installation program includes a feature that directs you totroubleshooting information when you encounter an error.
When an error occurs during the middleware plan deployment, the middlewareinstallation program displays an error summary panel. This panel provides detailson the nature of the error and when it occurred. This panel provides links to moredetailed information about the error through the use of a Logs button and aTroubleshooting button.
The Logs button opens a new window containing the directory hosting the logfiles relevant to the error. Parse these logs for information to troubleshoot theerror.
The Troubleshooting button launches your default Web browser and loadsrelevant troubleshooting information directly from the product support site. Usethe information from the support site to diagnose and resolve the error condition.
The links that bind an error condition to the URL of the product support site arefound in the MWITroubleshooting.xml file. This file is contained in the middlewareinstallation program workspace. The middleware installation program downloadsthe latest version of this file when it is started. If it is unable to connect to theproduct support site to update the file, it uses the local copy of the file.
Using the middleware installation program troubleshootingfeatureUsing the middleware installation program troubleshooting features improves yourability to resolve installation errors.
© Copyright IBM Corp. 2007, 2011 227
About this task
If an error occurs during the use of the middleware installation program, itdisplays an error summary panel. This panel provides error details, includingwhen the error occurred in the installation process. Also included on the panel aretwo buttons that lead to log and support information that is relevant to the errorcondition.
Use the following procedure to access troubleshooting information about an errorfrom the error summary panel.
Procedure1. Review the error information provided in the summary panel. This information
includes the error message text, error code, and the locations of relevant logfiles.
2. Click Logs to invoke a system directory window containing the log files of thecomponent that failed to install correctly. Examination of these log files canhelp you determine what caused the error condition.
3. Click Troubleshooting to launch a Web browser that navigates todocumentation on the product support site that is relevant to the errorexperienced. Use the information contained in the support information totroubleshoot the error. If the middleware server does not have access to theIBM support site, copy the URL to a system that has internet access.
Segmentation faultWhile using the middleware installation program to create an IBM Tivoli DirectoryServer instance, a segmentation fault occurs.
About this task
User authentication restrictions can cause a segmentation fault when using themiddleware installation program to create an IBM Tivoli Directory Server instance.Non-local user authentication is not permitted while creating IBM Tivoli DirectoryServer instances, causing the following error:/opt/ibm/ldap/V6.2/sbin/idscfgdb: line 30: integer: command not found/opt/ibm/ldap/V6.2/sbin/idscfgdb: line 1098: 29830 Segmentation fault${IDS_LDAP_PRE} ${IDS_LDAP_HOME}/${ITDS_INST_BIN}/${ITDS_BIN}/$PROGNAME "$@"
To resolve this issue, complete the following steps:
Procedure1. Start the middleware installation program, select Undeploy the Plan, and then
select the option for a Complete Uninstall.2. After the uninstall, exit the installer and delete all DB2 and IBM Tivoli
Directory Server instance users and their home directories.v db2inst1v db2fenc1v dasusr1v ctginst1v idsldapv idsccmdb
3. Verify the following conditions:
228 IBM Maximo Asset Management: Installation Guide (Oracle WebLogic Server)

v A local user is created to create the IBM Tivoli Directory Server instance. Ifnecessary, update the /etc/nsswitch.conf file. The files option must bespecified for the passwd and group entries. For example:passwd: filesgroup: files
v NIS must not be configured for the duration of the instance creation process.The /etc/passwd file must not have any entries starting with a plus (+) sign.NIS can be configured after the instance has been created. /etc/passwd filemust not have entries starting with + (which denotes including NIS user thepasswd file configuration
4. Start the middleware installation program and continue with the middlewaredeployment.
Encountering error ACUINI0044EDuring middleware installation using the middleware installer, you mightencounter error ACUINI0044E which occurs during the install step for thedeployment engine.
About this task
If you encounter error ACUINI0044E through the normal use of the middlewareinstallation program, it might be related to a failure of the deployment engine tobe installed or started. The following messages will be displayed after a failure todeploy the deployment engine is encountered:Deployment Engine did not start successfully. Please try to manuallystart the Deployment Engine and restart the installer.
ACUINI0044E Failed to register and start Deployment EngineIBM ADE Service
In order to troubleshoot this error, complete the following steps:
Procedure1. Exit the middleware installation program.2. Restart the deployment engine.
v For Windows, use the following command:net start "IBM ADE Service"
v For UNIX, use the following command:/usr/ibm/common/acsi/bin/acsisrv.sh -start
If the deployment engine is started successfully, restart the middlewareinstallation program and resume middleware deployment. If the deploymentengine fails to start, you have to manually uninstall the deployment engine.This action also eliminates the deployment engine registry information forother products installed on the system, so use caution when uninstalling thedeployment engine.“Common deployment failures” on page 244General troubleshooting techniques can be used to determine commondeployment failures.
Incorrect db2admin passwordWhen using the middleware installation program, you might encounter errorCTGIN9042E Errors were encountered during the execution of the step DB2Enterprise Server Edition Version 9.x.. This error is thrown when a user
Chapter 16. Troubleshooting 229

named db2admin is found on the system but uses a different password than theone entered in the middleware installation program.
Check the db2_97_inst.log file for an error like the following entry:ERROR:The password specified is invalid. Enter a valid password.
The db2_97_inst.log file is located at: <Workspace>\<machine name>\deploymentPlan\MachinePlan_<machine shortname>\00004_DB2_9.7\install\01_BASE\[INSTALL_<processing.req.id>]/logs/ db2_97_inst.log
So, for example, if the workspace is located at: C:\ibm\tivoli\workspace, themachine name is mymachine, and the processing.req.id is created as adate_timestamp, then the db2_97_inst.log file would be locatedin:C:\ibm\tivoli\mwi\workspace\mymachine.ibm.com\deploymentPlan\MachinePlan_mymachine\00004_DB2_9.7\install\01_BASE\[INSTALL_0424_09.32]\logs
Check the de_processreq.log file for an error like the following example:<errorMessages>
<errorMessage>[com.ibm.ac.si.ap.action.ExternalCommandActionException:ACUOSI0050E External command action failed with return code 87. Invocationstring: [C:\DOCUME~1\ADMINI~1\LOCALS~1\Temp\1/DB2-ESE_9.7.0/ESE/setup.exe,/f, /l, C:\DOCUME~1\ADMINI~1\LOCALS~1\Temp\1\[INSTALL_0424_09.32]/db2_97_inst.log,/u, C:\DOCUME~1\ADMINI~1\LOCALS~1\Temp\1\[INSTALL_0424_09.32]/
Decrypted_ResponseFile.txt],com.ibm.ac.common.hosts.CreationFailedException: : ]</errorMessage>
<errorMessage>[com.ibm.ac.common.hosts.CreationFailedException: : ]</errorMessage>
</errorMessages><actionErrorEvents>
<actionErrorEvent actionID="InstallProduct" actionName="externalCommand">ACUCME1100E</actionErrorEvent>
</actionErrorEvents>
The de_processreq.log file is located at:<Workspace>\<machinename>\deploymentPlan\MachinePlan_<machine shortname>\00004_DB2_9.7\install\01_BASE\[INSTALL_<processing.req.id>]/logs/ de_processreq.log
So, for example, if the workspace is located at: C:\ibm\tivoli\workspace, themachine name is mymachine, and the processing.req.id is created as adate_timestamp, then the de_processreq.log file would be located in:C:\ibm\tivoli\mwi\workspace\mymachine.ibm.com\deploymentPlan\MachinePlan_mymachine\00004_DB2_9.7\install\01_BASE\[INSTALL_0424_09.32]\logs
These errors indicate that the existing system user db2admin has differentpassword than the one entered in the middleware installation program.
To resolve this issue, complete the following steps:1. If you have not done so, click Finish to exit out of the middleware installation
program install wizard.2. Resolve the issue using one of the following methods:
v If you know the password for the user db2admin you can use the samepassword for the middleware installation program installation.
v You can delete the user db2admin and restart the middleware installationprogram.
230 IBM Maximo Asset Management: Installation Guide (Oracle WebLogic Server)

v You can set or change the password for existing DB2 user db2admin.To set the password follow these stepsa. Right click the My Computer icon and select Manage.b. From the Computer Management console, select Local Users and Groups
in System Tools.c. Expand Local Users and Groups and then select Users
d. Right-click the db2admin user and then click Set password.e. Enter the password, confirm it, and then click OK
f. Click OK once again.3. Navigate to the directory containing the middleware installation program
image and restart the middleware installation program.4. Select Restart the Plan and click Next.5. Specify the directory for the middleware install images and click Next.6. Specify the temporary directory and click Next.7. After disk space checks are completed, click Deploy to start the install.8. After install completes click Finish to exit the wizard.
Password expiration for db2adminWhen attempting to access Maximo Asset Management, you receive the error:Error 500 - BMXAA6418E - access#DBConnectFail.
When DB2 in installed, the operating system user, typically db2admin, isconfigured with a password that expires after 30 days. After 30 days, the passwordmust be changed for that user. When the DB2 service is restarted, if the operatingsystem user does not have a valid password, it cannot start the service. Ifconnectivity cannot be established between DB2 and the database, users are notable to log in to DB2.
Search the MyDomain.log file for the following error trace:[ERROR] BMXAA6418E - There was an error reloading the MAXPROPcache: access#DBConnectFail[FATAL] BMXAA6473E Maximo failed to start.psdi.util.MXSystemException: access#DBConnectFail
After the password is reset, DB2 services must be restarted.
Improper configuration of DB2 or IBM Tivoli Directory ServerWhile running the middleware installation program on an AIX system, youencounter the error message CTGIN9042E, which relates to a failure to properlyconfigure DB2 or IBM Tivoli Directory Server.
If you encounter error CTGIN9042E through the normal use of the middlewareinstallation program on an AIX machine, check the following log files to determinethe precise cause of the error:
Check the mwi.log file located within the workspace directory (forexample:/ibm/tivoli/mwi/workspace), and look for an error like the followingsample:Caused by:<workspace>/<machine name>/deploymentPlan/MachinePlan_<machine name>/00005_DB2_Configuration/install/02_CONFIG/02_CONFIG_AIX.xml:173: Failedto create database instance ctginsxy.
Chapter 16. Troubleshooting 231

Also check the createinstance.log file at <workspace>/<machinename>/deploymentPlan/MachinePlan_<machine shortname>/00005_DB2_Configuration/install/02_CONFIG/[INSTALL_<processing.req.id>]/logs/createinstance.log
for an error like the following sample:Caused by: <workspace>/<machine name>/deploymentPlan/MachinePlan_<machine name>/00008_ITDS_Configuration/install/02_CONFIG/02_CONFIG_AIX.xml:173:Failed to create itds database instance itdsccmxy.
Check the startInstanceTool.log file at <workspace>/<machinename>/deploymentPlan/MachinePlan_<machine shortname>/00008_ITDS_Configuration/install/02_CONFIG/[INSTALL_<processing.req.id>]/logs/startInstanceTool.log
for any error like the following sample:DBI1703E No valid service name or port number found
If you locate any of these errors in the log files listed, the error can be attributed toa failure to properly configure either DB2 or IBM Tivoli Directory Server.
To resolve this issue, complete the following steps:1. Click Finish to exit out of the middleware installation program install wizard.2. Restart the middleware installation program and proceed through the wizard
until you reach the Restart or Undeploy the Plan panel.3. Select Undeploy the Plan, and then click Next.4. Select Partial uninstall, and then click Next.5. Select only the Configuration for DB2 Enterprise Server Edition option, and
then click Next.6. Proceed through the panels to complete the uninstall and click Finish to exit
the installer.7. Download the mwi_db2instance.sh and mwi_itdsinstance.sh files attached to
this document to your local system.Alternatively, you can create your own copies of these files.a. Create a text file named mwi_db2instance.sh and add the following
content:#!/bin/kshport1=0var1=3if [ -f /etc/services ]thenif [ $# -eq 0 ]thencat >> /etc/services << EOFDB2_ctginst1 60000/tcpDB2_ctginst1_END 60003/tcpEOFelif [ $# -gt 0 ]thenport1=`expr $2 + $var1`cat >> /etc/services << EOFDB2_$1 $2/tcpDB2_$1_END $port1/tcpEOFfifi
232 IBM Maximo Asset Management: Installation Guide (Oracle WebLogic Server)

b. Create a text file named mwi_itdsinstance.sh and add the followingcontent:#!/bin/kshport1=0var1=3if [ -f /etc/services ]thenif [ $# -eq 0 ]thencat >> /etc/services << EOFDB2_idsccmdb 60004/tcpDB2_idsccmdb_END 60007/tcpEOFelif [ $# -gt 0 ]thenport1=`expr $2 + $var1`cat >> /etc/services << EOFDB2_$1 $2/tcpDB2_$1_END $port1/tcpEOFfifi
8. Based on the deployment choices you made in the middleware installationprogram, run the following scripts:v If you elected to deploy both the Database Server and Directory Server, run
both the mwi_db2instance.sh and mwi_itdsinstance.sh scripts.v If you elected to deploy the Database Server only, run the
mwi_db2instance.sh script.v If you elected to deploy the Directory Server only, run the
mwi_itdsinstance.sh script.9. Run the middleware installation program again and select the option to
Restart the plan, which installs everything you selected in the originaldeployment plan.
10. Proceed through the rest of the installation process and exit the installationprogram when complete.
When using the mwi_db2instance.sh script, DB2 is installed with default values ifyou initiate the script without passing any parameters. If you want to use customvalues run mwi_db2instance.sh and pass values for DB2 instance name and theDB2 port number in the following order:./mwi_db2instance.sh ctginsxy 50007where ctginzxy and 50007 are the values entered in middleware installationprogram DB2 Configuration Panel.
When using the mwi_itdsinstance.sh script, IBM Tivoli Directory Server isinstalled with default values if you initiate the script without passing anyparameters. If you want to use custom values run mwi_itdsinstance.sh and passvalues for the instance name and the port number in the following order:./mwi_itdsinstance.sh itdsccmxy 60007 where itdsccmxy and 60007 are thevalues entered in middleware installation program IBM Tivoli Directory ServerDB2 instance Configuration Panel.
Incorrect idsccmdb user passwordIf you encounter error CTGIN9042E through the normal use of the middlewareinstallation program, it might be related to the fact that there is an existing usernamed idsccmdb on the system, but with a different password than the oneentered in the middleware installation program.
Chapter 16. Troubleshooting 233

The error might look like the following sample:CTGIN9042E: Errors were encountered during the execution of the stepConfiguration for IBM Tivoli Directory Server
Check the configureDB.log file for an error like the following sample:GLPCDB018E The DB2 administrator ID or password you specified is not valid.
This message indicates that the existing IBM Tivoli Directory Server user idsccmdbhas different password in the system.
The configureDB.log file is located at: <Workspace>\<machine name>\deploymentPlan\MachinePlan_<machine shortname>\00008_ITDS_Configuration\install\02_CONFIG\logs\configureDB.log
WindowsSo, for example in Windows, if the workspace is located at:C:\ibm\tivoli\workspace, the machine name is mymachine, then theconfigureDB.log file would be located in: C:\ibm\tivoli\mwi\workspace\mymachine.ibm.com\deploymentPlan\MachinePlan_mymachine\00008_ITDS_Configuration\install\02_CONFIG\logs
Linux In Linux, if the workspace is located at: /root/ibm/tivoli/mwi/workspace,the machine name is mymachine, then the configureDB.log would belocated in: /root/ibm/tivoli/mwi/workspace/mymachine.ibm.com/deploymentPlan/MachinePlan_mymachine.ibm.com/00008_ITDS_Configuration/install/02_CONFIG/logs
AIX In AIX, if the workspace is located at: /ibm/tivoli/mwi/workspace, themachine name is mymachine, then the configureDB.log would be locatedin: /ibm/tivoli/mwi/workspace/mymachine.ibm.com/deploymentPlan/MachinePlan_mymachine.ibm.com/00008_ITDS_Configuration/install/02_CONFIG/logs
To resolve this issue, complete the following steps:1. If you have not done so, click Finish to exit out of the middleware installation
program install wizard.2. Resolve the issue using one of the following methods:
v If you are the Administrator for that machine and if you know thepassword for the user idsccmdb you can use the same password for themiddleware installation program installation.
v You can delete the user idsccmdb and restart the middleware installationprogram.
v You can set or change the password for existing IBM Tivoli Directory Serveruser idsccmdb.To set the password complete the following steps
Windows
a. Right-click on My Computer icon and click Manage menu item.b. From the Computer Management console, select Local Users and
Groups in System Tools.c. Expand Local Users and Groups and then select Usersd. Right-click on the idsccmdb user and then click the set
password menu item.e. Enter the password, confirm it, and then click OK
f. Click OK once again.
234 IBM Maximo Asset Management: Installation Guide (Oracle WebLogic Server)
Linux AND AIX
a. Log in as root and open command prompt.b. Run the following command at terminal:
# passwd idsccmdbc. Enter the new password and confirm it.
3. Navigate to the directory containing the middleware installation programimage and restart the middleware installation program.
4. Select Undeploy the Plan and click Next.5. Select Partial Uninstall and click Next.6. Select Configuration for IBM Tivoli Directory Server and click Next.7. Click Undeploy to start the uninstall.8. After install completes click Finish to exit the wizard.9. Navigate to the directory containing the middleware installation program
image and restart the middleware installation program.10. Select Restart the Plan and click Next.11. Specify the directory for the middleware install images and click Next.12. Specify the temporary directory and click Next.13. After disk space checks are completed, click Deploy to start the install.14. After install completes click Finish to exit the wizard.
Incorrect service pack requirement for AIXWhen running the middleware installation program on AIX platforms, you mightencounter the following message: CTGIN9061E: Unsupported Technology Level. OSTechnology Level should be 06 or greater and SP level 02 or greater.
This message is shown when the cited service pack level is incorrect. While theerror message indicates SP level 02 or greater is a prerequisite, SP level 01 orgreater is the actual middleware installation program prerequisite.
Failure when system directories cannot be renamedDuring middleware installation you encounter CTGIN9042E during the executionof a number of installation steps. This error can occur during the execution of anyof the middleware steps where renaming of the product install directories hasfailed.
If you encounter error message: “CTGIN9042E: Errors were encountered during theexecution of step <step_name>”, where <step_name> can be any of a number ofmiddleware installation steps. For example: "CTGIN9042E: Errors wereencountered during the execution of step DB2 Enterprise Server Edition". Beforeinstalling the specific middleware product, the middleware installer attempts tosave any existing product install directories by renaming them.
For example, if you are installing to /opt/IBM/db2/V9.7, and this directory exists,the middleware installer attempts to rename it to /opt/IBM/db2/V9.7_<date_time_stamp>.
This renaming of existing directories can fail in certain situations. For example:1. If it has been previously created as a file system (instead of a directory within a
defined file system).2. If the file system or directory has been created with Read Only access.
Chapter 16. Troubleshooting 235

To determine if this situation is the cause of the error complete the following steps:1. Check the DeploymentPlan.log
This log file is located at /ibm/tivoli/mwi/workspace/<Machine_name>/deploymentPlan/logs/[INSTALL_<date_time_stamp>]/DeploymentPlan.log,where /ibm/tivoli/mwi/workspace is the default middleware workspace or thepath you specified on the installer workspace panel, and <Machine_name> is thehost name of the machine on which you are installing.Locate the step name that has failed. For example:2008-12-15 04:07:44.595 : Failed: Deployment Step: step_00004_DB2_9.72008-12-15 04:07:44.595 : Machine Plan: MachinePlan_mymachine.mydomain.com
The failed step in this case is "step_00004_DB2_9.7"Also check the DeploymentPlan.log for the following sample error text(substitute your machine name instead of the host name shown here):ml:284: The following error occurred while executing this line:/ibm/tivoli/mwi/workspace/<host name>/deploymentPlan/MachinePlan_<host name>/deploymentPlan/MachinePlan_00004_DB2_9.7/common/Utils.x
ml:544: Deployment Engine command de_processReq reported an error.
Check the de_processReq output file at /ibm/tivoli/mwi/works pace/<hostname>/deploymentPlan/MachinePlan_<host name>/00004_DB2_9.7/install/01_BASE/[INSTALL_1215_04.00 ]/logs/de_processreq.log_utf8
Check de_trace.log at /ibm/tivoli/mwi/workspace/<host name>/deploymentPlan/MachinePlan_<host name>/00004_DB2_9.7/install/01_BASE/[INSTALL_1215_04.00]/logs.
2. Check the location and the logs indicated by the error message from step #1:Check de_processreq.log_utf8 at /ibm/tivoli/mwi/workspace/<hostname>/deploymentPlan/MachinePlan_<host name>/00004_DB2_9.7/install/01_BASE/[INSTALL_1215_04.00 ]/logs/de_processreq.log_utf8 for thefollowing error text:<errorMessage>[com.ibm.ac.si.ap.action.ExternalCommandActionException:ACUOSI0050E External command action failed with return code 1.<actionErrorEvent actionID=RenameExistingInstallLocation_UnixactionName="externalCommand">ACUCME1100E</actionErrorEvent>
If this error is found in de_processreq.log_utf8, check for the existence of thefollowing error file that might contain additional information:<Product_Name>_RenameExistingInstallLocation_Unix_<Date_Time_stamp>.errFor example,DB2_Enterprise_Server_Edition_RenameExistingInstallLocation_Unix_20081215_040712GMT-05.00.err
. View the contents of the file if it exists and determine if it contains an errormessage like the following sample:mv: 0653-401 Cannot rename /db2 to /db2_20081215_040712GMT-05.00:The requested resource is busy.
In this case, /db2 is the name of the existing file system or directory./db2_20081215_040712GMT-05.00 is the new name the middleware installer isusing for the mv command to rename the file system or directory. To resolve theproblem:a. If /db2 is a file system, rerun the installer and specify a new directory
within the file system:
236 IBM Maximo Asset Management: Installation Guide (Oracle WebLogic Server)

1) Restart the middleware installer, and select Undeploy the plan. ChooseComplete Uninstall and click Undeploy.
2) Restart the middleware installer and select Edit the configurationparameters.
3) Specify a directory (for example, /db2/V9.7) within the file system forthe install location of the product that previously failed.
4) Deploy the plan.b. If /db2 is a file system or directory with Read Only access, give write
permission for the user or owner of the file system (directory). Also givewrite permission to the user performing the installation. Then, run themiddleware installer again to deploy the plan.
Invalid DB2 password valueInvalid DB2 password value
The error CTGIN9042E: Errors were encountered during the execution of thestep DB2 Enterprise Server Edition occurs when you enter a password for theDB2 user in the middleware installation program that is incompatible with thepassword policy of the system.
Check the db2_97_inst.log file for an error like the following:1: ERROR:The installation program has been unable to create the user"db2admin" on computer "mymachine" because the password specified is too short.
1: ERROR:The response file specified "C:\WINNT\TEMP\2\_INSTA~1.18_/DECRYP~1.TXT"is not valid.
The db2_97_inst.log file is located at: <Workspace>\<machine name>\deploymentPlan\MachinePlan_<machine shortname>\00004_DB2_9.7\install\01_BASE\[INSTALL_<processing.req.id>]/logs/ db2_97_inst.log
So, for example, if the workspace is located at: C:\ibm\tivoli\workspace, themachine name is mymachine, and the processing.req.id is created as adate_timestamp, then the db2_97_inst.log would be located in:C:\ibm\tivoli\mwi\workspace\mymachine.ibm.com\deploymentPlan\MachinePlan_mymachine\00004_DB2_9.7\install\01_BASE\[INSTALL_0424_09.32]\logs.
Also check the de_processreq.log file for an error like the following sample:<errorMessages>
<errorMessage>[com.ibm.ac.si.ap.action.ExternalCommandActionException:ACUOSI0050E External command action failed with return code 87.Invocation string: [C:\DOCUME~1\ADMINI~1\LOCALS~1\Temp\1/DB2-ESE_9.7.0/ESE/setup.exe, /f, /l, C:\DOCUME~1\ADMINI~1\LOCALS~1\Temp\1\[INSTALL_0424_09.32]/db2_97_inst.log, /u, C:\DOCUME~1\ADMINI~1\LOCALS~1\Temp\1\[INSTALL_0424_09.32]/Decrypted_ResponseFile.txt],com.ibm.ac.common.hosts.CreationFailedException: : ]</errorMessage>
<errorMessage>[com.ibm.ac.common.hosts.CreationFailedException: : ]</errorMessage>
</errorMessages><actionErrorEvents>
<actionErrorEvent actionID="InstallProduct"actionName="externalCommand">ACUCME1100E</actionErrorEvent>
</actionErrorEvents>
Chapter 16. Troubleshooting 237

The de_processreq.log file is located at: <Workspace>\<machinename>\deploymentPlan\MachinePlan_<machine shortname>\00004_DB2_9.7\install\01_BASE\[INSTALL_<processing.req.id>]/logs/ de_processreq.log.
So, for example, if the workspace is located at: C:\ibm\tivoli\workspace, themachine name is mymachine, and the processing.req.id is created as adate_timestamp, then the de_processreq.log would be located in:C:\ibm\tivoli\mwi\workspace\mymachine.ibm.com\deploymentPlan\MachinePlan_mymachine\00004_DB2_9.7\install\01_BASE\[INSTALL_0424_09.32]\logs.
This circumstance would indicate that the password provided for the DB2 userdb2admin in the middleware installation program is not supported by the policyof the operating system.
To resolve this issue, complete the following steps:1. If you have not done so, click Finish to exit out of the middleware installation
program install wizard.2. Check the system rules defined for passwords by navigating to Start >
Control Panel > Administrative Tools > Local Security Policy > SecuritySettings > Account Policies > Password Policy.
3. Restart the middleware installation program.
WindowsNavigate to the root directory of the downloaded installation image,and run the following command: launchpad.exe.
Linux Navigate to the root directory of the downloaded installation image,and run the following command: launchpad.sh.
AIX Navigate to the root directory of the downloaded installation image,and run the following command: launchpad.sh.
4. Proceed through the panels until you reach the option to select Undeploy thePlan and then click Finish to exit the wizard.
5. Restart the middleware installation program.6. Select Edit the Configuration parameters.7. Enter a valid password for the DB2 user based upon the password policy
rules you observed earlier.8. Specify the directory for the middleware install images and click Next.9. Specify the temporary directory and click Next.
10. After disk space checks are completed, click Deploy to start the install.11. After install completes click Finish to exit the wizard.
Recovering from DB2 installation failure on AIXWhen you experience a failure during the DB2 installation step when using themiddleware installation program on AIX, sometimes it is necessary to perform acleanup procedure before restarting the middleware installation program in orderfor the middleware installation program to function correctly.
When you encounter a DB2 installation failure on AIX, complete the followingsteps:1. Exit the middleware installation program.2. Check the db2setup.log file for the error message specified to identify the
nature of your error.
238 IBM Maximo Asset Management: Installation Guide (Oracle WebLogic Server)

Checking license agreement acceptance:.......SuccessInstalling DB2 file sets:.......SuccessERROR:sh: /opt/IBM/db2/V9.7/install/db2chgpath: not found
ERROR:An error occurred while setting DB2 runtime path. Contact a technicalservice representative.
Setting DB2 library path:.......FailureERROR:A major error occurred while installing "DB2 Enterprise Server Edition"on this computer. The installation can not continue. If the problem persistscontact your technical service representative.
The db2setup.log file can be found in the /ibm/tivoli/mwi/workspace/<machine name>/deploymentPlan/MachinePlan_<machine name>/00003_DB2_9/install/01_BASE/[TIME STAMP]/log directory.
3. Ensure you have met all of the prerequisites listed.4. Change into the instance directory:
cd <DB2 install dir>/instance
For example,cd /opt/IBM/db2/V9.7/instance
5. Determine if a DB2 instance was created:./db2ilist
You can safely ignore errors.If an instance was created, drop it../db2idrop -f <instance name>
For example,./db2idrop -f db2inst1
6. Remove the DB2 Administration Server../dasdrop
You can safely ignore errors.7. Change directory to <DB2 install dir>/install and run the db2_deinstall
command.cd /opt/IBM/db2/V9.7/install./db2_deinstall -a
You can safely ignore errors.8. Delete the DB2 installation directory.9. Change directory to /tmp/DB2-ESE_9.7 and then run the db2_install
command.During the installation process, the DB2 images are uncompressed into the/tmp directory.cd /tmp/DB2-ESE_9.7./db2_install
If the DB2-ESE_9.7 folder is not found in /tmp or in the location specified inthe installation program panel, copy the DB2 binary image to /tmp and extractthe file to install DB2.
10. When prompted by the DB2 installation program with the choice of installinginto a different installation directory. enter no.
11. When prompted to specify a keyword to install DB2 products, enter ESE.This should result in a successful installation of DB2.
12. Change directory to <DB2 install dir>/install and run the db2_deinstallcommand again.
Chapter 16. Troubleshooting 239

cd /opt/IBM/db2/V9.7/install./db2_deinstall -a
This should result in a successful uninstallation of DB2.13. Delete the DB2 installation directory.14. Invoke the middleware installation program again and proceed, selecting the
option of restarting the plan.
Troubleshooting middleware uninstallUse the information contained in this section to troubleshoot middleware uninstallissues.
Use the information contained in this section to troubleshoot errors encountereduninstalling middleware installed through the middleware installation program.
Troubleshooting the product installation programIf you experience a failure using the product installation program, you musttroubleshoot the issue before continuing.
Begin with general troubleshooting techniques. These techniques help youdetermine which portion of the installation failed.
General troubleshooting of the product installation programRefer to this section for general troubleshooting information about the productinstallation program.
Because Maximo Asset Management is typically deployed as a distributed systemwith code running on several different servers, errors can be generated frommultiple sources. The install error panel displays any failure messages encounteredduring execution of the configuration step of the deployment. These messagesdirect you to the source of the problem, which tells you which set of logs toexamine for further details.
All installation-related messages begin with the prefix CTGIN. Informationalmessage end with a suffix of I, warning messages end with a suffix of W, and errormessages end with a suffix of E.
There are four main categories of logs that can be used for installation errorremediation.v Install trace logsv Solution install logsv Maximo logsv Middleware logs
Install trace logs
Install trace logs are generated on the Maximo Asset Management administrativeworkstation in the install_home\logs directory. These logs can be searched for theerror message displayed on the install error panel, and can be useful in gettingmore diagnostic information about why the error occurred. Install trace logscontain historical data about when the installation program was invoked andwhich options were chosen for the deployment. It also contains information aboutupdates and fix packs.
240 IBM Maximo Asset Management: Installation Guide (Oracle WebLogic Server)

Searching on the term maxinst places you in the general proximity of informationabout database configuration.
If you encounter an error during a validation task, install trace logs can also belocated within the C:\Documents and Settings\Administrator directory. They aremoved to the install_home\logs directory during execution of the configurationstep of the deployment.
The following trace log files are found in the install_home\logs directory:
CTGInstallTrace00.logThis log contains information produced by the Maximo Asset Managementinstallation program which includes information generated by theconfiguration code that performs the automated configuration of DB2 andalso information related to embedded calls to the process solutioninstallation program. Information generated from subsequent invocationsof the Maximo Asset Management installation program or the processsolution installation program is appended to this file.
The following success message examples are found in theCTGInstallTrace00.log file. These messages can be used to determine whichphases of the installation were successful:v CTGIN2114I: The database was created successfullyv CTGIN2135I: Tablespace maxdata created successfullyv CTGIN2135I: Tablespace maxtemp created successfullyv CTGIN2079I: process automation engine database configuration
completed successfully (This message indicates that maxinst finishedsuccessfully.)
v CTGIN2253I: buildmaximoear.cmd completed successfullyv CTGIN2253I: buildmxiehsear.cmd completed successfullyv CTGIN2208I: runConfigurationStep completed successfullyv CTGIN2370I: The installation finished successfully
The following warning message example is found in theCTGInstallTrace00.log file. This message indicates that while a functioncompleted successfully, you need to perform additional steps outside of theinstallation program.v CTGIN2420W The undoConfiguration function completed but some
manual clean-up is required for the following component: <VariableformatSpec="{0}">manual component</Variable>.
The following error message example indicates that while the installationcompleted, there were some serious errors.v CTGIN2371E: The installation is finished, but some serious errors
occurred during the install.
In this error case, open the CTGInstallTrace00.log file and examine themost recent logged information located at the bottom of the file. Determinewhat caused the failure. In some cases, the error is the result of a failedconfiguration task that was attempted by Maximo Asset Managementinstallation program configuration scripts.
CTGInstallMessage00.logThis log contains named message statements generated by the MaximoAsset Management installation program, configuration tasks, and theprocess solution installation program during the installation.
Chapter 16. Troubleshooting 241

CCMDB_install.logThis log contains information about the Maximo Asset Managementinstallation program itself, including values that you provided and optionsyou selected during the installation.
In some instances, you find trace logs containing 01, 02, and so on, in the filename. These files contain information like what is found in the files that include00 in the file name. These files are generated when a second JVM is started duringthe installation, and it begins logging information.
Solution install logs
Solution install logs are generated on the Maximo Asset Managementadministrative workstation in the install_home\solutions\logs and C:\programfiles\ibm\common\acsi\logs\<administrative user> directories. These logsprovide in-depth information about exceptions and errors related to processmanager packages, other PSI packages, and also the deployment engine.
Maximo logs
Core components of Maximo Asset Management include deployment utilities suchas updatedb, configdb, maxinst, tdtoolkit, buildmaximoear, and deployapplication.Logs for these components are generated on the Maximo Asset Managementadministrative workstation in the install_home\maximo\tools\maximo\logdirectory.
Middleware logs
Native middleware logs for the database server can be examined for failuresoccurring on the middleware server itself.
Log utility
When engaging IBM product support services, be prepared to provide log files inan archive file. The LogZipper.bat utility provided in the <install_home\scriptsdirectory can be used for this task. If you use the LogZipper.bat utility, all relevantlog files are archived in install_home\debug\YYYYMMDD_hhmmss.zip.
When contacting IBM support personnel, you are asked to provide log files fromthe following directories:v install_home\logsv install_home\solution/logsv install_home\maximo\applications\maximo\propertiesv install_home\etc\install.propertiesv <Middleware_Installer_Workspace>
IBM Support Assistant Workbench
The IBM Support Assistant (ISA) V4 is a free serviceability workbench that you candownload from IBM. ISA, using product-specific add-ons, provides a centrallocation to learn more about products, gather data for troubleshooting problems,and manage problem submissions.
The IBM Service Management and IBM Maximo Asset Management (MaximoAsset Management) add-ons to the ISA Workbench provide a quick and direct way
242 IBM Maximo Asset Management: Installation Guide (Oracle WebLogic Server)

to learn more about the product. If you encounter a problem with Maximo AssetManagement, you can use the ISA with these add-ons to search supportdocuments. These documents supply fixes or recommendations and quickly gatherrelevant logs for diagnosis. You can use the Log Analyzer to view the logs and usethe filter feature to reduce the amount of data to examine. The symptom catalogscan be used to analyze the logs.
You can use the ISA to perform these tasks:v Search documents concurrently. Rapidly search IBM documentation in many
different locations at the same time for answers to your questions or problems.ISA returns results that are categorized by source for easy review.
v Access product information. Quickly access key product information links, such asthe product support page and home page, online product documentation. Alsoaccess RSS feed information for the latest Flash notes, APARs, fixes, andtechnotes.
v Gather data. Collect files to document problems related to installation, databases,security, and general problems relevant to troubleshooting your environment.The collected data is packaged in compressed form for transmission to IBM.
v Analyze log data. Use the Log Analyzer to review collected log files andtroubleshoot problems.
v Report problems. Connect to the IBM Electronic Service Request system to openand update Problem Management Records. Send the information that the IBMService Management data collection scripts gather to IBM for diagnosis.
To learn about supported platforms, system requirements, and how to install theIBM Support Assistant, visit http://www.ibm.com/software/support/isa/isa40/install.html.
Deployment properties
Deployment of ISM solutions often happens in stages. You might install one ISMproduct and then deploy another at a later date. Follow-up deployments rely onthe installation and configuration data from previous installations. For example,how to connect to the database used with the original product deployment. Thisinformation must be persisted and protected. This data is persisted by storingdeployment data in both the product database and a set of properties files. Thisredundancy protects the deployment information in case anything were to happento the database.
After a successful deployment, deployment properties are kept both in thedatabase and in two property files.
maximo.propertiesThe maximo.properties file is an encrypted file which is located in theinstall_home\maximo\applications\maximo\properties\ directory. Thisproperty file contains database connection properties.
install.propertiesThe install.properties file is an encrypted file which is located in theinstall_home\etc\ directory and contains most properties related to thedeployment.
Errors related to an inability to connect or authenticate to middleware serversduring an upgrade or fix pack installation might be caused by obsolete propertyvalues. For example, if you have changed the password for a user ID that youused during the initial Maximo Asset Management installation without updating
Chapter 16. Troubleshooting 243

that value in the relevant property file, the next installation action fetchs theoutdated value from the property file and a failure occurs.
Refer to “Installation properties” on page 214 for detailed information aboutproperties contained in these files and also for information on updating propertiesfollowing a successful deployment.
License files
License files are located on the media and are not packaged with the installationprogram. If you copy the installation program from the product media to the filesystem, the License directory must also be copied.
Problem resolution
The configuration step of the Maximo Asset Management installation processoccurs once you have navigated through all the install wizard panels and thenclicked the Install button.
Errors experienced before the configuration step are typically related to theinability of the install program to verify that input values you have provided. Ifyou experience this error, investigate the trace logs, resolve the issue, and thenproceed through the rest of the install wizard.
If you experience an error after the configuration step, you must exit theinstallation program. Examine the trace, solution install, and Maximo logs. Resolvethe issue and then complete the installation using the taskrunner utility byinvoking it from the command line:C:\IBM\SMP\scripts\taskRunner.bat CONTINUE STOPONERROR
Note: If you reboot the system, you are not be able to use the taskrunner utility torun configuration scripts. Taskrunner data stores are not persisted. If you intend touse the taskrunner utility, do not reboot your system.
The taskrunner utility resumes the installation at the point where the lastsuccessfully completed task was recorded in the previous attempt. If you runtaskrunner with the NOSTOPONERROR parameter, the taskrunner continues despiteerrors.
Common deployment failuresGeneral troubleshooting techniques can be used to determine common deploymentfailures.
Invoking the installation program
If you invoke the product installer for a new installation or upgrade from a drivethat is different than the one you choose as the installation destination, theinstallation fails. This behavior occurs when invoking the installer directly orthough the product launchpad.
To resolve this problem, start the installer or launchpad application from the drivewhere you install the product.
For example, if you want to install the product on the g: drive, open a commandprompt and switch to the g: drive before invoking the installer. So, if your installerwas located on the d: drive the command might look like the following:
244 IBM Maximo Asset Management: Installation Guide (Oracle WebLogic Server)

g:\> d:\temp\install.exe
(where g:> is your Windows command prompt)
Windows explorer normally sets the system default drive to "%HOMEDRIVE%"which is typically the drive where Windows is installed. If that is the target driveof the product install you can start the installer or launchpad from WindowsExplorer.
If you plan to install the product on a drive other than the one hosting Windows,do not start the installer from Windows Explorer. Invoke the installer from thecommand line as described earlier.
Remote access configuration
If you choose to configure middleware using the automated configuration featureof the Maximo Asset Management installation program, you must enable a remoteaccess protocol for each system hosting a middleware server. Refer to “Remoteconfiguration enablement” on page 25 for more information. Messages with theprefix CTGRI found in the CTGInstallTrace.log file are related the Maximo AssetManagement installation program not being able to access remote systems thathave been designated as part of the product deployment.
Ports An error reporting a failure to reach the remote host can sometimes berelated to a required port not being available to the Maximo AssetManagement installation program. Ensure that the following ports areaccessible on servers that are hosting middleware:
445 Port 445 is used for SMB over TCP.
139 Port 139 is used for TCP NetBIOS connections.
Remote registry permissionsError CTGRI0011E is issued if the user ID provided to the installationprogram that is used to access a remote Windows system does not haveappropriate permissions to the registry. Remote access to the registry isdetermined by the HKLM\System\CurrentControlSet\Control\SecurePipeServers\winreg registry key entry. Visit the Microsoft help andsupport Web site (http://support.microsoft.com/). Use the issue searchfacility to locate the article on how to manage remote access to the registry.
Connection exceptionsRemote access connection exceptions typically manifest themselves aseither an authorization failure or as a host connection failure. Search theCTGInstallTrace.log file to determine the cause of the connectionexception.
An authorization error is triggered by an incorrect user ID or passwordvalue supplied to the Maximo Asset Management installation program.Errors for this type of exception typically look like the following example:SEVERE: EXIT ^RxaConnectFailure:^o^{{com.ibm.tivoli.remoteaccess.RemoteAccessAuthException: CTGRI0000E Could not establish a connectionto the target machine with the authorization credentials that were provided.at com.ibm.tivoli.remoteaccess.BaseProtocol.beginSession(BaseProtocol.java:522)at com.ibm.tivoli.ccmdb.install.common.util.rxa.RxaHost.init(RxaHost.java:130)at com.ibm.tivoli.ccmdb.install.common.util.rxa.RxaHost.<init>(RxaHost.java:78)at com.ibm.tivoli.ccmdb.install.common.ia.CmnInstallAnywhereUtils.getOSType(CmnInstallAnywhereUtils.java:303)
Chapter 16. Troubleshooting 245

at com.ibm.tivoli.ccmdb.install.foundation.appsvr.FndWasRemoteActions.install(FndWasRemoteActions.java:237)at com.zerog.ia.installer.actions.CustomAction.installSelf(DashoA10*..)at ZeroGab8.run(DashoA10*..)
A host connection failure is triggered when the remote protocols MaximoAsset Management installation program cannot reach the remote systemusing the protocols it supports. This error typically looks like the followingexample:RemoteSystem can’t be reached using Supported RXA protocols.
As stated in the Before you begin information, if Cygwin is present on aremote Windows system hosting middleware, errors can occur duringMaximo Asset Management installation. This error appears during hostvalidation.Aug 3, 2010 9:52:32 AM com.ibm.tivoli.ccmdb.install.common.log.CmnInstallLogUtils handleUnexpectedExceptionFINE: ENTER^java.net.ConnectException: CTGRI0023E An error occurredwhen executing GET_FREE_PHYS_MEM.at com.ibm.tivoli.remoteaccess.UNIXProtocol.getFreePhysicalMemory(UNIXProtocol.java:1358)at com.ibm.tivoli.ccmdb.install.common.util.rxa.RxaHost.initThreadRemoteAccess(RxaHost.java:434)at com.ibm.tivoli.ccmdb.install.common.util.rxa.RxaHost.initThreadRemoteAccess(RxaHost.java:277)at com.ibm.tivoli.ccmdb.install.common.util.rxa.RxaHost.getRemoteAccess(RxaHost.java:169)at com.ibm.tivoli.ccmdb.install.common.util.rxa.RxaUtil.directoryExists(RxaUtil.java:731)at com.ibm.tivoli.ccmdb.install.common.util.validation.CfgValidateRemoteSystem.directoryExists(CfgValidateRemoteSystem.java:94)at com.ibm.tivoli.ccmdb.install.common.config.was.ConfigWasThinClient.copyTrustStore(ConfigWasThinClient.java:396)at com.ibm.tivoli.ccmdb.install.common.config.was.ConfigWasThinClient.configWasThinClient(ConfigWasThinClient.java:529)at com.ibm.tivoli.ccmdb.install.common.config.was.ConfigWasThinClient.runConfigurationStep(ConfigWasThinClient.java:714)at com.ibm.tivoli.ccmdb.install.common.config.TaskRunner.runSingleTask(TaskRunner.java:324)at com.ibm.tivoli.ccmdb.install.foundation.ccmdb.FndUpgradePanelActions.handleInstall(FndUpgradePanelActions.java:256)at com.ibm.tivoli.ccmdb.install.foundation.ccmdb.AFndCustomCodeAction.install(AFndCustomCodeAction.java:127)at com.zerog.ia.installer.actions.CustomAction.installSelf(DashoA10*..)at ZeroGad8.run(DashoA10*..)^T^CTGRI0023E An error occurred when executing GET_FREE_PHYS_MEM.java.net.ConnectException: CTGRI0023E An error occurred when executingGET_FREE_PHYS_MEM.
In this case, you must either uninstall or disable the SSH daemon (sshd)included with Cygwin.
Once you have resolved these errors, you can continue to use the MaximoAsset Management installation program.
Database
Updatedb
The updatedb command is run several times during Maximo AssetManagement installation. Each time updatedb is run, a time-stamped logfile is generated in the install_home\maximo\tools\maximo\log directory. If
246 IBM Maximo Asset Management: Installation Guide (Oracle WebLogic Server)

you encounter an error attributed to updatedb, refer to the updatedb logwith the most recent timestamp for details.
Once you have performed corrective measures, you can complete thedeployment using the taskrunner utility as described in “Generaltroubleshooting of the product installation program” on page 240.
MAXPRESENTATION update errorWhile installing Maximo Asset Management, you might encounter aMAXPRESENTATION error.
If you receive the following errors when installing, it indicates the presenceof database values that are not synchronized.Error: (RECONLINK) Unable to update MAXPRESENTATION - nulljava.lang.ExceptionError: (RECONLINK) Unable to update MAXPRESENTATION - null atpsdi.webclient.upgrade.MXApplyTransactions.saveApplicationDocument(Unknown Source)
If you encounter these errors, execute the following SQL statements againstthe database to verify the cause:select maxreserved from maxsequence where tbname = ’MAXPRESENTATION’;select max(maxpresentationid) from maxpresentation;
The maxreserved value needs to be greater than or equal to themax(maxpresentationid) value. If it is not, use the following SQL statementto correct it.update maxsequence set maxreserved = (select max(maxpresentationid) frommaxpresentation) where tbname=’MAXPRESENTATION’ andname=’MAXPRESENTATIONID’;
Microsoft SQL Server and MEA registration failureWhen installing Maximo Asset Management on an upgraded MicrosoftSQL Server database, if the error CTGIN2254I: The C:\IBM\SMP\jacl\solutions\MEAReg.bat did not complete successfully. is displayed,complete the following steps.
You might also find the following errors within the mxserver logs:BMXAA5228E - Could not register event listeners for all active MigrationManager change packages. BMXAA4156E - Not a valid data type.
1. From the Microsoft SQL Server Control Center, go to the MAXUSERtable, and modify the SCREENREADER column name null attribute tonot allow nulls (required)
2. Execute the following SQL statement:alter table maxuser alter column screenreader smallint;
Microsoft SQL Server and ICfgConfigurationStep
When you attempt to install the product using Microsoft SQL Server, youmight also encounter the following error message: CTGIN2074E: Exceptioncaught creating ICfgConfigurationStep object.
The origin of this error can be confirmed by examining theCTGInstallTrace00.log for the following details:FINE: ENTER^ENTER^S^Using Connection: com.inet.tds.an@7ba07ba0Sep 17, 2008 4:21:14 PM com.ibm.tivoli.ccmdb.install.common.util.CmnEncryptPropertiesUtil init()SEVERE: NOTE ^^T^[ITAMBVT-WIN]Invalid object name’MaxPropValue’.com.inet.tds.at: Msg 208, Level 16, State 1, Line 1, SqlstateS0002[ITAMBVT-WIN]Invalid object name ’MaxPropValue’.
Chapter 16. Troubleshooting 247
at com.inet.tds.aq.a(Unknown Source)at com.inet.tds.k.b(Unknown Source)at com.inet.tds.k.a(Unknown Source)at com.inet.tds.b.a(Unknown Source)at com.inet.tds.b.a(Unknown Source)at com.inet.tds.b.b(Unknown Source)at com.inet.tds.u.f(Unknown Source)at com.inet.tds.u.executeQuery(Unknown Source)at com.ibm.tivoli.ccmdb.install.common.util.CmnEncryptPropertiesUtil.init(CmnEncryptPropertiesUtil.java:192)
This error is caused by the collation settings for your Microsoft SQL Server.For ISM products, Microsoft SQL Server collation settings must be set tothe following options:v Dictionary orderv Case-insensitivev For use with 1252 Character set
For Microsoft SQL Server collation setting details, refer to the userdocumentation provided with the software.
Invalid data typeWhile installing Maximo Asset Management, if you encounter errorCTGIN2252I: Cannot connect to base services web application orBMXAA415E - Not a Valid Data Type, complete the following steps.1. Run the following SQL statements against the database:
update maxattribute set maxtype=’YORN’ where objectname=’MAXSESSION’ andattributename=’ACTIVE’; update maxattributecfg set maxtype=’YORN’ whereobjectname=’MAXSESSION’ and attributename=’ACTIVE’;
2. From the DB2 Command Center, modify the MAXSESSION.ACTIVEdata type to be an integer.
Oracle Text indexingMaximo Asset Management requires a series of text indexes to improveperformance of text searches. These are created when the maxinstcommand is run as part of the installation. If maxinst fails to create textindexes for an Oracle database, errors like the following example in theCTGInstallTrace.log file occur:ORA-01031ORA-04045 with MDSYS.SDO_GEOR_TRUNC_TABLE
To resolve the issue, you must install Oracle Spatial:1. Connect to the database instance specifying AS SYSDBA2. Create the MDSYS user with a command in the following format:
SQL> CREATE USER MDSYS IDENTIFIED BY <password>;
3. Grant the required privileges to the MDSYS user by running thefollowing procedure:SQL> @ORACLE_HOME/md/admin/mdprivs.sql
4. Connect as MDSYS.5. Install Spatial by running the following procedure:
SQL> @ORACLE_HOME/md/admin/catmd.sql
6. Connect as SYS and lock the MDSYS user account to preventunauthorized use.SQL> ALTER USER MDSYS ACCOUNT LOCK;
7. Rebuild the triggers by using the following command:@/<oracle_home>/rdbms/admin/utlprp.sql 0
248 IBM Maximo Asset Management: Installation Guide (Oracle WebLogic Server)

Obsolete and prohibited property values
Deployment details are stored in the database and also on the administrativesystem in the install.properties and maximo.properties files.
Prohibited property valuesSystem users created by the installation programs must adhere to therequirements of the system. For example, the database user created by theinstallation program is an operating system user. The password youprovide for that user needs to match the operating system password rules.If it does not, you encounter an error message.
Ensure that you enter a password of the appropriate length on theinstallation panel for the DB2 user that is created. To verify that thepassword you entered for the database user is the appropriate length,before clicking Install, search the CTGInstallTrace00.log for the followingmessage:The password does not meet the password policy requirements.Check theminimum password length, password complexity and password historyrequirements.More help is available by typing NET HELPMSG 2245.
If this message is present, then you did not create a user with the rightpassword length. You need to fix the operating system user password, andthe password in the maximo.properties file before continuing with theinstallation program.
Troubleshooting the product uninstallation programUse the troubleshooting information to troubleshoot errors encountered whenusing the product uninstallation program.
Troubleshooting information is primarily found in log files
Error CTG00001 when performing an uninstallIn certain instances, while performing a product uninstall from the administrativesystem, you might encounter error CTG00001 The uninstall was unsuccessful.You must manually uninstall the Maximo product.
Exit the error message dialog box. To finish the uninstall, manually deleteinstallation directories located under C:\IBM\SMP\maximo. Afterward, verify registryentries for the product and process automation engine product are removed.Registry entries can be found under HKEY_LOCAL_MACHINE/SOFTWARE/IBM/processautomation engine and under the shortname of the ISM family product. Forexample,Maximo Asset Management. Also, depending on the failure, you mightneed to remove process manager information from the deployment database.
Chapter 16. Troubleshooting 249

250 IBM Maximo Asset Management: Installation Guide (Oracle WebLogic Server)

Appendix A. Planning worksheet for product installation
These tables list the values for settings you supply when using the Maximo AssetManagement installation program. Values you enter depend on the componentsyou select for the deployment.
Table 26. Settings for a custom installation
Setting Default Your value
Installation directoryWindows
C:\IBM\SMP
DB2 host name
DB2 port 50005
Maximo database name maxdb75
Maximo database instance ctginst1
Schema name maximo
Maximo database user ID maximo
DB2 installation directoryWindows
C:\ProgramFiles\IBM\SQLLIB
Linux /opt/ibm/db2/V9.7
AIX /opt/IBM/db2/V9.7
DB2 instance administrator user IDWindows
db2admin
Linux ctginst1
AIX ctginst1
Windows DB2 service user ID db2admin
Oracle installation directoryWindows
C:\oracle\product\11.2.0\db_1
Linux /opt/app/oracle/product/11.2.0/db_1
AIX /opt/app/oracle/product/11.2.0/db_1
Oracle administrator user ID sys
Oracle software owner user ID oracle
SQL installation directory C:\Program Files\Microsoft SQLServer\90
Data table space name MAXDATA
© Copyright IBM Corp. 2007, 2011 251

Table 26. Settings for a custom installation (continued)
Setting Default Your value
Data table space size medium (1000 Mb)
DB2 Medium (5000 Mb)
Oracle Medium (1000 Mb)
Microsoft SQL Server (Initial datafile size)
Medium (1000 Mb)
Temporary table space name MAXTEMP
Temporary table space size 1000 Mb
Index table space name MAXDATA
Index table space sizeDB2 Medium (5000 Mb)
Oracle Medium (1000 Mb)
Schema name maximo (required to be the samevalue as the owner of the tablespaces)
Group base entry ou=groups,ou=SWG,o=IBM, c=US
User base entry ou=users,ou=SWG,o=IBM, c=US
SMTP server
Administrator e-mail
252 IBM Maximo Asset Management: Installation Guide (Oracle WebLogic Server)

Appendix B. Planning worksheets for middleware installation
Before you start the installation, use the planning worksheets to record values tospecify when installing the components you choose for your deployment.
Users and groups
Before you begin, record the values to use, so that you can specify these valuesduring the installation For distributed deployments, record multiple values whereappropriate.
The worksheets are also helpful if you intend to manually configure or reuseexisting middleware.
In this table, list the users and groups that you want to create if you do not wantto use the default values.
Table 27. Users and groups created during Maximo Asset Management deployment
User Group Description Your value
db2admin (Windowsonly) Windows
v Administrators
v DB2USERS
v DB2ADMNS
DB2 administrator. Windows Serviceuser ID.
This user only required fordeployments using DB2.
idsccmdb
Note: The root usermust also be amember of theprimary group of theIBM Tivoli DirectoryServer instance user(by default,idsccmdb).
Linux and UNIX
v dasadm1
This value cannot bechanged when usingthe middlewareinstaller.
v idsldap
This value cannot bechanged when usingthe middlewareinstaller.
v dbsysadm
This value cannot bechanged when usingthe middlewareinstaller.
IBM Tivoli Directory Server instanceowner. Also the owner of the databaseused with the IBM Tivoli DirectoryServer instance.
This user only required fordeployments using IBM Tivoli DirectoryServer.
maximo Used for Maximo databaseconfiguration.
© Copyright IBM Corp. 2007, 2011 253

Table 27. Users and groups created during Maximo Asset Management deployment (continued)
User Group Description Your value
ctginst1Linux and UNIX
v dasadm1
This value cannot bechanged when usingthe middlewareinstaller.
v db2iadm1
The system user that is used as thedatabase instance owner on UNIXsystems.
This user only required fordeployments using DB2.
db2fenc1Linux and UNIX
v db2fgrp1
System user that is used as the fenceduser ID for the DB2 default instance ofdb2inst1.
This user only required fordeployments using DB2.
ctgfenc1Linux and UNIX
v ctgfgrp1
This value cannot bechanged when usingthe middlewareinstaller.
System user that is used as the fenceduser ID for the DB2 server instance ofctginst1.
This user only required fordeployments using DB2.
dasusr1Linux and UNIX
v dasadm1
This value cannot bechanged when usingthe middlewareinstaller.
System user used as the administrationserver user.
This user only required fordeployments using DB2.
db2inst1Linux and UNIX
v dasadm1
This value cannot bechanged when usingthe middlewareinstaller.
v db2iadm1
System user used as the defaultdatabase instance owner.
This user only required fordeployments using DB2.
idsldap
This value cannot bechanged when usingthe middlewareinstaller.
Linux and UNIX
v idsldap
This value cannot bechanged when usingthe middlewareinstaller.
v db2iadm1
v root
IBM Tivoli Directory Server user.
This user only required fordeployments using DB2.
254 IBM Maximo Asset Management: Installation Guide (Oracle WebLogic Server)

For Linux and UNIX systems, the root user must be a member of the dasadm1,idsldap, and dbsysadm groups. The root user must also be a member of theprimary group of the IBM Tivoli Directory Server instance user (by default,idsccmdb).
The following example illustrates users and groups created if you use themiddleware installation program to install middleware on Linux and UNIXsystems using default values. Use this information to determine the primary groupof a user ID.# id db2inst1uid=510(db2inst1) gid=102(db2iadm1) groups=102(db2iadm1),101(dasadm1)
#id ctginst1uid=512(ctginst1) gid=102(db2iadm1) groups=102(db2iadm1),101(dasadm1)
# id idsccmdbuid=514(idsccmdb) gid=502(dbsysadm) groups=502(dbsysadm),101(dasadm1),501(idsldap)
# id db2fenc1uid=511(db2fenc1) gid=103(db2fgrp1) groups=103(db2fgrp1)
# id ctgfenc1uid=513(ctgfenc1) gid=104(ctgfgrp1) groups=104(ctgfgrp1)
# id dasusr1uid=508(dasusr1) gid=101(dasadm1) groups=101(dasadm1)
# id idsldapuid=513(idsldap) gid=501(idsldap) groups=501(idsldap),0(root),102(db2iadm1)
#id rootuid=0(root) gid=0(root) groups=0(root),1(bin),2(daemon),3(sys),4(adm),6(disk),10(wheel),501(idsldap),502(dbsysadm)
The following entries are found in the /etc/group file:dasadm1:x:101:db2inst1,ctginst1,idsccmdb
db2iadm1:x:102:idsldap
idsldap:x:501:idsldap,root,idsccmdb
dbsysadm:x:502:root
Directory locations
In this table, list the middleware directory locations to use.
Table 28. Directory locations
Setting Default Your value
Workspace directory user_home\ibm\tivoli\mwi\workspace
Middleware images source directory
Compressed images directory
Uncompressed images directory
Appendix B. Planning worksheets for middleware installation 255

DB2 configuration
In this table, list the configuration values to use when you install DB2.
Table 29. DB2 configuration
Setting Default Your value
Installation directoryWindows
SystemDrive\ProgramFiles\IBM\SQLLIB
Linux, AIX, HP-UX, Solaris/opt/IBM/db2/V9.7
DAS userWindows
db2admin
Linux, AIX, HP-UX, Solarisdasusr1
Fenced user for the DB2 defaultinstance Linux, AIX, HP-UX, Solaris
db2fenc1
The option to create the DB2 defaultinstance is not enabled in themiddleware installation program, bydefault.
Fenced user group name for the DB2default instance Linux, AIX, HP-UX, Solaris
db2fgrp1
The option to create the DB2 defaultinstance is not enabled in themiddleware installation program, bydefault.
Fenced user for the DB2 defaultinstance home directory Linux, AIX, HP-UX
/home/db2fenc1
Solaris /export/home/db2fenc1
The option to create the DB2 defaultinstance is not enabled in themiddleware installation program, bydefault.
Fenced user for the DB2 serverinstance Linux, AIX, HP-UX, Solaris
ctgfenc1
Fenced user group name for the DB2server instance Linux, AIX, HP-UX, Solaris
ctgfgrp1
Fenced user for the DB2 serverinstance home directory Linux, AIX, HP-UX
/home/ctgfenc1
Solaris /export/home/db2fenc1
Instance name ctginst1
Port 50005
256 IBM Maximo Asset Management: Installation Guide (Oracle WebLogic Server)

Table 29. DB2 configuration (continued)
Setting Default Your value
Instance user name home directoryLinux, AIX, HP-UX
/home/ctginst1
Solaris /export/home/ctginst1
Database instance user IDWindows
db2admin
Linux, AIX, HP-UX, Solarisctginst1
DB2 administrators groupWindows
DB2ADMNS
Linux, AIX, HP-UX, Solarisdb2iadm1
DB2 users groupWindows
DB2USERS
Use same user name and passwordfor remaining DB2 Services
YES
Configure Tools Catalog NO
This value is relevant for reusescenarios only.
Enable operating system security forDB2 objects
YES
This value is relevant for reusescenarios only.
DB2 instance port
Data table space name MAXDATA
Data table space size medium (1000 MB)
DB2 Medium (5000 MB)
Temporary table space name MAXTEMP
Temporary table space size 1000 MB
Oracle configuration
In this table, list the configuration values to use when you install Oracle.
Table 30. Oracle configuration
Setting Default Your value
Installation directoryWindows
SystemDrive\oracle\product\11.2.0\db_1
Linux, AIX, HP-UX, Solaris/opt/app/oracle/product/11.2.0/db_1
Administrator User ID sys
Appendix B. Planning worksheets for middleware installation 257
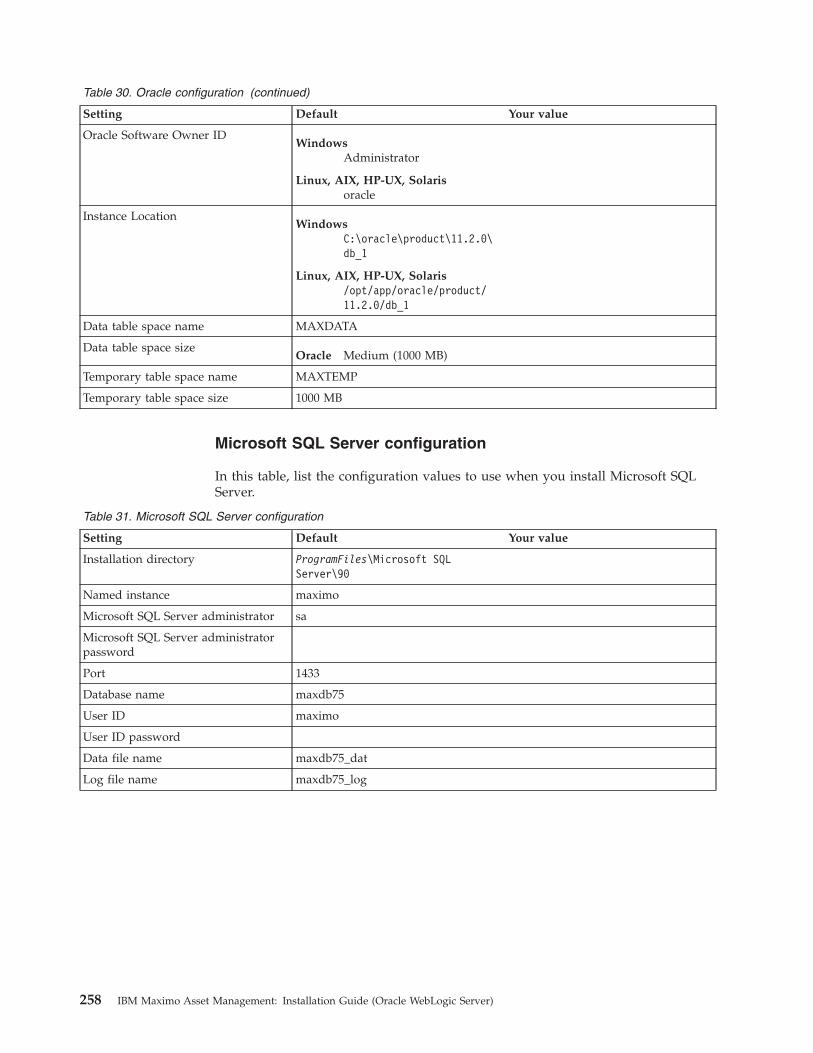
Table 30. Oracle configuration (continued)
Setting Default Your value
Oracle Software Owner IDWindows
Administrator
Linux, AIX, HP-UX, Solarisoracle
Instance LocationWindows
C:\oracle\product\11.2.0\db_1
Linux, AIX, HP-UX, Solaris/opt/app/oracle/product/11.2.0/db_1
Data table space name MAXDATA
Data table space sizeOracle Medium (1000 MB)
Temporary table space name MAXTEMP
Temporary table space size 1000 MB
Microsoft SQL Server configuration
In this table, list the configuration values to use when you install Microsoft SQLServer.
Table 31. Microsoft SQL Server configuration
Setting Default Your value
Installation directory ProgramFiles\Microsoft SQLServer\90
Named instance maximo
Microsoft SQL Server administrator sa
Microsoft SQL Server administratorpassword
Port 1433
Database name maxdb75
User ID maximo
User ID password
Data file name maxdb75_dat
Log file name maxdb75_log
258 IBM Maximo Asset Management: Installation Guide (Oracle WebLogic Server)

Oracle WebLogic Server configuration
List the configuration values to use when configuring Oracle WebLogic Server.
Table 32. Oracle WebLogic Server configuration
Setting Default Your value
Domain sourceWindows:
\wlserver_10.3\common\templates\domains
Linux, Solaris:/wlserver_10.3/common/templates/domains
Customize environment and servicessettings
No.
Domain name my_domainNote: Enter any name except forMAXIMOSERVER
Administration server name MAXIMOSERVER
Listen address All Local Addresses
Listen port 7001
Start Menu shortcut link name Start Server
Start Server program name startWebLogic.cmd
IBM Tivoli Directory Server configuration
In this table, list the configuration values to use when you install IBM TivoliDirectory Server.
Table 33. IBM Tivoli Directory Server configuration
Setting Default Your value
Install locationWindows
C:\ProgramFiles\IBM\LDAP\V6.3
Linux, AIX, HP-UX, Solaris/opt/IBM/ldap/V6.3
Administrator distinguished name cn=root
Organizational unit ou=SWG
Organization and country suffix o=IBM,c=US
Directory server port 389
Directory server secure port 636
Administration port 3538
Administration secure port 3539
Database name security
Instance name idsccmdb
Instance user name idsccmdb
Appendix B. Planning worksheets for middleware installation 259

Microsoft Active Directory configuration
List the configuration values to use when you install Microsoft Active Directory.
Table 34. Microsoft Active Directory configuration
Setting Default Your value
Directory server port 389
LDAP base entry
User suffix
Group suffix
Organization container suffix
Bind distinguished name
260 IBM Maximo Asset Management: Installation Guide (Oracle WebLogic Server)

Notices
This information was developed for products and services offered in the U.S.A.
IBM may not offer the products, services, or features discussed in this document inother countries. Consult your local IBM representative for information on theproducts and services currently available in your area. Any reference to an IBMproduct, program, or service is not intended to state or imply that only that IBMproduct, program, or service may be used. Any functionally equivalent product,program, or service that does not infringe any IBM intellectual property right maybe used instead. However, it is the user's responsibility to evaluate and verify theoperation of any non-IBM product, program, or service.
IBM may have patents or pending patent applications covering subject matterdescribed in this document. The furnishing of this document does not grant youany license to these patents. You can send license inquiries, in writing, to:
IBM Director of LicensingIBM CorporationNorth Castle DriveArmonk, NY 10504-1785U.S.A.
For license inquiries regarding double-byte (DBCS) information, contact the IBMIntellectual Property Department in your country or send inquiries, in writing, to:
Intellectual Property LicensingLegal and Intellectual Property LawIBM Japan Ltd.1623-14, Shimotsuruma, Yamato-shiKanagawa 242-8502 Japan
The following paragraph does not apply to the United Kingdom or any othercountry where such provisions are inconsistent with local law: INTERNATIONALBUSINESS MACHINES CORPORATION PROVIDES THIS PUBLICATION "AS IS"WITHOUT WARRANTY OF ANY KIND, EITHER EXPRESS OR IMPLIED,INCLUDING, BUT NOT LIMITED TO, THE IMPLIED WARRANTIES OFNON-INFRINGEMENT, MERCHANTABILITY OR FITNESS FOR A PARTICULARPURPOSE. Some states do not allow disclaimer of express or implied warranties incertain transactions, therefore, this statement may not apply to you.
This information could include technical inaccuracies or typographical errors.Changes are periodically made to the information herein; these changes will beincorporated in new editions of the publication. IBM may make improvementsand/or changes in the product(s) and/or the program(s) described in thispublication at any time without notice.
Any references in this information to non-IBM Web sites are provided forconvenience only and do not in any manner serve as an endorsement of thosewebsites. The materials at those websites are not part of the materials for this IBMproduct and use of those websites is at your own risk.
© Copyright IBM Corp. 2007, 2011 261

IBM may use or distribute any of the information you supply in any way itbelieves appropriate without incurring any obligation to you.
Licensees of this program who wish to have information about it for the purposeof enabling: (i) the exchange of information between independently createdprograms and other programs (including this one) and (ii) the mutual use of theinformation which has been exchanged, should contact:
IBM Corporation2Z4A/10111400 Burnet RoadAustin, TX 78758 U.S.A.
Such information may be available, subject to appropriate terms and conditions,including in some cases, payment of a fee.
The licensed program described in this document and all licensed materialavailable for it are provided by IBM under terms of the IBM Customer Agreement,IBM International Program License Agreement or any equivalent agreementbetween us.
Information concerning non-IBM products was obtained from the suppliers ofthose products, their published announcements or other publicly available sources.IBM has not tested those products and cannot confirm the accuracy ofperformance, compatibility or any other claims related to non-IBM products.Questions on the capabilities of non-IBM products should be addressed to thesuppliers of those products.
This information contains examples of data and reports used in daily businessoperations. To illustrate them as completely as possible, the examples include thenames of individuals, companies, brands, and products. All of these names arefictitious and any similarity to the names and addresses used by an actual businessenterprise is entirely coincidental.
COPYRIGHT LICENSE:
This information contains sample application programs in source language, whichillustrate programming techniques on various operating platforms. You may copy,modify, and distribute these sample programs in any form without payment toIBM, for the purposes of developing, using, marketing or distributing applicationprograms conforming to the application programming interface for the operatingplatform for which the sample programs are written. These examples have notbeen thoroughly tested under all conditions. IBM, therefore, cannot guarantee orimply reliability, serviceability, or function of these programs. The sampleprograms are provided "AS IS", without warranty of any kind. IBM shall not beliable for any damages arising out of your use of the sample programs.
TrademarksIBM, the IBM logo, and ibm.com are trademarks or registered trademarks ofInternational Business Machines Corp., registered in many jurisdictions worldwide.IBM, the IBM logo, and ibm.com are trademarks or registered trademarks ofInternational Business Machines Corp., registered in many jurisdictions worldwide.Other product and service names might be trademarks of IBM or other companies.A current list of IBM trademarks is available on the Web at “Copyright andtrademark information” at www.ibm.com/legal/copytrade.shtml.
262 IBM Maximo Asset Management: Installation Guide (Oracle WebLogic Server)

Java and all Java-based trademarks and logos are trademarks or registeredtrademarks of Oracle and/or its affiliates.
Linux is a registered trademark of Linus Torvalds in the United States, othercountries, or both.
Microsoft, Windows, and the Windows logo are trademarks of MicrosoftCorporation in the United States, other countries, or both.
UNIX is a registered trademark of The Open Group in the United States and othercountries.
Notices 263

264 IBM Maximo Asset Management: Installation Guide (Oracle WebLogic Server)

Index
Aaccess collection 8ACUINI0044E 229administrative workstation 6
backing up 213restoring 214
Bbackup 213
Ccompany related accounts
updating 175Configuration
Maximo Asset Management 1configure 172configure SMTP 172configuring
database server 112CTG00001 249CTGIN9042E 234, 235, 237CTGIN9061E 235currency codes
creating 172
Ddatabase
applying changes 174database server 112DB2
configuring existing server with themiddleware installationprogram 81
install on Solaris and HP-UX 208manual configuration, 9.x 112user password expiration 231
default insert sitecreating 175
deploying ear files 73, 104, 144deployment
multiple server 7single server 6
deployment enginebacking up 27
deployment planoverview 34
deployment roadmaps 11deployment topology
multi-server 5single-server 5
directory servermanually configuring 121
Ee-mail listener
configuring in WebLogic Server 56,88, 131
EAR filesbuilding manually 205manually deploying 204
environmental dataupdating 224
errorCTG00001 249
Ffonts
AIX 22
Ggeneral ledger account
creating 174general ledger account component
creating 173general ledger component type
authorizationupdating 175
group 51
Hhardware
prerequisite 2
IIBM Support Assistant Workbench 9IBM Tivoli Directory Server 51
install on Solaris 210manually configuring 122segmentation fault 228verifying existing server using the
middleware installationprogram 82
installautomatic middleware
configuration 29install silently 149installation 205
advanced topics 193automatically configuring existing
middleware 77custom 15deploying using manual middleware
configuration 112deploying with manually configured
middleware 109preparing 11product, automatically configured
middleware 60, 91
installation (continued)product, manually configured
middleware 134properties 214simple 15
Installationpost installation tasks 171
installation programtasks 193
installation program logs 10installing
middleware 31prerequisite software products 34,
149silent 149
integration frameworkJMS options
configuring 55, 87, 130item and company sets
creating 172
JJ2EE server
manually configuring 129JRE
configuring in Linux 23
Llanguage support
planning 10languages 3
deploying after database updatedeferral 75, 106, 146, 147
launchpadoverview 27starting 27
librariesLinux 23
logs 10middleware installation program 44,
46
MMaximo Application Server
starting 73, 104, 144MAXIMOSERVER domain
creating 54, 86, 129Media
Installation 16Microsoft Active Directory
configuring 126configuring with middleware
installation program 83Microsoft SQL Server
manual configuration 119restoring 186
middleware 34, 149
© Copyright IBM Corp. 2007, 2011 265

middleware (continued)changing configuration
parameters 204configuration options 14configuration values for expert
users 195install on Solaris and HP-UX 207,
208install preparation on Solaris and
HP-UX 207installing on HP-UX 207installing on Solaris 207planning worksheet 253remote configuration 25starting and stopping 191starting on UNIX 192starting on Windows 191uninstalling 52
middleware installation 31before you begin 16
middleware installation programerror ACUINI0044E 229error from DB2 installation failure on
AIX 238error improper configuration of DB2
or IBM Tivoli Directory Server 231error incorrect db2admin
password 230error incorrect idsccmdb user
password 234error incorrect service pack
requirement for AIX 235error Invalid DB2 password
value 237error when system directories cannot
be renamed 235log reference 46logs 44troubleshooting 227
feature 227using the troubleshooting
feature 228middleware installation workspace 32middleware installer
troubleshooting 228multiple 205multiple server deployment 7
Nnstallation
before you begin 16
OOracle
manual configuration, 10g 117manual configuration, 11g 114restoring 185
Oracle WebLogic Serverconfiguring 203managing 203manually uninstalling 205post product installation 71, 102, 143setting the host name in the
application 74, 106, 146
Oracle WebLogic Server (continued)starting 203
organizationcreating 173
Pplanning to deploy 5planning worksheet
middleware 253product 251
port availabilitychecking 21
post installation 171post product installation
Oracle WebLogic Server 71, 102, 143prerequisite 34, 149
hardware 2software 2
productplanning worksheet 251
product installationbefore you begin 16troubleshooting, common
problems 244troubleshooting, general 240
product installation programoverview 58, 90
propertiesinstallation 214silent product installation 151
Rrecovery tool
uninstall 187restoration 213reusing
DB2 12Tivoli Directory Server 12
role 8
Ssecurity
configuring 179security group 8serviceability 9shared memory
setting 24signing in 171signing in and out 177silent install 149silent product installation
properties 151single server deployment 6SMTP 172software
prerequisite 2swap size
setting 24system password policy
considerations 26
Ttar command
AIX 22troubleshoot
middlewareuninstall 240
product installation program 240troubleshooting 227
DB2 231middleware installer 228product uninstallation program 249
Uulimit
setting 24uninstall
automatically configureddeployment 182
automatically configuredmiddleware 182
database configuration recover 184error
CTG00001 249manual 189manually configured
deployment 183manually configured
middleware 183manually removing files 189product 181
without uninstallationprogram 187
recovery tool 187uninstall program recovery tool 188
user 51users
groupssynchronizing 177
synchronizing 177
Vverifying prerequisites
programmatically 17verifying the installation
manually 169programmatically 165
WWebLogic Server
manually configuring 54, 85, 129stopping 203
workspace 32worktypes
creating 176
266 IBM Maximo Asset Management: Installation Guide (Oracle WebLogic Server)


����
Printed in USA