ice learning center - squarespace. c - i c e i . t. able of ... how to use this learning module ......
TRANSCRIPT

®
Teaching independence: a TherapeuTic approach
To STroke rehabiliTaTions e c o n d e d i T i o n
By Jan Davis, MS, OTR/L
universiTy ediTion
sTudenT Workbook
ICE LEarnIng CEntErI N T E R N AT I O N A L C L I N I C A L E D U C AT O R S , I N C .

Copyright © 2000-2015 International Clinical Educators, Inc.
2
About the Author & PresenterJan Davis, MS, OTR/L, is an internationally recognized leader in educational programs developed for health care providers, families and caregivers of stroke survivors. She founded International Clinical Educators in 1983 and since then, faculty, students, and therapists have attended her workshops and used her training materials worldwide.
AcknowledgmentsThe author wishes to gratefully acknowledge those who have provided the basis of the therapeutic approach utilized in the Stroke Education Training Series.
Berta Bobath and Karel Bobath, MDPatricia Davies, MCSP, Dip. Phys. Ed.Louise Rutz-LaPitz, BS, PTFelicie Affolter, PhD
About International Clinical Educators, Inc.ICE is dedicated to providing high-quality educational programs for occupational therapists, physical therapists, nurses and assistants working with stroke survivors. All programs are designed to give practitioners practical treatment ideas that can be used in acute care, rehabilitation, skilled nursing, outpatient and home health settings.
Published by: INTERNATIONAL CLINICAL EDUCATORS, INC.P.O. Box 1990Port Townsend, WA 98368, USA(888) 665-6556 www.ICELearningCenter.com
Also available:• Treatment Strategies in the Acute Care of Stroke Survivors• Functional Treatment Ideas and Strategies in Adult Hemiplegia
StrokeHelp: Teaching Independence: A Therapeutic Approach to Stroke RehabilitationThis program is produced for informational purposes only. The information presented is not intended to substitute for informed medical advice, diagnosis or treatment of a health problem or condition without proper medical supervision. You are encouraged to consult a health care provider with any questions or concerns regarding this or any therapeutic or exercise program. International Clinical Educators, Inc. makes these programs available for educational value and not for medical diagnosis or practice.
Copyright © 2000-2015 International Clinical Educators, Inc.All rights reserved. This book and accompanying DVD/video series are protected by copyright. No part of this book may be reproduced in any form or by any means, including photocopying, without written permission from the copyright owner. Duplication of DVD/Video is prohibited. This series, or any portion of it, may not be used for broadcast. This series, or any portion of it, may not be used for workshops that generate revenue without the written permission of the copyright owner.
Videos Filmed & Edited by:Jane ChampionChampion Video ProductionsPort Townsend, WA 98368, USAwww.ChampionVideo.com
ISBN 978-1-930966-39-0 07/15
Copyright © 2000-2015 International Clinical Educators, Inc.
Table of conTenTs
How to Use this Learning Module . . . . . . . . . . . . . . . . . . . . . . . . . . . . . . . . . . . . . . . 7Program Guide . . . . . . . . . . . . . . . . . . . . . . . . . . . . . . . . . . . . . . . . . . . . . . . . . 9Improving Function & Awareness . . . . . . . . . . . . . . . . . . . . . . . . . . . . . . . . . . . . . . 15
Introduction to Improving Function & Awareness . . . . . . . . . . . . . . . . . . . . . . . . . . . .15The Five Basic Treatment Principles . . . . . . . . . . . . . . . . . . . . . . . . . . . . . . . . . . . .16
Encourage Weight shift over the Hemiplegic Side . . . . . . . . . . . . . . . . . . . . . . . . . . .16Encourage Trunk Rotation . . . . . . . . . . . . . . . . . . . . . . . . . . . . . . . . . . . . . . .16Put Muscles on Length . . . . . . . . . . . . . . . . . . . . . . . . . . . . . . . . . . . . . . . . .16Encourage Forward Flexion . . . . . . . . . . . . . . . . . . . . . . . . . . . . . . . . . . . . . .17Encourage Scapular Protraction . . . . . . . . . . . . . . . . . . . . . . . . . . . . . . . . . . . .17
Improving Awareness During Bedrest . . . . . . . . . . . . . . . . . . . . . . . . . . . . . . . . . . . .18Position of the Patient . . . . . . . . . . . . . . . . . . . . . . . . . . . . . . . . . . . . . . . . . .18Environmental Factors: Position of the Patient in the Room . . . . . . . . . . . . . . . . . . . . . .19
Improving Upper Extremity Function & Awareness . . . . . . . . . . . . . . . . . . . . . . . . . . . . .20Three Ways to Include a Nonfunctional Upper Extremity into a Task . . . . . . . . . . . . . . . . . .201. Weight bearing/Stabilizer . . . . . . . . . . . . . . . . . . . . . . . . . . . . . . . . . . . . . . .202. Guided Movement . . . . . . . . . . . . . . . . . . . . . . . . . . . . . . . . . . . . . . . . . .203. Bilateral . . . . . . . . . . . . . . . . . . . . . . . . . . . . . . . . . . . . . . . . . . . . . . . .21
Functional Treatment Ideas . . . . . . . . . . . . . . . . . . . . . . . . . . . . . . . . . . . . . . . . .22Examples of Guiding, Weight bearing, and Bilateral Use During Function . . . . . . . . . . . . . . .22Summary of Benefits of Weight bearing, Guiding, and Bilateral . . . . . . . . . . . . . . . . . . . .23Functional Treatment Ideas in Standing . . . . . . . . . . . . . . . . . . . . . . . . . . . . . . . .23Standing with Fearful Patients During Function . . . . . . . . . . . . . . . . . . . . . . . . . . . .24
Home Exercise Program . . . . . . . . . . . . . . . . . . . . . . . . . . . . . . . . . . . . . . . . . .25Stretching Forward with Scapular Protraction . . . . . . . . . . . . . . . . . . . . . . . . . . . . .25Scapular Protraction with Weight bearing . . . . . . . . . . . . . . . . . . . . . . . . . . . . . . .25Shoulder Flexion in Sitting . . . . . . . . . . . . . . . . . . . . . . . . . . . . . . . . . . . . . . .25Shoulder Flexion in Supine . . . . . . . . . . . . . . . . . . . . . . . . . . . . . . . . . . . . . . .25Forearm Supination and Pronation . . . . . . . . . . . . . . . . . . . . . . . . . . . . . . . . . . .26Wrist Flexion and Extension . . . . . . . . . . . . . . . . . . . . . . . . . . . . . . . . . . . . . .26Finger Extension . . . . . . . . . . . . . . . . . . . . . . . . . . . . . . . . . . . . . . . . . . . .26
Home Exercise Program, Group Treatment . . . . . . . . . . . . . . . . . . . . . . . . . . . . . . . . .27Preventing Shoulder Pain . . . . . . . . . . . . . . . . . . . . . . . . . . . . . . . . . . . . . . . . . . 29
Introduction to Preventing Shoulder Pain . . . . . . . . . . . . . . . . . . . . . . . . . . . . . . . .29Therapeutic Benefits of Preventing Shoulder Pain . . . . . . . . . . . . . . . . . . . . . . . . . . .29
Proper Handling of the Hemiplegic Shoulder: Evaluation & Observation . . . . . . . . . . . . . . . . . .30Preparing the Shoulder for Movement . . . . . . . . . . . . . . . . . . . . . . . . . . . . . . . . .30
Scapular Mobilization: Elevation . . . . . . . . . . . . . . . . . . . . . . . . . . . . . . . . . . . . . .31Scapular Mobilization: Protraction . . . . . . . . . . . . . . . . . . . . . . . . . . . . . . . . . . . . .32Scapular Mobilization: Upward Rotation . . . . . . . . . . . . . . . . . . . . . . . . . . . . . . . . . .33Scapular Mobilization in Supine . . . . . . . . . . . . . . . . . . . . . . . . . . . . . . . . . . . . . . .35Therapeutic Method for Treating Soft-Tissue Tightness . . . . . . . . . . . . . . . . . . . . . . . . . . . . . . . . . . . . . . . . . . . .36Facilitating Muscles Acting on the Scapula . . . . . . . . . . . . . . . . . . . . . . . . . . . . . . . . .37Protecting the Hemiplegic Shoulder . . . . . . . . . . . . . . . . . . . . . . . . . . . . . . . . . . . . .38
Proper bed positioning . . . . . . . . . . . . . . . . . . . . . . . . . . . . . . . . . . . . . . . . .38Proper positioning in the wheelchair . . . . . . . . . . . . . . . . . . . . . . . . . . . . . . . . . .38Proper positioning of arm on a lap tray . . . . . . . . . . . . . . . . . . . . . . . . . . . . . . . . .38Proper repositioning in the wheelchair . . . . . . . . . . . . . . . . . . . . . . . . . . . . . . . . .38Proper transfers . . . . . . . . . . . . . . . . . . . . . . . . . . . . . . . . . . . . . . . . . . . . .38
Table of Contents Copyright © 2000-2015 International Clinical Educators, Inc.
4
Proper sit to stand . . . . . . . . . . . . . . . . . . . . . . . . . . . . . . . . . . . . . . . . . . .38Subluxation . . . . . . . . . . . . . . . . . . . . . . . . . . . . . . . . . . . . . . . . . . . . . . . . .40Possible Causes of Shoulder Pain in Hemiplegia . . . . . . . . . . . . . . . . . . . . . . . . . . . . . .41
Wheelchair Transfers . . . . . . . . . . . . . . . . . . . . . . . . . . . . . . . . . . . . . . . . . . . . 43Introduction to Therapeutic Transfers . . . . . . . . . . . . . . . . . . . . . . . . . . . . . . . . . .43Therapeutic Benefits of Transfers Toward the Weak Side . . . . . . . . . . . . . . . . . . . . . . .43
Transfers to Similar Height Surfaces . . . . . . . . . . . . . . . . . . . . . . . . . . . . . . . . . . . .44Analyzing Normal Movement During Transfers . . . . . . . . . . . . . . . . . . . . . . . . . . . . .44
Wheelchair Transfer with Maximum Assistance . . . . . . . . . . . . . . . . . . . . . . . . . . . . . . .46Transfer with Maximum Assistance of Two Persons . . . . . . . . . . . . . . . . . . . . . . . . . . . .48Transfers with Moderate Assistance . . . . . . . . . . . . . . . . . . . . . . . . . . . . . . . . . . . .49Transferring On and Off a High Surface . . . . . . . . . . . . . . . . . . . . . . . . . . . . . . . . . .51
Transfer: Analysis of Normal Movement . . . . . . . . . . . . . . . . . . . . . . . . . . . . . . . .51High-Surface Transfer: Moderate Assistance . . . . . . . . . . . . . . . . . . . . . . . . . . . . . . . .52
Transferring Off of a High Surface . . . . . . . . . . . . . . . . . . . . . . . . . . . . . . . . . . .52Repositioning in the Wheelchair . . . . . . . . . . . . . . . . . . . . . . . . . . . . . . . . . . . . . .54
Analyzing Normal Movement in Repositioning . . . . . . . . . . . . . . . . . . . . . . . . . . . . .54Repositioning in the Wheelchair with Moderate Assistance . . . . . . . . . . . . . . . . . . . . . . . . . . . . . . . . . . . . . . . . . .55Repositioning in the Wheelchair with Maximum Assistance . . . . . . . . . . . . . . . . . . . . . . . . . . . . . . . . . . . . . . . . . .57Scooting Forward and Backward in the Chair . . . . . . . . . . . . . . . . . . . . . . . . . . . . . . . .59
Standing Safely. . . . . . . . . . . . . . . . . . . . . . . . . . . . . . . . . . . . . . . . . . . . . . . . 61Introduction to Standing Safely . . . . . . . . . . . . . . . . . . . . . . . . . . . . . . . . . . . . .61Therapeutic Benefits of Standing . . . . . . . . . . . . . . . . . . . . . . . . . . . . . . . . . . . .61
Sit to Stand: Normal Movement . . . . . . . . . . . . . . . . . . . . . . . . . . . . . . . . . . . . . . .62Sit to Stand with Moderate Assistance . . . . . . . . . . . . . . . . . . . . . . . . . . . . . . . . . . .64Sit to Stand with Maximum Assistance . . . . . . . . . . . . . . . . . . . . . . . . . . . . . . . . . . .67How to Facilitate Standing Safely . . . . . . . . . . . . . . . . . . . . . . . . . . . . . . . . . . . . . .69Shifting Weight Toward the Hemiplegic Side in Standing . . . . . . . . . . . . . . . . . . . . . . . . . .70Standing Safely if the Knee Buckles . . . . . . . . . . . . . . . . . . . . . . . . . . . . . . . . . . . .72Stand to Sit . . . . . . . . . . . . . . . . . . . . . . . . . . . . . . . . . . . . . . . . . . . . . . . . .74Stand to Sit with Moderate Assistance . . . . . . . . . . . . . . . . . . . . . . . . . . . . . . . . . . .75
Bed Positioning & Mobility . . . . . . . . . . . . . . . . . . . . . . . . . . . . . . . . . . . . . . . . . 77Introduction to Bed Positioning & Mobility . . . . . . . . . . . . . . . . . . . . . . . . . . . . . . .77Therapeutic Benefits of Proper Bed Positioning & Mobility . . . . . . . . . . . . . . . . . . . . . . .77
Bed Positioning in Sidelying on the Involved Side . . . . . . . . . . . . . . . . . . . . . . . . . . . . .78Bed Positioning in Sidelying on the Non-involved Side . . . . . . . . . . . . . . . . . . . . . . . . . . . . . . . . . . . . . . . . . .80Bed Positioning in Supine . . . . . . . . . . . . . . . . . . . . . . . . . . . . . . . . . . . . . . . . . .81Scooting Up in Bed: Normal Movement . . . . . . . . . . . . . . . . . . . . . . . . . . . . . . . . . . .82Scooting Up in Bed: Therapeutic Method . . . . . . . . . . . . . . . . . . . . . . . . . . . . . . . . . .83Scooting Side to Side: Normal Movement . . . . . . . . . . . . . . . . . . . . . . . . . . . . . . . . .84Scooting Side to Side: Therapeutic Method . . . . . . . . . . . . . . . . . . . . . . . . . . . . . . . . .85Sidelying to Sitting from the Involved Side . . . . . . . . . . . . . . . . . . . . . . . . . . . . . . . . .87Sitting to Sidelying Over the Involved Side . . . . . . . . . . . . . . . . . . . . . . . . . . . . . . . . .89Rolling from Supine to Sidelying: Normal Movement . . . . . . . . . . . . . . . . . . . . . . . . . . . . . . . . . . . . . . . . . . . . . .91
Analysis of Normal Movement: Rolling from Supine to Sidelying . . . . . . . . . . . . . . . . . . . .91Rolling from Supine to Sidelying . . . . . . . . . . . . . . . . . . . . . . . . . . . . . . . . . . . . . .92
Copyright © 2000-2015 International Clinical Educators, Inc. Table of Contents
5
Self-Care . . . . . . . . . . . . . . . . . . . . . . . . . . . . . . . . . . . . . . . . . . . . . . . . . . . 93Introduction to Self-Care . . . . . . . . . . . . . . . . . . . . . . . . . . . . . . . . . . . . . . . .93
Fundamental Therapeutic Principles . . . . . . . . . . . . . . . . . . . . . . . . . . . . . . . . . . . .94Activities of Daily Living (ADL) . . . . . . . . . . . . . . . . . . . . . . . . . . . . . . . . . . . . .94Therapeutic Benefits of Self-Care Activities . . . . . . . . . . . . . . . . . . . . . . . . . . . . . .94Therapy Tips for Self-Care Activities . . . . . . . . . . . . . . . . . . . . . . . . . . . . . . . . . .94
Dressing . . . . . . . . . . . . . . . . . . . . . . . . . . . . . . . . . . . . . . . . . . . . . . . . . . .96Donning Shirt . . . . . . . . . . . . . . . . . . . . . . . . . . . . . . . . . . . . . . . . . . . . . .97Donning Shoes and Socks . . . . . . . . . . . . . . . . . . . . . . . . . . . . . . . . . . . . . . .97
One-Handed Shoe Tying . . . . . . . . . . . . . . . . . . . . . . . . . . . . . . . . . . . . . . . . . .98Undressing . . . . . . . . . . . . . . . . . . . . . . . . . . . . . . . . . . . . . . . . . . . . . . . . .99Undressing with Assistance . . . . . . . . . . . . . . . . . . . . . . . . . . . . . . . . . . . . . . . . .99
Doffing Shirt . . . . . . . . . . . . . . . . . . . . . . . . . . . . . . . . . . . . . . . . . . . . . . .99Doffing Pants . . . . . . . . . . . . . . . . . . . . . . . . . . . . . . . . . . . . . . . . . . . . . 100Doffing Shoes and Socks . . . . . . . . . . . . . . . . . . . . . . . . . . . . . . . . . . . . . . . 100
Correcting Problems in Self-Care . . . . . . . . . . . . . . . . . . . . . . . . . . . . . . . . . . . . . 101Tips for Grooming . . . . . . . . . . . . . . . . . . . . . . . . . . . . . . . . . . . . . . . . . . . . . 102
Washing at the Sink . . . . . . . . . . . . . . . . . . . . . . . . . . . . . . . . . . . . . . . . . . 102Shaving . . . . . . . . . . . . . . . . . . . . . . . . . . . . . . . . . . . . . . . . . . . . . . . . 102Brushing Teeth . . . . . . . . . . . . . . . . . . . . . . . . . . . . . . . . . . . . . . . . . . . . 102Denture Care . . . . . . . . . . . . . . . . . . . . . . . . . . . . . . . . . . . . . . . . . . . . . 102Brushing Hair . . . . . . . . . . . . . . . . . . . . . . . . . . . . . . . . . . . . . . . . . . . . . 103Bathing Tips . . . . . . . . . . . . . . . . . . . . . . . . . . . . . . . . . . . . . . . . . . . . . . 103Adaptive Equipment Tips for Grooming and Hygiene . . . . . . . . . . . . . . . . . . . . . . . . . 103

Copyright © 2000-2015 International Clinical Educators, Inc.
6

Copyright © 2000-2015 International Clinical Educators, Inc. How to Use this Learning Module
7
hoW To use This learning Module
This learning module is made up of six individual programs, each with videos and step-by-step written instructions. The six programs are:
• Improving Function & Awareness• Preventing Shoulder Pain• Wheelchair Transfers• Standing Safely• Bed Positioning & Mobility• Self-Care
The learning module is designed to be interactive. Watch the videos for each program and follow along in this text. As you watch, you’ll also be participating.
Although you may view the videos in any order, we recommend that you watch them in the order they appear within the series. While viewing each video, refer to the corresponding section in this Workbook for additional written information specifically developed for that particular program.
� Pause and Practice: Practical Lab SessionsTheir are 41 individual practice labs illustrated and identified throughout this learning module. Each is extremely important.
While viewing the video, the symbol � will appear in the lower left-hand corner of your screen. At this point, pause the program and refer to the corresponding page in the Workbook, noting the Pause and Practice boxes. Follow the directions stated in the Workbook to practice the therapeutic method illustrated.
During each practice lab, write down your observations in the space provided. It is helpful to practice each therapeutic method with a partner and try it more than once. As you practice, you will feel more comfortable with each method. After you’ve “practiced, observed, and analyzed,” continue with the video portion of the learning module.
Handling MethodsThe treatment methods chosen for this learning module were carefully selected in order to provide success with the majority of your patients with hemiplegia.
In treatment, your handling should be firm but never forceful. Nothing in this series should ever hurt or be painful. If you or your patient finds any method uncomfortable, stop. If at any time you do not feel safe, stop and get assistance.
When practicing with a partner, give each other feedback. Your handling will improve as you and your partner share information.

8 Teaching Independence: A Therapeutic Approach to Stroke Rehabilitation • University Edition Student Workbook
How to Use this Learning Module Copyright © 2000-2015 International Clinical Educators, Inc.
Why We Analyze Normal Movement Before we begin, remember that all therapeutic methods are based upon normal patterns of movement. To fully understand the therapeutic value of each treatment idea, you may want to observe your own specific movement patterns during the activity you choose for your patient.
• Notice the sequence and patterns of your movement. • Notice the amount of trunk rotation, weight shift, and proximal control required for distal function. • Notice the placement of your hands and wrists during activities.
The better you are at observing and analyzing, the better you will identify and treat your patient’s key problem areas.
A great variety of movements and patterns of movements are possible during activities or tasks taken from normal daily routines. Rather than say “normal,” perhaps it is better to say “typical movement patterns” or “common patterns of movement”. A variation on “normal” does not necessarily mean “abnormal”. The more observations we make of people without central nervous system dysfunction doing functional tasks, the easier it will be to identify abnormal patterns of movement typical of patients with hemiplegia.
Copyright © 2000-2015 International Clinical Educators, Inc. Program Guide for Teaching Independence
9
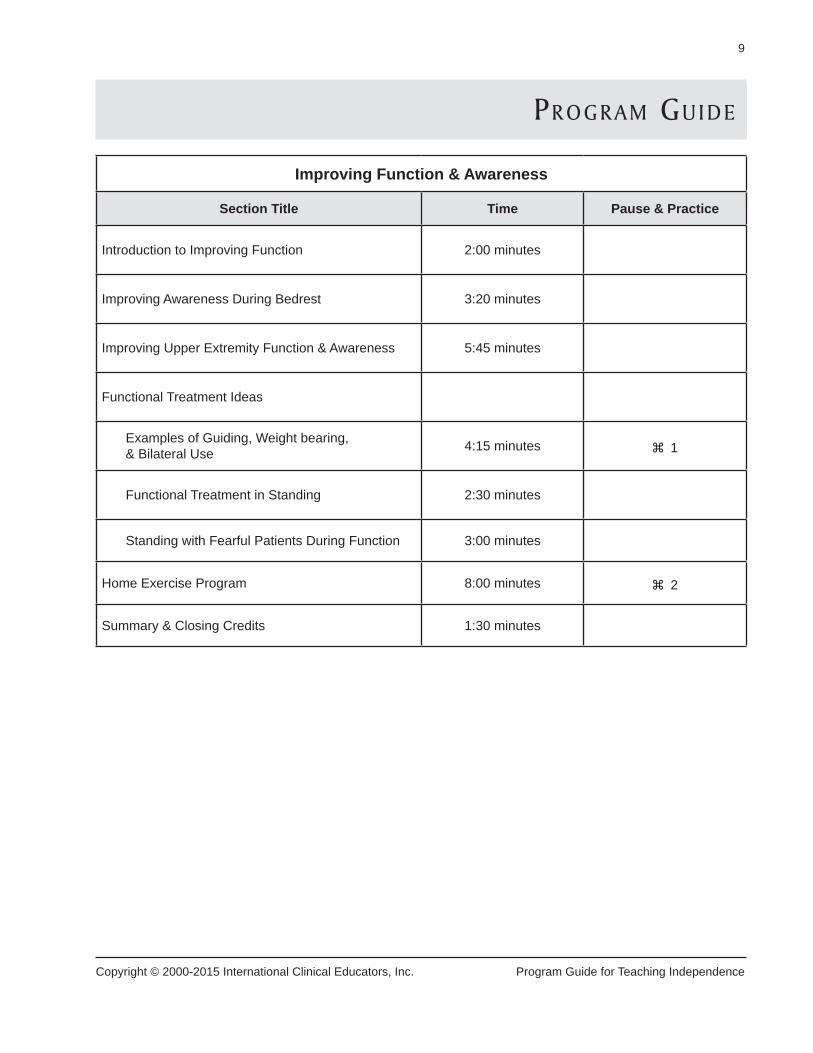
Improving Function & Awareness
Section Title Time Pause & Practice
Introduction to Improving Function 2:00 minutes
Improving Awareness During Bedrest 3:20 minutes
Improving Upper Extremity Function & Awareness 5:45 minutes
Functional Treatment Ideas
Examples of Guiding, Weight bearing, & Bilateral Use 4:15 minutes � 1
Functional Treatment in Standing 2:30 minutes
Standing with Fearful Patients During Function 3:00 minutes
Home Exercise Program 8:00 minutes � 2
Summary & Closing Credits 1:30 minutes
prograM guide

10 Teaching Independence: A Therapeutic Approach to Stroke Rehabilitation • University Edition Student Workbook
Program Guide for Teaching Independence Copyright © 2000-2015 International Clinical Educators, Inc.
Preventing Shoulder Pain
Section Title Time Pause & Practice
Introduction to Preventing Shoulder Pain 2:30 minutes
Proper Handling of the Hemiplegic Shoulder
Evaluations & Observations 2:20 minutes
Scapular Mobilization: Elevation 2:40 minutes � 3
Scapular Mobilization: Protraction 1:20 minutes � 4
Scapular Mobilization: Upward Rotation 1:20 minutes � 5
Scapular Mobilization in Supine 2:15 minutes
Treating Soft-Tissue Tightness 2:00 minutes � 6
Facilitating Scapular Stability � 7
Protecting the Hemiplegic Shoulder 4:30 minutes
Subluxation 1:00 minutes
Possible Causes of Shoulder Pain in Hemiplegia 1:00 minutes
Summary & Closing Credits 1:50 minutes

Teaching Independence: A Therapeutic Approach to Stroke Rehabilitation • University Edition Student Workbook 11
Copyright © 2000-2015 International Clinical Educators, Inc. Program Guide for Teaching Independence
Wheelchair Transfers
Section Title Time Pause & Practice
Introduction to Therapeutic Transfers 3:20 minutes
Transfers to Similar Height Surfaces
Transfer: Analysis of Normal Movement 1:30 minutes � 8
Transfer: Maximum Assist 4:00 minutes � 9
Transfer: Two-Person Assist 1:10 minutes � 10
Transfer: Moderate Assist 5:30 minutes � 11
Transferring On/Off a High Surface
High-Surface Transfer: Normal Movement 0:35 minutes � 12
High-Surface Transfer: Moderate Assist 2:30 minutes � 13
Repositioning in the Chair
Repositioning: Normal Movement 1:20 minutes � 14
Repositioning: Moderate Assist 3:45 minutes � 15
Repositioning: Maximum Assist � 16
Scooting Forward & Backward in the Chair 1:45 minutes � 17
Summary & Closing Credits 2:00 minutes

12 Teaching Independence: A Therapeutic Approach to Stroke Rehabilitation • University Edition Student Workbook
Program Guide for Teaching Independence Copyright © 2000-2015 International Clinical Educators, Inc.
Standing Safely
Section Title Time Pause & Practice
Introduction to Standing Safely 1:45 minutes
Sit to Stand
Sit to Stand: Normal Movement 1:20 minutes � 18
Sit to Stand: Moderate Assist 4:10 minutes � 19
Sit to Stand: Maximum Assist 3:00 minutes � 20
Sit to Stand: Common Problems 5:30 minutes
Standing Safely
How to Facilitate Standing Safely 3:00 minutes � 21
Weight shifts in Standing � 22
If the Knee Buckles 2:30 minutes � 23
Stand to Sit
Sitting Down: Analysis of Normal Movement 0:35 minutes � 24
Stand to Sit: Moderate Assist 1:30 minutes � 25
Incorrect Method 0:20 minutes
Summary & Closing Credits 2:00 minutes

Teaching Independence: A Therapeutic Approach to Stroke Rehabilitation • University Edition Student Workbook 13
Copyright © 2000-2015 International Clinical Educators, Inc. Program Guide for Teaching Independence
Bed Positioning & Mobility
Section Title Time Pause & Practice
Introduction to Bed Positioning & Mobility 2:10 minutes
Bed Positioning
Sidelying on the Involved Side 3:30 minutes � 26
Sidelying on the Non-involved Side 2:00 minutes � 27
Supine 1:20 minutes � 28
Bed Mobility
Scooting Up in Bed: Normal Movement 0:30 minutes � 29
Scooting Up in Bed: Therapeutic Method 2:00 minutes � 30
Scooting Side to Side: Normal Movement 0:45 minutes � 31
Scooting Side to Side: Therapeutic Method 4:00 minutes � 32
Sidelying to Sitting 2:00 minutes � 33
Sitting to Sidelying 1:30 minutes � 34
Rolling from Supine: Normal Movement � 35
Rolling from Supine to Sidelying 0:45 minutes � 36
Summary & Closing Credits 1:30 minutes

14 Teaching Independence: A Therapeutic Approach to Stroke Rehabilitation • University Edition Student Workbook
Program Guide for Teaching Independence Copyright © 2000-2015 International Clinical Educators, Inc.
Self-Care
Section Title Time Pause & Practice
Introduction to Self-Care 1:30 minutes
Fundamental Therapeutic Principles DuringActivities of Daily Living 7:30 minutes
Dressing: Analysis of Normal Movement � 37
Dressing: Therapeutic Method 5:30 minutes � 38
One-Handed Shoe Tying 3:45 minutes � 39
Undressing: Analysis of Normal Movement � 40
Undressing: Therapeutic Method 2:20 minutes � 41
Correcting Problems in Self-Care 2:15 minutes
Tips for Washing & Bathing 4:00 minutes
Summary & Closing Credits 1:30 minutes

Copyright © 2000-2015 International Clinical Educators, Inc. Improving Function & Awareness
15
iMproving funcTion & aWareness
Learning Objectives• Describe the therapeutic benefits of this approach.• List three benefits of positioning stroke survivors on the affected side during bed rest.• List four treatment principles which promote improved function and awareness.• Identify three ways to incorporate a nonfunctional upper extremity into a functional task.
Introduction to Improving Function & AwarenessThere are many things we can do to help increase a stroke survivor’s potential for functional gains after a stroke. The following ideas can be used by many members of the health care team: physical therapists, occupational therapists, nurses, aides and assistants.
The more we incorporate the weak side into everyday real-life functional tasks, the more possibilities there are to maximize the highest level of recovery. Use every opportunity to help patients improve and reach their maximum potential. Help patients learn to integrate the involved side along with the non-involved side.
This program will give you basic information on how to incorporate the involved side into activities taken from real-life situations, which are best at improving function and awareness of the involved side. Examples of treatment ideas are included on the video. These are just a few ideas. You may take these same concepts, modify them and then apply them to almost any situation in your own treatment settings.
Therapeutic Benefits of this Approach• Increased awareness of the involved side.• Decreased fear and neglect.• Improved use of the involved upper extremity.• Improved joint range of motion of the involved side.

16 Teaching Independence: A Therapeutic Approach to Stroke Rehabilitation • University Edition for Students
Improving Function & Awareness Copyright © 2000-2015 International Clinical Educators, Inc.
The Five Basic Treatment PrinciplesIn order to maximize the therapeutic benefits of this treatment approach, incorporate as many of the followingbasic treatment principles as possible into each of your treatment sessions.
Encourage Weight shift over the Hemiplegic SideWeight bearing over the hemiplegic side is the most effective way of regulating tone. It also provides sensory input to the involved side through proprioception. As the patient’s awareness of the involved side improves, fear and neglect will decrease.
The positive effects of weight bearing can be observed in nearly every stage of recovery. Correct weight bearing can be as simple as positioning the patient in sidelying on the weak side in bed or as difficult as the facilitation of stance phase during gait training. When weight bearing is introduced to the patient early in the program, the benefits can be seen throughout the rehabilitation process. Even when you work with patients who are longer term post-stroke, the introduction of weight bearing into daily tasks can still be extremely beneficial.
Encourage Trunk RotationTrunk rotation, or dissociation of the upper and lower trunk, is another very effective way of promoting normal movement throughout the upper and lower extremities. Hemiplegic patients often move in a “blocklike” pattern, with little separation of pelvic girdle and shoulder girdle. To facilitate normal movement, the therapist should set up activities to stimulate or facilitate trunk rotation. As trunk musculature becomes activated, patients will become more stable and have better potential for upper extremity function.
Setting up the task at different heights and on each side of the patient incorporates not only the rotational components of movement but mobilizes the shoulder girdle and pelvic girdle as well. Additional benefits from activities facilitating trunk rotation include: increased sensory input to the involved side, improved awareness of the involved side, and better compensation for visual-field deficits.
Put Muscles on LengthIt is common for hemiplegic patients to become “shortened” on the involved side as muscle tone increases. A common posture for some patients is scapular retraction with downward rotation while the pelvis is in retraction. This posture can eventually lead to soft-tissue tightness.
During therapeutic activities, encourage your patient to gently put muscles on length in order to prevent tightness. This can be accomplished by selecting a task or by placing the activity in such a way as to require gentle stretching of the trunk and extremities. Do not position the patient or the activity in such a way as to cause the patient to lose their balance.
v

Teaching Independence: A Therapeutic Approach to Stroke Rehabilitation • University Edition for Students 17
Copyright © 2000-2015 International Clinical Educators, Inc. Improving Function & Awareness
Encourage Forward FlexionStroke survivors often have difficulty flexing forward. This is due in large part to hip extension (a strong component of lower-extremity extension synergy), posterior pelvic tilt and fear. Difficulty in flexing forward can limit functional abilities such as sit to stand, surface-to-surface transfers, and lower extremity dressing.
Patients who have learned to come forward during the first few weeks of recovery are often less fearful. In addition, encouraging forward flexion with your patients helps to break up extensor tone of the hip, resulting in better selective control of the lower extremity. It also discourages posterior pelvic tilts, allowing for more normal patterns of movement as well as better alignment of the trunk and shoulder girdle. In sitting, you might ask your patients to reach toward their feet. Or, for fearful or lower-level patients, you can modify the amount of forward flexion by using a sturdy table and having them slide their arms forward, using the table as a support.
Encourage Scapular ProtractionThe musculature around the scapula plays an important role in the overall recovery of the upper extremity. Proximal stability is necessary for distal function and the stability of the scapula is critical for hand function. However, for full active voluntary control of the upper extremity, the scapula needs to have full excursion aswell.
Bringing the scapula forward into protraction helps to maintain the normal excursion of the scapula and also helps to regulate abnormal flexor tone of the upper extremity. Protraction of the scapula can be incorporated during bed rest (while in sidelying on the involved side), during dressing activities (flexing forward at the hips in order to place the hand in the shirt sleeve), or while sitting (wiping off the table) or standing (washing the car).
For more specific information on mobilizing the scapula, please see Preventing Shoulder Pain.

18 Teaching Independence: A Therapeutic Approach to Stroke Rehabilitation • University Edition for Students
Improving Function & Awareness Copyright © 2000-2015 International Clinical Educators, Inc.
Improving Awareness During BedrestThe following methods can begin as soon as the patient is first seen at the hospital or can be introduced atanytime during your therapy program.
Position of the PatientIn BedThe most therapeutic position is sidelying on the weak side. Make sure this position is included on a daily basis. (The exact procedure for bed positioning is included in the section Bed Positioning and Mobility.)
There are many advantages to positioning a patient on their weak side.
• They become more aware of this side due to weight bearing and increased sensory stimulation.
• They become less fearful of putting weight on the weak side.
• It can help to prevent painful shoulders as well as reduce the increased tone in upper extremity flexion synergies, which often occurs during recovery.
• It allows the strong side to be free to reach for objects from the nightstand.
In SittingDo not allow the arm to stay in the patient’s lap. Make sure that their involved arm is well supported on a surface, in front of them. It can be placed on the bedside table, on the counter along the bathroom sink, on the wheelchair lap tray, or on the dining room table. Be careful that the arm is fully supported. Do not allow a heavy arm to rest half on and half off the table. It can not only cause discomfort but could possibly cause problems with ulnar nerve compression.
There are many advantages to supporting the involved arm on a surface while sitting.
• It helps to support the trunk in a more symmetrical position, reducing flexion of the trunk.
• The arm is in their visual field, helping to reduce neglect.• They are more likely to spontaneously use the hand, even as an assist or stabilizer.• It helps to prevent dependent edema of the hand.
v
Teaching Independence: A Therapeutic Approach to Stroke Rehabilitation • University Edition for Students 19
Copyright © 2000-2015 International Clinical Educators, Inc. Improving Function & Awareness
Environmental Factors: Position of the Patient in the RoomIn addition to bed positioning of the patient, the actual placement of the furniture in the room can increasefunction and awareness of the weak side. Have the bed situated so the patient’s weak side is toward the door. This encourages staff, as well as family and friends, to approach the patient from the weak side as they care for and visit them. This helps improve awareness of that side. Have the nightstand positioned on the weak side so it encourages the patient to turn in that direction. Each time the patient reaches for the phone or water, trunk rotation with weight bearing on the involved side will be facilitated. The added stimulation on the weak side helps your patient to turn toward that side, decreasing neglect and helping them learn to compensate in the case of a visual-field cut.
The only exception: Make sure that the call light for the nurse is on the strong side, in the visual field, so thepatient can reach it easily and quickly.

20 Teaching Independence: A Therapeutic Approach to Stroke Rehabilitation • University Edition for Students
Improving Function & Awareness Copyright © 2000-2015 International Clinical Educators, Inc.
Improving Upper Extremity Function & Awareness
Three Ways to Include a Nonfunctional Upper Extremity into a TaskEven before movement returns to the nonfunctional extremity, you can encourage the patient to incorporatethe involved hand into daily functional activities. Therapists should always include the nonfunctional upper extremity during functional tasks in one of the three ways described: weight bearing, guided movement or bilaterally. Each and every opportunity, large or small, can help the overall recovery of the patient by improving their potential for recovery.
1. Weight bearing/StabilizerMovement often begins within the context of a functional task, even before an exercise program begins. Incorporating the involved hand can be as simple as placing the arm on the table to support it in weight bearing or by holding or stabilizing an object.
Patients, who are positioned in this way, with the arm supported and used as a stabilizer, are more likely to spontaneously include that extremity into everyday tasks.
2. Guided MovementGuiding is another method which can be used to help improve function and awareness of the hemiplegic side. It is incredibly effective. Guiding a patient during a task reduces the need for verbal cueing. In addition to encouraging more normal movement patterns, it is also very effective for patients with aphasia, apraxia, motor planning problems, and hemionopsia.
Guiding is best described as the therapist placing her hand over the patient’s hand in order to carry out the correct manipulation of objects during a task.
• Place your hand over their hand, down to the fingertips.• Try to move with them in as normal a movement pattern as
possible.• Minimize talking, allowing feedback to come from the activity.• Stand or sit where your movements are similar to theirs.• Be sensitive to your patient’s movements; move with them and in a normal movement sequence.• Guide both hands when possible (not just the weak hand).
�1 Pause and Practice with a PartnerSelect a simple task and following the above directions, guide your partner’s hands to experience this therapeutic method.
v

Teaching Independence: A Therapeutic Approach to Stroke Rehabilitation • University Edition for Students 21
Copyright © 2000-2015 International Clinical Educators, Inc. Improving Function & Awareness
3. BilateralWhen patients use both hands together, at the same time, it helps improve awareness of the involved side and better integrates the involved side with the non-involved side. This can begin early in the rehabilitation process.
Teaching patients to clasp their hands together. Helps them remember the weak hand. For example, as they roll over in bed, keeping the hands together helps them avoid rolling onto the glenohumeral joint of the involved arm, which could cause impingement and subsequent pain.
Bilateral use of the upper extremities can also help patients inhibit their own abnormal patterns of movement. By clasping the hands together in order to take the foot on and off the footrest of the wheelchair, the patient brings the scapula forward, reducing flexor tone of the upper extremity and, at the same time, incorporating the involved hand into the task.
Bilateral use of the upper extremities can also facilitate dynamic trunk control. A patient’s base of support becomes narrower when the upper extremities are removed from weight bearing and used bilaterally during tasks in sitting or standing. Therefore, bilateral use of the upper extremities during tasks activates more dynamic trunk control.

22 Teaching Independence: A Therapeutic Approach to Stroke Rehabilitation • University Edition for Students
Improving Function & Awareness Copyright © 2000-2015 International Clinical Educators, Inc.
Functional Treatment Ideas
Examples of Guiding, Weight bearing, and Bilateral Use During FunctionThis functional activity illustrates the three methods of including the nonfunctional upper extremity into everyday tasks: weight bearing, guiding, and bilateral. As the patient cuts the orange*, squeezes the juice and drinks from the cup, the involved upper extremity can be utilized throughout the activity. The glass juicer is especially good for patients exhibiting increased tone in finger flexion. The size is perfect for positioning the hand in slight finger flexion. The glass is rigid and keeps the fingers in the proper position.
Guiding can be unilateral or bilateral. Guiding is most commonly done with the involved hand, but there may be times during the activity when you will be guiding both hands. If your patient has bilateral weakness or if your patient has motor-planning problems, you may need to guide both hands.
At the end of the task, wiping off the table is a perfect example of bilateral use of the upper extremities. Placethe involved hand on the cloth or sponge and the non-involved hand over the weak hand. This method ofbilateral activity encourages trunk rotation and weight shift toward both sides. It is simple and easy to do. It isnot contrived but realistic and appropriate for patients to clean up their own spills. Never spill something on the table just to have the patient do this bilateral task!
This is a good activity for lower-level patients. It is simple, inexpensive, and can be accomplished within 30minutes in any setting: acute care, rehabilitation, skilled nursing, or home health. You don’t need expensive equipment or even a kitchen. For higher functioning patients, you could increase the complexity while workingin standing and even include ambulation while gathering the supplies needed. Making orange juice with your patient is purposeful and gives them a sense of accomplishment.
v
*A Safety Tip About Using Sharp KnivesA fairly sharp knife is necessary for this task, but safety is a concern. The safest method is to place the knife in the patient’s involved hand and then guide their hand to cut the fruit. This way you control the movements of the hand holding the knife. As your patient stabilizes the object with their other hand, place your other hand over theirs for additional safety.

Teaching Independence: A Therapeutic Approach to Stroke Rehabilitation • University Edition for Students 23
Copyright © 2000-2015 International Clinical Educators, Inc. Improving Function & Awareness
Summary of Benefits of Weight bearing, Guiding, and BilateralIncorporating the nonfunctional upper extremity in weight bearing or as a stabilizer
• Facilitates weight bearing over the involved side.• Encourages use of the involved side.• Improves awareness.
Guiding the involved upper extremity• Promotes normal sensory information.• Facilitates normal patterns of movement.• Encourages compensation for visual-field cut.
Bilateral use of both upper extremities• Allows the patient to incorporate the involved side without assistance from the therapist.• Promotes symmetry.• Facilitates dynamic trunk control.
Functional Treatment Ideas in StandingStanding with your patients during functional activities is often more effective than standing in the therapy gym “just for practice”. Patients involved in a task often initiate more trunk control, have greater weight shift toward the involved side, and exhibit improved endurance.
When standing your patient, provide a solid surface in front of them. This can be a heavy, solid table, a bathroom sink, or a kitchen counter. Avoid unstable surfaces such as a bedside table.
Stand slightly behind your patient, on their involved side. Position yourself close to your patient so that your trunk and their hip make contact. Place your hands on each side of their pelvis, not their waist, for better control. Place their wheelchair (or chair) behind them in case they need to sit down quickly.
During the activity, incorporate the involved upper extremity and hand in the three ways previously mentioned:weight bearing, guiding, and bilateral. Begin activating dynamic trunk control. Have your patient reach for objects from different height surfaces to encourage trunk elongation and/or lateral trunk flexion.
Be sensitive to your patient’s response to standing. Observe breathing patterns, skin color, and temperaturefor signs of fatigue. Ask your patient if they need to sit down before it becomes urgent.

24 Teaching Independence: A Therapeutic Approach to Stroke Rehabilitation • University Edition for Students
Improving Function & Awareness Copyright © 2000-2015 International Clinical Educators, Inc.
Standing with Fearful Patients During FunctionPatients may become very fearful during standing. Providing a secure environment is the most effective way to help decrease this fear. A patient once told me, “Standing in the middle of a room feels like standing on the edge of a cliff!”
Full contact along solid, stable surfaces is extremely effective in decreasing fear in a stroke survivor. Also, finding an activity that shifts their focus away from standing and onto the task at hand is also very effective. Once the patient has become less fearful, slowly begin to shift their weight toward the weak side and onto the involved lower extremity.
I have found that patients will increase their weight bearing over the involved side if they initiate the movement and I don’t pull them toward that side.
Remember: Provide a wide base of support. A narrow base of support requires more dynamic trunk control.
If your patient is functioning at a low level or fearful, begin with a broad base of support. Pay close attention to the placement of their feet, hands and trunk. Position their feet approximately shoulder width apart. Provide contact with a solid surface in front of your patient and position both of their hands on the table surface. Your patient will feel more secure as they experience the stability of the environment. With your hands provide additional support as needed.
As your patient improves, begin to narrow their base of support. For example, allow one hand to remain inweight bearing and free the other hand to begin the task. Or, to encourage even greater dynamic trunk control,do an activity that requires bilateral use of the upper extremities, narrowing their base of support.

Teaching Independence: A Therapeutic Approach to Stroke Rehabilitation • University Edition for Students 25
Copyright © 2000-2015 International Clinical Educators, Inc. Improving Function & Awareness
Home Exercise ProgramPatients should be instructed in a home exercise program before leaving your facility. Instruct your patients todo this program at least once a day. Since it is easiest to do at a table, your patients could routinely do this program as they wait for a meal. The program takes only 10 or 15 minutes.
The exercises are done in sitting, but some can be modified to be done in supine.
• Start with a good base of support, feet flat on the floor and trunk forward (out of a posterior pelvic tilt) with arms resting on the table.
• Work proximal to distal, beginning with the trunk and shoulders before working with the wrist and fingers.• Do the exercises in the same sequence, 10 repetitions each. This makes it easier for patients to
remember.
The following exercises should never be painful. A patient should stop if any discomfort is noted. In rare cases pain may signify a malalignment of structures and impingement could occur.
Stretching Forward with Scapular ProtractionHave your patient clasp their hands together and slide them forward on the table surface. This encourages the patient to come forward out of a posterior pelvic tilt and also encourages scapular protraction. Repeat 10 times.
Scapular Protraction with Weight bearingWith the shoulder in full protraction, have the patient roll over onto the shoulder. This encourages weight bearing over the involved side, facilitation of dynamic trunk control, and trunk elongation. Repeat 10 times.
Shoulder Flexion in SittingWith clasped hands, have your patient bring their arms up overhead. Instruct them to go only to the point of discomfort or to the point they feel resistance, and no further. If they follow these guidelines, this exercise will be safe. Never force range or move beyond the point of pain. Repeat 10 times.
Shoulder Flexion in SupineIf your patient has a heavy arm, has difficulty bringing it overhead, or has poor scapular gliding, have them do this exercise in supine.
v

26 Teaching Independence: A Therapeutic Approach to Stroke Rehabilitation • University Edition for Students
Improving Function & Awareness Copyright © 2000-2015 International Clinical Educators, Inc.
Forearm Supination and PronationHave your patient sit with forearms on the table. Ask them to keep their elbows on the table and bring their hands palm side up and palm side down. This will promote forearm supination and pronation. If their elbows come off of the table, they may be substituting with trunk movements or internal and external rotation at the shoulder. Repeat 10 times.
Wrist Flexion and ExtensionWith hands clasped and elbows on the table, flex the elbows and ask the patient to bring the involved wrist into extension. It is okay for the non-involved arm to come off of the table, if the patient has tightness at the wrist. Repeat 10 times.
Finger ExtensionAt the end of the program, have the patient stretch one more time all the way forward on the table. Slowly release the strong hand from the involved hand. Have the patient lay their weak hand as flat and relaxed as possible on the table. Only once is necessary.
Notes_______________________________________________________________________________________
_______________________________________________________________________________________
_______________________________________________________________________________________
_______________________________________________________________________________________
_______________________________________________________________________________________
�2 Pause and Practice with a PartnerPractice each of the above exercises with a partner. Help your partner with corrections and/or modifications as necessary.

Teaching Independence: A Therapeutic Approach to Stroke Rehabilitation • University Edition for Students 27
Copyright © 2000-2015 International Clinical Educators, Inc. Improving Function & Awareness
Home Exercise Program, Group TreatmentI like to teach the home exercise program in a group, rather than take time from my individual treatmentsessions. Your group could meet on a daily basis or several times a week, depending on your work setting.
• Sit around a table large enough that your patients can really reach and stretch. Sometimes I need to put two tables together.
• Begin the home exercise program (on previous page).• It helps when the group members interact with each other.
Giving each other a morning greeting can encourage them to turn their heads toward the weak side, which is great for those patients who have neglect.
• Be available to go around and help. I never just sit in my chair to lead the group.
• I often ask the patients to take turns leading the program. That way I know that they have remembered each exercise in the correct order.
v

28 Teaching Independence: A Therapeutic Approach to Stroke Rehabilitation • University Edition for Students
Improving Function & Awareness Copyright © 2000-2015 International Clinical Educators, Inc.

Copyright © 2000-2015 International Clinical Educators, Inc. Preventing Shoulder Pain
29
prevenTing shoulder pain
Learning Objectives• List two possible causes of shoulder pain in hemiplegia.• Name the three planes of motion of scapular movement.• List four precautions that therapists should consider while moving the hemiplegic shoulder.• Identify three handling methods that prepare the hemiplegic shoulder for range of motion.
Introduction to Preventing Shoulder PainMost painful shoulders can be prevented if those working with the patient are better informed and better trained. Every person working with the patient (including therapists, nurses, family members and caregivers) must know how to protect the shoulder from injury.
Shoulder pain interferes with the patient’s entire rehabilitation program. A patient with a painful shoulder may have difficulty sleeping, require pain medication, refuse to get out of bed or get dressed. The patient’s ability to ambulate can also be affected by a painful shoulder.
The focus of this program is how to prevent pain, not how to evaluate, diagnose, or treat painful conditions. Before attempting the following treatment methods, you should have a good understanding of the anatomy, physiology, and biomechanics of the shoulder complex.
Therapeutic Benefits of Preventing Shoulder PainPatients who are managed correctly can avoid many of the painful syndromes that frequenly occur following a stroke. It is easier to prevent pain rather than treat it once it has begun. Trauma that occurs in a moment of mishandling can take weeks or even months to heal.
The methods outlined in this program will not only help you prevent painful shoulders, they will also help your patient progress more quickly in the rehabilitation program.
If you are working with patients who are longer term post-stroke, they can still benefit from these guidelines.However, if orthopedic limitations have already begun, you may need to make modifications. Work fromproximal to distal when making modifications.
For More InformationMany of the treatment methods outlined in Preventing Shoulder Pain have been described in detail in other programs in this series. Wheelchair Transfers, Standing Safely, and Bed Positioning and Mobility all give detailed step-by-step instructions which complement this program. Please view the appropriate programs for more detailed information.

30 Teaching Independence: A Therapeutic Approach to Stroke Rehabilitation • University Edition Student Workbook
Preventing Shoulder Pain Copyright © 2000-2015 International Clinical Educators, Inc.
Proper Handling of the Hemiplegic Shoulder: Evaluation & ObservationThe more specific and in-depth your observations are, the better your evaluation will be. Good observations provide the foundation for a good assessment.
Position your patient in sitting with their feet flat on the floor. Proper alignment of the trunk and shoulder complex is dependent on the proper position of the pelvis. Check the position of the pelvis. Make sure that your patient is not in a posterior pelvic tilt.
Next, observe your patient from the front and the back.Your observations will be more accurate if you can see the patient’s skin and shoulder structures. Do you notice anything asymmetrical? For example, measure the distance from midline (vertebral column) to the medial border of both scapulae. Compare the distance of the involved side with the non-involved side. How does the scapula rest on the thorasic wall? Note any asymmetry. Note any retraction or downward rotation.
Before attempting to move your patient’s arm, give them permission to complain of any pain or discomfort. I usually say, “If anything hurts or is uncomfortable, let me know”. Explain to your patient that a sharp pain may indicate a problem of alignment or impingement, and it is important for them to tell you. It is critical to maintain proper shoulder range of motion. Remember: Protecting the shoulder does not mean immobilizing it!
The combination of muscle weakness and increased tone causes imbalance and poor alignment of theshoulder structures, putting them at risk for injury. Our handling methods combine ROM techniques with thosetechniques used to decrease abnormally high tone. Your hands should be firm but never forceful. The following techniques should never be painful for your patient.
Preparing the Shoulder for MovementThe scapula has three planes of motion. Most functional movements are a combination of the following three planes of motion:
• elevation and depression• protraction and retraction• upward rotation and downward rotation
Beginning with scapular elevation is recommended because it is safe, does not cause impingement, and gives information about the amount of scapular excursion. Be sure to check: Is there any resistance? A shoulder that has been immobilized may feel tight and, if there is an increase in tone, you may feel resistance against movement. In contrast, a flaccid or low tone arm will feel heavy, but the scapula will glide easily.
Once the scapula is gliding in elevation, bring the scapula forward into protraction. Only when you are able to get scapular excursion in elevation and protraction will you begin upward rotation of the scapula. The following guidelines provide a step-by-step approach to scapular mobilization.
v

Teaching Independence: A Therapeutic Approach to Stroke Rehabilitation • University Edition Student Workbook 31
Copyright © 2000-2015 International Clinical Educators, Inc. Preventing Shoulder Pain
Scapular Mobilization: Elevation
Starting PositionBefore beginning scapular mobilization, position the patient with feet flat on the floor and pelvis in a neutral position, out of a posterior pelvic tilt.
Handling1. Cup your hand and place it over the head of the humerus.
Don’t apply pressure on the head of the humerus—apply pressure with the heel of your hand on the pectoralis, medial to the humeral head.
2. Place the other hand along the medial and inferior border of the scapula. Use the heel of your hand, not your thumb, to cradle the inferior border of the scapula.
3. Bring your elbows down to your side. You’ll have more strength and better alignment of your wrists in a neutral position.
4. Apply pressure through the heels of your hands and bring the entire shoulder girdle into elevation. You’ll be surprised at how much effort it takes to bring the entire shoulder into scapular elevation.
5. Elevate the scapula to end range. Hold for a few seconds and allow it to return to a resting position. It may feel heavy or somewhat tight. With repetition, this movement will get easier.
VariationsFor patients with poor trunk control or poor sitting balance, you can mobilize the scapula while the patient is in supine or in sidelying on the non-involved side. The sidelying position can also be helpful for a patient who has a very heavy arm or poor trunk control. (See Scapular Mobilization in Supine.)
Common MistakesThe most common mistake therapists make in scapular elevation is that they don’t move the scapula to end range. They are afraid they’ll hurt the patient. But for the patient to benefit, you really need to take the scapula to end range. Practice on your partner first to see just how much scapular excursion is normal.
v
�3 Pause and Practice with a PartnerIt will be helpful to wear a tank top or bathing suit to really see the structures of the shoulder during practice.

32 Teaching Independence: A Therapeutic Approach to Stroke Rehabilitation • University Edition Student Workbook
Preventing Shoulder Pain Copyright © 2000-2015 International Clinical Educators, Inc.
Scapular Mobilization: Protraction
Starting PositionThe patient should be in a good sitting position with feet flat on the floor and pelvis in a neutral position, (not in a posterior pelvic tilt). Evaluate scapular excursion in elevation before proceeding with protraction of thescapula.
Handling1. Stand in front of your patient.
2. Gently take the involved arm and bring it into forward flexion of no more than 90°.
3. Support the arm at the elbow and tuck it along your side. This helps to keep it in neutral and doesn’t allow it to fall into internal rotation.
4. With your other hand, reach along the scapula and find the medial border. With a flat open hand press along the medial border and glide the scapula forward into protraction. (Don’t hook your fingers around the scapula.)
5. Maintain this position for a second or two and then return to the starting position.
6. As the scapula returns to its resting position, allow it to follow the natural curvature of the rib cage.
7. With repetition, the scapula will begin to glide forward. Once you’ve achieved protraction, you may begin upward rotation.
Common Mistakes• Don’t curl your fingers around the medial border of the scapula. This can stimulate the rhomboids and
increase scapular retraction.• The hand supporting under the elbow should not pull the arm forward. It only cradles and supports the
weight of the arm. The hand on the scapula does all of the work.• Don’t bring the arm into abduction while attempting to see the scapula. Get used to feeling for the border
and not depending on visual cues.• Although it is normal for the trunk to come slightly forward as the arm is brought forward into protraction,
sometimes the patient substitutes trunk flexion for the scapular protraction. When this happens, the arm comes forward only because the trunk is coming forward and the scapula is not gliding at all (or minimally). If this is the case, you can try cueing the patient to maintain a more erect posture, or you might try having the patient work in supine or sidelying instead.
�4 Pause and Practice with a Partner
v

Teaching Independence: A Therapeutic Approach to Stroke Rehabilitation • University Edition Student Workbook 33
Copyright © 2000-2015 International Clinical Educators, Inc. Preventing Shoulder Pain
Scapular Mobilization: Upward RotationOnce the therapist has evaluated excursion of the scapula in elevation and protraction, the shoulder is now ready for the final plane of motion: upward rotation. You do not need to keep your hand on the scapula during upward rotation. As the humerus moves over 90° of shoulder flexion, the scapula will follow. If the scapula does not glide you will begin to feel resistance in shoulder flexion. This is why it is important to remember: always move to the point of any resistance or discomfort and no further. Watch the patient’s facial expression for any signs of pain or discomfort and if you notice any, stop immediately.
Starting PositionThe patient should be in a good sitting position with feet flat on the floor and pelvis in a neutral position, out ofa posterior pelvic tilt. Evaluate scapular excursion and protraction before proceeding with upward rotation ofthe scapula.
Handling1. While the scapula is forward in protraction, slide one hand from the patient’s scapula to the elbow and
hook onto the epicondyles. This will keep you from grasping and stimulating the biceps.
2. Slide the other hand from the elbow to the hand (as if to shake hands).
3. Put your middle finger along the base of the metacarpophalangeal (MCP) joints, your index finger along the thenar eminence, and the other fingers along the patient’s fingers.
4. Keeping the arm in forward protraction, give a slight amount of external rotation and gently bring the arm in forward flexion.
5. Remember go only to the point of resistance or any discomfort.
6. Carefully watch the patient’s facial expression for any signs of discomfort.
Factors to ConsiderIf your patient does not have full ROM in scapular excursion, check their other shoulder. The non-affected sidemight also have loss of range which is unrelated to the stroke.
Factors which may contribute to loss of range.
• Increased tone of muscles acting on the scapula.• Soft-tissue tightness.• Loss of scapulohumeral rhythm (2:1).• Loss of range between humerus and scapula (the scapula glides fine but the soft-tissue tightness is
between the humerus and scapula).
TipsIf you are short and your patient is tall, it may be difficult to bring the arm into full range. You can change yourhand positions or you may want to position your patient in supine.
v

34 Teaching Independence: A Therapeutic Approach to Stroke Rehabilitation • University Edition Student Workbook
Preventing Shoulder Pain Copyright © 2000-2015 International Clinical Educators, Inc.
Notes_______________________________________________________________________________________
_______________________________________________________________________________________
_______________________________________________________________________________________
_______________________________________________________________________________________
_______________________________________________________________________________________
_______________________________________________________________________________________
_______________________________________________________________________________________
_______________________________________________________________________________________
_______________________________________________________________________________________
_______________________________________________________________________________________
_______________________________________________________________________________________
_______________________________________________________________________________________
_______________________________________________________________________________________
_______________________________________________________________________________________
_______________________________________________________________________________________
_______________________________________________________________________________________
_______________________________________________________________________________________
_______________________________________________________________________________________
_______________________________________________________________________________________
_______________________________________________________________________________________
_______________________________________________________________________________________
_______________________________________________________________________________________
_______________________________________________________________________________________
_______________________________________________________________________________________
�4 Pause and Practice with a Partner

Teaching Independence: A Therapeutic Approach to Stroke Rehabilitation • University Edition Student Workbook 35
Copyright © 2000-2015 International Clinical Educators, Inc. Preventing Shoulder Pain
Scapular Mobilization in SupineIt may be necessary to work on scapular mobilization with the patient in a supine position when there is poor sitting balance or a heavy arm. When working in supine, follow the same progression as previously described.
• Begin with scapular elevation and depression.• Follow with scapular protraction, below 90° of flexion.• And finally, if the scapula is gliding and the shoulder is pain
free, mobilize the scapula in upward rotation.Go only to the point where you feel any resistance or the patient experiences discomfort. No further!
Tips• Remember to cradle the arm to support the weight. Your hand along their scapula does all of the work.
Your hand supporting the arm does not pull!• Don’t forget to externally rotate the upper arm before exceeding 90° of shoulder flexion.• Supine is a good position for shoulder flexion in a home exercise position. Lying in supine will not restrict
movement of the scapula. The supine position is often easier for patients with a heavy arm or patients with a history of shoulder pain.
• Have your patient clasp their hands together. This prevents internal rotation of the shoulder, keeping the humerus in a neutral position. It also helps your patients learn to take care of their arm.
v

36 Teaching Independence: A Therapeutic Approach to Stroke Rehabilitation • University Edition Student Workbook
Preventing Shoulder Pain Copyright © 2000-2015 International Clinical Educators, Inc.
Therapeutic Method for Treating Soft-Tissue TightnessIf your patient has tightness around the shoulder, you may want to work on slow stretching before scapularmobilization. Remember, always move to the point of any resistance or discomfort and no further. Watch thepatient’s facial expression for any signs of pain or discomfort and if you notice any, stop immediately.
Starting PositionBegin with the patient position in supine, on the mat table or in bed.
Handling1. Gently bring the hips and knees into flexion and leave the
arm down to the side.
2. Gently guide both knees from one side to the next, giving a slow and gentle stretch.
3. Next, carefully bring the arm into some shoulder abduction. Remember, work only within a pain-free range.
4. With the arm resting supported on the mat in abduction, slowly and gently bring the knees over to the side again. This is a great way to work on preventing tightness, too.
5. If you want to maximize the stretch through the pectoralis, bring both arms into horizontal abduction!
TipsSupine is a nice position for a self ROM program, especially for someone with a heavy arm or poor trunkcontrol. You may want to have your patient do their exercises (in supine) after this preparation.
Notes_______________________________________________________________________________________
_______________________________________________________________________________________
_______________________________________________________________________________________
_______________________________________________________________________________________
_______________________________________________________________________________________
_______________________________________________________________________________________
_______________________________________________________________________________________
v
�6 Pause and Practice with a Partner

Teaching Independence: A Therapeutic Approach to Stroke Rehabilitation • University Edition Student Workbook 37
Copyright © 2000-2015 International Clinical Educators, Inc. Preventing Shoulder Pain
Facilitating Muscles Acting on the ScapulaFunctional use of the upper extremity requires both proximal control of the scapula and distal function of the forearm and hand. The following therapeutic method encourages facilitation of muscles required for scapular stability by moving the body on the arm, instead of moving the arm on the body. This method can be highly effective, although you may not be able to see or feel the muscles acting on the scapula during the activity, in facilitating muscles which help to stabilize the scapula.
Starting PositionBegin with the patient positioned in sidelying on the involved side, on the mat table or in their bed. The involved arm should be fully supported.
Handling1. Have your patient reach slowly forward with their
non-involved hand. As the patient reaches forward, stabilization of the involved side is required, activating muscles along the weight bearing scapula.
2. Now, have your patient reach slowly back, rotating their upper trunk toward a more supine position. The slower the movement, the more control of the upper trunk is required. Do not allow your patient to ‘flop’ forwards or backwards.
3. Continue for several repetitions.
TipsThis is great for any of your patients with a history of shoulder pain. They do really well with this techniquebecause the involved arm is resting on the mat and the scapula is supported. The patient is less fearful ofpain.
Notes_______________________________________________________________________________________
_______________________________________________________________________________________
_______________________________________________________________________________________
_______________________________________________________________________________________
_______________________________________________________________________________________
_______________________________________________________________________________________
_______________________________________________________________________________________
�7 Pause and Practice with a Partner(This Practice Session is not demonstrated in the video.)
v

38 Teaching Independence: A Therapeutic Approach to Stroke Rehabilitation • University Edition Student Workbook
Preventing Shoulder Pain Copyright © 2000-2015 International Clinical Educators, Inc.
Protecting the Hemiplegic ShoulderThe following examples illustrate how to protect the hemiplegic shoulder in order to prevent shoulder pain:
Proper bed positioningDuring bedrest, the most therapeutic position is sidelying on the hemiplegic side. Make sure that your patient is lying on the scapula, and not on the head of the humerus. You’ll know the scapula is fully protracted if you feel along the thoracic wall. If it feels smooth, it’s fine. If it is “winged” and you feel the medial border of the scapula, it is not far enough forward. For more information, see the chapter on Bed Positioning & Mobility.
Proper positioning in the wheelchairGood seating allows for better alignment of the entire shoulder girdle and reduces the possibility of impingement. Give your patient a good base of support with a wheelchair seat insert. Try to have your patient sit straight in the chair, using equipment only as needed. Patients who are seated in a posterior pelvic tilt or leaning against the arm of the wheelchair are more at risk for impingement.
Proper positioning of arm on a lap trayNot all patients need to have their arm supported while in the wheelchair. However, problems of edema or neglect may require the upper extremity to be supported. I prefer a lap tray rather than an arm trough to support the involved arm. A lap tray allows the arm and hand to remain in the visual field where the patient is more likely to incorporate it into activities. Impingement at the shoulder is also less likely with the use of a lap tray rather than an arm trough.
Proper repositioning in the wheelchairWhen patients slide out of their wheelchair and need to be repositioned, help them to lean forward and assist through the scapula, trunk, and knees. Do not pull or lift under the arms. For more information, see the chapter on Wheelchair Transfers.
Proper transfersTransfers are done in a similar way, whether maximum assistance or moderate assistance is needed. I never pull on the arm. More patients develop shoulder pain during improper transfer methods than at any other time. For more information, see the chapter on Wheelchair Transfers.
Proper sit to standWhen patients are taught to stand by leaning forward, not only is their shoulder protected but they are also learning more normal patterns of movement at the same time. For more information, see Standing Safely.
v

Teaching Independence: A Therapeutic Approach to Stroke Rehabilitation • University Edition Student Workbook 39
Copyright © 2000-2015 International Clinical Educators, Inc. Preventing Shoulder Pain
What to AvoidAll members of the team, including family members and caregivers, should avoid the following:
• Never pull on the hemiplegic arm to help the patient change position, transfer, or stand up.• Avoid placing your hands under the patient’s arms when repositioning in the wheelchair.• Avoid using slings to support a pain-free upper extremity. It not only immobilizes them but puts the
shoulder in a position of internal rotation and adduction, a position that should be avoided.• Avoid arm troughs. A weak arm strapped to an arm trough is at risk for impingement and traction
injury. Also, if your patient were to slide down in the wheelchair while the arm was positioned on the arm trough, an impingement could occur through malalignment at the shoulder.
• Don’t force painful ROM. Range only to the point of discomfort or resistance.• Don’t raise the arm in flexion or abduction without external rotation of the humerus. Without
external rotation of the humerus, the greater tuberosity will not be able to clear the acromion.• Do not raise the arm in flexion or abduction (past 90°) without the scapula gliding. The
scapulohumeral rhythm is approximately a 2:1 ratio. That means that for every 2 parts the humerus moves, the scapula moves 1 part, or 1/3 the distance. If the scapula does not glide, while the humerus is moved over 90˚ of shoulder flexion or abduction, impingement can occur.
• Never use reciprocal overhead pulleys with stroke patients. There is no way to monitor the gliding action of the scapula, resulting in pain and trauma to the shoulder.

40 Teaching Independence: A Therapeutic Approach to Stroke Rehabilitation • University Edition Student Workbook
Preventing Shoulder Pain Copyright © 2000-2015 International Clinical Educators, Inc.
SubluxationManaging subluxation of the glenohumeral joint is often a concern for physicians and therapists treatingpatients with hemiplegia. In preventing shoulder pain, it is important to remember: Subluxation does notcause pain. It’s what you do to a subluxed shoulder that causes pain! Improper handling of the involved arm can lead to traction injuries and impingement syndromes resulting from poor alignment of shoulder structures.
During my evaluation, I note any subluxation the patient may exhibit. During treatment, I follow the same guidelines whether my patient has subluxation or not. These guidelines include:
• establishing a good starting position• maintaining proper alignment of the trunk and shoulder
complex• preparing the shoulder for movement with proper scapular
mobilization• working within a pain-free range
Do not immobilize the shoulder: A pain-free shoulder should not be immobilized.
Do not use a sling on a pain-free shoulder: A sling does not correct subluxation. It immobilizes the shoulderand can lead to edema of the hand and limited range of motion.
v

Teaching Independence: A Therapeutic Approach to Stroke Rehabilitation • University Edition Student Workbook 41
Copyright © 2000-2015 International Clinical Educators, Inc. Preventing Shoulder Pain
Possible Causes of Shoulder Pain in HemiplegiaBefore treatment begins, check to see if there is any history of shoulder pain prior to the stroke. If your patient has a painful shoulder, be sure to refer your patient for appropriate medical care.
Impingement and immobility are two common causes of shoulder pain in hemiplegia. Impingement occurs when there is trauma to the joint. Improper handling or poor positioning are the most common causes of impingement of the shoulder. The more often someone is moved by an untrained person, the more opportunities there are for impingement to occur and pain to develop.
Impingement may occur during the acute (flaccid) phase, when the patient is less aware of the upper extremity. The patient may roll over their arm while in bed, trapping their arm in a poor position. Impingement is most common in stroke patients during the “mixed tone” phase of recovery. This phase is characterized by combinations of high tone and low tone. For example, it is common for our patients to have greater tone in the subscapularis and pectoralis (causing internal rotation and adduction) than in external rotation. This muscle imbalance contributes to the malalignment of the structures of the shoulder and puts them at greater risk of impingement.
Immobility is a second possible source of shoulder pain in hemiplegia. Sometimes therapists are afraid to provide ROM to patients who actually need it the most. Immobilizing the shoulder can result in soft-tissue tightness and loss of range of motion (ROM).
v

42 Teaching Independence: A Therapeutic Approach to Stroke Rehabilitation • University Edition Student Workbook
Preventing Shoulder Pain Copyright © 2000-2015 International Clinical Educators, Inc.

Copyright © 2000-2015 International Clinical Educators, Inc. Wheelchair Transfers
43
Wheelchair Transfers
Learning Objectives• List four components of movement normally required to transfer from one surface to another.• Identify five therapeutic principles required to safely transfer a stroke survivor using maximum
assistance.• Recognize components of movement necessary to transfer a patient onto a high surface.• Identify two methods for correctly repositioning a stroke survivor in their wheelchair.
Introduction to Therapeutic TransfersThere are many ways to train a stroke survivor to get in and out of a wheelchair. Some of us were taught to do “stand-pivot” transfers. Others were taught “low-bottom” transfers, and many of us were taught to “always transfer to the strong side”.
The truth is, not one transfer will work with every patient in every situation. During this program, I will providethe information necessary for safe and functional transfers. I will show you examples of patients duringdifferent stages of recovery and just how to modify your handling.
The following two transfers are the ones that I use most often. They best reflect those components of “normal” movement observed during movement from one surface to another.
Remember, safety is our number one goal. The transfer must be safe for both the patient and the persontransferring the patient. The following guidelines may need to be modified if your patient has additional medicalor orthopedic conditions. If, at any time, you feel unsure of your ability to transfer a patient, always stopand ask for help.
Therapeutic Benefits of Transfers Toward the Weak SideWhen teaching stroke patients to transfer toward the weak side utilizing the following methods, we are preparing the patient to achieve a higher level of function. Patients who are taught to move toward their weak side, put weight onto their weak leg, and come forward without pulling up or pushing off, are potentially less fearful, need less equipment, and eventually develop more normal patterns of movement.
In order to function in all settings (for example getting in and out of the bed, the car, and the bathtub) patientsneed to be able to transfer toward the weak side as well as the strong side. We will emphasize weaksidedtransfers in order to increase the patient’s awareness of and confidence in using their weak side. If a patient istaught to transfer only toward the strong side, the patient’s eventual level of independence will be diminished.Most therapists and nurses are trained to do “stand-and-pivot” transfers. There are times when such a transferwill be used. However, I like to encourage “low-bottom” transfers as well. They are based on “normal” and theyare safe, as they help to keep the patient’s center of gravity low.
44 Teaching Independence: A Therapeutic Approach to Stroke Rehabilitation • University Edition Student Workbook
Wheelchair Transfers Copyright © 2000-2015 International Clinical Educators, Inc.
Transfers to Similar Height Surfaces
Analyzing Normal Movement During TransfersBefore we begin, remember that our therapeutic methods are based upon normal patterns of movement. Tofully understand the therapeutic value of each technique, we will observe and analyze the normal components of movement necessary to transfer from one surface to another and reposition in the chair. The better you are at observation and the analysis of your observations (of both normal and abnormal movement), the better you will be at identifying and treating your patient’s key problem areas. Rather than say “normal,” perhaps it is better to say “typical movement patterns” or “common patterns of movement,” since there is a great variety of normal movement components in the general population. A variation on “normal” does not necessarily mean “abnormal”. In the following section, the underlying factors which can influence normal movement patterns arediscussed.
I have taught this transfer method literally hundreds of times over the past twenty years. Before I teach thetherapeutic method, I have the class observe the normal movement components necessary for the task, just as I do when I teach any facilitation method. I can ask someone to “roll,” “scoot,” or “stand up,” but the word “transfer” isn’t in our usual vocabulary. So when observing normal movement, instead of asking someone to “transfer”, I simply put two chairs next to each other and ask them to “move” from one chair to the next. I have observed over 100 people do this and it rarely varies.
• The person prepares for the transfer (moving from one chair to the other) by positioning the foot slightly toward the empty chair.
• Next, the person often reaches toward the empty chair, lightly resting their hand on the chair.• The person comes forward, shifting their weight from their hips to their feet, keeping their center of
gravity low.• In somewhat of a “squat” position, the person moves from one chair to the other by swinging their hips
from one seat to the next.• After changing chairs, the feet are slightly repositioned under the knees.
v

Teaching Independence: A Therapeutic Approach to Stroke Rehabilitation • University Edition Student Workbook 45
Copyright © 2000-2015 International Clinical Educators, Inc. Wheelchair Transfers
�8 Pause and Practice
Self ExperienceIt might be interesting for you to pause and observe your own personal patterns of movement, as well as others. There are several factors which influence just how each of us moves, whether we’ve had a stroke or not:
• height and build• joint flexibility• strength• previous injuries or orthopedic limitations• environmental factors (such as the height of the chair, the distance between
the two chairs, and whether or not the chair has armrests)
Notice• Your own foot placement, what feels comfortable.• How far forward you lean as your hips clear the chair.
Try• Placing your feet an inch or two forward from your “normal” foot placement.
What do you notice?• Placing the chairs a foot or more apart.• How does this affect your “transfer”?
Observe and Analyze OthersNote variations in movements and sequences of movements.

46 Teaching Independence: A Therapeutic Approach to Stroke Rehabilitation • University Edition Student Workbook
Wheelchair Transfers Copyright © 2000-2015 International Clinical Educators, Inc.
Wheelchair Transfer with Maximum AssistanceThis is one way to transfer a patient between surfaces of equal height with maximum assistance.
The following guidelines may need to be modified if your patient has already developed tightness,contractures, or if medical conditions interfere.
Starting PositionThe patient is seated in a wheelchair. Position the chair close to the bed, swing the footrest out of the way, and remove armrests if possible.
Handling1. Stand in front of the patient.
2. Remove the patient’s foot from the footrest and place both feet flat on the floor.
3. With your knees together, position yourself in front of the patient’s weak side.
4. Your feet should be staggered, one in front and one in back. This way you’ll be able to shift your weight from your front foot to your back foot as the patient shifts weight forward from their hips to their feet. Your foot in back should be toward the bed (from the side you are transferring toward).
5. The “V” space between your knees will be positioned on each side of the patella at the condyles. This correct position is extremely important and plays a key role in the method working successfully. Your point of contact should not be on the patella nor should it be up on along the femur. These are very common mistakes and should be avoided.
6. Help the patient bend down and forward (over the strong side) as far as possible. As you do this, support the upper trunk to decrease the fear of falling forward. I like to position the shoulders on the outside of my leg if possible. This allows me to get closer to the patient.
7. Reach over the patient’s back and place your hands securely under the trochanters of the hips. Do not grab onto their belt loops or the waistband of their pants. This can be dangerous as well as uncomfortable for the patient.
8. With your upper arm, hug the patient next to you, helping them feel more safe and secure.
9. Before moving the patient, flatten your back. This should not put a strain on your back if done correctly.
10. Do not lift the patient. Instead, rock their weight from their hips forward onto their feet. At the same time, rock your weight onto your back foot, keeping your back flat. This is done using leverage, not lifting!
11. Approximate the knees by giving input with your legs into their condyles, just on each side of their patella. The force of your input should help to bring their hips up and off the surface of the chair. The larger the patient, the more approximation you will need to give.
12. As their hips clear, pivot the patient to the bed. Do not attempt to pivot the patient until the hips have cleared the chair.
13. Lower the patient onto the bed.
v

Teaching Independence: A Therapeutic Approach to Stroke Rehabilitation • University Edition Student Workbook 47
Copyright © 2000-2015 International Clinical Educators, Inc. Wheelchair Transfers
VariationsThere may be many reasons to modify your transfers. Secondary complications such as orthopedic limitationsor medical conditions may not allow the patient to bend forward. Environmental factors (such as wheelchairarmrests that aren’t removable, discrepancy in surface heights, or too much distance between surfaces), mayrequire a stand-pivot transfer. Problem solve with each individual patient and determine the safest and mosttherapeutic transfer for each.
Common Mistakes• The patient’s hips don’t come off the chair. This is usually because there wasn’t enough force in
approximation at the knees or because the therapist tried to lift instead of shifting the weight forward onto the patient’s feet.
• The therapist tries to “lift” the patient with their arms and back. Your elbows should be almost “fixed” as you use your weight to bring them forward.
Notes_______________________________________________________________________________________
_______________________________________________________________________________________
_______________________________________________________________________________________
_______________________________________________________________________________________
_______________________________________________________________________________________
_______________________________________________________________________________________
_______________________________________________________________________________________
_______________________________________________________________________________________
_______________________________________________________________________________________
_______________________________________________________________________________________
_______________________________________________________________________________________
_______________________________________________________________________________________
_______________________________________________________________________________________
_______________________________________________________________________________________
�9 Pause and Practice with a PartnerPractice a maximum assist transfer with a partner. Help with corrections and/or modifications as necessary.

48 Teaching Independence: A Therapeutic Approach to Stroke Rehabilitation • University Edition Student Workbook
Wheelchair Transfers Copyright © 2000-2015 International Clinical Educators, Inc.
Transfer with Maximum Assistance of Two PersonsSome patients require the assistance of two persons to transfer between surfaces. This may be due to the patient’s size, to medical conditions that may interfere, or to tightness or contractures that may have developed. The following method is a very safe way to transfer a patient requiring the assistance of two persons. It is safe for the patient, prevents trauma to the shoulders and is safe for staff members, dramatically reducing back injuries.
The responsibility of the therapist in front is to shift (not lift!) the patient’s base of support from the chair to their feet. The responsibility of the person in back is to pivot the patient from the chair to the bed. Neither person is lifting the patient.
Starting PositionPatient is sitting in the wheelchair. One person is standing in front, toward the side the patient is transferring. The second person is standing behind the patient and next to the bed. Sometimes it is helpful to have one knee up on the bed. Be careful of your back and use good body mechanics.
Handling1. Stand in front of the patient.
2. Remove the patient’s foot from the footrest and place both feet flat on the floor.
3. With your knees together, position yourself in front of the patient’s weak side.
4. Your feet should be staggered, one in front and one in back. This way you’ll be able to shift your weight from your front foot to your back foot as the patient shifts weight from the hips to the feet. Your back foot should be on the weak side, toward the bed.
5. The “V” space between your knees will be positioned on each side of the patella at the condyles. This correct position is extremely important and plays a key role in the method working. Your point of contact should not be on the patella nor should it be up on along the femur. These are very common mistakes and should be avoided.
6. Help the patient to lean forward.
7. Reach over the patient’s back and place your hands securely along the scapula and onto the rib cage Do not grab under the patients arms, as this can cause injury to the patient’s shoulders.
8. Do not lift the patient into standing. Instead, rock their weight forward from their hips onto their feet. At the same time, rock your weight onto your back foot.
9. Approximate the knees by giving input with your legs into their condyles, just on each side of their patella. The force of your input should help bring their hips up and off the surface of the chair. The larger the patient, the more approximation you will need to give and the further your hands will come around the rib cage.
10. As their hips clear, the second therapist will now prepare to help pivot the patient’s hips to the bed.
11. Position yourself to protect your back. You’ll be behind the patient and next to the bed. Sometimes it is helpful to have one knee up on the bed.
12. Place your hands firmly on the pelvis.
13. Pivot the patient’s hips onto the bed. �10 Pause and Practice with Two Partners
v

Teaching Independence: A Therapeutic Approach to Stroke Rehabilitation • University Edition Student Workbook 49
Copyright © 2000-2015 International Clinical Educators, Inc. Wheelchair Transfers
Transfers with Moderate AssistanceThe following guidelines may need to be modified depending on the height of the patient, the heights of the surfaces, if medical conditions interfere, or if the patient has already developed tightness or contractures.
Starting PositionPatient is sitting in a wheelchair. As in all transfers, position the chair close to the bed, swing the footrest out of the way, and remove armrests, if possible.
Handling1. Stand in front of the patient, weak side toward the bed.
2. Remove the weak foot from the footrest and place both feet flat on the floor.
3. Your feet should be staggered, one in front and one in back. This enables you to shift your weight from your front foot to your back foot as the patient shifts their weight from their hips to their feet. Position your back foot toward the weak side. As you transfer the patient you’ll be pivoting on this foot.
4. Ask the patient to either place their hands on their thighs or clasp their hands together. (This helps the patient remember the arm, stay more symmetrical, and it keeps them from grabbing onto everything in sight.)
5. Help the patient lean forward (not down) with trunk extension.
6. Reach over the patient’s back and place your hands securely along the scapula and onto the rib cage. Do not grab under the patient’s arms as this can cause injury to the patient’s shoulders.
7. Do not lift the patient into standing. Instead, rock their weight from their hips forward onto their feet. At the same time, rock your weight onto your back foot, keeping your elbows extended.
8. As their hips come off the surface of the chair, swing their hips toward the bed, facilitating through the upper trunk.
9. Use the verbal commands “come forward,” “turn,” and “sit down” to assist the patient. Using the common “one, two, three” command does not help the patient learn how far forward to come and when to pivot.
10. Lower the patient back onto the bed.
v

50 Teaching Independence: A Therapeutic Approach to Stroke Rehabilitation • University Edition Student Workbook
Wheelchair Transfers Copyright © 2000-2015 International Clinical Educators, Inc.
Tips• Don’t stand so close to your patient that you block their ability to come forward. Give them room. Also,
remember to help them forward by shifting your weight from your front foot to your back foot. Do not pull them forward using your biceps. This will take all of the stress off of your back.
• Also, slow down the transfer and teach the patient controlled movements. Break the transfer into three parts: “come forward” (and pause for half a second), “turn” (pause for half a second), and “sit down”. It is safer and the patient learns to move when the weight shift is correct. The bigger the patient, the stronger my grasp and the further forward the patient moves to unweight their hips.
Variations• There may be many reasons to modify your transfers. Secondary complications such as orthopedic
limitations may not allow the patient to bend forward.• Environmental factors may require a stand-pivot transfer; bathrooms are often too small or the sink
might be in the way. Wheelchair armrests that aren’t removable, discrepancies in surface heights, or distance between surfaces can also require a stand-pivot transfer.
• Problem solve with each individual patient and determine the safest and most therapeutic transfer for each.
Common Mistakes• Lifting the patient into standing, instead of shifting the weight forward over the feet.• Standing too close to the patient, not allowing enough room for them to shift their weight forward.• Pivoting the patient from one surface to the other before the hips have cleared the chair.• Hand placement under the arms instead of along the scapula and rib cage.• Pulling the patient forward using arm strength, instead of the shifting your weight from the front foot to
the back foot.
Notes_______________________________________________________________________________________
_______________________________________________________________________________________
_______________________________________________________________________________________
_______________________________________________________________________________________
_______________________________________________________________________________________
_______________________________________________________________________________________
_______________________________________________________________________________________
_______________________________________________________________________________________
�11 Pause and Practice with a Partner
Teaching Independence: A Therapeutic Approach to Stroke Rehabilitation • University Edition Student Workbook 51
Copyright © 2000-2015 International Clinical Educators, Inc. Wheelchair Transfers
Transferring On and Off a High Surface
Transfer: Analysis of Normal MovementThere are many ways to transfer onto a high surface. The normal components of movement for one method are as follows.
• Starting position is in front of the bed, weight equally distributed over both legs.• Weight is shifted from one leg to the other.• The “unweighted leg” and pelvis come onto the bed.• The weight is then transferred from the standing leg to the leg that is on the bed.• Only when the weight is fully shifted can the standing leg also come onto the bed. The upper extremity
helps in this weight shift.• The trunk rotates, and the weight shift from side to side makes it possible to get fully up onto the bed.
Notes_______________________________________________________________________________________
_______________________________________________________________________________________
_______________________________________________________________________________________
_______________________________________________________________________________________
_______________________________________________________________________________________
_______________________________________________________________________________________
_______________________________________________________________________________________
_______________________________________________________________________________________
�12 Pause and Practice
Self ExperienceThere are many ways to transfer onto a high surface. Some people bear weight on both arms and “hop” up onto the bed. But, if you don’t use both arms, it will be easier to see the importance of weight shift and trunk rotation. Environmental considerations play an important role. If the surface is too high, it will be impossible to get up onto the surface. If the bed is too low, it will not be necessary to use this approach. Note your own movement patterns relative to the surface height.
Observe and Analyze OthersNote variations in movements and sequences of movements.
v

52 Teaching Independence: A Therapeutic Approach to Stroke Rehabilitation • University Edition Student Workbook
Wheelchair Transfers Copyright © 2000-2015 International Clinical Educators, Inc.
vHigh-Surface Transfer: Moderate AssistanceHospital beds can make a low-bottom transfer impossible. If the bed is no more than four inches higher than the seat of the wheelchair, I can usually transfer my patient with one of the previously described methods. But if the bed is more than four inches higher, I’ll use the following approach:
Starting PositionHave the patient start in a standing position, in front of the bed.
Handling1. Stand perpendicular to your patient, on their weak side. As you
face your patient clamp their weak knee between your legs (using your adductors) to keep their knee from buckling. Clasp your hands around their strong hip, like a bear hug.
2. Shift their weight from their strong leg onto their weak leg. It is important to put weight onto the involved side first. This helps to control abnormal tone of the involved leg and allows the strong leg to move freely.
3. As they “unweight” their strong leg, help them bring that leg up and onto the bed.
4. Move directly in front of the patient, maintaining contact of the weak leg.
5. Place one hand behind the strong shoulder, encouraging the patient to shift and put weight onto the strong hand.
6. Place your other hand onto the pelvis on the involved side. Shift their weight fully onto their strong side and bring the weak leg up and onto the bed. Do not lift under their leg; this makes them flop backward onto the bed.
7. Next, shift weight over the involved side, allowing the patient to bring the non-involved hip further back onto the bed. Continue the weight shifts, side to side, until both hips are up onto the bed.
Transferring Off of a High Surface• When coming down from a high surface or a hospital bed, first
bring the patient onto the weak leg. Be very careful to have the foot well positioned and not in inversion or plantar flexion. Make sure that they are squarely onto their foot—don’t allow them to come onto their ankle.
• Also, position your leg in front of theirs to protect the knee and keep it from buckling. Once the involved foot is in a good position, shift their weight onto that foot and allow the strong side to come into weight bearing.
Common MistakesDo not lift under their involved leg to bring it up onto the bed. This makes them flop backward onto the bed.

Teaching Independence: A Therapeutic Approach to Stroke Rehabilitation • University Edition Student Workbook 53
Copyright © 2000-2015 International Clinical Educators, Inc. Wheelchair Transfers
Notes_______________________________________________________________________________________
_______________________________________________________________________________________
_______________________________________________________________________________________
_______________________________________________________________________________________
_______________________________________________________________________________________
_______________________________________________________________________________________
_______________________________________________________________________________________
_______________________________________________________________________________________
_______________________________________________________________________________________
_______________________________________________________________________________________
_______________________________________________________________________________________
_______________________________________________________________________________________
_______________________________________________________________________________________
_______________________________________________________________________________________
_______________________________________________________________________________________
_______________________________________________________________________________________
_______________________________________________________________________________________
_______________________________________________________________________________________
_______________________________________________________________________________________
_______________________________________________________________________________________
_______________________________________________________________________________________
_______________________________________________________________________________________
_______________________________________________________________________________________
�13 Pause and Practice with a PartnerPractice each of the above exercises with a partner. Help with corrections and/or modifications as necessary.

54 Teaching Independence: A Therapeutic Approach to Stroke Rehabilitation • University Edition Student Workbook
Wheelchair Transfers Copyright © 2000-2015 International Clinical Educators, Inc.
Repositioning in the WheelchairOften patients slide out of their wheelchair and need repositioning. Most families and staff are taught toreposition someone in the chair by coming around behind them and ”lifting” them back into the wheelchair.This is not only dangerous for your back, but it can cause injury to the patient’s shoulder and it teaches thepatients nothing about normal patterns of movement.
Analyzing Normal Movement in RepositioningMost people reposition themselves in the chair in one of two ways, both are completely normal.
Method 11. The feet are repositioned behind the knees.
2. The person leans forward, far enough to shift their base of support from their hips to their feet (until their hips clear the chair), and no further.
3. After their hips clear the chair and while still leaning forward, the knees extend and the hips come back into the chair.
Method 21. The feet are positioned on the floor under or behind the knees.
2. The person leans slightly forward, in order to move away from the back of the chair.
3. The person shifts to one side, putting the majority of weight onto one hip and unloading the opposite hip.
4. The hip that has been “unweighted” comes back.
5. The opposite hip now becomes “unweighted” and comes back.
Remember that in both methods, the hip (or hips) are unweighted before repositioning in the chair.
v
�14 Pause and Practice with a Partner
Self ExperienceNote your own sequences of movements.
Observe and Analyze OthersNote variations in movements and sequences of movements.

Teaching Independence: A Therapeutic Approach to Stroke Rehabilitation • University Edition Student Workbook 55
Copyright © 2000-2015 International Clinical Educators, Inc. Wheelchair Transfers
Repositioning in the Wheelchair with Moderate AssistanceThe method used to reposition patients in a wheel chair is very similar to wheelchair transfers requiring moderate assistance. The primary difference is that once the patient’s hips are cleared, they go back into their wheelchair instead of pivoting to another surface.
Starting PositionThe patient is poorly positioned in the wheelchair, hips toward the edge of the seat.
HandlingThis method will help your patient relearn more normal patterns of movement while assisting them to reposition in the wheelchair.
1. Remove the foot from the footrest and place both feet flat on the floor.
2. Stand in front of the patient.
3. With your knees together, position yourself in front of the patient’s weak side.
4. Your feet should be staggered, one in front and one in back. This way you’ll be able to shift your weight from your front foot to your back foot as the patient shifts weight from the hips to the feet.
5. The “V” space between your knees will be positioned on each side of the patella at the condyles. This correct position is extremely important and plays a key role in the success of this method. Your point of contact should not be on the patella nor should it be up on along the femur. These are very common mistakes and should be avoided.
6. Help the patient lean forward, not down, with an extended trunk.
7. Reach over the patient’s back and place your hands securely along the scapula and onto the rib cage. Do not grab under the patient’s arms, as this can cause injury to the patient’s shoulders.
8. Do not lift the patient into standing. Instead, rock their weight from their hips forward onto their feet. At the same time, rock your weight onto your back foot, keeping your elbows extended.
9. Approximate the knees by giving input with your legs into their condyles, just on each side of their patella. The force of your input should help bring their hips up and off the surface of the chair. The larger the patient, the more approximation you will need to give and the further your hands will come around the rib cage.
10. As their hips clear, push their hips back into the wheelchair with your legs on their condyles (not with your hands).
11. Lower the patient back into the chair. You may need to do this more than once if your patient isn’t all the way back into the wheelchair.
v

56 Teaching Independence: A Therapeutic Approach to Stroke Rehabilitation • University Edition Student Workbook
Wheelchair Transfers Copyright © 2000-2015 International Clinical Educators, Inc.
Tips• Don’t stand so close to your patient that you block their ability to come forward. Give them room. The
taller the patient, the more room they will need to come forward.• Also, remember to help them forward by using your legs, not pulling them forward using your biceps.
This will take all of the stress off of your back.
VariationsAs your patient improves, you may need only to cue from the upper trunk, finding it unnecessary toapproximate the knees.
Notes_______________________________________________________________________________________
_______________________________________________________________________________________
_______________________________________________________________________________________
_______________________________________________________________________________________
_______________________________________________________________________________________
_______________________________________________________________________________________
_______________________________________________________________________________________
_______________________________________________________________________________________
_______________________________________________________________________________________
_______________________________________________________________________________________
_______________________________________________________________________________________
_______________________________________________________________________________________
_______________________________________________________________________________________
_______________________________________________________________________________________
_______________________________________________________________________________________
_______________________________________________________________________________________
_______________________________________________________________________________________
_______________________________________________________________________________________
�15 Pause and Practice with a Partner

Teaching Independence: A Therapeutic Approach to Stroke Rehabilitation • University Edition Student Workbook 57
Copyright © 2000-2015 International Clinical Educators, Inc. Wheelchair Transfers
Repositioning in the Wheelchair with Maximum AssistanceThe following guidelines may need to be modified if your patient has already developed tightness or contractures or if medical conditions interfere.
Starting PositionPatient is poorly positioned in the wheelchair.
Handling1. Stand in front of the patient.
2. Remove the foot from the footrest and place both feet flat on the floor.
3. With your knees together, position yourself in front of the patient’s weak side.
4. Your feet should be staggered, one in front and one in back. This way you’ll be able to shift your weight from your front foot to your back foot as the patient shifts their weight from their hips to their feet.
5. The “V” space between your knees will be positioned on each side of the patella at the condyles. This correct position is extremely important and plays a key role in the method working. Your point of contact should not be on the patella nor should it be up on along the femur. These are very common mistakes and should be avoided.
6. Help the patient to bend down and forward (over the strong side) as far as possible. As you do this, support their upper trunk so that they don’t feel like they are falling forward. I like to position their shoulders on the outside of my leg, if possible. This allows me to get closer to the patient.
7. Reach over the patient’s back and place your hands securely under the trochanters of the hips. Do not grab onto their belt loops or the waistband of their pants. This can be dangerous as well as uncomfortable for the patient.
8. “Hug” the patient next to you, helping them feel more safe and secure.
9. Before you move the patient, flatten your back. This should not put a strain on your back, if done correctly.
10. Do not lift the patient. Instead, rock their weight from their hips forward onto their feet. At the same time, rock your weight onto your back foot, keeping your back flat. This is done using leverage, not lifting!
11. Approximate the knees by giving input with your legs into their condyles, just on each side of their patella. The force of your input should help to bring their hips up and off the surface of the chair. The larger the patient, the more approximation you will need to give.
12. As their hips clear, push their hips back into the wheelchair with your legs, not your hands.
13. Lower the patient back into the chair. You may need to do this a couple of times if your patient isn’t all the way back into the wheelchair.
v

58 Teaching Independence: A Therapeutic Approach to Stroke Rehabilitation • University Edition Student Workbook
Wheelchair Transfers Copyright © 2000-2015 International Clinical Educators, Inc.
Common MistakesThe two most common mistakes made are as follows:
• The patient’s hips don’t come off the chair. This is usually because there wasn’t enough force in approximation at the knees or because the therapist tried to lift instead of shifting the weight forward onto the patient’s feet.
• The patient “plops” back into the chair and the therapist feels like they are “falling” forward over the patient. This is usually because the therapist uses their hands to reposition the patient’s hips instead of using their knees to place the hips back into the chair. Be sure to keep your center of gravity low.
Other Common Mistakes Include:• Lifting the patient into standing, instead of shifting the weight forward over the feet.• Standing too close to the patient, not allowing enough room for them to shift their weight forward.• Pivoting the patient from one surface to the other before the hips have cleared the chair.• Placing your hands under the arms instead of along the scapula and rib cage.• Pulling the patient forward, using arm strength, instead of shifting your weight from the front foot to the
back foot.
Notes_______________________________________________________________________________________
_______________________________________________________________________________________
_______________________________________________________________________________________
_______________________________________________________________________________________
_______________________________________________________________________________________
_______________________________________________________________________________________
_______________________________________________________________________________________
_______________________________________________________________________________________
_______________________________________________________________________________________
_______________________________________________________________________________________
_______________________________________________________________________________________
_______________________________________________________________________________________
_______________________________________________________________________________________
�16 Pause and Practice with a Partner

Teaching Independence: A Therapeutic Approach to Stroke Rehabilitation • University Edition Student Workbook 59
Copyright © 2000-2015 International Clinical Educators, Inc. Wheelchair Transfers
Scooting Forward and Backward in the ChairThe second method of scooting back in the chair is especially useful when your patient’s feet don’t reach thefloor or when your patient is unable to bend forward at the hip.
HandlingKneel in front of the patient.
1. Place your hand behind the patient’s weak side, supporting their upper trunk.
2. Assist the patient to shift weight laterally toward the weak side, enough to unweight the strong side.
3. Cue the patient to bring their strong hip back into the chair.
4. Switch hands and repeat this procedure, shifting weight onto the strong hip and bringing the weak hip back into the wheelchair.
5. This can be repeated as many times as necessary to reposition in the wheelchair.
You can also reverse this procedure to help patients scoot forward in their chair. This helps them to come far enough forward to get their feet to reach the floor before standing or transferring. This method can also be used to help patients scoot to the end of the bed. Both of these methods will help to teach your patient more normal patterns of movement. It can also help to prevent shoulder pain for the patient and save your back, as well.
Notes_______________________________________________________________________________________
_______________________________________________________________________________________
_______________________________________________________________________________________
_______________________________________________________________________________________
_______________________________________________________________________________________
_______________________________________________________________________________________
_______________________________________________________________________________________
_______________________________________________________________________________________
_______________________________________________________________________________________
�17 Pause and Practice with a Partner
v

60 Teaching Independence: A Therapeutic Approach to Stroke Rehabilitation • University Edition Student Workbook
Wheelchair Transfers Copyright © 2000-2015 International Clinical Educators, Inc.
Notes_______________________________________________________________________________________
_______________________________________________________________________________________
_______________________________________________________________________________________
_______________________________________________________________________________________
_______________________________________________________________________________________
_______________________________________________________________________________________
_______________________________________________________________________________________
_______________________________________________________________________________________
_______________________________________________________________________________________
_______________________________________________________________________________________
_______________________________________________________________________________________
_______________________________________________________________________________________
_______________________________________________________________________________________
_______________________________________________________________________________________
_______________________________________________________________________________________
_______________________________________________________________________________________
_______________________________________________________________________________________
_______________________________________________________________________________________
_______________________________________________________________________________________
_______________________________________________________________________________________
_______________________________________________________________________________________
_______________________________________________________________________________________
_______________________________________________________________________________________
_______________________________________________________________________________________
_______________________________________________________________________________________
_______________________________________________________________________________________

Copyright © 2000-2015 International Clinical Educators, Inc. Standing Safely
61
sTanding safely
Learning Objectives• Identify four components of movement necessary to come from sit to stand safely.• Name three points of control to provide maximum assistance to help a stroke survivor stand.• List two reasons why a stroke survivor’s knee might buckle during a standing activity.• Identify three therapeutic principles the therapist should follow to provide safety during standing
activities.
Introduction to Standing SafelyOur goal is to help patients learn to come from sit to stand safely, as normally as possible, and with fewerabnormal compensatory movement patterns. Teaching a patient to stand up by “scooting to the edge ofthe chair” can be unsafe and reinforces compensatory movements.
The fear of falling and apprehension on the part of the patient may prevent staff from attempting to stand patients early on. This program will provide safe and effective guidelines to help you begin standing your patient during their rehabilitation program.
It is important to remember that safety is our number one goal. If possible, help patients to learn to stand without devices or equipment. If patients have learned to stand only with the use of a grab bar or with the aid of pushing off from the wheelchair armrest, they will have difficulty with functional tasks such as pulling up pants in dressing or after toileting. However, use grab bars if necessary to help to improve safety with nursing staff or family members at home.
Initially it can be frightening for patients to stand up. Provide a secure environment. Standing up next to a strong, stable support can be very reassuring for the patient. Do not choose something that can move or shift such as the hospital bedside table on wheels.
Therapeutic Benefits of StandingPatients who learn to stand (with assistance) early in their recovery process benefit in many ways. From anorthopedic standpoint, patients are less likely to develop limitations or contractures in lower extremity joint range of motion. Knee flexion contractures (contributed by long periods of sitting in the chair) and Achilles tendon shortening (which occurs during prolonged bed rest) are easily prevented when patients are encouraged to stand. Standing also helps to prepare patients for many functional tasks and reinforces physical therapy programs in preparation for ambulation. Weight bearing over the affected lower extremity can also help to regulate abnormal muscle tone throughout the hemiplegic side.

62 Teaching Independence: A Therapeutic Approach to Stroke Rehabilitation • University Edition Student Workbook
Standing Safely Copyright © 2000-2015 International Clinical Educators, Inc.
Sit to Stand: Normal Movement
Analyzing Normal MovementBefore we begin, remember that all therapeutic methods are based upon normal patterns of movement. To fully understand the therapeutic value of each technique, we will observe and analyze the normal components necessary to come from sit to stand and from standing to sitting. The better you are at observation and the analysis of your observations (of both normal and abnormal movement), the better you will be at identifying and treating your patient’s key problem areas. Rather than say “normal,” perhaps it is better to say “typical movement patterns” or “common patterns of movement,” since there is a great variety of normal movement components in the general population. A variation on “normal” does not necessarily mean “abnormal”. In the following section, the underlying factors that can influence normal movement patterns are discussed.
The normal components of movement for a person to come from a sitting position to a standing position are as follows:
1. The feet are placed parallel on the floor, usually about shoulder width apart.
2. The feet are positioned behind the knees, the taller the person, the further the feet are placed behind the knees. The height of the chair is another factor which influences exact foot placement.
3. You will need to scoot forward on the chair if your feet don’t touch the floor or if your femur are entirely supported, up to the knee. Notice that the majority of people don’t scoot to the edge of the chair to stand.
4. The person leans forward, far enough to shift their base of support from their hips to their feet (until their hips clear the chair), and no further.
5. The femur comes slightly forward.
6. Once the hips clear the chair, the knees, hips, and trunk extend until the person is in full standing.
Notes_______________________________________________________________________________________
_______________________________________________________________________________________
_______________________________________________________________________________________
_______________________________________________________________________________________
_______________________________________________________________________________________
_______________________________________________________________________________________
_______________________________________________________________________________________
_______________________________________________________________________________________
_______________________________________________________________________________________
v

Teaching Independence: A Therapeutic Approach to Stroke Rehabilitation • University Edition Student Workbook 63
Copyright © 2000-2015 International Clinical Educators, Inc. Standing Safely
�18 Pause and Practice
Self ExperienceIt might be interesting for you to pause and observe your own personal patterns of movement as well as those of others. There are several factors which influence our movement, whether we’ve had a stroke or not:
• height and build• joint flexibility• strength• previous injuries or orthopedic limitations• environmental factors such as the height of the surface
Notice• your own foot placement, what feels “normal” or comfortable• how far forward you lean in order for your hips clear the chair
Try• placing your feet an inch or two forward from your “normal” foot
placement. What do you notice?• standing up without leaning forward. What do you notice?
Observe and Analyze OthersVariations and additional considerations.
• A small percentage of the population will have their feet slightly staggered, one foot in front of the other, as they prepare to stand.
• How far the feet are positioned behind the knees and how far the person leans forward will depend upon the height of the surface (the lower the chair, the further forward they’ll need to lean to shift the base of support from hips to feet) and the size and build of the person.
• Older people will often “push off” the armrests of the chair when they have difficulty leaning forward.

64 Teaching Independence: A Therapeutic Approach to Stroke Rehabilitation • University Edition Student Workbook
Standing Safely Copyright © 2000-2015 International Clinical Educators, Inc.
Sit to Stand with Moderate AssistanceThis is one way to bring a patient from sit to stand with moderate assistance. The following guidelines mayneed to be modified if your patient has already developed tightness or contractures or if medical conditionsinterfere.
Starting PositionThe patient is seated in a chair or wheelchair with feet flat on the floor. To determine where to position the feet and the amount of assistance that will be needed in coming forward and into standing, observe the following:
• Is the patient tall or short?• Is the patient large (will he or she have problems bending forward)?• On what surface is the patient sitting? Is it higher or lower than normal? (The height of a normal chair is
approximately 16” or 40 cm from the floor.)• Does the patient have any conditions (hip replacement, back injury, hip fracture, Achilles shortening)
which may make leaning forward difficult?• Does the patient appear to have any active trunk control?• How alert is the patient?• Does the patient wear any lower extremity orthopedic devices? For example, an AFO fixed at 90˚ of
ankle flexion would limit ankle dorsiflexion and not allow proper foot placement.
Handling1. Stand on the weak side, next to the patient.
2. Position the patient’s feet flat on the floor, parallel and about shoulder width apart.
3. Scoot the patient forward in the chair, if necessary, in order for their feet to reach the floor or to clear the distal 1/3 of the femur.
4. Position the feet behind the knees, remembering that the taller the patient, the further back the feet need to be positioned. Tip: As you bring the patient forward, watch the strong leg. The patient often brings it back to the correct position—then you can bring the weak leg back to the same position.
5. Ask the patient to place their hands either on their thigh or, for patients with neglect, ask them to clasp their hands together. (This helps patients remember their arm, keeps them more symmetrical, and from grabbing onto everything in sight.)
6. Position yourself so that your shoulder is behind their weak shoulder. This will help cue them forward and keep them from pushing back into extension.
7. Place your hand around the patient, reaching to their strong hip. This will cue them to come forward, and you’ll also be able to tell when the patient leaves the chair without needing to look back.
8. Place your other hand firmly on the distal portion of the patient’s femur (just proximal to their knee) and bring it down and forward, helping them to put weight onto the weak foot. This helps to give knee stability and cues the patient to come forward—it is not to block the knee or push it into extension.
v

Teaching Independence: A Therapeutic Approach to Stroke Rehabilitation • University Edition Student Workbook 65
Copyright © 2000-2015 International Clinical Educators, Inc. Standing Safely
9. Using three points of control, cue the patient (from the shoulder, the knee, and under the opposite hip) to come forward and stand up. You can add simple verbal cues such as “hands together, come forward, and stand up”. Avoid saying “stand up on the count of three”. If the patient is leaning back in the chair on “three” instead of leaning forward, normal movement is not facilitated.
10. As the patient’s hips clear the chair, don’t give any more forward information. Allow the patient to come into standing with knee, hip, and trunk extension.
11. As your patient stands, slide your hand along the femur to the pelvis. Stand on their weak side with your hip behind theirs and your hands on their hips.
Tips• Instead of pushing off or pulling up with a grab bar, the patient must relearn to come forward in order to
stand up. And thus becomes more independent with self-care skills. However, if they need equipment at home (such as a grab bar) in order to be safe, make sure that they have it.
• If your patient is fearful of coming forward, first prepare the patient by having them reach forward or down toward their shoes.
• Always avoid pulling the patient up with the weak arm. This can cause trauma to the shoulder and teaches compensatory movement instead of normal movement.
Common Mistakes• The feet are not in the correct position (not far enough behind the knees). This will make it much more
difficult for the patient to stand up.• The therapist does not give enough forward cues from the shoulder, hip, and knee to help the patient
shift their base of support from the hips to the feet. If you see the patient’s toes lift up off of the floor, their weight is too far back.
• The therapist continues to give forward cues after the hips have cleared the chair. The patient will feel as though he is falling forward.
• The cue from the therapist is not symmetrical and the patient is pushed away from their weak side onto their strong side.
�19 Pause and Practice with a Partner

66 Teaching Independence: A Therapeutic Approach to Stroke Rehabilitation • University Edition Student Workbook
Standing Safely Copyright © 2000-2015 International Clinical Educators, Inc.
Variation: Sit to Stand in the Kitchen or BathroomBecause we have observed the normal movement components necessary to get from sitting to standing, we know that it is necessary to come forward (the taller the patient, the further forward they will need to lean) in order to stand. When a patient needing moderate assistance wants to come from sit to stand at the kitchen counter, bathroom sink, or any other stable surface, the following modifications will be helpful.
• Position the wheelchair (or chair) one or two steps back from the sink, allowing enough room for the patient to comfortably lean forward. If the space is too cramped, the patient will have difficulty standing. Follow the same instructions as mentioned for moderate assist sit to stand. Once the patient comes to standing, they will need to take a step or two to get up to the sink or counter.
• Another option is to position the wheelchair (or chair) in front of the sink and have the patient come forward, bringing the hands and/or arms into the sink or onto the counter. Follow the same instructions as mentioned for moderate assist sit to stand.
Variation: Sit to Stand Using a CanePatients often “push themselves up” with a cane and over to the weak side. This can be dangerous. The same technique that has been mentioned above (moderate assist sit to stand) can be modified for a patient using a cane during ambulation.
1. Follow the directions in moderate assist sit to stand.
2. Instead of placing the hands on the thighs or clasping the hands together, place the cane between both clasped hands. Come forward sliding the outstretched cane directly in front of the patient.
3. Once the patient is in a standing posture, the cane can return to the strong hand. This eliminates the need to reach back to find the cane along the side of the wheelchair.

Teaching Independence: A Therapeutic Approach to Stroke Rehabilitation • University Edition Student Workbook 67
Copyright © 2000-2015 International Clinical Educators, Inc. Standing Safely
Sit to Stand with Maximum AssistanceThe following guidlines help determine if your patient will need maximum assistance to stand up.
• How alert is the patient?• Is there any active trunk control?• Is the patient fearful?• Are there any conditions that make leaning forward difficult?• Do they have trouble extending their trunk or bearing weight on lower extremity?
The following guidelines may need to be modified if your patient has already developed tightness or contractures or if medical conditions interfere.
Starting PositionThe patient is sitting in a wheelchair, in a regular chair, on a bed, or on a mat table.
Handling1. Stand on the weak side, next to and facing the patient.
2. Position the patient’s feet flat on the floor, parallel and about shoulder width apart.
3. Scoot the patient forward in the chair, if necessary, in order for the feet to reach the floor or for the distal 1/3 of the femur to be unsupported.
4. Position the feet behind the knees, remembering that the taller the patient, the further back the feet need to be positioned.
5. Ask the patient to place their hands either on their thigh or, for patients with neglect, ask the patient to clasp their hands together if possible.
6. Using three points of control, you will be able to bring a maximum assist patient from sit to stand. Do not lift. Instead, shift their weight from their hips to their feet by doing the following steps.
7. Position your leg so it will be in front of the patient’s knee. This will be your first point of control in helping with knee extension.
8. Place your open hand on their sternum, being careful not to slide up their neck. Gently bring the patient into trunk flexion, maintaining support through the sternum. This will be your second point of control.
9. Place your other hand around the patient under their strong hip. This will cue them to come forward, and you’ll also be able to tell when the patient leaves the chair without needing to look back. This is your third point of control.
v

68 Teaching Independence: A Therapeutic Approach to Stroke Rehabilitation • University Edition Student Workbook
Standing Safely Copyright © 2000-2015 International Clinical Educators, Inc.
10. Now cue the patient (from the sternum, the knee, and under the opposite hip) to rock forward and shift their weight from their hips to their feet. You can do this by shifting your weight from your back foot to your front foot (the one that is controlling the weak knee).
11. It is very important not to lift. As the patient’s hips clear the chair, bring the patient into full standing, using your three points of control. Press the sternum, hips, and knees gently but firmly, and the patient will come into extension.
Tips & Variations• As you bring the patient forward, watch the strong leg. The patient often brings it back behind the knee
(further than it was originally placed) to the “correct” position. If this happens, stop and reposition the involved foot, parallel with the strong foot.
• Fear is one of the most common problems for our stroke patients. For fearful patients, modify the environment by placing them next to or behind a solid surface (such as a heavy table).
Common ProblemsWhen the patient has difficulty standing up, the problem is often foot placement. Check the position of bothfeet. Remember, the taller the patient, the further the feet are behind the knees. As you bring the patientforward, watch their non-involved foot. If your patient changes their position and brings their foot further back,then that’s a cue to “correct” and reposition the involved foot as well.
When the patient has difficulty leaning forward, first determine why they are having trouble. Some patientsneed preparation to come forward before standing up. While in sitting, have your patient lean forward andreach toward their shoes. Are there any orthopedic or neurological conditions that make leaning forwarddifficult? If so, some adaptive equipment may be necessary.
When the patient’s feet are staggered, with the weaker foot in front, there are three common reasons why stroke patients do this:
1. Limited ankle dorsiflexion due to shortening of the Achilles tendon.
2. If the patient wears a lower extremity orthopedic device, which limits ankle dorsiflexion, it won’t allow for proper foot placement. An AFO fixed at 90° is rigid and makes ankle dorsiflexion impossible. An AFO with a “joint” that allows dorsiflexion is best, as we see here. If that isn’t possible, unstrap the top of the AFO and allow the knee to come forward during sit to stand. Re-strap the Velcro once the patient is in standing.
3. The third reason that a patient may stagger their feet is to put weight on their strong side and avoid shifting weight onto their weak side. Fear, weakness, and sensory loss can all contribute to this problem. Initially it can be frightening for patients to stand up. Standing up in front of a strong, stable support can be very reassuring to the patient.
�20 Pause and Practice with a Partner

Teaching Independence: A Therapeutic Approach to Stroke Rehabilitation • University Edition Student Workbook 69
Copyright © 2000-2015 International Clinical Educators, Inc. Standing Safely
How to Facilitate Standing Safely
Starting PositionIn order for the patient to feel safe and secure once standing, it is best to create a safe environment. Standingin the middle of an open room can be very frightening to patients. Instead, have the patient positioned with thechair/wheelchair behind them, a stable support or surface (such as a solid table, kitchen counter, or bathroomsink) in front of them, and the therapist standing on the weak side.
Handling1. Stand next to the patient on their weak side and a half step
behind.
2. Firmly place your hands on the patient’s hips.
3. Make contact with the front of your hip against the back of their weak side.
4. Do not pull the patient toward you as this can throw them off balance. Instead, move your hip forward from your own stable base of support. It’s okay if you are shorter or taller than your patient—it’s the contact that’s important.
5. Widen your base of support for tall, large patients.
TipsMonitor the patient closely and watch for signs of fatigue (changes in breathing, perspiration, or color). If the patient becomes fatigued or needs to sit down, their chair placed behind them makes it very easy to do so.
Variations• If you are tall and your patient is short, it may be easier for you to be in a sitting position with your legs
on each side of the patient’s knees while standing your patient. This will lower your center of gravity and make it more comfortable for you.
• If your facility requires you to use a gait belt, make sure you do. However, gait belts do not teach patients normal patterns of movement. All facilitiation methods are shown without a gait belt.
Common Mistakes• Many therapists are fearful when their patients stand and consequently pull them slightly backwards.
This common mistake is easy to identify. Look at the patient’s toes in standing. If their toes lift up off the floor, your patient has their weight too far back and will need to come slightly forward.
• Make sure your hands are firmly on the patient’s hips, not at the waist. You will have little control if your hands are on their waist.
v
�21 Pause and Practice with a Partner• When you are the “patient,” don’t push, just lean against your “therapist”. Notice how safe you feel.• Try the same method without contact at the hip. Experience the difference in how secure it feels.

70 Teaching Independence: A Therapeutic Approach to Stroke Rehabilitation • University Edition Student Workbook
Standing Safely Copyright © 2000-2015 International Clinical Educators, Inc.
Shifting Weight Toward the Hemiplegic Side in StandingThis is not intended for low-level patients. Your patient must be alert, have some dynamic trunk and lower extremity control.
Starting Position1. First, follow the guidelines for How to Safely Stand a Patient.
2. Stand next to the patient on their weak side and a half step behind.
3. Place your hands firmly on the patient’s hips.
4. Make contact with the front of your hip against the back of their weak side. Do not pull the patient toward you as this can throw them off balance. Move your hip forward from your own stable base of support.
5. Widen your base of support for tall, large patients.
HandlingTo help your patient to initiate a weight shift toward the weak side:
1. Maintain contact with your patient at the pelvis, hips, and trunk.
2. Begin at midline and slowly shift toward the weak side until the patient has nearly full weight on the weak lower extremely.
3. As the patient shifts their weight toward the weak side and away from the non-involved side, you might feel less co-contraction of the muscles around the hip of the non-involved side. You may notice even a slight drop or “letting go” of the pelvis.
4. Do not go too fast or too far. This could set off a balance reaction and be frightening to the patient.
5. Allow your patient to bear weight on the weak side for a moment or two.
6. Return to midline.
TipsWhile your patients are standing, monitor them closely and watch for any signs of fatigue. Watch for changesin breathing, perspiration, clamminess, or fatigue. Look for weakness in either of the lower extremities. Givethem an option to sit down before it becomes a problem. Introducing a functional task during standing will encourage a greater weight shift toward the weak side. Activities which are familiar and require weight shifts are the most beneficial. Patients will stand for longer periods of time during activities which are normally done in standing (for example, shaving).
v

Teaching Independence: A Therapeutic Approach to Stroke Rehabilitation • University Edition Student Workbook 71
Copyright © 2000-2015 International Clinical Educators, Inc. Standing Safely
Notes_______________________________________________________________________________________
_______________________________________________________________________________________
_______________________________________________________________________________________
_______________________________________________________________________________________
_______________________________________________________________________________________
_______________________________________________________________________________________
_______________________________________________________________________________________
_______________________________________________________________________________________
_______________________________________________________________________________________
_______________________________________________________________________________________
_______________________________________________________________________________________
_______________________________________________________________________________________
_______________________________________________________________________________________
_______________________________________________________________________________________
_______________________________________________________________________________________
_______________________________________________________________________________________
_______________________________________________________________________________________
_______________________________________________________________________________________
_______________________________________________________________________________________
_______________________________________________________________________________________
_______________________________________________________________________________________
�22 Pause and Practice with a PartnerNotice your experience as the “patient”.
• When your weight is in midline.• When your weight is over your “weak side” (you will easily be able to
pick up your strong foot).• When your weight is just slightly too far over your “weak side”.

72 Teaching Independence: A Therapeutic Approach to Stroke Rehabilitation • University Edition Student Workbook
Standing Safely Copyright © 2000-2015 International Clinical Educators, Inc.
Standing Safely if the Knee BucklesA patient’s weak knee usually buckles for one of two reasons:
• Fatigue is the most common factor. The therapist should always be aware of a change in the patient’s breathing patterns and should note if they perspire excessively or if their color or level of alertness changes. Give them an option to sit down before they become overly fatigued.
• The second reason a patient’s knee might buckle is due to sensory loss. They can’t feel it and, if they are standing close to a table or cabinet, they may not be able to see it. Sometimes patients are so engrossed in a task or activity that they have no idea that the leg has buckled. Fatigue, in this case, is not usually a factor. Sometimes a verbal or tactile cue may be enough and the patient will “straighten up” again.
Starting PositionFirst, follow the guidelines for How to Safely Stand a Patient.
1. Stand next to the patient on their weak side and a half step behind.
2. Place your hands on the patient’s hips firmly.
3. Make contact with the front of your hip against the back of their weak side.
Handling1. Stay close to your patient. The contact at the hip, shoulder, and
pelvis is extremely important.
2. As the weak knee buckles, slide your hand from the pelvis down the femur (to just above the knee). This will help keep the knee from buckling any further. Do not push the knee into extension. This may cause the patient to fall forward at the waist.
3. With very solid contact of your hand at the leg and your shoulder against their shoulder, move yourself away from the contact of your hip against theirs. Move yourself around perpendicular to the patient. It will be easier for you if you move your back leg away and around first, then your front leg.
4. When you are perpendicular to the patient, flex your knees slightly (the actual amount will be determined by your height and the patient’s height) and place the inside of your knees on the anterior and posterior surface of the patient’s knee. It is very important that your leg is completely in front of the patient’s knee, to keep it from buckling any further.
5. Using your lower extremity adductors, clamp your legs on the front and back of the patient’s buckled knee to prevent further buckling. Don’t just block the knee, as it will not feel as secure to the patient. (Some therapists describe this as similar to doing a “snowplow” in skiing.)
6. If necessary, you can bring both of your arms around your patient’s waist onto the opposite pelvis, like a “bear hug”.
v

Teaching Independence: A Therapeutic Approach to Stroke Rehabilitation • University Edition Student Workbook 73
Copyright © 2000-2015 International Clinical Educators, Inc. Standing Safely
You and the patient are now safe from falling. You can sit your patient back down in the chair or ask someoneto bring the wheelchair if it is not nearby. If fatigue was not the underlying factor, you can continue on with thetreatment.
TipsIf your patient pushes against you as the knee buckles, slowly and carefully shift their weight back to midline oreven over toward their strong side. If you feel like you’re falling backwards, adjust the position of your feet. Give yourself a slightly wider base of support by putting one foot in front and one foot in back.
Common Mistakes• The therapist pushes the knee into extension, instead of allowing slight flexion.• The therapist doesn’t have their leg directly in front of the patella.• The therapist moves their front leg first.
Notes_______________________________________________________________________________________
_______________________________________________________________________________________
_______________________________________________________________________________________
_______________________________________________________________________________________
_______________________________________________________________________________________
_______________________________________________________________________________________
_______________________________________________________________________________________
_______________________________________________________________________________________
_______________________________________________________________________________________
_______________________________________________________________________________________
_______________________________________________________________________________________
_______________________________________________________________________________________
_______________________________________________________________________________________
_______________________________________________________________________________________
�23 Pause and Practice with a PartnerThis can feel very awkward at first, especially if you aren’t used to standing closely with patients. With practice it will become more comfortable.

74 Teaching Independence: A Therapeutic Approach to Stroke Rehabilitation • University Edition Student Workbook
Standing Safely Copyright © 2000-2015 International Clinical Educators, Inc.
Stand to Sit
Analysis of Normal Movement• Stand in front of a chair or bench and slightly touch the surface
with the back of your leg. (We are often unaware that this even occurs.)
• The upper trunk comes forward, flexing at the hips as the hips come back to the chair.
• The knees bend and the ankles dorsiflex.• Soft landing!
Notes_______________________________________________________________________________________
_______________________________________________________________________________________
_______________________________________________________________________________________
_______________________________________________________________________________________
_______________________________________________________________________________________
_______________________________________________________________________________________
_______________________________________________________________________________________
_______________________________________________________________________________________
_______________________________________________________________________________________
_______________________________________________________________________________________
v
�24 Pause and Practice
Self ExperienceNotice
• Observe the typical sequence of your own movements as you sit down.
• For clarity, stop just before your hips touch the chair. Note the position of your shoulders over your knees.
Observe and Analyze Others• Note variations in movements and sequences of movements,
height and build of each person, flexibility, and environmental considerations.

Teaching Independence: A Therapeutic Approach to Stroke Rehabilitation • University Edition Student Workbook 75
Copyright © 2000-2015 International Clinical Educators, Inc. Standing Safely
Stand to Sit with Moderate AssistanceThe following guidelines may need to be modified if your patient has already developed tightness orcontractures or if medical conditions interfere.
Patients are often taught to “reach back for the chair”. As they turn to reach back for the wheelchair, they may lose their balance and are at risk for falling. Patients also tend to “plop” down into the chair instead of making a “soft landing”. This will improve as the patient learns to lean farther forward.
Fear, loss of sensation, weakness and/or extensor tone at the hip are all factors which can make this “softlanding” difficult for patients.
Starting PositionHave the patient stand in front of the chair, wheelchair, or bed.
Handling1. Stand next to the patient on their weak side.
2. Firmly place your hands on the patient’s hips.
3. Make contact with the front of your shoulder against the back of theirs. (It’s okay if you are shorter than your patient and your shoulder is below theirs. It is the contact that’s important.)
4. Stagger your feet so that your foot which is next to the patient’s chair, is the one behind.
5. Using your shoulder contact, facilitate normal movement by guiding the patient’s upper trunk forward. Simultaneously bring their hips back with your hands. You do not need to worry about the knees.
6. As their hips come back and their shoulders and trunk come forward, the patient will gently sit down.
7. Use your legs to help lower the patient. Do not use your back.
Incorrect Method• If patient “plops” down or falls back into their chair, the patient is not flexing far enough forward. Watch
your patient’s toes. If the toes come up, this is an indication that the patient’s weight is too far back. Bring the shoulders further forward, helping the patient to flex. Remember, the taller the person, the more forward flexion is needed.
• Another reason that the patient “plops” back into the chair is because the therapist actually pulls them back into the seat, afraid that they might miss the chair. Be careful that you are not “pulling” them.
v

76 Teaching Independence: A Therapeutic Approach to Stroke Rehabilitation • University Edition Student Workbook
Standing Safely Copyright © 2000-2015 International Clinical Educators, Inc.
Notes_______________________________________________________________________________________
_______________________________________________________________________________________
_______________________________________________________________________________________
_______________________________________________________________________________________
_______________________________________________________________________________________
_______________________________________________________________________________________
_______________________________________________________________________________________
_______________________________________________________________________________________
_______________________________________________________________________________________
_______________________________________________________________________________________
_______________________________________________________________________________________
_______________________________________________________________________________________
_______________________________________________________________________________________
_______________________________________________________________________________________
_______________________________________________________________________________________
_______________________________________________________________________________________
_______________________________________________________________________________________
_______________________________________________________________________________________
_______________________________________________________________________________________
_______________________________________________________________________________________
�25 Pause and Practice with a Partner• If you feel like you are falling forward, your partner is giving you too
much input at the shoulders.• If your toes are coming up and you feel like you are falling back,
your partner needs to give you more forward information.• You should have a “soft landing” that feels very normal.
Copyright © 2000-2015 International Clinical Educators, Inc. Bed Positioning & Mobility
77
bed posiTioning & MobiliTy
Learning Objectives• Identify four therapeutic benefits of proper bed positioning for stroke survivors.• List three components of movement necessary to assist in rolling from supine to sidelying.• Identify the most therapeutic position for bed rest and explain why.• List four components of movement necessary to scoot from side to side in bed.
Introduction to Bed Positioning & MobilityThe rehabilitation process begins before the patient gets out of the hospital bed. Use the procedures outlined in this program and give your patient a head start in the rehabilitation process.
The ultimate goal of bed positioning is to help the patient rest more comfortably. In addition, we need to prevent pressure sores. It is not realistic to expect family members to get up every two hours during the night, night after night, after the patient has returned home. Therefore, it is necessary that we don’t immobilize our patients but help them to learn how to move in bed.
Not only is it important to encourage proper bed positioning, but the position of the bed in the room can also be therapeutic. If possible, don’t have the patient positioned with their weak side toward the wall because all of the stimulation will be toward the sound side. Instead, have the patient positioned so the weak side is facing the door and other necessities (such as the night stand, telephone, television, and water pitcher). This will encourage awareness of the weak side as it allows those coming into the room (nurses, therapists, and visitors) to more easily approach that side, increasing visual, auditory, and tactile stimulation.
Encouraging the patient to look and move toward the weak side can also help patients who are fearful or have problems with neglect or visual-field deficits. One exception, just make sure the call-light for the nurse is placed on their strong side where they can easily see it and reach it, in order to get the assistance they need as soon as possible.
Therapeutic Benefits of Proper Bed Positioning & MobilityEncourage your patients to relearn normal patterns of movement before “bad habits” begin. For example putting weight into the involved foot during bridging will help prepare your patient for standing and will help to regulate lower extremity tone at the same time. We can achieve numerous therapeutic goals during bed positioning and bed mobility by following four basic treatment principles.
1. Encourage weight bearing over the involved side to help decrease fear and increase awareness.
2. Encourage trunk rotation for dissociation of pelvis and shoulder girdles and to facilitate more normal movement.
3. Encourage elongation of the trunk and gently put muscles on length in order to prevent tightness.
4. Encourage scapular protraction to prevent shoulder pain and inhibit flexor tone of the upper extremity. If you are working with patients who are longer-term post stroke, they can still benefit from these guidelines. However, if orthopedic limitations have already begun, you may need to make modifications. Work from proximal to distal when making modifications.

78 Teaching Independence: A Therapeutic Approach to Stroke Rehabilitation • University Edition Student Workbook
Bed Positioning & Mobility Copyright © 2000-2015 International Clinical Educators, Inc.
Bed Positioning in Sidelying on the Involved SideFor the most therapeutic value, position the patient on their weak side.
• Weight bearing on the weak side will help the patient become more aware of that side.• Weight bearing also helps to “normalize” or regulate abnormal muscle tone.• When positioned correctly on the weak side during the acute stage of recovery, abnormal postures
typically seen in hemiplegic patients can be controlled or inhibited.
The following guidelines may need to be modified if your patient has already developed tightness orcontractures, or if medical conditions interfere.
Starting PositionPatient is positioned in sideyling on the involved side.
Handling1. Position the patient sidelying on the weak side with the back
parallel with the edge of the bed (reducing trunk flexion). A pillow can be placed behind the patient to keep them from rolling supine.
2. The head should be well supported on a pillow large enough to take the weight off of the involved shoulder.
3. Bring the shoulder into full protraction. Be careful to have the patient lie on the scapula and do not allow the patient to lie on the humeral head. You will know when the shoulder is fully protracted if you feel the medial border of the scapula lying smoothly along the thoracic wall. If you feel the medial border of the scapula, correct it by carefully sliding your hand under the scapula and bringing the shoulder forward. Do not pull on the arm to bring it forward.
4. The shoulder should be in at least 90° of flexion in order to inhibit flexion synergy patterns.
5. The forearm is supinated and the elbow can either be in extension or flexion. (Patients with long arms will need to flex at the elbow if their hands come too close to the bedrails of the hospital bed.)
6. The weak leg is slightly flexed at the knee.
7. The sound leg is placed on a pillow, forward of the weak leg. For patients with wide hips, two pillows may be needed to support the leg in order to lessen the stress at the hip.
v

Teaching Independence: A Therapeutic Approach to Stroke Rehabilitation • University Edition Student Workbook 79
Copyright © 2000-2015 International Clinical Educators, Inc. Bed Positioning & Mobility
TipsKing-size pillows can come in very handy when patients have long extremities. The next time your nursingdepartment orders pillows, have them order one king-size pillow per bed.
VariationsIf your patient is several months post stroke and is unable to maintain shoulder external rotation, begin withsidelying on the weak side on a protracted scapula and allow the shoulder to rest in internal rotation or external rotation, as comfortable.
Common MistakesIn sidelying, bearing weight directly on the trochanter, can be painful. If your patient complains of hip pain, roll them slightly forward or back, off of the trochanter.
Notes_______________________________________________________________________________________
_______________________________________________________________________________________
_______________________________________________________________________________________
_______________________________________________________________________________________
_______________________________________________________________________________________
_______________________________________________________________________________________
_______________________________________________________________________________________
_______________________________________________________________________________________
_______________________________________________________________________________________
_______________________________________________________________________________________
_______________________________________________________________________________________
_______________________________________________________________________________________
_______________________________________________________________________________________
_______________________________________________________________________________________
_______________________________________________________________________________________
_______________________________________________________________________________________
�26 Pause and Practice with a PartnerUse 3 pillows to practice.

80 Teaching Independence: A Therapeutic Approach to Stroke Rehabilitation • University Edition Student Workbook
Bed Positioning & Mobility Copyright © 2000-2015 International Clinical Educators, Inc.
Bed Positioning in Sidelying on the Non-involved SideThe following guidelines may need to be modified if your patient has already developed tightness orcontractures, or if medical conditions interfere.
Starting PositionPatient is positioned in sideyling on the non-involved side.
Handling1. Position the patient in sidelying on the sound side with the
back parallel with the edge of the bed (reducing trunk flexion). A pillow can be placed behind the patient to keep them from rolling supine.
2. The head should be well supported on a pillow.
3. Bring the weak arm forward into shoulder protraction and flexion and support the entire arm, hand and fingers on a pillow.
4. The non-involved arm can be positioned in any way that is comfortable for the patient.
5. The weak leg is slightly flexed at the hip and knee and supported on a pillow. Make sure the entire foot is supported and not in inversion.
6. The non-involved leg is placed on the bed in slight hip extension and knee flexion. Your patient may move this leg to any comfortable position.
TipsPatients may complain of discomfort if they are lying directly on the trochanter. The discomfort will be relieved by allowing them to roll slightly forward or backward.
VariationsPatients with large hips and small waists may be more comfortable lying on a small roll at the waist, helping to lengthen the weak side. Also, supporting the lower extremity with two pillows instead of one may improve comfort.
Notes_______________________________________________________________________________________
_______________________________________________________________________________________
_______________________________________________________________________________________
_______________________________________________________________________________________
v
�27 Pause and Practice with a PartnerUse 3 pillows to practice.

Teaching Independence: A Therapeutic Approach to Stroke Rehabilitation • University Edition Student Workbook 81
Copyright © 2000-2015 International Clinical Educators, Inc. Bed Positioning & Mobility
Bed Positioning in Supine
Starting PositionSupine is the least therapeutic position for resting in bed, although it is the position most commonly used. Theonly true therapeutic goal achieved in this position is that of full knee extension. There are only two possibilities for the patient to have full knee extension—while lying in bed supine and while standing.
The following guidelines may need to be modified if your patient has already developed tightness or contractures, or if medical conditions interfere.
Handling1. The head is supported on a pillow, in midline. The trunk is
symmetrical without lateral trunk flexion.
2. The weak arm is supported on a pillow; elbow extended, forearm supinated (if possible), wrist and fingers supported in an extended position.
3. Place a portion of the pillow (or a small folded towel) under the weak shoulder if it is resting lower than the strong side. If the weak shoulder is level with the sound side, do not raise it further off of the bed with a pillow or towel.
4. Both legs are extended, and a pillow or a small roll can be placed under the weak hip if the pelvis is pulling into retraction. This will help to eliminate excessive external rotation of the hip.
5. Avoid placing a roll or pillow under the knee during supine positioning, as knee flexion contractures may develop.
Common Mistakes• Remember, we want to support them with pillows, not immobilize them with pillows.• Do not use a large pillow under the involved shoulder. Pushing or elevating the head of the humerus
higher than the non-involved side may contribute to an anterior subluxation of the glenohumeral joint.
Notes_______________________________________________________________________________________
_______________________________________________________________________________________
_______________________________________________________________________________________
_______________________________________________________________________________________
_______________________________________________________________________________________
v
�28 Pause and Practice with a PartnerUse 2 or 3 pillows to practice.

82 Teaching Independence: A Therapeutic Approach to Stroke Rehabilitation • University Edition Student Workbook
Bed Positioning & Mobility Copyright © 2000-2015 International Clinical Educators, Inc.
Scooting Up in Bed: Normal Movement
Analysis of Normal MovementBefore we begin, remember that all therapeutic methods are based upon normal patterns of movement. Tofully understand the therapeutic value of each technique, we will observe and analyze the normal componentsnecessary to scoot up in bed, scoot from side to side, come from sidelying to sitting, and go from sitting tosidelying. The better you are at observation and the analysis of your observations (of both normal andabnormal movement), the better you will be at identifying and treating your patient’s key problem areas.
Rather than say “normal,” perhaps it is better to say “typical movement patterns” or “common patterns ofmovement,” since there is a great variety of normal movement components in the general population. Avariation on “normal” does not necessarily mean “abnormal”.
Analyzing Normal Movement in Scooting Up in BedWhen we scoot up in bed, we use an “inchworm” effect.
• Our hips and knees are flexed.• Our feet are positioned on the bed.• Our hips and knees extend, putting weight onto our feet scooting us up toward the head of the bed.• We unweight our head and shoulders to release the stress.• We bear weight through one or both elbows.• We repeat the steps until we reach the desired position.
v
�29 Pause and Practice with a Partner
Self ExperienceNotice
• The more you flex your hips and knees, the easier it is to “bridge” and lift your hips off of the bed.
• Try bridging with less hip and knee flexion and notice the increased difficulty.
• As you push up toward the head of the bed, notice the resistance against your shoulders.
• When you lift your head and shoulders off the pillow in order to release your shoulders, pause and note how much you use your abdominal muscles.
Observe and Analyze Others• Note variations in movements and sequences of movements.• How does the height and build of the person affect movement
patterns?• Which environmental factors play a role (softness of bed, for
example)?
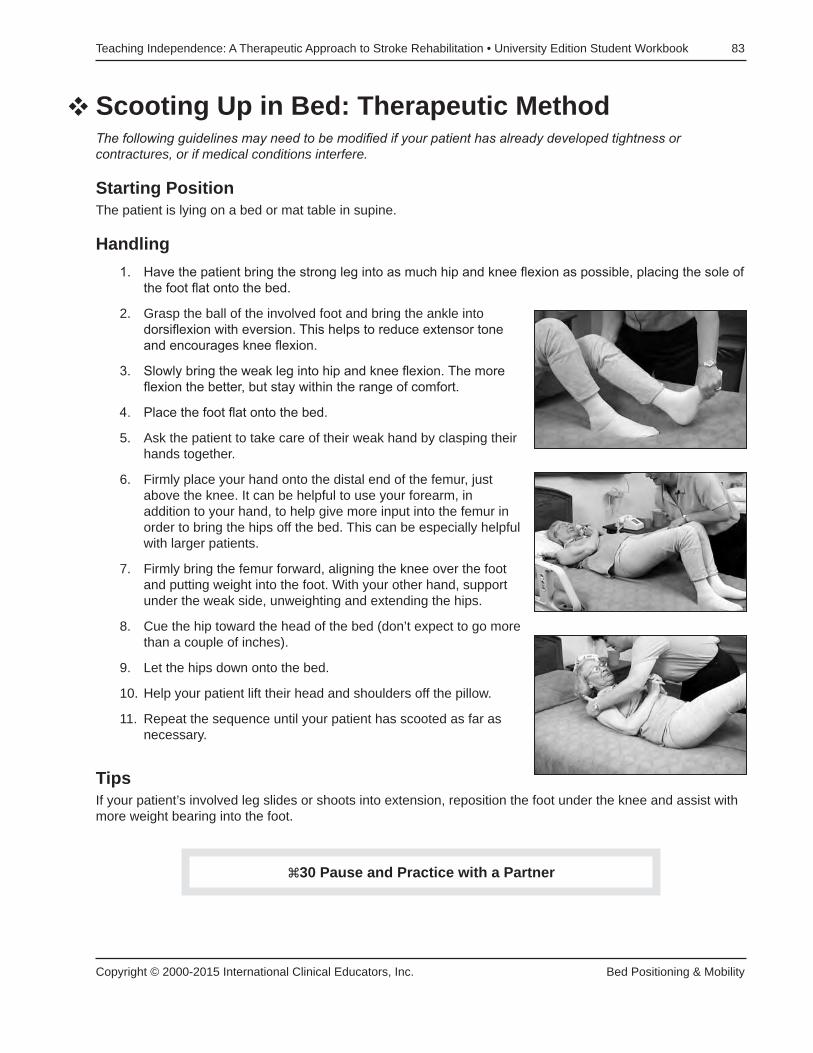
Teaching Independence: A Therapeutic Approach to Stroke Rehabilitation • University Edition Student Workbook 83
Copyright © 2000-2015 International Clinical Educators, Inc. Bed Positioning & Mobility
Scooting Up in Bed: Therapeutic MethodThe following guidelines may need to be modified if your patient has already developed tightness orcontractures, or if medical conditions interfere.
Starting PositionThe patient is lying on a bed or mat table in supine.
Handling1. Have the patient bring the strong leg into as much hip and knee flexion as possible, placing the sole of
the foot flat onto the bed.
2. Grasp the ball of the involved foot and bring the ankle into dorsiflexion with eversion. This helps to reduce extensor tone and encourages knee flexion.
3. Slowly bring the weak leg into hip and knee flexion. The more flexion the better, but stay within the range of comfort.
4. Place the foot flat onto the bed.
5. Ask the patient to take care of their weak hand by clasping their hands together.
6. Firmly place your hand onto the distal end of the femur, just above the knee. It can be helpful to use your forearm, in addition to your hand, to help give more input into the femur in order to bring the hips off the bed. This can be especially helpful with larger patients.
7. Firmly bring the femur forward, aligning the knee over the foot and putting weight into the foot. With your other hand, support under the weak side, unweighting and extending the hips.
8. Cue the hip toward the head of the bed (don’t expect to go more than a couple of inches).
9. Let the hips down onto the bed.
10. Help your patient lift their head and shoulders off the pillow.
11. Repeat the sequence until your patient has scooted as far as necessary.
TipsIf your patient’s involved leg slides or shoots into extension, reposition the foot under the knee and assist withmore weight bearing into the foot.
v
�30 Pause and Practice with a Partner

84 Teaching Independence: A Therapeutic Approach to Stroke Rehabilitation • University Edition Student Workbook
Bed Positioning & Mobility Copyright © 2000-2015 International Clinical Educators, Inc.
Scooting Side to Side: Normal Movement
Analyzing Normal Movement in Scooting from Side to SideNotice the normal movement (and sequence of movements) of the head, shoulders, trunk and lowerextremities in scooting from side to side.
• The knees and hips are flexed.• Weight is put into the feet in order to lift the hips off the bed.• The hips scoot over.• The hips are followed by the head and shoulders.• The feet scoot over to line up with the hips.
These movements are repeated until the desired distance is covered.
Notes_______________________________________________________________________________________
_______________________________________________________________________________________
_______________________________________________________________________________________
_______________________________________________________________________________________
_______________________________________________________________________________________
_______________________________________________________________________________________
_______________________________________________________________________________________
_______________________________________________________________________________________
_______________________________________________________________________________________
_______________________________________________________________________________________
�31 Pause and Practice with a Partner
Self ExperienceObserve your own personal patterns and sequences of movements.
Observe and Analyze Others• There are always variations from person to person in sequence and
amount of movement. But the components which enable people to scoot from side to side remain fairly consistent. Some people raise up on their elbows, others have more or less trunk and hip extension. Some move their feet first, and then their hips.
• Note variations in movements and sequences of movements.
v

Teaching Independence: A Therapeutic Approach to Stroke Rehabilitation • University Edition Student Workbook 85
Copyright © 2000-2015 International Clinical Educators, Inc. Bed Positioning & Mobility
Scooting Side to Side: Therapeutic MethodThe following guidelines may need to be modified if your patient has already developed tightness or contractures, or if medical conditions interfere.
Starting PositionThe patient is lying on the bed or the mat table in supine.
Handling1. Have the patient bring the strong leg into as much hip and knee
flexion as comfortably possible, placing the sole of the foot flat onto the bed.
2. Grasp the ball of the foot and bring the ankle into dorsiflexion with eversion.
3. Slowly bring the weak leg into hip and knee flexion.
4. Place the foot flat onto the bed.
5. Ask the patient to take care of their weak hand (assist as necessary).
6. Reposition your hand onto the lower end of the femur, just above the knee.
7. Firmly bring the femur forward, bringing the knee over the foot. It can be helpful to use your forearm, in addition to your hand, to help give more input into the femur to bring the hips off the bed. This is especially true with larger patients.
8. With your other hand, support under the weak side, unweighting and extending the hips.
9. When no longer weight bearing, cue the hip to the side or to the direction in which they are scooting.
10. Allow the hips to return to the surface of the bed.
11. Reposition feet in alignment with the knee and femur.
12. Assist the patient to lift the head and shoulders off the pillow (if the patient is very weak and needs maximal assistance, you can support the head and shoulders at the same time by using the pillow as a support).
13. Scoot the head and shoulders and align over the hips.
14. Repeat the sequence until the patient has scooted as far as needed.
v
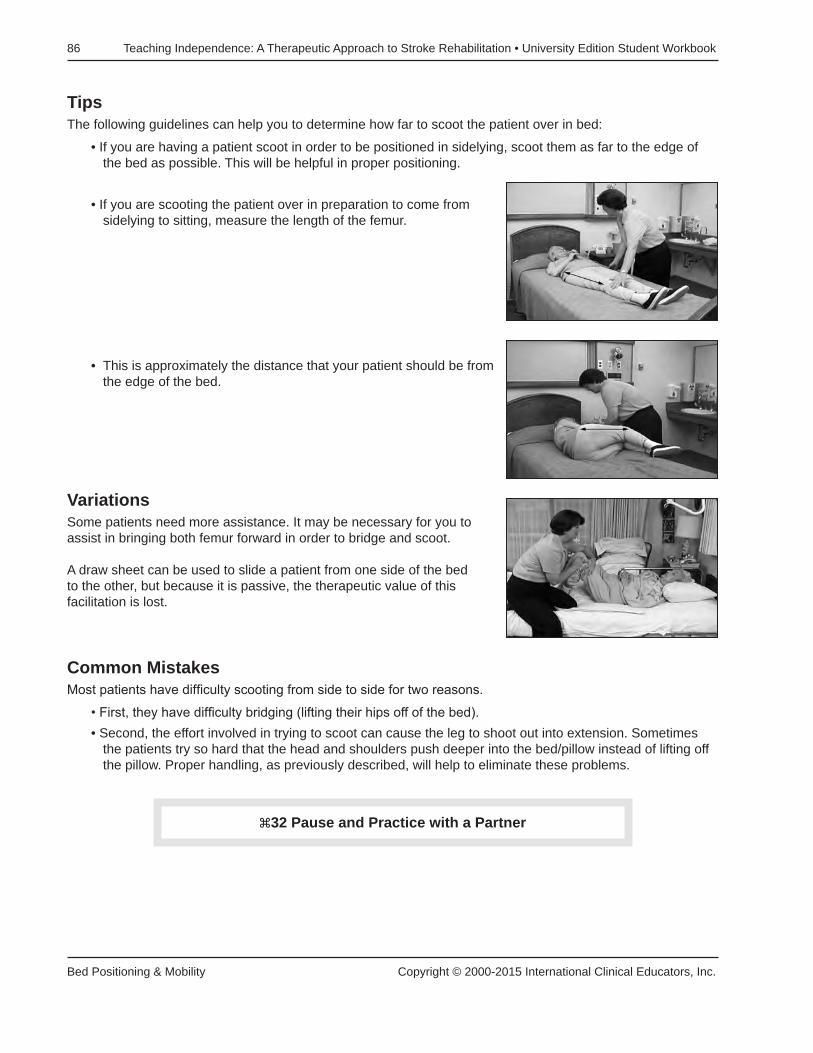
86 Teaching Independence: A Therapeutic Approach to Stroke Rehabilitation • University Edition Student Workbook
Bed Positioning & Mobility Copyright © 2000-2015 International Clinical Educators, Inc.
TipsThe following guidelines can help you to determine how far to scoot the patient over in bed:
• If you are having a patient scoot in order to be positioned in sidelying, scoot them as far to the edge of the bed as possible. This will be helpful in proper positioning.
• If you are scooting the patient over in preparation to come from sidelying to sitting, measure the length of the femur.
• This is approximately the distance that your patient should be from the edge of the bed.
VariationsSome patients need more assistance. It may be necessary for you to assist in bringing both femur forward in order to bridge and scoot.
A draw sheet can be used to slide a patient from one side of the bed to the other, but because it is passive, the therapeutic value of this facilitation is lost.
Common MistakesMost patients have difficulty scooting from side to side for two reasons.
• First, they have difficulty bridging (lifting their hips off of the bed).• Second, the effort involved in trying to scoot can cause the leg to shoot out into extension. Sometimes
the patients try so hard that the head and shoulders push deeper into the bed/pillow instead of lifting off the pillow. Proper handling, as previously described, will help to eliminate these problems.
�32 Pause and Practice with a Partner

Teaching Independence: A Therapeutic Approach to Stroke Rehabilitation • University Edition Student Workbook 87
Copyright © 2000-2015 International Clinical Educators, Inc. Bed Positioning & Mobility
Sidelying to Sitting from the Involved Side
Starting PositionThe patient is in sidelying on the weak side.
Handling1. Without forcing range, the hips and knees should be brought
into as much flexion as the patient can comfortably tolerate. This will help to inhibit extension synergy of the lower extremity and will also shorten the “levers,” making it easier to control taller patients.
2. Stand in front of the patient with a wide base of support.
3. The weak shoulder should be brought close to 90° of flexion and the scapula should be brought into protraction.
4. Slide your hand under the scapula and bring the upper trunk into flexion, forward toward the edge of the bed (this will help to keep the patient from pushing back and “flopping” back onto the bed).
5. Place the patient’s lower arm between your humerus and trunk and maintain this support.
6. Assist your patient to reach across with the non-involved arm and help “push themselves up” from the bed. This hand placement also helps to keep them forward and discourages them from falling back onto the bed.
7. Slide the patient’s feet off of the bed, keeping your leg in front of their feet. Don’t allow their legs to fall as this can cause stress at their hip.
8. Place one hand on the patient’s iliac crest, bringing the pelvis down and slightly back in order to facilitate the sound side.
9. At the same time, shift your weight from one leg (positioned toward the head of the bed) to the other leg (positioned near the foot of the bed). This “lunge” helps you use your legs protect your back.
10. Bring the patient’s upper trunk upright (keeping them forward) into a sitting position while supporting the affected upper extremity.
11. Do not let the weak arm “flop” to the side—keep it tucked between your body and your arm.
v

88 Teaching Independence: A Therapeutic Approach to Stroke Rehabilitation • University Edition Student Workbook
Bed Positioning & Mobility Copyright © 2000-2015 International Clinical Educators, Inc.
Common Mistakes• When in sidelying, don’t forget to drop the heels from the bed before coming to a sitting position.• If facilitation of the pelvis on the sound side isn’t strong enough, the therapist will lift the weight of the
upper trunk off the bed, instead of facilitating movement.• If the trunk is not flexed far enough forward the patient may push back and flop back into bed with hip
extension.• Be careful to use your legs to shift your patient’s weight, not your back.
Notes_______________________________________________________________________________________
_______________________________________________________________________________________
_______________________________________________________________________________________
_______________________________________________________________________________________
_______________________________________________________________________________________
_______________________________________________________________________________________
_______________________________________________________________________________________
_______________________________________________________________________________________
_______________________________________________________________________________________
_______________________________________________________________________________________
_______________________________________________________________________________________
_______________________________________________________________________________________
_______________________________________________________________________________________
_______________________________________________________________________________________
_______________________________________________________________________________________
_______________________________________________________________________________________
_______________________________________________________________________________________
_______________________________________________________________________________________
_______________________________________________________________________________________
�33 Pause and Practice with a Partner

Teaching Independence: A Therapeutic Approach to Stroke Rehabilitation • University Edition Student Workbook 89
Copyright © 2000-2015 International Clinical Educators, Inc. Bed Positioning & Mobility
Sitting to Sidelying Over the Involved Side
Starting PositionThe patient is sitting at the side of the bed; the feet may or may not be supported.
Handling1. Stand in front of the patient and place the patient’s weak arm
between your trunk and your arm, supporting them through the scapula.
2. Have the patient reach across their body with their sound arm to ease themselves down onto the bed.
3. While supporting the weight of their upper trunk through the scapula, make sure you stay directly in front of the patient. Stay in good alignment with them (not too far ahead or behind), so there isn’t any unnecessary strain on their shoulder.
4. As the patient shifts their weight toward the weak side, have them bring the non-involved leg up onto the bed.
5. Assist the patient in bringing the weak leg onto the bed.
6. Gently lower the patient onto their weak side, keeping their arm forward and having them lay down on the scapula, not on the head of the humerus.
7. Once the patient is in sidelying, carefully roll into supine, making sure the arm is brought into a good position of alignment and not left in abduction.
TipsMany patients are afraid to lay down over the weak side, especially if it is not done on a regular basis. To reduce fear, motion to their pillow (placed at the head of the bed, toward the weak side) and ask them if they would like to lay down to rest. This will help them to begin weight shifting and initiating movement toward the weak side.
v

90 Teaching Independence: A Therapeutic Approach to Stroke Rehabilitation • University Edition Student Workbook
Bed Positioning & Mobility Copyright © 2000-2015 International Clinical Educators, Inc.
VariationsPatients are often taught to ”hook” their strong leg under the weak leg to assist in bringing it up onto the bed.This puts the patient into a position of lower extremity extension, making it difficult to move normally. Instead,have your patient put their stronger leg over the weaker leg, scooping it up onto the bed with the knee in a flexed position. This helps to inhibit the extensor tone of the lower extremity and provides better control.
Common MistakesPatients will sometimes “fall” back into bed instead of coming into a sidelying position. Be careful to keep the patient forward, as a traction injury at the shoulder could occur and extensor tone at the hip will be difficult toinhibit.
Notes_______________________________________________________________________________________
_______________________________________________________________________________________
_______________________________________________________________________________________
_______________________________________________________________________________________
_______________________________________________________________________________________
_______________________________________________________________________________________
_______________________________________________________________________________________
_______________________________________________________________________________________
_______________________________________________________________________________________
_______________________________________________________________________________________
_______________________________________________________________________________________
_______________________________________________________________________________________
_______________________________________________________________________________________
_______________________________________________________________________________________
_______________________________________________________________________________________
_______________________________________________________________________________________
_______________________________________________________________________________________
_______________________________________________________________________________________
�34 Pause and Practice with a Partner

Teaching Independence: A Therapeutic Approach to Stroke Rehabilitation • University Edition Student Workbook 91
Copyright © 2000-2015 International Clinical Educators, Inc. Bed Positioning & Mobility
Rolling from Supine to Sidelying: Normal Movement
Analysis of Normal Movement: Rolling from Supine to SidelyingNotice the normal movement (and sequence of movements) of the head, shoulders, trunk, and lowerextremities in rolling from supine to sidelying. There will be variations from person to person (some initiaterolling with the shoulders, others initiate rolling with the legs), but the components which enable people to rollfrom side to side remain fairly consistent.
Notes_______________________________________________________________________________________
_______________________________________________________________________________________
_______________________________________________________________________________________
_______________________________________________________________________________________
_______________________________________________________________________________________
_______________________________________________________________________________________
_______________________________________________________________________________________
_______________________________________________________________________________________
_______________________________________________________________________________________
_______________________________________________________________________________________
_______________________________________________________________________________________
_______________________________________________________________________________________
_______________________________________________________________________________________
_______________________________________________________________________________________
�35 Pause and Practice with a Partner(This Practice Session is not demonstrated on the video.)
Self ExperienceNote your own movements and sequences of movements.
Observe and Analyze OthersNote variations.
v

92 Teaching Independence: A Therapeutic Approach to Stroke Rehabilitation • University Edition Student Workbook
Bed Positioning & Mobility Copyright © 2000-2015 International Clinical Educators, Inc.
Rolling from Supine to Sidelying
Starting PositionThe patient is lying on the bed or the mat table in supine.
Handling1. Have the patient clasp their hands together. This helps them to
make them more aware of the weak side and to “take care” of it. They can either intertwine their fingers together, or (in the case of swollen or painful joints) they can place their thumb in the palm of the weak hand and wrap their fingers around to support the weight of the arm at the wrist.
2. Bring the patient’s knees and hips into flexion.
3. Place the feet onto the bed.
4. Assist the patient to bring their arms into shoulder flexion and protraction.
5. Assisting at the knees and arms, roll the patient onto their side.
TipsFlexing the lower extremities helps to inhibit extensor tone. Bringing the shoulders into flexion and scapularprotraction helps the patient to keep from rolling onto the head of the humerus. To encourage trunk rotationand dissociation of the pelvis and shoulder girdle, bring the hips into sidelying first, then the shoulder orshoulders, and then the hips.
VariationsFor patients with internal rotation of the involved lower extremity, extend both lower extremities. Help thepatient to initiate rolling toward the weak side by placing your hand on the femur of the weak leg. Gently bringit into external rotation. This will help the patient to roll in that direction.
Common MistakesPatients have difficulty rolling toward the weak side due to internal rotation of the affected lower extremity.Avoid the use of an overhead trapeze, pushing with the strong leg, or pulling the bedside railing with the strongarm, all of which can with excessive effort cause abnormal tone.
v
�36 Pause and Practice

Copyright © 2000-2015 International Clinical Educators, Inc. Self-Care
93
self-care
Learning Objectives• List four important safety considerations during dressing activities.• Identify therapeutic methods which help decrease patient frustration during dressing.• Name common mistakes during dressing activities which can lead to painful conditions.• List three methods during grooming and hygiene activities which help to promote independent function.
Introduction to Self-CareActivities of daily living (ADL) are often one of the first skills we introduce in our rehabilitation program but ofteninclude some of the most difficult tasks we ask the patient to do. Getting dressed requires dynamic trunkcontrol with weight shifts to both the weak side and the strong side. Sit to stand is also incorporated. Dressingcan also be perceptually complex for patients and requires task sequencing, right/left discrimination, andcognitive organization. It’s common for patients to put their clothes on inside out, upside down, or reversed.
Patients can become fatigued and frustrated during the self-care program. Grade the ADL program for each individual patient. For lower-level patients, begin with light grooming and hygiene. As the patient improves, add upper extremity dressing and continue with lower extremity dressing.
Use every opportunity during ADL training and self-care activities to address safety, cognitive, perceptual and motor skills.

94 Teaching Independence: A Therapeutic Approach to Stroke Rehabilitation • University Edition Student Workbook
Self-Care Copyright © 2000-2015 International Clinical Educators, Inc.
Fundamental Therapeutic Principles
Activities of Daily Living (ADL)As we begin teaching ADL, keep in mind that these are only some of the possibilities. There are many ways of doing each of the following tasks. You may want to modify your hand placement and continue with facilitation of a task to meet your individual patient’s abilities and specific problem areas.
Therapeutic Benefits of Self-Care ActivitiesSelf-care tasks have many therapeutic benefits in addition to overall functional independence.
• Improved joint range of motion of the involved side.• Increased awareness of the involved side.• Improved problem-solving abilities. We know that tasks done repetitively, on a daily basis and in different
situations, improve problem solving skills and opportunities for learning.• Facilitation of normal movement components of the trunk and limbs. It’s not uncommon to see some
spontaneous movement on the weak side during familiar activities.
Therapy Tips for Self-Care Activities• Grade the activity. If a patient has limited endurance, begin with light hygiene at the sink. Progress to
upper extremity dressing and, as their endurance and tolerance to activity improve, assist with lower extremity dressing as well. Don’t attempt too much in the beginning.
• Monitor fatigue and frustration. What typically took 10 to 15 minutes prior to the stroke, may now take 30 to 45 minutes with full concentration.
• Assist your patient as needed. Don’t just sit and watch your patient (unless you are evaluating their independent status). Avoid saying “What comes next?” or “What did you forget?” This only adds to their frustration.
• Think normal movement. In order to help facilitate normal movement patterns, I often think about how I would move.
• Incorporate the weak side into the task, as appropriate, when assisting your patient. Even if the patient has absolutely no movement of the weak side, you can still incorporate that side into the task.
• Grade your facilitation as your patient improves. When moving the limb, gradually “lighten” your assistance as your patient begins to take over. Be prepared to “take over” if more assistance is needed again. For the higher level patient, you may need to assist only at the moments where they experience difficulty.
• Try to discourage abnormal patterns of movement. Reposition your patient or guide their movements to encourage more normal movement patterns.
• Use the three ways to incorporate a nonfunctional upper extremity into self-care activities (see Improving Function & Awareness: Improving Upper Extremity Function):
1. weight bearing or stabilizer 2. guiding 3. bilateral
v

Teaching Independence: A Therapeutic Approach to Stroke Rehabilitation • University Edition Student Workbook 95
Copyright © 2000-2015 International Clinical Educators, Inc. Self-Care
Analyzing Normal Movement During DressingBefore we begin, remember that all therapeutic methods are based upon normal patterns of movement. Tofully understand the therapeutic value of each technique, you may want to observe your own personalapproach to dressing, grooming, and hygiene. Notice the sequence and patterns of your movements. Noticethe amount of trunk rotation, weight shift, and proximal control for distal function. Notice the placement of thehand and wrist during activities such as brushing your teeth. The better you are at observation and theanalysis of your observations (of both normal and abnormal movement), the better you will be at identifyingand treating your patient’s key problem areas.
During self-care tasks, perhaps more than at any other time during the rehabilitation program, we can observea great variety of movements and patterns of movements. Rather than say “normal,” perhaps it is better to say“typical movement patterns” or “common patterns of movement” since there is a great variety of normalmovement components in the general population. A variation on “normal” does not necessarily mean“abnormal”. We need to be sensitive to the individuality of each patient.
Notes_______________________________________________________________________________________
_______________________________________________________________________________________
_______________________________________________________________________________________
_______________________________________________________________________________________
_______________________________________________________________________________________
_______________________________________________________________________________________
_______________________________________________________________________________________
_______________________________________________________________________________________
_______________________________________________________________________________________
_______________________________________________________________________________________
_______________________________________________________________________________________
_______________________________________________________________________________________
_______________________________________________________________________________________
�37 Pause and Practice with a Partner(This Practice Session is not demonstrated on the video.)
Self ExperienceObserve how your movements vary depending on environmental factors such as the type of clothing you’re wearing, the surface you’re sitting on, etc.

96 Teaching Independence: A Therapeutic Approach to Stroke Rehabilitation • University Edition Student Workbook
Self-Care Copyright © 2000-2015 International Clinical Educators, Inc.
DressingThe following guidelines may need to be modified if your patient has already developed tightness, contractures or if medical conditions interfere.
Starting PositionBegin with your patient sitting in a chair or a wheelchair. If necessary have them transfer from the bed to a chair next to the bed. The stroke patient should not get dressed lying in bed. Not only is this difficult for them, it teaches abnormal patterns of movement. Sitting on the edge of a hospital bed is also not the best choice, as it is too soft (making it difficult to maintain balance) and too high (making it difficult for patients to have their feet flat on the floor with a good base of support). Place your patient’s clothes on the bed, toward their strong side.
HandlingFor safety, always stay on their involved side in order to give assistance.
Donning Underclothes and Pants1. Begin dressing with the involved side. Have the patient cross
their weak leg over their strong leg. Incorporate the weak upper extremity by clasping their hands together.
2. Release their hands and pull the pant leg over the weak foot. Do not allow the weak arm to be trapped in their lap as this can contribute to shoulder pain. Allow the hand to rest on a surface. When able, the patient can use the involved hand as needed.
3. Clasp hands again to uncross weak leg. If the patient has enough movement in the weak leg to actively uncross the leg, (without assistance) encourage them to do so.
4. The patient places the strong foot into the pant leg (without crossing the legs). This step is often difficult for patients because they must transfer weight to the weak leg while picking up the strong leg. You may need to assist the patient in weight shifting toward the weak side.
5. The patient pulls the pants up to their knees.
6. The therapist stands on the patient’s weak side. While holding onto the waistband, the patient leans forward and stands with assistance (as needed). See Standing Safely for detailed instructions.
7. In standing (or if that is too difficult, in sitting) the patient zips and buttons the pants.
8. The therapist helps the patient sit down (see Standing Safely).

Teaching Independence: A Therapeutic Approach to Stroke Rehabilitation • University Edition Student Workbook 97
Copyright © 2000-2015 International Clinical Educators, Inc. Self-Care
Donning Shirt1. Position the shirt across your patient’s knees with the armhole
visible and the sleeve placed between the patient’s knees.
2. Have the patient bend forward at the hips and place their weak hand in the sleeve. The forward flexion helps to inhibit lower extremity extensor tone and, at the same time, bringing the scapula forward helps to inhibit upper extremity flexor tone.
3. As the arm drops into the sleeve, the patient brings the collar up to the neck.
4. As the patient sits upright, place the strong arm into the sleeve.
5. Buttoning the shirt from the bottom to the top helps to keep it straight and buttons in proper alignment.
VariationsFor T-shirts and pullover shirts, place the weak arm in the sleeve, then the strong arm, and then gather up the front of the shirt and place over the head.
Donning Shoes and Socks1. Have the patient cross their weak leg over their strong leg (as
previously described).
2. Begin with the weak foot to don shoes and socks.
3. Cross the strong leg over the weak leg and put on the sock.
4. Step into the shoe.
Notes_______________________________________________________________________________________
_______________________________________________________________________________________
_______________________________________________________________________________________
_______________________________________________________________________________________
_______________________________________________________________________________________
_______________________________________________________________________________________
_______________________________________________________________________________________
�38 Pause and PracticeNote your own movement patterns. Note how environmental factors play a roll in movement patterns.

98 Teaching Independence: A Therapeutic Approach to Stroke Rehabilitation • University Edition Student Workbook
Self-Care Copyright © 2000-2015 International Clinical Educators, Inc.
One-Handed Shoe TyingLearning one-handed shoe tying gives patients the option of wearing any shoes with laces.
Prepare the shoe for the patient:1. Unlace the shoe completely.
2. Make a simple knot at one end and place it through the hole on the outside of the shoe (on the patient’s strong side).
3. Bring the lace across the shoe down through the first hole.
4. Bring the lace up and under the second hole on the opposite side. Continue lacing in this pattern to the top of the shoe.
5. At the top, go through the last hole a second time to keep the shoe securely on the foot all day long.
Now the shoe is ready to give the patient.1. Teach the patient to make a simple loop (as in the letter “c”)
starting up toward the ankle and then down toward the toe of the shoe.
2. Tuck the shoe lace (toward the toe) under laces which span the last two holes at the top of the shoe.
3. Pull and cinch toward the strong side.
4. If the laces are too long, you can cut the laces. Be sure to cut the end of the shoe lace where the knot is, so the “working” end doesn’t become frayed.
About tennis shoes:Patients with impaired ankle dorsiflexion often do much better with leather-soled shoes than with tennis shoes. The “stickiness” of rubber soles (especially on carpeting) can hinder swing phase and worsen abnormal gait patterns, causing exaggerated circumduction. Also, older patients who never wore tennis shoes prior to the stroke can find walking in them difficult. And, because tennis shoes are designed to absorb impact, if your patients have any sensory loss, they may have difficulty feeling when their foot hits the floor during heel strike.
�39 Pause and Practice
v

Teaching Independence: A Therapeutic Approach to Stroke Rehabilitation • University Edition Student Workbook 99
Copyright © 2000-2015 International Clinical Educators, Inc. Self-Care
Undressing
Analysis of Normal Movement in UndressingNotice the normal movement (and sequence of movements) of the head, shoulders, trunk, and lowerextremities in undressing. There will be a number of variations from person to person depending upon size,build, and type of clothing worn.
Notes_______________________________________________________________________________________
_______________________________________________________________________________________
_______________________________________________________________________________________
_______________________________________________________________________________________
_______________________________________________________________________________________
_______________________________________________________________________________________
Undressing with Assistance
Starting PositionBegin with the patient sitting on a chair or in a wheelchair with the therapist on the involved side.
HandlingWhen undressing, begin with the strong side. Getting undressed is easier to do and more automatic for the patient. The patient essentially reverses the order described in “dressing”.
Doffing ShirtRemove the sleeve of the strong arm first.
While removing the sleeve from the involved side, keep the trunk flexed forward and the shoulder down and forward. Allow the scapula to come into protraction in order to reduce flexion tone of the upper extremity.
�40 Pause and PracticeSelf ExperienceNote your own movements and sequences of movements. Note how different types of clothing and other environmental factors influence your movements.
v
v

100 Teaching Independence: A Therapeutic Approach to Stroke Rehabilitation • University Edition Student Workbook
Self-Care Copyright © 2000-2015 International Clinical Educators, Inc.
Doffing PantsWhile in standing, unfasten the pants and bring them down over the hips. Allow the patient to sit and removethe non-involved leg first by crossing the weak leg over the strong leg.
Doffing Shoes and SocksClasp hands together and cross the weak leg over the strong leg. If possible, incorporate the involved handinto the task or put it into a position of light weight bearing. For energy conservation, remove the shoe and sock (at the same time) from one leg before crossing the other leg.
Notes_______________________________________________________________________________________
_______________________________________________________________________________________
_______________________________________________________________________________________
_______________________________________________________________________________________
_______________________________________________________________________________________
_______________________________________________________________________________________
_______________________________________________________________________________________
_______________________________________________________________________________________
_______________________________________________________________________________________
_______________________________________________________________________________________
_______________________________________________________________________________________
_______________________________________________________________________________________
_______________________________________________________________________________________
_______________________________________________________________________________________
_______________________________________________________________________________________
_______________________________________________________________________________________
_______________________________________________________________________________________
_______________________________________________________________________________________
�41 Pause and Practice

Teaching Independence: A Therapeutic Approach to Stroke Rehabilitation • University Edition Student Workbook 101
Copyright © 2000-2015 International Clinical Educators, Inc. Self-Care
Correcting Problems in Self-CareDon’t allow your patient’s arm to become trapped in the lap. This could cause pain and impingement at theshoulder.
Notes• Some patients have difficulty sitting down because they are standing on a locked knee. To help release
the knee, bring the pelvis lightly down and forward.• Many stroke patients have difficulty picking up the non-involved leg in order to put on shoes or socks.
This is because of their inability to weight shift toward the weak side. Assist your patient to weight shift toward the weak side with one hand on the upper trunk and the other helping to put weight through the knee and into the foot.
Notes_______________________________________________________________________________________
_______________________________________________________________________________________
_______________________________________________________________________________________
_______________________________________________________________________________________
_______________________________________________________________________________________
_______________________________________________________________________________________
_______________________________________________________________________________________
_______________________________________________________________________________________
_______________________________________________________________________________________
_______________________________________________________________________________________
_______________________________________________________________________________________
_______________________________________________________________________________________
_______________________________________________________________________________________
_______________________________________________________________________________________
_______________________________________________________________________________________
_______________________________________________________________________________________
_______________________________________________________________________________________
_______________________________________________________________________________________
_______________________________________________________________________________________
v
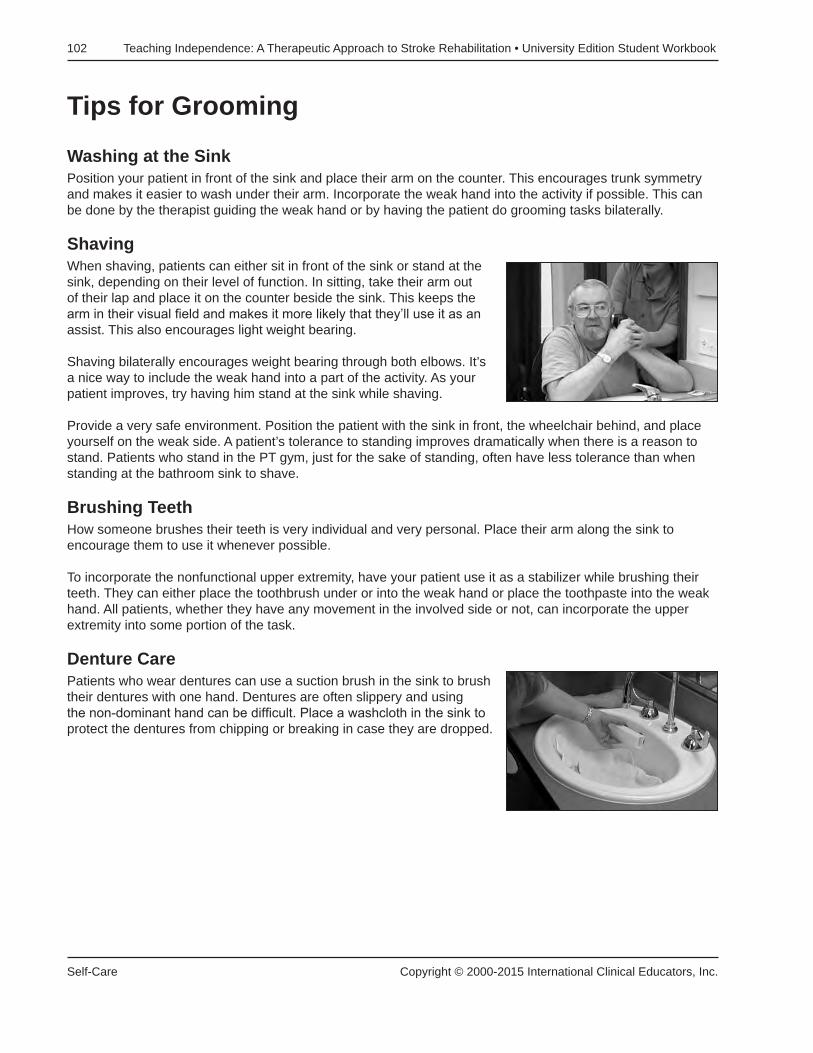
102 Teaching Independence: A Therapeutic Approach to Stroke Rehabilitation • University Edition Student Workbook
Self-Care Copyright © 2000-2015 International Clinical Educators, Inc.
Tips for Grooming
Washing at the SinkPosition your patient in front of the sink and place their arm on the counter. This encourages trunk symmetry and makes it easier to wash under their arm. Incorporate the weak hand into the activity if possible. This can be done by the therapist guiding the weak hand or by having the patient do grooming tasks bilaterally.
ShavingWhen shaving, patients can either sit in front of the sink or stand at the sink, depending on their level of function. In sitting, take their arm out of their lap and place it on the counter beside the sink. This keeps the arm in their visual field and makes it more likely that they’ll use it as an assist. This also encourages light weight bearing.
Shaving bilaterally encourages weight bearing through both elbows. It’s a nice way to include the weak hand into a part of the activity. As your patient improves, try having him stand at the sink while shaving.
Provide a very safe environment. Position the patient with the sink in front, the wheelchair behind, and place yourself on the weak side. A patient’s tolerance to standing improves dramatically when there is a reason to stand. Patients who stand in the PT gym, just for the sake of standing, often have less tolerance than when standing at the bathroom sink to shave.
Brushing TeethHow someone brushes their teeth is very individual and very personal. Place their arm along the sink to encourage them to use it whenever possible.
To incorporate the nonfunctional upper extremity, have your patient use it as a stabilizer while brushing their teeth. They can either place the toothbrush under or into the weak hand or place the toothpaste into the weak hand. All patients, whether they have any movement in the involved side or not, can incorporate the upper extremity into some portion of the task.
Denture CarePatients who wear dentures can use a suction brush in the sink to brush their dentures with one hand. Dentures are often slippery and using the non-dominant hand can be difficult. Place a washcloth in the sink to protect the dentures from chipping or breaking in case they are dropped.

Teaching Independence: A Therapeutic Approach to Stroke Rehabilitation • University Edition Student Workbook 103
Copyright © 2000-2015 International Clinical Educators, Inc. Self-Care
Brushing HairIt makes sense for your patient to use their strong hand to brush their hair, but sometimes I guide the weak hand to provide sensory stimulation to that side. At the same time, this also encourages range of motion. Many patients begin to lose external rotation at the shoulder and guiding their hand in these patterns of movement can be helpful. Be careful to make sure the glenohumeral joint is in good alignment (see Preventing Shoulder Pain).
Bathing TipsIt is often difficult for patients to wash and dry their strong side. The following tips may be helpful whether washing at the sink or sitting on a bath bench in the tub or shower.
• Place a damp washcloth on the non-involved leg. Put some soap on the washcloth and have your patient bend forward to wash the non-involved hand and arm.
• Use the same method to dry the arm with a towel placed on the non-involved leg.
• To dry the back, place the towel over the shoulder. Reach to the small of the back and pull the towel down. Place the towel over the other shoulder, reach down to the small of the back, and pull the towel down. This will dry off the entire back.
Adaptive Equipment Tips for Grooming and HygieneAdaptive equipment can be helpful, but too much equipment can be confusing to your patients. Here are two very simple, inexpensive ideas that my patients have found useful.
• First, a brush with suction cups. This can be used as a fingernail brush or a denture brush or can be used in the kitchen to help wash utensils.
• Second, soap-on-a-rope. It sounds so simple, but many patients slip and fall at home reaching for that bar of soap that has fallen to the floor of the shower. It’s cheap, it’s easy, and my patients love it. Punch a hole in the middle of the soap with any pointed instrument (an awl, ice pick, or screwdriver works fine). I like to use Ivory brand soap because it doesn’t crack. Cut a length of cord and push it through the hole. Tie a knot and you’re ready!