iconotech technical paper number bt-008 · using the bartender text tool overview: this tutorial...
TRANSCRIPT

Case Printing Systems
conotechi Technical Paper number BT-008
1
Using the BarTender Text ToolOverview: This tutorial will show you how to use the Text tool in the BarTender software.
Fig. 1
Fig. 2
Fig. 4Fig. 3
1. The BarTender Text tool offers several options. (Fig. 1) Users can choose a single line of text, multiple lines of text, a word processor, an arc configuration and symbol font characters. All are available in the drop down menu.
The text tools all function the same. After selecting the type of text tool from the drop down menu, it loads the cursor and when you click on the layout, a sample text field is activated. (Fig. 2)
2. With the sample text on the layout, double click to bring up the Properties menu, (Fig. 3) or you may use the Data Edit tool to edit directly on the layout. (Fig. 4) The menu will vary in options depending on the tool that is chosen.
In the Properties menu, the Data Source tab is where text is entered. The data Type is defaulted to Embedded Data and more often than not, that is what you will be doing. The only other option that makes sense here is if you are using a data base which can be accessed as an option by clicking on the hand icon and following the wizard to set up. This is covered in the tutorial BT 021, Using Data Bases in BarTender.
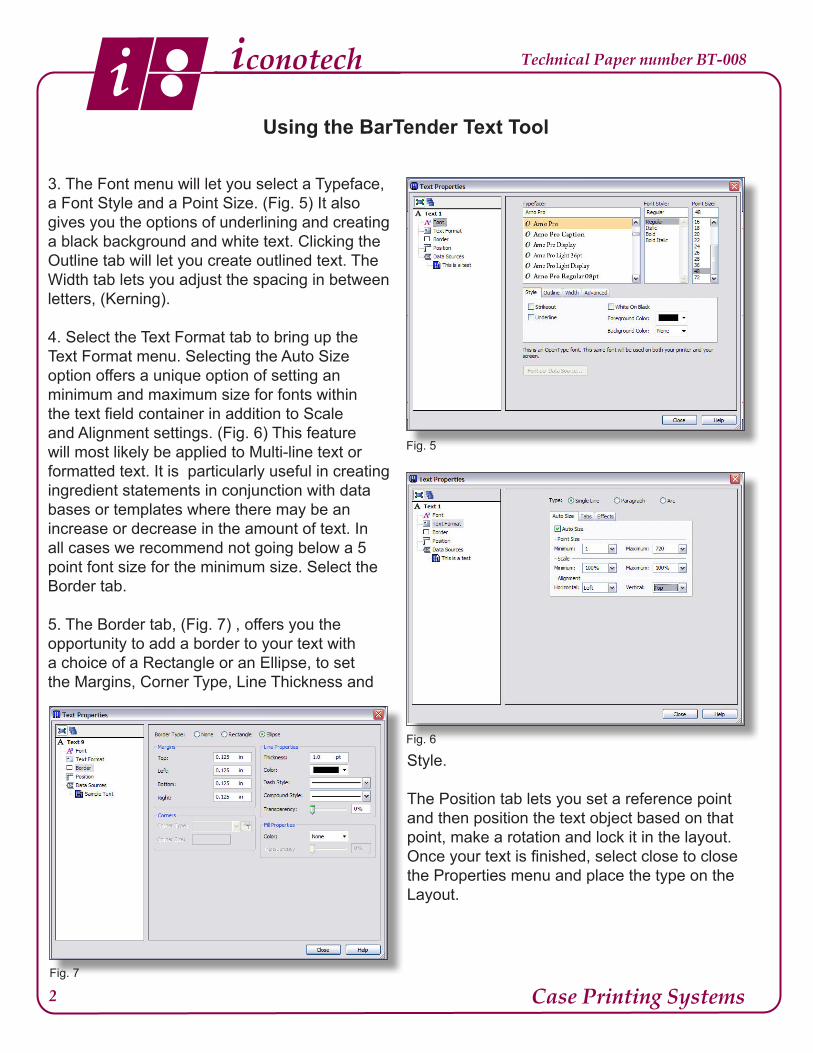
After entering your text in the Embed Data field, select the Font tab in the left had pane to bring up the Font menu. (Fig. 5)
Case Printing Systems
conotechi
2
Fig. 6
Fig. 7
Technical Paper number BT-008
Using the BarTender Text Tool
Fig. 5
3. The Font menu will let you select a Typeface, a Font Style and a Point Size. (Fig. 5) It also gives you the options of underlining and creating a black background and white text. Clicking the Outline tab will let you create outlined text. The Width tab lets you adjust the spacing in between letters, (Kerning).
4. Select the Text Format tab to bring up the Text Format menu. Selecting the Auto Size option offers a unique option of setting an minimum and maximum size for fonts within the text field container in addition to Scale and Alignment settings. (Fig. 6) This feature will most likely be applied to Multi-line text or formatted text. It is particularly useful in creating ingredient statements in conjunction with data bases or templates where there may be an increase or decrease in the amount of text. In all cases we recommend not going below a 5 point font size for the minimum size. Select the Border tab.
5. The Border tab, (Fig. 7) , offers you the opportunity to add a border to your text with a choice of a Rectangle or an Ellipse, to set the Margins, Corner Type, Line Thickness and
Style.
The Position tab lets you set a reference point and then position the text object based on that point, make a rotation and lock it in the layout. Once your text is finished, select close to close the Properties menu and place the type on the Layout.

Case Printing Systems
conotechi
3
Fig. 8
Technical Paper number BT-008
Using the BarTender Text Tool
6. As mentioned, the base menus are the same for all of the text types with slight variations based on the tool type. We will now look at the deviations form those menus.
7. The Arc tool, (Fig. 8) offers a menu that lets you configure the arc to your liking. You can prescribe the Reference Point, the Radius of the arc, the Reference Angle, Direction and Alignment.
Fig. 9
8. The Word Processor, (Fig. 9) is just that, everything you would expect form a word processor except, spell check. The home tab offers about everything you will be using this tool for. The Insert tab, (Fig. 10) lets you insert Tables, Graphics or Symbols into the text field. This is where special characters for foreign languages may be added.
Case Printing Systems
conotechi
4
Technical Paper number BT-008
Using the BarTender Text Tool
Fig. 10
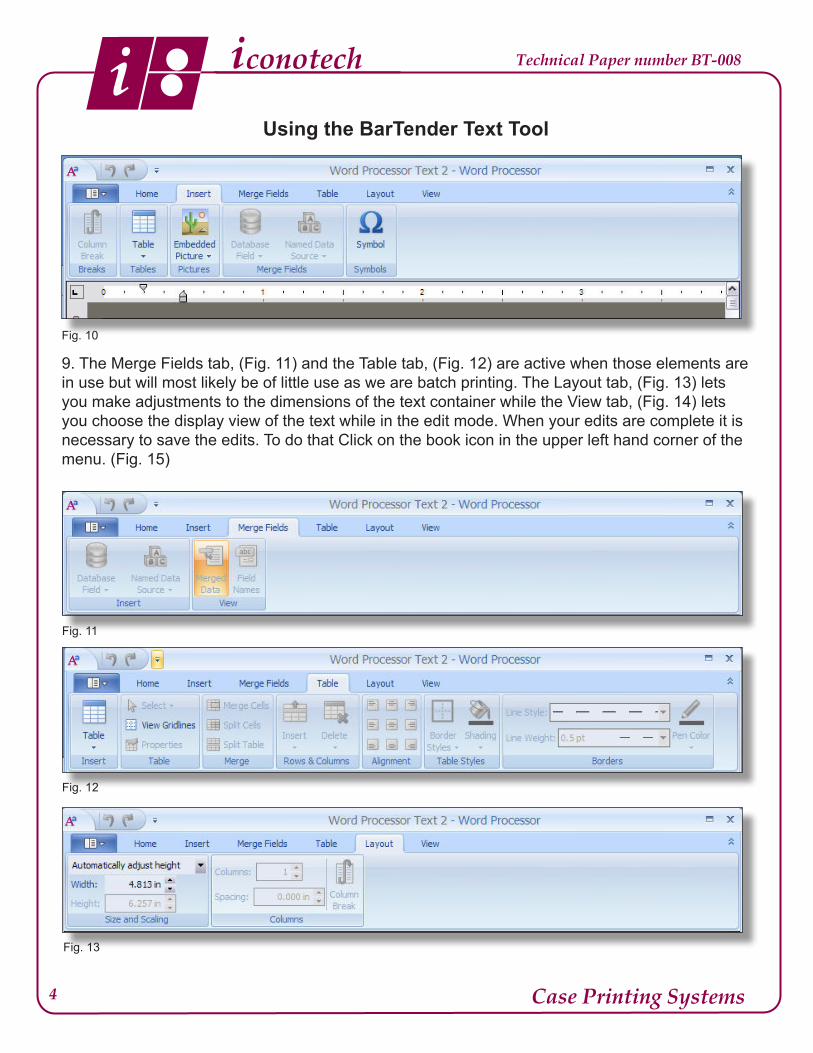
9. The Merge Fields tab, (Fig. 11) and the Table tab, (Fig. 12) are active when those elements are in use but will most likely be of little use as we are batch printing. The Layout tab, (Fig. 13) lets you make adjustments to the dimensions of the text container while the View tab, (Fig. 14) lets you choose the display view of the text while in the edit mode. When your edits are complete it is necessary to save the edits. To do that Click on the book icon in the upper left hand corner of the menu. (Fig. 15)
Fig. 11
Fig. 12
Fig. 13

Case Printing Systems
conotechi
5
Technical Paper number BT-008
Using the BarTender Text Tool
Fig. 14
Fig. 15
10. Once the text is on the desktop, single,multi-line and arced text may be further styled using the Text Toolbar. (Fig. 16) Double clicking a Word Processor text field will take you directly to the word processor and bypass the Properties menu.
Fig. 16