igel remote manager installation guide - usermanual.wiki · igel sap-db is a an installation...
TRANSCRIPT

IGEL Technology GmbH High Availability and Load Balancing Concept 1
IGEL Remote Manager
IGEL Remote Manager
Installation Guide
V 2.06 5/2007 Copyright © 2007 IGEL Technology GmbH

IGEL Technology GmbH High Availability and Load Balancing Concept 2
Important Information
• Copyright
This publication is protected under international copyright laws, with all rights reserved. No part of this manual, including the products and software described in it, may be reproduced, manipulated, transmitted, transcribed, stored in a retrieval system, or translated into any language in any form or by any means, except documentation kept by the purchaser for backup purposes, without the express written permission of IGEL Technology GmbH.
• Disclaimer
The information in this document is subject to change without notice. IGEL Technology GmbH makes no representations or warranties with respect to the contents hereof and specifically disclaims any implied warranties of merchantability or fitness for any particular purpose. Further, IGEL Technology GmbH reserves the right to revise this publication and to make changes from time to time in the content hereof without obligation of IGEL Technology GmbH to notify any person of such revision or changes.
• Trademark Recognition
IGEL is a registered trademark of IGEL GmbH.
SAPdb is a trademark of SAP AG.
Windows, Windows 95, Windows NT, Windows 2000, Windows XP and Windows 2003 are either registered trademarks or trademarks of Microsoft Corporation .
Java is a registered trademark of Sun Microsystems, Inc.
All other products and corporate names appearing in this manual may or may not be registered trademarks or copyrights of their respective companies, and are used only for identification or explanation and to the owner’s benefit.
Specifications and information contained in this manual are furnished for informational use only, and are subject to change at any time without notice, and should not be construed as a commitment by IGEL Technology GmbH.IGEL Technology GmbH assumes no responsibility or liability for any errors or inaccuracies that may appear in this manual, including the products and software described in it.
Copyright © 2007 IGEL Technology GmbH. All Rights Reserved.
V 2.06 5/2007 Copyright © 2007 IGEL Technology GmbH
IGEL Technology GmbH High Availability and Load Balancing Concept 3
Table of Contents
1 INTRODUCTION............................................................................................................................. 42 DEFINITIONS................................................................................................................................ 43 PREREQUISITES............................................................................................................................ 44 REMOTE MANAGER INSTALLATION................................................................................................ 5
4.1 Installation Types............................................................................................................ 54.2 Installation Process.......................................................................................................... 5
4.2.1 License Agreement................................................................................................................... 64.2.2 Installation Path........................................................................................................................64.2.3 Installation Type....................................................................................................................... 64.2.4 Default Installation................................................................................................................... 74.2.5 Installation for use of 3rd party databases............................................................................74.2.6 Console only Installation..........................................................................................................84.2.7 Summary................................................................................................................................... 8
5 DATABASE SETUP......................................................................................................................... 95.1 IGEL SAP-DB Installation............................................................................................. 9
5.1.1 Linux Systems........................................................................................................................... 95.1.2 Windows Systems................................................................................................................... 105.1.3 Uninstallation of SAPdb.........................................................................................................10
5.2 Setup for 3rd party Databases...................................................................................... 125.2.1 Oracle 9i/10g........................................................................................................................... 125.2.2 Microsoft SQL Server 2005................................................................................................... 125.2.3 IBM DB2 (since version 8.2).................................................................................................. 125.2.4 Setting up a new Datasource..................................................................................................13
6 UNINSTALLATION....................................................................................................................... 146.1 Linux and Windows: Uninstallation of IGEL Remote Manager............................... 14
7 CERTIFICATES........................................................................................................................... 158 TROUBLESHOOTING.................................................................................................................... 16
8.1 Linux: Errors while installing SAPdb.......................................................................... 168.2 Linux/Windows: Uninstalling SAPdb manually......................................................... 16
9 HIGH AVAILABILITY AND LOAD BALANCING CONCEPT.................................................................. 179.1 Introduction................................................................................................................... 179.2 Prerequisites................................................................................................................... 179.3 SQL Server Setup.......................................................................................................... 17
9.3.1 First Steps................................................................................................................................179.3.2 Create publications.................................................................................................................179.3.3 Create subscriptions............................................................................................................... 18
9.4 RM Server Setup........................................................................................................... 189.4.1 Failover RM............................................................................................................................ 189.4.2 Failover Database................................................................................................................... 189.4.3 Failover Job Scheduling.........................................................................................................19
9.5 Failover Scenarios......................................................................................................... 199.5.1 Example Configuration..........................................................................................................199.5.2 Problems and Solutions (Examples)..................................................................................... 20
V 2.06 5/2007 Copyright © 2007 IGEL Technology GmbH

IGEL Technology GmbH High Availability and Load Balancing Concept 4
1 Introduction
This document will assist in installing (or uninstalling) the IGEL Remote Manager on your system. It covers both, the Linux and the Windows versions.
2 Definitions
The program suite „IGEL Remote Manager“ (hereinafter referred to as IRM) consists of these three components.
- IGEL Remote Manager Server (RM Server)- IGEL Remote Manager Administrator (RM Admin)- IGEL Remote Manager Console (RM Console)
RM Server is the a server application that requires a relational database management system (RDBMS), in the following called database (see Prerequisites for supported databases). The database can be installed on remote hosts.
RM Admin is a setup utility for the RM Server component, that is installed locally on the RM Server’s system.
RM Console is a client component that provides a graphical user interface (GUI) to manage the RM Server application. RM Console can be installed either locally on the RM Server, or at any remote system.
IGEL SAP-DB is a an installation package for SAP-DB ( a free Enterprise Open Source Database, now called Max-DB) that is shipped with the IGEL Remote Manager software or freely available at IGEL.
3 Prerequisites
To install IRM, your system must meet the following requirements:
IRM Server:- Operating system: Windows 2000/XP/2003 or Linux** (see below)- At least a 1 GHz processor recommended- At least 256MB required, with 512 preferred- At least 500MB of free disk space- No version of SAPdb already installed on the system
Console:- Operating system: Windows 9x/ME/NT/2000/XP/2003 or any common Linux distribution.- At least 128MB RAM recommended- At least 50MB of free disk space
Database:- IGEL SAP-DB or Max-DB- Oracle 9i/10g- Microsoft SQL Server 2005- IBM DB2 (version 7.2 and above)
**: IRM has been successfully tested on the following Linux distributions:- Debian GNU/Linux 3.0 (woody)- Mandrake 8.1- Mandrake 9.0- Mandrake 9.1- SuSE 7.3- SuSE 8.1- SuSE 8.2- RedHat 8.0- RedHat 9.0- TurboLinux 7.0
V 2.06 5/2007 Copyright © 2007 IGEL Technology GmbH

IGEL Technology GmbH High Availability and Load Balancing Concept 5
4 Remote Manager Installation
4.1 Installation Types
The IGEL Remote Manager Installer offers three types of Installation:- Default- Without Database- Console only
Default and Without database are RM Server installations (also containing the RM Console).
Default installation requires a system with a preinstalled and running IGEL SAP-DB.
If you prefer using a 3d party database you have to manually configure a datasource when the installation has finished (Use RM Admin tool as described in the Remote Manager’s user manual).
For both types of RM Server installations first see chapter Database Setup !
4.2 Installation Process
- Windows Systems:
Start the IGEL Remote Manager Installer by executing setup-igel-rm-win32_2.03.110.exe(or subsequent newer releases)
Note: The installer creates entries in Windows' „Add/Remove Software“ control panel as well as a start menu group „IGEL Remote Manager“ with links to the uninstallers.Additionally, an icon for launching IRM is created on the desktop and inside the „IGEL Remote Manager“ start menu group.
V 2.06 5/2007 Copyright © 2007 IGEL Technology GmbH

IGEL Technology GmbH High Availability and Load Balancing Concept 6
- Linux Systems:
The installation program of the IRM Server is an X11 application, so you need to be able to display X11 applications.
Log in as „root“.
Open an xterm window (like xterm, console, gnome-terminal etc) and chdir to the directory where the packages reside.First, check if the package is executable. If not, use „chmod a+x setup*.bin“ to make them executable.
Start the IGEL Remote Manager Installer by executing setup-igel-rm-linux_2.03.110.bin(or subsequent newer releases). The installer decompresses itself to /tmp, launches its Java engine, and removes itself from /tmp after the execution.
4.2.1 License Agreement
Next to the Welcome Panel, the IGEL RM license agreement will be displayed. If you do not agree with the terms of the license, the installer will terminate and you may not use IRM.
4.2.2 Installation Path
If you agree with the license, click Next to be prompted for the path where to install the software.The default path for window systems is C:\Program files\IGEL\RemoteManager(Linux: /opt/IGEL/RemoteManager), which will work almost anywhere, but may as well be changed manually.
Note: Inside the installer, you can use shortcut keys to access most buttons or input boxes; just press Alt and the underlined letter (e.g. Alt+N for Next).
4.2.3 Installation Type
Next select one of the previously described installation types.Note that you need an pre-installed IGEL SAP-DB for Default installation !
V 2.06 5/2007 Copyright © 2007 IGEL Technology GmbH

IGEL Technology GmbH High Availability and Load Balancing Concept 7
4.2.4 Default Installation
The Default installation will install all IGEL Remote Manager Software packages on your system, including the RM console.Additionally the installer creates an database instance and schema on your SAP-DB. When you use a SAP-DB that already contains an database instance from former Remote Manager Installations the existing one is used and eventually updated.
Your first have to define the following passwords for your database:
The DBM/DBA password.This will be used as master password for the SAPdb Database System.Using this password, the IRM database will be created.(This password will also be requested when trying to uninstall IRM!)
Note: Be aware that if someone else knows this password and is familiar with SAPdb, (s)he can delete your complete database!
The RM username and password.The account you enter here will be used to login to RM as well as accessing SAPdb.The installer will create a user account for this username/password inside the SAPdb system, allowing limited access to SAPdb.
Next, the installer shows a summary of your installation options.
Note: Up to this point, you can still cancel the setup, without having any changes made to your system!
By clicking Next, the installation starts. The time this will take depends on you system.(If your computer is 700 MHz or below, it can take up to 20 minutes.)
When the installer has finished, log files are in the installation root directory and can be used to troubleshoot installation problems.They will also be needed, if you contact our support team in case of an improper installation of IRM.
4.2.5 Installation for use of 3rd party databases
This option installs all IGEL Remote Manager Software packages on your system, including the RM console. There are no additional steps required for installation of the IGEL Remote Manager. See chapter 5.2 for information about setting up 3rd party databases.
After the installation a datasource has to be configured with the RM Admin application.
V 2.06 5/2007 Copyright © 2007 IGEL Technology GmbH
IGEL Technology GmbH High Availability and Load Balancing Concept 8
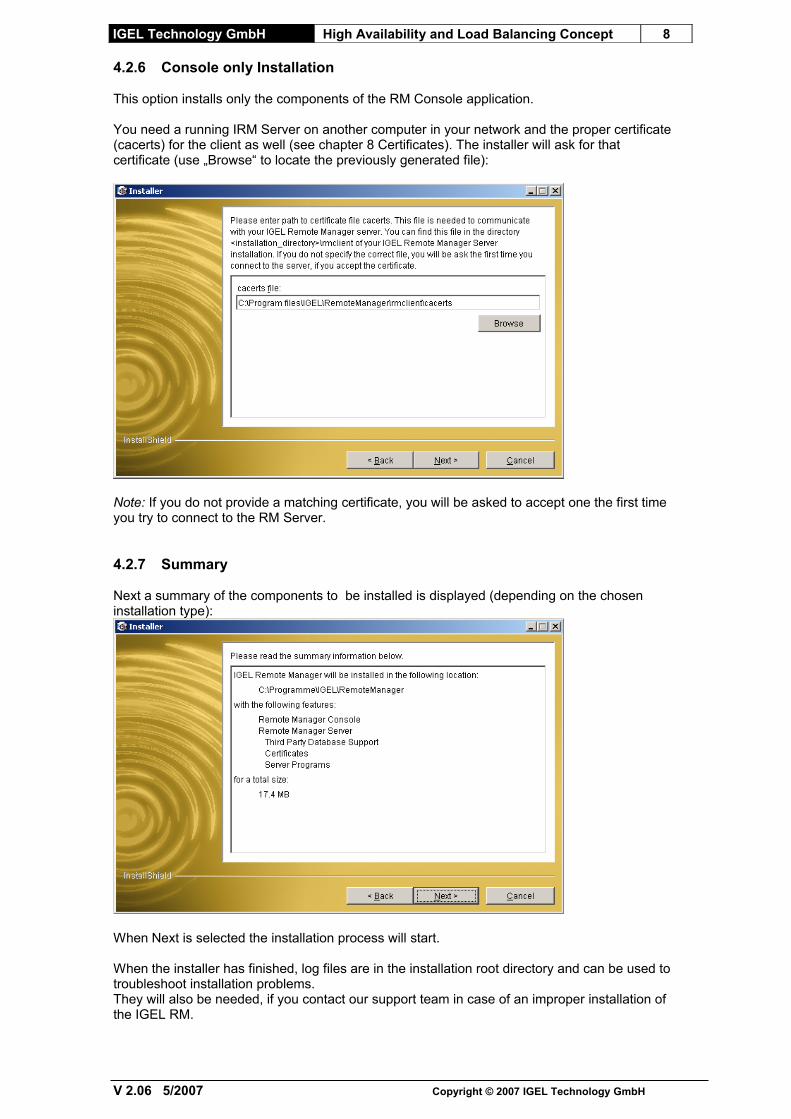
4.2.6 Console only Installation
This option installs only the components of the RM Console application.
You need a running IRM Server on another computer in your network and the proper certificate (cacerts) for the client as well (see chapter 8 Certificates). The installer will ask for that certificate (use „Browse“ to locate the previously generated file):
Note: If you do not provide a matching certificate, you will be asked to accept one the first time you try to connect to the RM Server.
4.2.7 Summary
Next a summary of the components to be installed is displayed (depending on the chosen installation type):
When Next is selected the installation process will start.
When the installer has finished, log files are in the installation root directory and can be used to troubleshoot installation problems. They will also be needed, if you contact our support team in case of an improper installation of the IGEL RM.
V 2.06 5/2007 Copyright © 2007 IGEL Technology GmbH

IGEL Technology GmbH High Availability and Load Balancing Concept 9
5 Database Setup
5.1 IGEL SAP-DB Installation
Igel RM uses SAPdb to store its data. We provide our own SAPdb package together with the Remote Manager. Use this package if you like to use RM Admin's built in backup functionality.You may not have another version of SAPdb running on the computer the Remote Manager will be installed on.
5.1.1 Linux Systems
Log in as „root“.
Open an xterm window (like xterm, console, gnome-terminal etc) and chdir to the directory where the packages reside.First, check if the package is executable. If not, use „chmod a+x setup*.bin“ to make them executable.
Start the installation by typing ./setup_sapdb_1.00.100.bin.(or subsequent newer releases).
Because SAPdb provides a very basic setup tool, we created a package in order to ease up the installation for you. You can cancel the setup at any stage (until the final summary screen) by pressing ESC twice - in this case, no changes will be made to your system.
The package is a self-extracting .tar.gz-archive that uncompresses itself into /tmp, launches the installer and removes itself from /tmp after the installation.You may also uncompress it to a specific location and launch setup.sh manually (have a look at the --help option).
At first, the setup prompts for the installation path for the SAPdb.(the default is /opt/IGEL/SAPdb.)
Enter the desired path or simply hit Enter to go with the default (recommended).
Note: It is recommended to install IRM SAPdb into a directory which resides on an ext2 filesystem. We found that SAPdb is noticeably slower on a Reiser FS partition.
The next setup step looks for your init- and runlevel scripts. This only works, if your system has a System V-like init system (which most Linux distributions have). If one of the paths is not found, the setup program will prompt for it. If all scripts were found, you can continue by hitting Enter.You may also manipulate the paths by selecting “No”, but this is usually not necessary and also not recommended.
V 2.06 5/2007 Copyright © 2007 IGEL Technology GmbH

IGEL Technology GmbH High Availability and Load Balancing Concept 10
Next, set the runlevel you want the IRM Server to be launched in.If you want it (and thus also SAPdb) to start every boot up, just leave all runlevels checked.In case you want to start it by hand, deselect all runlevels (by using the cursor up/down keys to navigate and space to (de)select).If one or more runlevel paths were not found or you chose to change any, these paths are requested now.
Now, the setup continues and asks which UNIX username and group should SAPdb use. You may use the default values unless you want to use a specific user (or group). This user will be used by SAPdb to access its data files, so it runs safely inside the UNIX security system.
The last setup screen before the actual installation of SAPdb shows a summary of all parameters that will be used.If you wish to change anything, press ESC twice to exit and simply restart the setup program.
If you continue, the installer of SAPdb will be started. (This may take a little while.)If it encounters an error, no other changes to your system will be made.
If SAPdb's installer succeeds, the installation of this package is complete.
5.1.2 Windows Systems
To install SAPdb on a Windows system, simply run setup_sapdb_1.00.100.exe.
Note: SAPdb can only be installed on Windows 2000/XP/2003
After accepting the license agreement, you will be prompted where to install SAPdb.
Before starting the actual installation, you will see a summary.Here you may quit the installer without your system being touched.If you proceed, the installer will copy the SAPdb installer files to the selected path, launch SAPdb's own installation routine and remove the temporary installer files after the installation.After the installer finishes, you need to reboot your computer to proceed with the installation of the IRM itself.
5.1.3 Uninstallation of SAPdb
Before uninstalling SAPdb, first remove IRM! (As long as you still have records in the database, SAPdb cannot be uninstalled.)
Linux:
Run uninstall.sh from the _uninst subdirectory of SAPdb's installation directory. (e.g.: /opt/IGEL/Remote Manager/_uninst/uninstall.sh)
It is a text mode uninstaller; just answer the questions with „y“ or „n“.
V 2.06 5/2007 Copyright © 2007 IGEL Technology GmbH

IGEL Technology GmbH High Availability and Load Balancing Concept 11
If SAPdb's own uninstaller fails (shows an error message instead of the messages - see below to the right), do not answer the question, if you want to remove initscripts and runlevel links with “y”.
After the uninstallation script terminates, there may be some logfiles or data files that still reside in SAPdb's and IRM's directory. If no error occurred during uninstallation, and you do not want to save these files, you can safely remove.
Windows:
Use the link in the IGEL program group of the start menu or run uninstaller.exe from the _uninst subdirectory of SAPdb's installation directory.(Example: C:\Program Files\IGEL\SAPdb*\_uninst\uninstaller.exe)
The Windows uninstaller of SAPdb is again a graphical version (InstallShield uninstaller).Just follow the wizard to remove SAPdb.No further input is required.
V 2.06 5/2007 Copyright © 2007 IGEL Technology GmbH

IGEL Technology GmbH High Availability and Load Balancing Concept 12
5.2 Setup for 3rd party Databases
Use the Remote Manager Administrator’s Datasource Configuration to define remote or local database-connections as described in the RM user manual.This tool creates a database-schema containing all necessary tables and other schema objects for the Remote Manager Server application. An existing RM database –schema is mounted and eventually updated to the current version.
5.2.1 Oracle 9i/10g
Create a database user with RESOURCE permissions.Use RM Administrator to setup a new datasource of type Oracle.
5.2.2 Microsoft SQL Server 2005
1. Create a Login with login name rmlogin.2. Create an empty DB-schema with equal schema name rmlogin.3. Create a database user and assign login and default schema you created in the
previous steps.4. Assure that permissions for creating tables and procedures (minimum) are granted to
the database user you created in step 3.5. Grant Control permission on schema rmlogin to the database user.
(grant control on schema::rmlogin to rmuser)6. Make sure that SQL Server TCP/IP service is active and get its port number.7. Check if you are able to connect to the database using the credentials for rmlogin.8. Use RM Administrator to setup a new datasource of type SQL-Server with username
rmlogin and the port number of SQL Server TCP/IP service.
5.2.3 IBM DB2 (since version 8.2)
IGEL Remote Manager Server requires tablespaces with at least 16Kb pages, which is not the default for DB2. In order to create a tablespace with an 8 Kb page size, you must also have a buffer pool with an 8kb page size. Furthermore the default size of the logfiles is not sufficient.
1. Create a buffer pool with 16 Kb page size. 2. Create 8 (if not yet existing) regular, user-temporary and system-temporary tablespaces
with a page size of at least 16 Kb.3. Add a user with name username that has permissions CONNECT and CREATE
TABLE. Assign regular and user-temporary tablespace from step 2 to this use. Grant full access on these tablespaces to user username (CREATEIN, DROPIN, ALTERIN).
4. Create a DB-schema with schema name equal to username.5. Alter the database’s configuration parameters that determine it’s logfile size. The
following values have been successfully tested with the IGEL Remote Manager:logilesiz = 4000logprimary = 16logsecond = 8
6. Make sure that DB2 TCP/IP service is active and get its port number from the database’s configuration.
7. Check if you are able to connect to the database using the credentials for username.8. Use RM Administrator to setup a new datasource of type DB2 with username
username and the port number you received in step 7.
V 2.06 5/2007 Copyright © 2007 IGEL Technology GmbH

IGEL Technology GmbH High Availability and Load Balancing Concept 13
5.2.4 Setting up a new Datasource
When you selected installation type without database, initially no database is configured for the RM Server. Therefore your first step after the installation process has completed is start the Remote Manager Administrator and create and activate a new datasource. For detailed information see the Remote Manager manual.
Figure 5-1 : Set up a Datasource
V 2.06 5/2007 Copyright © 2007 IGEL Technology GmbH

IGEL Technology GmbH High Availability and Load Balancing Concept 14
6 Uninstallation
To uninstall IRM, close all open Remote Manager windows first.Next, launch the uninstaller of IRM.
6.1 Linux and Windows: Uninstallation of IGEL Remote Manager
On Windows systems:Use the link in the „IGEL Remote Manager“ program group of the „Start“-Menu or run uninstaller.exe from the _uninst subdirectory of the Remote Manager installation directory.(Example: C:\Program Files\IGEL\RemoteManager\_uninst\uninstaller.exe)
On Linux systems:Run uninstaller.bin from the _uninst subdirectory of Remote Manager's installation directory.(Example: /opt/IGEL/RemoteManager/_uninst/uninstaller.bin)
First, you will be prompted for the DBM password you entered during installation of IRM.
Note: Trying to uninstall IRM without knowing the master password will be denied.
Next, you can choose which parts of your installation you like to remove.You may remove the Console only, the Server only, or both.
You can quit without touching your installation on this summary page.If you proceed here, the uninstaller starts removing IRM.
V 2.06 5/2007 Copyright © 2007 IGEL Technology GmbH

IGEL Technology GmbH High Availability and Load Balancing Concept 15
7 Certificates
IRM uses SSL-certificates for the communication between its modules (the IRM Server and the Thin Clients).
These certificates are:- irm_keystore (in the subdirectory rmguiserver)- server.crt and server.pem (in the subdirectory rmtcserver)- cacerts (in the subdirectory rmclient)
If you plan to reinstall IRM on another computer, install it there and copy these files to the installation directory on the new computer.The deinstallation utility does not delete the certificates.(If you really don’t need them anymore, you have to delete them manually.)
The cacerts file is important if you plan to install more than one IRM Console.You may install the Console on several remote computers while running only a single IRM Server.
To enable communication between the IRM Server and the computer(s) where the Console resides, copy the cacerts file to a floppy disk (or a USB stick, or…) and during installation of IRM, choose the „Console only“ option. When prompted, select your copied cacerts file.
When launching the IRM Console on your workstation, enter the host name of the IRM Server and the username/password combination that you entered during the installation of the server.
V 2.06 5/2007 Copyright © 2007 IGEL Technology GmbH

IGEL Technology GmbH High Availability and Load Balancing Concept 16
8 Troubleshooting
8.1 Linux: Errors while installing SAPdb
If the setup tool of SAPdb reports the error:“install registry path ... does not existcannot create install registry file”,you probably have one of the following problems:
1. Another version of SAPdb is already installedor 2. A previous version of SAPdb was not properly removed
To solve that problem, you have the following options:
- If you used a version of SAPdb which was installed using your distributions package managing system (rpm / deb), remove all sapdb-related packages (using YaST, kpackage, aptitude etc).Be sure that all config files are removed correctly as well.
- If you are sure that no other version is installed but you still get one of the errors above, remove the directory /usr/spool/sql and /var/spool/sql manually. SAPdb uses this path to store its own software registry files which seem to contain wrong information in this case.
8.2 Linux/Windows: Uninstalling SAPdb manually
If the uninstaller fails for some reason (see log files after uninstallation in SAPdb's directory), and the uninstaller does not help you, you can try to uninstall SAPdb manually:
Linux:Open an xterm window (like xterm, console, gnome-terminal etc) and change into SAPdb's indep/bin directory (e.g. cd /opt/IGEL/SAPdb/indep/bin).Here, run following commands:./dbmcli -u dbm,[dbmpassword] -d RMDB db_offline./dbmcli -u dbm,[dbmpassword] -d RMDB db_drop./sdbuninst -all
Note: Please enter your dbm password (see installation of Remote Manager) instead of [dbmpassword], e.g. -u dbm,secret.
Windows:Open a command line window (DOS prompt) and go to SAPdb's indep/bin directory (e.g. cd „Program Files\IGEL\SAPdb\indep\bin“).Here, run following commands:dbmcli -u dbm,[dbmpassword] -d RMDB db_offlinedbmcli -u dbm,[dbmpassword] -d RMDB db_dropsdbuninst -all
Note: Please enter your dbm password (see installation of Remote Manager) instead of [dbmpassword], e.g. -u dbm,secret.
V 2.06 5/2007 Copyright © 2007 IGEL Technology GmbH

IGEL Technology GmbH High Availability and Load Balancing Concept 17
9 High Availability and Load Balancing Concept
9.1 Introduction
This document demonstrates IGEL Remote Manager features that support an high availability environment and load balancing by setting up a sample installation using several instances of IGEL RM and SQL Server 2005 replicated databases.
Currently (version 2.06 of IGEL RM), Remote Manger support for replicated/distributed database systems is restricted on SQL Server 2005 ( NOT SQL Server 2000 !)In future releases of RM, DB-replication support for other common DBMS will follow.
This document is not a guide to Microsoft SQL Server Replication. If you are not familiar with this subject, see http://msdn2.microsoft.com/en-us/library/ms151198.aspx or the printed documentation of your SQL Server 2005.
9.2 Prerequisites
To install IRM, your system must meet the following requirements:
- operating system: Windows 2000/XP/2003- IGEL Remote Manager: Version 2.06 or above- one instance of SQL Server 2005 Standard Edition (or above) as publisher
database - several instances of SQL Server 2005 including free Express Edition as
subscriber databases.
9.3 SQL Server Setup
9.3.1 First Steps
Follow the steps described in IGEL RM Install guide to setup the SQL Server 2005 DBS for the IGEL Remote Manager. If you wish to continue your work with data from a database backup restore this now.
Install IGEL RM 2.06 and choose installation-type “without database” (or update an existing version of Remote manger to version 2.06)
Start IGEL RM Administrator, create a datasource for your SQL Server instance and activate it. RM Administrator will create all RM schema objects within the empty database scheme. If you continue your work with an existing RM installation, re-activate the SQL Server datasource, this will perform an update on the existing database scheme.
Make sure Microsoft Distributed Transaction Coordinator (MSDTC) is running on all systems participating in the distributed database setup. Eventually restart the system if you changed any settings.
9.3.2 Create publications
Stop IGEL RMGUIServer service.
Now create the publications for the RM scheme.Use SQL Server Management Studio (login with administrator account) and create a new transactional publication with updateable subscriptions for your RM Database:
• Add all Remote Manager schema-objects (tables, procedures, views, functions), except tables “job_exec” and “command_exec”.
• Choose the tables node and edit the properties: set copy Foreign Key constraints to true.
• In the next step the setup asks for adding unique identifier columns and other schema objects, confirm this by selecting next.
• Skip next step (no table column filtering necessary).
V 2.06 5/2007 Copyright © 2007 IGEL Technology GmbH
IGEL Technology GmbH High Availability and Load Balancing Concept 18
• In the next step choose creating a snapshot, press continue.• Next configure security settings for the snapshot agent.• Finally choose a name for the publication (e.g. RMschema_publ).
Repeat the steps above for a second publication (for example name it RMschema_job_publ) with tables “job_exec” and “command_exec” that have not been included in the first publication.
9.3.3 Create subscriptions
This chapter describes the setup of the local subscriptions for each system that is registered to the publisher database.
• Create a push-subscription for RMschema_publ (the one containing all RM-schema objects, except the two job-tables mentioned above.
• Next apply appropriate security settings.• Choose continuous execution of the agents.• Choose subscriber updates with immediate updating.
Perform the same step as above for the second RM publication (the one just containing two tables) but this time choose queued updating.
In order to execute scheduled jobs, RM must be able to update the RM database (those tables in the queued update – subscription). With the subscriber setup described above RM can successfully execute scheduled jobs and log the individual execution state, even if the subscriber database lost connection to the publisher or the publisher is down.If this case does occur, the RM consoles that are connected to a RM server that is connected to a subscriber database will be informed that the database switched to read only mode.
Nonetheless, scheduled jobs will continue executing, and Thin clients will be able to fetch their configuration data from this RM host (read-only access) !
Do not try to use queued updating for the complete RM scheme. This could result in replication conflicts that cause data losses !
9.4 RM Server Setup
9.4.1 Failover RM
For a robust failover and load balancing scenario, create several installations of RM server on additional machines, best one on every host that holds a local subscription of the RM database.
After the installation, you need to copy the RM certificates (server.pem, server.crt, tc.keystore from the <RM-install-dir>/rmtcserver directory) from you primary installation to all additional RM servers that share the same data. This way every RM server can communicate with every TC that is registered to the shared database (depending on network conf.).
All current firmware versions support the configuration of a secondary RM, so if the primary RM is unavailable, the TC tries to get it’s configuration data from any other RM in it’s list. If none can be reached, the TC continues it’s work with the last settings it received (locally stored on flash).
9.4.2 Failover Database
In order to improve availability you can configure any of the database instances that participate in the SQL Server replication setup with the RM database scheme as a failover database. If the acitive/primary DB becomes unavailable, the RM switches to the failover database (as far as this one is available). This DB switch will also take place if the primary DB is a subscriber that falls into read-only mode (no connection to publisher), while the failover DB is still updateable.
Once using the failover DB, RM server does not switch back to the primary DB by itself. Make sure the database is available again and restart the RM service.
V 2.06 5/2007 Copyright © 2007 IGEL Technology GmbH

IGEL Technology GmbH High Availability and Load Balancing Concept 19
9.4.3 Failover Job Scheduling
User RM administrator to configure failover scheduling (Settings further Settings Do failover Scheduling). If the host that is configured here stops it’s service for any reason, the local RM server will stand in and take over it’s scheduled jobs. (Note: For successful execution TCs must be reachable for both RM servers). The synchronization of the schedulers that run on different hosts is performed by the shared/replicated database and a network - “ping” from one RM server to the other. If both methods fail the local host assumes that it’s failover partner is down. This would happen if the network gets partitioned and the host with RM server and subscriber database can’t reach any addresses outside their LAN. This could result in duplicate execution of the jobs on some TCs (or at least attempts to execute), but this uncritical as TCs do not run unnecessary commands (double updates) other commands are uncritical anyway (e.g. shutdown a shutdown TC), and probably the affected TCs can’t be reached anyway.
9.5 Failover Scenarios
9.5.1 Example Configuration
The example configuration that is discussed here consists of three host, these could share a LAN or be connected via WAN/VPN. On each of the hosts there’s an RM installation and a local SQL Server 2005 DB instance:
The local databases are publisher/subscriber instances of a replicated database scheme, so all Remote Mangers share the same set of data. Each RM has a set of TCs for witch it is configured as the primary RM. Especially in a WAN environment this can improve performance as all read accesses (probably 90% +). to the DB can be handled locally.
Host 1:Database DB 1
- publisher database (SQL Server 2005 Standard Edition)- transactional publication with updateable subscriptions
Remote Manager RM 1- Failover DB: DB 2- Failover Scheduler: RM 2
Host 2:Database DB 2
V 2.06 5/2007 Copyright © 2007 IGEL Technology GmbH
IGEL Technology GmbH High Availability and Load Balancing Concept 20
- subscriber database (e.g. free SQL Server 2005 Express Edition)Remote Manager RM 2- Failover DB: DB 3- Failover Scheduler: RM 3
Host 3:Database DB 3- subscriber database (e.g. free SQL Server 2005 Express Edition)Remote Manager RM 3- Failover DB: DB 2
- Failover Scheduler: RM 2
9.5.2 Problems and Solutions (Examples)
A) Network Issues
A1) No connection between host 1 and host 2:
Local subscriber DB at host 2 has no connection to publisher db at host 1, so it can’t be updated any longer. RM Administrators using this host can’t create profiles update settings etc.Changes done on the host 1 have no effect on host 2 until the connection is reestablished.
RM tries to switch to failover database DB 3.If DB 3 is still updateable (~has connection to host 1) work continues without restrictions.
A2) Network partitioned, LAN of host 1 gets isolated:
Local DB not updateable any longer (see above) read only mode.Failover DB is not available.
TCs can still get settings (read-only operation) and scheduled jobs are still executed by local RM 2. This is possible as database tables managing the current execution state of scheduled job are in a queued updateable subscription.
B) Component Failures
B1) Local database becomes unavailable
RM switches to failover DB.
B2) Publisher database becomes unavailable
See A 2)
B3) RM server becomes unavailable (or complete host with RM + DB)
TC can get settings from alternative RM.Scheduled jobs will be performed by failover scheduler.
V 2.06 5/2007 Copyright © 2007 IGEL Technology GmbH