installation and configuration guide for...
TRANSCRIPT

Quest® Archive Manager 5.4Installation and Configuration Guide for GroupWise
© 2018 Quest Software Inc.ALL RIGHTS RESERVED.This guide contains proprietary information protected by copyright. The software described in this guide is furnished under a software license or nondisclosure agreement. This software may be used or copied only in accordance with the terms of the applicable agreement. No part of this guide may be reproduced or transmitted in any form or by any means, electronic or mechanical, including photocopying and recording for any purpose other than the purchaser’s personal use without the written permission of Quest Software Inc.
The information in this document is provided in connection with Quest Software products. No license, express or implied, by estoppel or otherwise, to any intellectual property right is granted by this document or in connection with the sale of Quest Software products. EXCEPT AS SET FORTH IN THE TERMS AND CONDITIONS AS SPECIFIED IN THE LICENSE AGREEMENT FOR THIS PRODUCT, QUEST SOFTWARE ASSUMES NO LIABILITY WHATSOEVER AND DISCLAIMS ANY EXPRESS, IMPLIED OR STATUTORY WARRANTY RELATING TO ITS PRODUCTS INCLUDING, BUT NOT LIMITED TO, THE IMPLIED WARRANTY OF MERCHANTABILITY, FITNESS FOR A PARTICULAR PURPOSE, OR NON-INFRINGEMENT. IN NO EVENT SHALL QUEST SOFTWARE BE LIABLE FOR ANY DIRECT, INDIRECT, CONSEQUENTIAL, PUNITIVE, SPECIAL OR INCIDENTAL DAMAGES (INCLUDING, WITHOUT LIMITATION, DAMAGES FOR LOSS OF PROFITS, BUSINESS INTERRUPTION OR LOSS OF INFORMATION) ARISING OUT OF THE USE OR INABILITY TO USE THIS DOCUMENT, EVEN IF QUEST SOFTWARE HAS BEEN ADVISED OF THE POSSIBILITY OF SUCH DAMAGES. Quest Software makes no representations or warranties with respect to the accuracy or completeness of the contents of this document and reserves the right to make changes to specifications and product descriptions at any time without notice. Quest Software does not make any commitment to update the information contained in this document.
If you have any questions regarding your potential use of this material, contact:
Quest Software Inc. Attn: LEGAL Dept. 4 Polaris Way Aliso Viejo, CA 92656
Refer to our website (www.quest.com) for regional and international office information.
PatentsQuest Software is proud of our advanced technology. Patents and pending patents may apply to this product. For the most current information about applicable patents for this product, please visit our website at www.quest.com/legal.
TrademarksQuest and the Quest logo are trademarks and registered trademarks of Quest Software Inc. in the U.S.A. and other countries. For a complete list of Quest Software trademarks, please visit our website at www.quest.com/legal. All other trademarks, servicemarks, registered trademarks, and registered servicemarks are the property of their respective owners.
Archive Manager Installation and Configuration Guide for GroupWise Updated - March 2018 Software Version - 5.4
Legend
CAUTION: A CAUTION icon indicates potential damage to hardware or loss of data if instructions are not followed.
IMPORTANT, NOTE, TIP, MOBILE, or VIDEO: An information icon indicates supporting information.

Contents
Deployment considerations for GroupWise . . . . . . . . . . . . . . . . . . . . . . . . . . . . . . . . . . . . 5Deployment models . . . . . . . . . . . . . . . . . . . . . . . . . . . . . . . . . . . . . . . . . . . . . . . . . . . . . . . . . 5
Single-site model . . . . . . . . . . . . . . . . . . . . . . . . . . . . . . . . . . . . . . . . . . . . . . . . . . . . . . . . 5Multi-site model . . . . . . . . . . . . . . . . . . . . . . . . . . . . . . . . . . . . . . . . . . . . . . . . . . . . . . . . . 5Distributed model . . . . . . . . . . . . . . . . . . . . . . . . . . . . . . . . . . . . . . . . . . . . . . . . . . . . . . . 6Mixed model . . . . . . . . . . . . . . . . . . . . . . . . . . . . . . . . . . . . . . . . . . . . . . . . . . . . . . . . . . . 6
Installing without Active Directory . . . . . . . . . . . . . . . . . . . . . . . . . . . . . . . . . . . . . . . . . . . . . . 6
System requirements . . . . . . . . . . . . . . . . . . . . . . . . . . . . . . . . . . . . . . . . . . . . . . . . . . . . . . 7GroupWise messaging system . . . . . . . . . . . . . . . . . . . . . . . . . . . . . . . . . . . . . . . . . . . . . . . . 7NetIQ eDirectory Services . . . . . . . . . . . . . . . . . . . . . . . . . . . . . . . . . . . . . . . . . . . . . . . . . . . . 8SQL Server . . . . . . . . . . . . . . . . . . . . . . . . . . . . . . . . . . . . . . . . . . . . . . . . . . . . . . . . . . . . . . . 8Archive Manager Server operating system . . . . . . . . . . . . . . . . . . . . . . . . . . . . . . . . . . . . . . . 9Prerequisites for servers running GroupWise Services . . . . . . . . . . . . . . . . . . . . . . . . . . . . . . 9Prerequisites for servers running Archive Manager services . . . . . . . . . . . . . . . . . . . . . . . . 10Prerequisites for servers running Archive Manager websites . . . . . . . . . . . . . . . . . . . . . . . . 10Attachment store types . . . . . . . . . . . . . . . . . . . . . . . . . . . . . . . . . . . . . . . . . . . . . . . . . . . . . 11Web browsers . . . . . . . . . . . . . . . . . . . . . . . . . . . . . . . . . . . . . . . . . . . . . . . . . . . . . . . . . . . . 11Archive Manager rights and permissions . . . . . . . . . . . . . . . . . . . . . . . . . . . . . . . . . . . . . . . 11
Hardware recommendations . . . . . . . . . . . . . . . . . . . . . . . . . . . . . . . . . . . . . . . . . . . . . . . 13Archive Manager Services server . . . . . . . . . . . . . . . . . . . . . . . . . . . . . . . . . . . . . . . . . . . . . 13Archive Manager SQL database server . . . . . . . . . . . . . . . . . . . . . . . . . . . . . . . . . . . . . . . . . 13Archive Manager hardware recommendations . . . . . . . . . . . . . . . . . . . . . . . . . . . . . . . . . . . 14
SQL database server . . . . . . . . . . . . . . . . . . . . . . . . . . . . . . . . . . . . . . . . . . . . . . . . . . . 14Services server . . . . . . . . . . . . . . . . . . . . . . . . . . . . . . . . . . . . . . . . . . . . . . . . . . . . . . . . 14Dedicated IIS Server . . . . . . . . . . . . . . . . . . . . . . . . . . . . . . . . . . . . . . . . . . . . . . . . . . . . 15
Sizing the Microsoft SQL database and Archive Manager attachment store . . . . . . . . . . . . . 15
Pre-installation preparations . . . . . . . . . . . . . . . . . . . . . . . . . . . . . . . . . . . . . . . . . . . . . . . 17Configuring the Archive Manager Services server . . . . . . . . . . . . . . . . . . . . . . . . . . . . . . . . 17Configuring the Archive Manager SQL database server . . . . . . . . . . . . . . . . . . . . . . . . . . . . 18
Installing and configuring Archive Manager . . . . . . . . . . . . . . . . . . . . . . . . . . . . . . . . . . . 19Installing Archive Manager . . . . . . . . . . . . . . . . . . . . . . . . . . . . . . . . . . . . . . . . . . . . . . . . . . 19Configuring Archive Manager . . . . . . . . . . . . . . . . . . . . . . . . . . . . . . . . . . . . . . . . . . . . . . . . 20Useful configuration settings . . . . . . . . . . . . . . . . . . . . . . . . . . . . . . . . . . . . . . . . . . . . . . . . . 25
General . . . . . . . . . . . . . . . . . . . . . . . . . . . . . . . . . . . . . . . . . . . . . . . . . . . . . . . . . . . . . . 25Archive Manager Database . . . . . . . . . . . . . . . . . . . . . . . . . . . . . . . . . . . . . . . . . . . . . . . 26GroupWise Directory Connector (GDC) . . . . . . . . . . . . . . . . . . . . . . . . . . . . . . . . . . . . . 26GroupWise Store Manager (GSM) . . . . . . . . . . . . . . . . . . . . . . . . . . . . . . . . . . . . . . . . . 26Data Loader . . . . . . . . . . . . . . . . . . . . . . . . . . . . . . . . . . . . . . . . . . . . . . . . . . . . . . . . . . 26Full Text Index (FTI) . . . . . . . . . . . . . . . . . . . . . . . . . . . . . . . . . . . . . . . . . . . . . . . . . . . . 27Full Text Search (FTS) . . . . . . . . . . . . . . . . . . . . . . . . . . . . . . . . . . . . . . . . . . . . . . . . . . 28
Archive Manager 5.4 Installation and Configuration Guide for GroupWiseContents 3

Website . . . . . . . . . . . . . . . . . . . . . . . . . . . . . . . . . . . . . . . . . . . . . . . . . . . . . . . . . . . . . . 28
Upgrading/Uninstalling Archive Manager . . . . . . . . . . . . . . . . . . . . . . . . . . . . . . . . . . . . . 29Upgrading Archive Manager . . . . . . . . . . . . . . . . . . . . . . . . . . . . . . . . . . . . . . . . . . . . . . . . . 29Uninstalling Archive Manager . . . . . . . . . . . . . . . . . . . . . . . . . . . . . . . . . . . . . . . . . . . . . . . . 29
Post-installation tasks . . . . . . . . . . . . . . . . . . . . . . . . . . . . . . . . . . . . . . . . . . . . . . . . . . . . 30Configuring Archive Manager . . . . . . . . . . . . . . . . . . . . . . . . . . . . . . . . . . . . . . . . . . . . . . . . 30Configuring the GroupWise Directory Connector (GDC) . . . . . . . . . . . . . . . . . . . . . . . . . . . . 30Backloading your data . . . . . . . . . . . . . . . . . . . . . . . . . . . . . . . . . . . . . . . . . . . . . . . . . . . . . . 31Localizing Archive Manager website (optional) . . . . . . . . . . . . . . . . . . . . . . . . . . . . . . . . . . . 31
Appendix A: Attachment store types . . . . . . . . . . . . . . . . . . . . . . . . . . . . . . . . . . . . . . . . . 32Attachment store types overview . . . . . . . . . . . . . . . . . . . . . . . . . . . . . . . . . . . . . . . . . . . . . . 32NTFS/Windows File System . . . . . . . . . . . . . . . . . . . . . . . . . . . . . . . . . . . . . . . . . . . . . . . . . 33NetApp SnapLock . . . . . . . . . . . . . . . . . . . . . . . . . . . . . . . . . . . . . . . . . . . . . . . . . . . . . . . . . 33
Prerequisites . . . . . . . . . . . . . . . . . . . . . . . . . . . . . . . . . . . . . . . . . . . . . . . . . . . . . . . . . . 33Running the NetApp SnapLock Setup Wizard . . . . . . . . . . . . . . . . . . . . . . . . . . . . . . . . 34
EMC Centera . . . . . . . . . . . . . . . . . . . . . . . . . . . . . . . . . . . . . . . . . . . . . . . . . . . . . . . . . . . . . 34Using a PEA File . . . . . . . . . . . . . . . . . . . . . . . . . . . . . . . . . . . . . . . . . . . . . . . . . . . . . . . 35
Caringo CAStor/Dell DX . . . . . . . . . . . . . . . . . . . . . . . . . . . . . . . . . . . . . . . . . . . . . . . . . . . . 35Bridgehead HDR . . . . . . . . . . . . . . . . . . . . . . . . . . . . . . . . . . . . . . . . . . . . . . . . . . . . . . . . . . 35IBM DR550 . . . . . . . . . . . . . . . . . . . . . . . . . . . . . . . . . . . . . . . . . . . . . . . . . . . . . . . . . . . . . . 35Hedvig Distributed Storage Platform . . . . . . . . . . . . . . . . . . . . . . . . . . . . . . . . . . . . . . . . . . . 36Common scenarios for editing the configuration . . . . . . . . . . . . . . . . . . . . . . . . . . . . . . . . . . 36
Using a NAS Box . . . . . . . . . . . . . . . . . . . . . . . . . . . . . . . . . . . . . . . . . . . . . . . . . . . . . . 36Deleting attachments from a SnapLock volume . . . . . . . . . . . . . . . . . . . . . . . . . . . . . . . 36
Appendix B: Process overview checklist . . . . . . . . . . . . . . . . . . . . . . . . . . . . . . . . . . . . . 37Pre-installation checklist . . . . . . . . . . . . . . . . . . . . . . . . . . . . . . . . . . . . . . . . . . . . . . . . . . . . 37Install Archive Manager . . . . . . . . . . . . . . . . . . . . . . . . . . . . . . . . . . . . . . . . . . . . . . . . . . . . . 38Post-installation checklist . . . . . . . . . . . . . . . . . . . . . . . . . . . . . . . . . . . . . . . . . . . . . . . . . . . 38
About us . . . . . . . . . . . . . . . . . . . . . . . . . . . . . . . . . . . . . . . . . . . . . . . . . . . . . . . . . . . . . . . . 39
Archive Manager 5.4 Installation and Configuration Guide for GroupWiseContents 4
1
Deployment considerations for GroupWise
• Deployment models
• Installing without Active Directory
Deployment modelsArchive Manager can be deployed and configured in several different schemes, depending on an organization’s size and type. The information in this chapter explains the most common Archive Manager configurations, but remember that each organization’s needs must be assessed and addressed individually.
When choosing a basic Archive Manager configuration, it is important to know:
• The number of sites and the number of users at each site
• The number of mail servers
• The bandwidth between each site
Single-site modelThe single-site model is suitable for single-site organizations as well as for organizations with high-speed and low-use WAN connections.
Hardware sizing can be roughly estimated from the number of users. For detailed recommendations, see the Hardware recommendations chapter.
Sizing is also affected by the Archive Manager message policies applied to GroupWise after Archive Manager is implemented. Specifically, hardware requirements will increase if messages are kept on the mail server for only short periods (for example, <15 days), since users will access the Archive Manager system far more extensively than if messages are kept 30 or 60 days.
Multi-site modelThe multi-site model can be used where WAN links are high-speed and low-utilization, and the remote connected sites have 100 or fewer users.
To lower the bandwidth requirements even further from the default installation, Archive Manager can be configured to ‘Dataload’ email messages from the remote sites at regularly scheduled times of the day.
NOTE: Large organizations and sites with comprehensive disaster recovery (DR) requirements should consider clustering Microsoft SQL Server and Internet Information Services (IIS) if the archived information is deemed critical to the organization. The information within Archive Manager is a copy of current information and possibly all email information outside of the configured retention policy period; this may affect the requirements.
Archive Manager 5.4 Installation and Configuration Guide for GroupWiseDeployment considerations for GroupWise 5
Distributed modelThe Archive Manager distributed model is best used when an organization has connected sites with more than 100 users at each, or low-bandwidth connections with potentially fewer users.
To estimate the requirements of different site configurations, see the Hardware recommendations chapter.
Mixed modelArchive Manager can also be run as a combination of the preceding models. This is useful, for example, when the distributed model is not applicable, as with a satellite site of 50 users with no email server, which does not require a dedicated Archive Manager server.
Archive Manager can be considered a “thin client” solution because it uses a Web browser for access.
Installing without Active DirectoryIt is possible to install Archive Manager in an environment without Active Directory, where the Archive Manager server and SQL server are parts of a workgroup, using pass-through authentication. But without a central authenticating authority like AD, a configuration like this increases the risk of authentication issues as the Archive Manager, SQL, and web services servers try to interact.
Archive Manager 5.4 Installation and Configuration Guide for GroupWiseDeployment considerations for GroupWise 6

2
System requirements
• GroupWise messaging system
• NetIQ eDirectory Services
• SQL Server
• Archive Manager Server operating system
• Prerequisites for servers running GroupWise Services
• Prerequisites for servers running Archive Manager services
• Attachment store types
• Web browsers
• Archive Manager rights and permissions
GroupWise messaging systemAny of:
• 2014 R2 SP2
• 2014 R2 SP1
• 2014 R2
• 2014 SP2
• 2014 SP1
• 2014
• 2012 SP4
• 2012 SP3
• 2012 SP2
• 2012 SP1
• 2012
• 8.0.3 HP4
• 8.0.3 HP3
• 8.0.3
• 8.0.2
See supported clients in the Prerequisites for servers running GroupWise Services section below.
NOTE: Archive Manager is not certified for use with clustered GroupWise host systems configured for parallel processing, load balancing, or fault tolerance.
Archive Manager 5.4 Installation and Configuration Guide for GroupWiseSystem requirements 7

NetIQ eDirectory Services• 9.0, 9.0 SP1, 9.0 SP2, 9.0 SP3 on supported platforms
• 8.8 SP8, SP7, SP6 on supported platforms
• 8.7.3 on supported platforms
SQL ServerEnterprise or Standard edition, any of:
• Microsoft SQL Server, either 32- or 64-bit version
• 2017
• 2016 SP1
• 2016
• 2014 SP2
• 2014 SP1
• 2014
• 2012 SP4
• 2012 SP3
• 2012 SP2
• 2012 SP1
• 2012
• 2008 R2 SP3
• 2008 R2 SP2
• 2008 R2 SP1
• 2008 R2
• 2008 SP4
• 2008 SP3
▪ 2008 SP2
NOTE: Two Archive Manager databases should not be installed to the same SQL server instance. It is fine to install two Archive Manager databases to the same machine if the machine has two or more SQL Server instances running, and each will host a single Archive Manager database.
NOTE: If you are moving from one SQL server to another SQL server, the collation settings of the Aftermail_temp table and the Archive Manager database itself must match what existed when the Archive Manager database was first created. As long as the two settings are maintained as specified for Archive Manager, the SQL server that houses the Archive Manager database may have a different collation setting that may be needed for other purposes on that machine. The supported collation setting is: SQL_Latin1_General_CP1_CI_AS
NOTE: Use of the "sa" account for operational credentials during installation is not supported.
NOTE: Archive Manager supports AlwaysOn Availability Groups for SQL Server 2012 and later versions.
Archive Manager 5.4 Installation and Configuration Guide for GroupWiseSystem requirements 8
Archive Manager Server operating systemAny of:
• Windows Server 2016
• Windows Server 2012 R2
• Windows Server 2012
• Windows Server 2008 R2 SP1 or RTM
• Windows Server 2008 SP2, 64-bit version
Please verify that your mail system requirements are supported on the desired operating system.
Prerequisites for servers running GroupWise ServicesNovell clients:
• Novell Client 2 SP4 for Windows Server 2008 R2 & 2012
• Novell Client 2 SP3 for Windows Server 2008 R2 & 2012
• Novell Client 2 SP2 for Windows Server 2008 & 2008 R2
• Novell Client 2 SP1 for Windows Server 2008 R2
• Novell Client 2 SP1 for Windows Server 2008
GroupWise clients:
The client version must match the server version. For example, if you are using GroupWise Server 2012, you must use GroupWise Client 12.0.0.
• 14.2.x
• 14.0.x
• 12.0.x
• 8.0.x
GroupWise Store Manager (GSM):
• MAPI CDO and SQL Native Client are required for any GSM installation, and for TNEF. TNEF allows messages from Exchange-based mail systems to be processed with rich content, such as meeting invites.
• It is recommended that the GroupWise Store Manager (GSM) run under a separate account than all of the other Archive Manager services.
NOTE: Archive Manager is not certified for use with clustered GroupWise host systems configured for parallel processing, load balancing, or fault tolerance.
NOTE: File read, write and execute permissions are required for access to the wpdomain.db file and other associated files and folders.
NOTE: Supervisor-level permission is required for the Novell tree.
NOTE: GroupWise Store Manager will not support parameters -config and -silentconfig in the next release. You can use the Configuration Console to implement these functions.
Archive Manager 5.4 Installation and Configuration Guide for GroupWiseSystem requirements 9

Prerequisites for servers running Archive Manager servicesAny prerequisites that are required for installation are installed automatically when you run the Archive Manager Setup Wizard to install Archive Manager. If you want to install the prerequisites software prior to running the installer, see the requirements below.
Requires:
• Microsoft .NET Framework 3.5 SP1 must be pre-installed (before running the installer).
• Supported Archive Manager Server Operating System version. Please verify that your mail system requirements are supported on the desired operating system.
• Visual C++ 2012 Redistributable for Visual Studio 2012 Update 4: vcredist_x86.exe
• Visual C++ 2010 SP1 Redistributable Package: vcredist_x86.exe
• Visual C++ 2008 SP1 Redistributable Package: vcredist_x86.exe
• Microsoft .NET Framework 4.5.2.
• SQL Native Client (sqlncli.msi). SQL Native Client 2005 is required. SQL Native Client 2008 is not supported.
Enabling text-string searches and indexing of file attachments You must install IFilters for the file types you want to search and index:
• Microsoft offers a free pack of IFilters for its Office 2010 file types at http://www.microsoft.com/en-us/download/details.aspx?id=17062, (link current as of this release). SP2 can be applied via Windows Update or downloaded at http://support.microsoft.com/kb/2687447. This Filter Pack includes IFilters for the following formats: .docx, .docm, .pptx, .pptm, .xlsx, .xlsm, .xlsb, .zip, .one, .vdx, .vsd, .vss, .vst, .vdx, .vsx, and .vtx.
• IFilters for earlier-version Office file extensions (.doc, .rtf, .xls, .ppt, etc.), and for .txt, .htm and .html files, are installed with Microsoft Windows, and so should already reside on the Archive Manager server. You can verify their installation, and track and manage your IFilters generally, with a third-party IFilter browser; several are available at little or no cost from independent vendors.
• Adobe bundles a copy of its PDF 32-bit iFilter with free Adobe Reader 11 software, and offers a free PDF iFilter 64 11.0.1 as a separate download. It is recommended that you use Adobe version 11 PDF IFilters, or FoxIt IFilters.
• The Sumatra PDF Viewer includes a PDF iFilter that can be used as an alternative to the Adoble iFilter. For more information, see Quest Knowledge Base Solution 146890.
• Installing Adobe Reader X uninstalls PDF iFilters, which then need to be reinstalled. For additional information, see www.adobe.com.
Prerequisites for servers running Archive Manager websites
• Microsoft Internet Information Services (IIS) version 8.5, 8.0, 7.5, or 7.0.
Certain role services are required to be manually selected and installed on the web server in order for the Archive Manager Website to run correctly. These roles include: Common HTTP Features; Static Content ; ASP.net; ASP; Basic Authentication; Windows Authentication; IIS Management Tools and Scripts; and IIS Management Console.
• Microsoft ASP.NET (component of Windows, any supported Windows version).
Archive Manager 5.4 Installation and Configuration Guide for GroupWiseSystem requirements 10
The API web service endpoint can be configured to use Windows Authentication or Anonymous Authentication. When using Anonymous Authentication, the web service application performs security checks and authenticates the client using Basic Authentication (plain text user password authentication). When using Windows Authentication, IIS handles the authentication and provides the web service application with a confirmation of the authentication attempt.
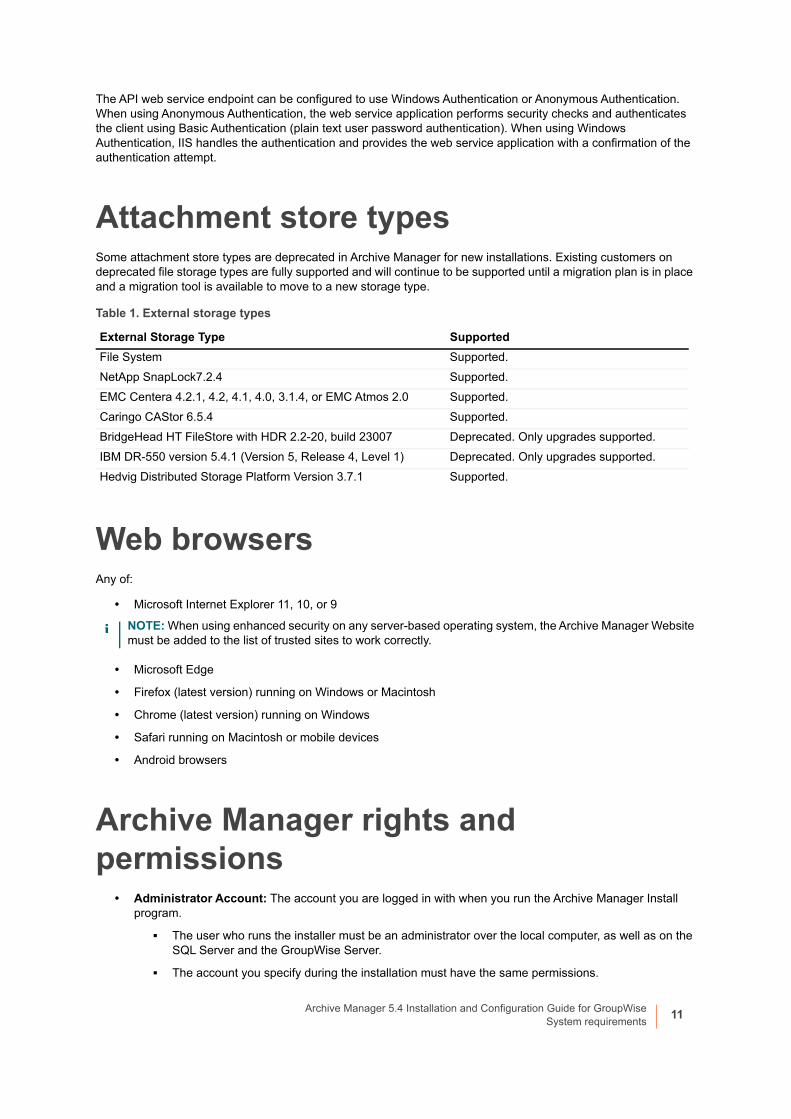
Attachment store typesSome attachment store types are deprecated in Archive Manager for new installations. Existing customers on deprecated file storage types are fully supported and will continue to be supported until a migration plan is in place and a migration tool is available to move to a new storage type.
Web browsersAny of:
• Microsoft Internet Explorer 11, 10, or 9
• Microsoft Edge
• Firefox (latest version) running on Windows or Macintosh
• Chrome (latest version) running on Windows
• Safari running on Macintosh or mobile devices
• Android browsers
Archive Manager rights and permissions
• Administrator Account: The account you are logged in with when you run the Archive Manager Install program.
▪ The user who runs the installer must be an administrator over the local computer, as well as on the SQL Server and the GroupWise Server.
▪ The account you specify during the installation must have the same permissions.
Table 1. External storage types
External Storage Type SupportedFile System Supported. NetApp SnapLock7.2.4 Supported. EMC Centera 4.2.1, 4.2, 4.1, 4.0, 3.1.4, or EMC Atmos 2.0 Supported. Caringo CAStor 6.5.4 Supported.BridgeHead HT FileStore with HDR 2.2-20, build 23007 Deprecated. Only upgrades supported.IBM DR-550 version 5.4.1 (Version 5, Release 4, Level 1) Deprecated. Only upgrades supported.Hedvig Distributed Storage Platform Version 3.7.1 Supported.
NOTE: When using enhanced security on any server-based operating system, the Archive Manager Website must be added to the list of trusted sites to work correctly.
Archive Manager 5.4 Installation and Configuration Guide for GroupWiseSystem requirements 11

• Service Account: (default account name is ArchiveMgr_Service): Specified in the Configuration Console. Used by the Directory Connector, Alert Service, Full-Text Index, Full-Text Search and Message Retention Services.
▪ Account is granted full access to the Archive Manager and AfterMail_TEMP databases by the installer.
▪ Requires read access to AD, and to the Exchange Organization so it can determine Storage Group information.
▪ Must be in the Users group on the local machine, and a member of the local IIS_WPG group on the Web Servers. This is typically done by the installer.
▪ Is a member of ArchiveManagerServiceUsers group.
▪ Should be added to the local administrators group on both E-Directory server and GroupWise server, if GroupWise and E-Directory are installed on Windows. If GroupWise and E-Directory are installed on Windows but not in the same domain as the Archive Manager server, create a local user with the same login name and password as the service account, then add the local user to the local administrators group on the E-Directory server and GroupWise server.
• ArchiveManagerServiceUsers Group: A Domain Group containing the Service account.
▪ Group is used by installer to apply permissions to file-system locations used by Archive Manager.
Archive Manager 5.4 Installation and Configuration Guide for GroupWiseSystem requirements 12
3
Hardware recommendations
• Archive Manager Services server
• Archive Manager SQL database server
• Archive Manager hardware recommendations
• Sizing the Microsoft SQL database and Archive Manager attachment store
Archive Manager Services serverThe services listed below are installed on the Archive Manager Services Server. These services can also be spread among other server hardware.
• GroupWise Directory Connector (GDC): The GDC synchronizes Archive Manager with users and security maintained in your existing GroupWise Directory store.
• GroupWise Store Manager (GSM): The GSM synchronizes Archive Manager with the current state of the enterprise’s GroupWise mail server.
• Data Loader: The Data Loader populates Archive Manager with email messages from the enterprise mail server and/or other data sources.
• Search Service: The Search Service consists of two separate services: the Full Text Index Service (FTI) and the Full Text Search Service (FTS). The Full Text Index Service indexes the full text of messages within the Archive Manager store, storing security context as well, for high-speed full-text searches. The Full Text Search Service performs full-text searches against the Archive Manager Full Text Index, providing results to the Archive Manager core search engine.
• Message Retention Policy Service: The Message Retention Policy Service deletes email messages from the archive according to the retention rules and policies defined in the Retention Policy Editor.
• Alert Service: The Alert Service runs SQL queries on the Archive Manager database, and WMI queries on your server and sends Alert emails.
• Website: The Archive Manager website allows you to search your archive and administer various components of Archive Manager. The installer can place the Archive Manager website on a different server than the services server.
Archive Manager SQL database serverThe Archive Manager SQL database server performs the following function listed below:
• The Archive Manager SQL database server hosts your the Archive Manager database, which contains all message and user data, except for attachments.
Archive Manager 5.4 Installation and Configuration Guide for GroupWiseHardware recommendations 13
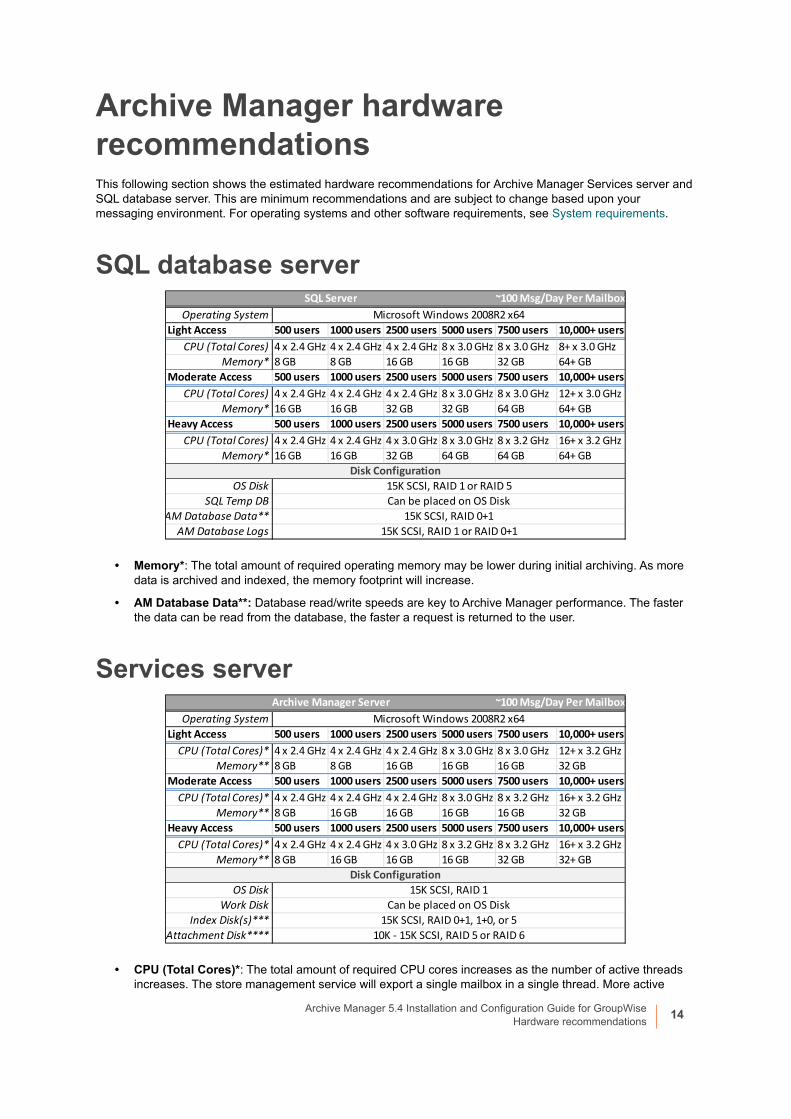
Archive Manager hardware recommendationsThis following section shows the estimated hardware recommendations for Archive Manager Services server and SQL database server. This are minimum recommendations and are subject to change based upon your messaging environment. For operating systems and other software requirements, see System requirements.
SQL database serverOperating System
Light Access 500 users 1000 users 2500 users 5000 users 7500 users 10,000+ usersCPU (Total Cores) 4 x 2.4 GHz 4 x 2.4 GHz 4 x 2.4 GHz 8 x 3.0 GHz 8 x 3.0 GHz 8+ x 3.0 GHz
Memory* 8 GB 8 GB 16 GB 16 GB 32 GB 64+ GBModerate Access 500 users 1000 users 2500 users 5000 users 7500 users 10,000+ users
CPU (Total Cores) 4 x 2.4 GHz 4 x 2.4 GHz 4 x 2.4 GHz 8 x 3.0 GHz 8 x 3.0 GHz 12+ x 3.0 GHzMemory* 16 GB 16 GB 32 GB 32 GB 64 GB 64+ GB
Heavy Access 500 users 1000 users 2500 users 5000 users 7500 users 10,000+ usersCPU (Total Cores) 4 x 2.4 GHz 4 x 2.4 GHz 4 x 3.0 GHz 8 x 3.0 GHz 8 x 3.2 GHz 16+ x 3.2 GHz
Memory* 16 GB 16 GB 32 GB 64 GB 64 GB 64+ GB
OS DiskSQL Temp DB
AM Database Data**AM Database Logs
Microsoft Windows 2008R2 x64
Disk Configuration
SQL Server ~100 Msg/Day Per Mailbox
15K SCSI, RAID 1 or RAID 5Can be placed on OS Disk
15K SCSI, RAID 0+115K SCSI, RAID 1 or RAID 0+1
• Memory*: The total amount of required operating memory may be lower during initial archiving. As more data is archived and indexed, the memory footprint will increase.
• AM Database Data**: Database read/write speeds are key to Archive Manager performance. The faster the data can be read from the database, the faster a request is returned to the user.
Services serverOperating System
Light Access 500 users 1000 users 2500 users 5000 users 7500 users 10,000+ usersCPU (Total Cores)* 4 x 2.4 GHz 4 x 2.4 GHz 4 x 2.4 GHz 8 x 3.0 GHz 8 x 3.0 GHz 12+ x 3.2 GHz
Memory** 8 GB 8 GB 16 GB 16 GB 16 GB 32 GBModerate Access 500 users 1000 users 2500 users 5000 users 7500 users 10,000+ users
CPU (Total Cores)* 4 x 2.4 GHz 4 x 2.4 GHz 4 x 2.4 GHz 8 x 3.0 GHz 8 x 3.2 GHz 16+ x 3.2 GHzMemory** 8 GB 16 GB 16 GB 16 GB 16 GB 32 GB
Heavy Access 500 users 1000 users 2500 users 5000 users 7500 users 10,000+ usersCPU (Total Cores)* 4 x 2.4 GHz 4 x 2.4 GHz 4 x 3.0 GHz 8 x 3.2 GHz 8 x 3.2 GHz 16+ x 3.2 GHz
Memory** 8 GB 16 GB 16 GB 16 GB 32 GB 32+ GB
OS DiskWork Disk
Index Disk(s)***Attachment Disk****
Archive Manager Server ~100 Msg/Day Per Mailbox
Disk Configuration
Microsoft Windows 2008R2 x64
15K SCSI, RAID 1Can be placed on OS Disk
15K SCSI, RAID 0+1, 1+0, or 510K - 15K SCSI, RAID 5 or RAID 6
• CPU (Total Cores)*: The total amount of required CPU cores increases as the number of active threads increases. The store management service will export a single mailbox in a single thread. More active
Archive Manager 5.4 Installation and Configuration Guide for GroupWiseHardware recommendations 14

threads allow a faster ingestion rate. Full Text Index also has the ability to run multiple processing threads. The administrator needs to find the appropriate balance.
• Memory**: The total amount of required operating memory may be lower during initial archiving. As more data is archived and indexed, the memory footprint will increase.
• Index Disk(s)***: The performance of the index disk will greatly impact the general performance of the product. For best results, use dedicated attached storage. New indexing technology allows the ability to span the index across multiple disk for both performance and fault tolerance.
• Attachment Disk****: The performance of the attachment disk has less impact on the general performance of the product, but for the fastest retrievals, a faster disk is recommended.
Dedicated IIS ServerOperating System
Light Access 500 users 1000 users 2500 users 5000 users 7500 users 10,000+ usersCPU (Total Cores)** 4 x 2.4 GHz 4 x 2.4 GHz 4 x 3.0 GHz 4 x 3.2 GHz 4 x 3.2 GHz 4+ x 3.2 GHz
Memory 4 GB 4 GB 4 GB 8 GB 8 GB 8 GBModerate Access 500 users 1000 users 2500 users 5000 users 7500 users 10,000+ usersCPU (Total Cores)** 4 x 2.4 GHz 4 x 2.4 GHz 4 x 3.0 GHz 4 x 3.2 GHz 8 x 3.2 GHz 8+ x 3.2 GHz
Memory 4 GB 4 GB 4 GB 8 GB 8 GB 8 GBHeavy Access 500 users 1000 users 2500 users 5000 users 7500 users 10,000+ usersCPU (Total Cores)** 4 x 2.4 GHz 4 x 2.4 GHz 4 x 3.0 GHz 8 x 3.2 GHz 8 x 3.2 GHz 8+ x 3.2 GHz
Memory 4 GB 4 GB 4 GB 8 GB 8 GB 8+ GB
OS Disk***
Microsoft Windows 2008R2 x64
Disk Configuration10K - 15K SCSI, RAID 1
Dedicated IIS Server* ~100 Msg/Day Per Mailbox
• Dedicated IIS Server*: The IIS Server can host multiple instances of the Archive Manager website. The website also supports Network Load Balancing (NLB) with IP-based affinity. Multiple web servers can be configured to host multiple Archive Manager website instances.
• CPU (Total Cores)**: Total cores required will vary based on message policies. If stubbing is used, consider your environment moderate access or heavy access and plan accordingly.
• OS Disk***: The OS disk will store attachments temporarily while users are downloading them. Disk speeds are typically not a bottleneck.
Sizing the Microsoft SQL database and Archive Manager attachment storeArchive Manager’s storage recommendations must be considered when planning storage, whether the data is to be stored on the same hardware as the software or stored on a separate high-speed disk. Specifically, there needs be either capacity for growth of archive data when Archive Manager is installed or the ability to increase capacity as the archive grows, or both.
NOTE: When running the 64-bit Archive Manager Full Text Search Service, a minimum of 8 GB RAM is recommended. The total amount of memory recommended can be calculated by determining the disk space used by the indexes (messages + attachments) in GB, dividing that number by 100, and adding it to the 8 GB RAM minimum. For example, if the total space used for your indexes is 400 GB, then you should have (8 + 400/100) or 12 GB of RAM installed on your Archive Manager system.
NOTE: Archive Manager can easily be backed up and restored to different hardware to increase performance or capacity.
Archive Manager 5.4 Installation and Configuration Guide for GroupWiseHardware recommendations 15
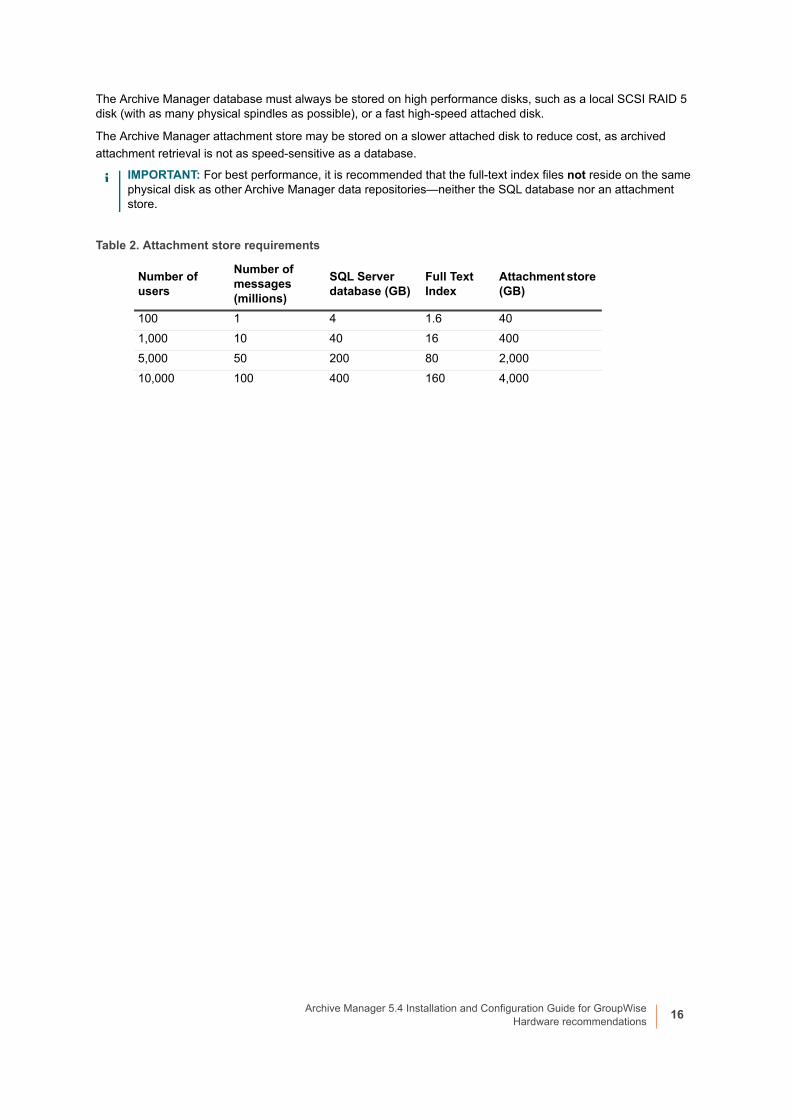
The Archive Manager database must always be stored on high performance disks, such as a local SCSI RAID 5 disk (with as many physical spindles as possible), or a fast high-speed attached disk.
The Archive Manager attachment store may be stored on a slower attached disk to reduce cost, as archived attachment retrieval is not as speed-sensitive as a database.
IMPORTANT: For best performance, it is recommended that the full-text index files not reside on the same physical disk as other Archive Manager data repositories—neither the SQL database nor an attachment store.
Table 2. Attachment store requirements
Number of users
Number of messages (millions)
SQL Server database (GB)
Full Text Index
Attachment store (GB)
100 1 4 1.6 401,000 10 40 16 4005,000 50 200 80 2,00010,000 100 400 160 4,000
Archive Manager 5.4 Installation and Configuration Guide for GroupWiseHardware recommendations 16

4
Pre-installation preparations
• Configuring the Archive Manager Services server
• Configuring the Archive Manager SQL database server
Before you installing Archive Manager, complete the following pre-installation steps:• Update the server to the latest supported service pack levels for use with Archive Manager.
• Set up and configure the Archive Manager database server.
• Create the accounts required for Archive Manager and grant permissions.
• Configure the Novell GroupWise server.
Configuring the Archive Manager Services server
To configure the Archive Manager Services server:1 Configure your antivirus software:
▪ Disable real-time scanning.
▪ Prevent your antivirus software from scanning the Data Load directory and the Microsoft SQL Server database files.
▪ Remove Antivirus scanning from the %temp% directory.
2 Configure your firewall:
▪ If you are installing Archive Manager from a remote computer, open port 8686 for the Installation Wizard. The port should be opened during the installation session only.
▪ If you are planning to install web services and the Full-Text search service on separate computers, open port 8687 for the Archive Manager search service.
▪ Note that this is not the common configuration, but it is available if needed. If an application-level firewall is installed, the Archive Manager Full-Text Search Service must be allowed to listen on port 8687.
3 Install required IFilters. Install third-party IFilters to enable searching attachment file formats. Searching and indexing of all attachment file types is enabled by the installation of particular IFilters for particular file types. See the System requirements above for more information about obtaining the IFilters you need.
4 Install Novell client.
NOTE: You can install Archive Manager Services and the Archive Manager SQL database on the same computer.
TIP: See the System requirements chapter for required versions of the components cited in this section.
Archive Manager 5.4 Installation and Configuration Guide for GroupWisePre-installation preparations 17
5 Install GroupWise client.
6 Verify the default mail profile.
1 Open the Mail Control panel.
2 Click the Show Profiles... button.
3 Select the Always use this profile radio button.
4 Select the Novell Default Settings profile name from the drop-down list.
5 Click OK.
7 Remove Exchange Services from the GroupWise profile. Open the Novell Default Settings profile in the Mail control panel and make sure that there are no Exchange related services in your MAPI profile. If you see any of the following services listed in your profile, delete them from the profile before starting the GroupWise Directory Connector:
▪ Microsoft Exchange Server
▪ Outlook Address Book
▪ Personal Address Book
8 Create DNS entry. Create a DNS entry for "ArchiveManager" that points to the Archive Manager web server. If necessary, refer to Microsoft’s KnowledgeBase article #814591 (link current as of this document release) for more information.
Configuring the Archive Manager SQL database serverTo configure the Archive Manager SQL database server:
1 Install Microsoft SQL Server. Ensure the folder containing the database files is not compressed.
2 Configure SQL Agent. Ensure SQL Agent service has started, and confirm that the start-up method is set to Automatic.
NOTE: Do not install Tip of the Day.
Archive Manager 5.4 Installation and Configuration Guide for GroupWisePre-installation preparations 18
5
Installing and configuring Archive Manager
• Installing Archive Manager
• Configuring Archive Manager
• Useful configuration settings
Installing Archive ManagerTo access the installer for Archive Manager:
1 From the Archive Manager installation CD, run the AutoRun program.
2 Click the Install tab.
3 Under Product, click the Archive Manager link to run setup.
The installer can be started automatically from setup, or by going to ...Program Files\Quest\Archive Manager\Installer after running setup.
In addition to providing a link to the Archive Manager installer, the AutoRun program provides other useful information about Archive Manger including: a link to distribute the Outlook Form, prerequisites and redistributables, integrations, documentation, information on the Archive Manger Online Community, and contact information.
To Install Archive Manager:
1 On the Welcome to the Quest® Archive Manager Setup Wizard screen, click Next.
2 On the License screen, scroll through the license agreement and then select the I accept the terms of the license agreement check box and click Next to continue.
3 On the SQL Server settings screen, enter the following information:
a Server name: The name of the SQL Server you plan to use.
To specify a SQL Server availability group, enter the availability group listener name.
b In the Log on to the server section, select either Use Windows Authentication or Use SQL Server Authentication and specify credentials, if required. The authentication mode you specify will be used to install the Archive Manager database.
c Database name: Enter a name for the Archive Manager database.
4 Click Next. If no database exists, the following message is displayed:
The specified database does not exist. Create it now?
If a database does exist, you will be asked if you want to upgrade.
5 Click Yes to create a new database.
NOTE: Please refer to the System requirements chapter of this guide prior to installing Archive Manager.
Archive Manager 5.4 Installation and Configuration Guide for GroupWiseInstalling and configuring Archive Manager 19
6 On the Log folder screen, click Next to install to the default log folder or click Change to select another folder.
7 On the Destination Folder screen, click Next to install to the default destination folder or click Change to select another folder.
8 On the Custom Setup screen, select your environment and the product components to be installed. Each component can be installed independently.
Product components include:
▪ Exchange Environment
▫ Active Directory Connector
▫ Exchange Store Manager
▫ Lync Store Manager
▪ GroupWise Environment
▫ GroupWise Directory Connector Service
▫ GroupWise Store Manager Service
▪ Data Load Service
▪ Full Text Index and Search Service
▪ Message Retention Policy Service
▪ Alert Service
▪ Website
9 The Features to install screen displays the components that you have selected for installation, and the prerequisite software that will also be installed. If the list is correct, click Next.
10 On the Ready to install Quest® Archive Manager screen, click Install to begin the installation. If you want to review or change any of your installation options prior to starting the installer, click Back to go to the previous screens.
11 The Installing Quest® Archive Manager screen provides installation status messages as the installation progresses.
12 The Completed the Quest® Archive Manager Setup Wizard screen is displayed when the installation has completed. The Launch the Configuration Console when setup exits check box is checked by default. If you do not want to go straight to the Configuration Console, deselect the checkbox.
If there were any problems installing the prerequisites, a View Installation Warnings check box is displayed. Select this check box to get detailed list of the installation warnings.
13 Click Finish to exit the setup wizard and launch the Configuration Console if you have selected to do so.
Configuring Archive ManagerThe Archive Manager Configuration Console allows you to configure the settings needed to begin using Archive Manager. The first time you configure Archive Manager, you must walk through the screens in order by clicking Next after each screen.
CAUTION: The Log folder should not be installed in the Archive Manager installation path.
NOTE: If a SQL Server availability group has been specified when you install Archive Manager, you must add the databases Archivemanager (the one you specified in Step 3) and Aftermail_TEMP to the Availability Databases of the owner node after the installation. To check which is the owner node with Failover Cluster Manager, expand the cluster name, and click Roles.
Archive Manager 5.4 Installation and Configuration Guide for GroupWiseInstalling and configuring Archive Manager 20

After completing the initial configuration, the Configuration Console will switch to an edit mode where any screen can be configured in any order. In edit mode, click Apply to save your settings.
Configuration pages are displayed only for the features that you selected during installation.
If you are upgrading from a previous version of Archive Manager, the settings are populated with your previous selections.
1 The Welcome screen provides a list of information that you need to gather to configure Archive Manager. Review this list and click Next to begin configuring Archive Manager.
2 On the License screen, click Browse... to locate your license and click Install to install it. You can overwrite an existing license by entering a new license and installing it. Once a valid license is installed, the following information is displayed:
▪ Type: The type of license purchased.
▪ Expires: The expiration date of the license.
▪ Seats Licensed: The number of seats available from the license.
▪ Seats Used: The number of seats currently used.
License information can also be viewed at any time by clicking the Help icon and selecting the Licenses tab.
3 On the Service User Credentials screen, enter credentials for the following Archive Manager service users:
▪ General Service User
▪ Journaling Service User
▪ Archive Manager Administrative Group
Use the default credentials or enter new credentials. If the service accounts exist you will need to confirm the password. If it does not exist, enter the password twice and the account will be created.
4 On the General Settings screen, enter the directory path for the base data directory and the log path.
▪ Base Data Directory: Directory Path: The Base Data Directory path contains storage for errors, exclusions, exporting, and temporary storage for searching. Make sure to select a directory with adequate free space. Enter a directory for the Archive Manager base data directory. The default path is the following: C:\Quest\ArchiveManager
▪ Log Path: Directory Path: Enter the path to the Archive Manager log folder. The default path is the following: C:\Quest\ArchiveManager\Logs
5 On the Novell E-Directory screen, configure the Novell Directory Services settings.
▪ NDS LDAP Server: The name of the NDS LDAP server.
▪ NDS LDAP Port: The NDS LDAP port number.
▪ NDS Login: The path of the NDS login account. (NDS:\\TREE\Context\User)
▪ NDS Password: The password for the NDS login account.
6 On the GroupWise Store Manager screen, configure the GroupWise mail server.
▪ GroupWise Domain Directory: The path the domain database directory.
▪ GroupWise Server Address: This must be a primary mail server in the domain database listed above. Archive Manager creates a trusted application key in the domain, and application key only works if the mail server is local to the domain database.
▪ GroupWise Port: The GroupWise port number.
▪ GroupWise Admin Console Url: Default value is http(s)://mta_server:9710. This configuration applies only to GroupWise versions 2014 and above.
CAUTION: Configurable paths, such as Base Data Directory, Attachment Store, Index, or Export, should not be installed in the Archive Manager installation path.
Archive Manager 5.4 Installation and Configuration Guide for GroupWiseInstalling and configuring Archive Manager 21
▪ Archive Manager Server IP: The IP address of the Archive Manager Services Server.
7 On the Data Loader screen, select a data loader group from the drop down list to run in the server.
8 On the SMTP Mail Server screen, enter the information for the outgoing SMTP mail server:
▪ Mail Server Name: Enter the host name of the SMTP mail server. If your mail server requires SMTP authentication, enter the login details below. Leaving these fields blank forces Archive Manager not to authenticate.
▪ SMTP Login: The login name for the mail server.
▪ SMTP Password: The password for the mail server.
9 On the Website screen, enter the settings for the Archive Manager website:
▪ Website Name: Name for the Archive Manager site.
▪ Host Header: Name of the server without the protocol prefix (without "http://" or "https://").
▪ IP Address: IP address of the web server.
▪ Port: Port number (default=80) for the Archive Manager web server.
▪ Reset Password: When upgrading from a previous version of Archive Manager, to reset the Admin account password, select the Reset Password checkbox and enter a new password.
▪ Admin Password: Password for the Archive Manager administrator. You cannot leave the password blank. Note that the Archive Administrator’s login name is Admin, and this cannot be changed at the time of installation.
▪ Confirm Password: Re-enter the administrator password.
Secondary Websites: To add secondary websites, click Add under the Secondary Websites section. This opens the Secondary Website Setup screen. Enter the following information:
▪ Website Name: Name for the Archive Manager site.
▪ Host Header: Name of the server without the protocol prefix (without "http://" or "https://").
▪ IP Address IP address of the web server.
▪ Port: Port number for the Archive Manager web server.
▪ Share main website files: Archive Manager will use the same files on disk. Use this option if both instances of Archive Manager use the same authentication type (e.g. Windows or Forms).
▪ Create separate files for this website: Archive Manager will create a copy of the website files for the new website. Use this option if you need different authentication schemes for each of your website instances.
To edit a website, click Edit. To remove a website, click Remove.
10 On the Storage Location screen, set up the location for the attachment store. Click Add to access the Storage Location Type screen, then select an attachment store type and configure it.
File System or other storages deployed as a file system
a Select File System from the drop-down list and click Next to access the File System Store Setup screen and enter the following information.
▫ Path: Click Browse to select a path for the attachment store.
▫ Network Share: Enter the name of the share for the storage location.
▫ Store message data for compliance: Select this checkbox to save copies of all of the emails to be stored in external storage. This setting will apply to all storage locations.
▫ Compliance Directory Path: Enter a storage location path in this box. This can be an absolute path or a shared path with Full Control permissions to the Archive Manager Administrative Group.
▫ Default Storage Location: Select this checkbox to make the current storage location the default storage location.
Archive Manager 5.4 Installation and Configuration Guide for GroupWiseInstalling and configuring Archive Manager 22
b Click Next to access the Summary screen. This screen displays a list of the selected options.
EMC Centera
a Select EMC Centera from the drop-down list and click Next to access the EMC Centera Store Setup screen and enter the following information.
▫ Connection String: The connection string specifies the Centera device.
▫ Store message data for compliance: Select this checkbox to save copies of all of the emails to be stored in external storage. This setting will apply to all storage locations.
▫ Default Storage Location: Select this checkbox to make the current storage location the default storage location.
b Click Next to access the Summary screen. This screen displays a list of the selected options.
Bridgehead HDR Store Setup
a Select Bridgehead HDR from the drop-down list and click Next to access the Bridgehead HDR Store Setup screen and enter the following information.
▫ Bridgehead HDRHOME Location: Enter the location of the HT data repository, usually stored in the HDRHOME environment variable.
▫ Bridgehead Library Path: Enter the following path:
C:\Program Files (x86)\Quest\Archive Manager\Bridgehead\HDRDatastream.dll
▫ Repository ID: Enter the HT repository ID. This value must be a number.
▫ Application Name: Enter the HT data application name. This is usually ArchiveManager.
▫ Store message data for compliance: Select this checkbox to save copies of all of the emails to be stored in external storage. This setting will apply to all storage locations.
▫ Default Storage Location: Select this checkbox to make the current storage location the default storage location.
b Click Next to access the Summary screen. This screen displays a list of the selected options.
IBM DR550 Store Setup
a Select Bridgehead HDR from the drop-down list and click Next to access the Bridgehead HDR Store Setup screen and enter the following information.
▫ Host: Enter the host to connect to.
▫ Node: Enter the node name.
▫ Port: Enter the port to connect to. If this field is left blank, the default port number of 1500 is used.
▫ Username: Enter the username to use to sign in to the IBM DR550.
▫ Password: Specify the password to use to sign in to the IBM DR550. If this field is left blank, the value from the IBM DR550 Client Registry will be used. For example:
HKLM\SOFTWARE\IBM\ADSM\CurrentVersion\Nodes\<NodeName>\<Nodename>_SERVER1\Password, type of REG_BINARY
▫ Open Storage In: Select either the Archive Mode or Backup Mode radio button. Archive mode is optimized for better space utilization. Backup mode is optimized for faster retrieval. The default setting is Backup Mode.
▫ File Space for Attachments: Specify the file space where attachments will go. It is recommended that you use the default settings.
▫ File Path for Attachments: Specify the file path where attachments will go. It is recommended that you use the default settings.
▫ Store message data for compliance: Select this checkbox to save copies of all of the emails to be stored in external storage. This setting will apply to all storage locations.
Archive Manager 5.4 Installation and Configuration Guide for GroupWiseInstalling and configuring Archive Manager 23

▫ File Space for Messages: Specify the file space where messages stored for compliance will go. It is recommended that you use the default settings.
▫ File Path for Messages: Specify the file path where messages stored for compliance will go. It is recommended that you use the default settings.
▫ Default Storage Location: Select this checkbox to make the current storage location the default storage location.
b Click Next to access the Summary screen. This screen displays a list of the selected options.
NetApp SnapLock
a Select NetApp SnapLock from the drop-down list and click Next to access the NetApp SnapLock Store Setup screen and enter the following information.
▫ Share Name: Enter the share name for the storage location.
▫ Retention Mode: Select SnapLock Default or Archive Manager Default.
▫ Retention Time: Enter the number of days, months, and years for retention. These settings are enabled only if you have selected Archive Manager Default.
▫ Store message data for compliance: Select this checkbox to save copies of all of the emails to be stored in external storage. This setting will apply to all storage locations.
▫ Default Storage Location: Select this checkbox to make the current storage location the default storage location.
b Click Next to access the Summary screen. This screen displays a list of the selected options.
Caringo DX
a Select Caringo DX from the drop-down list and click Next to access the Caringo DX Store Setup screen and enter the following information.
▫ Hosts: Enter the hosts to connect to. If there are multiple hosts, they should be entered in a comma-separated list.
▫ Port: The port to connect to.
▫ Username: The User Name to connect to the Caringo service.
▫ Password: The password for the account used to connect to the Caringo service.
▫ Store message data for compliance: Select this checkbox to save copies of all of the emails to be stored in external storage. This setting will apply to all storage locations.
▫ Default Storage Location: Select this checkbox to make the current storage location the default storage location.
b Click Next to access the Caringo DX Advanced configuration screen.
Caringo DX Advanced (Optional)
▫ Cluster Name: The name of the cluster for the Caringo DX storage location.
▫ Proxy Address: The cluster reverse proxy IP address.
▫ Port: The cluster reverse proxy access port.
▫ Realm: The Caringo security domain/realm.
▫ Bucket: The name of the container within the device.
▫ Max Retries: Maximum number of times to retry a command on a communication or server failure.
▫ Max Stored Connections: The maximum number of connections stored in the connection pool.
▫ Pool Timeout: The time in seconds that the connection pool will store an open connection.
▫ Locator Retry Timeout: The amount of time the locator should wait before retrying a previously discarded host address.
Archive Manager 5.4 Installation and Configuration Guide for GroupWiseInstalling and configuring Archive Manager 24
▫ Hash Type: The hash algorithm to use to verify content integrity.
▫ Connection Timeout: Time in seconds that a request will wait for a connection and for activity on a request.
▫ Named: Check to enable the use of Named objects. Uncheck to use automatically generated UUIDs (Unique User IDs).
▫ Validate: Check to enable content integrity verification.
▫ Replicate: Check to enable immediate replication of objects as they are stored.
c Click Next to access the Summary screen. This screen displays a list of the selected options.
11 On the Full Text Index Setup screen, the Default Configuration check box is selected by default. The Full Text Index will be sectioned into partitions based upon the default rollover policy. Using multiple (physical) hard disks may improve indexing and searching performance and is required for automatic index failover (recovery).
▪ Index drives: Select the drive(s) to use for indexing. Automatic index failover requires 2 or more drives to be selected.
12 The Default Policy screen displays mail servers that have been found with the directory connector settings entered previously. Enter the following information.
▪ Create a default policy on servers defined below: Select this check box to add a default message policy to the servers listed. Selecting this check box selects the entire server list. You may deselect individual servers.
13 On the Advanced Settings screen, configure the additional optional settings if needed. Click Add to add a configuration settings. Click Remove to remove a configuration setting. Click Revert All to go back to the original settings.
If you are doing an upgrade, your settings will be populated from the previous version of Archive Manager.
14 The Summary screen lists all of the settings you have entered. Click Finish to apply these settings in the Configuration Console.
Useful configuration settingsThe following configuration settings can be added/edited in the Advanced Settings screen in the Configuration Console, if needed.
• General
• Archive Manager Database
• GroupWise Directory Connector (GDC)
• GroupWise Store Manager (GSM)
• Data Loader
• Full Text Index (FTI)
• Full Text Search (FTS)
• Website
General• AfterMail URL: Sets Archive Manager website URL. This field should be auto filled by Configuration
Console. If you have changed the website URL by IIS, change this setting accordingly.
• CACHE TIME: The time in minutes to keep the message and attachment search result in cache. The default value is 30 (minutes).
Archive Manager 5.4 Installation and Configuration Guide for GroupWiseInstalling and configuring Archive Manager 25
• CommandTimeout: The maximum time in seconds to execute a command. The default value is 600 (seconds).
Archive Manager Database• CleanUpTime: Deletes all of the old temporary "scratch" tables that the program generates for searches
and other functions. The script defaults to running at 12:01:01 a.m. every day. This time is configurable. Since the Retention Engine also uses temporary tables, the CleanUp script should not be run at the same time as the Retention Engine. Most administrators choose to run the CleanUp script before the Retention Engine, which may occasionally run for prolonged time periods.
GroupWise Directory Connector (GDC)• GroupWise Directory Connector Timer Interval: The default value for this setting is 3600 (seconds). The
value is the number of seconds that the GDC will wait after an export run has completed to run the next export.
• GroupWise Directory Connector Reset Timer Interval: The default value for this setting is 600 (seconds). The value is the number of seconds that the GDC will wait for a GroupWise API call to finish. If a GroupWise API method fails to return within this time, the GDC will terminate the process and start the export run over from the beginning.
GroupWise Store Manager (GSM)• GroupWise Store Manager No Message Stamping: Enables or disables the message stamping. This
setting defaults to True. Note that the message stamp is never used in Archive Manager.
• GroupWise Store Manager Export Shared Folders: Enables archiving shared GroupWise folders when set to 1. The default is 0 or off.
• GroupWise Store Manager Log Level:
▪ 0 - Error
▪ 1 - Warn
▪ 2 - Info (default)
▪ 3 - Debug
▪ 4 - Verbose
• GroupWise Store Manager Max Thread Count: The maximum number of threads that mailboxes can processed in parallel. The default value is 1.
• Archive GroupWise Store Manager Service Timer Interval: Sets the number of seconds that the GSM service will stop before running again. The default value is 10 (seconds).
Data Loader• Dataload Timer Interval: Sets the number of seconds that the data loader will stop before running through
the enabled "Dataloaders" (within the Archive manager user interface), for example, MAPI, Filesystem etc. The default value is 60 (seconds), since the MAPI32 process must have time to unload before the Dataloader processes the Mailbox on its next run. A lower value may work better in some circumstances, but in most cases 60 seconds is the optimum interval.
• DataLoad Service Max POP Message Size: The maximum size in MB of message processed by the POP3 data loader. The default value is 50 (MB).
Archive Manager 5.4 Installation and Configuration Guide for GroupWiseInstalling and configuring Archive Manager 26

• Dataload Process Rows: The number of database records that the data loader will process in a batch. The default value is 2500.
• Save Excluded Emails: Save Excluded Emails is a Boolean (true or false) parameter that determines whether File System Data Loader will save all messages that match an exclusion rule to the Exclusion directory as XML. If this feature is enabled, it also will write some metadata to the Exclusion table in Archive Manager. The default value is True.
• ExclusionDirectory: Specifies the location to store the excluded XML files. The default value is C:\Quest\ArchiveManager\Exclusion.
• ErrorPath: Specifies the location to store the XML files that the File System Data Loader fails to load. The default value is C:\Quest\ArchiveManager\Error.
• Data Loader Worker Log Retention Days: How many days the logs of the MAPI data loader will be kept in the log folder. The default value is 7 (days).
• Journal Data Loader Log Level: The log level for the MAPI data loader.
▪ 0 - Error
▪ 1 - Warn
▪ 2 - Info (default)
▪ 3 - Debug
• POP3 Timeout Seconds: The maximum number of seconds for the POP3 data loader to process a single message. The default value is 3000 (seconds).
Full Text Index (FTI)• Full Text Index Include Recipients: Controls whether or not recipients are added to the Lucene index.
The default is False. This setting has historically defaulted to false as the recipients are not searchable in Lucene, but are instead pulled from the Archive Manager database. This setting should remain false.
• Full Text Index Max Field Length: This setting can be used to increase or decrease the field length from the default of 100,000 for indexed terms in a single document.
• Full Text Index Max Merge Docs: This setting can be used to merge indexes into larger files, increasing search performance. The default is 1000000 documents per file.
• Full Text Index Merge Factor: This setting can be used to merge same-sized index files, increasing search performance. The default is 10 files.
• FTI Max Buffered Docs: Specifies how many documents Lucene can buffer in RAM before flushing them to an on-disk segment. If set to zero, flushing is triggered by size only, according to "Full Text Index Ram Buffer Size MB". The default is 0.
• FTI Max Worker Count: The max number of indexing workers the FTI can devote to a single partition. The default is 10.
• FTI Max Total Indexer Threads: Aggregate maximum total number of indexer threads the FTI is allowed to use. If "FTI Max Worker Count" times the number of active partitions exceeds this total, the FTI will scale back each partition's use of threads to try not to exceed this limit. No partition, no matter how low its IndexingPriority, will use less than 1 thread. The default value is 40.
• FTI Commit Point Keep Count: The number of Lucene index commit points to retain. This should only be increased above 1 if attempting to gather data on index corruption. The default is 1.
• FTI Auto Failover: Controls whether the FTI will initiate failover automatically. The default is True.
• FTI Auto Repair: Controls whether the FTI will initiate repair of corruption automatically. The default is True.
• FTI Repair Auto Fix: Controls whether the FTI will actually repair the corruption it identifies during a Repair operation. The default is True.
Archive Manager 5.4 Installation and Configuration Guide for GroupWiseInstalling and configuring Archive Manager 27
• FTI Auto Itemize: Controls whether the FTI will initiate itemize automatically after repair. The default is True.
• FTI Itemize Auto Fix: Controls whether the FTI will actually add FailedToIndex records for the items it identifies as missing during an Itemize operation. The default is True.
• Full Text Index Ram Buffer Size MB: Determines the amount of RAM that may be used when buffering added documents and deletions before they are flushed to the Directory. This setting corresponds directly to Lucene's SetRAMBufferSizeMB method. The default is disabled. Using the default setting is recommended.
Full Text Search (FTS)• Full Text Search Cache Time: Determines the length of time, in minutes, that a Full Text Index search on
the body of a message or attachment will be cached after it runs. The default value is 60 (minutes). The cache lets a user re-run the same search within the Cache Time limit, obtaining the same results, but much faster than if the search were re-run from scratch.
• Full Text Max Results: The maximum number of results that the FTS service retrieves. The default value is 5000.
Website• WWW Page Size: Determines the number of search results displayed on a single page. The default is 20.
This setting affects the entire instance and is not customizable per user.
• WWW Show Source Properties: Enables or disables the website to show the source properties of a message. The default value is False.
• Include Sub Folders By Default: Determines whether to include the sub folders by default when searching messages or attachments. The default value is False.
• Allow GW Authentication: Identifies whether the Archive Manager web site supports GroupWise authentication. Default is False. When set to True, an authentication option appears in the Archive Manager login page. User can select default authentication or GroupWise authentication to log into the Archive Manager web site. This configuration is only supported by GroupWise 2014 or later.
Archive Manager 5.4 Installation and Configuration Guide for GroupWiseInstalling and configuring Archive Manager 28

Archive Manager 5.4 Installation and Configuration Guide for GroupWiseUpgrading/Uninstalling Archive Manager
6
29
Upgrading/Uninstalling Archive Manager
• Upgrading Archive Manager
• Uninstalling Archive Manager
Upgrading Archive ManagerWhen upgrading Archive Manager, please refer to the release notes for information on supported upgrade versions.
To upgrade Archive Manager:1 Stop all Archive Manager services.
2 Run the AutoRun program to run the Archive Manager Installer: ArchiveManagerInstaller.msi.
3 Perform an installation as described in the Installing Archive Manager section.
4 Run the Archive Manager Configuration Console to configure your Archive Manager settings. Some settings will be populated with information from your previous installation. These settings can be changed if needed. You will be prompted to enter any required information.
Uninstalling Archive ManagerTo uninstall Archive Manager:
1 Launch the Installer used to install the current version of Archive Manager.
2 Click Next.
3 Click Remove.
CAUTION: Before upgrading or uninstalling Archive Manager, backup your databases, attachment files, export files, index files, log files and any non-program files located in the Archive Manager installation directory. Use the configuration console to obtain the location of these files.
NOTE: When upgrading from version 4.8 to 5.0 or later, uninstall version 4.8 before performing the upgrade.
TIP: After upgrading to Archive Manager 5.1 or later, any mail items that are not associated with a folder will be placed in an _Orphans mailbox the first time the Retention service runs. If you wish to delete these items, set a Delete policy in the Retention Policies section of the Administration website.

7
Post-installation tasks
• Configuring Archive Manager
• Configuring the GroupWise Directory Connector (GDC)
• Backloading your data
• Localizing Archive Manager website (optional)
Configuring Archive ManagerAfter you install Archive Manager, you must perform certain configuration tasks before you can begin to use the product. Most of these necessary post-installation tasks are explained in the contents of this chapter:
• Configuring the GroupWise Directory Connector (GDC)
• Backloading your data
In addition to the above-listed tasks, you must also set up at least one Message Policy, and apply a Policy to a mail server or mailboxes.
Detailed instructions can be found in the Archive Manager Administration Guide.
To begin the initial configuration, sign in to the Quest Archive Manager web site. The default administrator account is admin, and the password was specified during installation. Use the domain DEFAULT.
Once you have signed in, click the Administration icon (top-right corner of the window) to go to the administrative section of the Archive Manager web site.
Configuring the GroupWise Directory Connector (GDC)If you want to modify the defaults for the following configuration settings, add them to the Archive Manager Configuration Console and then modify the default settings.
• GroupWise Directory Connector Timer Interval: The default value for this setting is 3600 seconds (1 hour). The value is the number of seconds that the GDC will wait after an export run has completed to run the next export
• GroupWise Directory Connector Reset Timer Interval: The default value for this setting is 600 seconds (10 minutes). The value is the number of seconds that the GDC will wait for a GroupWise API call to finish. If a GroupWise API method fails to return within this time, the GDC will terminate the process and start the export run over from the beginning.
Archive Manager 5.4 Installation and Configuration Guide for GroupWisePost-installation tasks 30
Backloading your dataBefore you run the GSM for the first time, complete the following steps to ensure that all of your email data is successfully processed.
1 Add the GroupWise Store Manager Use No Filters configuration setting to the Configuration Console and set the value to True.
2 Start GSM Service to begin the initial backload of your email data.
3 Once all mailboxes have been successfully processed once with the GroupWise Store Manager Use No Filters setting enabled, change the value for the setting to False.
This allows other date filters to take over and process a smaller set of data instead of continually processing the full set of data.
Localizing Archive Manager website (optional)Both the Archive Manager websites for end users and Administration can be localized using JSON files stored in the Archive Manager installation directory.
To localize the website for end users into your language:1 In the directory <ArchiveManager_Home>\WebSite\assets\language, copy the file en-US.JSON, and paste
it to the same folder.
2 Rename the copy file with your language code. For example, for French (France), rename it to fr-fr.JSON.
3 Translate your language file (For each line in the file, only edit the text between the quotation marks after the colon).
4 Restart IIS.
To localize the Administration website into your language:1 Open the language file <ArchiveManager_Home>\WebSite\Resource\Languages.xml.
2 For each value code, add a new line with your language code as the culture name, and the translated text in your language.
3 Restart IIS.
NOTE: The display language of the website for end users is determined by the user’s browser language, and English will be used if no resource file for the desired language can be found in the directory <ArchiveManager_Home>\WebSite\assets\language.
NOTE: The display language of Administration website is determined by the Archive Manager server language, and English will be used if no resource for the desired language can be found in the file Languages.xml.
Archive Manager 5.4 Installation and Configuration Guide for GroupWisePost-installation tasks 31
8
Appendix A: Attachment store types
• Attachment store types overview
• NTFS/Windows File System
• NetApp SnapLock
• EMC Centera
• Caringo CAStor/Dell DX
• Bridgehead HDR
• IBM DR550
• Hedvig Distributed Storage Platform
• Common scenarios for editing the configuration
Attachment store types overviewArchive Manager supports different storage types for storing attachments and compliance messages. Details on using each of the storage types are provided below. The storage types supported by Archive Manager include:
• NTFS / Windows File System: This is the default option, and stores files on standard disk.
• NetApp SnapLock: SnapLock provides fast WORM (Write Once Read Many) storage on magnetic disk. It uses non-rewritable, non-erasable disk storage protects data until a specified retention date.
• EMC Centera: This option uses an external EMC Centera server or cluster to store the attachments.
• Caringo CAStor/Dell DX: This option uses a Caringo CAStor storage cluster or Dell DX Object Storage Platform to store attachments.
• Bridgehead HDR: This option uses an external Bridgehead HDR server to store attachments.
• IBM DR550: This option uses an IBM DR550 running IBM System Storage Archive Manager (SSAM) to store attachments.
• Hedvig Distributed Storage Platform: Works with Archive Manager as the NTFS/Windows File System.
Archive Manager allows more than one type of storage to be used on a running system. However, only one storage location can be considered the default storage location at a time.
When installing Archive Manager, you set the attachment store type on the Attachment Store Type screen. Once the product is installed, additional attachment stores can be added. This process is described below in the section Common scenarios for editing the configuration.
In all cases, Archive Manager stores each unique attachment as a single file or the equivalent unit. Archive Manager performs no compression or encryption. This is left to the underlying storage system.
Some attachment store types are deprecated in Archive Manager for new installations. Existing customers on deprecated file storage types are fully supported and will continue to be supported until a migration plan is in place and migration tool is available to move to a new storage type
Archive Manager 5.4 Installation and Configuration Guide for GroupWiseAppendix A: Attachment store types 32
NTFS/Windows File SystemThe file system is the default storage mechanism for Archive Manager. This is a directory structure, usually in C:\ArchiveManager\Data, with each file stored represented by its database id and file type. For example: 34.gif
These files are stored in blocks of 1000 files per directory. Each database ID has up to twelve 0’s added to the front. For example, 34 becomes 000 000 000 034, and this is converted in a directory name:
c:\archivemanager\data\000\000\000\000\34.gifBy default, the entire tree, from c:\archivemanager\data down, is set to be compressed using NTFS compression. These files will not be rewritten, so any backup scheme can be used. It is recommended that you do an incremental backup.
NetApp SnapLockThe NetApp SnapLock Setup Wizard allows you to create volumes or WORMS on which Archive Manager can put attachment stores. The volumes containing attachment stores are an effective tool for compliance.
The NetApp SnapLock Wizard is run from the Archive Manager Installer. Run the installer during the installation process, unless you already have all the necessary volumes created.
Prerequisites• Install all of the necessary licenses for the NetApp Data ONTAP operating system.
• In DataONTAP, run the CIFS (Common Internet File System) setup. The CIFS shows the volume to the Windows system as a drive.
Table 3. External storage type deprecation status
External Storage Type Archive Manager Version for DeprecationFile System Supported. NetApp SnapLock 7.2.4 Supported. EMC Centera 4.2.1, 4.2, 4.1, 4.0, 3.1.4, or EMC Atmos 2.0 Supported. Caringo Castor/Dell DX Supported.BridgeHead HT FileStore with HDR 2.2-20, build 23007 Deprecated. Only upgrades supported.IBM DR-550 version 5.4.1 (Version 5, Release 4, Level 1) Deprecated. Only upgrades supported.Hedvig Distributed Storage Platform Version 3.7.1 Supported.
NOTE: If a CIFS share is already in place, you can upgrade from a Windows file system attachment store to NetApp SnapLock by these two steps:
1 Copy the filesystem data folder (containing the archived attachments) to the NetApp CIFS share.
2 In the Archive Manager SQL database, StorageLocation Table: Change the connection string (originally in the form "DATA=\\archivemanagerserver\filesystemlocation") to point to the new CIFS share location (for example, "DATA=\\NetApp\data").
Archive Manager 5.4 Installation and Configuration Guide for GroupWiseAppendix A: Attachment store types 33
Running the NetApp SnapLock Setup WizardThe NetApp SnapLock Setup Wizard is run from the Archive Manager Installer. The NetApp SnapLock Configuration screen contains a Launch SnapLock Setup Wizard button. When you launch the wizard, fill in the information on the following screens:
Login Page• Create New SnapLock Volume: Select this option to create a new volume.
• Change Retention Times: Select this option to change the default retention times. The settings here apply only if you select SnapLock Default as the retention mode in the Archive Manager Installer.
• Filer Address: IP name or address of the machine running Data ONTAP.
• User Name: Account name you want to use to access the machine running Data ONTAP. This account must be an Administrator account, preferably root.
• Password: Password for the account used to access the machine running Data ONTAP.
• Volume Name: Name of the volume you want to create on the machine running Data ONTAP. Or the name of the volume for which you want to change retention times. This name is case sensitive.
Volume Properties• New Volume Name: Enter the name of the volume you wish to create.
• Number of Disks to Use: Enter the number of disks to use on the volume. Because it is a RAID configuration, this must be an even number.
• Create Data Loader User: Select this box if you are not using Active Directory and need to set up a Journal User for the data loader.
• Data Loader Log-In User Name: Enter the name for the Journal User that you are creating.
• Data Loader Log-In User Password: Enter the password you want to create for the Journal User.
• Verify Password: Retype the password.
Click Next to create the volume If this is a new setup, the volume will be created instantly. If this is an existing setup, the wizard will take some time to prepare the volume for use.
Retention Time• Current Retention Times: Shows the current settings for the minimum time, default time, and maximum
time.
• Set Retention Time: Enter a number for the minimum time, default time, and maximum time. Select days, months, or years from the drop-down list.
EMC CenteraThe EMC Centera is supported for the storage of attachments and compliance messages. The native Centera API is used to store attachments in the Centera cluster. Archive Manager considers the Centera to be an "always-online blind storage system." Archive Manager presents an attachment, and then receives a “ticket”. To get the attachment back, Archive Manager presents the ticket and gets the attachment.
Archive Manager does not set any retention policies on the Centera. This is left to the Centera administrator.
Archive Manager supports any centera settings which can be set on the Centera connection string or in a PEA file.
Archive Manager 5.4 Installation and Configuration Guide for GroupWiseAppendix A: Attachment store types 34

Using a PEA FileWhen utilizing a PEA file with a Centera Configuration, it is important that the PEA file is accessible by each component that requires access to it. The Archive Manager components that will access the Centera, and therefore require access to the PEA file, are:
• Archive Data Load Service
• Archive Full-Text Index Service
• Website
As a result, the group ArchiveManagerServiceUsers should have permissions to access the PEA file location. The PEA file should also be present on all servers with the above Archive Manager components. (This is important if you have NLB WebServers, and/or a clustered Archive Manager installation).
If the machines are separate, then the PEA file must be either configured with a UNC path, or placed in the same local path as all machines that use the PEA file.
Caringo CAStor/Dell DXThe Caringo CAStor/Dell DX storage cluster is supported for the storage of attachments and compliance messages. The Caringo HTTP interface is used to store and retrieve items. Archive Manager considers the storage cluster to be an online blind storage system; we present an item, and receive a "ticket". To get the item back, we present the ticket and get the item. Note that performing a full text index reindex can overload the storage cluster with restore requests. Please consult Quest before doing this.
Bridgehead HDRThe Bridgehead HDR system is supported for the storage of attachments and compliance messages. The native HDR API’s are used to store attachments in a HDR system. Archive Manager considers the HDR to be a "usually-online blind storage system." Archive Manager presents an attachment, and then receives a “ticket”. To get the attachment back, Archive Manager presents the ticket and gets the attachment. If the HDR tells Archive Manager that the attachment is to be retrieved from slow storage (tape, DVD etc.), Archive Manager presents this to the user or handles it in the appropriate way.
Note that performing a full text index or reindex can cause the Bridgehead system to become overloaded with restore requests. Please consult with Quest before performing this action.
IBM DR550The IBM DR550 is supported for the storage of attachments and compliance messages. The native TSM API is used to store attachments in the system.
Archive Manager considers the IBM DR550 to be a usually-online blind storage system; we present an attachment, and receive a “ticket”. To get the attachment back, we present the ticket and get the attachment. If the IBM DR550 tells us the attachment is to be retrieved from slow storage (tape, DVD etc.), we present this to the user or handle it in an appropriate way.
Note that performing a full text index reindex can overload the IBM DR550 with restore requests. Please consult Quest before doing this.
NOTE: Using BridgeHead configured with transform methods is not supported. It causes Dataloader exceptions when processing messages.
Archive Manager 5.4 Installation and Configuration Guide for GroupWiseAppendix A: Attachment store types 35
Hedvig Distributed Storage PlatformThe Hedvig Distributed Storage Platform serves as a local file system when working with Archive Manager. For more information, see NTFS/Windows File System on page 33.
Common scenarios for editing the configurationThe following sections describe different scenarios for editing the configuration.
Using a NAS BoxArchive Manager’s installer does not support storing attachments on a NAS box, as software is installed on the box, which is most likely not running windows.
If you want to store attachments on a NAS box, use the following workaround:
1 When installing Archive Manager, set the services to NOT start after installation. Install using a normal filesystem storage location.
2 Once Archive Manager is installed, edit the StorageLocation table and change the default storage location to point to the UNC of the NAS box. For example: DATA=\\nasbox\archivemanagerstore
3 You must ensure that all Archive Manager users, ArchiveMgr_Service, ArchiveMgr_ESM, ArchiveMgr_Journal, have full access to that folder.
4 Start the services. They will now load and retrieve attachments from the NAS box.
Deleting attachments from a SnapLock volumeThe Archive Manager Retention Engine cannot delete attachments from a Data ONTAP device unless the retention settings in SnapLock contain a retention time that precedes or is the same as the one set in the Retention Engine. The Retention Engine generates errors when the retention settings in SnapLock for attachments on a Data ONTAP device are set at a later time than the Archive Manager retention delete policy.
Archive Manager 5.4 Installation and Configuration Guide for GroupWiseAppendix A: Attachment store types 36
9
Appendix B: Process overview checklist
• Pre-installation checklist
• Install Archive Manager
• Post-installation checklist
This checklist provides a high-level overview of the process for installing Archive Manager for GroupWise. Full details are provided in earlier chapters of this Guide, as cited below.
Pre-installation checklistTable 4. Pre-Installation checklist
Check1. Review your system requirements.
See the System requirements chapter of this Installation Guide for the required/supported versions of components listed below.
2. Configure Your Archive Manager Services Server.For more details about these steps, see Configuring the Archive Manager Services server earlier in this Guide.
1 Install Microsoft Windows operating system.2 Install anti-virus software.3 Install Internet Information Server and ASP.NET.4 Install Required IFilters.5 Install Novell Netware Client.6 Install GroupWise Client.7 Verify the Default Mail Profile has all required GroupWise
services, and no Exchange services.8 Verify that both required versions of Microsoft .NET
Framework are installed.9 Create a DNS Entry for the Archive Manager Services
server.3. Configure the Archive Manager Database Server.
For more details about these steps, see Configuring the Archive Manager SQL database server earlier in this Guide.
1 Install the Microsoft Windows operating system.2 Install Microsoft SQL Server.3 Configure the SQL Agent Service.4 Configure the SQL Server Data and Log directories.
Archive Manager 5.4 Installation and Configuration Guide for GroupWiseAppendix B: Process overview checklist 37

Install Archive ManagerInstall Archive Manager using the instructions provided in the Installing and configuring Archive Manager chapter of this Guide.
Post-installation checklistFor details on completing the following steps, see the chapter Post-installation tasks.
4. Configure Your Groupwise Server.1 Run GWCheck.2 Set Post Office Logging to Verbose.
5. If you do not want Archive Manager to begin an export of all users immediately upon installation, be sure to disable store management at the server and user levels before starting the services for the first time.
Table 5. Post-Installation checklist
Check1. Configure Archive Manager:
1 Set Up a Data Loader 2 Set up a Message Policy 3 Apply a Policy to a Mail Server or Mailbox(es).
2. Functionality Check for Sign In and Display.3. Functionality Check for Searching.4. Functionality Check for Messages.5. Functionality Check for Attachments.6. Functionality Check for Online Help.7. Functionality Check for Mailboxes.8. Functionality Check for Administrator Features.
Table 4. Pre-Installation checklist
Archive Manager 5.4 Installation and Configuration Guide for GroupWiseAppendix B: Process overview checklist 38

About us
We are more than just a nameWe are on a quest to make your information technology work harder for you. That is why we build community-driven software solutions that help you spend less time on IT administration and more time on business innovation. We help you modernize your data center, get you to the cloud quicker and provide the expertise, security and accessibility you need to grow your data-driven business. Combined with Quest’s invitation to the global community to be a part of its innovation, and our firm commitment to ensuring customer satisfaction, we continue to deliver solutions that have a real impact on our customers today and leave a legacy we are proud of. We are challenging the status quo by transforming into a new software company. And as your partner, we work tirelessly to make sure your information technology is designed for you and by you. This is our mission, and we are in this together. Welcome to a new Quest. You are invited to Join the Innovation.
Our brand, our vision. Together.Our logo reflects our story: innovation, community and support. An important part of this story begins with the letter Q. It is a perfect circle, representing our commitment to technological precision and strength. The space in the Q itself symbolizes our need to add the missing piece — you — to the community, to the new Quest.
Contacting QuestFor sales or other inquiries, visit www.quest.com/contact.
Technical support resourcesTechnical support is available to Quest customers with a valid maintenance contract and customers who have trial versions. You can access the Quest Support Portal at https://support.quest.com.
The Support Portal provides self-help tools you can use to solve problems quickly and independently, 24 hours a day, 365 days a year. The Support Portal enables you to:
• Submit and manage a Service Request.
• View Knowledge Base articles.
• Sign up for product notifications.
• Download software and technical documentation.
• View how-to-videos.
• Engage in community discussions.
• Chat with support engineers online.
• View services to assist you with your product.
Archive Manager 5.4 Installation and Configuration Guide for GroupWiseAbout us 39