installation and reference manualstatic.highspeedbackbone.net/pdf/hauppauge_wintv... · wintv-pvr...
TRANSCRIPT

WinTV-PVR-150WinTV-PVR-250WinTV-PVR-350
WinTV-PVR-usb2
Installation andReference Manual

FCC Statement
Radio Interference Statement:The WinTV boards have been tested and found to comply with the limitsfor a Class B digital device, pursuant to part 15 of the FCC Rules. Theselimits are designed to provide reasonable protection against harmfulinterference in a residential installation. This equipment generates, uses,and can radiate radio frequency energy and, cause harmful interferenceto radio communications. However, there is no guarantee that interfer-ence will not occur in a particular installation. If this equipment doescause harmful interference to radio or television reception, which can bedetermined by turning the equipment off and on, the user is encour-aged to try to correct the interference by one or more of the followingmeasures:
• reorient or relocate the receiving antenna.• increase the separation between the equipment and receiver.• connect the equipment into an outlet on a circuit different from that to
which the receiver is connected. • consult the dealer or an experienced radio/TV technician for help.
FCC ID: H90WINCAST Assembled in Malaysia
CAUTION: Changes or modifications not expressly approved by theparty responsible for compliance to the FCC Rules could void the user’sauthority to operate the equipment.
CE Statement:This equipment has been tested and complies with EN 55013, EN55020 and IEC 801-3 part 3 standards.
2
WinTV-PVR Installation and Reference Manual

WinTV-PVRInstallation and
Reference Manual
Hauppauge Computer Works GmbHKrefelder Straße 669
41066 Mönchengladbach, GermanyHotline: (+49) 2161/69 48 840
Tel: (+49) 2161/69 48 80Fax: (+49) 2161/69 48 815email: [email protected]
www.hauppauge.de
Hauppauge Computer Works Ltd.6-10 Bank Chambers, Borough High Street
London SE1 9QQ, U.K.Phone: (+44) 207 378 1997
Fax: (+44) 207 357 9171Tech support: (+44) 207 378 0202
email: [email protected]
Hauppauge Computer Works, Inc.91 Cabot Court, Hauppauge, NY 11788 USA
Phone: (+1) 631.434.1600Fax: (+1) 631.434.3198
Tech support: (+1) 631.434.3197www.hauppauge.com

Table of Contents
WinTV-PVR Installation and Reference Manual Revision 2.0FCC Statement .....................................................................................CE Statement ........................................................................................
Installing the WinTV-PVR 1Installation overview.........................................................................1-1WinTV-PVR 150/250/350 board diagram .........................................1-2Installing the WinTV-PVR board in your PC .....................................1-3Connecting the WinTV-PVR-USB2 cables .......................................1-3Installing the WinTV-PVR driver under Windows XP........................1-4Installing the WinTV-PVR-USB2 driver on Windows XP ..................1-5nstalling the WinTV-PVR-350 under Windows 98SE .......................1-6Installing the WinTV-PVR-250/350 under Windows Me...................1-8Installing the WinTV-PVR-250/350 under Windows 2000 ................1-9Finding the WinTV-PVR-150/250/350 driver in Device Manager ...1-12
Installing the Application Software 2How to install the application software for Windows 98SE & Me....2-1How to install the application software for Windows XP .................2-4How to install the application software for Windows 2000..............2-7
Using the WinTV2000 Application 3The WinTV2000 window...................................................................3-1Running the WinTV application .......................................................3-1Setting up your TV channels............................................................3-2WinTV-PVR remote control...............................................................3-3Watch, Pause and Record TV buttons.............................................3-4Setting up an external source ..........................................................3-4The Channel Suite Manager ............................................................3-6Adjusting the video image color ......................................................3-6Still Frame Image Capture ..............................................................3-7Adjusting your captured images......................................................3-7Using the mouse in WinTV...............................................................3-7Single click TitleMode/NoTitleMode makes WinTV easy to use! ....3-8Setting preferences in Title mode ...................................................3-9Setting full screen TV mode ..........................................................3-10Image Save, Print, Copy to Clipboard ...........................................3-10Keyboard control of the WinTV application ...................................3-11
i
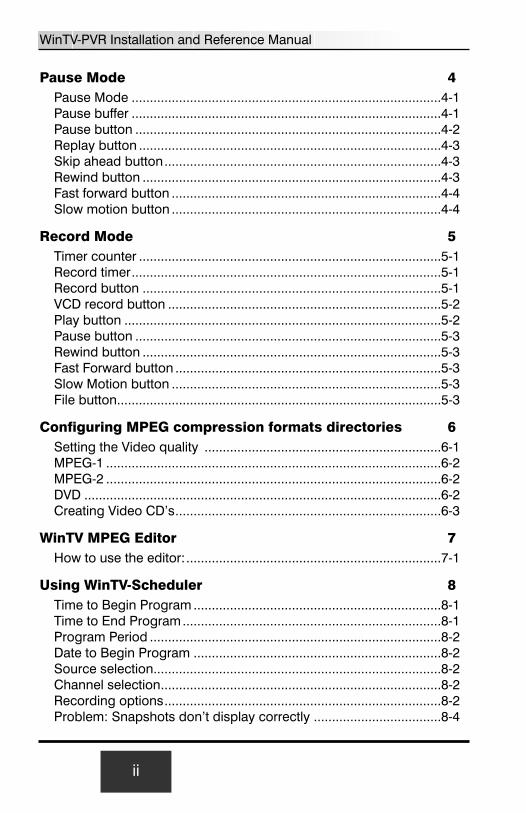
Pause Mode 4Pause Mode .....................................................................................4-1Pause buffer .....................................................................................4-1Pause button ....................................................................................4-2Replay button ...................................................................................4-3Skip ahead button............................................................................4-3Rewind button ..................................................................................4-3Fast forward button ..........................................................................4-4Slow motion button ..........................................................................4-4
Record Mode 5Timer counter ...................................................................................5-1Record timer.....................................................................................5-1Record button ..................................................................................5-1VCD record button ...........................................................................5-2Play button .......................................................................................5-2Pause button ....................................................................................5-3Rewind button ..................................................................................5-3Fast Forward button .........................................................................5-3Slow Motion button ..........................................................................5-3File button.........................................................................................5-3
Configuring MPEG compression formats directories 6Setting the Video quality .................................................................6-1MPEG-1 ............................................................................................6-2MPEG-2 ............................................................................................6-2DVD ..................................................................................................6-2Creating Video CD’s.........................................................................6-3
WinTV MPEG Editor 7How to use the editor:......................................................................7-1
Using WinTV-Scheduler 8Time to Begin Program ....................................................................8-1Time to End Program.......................................................................8-1Program Period ................................................................................8-2Date to Begin Program ....................................................................8-2Source selection...............................................................................8-2Channel selection.............................................................................8-2Recording options............................................................................8-2Problem: Snapshots don’t display correctly ...................................8-4
ii
WinTV-PVR Installation and Reference Manual

Troubleshooting 9Problem: Poor image when running in 256-color mode ................9-1Problem: Poor TV Reception or Not detecting all channels:..........9-1Problem: WinTV2000 has display problems on the screen, e.g.blurred image. ..................................................................................9-1How do I configure the Audio for the WinTV-PVR ........................9-2
Tips on System Optimization 10
Technical Support ATechnical support telephone ..........................................................A-1Service ............................................................................................A-1
Warranty BWarranty...........................................................................................B-1
Trademarks: WinTV and the Hauppauge logo are registered trademarks of Hauppauge ComputerWorks, Inc. Microsoft is a registered trademark and Windows and the Microsoft logo are trademarks ofMicrosoft Corporation. IBM and PC are trademarks of International Business Machines Corporation.©2002-2005 Hauppauge Computer Works, Inc. All rights reserved.
03/15/05
WinTV-PVR Installation and Reference Manual
iii

iv
WinTV-PVR Installation and Reference Manual
Introduction
This manual covers all of the WinTV-PVR models for displaying TV onyour PC’s VGA screen. It covers, but is not limited to, the following mod-els:
WinTV-PVR-150, WinTV-PVR-250, WinTV-PVR-350 & WinTV-PVR-usb2
References to the WinTV-PVR apply to all models. The Windows driverfor all of the WinTV boards will be referred to as the WinTV driver, andthe installation CD-ROM will be referred to as the WinTV InstallationCD-ROM.
For models which have particular features (such as the chapter on theRadio application), we will note which models these features are avail-able on.
For a description of how the WinTV boards display video on your VGAscreen, see the chapter entitled How WinTV Works.

Installing the WinTV-PVR board
The WinTV-PVR is a Plug & Play device designed for Microsoft®
Windows® XP/2000/98SE/Me. The WinTV-PVR-150 currently only worksunder Windows XP. Plug & Play simplifies the installation and hardwaresetup of WinTV by having hardware settings assigned by Windows.This section describes how to install these boards using the Plug & Playinstallation.
Installation overview
To install WinTV-PVR under Windows XP, you will follow these steps:
� Install the WinTV-PVR board in your PC and connect the cables
� After booting Windows, you will install WinTV Windows device driverfrom the WinTV-PVR Installation CD-ROM
� After the Windows driver is installed, you will install the WinTV appli-cation software from the WinTV-PVR Installation CD-ROM
1-1

WinTV-PVR board connections diagram
The following diagram shows the main functions and connectors of theWinTV-PVR board. Since there are several different models with differ-ent features and functions, your board may not have all of the compo-nents installed.
Installing the WinTV-PVR in your PC
Switch off the computer. The manufacturer of your PC supplies instruc-tions on removing the PC cover. Remove the cover.
Locate a free PCI slot (a short white slot). Unscrew and remove themetal cover plate which covers the back of the empty slot.
1-2
WinTV-PVR Installation and Reference Manual
WinTV-PVR-150/250/350 board connectors
FM radio connector
TV Connectorfor antenna or Cable TVinput
S-Video/Composite videoinput
Remote control (IR) receiver socket
Audio Input (Line-In)
150
250
350
S-Video/Composite videoand Audio output (350 only)
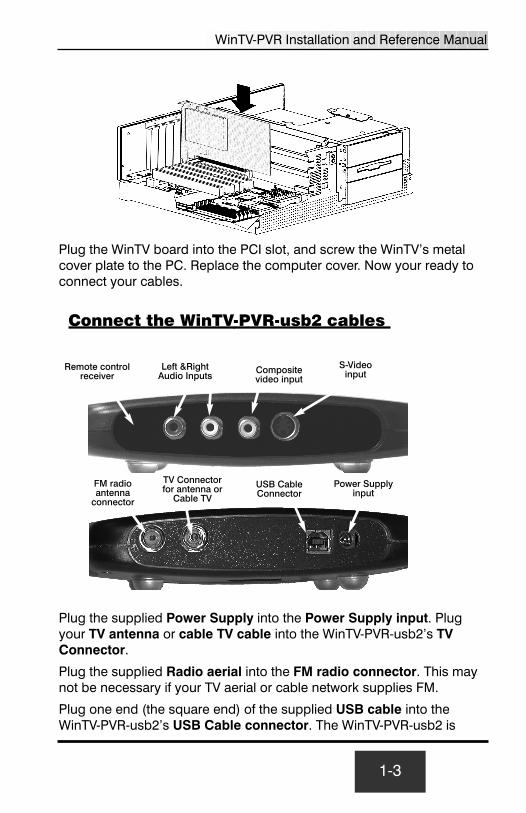
Plug the WinTV board into the PCI slot, and screw the WinTV’s metalcover plate to the PC. Replace the computer cover. Now your ready toconnect your cables.
Connect the WinTV-PVR-usb2 cables
Plug the supplied Power Supply into the Power Supply input. Plugyour TV antenna or cable TV cable into the WinTV-PVR-usb2’s TVConnector.
Plug the supplied Radio aerial into the FM radio connector. This maynot be necessary if your TV aerial or cable network supplies FM.
Plug one end (the square end) of the supplied USB cable into theWinTV-PVR-usb2’s USB Cable connector. The WinTV-PVR-usb2 is
S-Videoinput
Remote controlreceiver
Compositevideo input
Left &RightAudio Inputs
FM radioantenna
connector
TV Connector for antenna or
Cable TV
USB CableConnector
Power Supplyinput
WinTV-PVR Installation and Reference Manual
1-3

compatible with both USB 1.1 and USB 2.0 (high speed USB). If you areusing USB 2.0, the WinTV-PVR-usb2 can create videos at higher quality.
DO NOT PLUG THE OTHER END INTO YOUR PC UNTIL IT HASCOMPLETELY BOOTED!
The S-Video and Composite video inputs and the L&R audio inputs canbe used to bring audio/video from a VCR, camcorder, DVD player orsatellite TV receiver.
Installing the WinTV-PVR-150/250/350 driverunder WindowsXP
After installing the WinTV-PVR in your PC and booting into Windows,the Found New Hardware Wizard will appear.
Insert the WinTV Installation CD-ROM in your PC’s CD-ROM drive andmake sure Install the software automatically (Recommended) ischecked. Click Next.
1-4
WinTV-PVR Installation and Reference Manual

Note: If the Hardware Installation dialog box opens, click ContinueAnyway:
When the window (Windows has finished installing the software thatyour new hardware device requires) opens.
Click Finish.
This completes the PVR driver installation for Windows XP.
Continue to Chapter 2 to install the application software.
On those WinTV models equipped with remote control, after rebootingyour PC the Remote Control will be enabled.
Installing the WinTV-PVR-usb2 driver forWindows XP and Windows2000
After booting into Windows, plug the WinTV-PVR-usb2 in your USB port.The Found New Hardware Wizard will appear. Insert the WinTV
WinTV-PVR Installation and Reference Manual
1-5

Installation CD-ROM in your PC’s CD-ROM drive and make sure Installthe software automatically (Recommended) is checked.
Then click NEXT.
When the Hardware Installation dialog box opens, click ContinueAnyway.
Click Finish.
This will complete the driver installation for Windows XP.
Continue to Chapter 2 to install the application software.
Installing the WinTV-PVR-350 driver underWindows 98SE
When re-starting Windows for the first time after the WinTV board hasbeen installed, the Add New Hardware Wizard will open. Click Next.
Insert the WinTV Windows Installation CD-ROM into your CD-ROM
1-6
WinTV-PVR Installation and Reference Manual

drive.
Click Next.
Select Search for the best driver for your device (Recommended).
Click Next.
Select CD-ROM drive and click Next.
The Copying Files window will open and you will see a number of filesbeing copied to your hard disk drive
WinTV-PVR Installation and Reference Manual
1-7

Note: If a message stating “Windows was unable to locate a driver forthis device”, you did not wait long enough for the WinTV Installation CD-ROM to be read. Click Back and then click Next again for the CD to berecognized.
When the window (Windows has finished installing the software thatyour new hardware device requires) opens.
Click Finish
This completes the PVR driver installation for Windows 98SE.
Continue to Chapter 2 to install the application software.
Note: On those WinTV models equipped with remote control, afterrebooting your PC the Remote Control will be enabled.
Installing the WinTV-PVR-250/350 driver underWindows Me
When re-starting Windows for the first time after the WinTV board isinstalled, the New Hardware Found window will open.
Insert the WinTV Windows Installation CD-ROM into your CD-ROM
1-8
WinTV-PVR Installation and Reference Manual
drive.
When the Add New Hardware Wizard opens, select Automatic searchfor a better driver device (Recommended).
Click Next.
The Copying Files window will open and you will see a number of filesbeing copied to your hard disk drive
When the window (Windows has finished installing the software thatyour new hardware device requires) opens.
Click Finish
This completes the PVR driver installation for Windows Me.
Continue to Chapter 2 to install the application software.
Note: On those WinTV models equipped with remote control, afterrebooting your PC the Remote Control will be enabled.
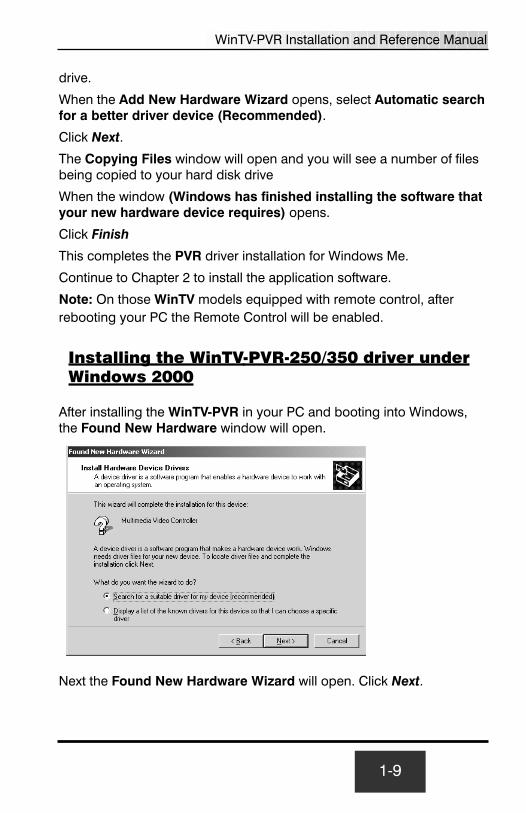
Installing the WinTV-PVR-250/350 driver underWindows 2000
After installing the WinTV-PVR in your PC and booting into Windows,the Found New Hardware window will open.
Next the Found New Hardware Wizard will open. Click Next.
WinTV-PVR Installation and Reference Manual
1-9

Next, the (Install the Device drivers) window will open.
Insert the WinTV Installation CD-ROM in your PC’s CD-ROM drive andmake sure Search for a suitable driver for my device(Recommended) is checked.
Click Next
Next, the (Locate Driver Files) window will open.
Make sure the CD-ROM Drives is checked.
Click, Next
The (Driver Files Search Results) window will open.
Click Next
The (Digital Signature Not Found) window opens, it will ask you if youwant to continue the driver installation:
1-10
WinTV-PVR Installation and Reference Manual

Click Yes.
The Copying Files window will open and you will see a number of filesbeing copied to your hard disk drive
Next, when the (Completing the Found New Hardware Wizard) win-dow opens, click Finish.
This completes the PVR driver installation for Windows 2000. Continueto Chapter 2 to install the application software.
On those WinTV models equipped with remote control, after rebootingyour PC the Remote Control will be enabled.
WinTV-PVR Installation and Reference Manual
1-11

Finding the WinTV-PVR-150/250/350 driver inDevice Manager
1-12
WinTV-PVR Installation and Reference Manual
Windows 98SE
Windows MeWindows XP
Windows 2000

Installing the WinTV-PVRApplication Software
Installing the application software for WindowsXPAfter the WinTV driver has been installed, you need to run WinTVSetup to complete the installation.
Click on the My Computer icon on your desktop and then click on yourCD-ROM drive letter.
Double click, Setup.exe to begin installing the application software.
Next, Select your language and click, Next.
The WinTV Setup menu will appear. The default listing of programsshows the main TV applications which will be installed.
2-1

Click Install
Next, the Welcome window will open.
Click, Next
You are now Ready to Install the application software.
Click, Next
The Copying Files window will open and you will see a number of filesbeing copied to your hard disk drive.
Click, Finish to complete the WinTV 2000 application software installation.
2-2
WinTV-PVR Installation and Reference Manual

The WinTV2000 application
Running the WinTV application
After installing the WinTV application from the WinTV Installation CD-ROM, you will see WinTV icons on your Windows background. StartWinTV2000 by double clicking on its icon.
3-1
SnapSnapshot
Button
Freezevideo
CFGConfigureSnapshot
PrefPreferences
menu
MenuSetup Menu
Always-on-top
Volumevolumeslidebar
Full screen TV
Remove toolbars"no toolbar" mode
Minimize
TVreturns to
live TV
Pauseopen the
pausecontrols
Recordopen therecord
controls
Channel surf
Video source select
Channel down
Channel up
Previous channel
CloseWinTV
Snapshot viewerwindow
Double click oneach "thumbnail" tosee image full size.Click and hold yourright mouse button
to see imageoptions.
Current TVchannel
or video source
Click your rightmouse buttonhere to see the
channel selector
Remove toolbarsClick your right mouse button in the TV
window to remove toolbars.
Click again to restore toolbars.
One TouchRecord
One TouchPause

You can also click on Start/Programs/Hauppauge WinTV and then theWinTV2000 icon to start WinTV.
Setting up your TV channels
The first time you run WinTV,you will be asked to scan for TVchannels.
Click OK.
Choose the Video Format foryour Geographic region:
North America uses NTSC(M)
Most of Europe uses PAL B/G
U.K. uses PAL I
South America uses either,PAL M or PAL N
If you are using Cable TV, inthe Broadcast/Cable selectCable. Otherwise selectAntenna.
Then, click on Start.
You can modify the channel names by single clicking on the channel.
Then click Edit.
3-2
WinTV-PVR Installation and Reference Manual

In the Edit channel window, clickyour mouse in the Channel namebox, then type in your desired name.You can also add a description.
When finished, click OK.
WinTV-PVRremote control
The WinTV-PVR’s remote controlsoftware is installed automaticallyduring the installation of theWinTV applications. You will seethe WinTV Remote icon in theDevice Tray. The installation willadd a shortcut to IR.EXE to theStartup group, so that IR.EXE isloaded every time after Windowshas booted.
If you need to restart the remotecontrol, run IR32.EXE from theC:\Program Files\WinTV directory.
To install the IR Remotereceiver:- Turn off your computer. Plug
the sub-mini jack at the endof the IR Receiver cable intothe Remote control (IR)receiver socket of the WinTV-PVR.
WinTV-PVR Installation and Reference Manual
3-3
Applicationon/off
0 - 9“QuickSkip”
buttons
Audio mute
Menu
Channelup/dn
Volumeup/dn
Fastforward
Fastrewind
Stop
Pause
Play
Skip aheadSkip
back
Go button
Record
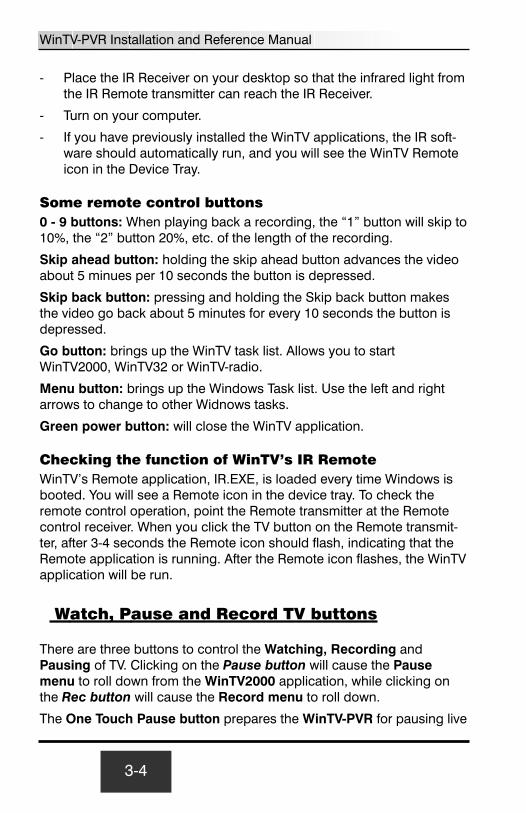
- Place the IR Receiver on your desktop so that the infrared light fromthe IR Remote transmitter can reach the IR Receiver.
- Turn on your computer.
- If you have previously installed the WinTV applications, the IR soft-ware should automatically run, and you will see the WinTV Remoteicon in the Device Tray.
Some remote control buttons0 - 9 buttons: When playing back a recording, the “1” button will skip to10%, the “2” button 20%, etc. of the length of the recording.
Skip ahead button: holding the skip ahead button advances the videoabout 5 minues per 10 seconds the button is depressed.
Skip back button: pressing and holding the Skip back button makesthe video go back about 5 minutes for every 10 seconds the button isdepressed.
Go button: brings up the WinTV task list. Allows you to startWinTV2000, WinTV32 or WinTV-radio.
Menu button: brings up the Windows Task list. Use the left and rightarrows to change to other Widnows tasks.
Green power button: will close the WinTV application.
Checking the function of WinTV’s IR RemoteWinTV’s Remote application, IR.EXE, is loaded every time Windows isbooted. You will see a Remote icon in the device tray. To check theremote control operation, point the Remote transmitter at the Remotecontrol receiver. When you click the TV button on the Remote transmit-ter, after 3-4 seconds the Remote icon should flash, indicating that theRemote application is running. After the Remote icon flashes, the WinTVapplication will be run.
Watch, Pause and Record TV buttons
There are three buttons to control the Watching, Recording andPausing of TV. Clicking on the Pause button will cause the Pausemenu to roll down from the WinTV2000 application, while clicking onthe Rec button will cause the Record menu to roll down.
The One Touch Pause button prepares the WinTV-PVR for pausing live
3-4
WinTV-PVR Installation and Reference Manual

video (see Pause mode below).
The One Touch Record button will start a record session. If you clickOTR more than once, a record timer will be set and the recording will bedone for 15 minutes for each additional time the OTR button is clicked.For example, if you click the OTR button 3 times, the WinTV-PVR willrecord for 30 minutes.
Setting up an External video source
Click the Suite button (Channel configuration) on the WinTV2000 andclick on Add. Click Composite (or S-Video). Pick your video format(NTSC for North and South America, PAL for Europe, etc.) and give ita name (for example: external) and description, then click ADD. Nowyou have a external video channel. Note: if setting up S-Video, makesure to check the S-Video box.
To change to External video, either select the channel name you justconfigured, or click the Switch video source button on the WinTV2000
application.
WinTV-PVR Installation and Reference Manual
3-5
Pause mode button
One TouchPause
One TouchRecord
Record modebutton
TV Mode button

The Channel Suite Manager
From the Channel Manager, you can Add, Edit or Delete channels. Youcan also create channel suites, which are subsets of the All Channels
suite. For example, you can have a suite of just TV news channels, andname this suite “News”. This allows you to create a subset of all thechannels, so that you can channel surf through only those channels.
To set up a new Channel Suite, click on the Suite button in theWinTV2000 application. Then right click your mouse on Suites (in theleft column) and click on New. You can then name the suite and addchannels to the suite. Click OK when finished. To change to a suite,right click your mouse in the TV window for 2 seconds and go to SelectSuite, you will then see a list of suites. Click on the one you would liketo switch to.
Adjusting the video image color
You can adjust the Brightness, Contrast, Saturation and Hue of the liveTV image by using the color adjustment menu.
3-6
WinTV-PVR Installation and Reference Manual

Click on Pref button to get theadjustment menu.
Still Frame ImageCapture mode
You can capture high qualityimages by clicking on the Snapbutton in the WinTV2000 applica-tion, you will see a thumbnailappear in the Capture tray.
Adjusting your captured images
You can capture images from320x240 up to 1600x1200pixels. To reduce the effectsof motion in the video image,but with lower image resolu-tion, Click on the PREF but-ton and then click theCapture tab. In the FieldsCaptured option choose 1(Motion). Example,1(Motion) used for Sportingevents, Football, Baseball,etc. 2(Still) used forInterviews, talk shows, news, etc.
You can also adjust your captured image by clicking your right mousebutton on the Thumbnail that appears in the WinTV application window.
Using the mouse in WinTV
The Windows mouse is used to move the TV window, resize the WinTVwindow, select menu options and make the WinTV window appear infull screen or adjustable screen size. WinTV uses the left and right but-
WinTV-PVR Installation and Reference Manual
3-7
Capture Tray
Capture Button

tons. The middle mouse button (if your mouse has one!) is not used.
Single click TitleMode/NoTitleMode makesWinTV easy to use!
The left mouse button is used for all control and select functions. Theright mouse button when clicked once inside the WinTV video windowwill hide or display the tool and menu bars and is used to turn offthe full screen TV mode.
These modes are called TitleMode and NoTitleMode. You can toggleback and forth between TitleMode and NoTitleMode by simply clickingyour right mouse button when your mouse is inside the video window.
The WinTV window is moved in NoTitleMode by clicking and holdingyour left mouse button in the middle of the TV window and moving it tothe new position. Then let it go! Move the TV window in TitleMode byclicking and holding your mouse button on the Title Bar (where it saysHauppauge WinTV2000), holding it down and dragging it to the newposition.
You can set a different size and a different place on your VGA screen forthe WinTV window in TitleMode and NoTitleMode. Then by simplyclicking with the right mouse button, the WinTV window will switchfrom one saved size and place on the screen to the other! Try clickingyour right mouse button several times in the middle of the TV windowand see what happens.
To set the window size, “grab” a corner of the video window with yourmouse (hold down the left mouse button when it is on one of thecorners of the WinTV window) and then drag it to the preferred size,then release the mouse button. You can set different sizes for TitleModeand the NoTitleMode.
For example, if you would like to watch WinTV without the tool/menubars in a small corner of the Windows screen, click the right mousebutton inside the WinTV video window and the tool/menu bars will dis-appear. Then drag the WinTV window to its preferred size and locationon the Windows screen. Now click the right mouse button inside theWinTV window and the WinTV application will now save the correctsize and location on screen for NoTitleMode. Every time you select theNoTitleMode by right clicking in the WinTV window, the window willresize and move to the saved position.
3-8
WinTV-PVR Installation and Reference Manual

To select which bars and indicators are shown when in the TitleBar andNoTitleBar modes, click on Preferences. You can eliminate the statusbar and the toolbar in the TitleMode or add the status bar in theNoTitleMode.
Setting preferences in Title mode
Click PREF and then click on the Title Mode tab.
Enforce Aspect Ratio : forces the viewed aspect ratio to 4:3. Whenturned off it will allow arbitrary aspect ratios.
Annunciators On : display the TV channel on screen when you change
WinTV-PVR Installation and Reference Manual
3-9

channels, and display the volume when you adjust the volume.
Allow Screen Saver : On, will allow your system to use your defaultscreen saver when WinTV is open or to use the live TV as a screensaver.
Setting full screen TV mode
Click Preferences and then click on the TV Mode tab. Set AllowResolution Change. If you then click on the TV icon on theWinTV2000 Toolbar, the WinTV application will switch the VGA mode tothe chosen size (using the Windows Quick Res feature), allowing theWinTV image to be viewed full screen.
Image Save, Print and Copy to Clipboard
The process to save, print or copy an image starts with the digitizing ofa single video frame. When one of these functions are clicked on, theWinTV moves the next video frame into your PC’s main system memoryinstead of the VGA display. Your PC’s processor then converts the digi-tized video image into a 24-bit DIB image (a format which is usedinternally in Windows), and then copied back into the VGA memory sothat you can see the image which will be printed or saved. Thisbecomes a “Thumbnail” image in the WinTV tray window. The videoimages which are digitized can be saved to disk, printed to a color orblack/white printer or copied to the clipboard. These functions can beviewed from the PREF menu:
There are a few things which need to be noted. First, because a videoframe is composed of two “fields”, an odd field with the odd lines in theimage and an even field composed of the even lines, there might be adistortion in the frozen image if there was rapid motion while the imagewas being moved into main system memory. This distortion is called“interlaced artifact”.
Another item to note is that the video image, when converted into a 24-bit DIB image, will look lighter then it did when it was in motion. You canadjust the images brightness, contrast and color saturation and hue byclicking on CLR Button. These adjustments are made during the digitiz-ing process on the WinTV board and will affect both the “live” imageand the frozen image.
3-10
WinTV-PVR Installation and Reference Manual

Keyboard shortcuts
Convenient keyboard control functions:
Volume Up = Page Up
Volume Down = Page Down
Mute = Ctrl+M
Channel Up = Plus (+)
Channel Down = Minus (-)
Print a Frame = Ctrl+P
Copy to Clipboard = Ctrl+C
Copy from Clipboard = Ctrl+V
Freeze Frame = Ctrl+F
Full screen TV mode = Ctrl+T
WinTV-PVR Installation and Reference Manual
3-11

3-12
WinTV-PVR Installation and Reference Manual

Pause Mode
Pause Mode
Clicking the Pause button or OTP button on the WinTV2000 applica-tion starts the Pause mode. The Pause Menu will drop down. (shownabove)
Note: It takes about 10 seconds to create a pause buffer. While thebuffer is initializing, do not click any buttons on the WinTV application.
Pause buffer:The Pause buffer is space on your hard disk where video is stored dur-ing the Pause mode. The maximum amount of time which your TV pro-gram can be delayed is dependent upon how much storage space youhave set for the Pause buffer and which type of MPEG format you havechosen. Both of these can be set in the MPEG settings menu (see thesection entitled “Configuring the format for MPEG compression”).
To catch up to the "live" audio/video program, you can either exit thePause mode by clicking the TV mode button, you can click the Skipbutton, which skips ahead 10 seconds per click, or you can grab theVideo Position indicator and move it to the right until it is at the end of
4-1
Pause
Skip ahead10 seconds
Replay 10seconds
Skip tothe endSkip to the
beginning
Skip ahead10 seconds
Replay 10seconds
Delaycounter
VideoPosition bar
Play
Play forwardslow motion
FastForward 2X,
8X
Rewind

the Video Position bar.
The Limit Pause Mode buffer size sets the maximum size of the Pausebuffer.
Here are some suggested sizes:
- if you are using MPEG-1 VCD format, 650 MBytes per hour areused. So if you want a 1/2 hour buffer, then set the Limit PauseMode Buffer Size to 325 MBytes.
- if you are using MPEG-2 4.0MB/sec, about 2 Gigabytes per hour isused for the Pause buffer. So for a 30 minute buffer, then set theLimit Pause Mode Buffer Size to 1000 MBytes.
Delay counter:The Delay counter displays how much time you are behind the livevideo. For example, if the delay counter says 00:01:23, then the videowindow is showing video 1 minute and 23 seconds behind live video.
Pause button:
Clicking the Pause button or OTP button causes WinTV to start savinga audio and video stream (referred to as an A/V stream) into the WinTV'sReplay Buffer. It takes about 10 seconds for the Replay Buffer to be ini-tialized and for Pause to become effective.
Unclicking the Pause button will cause the audio/video program tostart playing from the point where the button was originally pushed.
Most WinTV functions are active while in the Pause or Pause Live mode.For example, you can change volume, resize the TV window, go into"no-title mode", etc.
While in Pause mode, the Video Position bar shows the amount of theReplay Buffer which is filled with video. For example, if the VideoPosition indicator shows halfway, it means that half of the Replay Bufferis filled. If you find you cannot Replay or Pause as many minutes as youwould like, increase the size of the Replay Buffer.
While in Pause mode, the A/V stream is always saved in the ReplayBuffer. To stop saving the A/V stream in the Replay Buffer, you must exitthe Pause mode by clicking the TV mode button.
4-2
WinTV-PVR Installation and Reference Manual

Replay button:
While in the Pause mode, hitting the Replay button acts like the InstantReplay you see on TV broadcast sporting events: the audio/video goesback in time and you repeat what you have previously seen.
Each click of the Replay button causes audio/video to go back 10 sec-onds. For example, if you want to repeat the audio/video you saw 10seconds ago, you would click the Replay button once. If you want tosee the video you saw one minute ago, you would need to click theReplay button six times.
For extended replay times, you might find it more convenient to grabthe Video Position indicator control bar and move it to the left. Once youlet the control bar go, audio/video starts to play (it might take a few sec-onds for the WinTV2000 application to start playing). You might have tomove the Video Position indicator to the left and right to find the desiredspot to start replaying audio/video.
While Replaying, your audio/video program continues to be recorded inthe Replay Buffer. Therefore, if you have clicked the Replay button 3times (so that you are replaying the audio/video seen 30 seconds ago),the video you see in the WinTV window will be 30 seconds behind the"live" audio/video program.
Skip Ahead Button:
Clicking the Skip button will skip the video ahead 10 seconds.
Rewind Button:
Clicking the Rewind button while playing video will rewind the recordedvideo. Clicking the Rewind button again will continue the playing.
WinTV-PVR Installation and Reference Manual
4-3

Fast Forward Button:
Clicking the Fast Forward button one time will fast forward your videoat 2X speed. Clicking the Fast Forward button two times will fast for-ward your video at 8X speed.
Slow Motion Button:
Clicking the Slow Motion button, will play the video in Slow Motion.Clicking the Slow Motion button again, will continue playing normally.
4-4
WinTV-PVR Installation and Reference Manual

Record Mode
Click on the Record button or the OTR button on the WinTV2000 appli-cation to open the Record and Playback control bar.
Time counter:The time is specified in a Hour:Minute:Second format.
Record timer:A timed record is started by clicking the OTR button. Each time youclick OTR, the Record Timer is incremented by 15 minutes. At the endof the time specified by the Record timer, the record will stop. Also,clicking the Stop button will stop a timed record. The time is specifiedin a Hour:Minute:Second format.
Record Button:
Clicking the Record button will automatically generate a file name andstart recording your audio/video program.
5-1
Record Play
PauseStop
File menu(Save/Open/Burn)
Timecounter
Skipto
End
Skip back10 sec.
Video CDrecord
video position
Fast Forward2X 8X
SlowMotion
Rewind
Skip ahead10 sec.
Skip tobeginning
Record timerafter clicking OTR button
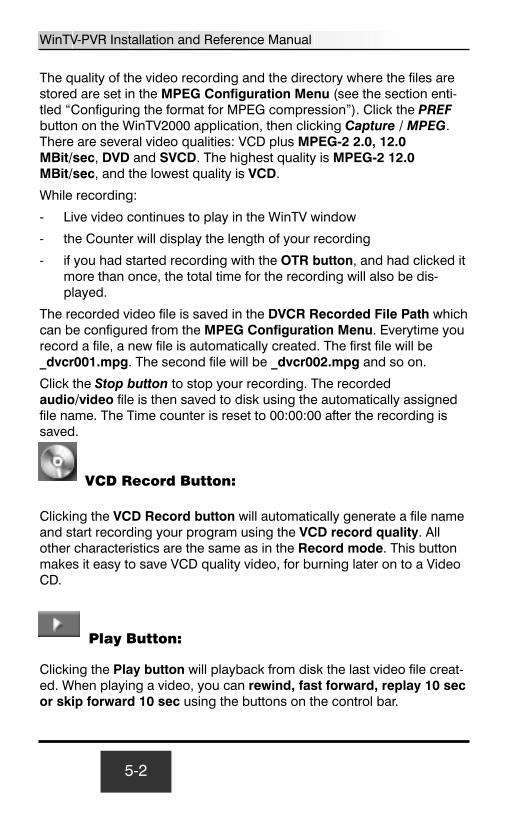
The quality of the video recording and the directory where the files arestored are set in the MPEG Configuration Menu (see the section enti-tled “Configuring the format for MPEG compression”). Click the PREFbutton on the WinTV2000 application, then clicking Capture / MPEG.There are several video qualities: VCD plus MPEG-2 2.0, 12.0MBit/sec, DVD and SVCD. The highest quality is MPEG-2 12.0MBit/sec, and the lowest quality is VCD.
While recording:
- Live video continues to play in the WinTV window
- the Counter will display the length of your recording
- if you had started recording with the OTR button, and had clicked itmore than once, the total time for the recording will also be dis-played.
The recorded video file is saved in the DVCR Recorded File Path whichcan be configured from the MPEG Configuration Menu. Everytime yourecord a file, a new file is automatically created. The first file will be_dvcr001.mpg. The second file will be _dvcr002.mpg and so on.
Click the Stop button to stop your recording. The recordedaudio/video file is then saved to disk using the automatically assignedfile name. The Time counter is reset to 00:00:00 after the recording issaved.
VCD Record Button:
Clicking the VCD Record button will automatically generate a file nameand start recording your program using the VCD record quality. Allother characteristics are the same as in the Record mode. This buttonmakes it easy to save VCD quality video, for burning later on to a VideoCD.
Play Button:
Clicking the Play button will playback from disk the last video file creat-ed. When playing a video, you can rewind, fast forward, replay 10 secor skip forward 10 sec using the buttons on the control bar.
5-2
WinTV-PVR Installation and Reference Manual

Pause Button:
Clicking the Pause button while Playing will pause your audio/videofile. Clicking the Pause button again will continue the playing.
Rewind Button:
Clicking the Rewind button will play the video file in reverse at 1xspeed. Clicking the Rewind button again will continue the playing.
Fast Forward Button:
Clicking the Fast Forward button one time will fast forward your videoat 2X speed. Clicking the Fast Forward button two times will fast for-ward your video at 8X speed. Clicking the button again will continueplaying at normal speed.
Slow Motion Button:
Clicking the Slow Motion button will play video at 1/2 speed. Click theSlow Motion button again to play your video at normal speed.
File Button:
Clicking the File button opens the File menu. The last file recorded islisted in the File name box.
In the File menu you can:
- Rename your recorded video file. To rename a video file, find thefile you would like to rename (remember, the automatically generat-ed file names start with _dvcr), highlight it with your mouse, andclick and hold the right mouse button. Go down to Rename andthen you can type in a new name. Remember: you must keep the.MPG extension on the file.
WinTV-PVR Installation and Reference Manual
5-3

- Play a video file previously recorded: find the file you would like toplay, highlight it with your mouse (one click of the mouse button)and click Open. Then click the Play button.
- Delete recorded video files which you no longer want (and whichconsume hard disk space). Click your right mouse button on thevideo file once, go down the menu and click on Delete.
5-4
WinTV-PVR Installation and Reference Manual

Configuring MPEG compressionformats and record directories
To set the directory where your video recordings will be stored, click thePREF button (Preferences menu) on WinTV2000, then Capture andthen on the MPEG tab. Set the DVCR File Path to your video directory.The default path is C:/My Documents\My Videos
The WinTV-PVR supports several formats for MPEG video compres-sion, called Quality Levels.
The differences in these formats are:
- The higher the datarate, the better the video quality you see fromlive TV and your recordings. The higher the datarate, the more diskspace which will be required.
- CPU horsepower required during playback and pause mode.
- The compatibility when creating Video CD’s or S-VCD’s.
6-1

To configure the MPEG Quality Level, click on the PREF button(Preferences menu) on WinTV2000, then Capture and then on theMPEG tab.
Here are the video formats:
MPEG-1: VCD
MPEG-2: 2.0MB/sec (Full D1)
MPEG-2: 2.0MB/sec (Half D1)
MPEG-2: 12.0 MB/sec (Full D1)
MPEG-2: 12.0 MB/sec (CBR)
DVD Standard Play: Datarate 8.0Mb/sec, 720x480, 48.0 kHz stereo
DVD Long Play: Datarate 6.2Mbits/sec, 720x480, 48.0 kHz stereo
DVD Extra Long Play: Datarate 4.4Mbits/sec, 720x480 48.0 kHz stereo
SVCD Standard Play: Datarate 2.5Mbits/sec, 480x480 pixels
Note: CBR is constant bit rate, VBR is variable bit rate.
For creating Video CD’s for playback on your home DVD player, chosethe MPEG-1 VCD format. If you would like to burn a DVD ROM, choseDVD Standard Play, DVD Long Play, DVD Extra Long Play.
If you have a fast PC and would like the best video image quality, choseMPEG-2 12.0MB/sec. If you have a slower PC, try the MPEG-22.0MB/sec format.
Once chosen, the format is set for both the Pause and Record modes.You can change the format between recordings or after you have exitedPause mode, but the format cannot be changed while Recording orwhile in the Pause mode.
6-2
WinTV-PVR Installation and Reference Manual

Creating Video CD’s
Most PC’s based on Windows can play MPEG-1 files created withWinTV-PVR through the Windows MediaPlayer. PC-based DVD players,such as WinDVD, can play the MPEG-2 formats as well. So, if you sim-ply want to play your video files on a PC, you do not have to create aVideo CD. Just use Windows MediaPlayer to play your MPEG-1 encod-ed videos from your hard disk.
The format used on Video CD’s (VCD) is MPEG-1. Most DVD playerscan play Video CD’s in addition to DVD movies. The WinTV-PVRincludes a VCD authoring package, Uleads’ DVD MovieFactory, whichcan burn Video CD’s on your PCs’ CD-RW burner.
Note: We have found that most home DVD players can play Video CD’screated with CD-RW media. Some DVD players, though, can only readCD-R media. If you are not able to have your DVD player read a CD-RWmade using these steps, we suggest trying a CD-R media. A completelist of tested compatible DVD players can be found on our web site at:http://www.hauppauge.com/dvdplayers
Step 1: Creating a Video CD compatible video file While in the record mode, click on the Video CD Record button. Youcan also have set the MPEG Quality Level to MPEG-1 VCD, and thenclick the Record button. In both cases, a Video CD compatible file willbe created on your hard disk, with the name of the file automaticallygenerated by the WinTV application. After you have recorded yourshow, click on File button in the Record menu, the last file recordedwill be highlighted.
Step 2: Creating a “burnable” VCD MovieAfter you have recorded using the MPEG-1 VCD setting, it is still not informat which can be burnt onto a CD-RW and played in a DVD player.The difference between a VCD compatible video file and a burnableVCD file is in the way the audio and video are interleaved within the file.
To create a “burnable” VCD file, you can either use the WinTV-Editoror the included DVD MovieFactory. If you start with a VCD compatiblevideo file, after editing you will have a “burnable” VCD file.
Run the WinTV-Editor, then click File / Open. Add you Video CD com-patible video file.
7-1

After editing, click Make Movie. At the end of this process your videofile will be in a “burnable” format.
Step 3: Burning your converted file to a CD-R or CD-RWAfter the converting process is complete, your file will be VCD compliant. Now you are ready to burn your VCD file on a CDRW.
Open DVD MovieFactory, click on Author Menus, and click on theVCD button. Then click Next. Click “Add MPEG file”, then select yourVCD compliant video file.
Note: if you select a non-burnable VCD file, MovieFactory will give youan error and not allow you to open this file.
Then click Next and you will be brought to the Burn menu.
Note: Hauppauge recommends using CD-RW media to create VideoCD’s for DVD playback. Most DVD players can use CD-RW media, whilesome can use either CD-RW or CD-R media. If you insert one of the cre-ated Video CD’s and it does not play on your TV screen, then try creat-ing a Video CD using a CD-R media.
Step 4: Playing the Video CD back on your DVD playeror PCOnce a Video CD has been created, you can play this on most homeDVD players, or you can play it back using Windows MediaPlayer.
A list of tested compatible DVD players which can play Video CD’s cre-ated with the WinTV-PVR can be found on our web site:
www.hauppauge.com/dvdplayers
Sometimes a version of MediaPlayer cannot “see” the Video CD moviefile. If this is the case, you can manually select a video to be played byopening the Video CD using Windows Explorer, and looking in theMPEGAV directory on the Video CD. There will be a file (or several filesif your Video CD contains more than one video file) with names likeAvseq01.dat You can open this file with WindowsMedia Player and thevideo will play back in a window on your PC screen.
7-2
WinTV-PVR Installation and Reference Manual

MPEG Editor
The Hauppauge MPEG Editor is an MPEG-1/MPEG-2 cut and join edi-tor. You can cut out segments from videos, or combine videos (of thesame MPEG format) together. The MPEG editor makes its cuts on whatare called "MPEG I-frames". These types of cuts do not require a re-encode, and therefore preserves the quality of the original video.
How to use the editor:Click on the Add source button or click on File / Add source to bringthe file you want to edit into the MPEG editor. The WinTV-PVR uses thec:\My Documents\My Videos directory as the default directory to savevideo files created by the WinTV-PVR. When the selected file is opened,it will start playing back in the video window. Click the Stop button tostop playback.
Grab the video position slider, and move it to the beginning of thevideo segment you want to keep. The video frame will be shown in thevideo window. You can also use the controls under the video window(play, pause, stop and the frame control buttons).
When you have correctly positioned to the video frame you want, clickthe In button. This will define the starting point of the video interval.
Grab the video position slider and move it to the end position of theclip you want to keep, then click the Out button.
Click Add Interval to add the defined clip to the cut list. Repeat until youhave put all the desired video clips in the "cut list".
When you have finished with your cut list, click the Generate outputbutton. All intervals in the cut list will appear in the final video. TheGenerate Output step normally takes a while.
Your MPEG video is named nanoEDIT.mpg. Be sure to rename thisbefore cutting another video, otherwise the file will be overwritten!Before you click Generate Output, click File / SelectOutputFile tochange the file name of your recorded file.
To cut away an advertisement, click the In button at the beginning ofthe video sequence, then click the Out button just before the advertise-ment starts. Click Add Interval. Then click the In button at the end ofthe advertisement, and click the Out button at the end of the videosequence you want to keep. Then click Add interval.
8-1

To cut away advertisements from a movie, you must define all piecesBETWEEN the advertisement (everything which belongs to the movie)and add them to the cut list.
8-2
WinTV-PVR Installation and Reference Manual

Using WinTV-Scheduler
WinTV-Scheduler allows you to schedule the recording of TV shows.WinTV-Scheduler, once it is set, can be closed, and the WinTV applica-tion will “wake up” at the desired time and tuned to the desired chan-nel.
After installation, WinTV-Scheduler can be found on your desktop.WinTV-Scheduler works by using the Windows Task Scheduler tolaunch WinTV at the chosen time. WinTV-Scheduler sets up a com-mand line in Task Scheduler to run WinTV2000, specifying a TV chan-nel and a length of time to record.
To set up an event for timed watching or recording, run WinTV-Scheduler and click on the Add Program.
The items that need to be set for each event are:- Time to Begin Program: set to the desired start time. The default
time is about 3 minutes from the current time. Click on the hour toset the hour, the minute to set the minute and the second (if youfeel this is necessary) to set the minute to start the program. Note: Ittakes about 10 seconds to launch the WinTV and set up for record-ing, so set the Time to Begin Program to at least 10 secondsbefore the time your TV show actually starts.
- Time to End Program: set to the time to end this event. Note: youneed to leave at least 30 seconds between scheduled programs togive the recorder time to set up its disk buffers.
9-1

- Program Period: one time, daily, weekly
- Date to Begin Program: today's date is the default. Change this ifyou want to schedule on another date.
- Source selection: leave set at WinTV2000 to bring up the WinTV atthe requested time and on the requested channel.
- Channel selection: chose one of your scanned channels.
- Recording options: click on Record to File to record your show.Leave this button unchecked to watch TV at the requested time.You can also name your file to record, in the dialog box below.
Once these are set, click Set Program. You can add more Events, click-ing Set Program after each event is set. When you are finished clickClose. The WinTV program does not have to be running for the WinTV-Scheduler to work. If WinTV is not running, it takes about 10 secondsto start WinTV-PVR and to start the recording of TV.
9-2
WinTV-PVR Installation and Reference Manual

Troubleshooting
Installation tips and software updates can be found at: www.hauppauge.com/html/sw_pvr_pci.htm (WinTV-PVR pci only)
Note: Our FAQ on the Hauppauge web site provides up to dateTroubleshooting tips, which can be found at:www.hauppauge.com/html/faq.htm
Problem: Poor image when running in 256-color modeMany VGA’s cannot run WinTV in 256-color mode. Instead, run in 16-bitor 24-bit color mode.
Problem: Poor TV Reception or Not detecting all channels:Poor TV reception is generally the result of an Weak TV signal. Whenusing a 'roof-top' antenna, an aerial booster may be required if there ispoor TV reception. If you find that some or all of the channels have notbeen detected, you can insert channels manually. Also, in some areasusing cable TV, a format called Cable HRC is used. If so, try rescanning(see page 3-2) but use CABLE (HRC) instead of cable in theBroadcast/Cable box.
Problem: Live TV program and video playback has a"Jerky" effect and/or lip synchronization during play-back.Make sure that DMA is enabled for IDE hard disks. See the sectionentitled “Tips on System Optimization” (Section 10).
Problem: WinTV2000 has display problems on thescreen, e.g. blurred image.In the WinTV program group (Start / Programs / Hauppauge WinTV)there is a utility called "Primary". Set it to "Allow Overlay". If it is on"Allow Overlay", try it on "Force Primary". Some VGA cards need toupgrade from the latest drivers in order for it to support Overlay mode.Try to upgrade your VGA drivers from the manufacturer web site.
10-1

How do I configure the Audio for the WinTV-PVR?While watching live TV and while recording video, the WinTV-PVRboard amplifies the audio signal. When you adjust the audio volumeslide bar in the WinTV2000 application, the WinTV-PVR adjusts theaudio volume accordingly.
While playing back a video, the PC’s MediaPlayer is used, though thevideo appears in the WinTV window. The Wave Out device in your PC’sVolume Control mixer is used to adjust audio volume.
10-2
WinTV-PVR Installation and Reference Manual
Tips on System Optimization
These are tips that will help you improve capture and playback perfor-mance of video files on you PC.
1.) Do not use DoubleSpace or any other disk compression scheme!This severely slows down your hard disk.
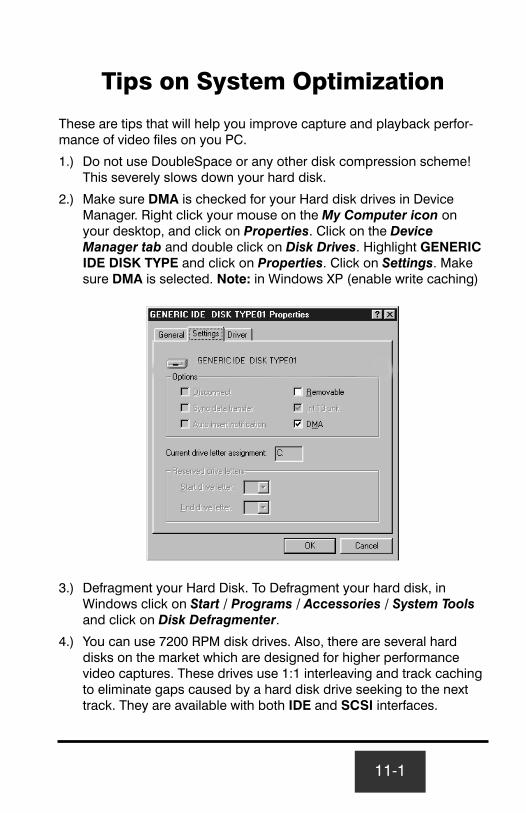
2.) Make sure DMA is checked for your Hard disk drives in DeviceManager. Right click your mouse on the My Computer icon onyour desktop, and click on Properties. Click on the DeviceManager tab and double click on Disk Drives. Highlight GENERICIDE DISK TYPE and click on Properties. Click on Settings. Makesure DMA is selected. Note: in Windows XP (enable write caching)
3.) Defragment your Hard Disk. To Defragment your hard disk, inWindows click on Start / Programs / Accessories / System Toolsand click on Disk Defragmenter.
4.) You can use 7200 RPM disk drives. Also, there are several harddisks on the market which are designed for higher performancevideo captures. These drives use 1:1 interleaving and track cachingto eliminate gaps caused by a hard disk drive seeking to the nexttrack. They are available with both IDE and SCSI interfaces.
11-1

11-2
WinTV-PVR Installation and Reference Manual
Technical Support
Technical support telephone
If you have questions regarding installation or compatibility, please con-tact our technical support staff at:
Phone: (631) 434-3197
Fax: (631) 434-3198
Service
If you should need assistance with the installation, operation, or applica-tion of your Hauppauge WinTV board, there are several options avail-able to you. Your primary source for information and problem assis-tance is always your dealer. Should the need arise, contact your dealerfor on-site or repair service.
Hauppauge’s Technical Support and Customer Service staff can aid insolving many problems. Our service department is available to repairany Hauppauge product. For completion of repair, the product must bereturned to our factory.
If this WinTV board is not in working order, your only recourse is repairor replacement, as described above. UNDER NO CIRCUMSTANCESwill Hauppauge be liable for consequential damages, including any lostsavings, lost profits, or any other damages, caused by the use of theWinTV board or inability to use it, even if the dealer or Hauppauge hasbeen advised of such liability or other claims.
A-1

A-2
WinTV-PVR Installation and Reference Manual

The Hauppauge Limited Warranty
Warranty Hauppauge Computer Works, Inc. warrants the WinTV board to be freefrom defects in material and workmanship for a period of 2 years fromdate of initial retail purchase. We will, at our option, repair or replace adefective product. The limited warranty does not cover any losses ordamage that occur as a result of:
• Improper installation • Misuse or neglect or operation with faulty equipment • Repair or modification by anyone other than Hauppauge Computer
Works or an authorized repair agentPlease complete and return the Warranty Registration Form inserted inthis manual. To obtain service under this warranty, contact HauppaugeComputer works at (631) 434-3197, or fax “RMA Department” at 631-434-3198. Please see the return procedure in the “Technical Support”chapter.
B-1

B-2
WinTV-PVR Installation and Reference Manual