installation guide - meteor lighting · to avoid the risk of fire, explosion, or electric shock,...
TRANSCRIPT

REV.20160101
Installation GuidePendant/Stem/Bracket/0-10V/DMXWhiz Series-High Ceiling LED Platform
MODEL#WS-90WSD-90WS-130WSD-130WS-240WS-300

ILOS Corp. 19745 Colima Rd #1-807, Rowland Heights, CA 91748 P: 213.255.2060 F: 213.596.3704 www.meteor- l ighting.com
Safety Information P3
Notice to Installer
- Pendant Mount (for WSD-90 / WSD-130 / WS-240 / WS-300)
- Stem Mount (for WS-90 / WS-130)
- Pendant Mount (for WS-90 / WS-130)Physical Installation
Physical Installation
Physical Installation
Table of Content
0-10V Dimming External Electrical Connection
DMX Power Supply Box Installation & Electrical Connection
Installation GuideWhiz Series
- 2 -
P4-5
P6
P7
- Bracket Mount (for WS-90 / WS-130 / WS-240 / WS-300)
- Stem Mount (for WSD-90 / WSD-130 / WS-240 / WS-300)Physical Installation
Physical Installation
P9-10
P11
P8
P12
P13~15

To avoid the risk of fire, explosion, or electric shock, this product should be installed, inspected, and maintained by a qualified electrician only, in accordance with all applicable electrical codes. Warning: To avoid electric shock: • Be certain electrical power is OFF before and during installation and maintenance. • Luminaire must be connected to a wiring system with an equipment-grounding conductor. Warning: To avoid premature failure and to maintain continuous operation: • Make sure the supply voltage is the same as the rated luminaire voltage. Do not install where the ambient temperature exceeds the marked operating temperatures.
• Shut down power to the entire installation at the main power distribution board and lock out power (by removing the fuse for example) before carrying out any installation or maintenance work.• Disconnect the fixture from AC power before removing or installing any cover or part and when not in use. • Connect the fixture electrically to ground (earth).• Use only a source of AC power that complies with local building and electrical codes and has both overload and ground-fault (earth-fault) protection. • Before using the fixture, check that all power distribution equipment and cables are in perfect condition, are rated for the current requirements of all connected devices, are protected to IP67 or higher and are of suitable type for the location (including water, pollution, temperature and UV resistance).• Please do not to handle the light fixture by the power or DMX or 0-10V cords to avoid any damage to
the electrical cords.• Turn off power to fixture immediately if any cable, seal, cover or other component is damaged, cracked or deformed. Do not reapply power until repairs have been completed.• Do not expose any part of the fixture to a high-pressure water jet.• Do not immerse the fixture in water or any other fluid, or install it in a location where flooding may
occur.
ILOS Corp. 19745 Colima Rd #1-807, Rowland Heights, CA 91748 P: 213.255.2060 F: 213.596.3704 www.meteor- l ighting.com
Installation Guide
Safety Information
Whiz Series
- 3 -
!
Warning:
PROTECTION FROM ELECTRIC SHOCK
- 4 -
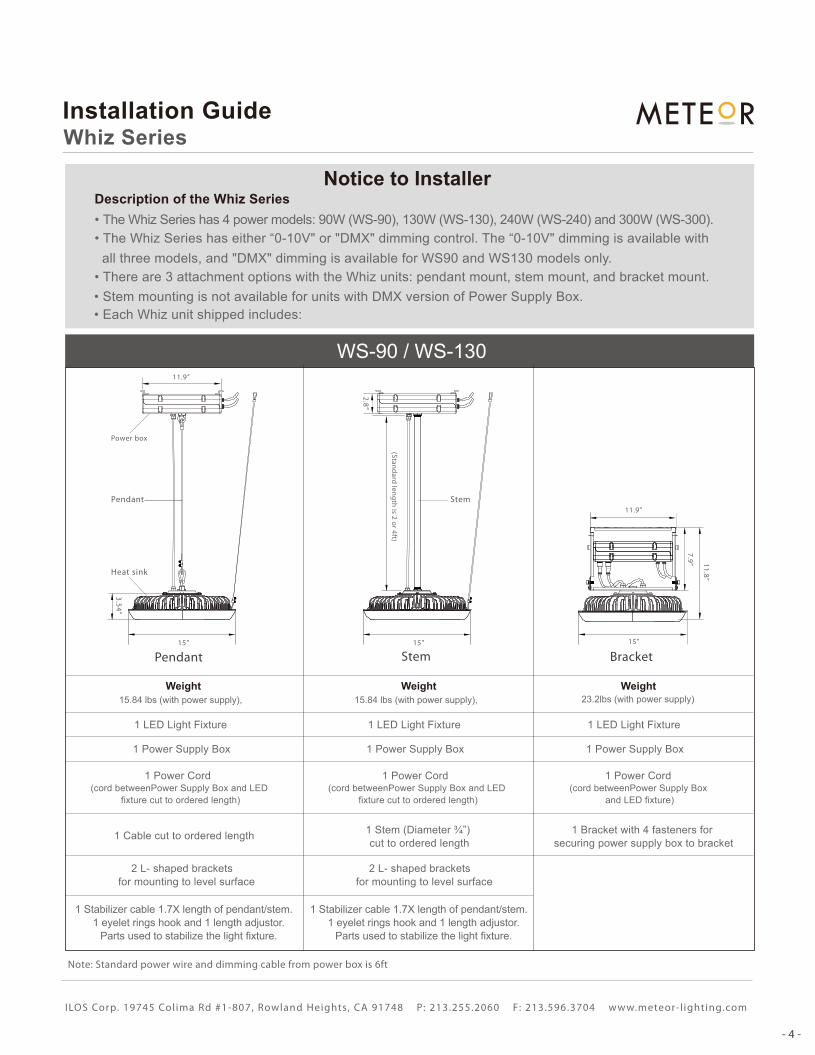
• The Whiz Series has 4 power models: 90W (WS-90), 130W (WS-130), 240W (WS-240) and 300W (WS-300). • The Whiz Series has either “0-10V" or "DMX" dimming control. The “0-10V" dimming is available with
ILOS Corp. 19745 Colima Rd #1-807, Rowland Heights, CA 91748 P: 213.255.2060 F: 213.596.3704 www.meteor- l ighting.com
Note: Standard power wire and dimming cable from power box is 6ft
Installation Guide
Notice to Installer
Whiz Series
Description of the Whiz Series
all three models, and "DMX" dimming is available for WS90 and WS130 models only. • There are 3 attachment options with the Whiz units: pendant mount, stem mount, and bracket mount.
• Each Whiz unit shipped includes: • Stem mounting is not available for units with DMX version of Power Supply Box.
1 LED Light Fixture
1 Cable cut to ordered length
2 L- shaped brackets for mounting to level surface
2 L- shaped brackets for mounting to level surface
1 Stem (Diameter ¾”) cut to ordered length
1 Bracket with 4 fasteners for securing power supply box to bracket
1 Power Supply Box
1 Power Cord (cord betweenPower Supply Box and LED
fixture cut to ordered length)
1 Power Cord (cord betweenPower Supply Box and LED
fixture cut to ordered length)
1 Power Cord (cord betweenPower Supply Box
and LED fixture)
1 LED Light Fixture
1 Power Supply Box
1 LED Light Fixture
1 Power Supply Box
Pendant BracketStem
1 Stabilizer cable 1.7X length of pendant/stem. 1 eyelet rings hook and 1 length adjustor.
Parts used to stabilize the light fixture.
1 Stabilizer cable 1.7X length of pendant/stem. 1 eyelet rings hook and 1 length adjustor.
Parts used to stabilize the light fixture.
WS-90 / WS-130
15”15”15”
2.8”
11.9”
11.9”
11.8”
7.9”
3.54”
(Standard length is 2 or 4ft)
Heat sink
Power box
StemPendant

- 5 -
ILOS Corp. 19745 Colima Rd #1-807, Rowland Heights, CA 91748 P: 213.255.2060 F: 213.596.3704 www.meteor- l ighting.com
Note: Standard power wire and dimming cable from power box is 6ft
Installation GuideWhiz Series
1 LED Light Fixture
1 Cable cut to ordered length
1 power box with bracket 1 power box with bracket
1 Stem (Diameter ¾”) cut to ordered length
1 power box with bracket
1 Power Supply Box
1 Power Cord (DMX)2 Power Cords (WS-240/WS-300)
1 Power Cord (DMX)2 Power Cords (WS-240/WS-300)
1 Power Cord (DMX)2 Power Cords (WS-240/WS-300)
1 LED Light Fixture
1 Power Supply Box
1 LED Light Fixture
1 Power Supply Box
Pendant BracketStem
1 Stabilizer cable 1.7X length of pendant/stem. 1 eyelet rings hook and 1 length adjustor.
Parts used to stabilize the light fixture.
1 Stabilizer cable 1.7X length of pendant/stem. 1 eyelet rings hook and 1 length adjustor.
Parts used to stabilize the light fixture.
WSD-90 / WSD-130 / WS-240 / WS-300
11.9”
7.9”
(Standard length is 2,4ft)

- 6 -
* If cable length needs to be adjusted, remove cable from the spring clip and loosen the screws at the end of the cable and adjust accordingly.
* If power wire length needs to be adjusted, place extra wire under cover. Secure cover with fastener onto lighting fixture. Perform this task before installation.
ILOS Corp. 19745 Colima Rd #1-807, Rowland Heights, CA 91748 P: 213.255.2060 F: 213.596.3704 www.meteor- l ighting.com
Installation GuideWhiz Series
• Pendant Mount (for WS-90 / WS-130)1. Remove the light from the box and ensure all wires between power supply box and light are securely connected(Figure 1). Please do not to handle the light fixture by the power or 0-10V cords to avoid any damage to the electrical cords.
Physical Installation
2. Connect power input wires with corresponding black/white/green wires using attached connector at the end of the wires. (Figure 4)
3. Secure power box with 2 L-shaped brackets to a level surface with 4 mounting hardware suitable to hold the weight of fixture and power supply box. (Figure 5)
(Figure 1)
(Figure 4)
(Figure 5)
(Figure 2)
spring clip
Power Supply Box
Standard power and dimming cable from power box is 6ft
BLACK (LINE)
GREEN (GROUND)WHITE (NEUTRAL)
RED (POSITIVE)BLACK (NEGATIVE)
connector
Power
Power wire
Dimming wire
Dimming
0.75’’0.28’’

* If cable length needs to be adjusted, remove cable from the spring clip and loosen the screws at the end of the cable and adjust accordingly.
3. Connect power input wires with corre sponding black/white/green wires using attached connector at the end of the wires. (Figure 8)
4. Ensure all wires between power supply and light are securely fastened. (Figure 9) 5. Secure lower bracket to main bracket with power box with provided self-locking fastener and screw.
(Figure 6)
(Figure 8)
(Figure 9)
(Figure 7)
spring clip
BLACK (LINE)
GREEN (GROUND)WHITE (NEUTRAL)
VIOLET (POSITIVE)
GRAY (NEGATIVE)
Power
Power wire
Dimming
Dimming wire
connector
Power Supply Box
Standard power and dimming cable from power box is 6ft
- 7 -
ILOS Corp. 19745 Colima Rd #1-807, Rowland Heights, CA 91748 P: 213.255.2060 F: 213.596.3704 www.meteor- l ighting.com
(Figure 10)
6. Assemble the stabilizer cables with eyelet ring hook on one end and length adjuster on the other end. Feed cable through the mounting corners and tighten adjusting screw. Ensure fixture is secure before adjusting height of the cable. (Figure 10)
Installation GuideWhiz Series
• Pendant Mount (for WSD-90 / WSD-130) / WS-240 / WS-300)
1. Pendant Mount Secure bracket to level surface with mounting hardware that is sufficient to support weight of LED fixtureand power box. (Figure 6)2. Secure power supply box to bracket with provided screws. (Figure 7) Please do not to handle the light fixture by the power or 0-10V cords to avoid any damage to the electrical cords.
Closeup viewLength adjuster
“ diameter
*Cable length provided is based on ordered stem length.

- 8 -
ILOS Corp. 19745 Colima Rd #1-807, Rowland Heights, CA 91748 P: 213.255.2060 F: 213.596.3704 www.meteor- l ighting.com
Installation GuideWhiz Series
• Stem Mount (for WS-90 / WS-130) (Figure 11)
1.Remove the light from the box and ensure all wires between power supply box and light are securely connected(Figure 1). Please do not to handle the light fixture by the power or 0-10V cords to avoid any damage to the electrical cords.
4. Secure power box with 2 L-shaped brackets to a level surface with 4 mounting hardware suitable to hold the weight of fixture and power supply box. (Figure 13)
3. Connect power input wires with corresponding black/white/green wires using attached connector at the end of the wires. (Figure 12)
(Figure 12)
Power Supply Box
BLACK (LINE)
GREEN (GROUND)WHITE (NEUTRAL)
RED (POSITIVE)BLACK (NEGATIVE)
connector
Power
Power wire
Dimming wire
Dimming
(Figure 13)
Standard power and dimming cable from power box is 6ft
0.75’’0.28’’
DC Cable

• Stem Mount (for WSD-90 / WSD-130 / WS-240 /WS-300)
(Figure 13)
(Figure 16)
(Figure 17)
(Figure 14) (Figure 15)
4. Connect power input wires with corresponding black/white/green wires using attached connector at the end of the wires. (Figure 16)
5. Ensure all wires between power supply and light are securely fastened. 6. Secure lower bracket to main bracket with power box with provided self-locking fastener and screw. (Figure 17)
BLACK (LINE)
GREEN (GROUND)WHITE (NEUTRAL)
RED (POSITIVE)
BLACK (NEGATIVE)
Power
Power wire
Dimming
Dimming wire
connector
Power Supply Box
Standard power and dimming cable from power box is 6ft
- 9 -
ILOS Corp. 19745 Colima Rd #1-807, Rowland Heights, CA 91748 P: 213.255.2060 F: 213.596.3704 www.meteor- l ighting.com
1. Secure bracket to level surface with mounting hardware that is sufficient to support weight of LED fixture and power box. (Figure 13)2. Secure power supply box to bracket with provided screws. (Figure 14)3. Fasten stem to lighting fixture and lower bracket with provided hardware. (Figure 15)
Installation GuideWhiz Series

- 10 -
ILOS Corp. 19745 Colima Rd #1-807, Rowland Heights, CA 91748 P: 213.255.2060 F: 213.596.3704 www.meteor- l ighting.com
Installation GuideWhiz Series
(Figure 18)
5. Assemble the stabilizer cables with eyelet ring hook on one end and length adjuster on the other end. Feed cable through the mounting corners and tighten adjusting screw. Ensure fixture is secure before adjusting height of the cable. (Figure 18)

- 11 -
ILOS Corp. 19745 Colima Rd #1-807, Rowland Heights, CA 91748 P: 213.255.2060 F: 213.596.3704 www.meteor- l ighting.com
Installation GuideWhiz Series
• Bracket Mount (for WS-90 / WS-130 / WS-240 / WS-300)
(Figure 19)
(Figure 20)
3. Secure LED fixture onto bracket with provided self-locking fastener and screw. (Figure 21) Connect power input wires with corresponding black/white/green wires using attached connector at the end of the wires.
1.Secure bracket onto level surface using mounting hardware that is sufficient to support weight of LED fixture and power box (Figure 19). Please do not to handle the light fixture by the power or 0-10V cords to avoid any damage to the electrical cords.
2.Secure power supply box to bracket with provided screws. (Figure 20)
BLACK (LINE)
GREEN (GROUND)WHITE (NEUTRAL)
RED (POSITIVE)
BLACK (NEGATIVE)
Power
Power wire
Dimming
Dimming wire
* Secure LED fixture onto bracket with provided bolt, nut, and screw. (Figure 13)
connector
(Figure 21) Power Supply Box
Standard power and dimming cable from power box is 6ft

- 12 -
ILOS Corp. 19745 Colima Rd #1-807, Rowland Heights, CA 91748 P: 213.255.2060 F: 213.596.3704 www.meteor- l ighting.com
Installation GuideWhiz Series
0-10V Dimming External Electrical Connection
Power Supply Box
E321253
* Please review compatible dimming controller guide in Download section of the website.
Wire Size (AWG) Distance (feet)
26 16 24 26
22 43
20 68 18 108
16 170
14 275
12 420
10 714
Maximum Wiring Distance (at full load)
RED (POSITIVE)
BLACK (NEGATIVE) 0-10V Dimming*
ElectricalSystem
BLACK (LINE)
Green (Ground)
WHITE (NEUTRAL)

- 13 -
ILOS Corp. 19745 Colima Rd #1-807, Rowland Heights, CA 91748 P: 213.255.2060 F: 213.596.3704 www.meteor- l ighting.com
Installation GuideWhiz Series
Power Supply:
DMX-512:
DMX Linking:
Data Cable (DMX Cable) Requirements:
The Whiz LED can be controlled via DMX-512 protocol. The Whiz LED fixture with DMX is a one channel DMX unit. (***When placing order, please indicate DMX address The DMX address will be preset insidethe power supply box.***) The LED fixture and your DMX controller require an approved DMX-512 Data cable for data input and data output. Your cables should be made with a male and female 5-pin connector on either end of the cable. Line Termination. DMX Terminator (not provided) must be used on the last unit to maintain data integrity.
WSD-90 WSD-130
DMX Power Supply Box Installation & Electrical Connection
Before making electrical connections, be sure the AC voltage in your area matches the required voltage for the purchased Meteor LED fixture. Because the line voltage may vary from venue to venue, you should be sure your unit voltage matches the wall outlet voltage before attempting to operate the fixture.
operate from a single controller, as long as all fixtures and the controller are DMX compliant. To ensure proper
DMX data transmission, when using several DMX fixtures try to use the shortest cable path possible. DMX512 is connected using a daisy-chain methodology where the source connects to the input of the first
device, the output of the first device connects to the input of the next device, and so on. Network can be expanded across parallel buses using DMX splitters.
manufactures as a form of communication between intelligent fixtures and controllers. A DMX controller
sends DMX data instructions from the controller to the fixture. DMX data is sent as serial data that travels from fixture to fixture via the DATA “IN” and DATA “OUT” XLR connector located on our power supply box.
DMX stands for Digital Multiplex Signal. It is a universal protocol used by most lighting and controller
DMX is a language allowing all makes and models of different manufactures to be linked together and
channel 1channel 1

- 14 -
Standard DMX512 Wire with 5 pin in/out Connector
ILOS Corp. 19745 Colima Rd #1-807, Rowland Heights, CA 91748 P: 213.255.2060 F: 213.596.3704 www.meteor- l ighting.com
Installation GuideWhiz Series
DMX Power Supply Box Installation & Electrical Connection
Power wire
1122
3344
55
DMX IN DMX OUT
1.Shield(Not connected to the XLR-chassis)
2.Signal -3.Signal +4.Spare5.Spare
1. Make power connection Install cable clamp connector (required, but not included) first. Pull out wires and connect power input wires with corre
sponding black/white/green wires using attached connector at the end of the wires. Push connected wires through cable
clamp connector. Clamp to secure. (Figure 22)
2. Mount DMX power box For pendant mount, refer to page 5 Step 3; for bracket mount, refer to page 8 Step 1.
*Stem mounting not available for DMX power box3. Connect DMX cables. DMX512 is connected using a daisy-chain methodology where the source connects to the input of the first device, the output
of the first device connects to the input of the next device, and so on (Figure 24).
DMX512 is connected using a standard DMX512 cable with 5 pin in/out connector (figure 23) via a daisy-chain methodology.
The "DMX Controller" output connects to the input connector of the first "Power Supply Box - DMX IN", and the output of the
first "Power Supply Box – DMX OUT" connects to the input of the next "Power Supply Box – DMX IN", and so on. The last
"Power Supply Box – DMX OUT" has to be terminated with a DMX Terminator. (Figure 24)
Power Supply Box
1
(Figure 22)
(Figure 23)
DMX OUT DMX IN3
DC cable
BLACK (LINE)
GREEN (GROUND)WHITE (NEUTRAL)Power
connector

- 15 -
ILOS Corp. 19745 Colima Rd #1-807, Rowland Heights, CA 91748 P: 213.255.2060 F: 213.596.3704 www.meteor- l ighting.com
Installation GuideWhiz Series
Daisy Chain Layout (DMX)
ElectricalSystem
(Do Not Use DMX Terminator)
(Do Not Use DMX Terminator)
Standard DMX512 Wire Cable with 5 Pin In/Out Connector (See Figure 15 for pin configuration)
DMXDMX Console
DMX IN
DMX IN
DMX IN
The dotted lines represent AC power circuits(Figure 24)
DMX OUT
DMX OUT
Splitter
! WARNING1. Before installation, please test LED fixture with DMX function on ground to ensure compatibility with control console.2. DMX address is listed on power box. If DMX address needs to be reset, please contact our technical department for further instructions.3. Our lights require its own channel. If using different fixture type, please use splitter device to separate.4. DMX terminator is not required for our own lighting channel.