installation manual for groundwater estimation and management … · this manual is to help in...
TRANSCRIPT
Installation Manual - GEMS 1
Installation Manual
for
Groundwater Estimation and Management
System
Prepared by
Tata Infotech Ltd

Installation Manual - GEMS 2
Table of Contents
1. Introduction ................................................................................................................. 3 2. Software Installation for Package A & B.................................................................... 3 2.1. Server Installation .................................................................................................... 3 2.2. Client Installation ..................................................................................................... 4 3. Software Installation for Package C & D.................................................................... 4 3.1. Server Installation .................................................................................................... 4 3.2. Client Installation ..................................................................................................... 4 4. Installation of Software ............................................................................................... 5 4.1. MapInfo Installation................................................................................................. 5 4.2. Vertical Mapper Installation .................................................................................... 5 4.3. SPSS Installation...................................................................................................... 6 4.4. Oracle Installation .................................................................................................... 6 4.4.1. Oracle 9i Release2 Server Installation ................................................................. 6 4.4.2. Oracle - 9i Release2 Database creation and configuration ................................. 12 4.4.3. Oracle 9i Release2 Net configuration ............................................................... 19 4.4.4 Oracle 9i Release2 Client Installation.................................................................. 33 4.5. DSN Creation ......................................................................................................... 39 4.6. Data Script for inserting basic data in database ..................................................... 42 4.7. GEMS Installation.................................................................................................. 43 4.8. Appendix A ............................................................................................................ 50

Groundwater Estimation and Management System – GEMS 3
Installation Manual
1. Introduction
Tata Infotech Ltd has developed Groundwater Estimation and Management System (GEMS) software for Central Ground Water Board and eight participating states. GEMS will be installed at Regional Offices, Unit offices of CGWB and the State Data Centers, Unit offices of the participating states. The GEMS consists of creating database, updating it frequently as and when new data are available after carrying out validation checks on the database and retrieving the data from database when desired. It facilitates data entry, processing, validation, analysis and dissemination of periodic/annual reports on hydrological conditions water resources and development status. CGWB has defined its locations in terms of the no of nodes supplied to the location and the type of installation to be implemented. Accordingly the software has also been distinguished as Package A, Package B, Package C and Package D. This manual is to help in installing the GEMS software and all the supporting software necessary for execution of GEMS software.
Package Hardware A 8 Workstations and 1 Server B 5 Workstations and 1 Server C 2 Workstations D 2 Workstations
In A Package the workstations and Server will be connected via Switch. In B Package the workstations and Server will be connected via Hub and Router. In C & D Packages the two workstations will be connected to each other via peer-to-peer.
2. Software Installation for Package A & B 2.1. Server Installation
• Windows 2000 Server. Make sure that Service Pack3 is loaded • FTP Server (Installation in Appendix A)

Groundwater Estimation and Management System – GEMS 4
• Oracle 9i Release2, Enterprise Edition for package A and Standard Edition for package B
• DSN Creation 2.2. Client Installation
• Windows 2000 Professional. Make sure that Service Pack3 is loaded • Oracle 9i Release2, Client • DSN Creation • MapInfo 6.5 • SPSS 10.0 • Vertical Mapper 2.6 (Along with hardware lock on Parallel Port of the
workstation) • Vertical Mapper patch to be installed and configured on the client. • GEMS 1.0 Application Software
3. Software Installation for Package C & D
As there are two machines for these packages • Oracle 9i Release2, Personal Edition will be installed on one workstation • Oracle 9i Release2, Client will be installed on other workstation. • These two workstations will be connected peer-to-peer
3.1. Server Installation • Windows 2000 Professional. Make sure that Service Pack3 is loaded • FTP Server (Installation in Appendix A) • Oracle 9i Release2, Personal Oracle • DSN Creation • MapInfo 6.5 • SPSS 10.0 • Vertical Mapper 2.6 (Along with hardware lock on Parallel Port of the
workstation) • Vertical Mapper patch to be installed and configured on the client. • GEMS 1.0 Application Software
3.2. Client Installation • Windows 2000 Professional. Make sure that Service Pack3 is loaded • Oracle 9i Release2, Client • DSN Creation • MapInfo 6.5 • SPSS 10.0 • Vertical Mapper 2.6 (Along with hardware lock on Parallel Port of the
workstation)

Groundwater Estimation and Management System – GEMS 5
• Vertical Mapper patch to be installed and configured on the client. • GEMS 1.0 Application Software
4. Installation of Software This section covers software requirements and installation procedure. The following steps should be followed in the given sequence only
Name of software to be installed Disk space
requirements Location of Installation
1. Oracle 9i Release2 SERVER 3 GB On the server at A (Enterprise edition) and B (Standard edition) packages
2. Oracle 9i Release2 CLIENT 350 MB On the client machine at all the packages 3. Oracle 9i Release2 Personal
Oracle 1.5GB On one of the client machine (which will
also act as server) at C & D packages 4. MapInfo 6.5 200 MB All the client machines at all the packages 5. Vertical Mapper 2.6(with VM
Patch) 50 MB All the client machines at all the packages
6. SPSS 10.1 150 MB All the client machines at all the packages 7. GEMS 1.0 550 MB the client machines at all the packages 4.1. MapInfo Installation
Step 1 : Insert the MapInfo Professional 6.5 CD. The installation screen starts automatically. If it does not start automatically then browse the CD and double-click on Setup.exe.
Step 2 : Click on Install Products and then click on MapInfo Professional. The
installation wizard starts. Follow the steps and complete the Installation. Step 3 : Click on DBMS support and the installation wizard starts. Follow the
steps and complete the installation. 4.2. Vertical Mapper Installation
Step 1 : Make sure that Map Info is loaded and working. Insert the Vertical Mapper CD. The installation screen starts automatically. If it does not start automatically then browse the CD and double-click on Setup.exe
Step 2 : The installation wizard starts. Follow the steps and enter the License
key to complete the installation

Groundwater Estimation and Management System – GEMS 6
Step 3 : VM Patch (Browse the CD, click on VM Patch\Win_NT\ Setup86.exe Install the Sentinel Driver and click Ok. Then Configure Sentinel Driver and click Ok to configure the software.)
Note : The Vertical Mapper software comes with a hardware lock which
needs to be fitted in the parallel port of the PC. If the hardware lock is not fitted, Vertical Mapper will not work.
4.3. SPSS Installation Step 1: Insert the SPSS 10.1 CD. The installation screen starts automatically. If it
does not start automatically then browse the CD and double-click on Setup.exe.
Step 2: Select Install SPSS option. The wizard starts. Follow the steps and enter
the License key and Click Update button and then Next button to complete the installation
Step 3: Select Install Smart Viewer option. The wizard starts. Follow the steps
same as above. 4.4. Oracle Installation 4.4.1. Oracle 9i Release2 Server Installation
Step 1: Insert disk 1 of 3 from the Oracle 9i Release2 Server CD’s, and the
installation of Oracle 9i starts
Step 2: Click on Install / Deinstall products and the Oracle Universal Installer: Welcome screen appears.

Groundwater Estimation and Management System – GEMS 7
Step 3: On “Oracle Universal Installer: Welcome” screen click on Installed Products and see whether any Oracle Product is already installed or not.
Step 4: If it is a fresh Installation, this screen will be blank. On the contrary, if
any product is listed (installed) check the checkbox against that product and click on Remove as shown in the screen below, else click on Close to come to the “Oracle Universal Installer: Welcome “screen. Click <Next> and “Oracle Universal Installer: File Locations” screen appears.

Groundwater Estimation and Management System – GEMS 8
Step 5: Do not change the source settings. The destination path can be altered if the shown drive has less disk space. Keep a note of Destination Path for further reference. Click <Next> to come to the “Oracle Universal Installer: Available Products” screen.
Step 6: Select Oracle 9i Database 9.2.0.1.0 and click <Next> to come to “Oracle
Universal Installer: Installation Types” Screen.

Groundwater Estimation and Management System – GEMS 9
Step 7: Select Enterprise Edition for package A, Standard Edition for package B,
Personal Edition for packages C and D. Click <Next> to come to the “Oracle Universal Installer: Database Configuration” screen.
Step 8: Select Software Only radio button and click <Next> to come to the
“Oracle Universal Installer: Oracle Services for Microsoft Transaction Server” screen.

Groundwater Estimation and Management System – GEMS 10
Step 9: The Oracle software automatically identifies the port number of server
and does not require user intervention. Click <Next> to come to the “Oracle Universal Installer: Summary Screen”.
Step 10: Click on Install and the installation starts with a progress bar showing the percentage of installation finished. During Installation it will prompt for Disk 2 of 3 as in the following screen

Groundwater Estimation and Management System – GEMS 11
Step 11: Enter disk 2 of 3 and click <OK>. Similarly disk 3 of 3 will be asked, enter disk 3.
Step 12: “Oracle Universal Installer: End of Installation” screen comes with the message saying “The installation of Oracle 9i Database was successful”. Click <Exit> to come out of the installation wizard.

Groundwater Estimation and Management System – GEMS 12
Step 13: Click Cancel to close the “Add Database to Tree” screen. Close the Oracle Enterprise Manager Console, Standalone application. Remove the CD from CD Drive.
4.4.2. Oracle - 9i Release2 Database creation and configuration
Step 1: Go to Start Programs Oracle-OraHome92 Configuration and Migration Tools Database Configuration Assistant.

Groundwater Estimation and Management System – GEMS 13
Step 2: On the “Database configuration Assistant: Welcome” screen, click Next.
Step 3: On the Database configuration Assistant: Step 1 of 8” screen, Click on
“Create a database” radio button. Click <Next>

Groundwater Estimation and Management System – GEMS 14
Step 4: On the “Database configuration Assistant, Step 2 of 8” screen, Choose
“General Purpose” and click <Next>
Step 5: On the “Database configuration Assistant: step 3 of 7 “ screen, Enter a database name (eg. gemspdb) in the Global Database Name textbox. SID textbox gets automatically filled in with the same name, the user need not change it. Click < Next>

Groundwater Estimation and Management System – GEMS 15
Step 6: On the “Database configuration Assistant, step 4 of 7: Database
Connection Options” screen, choose the “Dedicated Server Mode” radio button and click <Next>.
Step 7: On the “Database configuration Assistant, step 5 of 7: Initialization Parameters” screen, click on “All Initialization Parameters”, to proceed to all Initialization Parameters Screen.

Groundwater Estimation and Management System – GEMS 16
Step 8: In the All Initialization Parameters screen scroll down to “open_cursors” and change its value to 2000 as shown in the screen below.

Groundwater Estimation and Management System – GEMS 17
Scroll down to “utl_file_dir “ and enter “*” there. Be sure that a asymbol comes in the Included(Y/N) column of the screen against “open_cursors “and “util_file_dir” , then click <Close>
Step 9: On the “Database configuration Assistant 6 of 7: Database Storage” screen, click <Next>

Groundwater Estimation and Management System – GEMS 18
Step 10: On the “Database configuration Assistant, step 7 of 7: Creation Options” screen, click <Finish>
Step 11: After the above step the following screen pops up showing all the details with which the database will be created. Make sure the changes done are reflected in the summary and click <OK>

Groundwater Estimation and Management System – GEMS 19
Step 12: In the screen below assign and confirm passwords for SYS and
SYSTEM and click <Exit>
4.4.3. Oracle 9i Release2 Net configuration
Step 1: Go to Programs Oracle-OraHome92 Configuration and Migration
tools Net Configuration Assistant
********************

Groundwater Estimation and Management System – GEMS 20
Step 2: On the “Oracle Net Configuration Assistant: Welcome” screen,Choose
Listner Configuration radio button and click <Next>
Step 3: On the “Oracle Net Configuration Assistant: Listener Configuration, Listener” screen, choose Add radio button and click <Next>

Groundwater Estimation and Management System – GEMS 21
Step 4: On the “Oracle Net Configuration Assistant: Listener Configuration,
Listener Name” screen, Listner name textbox gets automatically filled up with “LISTENER” (need not change it). Click <Next>
Step 5: On the “Oracle Net Configuration Assistant: Listener Configuration, Select Protocols” screen,click <Next>

Groundwater Estimation and Management System – GEMS 22
Step 6: On the “Oracle Net Configuration Assistant: Listener Configuration, TCP/IP Protocol” screen,choose “Use the standard port number of 1521” and click <Next>.
Step 7: On the “Oracle Net Configuration Assistant: Listener Configuration,
More Listeners” screen,choose No and click <Next>

Groundwater Estimation and Management System – GEMS 23
Step 8: On the “Oracle Net Configuration Assistant: Listener Configuration
Done”. Click <Next>
Step 9: Again the “Oracle Net Configuration Assistant: Welcome” screen appears. Choose “Local Net Service Name configuration” and click <Next>

Groundwater Estimation and Management System – GEMS 24
Step 10: On the “Oracle Net Configuration Assistant: Net Service Name
Configuration screen”,choose Add and click <Next>
Step 11: On the “Oracle Net Configuration Assistant: Net Service Name Configuration, Database Version” screen, choose “Oracle 8i or later database or service” and click <Next>

Groundwater Estimation and Management System – GEMS 25
Step 12: On the “Oracle Net Configuration Assistant: Net Service Name Configuration, Service Name” screen enter a service name in the Service Name textbox and click <Next>
Step 13: On the “Oracle Net Configuration Assistant: Net Service Name Configuration, Select Protocols” screen, choose TCP and click <Next>

Groundwater Estimation and Management System – GEMS 26
Step 14: On the “Oracle Net Configuration Assistant: Net Service Name Configuration, TCP/IP Protocol” screen, enter the name of the local machine or the IP Address (as shown in the following screenshots) in Host Name textbox. Choose the radio button “Use the standard port number of 1521” and click <Next>

Groundwater Estimation and Management System – GEMS 27
Step 15: On the “Oracle Net Configuration Assistant: Net Service Name Configuration, Test” screen, choose “No, do not test” and click <Next>
Step 16: On the “Oracle Net Configuration Assistant: Net Service Name Configuration, Net Service Name” screen, the Net Service Name is automatically filled in. Need not change and click <Next>

Groundwater Estimation and Management System – GEMS 28
Step 17: On the “Oracle Net Configuration Assistant: Net Service Name Configuration, Another Net Service Name?” screen,choose No and click <Next>
Step 18: On the “Oracle Net Configuration Assistant: Net Service Name
Configuration Done” screen ,click <Next>

Groundwater Estimation and Management System – GEMS 29
Step 19: On the “Oracle Net Configuration Assistant: Naming Methods
Configuration Done” screen,click <Next>
Step 20: Again from the “Oracle Net Configuration Assistant: Welcome” screen, click < Finish>

Groundwater Estimation and Management System – GEMS 30
Step 21: Go to Start Programs Oracle-OraHome92 Configuration and Migration tools Net Manager
Step 22: Click on Listeners and then Listener. After the details of the Listener are shown Click on Listening Locations.

Groundwater Estimation and Management System – GEMS 31
Step 23: Select Database Services.
Step 24: If the screen shows the details of the Database Service make sure that the are as follows
Global Database Name: Name of the database as given in Oracle Step 5 of “Oracle 9i Release2 Database creation and configuration".
Oracle Home Directory : The destination path given as in Step 5 of
“Oracle 9i Release2 Installation” SID: Same as Global Database Name If no Database Service is shown Click on Add Database.

Groundwater Estimation and Management System – GEMS 32
Step 25 : Enter following details Global Database Name: Name of the database as given in Oracle Step 5 of “Oracle 9i Release2 Database creation and configuration". ..........................Oracle Home Directory : The destination path given as in Step 5 of “Oracle 9i Release2 Installation” SID: Same as Global Database Name Click on File Save Network Configuration to save the settings. Click on File Exit to complete the configuration.

Groundwater Estimation and Management System – GEMS 33
4.4.4 Oracle 9i Release2 Client Installation
Step 1: Insert the Oracle 9i Release2 Client CD and the following screen appears
Step 2: Follow the steps 3-5 described in Server installation to check the existing
/installed oracle products and remove the same before installing Oracle client product on computer. Select Custom radio button and click <Next>.

Groundwater Estimation and Management System – GEMS 34
Step 3:
o On the “Oracle Universal Installer :Available Product Components “ screen, check the following checkboxes on the below screen
o Oracle Network Utilities 9.2.0.1.0 o Oracle Database Utilities 9.2.0.1.0 o SQL *Plus 9.2.0.1.0 o Oracle Windows Interfaces 9.2.0.1.0 o Oracle Programmer 9.2.0.1.0 o Oracle Universal Installer 9.2.0.1.0
And click <Next>

Groundwater Estimation and Management System – GEMS 35
Step 4: On the “Oracle Universal Installer :Component Location” screen, click <Next >
Step 5: The Oracle software automatically identifies the port number of
server(GEMSPDB) and does not require user intervention. Click <Next >to proceed to the “Oracle Universal Installer: Summary Screen”.

Groundwater Estimation and Management System – GEMS 36
Step 6: Click <Install> and the installation starts with a progress bar showing the
percentage of installation finished.
Step 7: On the “Oracle Net Configuration Assistant :Welcome” screen, click
<Next>

Groundwater Estimation and Management System – GEMS 37
Step 8: On the “Oracle Net Configuration Assistant: Directory Usage Configuration” choose “No, I want to defer this configuration to another time” and click <Next>.
Step 9: On the “Oracle Net Configuration Assistant: Naming Methods Configuration, Select Naming Methods” click <Next>

Groundwater Estimation and Management System – GEMS 38
Step 10: Follow the steps 11-19 described in “Oracle 9i Release2 Net configuration “
Step 11: On the “Oracle Net Configuration Assistant: Done” screen click <Finish>
Step 12: The Oracle Universal Installer: End Of Installation screen shows that the installation of Client was successful. Click <Exit>

Groundwater Estimation and Management System – GEMS 39
4.5. DSN Creation Data Source Name(DSN) is required by GEMS to connect to Oracle database.
Step 1: Go to Start Settings Control Panel and the following screen “Control Panel” appears.
Step 2: Click <Administrative Tools> and the following screen “Administrative
Tools” appears.

Groundwater Estimation and Management System – GEMS 40
Step 3: Click on <Data Sources(ODBC)> and the following screen “ODBC Data
Source Administrator” appears.
Step 4: Select “System DSN” tab page and the following screen “ODBC Data Source
Administrator” with System DSN page opened appears.

Groundwater Estimation and Management System – GEMS 41
Step 5: Click <Add> and the following screen “Create new Data Source “ appears.
Step 6: Select “Oracle in OraHome92” and click <Finish>. The following screen “Oracle
ODBC Driver Configuration appears.”

Groundwater Estimation and Management System – GEMS 42
Step 7: Enter Data Source Name and select the TNS Service Name (from list) and click
<OK>. The following screen “ODBC Data Source Administrator” appears showing the new DSN in the list. This DSN name will be required at the time of GEMS installation.
Step 8: Click <OK> to finish the DSN creation. 4.6. Data Script for inserting basic data in database
After loading all the software except GEMS, the most important step is to configure a database, which has all the schemas, database objects, necessary data

Groundwater Estimation and Management System – GEMS 43
for GEMS to execute. This basic data is a pre-requisite for GEMS. The database has been created in section 4.4.2 as discussed in this manual To insert the necessary data to the database, following script has to be executed. The database script will be executed at the Server on Package A & B and for Package C & D, the script will be executed at the workstation on which Personal Oracle has been installed.
Steps to execute the Database Script
1. Locate bat folder in the CD. 2. Open a Command Prompt Window. Command Prompt window can be
invoked by clicking Start /Run and enter cmd in the open text box and click on OK
3. Change directory to the bat directory in the CD. 4. Execute setup.bat (setup ↵).
(NB: If it says that batch file is already running, then delete C:\firstrun.txt and/or C:\firstinst.txt from C:\ directory)
5. Enter TNS name entry of the Server. 6. It will create 3 schemas and the user will be prompted to supply
Passwords of CGWBDEV, CGWB and CGWBREP users . 7. The user will be asked for Machine Id. The Machine Id will be the tag
number provided by M/s Tata Infotech Limited on the Server Machine in which Oracle Database has been installed(in case of A & B Sites). In case of C & D sites the tag no of the machine on which Oracle Database has been installed will be entered as Machine Id.
8. At last phase, it also asks for the State Id (cf. Appendix A(State ID’s for Data Script)) for which only the Admin/Hydro data to be kept.
9. After the script finishes, a log file will pop up. (Name of file will be C:\gemsdb_<date>_<time>.log). Check for any errors and take action accordingly. (For errors thrown from the script, proper messages would come up. For errors from Oracle, error numbers and messages would come up. Follow the Oracle manual).
10. Create folder GEMSDBA_Export in c:\ and GEMSDBA in c:\ GEMSDBA_Export at A & B sites.
11. Create of default FTP Site at C:\GEMSDBA_Export\GEMSDBA at the Server.
12. Create an FTP user. 4.7. GEMS Installation
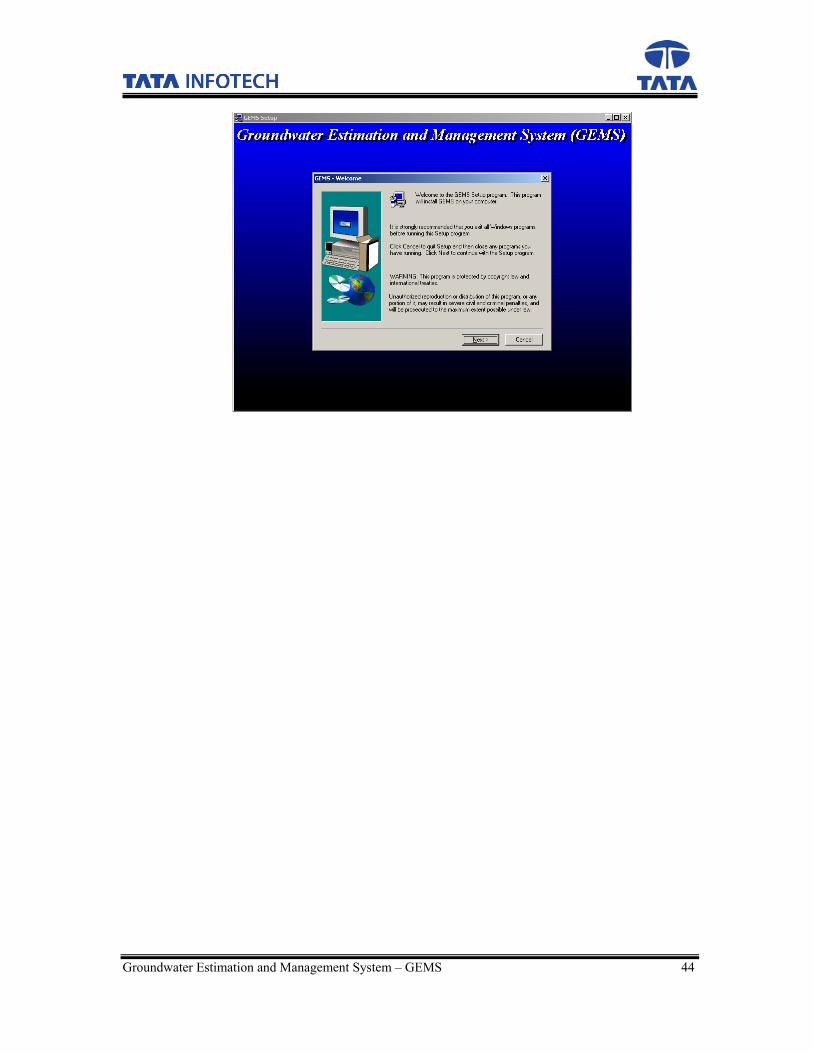
Step 1: Insert the GEMS CD and double click on the SETUP.exe file. The wizard starts and the following screen “Gems-Welcome” appears.
Groundwater Estimation and Management System – GEMS 44

Groundwater Estimation and Management System – GEMS 45
Step 2: Click <Next>, the following screen “GEMS User Information” appears.
Step 3: Enter the Name of the user, Company Name and the Serial No as supplied
with the CD and click <Next> the following screen “GEMS Destination Location” appears.

Groundwater Estimation and Management System – GEMS 46
Step 4: The destination folder of the application can be set on the above screen. The setup by default sets the path as c:\program files \gems which can be left as it is and can be changed also. Click <Next> the following screen “GEMS SetupType” appears.
Step 5: The user can select the application to be installed. It can be GEMS
Application, GEMS Database Maintenance or Both of them. If GEMS Application is selected then clicking <Next> the following screen “GEMS ODBC for Application Dialog” appears.

Groundwater Estimation and Management System – GEMS 47
Step 6:Enter the following details DSN Name : The DSN Name as created. Password for cgwb : nepzsrd Password for cgwbrep: cgwbrep Step 7: If in GEMS SetupType screen “GEMS Database Maintenance” is
selected then on clicking <Next> the following screen “GEMS- Host(Server) Name, TNS Name and DRM Name for Database Dialog” appears .
Step 8: Enter the following details HostName: Name of the Server or IP Address of the Server.
TNSName: Same as the Service Name entered in Step 12 of “Oracle 9i release 2 Net Configuration”. DRMName: The name of the machine that will be used for Receiving Data. Click <Next> and “GEMS ODBC for Application Dialog” screen appears. Fill in details for this screen as discussed in Step-6.

Groundwater Estimation and Management System – GEMS 48
Step 9: If in GEMS SetupType screen “Both is selected “ then details in “GEMS ODBC for Application Dialog “ screen and “GEMS- Host(Server) Name, TNS Name and DRM Name for Database Dialog” screen will have to be provided as in step 6 and Step 8. After providing the details in any of the SetupType click <Next> and the installation starts with a progress bar showing the amount of installation completed. When the installation completes the following screen “Information” appears.
Step 10: Enter Map data CD and select the path of the CD Drive which can be on the same PC or on some other PC on the network. Click <OK> and map data will be copied and the following screen “GEMS Setup Complete” will appear. If the path selected is wrong then the user will be prompted to select the correct path.

Groundwater Estimation and Management System – GEMS 49
Step 11 : Select “Yes, I want to restart my computer now” and click <Finish>. This completes the GEMS installation. Step 12: After restarting the computer login in GEMS and change Machine
Parameters as per the requirement. This completes the installation of software.

Groundwater Estimation and Management System – GEMS 50
4.8. Appendix A
FTP Server Installation Step 1: For FTP Server IIS needs to be installed. To install IIS go to Control Panel and
click on Add/Remove Programs. The following screen “Add/Remove Programs” appears.
Step 2: On the above screen click on <Add/Remove Windows Components>. The
following screen “Windows Component Wizard” appears.

Groundwater Estimation and Management System – GEMS 51
Step3 : On the above screen check <Internet Information Services(IIS)> and uncheck all the other components if checked. Click <Next> and the installation starts.
Step4: If the System asks for “Windows 2000 Professional CD” as in the following
screen “Insert Disk”.
Step 5: Enter the CD and click <OK>. If the system does not detects the CD
automatically the following screen “Files Needed” appears.
Step 6: Select the path through <Browse> and click <OK>. The installation resumes and
in the end the following screen “Windows Component Wizard” appears.

Groundwater Estimation and Management System – GEMS 52
Step 7: Click <Finish>. Step 8:On the Desktop right click <My Computer> as in the following screen.
Step 9: On the menu which appears after right clicking My Computer select <Manage>. The following screen “Computer Management” appears.

Groundwater Estimation and Management System – GEMS 53
Step 10: In the above screen On the Tree Listing click <Local User and Groups>.
Under that right click <Users> and select <New User> from the menu. The following screen “New User” appears.
Step 11: Enter the User Name. Give a password and confirm the password. Check <User
cannot change password> and <Password never expires>. Click <Create>. Step 12:On the Tree listing right click <FTP Site> which is under <Internet
Information Services> which again is under <Services and Applications> as in the following screen “Computer management”

Groundwater Estimation and Management System – GEMS 54
Step 13: On the menu select <New> and then <Virtual Directory>. The following
wizard “Virtual Directory Creation Wizard” starts as in the following screen.
Step 14: Click <Next>. The following screen of the wizard appears.
Groundwater Estimation and Management System – GEMS 55
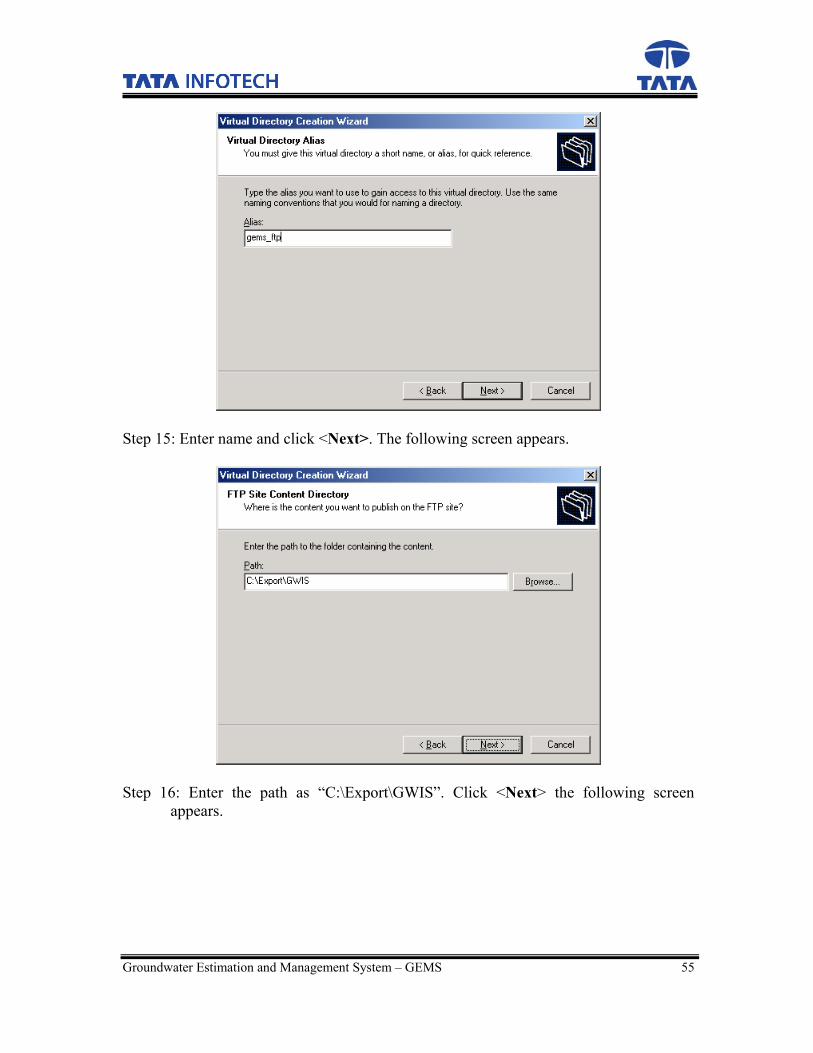
Step 15: Enter name and click <Next>. The following screen appears.
Step 16: Enter the path as “C:\Export\GWIS”. Click <Next> the following screen
appears.

Groundwater Estimation and Management System – GEMS 56
Step 17: Check <Read> and <Write>. Click <Next> and the installation starts and in the
end the following screen appears.
Step 18: Click <Finish>. Step 19: In the Computer Management screen in the Tree listing right click <FTP Site
which is under <Internet Information Services> which again is under <Services and Applications> as in the following screen “Computer management”

Groundwater Estimation and Management System – GEMS 57
Step 20: In the menu select <Properties> and the following screen “FTP Site
Properties” appears.
Step 21: Select <Security Accounts> tab page and enter the following detail. Username : Computer Name\User Name(as created earlier in Step 11) Password: Enter password Select <Home Directory> tab page and the following screen appears.

Groundwater Estimation and Management System – GEMS 58
Step 18: Select <a directory located on this computer> and enter the following detail
on the above screen. Local Path: C:\Export\GWIS Check <Read>, <Write> and <Log Visits> Under Directory Listing Style select <MS-DOS> Click <OK>
State ID’s for Data Script M_STATE_ID M_STATE_NAME
101 Jammu and Kashmir 102 Himachal Pradesh 103 Punjab 104 Chandigarh 105 Uttaranchal 106 Haryana 107 Delhi 108 Rajasthan 109 Uttar Pradesh 110 Bihar 111 Sikkim 112 Arunachal Pradesh 113 Nagaland

Groundwater Estimation and Management System – GEMS 59
114 Manipur 115 Mizoram 116 Tripura 117 Meghalaya 118 Assam 119 West Bengal 120 Jharkhand 121 Orissa 122 Chhattisgarh 123 Madhya Pradesh 124 Gujarat 125 Daman and Diu 126 Dadra and Nagar Haveli 127 Maharashtra 128 Andhra Pradesh 129 Karnataka 130 Goa 131 Lakshadweep 132 Kerala 133 Tamil Nadu 134 Pondicherry 135 Andaman and Nicobar