installation,operation,&maintenance manual ... · installation,operation,&maintenance...
TRANSCRIPT

INSTALLATION, OPERATION, & MAINTENANCEMANUAL
ORIGINAL INSTRUCTIONS FORRO-FLO® COMPRESSORS AND VACUUM PUMPS
Ro-Flo Compressors, LLC2540West Everett St.Appleton, WI 54914
United States of America
Compressor SerialNumber: ____________________________________________________________
16-620-101-000REV03


TABLE OF CONTENTS
SAFETY INFORMATION 5
INTRODUCTION 7
INTENDEDUSEOF RO-FLO®COMPRESSORS 7
RO-FLO®SLIDING VANECOMPRESSORS 7
WARRANTY 7
GeneralProvisions 7
PerformanceGuarantee 8
SpecialWarrantyProvisions 8
SECURING COMPRESSORFORSHIPMENT 8
COMPRESSOR LIFTING 8
RECEIVING INSPECTION 9
UNPACKING 9
PRESERVATIONOF COMPRESSORS - VAPORPHASECORROSION INHIBITORMETHOD 9
PreservationMaterialsAndEquipment 9
Preservation Procedure 9
Storage 10
CommissioningCompressor ToService 10
PRESERVATIONOF COMPRESSORS - DRYGASMETHOD 10
PreservationMaterials 10
Preservation Procedure 10
Storage 10
CommissioningCompressor ToService 11
PROTECTIONOF IDLECOMPRESSORS 11
INSTALLATION 12
FOUNDATION 12
COMPRESSORDRIVE 12
COMPRESSORALIGNMENT 12
Direct DriveUnits 13
Belt Drives 13
Ro-FloCompressors, LLC - 3 - 16-620-101-000REV 03
Excessive Belt Load 13
Acceptable Belt Load 13
2StageCompressor Train 14
PROCESSPIPING 14
COMPRESSORCOOLING SYSTEM 16
Open LoopCooling 16
Closed LoopCooling 16
Coolant FlowRequirement 16
CoolingWater Contaminants 17
CoolingWater PressureDrop 17
CoolingOf TwoStageSystems 17
LUBRICATIONSETUP 17
SealSupport SystemFor DoubleOpposedShaft Seals 19
OPERATION 20
COMPRESSORWORKING PRESSURES 20
LUBRICATION 20
ConsiderationsFor OilViscositySelection 20
ConsiderationsFor Oil TypeAndAdditive Package 20
ConsiderationsFor LubricationRate 20
PRE-START-UPCHECKS 22
START-UPCHECKS 22
OPERATING CHECKS 22
MAINTENANCE 23
PREPARATION FORCOMPRESSOR INSPECTIONANDMAINTENANCE 23
ESTABLISHING APREVENTATIVEMAINTENANCE(PM) SCHEDULE 23
24Hour (Daily) Inspection 23
4000Hour (Semi-Annual) Inspection 24
8000Hour (Annual) Inspection 24
COMPONENT INSPECTION 24
BladeEvaluation 24

Evaluating BladeWear 24
InitialBlade Inspection 25
Bearing Evaluation 25
SealRingsAndBearing SpacingRings 25
Cylinder Evaluation 25
Rotor Evaluation 25
COMPRESSORDISASSEMBLYPROCEDURE 26
Cylinder HeadRemoval 26
Removal of OutboardCylinder Head (Non-drive end) 27
Removal of InboardCylinder Head (Drive End): 27
ROTORREMOVAL 27
Rotor RemovalSteps 28
COMPRESSORREASSEMBLYPROCEDURES 28
ReassemblySteps 28
CHECKING ASSEMBLYCLEARANCES 29
Definitions 29
TotalRotor Float 29
Rotor EndClearance 29
Net Rotor Float 29
FixedRotor Float (appliesonly to compressorswith anH-Ring installed) 29
Rotor to Cylinder BoreClearance 29
Procedure For CheckingClearances 29
Checking TotalRotor Float 29
CheckingRotor EndClearance 30
CheckingNet Rotor Float 30
MECHANICALSHAFT SEALS 33
Single FaceMechanicalSeal (Rebuild-able) 33
General 33
Single FaceMechanicalSealDisassembly 33
Single FaceMechanicalSealReassembly 33
Double BellowsMechanicalSeal 33
Ro-FloCompressors, LLC - 4- 16-620-101-000REV03
General 33
Double BellowsMechanicalSealDisassembly 33
Double BellowsMechanicalSealReassembly 33
DualOpposedCartridgeSeal 34
General 34
DualOpposedCartridgeSealRemoval 34
DualOpposedCartridgeSeal Installation 34
COMPRESSOR ROTATION 36
COMPRESSORROTATIONDESIGNATIONS– LOWPRESSUREMODELS (2CC - 19LE) 36
COMPRESSORROTATIONDESIGNATIONS–HIGHPRESSUREMODELS (206 - 219M) 37
CHANGING COMPRESSORROTATION 38
EXPECTED SOUND CHARACTERISTICS 42
COMPRESSOR FASTENER TORQUE VALUES 44
FLANGE LOAD LIMITS 46
LOWPRESSUREMODELS 46
HIGHPRESSUREMODELS 47
TROUBLESHOOTING 48
TEMPERATURETELLSALL 48
TROUBLESHOOTING TABLE 49
REPLACEMENT PARTS 51
GENUINERO-FLO®PARTS 51
HOWTOORDERREPLACEMENT PARTS 51
CONTACT RO-FLO COMPRESSORS 52
GENERAL INQUIRIES 52
NEWCOMPRESSORANDVACUUMPUMPSALES 52
PARTS INQUIRIES 52
SERVICEANDSUPPORT 52

SAFETY INFORMATION
SAFETY INFORMATION
CAUTIONRO-FLO COMPRESSORSANDVACUUMPUMPSMUST BEOPERATEDBYPROFESSIONALSTRAINED IN THEUSEOFGASCOMPRESSIONEQUIPMENT.
PLEASECONTACT YOURSYSTEM INTEGRATOR / PACKAGERFORTRAINING IN THEUSEANDMAINTENANCEOF RO-FLOCOMPRESSORSANDVACUUMPUMPSASAPPLIED IN YOURSYSTEM.
CAUTIONREADANDUNDERSTANDTHEOPERATOR’SMANUALBEFOREUSING THISCOMPRESSOR. IT ISESSENTIAL TO REFER TO THEPACKAGER'SOPERATING MANUALFORCOMPLETEOPERATING INSTRUCTIONS.
FAILURETO FOLLOWOPERATING INSTRUCTIONSMAYRESULT IN SERIOUS INJURYORDEATH.
Read thisdocument carefullybefore installing and starting your compressor.
The following instructionshave been prepared to assist in installation, operation, andmaintenance of your Ro-Flo® sliding vane compressor. Following these instructionsand those provided for the compressor packagewill ensure a long operational life for your equipment.
The entiremanual should be reviewed before attempting to install, operating, service, or repair the compressor.
Ro-Flo® sliding vane compressorsare positive displacement style compressors, which are designed to compressgas. The compressor must notbe subjected to liquids in the inlet gasstream. Ro-FloCompressors, LLC isnot responsible for the systemdesign to prevent liquid in the gasstream, and assuchRo-FloCompressors, LLC cannot warrant equipment damaged by improperlyprotected or operated equipment.
CAUTIONPERSONALPROTECTIVEEQUIPMENT (PPE) SHOULDBEUSEDTO AVOIDHEALTHHAZARDS (EXCESSIVESOUND LEVELEXPOSURE) DUETO HIGHNOISELEVELDURING NORMALOPERATION.
IT ISRECOMMENDEDTHAT THECUSTOMERESTABLISHANEHSPLAN TO AVOID ANEXPOSURERISK IN EXCESSOFPERMISSIBLEEXPOSURELIMIT (PEL) ASDEFINEDBYTHEOCCUPATIONALSAFETY&HEALTHADMINISTRATION (OSHA) OROTHERREGULATING BODY.
CAUTIONTHE INFORMATIONCONTAINEDWITHIN IS INTENDEDTO ASSIST OPERATING PERSONNELBYPROVIDING INFORMATIONONTHEGENERALCHARACTERISTICSOF EQUIPMENTOF THISTYPE. IT DOESNOT RELIEVETHEUSEROF RESPONSIBILITYTOUSESOUNDENGINEERING PRACTICES IN THE INSTALLATION, APPLICATION, ANDMAINTENANCEOF PARTICULAREQUIPMENT PURCHASES.
ThePACKAGER andEND USER of Ro-Flo® sliding vane compressorsand vacuumpumpsshall assessall hazards that are present, or are likelypresent, with the compressor package and determinewhat personal protective equipment (PPE) isnecessary. In instanceswhere thecompressor processgas is considered hazardous, PPE may include respirators, personal gasdetectors, etc. Hard hatsmayalso be requireddepending upon the installation.
Ro-FloCompressors, LLC - 5 - 16-620-101-000REV03

SAFETY INFORMATION
For individualswithin danger zonesof operatingRo-Flo® compressorsand vacuumpumps, asdefined by thePACKAGER and/or ENDUSER,Ro-FloCompressors recommendsaminimumof eye protection and hearing protection. For individualsperforming assembly, disassembly, serviceand/or maintenance of Ro-Flo® compressorsnot in operation, Ro-FloCompressors recommendsaminimumof eye protection, gloves, and steeltoe footwear.
Lighting should be considered in the package design, the PACKAGER is referred to the compressor general arrangement drawings for areasof thecompressor requiring service,maintenance, and/or inspection.
CAUTIONTHECOMPRESSORSURFACESANDATTACHEDPIPING MAYBEHOT.GASESANDFLUIDSWITHIN THECOMPRESSORMAYBEHOT.
Before starting anymaintenance or removing anycomponents, lockout the compressor driver, relieve all pressure from the compressor, vent andpurge any residual gases. drain fluidsand decontaminate the compressor in accordancewith thePACKAGER's instructions. Failure to properlydepressurize the compressor could result in hot gasesand/or liquidsbeing ejected from the compressor and piping. Additionally, it maybe necessaryto allow the compressor and piping to cool prior to anyassembly, disassembly, service, and/or maintenance to avoid burn hazards.
ThePACKAGER andEND USER of aRo-Flo® compressor shall assessall hazards that are present, or are likelypresent, with the compressorpackage and develop anEHS programand plan that includesbut isnot limited to lockout/tag out procedures, depressurization procedures, ventingprocedures, draining procedures, and decontamination procedures.
Ro-FloCompressors, LLC - 6- 16-620-101-000REV03

INTRODUCTION
INTRODUCTIONINTENDED USE OF RO-FLO® COMPRESSORSRo-FloCompressors, LLCmanufacturescompressorsand vacuumpumps for various industrial applications, including: oil & gasvaporrecovery, industrial processgas recovery, rail car unloading, foodprocessing, etc. Ro-Flo® compressorsare typicallyemployed inenvironmentswith wet, toxic, and/or corrosive gases. Please contact Ro-Flo Engineering about questionsconcerning suitability for a specificapplication. Ro-Flo compressorsare suitable for ambient conditionsof -20°F to 140°F (-28°C to 60°C).
RO-FLO® SLIDING VANE COMPRESSORSThe basicdesign of aRo-Flo® compressor is comprised of two cylinderheads that eccentrically locate a rotor in a round cylinder bore. Atoperating speed, centrifugal force extends the blades fromeight rotorslots so theymaintain contact with the cylinder bore through a fullrevolution. Thisoperating configuration produceseight individualenclosed sectionsbounded by the cylinder, cylinder heads, rotor andconsecutive blades. The compressor inlet port isat the point ofmaximumrotor to cylinder bore distance so each section isat itsmaximumvolumeandminimumpressure as it rotatespast the inlet port allowing gas to fillthem. As the rotation continues, the distance between the rotor andcylinder bore decreases, therebydecreasing the volume and increasingthe pressure of each section. The compressor discharge port isat thepoint ofminimum rotor to cylinder bore distance so each section isat itsminimumvolume andmaximumpressure as it rotatespast the dischargeport forcing the gas to exit the compressor. A small quantityof lube oil isinjected into the compressor cylinder to lubricate these components.
CYLINDER ROLLER BEARING
ROLLER
BEARING
BEARING END
COVER
LUBE POINTLUBE POINT
LUBE POINTS FOR
SEAL RINGS
(LUBE POINT LOCATIONS VARY BY MODEL)
ROTOR
BLADE
LUBE POINT FOR
SHAFT SEAL
CYLINDER
HEAD
ONE PIECE ROTOR
AND SHAFT
LUBE POINT
FIGURE 1 - General crosssection of aRo-Flo® LowPressuremodelsliding vane compressor along the rotor axis.
Ro-FloCompressors, LLC - 7 - 16-620-101-000REV 03
WARRANTY
General ProvisionsRo-FloCompressors, LLC (theCompany) warrants title to theproduct(s) and, except asnoted belowwith respect to itemsnot ofCompany’smanufacture, alsowarrants to the product(s) on date ofshipment to purchaser, to be of the kind and qualitydescribed herein,merchantable, and free of defects in workmanship andmaterial.
THIS WARRANTY IS EXPRESSLY IN LIEU OF ALL OTHERWARRANTIES. INCLUDING BUT NOT LIMITED TO IMPLIEDWARRANTIES OF MERCHANTABILITY AND FITNESS, ANDCONSTITUTES THE ONLY WARRANTY OF COMPANY WITHRESPECT TO THE PRODUCT(S).
If fromone year fromdate of initial operation, but notmore thaneighteenmonths fromdate of shipment byCompanyof anycompressor, Purchaser discovers that such itemwasnot aswarranted above and promptlynotifiesCompany inwriting thereof,Companyshall remedysuch non-conformance by, at Company’soption, adjustment or repair or replacement of the itemand anyaffected part of the product(s). Purchaser shall assume allresponsibility and expense for removal, re-installation, and freight inconnectionwith the foregoing remedies. The sameobligationsandconditionsshall extend to replacement parts furnished byCompanyhereunder. Companyshall have the right of disposal of parts replacedby it.

INTRODUCTION
ANYSEPARATELYLISTED ITEMOF THEPRODUCT(S) WHICH ISNOTMANUFACTUREDBYCOMPANY ISNOTWARRANTEDBYCOMPANY, and shall be covered onlyby the expressedwarranty, if any,of themanufacturer thereof. THISSTATESPURCHASER’SEXCLUSIVEREMEDYAGAINST COMPANYAND ITSSUPPLIERSRELATED TO THEPRODUCT(S) WHETHER INCONTRACTORTORTORUNDERANYOTHER LEGALTHEORY, ANDWHETHER ARISING OUTOFWARRANTIES, REPRESENTATIONS,INSTRUCTIONS, INSTALLATIONSORDEFECTSFROMANYCAUSE.
Companyand its suppliers shall have no obligation as to anyproductwhich hasbeen improperly stored or handled, or which hasnot beenoperated or maintained according to instructions inCompanyor supplierfurnishedmanuals.
In the event that non-OEMpartshave been used in conjunctionwith therepair or reworkof the compressor, thewarrantywill become null andvoid.
PartsWarranty - Replacement partsarewarranted for a period of ninetydays from the date of shipment to be free of defects in workmanship andmaterial.
Performance GuaranteeThePerformanceGuarantee onVolume and/or BrakeHorsepower issubject to a tolerance of ±5% for a single operating point. Please contactRo-FloCompressorsengineering for further information.
Special Warranty ProvisionsRo-FloCompressors, LLC shall not be responsible for damage caused bycorrosion, liquid or solid carryover in the gas, or improper operation onthePurchaser’spart.
ALL REPAIR PARTSordersmust be accompanied by the originalcompressor serial number.
SECURING COMPRESSOR FOR SHIPMENTCompressorsshould be securely fastened to the shipping skid through themounting feet holes. If banding the compressor to the skid, securewithband strapsover the cylinder body. DO NOT secure the compressorover the cylinder headsor rotor, as thismayaffect the alignment of thecompressor assembly.
Ro-FloCompressors, LLC - 8- 16-620-101-000REV03
FIGURE 2 - Securing compressor for shipment. Never applybandingover the cylinder headsor rotor shaft.
COMPRESSOR LIFTINGThe compressor can be lifted frombeneath themounting feet or with asling around the cylinder.DO NOT lift from threaded holes in the top ofthe cylinder head. SeeFIGURE 3 for the proper method of liftingwith asling. Refer toTABLE 1 for approximate compressor weights.
FIGURE 3 - Compressor liftingwith a sling.NEVER lift the compressorby the threaded holes in the cylinder head. The threaded holesare forlifting of the cylinder head onlyduringmaintenance and assembly.

INTRODUCTION
TABLE 1 - ApproximateCompressor Weights
MODEL WEIGHTlbs. kg
Low Pressure Models2CC 215 984CC 220 1005CC 240 1097D 450 205
8D, SD8D 750 3418DE, SD8DE 730 332
10G 1350 61311S 2000 90811L 2150 97512S 2100 104412L 2550 115717S 3500 158817L 4000 1815
19S, SD19S 5100 231319L, SD19L 5600 2540
19LE, SD19LE 5450 2472
High Pressure Models206, HP6 550 250207, HP7 550 250208B, HP8 550 250210M, HP10 880 400211M, HP11 1325 600212M, HP12 1650 750
217M 2200 998219M 3100 1407
RECEIVING INSPECTIONUpon receipt of the compressor, promptly check for anydamage, whichmayhave been incurred during transit. Make a claim for damage to thecarrier immediately.
Additionally, check the shippingmanifest for assurance that allmaterialorderedwith the compressor(s) hasbeen received or alternatelyaccounted for on backorder.
UNPACKINGIt is recommended to the leave the compressor in itsoriginal packaginguntil installation into the compressor package.
To unpack the equipment:1. Position correctly rated lifting strapsasshown inFIGURE 3.2. Unbolt the compressor from the shipping skid.3. Remove tape from the compressor input shaft.4. Remove suction and discharge flange covers.5. Remove plasticplugs from lube injection points.
Ro-FloCompressors, LLC - 9 - 16-620-101-000REV 03
PRESERVATION OF COMPRESSORS - VAPORPHASE CORROSION INHIBITOR METHODAllRo-Flo® sliding vane compressorsare shipped from the factorywith vapor phase corrosion inhibitor (VpCI). The below proceduresshould be followed every12monthsor when equipment needs to bestored.
Preservation Materials and EquipmentUse the following or their equivalents:1. A liquid vapor phase corrosion inhibitor (VpCI): CortecVpCI 329
or VpCI-322.NOTE: These products are incompatiblewith polyglycol (PAG) synthetic oils.
2. A contact rust preventative: CortecVpCI-368 corrosion inhib-itor.
Preservation Procedure1. Inspect and preserve the compressor in a clean dryenvir-
onment.2. Remove the following:
l Suction and discharge nozzle flange covers.l Pipe plug fromend cover and seal adapter, and top of double
bellowsseal if equipped.3. Inspect all internal surfacesand cavitiesof the compressor.
l Inspect for corrosion or standingwater. If found, photographaffected areasand contact Ro-FloCompressors.
l Removewater contamination and corrosion prior to coatingpartswith rust preventative.
l Inspect for potential leakpaths for water and air and if foundseal them.
l Verifymetal and plasticplugsare tight. Replace damagedplugs if necessary
l Inspect suction and discharge nozzle flange coversand gas-kets for damage. Replace if necessary.
4. Thoroughlymix liquid vapor phase corrosion inhibitor (VpCI-322before dispensing it.
5. Sprayor fog bearing cavities through the lube port with VpCI-322.
6. Sprayor fog the rotor and cylinder bore evenly through the suc-tion port with VpCI-322. Rotate the compressor rotor duringapplication.
7. If equippedwith a double bellowsseal, sprayor fog the doublebellowsseal cage.
8. Deposit VpCI-322 oil in compressor discharge plenumper thequantity listed inTABLE 2.
9. BrushVpCI-368 on the suction and discharge flanges.10. VpCI corrosion inhibitors require protected cavities to remain
sealed during storage. Open cavitiesdepletesVpCI concentration, rendering it ineffective. To prevent VpCIdepletion, seal the compressor ensure all plugsare tight and suc-tion &discharge flangesshould be sealedwith blind flanges&gaskets.
11. BrushVpCI-368 on the compressor input shaft. Applysufficientcoats to provide 2 -3milsof protection.Wrap input shaft withwaterproof backed tape.

INTRODUCTION
12. Apply tag to the compressor, noting the date of compressor pre-servation.
13. Applya second tag to the shipping crate, noting the date of com-pressor preservation.
TABLE 2 - Liquid Vapor-phaseCorrosion Inhibitor Application Volume
MODEL QTY OF VPCI-322Oz. ml
2CC 0.25 7.54CC 0.25 7.55CC 0.25 7.57D 0.25 7.5
8D, SD8D 0.5 158DE, SD8DE 0.5 15
10G 1 3011S 1.5 4511L 2 6012S 2 6012L 2.5 7517S 3.5 10517L 4 120
19S, SD19S 5.5 16519L, SD19L 6 180
19LE, SD19LE 6 180206, HP6 0.25 7.5207, HP7 0.25 7.5208B, HP8 0.25 7.5210M, HP10 0.5 15211M, HP11 1 30212M, HP12 1 30
217M 1.5 45219M 2 60
StorageStore the compressors in a clean, dryenvironment.
If the compressor is stored after packaging, protect all piping and bottles inthe package in addition to the compressor. Verifyall openings in thepackage are sealed.
Commissioning Compressor to ServiceAt commissioning:
1. Inspect all compressor internal surfacesand cavities. Inspect for cor-rosion or standingwater. If found, photograph affected areasandcontact Ro-FloCompressors.
2. Remove temporarycovers, gaskets, plugs, tape, tags, etc. that sealthe compressor. There isno need to remove the preservative fromthe interior of the compressor. NOTE: VpCI-322 andVpCI-329 arenot compatible with PAG oils.
Ro-FloCompressors, LLC - 10- 16-620-101-000REV03
3. Complete the "Pre-Start-UpChecks" on page 22.4. Complete anystart-up checksasprovided by the compressor
Packager.
PRESERVATION OF COMPRESSORS - DRY GASMETHODIf a drygasmethod isused to preserveRo-Flo® sliding vanecompressors, the gassupplyshould be are shipped from the factorywith vapor phase corrosion inhibitor (VpCI). The below proceduresshould be followed every12monthsor when equipment needs to bestored.
Preservation MaterialsUse the following or the equivalents:1. Adrygas, inert gas. Nitrogen is recommended.2. Pressure regulator.3. Pressure gauge.4. Isolation valves.5. A contact rust preventative: CortecVpCI-368 corrosion inhibitor.
Preservation Procedure1. Inspect and preserve the compressor in a clean dryenvironment.2. Remove the following:
l Suction and discharge nozzle flange covers.l Pipe plug from the end cover and seal adapter, and top of
double bellowsseal (if equipped).3. Inspect and preserve the compressor in a clean dryenvironment.
Remove the following:l Inspect for corrosion or standingwater. If found, photograph
affected areasand contact Ro-FloCompressors.l Removewater contamination and corrosion prior to pressuring
with Nitrogen.l Inspect for potential leakpaths for water &air and seal them.l Verifymetal and plasticplugsare tight. Replace damaged
plugs if necessary.l Inspect suction and discharge nozzle flange coversand gas-
kets for damage. Replace if necessary.4. Attach a gauge (0-10 psi) in linewith gassupply into end cover oil
injection port prior to the isolation valve.5. Attach pressure regulator to nitrogen supplyand attach to isolation
valve. Attach isolation valve to compressor.6. Applydrygasat 5 psig. Leave gas run for 30minutes to ensure
that onlydry inert gas is in the compressor. Isolate the compressorso that the pressure gauge readsapproximately5 psig. (Changesin gaspressuremayoccur with temperature changes, the gaugeispresent to help detect anygas leaks.)
7. BrushVpCI-368 on the suction and discharge flanges.8. The compressor is to remain sealed during storage.9. BrushVpCI-368 on the compressor input shaft. Applysufficient
coats to provide 2 - 3milsof protection.Wrap input shaft withwaterproof backed tape.
10. Keep log of pressure, add drygasasnecessary.
StorageStore the compressor in a clean, dryenvironment.

INTRODUCTION
If the compressor is stored after packaging, protect all piping and bottles inthe package in addition to the compressor. Verifyall openings in thepackage are sealed.
Commissioning Compressor to ServiceAt commissioning:1. Inspect all compressor internal surfacesand cavities for corrosion or
standingwater. If found, photograph affected areasand contact Ro-FloCompressors.
2. Remove temporarycovers, gaskets, plugs, tape, etc. that seal thecompressor.
3. Reconnect oil linesand purge air from the oil line.4. Complete the "Pre-Start-UpChecks" on page 225. Complete anystart-up checksprovided by the compressor Pack-
ager.
PROTECTION OF IDLE COMPRESSORSDuring periodswhen the compressor remains idle, a degree of protectionisadvisable to avoid rusting of the internal partsand swelling of blades inthe rotor slots. Themost desirablemethod of protection is to run the unitweekly for approximatelyone hour.When this isnot practical, the unitshould be sprayed thoroughly in the bore and each bearing cavitywith alight oil. Additionally, when inlet and/or discharge piping is removed oropen to atmosphere during idle periods, the compressor openingsshouldbe sealedwith plugsor cover plates to prevent humid or dirt fromenteringthe compressor.
WARNINGBlades that swellmaybind in the rotor slots, causing additional stress tobe imposed on any free sliding blades. This can result in broken bladesand catastrophic failure of the compressor.
BLADES
CYLINDER
DISCHARGE
OUTLETSUCTION
INLET
ROTOR
STUDS
COOLANT
CAVITY
DOWEL PIN
FIGURE 4 - Crosssection of aRo-Flo® LowPressuremodel,perpendicular to rotor axis.
Ro-FloCompressors, LLC - 11 - 16-620-101-000REV 03

INSTALLATION
INSTALLATIONFOUNDATIONThe compressor skid should bemounted on a level foundationwith shimssuch that deformation doesnot occur when foundation boltsaretightened. Skidsshould be designed for the static loadsof the compressor,driver, and other equipmentmounted such that adequate stiffnessexiststo keep couplings in alignment. Filling the skid and the area between theskid and foundationwith high strength non-shrinking grout will aid inpreventing skidmovement and also aid in noise &vibration control.
Whether a skid or alternatelya simple concrete slabwith sole plates isused, the height above ground should be adequate for compressorservicing andmaintenance.
TABLE 3 - Compressor Shaft Dimension
MODEL
SHAFTDIAMETER @COUPLING
NOMINALSQUARE KEYWAY
DIMENSIONinch
(+0.000 / -0.001) inch
2CC, 4CC, 5CC 1.250 0.2507D 1.625 0.375
8D, 8DE 1.625 0.375SD8D, SD8DE 1.875 0.500
10G 2.625 0.62511S, 11L 3.000 0.75012S, 12L 3.000 0.75017S, 17L 3.500 0.875
19S, 19L, 19LE 3.500 0.875SD19S, SD19L, SD19LE 4.000 1.000
206, 207, 208B 1.625 0.375HP6, HP7, HP8 0.500210M, HP10 2.625 0.625211M, HP11 3.000 0.750212M, HP12 3.000 0.750
217M 3.500 0.875219M 3.500 0.875
COMPRESSOR DRIVEAllRo-Flo® compressorshave a straight shaft with a keyway. Compressor shaft dimensionscan be found inTABLE 3.
A variable speed driver will allow for utilization of theRo-Flo®compressors turn down capability to control flow rate. Compressoroperating speed rangesare shown inTABLE 4. It should be noted thatthese areminimumandmaximumoperating speeds, however, thecompressor speedmaybe further limited by the application conditions.
Ro-FloCompressors, LLC - 12- 16-620-101-000REV03
Ro-Flo® compressorsare suitable for usewith electricmotor or gasengine drives. Ro-Flo® compressorsmaybe either direct coupled orbelt driven. An application review is required to determine if it is possibleto use a belt drive.
TABLE 4 - Compressor Operating SpeedRanges
MODEL MINIMUMSPEED (RPM)
MAXIMUMSPEED (RPM)
2CC, 4CC, 5CC 865 22007D 690 1465
8D, 8DESD8D, SD8DE 600 1465
10G 450 130011S, 11L 400 100012S, 12L 380 92017S, 17L 310 760
19S, 19L, 19LESD19S, SD19L, SD19LE 275 640
206, 207, 208BHP6, HP7, HP8 600 1465
210M, HP10 450 1300211M, HP11 400 1000212M, HP11 380 920
217M 310 760219M 275 640
COMPRESSOR ALIGNMENTRealignment should be completed following transit and before boltingpiping to the compressor. Failure to assure proper shaft alignment oncoupling drive unitswill result in excessive noise, couplingwear, and/orbearing damage. Improper shaft alignment for belt driven unitsmayresult in belt slippage and/or unequal belt wear, whichmay result inshortened belt life.
WARNINGFollow the lockout and depressurization proceduresprovidedwithyour compressor package before accessing the couplings, belts, pul-leys, etc.
1.875

INSTALLATION
Direct Drive UnitsRo-Flo® compressorsare suitable for direct drive applications, asshowninFIGURE 5.
FIGURE 5 - Compressor directly coupled to electricmotor.
Refer toFIGURE 6,FIGURE 7, andFIGURE 8 illustrating angular andparallelmisalignment and the dial indicator method for checking these. It isimportant to rotate both shafts simultaneously to avoid errorsdue tosurface imperfectionsof the coupling hubs. Note that each shaft revolutionthe couplingwill flex for the combined parallel and angular misalignment.The sumof thesemaybe considered as the overall shaft misalignment.
Parallel and angular alignment of the compressor and driver should bewithin 0.006 inch or the coupling limits, whichever is less.
FIGURE 6 - Angular misalignment, parallelmisalignment, and axialcapacity illustrated.
FIGURE 7 - Checking parallel alignment with dial indicator on couplingflange.
Ro-FloCompressors, LLC - 13 - 16-620-101-000REV 03
FIGURE 8 - Checking angular alignment with dial indicator oncoupling face.
Belt DrivesBelt drive designmust be determined by the compressor operatingconditionsand belt manufacturer. The belt manufacturer will definetension levelsand belt operating limits. The loadspredicted by the beltdrivemanufacturer should be reviewedwith theRo-Flo Performancesoftware to determine if a jackshaft arrangement is required.
Excessive Belt Load
FIGURE 9 illustratesa typical jackshaft arrangement, whicheliminatesexcessive belt load on the compressor. Alignment betweencompressor and jackshaft is checked in the samemanner aswithdirect drive units.
FIGURE 9 - Typical arrangement for belt driveswith pedestalbearingsand a jackshaft.
Acceptable Belt Load
FIGURE 10 illustrates the compressor sheave beingmounteddirectlyon the compressor. This isan acceptable arrangement if thebearing loadsand bendingmomentsdo not exceed design limitsofthe compressor.

INSTALLATION
FIGURE 10 - V-belt drivewith sheavemounted directlyon compressorshaft.
2 Stage Compressor TrainFIGURE 11 showsa typical 2 stage compressor train driven byoneelectricmotor.
FIGURE 11 - Example of a 2 stage compressor train driven byoneelectricmotor. (Couplingssold byothers.)
Ro-FloCompressors, LLC - 14- 16-620-101-000REV03
PROCESS PIPINGPiping connected to the compressor should be adequately supportedand aligned such thatminimal stress is transmitted to thecompressor/piping connection. See "FLANGELOAD LIMITS" on page46 for allowable flange loading for Ro-Flo® compressors&vacuumpumps. Additionally, the pipingmust have an adequate number ofelbows, tee’sand spool pieces to permit their removal for accessibility tothe compressor for service.
Suction pipe internalsmust be cleaned. A16-mesh start-up screen(witch'shat) should be installed near the compressor suction flange.The screen can be removedwhen debris stopsaccumulating.
Drainsand drop legs for oil and liquid accumulation are recommendedasshown inFIGURE 12, on both the suction and discharge piping.
WARNINGLiquid ingestion in the compressor can result in catastrophic failure.
Typical piping arrangementscontain basic features, such as (refer toFIGURE 13):
1. The discharge checkvalvemounted asclose aspossible tothe compressor discharge outlet to prevent reverse flowwhen the compressor is shut down
2. Adischarge safetyvalve placed before the first isolation valve.3. Drain valve, either manual or automatic, for the drop legsand
liquid separators.4. Intake filters to remove at least 90% of all dirt particles (10
micronsor larger) from the inlet gasstream. Pressure dropthrough a filter will increase due to contamination and shouldbe accounted for during equipment selection.
5. Instrumentation should be placed asclose aspossible to thecompressor to accuratelydetermine the operating con-ditions.

INSTALLATION
GAS
DISCHARGEGAS
SUCTION
HIGH PRESSURE MODELS
206 THRU 219M
LOW POINT DRAIN
COOLANT INLET
COOLANT DISCHARGE
LOW PRESSURE MODELS
4CC, 5CC, & 7D
GAS
DISCHARGE
GAS
SUCTION
COMPRESSOR CASING DRAIN
COOLANT INLET
COOLANT DISCHARGE
ALTERNATE
COOLANT INLET
LOCATION
LOW PRESSURE MODELS
8D THRU 10G COOLANT INLET
ALTERNATE
COOLANT INLET
LOCATION
COMPRESSOR CASING DRAIN
COOLANT DISCHARGE
ALTERNATE
CASING DRAIN
LOCATION
LOW PRESSURE MODELS
11S THRU 19LE
COMPRESSOR CASING DRAIN
COOLANT DISCHARGE
COOLANT INLET
ALTERNATE
COOLANT INLET
LOCATION
ALTERNATE
CASING DRAIN
LOCATION
GAS
DISCHARGE
GAS
DISCHARGE
GAS
SUCTION
GAS
SUCTION
FIGURE 12 - Ro-Flo® cylinder drain locationsand arrangements. (Note: All pipe &valve positionsshown for clarityonly, customerconfigurationmaydiffer per application.)
LEGEND
1
1. RO-FLO COMPRESSOR
2
2. DRIVE MOTOR
3. COUPLING
3
4. LUBRICATOR
4
5. INLET SCRUBBER
5
6. DIFFERENTIAL PRESSURE GAUGE
w/BLOCK & BLEED VALVE
6
6
7. HIGH TEMPERATURE LIMIT SWITCH
7
8. TEMPERATURE GAUGE
8
9. CHECK VALVE
9
10. AFTERCOOLER
10
11. DISCHARGE SEPARATOR
11
12. SAFETY RELIEF VALVE
13
13. BYPASS CONTROL VALVE
14. ISOLATION VALVE
14
14
15. COOLANT SOLENOID VALVE
16. COOLANT STRAINER
8
17
17. COOLANT FLOW REGULATOR
18. SHUTOFF VALVE
18
18
18
TO DRAIN
GAS
DISCHARGE
GAS
INLET
8
TO DRAIN
TO DRAIN
COOLANT
DISCHARGE
18
19
19. TWO WAY THERMOSTATIC CONTROL VALVE
16
15
COOLANT INLET
12
VENT
TO SAFE
LOCATION
FIGURE 13 - Typical piping arrangement - open loop cooling systemshown. (Note: All pipe &valve positionsshown for clarityonly, customerconfigurationmaydiffer per application.)
Ro-FloCompressors, LLC - 15 - 16-620-101-000REV 03

INSTALLATION
COMPRESSOR COOLING SYSTEMThe compressor coolant system isused to control thermal expansion tomaintain internal compressor clearances. This system isnot designed tocontrol gasdischarge temperatures.
Coolant discharge temperaturesbelow 100 °F (37.8 °C) can result inreduced internal clearances, whichmaycause rotor contact damage.Coolant discharge temperaturesabove 160 °F (71 °C) may result in headgasket failure.
CAUTIONCoolant flowmust be stoppedwhen the compressor is shutdown toprevent rotor/cylinder contact.
Circulation of coolant during shutdown periodscan cause lossofinternal clearances, whichmay result in rotor/cylinder contact.
CAUTIONWater jacket pressuremust not exceed 50 psig (3.44 barg).
6. CASING DRAIN VALVE5. COOLANT STRAINER4. COOLANT SOLENOID VALVE
1. RO-FLO COMPRESSOR
3. ISOLATION VALVE2. TWO WAY THERMOSTATIC CONTROL VALVE
LEGEND
1
2 3
3 5 4
6
7. TEMPERATURE GAUGE
7
COOLANT
SUPPLY
COOLANT
DRAIN
FIGURE 14 - Typical open loop cooling system.
Open Loop CoolingOpen loop cooling typicallyusesa two-way flow regulator installed nearthe compressor coolingwater discharge asshown inFIGURE 14. Theoptimalwater discharge temperature for the compressor is105±5 ºF (40.5 ±2.7 °C). The compressor cooling systemmust be filledwithcoolant and purged of air prior to start-up.
Ro-FloCompressors, LLC - 16- 16-620-101-000REV03
Solenoid valvescan replacemanual valves to start and stop coolant flowwhen compressor is started and stopped. Good piping practice typicallyincludesamanual bypasssystemaround the solenoid valve and thetwo-way flow regulator.
Closed Loop CoolingClosed loop glycol/water (FIGURE 15) radiator cooling systemsmaybedesigned for the approximate flow ratescalculated in "Coolant FlowRequirement". An adequately sized radiator will reduce the coolanttemperature approximately15 ºF (8.3 °C). Higher compressor casingtemperatureswill result in higher gasdischarge temperatures.
A three-waycoolant flow regulator, asshown inFIGURE 15, is anessential requirement tomaintain compressor coolant outlettemperature above 100 ºF (37.8 °C).
The cooling systemmust be purged of air prior to start-up.
1
23
4
FLOW
FLOW
FLOW
3. ISOLATION VALVE
LEGEND
1. RO-FLO COMPRESSOR2. THREE WAY THERMOSTATIC CONTROL VALVE
4. CASING DRAIN VALVE5. TEMPERATURE GAUGE
8. SURGE TANK
6. CIRCULATING COOLANT PUMP7. VERTICAL RADIATOR
6
PRESSURE
CAP
7
8
FILL PRESSURE
CAPVENT LINE
FLOW
5FLOW
3
FIGURE 15 - Typical closed loop cooling system.
Coolant Flow RequirementCompressor applicationsshould have coolant piping capable of the flowrate (gallonsper minute (GPM)) calculated by the following equation:
GPM =Motor Horsepower
10
Vacuumpumpapplicationsshould have coolant piping capable of theflow rate (gallonsper minute (GPM)) calculated by the followingequation:
GPM=Motor Horsepower
5
The above estimated flow ratesare based on a design coolanttemperature rise of 15 ºF (8.3 °C). This flow ratewillmaintain 105 ºF

INSTALLATION
(40.5 °C) coolant discharge temperaturewith 90 ºF (32.2 °C) incomingcoolant.
Cooling Water ContaminantsThe totalwater hardness (TDS) of the coolingwater should not exceed300 ppm (mg/l). Depositswill build up over time andwill require periodicacid cleaning of the compressor water jacket.
Water containing suspended solidsshould not be used since the solidswillrapidly settle out in the compressor water jacket.
Cooling Water Pressure DropApressure drop of 5 PSI (35 kPa) maybe assumed through thecompressor casing. The pressure drop through thewater temperatureregulating valve and inlet solenoid valve should be considered duringsystemdesign.
TABLE 5 - Compressor Coolant Jacket Capacities
MODEL
APPROXIMATEVOLUME MODEL
APPROXIMATEVOLUME
Gallons(Liters) Gallons (Liters)
2CC 0.8 (3) 206, HP6 2.8 (10.6)4CC 1.0 (3.8) 207, HP7 2.8 (10.6)5CC 1.3 (4.9) 208B, HP8 2.8 (10.6)7D 3.0 (11.4) 210M, HP10 6.0 (23)
8D, SD8D 5.5 (21) 211M, HP11 9.0 (34)8DE, SD8DE 5.5 (21) 212M, HP12 10.5 (40)
10G 8.0 (30) 217M 13.0 (49)11S 10.0 (38) 219M 16.3 (62)11L 10.5 (40)12S 12.5 (47)12L 13.8 (52)17S 20.0 (76)17L 24.5 (93)
19S, SD19S 27.0 (102)19L, SD19L 30.0 (114)
19LE, SD19LE 30.0 (114)
Cooling of Two Stage SystemsTwo stage compressor systemsshould have the coolant supplyconnected in parallel to each compressor. Each compressor should havea thermostatic valve to control the coolant discharge temperatureindependently. The compressor cooling circuit should not be connected inseriesas thismaycause excessive heat build upwithin the compressorandmaycause damage to the sealing elementsand/or prematurecylinder borewear/blade failure.
Ro-FloCompressors, LLC - 17 - 16-620-101-000REV 03
LUBRICATION SETUPRo-FloCompressors recommendscheckvalvesat all lubricationpoints. Ro-FloCompressorsoffers the following lubricationcomponents.
TABLE 6 - Compressor Lubrication Accessories
MODELNUMBEROFLUBEPOINTS
INLET LUBRICATIONQUILL LUBRICATORDRIVESHEAVE
QuillLength(inches)(“A”Dim.)
Part NumberPitch Dia-meter(inches)
Part Number
2CC,4CC5CC
5 3 16-630-888-034 3 16-132-506-501
7D 7 4 16-630-888-035 3 16-132-506-5028D, 8DESD8DSD8DE
7 5 16-630-888-038 3 16-132-506-502
10G 7 5 16-630-888-038 4 16-132-492-50311S, 11L 8 N/A N/A 5 16-132-53450112S, 12L 9 6 16-630-888-036 5 16-132-534-50117S, 17L 9 6 16-630-888-036 5 16-132-399-50119S, 19L19LESD19SSD19LSD19LE
10 8 (2 required)16-630-888-037 5 16-132-399-501
206, 207208BHP6,HP7HP8
7 3 16-630-888-034 3 16-132-506-502
210MHP10 7 4 16-630-888-035 4 16-132-492-503
211M212MHP11HP12
7 5 16-630-888-038 5 16-132-534-501
217M219M 7 6 16-630-888-036 5 16-132-399-501
* For detailed information on lubrication point locations refer to"Lubrication" on page 20

INSTALLATION
!"!#
$%!& '()* +,'',-. /0--*/',0-
$%!& 1-2'
FIGURE 16 - AngledDoubleCheckValve for compressor lube points.
!"#! $%$
&'!$ ()*+,- ./,,0.(+/, &'!$ 1,2(
FIGURE 17 - Inlet LubricationQuill.
Ro-FloCompressors, LLC - 18- 16-620-101-000REV03

INSTALLATION
Seal Support System for Double Opposed Shaft SealsThe seal support system for dual opposed shaft seals (double bellow typeand dual opposed cartridge) isdesigned to keep the seal partssubmerged in oil and tomaintain the pressure on thisoil. If leakage occursat the outer seal, it will be towards the atmosphere and air will not bedrawn into the system. If leakage occursat the inner seal, it will be into thecompressor.
The double bellowsseal (see "Double BellowsMechanicalSeal" on page33) and the dual opposed cartridge seal (see "DualOpposedCartridgeSeal") consistsof two carbon rings that seal against two highlypolishedstationary rings. The seal is filledwith oil bya reservoir mounted above theseal cage. The seal isboth lubricated and cooled by thermal circulation ofthe oil and rotation of the seal.
FIGURE 18 - Typical piping arrangement for dual opposed seals.
Ro-FloCompressors, LLC - 19 - 16-620-101-000REV 03
The oil reservoir should be designed to contain 1 gallon of oil per inchof shaft diameter. The reservoir must be connected asshown inFIGURE 18. The lower connection on the oil reservoir should beconnected to the bottomof the seal cage.
The upper connection of the oil reservoir should be connected to thetop of the seal cage. For low pressuremodelsuse the connectionnearest the compressor suction flange. For high pressuremodelsusethe connection nearest the compressor discharge flange.
Use tubing sized 1/2 inch or larger. Locate oil reservoir so piping isasstraight aspossible tominimize restriction to convective oil flow.
NOTE: Be sure tomaintain oil level in reservoir above upper pipeconnection to provide proper oil circulation. Oil levelwill drop slightlyduring initial start-up.

OPERATION
OPERATIONRo-Flo® compressorsand vacuumpumpsmust be operated byprofessionals trained in the use of gascompression equipment. Pleasecontact your system integrator / packager for training in the use andmaintenance of Ro-Flo® compressorsand vacuumpumpsasapplied inyour system.
COMPRESSOR WORKING PRESSURESThemaximumallowableworking temperature (MAWT) for allRo-Flo®compressor models is350 °F (176 °C).
Themaximumallowableworking pressure (MAWP) for Ro-Flo®compressorsare listed inTABLE 7. The user should refer todocumentation provided by thePackager as the compressor maynot bethe lowestMAWPcomponent in the system. Application conditionsmaylimit the operating pressure to a discharge pressure level below theMAWP.
TABLE 7 - Compressor MaximumAllowableWorking Pressure (MAWP)
LOWPRESSURE HIGH PRESSUREMODEL MAWP (psig) MODEL MAWP (psig)2CC 80 206 1504CC 80 207 1505CC 80 208B 1507D 80 210M 150
8D, SD8D 80 211M 1508DE, SD8DE 80 212M 150
10G 80 217M 15011S 80 219M 15011L 8012S 80 HP6 20012L 80 HP7 20017S 80 HP8 20017L 80 HP10 200
19S, SD19S 80 HP11 20019L, SD19L 80 HP12 200
19LE, SD19LE 80
LUBRICATIONRo-Flo® compressorsare oil lubricated bya force-feedlubricator. Lubrication pointsare shown inFIGURE 19 and listed inTABLE 9. The “PerformanceData Sheet” for your compressor should beused to set oil feed rates. Consult the lubrication engineer at your lubesupplier to select the appropriate oil for your compressor system. If theoperating conditionsor gashandled changes, the following three itemsmust be considered:
A. OilViscosity–Determined bygasdischarge temperature.B. Oil Type andAdditive Package –Determined bychemical nature of
gas/vapor being handled.
Ro-FloCompressors, LLC - 20- 16-620-101-000REV03
C. LubricationRate –Determined bycompressor size, operatingspeed, and chemical/physical action of gas/vapor being handled.
See the following sections for amore detailed discussion of lubricationconcerns.
Considerations for Oil Viscosity Selection
l If the gashandled isexpected to condense and dilute the oil,use the next higher viscositygrade.
l Multi-viscositygradesof oil are recommended for inlet tem-peraturesbelow 32 °F (0 °C), asare lubricator reservoirheater and thermostat.
l Onmulti-stage units, use the highest discharge temperature toselect the oil viscosity.
l If the inlet and/or discharge temperaturesare consistently70ºF (21 °C) lower than those printed on the “PerformanceDataSheet”, use the next lower viscositygrade.
l For solvents, heavyparaffin’s, and gasoline vaporsuse thenext higher viscositygrade.
TABLE 8 - RecommendedOilViscosityGrades
Gas Discharge Temperature SAE Grade ISO VGBelow 200 °F (93 °C) 20 32-68
200 - 250 °F (93-121 °C) 30 68-100250 - 300 °F (121 - 148 °C) 40 150
Above 300 °F (148 °) 50 220
Considerations for Oil Type and Additive Package
l Lubricantscontaining detergentshave been observed to causefoamingwhen encounteringwater saturated gasand tur-bulence.
l Lubricantsproduced from vegetable oilshave been known tocause harmful deposits in the compressor andmay lead to pre-mature failure.
Considerations for Lubrication RateThe lubrication ratesshown inTABLE 9 are for guidance only (basedon air =1.0multiplier). For other gases,multiply the lubrication rates inTABLE 9 by the appropriate value inTABLE 10 for your application. Ifa Ro-Flo® "PerformanceData Sheet" hasbeen providedwith yourcompressor, use the rate on that sheet, as it takes into account gascomposition and compressor operating speed.
Other lubrication rate notes:
A. Double the lubrication rate for initial break-in period of 300hours.
B. Prime all oil feed linesbefore starting compressor.C. Suction flange lubrication points7, 8, 9, 22, and 32,must
have an inlet quill/checkvalve (see FIGURE17 on page 18)for proper cylinder lubrication.

OPERATION
D. Use dropsper minute information for initial start-up only! Use“pintsper hour” flow rate after 24 hoursof operation to verifycorrect oil consumption.
TABLE 9 - Oil injection pointsand approximate lubrication rates. Thelubrication rates listed in this table are for compressorsoperating on air atmaximumoperating speed.
ModelLubricationInjectionPoints
QuantityOf LubePoints
PintsPer HrTotal
ApproximateDrops/Min PerLube Point*
2CC, 4CC5CC 1-2-7-14-15 5 .09 5
7D 1-2-3-4-7-14-15 7 .15 6
8D, 8DESD8DSD8DE
1-2-5-6-7-14-15 7 .19 7
10G 1-2-11-12-7-14-15 7 .29 10
11S 1-2-3-4-5-6-28-29 8 .28 9
11L 1-2-3-4-5-6-28-29 8 .35 11
12S 1-2-3-4-5-6-7-28-29 9 .36 10
12L 1-2-3-4-5-6-7-28-29 9 .36 10
17S 1-2-3-4-5-6-7-28-29 9 .37 10
17L 1-2-3-4-5-6-7-28-29 9 .45 12
19S,SD19S
1-2-8-9-10-11-12-13-28-29 10 .42 10
19L, 19LESD19LSD19LE
1-2-8-9-10-11-12-13-28-29 10 .50 12
206, HP6207, HP7208B, HP8
17-18-19-20-30-31-32 7 .15 5
210MHP10
17-18-19-20-22-30-31 7 .17 6
211MHP11
17-18-19-20-22-24-25 7 .24 9
212MHP12
17-18-19-20-22-24-25 7 .24 9
217M 17-18-19-20-22-24-25 7 .29 10
219M 17-18-19-20-22-24-25 7 .29 10
Ro-FloCompressors, LLC - 21 - 16-620-101-000REV 03
*Assumes14,000 dropsper pint. Lubricator manufacturersusedifferent standard dropsper pint whichwill affect the above drops/minlubrication rate. See lubricator manufacturer’smanual for moreinformation.
TABLE 10 - LubricationRateMultiplier
Gas/Vapor Handled MultiplierFor air and dry inert gases 1.0Water vapor, wet non-corrosive gasesand vapors
Condenser service1.1
Refrigeration, sweet natural gas,methane, ethane,propane, butane 1.2
Sour natural gas, sludge gas, heavyhydrocarbons(pentane&heavier) 1.5
Vapor recovery, solvents, acids, ketones 2.0Gasoline vapors 4.0
7 158 6 495314
26
1
10
1129 12 28
13
2*
2
27
3130
17
24 19 22 20 25
18
32
COMPRESSOR LUBRICATION INJECTION POINTS
(INLET SIDE SHOWN)
LOW PRESSURE MODEL
HIGH PRESSURE MODEL
FIGURE 19 - Compressor lubrication injection points, inlet sideshown. For more specific locationssee the compressor generalarrangement drawingsavailable on theRo-FloCompressorswebsite.

OPERATION
PRE-START-UP CHECKS
l Open inlet and discharge line drain valves to assure no liquid ispresent.Where no drain valvesare installed, loosen the suctionand discharge flange bolts to determine if any liquid hasenteredthe cylinder bore.
WARNINGLiquids in the compressor during start-up can cause catastrophic fail-ure.
l Manually rotate the compressor shaft to assure no rubbing orbinding.
l Checkmotor for correct direction of rotation bymomentarily “jog-ging” the start/stop switch.
l Recheckall piping and flange connections, in addition to valvesonsuction and discharge lines.
l Check the settingsof pressure relief and control valves to ensuretheyare adjusted and operating correctly.
l Verify the pressure relief valve isproperly sized for the expectedoperating conditions.
l Fill lubricator pump casewith oil.l Fill the day tanksupplying oil for compressor lubrication.l Prime all lube linesby loosening the tubing nut at each oil line
checkvalve and pumping oil until all air ispurged from the lines–then retighten the tubing nuts.
l For belt-driven lubricators, assure the belt hasproper tension.l Test lubricator low oil level and no flow switchesbysimulating the
condition.l Verify that the compressor water jacket is filledwith coolant and
purged of air.l Confirm all instrumentation isworking properly.l For those compressor installedwith a double bellowsseal insure
that the seal cage and reservoir are filledwith oil, and that the sealoil is pressurized 20 to 50 psi (138 - 345 kPa) above gasdis-charge pressure.
l Ensure all guardsand shieldsare installed correctly.
START-UP CHECKS
l Start the systemand verifyall operating parametersarewithintheir expected rangesand arewithin the compressor design spe-cifications.
l Visually check lubrication system to verify it is operating properly,per themanufacturer’s instructionmanual.
l Monitor the compressor coolant discharge temperature rise dur-ing the initial 20minutesof operation to assure it stabilizesbetween 100-110 ºF (37.8 – 43.3 °C). Coolant discharge tem-perature greater than 110 ºF (43.3 °C) will result in increasinginternal clearance and lower compressor volumetricefficiency.
l The gasdischarge temperature is themost important indicationof howwell the compressor isoperating. The gasdischarge tem-perature should bemonitored continuouslyduring operation.The temperature indicator should bewithin one foot of the
Ro-FloCompressors, LLC - 22- 16-620-101-000REV03
discharge flange for greatest accuracy. The thermowell shouldextend into the center of the gasstream.
l Verifyall operating parametersarewithin their expectedrangesand arewithin the compressor design specifications. Ifthe temperaturesare outside of their expected ranges refer to"Temperature TellsAll" on page 48.
CAUTIONMinimumsuction temperature -20 °F (-28.8 °C).
For suction temperaturesbelow -20 °F (-28.8 °C) please contact Ro-FloCompressors.
OPERATING CHECKS
CAUTIONContinuousoperationswith gasdischarge temperaturesabove 350°F (176.6 °C) will reduce blade life andmaycause cylinder bore scor-ing, reducing compressor life.
l Common set points for temperature switchesare the highestnormal operating temperature expected for that compressorapplication PLUS10 to 15 ºF (5.6 to 8.3 °C). It should never besetmore than 25 °F (13.9 °C) above the expected gasdis-charge temperature.
l Verify the proper 24 hour lubrication rate.l For unitsequippedwith a double bellow type or dual opposed
cartridge seal review seal pot oil level.l If vibration sensorsare used tomonitor equipment health, it is
recommended that baseline vibration levelsare recorded soonafter equipment start-up and processstabilization. Use thisdata for comparison to future vibrationmeasurements. Ro-Flo® vibration levelswill typicallybe less than 0.5in/sec,however, each installation isunique due to skid design,piping arrangements, gascompositions, operating speeds, etc.Vibration readingsshould bemade in the same location on thecompressor/skid with the same equipment for themost accur-ate comparison. Vertical and horizontal vibrationmeas-urementsshould be taken 90 degreesapart on the cylinderhead(s), directlyoutboard of the bearings. Axialmeas-urementsshould be taken on the vertical face of the cylinderhead(s). Vibrationmeasurementson all peripheral equipmentshould be taken according to themanufacturer's recom-mendations.
CAUTIONIt is recommended that an air qualitymonitoring systembe installedfor processescontaining toxicgases.

MAINTENANCE
MAINTENANCE
CAUTIONMaintenance of Ro-Flo® compressorsshould be conducted bypro-fessionalmaintenance personnelwith proper training regarding com-pression equipment and lifting devices. If training isdesired, pleasecontact Ro-FloCustomer Support.
CAUTIONSolventsmaybe used for cleaning purposesduring assembly, dis-assembly, service, and/or maintenance of Ro-Flo® compressorsandvacuumpumps. Oil isused asa lubricant during assembly, disassembly,operation, service, and/or maintenance of Ro-Flo® compressors.Refer to the solvent and oilMSDS for PPE requirements.
Compressor operating conditionssuch as temperature, pressure, speed,processgas, etc., directlyaffect the operational life of individualcompressor components, and ultimately, the life of the compressor itself.Due tomanyvariables, it is not possible to provide a predeterminedinspection,maintenance, and repair schedule for each application.Compressor inspectionmay lead to performing generalmaintenance orthe need for compressor repair. Maintenance procedureswill be coveredlater in this section. For compressor repair proceduresplease refer to theRo-FloCompressors - Repair Manual.
When properlyoperated, the primarywear items in aRo-Flo®compressor are the rotor blades, but it is equally important to inspect allpartsof the compressor to identifyunusual or prematurewear.
Compressor reliability can be achieved bydeveloping a comprehensivepreventativemaintenance (PM) schedule for everycompressorinstallation. Recommendations for developing aPM schedule are listedbelow. Thisshould not be considered a comprehensive list asallinstallationsare different.
Ro-Flo® compressorsare incorporated into a compressor package byaPackager. Proper maintenance of the compressor package is required toproperlyoperate and protect the compressor. Please refer to thedocumentation providedwith your compressor package for propermaintenance of all associated compressor support systems.
PREPARATION FOR COMPRESSOR INSPECTION ANDMAINTENANCE
WARNINGFollow the lockout, depressurization, and decontamination proceduresprovidedwith your compressor package before servicing the com-pressor.
Ro-FloCompressors, LLC - 23 - 16-620-101-000REV 03
WARNINGThe compressor systemmaycontain explosive and/or toxicgases.Refer to the reference information providedwith your compressorpackage for workingwith these gasesand proper personal pro-tective equipment (PPE).
Before starting anymaintenance or removing anycomponents,lockout the compressor driver and relieve ALL pressure from thecompressor. See the packager’s instructions for completely ventingthe compressor.
CAUTIONIt is important to have the compressor cylinder properly secured dur-ingmaintenance or repair activities to prevent personal injuryordamage to the compressor.
ESTABLISHING A PREVENTATIVE MAINTENANCE(PM) SCHEDULEAgoodmaintenance programshould provide for periodic inspectionof the compressor. The gascomposition, operating temperature,operating speed, and pressure differentialwill determine the extent ofpreventativemaintenance necessary. The following schedule showstypical frequencyofmaintenance. This schedule can adjusted tomeet the needsof each installation.
24 Hour (Daily) Inspection
l Monitor compressor operating conditionssuch asprocessgaspressuresand temperatures, coolant temperatures, etc.Sudden changesmay indicate a problemwithin the com-pressor.
l Verifygasdischarge temperaturesarewithin the expectedoperating range for your application.
l Drain all pointsof liquid accumulation in the gassystem(receivers, control lines, drop-legs, interconnecting piping,separators, etc…).
l Verify lubricator pump sight glassoil level.l Fill lubricator oil supply tankand verify the lubrication system
isoperating properly.l Verifygasdischarge temperaturesarewithin the expected
operating range for your application.l Check the compressor for coolant, oil, or gas leaks.l Look for discolored paint, whichmay indicate excessive heat.l Check for loose peripheral equipment such asoil injection
lines, coolant lines, processgaspiping, instrumentation, etc.l If equippedwith aDouble BellowsMechanicalSeal verify
seal reservoir oil level and buffer gassupplypressure.

MAINTENANCE
NOTERo-Flo®mechanical sealsare designed to have oil lubricate the barrierbetween the stationaryand rotating seal parts. For this reasonmech-anical shaft sealsmayhaveminor oilweeping.
4000 Hour (Semi-Annual) Inspection
l Follow thePMprocedures listed for the "24Hour (Daily) Inspec-tion".
l Checkcoupling alignment or belt tension.l Evaluate if bladesare acceptable for reuse by following the
guidelines in "BladeEvaluation".
CAUTIONDoNOT reverse blade orientation.When returning the blades to therotor slotsensure the bladesare installed their original orientation.Reversal of bladesmay result in premature blade failure.
NOTEChanges in operating conditions (operating speed, temperatures, pres-sures, gascomposition, liquid carryover, etc.) mayaffect the bladewear rate requiring inspection interval adjustment.
8000 Hour (Annual) InspectionCompletelydisassemble compressor and inspect the following itemsper"Component Inspection" on page 24:
l GasketsandO-Ringsl SealRingsl MechanicalSeall Bladesl Rotorl Bearingsl Cylinder Headsl Cylinder
Replace the seal rings, head gaskets, andO-ringsupon reassembly.
COMPONENT INSPECTION
Blade EvaluationMonitoring rotor blades is important as theyare the primarywearcomponent within the compressor. It is recommended to develop abaseline of bladewear during initial compressor operation. Thisbaselinecan then be used tomaximize time between inspections.
Evaluating Blade Wear
Bladewear occurson the bladewidth asa result of the rubbing actionagainst the cylinder wall, and on the blade thicknessasa result of therubbing action against the rotor slot. FIGURE 20 illustrates the bladedimensionsdescribed above.TABLE 11 provides the recommended
Ro-FloCompressors, LLC - 24- 16-620-101-000REV03
limits for bladewear on standardRo-Flo®models. Refrigeration/condenser blade setsmaydiffer, please consult thefactory for assistancewith thesemodels.
Slot Depth
Slot Width
Blade
Width
Blade
Thickness
ROTOR
BLADE
FIGURE 20 - Blade andRotor dimensions illustrated.
TABLE 11 - Bladewear limitsbymodel. Valuesshown are forstandard blades. For refrigeration applicationscontact Ro-FloCompressors for assistance.
MODELMinimum Allowable
ThicknessMinimum Allowable
Widthinch (mm) inch (mm)
2CC, 4CC, 5CC .106 (2.7) 1.012 (25.7)7D .159 (4.0) 1.530 (38.9)
8D, 8DESD8D, SD8DE .212 (5.4) 1.800 (45.7)
10G .212 (5.4) 2.137 (54.3)11S, 11L .265 (6.7) 2.540 (64.5)12S, 12L .265 (6.7) 2.709 (68.8)17S, 17L .319 (8.1) 3.150 (80.0)
19S, 19L, 19LESD19S, SD19L,
SD19LE.372 (9.4) 3.825 (97.2)
206, 207, 208BHP6, HP7, HP8 .212 (5.4) 1.518 (38.6)
210M, HP10 .265 (6.7) 1.746 (44.3)211M, HP11 .319 (8.1) 2.286 (58.1)212M, HP12 .319 (8.1) 2.457 (62.4)
217M .371 (9.4) 3.150 80.0219M .425 (10.8) 3.609 (91.7)
Normalbladewear isaffected by the pressure differential, temperature,operating speed, and condition of the gas. Higher pressuredifferentials, higher temperatures, faster operating speeds, andcontaminants in the gasstreamwill increase the bladewear rate.
Blade replacement is recommended if anyof the following areobserved:

MAINTENANCE
l Delamination of the blade edge in contact with the cylinderl Chipping on the edge or face of the bladel Appearsscorched / charred
Initial Blade Inspection
Initial blade inspection can be performed byevaluating the remainingchamfer on the edge of the compressor blade. If anyof the originalchamfer isobserved, the blade has50% blade life left. Existing chamfer onthe blade can be observed through the suction or discharge pipe flanges.Alternately, on LowPressuremodels (10G through 19LE), inspectionportsare located on the discharge side of the compressor (refer toGeneralArrangement Drawings). Please note that these inspection portsare in contact with the processgas, and proper safetyprecautionsshouldbe followed.
After the chamfer hasbeenworn off, bladewidth should bemeasured byremoving the blade from the compressor.
Bearing Evaluation
NOTEWhen bearing outer racesand shimsare removed from the cylinderhead, their orientation should be noted so that theyare reassembled inthe same cylinder head and in the samedirection as removed.
Bearing replacement is recommended if anyof the following areobserved:
l Unevenwearl Discoloration due to heatl Pittingl Spalling
Bearing inner and outer racesarematched sets, therefore, the entirebearingmust be replaced .
The bearing inner race can be removed byquicklyheatingwith a torch orbearing induction heater (before heating of the shaft can occur).
WARNINGThe roller bearingsused inRo-Flo® compressorshave special radialclearances (different than bearingscarried bydistributors) to allow forthermal expansion and should never be replacedwith non-factoryspe-cified bearings. Non-compliance can result in compressor failure andwill void thewarranty.
Ro-FloCompressors, LLC - 25 - 16-620-101-000REV 03
Seal Rings and Bearing Spacing RingsSeal ring replacement is recommended if theyare:
l Brokenl Wornl Brittlel Insufficient gap (new, seal ringshave approximately¼” gap
between the ends)
The seal ringsare located in the bearing spacer ring.
Bearing spacing ring replacement is recommended if it is:
l Scoredl Pitted
The bearing spacer ring can be removed byquicklyheatingwith atorch or bearing induction heater (before heating of the shaft canoccur).
Cylinder EvaluationInspect cylinder coolant jackets for solid build-up and/or corrosion. Ifsolid build-up is found remove contaminants that restrict coolant flow. If corrosion is found, review coolant additive package (closed-loop)and/or cathodicprotection.
Inspect the cylinder bore for unusualwear:
l Normallyoccurringwave pattern,maximumpeak to crest is0.010 in. (0.25mm).
l Circumferential groovesof 0.030 in. (0.76mm), or greater
(Note:Minor bore defectsmaybe improved byhand to an acceptablecondition).
When scoring or severewear is found, re-boring is required. Refer totheRo-FloCompressors - Repair Manual for more information.
Rotor EvaluationRotor runout should be checkedwith dial indicator readingsat eachend of the rotor and shaft extension(s) with the bearing inner racessupported in “V” blocks.
The rotor shaft should be inspected in the locationsnoted inTABLE12. These areasare illustrated inFIGURE 21.
TABLE 12 - Rotor Inspection - Total Indicator Runout
MODEL
Maximum Total Indicator Runout (TIR)(inch)
Rotor BodyBearing
Journal ORInner Race
Shaft Exten-sion
ALL MODELS 0.004 0.0025 0.006

MAINTENANCE
FIGURE 21 - Rotor terminology. AHighPressuremodel rotor is shown.
Ro-FloCompressors, LLC - 26- 16-620-101-000REV03
COMPRESSOR DISASSEMBLY PROCEDURE
WARNINGReview "Preparation for Compressor Inspection andMaintenance"on page 23 before servicing the compressor.
CAUTIONCylinder head dowelpinsare brittle bydesign. Take carewhen remov-ing and installing the cylinder head to avoid breaking the dowelpins.
Ro-Flo® compressorsare designed to be easilymaintainedwhilemounted to the compressor package andwith aminimal amount ofhand tools. The below proceduresapply to allRo-Flo® compressormodels.
Please note, HighPressuremodelshave their rotor mountedeccentrically toward the top of the cylinder. On thesemodels the rotormust be supported during compressor service asshown inFIGURE 22,to prevent personal injuryor damage to the compressor.
FIGURE 22 - Shaft support for aHighPressuremodel compressor.
If theHighPressuremodel compressor is removed for service, it can beinverted, placed on the discharge flange, and secured allowing it to bedisassembledwithout the need to support the rotor.
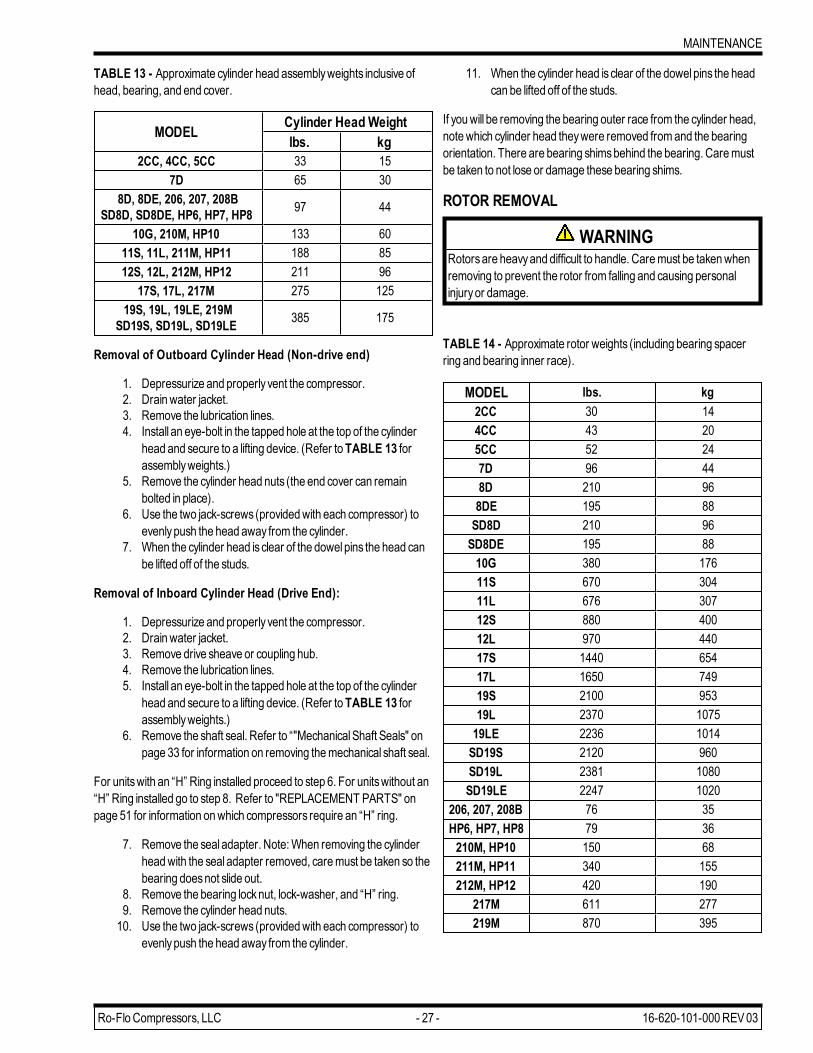
Cylinder Head RemovalAllRo-Flo® cylinder headshave provisions for mounting lifting eyes forcylinder head removal. Approximate cylinder head assemblyweightsare listed inTABLE 13.
MAINTENANCE
TABLE 13 - Approximate cylinder head assemblyweights inclusive ofhead, bearing, and end cover.
MODEL Cylinder HeadWeightlbs. kg
2CC, 4CC, 5CC 33 157D 65 30
8D, 8DE, 206, 207, 208BSD8D, SD8DE, HP6, HP7, HP8 97 44
10G, 210M, HP10 133 6011S, 11L, 211M, HP11 188 8512S, 12L, 212M, HP12 211 96
17S, 17L, 217M 275 12519S, 19L, 19LE, 219M
SD19S, SD19L, SD19LE 385 175
Removal of Outboard Cylinder Head (Non-drive end)
1. Depressurize and properly vent the compressor.2. Drainwater jacket.3. Remove the lubrication lines.4. Install an eye-bolt in the tapped hole at the top of the cylinder
head and secure to a lifting device. (Refer toTABLE 13 forassemblyweights.)
5. Remove the cylinder head nuts (the end cover can remainbolted in place).
6. Use the two jack-screws (providedwith each compressor) toevenlypush the head away from the cylinder.
7. When the cylinder head isclear of the dowelpins the head canbe lifted off of the studs.
Removal of Inboard Cylinder Head (Drive End):
1. Depressurize and properly vent the compressor.2. Drainwater jacket.3. Remove drive sheave or coupling hub.4. Remove the lubrication lines.5. Install an eye-bolt in the tapped hole at the top of the cylinder
head and secure to a lifting device. (Refer toTABLE 13 forassemblyweights.)
6. Remove the shaft seal. Refer to “"MechanicalShaft Seals" onpage 33 for information on removing themechanical shaft seal.
For unitswith an “H” Ring installed proceed to step 6. For unitswithout an“H” Ring installed go to step 8. Refer to "REPLACEMENT PARTS" onpage 51 for information onwhich compressors require an “H” ring.
7. Remove the seal adapter. Note:When removing the cylinderheadwith the seal adapter removed, caremust be taken so thebearing doesnot slide out.
8. Remove the bearing locknut, lock-washer, and “H” ring.9. Remove the cylinder head nuts.10. Use the two jack-screws (providedwith each compressor) to
evenlypush the head away from the cylinder.
Ro-FloCompressors, LLC - 27 - 16-620-101-000REV 03
11. When the cylinder head isclear of the dowelpins the headcan be lifted off of the studs.
If youwill be removing the bearing outer race from the cylinder head,notewhich cylinder head theywere removed fromand the bearingorientation. There are bearing shimsbehind the bearing. Caremustbe taken to not lose or damage these bearing shims.
ROTOR REMOVAL
WARNINGRotorsare heavyand difficult to handle. Caremust be takenwhenremoving to prevent the rotor from falling and causing personalinjuryor damage.
TABLE 14 - Approximate rotor weights (including bearing spacerring and bearing inner race).
MODEL lbs. kg2CC 30 144CC 43 205CC 52 247D 96 448D 210 968DE 195 88SD8D 210 96SD8DE 195 8810G 380 17611S 670 30411L 676 30712S 880 40012L 970 44017S 1440 65417L 1650 74919S 2100 95319L 2370 107519LE 2236 1014SD19S 2120 960SD19L 2381 1080SD19LE 2247 1020
206, 207, 208B 76 35HP6, HP7, HP8 79 36210M, HP10 150 68211M, HP11 340 155212M, HP12 420 190
217M 611 277219M 870 395

MAINTENANCE
Rotor Removal Steps
1. Support the end of the rotor in the direction youwill be removingthe rotor from the cylinder.
2. Slide the rotor approximately2/3 out of the cylinder, past thecenter of gravity.
3. With the rotor still being supported, attach a lifting device at therotor center of gravityand remove from the cylinder.
4. Lower rotor onto “V” blocks (on bearing inner races).
COMPRESSOR REASSEMBLY PROCEDURES
CAUTIONThe compressor should be secured towork table before reassembly.
The below assemblyproceduresapply to a compressor that hasgonethrough routinemaintenance and/or replacement of components. If thecompressor was re-bored, re-dowelingwill be required. Please refer totheRo-FloCompressors - Repair Manual for more information on theseprocedures.
Ro-FloCompressorsoffers repair kits that provide all of the componentsnecessary for routinemaintenance and compressor overhaul. Pleasecontact Ro-FloCompressors for pricing and availability.
New gasketsandO-ringsshould alwaysbe used for reassembly.
Reassembly Steps
1. Thoroughly clean all componentsbefore reassembly, payingparticular attention to the gaspassages, oil hole, and rotor slots.
2. Coat the rotor and cylinder borewith oil.3. Slide the rotor into the cylinder bore until rotor body isevenwith
the endsof the cylinder.4. Coat compressor bladeswith clean oil and slide them into the
rotor.5. Coat seal ringswith oil and install in the bearing spacing ring.6. Install the drive end cylinder head gasket over the studsuntil it is
completely in contact with the cylinder.7. Install the bearing shimsand bearing outer race into the drive
end cylinder head.8. On compressorswith H-Rings: Install theH-ring, lockwasher,
and locknut.9. Install the seal adapter or end cover.10. Compress the seal ringsas illustrated inFIGURE 23.11. Lift the drive end cylinder head using the installed eyebolt. Care-
fully install the cylinder head over the rotor shaft and onto thestudsuntil reaching the first seal ring.
a. Adjust the first seal ring so that it slides into the sealring bore.
b. Remove the seal ring compression tool.c. Repeat thisprocedure for the second seal ring.
(Helpful hints: Take care to prevent pushing the rotor out of positionwhen installing the cylinder head. The cylinder head nuts (with washers)
Ro-FloCompressors, LLC - 28- 16-620-101-000REV03
can be used to draw the cylinder head onto the rotor. Draw the head upevenly to prevent breaking the dowelpins.)
9. Using a crossing pattern, draw the cylinder head up evenlyuntil there ismetal-to-metal contact with the cylinder. Torquecylinder head nuts to the appropriate value listed in"COMPRESSORFASTENERTORQUEVALUES" on page44.
10. Applyoil to the bladesand slide into the rotor slots. The rotorwill need to be rotated to install all of the blades. Used bladesmust be installed in the same orientation as removed.
11. Repeat steps3 – 9 above for the non-drive end cylinderhead.
12. Check rotor float asdescribed in "Checking AssemblyClear-ances" on page 29.
13. OnCompressorswith H-Rings: After setting theNet RotorFloatmove the rotor to the drive end of the compressor andinstall theH-ring.
14. Reinstall the shaft seal. Refer to "MechanicalShaft Seals" onpage 33.
FIGURE 23 - Compressor seal ring compression prior to re-installingcylinder head.
15. After completing assembly the compressor should be barredover byhand to ensure free rotation. If resistance isencountered the issue should be investigated and resolved.
16. To test the integrityof the compressor, it is recommended toisolate the compressor with either blind flangesor isolationvalvesand then pressure test both the gasside andwaterside independently to ensure there are no leaks.

MAINTENANCE
CHECKING ASSEMBLY CLEARANCES
DefinitionsTotal Rotor Float
TotalRotor Float is the difference between the cylinder length and rotorbody length. (See .FIGURE 27.)
Rotor End Clearance
Rotor EndClearance is the distance between the rotor and cylinder headsafter the bearingshave been properlypositioned. Bearingsare axiallypositioned by inserting shim(s) between the outer bearing racesand thecylinder heads. (SeeFIGURE 28).
Net Rotor Float
Net Rotor Float is the total axialmovement of the rotor after theRotor EndClearanceshave been set (SeeFIGURE 29). Please note that thismeasurement isprior to theH-ring being installed.
The sumof bothRotor EndClearancesand theNet Rotor Float shouldequal the TotalRotor Float.
Fixed Rotor Float (applies only to compressors with an H-Ringinstalled)
TheFixedRotor Float is the total axialmovement of the rotor AFTER theH-Ring hasbeen installed (SeeFIGURE 26) and isgoverned by themanufacturing tolerancesof the (A) end bearing and theH-Ring. TheFixedRotor Float reading should be recorded at start-up for futuremaintenance reference.
H-Ringsare installed onmodels17S thru 19LE that have a single-facemechanical seal andmodels11S thru 19LE that have a double bellowsmechanical seal.
Rotor to Cylinder Bore Clearance
The rotor to cylinder bore clearance is theminimumdistance between therotor and cylinder.
On LowPressuremodels theminimumdistance isat the bottomof thecylinder (6 o'clockposition).FIGURE 24 illustrates the compressorbottom clearance.
OnHighPressuremodels theminimumdistance isat the top of thecylinder (12 o'clockposition), with the rotor lifted to remove bearingclearance. HighPressuremodelsare often assembledwith thecompressor inverted and resting on the discharge flange, to avoid havingto lift the rotor and account for bearing clearance.FIGURE 25 illustratesthe top clearance.
Procedure for Checking ClearancesNet Rotor Float should be checked after compressor inspection or partreplacement. TheNet Rotor Float should bewithin the tolerances listed inTABLE 15
Ro-FloCompressors, LLC - 29 - 16-620-101-000REV 03
BLADES
CYLINDER
DISCHARGE
OUTLETSUCTION
INLET
ROTOR
BOTTOM
CLEARANCE
FIGURE 24 - Illustration of bottom clearance between rotor andcylinder (Low Pressuremodels).
ROTOR
ROTOR BLADE
ROTATION
TOP CLEARANCE
SUCTION
DISCHARGE
FIGURE 25 - Illustration of top clearance between rotor and cylinder(HighPressuremodels).
Rotor to cylinder bore clearance (also referred to asbottomclearance or top clearance) isnot normally checked during routinemaintenance. Rotor to cylinder bore clearancewould be set/checkedduring compressor repair.
NOTERefrigeration compressorshave different clearances. Please con-sult Ro-FloCompressors for assistance.
Checking Total Rotor Float
Important: All clearancemeasurementsmust bemadewith allcompressor partsat ambient temperature.
There are twomeasurementmethods required to checkTotalRotorFloat:
1. Determine the difference between the cylinder length androtor body length.
2. Install the rotor, bearings, and cylinder headsper theassemblyprocedure. Push the rotor against one cylinderhead. Set a dial indicator at zero on one end of the rotor

MAINTENANCE
and push the rotor against the opposite cylinder head. The res-ultantmeasured axialmovement fromone head to the other iscalled TotalRotor Float. Refer toFIGURE 27.
If the above two steps result in a difference greater than 0.002 inch, thismay indicate:
l Debrismaybe between the cylinder head or rotor end preventingcontact. Disassembly the compressor paying attention to any for-eign objects thatmayprevent proper clearances frombeingobtained.
l There isa high spot on the rotor or cylinder head. Disassemblethe compressor and remove the high spot.
l The axisof the rotor isnot parallel to the cylinder bore axisdue tomisalignment of one or both cylinder heads. Refer to theRo-FloCompressors - Repair Manual for more information on repairingthis issue.
Checking Rotor End Clearance
To checkRotor EndClearance the rotor should be installed in thecompressor, the cylinder headsmounted and torqued, and the bearingsshould be installed.
1. With the bearing end cover loose the rotor should be pushed againstthe non-drive end cylinder head.
2. Adial indicator should be placed on the opposite end of the com-pressor and set to zero.
3. Evenly tighten the bearing end cover boltsuntil theyare at the appro-priate torque value.
4. Record theRotor EndClearance reading from the dial indicator.5. Push the rotor against the non-drive end cylinder head, and confirm
the dial indicator returns to zero.
If the dial indicator showsa value different than the compressor nameplate (or isoutside of the values listed inTABLE 15 if componentswerereplaced), bearing shimsmayneed to be added or removed.
Thisprocedure should then be repeated for the drive end bearing, thistime loosening the seal adapter.
Checking Net Rotor Float
TheNet Rotor Float can be calculated by taking the TotalRotor FloatminusbothRotor EndClearance values.
TheNet Rotor Float can bemeasured by:
1. Removing the locknut, lockwasher, andH-ring from the compressorshaft (if installed).
2. Ensure bearing shimsare installed as required.3. Tighten the end cover and seal adapter to the appropriate torque val-
ues.4. Push the rotor to one end of the cylinder.5. Place a dial indicator on the rotor shaft and set it to zero.6. Push the rotor toward the opposite cylinder head.7. Record theNet Rotor Float from the dial indicator.
Ro-FloCompressors, LLC - 30- 16-620-101-000REV03
8. Push the rotor against the non-drive end cylinder, and confirm thedial indicator returns to zero.
Both the calculated andmeasuredNet Rotor Float Valuesshould be inagreement. These valuesshould also be compared to the compressorname plate. AcceptableNet Rotor Float valuesare listed inTABLE 15for current production compressors. For legacyunits refer to .TABLE16*.
TABLE 15 - Current ProductionCompressorsClearances
Model Net Rotor Float(inch)
Bottom Clear-ance (inch)
End Clearance(inch)
2CC 0.012 - 0.017 0.002 - 0.003 0.002 - 0.0034CC 0.012 - 0.017 0.002 - 0.003 0.002 - 0.0035CC 0.012 - 0.017 0.002 - 0.003 0.002 - 0.0037D 0.023 - 0.030 0.0025 -0 .0035 0.002 - 0.003
8D, SD8D 0.034 - 0.044 0.003 - 0.004 0.002 - 0.0038DE, SD8DE 0.034 - 0.044 0.003 - 0.004 0.002 - 0.003
10G 0.047 - 0.056 0.004 - 0.005 0.003 - 0.00411S 0.050 - 0.062 0.006 - 0.007 0.003 - 0.00411L 0.057 - 0.069 0.006 - 0.007 0.003 - 0.00412S 0.055 - 0.067 0.007 - 0.008 0.004 - 0.00512L 0.062 - 0.075 0.007 - 0.008 0.004 - 0.00517S 0.065 - 0.078 0.008 - 0.009 0.004 - 0.00517L 0.075 - 0.091 0.008 - 0.009 0.004 - 0.005
19S, SD19S 0.080 - 0.097 0.009 - 0.010 0.005 - 0.00619L, SD19L 0.087 - 0.105 0.009 - 0.010 0.005 - 0.006
19LE, SD19LE 0.087 - 0.105 0.009 - 0.010 0.005 - 0.006
Model Net Rotor Float(inch)
Top Clearance(inch)
End Clearance(inch)
206, HP6 0.019 - 0.024* 0.002 - 0.003 0.002 - 0.0025207, HP7 0.019 - 0.024* 0.002 - 0.003 0.002 - 0.0025208B, HP8 0.019 - 0.024* 0.002 - 0.003 0.002 - 0.0025210M, HP10 0.028 - 0.035* 0.002 - 0.003 0.003 - 0.004211M, HP11 0.035 - 0.042* 0.002 - 0.003 0.003 - 0.004212M, HP12 0.035 - 0.043 0.002 - 0.003 0.003 - 0.004
217M 0.038 - 0.046 0.002 - 0.003 0.004 - 0.005219M 0.042 - 0.049* 0.003 - 0.004 0.004 - 0.005
TABLE 16 - *Compressor clearances for legacyunits.Please contactRo-FloCustomer Service if you require support.
Model Net Rotor Float (Inch) Unit Built Prior To Date206 0.017 - 0.021 September 2014207 0.017 - 0.021 September 2014208B 0.017 - 0.021 September 2014210M 0.024 - 0.030 August 2014211M 0.033 - 0.040 July2014219M 0.034 - 0.041 May2014

MAINTENANCE
ROTOR
SEAL RING
CYLINDER
HEAD
SEAL ADAPTER
LOCKNUT
LOCKWASHER
H-RING
INNER RACE
TYPE NJ ROLLER
BEARING
SEE DETAIL "B"
ROLLERS
OUTER RACE
DETAIL "B"
OUTER RACE ASSEMBLY
REMOVED FROM INNER RACE
O-RING
SHIM(S)
BEARING
SPACING
RING
CAGE
FIGURE 26 - H-Ring, lockwasher, locknut, and roller bearing detail.
INSIDE CYLINDER
LENGTH
SEAL RING(S)
ROLLER BEARING
GASKET
CYLINDER HEAD
SEAL RING(S)
ROLLER BEARING
COOLANT JACKET
BLADES
CYLINDER HEAD
INDICATOR
MAGNETIC BASE
INDICATOR HOLDER
CYLINDER
NON-DRIVE END
DRIVE END
TOTAL ROTOR FLOAT
ROTOR CONTACTING
CYLINDER HEAD
FIGURE 27 - TotalRotor Float - bearingsnot positioned byshimsor endcover / seal adapter.
Ro-FloCompressors, LLC - 31 - 16-620-101-000REV 03

MAINTENANCE
(B) END
MAGNETIC BASE
INDICATOR HOLDER
BEARING
SHIMS
FIXED ROTOR
END CLEARANCE BEARING
SHIMS
SHAFT SEAL
(SINGLE FACE MECHANICAL SHOWN)
(A) END
INDICATOR POSITION
FOR CHECKING CLEARANCE
AT "B" END AFTER
BEARING END COVER HAS
BEEN INSTALLED
MAGNETIC BASE
INDICATOR HOLDER
INDICATOR POSITION
FOR CHECKING CLEARANCE
AT "A" END
FIXED ROTOR
END CLEARANCE
FIGURE 28 - Rotor EndClearance - bearingspositioned byshims.
(B) END (A) ENDGASKET
CYLINDER
BEARING
SHIMS
BEARING
SHIMS
BEARING END
COVER
NET ROTOR FLOAT
FIGURE 29 - Net Rotor Float (TotalRotor Float less the sumof FixedRotor EndClearances).
Ro-FloCompressors, LLC - 32- 16-620-101-000REV03

MAINTENANCE
MECHANICAL SHAFT SEALS
Single Face Mechanical Seal (Rebuild-able)
SEAL ADAPTER
1/8" PIPE TAP
FOR OIL FEED
(2) SET SCREWS
PER HOLE
LOCKING SLEEVE
MATING RING O-RING * #
ROTOR
CENTERLINE
O-RING *
ANTI-ROTATION PIN
MATING RING * #
CARBON RING * #
SEAL SPACER
(ON SOME MODELS)
* PROVIDED IN SINGLE FACE MECHANICAL SEAL ASSEMBLY
# PROVIDED IN SEAL REBUILD KIT
SNAP RING *
FIGURE 30 - Single facemechanical seal.
General
The single facemechanical seal consistsof awave spring thatcompressesa carbon ring (stationary) against of amating face of 52100carbon steel (rotating). These seal facesare polished to extremelyclosetolerancesand therefore, should be handledwith care.
Single Face Mechanical Seal Disassembly
1. Refer to "Preparation for Compressor Inspection andMain-tenance" on page 23.
2. Remove drive sheave or coupling hub.3. Remove all burrs from shaft and keyway.4. Lubricate shaft to ease disassembly.5. Remove all old seal parts, except anti-rotation pin and seal
spacer. Note: The locking sleeve has two set screws in each ofthe three set screw locations.
Single Face Mechanical Seal Reassembly
1. Clean shaft and seal adapter bore.2. Lubricate shaft and “O” ring inmating ring.3. Slidemating ring on shaft until the slot engages the anti-rotation
pin andmating ring is firmlyagainst the seal spacer (ifequipped).
4. Applyoil to seal faceswith a lint freematerial such as facial tis-sue; do not wipe or rub dirty fingersover seal faces.
5. WithO-ring in place, slide seal assemblyonto seal adapter.6. Approximately1/8” compression on sealwave spring should be
observed to provide sufficient “preload” on seal faces.7. Reinstall seal boltsand lockwashers; tighten seal flange evenly.8. Reinstall locking sleeve by firmlyholding the locking sleeve
againstmating ringwhile tightening setscrews.
Ro-FloCompressors, LLC - 33 - 16-620-101-000REV 03
Double Bellows Mechanical Seal
SEAL ADAPTER
SEAL CAGE
MATING RING
O-RING *
MATING RING O-RING *
ROTOR
CENTERLINE
SEAL CAGE O-RING
MATING RING *
RETAINER *
SPRING *
MATING RING *
CARBON RING *
BELLOWS *
CARBON RING *
RETAINER *
* PROVIDED IN DOUBLE BELLOWS SEAL ASSEMBLY
FIGURE 31 - Detailsof double bellowsmechanical seal.
General
The double bellowsmechanical seal consistsof two carbon seal rings(inner and outer, rotating) and twoNi-resist ironmating rings(stationary). Pressure isapplied in opposite directions to both carbonseal ringsbya coil spring and pressurized barrier fluid. The seal facesare polished to extremelyclose tolerancesand therefore, should behandledwith care.
Double Bellows Mechanical Seal Disassembly
1. Refer to "Preparation for Compressor Inspection andMain-tenance" on page 23
2. Remove the drive sheave or coupling hub.3. Remove all burrs from shaft and keyway.4. Shut off buffer gassupplyand drain oil from seal cage.5. Remove seal cage.6. Carefully remove the outer carbon ring assembly from the
bellows.7. Lubricate the shaft generouslywith oil.8. Pull on outer retainer to loosen outer rubber bellowsand
remove from the shaft.9. Remove spring from the shaft.10. Pull on inner steel retainer to loosen inner bellowsand
remove bellows, retainer and inner carbon ring from theshaft.
11. Inspect both carbon ringsandmating faces for signsofdamage or wear. Inspect bellowsandO-rings for signsofhardening, cracking or deterioration.
Double Bellows Mechanical Seal Reassembly
Note: Ensure the original inner carbon ring &mating ring AND outercarbon ring &mating ring are assembled asmatched sets.
1. Remove anyburrson the shaft.2. Lightlyoil themating ringO-ring, slide it over the shaft and
carefullypush it into the adapter bore until fully seated.

MAINTENANCE
3. Oil the inner carbon ring-retainer-bellowsand slide theassemblyover the shaft until the carbon face contacts the innermating ring face.
CAUTIONBydesign the elastomer bellowsabsorbsoil and swells to lockonto theshaft. The entire seal should be assembled immediately followingapplication of lubricating oil.
4. Slide the spring over the shaft.5. Oil the outer carbon ring-retainer-bellowsand slide the
assemblyover the shaft until the retainer contacts the spring.6. Lightlyoil themating ringO-ring, and carefullypush it into the
seal cage bore until fully seated.7. Carefully locate bore of seal cagewith the shaft end and slide
the seal cage over shaft untilmating ring contacts the outer car-bon ring.
CAUTIONDonot allow the ring face to contact the compressor shaft while ininstalling the seal cage, as thiswill damage the sealing surface.
8. Push the seal cage evenlyuntil it contacts the seal adapter, mak-ing sure that theO-ring stays in the seal adapter O-ring groove.Install two cap screwsopposite each other and turn themuntilcage is in contact with the seal adapter. Install remaining capscrews.
9. Refer to the "SealSupport System for DoubleOpposedShaftSeals" on page 19 for instruction on the usage of this seal.
Ro-FloCompressors, LLC - 34- 16-620-101-000REV03
Dual Opposed Cartridge Seal
FIGURE 32 - Detailsof dual opposed cartridge seal.
General
The dual opposed cartridge seal seal consistsof two carbon seal ringsand twomating rings. Pressure isapplied in opposite directions to bothcarbon seal ringsbyspringsand pressurized barrier fluid. This seal isnot customer serviceable and should be sent to an appropriate repairfacility for maintenance& rebuild.
Dual Opposed Cartridge Seal Removal
1. Refer to "Preparation for Compressor Inspection andMain-tenance" on page 23
2. Remove the drive sheave or coupling hub.3. Remove all burrs from rotor shaft and keyway.4. Shut off buffer gassupplyand seal fluid from shaft seal.5. Install seal locking tabs.6. Loosen set screwssecuring cartridge seal to compressor
shaft.7. Lubricate the rotor shaft generouslywith oil or assembly lub-
ricant.8. Remove seal nutsandwasherssecuring the seal.9. Remove seal from the shaft.10. Send seal to authorized service center for repair.
Dual Opposed Cartridge Seal Installation
1. Remove anyburrson the rotor shaft.2. Secure the rotor in themiddle of itsnet float.3. Applya compatible lubricant the compressor shaft and seal
sleeve&O-ring to assist installation of seal4. Slide the seal into location.5. Install thewashersand nuts to secure the seal to the seal
adapter. Torque to 10 ft-lbs. (13.6Nm) in a crossing pattern.Torque to a final value of 20 ft-lbs. (27.1Nm) in a crossing pat-tern.

MAINTENANCE
6. Tighten the set screws to secure the seal sleeve to the rotorshaft.
7. Remove the locking tabsand screws from the seal. Store thelocking tabsand screws for futuremaintenance activities.
8. Fill the sealwith seal fluid and purge air from system.9. Verifyproper seal fluid level in seal pot.10. Applybuffer gas to proper operating pressure. Refer to the
"SealSupport System for DoubleOpposedShaft Seals" onpage 19
Ro-FloCompressors, LLC - 35 - 16-620-101-000REV 03

COMPRESSORROTATION
COMPRESSOR ROTATIONCOMPRESSOR ROTATION DESIGNATIONS – LOW PRESSURE MODELS (2CC - 19LE)
ClockwiseRotation (CW) –When viewing the driven end of the shaft, the suction flangewill be on the left side and the shaft rotatesclockwise.Whenviewing the suction flange of the compressor, the shaft ison the right hand side.
CounterclockwiseRotation (CCW) –When viewing the driven end of the shaft, the suction flangewill be in the right side and the shaft rotatescounterclockwise.When viewing the suction flange of the compressor, the shaft ison the left hand side.
NOTE: Unless rotation is specified at time of order, all compressorswill be furnished clockwise rotation standard.
Ro-FloCompressors, LLC - 36- 16-620-101-000REV03

COMPRESSORROTATION
COMPRESSOR ROTATION DESIGNATIONS – HIGH PRESSURE MODELS (206 - 219M)
ClockwiseRotation (CW) –When viewing the longer end of the shaft, the suction flangewill be on the right side and the shaft rotatesclockwise.When viewing the suction flange of the compressor, the longer shaft ison the left hand side.
CounterclockwiseRotation (CCW) –When viewing the longer end of the shaft, the suction flangewill be in the left hand side and the shaft rotatescounterclockwise.When viewing the suction flange of the compressor, the longer shaft ison the right side.
NOTE: Unless rotation is specified at time of order, compressorsmodel numbers206 through 208Bwill be furnished clockwise rotation asstandard.Models210M through 219Mare symmetrical and are designated asclockwise rotation.
Ro-FloCompressors, LLC - 37 - 16-620-101-000REV03

COMPRESSORROTATION
CHANGING COMPRESSOR ROTATIONPlease refer to the "MAINTENANCE" section of thismanual for proper disassemblyand reassemblyprocedures for your compressor.
The procedure for changing compressor rotation is listed below:
1. Checkand record all clearance per the nameplate data.
+(-4-)"#$*+)<-45("'-+):*#+*7/- !
2. Remove anysheavesor coupling hubs from the compressor shaft.3. Remove the seal assembly from the compressor. Refer to "MechanicalShaft Seals" on page 33 for more information on seal disassembly.
NOTE:OnHighPressuremodels therewill be two shaft seals to remove.4. Remove the end cover and the seal adapter. Keep boltswith each part.
!"#$"%"&'!(
!)%*+,!(
(+'+($-)$'.!$*/$&+ -'-+)$0)+'!$*" '$"((+/$+)$*1#-)%!(2
%(-,!$&-)
5. Remove locknut, lockwasher, andH-ring (not installed on allmodelsor configurations, refer to theRo-Flo PartsBook for more information).Refer to FIGURE26 on page 31 for an illustration of these items. If a single facemechanical seal isused, remove the seal drive pin.
Ro-FloCompressors, LLC - 38- 16-620-101-000REV03

COMPRESSORROTATION
6. Remove both cylinder heads.Markheadsand cylindersso that the headscan be reassembled on the sameend of the cylinder as theywereoriginallyassembled.
*1#-)%!($.!"%$
")%$3!"(-)4$+5'!(
("*!
*1#-)%!($.!"%$
")%$3!"(-)4$+5'!(
("*!
6"(7$8"86"(7$838
7. Remove blades from rotor. Note orientation of blades.8. Remove rotor assembly, marking the bearing outer race assemblies to staywith the same inner race (mounted on the rotor). Take caution in
handling the rotor assembly.
(+'+(9-))!($3!"(-)4$("*! 9$ !"#$(-)4 9$")%$3!"(-)4$
&"*!($(-)4
9. Reassemble the rotor assemblywith the coupling end on the opposite end of the cylinder compared to the original assembly.
(+'+($" !63#1$ .+/)$(!:-) '"##!%$-)$'.!$**/$%-(!*'-+)0)+'!$*" '$"((+/$+)$*1#-)%!(2;
10. Reinstall compressor blades insuring theyare installed in the same orientation as removed.
Ro-FloCompressors, LLC - 39 - 16-620-101-000REV03

COMPRESSORROTATION
11. Remove the bearing outer race assemblies fromeach head.Maintain bearing shimswithin the original cylinder heads. Reinstall the bearingouter race assemblies into the opposite cylinder heads. Insure theyare reassembled onto the original inner races fromwhich theywereremoved .
6"(7$838 6"(7$8"8 .-6 0 -%!$32
3!"(-)4$+5'!($("*!$" !63#1+(-!)'"'!%$/-'.$ "6!$<"*!$"4"-) ' .-6 ;$$0<(+6$ -%!$"2
3!"(-)4$+5'!($("*!$" !63#1+(-!)'"'!%$/-'.$ "6!$<"*!$"4"-) ' .-6 ;$$0<(+6$ -%!$32
.-6 0 -%!$"2
12. Reinstall seal adapter and end cover.
!"#$"%"&'!(
!)%*+,!(
(+'+($-)$'.!$*/$&+ -'-+)$0)+'!$*" '$"((+/$+)$*1#-)%!(2
%(-,!$&-)
13. Checkand reset end clearances."Checking AssemblyClearances" on page 2914. Check rotor bottom clearance. Refer to "Current ProductionCompressorsClearances" on page 3015. Reinstall bearingH-ring, lockwasher, and locknut. For single facemechanical seals reinstall the seal drive pin.16. Reinstallmechanical seal.17. Rotate compressor byhand to insure it is rolling freely.
(!:*+)<-45(!%$'+$*+5)'!(:*#+*7/- !
18. Checkmotor rotation by "jogging" motor before reinstalling the coupling or sheave.
Ro-FloCompressors, LLC - 40- 16-620-101-000REV03

COMPRESSORROTATION
For Low Pressuremodels, the compressor suction and the discharge flangewill be reversed from their original locationwhen the unit isassembledwith the driver. The compressor rotationmust be from the suction flange to the discharge flange across the top of the cylinder. All compressorcylindershave arrowscast in the cylinder body that identify the correct rotation of the compressor.
Ro-FloCompressors, LLC - 41 - 16-620-101-000REV03

EXPECTEDSOUNDCHARACTERISTICS
EXPECTED SOUND CHARACTERISTICSThe expected sound pressure levels shown inTABLE 17 andTABLE 18 are provided asa general reference. Actual sound characteristicswill varybyapplication due to changes in gasproperties, gaspressures, gas temperatures, operating speeds, piping arrangements, and other factorsof theskid design.
TABLE 17 - ExpectedSoundCharacteristicsof Ro-Flo®Sliding VaneCompressors
EXPECTED SOUND PRESSURE LEVELS (dB)
Model Speed(RPM)
DischPress(PSIG)
dBA@ 3'
OCTAVE CENTER FREQUENCIES (Hz) dBC@ 3'31.5 63 125 250 500 1000 2000 4000 8000 16000
2CC1160 50 75 61 62 66 73 70 69 62 60 59 55 771740 50 78 63 64 69 76 72 72 71 68 64 60 80
4CC1160 50 75 61 62 66 73 70 69 62 60 59 55 771740 50 78 63 64 69 76 72 72 71 68 64 60 80
5CC1160 50 75 61 62 66 73 70 69 62 60 59 55 771740 50 78 63 64 69 76 72 72 71 68 64 60 80
7D865 50 76 66 72 74 72 69 67 63 61 66 63 791160 50 80 66 71 76 78 72 71 67 69 74 70 83
8D, SD8D865 50 86 78 69 77 83 79 82 74 70 62 63 881160 50 89 77 73 85 86 81 75 77 85 86 83 92
8DE, SD8DE 1160 50 90 76 74 81 87 80 77 78 86 79 82 92
10G865 50 89 78 85 87 86 81 78 72 80 72 61 901160 50 90 69 73 85 89 84 80 77 74 84 66 93
11S 865 50 90 70 72 86 88 85 81 73 76 83 59 9211L 865 50 91 72 76 88 84 83 78 76 77 86 60 9312S 865 50 91 69 67 78 80 81 80 84 86 83 67 9412L 865 50 94 71 74 86 91 83 80 78 80 89 70 9717S 690 50 95 72 72 88 90 89 83 83 89 84 73 9817L 690 50 96 70 73 82 90 90 81 87 90 94 90 99
19S, SD19S 575 50 94 67 81 85 84 91 86 91 86 90 77 10019L, SD19L 575 50 95 69 78 87 89 86 88 89 93 91 90 101
19LE, SD19LE 575 50 95 69 78 87 89 86 88 89 93 91 90 101206, HP6 1160 40 85 59 62 71 84 76 73 70 78 80 70 87207, HP7 1160 40 85 59 62 71 84 76 73 70 78 80 70 87208B, HP8 1160 40 85 59 62 71 84 76 73 70 78 80 70 87210M, HP10 1160 40 84 65 76 81 80 75 76 75 73 70 66 86211M, HP11 865 40 85 63 75 80 82 74 77 76 71 73 69 87212M, HP12 865 40 86 65 77 82 81 75 78 82 73 75 70 88
217M 690 40 87 66 76 80 84 72 79 85 82 84 73 89219M 575 40 87 62 78 77 81 78 80 85 84 86 64 90
Ro-FloCompressors, LLC - 42- 16-620-101-000REV03

EXPECTEDSOUNDCHARACTERISTICS
TABLE 18 - ExpectedSoundCharacteristicsof Ro-Flo®Sliding VaneVacuumPumps
EXPECTED SOUND PRESSURE LEVELS (dB)
Model Speed(RPM)
SuctionPress
(Inches HgV)
dBA@ 3'
OCTAVE CENTER FREQUENCIES (Hz) dBC@ 3'31.5 63 125 250 500 1000 2000 4000 8000 16000
2CC1160 25 75 61 60 66 72 69 70 66 61 59 52 761740 25 76 62 61 68 73 74 70 69 63 60 55 57
4CC1160 25 75 61 60 66 72 69 70 66 61 59 52 761740 25 76 62 61 68 73 74 70 69 63 60 55 57
5CC1160 25 75 61 60 66 72 69 70 66 61 59 52 761740 25 76 62 61 68 73 74 70 69 63 60 55 57
7D865 25 80 66 65 69 74 77 71 71 62 59 64 821160 25 82 63 70 68 72 78 76 73 64 65 59 84
8D, SD8D865 25 85 64 73 72 76 79 74 75 66 61 56 871160 25 86 62 71 74 77 82 78 77 72 72 62 88
8DE, SD8DE 1160 25 86 62 71 74 77 82 78 77 72 72 62 88
10G865 25 87 69 72 75 80 81 80 80 75 76 56 891160 25 88 68 73 76 81 83 81 82 78 78 61 90
11S 865 25 88 72 71 76 82 81 84 81 77 80 57 8911L 865 25 88 71 73 77 83 82 79 80 79 81 60 9012S 865 25 88 71 72 76 82 80 77 79 80 70 63 8912L 865 25 88 73 69 78 84 79 82 78 80 63 64 9017S 690 25 88 74 74 81 84 81 81 81 79 69 60 9017L 690 25 89 74 75 82 84 80 83 82 78 67 62 92
19S, SD19S 575 25 90 71 74 84 83 84 82 80 79 70 60 9219L, SD19L 575 25 91 73 77 85 82 83 83 81 78 73 65 93
19LE, SD19LE 575 25 91 73 77 85 82 83 83 81 78 73 65 93
Ro-FloCompressors, LLC - 43 - 16-620-101-000REV03

COMPRESSORFASTENERTORQUEVALUES
COMPRESSOR FASTENER TORQUE VALUES
Ro-FloCompressors, LLC - 44- 16-620-101-000REV03

COMPRESSORFASTENERTORQUEVALUES
Ro-FloCompressors, LLC - 45 - 16-620-101-000REV03

FLANGELOAD LIMITS
FLANGE LOAD LIMITSLOW PRESSURE MODELS
Ro-FloCompressors, LLC - 46- 16-620-101-000REV03

FLANGELOAD LIMITS
HIGH PRESSURE MODELS
Ro-FloCompressors, LLC - 47 - 16-620-101-000REV03
TROUBLESHOOTING
TROUBLESHOOTINGTEMPERATURE TELLS ALLTemperatures that deviate fromnormalare generally the first andmost significant signsofmachinerymalfunction! Tomake use of thismaxim inevaluatingmachineryperformance, it is necessary to know:
l Where is themost significant temperaturemeasured?l What are the temperaturesof "normal" operation?
This instruction is concernedwith temperatures that are used to evaluate the efficiencyof compressing gases from suction pressure to dischargepressure.
Four factsare necessary to evaluate operation:
1. What is the atmosphericpressure?2. What isgascomposition entering the compressor suction flange?3. What is the gas flow rate entering the compressor suction flange?4. What are the gaspressure and temperature at the suction flange of the compressor?5. What are the gaspressure and temperature at the discharge flange of the compressor?6. The extent of jacket cooling, such as flow rate of coolingwater and its inlet and discharge temperatures?
Please note it is important tomake pressure and temperaturemeasurementsasclose to the compressor flangesaspossible. Actual suctionpressure and temperature at the compressor inlet flange can be affected bydirtyor plugged filters/mist padsor faultyprocesscontrols. Actualdischarge pressure and temperature at the compressor discharge flange can be affected byplugged gasdischarge checkvalves, after coolers, orseparator vessels.
Compressorssee absolute suction and discharge pressure rather than gauge pressures. The pressure ratio is calculated bydividing the absolutedischarge pressure by the absolute inlet pressure.
The compressor performance can be predicted using theRo-Flo Performance software, available on theRo-FloCompressorswebsite
www.ro-flo.com
Ro-FloCompressors, LLC - 48- 16-620-101-000REV03

TROUBLESHOOTING
TROUBLESHOOTING TABLETROUBLE PROBABLE CAUSE REMEDY
Discharge air or gastemperature excessive
Operation ofmachine at higher-pressure ratio thanneeded Operate unit at rating plate pressures.
Excessive suction temperature. Reduce suction temperature.Insufficient or high temperature inlet water. Increasewater flow rate or provide coolwater supply.
Scale or residue build-up inwater jacket. Cleanwater jacket and filter or treat water supplyasrequired.
Clogged intake filter. Clean intake filter.Unloading valve not fullyopen or clogged Clean valve and replace anywarn or broken parts.Suction valve not fullyopen. Open suction valve.
Insufficient or wrong lubricating oil. Use correct oil and feed rates recommended ininstructionmanual or lube sheet.
Swelled or warped rotor blades. Dryout or replace rotor blades.Improper clearances. Reassemble unit to proper clearancesRatio of specificheatshigher than expected. Change gascomposition.
Excessive blade wear
Insufficient quantityof lubricant to one or more cylinderfeeds
Inspect Lubricator V-belt for slippage or breakage;tighten or replace as required.
Check lube rate and increase byseveral dropsperminute.
Inspect lubricator sight glasses; replace if cracked.
Inspect cylinder lube checkvalves; clean or replace asrequired.
Inspect oil holes in cylinder clean if dirty.
Incorrect lubricant and/or viscosity. Use correct oil and viscosityas recommended on lube oilrecommendation sheet or instructionmanual.
Dirty inlet air or gas. Clean and inspect intake filter or scrubber.
Excessive discharge temperature. See remediesunder excessive discharge gasor jacketoutlet water temperature.
Floating ringsstuckonModels23C, 23D, 27D, or 33D. Disassemble unit and free-floating rings.Excessive discharge gaspressure. Operate unit at rating plate pressures.Faulty lube oil checkvalve. Replace or repair checkvalve.
Jacket outlet watertemperature excessive
Insufficient or high temperature inlet water. Increasewater flow rate or provide coolwater supply.Fouled or faultywater temperature flow regulator. Clean, repair or replace regulating valve.Supplyvalve (manual or automatic type) either not fullyopen or clogged.
Open or clean valve. Checksolenoid andwiring onautomatic type valve
Inlet water strainer clogged. Clean strainer.Scale or residue build-up inwater jacket. Cleanwater jacket.
Water drained from mainor inspection ports
Leakyhead gasket. Replace gasket.
Leakyaftercooler or inter-cooler. Remove cooler and hydrostatic test for leaks. Repair orreplace leakycooler.
Ro-FloCompressors, LLC - 49 - 16-620-101-000REV03

TROUBLESHOOTING
TROUBLE PROBABLE CAUSE REMEDY
Undue noise, vibration orperiodic knocking
Worn bearings. Replace bearing.Excessive bladewear. Replace bladesand check lubrication.Erratic cylinder wear. Re-bore, re-dowel, and check lubrication.Insufficient lubrication. See remediesunder excessive bladewear.
Rotor contacting cylinder heads. Check temperature and pressure conditions; checkinternal clearance.
Misalignment Realign units.Swelled or warped rotor blades. Dryout or replace rotor blades.Compressor unloaded. Load compressor.Inadequate piping support Support piping.Bad foundation. Fixor replace foundation.
Low or no capacity
Restricted suction line. Remove restriction.Clogged inlet filter. Clean inlet filter.Defective bypass loop. Repair valve or controls.Wrong speed. Operate at correct speed.Excessive internal clearance. Reassemble unit to proper clearance.Blades rubbing cylinder heads. Dryor replace blades.Bladesbinding in slots. Dryor replace blades.
Low or no pressure
Broken blades. Replace blades.Defective bypass loop. Repair valvesor controls.
Bladesbinding in slots.
Clean slotsor blades.
Dryor replace blades.
Reduce operating temperatures.Leakypiping. Fix leaks.Restricted discharge piping upstreamof gauge. Remove restriction.
Excessive powerconsumption
Bladesswelled or warped. Dryout or replace blades.Operation at wrong pressure ratio. Operate unit at correct pressure ratio.K-value (ratio of specificheats) too high. Reduce pressure ratio.Inadequate lubrication. See remediesunder excessive bladewear.Improper clearances. Reassemble unit to proper clearances.Speed to high. Reduce speed.Scale or residue build-upwater jacket. Cleanwater jacket.Abrasive particles in gasstream. Filter inlet gas.
Excessive oilconsumption from double
bellows sealWorn or damaged sealing elements Replace shaft seal.
Ro-FloCompressors, LLC - 50- 16-620-101-000REV03

REPLACEMENT PARTS
REPLACEMENT PARTSGENUINE RO-FLO® PARTSRo-FloCompressors recommends the use of genuineRo-Flo® replacement parts. Ro-Flo® partshave been customdesigned for corrosivegasesand harsh environments. This is the primary reason for superior performance of Ro-Flo® compressors. The use of Ro-Flo® partsensuresfullwarrantycoverage and promotes long, reliable service.
HOW TO ORDER REPLACEMENT PARTSMachine serial numbers together with part descriptionsare requiredwhen placing partsorders. The exploded viewwith the accompanying cross-reference to part descriptionwill aid in identifying parts. Partsdescriptionsand part numberscan be found in theRo-Flo PartsBookavailable ontheRo-FloCompressorswebsite: www.ro-flo.com/manuals. Maintenance and rebuild kitsare also available. Please contact Ro-FloCompressorsfor quotationsand placing orders:
l Phone: (+1) 920-574-2653l Email: [email protected]
Ro-FloCompressors, LLC - 51 - 16-620-101-000REV03

CONTACT RO-FLO COMPRESSORS
CONTACT RO-FLO COMPRESSORSThe people at Ro-FloCompressorsknow that communication is key inproviding aworld classproduct. For that reasonwe have provided thefollowingmethodsof contacting our team:
GENERAL INQUIRIESToll FreePhone: (+1) 855-427-6356
Main Phone: (+1) 920-574-2651
www.ro-flo.com
NEW COMPRESSOR AND VACUUM PUMP SALESToll FreePhone: (+1) 855-427-6356
Main Phone: (+1) 920-574-2651
Email: [email protected]
PARTS INQUIRIESPhone: (+1) 920-574-2653
Email: [email protected]
SERVICE AND SUPPORTPhone: (+1) 920-574-2653
Email: [email protected]
Ro-FloCompressors, LLC - 52- 16-620-101-000REV03