installing nethelpdesk · right click on the zip folder, and extract the files to a location you...
TRANSCRIPT
Installing NetHelpDesk Version 7, Amendment 4 Author: Sean McLaughlan Should you have any questions regarding any steps in this guide, please speak with the NetHelpDesk support team. www.nethelpdesk.com/contact
Net Help Desk Limited – NetHelpDesk-Mini-Guide-Installation.docx Page 1 of 46

CONTENTS INSTALLATION OF NETHELPDESK (INSTALLER) ........................................................................................... 4
BEFORE YOU START...................................................................................................................................................................... 4
IIS Manager ............................................................................................................................................................................ 5
CGI Module ............................................................................................................................................................................. 5
.net Framework 3.5 ............................................................................................................................................................ 6
USING THE INSTALLER ................................................................................................................................................................ 7
INSTALLATION OF WEB INTERFACES USING INSTALLER ..................................................................................................... 8
INSTALLATION OF MICROSOFT SQL SERVER DATABASE USING INSTALLER .............................................................. 10
INSTALLATION OF NETHELPDESK (MANUAL) ............................................................................................ 12
MANUAL INSTALLATION OF MICROSOFT SQL SERVER DATABASE .............................................................................. 12
Some Important Notes ................................................................................................................................................... 12
USING A PRE-EXISTING SQL SERVER INSTANCE .............................................................................................................. 13
SQL Server Management Studio ............................................................................................................................... 13
SQL Server Configuration Manager ......................................................................................................................... 13
INSTALLING A NEW SQL SERVER INSTANCE MANUALLY ................................................................................................ 16
SQL Server Configuration Manager ......................................................................................................................... 17
MANUALLY RESTORING A NETHELPDESK DATABASE INTO A SQL SERVER INSTANCE .......................................... 20
To Restore the .bak Database: ................................................................................................................................... 20
CONFIGURING A NEW UDL FILE FOR USE WITH SQL SERVER ........................................................................................ 22
Creating New Shortcuts Manually ........................................................................................................................... 24
MANUAL INSTALLATION OF WEB INTERFACES ................................................................................................................... 25
IIS Manager .......................................................................................................................................................................... 25
CGI Module ........................................................................................................................................................................... 25
.net Framework 3.5 .......................................................................................................................................................... 26
Manual Web Interface Configuration ................................................................................................................. 27
ISAPI and CGI Restrictions ................................................................................................................................. 27
Handler Mappings ................................................................................................................................................... 28
Windows Authentication – Auto-login for Internal Users Only ........................................................ 29
User Access Levels ................................................................................................................................................ 29
Virtual Directories ................................................................................................................................................... 30
Attachments Size Limit ........................................................................................................................................ 30
Have you changed NetHelpDesk’s Default Folder Settings? ................................................................. 31
Attachfile.asp ............................................................................................................................................................ 31
Cnetweb.ini ................................................................................................................................................................. 31
Net Help Desk Limited – NetHelpDesk-Mini-Guide-Installation.docx Page 2 of 46

Connecting Web Interfaces to the NHD Database........................................................................................... 32
Standard Installation ....................................................................................................................................................... 32
Web Interfaces Installed on Different Server ..................................................................................................... 32
END-USER WEB INTERFACE ..................................................................................................................................................... 32
CUSTOMISING THE WEB INTERFACES ................................................................................................................................... 34
An Overview ......................................................................................................................................................................... 34
How does the portal display data from the database? ................................................................................. 34
Customising the Web Portal Pages ......................................................................................................................... 37
Customising the Standard Template’s Menu ................................................................................................ 37
Changing the Website Logo and Smartphone Logo .................................................................................. 38
Setting the Global Web Announcement ........................................................................................................... 39
Customising the Request View .................................................................................................................................. 40
TECHNICIAN WEB PORTAL ACCESS ....................................................................................................................................... 42
SMARTPHONE APPS .................................................................................................................................................................. 43
Configuring the Smartphone Apps Access Manually .................................................................................... 43
Launching The Apps ........................................................................................................................................................ 45
Logging into the app ................................................................................................................................................... 45
Net Help Desk Limited – NetHelpDesk-Mini-Guide-Installation.docx Page 3 of 46
Installation of NetHelpDesk (Installer) BEFORE YOU START There are three main components when setting up NetHelpDesk;
Component 1. Installing the NetHelpDesk folder, with contents for the general user interfaces.
Component 2. Installing the Web Interfaces (End-user and Technician and Smartphone)
Component 3. Installing a SQL Server instance for the NetHelpDesk database
Before starting the install, some basic things to check:
1) Choose where you want to place the NetHelpDesk folder. The default is the root of the C:\ Drive, but it can be stored anywhere you prefer.
2) The Web Interfaces do not need to be installed on the same server as NetHelpDesk. If you
have a dedicated Web server, you may want to use that location, detailed in this guide.
3) Whichever you choose, three things need to be set in your environment before setting up the web interfaces:
a) IIS Manager v7.0 or above is installed on the machine.
b) The IIS has the CGI Module enabled.
c) .net Framework 3.5 is installed on the machine.
- Section Continued -
Net Help Desk Limited – NetHelpDesk-Mini-Guide-Installation.docx Page 4 of 46

IIS MANAGER To check if you have IIS installed, or to add it in, go to Control Panel > Programs > Programs and Features > Turn Features On or Off CGI MODULE To check if you have the CGI module as part of the IIS install, go to Control Panel > Programs > Programs and Features > Turn Features On or Off > Internet Information Services > World Wide Web Services > Application Development Features. If you cannot see the web server role service initially, scroll down, and also make sure the ASP role service has been added to change size limit permissions.
- Section Continued -
Net Help Desk Limited – NetHelpDesk-Mini-Guide-Installation.docx Page 5 of 46
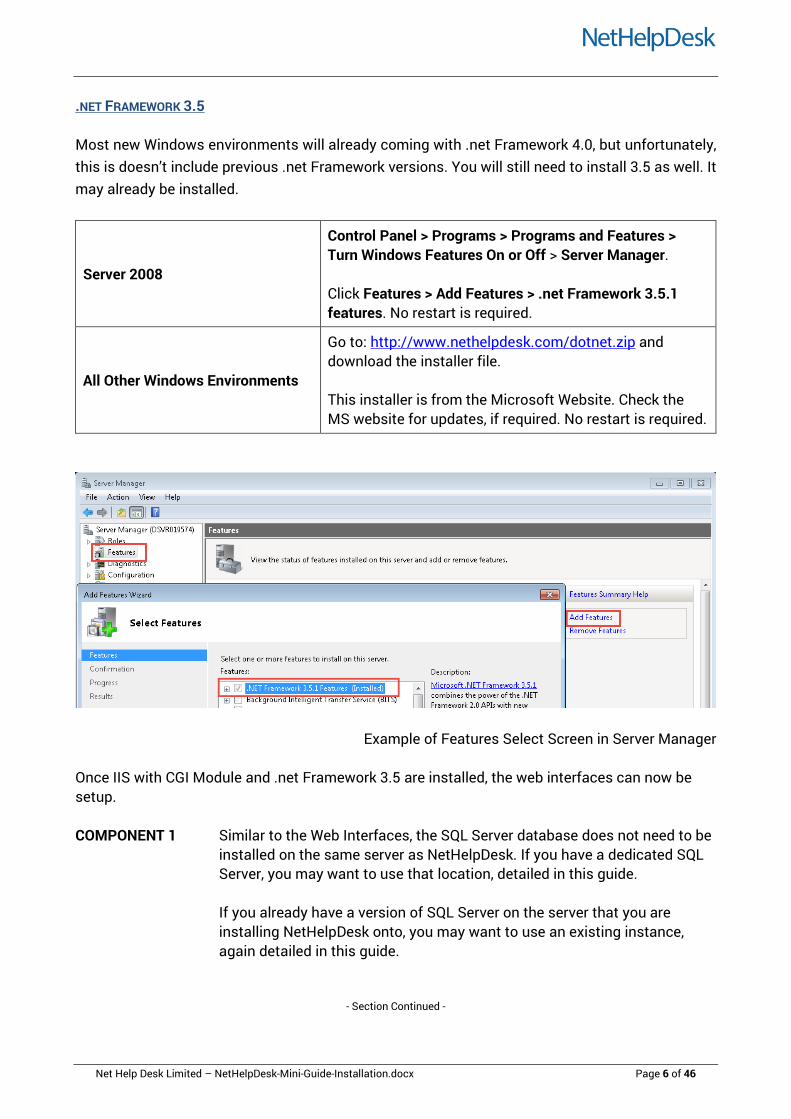
.NET FRAMEWORK 3.5 Most new Windows environments will already coming with .net Framework 4.0, but unfortunately, this is doesn’t include previous .net Framework versions. You will still need to install 3.5 as well. It may already be installed.
Server 2008
Control Panel > Programs > Programs and Features > Turn Windows Features On or Off > Server Manager. Click Features > Add Features > .net Framework 3.5.1 features. No restart is required.
All Other Windows Environments
Go to: http://www.nethelpdesk.com/dotnet.zip and download the installer file. This installer is from the Microsoft Website. Check the MS website for updates, if required. No restart is required.
Example of Features Select Screen in Server Manager Once IIS with CGI Module and .net Framework 3.5 are installed, the web interfaces can now be setup. COMPONENT 1 Similar to the Web Interfaces, the SQL Server database does not need to be
installed on the same server as NetHelpDesk. If you have a dedicated SQL Server, you may want to use that location, detailed in this guide.
If you already have a version of SQL Server on the server that you are installing NetHelpDesk onto, you may want to use an existing instance, again detailed in this guide.
- Section Continued -
Net Help Desk Limited – NetHelpDesk-Mini-Guide-Installation.docx Page 6 of 46
USING THE INSTALLER To install NetHelpDesk, do so in a place that is central for multiple users to access, like a server. NetHelpDesk does not need to be installed on each machine. To begin, with Component 1:
1. Go to the folder where you have downloaded the nethelpdesk.zip folder to.
2. Right click on the zip folder, and extract the files to a location you are happy with.
3. In the NetHelpDesk folder that is extracted, right click on the NHDsetup.exe file, and run as a local Administrator.
4. The InstallShield Wizard will open, and prepare for installation. Click Next when asked to.
5. Choose where to install the program to. The default is C:\NetHelpDesk. Click Next.
6. Click Install. Please wait the InstallShield Wizard installs NetHelpDesk. This may take
several minutes.
7. Click the “Launch the program” checkbox and then
Congratulations! You have installed component 1 of NetHelpDesk! Wasn’t that easy?
8. When completed, a shortcut to NetHelpDesk and NHServer will have been placed onto the Desktop of the Server/Workstation you have installed component 1 of NetHelpDesk on. These shortcuts will point to the Server or Workstation name, or Uniform Naming Convention (UNC) path, rather than “the C drive”. This allows the shortcut to be put onto other Workstations, so others can trial NetHelpDesk with you.
9. If the installer fails to share the NetHelpDesk folder itself in the location you specified, it will be a local machine privileges issue with your permissions. Ensure that the installer was installed as an administrator and you right clicked to “Run as Administrator”.
10. Otherwise, all being well, the installer will continue, and this is described below.
- Document Continued –
Net Help Desk Limited – NetHelpDesk-Mini-Guide-Installation.docx Page 7 of 46
INSTALLATION OF WEB INTERFACES USING INSTALLER After Component 1 is completed, which creates the basic NetHelpDesk folder structure, a message appears asking if you would “like to setup the web portal”, which is Component 2. With the Web Interfaces, you have several options: OPTION W1 Click “Yes”, and use the installer to very quickly setup the web interfaces
using IIS v7.0 or newer on the same machine as Component 1,
or OPTION W2 Click “No”, and install the web interfaces on a different machine, such as a
dedicated web server. Whichever option you decide, ensure that the elements in the “Before You Start” section above have been completed before proceeding. To use Option W1:
1. Click Yes in the installer.
2. The installer will create the web interfaces on the same server that NetHelpDesk is installed on.
3. If this fails, go back to the “Before You Start” section, and ensure everything is done as specified, or contact the support team.
4. When completed, the installer will then tell you the path to your web portal via your browser. An example path used to access to web interfaces internally is:
\\localhost:8099
5. By default, the web interfaces will only be available internally to your network. To make
external, see details in this guide.
Congratulations! You have installed component 2 of NetHelpDesk! Wasn’t that easy? To use Option W2:
1. Click No on the installer, and setup the web interfaces manually, as detailed in this guide.
- Section Continued -
Net Help Desk Limited – NetHelpDesk-Mini-Guide-Installation.docx Page 8 of 46

Please note: We recommend that before installing component 3, you bear in mind to
install Microsoft SQL Server Management Studio alongside the SQL Server Instance. This will help with any troubleshooting issues encountered in the future.
A free edition of Database Tools and Management Tools is available for
download on the Microsoft website. This is recommended for queries and so on. Alternatively, you can access copies of SQL Management Studio 2008 R2 via our links below:
32 Bit: www.nethelpdesk.com/sqlms32 64 Bit: www.nethelpdesk.com/sqlms64
- Document Continued -
Net Help Desk Limited – NetHelpDesk-Mini-Guide-Installation.docx Page 9 of 46

INSTALLATION OF MICROSOFT SQL SERVER DATABASE USING INSTALLER After components 1 and 2 are completed using the installer, a message appears to tell you that NetHelpDesk needs a SQL Server database. This is Component 3. Here you have three options: OPTION SQ1 Say “Yes”, and use the installer to create its own SQL Server Instance on
the same machine as Component 1 is installed on, with a pre-packaged SQL database and shortcuts already configured for you,
or
OPTION SQ2 Say “No”, and use an existing SQL Server instance on the same machine as
Component 1 is installed on, or a different machine, perhaps a dedicated SQL Server, and manually import the NetHelpDesk database, and manually create/adjust shortcuts.
or
OPTION SQ3 Say “No”, and create a new SQL Server instance on another machine,
perhaps a dedicated SQL Server, and manually import the NetHelpDesk database, and manually create/adjust shortcuts.
Go to Start > All Programs on the machine to see if Microsoft SQL Server is already installed before proceeding. If it is, and you may want to add the NetHelpDesk database to this existing instance as per Option SQL 2, you can do this manually using the instructions below. We do recommend a separate instance though, as it helps us when supporting you, to keep everything separate. To use Option SQL 1:
1. Click Yes, and allow NetHelpDesk to extract its pre-packaged SQL Server Express package from Microsoft.
2. The defaults for the instance are:
a. A SQL Server instance called “NETHELPDESK”, b. Inside that instance a database called “NetHelpDesk”, and c. The SQL Server Administrator (sa) account will be set for you, with a default
password given to you on the screen.
Congratulations! You have installed component 3 of NetHelpDesk! Wasn’t that easy?
3. If, for any reason, this is unsuccessful, contact of our team, who are trained to assist with your needs.
Net Help Desk Limited – NetHelpDesk-Mini-Guide-Installation.docx Page 10 of 46
4. Alternatively, you may wish to use the other options with manual installation instructions below.
To use Options SQL2 or SQL3, click No and decide which one option is the best for you. Then proceed as necessary, using the relevant part of this guide.
- Section Continued -
Net Help Desk Limited – NetHelpDesk-Mini-Guide-Installation.docx Page 11 of 46
Installation of NetHelpDesk (Manual) If you wish to install NetHelpDesk Components 2 and 3 manually, for whatever reason, this part of the guide will take you through the necessary steps. When Component 1 has completed, it places files ready for the manual setup that it also uses as part of the installer. All the installer does is automatically do what we will now show you manually how to do. We recommend starting with Component 3, and then going back to do Component 2. MANUAL INSTALLATION OF MICROSOFT SQL SERVER DATABASE SOME IMPORTANT NOTES As per the instructions in this guide, there are two options if not using the installer for the database: OPTION SQL 2 Say “No”, and use an existing SQL Server instance on the same machine as
Component 1 is installed on, or a different machine, perhaps a dedicated SQL Server, and manually import the NetHelpDesk database, and manually create/adjust shortcuts.
or
OPTION SQL 3 Say “No”, and create another SQL Server instance on another machine,
perhaps a dedicated SQL Server, and manually import the NetHelpDesk database, and manually create/adjust shortcuts
Whichever option you choose:
1. NetHelpDesk supports all versions of SQL Server from Microsoft, version 7 onwards. We merely use examples below, and our team can assist if you get stuck.
2. If Microsoft SQL Server is not yet installed on the machine you choose, it is best to use
our installer, detailed in this guide.
3. If the SQL Management Studio tool is not yet installed either, a free edition of Database Tools and Management Tools is available for download on the Microsoft website. This is recommended for queries and so on. Alternatively, you can access copies of SQL Management Studio 2008 R2 via our links below:
32 Bit: www.nethelpdesk.com/sqlms32 64 Bit: www.nethelpdesk.com/sqlms64
4. NetHelpDesk recommends that you do not use Windows Authentication. Use SQL Server
Authentication instead, using a SQL Server Administrator or “sa” account.
Net Help Desk Limited – NetHelpDesk-Mini-Guide-Installation.docx Page 12 of 46

The sa account will automatically have full access to the instance you are using, and the databases within that instance. Using the “sa” login credential will ensure everyone on your domain can access NetHelpDesk without issue.
5. The installer will create its own “sa” account for its own SQL instance for you. However,
when manually setting up, if you are unaware of the “sa” login credentials, or not sure if one has been created, speak with your SQL Administrator about this account. Alternatively, our Support team can assist with getting this resolve for you.
6. If using an existing instance of SQL Server, and did not setup a ‘sa’ account, the user login
you use must have full access to the instance.
7. Some customers are not comfortable using the same sa credentials. You can create another account, or use a separate instance. We can help with all of this. The important thing is the high level of access to the NetHelpDesk DB.
USING A PRE-EXISTING SQL SERVER INSTANCE For Option SQL2, if the SQL Server instance is pre-existing, it will need some configuration checks before restoring the NetHelpDesk pre-configured database to it. SQL SERVER MANAGEMENT STUDIO Launch SQL Server Management Studio, and login using a high level access login to the instance. If the “sa” account exists, you’ll need to be able to log into the instance with it. When logged in:
1. Right click on the Instance name at the top of the treeview, and select Properties.
2. In the “Select a page” options, select Security and ensure that server authentication is set to SQL Server and Windows Authentication mode.
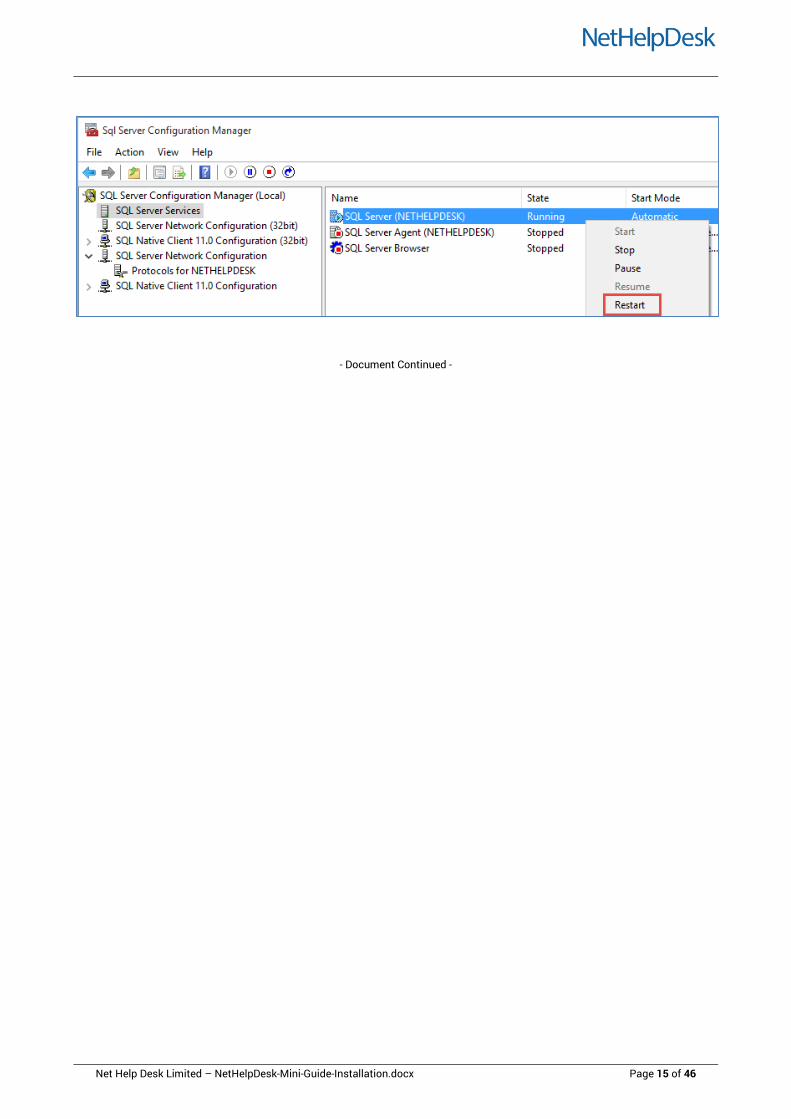
SQL SERVER CONFIGURATION MANAGER Launch SQL Server Configuration Manager. Screenshots of steps follow.
1. In SQL Server Services screen, check the SQL Server Browser’s Start Mode, and if set to Disabled to Automatic. This is changed in the “Service” tab in the Server Browsers properties, accessed by double clicking the entry.
2. In SQL Server Network Configuration > Protocols for (INSTANCE NAME) and double click
the TCP/IP protocol name, and on the Protocol tab, set Enabled to Yes.
3. In IP Addresses tab, scroll to bottom of list and under IPAll; ensure:
a) TCP Dynamic Ports is Blank (not zero).
Net Help Desk Limited – NetHelpDesk-Mini-Guide-Installation.docx Page 13 of 46

b) Ensure a unique TCP Port is specified, such as 14331. Click Apply to save.
4. Go back to SQL Server Configuration Manager > SQL Server Services > Restart the SQL Server Service for your instance for changes to take effect.
5. If you have Firewall software (Windows or 3rd Party software) running on the Server, add
an exception/incoming rule to allow TCP Port 14331.
6. Go to the “Manually Restoring a NetHelpDesk Database into a SQL Server instance” in this guide.
Net Help Desk Limited – NetHelpDesk-Mini-Guide-Installation.docx Page 14 of 46
- Document Continued -
Net Help Desk Limited – NetHelpDesk-Mini-Guide-Installation.docx Page 15 of 46

INSTALLING A NEW SQL SERVER INSTANCE MANUALLY For Option SQL3, the SQL Server instance will be new, and it will need some configuration checks before restoring the NetHelpDesk pre-configured database to it. You have several options available to you also: SQL Server Full: If you have a full version of SQL Server you wish to install, NetHelpDesk
supports all versions of Microsoft SQL Server, version 7 onwards. We merely use examples in this guide, and our team can assist if you get stuck.
SQL Server Express: Alternatively, in the …\NetHelpDesk\SQL folder, there are two applications
included with NetHelpDesk Component 1, and they are versions of Microsoft SQL Server 2008 R2 Express ready for you to use, which comes with a 10GB database size limit.
Use either 32bit of 64bit, depending on what System Type Operating System you have on the machine the instance is to be installed on.
1. Launch the relevant application, and the SQL Server installer will begin.
2. Installation Type should be a New Installation.
3. Accept defaults until the Instance Configuration screen, and specify the Named instance and Instance ID. The Installer would call these both NETHELPDESK, but the default is SQLExpress. Whatever you choose, it doesn’t matter to the program, but make a note of what it is called, as you will need this later.
4. Accept defaults until the Database Engine Configuration screen, where we recommend that you:
A. Select Mixed Mode (SQL Server authentication and Windows authentication), and,
B. Specify an appropriate password for the default SQL Server System Administrator (sa)
account, and,
Net Help Desk Limited – NetHelpDesk-Mini-Guide-Installation.docx Page 16 of 46

C. If you must use Windows Authentication, add the users to the SQL Server administrators list who will have unrestricted access to the Database Engine.
5. Continue until the Instance has installed, and the SQL Server installer confirms that it completed successfully.
SQL SERVER CONFIGURATION MANAGER As before, in the OPTION SQL2 steps, you will need to make some changes in the SQL Server Configuration Manager. Screenshots of steps follow.
1. In SQL Server Services screen, check the SQL Server Browser’s Start Mode, and if set to Disabled to Automatic. This is changed in the “Service” tab in the Server Browsers properties, accessed by double clicking the entry.
2. In SQL Server Network Configuration > Protocols for (INSTANCE NAME) and double click
the TCP/IP protocol name, and on the Protocol tab, set Enabled to Yes.
3. In IP Addresses tab, scroll to bottom of list and under IPAll; ensure:
a) TCP Dynamic Ports is Blank (not zero).
b) Ensure a unique TCP Port is specified, such as 14331. Click Apply to save.
Net Help Desk Limited – NetHelpDesk-Mini-Guide-Installation.docx Page 17 of 46

4. Go back to SQL Server Configuration Manager > SQL Server Services > Restart the SQL Server Service for your instance for changes to take effect.
5. If you have Firewall software (Windows or 3rd Party software) running on the Server, add
an exception/incoming rule to allow TCP Port 14331.
6. Go to the “Manually Restoring a NetHelpDesk Database into a SQL Server instance” in this guide.
- Section Continued -
Net Help Desk Limited – NetHelpDesk-Mini-Guide-Installation.docx Page 18 of 46

- Document Continued -
Net Help Desk Limited – NetHelpDesk-Mini-Guide-Installation.docx Page 19 of 46

MANUALLY RESTORING A NETHELPDESK DATABASE INTO A SQL SERVER INSTANCE Whether selecting Option SQL2 or Option SQL3, a database for NetHelpDesk to use will need to be added to the instance of SQL Server. NetHelpDesk uses this database to store and retrieve data and configuration to the main NetHelpDesk interfaces. In the \\…NetHelpDesk\SQL folder, we have included a pre-configured blank NetHelpDesk database file for you to use, called NetHelpDesk.bak. This file is suitable for use in SQL Server v2005 onwards. However, if this is missing, or the folder not present, please go to www.nethelpdesk.com/sqldb for more .bak files. Please note: At this point, you will need to have SQL Server Management Studio
installed to be able restore the database .bak file into the SQL Server instance.
You can use any version of SQL Server Management Studio to access the
instance, as long as the version is the same or newer as the SQL Server version that is installed.
If at any time you get stuck, or you’re unsure how to proceed, please speak
with a member of our team. TO RESTORE THE .BAK DATABASE:
1. Open SQL Management Studio, and log into your instance using your “sa” or relevant high level access account.
2. Right click on Databases and left click Restore Database.
Net Help Desk Limited – NetHelpDesk-Mini-Guide-Installation.docx Page 20 of 46
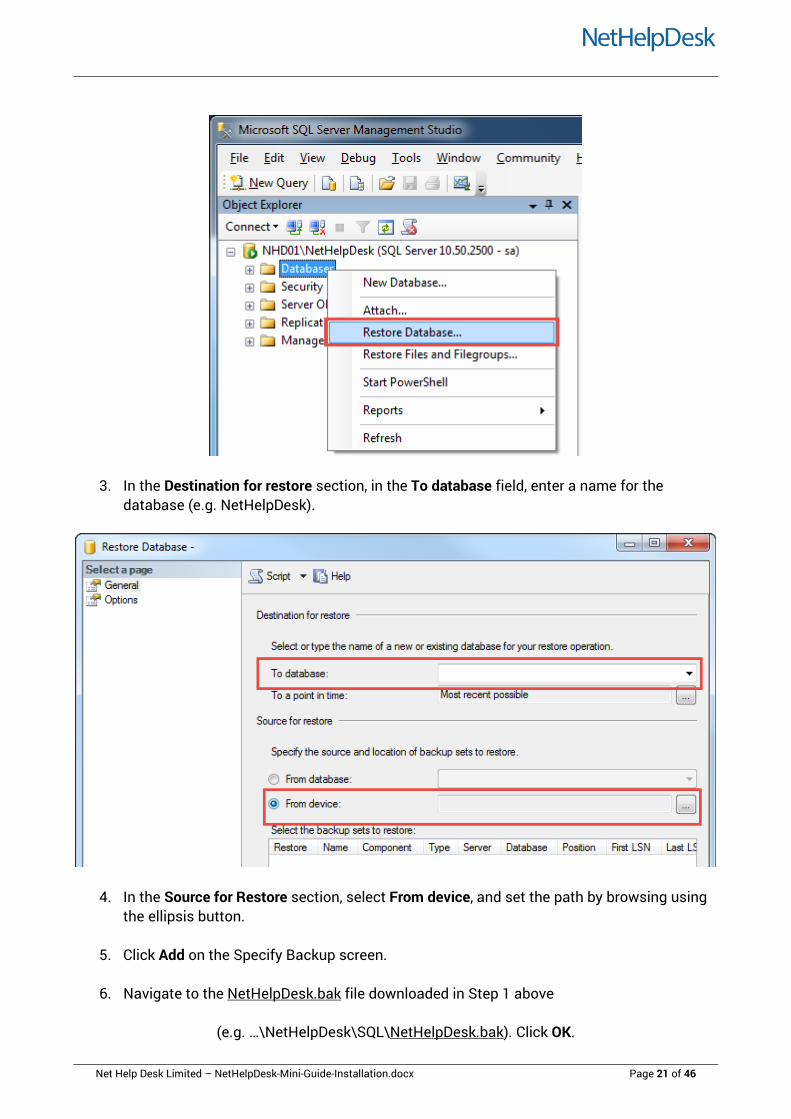
3. In the Destination for restore section, in the To database field, enter a name for the database (e.g. NetHelpDesk).
4. In the Source for Restore section, select From device, and set the path by browsing using the ellipsis button.
5. Click Add on the Specify Backup screen.
6. Navigate to the NetHelpDesk.bak file downloaded in Step 1 above
(e.g. …\NetHelpDesk\SQL\NetHelpDesk.bak). Click OK.
Net Help Desk Limited – NetHelpDesk-Mini-Guide-Installation.docx Page 21 of 46
7. Ensure the checkbox in the Restore column is selected.
8. Click OK, and then click OK. Again.
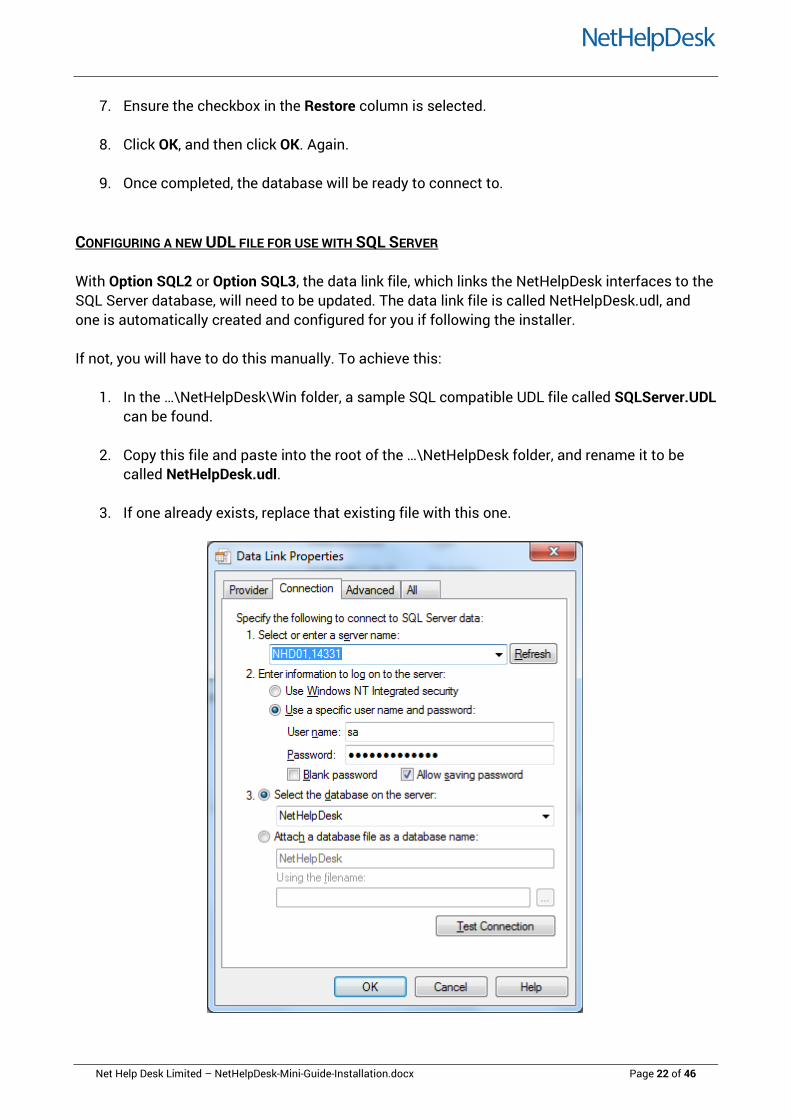
9. Once completed, the database will be ready to connect to. CONFIGURING A NEW UDL FILE FOR USE WITH SQL SERVER With Option SQL2 or Option SQL3, the data link file, which links the NetHelpDesk interfaces to the SQL Server database, will need to be updated. The data link file is called NetHelpDesk.udl, and one is automatically created and configured for you if following the installer. If not, you will have to do this manually. To achieve this:
1. In the …\NetHelpDesk\Win folder, a sample SQL compatible UDL file called SQLServer.UDL can be found.
2. Copy this file and paste into the root of the …\NetHelpDesk folder, and rename it to be
called NetHelpDesk.udl.
3. If one already exists, replace that existing file with this one.
Net Help Desk Limited – NetHelpDesk-Mini-Guide-Installation.docx Page 22 of 46

4. Double click the file to launch the OLE DB Core Services program to edit.
5. In the Connection tab, specify the name of the server or the IP address, followed by “,14331” or whatever TCP port number you have specified in the Configuration Manager previously.
6. We strongly recommend that you Use a specific username and password, and use the ‘sa’
account mentioned previously.
7. If you must Use Windows NT Integrated Security, make sure that the users connecting have full access to the SQL Server instance, similar to the ‘sa’ account mentioned previously. If not, the connection will not work.
8. Select the SQL database created above, whether upsized or empty.
9. Test the connection, and you will see the confirmation screen below.
10. If the test does not succeed, switch off the firewall on the server, to ensure this is not blocking connectivity.
11. Any other errors will be mostly due to permissions issues with the login(s) you are using. If using the “sa” account, these rarely, if ever, happen.
- Section Continued -
Net Help Desk Limited – NetHelpDesk-Mini-Guide-Installation.docx Page 23 of 46
CREATING NEW SHORTCUTS MANUALLY To use the NetHelpDesk Windows Interface, a shortcut is needed, and manually created if using the installer. If setting NetHelpDesk up manually, you will need to configure this manually. If there is a NetHelpDesk shortcut in the root of your …\NetHelpDesk folder, these can be amended as necessary.
1. Right click > Properties to amend. The shortcuts must have the following in order to be used:
a) The target line must point to the location of the NetHDClient.exe.
b) Immediately after this, the path of the NetHelpDesk.udl file needs to be specified.
c) Both of these must be pointed to the UNC path, so rather than C:\, it will be labelled
\\(Server name)\.
2. Make sure that you give the new shortcut to your team internally, so that they can access it when they need to, following full migration.
Please Note: The NetHDClient.exe, the web interfaces, and the database can all be
situated in three different places, two different places, or altogether in one. As long as the shortcut, and the NetHelpDesk.udl files point to right locations, NetHelpDesk will launch without issue.
3. Also make sure the NHServer has a shortcut configured similar to the main client one.
- Document Continued -
Net Help Desk Limited – NetHelpDesk-Mini-Guide-Installation.docx Page 24 of 46

MANUAL INSTALLATION OF WEB INTERFACES When Component 1 has completed, it places files ready for the manual setup that it also uses as part of the installer. All the installer does is automatically do what we will now show you manually how to do. A brief reminder of the pre-configuration steps for Component 2: IIS MANAGER To check if you have IIS installed, or to add it in, go to Control Panel > Programs > Programs and Features > Turn Features On or Off. CGI MODULE To check if you have the CGI module as part of the IIS install, go to Control Panel > Programs > Programs and Features > Turn Features On or Off > Internet Information Services > World Wide Web Services > Application Development Features. If you cannot see the web server role service initially, scroll down, and also make sure the ASP role service has been added to change size limit permissions.
If using a separate server for the Web Interfaces, simply copy the …\NetHelpDesk\Web folder and place on the new server in a folder of your choice. Carry out all steps here on that server.
Net Help Desk Limited – NetHelpDesk-Mini-Guide-Installation.docx Page 25 of 46

.NET FRAMEWORK 3.5 Most new Windows environments will already coming with .net Framework 4.0, but unfortunately, this is doesn’t include previous .net Framework versions. You will still need to install 3.5 as well. It may already be installed.
Server 2008
Control Panel > Programs > Programs and Features > Turn Windows Features On or Off > Server Manager. Click Features > Add Features > .net Framework 3.5.1 features. No restart is required.
All Other Windows Environments
Go to http://www.nethelpdesk.com/dotnet.zip and download the installer file. This installer is from the Microsoft Website. Check the MS website for updates, if required. No restart is required.
Example of Features Select Screen in Server Manager
Once IIS with CGI Module and .net Framework 3.5 are installed, the web interfaces can now be setup. For Component 2, there are a few more steps to take once the above is confirmed completed:
- Section Continued -
Net Help Desk Limited – NetHelpDesk-Mini-Guide-Installation.docx Page 26 of 46

Manual Web Interface Configuration
1. If the IIS has a Default website, and the server has not been used before for websites, this can be deleted. The default website is put in place by Microsoft. It is not needed to use IIS and/or the web interface for NetHelpDesk.
2. Open up IIS Manager, under Sites node, create a new website called NetHelpDesk, setting the path of your web files folder chosen during initial setup. (e.g. \...NetHelpDesk\Web).
3. If you have deleted the Default website above, you can specify a port of 80. This is the default for IIS websites.
4. If there are other websites installed in IIS, you will need to give the NHD web interfaces their own unique portal. The installer uses port :8099 by default. You can choose another if you prefer.
ISAPI and CGI Restrictions
5. In the IIS Manager, click on the top tree node that has the name as your server, then click on the icon for ISAPI and CGI Restrictions in the right window. If you cannot see this icon, please go back to the pre-configuration steps above relevant to your IIS version.
6. In ISAPI and CGI Restrictions, add the path to the following files:
a. wb2.nhd b. webstats.exe c. NetHDWebServiceB.exe
Net Help Desk Limited – NetHelpDesk-Mini-Guide-Installation.docx Page 27 of 46
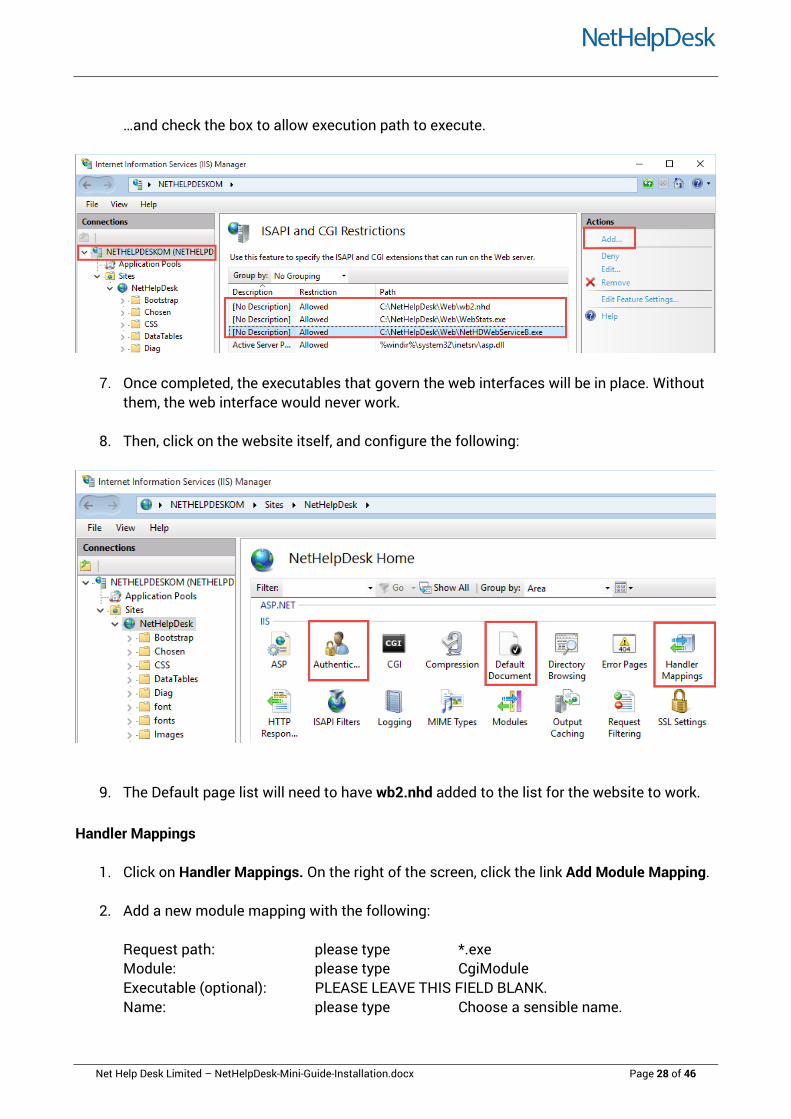
…and check the box to allow execution path to execute.
7. Once completed, the executables that govern the web interfaces will be in place. Without them, the web interface would never work.
8. Then, click on the website itself, and configure the following:
9. The Default page list will need to have wb2.nhd added to the list for the website to work. Handler Mappings
1. Click on Handler Mappings. On the right of the screen, click the link Add Module Mapping.
2. Add a new module mapping with the following: Request path: please type *.exe Module: please type CgiModule Executable (optional): PLEASE LEAVE THIS FIELD BLANK. Name: please type Choose a sensible name.
Net Help Desk Limited – NetHelpDesk-Mini-Guide-Installation.docx Page 28 of 46

3. Add another one as follows:
Request path: please type *.nhd Module: please type CgiModule Executable (optional): PLEASE LEAVE THIS FIELD BLANK. Name: please type Choose a sensible name.
These add a handler to the website itself, to tell IIS to treat the *.exe and *.nhd files as CGI programs, and not just as a downloadable files. Windows Authentication – Auto-login for Internal Users Only
1. Click on Authentication, and ensure Anonymous Authentication is set to disabled, and Enable Windows Authentication.
2. If not present, open up Server Manager, expand the Roles node. Click the Web Server (IIS)
> Add Role Services. Add Windows Authentication under the security node.
3. In NetHelpDesk, go to N > Setup > Main Configuration > Self Service Portal > Allow Windows Authentication.
4. Select “Use end user’s network login name on logon screen instead of full user name” and
deselect “Use end user’s e-mail address on logon screen instead of full user name”. What this will do, is allow the end-user to be automatically logged into their account using their account they use to authenticate against your domain. If their Windows Username is specified in their end-user account in the NHD treeview, and they have authenticated on the machine they are logging in on with the same name, this will allow them to login without any further credentials. User Access Levels To run a website in IIS, nominate a user who will have full access to the web site files and grant them the correct access. The standard IUSR account is perfect for this. In IIS:
1. Highlight the website name, and on the right hand side under Edit Site, click Basic Settings.
2. Click Connect As button.
3. Choose the Specific User option and specify the IUSR account.
4. Right click on the Website Name and check the Security Tab. Check this user has full
access.
Net Help Desk Limited – NetHelpDesk-Mini-Guide-Installation.docx Page 29 of 46
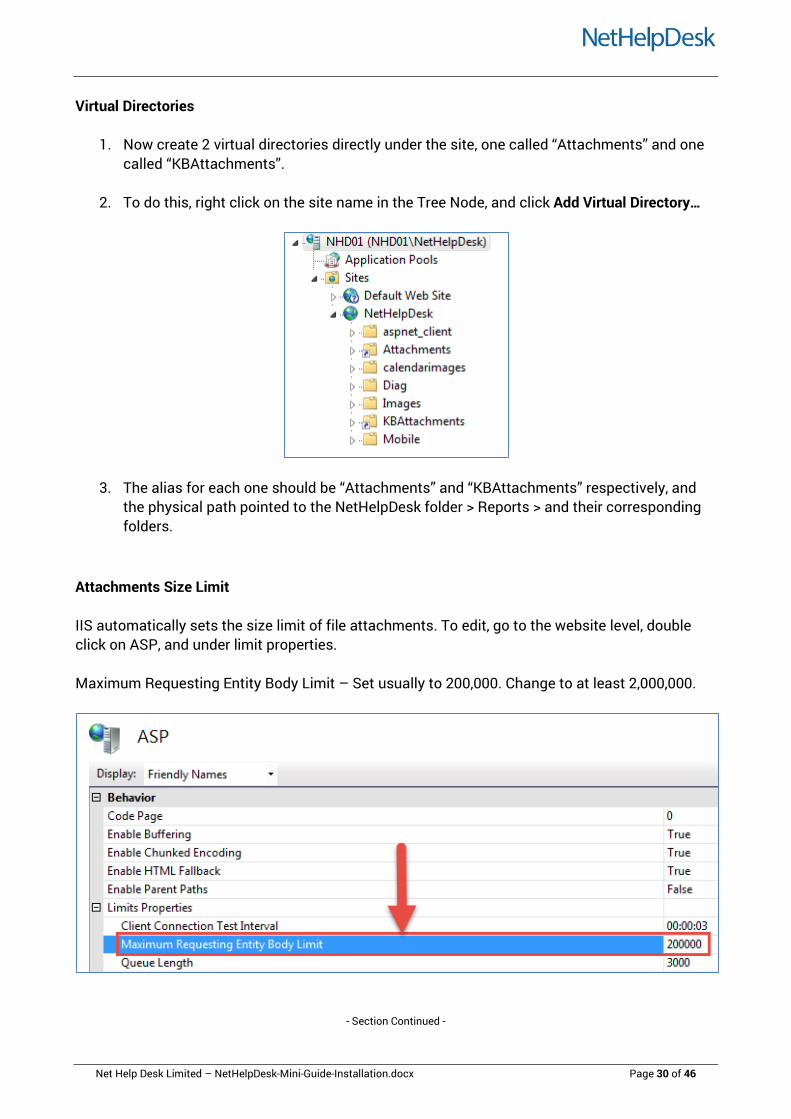
Virtual Directories
1. Now create 2 virtual directories directly under the site, one called “Attachments” and one called “KBAttachments”.
2. To do this, right click on the site name in the Tree Node, and click Add Virtual Directory…
3. The alias for each one should be “Attachments” and “KBAttachments” respectively, and the physical path pointed to the NetHelpDesk folder > Reports > and their corresponding folders.
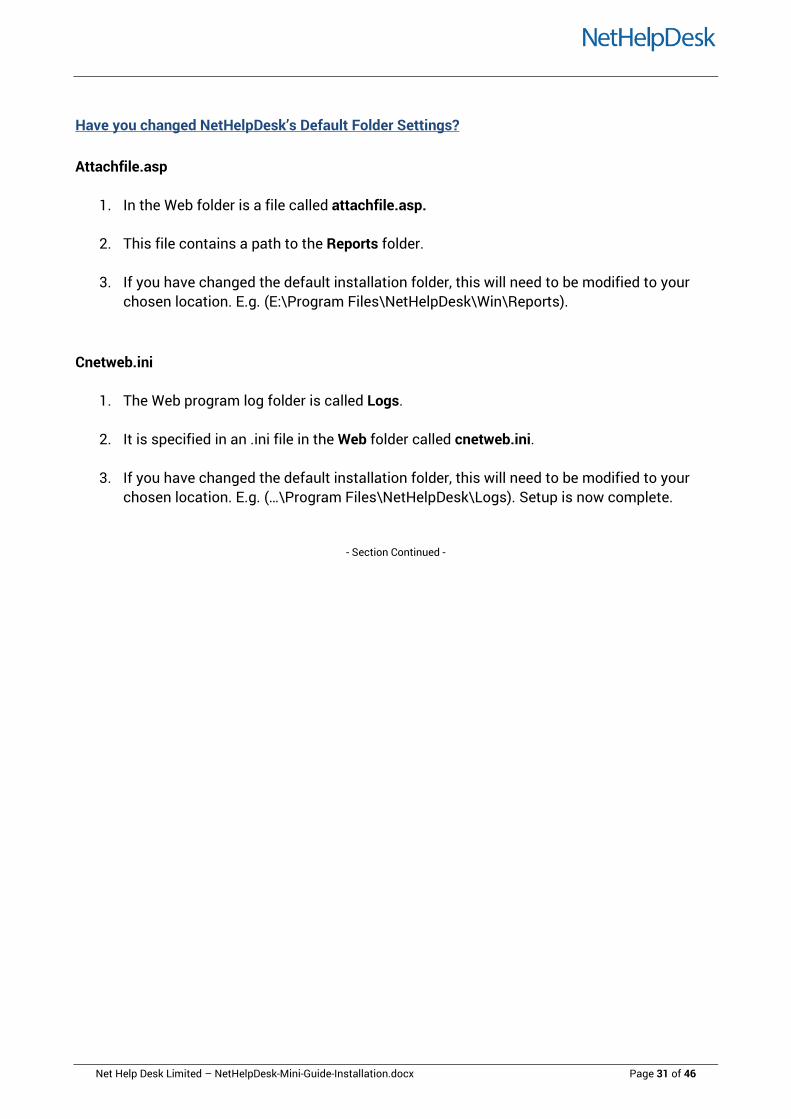
Attachments Size Limit IIS automatically sets the size limit of file attachments. To edit, go to the website level, double click on ASP, and under limit properties. Maximum Requesting Entity Body Limit – Set usually to 200,000. Change to at least 2,000,000.
- Section Continued -
Net Help Desk Limited – NetHelpDesk-Mini-Guide-Installation.docx Page 30 of 46
Have you changed NetHelpDesk’s Default Folder Settings? Attachfile.asp
1. In the Web folder is a file called attachfile.asp.
2. This file contains a path to the Reports folder.
3. If you have changed the default installation folder, this will need to be modified to your chosen location. E.g. (E:\Program Files\NetHelpDesk\Win\Reports).
Cnetweb.ini
1. The Web program log folder is called Logs.
2. It is specified in an .ini file in the Web folder called cnetweb.ini.
3. If you have changed the default installation folder, this will need to be modified to your chosen location. E.g. (…\Program Files\NetHelpDesk\Logs). Setup is now complete.
- Section Continued -
Net Help Desk Limited – NetHelpDesk-Mini-Guide-Installation.docx Page 31 of 46

CONNECTING WEB INTERFACES TO THE NHD DATABASE For the web interfaces to be meaningful and useful, they need to be connected to your NetHelpDesk database. Standard Installation If using the installer on the same server, this is done for you. The wb2 application that drives the web interface looks for the NetHelpDesk.udl file in the folder above its install location. So, in the standard installation using the installer, wb2 is found in the …\NetHelpDesk\Web folder, and so looks to the root of the …\NetHelpDesk folder for NetHelpDesk.udl. Web Interfaces Installed on Different Server If the web interfaces are installed on IIS on a different server to the main NetHelpDesk install location, you will need to tell the web interfaces how to connect to the database. In this case, you will need to take a copy of the NetHelpDesk.udl file and place in the …\NetHelpDesk\Log folder (specified in the cnetweb.ini file) and rename the file to be: NHDatabase.udl. END-USER WEB INTERFACE When browsing to the web interface in IIS, the very first page is for your end-users. The default is for the end users to use E-mail addresses and Passwords given to them by you.
Net Help Desk Limited – NetHelpDesk-Mini-Guide-Installation.docx Page 32 of 46
If your end-users are inside your domain, and you are using LDAP / Active Directory integration, you may want them to be automatically logged in. To do this:
1) Change to Windows Authentication in the setup as detailed in this guide.
2) In NetHelpDesk, go to N > Setup > Main Configuration > Self Service Portal > Allow Windows Authentication.
3) Select “Use end user’s network login name on logon screen instead of full user name” and
deselect “Use end user’s e-mail address on logon screen instead of full user name”. To set up End-user access to this web interface, see the relevant section of this guide. It is important that you decide how to create your users in NetHelpDesk, before setting up their web access. To customise the web interfaces, see the relevant section of this guide.
- Section Continued -
Net Help Desk Limited – NetHelpDesk-Mini-Guide-Installation.docx Page 33 of 46

CUSTOMISING THE WEB INTERFACES After creating the web interface using the setup details in this guide, you may wish to tailor the main template that we provide to be more in keeping with your own web themes, corporate colour schemes and so on. You may want to have more than one portal, have it customised per client once they are logged in, and so on. All is possible in the NetHelpDesk setup. AN OVERVIEW Customising the web portal now it is setup is very easy to do. We offer a sensible template for you upon install, but you can customise this very quickly and simply. The ability to setup multiple web interfaces straight away is available immediately, and very easy to configure if using the example template we provide. Alternatively, a good HTML editing program and/or someone proficient in HTML can customise the portal quickly to look however you want. The functionality in the main program injects data from the database onto the HTML pages using $variables. Wherever the program finds a $variable, it populates the relevant data. How the page looks is irrelevant for the functionality. This functionality means that, unlike many of our competitors, as far as your Customers are concerned, NetHelpDesk doesn’t exist. It’s all about your connection with your customers, to people they trust. We have worked on a lot of templates with our existing Customer base, and we have access to a suite of templates that you can purchase very inexpensively, and we can add the NHD functions in for you as part of that service. Just speak with one of our team about the web interface options today. This is an optional additional service that NetHelpDesk offers to help move your business to the next level. The Web Portal runs from files in the …NetHelpDesk\Web folder, and uses the wb2.nhd file, and 4 HTML pages:
Notloggedin.html Loggedin.html Request.html Loggedintech.html
IMPORTANT: The Web Interfaces are constantly evolving, and we have new skins
available for anyone to use. Speak with our team today about how we can help you.
HOW DOES THE PORTAL DISPLAY DATA FROM THE DATABASE? The portal displays data from the database using $variable strings. To help you understand this type of functionality, we’ll give you a simple step-by-step of points.
1) You have set up the website in IIS using the guide above. This means that there is a functional web portal ready to be accessed by your End-users.
Net Help Desk Limited – NetHelpDesk-Mini-Guide-Installation.docx Page 34 of 46

2) The default document in that website was not an .html file. Instead it is wb2.nhd.
3) That wb2.nhd file opens up the notloggedin.html page, and where it sees $transaction, it knows to display the login boxes for the NetHelpDesk database. So,
This allows a great amount of flexibility to design your very own web portals for your end-users. If you have an existing portal access that your end-users are used to using, this too can be linked to our web portal functionality. There are two types of access available; one for your End-users and one for your Technicians. You can have multiples for each group, as well as different URLs, different themes and levels of access to data.
Example of NetHelpDesk standard template showing $variables
Example of NetHelpDesk standard template converting previous $variables into functionality.
Net Help Desk Limited – NetHelpDesk-Mini-Guide-Installation.docx Page 35 of 46
4) Once the end user has logged into the portal, to the loggedin.html page, and where the wb2.nhd file sees $transaction, it knows to display the requests for that user’s access level set in the database.
5) Once the end user has clicked to view a request, they see the request.html page, and the
where the wb2.nhd file sees $faultid, it knows to display the request number, $status for the request’s status and so on. So,
How the HTML page looks around these $variable strings, and how you stylise the page with the .css style sheets, is completely up to you.
- Section Continued -
Net Help Desk Limited – NetHelpDesk-Mini-Guide-Installation.docx Page 36 of 46

CUSTOMISING THE WEB PORTAL PAGES There are two approaches to customisation: We use the login page below as an example:
1. Edit the existing notloggedin.html page using a HTML editor program, ensuring $transaction is kept on the page. The text that is put in place of the variable strings has font and colour properties, as defined in the style sheet nethd.css in the ‘Web’ folder.
Use an existing page from your company website, save as notloggedin.html and insert the $transaction string wherever the login form should appear.
2. An easy way to use an existing page from your website is to open the page in Internet
Explorer, and File > Save As > Webpage Complete selecting the ‘Web’ as the destination. Then, edit the HTML file once in place.
Customising the Standard Template’s Menu Let’s open up the loggedin.html page and look at the HTML. You don’t need to be an expert to understand, so no need to panic:
The lines you see above, 22 to 32 is the code in the HTML. Below line 32 is a preview of the screen’s layout. The “By Status” Button uses the following code:
<li><a href="$LINKTOBYSTATUS" class="nethdmenuline">By Status</a></li> If I wanted to change this button to be a “Search FAQ” button, change the $variable and the display text of the button, highlighted in blue above.
Net Help Desk Limited – NetHelpDesk-Mini-Guide-Installation.docx Page 37 of 46
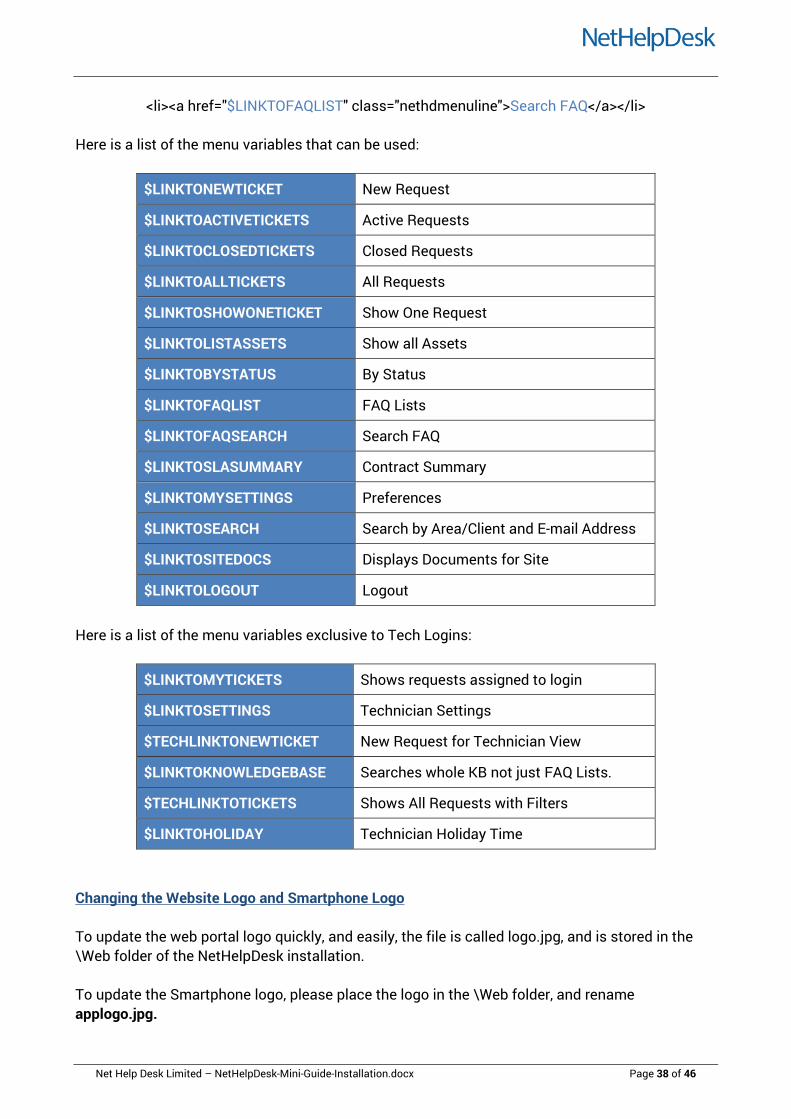
<li><a href="$LINKTOFAQLIST" class="nethdmenuline">Search FAQ</a></li> Here is a list of the menu variables that can be used:
$LINKTONEWTICKET New Request
$LINKTOACTIVETICKETS Active Requests
$LINKTOCLOSEDTICKETS Closed Requests
$LINKTOALLTICKETS All Requests
$LINKTOSHOWONETICKET Show One Request
$LINKTOLISTASSETS Show all Assets
$LINKTOBYSTATUS By Status
$LINKTOFAQLIST FAQ Lists
$LINKTOFAQSEARCH Search FAQ
$LINKTOSLASUMMARY Contract Summary
$LINKTOMYSETTINGS Preferences
$LINKTOSEARCH Search by Area/Client and E-mail Address
$LINKTOSITEDOCS Displays Documents for Site
$LINKTOLOGOUT Logout
Here is a list of the menu variables exclusive to Tech Logins:
$LINKTOMYTICKETS Shows requests assigned to login
$LINKTOSETTINGS Technician Settings
$TECHLINKTONEWTICKET New Request for Technician View
$LINKTOKNOWLEDGEBASE Searches whole KB not just FAQ Lists.
$TECHLINKTOTICKETS Shows All Requests with Filters
$LINKTOHOLIDAY Technician Holiday Time
Changing the Website Logo and Smartphone Logo To update the web portal logo quickly, and easily, the file is called logo.jpg, and is stored in the \Web folder of the NetHelpDesk installation. To update the Smartphone logo, please place the logo in the \Web folder, and rename applogo.jpg.
Net Help Desk Limited – NetHelpDesk-Mini-Guide-Installation.docx Page 38 of 46

If you wish to keep the NetHelpDesk logo, there is no need to do anything, as this is the default setting with the application. Setting the Global Web Announcement
Before your End-users log into the Web Portal, you can set a Global Web Announcement to notify them of something that affects your business, which they may need to know. This could be notifying of a public holiday in your area, if you service a global Customer base, and so on. To set this:
1. Go to File > Set Global Web Announcement
2. Choose the Standard Messages group.
3. You will then be able to specify an announcement that appears on your Web Portal.
4. Click OK.
5. Then, browse to your web portal to see the update.
- Section Continued -
Net Help Desk Limited – NetHelpDesk-Mini-Guide-Installation.docx Page 39 of 46

CUSTOMISING THE REQUEST VIEW In the ‘Web’ folder, there is a HTML file called request.html, and this is the main request view for the web portal. The variable strings that are not required, can be removed, as necessary. Additional Variable Strings can be added to display information on the request.html page:
$AllFields All fields
$area Area
$assignedto Assigned To
$category2 Category 2
$category3 Category3
$category4 Category4
$category5 Category5
$ccto CC to
$devname Asset Name
$equipmenttype Asset Type
$estimate Estimated Resolve Time
$fixbydate Fix By Date
$labelassignedto User Definable Label
$labelcategory2 User Definable Label
$labelcategory3 User Definable Label
$labelcategory4 User Definable Label
$labelcategory5 User Definable Label
$labeldateoccured User Definable Label
$labelreportedby User Definable Label
$labelsection User Definable Label
$labelseriousness User Definable Label
$labelsitename User Definable Label
$labelSymptom User Definable Label
$labelusername User Definable Label
$LastActionDate Last Action on Request’s Date
Net Help Desk Limited – NetHelpDesk-Mini-Guide-Installation.docx Page 40 of 46
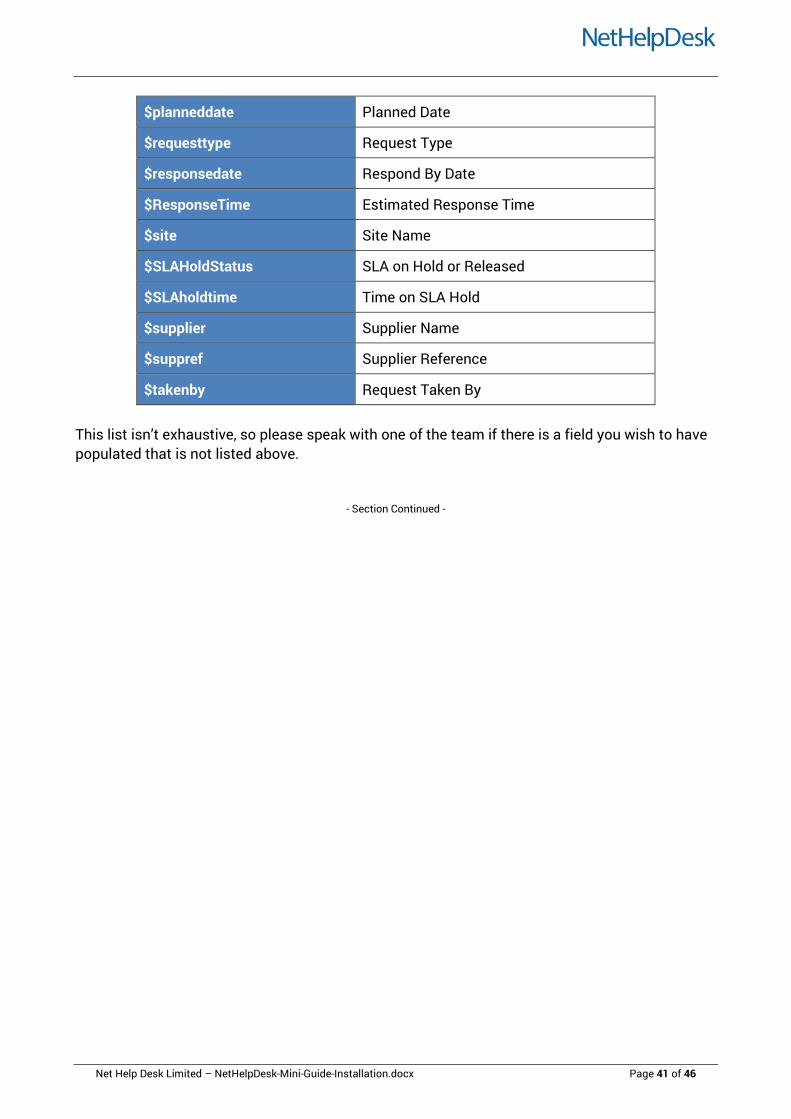
$planneddate Planned Date
$requesttype Request Type
$responsedate Respond By Date
$ResponseTime Estimated Response Time
$site Site Name
$SLAHoldStatus SLA on Hold or Released
$SLAholdtime Time on SLA Hold
$supplier Supplier Name
$suppref Supplier Reference
$takenby Request Taken By
This list isn’t exhaustive, so please speak with one of the team if there is a field you wish to have populated that is not listed above.
- Section Continued -
Net Help Desk Limited – NetHelpDesk-Mini-Guide-Installation.docx Page 41 of 46

TECHNICIAN WEB PORTAL ACCESS There will be an option below the standard login boxes for your Technician Login, which says “Login as a Technician”. The login box name changes to “Technician Login Name”. You will see that the URL is slightly different too. For the Technician logon screen, it has added “wb2.nhd\?f=login” in the address bar. To hide the link from the main end-user login screen, go to N > Setup > Main Configuration > Self Service Portal > Untick Hide Login as End user/Technician Link. Please Note: Whilst the Technician Web Interface has a different URL for use with a
regular web browser on your device, it is not the URL used for the smartphone access. For the smartphone URL, use the end-user URL instead (see separate guide for this).
The screens once you login are different for an End-user, compared to a Technician. The easiest way to tell the difference during testing is the 6 drop-down menus in Technician login. They only appear for a Technician, and not for an End-user.
- Document Continued -
Net Help Desk Limited – NetHelpDesk-Mini-Guide-Installation.docx Page 42 of 46

SMARTPHONE APPS The smartphone apps are available from their relevant store, and free to download and use. If you used the installer, the access to the smartphone is already available to you. Use the End-users URL and not the Technician’s and you will connect fine. If you didn’t use the installer, and want to start using the smartphones, you will need to set this up manually. CONFIGURING THE SMARTPHONE APPS ACCESS MANUALLY If you have installed NetHelpDesk using the installer, the smartphone apps will be accessible using the same URL that your end-users use. Please read the launching the apps section of this guide. If you have had to manually configure the web portal, you will need to manually configure to allow the smartphone apps to connect to your database. To do this:
1. Download the mobile app service from www.nethelpdesk.com/mobileappfiles
2. Extract this .exe from the zip folder, and place into the web folder (Default C:/nhweb or C:/NetHelpDesk/Web) on the server that NetHelpDesk is installed on.
3. Add this executable to the ISAPI and CGI restrictions list within IIS.
4. At Server level > ISAPI and CGI restrictions > Add > Browse to the nethdwebserviceB.exe
file and check ‘Allow Extension Path to Execute’
5. You will now need to set up a handler mapping for this executable. At the website level > Handler Mappings > Add Module Mapping >
6. Delete any other *.exe handler mapping for NetHelpDesk at web site level
7. Add a new handler module mapping at WEB SITE level
Request Path: *.exe
Module: CgiModule
Net Help Desk Limited – NetHelpDesk-Mini-Guide-Installation.docx Page 43 of 46
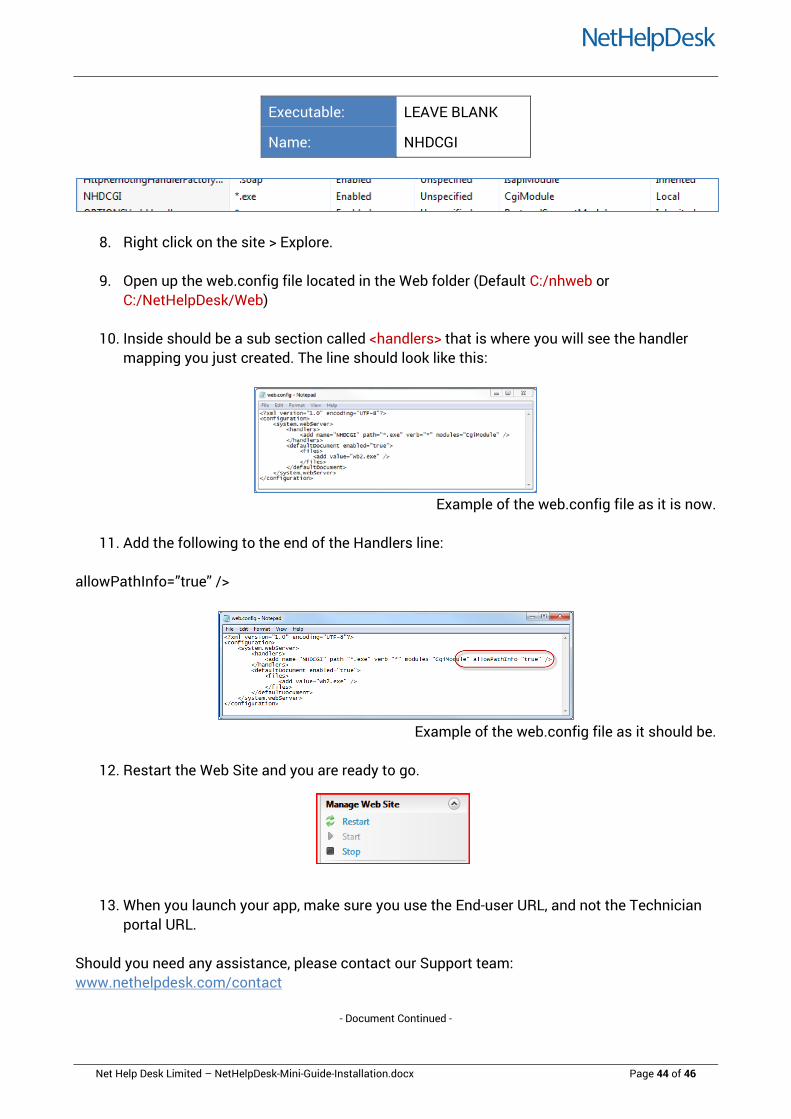
Executable: LEAVE BLANK
Name: NHDCGI
8. Right click on the site > Explore.
9. Open up the web.config file located in the Web folder (Default C:/nhweb or C:/NetHelpDesk/Web)
10. Inside should be a sub section called <handlers> that is where you will see the handler
mapping you just created. The line should look like this:
Example of the web.config file as it is now.
11. Add the following to the end of the Handlers line:
allowPathInfo=”true” />
Example of the web.config file as it should be.
12. Restart the Web Site and you are ready to go.
13. When you launch your app, make sure you use the End-user URL, and not the Technician portal URL.
Should you need any assistance, please contact our Support team: www.nethelpdesk.com/contact
- Document Continued -
Net Help Desk Limited – NetHelpDesk-Mini-Guide-Installation.docx Page 44 of 46

LAUNCHING THE APPS When launching the apps, you will experience the following, regardless of which format you use.
PLEASE MAKE SURE YOU ARE ON NHD VERSION 8.04 or NEWER TO ACCESS THE APPS. Important things to bear in mind:
− If you are using your Web Portal for internal purposes only (supporting End-users internal to your company), then you can use the Web Portal and the apps internally only. Your smartphones will need to be connected to the wireless access of your Local Area Network (LAN).
− If you wish to use the Web Portal externally from your LAN, for example, when out on the
road, you will need to make the Web Portal accessible externally from your network. This will involve opening up the port of your website in IIS to the outside world.
− Once this is achieved, you will be able to access the apps using your 3G/4G connection
when outside of your LAN, as well as the wireless when in the office.
− If you wish your end users to type a nicer user-friendly URL, instead of an IP address in their web browser, then you can purchase these yourselves from any provider. All you need to do afterwards is change the DNS record on their dashboards to point to the IP address and port of the web portal, and this will update. Our web portal is no different to any other website.
− To test whether the smartphone app will connect to your database, go to the browser on
your phone, and connect to the web portal. If the login screen comes up, and the initial setup configuration for the smartphone apps detailed in this guide is completed, then you should be able to login without issues.
− To do so, please go to the iTunes Apps Store (iPhone), Google Play (Android) or BlackBerry
App World for the latest app download. Logging into the app
1. In the main Application Setup screen, specify your NetHelpDesk Username. This is not necessarily your Windows Username, and if you use Windows Authentication to access NetHelpDesk, it won’t be this, unless you specifically specify the username and password manually in NetHelpDesk.
2. To find your NHD Username, open up the main Windows application, and go to N > Setup >
Main Configuration > Technicians > Edit > General Tab to see this:
- Section Continued -
Net Help Desk Limited – NetHelpDesk-Mini-Guide-Installation.docx Page 45 of 46

Where to find your Username and Password
3. Make sure to include http:// or https://, as necessary in the URL specification.
4. If you have used a port other than :80 in IIS, you will need to specify the port number at the end of the URL.
e.g. http://support.nethelpdesk.com:8099
5. Once you log in, you will start seeing the information download from the database of the Windows application, to your local database stored on your smartphone.
If you do not see this countdown begin, and the screen “hangs” on downloading Assets, then either:
1. The web portal is not configured to allow the apps to work yet. Please see this guide.
2. Or, the URL specified is not correct. Make sure to use the End-user URL, not Technician.
3. Or, the apps are being run on a network that the portal has not been given access to. Should you need any assistance, please contact our Support team: www.nethelpdesk.com/contact
INSTALLATION OF NETHELPDESK COMPLETE
Whether Manual or using the installer, the NetHelpDesk installation is completed.
- End of Document -
Net Help Desk Limited Page 46 of 46