installing or updating fiery system...
TRANSCRIPT
Part Number: 45068014November 8, 2007
Copyright © 2007 Electronics for Imaging, Inc.
This document explains how to install or update system software on the Fiery Network Controller for DocuColor 240/250.
NOTE: The term “Fiery” is used in this document to refer to the Fiery Network Controller for DocuColor 240/250. The term “copier” is used to refer to the DocuColor 240/250.
Fiery System Installer, located on the System Software CDs, offers two methods of installing system software:
• Direct Installation—Allows you to reinstall system software directly through a crossover Ethernet cable connected between the Fiery and a Windows computer. This method is for use by authorized service technicians only.
• Network Installation—Allows you to update system software on the Fiery through a remote network connection.
Using Direct Installation (for service technicians only)NOTE: The Direct Installation method allows service technicians to reinstall system software on the Fiery for service or troubleshooting purposes. If you are not an authorized service technician, do not attempt to use Direct Installation; use Network Installation instead (see page 3).
TO REINSTALL SYSTEM SOFTWARE USING DIRECT INSTALLATION
1. Make sure that you have a Windows XP/2000 PC equipped with the necessary system requirements.
For more information on system requirements, see the section “Installing system software over the network port” in the Installation and Service Guide for the Fiery.
2. Do the following (for more information, contact your system administrator):
• Close all software applications that may be running on the PC.
• Stop all File Transfer Protocol (FTP) and Trivial File Transfer Protocol (TFTP) services that may be running on the PC.
• Disable any virus scan programs that may be running on the PC.
• Remove any network cables between the PC and the customer network.
• Disable any wireless network connections on the PC.
Installing or Updating Fiery System Software
2
3. Follow steps 1 through 5 of the procedure “To install system software over the network port” in the Installation and Service Guide.
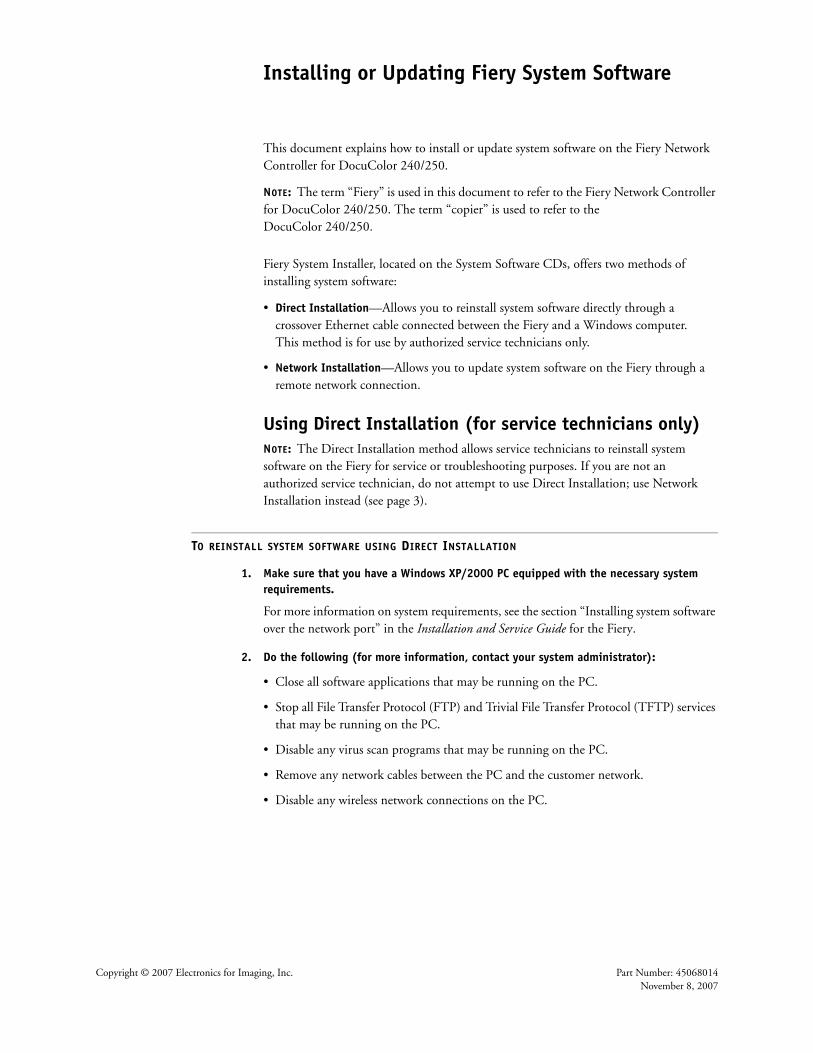
4. Power on the PC and insert System Software CD 1 into the PC media drive.
Wait for the Fiery System Installer screen to appear.
NOTE: If the installer does not launch automatically, open the CD folder and double-click Installer.vbs. If another window opens in front of the Fiery System Installer screen, close the window.
5. Click Direct Installation.
6. Continue with the remaining steps of “To install system software over the network port” in the Installation and Service Guide, starting from step 7. When prompted by the installer, insert System Software CD 2 and then CD 3.
3
Using Network InstallationNetwork Installation allows you to update the Fiery to the latest version of system software.
NOTE: If you need to reinstall the same version of Fiery system software for service or troubleshooting purposes, do not use Network Installation. Contact your authorized service technician and ask the technician to reinstall system software using Direct Installation.
Before you update system softwareKeep in mind the following when updating system software:
• Remote users—Before you begin the update, notify all users that a remote installation is in progress. Caution users against interacting or powering off the Fiery(s) or copier(s) during the installation. If a user interacts with a Fiery or copier during the installation, the update on that Fiery will fail.
• Fonts—Updating system software deletes all fonts that you have installed on the Fiery. Only resident fonts will be restored during system software installation. Command WorkStation can be used to reinstall additional fonts.
To determine which additional fonts have been installed on the Fiery, print the
Fonts List before you start the system software update and again after you complete
the update. Any fonts not listed after the update will need to be reinstalled.
For information about how to print the Fonts List, see Utilities on the
User Documentation CD.
• Custom simulation and output profiles—Custom simulation and output profiles saved on the Fiery are deleted when you update system software. Be sure to save copies of any custom profiles before you start the update.
• Language—Screens for installing system software are always displayed in English, even if the Fiery is configured for another language.
• Compatibility—The latest user software must be installed onto all computers that print to the Fiery. Using incompatible versions of system and user software may result in system problems.
• Configuration—Be sure to print a Configuration page before starting the update (for instructions, see Command WorkStation Help). All Setup configurations (including the DNS name and IP address) for the Fiery are reset to defaults when you update system software.
4
System requirementsTo update system software using Network Installation, you need:
• System Software CDs (3)
NOTE: Be sure to use the three System Software CDs provided in this kit. Do not use any other CDs associated with the Fiery.
• A Windows Vista/XP/2000 computer with:
• Pentium III 1.0GHz or faster
• A CD or DVD drive, built-in or attached
• 4GB available on the hard disk drive
• 512MB RAM
Updating system software using Network InstallationUse the following procedure to update system software on one or more Fierys remotely over the network.
TO UPDATE SYSTEM SOFTWARE USING NETWORK INSTALLATION
1. Make sure that both the copier and the Fiery are powered on, and that all external cables are properly connected to the Fiery.
2. Connect the Windows PC to the same network as the Fiery, and power on the PC.
3. Stop any File Transfer Protocol (FTP) services that may be running on the PC.
For more information on how to stop these services, contact your system administrator.
4. If needed, use Command WorkStation to archive non-resident fonts on the Fiery to a location on the PC.
5. Archive any custom color profiles to a location on the PC.
For more information, see Color Printing on the User Documentation CD.
5
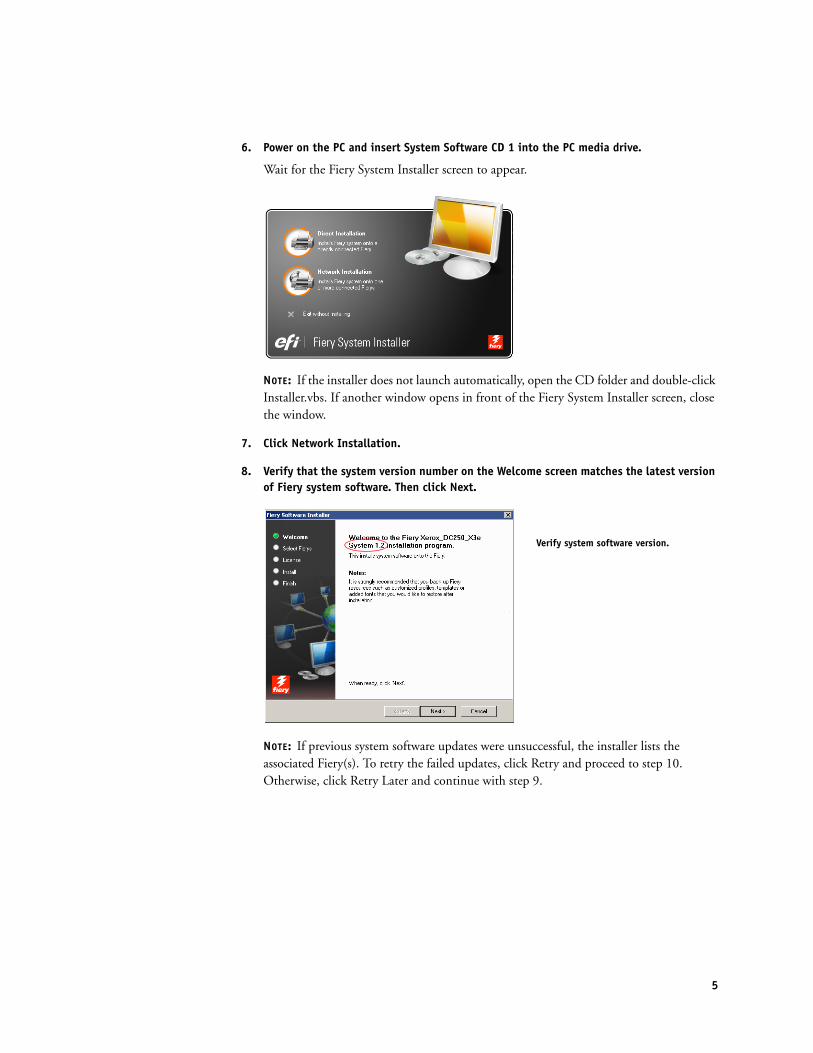
6. Power on the PC and insert System Software CD 1 into the PC media drive.
Wait for the Fiery System Installer screen to appear.
NOTE: If the installer does not launch automatically, open the CD folder and double-click Installer.vbs. If another window opens in front of the Fiery System Installer screen, close the window.
7. Click Network Installation.
8. Verify that the system version number on the Welcome screen matches the latest version of Fiery system software. Then click Next.
NOTE: If previous system software updates were unsuccessful, the installer lists the associated Fiery(s). To retry the failed updates, click Retry and proceed to step 10. Otherwise, click Retry Later and continue with step 9.
Verify system software version.
6
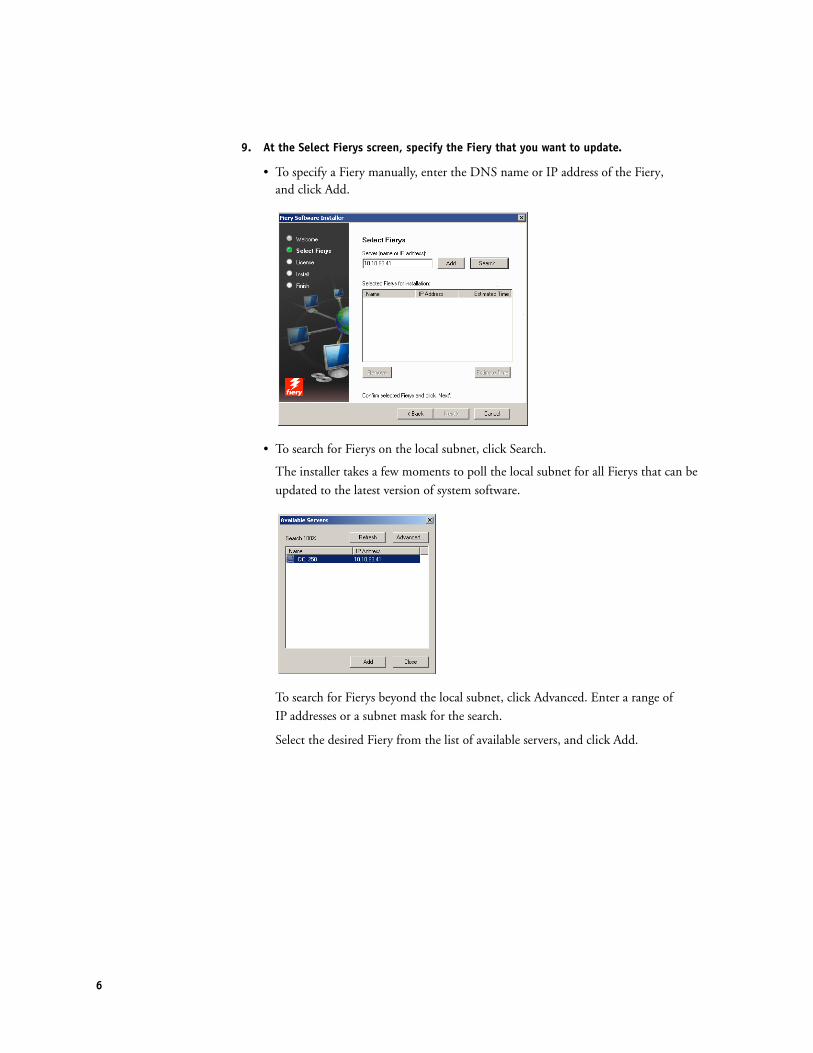
9. At the Select Fierys screen, specify the Fiery that you want to update.
• To specify a Fiery manually, enter the DNS name or IP address of the Fiery, and click Add.
• To search for Fierys on the local subnet, click Search.
The installer takes a few moments to poll the local subnet for all Fierys that can be
updated to the latest version of system software.
To search for Fierys beyond the local subnet, click Advanced. Enter a range of
IP addresses or a subnet mask for the search.
Select the desired Fiery from the list of available servers, and click Add.

7
10. In the Login dialog box, make sure that “admin” appears in the User Name field, enter the Administrator password for the Fiery, and click Login.
The Fiery should appear in the list of selected servers for the update.
NOTE: The name of the Fiery as it appears in the list may differ from the DNS name of the Fiery.
11. Repeat step 9 through step 10 if you want to add more Fierys to the update list.
To remove a Fiery from the list, select the Fiery and click Remove.
12. To view an estimate of how long the update will take, click Estimate Time.
NOTE: The installer displays an estimate of how long it will take to install update files on the Fiery. The exact time will vary depending on your network speed and the number of Fierys you are updating. Along with the estimated time, you should allow an additional 10 minutes for the update files to be copied from the System Software CDs to your PC.
13. Click Next. Then click OK at the prompt asking if you want to continue the installation.
8
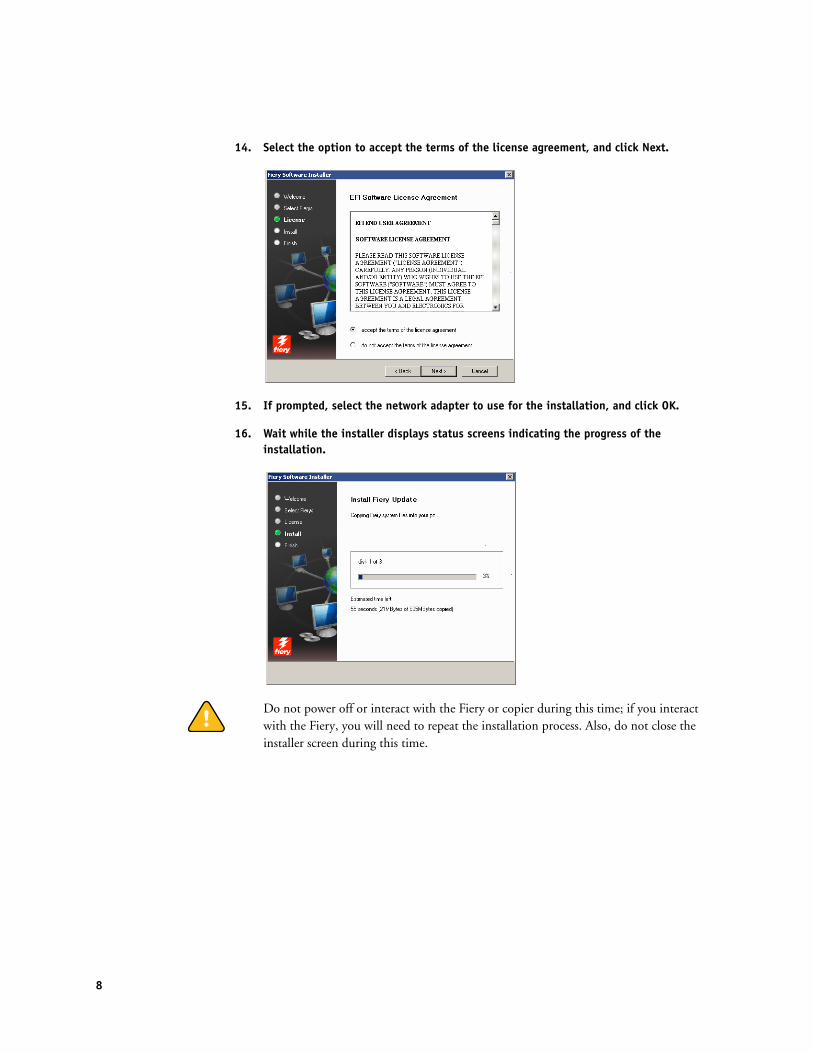
14. Select the option to accept the terms of the license agreement, and click Next.
15. If prompted, select the network adapter to use for the installation, and click OK.
16. Wait while the installer displays status screens indicating the progress of the installation.
Do not power off or interact with the Fiery or copier during this time; if you interact with the Fiery, you will need to repeat the installation process. Also, do not close the installer screen during this time.
9
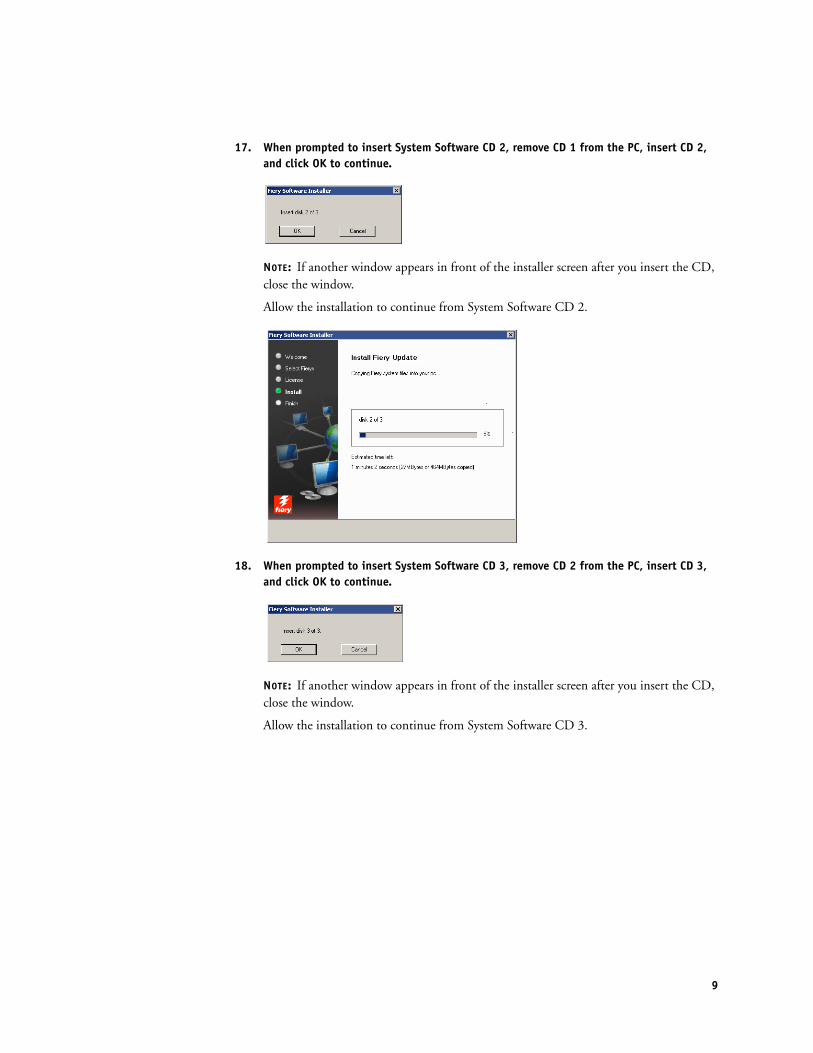
17. When prompted to insert System Software CD 2, remove CD 1 from the PC, insert CD 2, and click OK to continue.
NOTE: If another window appears in front of the installer screen after you insert the CD, close the window.
Allow the installation to continue from System Software CD 2.
18. When prompted to insert System Software CD 3, remove CD 2 from the PC, insert CD 3, and click OK to continue.
NOTE: If another window appears in front of the installer screen after you insert the CD, close the window.
Allow the installation to continue from System Software CD 3.
10
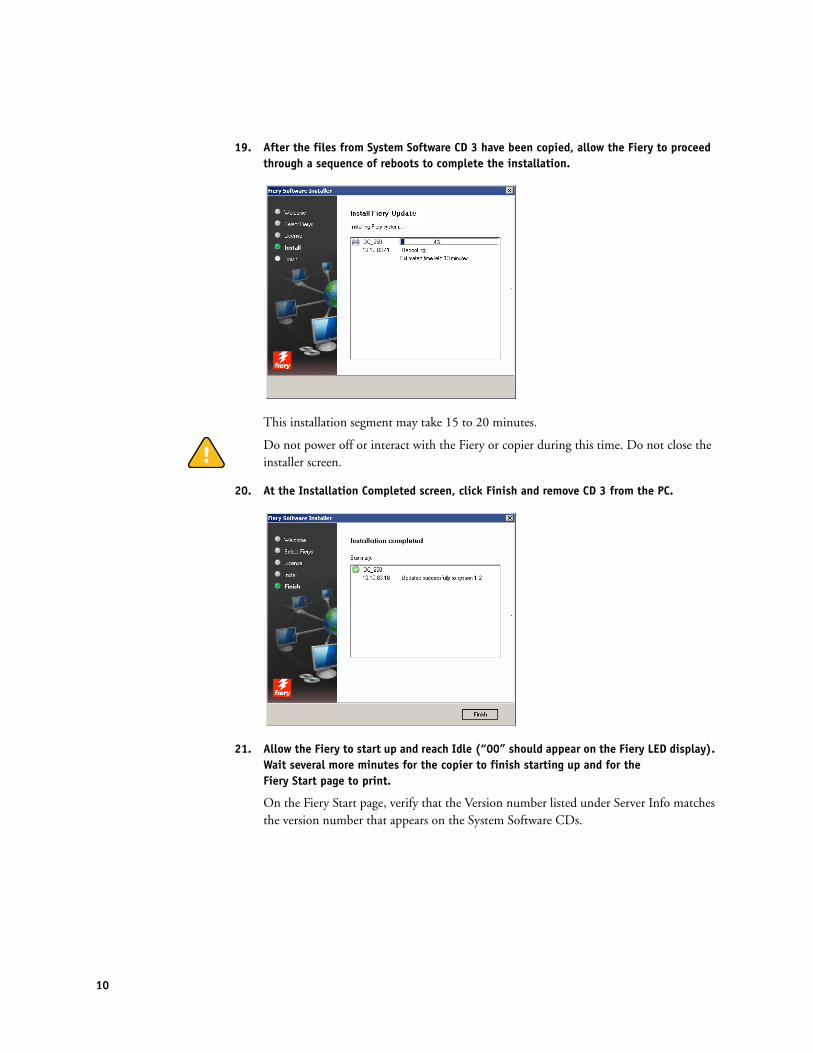
19. After the files from System Software CD 3 have been copied, allow the Fiery to proceed through a sequence of reboots to complete the installation.
This installation segment may take 15 to 20 minutes.
Do not power off or interact with the Fiery or copier during this time. Do not close the installer screen.
20. At the Installation Completed screen, click Finish and remove CD 3 from the PC.
21. Allow the Fiery to start up and reach Idle (“00” should appear on the Fiery LED display). Wait several more minutes for the copier to finish starting up and for the Fiery Start page to print.
On the Fiery Start page, verify that the Version number listed under Server Info matches the version number that appears on the System Software CDs.
11
22. Configure Setup using the Configuration page that you printed earlier. After exiting Setup, allow the system to reboot.
For more information, see Configuration and Setup on the User Documentation CD.
23. Restore the non-resident fonts and custom color profiles that were archived earlier.
24. Install any required software patches.
Contact your authorized service/support center for a list of valid software patches. Some or all of the patches listed on the Configuration page that you printed earlier may no longer be valid. Before installing a patch, be sure to verify with your authorized service/support center that it is valid for your system version. Installing an invalid patch may result in system corruption.
Software patches may be accessed from one or more of the following locations:
• Check for Product Updates— In a Web browser, connect to the IP address of the Fiery, click the Configure tab, and click “Check for Product Updates.”
• CD or DVD media— Locate the patch file in the media directory and install it according to the instructions provided with the media.
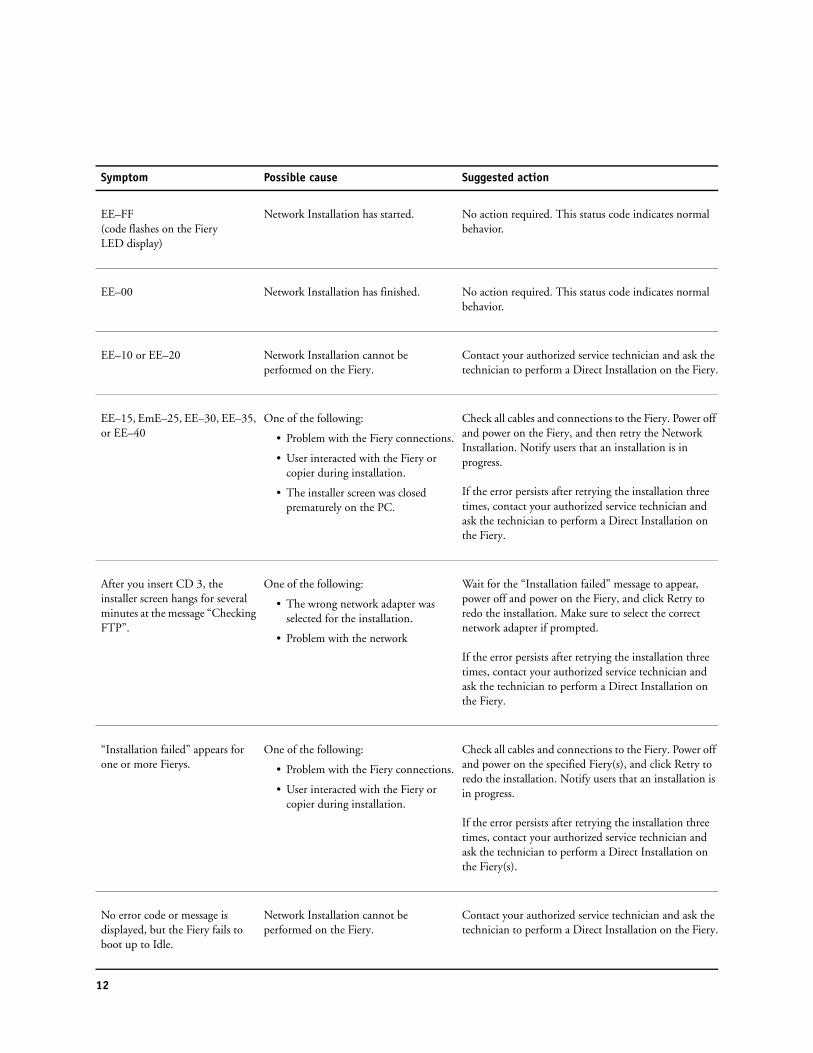
Error codes and messagesTo learn possible causes and solutions for a specific error code or message during Network Installation, find the symptom in the following table and perform the suggested actions.
Error codes appear on the LED display of the Fiery and are indicated by a flashing “EE” followed by a two-digit code. Error messages appear on the installer screen on the PC.
12
Symptom Possible cause Suggested action
EE–FF (code flashes on the Fiery LED display)
Network Installation has started. No action required. This status code indicates normal behavior.
EE–00 Network Installation has finished. No action required. This status code indicates normal behavior.
EE–10 or EE–20 Network Installation cannot be performed on the Fiery.
Contact your authorized service technician and ask the technician to perform a Direct Installation on the Fiery.
EE–15, EmE–25, EE–30, EE–35, or EE–40
One of the following:
• Problem with the Fiery connections.
• User interacted with the Fiery or copier during installation.
• The installer screen was closed prematurely on the PC.
Check all cables and connections to the Fiery. Power off and power on the Fiery, and then retry the Network Installation. Notify users that an installation is in progress.
If the error persists after retrying the installation three times, contact your authorized service technician and ask the technician to perform a Direct Installation on the Fiery.
After you insert CD 3, the installer screen hangs for several minutes at the message “Checking FTP”.
One of the following:
• The wrong network adapter was selected for the installation.
• Problem with the network
Wait for the “Installation failed” message to appear, power off and power on the Fiery, and click Retry to redo the installation. Make sure to select the correct network adapter if prompted.
If the error persists after retrying the installation three times, contact your authorized service technician and ask the technician to perform a Direct Installation on the Fiery.
“Installation failed” appears for one or more Fierys.
One of the following:
• Problem with the Fiery connections.
• User interacted with the Fiery or copier during installation.
Check all cables and connections to the Fiery. Power off and power on the specified Fiery(s), and click Retry to redo the installation. Notify users that an installation is in progress.
If the error persists after retrying the installation three times, contact your authorized service technician and ask the technician to perform a Direct Installation on the Fiery(s).
No error code or message is displayed, but the Fiery fails to boot up to Idle.
Network Installation cannot be performed on the Fiery.
Contact your authorized service technician and ask the technician to perform a Direct Installation on the Fiery.