installing workbench v2.05
DESCRIPTION
Come installare il workbench con winuaeTRANSCRIPT

In this guide we will take you through creating a hard Disk (HDF) and installing Workbench 2.05. Forthis guide we will be creating 2 separate drives 1 (HDF) and one created from a Windows Directory.So for this you will need the followingItems.
1. Kickstart 2.052. Workbench 2.05 Install Diskette3. Workbench 2.05 Boot Diskette4. Workbench 2.05 Fonts Diskette5. Workbench2.05 Extras Diskette6. WinUAE (Installed)
Now as we are going to be creating a Hard Disk Drive, the 1st thing you should do is go to the directorywhere you installed WinUae (Usually C:\program Files\winuae) and create a Folder Called “AmigaHard Disks” and then inside that file create another directory called “Workbench 2.05 (This will be theplace where you will eventuallysave Workbench 2.05 to). SO lets begin to setup Workbench 2.05 on a virtual disk, Double click on the WinUAE Icon.
Now WinUAE launches and you should see the followingscreen:(Indicated Below):
OK lets get started by clicking the “CPU” tab (located in the left hand side panel under “Hardware”)See below diagram.

Once the “CPU” tab is clicked you should be looking at the followingscreen:
Ok lets click the “68000” Tab (under “CPU”) and also make sure that the “More Compatible” box isticked”
Now Under the “CPU Emulation Speed” make sure that the “Match A500 Speed” is selected.
Now for the “Chipset” tab (this is placed on the left side under the “CPU” tab

With this selected you should be looking at a screen similar to the followingone:
Now this screen may look complicated but believe me…it’s notso lets get going. Now under the “Chipset” Section, make sure that the “Full ECS” button is selected:
Also under “Chipset Extra” please select “A500+“from the Pull-Down Menu

Now finallyfor this tab select “Options” and then select the “Cycle-exact CPU and Blitter”
Now for the “ROM ” tab this is located on the Lefthand side under “Adv. Chipset”
Now we will change the ROM properties from the followingScreen:
From here look under the “System ROM Settings” and select your Kickstart.Rom file (for this guidewe need the Kickstart 2.05 ROM) Usually used for the A500+/A600 Models.

So we need to browse for the Kickstart.ROM file by pressing the “ ” button, once you have pressedthis you should see the followingbox appear.
Now from here simply select the Kickstart file you need (yourKickstart.ROM files should be whereveryou extracted) for exampleC:\Program Files\WinUAE\Kickstart.Roms ))
Once you have selected your Kickstart file simply press the “ ” button, now you will bereturned to the followingscreen.

You will now notice that under the “System ROM Settings” that the Kickstat.ROM file you need isnow selected. See image below.
We are now done for the ROM section so lets now move to the “RAM ” section, again this is located onthe left hand side and is under the “ROM ” tab.
Now to be honest there really is not that much to do here so lookat the “Memory Settings” and adjustthe “Chip ” slider bar to 2MB.
PLEASE NOTE make sure that the “Slow” slider bar is set to “none”
Finally lets go to the “Hard drives” tab you should see the followingscreen:

Now from this screen we are going to make our Hard Drives, so first lets click on the “Add Hardfile”Button.
You should now see the followingScreen:
Again this may look complicated but believe me it isn’t so lets get going. Look under the “New hard disk image file” section.
Now in the White box at the top type “20” (next to where it says “MB ”) this is going to be the size ofour hard disk. (Save this HDF file in the Directory you made inyour WinUAE/hard disks folder)
then press the “ ” button A screen will now popup:

All we have to do from this screen is name the hard disk so Under“File name” type the name you wantto give the disk (in this case “WB 2.05”)
Then hit the “ “ button You will not be taken back to the “Hard drives” screen and it should look something like the picturebelow:

As you can now see the name and location of the hard disk that you have just created is now listed in the“Path” window under the “Settings” window.
So on we go, the next thing we need to do is set the Device name we do this in the White box next to theword “Device” . (Located under theFileSysbox).
PLEASE NOTE this is DH0 as in Zero it’s not an “o”
Once you have done this simply press the " ” button. You should now have returned to the “Hard drives” screen.
As you can see from this picture out hard Drive is listed and ready to use, we have made this hard diskusing the Hardfile button (this creates a Hard Disk File (HDF)), now we are going to create anotherdrive, this time using a directory.
So lets click on the “ ” button., now you are presented with the followingscreen:

Now under “Device name” Type in “DH1” (as the first drive is set as DH0 then this drive shouldfollow as DH1)
Going well so far, now we need to set the “Volume label” as we are going to use this second drive as a“ Work Related” drive (for adding programs to the HDF file), lets call it “Work”.
Next is the “Path” box, this is the place where we will tell WinUAE where the folder is that we want touse as a hard disk, and, as we have saved theHDF file to the WinUAE directory then we mayas wellcreate a directory is the same place. So go to C:\Program Files\WinUAE\Amiga Hard Disks\ Workbench 2.05\ This is where we create out New Folder called “Work ” So do that now Now the Folder is created we can go back and enter the locationof the folder we just created, so look tothe Right of the “Path” section:
Now Press the “ ” button and you will be shown the followingscreen:

From this screen simply navigate your way to the “Work” folder in this Guides case the path is: C:\Program Files\winuae\Amiga Hard Disks\Work
Once you have selected the folder just press the “ ” button..Now you will see a familiarscreen:
As you can see all the informationis entered and now all we need to do is press the “ ”button once more. Again another familiar screen will appear now this is again the “Hard drives” screen: see picturebelow:

As you can see we now have 2 hard drives set up and we are now ready to save the configurationso weneed to select the “Configurations” tab on the left panel.
Now theConfigurations screen has popped up and should look like this (PLEASE NOTE: if you haveother configurationssaved the will appear here too)

Now we are very nearly finished for this part so all we need to do is Save the Configuration, so under the“Name” part type in the name of the configuration file. (for this guide we are giving it the name“Workbench 2.05”).
Then under “Description” type in a description of the file (for this guide we are giving it the description“Workbench 2.05 Hard Disk”).
This is all we need to do for this tab so now we will move to the “Display” tab

YES! I know this looks complicated, but I assure you it’s not ……. Honest, so the 1st thing we need todo on this screen is to change the “Full screen” resolution and the “Windowed” mode., also make surethat theVertical sync (for Windowed mode) is ticked. See the diagram below
Next we want the “Settings” tab and from her we want to select “Full Screen Native Modes”and“Correct Aspect Ratio”
Next is to go into the “Line Mode” Tab and make sure thatDouble is checked
Finally the “Cantering” Tab, make sure that bothHorizontal andVertical are ticked
Now this is PERFECT for both Full Screen mode and Windowed Mode Simple so far now all we need to do is Save the Configuration, we can do this by pressing the “Save”Button.

CONGRATULATIONS you have now created a new Configurationwith 2 hard files ready for installingWorkbench 2.05. Now lets install Workbench 2.05 and see how things work. So! Lets Start the Configuration and Install Workbench 2.05. First thing to do is insert your Workbench Diskettes into your Floppy Drives. To do this go to the“Floppy drives” this is located at the Lefthand side of the screen under the “RAM ” tab.
Ok the first thing to do is enable all the Disk drives (as, as you can see from the picture only two areenabled). So to enableDF2 andDF3 we go to the box marked “Disable” and select “3.5”DD” fromthe Pull Down Menu: See Below.
Once you have selected “3.5”DD” from the Pull Down Menu, then repeat the process withDF3: Now you have selected all the drives your screen should look like this: See Below illustration

Right, from this screen we need to insert the Diskettes into the drive, so under “DF0:” we are going to
place the Workbench Install Diskette” to do this press the “” on the Right hand of the screen on theDF0: section, once you have done this you will see this box.
From this section you can select the folderwhere your Workbench Disks are located on your hard drive.
Once you have selected the image press “ ” and you will be presented with the screen shownbelow.

As you can see the Workbench Diskette has been inserted into the drive labledDF0: Now follow the above steps for inserting a Workbench Diskette again and insert the other 3 WorkbenchDiskettes in the Drives: See Below: PLEASE NOTE Below is the order of wich the disks should be inserted into the drives DF0: - InstallDF1: - BootDF2: - FontsDF3: - Extras
As you can now we have inserted all 4 Workbench Diskettes intoall 4 drives in WinUAE mow all we
need to do is press the “ ” button and get going.

Workbench 2.05 will start to load (see the screen below).
When the “Key map Selection” screen appears choose 1 and press “Enter” on the keyboard (Seebelow).
Once you have selected 1 and then pressed “Enter” you will be taken to the Keymap Selection screen,all you have to do on this screen is select the number for your location and then press “Enter”, on yourKeyboard.
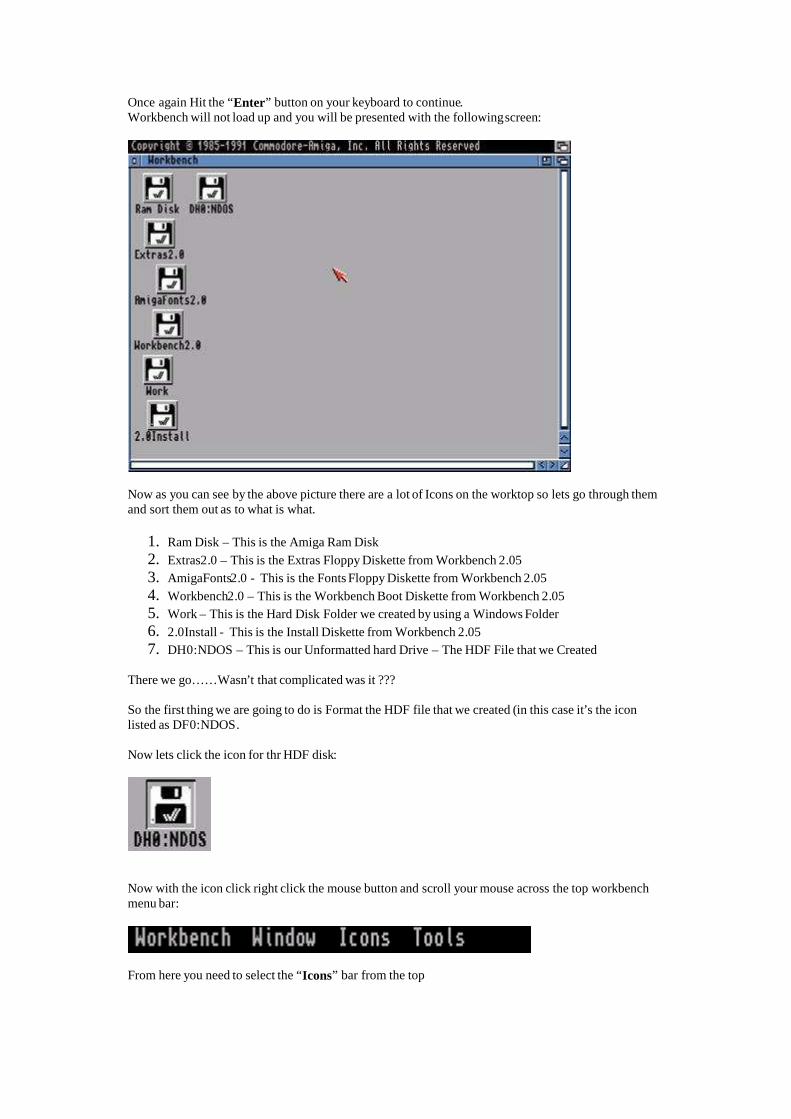
Once again Hit the “Enter” button on your keyboard to continue.Workbench will not load up and you will be presented with the followingscreen:
Now as you can see by the above picture there are a lot of Icons on the worktop so lets go through themand sort them out as to what is what.
1. Ram Disk – This is the Amiga Ram Disk2. Extras2.0 – This is the Extras Floppy Diskette from Workbench 2.053. AmigaFonts2.0 - This is the Fonts Floppy Diskette from Workbench 2.054. Workbench2.0 – This is the Workbench Boot Diskette from Workbench 2.055. Work – This is the Hard Disk Folder we created by using a Windows Folder6. 2.0Install - This is the Install Diskette from Workbench 2.057. DH0:NDOS – This is our Unformatted hard Drive – The HDF File that we Created
There we go……Wasn’t that complicated was it ??? So the first thing we are going to do is Format the HDF file thatwe created (in this case it’s the iconlisted as DF0:NDOS. Now lets click the icon for thr HDF disk:
Now with the icon click right click the mouse button and scroll your mouse across the top workbenchmenu bar:
From here you need to select the “Icons” bar from the top

See Illustrationbelow:
From this menu select the “Format Disk ” part .
Once you have selected this option (and let go of the mouse button) the followingbox will appear:
As this is a Fixed drive we are working with we can ignore the part about inserting a disk and just press“Continue”. Again another box will pop up this time looking like this:
This is just an informationbox asking you of it’s ok to formatthe drive, click “Continue” as that’sexactlywhat we want to do.

As you can see by the above picture the drive is now formattingand as soon as it finishes you will bereturned to your Workbench Screen:
As you will now notice from the picture above there is now a Disk icon called “Empty ”
Now all we have to do is rename the HDF (Hard disk) that we have just formatted, so left click on the“Empty” Icon (the icon will go white).
Now Right Click the mouse and move to the top of the screen, a menu bar will appear (see Below)
Click the “Icons” part and a pull down menu will appear:
From here select “Rename” (just let go of the Mouse buttons)

Now a rename bar will appear that resembles the picture below:
Now just type in the name of the Drive (for this guide we are using the name “System”) once you have
type it in just click the “ ” button and when you return to the Workbench Screen you willnotice your icon (previously called “Empty”) has now been changed to “System”.
Now we have created, formatted and re-named the drive we are ready to install Workbench 2.05. (yeahfinallyI hear you cry). So! Now Double click the “2.0Install” Icon.
Now a window will open and you will see the followingscreen.

Now double click the “UpdateWB” icon.
Once you have clicked this icon the screen below will appear:
The screen is now asking you a question “Is your normal SYS: partition located on DH0: ? (Y/N)” Answer “Y ” to this question and press “Enter” on your keyboard.
You are now asked if the date is correct then press “Y” again if not Press “N” and enter the correctDate. For example “25-May-07” Next you are asked to set the time:

Once you have entered all the information, (and then pressed“Enter” on your keyboard), you will bepresented with the screen below:
Now this is a simple screen all we have to do is press “Y” (and return on the keyboard)
As you can now see Workbench 2.05 is Installing(Yippeeee I hear you shout) and I couldn’t agreemore. Once this screen is going you will eventuallybe presented with another screen: (See Below):
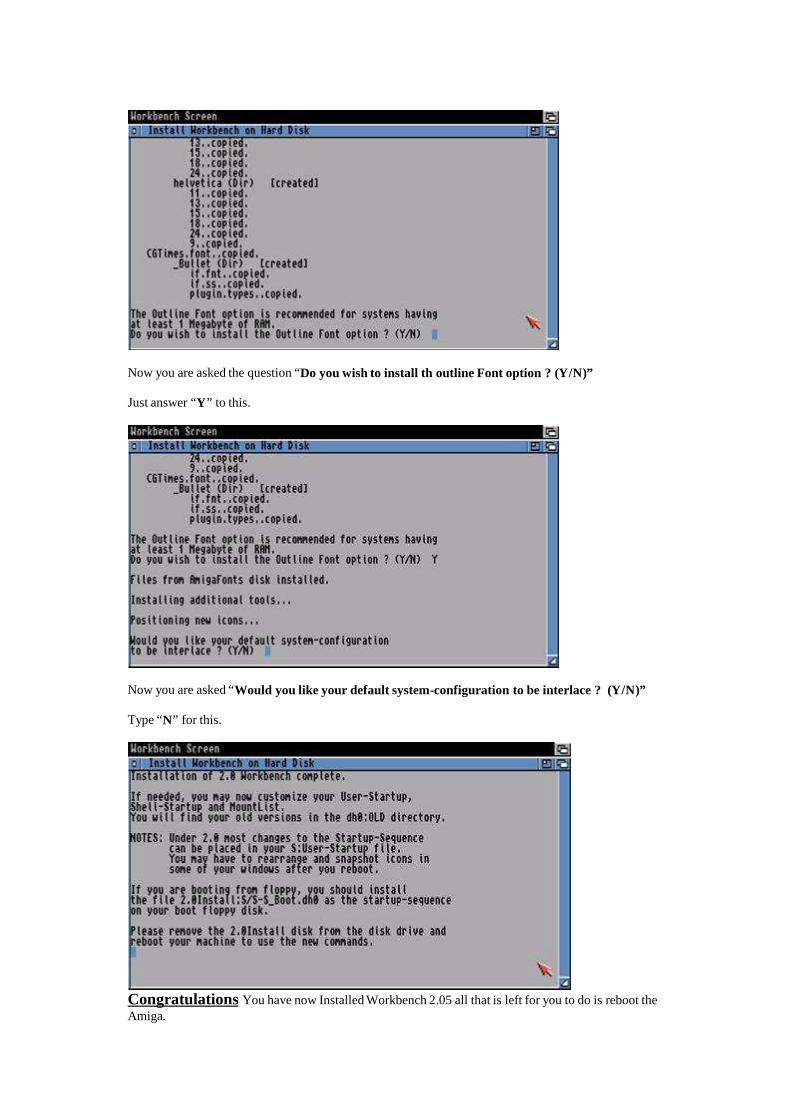
Now you are asked the question “Do you wish to install th outline Font option ? (Y/N)” Just answer “Y ” to this.
Now you are asked “Would you like your default system-configuration to be interlace ? (Y/N)” Type “N” for this.
Congratulations You have now Installed Workbench 2.05 all that is left for youto do is reboot theAmiga.

So 1st lets take the Floppy images from the drives, now to do this press “F12” on the keyboard. Thefollowingscreen will appear.
Now from this (very familiar looking) screen we want to go to the Floppy drives section (if youremember this is located on the left hand side of the screen under “RAM ” Finally you will see this screen:
Once you have selected this screen you should be faced with the followingpicture (see below picture).

Now from this screen we can eject all out floppy images. So lets do it, starting from DF0: look to the
right hand side of the screen and press the “ ” button. Do this will all four drives until all thedrives are empty. See illustration below:
Now you have emptied all the drives all that is left to do is reboot the Amiga to do this simply press the
Reset button “ ”
You have now Installed Amiga Workbench 2.05. This guide is © CPC464 and Amiga Emulation for Beginners Please do not Alter, Adjust Duplicate, Copy or Distribute this guide without the Authors Consent.