institute of chessinstituteofchess.co.uk/esw/files/level_2_pdf.pdf · institute of chess revision...
TRANSCRIPT
Institute of
Chess
Revision Guide to
LEVEL 2
The contents were written and arranged by
GM Chris Ward FM Desmond Tan.
This revision guide is dedicated to the memory of
IM Bob Wade OBE (1921 ~ 2008),
who devoted his life to chess.
(Revised) September 2010

1
Institute of Chess Level 2 Coaching Course
by GM Chris Ward and FM Desmond Tan
Index of Contents
Page
1) Notating a Game and the Four Move Mate 2
2) Annotation Symbols 4
3) The ‘Lawnmower’ Checkmate 5
4) Checkmating with a King and Queen 8
5) Checkmating with a King and Rook 11
6) The Sacrifice 14
7) Tips on Stalemate 18
8) The Fork 20
9) The Pin 21
10) The Skewer 24
11) Discovered Check 26
12) Double Check 28
13) Doubling up 30
14) The 7th Rank 33
15) The Overloaded Piece 35
16) General Opening Principles 36
17) Advice on Practical Play 44

2
Notating a Game
Writing the moves down is a very useful exercise for a few reasons. If you are prone
to moving too quickly then it will help you slow your play down and if you have a
record of it then you can play over it later in order to either enjoy a nice game that you
may have had or else figure out where you went wrong! We all learn from our
mistakes and if you have a correctly completed score sheet then you can show it to
someone else who may be able to offer you help.
In competitions you will write down your game on specially-provided score sheets
whilst some may obtain a scorebook so that they can all be written in the same place.
In the absence of either of those you can of course make your own score sheet on
blank paper. All you will need to ensure is that you write down the names of the
players involved and have a column for the white moves and a column for the black
moves.
Your teacher will show you how to notate correctly using ‘algebraic’ notation but a
few key points to remember are:
1) K stands for king, Q for queen, R for rook, B for bishop and N for knight even
though it begins with a ‘k’.
2) Always use capital letters then for the pieces although there is no need to put
‘P’ for pawn. If there is no capital letter, then it is assumed that the piece to be moved
is a pawn.
3) Always ensure that the square ‘a1’ is in the bottom left hand corner of the
player with the white pieces. If you have a board that doesn’t have coordinates on it
then you simply have to imagine that is the case and assign the other squares
accordingly.
4) Don’t use capital letters for squares. Intending rook to the square e4, correct is
Re4 but wrong is rE4.
5) ‘x’ denotes a capture and a ‘+’ at the end shows that it is check.
6) 0-0 stands for castling short (i.e. on the kingside) and 0-0-0 is for long castles
(castling on the queenside).
7) If it is possible that two pieces of the same type could move to the same
square, then it is necessary to differentiate between the two. This could be by either
the file or rank that it starts on. For example, Nge4 would show that it is the knight on
the g-file that has moved to e4. It is only necessary to put the ‘g’ in if for example
Nce4 was also possible.

3
To give a very quick example of a game notation let’s begin with the four-move mate
that you should make yourself very familiar with to ensure that it never happens to
you!
XABCDEFGHY 8rsnlwqkvlntr( 7zppzppzppzpp' 6-+-+-+-+& 5+-+-+-+-% 4-+-+-+-+$ 3+-+-+-+-# 2PzPPzPPzPPzP" 1tRNvLQmKLsNR! xabcdefghy
1.e4 e5 2.Qh5 Nc6 3.Bc4 Nf6 4.Qxf7 mate.
XABCDEFGHY 8r+lwqkvl-tr( 7zppzpp+Qzpp' 6-+n+-sn-+& 5+-+-zp-+-% 4-+L+P+-+$ 3+-+-+-+-# 2PzPPzP-zPPzP" 1tRNvL-mK-sNR! xabcdefghy
Particularly when using computers, you may notice that ‘checkmate’ is denoted by the
‘#’ symbol. Alternatively, you could simply write ‘mate’ or a 1-0 or 0-1 should make
it clear what the final result was.

4
Annotation Symbols
Following on from the notation of games you will certainly come across ‘annotations’
of other games. This is typically where there is some analysis or commentary of a
game, often involving top-ranking players. The following abbreviations applied next
to moves are worth taking note of:
? A bad move
?? A very bad move, often referred to as a blunder.
! A good move
!! A very good or excellent move.
?! A dubious (probably bad) move.
!? An interesting (and most likely good) move.
With regards our previous 4-move game, the move 3…Nf6 (note the dots show that it
is Black’s rather than White’s 3rd move) would be annotated with a ‘??’, as it is a
quite dreadful move that pays no attention whatsoever to what White was threatening.
Although strictly speaking I guess you could argue that 4 Qxf7 is deserving of a ‘!!’
that tends not to be the way when it is a rather obvious continuation.
5
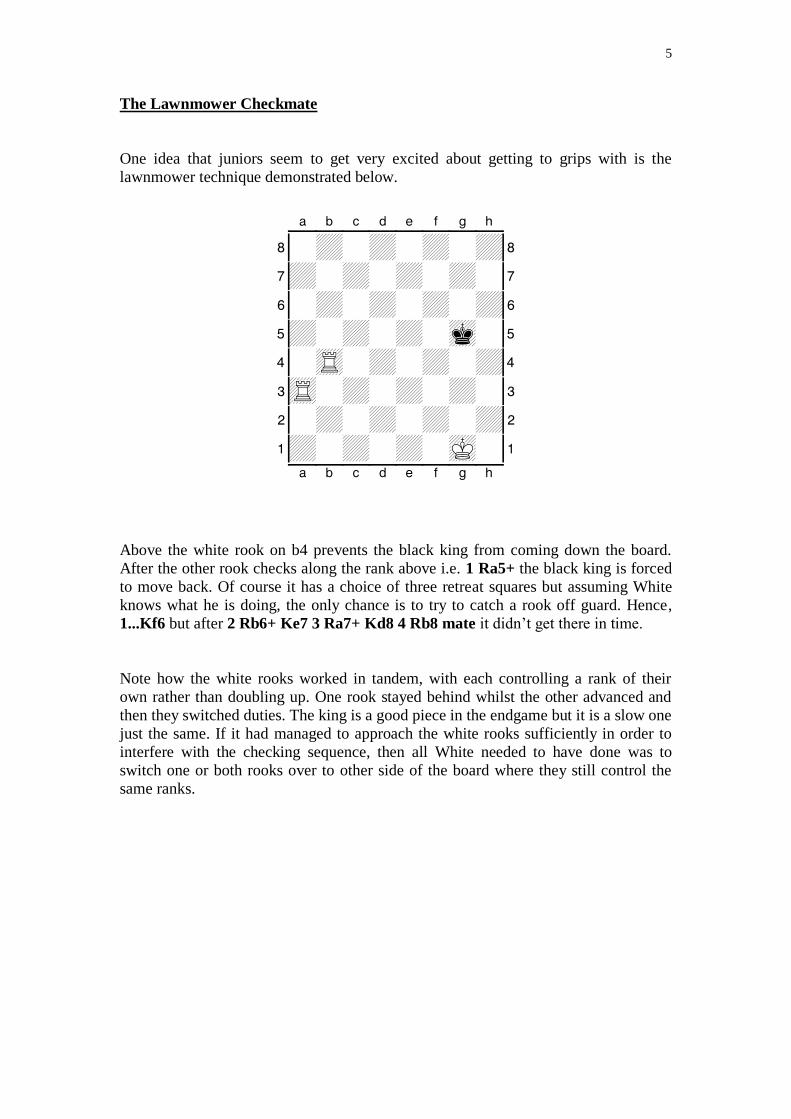
The Lawnmower Checkmate
One idea that juniors seem to get very excited about getting to grips with is the
lawnmower technique demonstrated below.
XABCDEFGHY 8-+-+-+-+( 7+-+-+-+-' 6-+-+-+-+& 5+-+-+-mk-% 4-tR-+-+-+$ 3tR-+-+-+-# 2-+-+-+-+" 1+-+-+-mK-! xabcdefghy
Above the white rook on b4 prevents the black king from coming down the board.
After the other rook checks along the rank above i.e. 1 Ra5+ the black king is forced
to move back. Of course it has a choice of three retreat squares but assuming White
knows what he is doing, the only chance is to try to catch a rook off guard. Hence,
1...Kf6 but after 2 Rb6+ Ke7 3 Ra7+ Kd8 4 Rb8 mate it didn’t get there in time.
Note how the white rooks worked in tandem, with each controlling a rank of their
own rather than doubling up. One rook stayed behind whilst the other advanced and
then they switched duties. The king is a good piece in the endgame but it is a slow one
just the same. If it had managed to approach the white rooks sufficiently in order to
interfere with the checking sequence, then all White needed to have done was to
switch one or both rooks over to other side of the board where they still control the
same ranks.
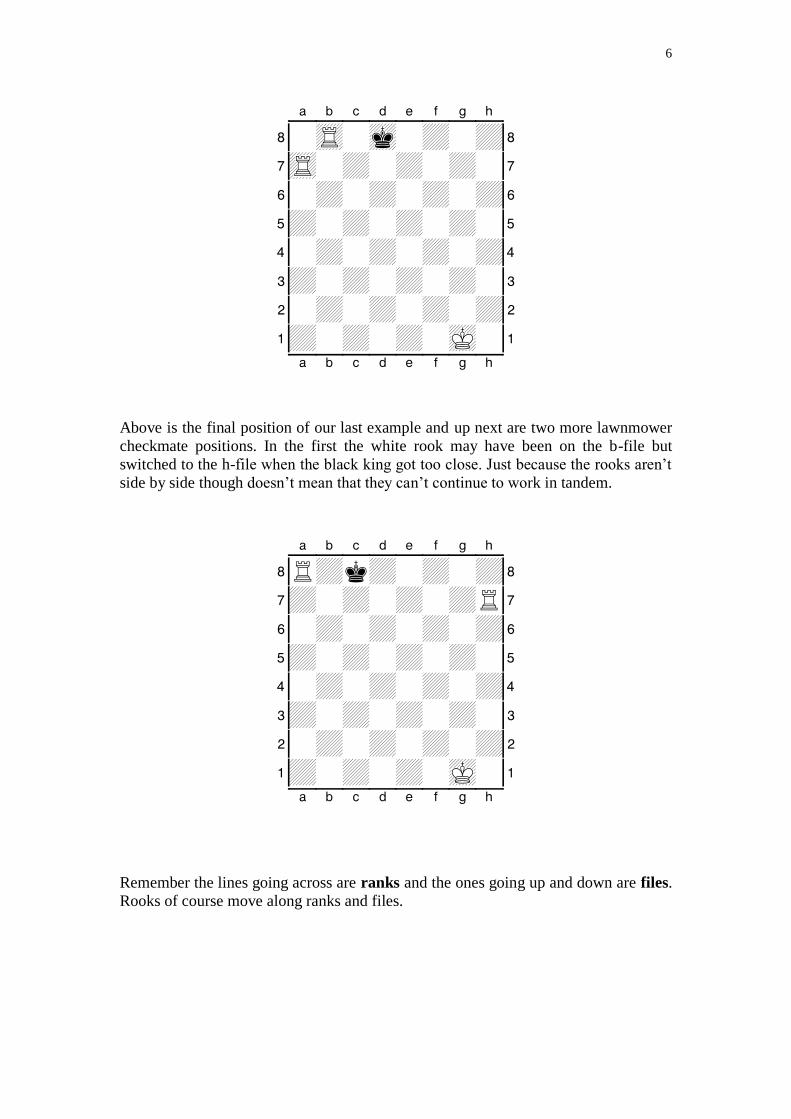
6
XABCDEFGHY 8-tR-mk-+-+( 7tR-+-+-+-' 6-+-+-+-+& 5+-+-+-+-% 4-+-+-+-+$ 3+-+-+-+-# 2-+-+-+-+" 1+-+-+-mK-! xabcdefghy
Above is the final position of our last example and up next are two more lawnmower
checkmate positions. In the first the white rook may have been on the b-file but
switched to the h-file when the black king got too close. Just because the rooks aren’t
side by side though doesn’t mean that they can’t continue to work in tandem.
XABCDEFGHY 8R+k+-+-+( 7+-+-+-+R' 6-+-+-+-+& 5+-+-+-+-% 4-+-+-+-+$ 3+-+-+-+-# 2-+-+-+-+" 1+-+-+-mK-! xabcdefghy
Remember the lines going across are ranks and the ones going up and down are files.
Rooks of course move along ranks and files.

7
The next example may also have seen the same technique employed only with White
working with files instead of ranks. Though it may appear visually odd to a human, to
rooks which operate along straight lines, it is of course all the same!
XABCDEFGHY 8R+-+-+-+( 7+R+-+-+-' 6-+-+-+-+& 5mk-+-+-+-% 4-+-+-+-+$ 3+-+-+-+-# 2-+-+-+K+" 1+-+-+-+-! xabcdefghy

8
Checkmating with a King and Queen
XABCDEFGHY 8-+-+-+-+( 7+-+-+-+-' 6-+-+-+-+& 5+-+-+k+-% 4-+-+-+-+$ 3+-+-+-+-# 2-+-+-+-+" 1+-+QmK-+-! xabcdefghy
1.Qd4
There is more than one way to set about delivering checkmate but one favourite idea
is to let the queen do all the work to trap the enemy king on an edge. Once that is
achieved the attacking king can wander over to help provide the killing blow. Note
how the queen on d4 restricts the black king to just one portion of the board.
1...Ke6 Or 1...Kg5 2.Qe4 and the black king is being slowly forced to either the back or side
edge.
2.Qc5 Kf6 3.Qd5 Kg6
Or of course 3...Ke7 4.Qc6.
4.Qe5 Kf7
Upon 4...Kh6 5.Qg3 the black king is trapped on the side edge and the white king is
ready to advance e.g. 5...Kh5 6.Kf2 Kh6 7.Kf3 Kh7 8.Kf4 Kh6 9.Kf5 Kh7 10.Kf6
Kh8 11.Qg7 mate.
5.Qd6 Kg7 6.Qe6

9
XABCDEFGHY 8-+-+-+-+( 7+-+-+-mk-' 6-+-+Q+-+& 5+-+-+-+-% 4-+-+-+-+$ 3+-+-+-+-# 2-+-+-+-+" 1+-+-mK-+-! xabcdefghy
Now wherever the black king moves the white queen can 'cut it off' on an edge.
6...Kf8
Or 6...Kh7 7.Qg4
7.Qd7
The queen has performed its duty and is now poised to deliver mate as soon as the
white king appears on the scene. Play might continue:
7...Kg8 8.Kf2 Kf8
The only danger to White is the potential for him to carelessly deliver stalemate. Once
the king is trapped on an edge there is no point in restricting its possibilities further.
For example, after 8...Kh8 White should continue with his plan of bringing his king
up so that the queen can be placed between the two kings to deliver mate. Instead here
9.Qf7?? would be a disaster. Black has no legal moves and hence it is stalemate and
White only gets the half point rather than the full point.
9.Kf3 Kg8 10.Kf4 Kf8 11.Kf5 Kg8 12.Kg6 Kf8 13.Qf7 mate

10
TIP: The most common type of checkmate involves a queen ending up next to an
enemy king (usually on an edge) but with a piece protecting it so that her majesty
can’t simply be taken. The defending piece here is of course White’s king thanks to
the rule prohibiting two kings moving next to each other.
XABCDEFGHY 8-+-+-mk-+( 7+-+-+Q+-' 6-+-+-+K+& 5+-+-+-+-% 4-+-+-+-+$ 3+-+-+-+-# 2-+-+-+-+" 1+-+-+-+-! xabcdefghy

11
Checkmating with a King and Rook
The technique here is similar to that with a king and queen in that the procedure
involves forcing the defending king to an edge.
XABCDEFGHY 8-+-+-+-+( 7+-+-+-+-' 6-+-+-+-+& 5+-+-mk-+-% 4R+-+-+-+$ 3+-+-+-+-# 2-+-+K+-+" 1+-+-+-+-! xabcdefghy
1.Ke3
White correctly activates his king as unlike the queen the rook can't force the enemy
king back on its own.
1...Kf5 2.Rb4
It is important to realize that White needs to play a ‘waiting move’. A waiting move is
effectively passing.
Regarding 2.Kf3 Ke5 3.Ke3 Kf5 4.Kf3 obviously there is no point in oscillating the
kings. White wants to win and can only successfully give the check to force the
enemy king back when the two kings are directly opposed.
2...Kg5 3.Kf3 Kh5 4.Kg3
In the last couple of moves, White has chased the black king to the side. He has now
run out of squares to run to and so must return.
The technique that is used in this example is an instructive one but after you have
played through it you may wish to return to this point and observe that 4.Rg4 is even
quicker as the black king is now trapped on the side immediately. Now the game
might end via 4...Kh6 5.Kf4 Kh5 6.Kf5 Kh6 7.Rg1 (the waiting or passing move that
you should now be familiar with) 7...Kh7 8.Kf6 Kh8 9.Kf7 Kh7 10.Rh1 mate.
4...Kg5 5.Rb5+
When the kings are directly facing each, check the king along the rank as the
defending king is unable to go forward.
5...Kf6 6.Kf4 Ke6

12
XABCDEFGHY 8-+-+-+-+( 7+-+-+-+-' 6-+-+k+-+& 5+R+-+-+-% 4-+-+-mK-+$ 3+-+-+-+-# 2-+-+-+-+" 1+-+-+-+-! xabcdefghy
7.Rh5 Needless to say as before 7.Ke4 Kf6 8.Kf4 Ke6 9.Ke4 Kd6 10.Kd4 Ke6 11.Ke4 is not
very constructive, as the black king constantly dodges its opposite number. Instead a
'waiting move' or 'passing move' is required again with the rook passing on the 'safe
side' of its own king (i.e. where the black king is unable to approach and take it).
7...Kd6 8.Ke4 Kc6 9.Kd4
Yes, the white king chases after the black king knowing that it can't run forever
because it would have to rebound off the side eventually.
9...Kb6 10.Kc4 Kc6
Now with the kings directly opposed the check is in order to force the black king
further back.
11.Rh6+ Kd7 12.Kd5
XABCDEFGHY 8-+-+-+-+( 7+-+k+-+-' 6-+-+-+-tR& 5+-+K+-+-% 4-+-+-+-+$ 3+-+-+-+-# 2-+-+-+-+" 1+-+-+-+-! xabcdefghy
13
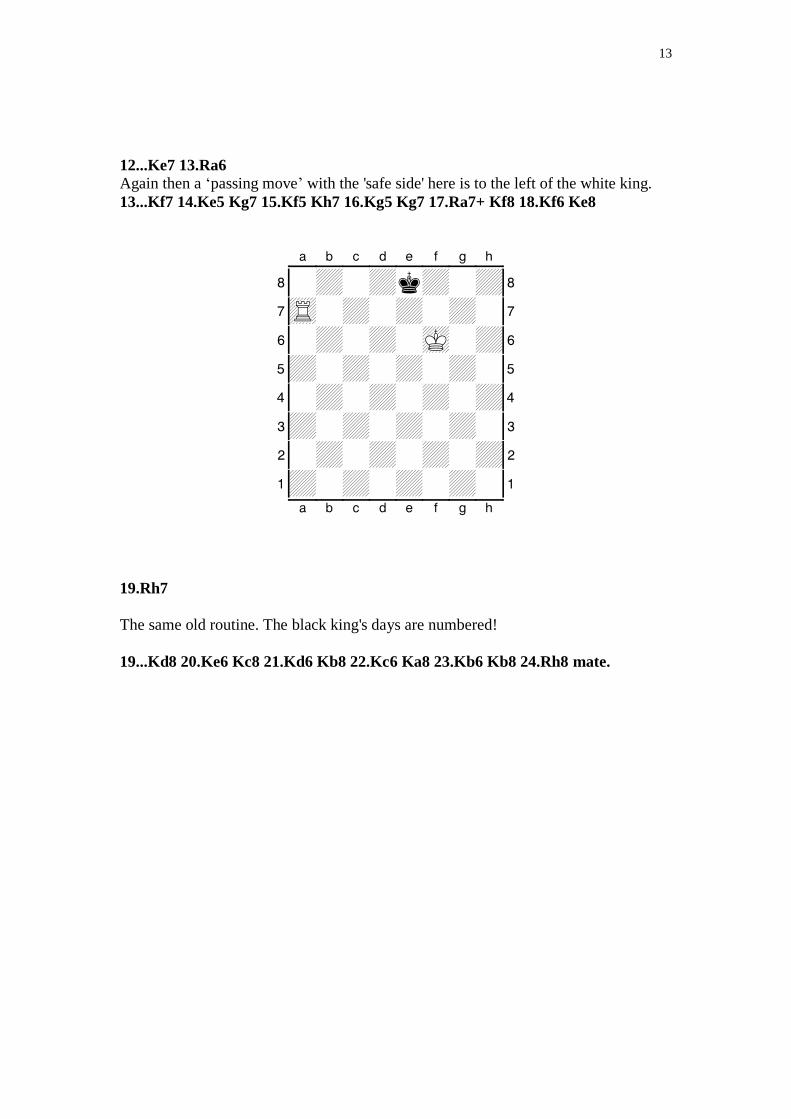
12...Ke7 13.Ra6
Again then a ‘passing move’ with the 'safe side' here is to the left of the white king.
13...Kf7 14.Ke5 Kg7 15.Kf5 Kh7 16.Kg5 Kg7 17.Ra7+ Kf8 18.Kf6 Ke8
XABCDEFGHY 8-+-+k+-+( 7tR-+-+-+-' 6-+-+-mK-+& 5+-+-+-+-% 4-+-+-+-+$ 3+-+-+-+-# 2-+-+-+-+" 1+-+-+-+-! xabcdefghy
19.Rh7
The same old routine. The black king's days are numbered!
19...Kd8 20.Ke6 Kc8 21.Kd6 Kb8 22.Kc6 Ka8 23.Kb6 Kb8 24.Rh8 mate.
14
The Sacrifice
Generally, one should look after one’s own pieces, not giving any away cheaply
whilst keeping an eye open for gifts that your opponent may give you.
A ‘sacrifice’ though occurs when a piece of greater value is deliberately conceded
either for nothing or for an enemy piece of lesser value, ultimately for the greater
good.
The key is that for a concession to be a genuine sacrifice, the intent must be there with
some justification in mind. Too often I have heard juniors claim they have sacrificed a
piece when the reality is that they hadn’t noticed it was attacked and in fact had just
lost it for nothing. Clearly there is a difference!
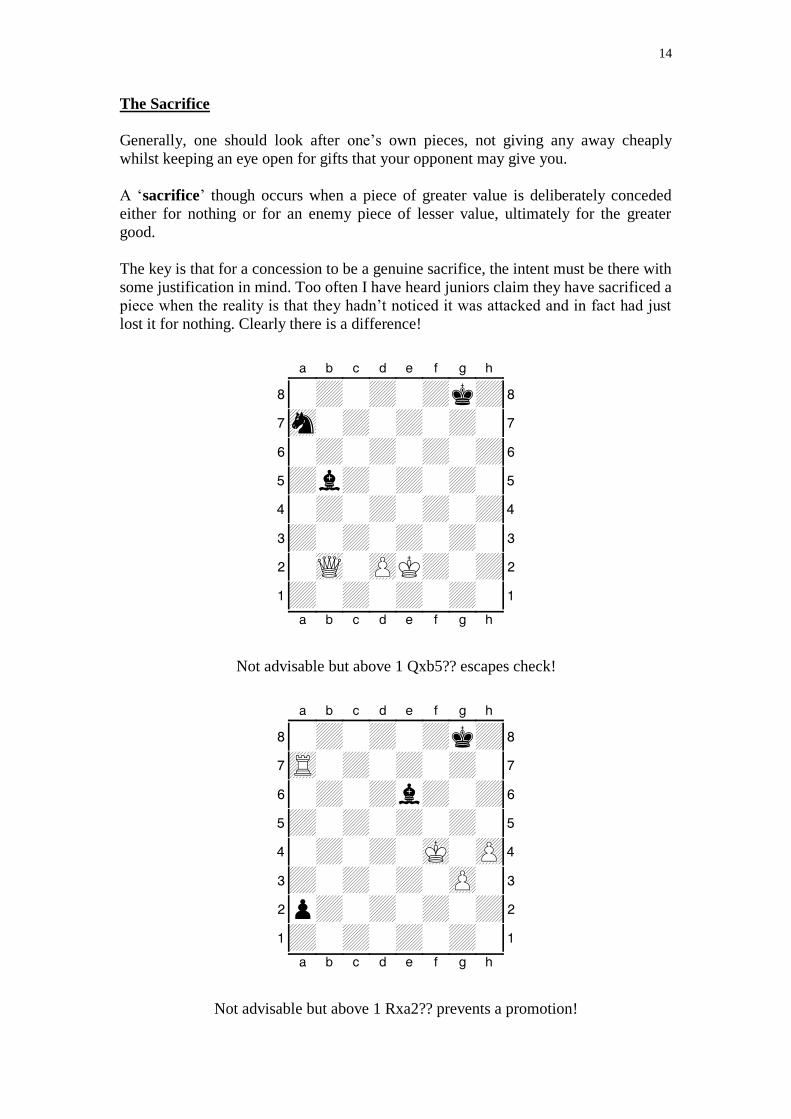
XABCDEFGHY 8-+-+-+k+( 7sn-+-+-+-' 6-+-+-+-+& 5+l+-+-+-% 4-+-+-+-+$ 3+-+-+-+-# 2-wQ-zPK+-+" 1+-+-+-+-! xabcdefghy
Not advisable but above 1 Qxb5?? escapes check!
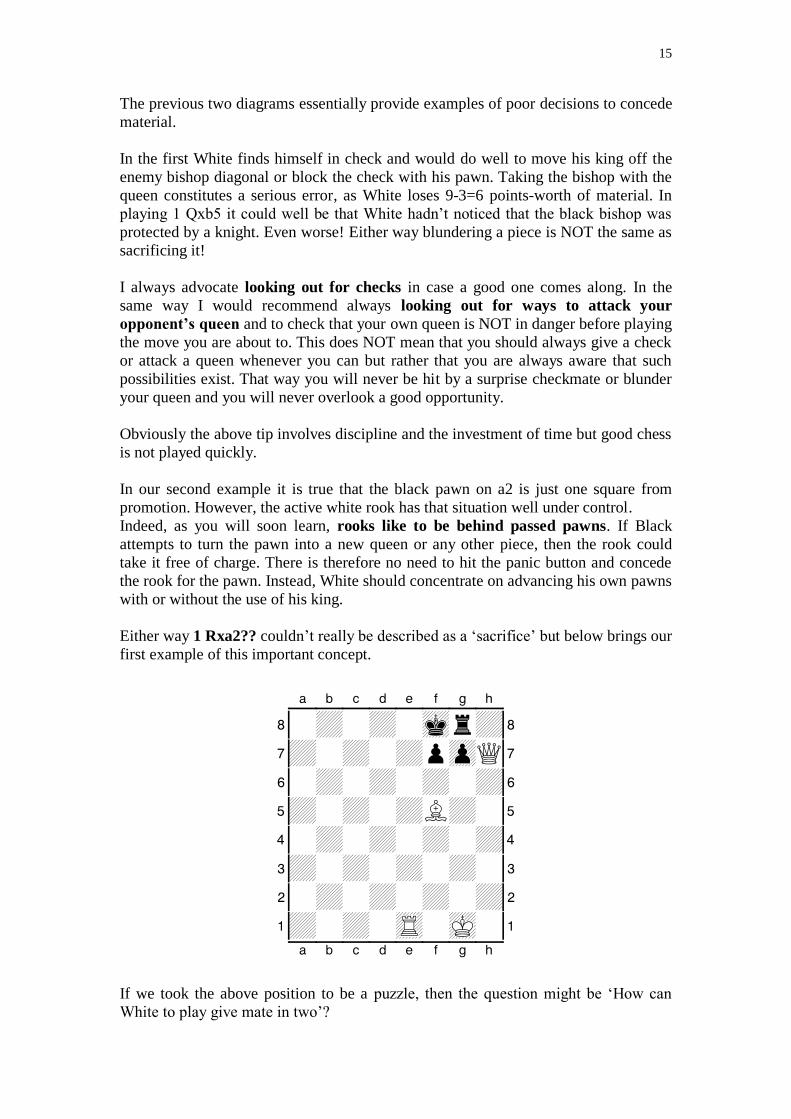
XABCDEFGHY 8-+-+-+k+( 7tR-+-+-+-' 6-+-+l+-+& 5+-+-+-+-% 4-+-+-mK-zP$ 3+-+-+-zP-# 2p+-+-+-+" 1+-+-+-+-! xabcdefghy
Not advisable but above 1 Rxa2?? prevents a promotion!
15
The previous two diagrams essentially provide examples of poor decisions to concede
material.
In the first White finds himself in check and would do well to move his king off the
enemy bishop diagonal or block the check with his pawn. Taking the bishop with the
queen constitutes a serious error, as White loses 9-3=6 points-worth of material. In
playing 1 Qxb5 it could well be that White hadn’t noticed that the black bishop was
protected by a knight. Even worse! Either way blundering a piece is NOT the same as
sacrificing it!
I always advocate looking out for checks in case a good one comes along. In the
same way I would recommend always looking out for ways to attack your
opponent’s queen and to check that your own queen is NOT in danger before playing
the move you are about to. This does NOT mean that you should always give a check
or attack a queen whenever you can but rather that you are always aware that such
possibilities exist. That way you will never be hit by a surprise checkmate or blunder
your queen and you will never overlook a good opportunity.
Obviously the above tip involves discipline and the investment of time but good chess
is not played quickly.
In our second example it is true that the black pawn on a2 is just one square from
promotion. However, the active white rook has that situation well under control.
Indeed, as you will soon learn, rooks like to be behind passed pawns. If Black
attempts to turn the pawn into a new queen or any other piece, then the rook could
take it free of charge. There is therefore no need to hit the panic button and concede
the rook for the pawn. Instead, White should concentrate on advancing his own pawns
with or without the use of his king.
Either way 1 Rxa2?? couldn’t really be described as a ‘sacrifice’ but below brings our
first example of this important concept.
XABCDEFGHY 8-+-+-mkr+( 7+-+-+pzpQ' 6-+-+-+-+& 5+-+-+L+-% 4-+-+-+-+$ 3+-+-+-+-# 2-+-+-+-+" 1+-+-tR-mK-! xabcdefghy
If we took the above position to be a puzzle, then the question might be ‘How can
White to play give mate in two’?

16
First up in case you didn’t know, mate in two means that White will move, Black will
respond and then White will give checkmate on the next turn. Beginners frequently
misunderstand that, incorrectly assuming that instead White will get two moves on the
trot. That unrealistic scenario is most certainly NOT the case.
The solution to the puzzle is:
1 Qxg8+
The white queen sacrifices itself for the black rook.
1...Kxg8
Black’s only option was to take the queen. Material-wise he has gained 9-5=4 points-
worth of pieces. Unfortunately, there is something more relevant than that.
2 Re8 mate
XABCDEFGHY 8-+-+R+k+( 7+-+-+pzp-' 6-+-+-+-+& 5+-+-+L+-% 4-+-+-+-+$ 3+-+-+-+-# 2-+-+-+-+" 1+-+-+-mK-! xabcdefghy
The material situation is irrelevant when there is checkmate (as shown above) on the
board. Clearly the sacrifice of the white queen was a perfectly sound and good idea.
The objection that I have to problems that you might see in puzzle books or
newspaper and magazine articles is that often there is a mate in two or three to solve
when in fact one could win easily (if more slowly) through more standard means.
Remember there are no prizes for winning a game as quickly as possible!
Far more useful are situations where one side may appear to be struggling or
seemingly only equal or slightly better. Then a sacrifice or combination to achieve
checkmate or a winning advantage takes on far more significance. In truth our last
example seemed like overkill. Granted it was a neat combination, but the queen
sacrifice was hardly required to ensure victory. If White had just played simple chess
and in the course of play even swapped off rooks, then completely risk-free White
could have gone on to win by delivering checkmate with the king and queen, with the
bishop also on hand to help out.
17
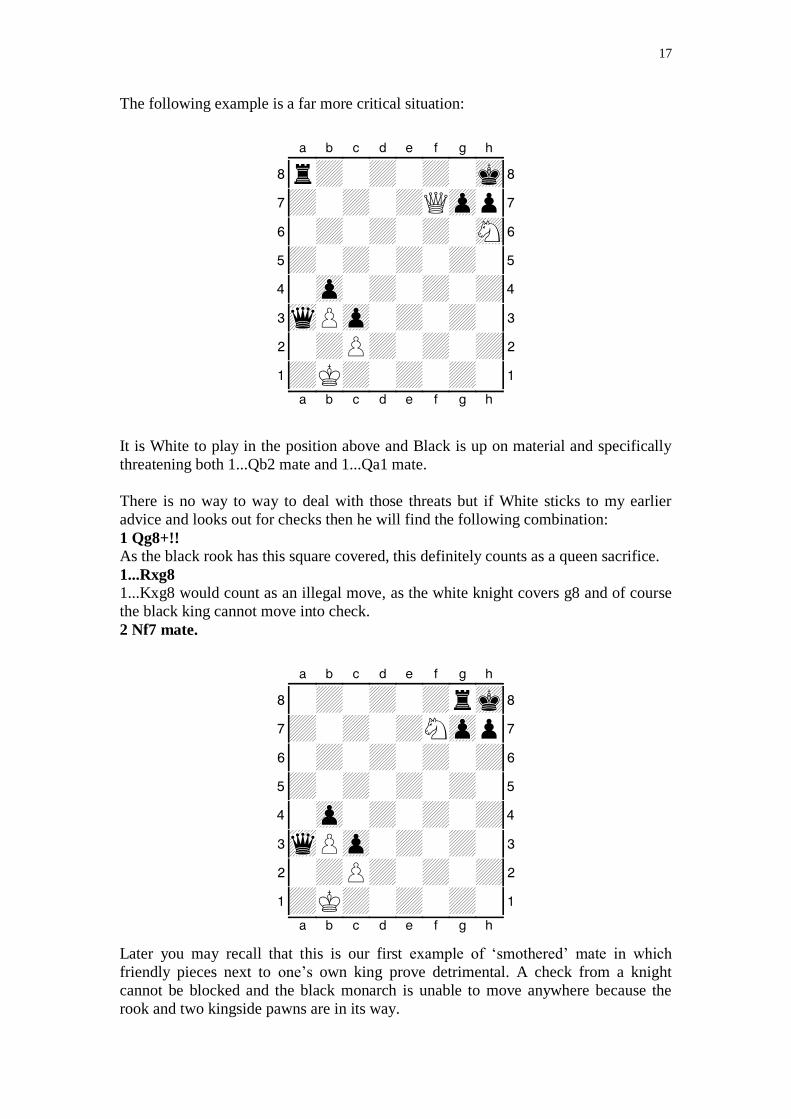
The following example is a far more critical situation:
XABCDEFGHY 8r+-+-+-mk( 7+-+-+Qzpp' 6-+-+-+-sN& 5+-+-+-+-% 4-zp-+-+-+$ 3wqPzp-+-+-# 2-+P+-+-+" 1+K+-+-+-! xabcdefghy
It is White to play in the position above and Black is up on material and specifically
threatening both 1...Qb2 mate and 1...Qa1 mate.
There is no way to way to deal with those threats but if White sticks to my earlier
advice and looks out for checks then he will find the following combination:
1 Qg8+!!
As the black rook has this square covered, this definitely counts as a queen sacrifice.
1...Rxg8
1...Kxg8 would count as an illegal move, as the white knight covers g8 and of course
the black king cannot move into check.
2 Nf7 mate.
XABCDEFGHY 8-+-+-+rmk( 7+-+-+Nzpp' 6-+-+-+-+& 5+-+-+-+-% 4-zp-+-+-+$ 3wqPzp-+-+-# 2-+P+-+-+" 1+K+-+-+-! xabcdefghy
Later you may recall that this is our first example of ‘smothered’ mate in which
friendly pieces next to one’s own king prove detrimental. A check from a knight
cannot be blocked and the black monarch is unable to move anywhere because the
rook and two kingside pawns are in its way.
18
Tips on Stalemate
When closing in to deliver checkmate, always make sure that, if you are not checking
your opponent on that turn, they have at least somewhere to move. Basically then,
BEWARE stalemate.
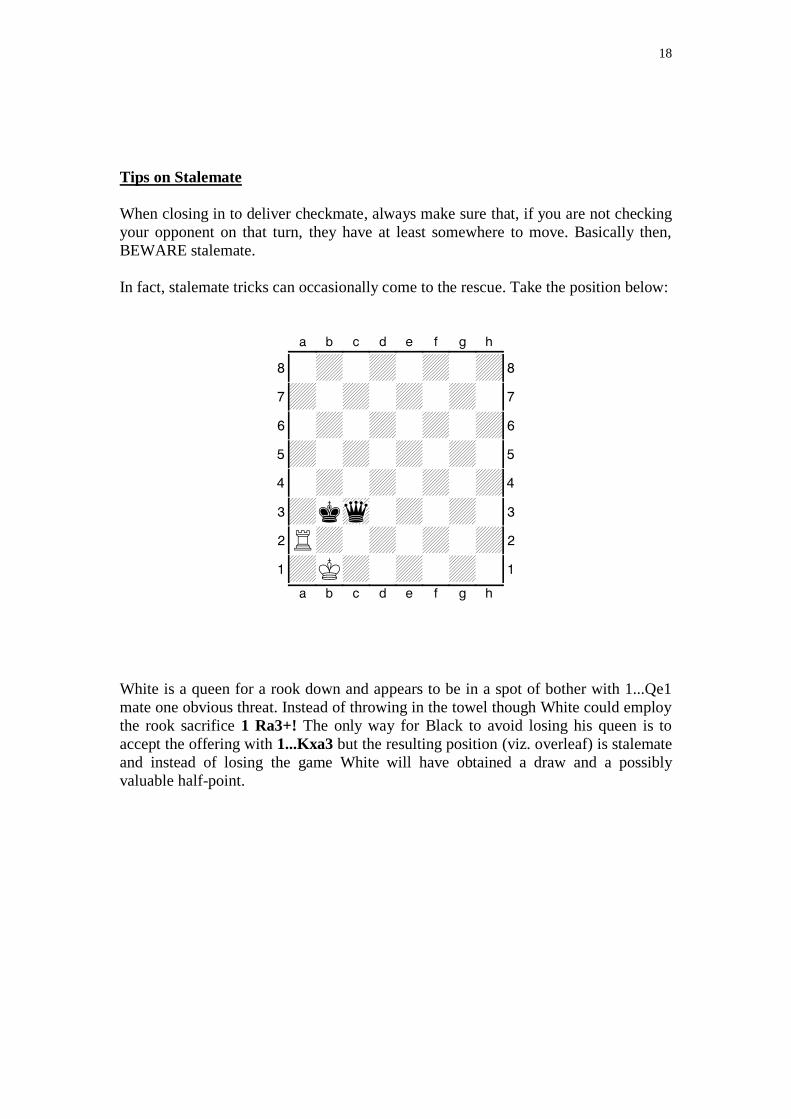
In fact, stalemate tricks can occasionally come to the rescue. Take the position below:
XABCDEFGHY 8-+-+-+-+( 7+-+-+-+-' 6-+-+-+-+& 5+-+-+-+-% 4-+-+-+-+$ 3+kwq-+-+-# 2R+-+-+-+" 1+K+-+-+-! xabcdefghy
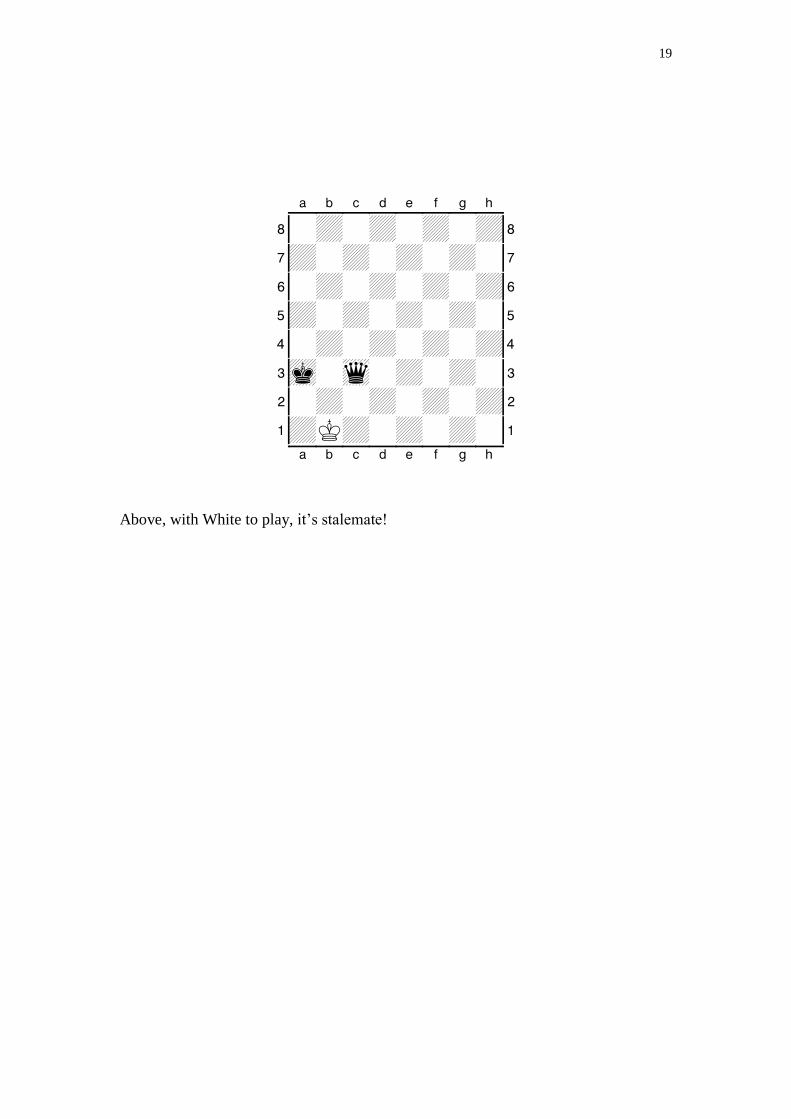
White is a queen for a rook down and appears to be in a spot of bother with 1...Qe1
mate one obvious threat. Instead of throwing in the towel though White could employ
the rook sacrifice 1 Ra3+! The only way for Black to avoid losing his queen is to
accept the offering with 1...Kxa3 but the resulting position (viz. overleaf) is stalemate
and instead of losing the game White will have obtained a draw and a possibly
valuable half-point.
19
XABCDEFGHY 8-+-+-+-+( 7+-+-+-+-' 6-+-+-+-+& 5+-+-+-+-% 4-+-+-+-+$ 3mk-wq-+-+-# 2-+-+-+-+" 1+K+-+-+-! xabcdefghy
Above, with White to play, it’s stalemate!

20
The Fork
A fork occurs when a piece attacks two or more enemy pieces at the same time and,
when referred to, the implication is usually that something is to be won as a result.
Any piece is capable of forking and below are a couple of basic examples:
XABCDEFGHY 8-+-+-+k+( 7+-+-+-+-' 6-+-+-+-+& 5+-tr-sn-+-% 4-+-zP-+-+$ 3+-+-+-+-# 2-+-+-sNK+" 1+-+R+-+-! xabcdefghy
A pawn fork
XABCDEFGHY 8-+-+-+k+( 7+-+-sN-+-' 6-+-+-+-+& 5+-+q+-+-% 4-+-+-+-+$ 3+-+-+-+-# 2-+-+-+-+" 1+-+-+-mK-! xabcdefghy
A knight fork
In our first example, the white pawn on d4 attacks two of Black’s pieces. As there is
no way to escape the fork by giving check, Black must choose which bit to concede.
Usually one would opt to preserve the piece of greater value (in this case the rook).
Our second example demonstrates a knight doing what it is famous for; forking!
Here the recipients are the black king and queen and, as it is check, Black has no
decision to make as to which piece to lose. He must move his king after which the
happy white knight will gladly capture the black queen.
NOTE: A family fork is when a knight is attacking the enemy king (i.e. check!),
queen and rook all at the same time and it is a very enjoyable experience!

21
The Pin
A pin occurs when one piece pressurises an enemy piece along a rank, file or
diagonal. If the enemy piece were to move off the line, then the attacking piece would
find itself hitting a different enemy piece of greater value along the same line.
Although moving the first attacked piece may seem silly from a materialistic point of
view, if that second in line piece was a king then of course the first piece is simply not
allowed to move. Anyway this may sound trickier than it is and in fact everything is
made simpler by a couple of illustrative examples:
XABCDEFGHY 8-+-wq-trk+( 7+-+-+pzpp' 6-+-+-sn-+& 5+-+-+-vL-% 4-+-+-+-+$ 3+-+-+Q+-# 2-+-+-zPPzP" 1+-+-+RmK-! xabcdefghy
Above the bishop pins the knight to the queen
XABCDEFGHY 8-+-+k+-+( 7+-+-+-+-' 6-+-+-+-+& 5+-+-+-+-% 4-+-+n+-+$ 3+-+-+-+-# 2-+-+-+-+" 1+-+-tR-mK-! xabcdefghy
Above the rook pins the knight to the king
22
In our first pin example we see a fairly common scenario of a bishop pinning an
enemy knight to a queen. There is nothing particularly spectacular about the position
but the obvious feature is that Black doesn’t want to move the knight yet or else it will
be the end of the road for her majesty. In order to free up the steed Black will either
have to move the queen off the g5-d8 diagonal or else set about forcing the white
bishop away.
NOTE: Escaping from a pinned situation is known as ‘unpinning’.
Our second example is however rather bad news for the black knight. The white rook
‘pins’ it to the black king along the e-file. As it can’t move away, as that would put
the king in check, White is set to capture the steed next turn.
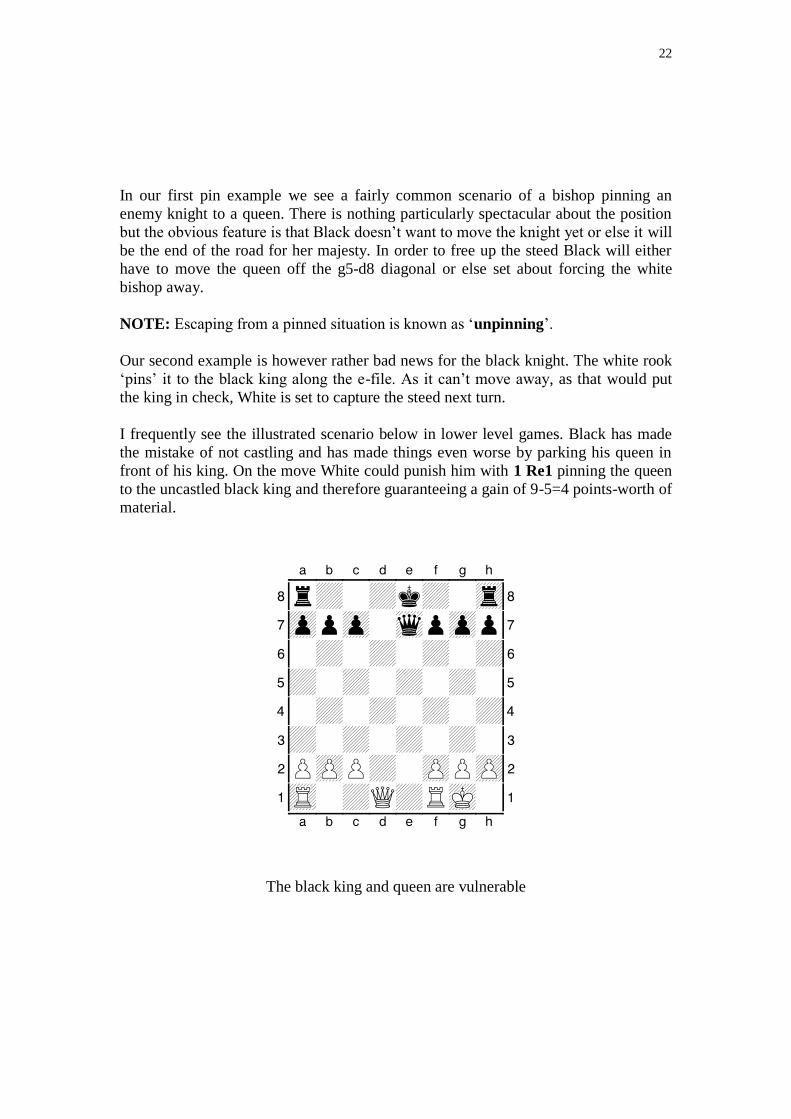
I frequently see the illustrated scenario below in lower level games. Black has made
the mistake of not castling and has made things even worse by parking his queen in
front of his king. On the move White could punish him with 1 Re1 pinning the queen
to the uncastled black king and therefore guaranteeing a gain of 9-5=4 points-worth of
material.
XABCDEFGHY 8r+-+k+-tr( 7zppzp-wqpzpp' 6-+-+-+-+& 5+-+-+-+-% 4-+-+-+-+$ 3+-+-+-+-# 2PzPP+-zPPzP" 1tR-+Q+RmK-! xabcdefghy
The black king and queen are vulnerable
23
XABCDEFGHY 8-+-wq-+k+( 7+-+-+p+p' 6-+-+-+p+& 5+-+-+-+-% 4-+-+-+-+$ 3+-+-+L+-# 2-+-+-zPPzP" 1tR-+-+-mK-! xabcdefghy
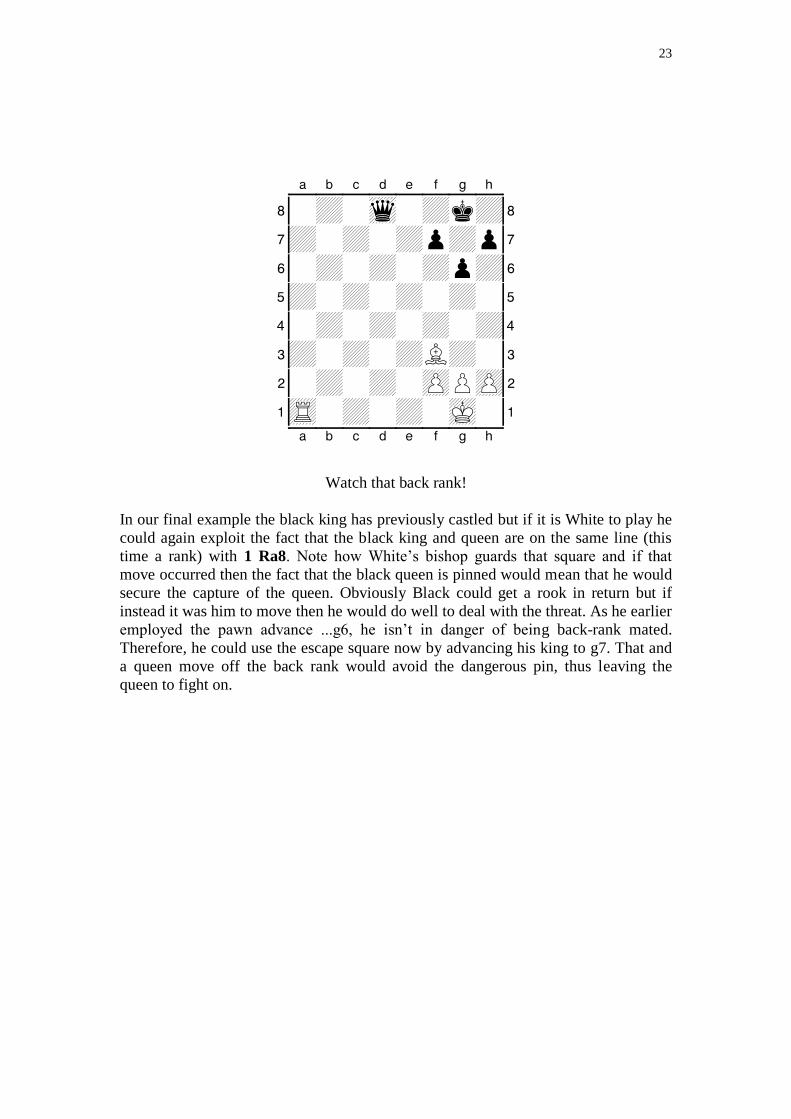
Watch that back rank!
In our final example the black king has previously castled but if it is White to play he
could again exploit the fact that the black king and queen are on the same line (this
time a rank) with 1 Ra8. Note how White’s bishop guards that square and if that
move occurred then the fact that the black queen is pinned would mean that he would
secure the capture of the queen. Obviously Black could get a rook in return but if
instead it was him to move then he would do well to deal with the threat. As he earlier
employed the pawn advance ...g6, he isn’t in danger of being back-rank mated.
Therefore, he could use the escape square now by advancing his king to g7. That and
a queen move off the back rank would avoid the dangerous pin, thus leaving the
queen to fight on.

24
The Skewer
I always view a skewer as a kind of inverted pin. Basically a skewer occurs when one
piece attacks an enemy piece along a line and if that enemy piece was to move off that
same rank, file or diagonal, then the attacking piece would hit another enemy piece of
equal or lesser value.
Again pictures tell the story better than words:
XABCDEFGHY 8r+-+-+k+( 7+-+-+pzpp' 6-+-+-vl-+& 5+-+q+-+-% 4-+-+-+-+$ 3+-+-+-zP-# 2-+Q+-zPLzP" 1+-+-+RmK-! xabcdefghy
The white bishop skewers Black’s major pieces
XABCDEFGHY 8-+-tr-+-+( 7+-+-+-+-' 6-+-+-+-+& 5+-+k+-+-% 4-+-+-+-+$ 3+-+-+-+-# 2-+-+-+-+" 1+-+R+-mK-! xabcdefghy
Rook takes rook is inevitable!

25
In our first skewer example the black queen is attacked by the white bishop. When it
moves, the bishop will capture the black rook located on the same g2-a8 diagonal.
Even if Black wins the bishop e.g. after 1...Qd8 2 Bxa8 Qxa8, then White will emerge
the ‘exchange’ (a rook for knight or rook for bishop) up.
In the above position though rather than netting 2 points (5-3), White will secure a full
5 points. Black is in check and when the king moves off the e-file, the white rook will
capture its enemy number free of charge.
NOTE: Often a king is included in the bracket of a piece of greater value although as
explained earlier strictly speaking a king doesn’t have a price. Some may even say it
is of infinite value because of course it can’t be taken.
26
Discovered Check
I was once monitoring a beginners’ group playing chess when a young girl suddenly
announced the presence on her board of a discovered check. Very impressed I rushed
over to notice that both kings were in check. “We’ve just discovered that the black
king has been in check for a long time”, she said! That is of course not what a
‘discovered check’ is, but sadly the occurrence of having two kings in check does
seem quite common amongst absolute novices. Having gone to great lengths to
explain about looking out for checks and being compelled to escape check, I’m
confident now though that sort of thing won’t now happen in your games!
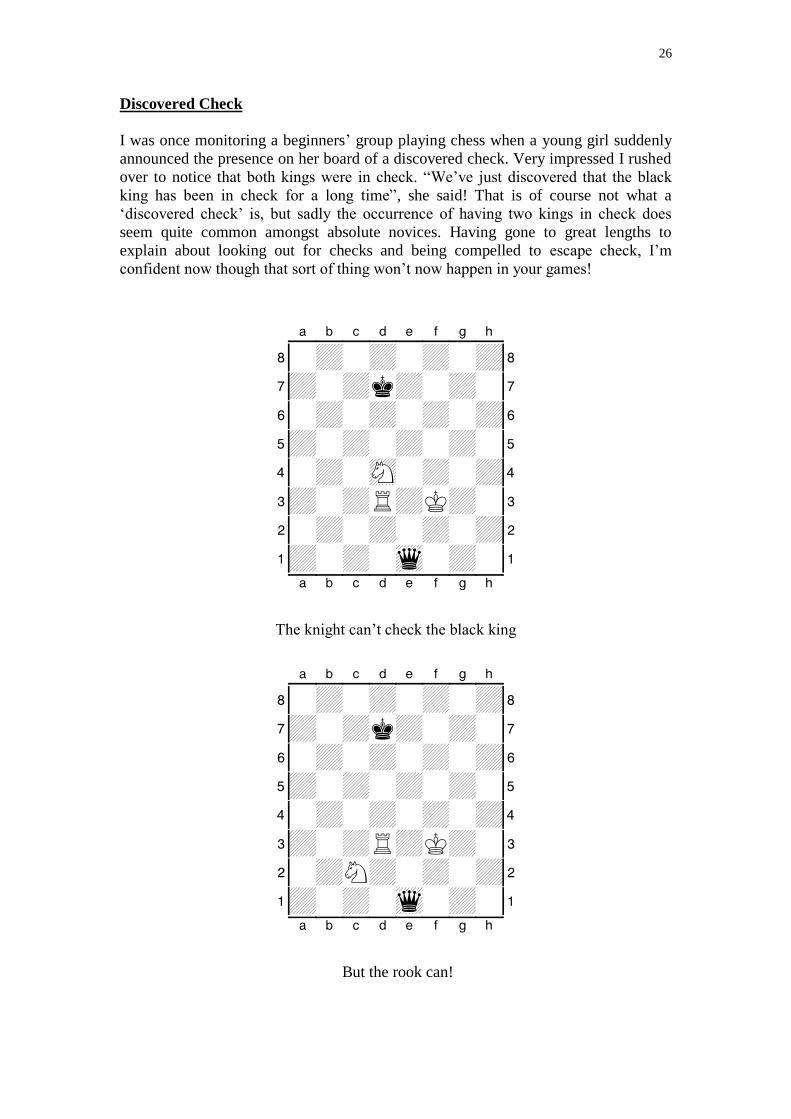
XABCDEFGHY 8-+-+-+-+( 7+-+k+-+-' 6-+-+-+-+& 5+-+-+-+-% 4-+-sN-+-+$ 3+-+R+K+-# 2-+-+-+-+" 1+-+-wq-+-! xabcdefghy
The knight can’t check the black king
XABCDEFGHY 8-+-+-+-+( 7+-+k+-+-' 6-+-+-+-+& 5+-+-+-+-% 4-+-+-+-+$ 3+-+R+K+-# 2-+N+-+-+" 1+-+-wq-+-! xabcdefghy
But the rook can!

27
So the first position turns into the next after the discovered check 1 Nc2+. Yes,
although the knight has been the piece to move it is the white rook that gives check.
Retreating the knight to c2 rather than moving it anywhere else is especially
beneficial here, as after the black king moves out of check, the white knight can
capture the black queen.
A ‘discovered attack’ is very similar, the main difference being that an enemy piece
other than the king is what ends up being attacked.
28
Double Check
A double check is just as it sounds; two pieces checking an enemy king at the same
time. As an example I will use one of my own games:
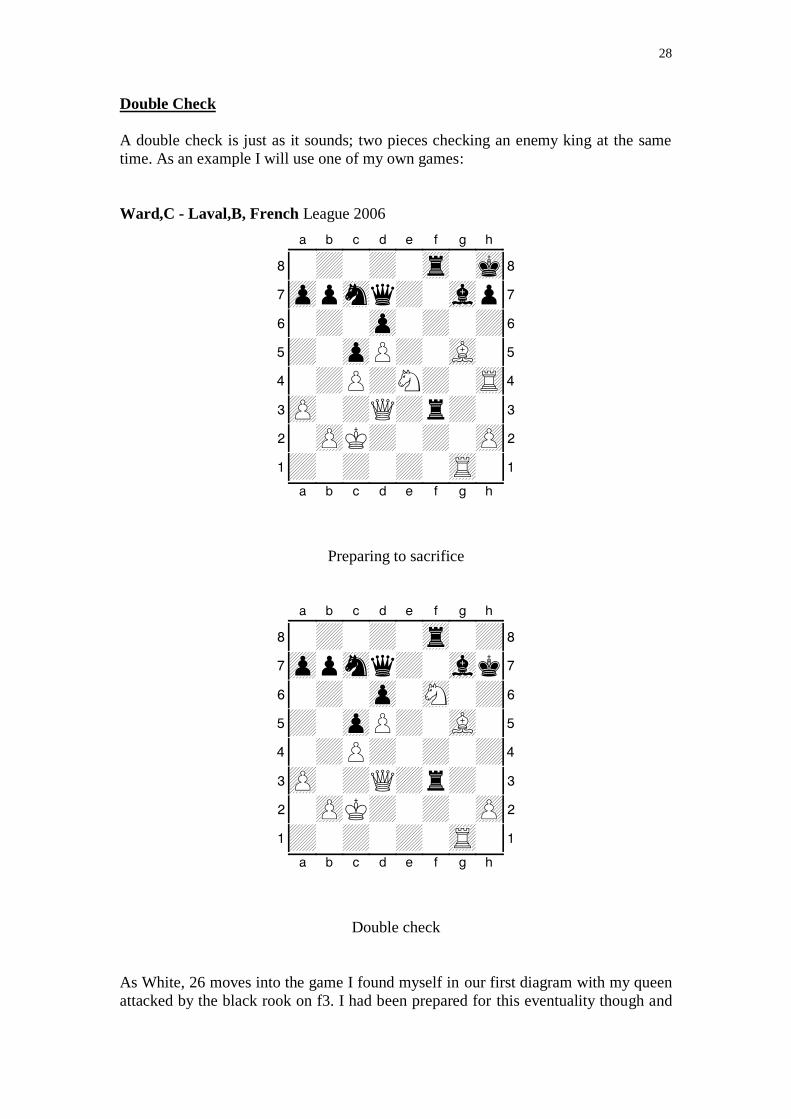
Ward,C - Laval,B, French League 2006
XABCDEFGHY 8-+-+-tr-mk( 7zppsnq+-vlp' 6-+-zp-+-+& 5+-zpP+-vL-% 4-+P+N+-tR$ 3zP-+Q+r+-# 2-zPK+-+-zP" 1+-+-+-tR-! xabcdefghy
Preparing to sacrifice
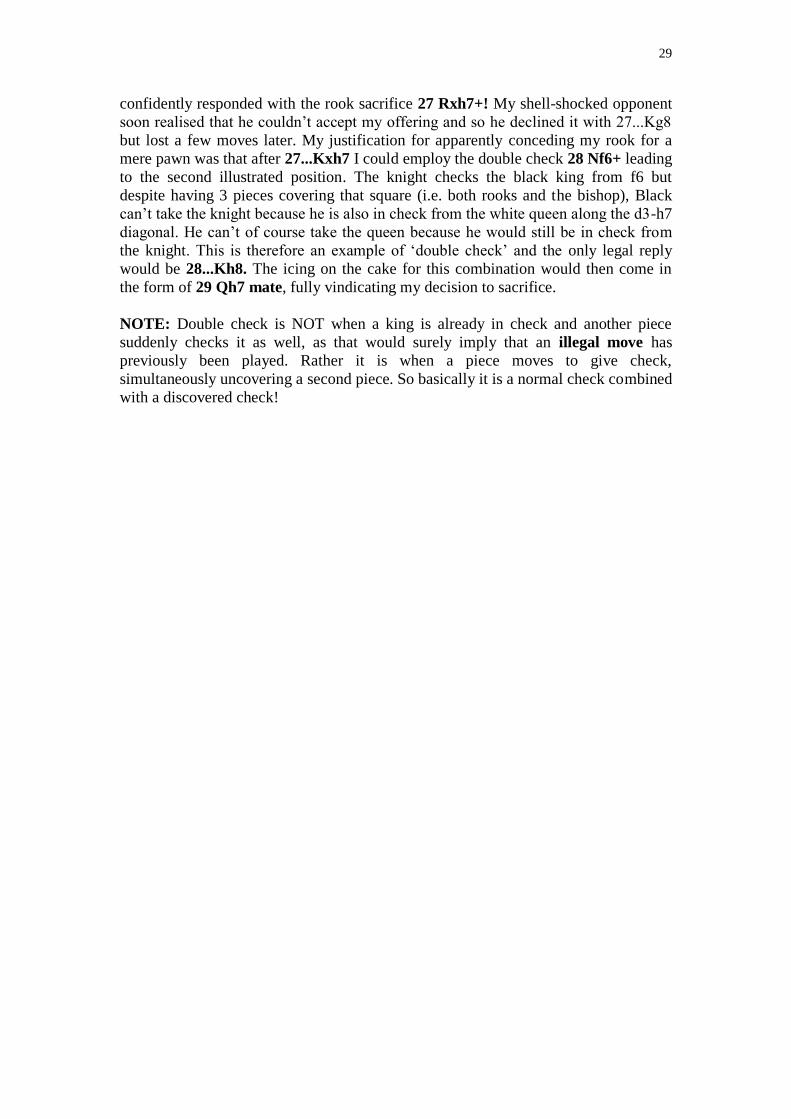
XABCDEFGHY 8-+-+-tr-+( 7zppsnq+-vlk' 6-+-zp-sN-+& 5+-zpP+-vL-% 4-+P+-+-+$ 3zP-+Q+r+-# 2-zPK+-+-zP" 1+-+-+-tR-! xabcdefghy
Double check
As White, 26 moves into the game I found myself in our first diagram with my queen
attacked by the black rook on f3. I had been prepared for this eventuality though and
29
confidently responded with the rook sacrifice 27 Rxh7+! My shell-shocked opponent
soon realised that he couldn’t accept my offering and so he declined it with 27...Kg8
but lost a few moves later. My justification for apparently conceding my rook for a
mere pawn was that after 27...Kxh7 I could employ the double check 28 Nf6+ leading
to the second illustrated position. The knight checks the black king from f6 but
despite having 3 pieces covering that square (i.e. both rooks and the bishop), Black
can’t take the knight because he is also in check from the white queen along the d3-h7
diagonal. He can’t of course take the queen because he would still be in check from
the knight. This is therefore an example of ‘double check’ and the only legal reply
would be 28...Kh8. The icing on the cake for this combination would then come in
the form of 29 Qh7 mate, fully vindicating my decision to sacrifice.
NOTE: Double check is NOT when a king is already in check and another piece
suddenly checks it as well, as that would surely imply that an illegal move has
previously been played. Rather it is when a piece moves to give check,
simultaneously uncovering a second piece. So basically it is a normal check combined
with a discovered check!

30
Doubling up
XABCDEFGHY 8r+-snk+-tr( 7zppzppvlpzpp' 6-+-+-+-+& 5+P+-+P+-% 4-+-zP-+-+$ 3+L+-+N+-# 2P+P+-+PzP" 1tR-+-tR-mK-! xabcdefghy
Black has neglected to castle
Above the black king is still in the centre and consequently White can punish his
opponent along the e-file. You will be well aware that the black bishop on e7 is
pinned to its king but as things stand the monarch protects it once and it is only
attacked once i.e. by the white rook on e1. White however intends to change that
situation and, after 1 Re3 (or e2 or e4), he will make way for its compatriot to join it
on the e-file in order to add extra firepower. If Black does nothing about White’s plan,
then in a couple of moves he will lose his bishop but in fact a closer inspection reveals
that there is little that he can do anyway.
He has evidently neglected to castle and now cannot ‘unpin’ in time.
Indeed, below is the position that would be reached after the sequence 1...Kf8 2 Rae1
(doubling the rooks on the e-file) 2...Bf6?? 3 Re8 mate.
XABCDEFGHY 8r+-snRmk-tr( 7zppzpp+pzpp' 6-+-+-vl-+& 5+P+-+P+-% 4-+-zP-+-+$ 3+L+-+N+-# 2P+P+-+PzP" 1+-+-tR-mK-! xabcdefghy
31
TIP: Rooks love open files. They love to access them and either cause some damage
along them or else transfer to another useful post via any of the available squares on
that file.
So basically the bishop was pinned throughout, either for legal reasons (i.e. not being
allowed to put himself in check) or because moving it allowed a mate in one. Clearly
it would have been preferable to have conceded the bishop instead and that’s exactly
what would need to have happened because none of Black’s pieces were on hand to
offer support. Black didn’t connect his rooks by castling earlier whilst the knight on
d8 was a right lemon! Its presence there prevented the king from escaping the e-file
by moving to its right whilst the square c6 is scrutinised by the b5-pawn and the
blocking option on e6 was also not possible because of the f5-pawn.
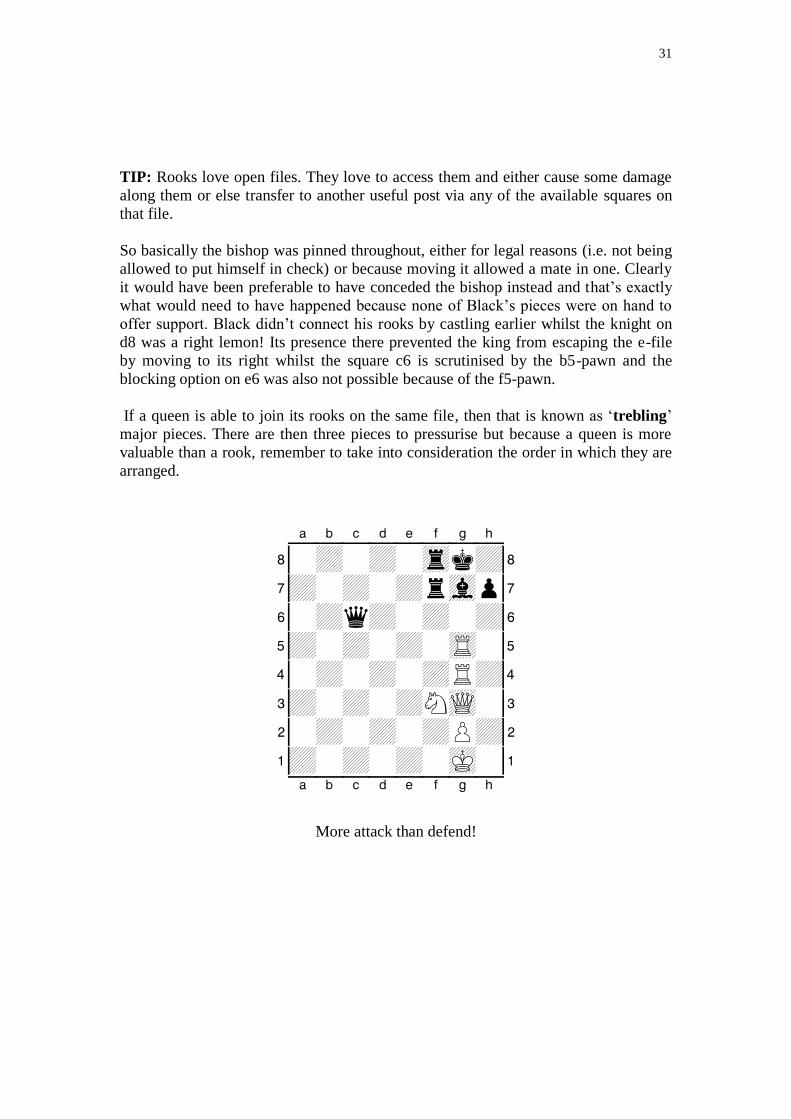
If a queen is able to join its rooks on the same file, then that is known as ‘trebling’
major pieces. There are then three pieces to pressurise but because a queen is more
valuable than a rook, remember to take into consideration the order in which they are
arranged.
XABCDEFGHY 8-+-+-trk+( 7+-+-+rvlp' 6-+q+-+-+& 5+-+-+-tR-% 4-+-+-+R+$ 3+-+-+NwQ-# 2-+-+-+P+" 1+-+-+-mK-! xabcdefghy
More attack than defend!

32
XABCDEFGHY 8k+-+-+-+( 7snrzp-+-zpp' 6-zpl+-+-+& 5wQ-+q+-+-% 4-+-+-+-+$ 3tR-+-+N+-# 2-+P+-zPP+" 1tR-+-+-mK-! xabcdefghy
The order is wrong!
The first diagram is a very simple case of mathematics. White attacks the bishop on
g7 three times but it is only guarded twice. After 1 Rxg7+ Rxg7 2 Rxg7+ he will
have won a piece for nothing.
The second on the other hand is a little more complicated although still not exactly
rocket science! After 1 Qxa7+? Rxa7 2 Rxa7+ Kb8 there is no chance of a
checkmate using the a8-square because the black bishop guards that well. Although
White will have gained two physical pieces for one, taking their values into
consideration, the fact is that he has gained a rook and a knight (8 points) for a queen
(9 points) and thus actually emerged from the deal with the loss of a point. Instead
White should retreat his attacked queen or, because he is after all the exchange for a
pawn up, he could swap the queens off on d5. The pin will remain on the a-file and
could still prove very useful in the future.

33
The 7th Rank
TIP: Rooks love to be active and as well as open files, they also love 7th ranks.
Below White’s e7-rook is extremely active whereas in contrast the black one on a7 is
stuck in a passive role of simply defending the b7-pawn. For Black this is a highly
undesirable situation and it is often worth sacrificing a pawn with the compensation
being to turn a passive rook active.
XABCDEFGHY 8-+-+-trk+( 7trp+-tR-zpp' 6p+p+-zp-+& 5+-+-+-+-% 4-+-+-+-+$ 3+-+-+-zP-# 2PzPP+-zP-zP" 1tR-+-+-mK-! xabcdefghy
Alas it is White’s move and he can quickly set about activating his other rook. One
possibility is to double rooks on the e-file but stronger still is to set about doubling the
rooks along the 7th rank.
34
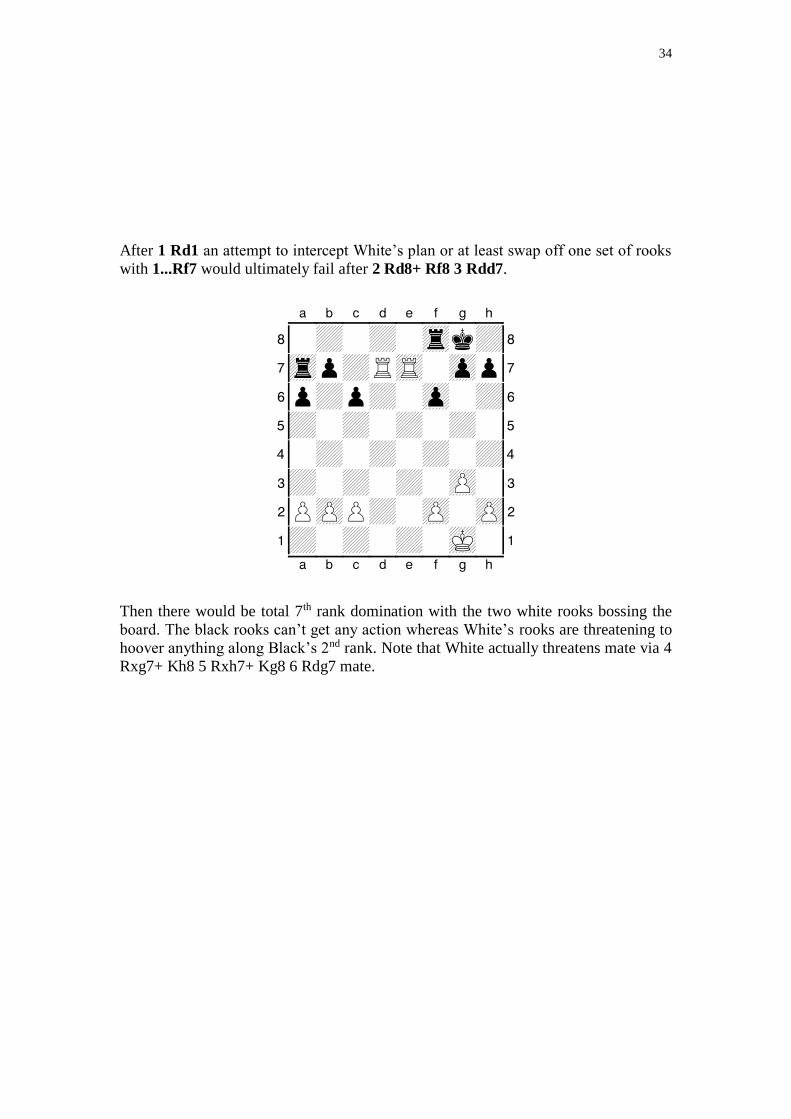
After 1 Rd1 an attempt to intercept White’s plan or at least swap off one set of rooks
with 1...Rf7 would ultimately fail after 2 Rd8+ Rf8 3 Rdd7.
XABCDEFGHY 8-+-+-trk+( 7trp+RtR-zpp' 6p+p+-zp-+& 5+-+-+-+-% 4-+-+-+-+$ 3+-+-+-zP-# 2PzPP+-zP-zP" 1+-+-+-mK-! xabcdefghy
Then there would be total 7th rank domination with the two white rooks bossing the
board. The black rooks can’t get any action whereas White’s rooks are threatening to
hoover anything along Black’s 2nd rank. Note that White actually threatens mate via 4
Rxg7+ Kh8 5 Rxh7+ Kg8 6 Rdg7 mate.

35
The Overloaded Piece
An overloaded piece is one which is being asked to do more tasks than it is capable of
fulfilling. Depending on the position, ‘too many’ may be just two.
XABCDEFGHY 8r+-+r+-+( 7zpl+-wq-+k' 6-+-+-snpzp& 5+-+-+-+-% 4-+LsNp+-+$ 3+-+-zP-+-# 2P+-+Q+PzP" 1+R+-+RmK-! xabcdefghy
The black queen is overloaded
Above the black queen is being asked to defend both the bishop on b7 and the knight
on f6. With that in mind, both 1 Rxf6 Qxf6 2 Rxb7+ and 1 Rxb7 Qxb7 2 Rxf6 would
net two minor pieces for a rook.
TIP: Two minor pieces (bishops and knights) for a rook mathematically constitutes a
gain of just 1 point but in practice it tends to be more valuable than that, particularly
in the opening and middle-game.
36
General Opening Principles
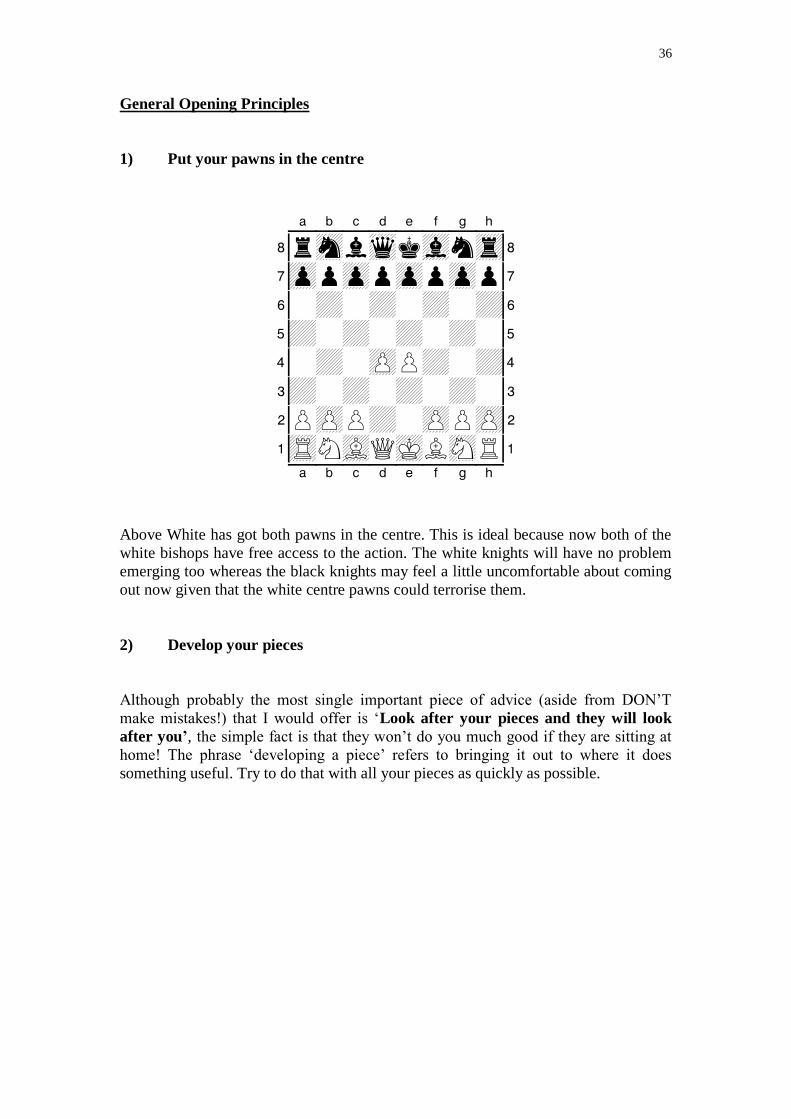
1) Put your pawns in the centre
XABCDEFGHY 8rsnlwqkvlntr( 7zppzppzppzpp' 6-+-+-+-+& 5+-+-+-+-% 4-+-zPP+-+$ 3+-+-+-+-# 2PzPP+-zPPzP" 1tRNvLQmKLsNR! xabcdefghy
Above White has got both pawns in the centre. This is ideal because now both of the
white bishops have free access to the action. The white knights will have no problem
emerging too whereas the black knights may feel a little uncomfortable about coming
out now given that the white centre pawns could terrorise them.
2) Develop your pieces
Although probably the most single important piece of advice (aside from DON’T
make mistakes!) that I would offer is ‘Look after your pieces and they will look
after you’, the simple fact is that they won’t do you much good if they are sitting at
home! The phrase ‘developing a piece’ refers to bringing it out to where it does
something useful. Try to do that with all your pieces as quickly as possible.
37
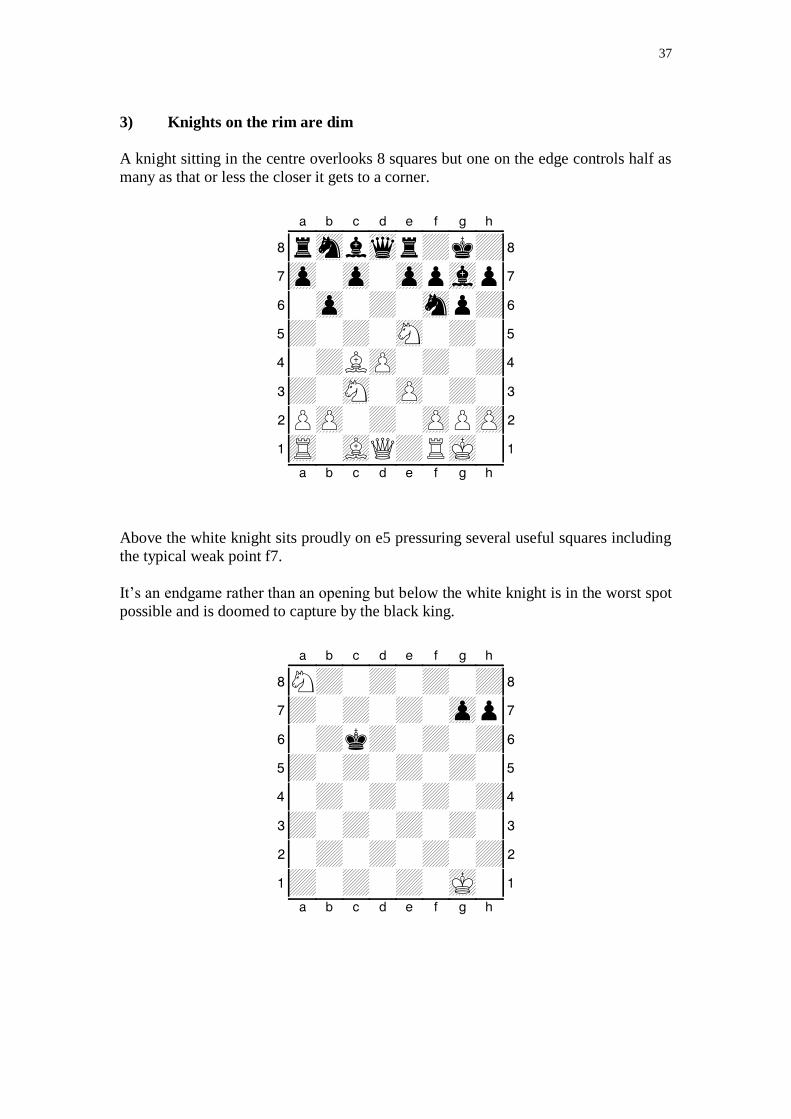
3) Knights on the rim are dim
A knight sitting in the centre overlooks 8 squares but one on the edge controls half as
many as that or less the closer it gets to a corner.
XABCDEFGHY 8rsnlwqr+k+( 7zp-zp-zppvlp' 6-zp-+-snp+& 5+-+-sN-+-% 4-+LzP-+-+$ 3+-sN-zP-+-# 2PzP-+-zPPzP" 1tR-vLQ+RmK-! xabcdefghy
Above the white knight sits proudly on e5 pressuring several useful squares including
the typical weak point f7.
It’s an endgame rather than an opening but below the white knight is in the worst spot
possible and is doomed to capture by the black king.
XABCDEFGHY 8N+-+-+-+( 7+-+-+-zpp' 6-+k+-+-+& 5+-+-+-+-% 4-+-+-+-+$ 3+-+-+-+-# 2-+-+-+-+" 1+-+-+-mK-! xabcdefghy
38
4) Knights before bishops
This rule is derived from the fact that generally it is clearer where a knight wants to
get developed than a bishop and is very much connected to rule 10. It certainly does
not mean that you should always bring out both of your knights before a bishop but
more often than not it will be wiser to develop at least one knight on its most natural
square first.
5) Don’t move one piece twice before moving others once
A typical mistake that many beginners make is to ‘send a piece or pawn out to battle’
to ‘see what it can get’! Then when it is lost they ‘send out’ a second, then a third etc.
In a game of chess, you have an army of pieces and you should try to get them
working together. Consequently, don’t just focus on one or two, develop your whole
army and try to get them combining in perfect harmony.
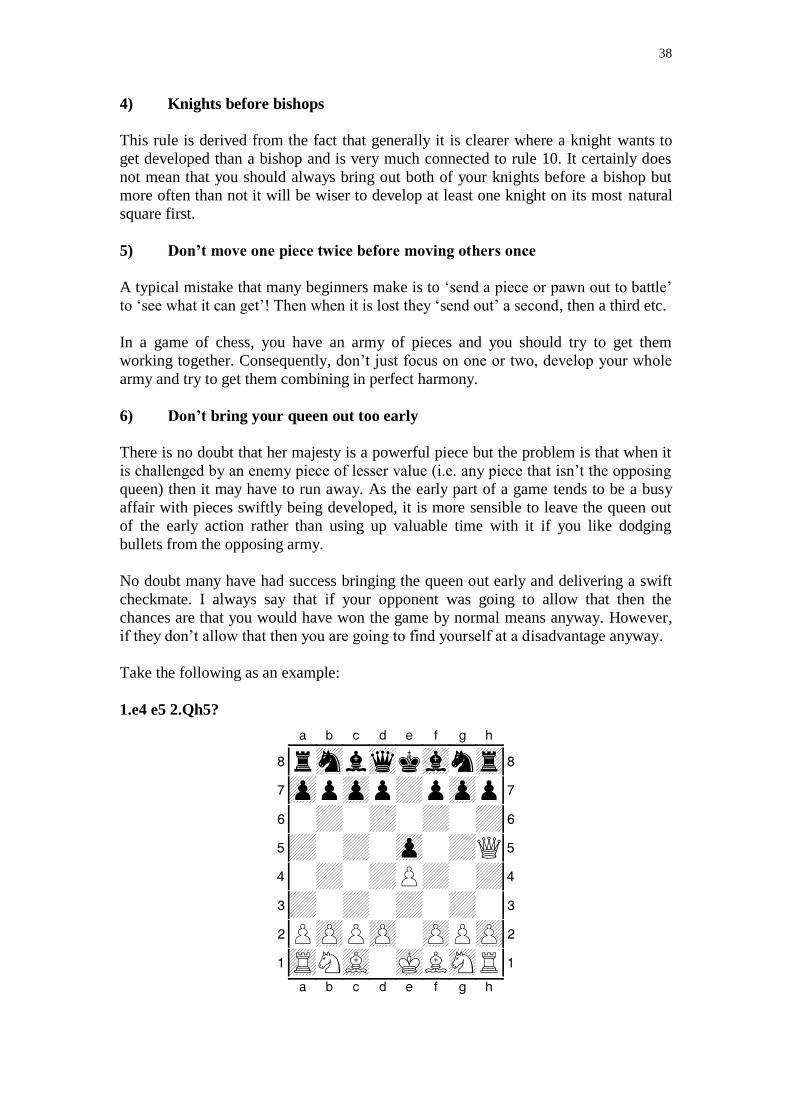
6) Don’t bring your queen out too early
There is no doubt that her majesty is a powerful piece but the problem is that when it
is challenged by an enemy piece of lesser value (i.e. any piece that isn’t the opposing
queen) then it may have to run away. As the early part of a game tends to be a busy
affair with pieces swiftly being developed, it is more sensible to leave the queen out
of the early action rather than using up valuable time with it if you like dodging
bullets from the opposing army.
No doubt many have had success bringing the queen out early and delivering a swift
checkmate. I always say that if your opponent was going to allow that then the
chances are that you would have won the game by normal means anyway. However,
if they don’t allow that then you are going to find yourself at a disadvantage anyway.
Take the following as an example:
1.e4 e5 2.Qh5?
XABCDEFGHY 8rsnlwqkvlntr( 7zppzpp+pzpp' 6-+-+-+-+& 5+-+-zp-+Q% 4-+-+P+-+$ 3+-+-+-+-# 2PzPPzP-zPPzP" 1tRNvL-mKLsNR! xabcdefghy

39
Breaking our opening rule but attacking the e5-pawn and having designs on f7.
2...Nc6 3.Bc4
Threatening the Qxf7 mate that could bring a swift victory!
3...g6
It's not to be though as Black has noticed White's threat.
4.Qf3
The attacked queen moves. She once again threatens mate on f7 but half of White's
moves have been with the queen!
4...Nf6
Sensibly developing a piece and of course blocking out the threat to f7.
5.g4
XABCDEFGHY 8r+lwqkvl-tr( 7zppzpp+p+p' 6-+n+-snp+& 5+-+-zp-+-% 4-+L+P+P+$ 3+-+-+Q+-# 2PzPPzP-zP-zP" 1tRNvL-mK-sNR! xabcdefghy
A rather transparent plan. White is clearly trying to budge the knight on f6 so as to get
the queen down to f7.
5...Nd4
Admittedly this does move the same piece twice before moving some of the others
once but is perfectly justified as it gains a 'tempo' against the white queen. In other
words, the white queen is attacked and so must move again.
6.Qe3??
Not looking out for checks. Instead, 6.Qd1 would have been safest but leaving aside
the fact that Black could simply capture the e4-pawn, the white queen would find
herself back home anyway having wasted all that time.

40
6...Nxc2+
XABCDEFGHY 8r+lwqkvl-tr( 7zppzpp+p+p' 6-+-+-snp+& 5+-+-zp-+-% 4-+L+P+P+$ 3+-+-wQ-+-# 2PzPnzP-zP-zP" 1tRNvL-mK-sNR! xabcdefghy
A juicy 'family fork'! Having invested so much time in the queen, White will now
have it taken!
7) Castle earlyish!
If the centre is closed (i.e. there are no open lines against the king, making it less
vulnerable to checks from the enemy major pieces) then occasionally it is acceptable
to leave his majesty in the centre and seek access to the game for the rooks elsewhere.
Of course the king likes to be centralised in endgames when it is an integral part of an
army but here and now of course the topic is the opening. Generally speaking, tucking
the king away into safety and enabling the rooks to be brought to the centre is a good
idea and is to be encouraged as soon as possible.
8) No unnecessary pawn moves
We have already established that it is a good idea to advance your centre pawns in
order to free your pieces and gain space but you really have to be sure that you can
justify taking time out to make seemingly innocuous pawn moves on the edges.
Escaping or preventing pins might be worthwhile but preventing back-rank mates is a
little over cautious and you can easily suffer if you waste valuable time on surplus
pawn moves instead of sensibly developing the minor pieces.
9) Think of your rooks
The most common opening/middle-game error of lower level players is not paying
enough attention to their rooks. Sure they would laugh if they saw the likes of:
1.h4
'I'm going to try to get my rook out around the side'.
1...d5
'Not if my light-squared bishop has a say in the matter'!

41
2.a4
'OK then I'll swing my queen's rook into play along the 3rd rank'!
2...e5
XABCDEFGHY 8rsnlwqkvlntr( 7zppzp-+pzpp' 6-+-+-+-+& 5+-+pzp-+-% 4P+-+-+-zP$ 3+-+-+-+-# 2-zPPzPPzPP+" 1tRNvLQmKLsNR! xabcdefghy
'In sensibly placing my pawns in the centre I think you'll find that my dark-squared
bishop thinks otherwise'!
On the other hand, they won’t appreciate why the following is flawed:
1.e4 e5 2.Nf3 Nc6 3.Bc4 Nf6 4.d3 Bc5 5.Nc3 d6 6.h3 h6 7.0–0 0–0 8.Bd2 Bd7
9.Re1 Rb8 10.Rc1 Re8
XABCDEFGHY 8-tr-wqr+k+( 7zppzpl+pzp-' 6-+nzp-sn-zp& 5+-vl-zp-+-% 4-+L+P+-+$ 3+-sNP+N+P# 2PzPPvL-zPP+" 1+-tRQtR-mK-! xabcdefghy

42
Above all the pieces except the queens have moved but it should be noted that there
is a difference between moving a piece and developing a piece. In particular, both
sides have castled and the rooks have moved but none of them are doing anything
particularly useful. There is a blatant lack of open or even half-open files for them to
seek any serious action on.
This is a fairly advanced subject but the solution lies in seeking to make a ‘pawn
break’. This is where a pawn advances to challenge an enemy fixed pawn as
illustrated below:
XABCDEFGHY 8-+rtr-+k+( 7zp-+-+pzpp' 6-+p+-+-+& 5+pzP-zp-+-% 4-zP-zpP+-+$ 3zP-+P+-+-# 2-+-+-zPPzP" 1tR-+-+RmK-! xabcdefghy
The black rooks aren’t doing very much and the white ones can seek to get a lot more
action via the pawn breaks f4 or a4. As a direct result of those thrusts half-open or
even completely open files might be created to enable a rook or two to penetrate the
opponent’s position.
One famous example of an early pawn break is the ‘Queen’s Gambit’ (1 d4 d5 2 c4)
illustrated below:
XABCDEFGHY 8rsnlwqkvlntr( 7zppzp-zppzpp' 6-+-+-+-+& 5+-+p+-+-% 4-+PzP-+-+$ 3+-+-+-+-# 2PzP-+PzPPzP" 1tRNvLQmKLsNR! xabcdefghy
43
As ultimately either the black pawn will take on c4 or the c-pawn will capture the d5-
pawn then there is destined to be a half-open file created. The aim is then to put a
rook or two to good use along those files.
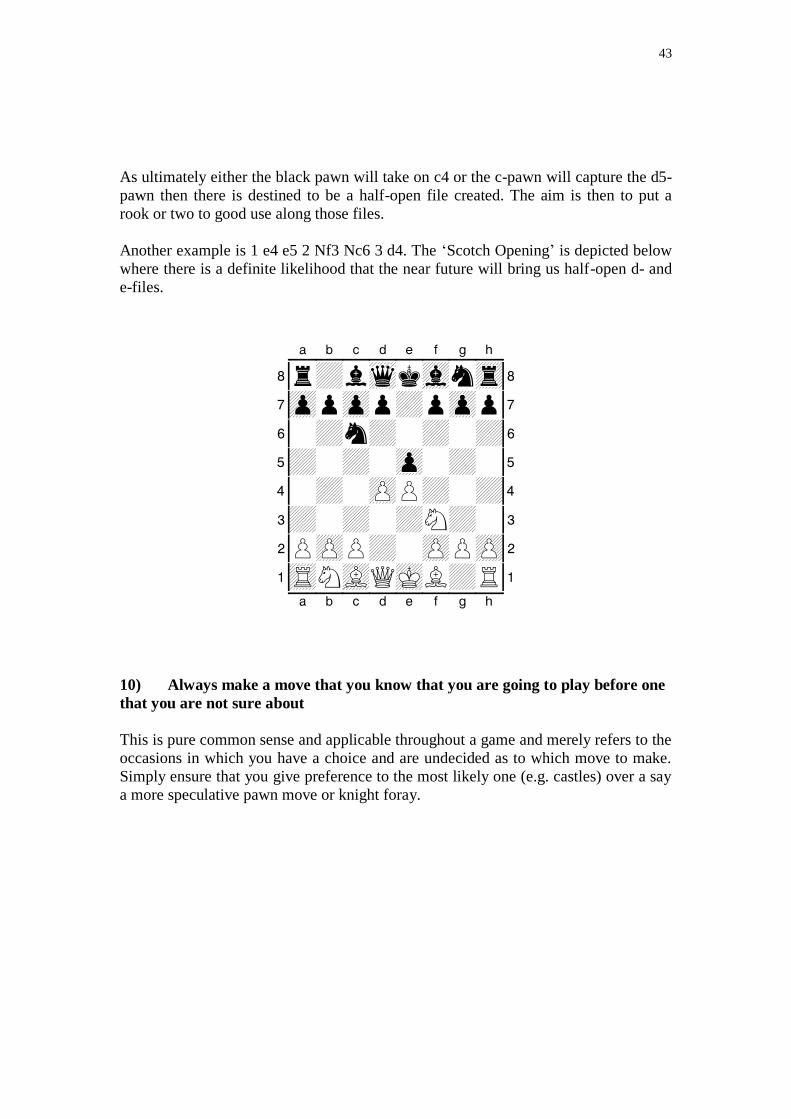
Another example is 1 e4 e5 2 Nf3 Nc6 3 d4. The ‘Scotch Opening’ is depicted below
where there is a definite likelihood that the near future will bring us half-open d- and
e-files.
XABCDEFGHY 8r+lwqkvlntr( 7zppzpp+pzpp' 6-+n+-+-+& 5+-+-zp-+-% 4-+-zPP+-+$ 3+-+-+N+-# 2PzPP+-zPPzP" 1tRNvLQmKL+R! xabcdefghy
10) Always make a move that you know that you are going to play before one
that you are not sure about
This is pure common sense and applicable throughout a game and merely refers to the
occasions in which you have a choice and are undecided as to which move to make.
Simply ensure that you give preference to the most likely one (e.g. castles) over a say
a more speculative pawn move or knight foray.
44
Advice on Practical Play
WARNING: The vast majority of practical games do not involve stunning visual
tactics and combinations and are instead more mundane affairs. Although it may be
nice to sacrifice lots of pieces and to give a snazzy mate, at the end of the day the aim
is to win and one should play in a manner that will maximise one’s chances of
winning.
TIP: Taking the opponent’s pieces will reduce the likelihood of them being able to
win and by removing defenders you will increase your chances of being able to
deliver a successful checkmate. Don’t ignore ‘no strings attached’ gifts just because
the freebie in question may not currently be directly defending the enemy king. Think
more long term!
Take a look at the following situation:
XABCDEFGHY 8-mk-+rsN-+( 7+-+-+-+-' 6QzPP+-+-+& 5+PvLp+-+-% 4-+-+-+-+$ 3+-+-+-+-# 2R+-+-zPPzP" 1+-+R+-mK-! xabcdefghy
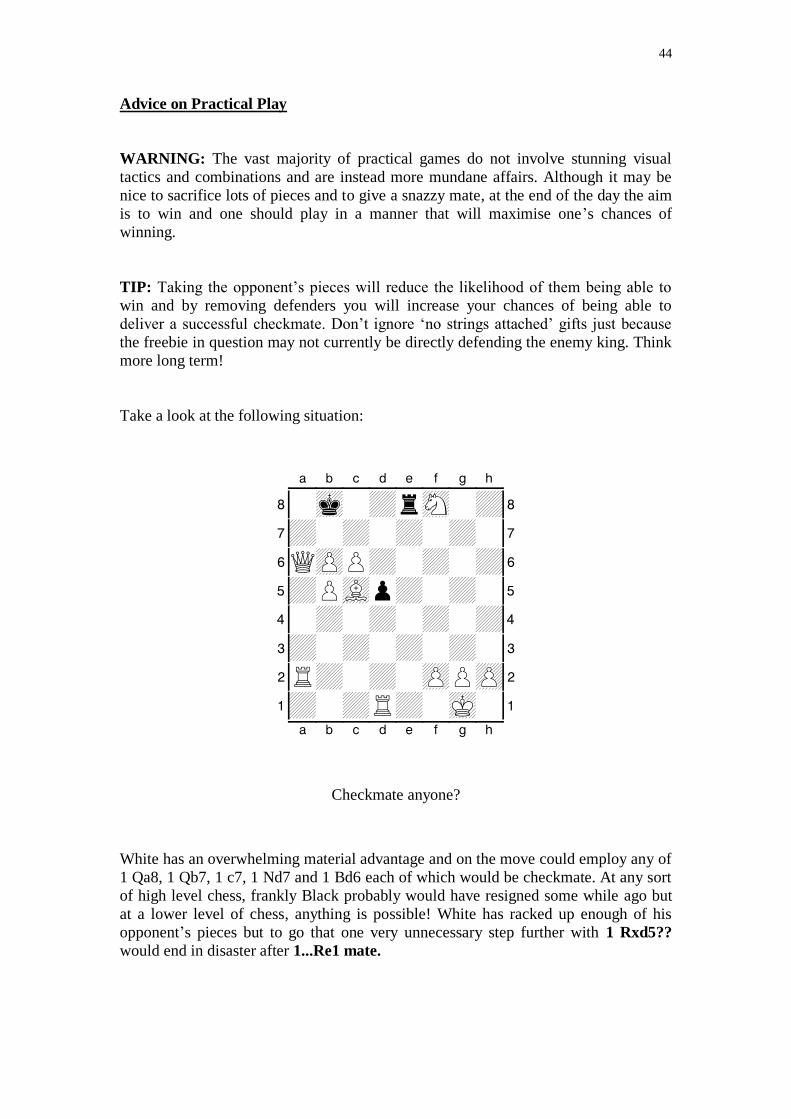
Checkmate anyone?
White has an overwhelming material advantage and on the move could employ any of
1 Qa8, 1 Qb7, 1 c7, 1 Nd7 and 1 Bd6 each of which would be checkmate. At any sort
of high level chess, frankly Black probably would have resigned some while ago but
at a lower level of chess, anything is possible! White has racked up enough of his
opponent’s pieces but to go that one very unnecessary step further with 1 Rxd5??
would end in disaster after 1...Re1 mate.
45
XABCDEFGHY 8-mk-+-sN-+( 7+-+-+-+-' 6QzPP+-+-+& 5+PvLR+-+-% 4-+-+-+-+$ 3+-+-+-+-# 2R+-+-zPPzP" 1+-+-tr-mK-! xabcdefghy
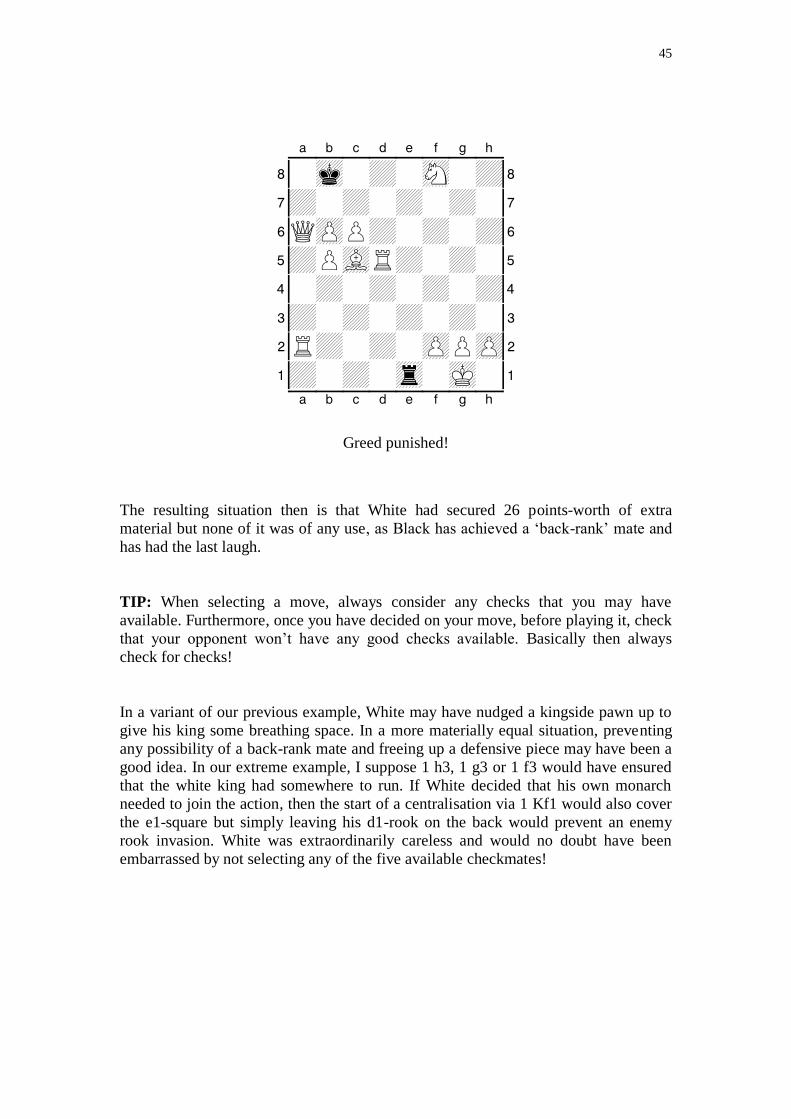
Greed punished!
The resulting situation then is that White had secured 26 points-worth of extra
material but none of it was of any use, as Black has achieved a ‘back-rank’ mate and
has had the last laugh.
TIP: When selecting a move, always consider any checks that you may have
available. Furthermore, once you have decided on your move, before playing it, check
that your opponent won’t have any good checks available. Basically then always
check for checks!
In a variant of our previous example, White may have nudged a kingside pawn up to
give his king some breathing space. In a more materially equal situation, preventing
any possibility of a back-rank mate and freeing up a defensive piece may have been a
good idea. In our extreme example, I suppose 1 h3, 1 g3 or 1 f3 would have ensured
that the white king had somewhere to run. If White decided that his own monarch
needed to join the action, then the start of a centralisation via 1 Kf1 would also cover
the e1-square but simply leaving his d1-rook on the back would prevent an enemy
rook invasion. White was extraordinarily careless and would no doubt have been
embarrassed by not selecting any of the five available checkmates!