instruction manual enclosed manuel … manual enclosed manuel d’instruction Á l ... instruction...
TRANSCRIPT
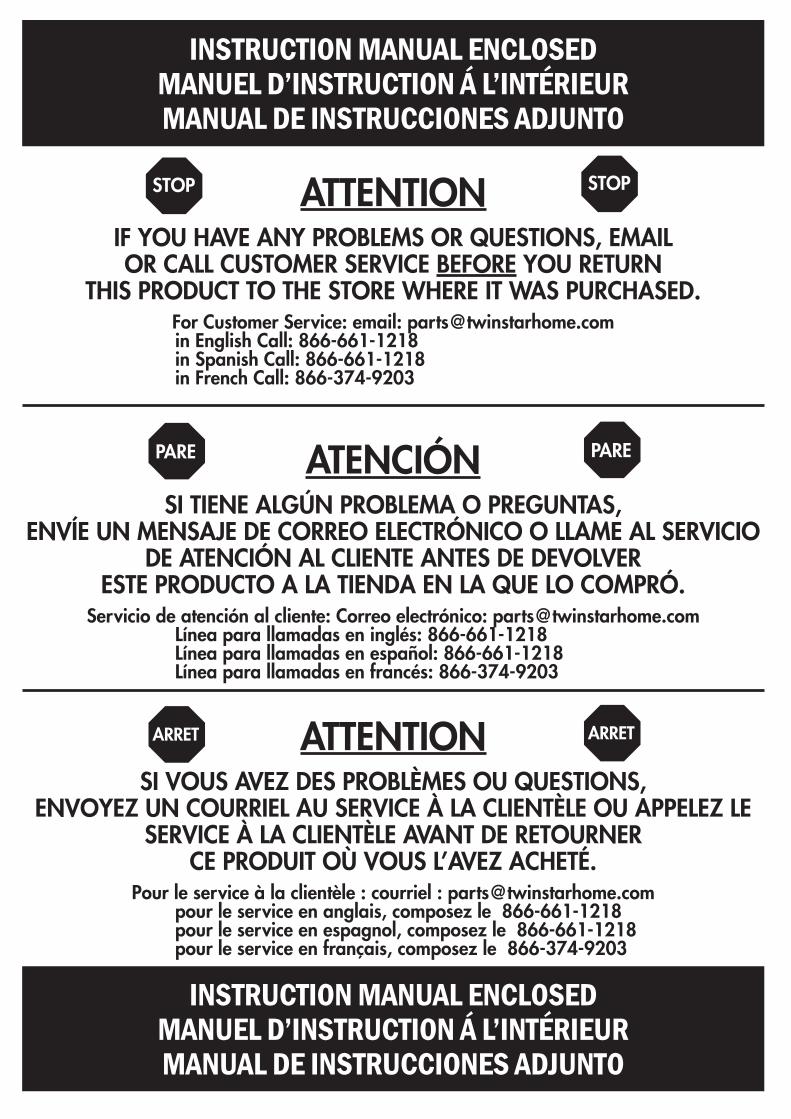
ATTENTIONIF YOU HAVE ANY PROBLEMS OR QUESTIONS, EMAIL OR CALL CUSTOMER SERVICE BEFORE YOU RETURN
THIS PRODUCT TO THE STORE WHERE IT WAS PURCHASED.For Customer Service: email: [email protected] English Call: 866-661-1218in Spanish Call: 866-661-1218in French Call: 866-374-9203
ATENCIÓNSI TIENE ALGÚN PROBLEMA O PREGUNTAS,
ENVÍE UN MENSAJE DE CORREO ELECTRÓNICO O LLAME AL SERVICIO DE ATENCIÓN AL CLIENTE ANTES DE DEVOLVER
ESTE PRODUCTO A LA TIENDA EN LA QUE LO COMPRÓ.Servicio de atención al cliente: Correo electrónico: [email protected]
Línea para llamadas en inglés: 866-661-1218Línea para llamadas en español: 866-661-1218Línea para llamadas en francés: 866-374-9203
STOP STOP
PARE PARE
ATTENTIONSI VOUS AVEZ DES PROBLÈMES OU QUESTIONS,
ENVOYEZ UN COURRIEL AU SERVICE À LA CLIENTÈLE OU APPELEZ LE SERVICE À LA CLIENTÈLE AVANT DE RETOURNER
CE PRODUIT OÙ VOUS L’AVEZ ACHETÉ.Pour le service à la clientèle : courriel : [email protected]
pour le service en anglais, composez le 866-661-1218pour le service en espagnol, composez le 866-661-1218pour le service en français, composez le 866-374-9203
ARRET ARRET
INSTRUCTION MANUAL ENCLOSEDMANUEL D’INSTRUCTION Á L’INTÉRIEURMANUAL DE INSTRUCCIONES ADJUNTO
INSTRUCTION MANUAL ENCLOSEDMANUEL D’INSTRUCTION Á L’INTÉRIEURMANUAL DE INSTRUCCIONES ADJUNTO
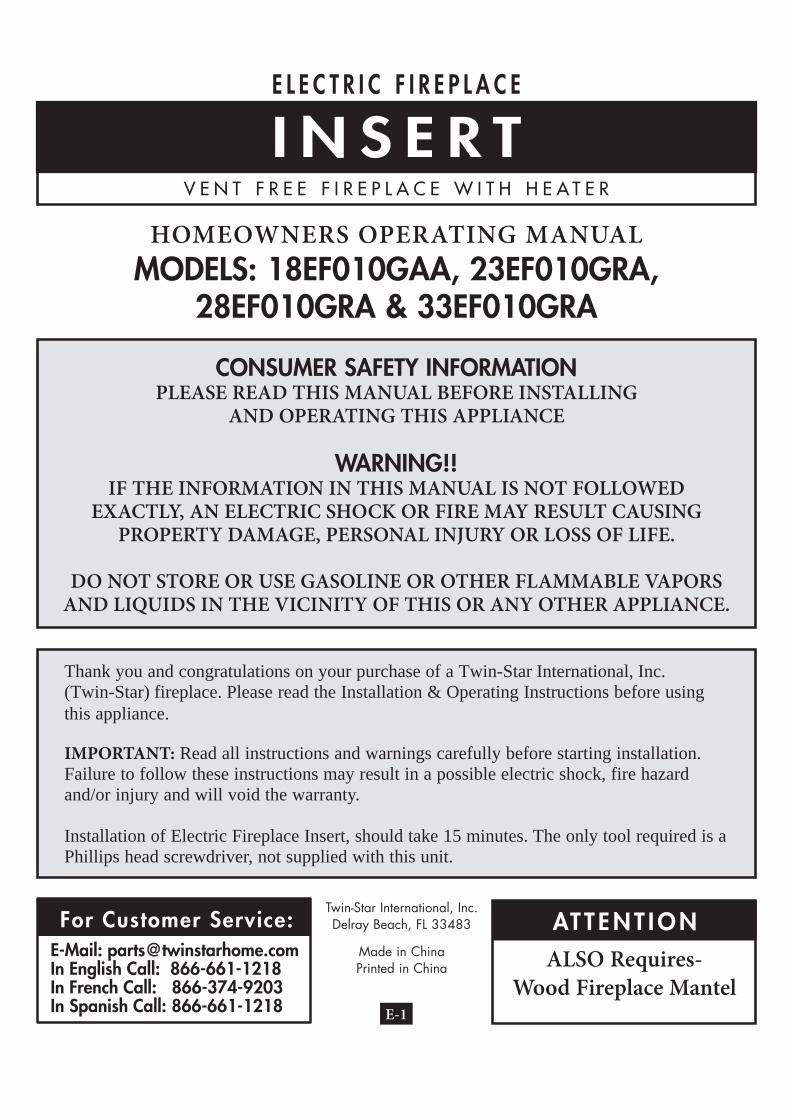
CONSUMER SAFETY INFORMATIONPLEASE READ THIS MANUAL BEFORE INSTALLING
AND OPERATING THIS APPLIANCE
WARNING!!IF THE INFORMATION IN THIS MANUAL IS NOT FOLLOWED
EXACTLY, AN ELECTRIC SHOCK OR FIRE MAY RESULT CAUSINGPROPERTY DAMAGE, PERSONAL INJURY OR LOSS OF LIFE.
DO NOT STORE OR USE GASOLINE OR OTHER FLAMMABLE VAPORSAND LIQUIDS IN THE VICINITY OF THIS OR ANY OTHER APPLIANCE.
Twin-Star International, Inc.Delray Beach, FL 33483
Made in ChinaPrinted in China
E L E C T R I C F I R E P L A C E
I N S E R T
HOMEOWNERS OPERATING MANUALMODELS: 18EF010GAA, 23EF010GRA,
28EF010GRA & 33EF010GRA
ALSO Requires-Wood Fireplace Mantel
V E N T F R E E F I R E P L A C E W I T H H E A T E R
Thank you and congratulations on your purchase of a Twin-Star International, Inc.(Twin-Star) fireplace. Please read the Installation & Operating Instructions before usingthis appliance.
IMPORTANT: Read all instructions and warnings carefully before starting installation.Failure to follow these instructions may result in a possible electric shock, fire hazardand/or injury and will void the warranty.
Installation of Electric Fireplace Insert, should take 15 minutes. The only tool required is aPhillips head screwdriver, not supplied with this unit.
AT T E N T I O N
E-1
E-Mail: [email protected] English Call: 866-661-1218In French Call: 866-374-9203In Spanish Call: 866-661-1218
For Customer Service:
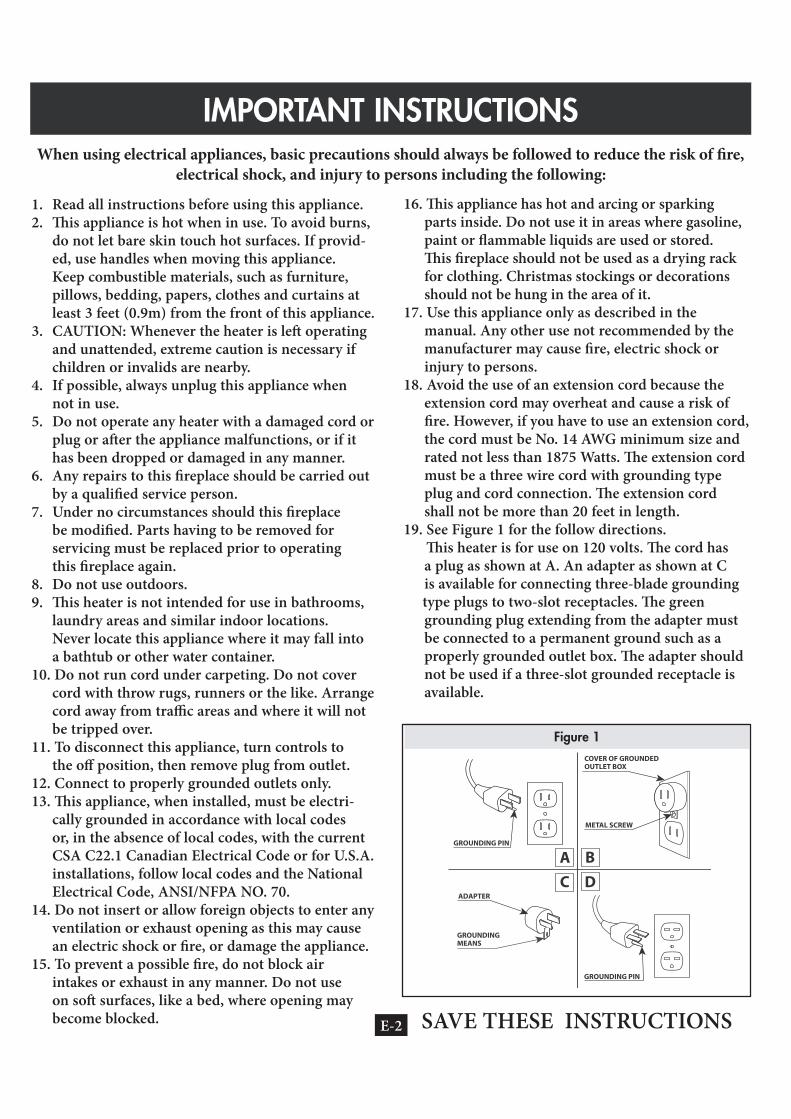
IMPORTANT INSTRUCTIONS
1. Read all instructions before using this appliance.2. This appliance is hot when in use. To avoid burns,
do not let bare skin touch hot surfaces. If provid-ed, use handles when moving this appliance.Keep combustible materials, such as furniture,pillows, bedding, papers, clothes and curtains atleast 3 feet (0.9m) from the front of this appliance.
3. CAUTION: Whenever the heater is left operatingand unattended, extreme caution is necessary ifchildren or invalids are nearby.
4. If possible, always unplug this appliance whennot in use.
5. Do not operate any heater with a damaged cord orplug or after the appliance malfunctions, or if ithas been dropped or damaged in any manner.
6. Any repairs to this fireplace should be carried outby a qualified service person.
7. Under no circumstances should this fireplacebe modified. Parts having to be removed forservicing must be replaced prior to operatingthis fireplace again.
8. Do not use outdoors.9. This heater is not intended for use in bathrooms,
laundry areas and similar indoor locations.Never locate this appliance where it may fall intoa bathtub or other water container.
10. Do not run cord under carpeting. Do not covercord with throw rugs, runners or the like. Arrangecord away from traffic areas and where it will notbe tripped over.
11. To disconnect this appliance, turn controls tothe off position, then remove plug from outlet.
12. Connect to properly grounded outlets only.13. This appliance, when installed, must be electri-
cally grounded in accordance with local codesor, in the absence of local codes, with the currentCSA C22.1 Canadian Electrical Code or for U.S.A.installations, follow local codes and the NationalElectrical Code, ANSI/NFPA NO. 70.
14. Do not insert or allow foreign objects to enter anyventilation or exhaust opening as this may causean electric shock or fire, or damage the appliance.
15. To prevent a possible fire, do not block airintakes or exhaust in any manner. Do not useon soft surfaces, like a bed, where opening maybecome blocked.
16. This appliance has hot and arcing or sparkingparts inside. Do not use it in areas where gasoline,paint or flammable liquids are used or stored.This fireplace should not be used as a drying rackfor clothing. Christmas stockings or decorationsshould not be hung in the area of it.
17. Use this appliance only as described in themanual. Any other use not recommended by themanufacturer may cause fire, electric shock orinjury to persons.
18. Avoid the use of an extension cord because theextension cord may overheat and cause a risk offire. However, if you have to use an extension cord,the cord must be No. 14 AWG minimum size andrated not less than 1875 Watts. The extension cordmust be a three wire cord with grounding typeplug and cord connection. The extension cordshall not be more than 20 feet in length.
19. See Figure 1 for the follow directions. This heater is for use on 120 volts. The cord has
a plug as shown at A. An adapter as shown at Cis available for connecting three-blade grounding
type plugs to two-slot receptacles. The greengrounding plug extending from the adapter mustbe connected to a permanent ground such as aproperly grounded outlet box. The adapter shouldnot be used if a three-slot grounded receptacle isavailable.
E-2 SAVE THESE INSTRUCTIONS
When using electrical appliances, basic precautions should always be followed to reduce the risk of fire,electrical shock, and injury to persons including the following:
Figure 1
GROUNDING PIN
METAL SCREW
COVER OF GROUNDED OUTLET BOX
BA
C
GROUNDING PIN
DADAPTER
GROUNDINGMEANS
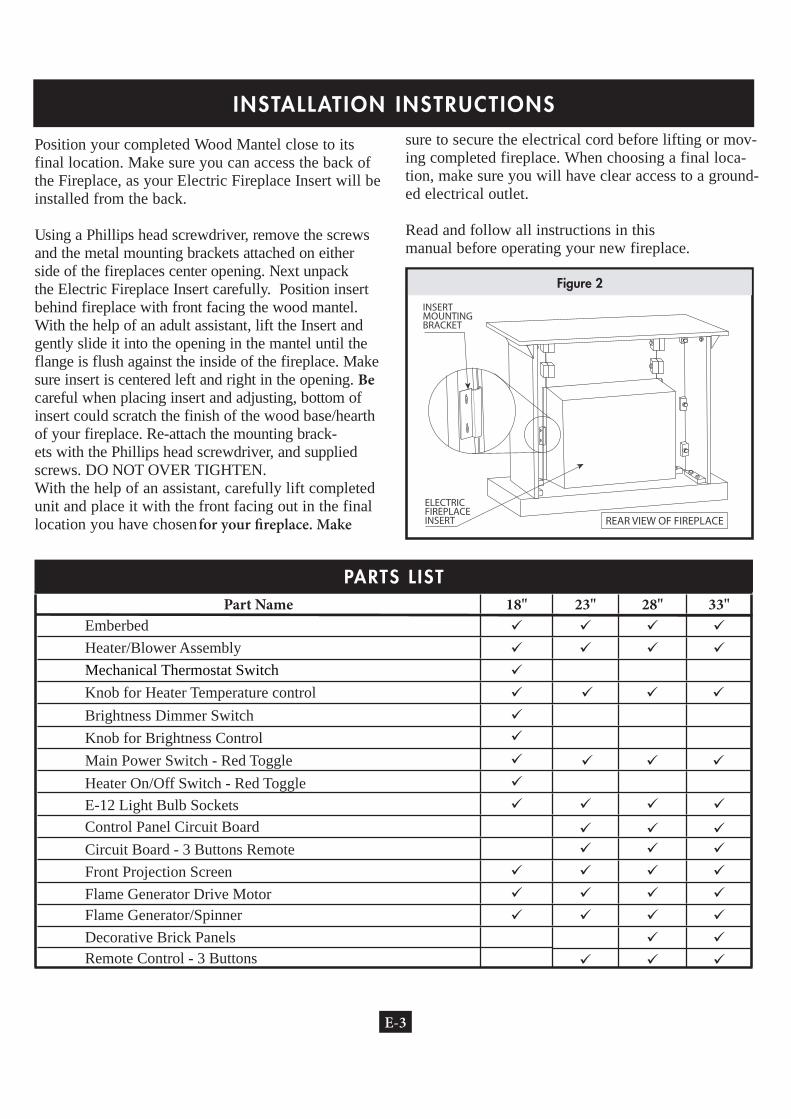
Part Name 18" 23" 28" 33"EmberbedHeater/Blower AssemblyMechanical Thermostat Switch
Knob for Brightness Control
Knob for Heater Temperature control
Main Power Switch - Red ToggleHeater On/Off Switch - Red Toggle
Brightness Dimmer Switch
E-12 Light Bulb Sockets Control Panel Circuit BoardCircuit Board - 3 Buttons Remote Front Projection Screen Flame Generator Drive Motor Flame Generator/Spinner Decorative Brick Panels Remote Control - 3 Buttons
INSTALLATION INSTRUCTIONS
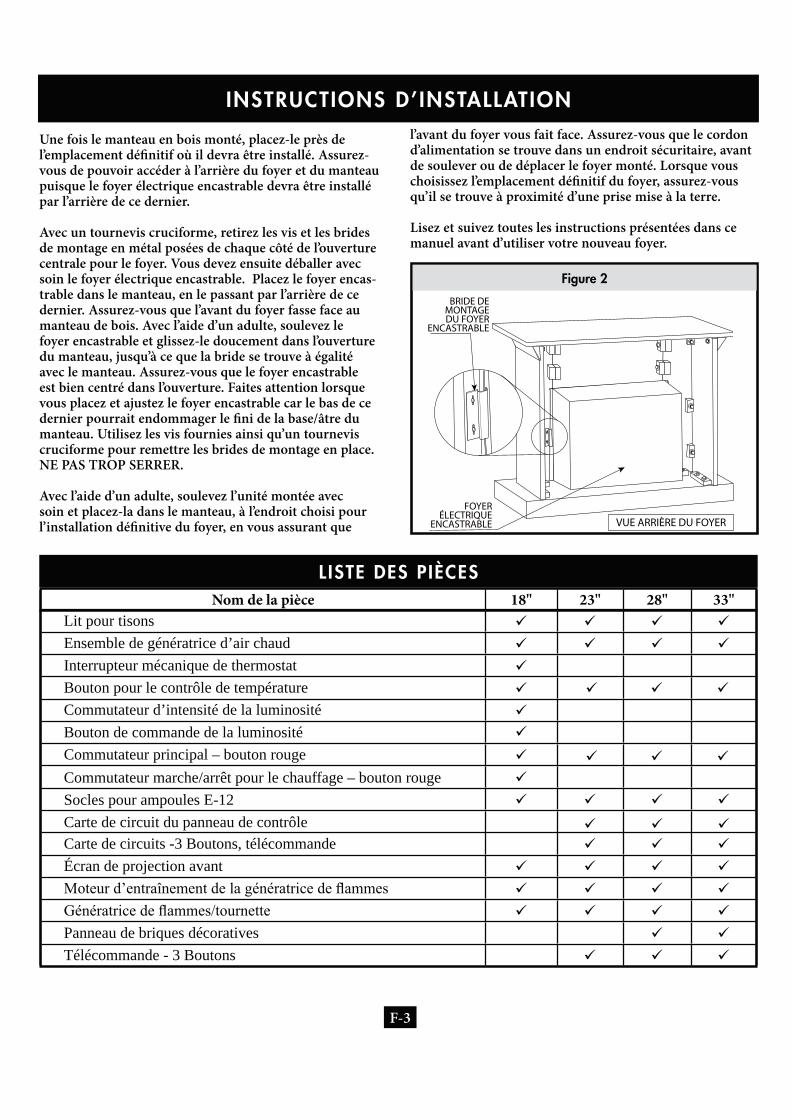
Position your completed Wood Mantel close to itsfinal location. Make sure you can access the back ofthe Fireplace, as your Electric Fireplace Insert will beinstalled from the back.
Using a Phillips head screwdriver, remove the screwsand the metal mounting brackets attached on eitherside of the fireplaces center opening. Next unpackthe Electric Fireplace Insert carefully. Position insertbehind fireplace with front facing the wood mantel.With the help of an adult assistant, lift the Insert andgently slide it into the opening in the mantel until theflange is flush against the inside of the fireplace. Makesure insert is centered left and right in the opening. Becareful when placing insert and adjusting, bottom ofinsert could scratch the finish of the wood base/hearthof your fireplace. Re-attach the mounting brack-ets with the Phillips head screwdriver, and suppliedscrews. DO NOT OVER TIGHTEN.With the help of an assistant, carefully lift completedunit and place it with the front facing out in the finallocation you have chosenfor your fireplace. Make
PARTS LIST
E-3
Figure 2
ELECTRICFIREPLACEINSERT REAR VIEW OF FIREPLACE
INSERTMOUNTINGBRACKET
sure to secure the electrical cord before lifting or mov-ing completed fireplace. When choosing a final loca-tion, make sure you will have clear access to a ground-ed electrical outlet.
Read and follow all instructions in thismanual before operating your new fireplace.
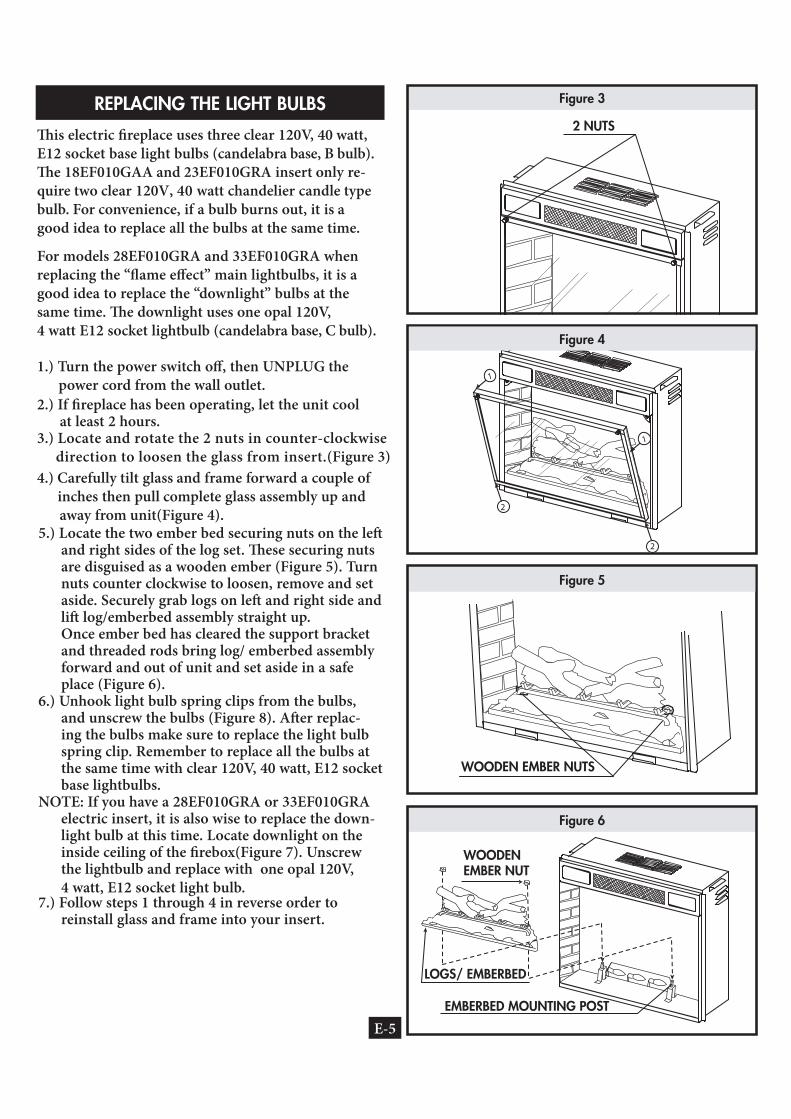
REPLACING THE DOWNLIGHT BULBSModels 28EF010GRA and 33EF010GRAModels 28EF010GRA and 33EF010GRA
ONLYONLY
Locate and rotate the 2 nuts in counter-clock- Locate and rotate the 2 nuts in counter-clock- wise direction to loosen the glass from insert. wise direction to loosen the glass from insert.
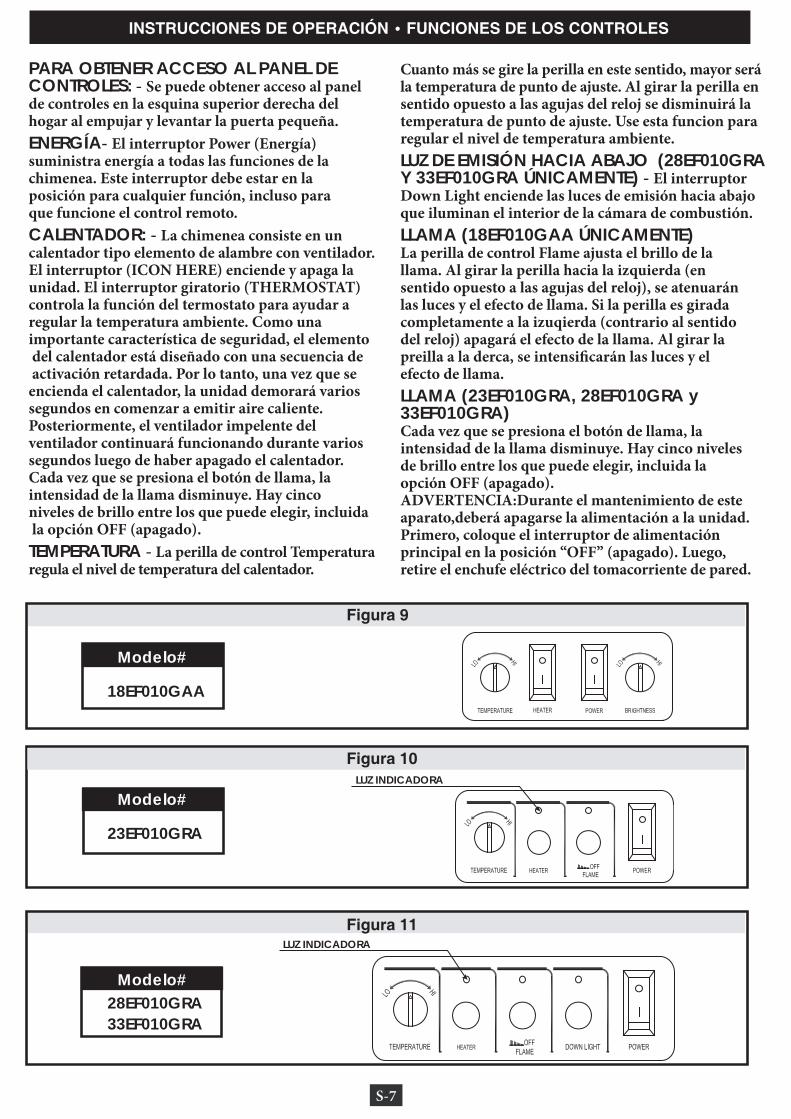
OPERATING INSTRUCTIONS CONTROL FUNCTIONS
Figure 9
Figure 10
Figure 11
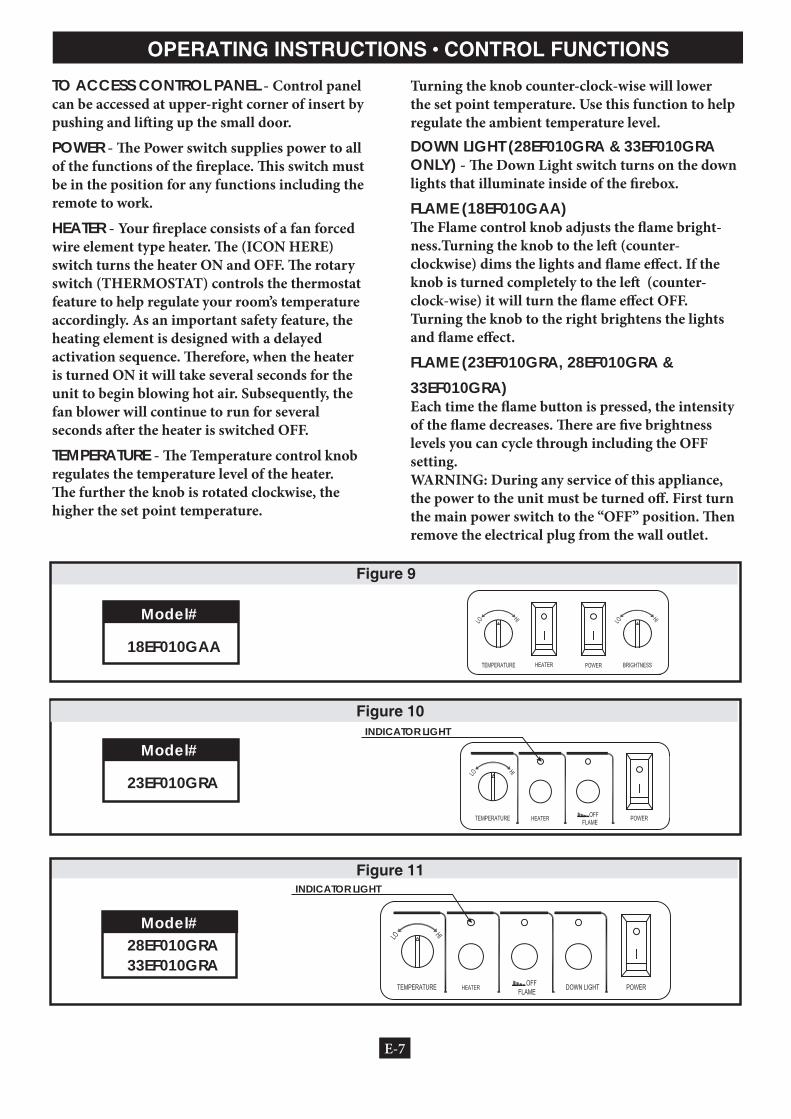
TO ACCESS CONTROL PANEL - Control panel can be accessed at upper-right corner of insert bypushing and lifting up the small door.
POWER - The Power switch supplies power to all of the functions of the fireplace. This switch must be in the position for any functions including the remote to work.
HEATER - Your fireplace consists of a fan forced wire element type heater. The (ICON HERE) switch turns the heater ON and OFF. The rotary switch (THERMOSTAT) controls the thermostat feature to help regulate your room’s temperature accordingly. As an important safety feature, the heating element is designed with a delayed activation sequence. Therefore, when the heater is turned ON it will take several seconds for the unit to begin blowing hot air. Subsequently, the fan blower will continue to run for several seconds after the heater is switched OFF.
TEMPERATURE - The Temperature control knobregulates the temperature level of the heater. The further the knob is rotated clockwise, the higher the set point temperature.
Turning the knob counter-clock-wise will lower the set point temperature. Use this function to help regulate the ambient temperature level.DOWN LIGHT (28EF010GRA & 33EF010GRAONLY) - The Down Light switch turns on the downlights that illuminate inside of the firebox.
FLAME (18EF010GAA)The Flame control knob adjusts the flame bright-ness.Turning the knob to the left (counter-clockwise) dims the lights and flame effect. If the knob is turned completely to the left (counter-clock-wise) it will turn the flame effect OFF. Turning the knob to the right brightens the lights and flame effect.
FLAME (23EF010GRA, 28EF010GRA &33EF010GRA)Each time the flame button is pressed, the intensityof the flame decreases. There are five brightness levels you can cycle through including the OFF setting.WARNING: During any service of this appliance,the power to the unit must be turned off. First turnthe main power switch to the “OFF” position. Thenremove the electrical plug from the wall outlet.
Model#
18EF010GAA
23EF010GRA
INDICATOR LIGHT
INDICATOR LIGHT
28EF010GRA33EF010GRA
Model#
Model#
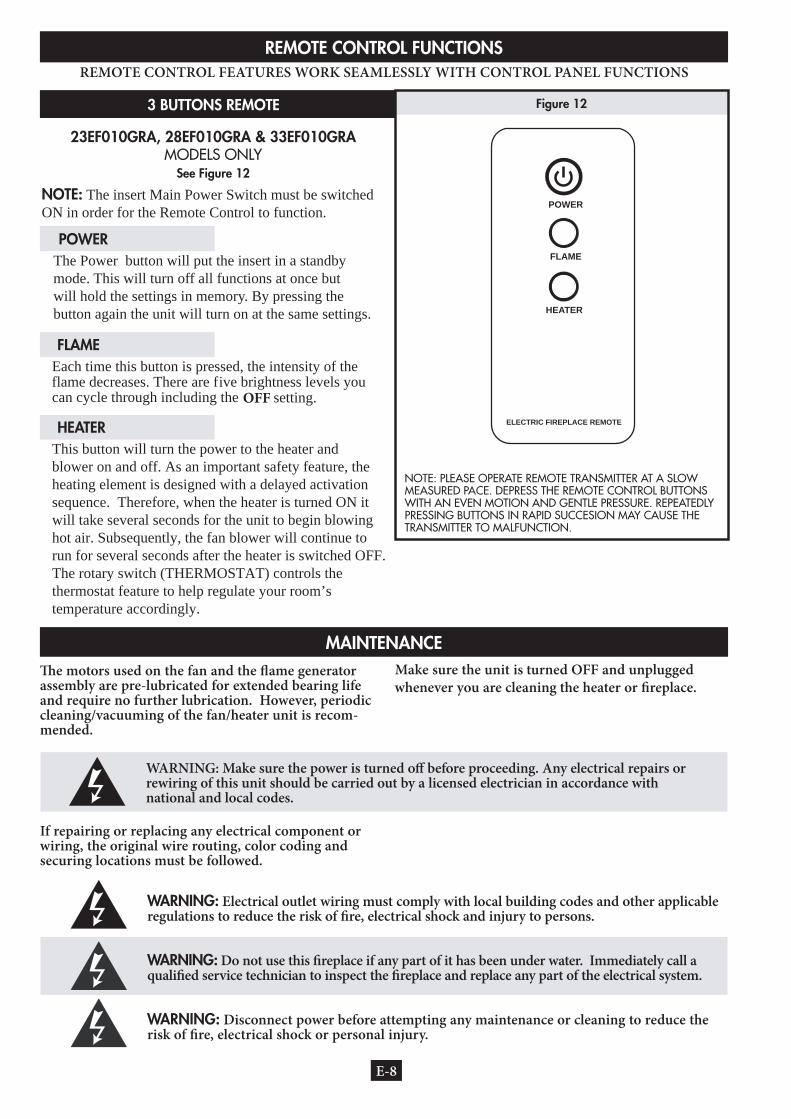
Figure 12
REMOTE CONTROL FUNCTIONS
E-8
REMOTE CONTROL FEATURES WORK SEAMLESSLY WITH CONTROL PANEL FUNCTIONS
3 BUTTONS REMOTE
23EF010GRA, 28EF010GRA & 33EF010GRAMODELS ONLY
See Figure 12
POWERThe Power button will put the insert in a standby mode. This will turn off all functions at once but will hold the settings in memory. By pressing the button again the unit will turn on at the same settings.
HEATERThis button will turn the power to the heater andblower on and off. As an important safety feature, theheating element is designed with a delayed activation sequence. Therefore, when the heater is turned ON it will take several seconds for the unit to begin blowing hot air. Subsequently, the fan blower will continue to run for several seconds after the heater is switched OFF.The rotary switch (THERMOSTAT) controls the thermostat feature to help regulate your room’s temperature accordingly.
FLAMEEach time this button is pressed, the intensity of the flame decreases. There are five brightness levels youcan cycle through including the OFF setting.
MAINTENANCE
WARNING: Make sure the power is turned off before proceeding. Any electrical repairs orrewiring of this unit should be carried out by a licensed electrician in accordance withnational and local codes.
WARNING: Electrical outlet wiring must comply with local building codes and other applicableregulations to reduce the risk of fire, electrical shock and injury to persons.
WARNING: Do not use this fireplace if any part of it has been under water. Immediately call aqualified service technician to inspect the fireplace and replace any part of the electrical system.
WARNING: Disconnect power before attempting any maintenance or cleaning to reduce therisk of fire, electrical shock or personal injury.
The motors used on the fan and the flame generatorassembly are pre-lubricated for extended bearing lifeand require no further lubrication. However, periodiccleaning/vacuuming of the fan/heater unit is recom-mended.
Make sure the unit is turned OFF and unplugged whenever you are cleaning the heater or fireplace.
If repairing or replacing any electrical component orwiring, the original wire routing, color coding andsecuring locations must be followed.
NOTE: PLEASE OPERATE REMOTE TRANSMITTER AT A SLOW MEASURED PACE. DEPRESS THE REMOTE CONTROL BUTTONS WITH AN EVEN MOTION AND GENTLE PRESSURE. REPEATEDLYPRESSING BUTTONS IN RAPID SUCCESION MAY CAUSE THE TRANSMITTER TO MALFUNCTION.
FLAME
HEATER
POWER
ELECTRIC FIREPLACE REMOTE
NOTE: The insert Main Power Switch must be switchedON in order for the Remote Control to function.

BASIC WARRANTY
Twin-Star International, Inc. (hereinafter referred tocollectively as the (“Company”) warrants that yournew Twin-Star Electric Fireplace is free from manu-facturing and material defects for a period of one yearfrom date of purchase, subject to the following condi-tions and limitations.
1. This electric fireplace must be installed and oper-ated at all times in accordance with the installa-tion and operating instructions furnished with theproduct. Any unauthorized repair, alteration, will-ful abuse, accident, or misuse of the product shallnullify this warranty.
2. This warranty is non-transferable, and is made tothe original owner, provided that the purchase wasmade through an authorized supplier of the com-pany.
3. The warranty is limited to the repair or replace-ment of part(s) found to be defective in mate-rial or workmanship, provided that such part(s)have been subjected to normal conditions of useand service, after said defect is confirmed by theCompany’s inspection.
4. This warranty does not cover the light bulb(s) included with the Twin-Star Electric Fireplace.5. The Company may, at its discretion, fully discharge
all obligations with respect to this warranty byrefunding the wholesale price of the defectivepart(s).
6. Any installation, labor, construction, transporta-tion, or other related costs/expenses arising fromdefective part(s), repair, replacement, or otherwiseof same, will not be covered by this warranty, norshall the Company assume responsibility for same.
7. The owner/user assumes all other risks, if any,including the risk of any direct, indirect or conse-quential loss or damage arising out of the use, orinability to use the product, except as provided bylaw.
8. All other warranties – expressed of implied – withrespect to the product, its components and acces-sories, or any obligations/liabilities on the part ofthe Company are hereby expressly excluded.
9. The Company neither assumes, nor authorizes anythird party to assume, on its behalf, any other lia-bilities with respect to the sale of the Twin-Starproduct.
10. The warranties as outlined within this documentdo not apply to non Twin-Star accessories usedin conjunction with the installation of this prod-uct.
This warranty is void if:a. The fireplace is subjected to prolonged periods of
dampness or condensation.b. Any unauthorized alteration, willful abuse, acci-
dent, or misuse of the product.c. You do not have the original receipt of purchase.
IF WARRANTY SERVICE IS NEEDED
1) Contact the Company, at parts@twinstarhome. com, or call 866-661-1218 in English, 866-374-9203 in French, 866-661-1218 in Spanish. Make sure you have your warranty, your sales receipt,location of purchase and the model/serial number of your Twin-Star product.
1 YEAR LIMITED WARRANTYTwin-Star ™ Electric Fireplace Models
Twin-Star International, Inc.Delray Beach, FL 33483
Made in ChinaPrinted in China
© 2007, Twin-Star International, Inc.E-9
For updates and revisions to this manualplease see our website
www.twinstarhome.com/instructions
E-Mail: [email protected] English Call: 866-661-1218In French Call: 866-374-9203In Spanish Call: 866-661-1218
For Customer Service:
INFORMACIÓN SOBRE SEGURIDAD PARA EL CONSUMIDORLEA ESTE MANUAL ANTES DE INSTALAR Y OPERAR ESTE APARATO
ADVERTENCIA!!EN CASO DE NO SEGUIR LA INFORMACIÓN EN ESTE MANUAL CON
EXACTITUD, PODRÍAN PROVOCARSE DESCARGA ELÉCTRICA OINCENDIO Y DAÑOS A LA PROPIEDAD, LESIONES PERSONALES O LA
PÉRDIDA DE LA VIDA.
NO GUARDE NI USE GASOLINA NI OTROS VAPORES Y LÍQUIDOSINFLAMABLES EN LA CERCANÍA DE ESTE APARATO NI DE
CUALQUIER OTRO.
Twin-Star International, Inc.Delray Beach, FL 33483
Fabricado en ChinaImpreso en China
I N S E R T O PA R A C H I M E N E A
E L É C T R I C A
MANUAL DE OPERACIÓN DEL PROPIETARIOMODELOS: 18EF010GAA, 23EF010GRA,
28EF010GRA y 33EF010GRA
C H I M E N E A S I N R E S P I R A D E R O C O N C A L E N T A D O R
Gracias y felicitaciones por su adquisición de una chimenea Twin-Star. Lea las Instrucciones de instalación y operación antes de utilizar este aparato.
IMPORTANTE: lea todas las instrucciones y advertencias con detenimiento antes decomenzar la instalación. Si no se cumplen con estas instrucciones, podría provocarseuna posible descarga eléctrica, riesgo de incendio y/o lesiones y, además, la garantíaperderá validez.
La instalación del Inserto para chimenea eléctrica sólo tomará 15 minutos. La única herra-mienta requerida es un destornillador Phillips que no se suministra con esta unidad.
S-1
TAMBIÉN se requiereRepisa de chimenea de madera
AT E N C I Ó NCorreo electrónico: [email protected]ínea para llamadas en inglés: 866-661-1218Línea para llamadas en francés: 866-374-9203Línea para llamadas en español: 866-661-1218
Servicio de atención al cliente:
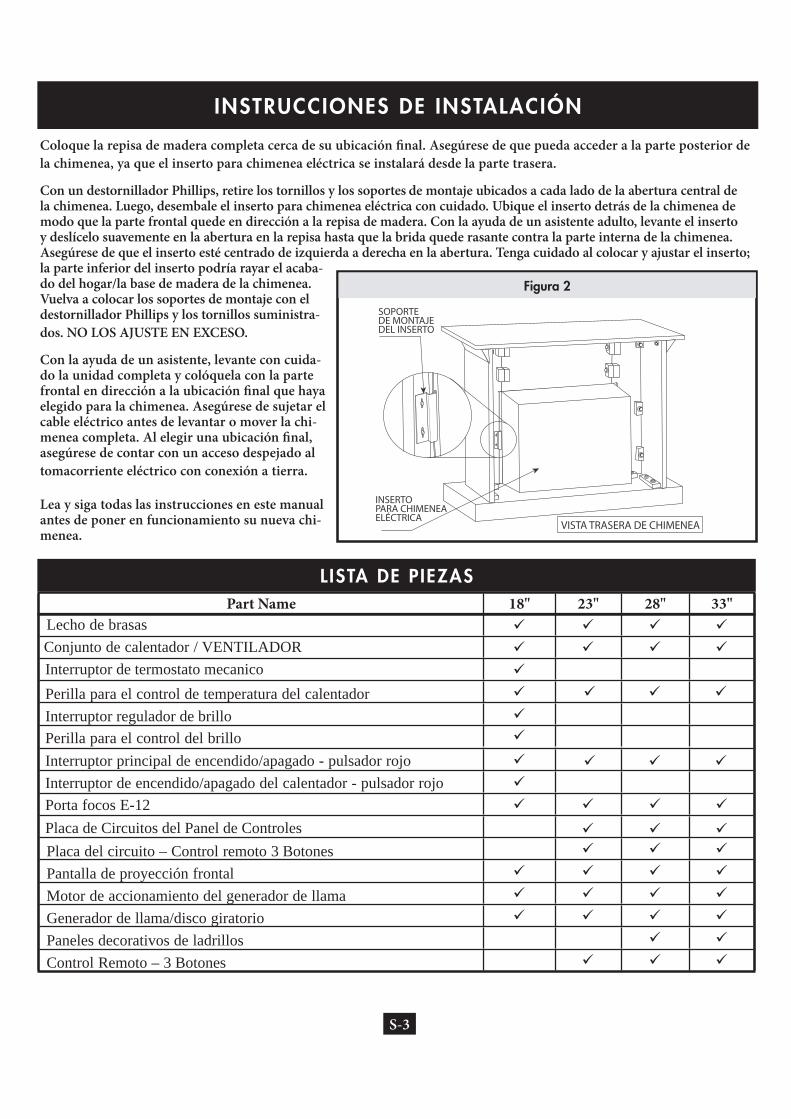
INSTRUCCIONES DE INSTALACIÓN
Coloque la repisa de madera completa cerca de su ubicación final. Asegúrese de que pueda acceder a la parte posterior dela chimenea, ya que el inserto para chimenea eléctrica se instalará desde la parte trasera.
Con un destornillador Phillips, retire los tornillos y los soportes de montaje ubicados a cada lado de la abertura central dela chimenea. Luego, desembale el inserto para chimenea eléctrica con cuidado. Ubique el inserto detrás de la chimenea demodo que la parte frontal quede en dirección a la repisa de madera. Con la ayuda de un asistente adulto, levante el insertoy deslícelo suavemente en la abertura en la repisa hasta que la brida quede rasante contra la parte interna de la chimenea.Asegúrese de que el inserto esté centrado de izquierda a derecha en la abertura. Tenga cuidado al colocar y ajustar el inserto;la parte inferior del inserto podría rayar el acaba-do del hogar/la base de madera de la chimenea.Vuelva a colocar los soportes de montaje con eldestornillador Phillips y los tornillos suministra-dos. NO LOS AJUSTE EN EXCESO.
Con la ayuda de un asistente, levante con cuida-do la unidad completa y colóquela con la partefrontal en dirección a la ubicación final que hayaelegido para la chimenea. Asegúrese de sujetar elcable eléctrico antes de levantar o mover la chi-menea completa. Al elegir una ubicación final,asegúrese de contar con un acceso despejado altomacorriente eléctrico con conexión a tierra.
Lea y siga todas las instrucciones en este manualantes de poner en funcionamiento su nueva chi-menea.
S-3
Figura 2
INSERTOPARA CHIMENEAELÉCTRICA
VISTA TRASERA DE CHIMENEA
SOPORTEDE MONTAJEDEL INSERTO
Part Name 18" 23" 28" 33"Lecho de brasasConjunto de calentador / VENTILADORInterruptor de termostato mecanico
Perilla para el control del brillo
Perilla para el control de temperatura del calentador
Interruptor principal de encendido/apagado - pulsador rojoInterruptor de encendido/apagado del calentador - pulsador rojo
Interruptor regulador de brillo
Porta focos E-12Placa de Circuitos del Panel de ControlesPlaca del circuito – Control remoto 3 Botones Pantalla de proyección frontalMotor de accionamiento del generador de llamaGenerador de llama/disco giratorioPaneles decorativos de ladrillosControl Remoto – 3 Botones
L ISTA DE PIEZAS

1. No hay energía; los interruptores no se encienden.
2. Los interruptores se encienden, pero no hayefecto de llama.
3. Las luces de emisión hacia abajo no se encienden.
4. Los leños se encienden; pero el efecto de llama no funciona.
5. El efecto de llama funciona, pero el calentador no emite aire caliente.
6. El calentador no funciona, pero los interruptores Power (Energía) y Heater (Calentador) están en la posición “ON” (encendido) y el termostato está en “HI”.
1a. Compruebe que la unidad esté enchufada a un tomacorriente estándar de 120V.
2a. Retire la placa de protección frontal y compruebe si hay bombillas rotas o sueltas.
3a. Retire el soporte superior del vidrio frontal. Con cui- dado, levante el vidrio de la guía. Compruebe que las
dos bombillas dentro de la parte superior de la unidad no estén rotas ni sueltas.
4a. Abra la parte posterior de la unidad. Compruebe que el “rotador de llama” esté correctamente montado en la parte trasera de la unidad.
4b. Compruebe si el motor de rotación funciona. En caso contrario, llame al servicio al cliente.
5a. Compruebe que el interruptor del calentador esté en la posición “ON” (encendido). El interruptor debería encenderse. 5b. Asegúrese de que el termostato esté dirigido hacia la
posición “HI”.
6a. Coloque todos los interruptores en la posición “OFF” (apagado) ydesenchufe la unidad del tomacorriente de pared durante 5 minutos. Luego de 5 minutos, enchufe nuevamente la unidad al tomacorrientede pared y haga funcionar la unidad normalmente.
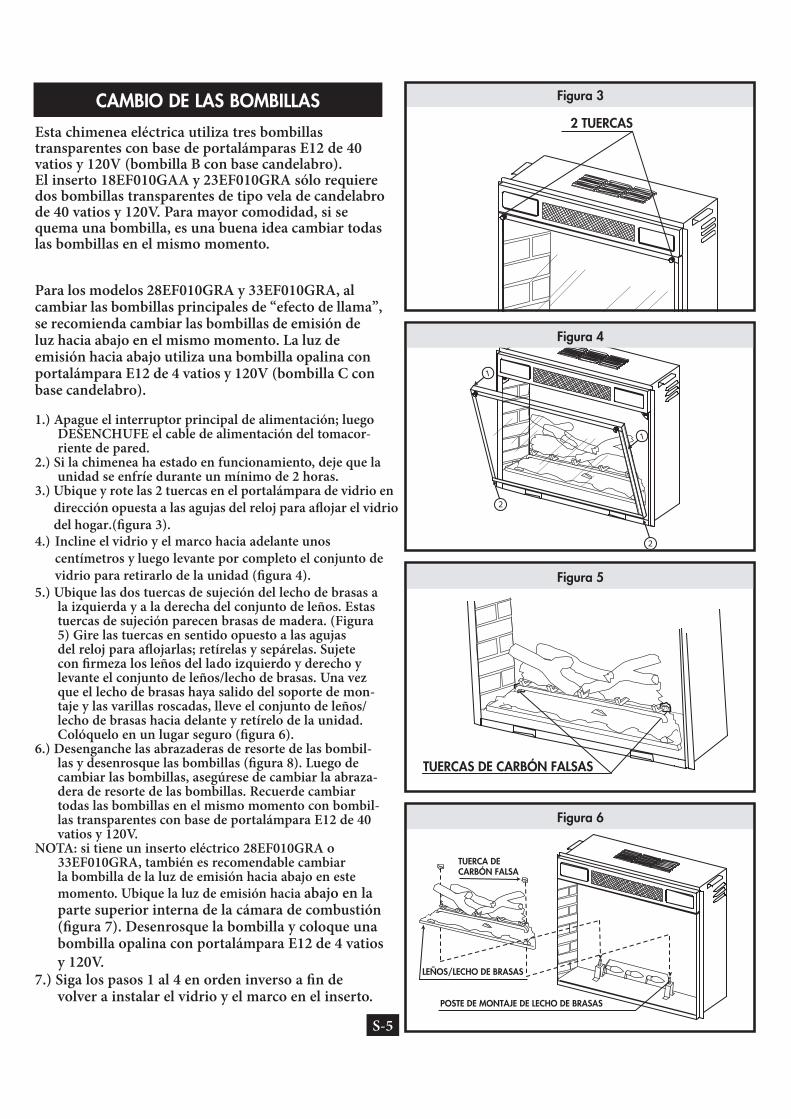

Figura 8
PARA OBTENER ACCESO A LALUZ DE EMISIÓN HACIA ABAJOHÁGALO POR AQUÍ ABAJO
BOMBILLA DE LECHO DE BRASAS
RESORTE DE RETENCIÓN DE BOMBILLA DE LECHO DE BRASAS
CAMBIO DE LAS BOMBILLAS DE LA LUZ DEEMISIÓN HACIA ABAJO
modelos 28EF010GRA y 33EF010GRAÚNICAMENTE
INSTRUCCIONES DE OPERACIÓN FUNCIONES DE LOS CONTROLES
Figura 9
Figura 10
Figura 11
Modelo#
18EF010GAA
23EF010GRA
LUZ INDICADORA
LUZ INDICADORA
28EF010GRA33EF010GRA
Modelo#
Modelo#
PARA OBTENER ACCESO AL PANEL DE CONTROLES: - Se puede obtener acceso al panel de controles en la esquina superior derecha del hogar al empujar y levantar la puerta pequeña.ENERGÍA- El interruptor Power (Energía) suministra energía a todas las funciones de la chimenea. Este interruptor debe estar en la posición para cualquier función, incluso para que funcione el control remoto.CALENTADOR: - La chimenea consiste en un calentador tipo elemento de alambre con ventilador. El interruptor (ICON HERE) enciende y apaga la unidad. El interruptor giratorio (THERMOSTAT) controla la función del termostato para ayudar a regular la temperatura ambiente. Como una importante característica de seguridad, el elemento del calentador está diseñado con una secuencia de activación retardada. Por lo tanto, una vez que se encienda el calentador, la unidad demorará varios segundos en comenzar a emitir aire caliente. Posteriormente, el ventilador impelente del ventilador continuará funcionando durante varios segundos luego de haber apagado el calentador.Cada vez que se presiona el botón de llama, la intensidad de la llama disminuye. Hay cinco niveles de brillo entre los que puede elegir, incluida la opción OFF (apagado).TEMPERATURA - La perilla de control Temperaturaregula el nivel de temperatura del calentador.
Cuanto más se gire la perilla en este sentido, mayor será la temperatura de punto de ajuste. Al girar la perilla en sentido opuesto a las agujas del reloj se disminuirá la temperatura de punto de ajuste. Use esta funcion para regular el nivel de temperatura ambiente.LUZ DE EMISIÓN HACIA ABAJO (28EF010GRAY 33EF010GRA ÚNICAMENTE) - El interruptor Down Light enciende las luces de emisión hacia abajo que iluminan el interior de la cámara de combustión.LLAMA (18EF010GAA ÚNICAMENTE)La perilla de control Flame ajusta el brillo de la llama. Al girar la perilla hacia la izquierda (en sentido opuesto a las agujas del reloj), se atenuarán las luces y el efecto de llama. Si la perilla es girada completamente a la izuqierda (contrario al sentido del reloj) apagará el efecto de la llama. Al girar la preilla a la derca, se intensificarán las luces y el efecto de llama.LLAMA (23EF010GRA, 28EF010GRA y33EF010GRA)Cada vez que se presiona el botón de llama, la intensidad de la llama disminuye. Hay cinco niveles de brillo entre los que puede elegir, incluida la opción OFF (apagado).ADVERTENCIA:Durante el mantenimiento de esteaparato,deberá apagarse la alimentación a la unidad.Primero, coloque el interruptor de alimentación principal en la posición “OFF” (apagado). Luego, retire el enchufe eléctrico del tomacorriente de pared.
S-7
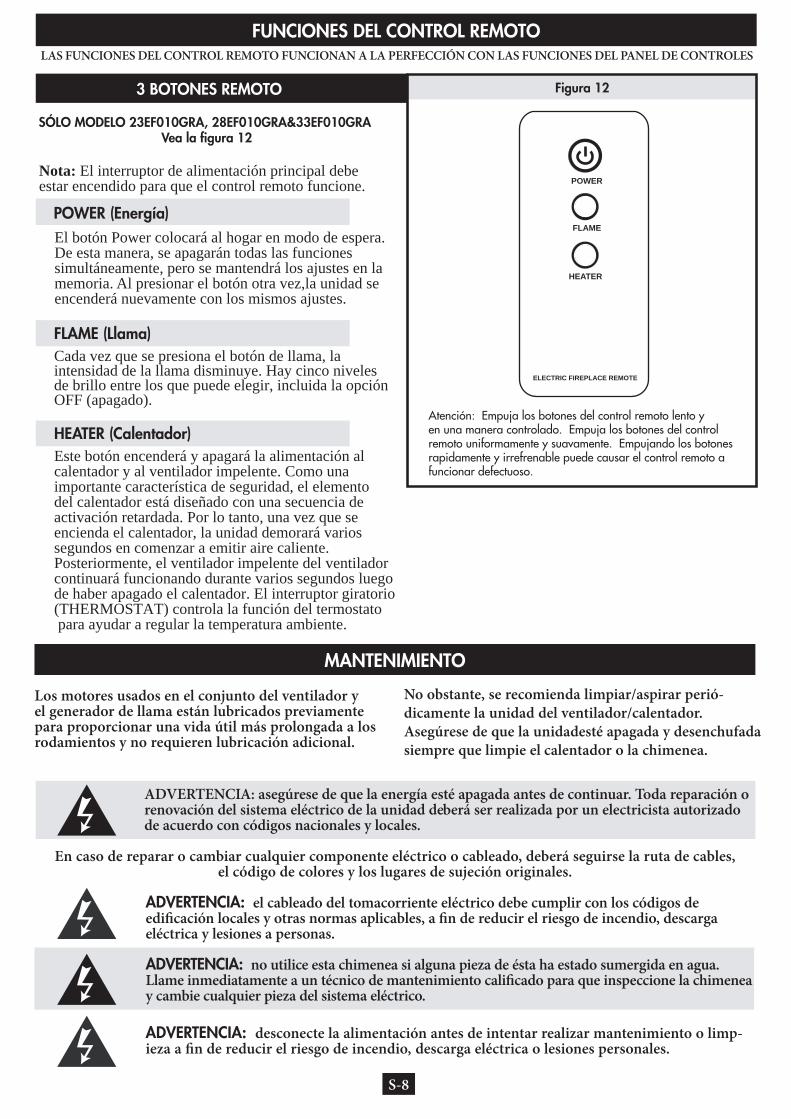
Figura 12
FUNCIONES DEL CONTROL REMOTO
S-8
LAS FUNCIONES DEL CONTROL REMOTO FUNCIONAN A LA PERFECCIÓN CON LAS FUNCIONES DEL PANEL DE CONTROLES
3 BOTONES REMOTO
SÓLO MODELO 23EF010GRA, 28EF010GRA&33EF010GRA Vea la figura 12
POWER (Energía) El botón Power colocará al hogar en modo de espera. De esta manera, se apagarán todas las funciones simultáneamente, pero se mantendrá los ajustes en la memoria. Al presionar el botón otra vez,la unidad se encenderá nuevamente con los mismos ajustes.
HEATER (Calentador)Este botón encenderá y apagará la alimentación al calentador y al ventilador impelente. Como una importante característica de seguridad, el elementodel calentador está diseñado con una secuencia deactivación retardada. Por lo tanto, una vez que se encienda el calentador, la unidad demorará variossegundos en comenzar a emitir aire caliente. Posteriormente, el ventilador impelente del ventilador continuará funcionando durante varios segundos luego de haber apagado el calentador. El interruptor giratorio(THERMOSTAT) controla la función del termostato para ayudar a regular la temperatura ambiente.
FLAME (Llama)Cada vez que se presiona el botón de llama, la intensidad de la llama disminuye. Hay cinco niveles de brillo entre los que puede elegir, incluida la opción OFF (apagado).
MANTENIMIENTO
Los motores usados en el conjunto del ventilador yel generador de llama están lubricados previamentepara proporcionar una vida útil más prolongada a losrodamientos y no requieren lubricación adicional.
No obstante, se recomienda limpiar/aspirar perió-dicamente la unidad del ventilador/calentador.Asegúrese de que la unidadesté apagada y desenchufadasiempre que limpie el calentador o la chimenea.
ADVERTENCIA: asegúrese de que la energía esté apagada antes de continuar. Toda reparación orenovación del sistema eléctrico de la unidad deberá ser realizada por un electricista autorizadode acuerdo con códigos nacionales y locales.
En caso de reparar o cambiar cualquier componente eléctrico o cableado, deberá seguirse la ruta de cables,el código de colores y los lugares de sujeción originales.
ADVERTENCIA: el cableado del tomacorriente eléctrico debe cumplir con los códigos deedificación locales y otras normas aplicables, a fin de reducir el riesgo de incendio, descargaeléctrica y lesiones a personas.
ADVERTENCIA: no utilice esta chimenea si alguna pieza de ésta ha estado sumergida en agua.Llame inmediatamente a un técnico de mantenimiento calificado para que inspeccione la chimeneay cambie cualquier pieza del sistema eléctrico.
ADVERTENCIA: desconecte la alimentación antes de intentar realizar mantenimiento o limp-ieza a fin de reducir el riesgo de incendio, descarga eléctrica o lesiones personales.
Atención: Empuja los botones del control remoto lento yen una manera controlado. Empuja los botones del controlremoto uniformamente y suavamente. Empujando los botonesrapidamente y irrefrenable puede causar el control remoto afuncionar defectuoso.
FLAME
HEATER
POWER
ELECTRIC FIREPLACE REMOTE
Nota: El interruptor de alimentación principal debe estar encendido para que el control remoto funcione.
GARANTÍA BÁSICA DE 1 AÑO
Twin-Star International, Inc. (de aquí en adelante,denominado la “Compañía” de manera colec-tiva) garantiza que su nueva Chimenea EléctricaTwin-Star está libre de defectos de fabricacióny de materiales, durante un período de un año apartir de la fecha de compra, sujeto a las siguientescondiciones y limitaciones.
1. Esta chimenea eléctrica deberá instalarse y oper-arse en todo momento de acuerdo con las instruc-ciones de instalación y operación suministradascon el producto. Toda reparación, alteración,abuso intencionado, accidente o mala utilizacióndel producto que no esté autorizada anulará estagarantía.
2. Esta garantía no es transferible y se otorga al pro-pietario original, siempre y cuando la compra sehaya realizado a través de un proveedor autorizadode la compañía.
3. La garantía está limitada a la reparación o lareposición de piezas que se hayan encontradodefectuosas en relación con la mano de obra o elmaterial, siempre y cuando estas piezas hayan sidosometidas a condiciones normales de uso y man-tenimiento, luego de que dicho defecto haya sidoconfirmado por la inspección de la Compañía.
4. Esta garantía no cubre las bombillas incluidas con la Chimenea Eléctrica Twin-Star. 5. Según su criterio, la Compañía podrá cumplir con
todas las obligaciones con respecto a esta garantíaal reembolsar el precio mayorista de las piezasdefectuosas.
6. Todos los costos de instalación, mano de obra,construcción, transporte u otros gastos que sur-jan de las piezas defectuosas, la reparación, lareposición o similares, no estarán cubiertos poresta garantía, ni la Compañía asumirá la respon-sabilidad de éstos.
7. El propietario/usuario asume todos los otros ries-gos, si los hay, que incluyen el riesgo de cualquierpérdida o daño directo, indirecto o resultante quesurja del uso o la incapacidad para usar el produc-to, a excepción de lo dispuesto por ley.
8. Por la presente se excluyen expresamente todas lasotras garantías, ya sean explícitas o implícitas, conrespecto al producto, sus componentes y acceso-rios, o cualquier obligación/responsabilidad porparte de la Compañía.
9. La compañía no asume, ni autoriza a ningún ter-cero a asumir en su nombre, ninguna otra respon-sabilidad con respecto a la venta del productoTwin-Star.
10. Las garantías tal como se describen en este docu-mento no se aplican a accesorios que no sean deTwin-Star y que se utilicen en conjunto con lainstalación de este producto.
Esta garantía no tendrá validez en caso de:a. La chimenea sea sometida a períodos prolongados
de humedad o condensación.b. Toda alteración, abuso intencionado, accidente o
mala utilización del producto que no esté auto-rizada.
c. No tenga el recibo original de la compra.
SI NECESITA EL SERVICIO DE LA GARANTÍA
1) Comuníquese con la Compañía a:[email protected], o llame al: (línea en inglés) 866-661-1218; (línea en francés) 866-374-9203; (línea en español) 866-661-1218. Asegúrese de tener la garantía, el recibo de venta,el lugar de la compra y el número de modelo/seriede su producto Twin-Star.
GARANTÍA DE 1 AÑOPara modelos de ChimeneasEléctricas Twin-Star™
Twin-Star International, Inc.Delray Beach, FL 33483
Fabricado en ChinaImpreso en China
© 2007, Twin-Star International, Inc.
S-9
Para obtener las actualizaciones yrevisiones de este manual, visite
nuestro sitio Webwww.twinstarhome.com/instructions
Correo electrónico: [email protected]ínea para llamadas en inglés: 866-661-1218Línea para llamadas en francés: 866-374-9203Línea para llamadas en español: 866-661-1218
Servicio de atención al cliente:
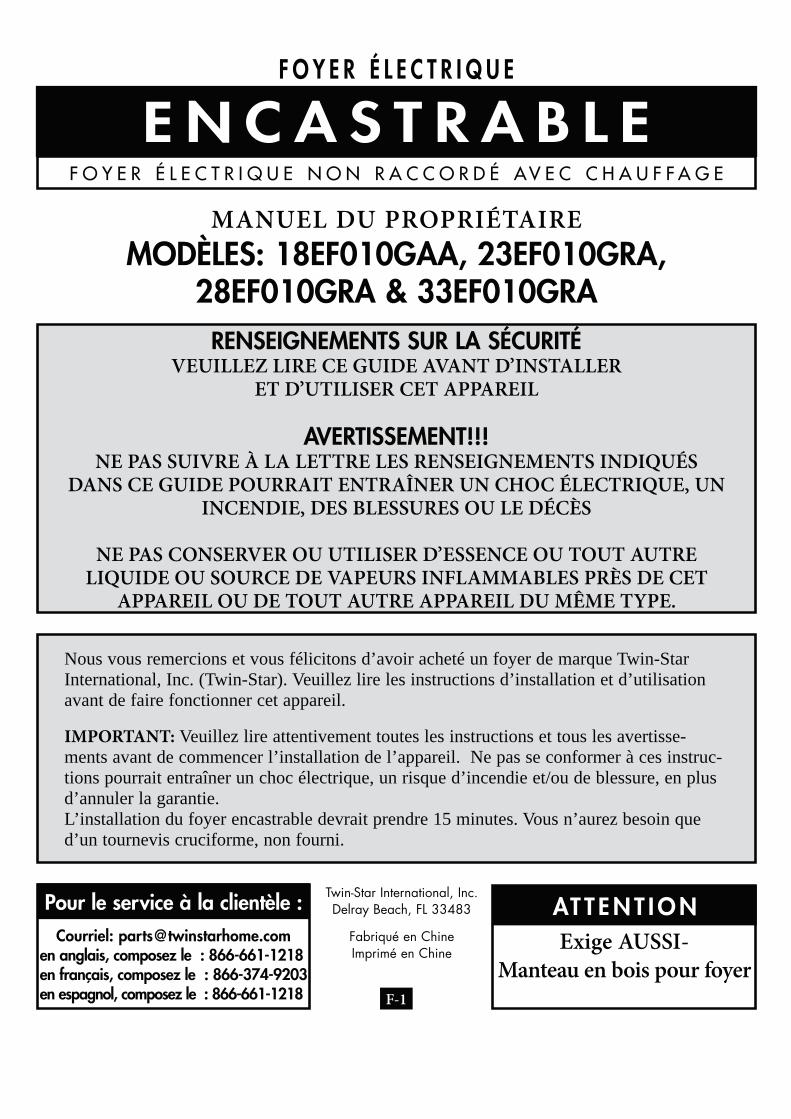
RENSEIGNEMENTS SUR LA SÉCURITÉVEUILLEZ LIRE CE GUIDE AVANT D’INSTALLER
ET D’UTILISER CET APPAREIL
AVERTISSEMENT!!!NE PAS SUIVRE À LA LETTRE LES RENSEIGNEMENTS INDIQUÉS
DANS CE GUIDE POURRAIT ENTRAÎNER UN CHOC ÉLECTRIQUE, UNINCENDIE, DES BLESSURES OU LE DÉCÈS
NE PAS CONSERVER OU UTILISER D’ESSENCE OU TOUT AUTRELIQUIDE OU SOURCE DE VAPEURS INFLAMMABLES PRÈS DE CET
APPAREIL OU DE TOUT AUTRE APPAREIL DU MÊME TYPE.
Twin-Star International, Inc.Delray Beach, FL 33483
Fabriqué en ChineImprimé en Chine
F O Y E R É L E C T R I Q U E
E N C A S T R A B L E
MANUEL DU PROPRIÉTAIREMODÈLES: 18EF010GAA, 23EF010GRA,
28EF010GRA & 33EF010GRA
Exige AUSSI-Manteau en bois pour foyer
F O Y E R É L E C T R I Q U E N O N R A C C O R D É AV E C C H A U F F A G E
Nous vous remercions et vous félicitons d’avoir acheté un foyer de marque Twin-StarInternational, Inc. (Twin-Star). Veuillez lire les instructions d’installation et d’utilisationavant de faire fonctionner cet appareil.
IMPORTANT: Veuillez lire attentivement toutes les instructions et tous les avertisse-ments avant de commencer l’installation de l’appareil. Ne pas se conformer à ces instruc-tions pourrait entraîner un choc électrique, un risque d’incendie et/ou de blessure, en plusd’annuler la garantie.L’installation du foyer encastrable devrait prendre 15 minutes. Vous n’aurez besoin qued’un tournevis cruciforme, non fourni.
AT T E N T I O N
F-1
Courriel: [email protected] anglais, composez le : 866-661-1218en français, composez le : 866-374-9203en espagnol, composez le : 866-661-1218
Pour le service à la clientèle :
Nom de la pièce 18" 23" 28" 33"Lit pour tisons Ensemble de génératrice d’air chaud Interrupteur mécanique de thermostat
Bouton de commande de la luminosité
Bouton pour le contrôle de température
Commutateur principal – bouton rouge Commutateur marche/arrêt pour le chauffage – bouton rouge
Commutateur d’intensité de la luminosité
Socles pour ampoules E-12 Carte de circuit du panneau de contrôle Carte de circuits -3 Boutons, télécommande Écran de projection avant
Panneau de briques décoratives Télécommande - 3 Boutons
INSTRUCTIONS D’INSTALLATION
Une fois le manteau en bois monté, placez-le près del’emplacement définitif où il devra être installé. Assurez-vous de pouvoir accéder à l’arrière du foyer et du manteaupuisque le foyer électrique encastrable devra être installépar l’arrière de ce dernier.
Avec un tournevis cruciforme, retirez les vis et les bridesde montage en métal posées de chaque côté de l’ouverturecentrale pour le foyer. Vous devez ensuite déballer avecsoin le foyer électrique encastrable. Placez le foyer encas-trable dans le manteau, en le passant par l’arrière de cedernier. Assurez-vous que l’avant du foyer fasse face aumanteau de bois. Avec l’aide d’un adulte, soulevez lefoyer encastrable et glissez-le doucement dans l’ouverturedu manteau, jusqu’à ce que la bride se trouve à égalitéavec le manteau. Assurez-vous que le foyer encastrableest bien centré dans l’ouverture. Faites attention lorsquevous placez et ajustez le foyer encastrable car le bas de cedernier pourrait endommager le fini de la base/âtre dumanteau. Utilisez les vis fournies ainsi qu’un tourneviscruciforme pour remettre les brides de montage en place.NE PAS TROP SERRER.
Avec l’aide d’un adulte, soulevez l’unité montée avecsoin et placez-la dans le manteau, à l’endroit choisi pourl’installation définitive du foyer, en vous assurant que
L ISTE DES PIÈCES
F-3
Figure 2
FOYERÉLECTRIQUE
ENCASTRABLE VUE ARRIÈRE DU FOYER
BRIDE DE MONTAGEDU FOYER
ENCASTRABLE
l’avant du foyer vous fait face. Assurez-vous que le cordond’alimentation se trouve dans un endroit sécuritaire, avantde soulever ou de déplacer le foyer monté. Lorsque vouschoisissez l’emplacement définitif du foyer, assurez-vousqu’il se trouve à proximité d’une prise mise à la terre.
Lisez et suivez toutes les instructions présentées dans cemanuel avant d’utiliser votre nouveau foyer.
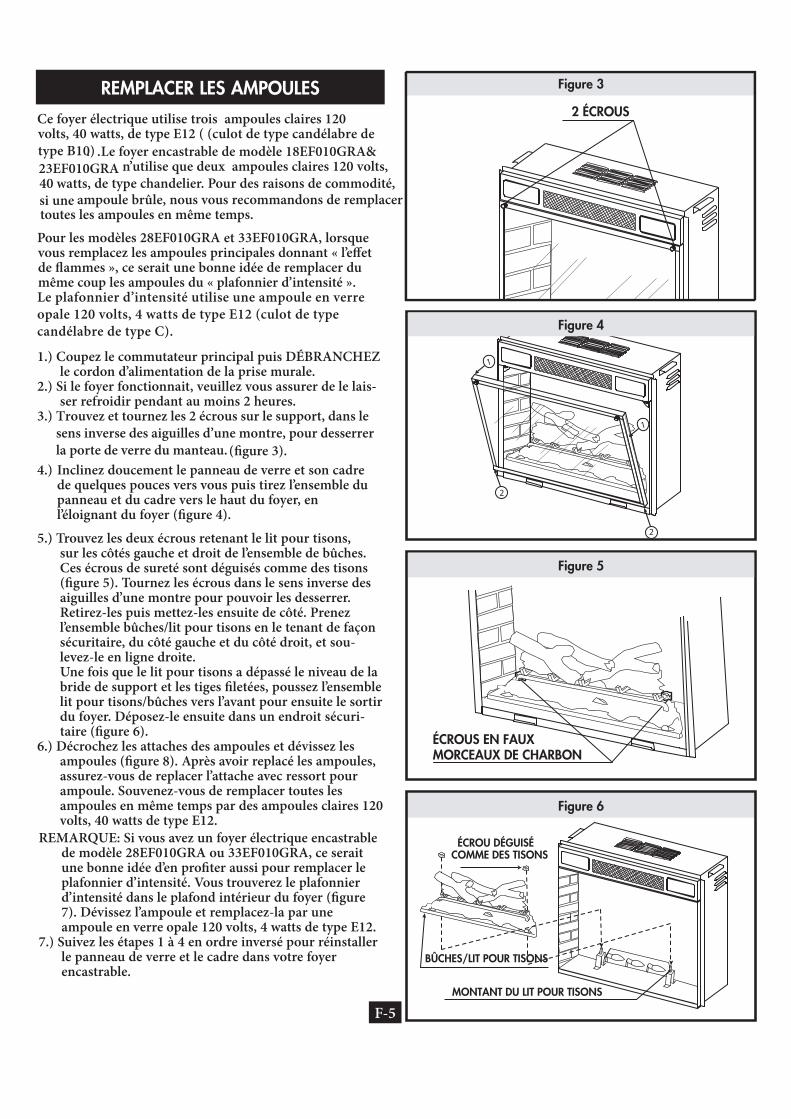
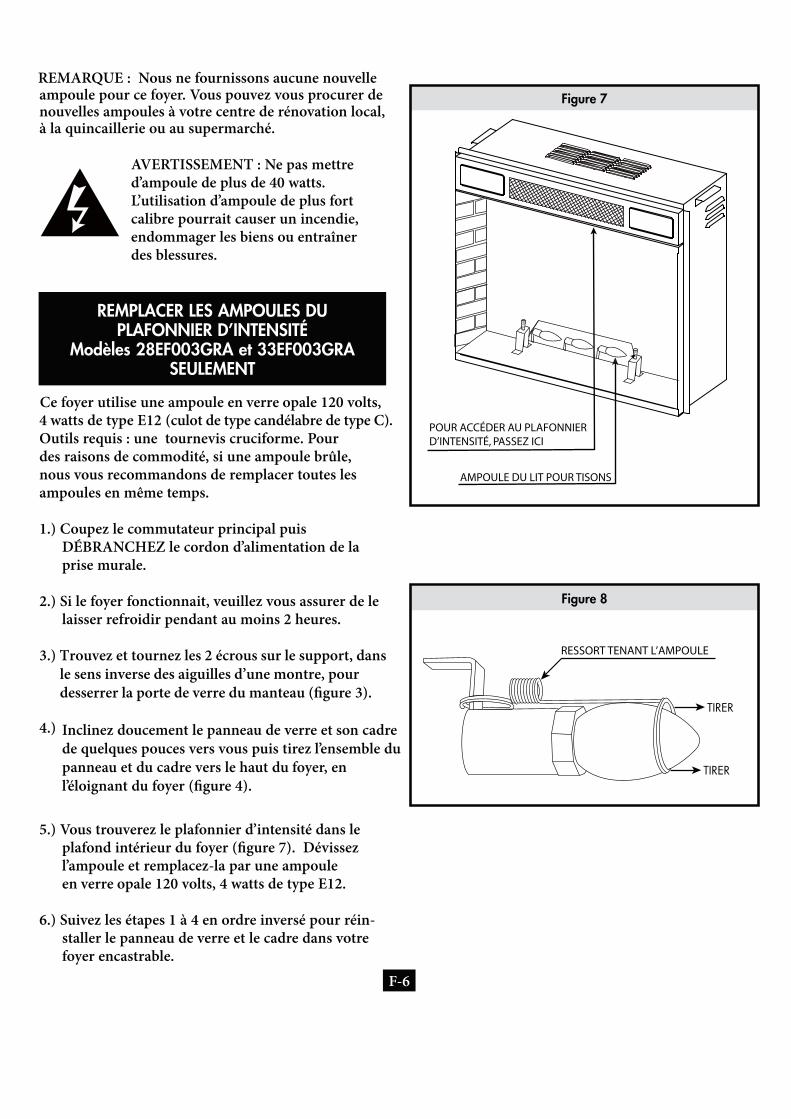
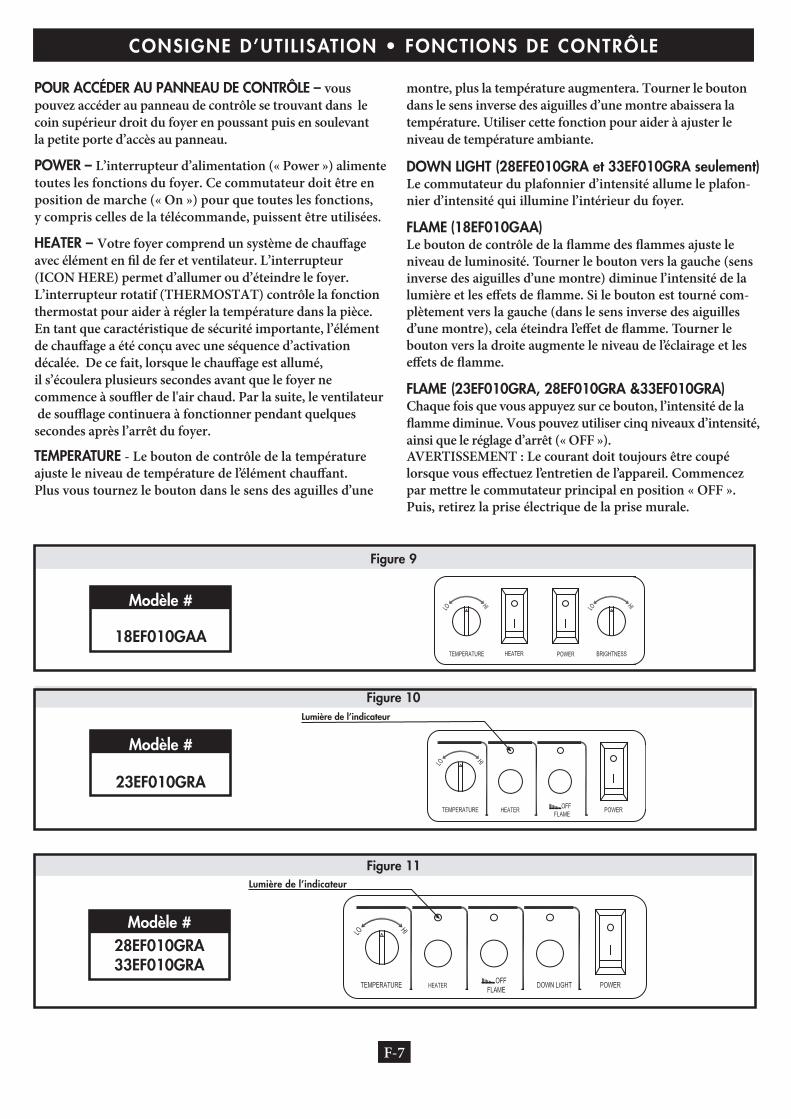
Figure 10Lumière de l’indicateur
CONSIGNE D’UTIL ISATION • FONCTIONS DE CONTRÔLE
POUR ACCÉDER AU PANNEAU DE CONTRÔLE – vous pouvez accéder au panneau de contrôle se trouvant dans le coin supérieur droit du foyer en poussant puis en soulevant la petite porte d’accès au panneau.
POWER – L’interrupteur d’alimentation (« Power ») alimente toutes les fonctions du foyer. Ce commutateur doit être enposition de marche (« On ») pour que toutes les fonctions,y compris celles de la télécommande, puissent être utilisées.
HEATER – Votre foyer comprend un système de chauffage avec élément en fil de fer et ventilateur. L’interrupteur (ICON HERE) permet d’allumer ou d’éteindre le foyer. L’interrupteur rotatif (THERMOSTAT) contrôle la fonction thermostat pour aider à régler la température dans la pièce. En tant que caractéristique de sécurité importante, l’élément de chauffage a été conçu avec une séquence d’activation décalée. De ce fait, lorsque le chauffage est allumé, il s’écoulera plusieurs secondes avant que le foyer ne commence à souffler de l'air chaud. Par la suite, le ventilateur de soufflage continuera à fonctionner pendant quelques secondes après l’arrêt du foyer.
Figure 11Lumière de l’indicateur
Figure 9
F-7
DOWN LIGHT (28EFE010GRA et 33EF010GRA seulement)Le commutateur du plafonnier d’intensité allume le plafon-nier d’intensité qui illumine l’intérieur du foyer.
FLAME (18EF010GAA)Le bouton de contrôle de la flamme des flammes ajuste leniveau de luminosité. Tourner le bouton vers la gauche (sensinverse des aiguilles d’une montre) diminue l’intensité de lalumière et les effets de flamme. Si le bouton est tourné com-plètement vers la gauche (dans le sens inverse des aiguillesd’une montre), cela éteindra l’effet de flamme. Tourner lebouton vers la droite augmente le niveau de l’éclairage et leseffets de flamme.
FLAME (23EF010GRA, 28EF010GRA &33EF010GRA)Chaque fois que vous appuyez sur ce bouton, l’intensité de la flamme diminue. Vous pouvez utiliser cinq niveaux d’intensité, ainsi que le réglage d’arrêt (« OFF »).AVERTISSEMENT : Le courant doit toujours être coupélorsque vous effectuez l’entretien de l’appareil. Commencezpar mettre le commutateur principal en position « OFF ».Puis, retirez la prise électrique de la prise murale.
Modèle #28EF010GRA33EF010GRA
Modèle #
23EF010GRA
Modèle #
18EF010GAA
TEMPERATURE - Le bouton de contrôle de la températureajuste le niveau de température de l’élément chauffant.Plus vous tournez le bouton dans le sens des aguilles d’une
montre, plus la température augmentera. Tourner le bouton dans le sens inverse des aiguilles d’une montre abaissera la température. Utiliser cette fonction pour aider à ajuster leniveau de température ambiante.

Figure 12
FONCTIONS DE LA TÉLÉCOMMANDE
F-8
LES FONCTIONS DE LA TÉLÉCOMMANDE DOIVENT ÊTRE UTILISÉES COMME CELLES DU PANNEAU DE CONTRÔLE
TÉLÉCOMMANDE À TROIS BOUTONS
MODÈLES 23EF010GRA, 28EF010GRA & 33EF010GRA SEULEMENT
Voir la figure 12
POWERCe bouton mettra le foyer en mode attente. Cela arrêtera d’un coup toutes les fonctions mais con-servera les réglages en mémoire. En appuyant de nouveau sur le bouton, le foyer s’allumera et reviendra aux mêmes réglages.
REMARQUE : L’interrupteur d’alimentation principal de l’unité encastrable doit être allumé (ON), pour que la commande à distance fonctionne.
HEATER
Ce bouton fera fonctionner et arrêtera l’élément chauffant et le moteur de soufflante. En tant quecaractéristique de sécurité importante, l’élément dechauffage a été conçu avec une séquence d’activation décalée. De ce fait, lorsque le chauffage est allumé, il s’écoulera plusieurs secondes avant que le foyer ne commence à souffler de l'air chaud. Par la suite, leventilateur de soufflage continuera à fonctionnerpendant quelques secondes après l’arrêt du foyer.L’interrupteur rotatif (THERMOSTAT) contrôle la fonction thermostat pour aider à régler la température dans la pièce.
FLAMEChaque fois que vous appuyez sur ce bouton, l’intensité de la flamme diminue. Vous pouvez utiliser cinq niveaux d’intensité, ainsi que le réglage d’arrêt (« OFF »).
ENTRETIEN
AVERTISSEMENT : Assurez-vous que le courant est coupé avant de commencer. Toute réparationélectrique ou recâblage de ce foyer devrait être effectué par un électricien agréé, conformément auxcodes nationaux et locaux.
AVERTISSEMENT : Le câblage de la prise électrique doit respecter les codes du bâtiment locauxet autres règlements applicables pour ainsi réduire le risque d’incendie, de choc électrique et deblessures.
AVERTISSEMENT : Ne pas utiliser ce foyer si une pièce de celui-ci a été immergée sous l’eau.Appelez immédiatement un technicien de service agréé pour faire inspecter le foyer et remplacerles pièces du système électrique.
AVERTISSEMENT : Débranchez le câble d’alimentation avant de tenter d’effectuer l’entretien oule nettoyage pour ainsi réduire le risque d’incendie, de choc électrique ou de blessure.
Les moteurs utilisés par le ventilateur et la génératrice deflammes sont pré lubrifiés pour une durée de vie prolongéeet n’exigent aucune autre lubrification. Nous recommandonscependant un nettoyage périodique avec aspirateur pour le
ventilateur/élément chauffant. Assurez-vous que le foyerest ÉTEINT et débranché lorsque vous nettoyez l’élémentchauffant ou le foyer.
Si vous devez réparer ou remplacer un composant électrique oudu câblage, vous devez suivre l’acheminent original du câble, lecode de couleur et les emplacements sécuritaires utilisés.
REMARQUE : REMARQUE : ASSUREZ-VOUS DE CONSERVER UN RYTHMEMESURÉ ET LENT LORSQUE VOUS UTILISEZ LA TÉLÉCOMMANDE. AINSI,LORSQUE VOUS RELÂCHEZ LES BOUTONS DE CELLE-CI, ASSUREZ-VOUS DETOUJOURS CONSERVER UNE PRESSION ÉGALE ET DOUCE CAR APPUYER RAP-IDEMENT ET À PLUSIEURS REPRISES SUR LES BOUTONS DE LA TÉLÉCOMMANDEPOURRAIT ENTRAÎNER UN MAUVAIS FONCTIONNEMENT DE CETTE DERNIÈRE.
FLAME
HEATER
POWER
ELECTRIC FIREPLACE REMOTE
GARANTIE DE BASE
Twin-Star International, Inc. (ci-après appelé collec-tivement la (« société ») garantit que votre nouveaufoyer électrique Twin-Star sera libre de tout défaut defabrication pendant une période d’un an à compterde la date d’achat, sous réserve des conditions et deslimites suivantes.
1. Ce foyer électrique doit être installé et fonction-ner en tout temps conformément aux instruc-tions d’installation et d’utilisation fournies avecle produit. Toute réparation ou modification nonautorisée, toute utilisation abusive, tout accidentou toute mauvaise utilisation du produit annulerala présente garantie.
2. Cette garantie est non transférable et ne vise quel’acheteur original, à la condition que l’achat ait étéeffectué par le biais d’un fournisseur autorisé de lasociété.
3. La présente garantie se limite à la réparation ou auremplacement des pièces jugées défectueuses, tantau niveau du matériel que de la qualité d’exécution,à la condition que ces pièces aient été utilisées dansdes conditions normales d’utilisation et d’entretien,une fois que ce défaut aura été confirmé dans lecadre de l’inspection effectuée par la société.
4. La présente garantie ne couvre pas les ampoulesincluses dans le foyer électrique Twin-Star.
5. La société pourra, à sa discrétion, se déchargerentièrement de ses obligations à l’égard de laprésente garantie en remboursant le prix de grosdes pièces défectueuses.
6. Toute installation, tout travail, toute construction,tout transport ou tout autre coût/frais connexedécoulant des pièces défectueuses, de la réparation,du remplacement ou autre, ne sera pas couvert parla présente garantie et la société n’assume aucuneresponsabilité à cet égard.
7. Le propriétaire/utilisateur assume tous les autresrisques, le cas échéant, y compris tout dommageou perte direct, indirect ou accessoire découlant del’utilisation ou de l’incapacité à utiliser le produit,sauf comme le prévoit la loi.
8. Toutes les autres garanties – expresses ou implic-ites – à l’égard de ce produit, de ses composants etaccessoires, ou de toute obligation/responsabilitéde la part de la société sont expressément excluespar les présentes.
9. La société n’assume aucune autre responsabilitéà l’égard de la vente du produit Twin-Star nin’autorise un tiers à assumer une telleresponsabilité en son nom.
10. Les garanties présentées dans ce document nes’appliquent qu’aux accessoires de marque Twin-Star utilisés dans l’installation de ce produit.
La présente garantie sera annulée si :a. Le foyer reste, pendant de longues périodes, dans
un endroit humide ou avec condensation.b. Des réparations ou modifications non autorisées y
sont effectuées, s’il y a utilisation abusive, accidentou mauvaise utilisation du produit.
c. Vous n’avez pas la preuve d’achat originale.
SI UN ENTRETIEN VISÉ PAR LAGARANTI EST REQUIS
1) Veuillez communiquer avec la société, à l’[email protected] ou composez les numérossuivants : pour le service en anglais : 866-661-1218;pour le service en français : 866-374-9203 ou pour leservice en espagno 866-661-1218. Assurez-vousd’avoir la garantie, la preuve d’achat originale,l’endroit où le produit a été acheté ainsi que lesnuméros de modèle et de série de votre produitTwin-Star.
GARANTIE LIMITÉE D’UN ANPour les modèles de foyer électrique Twin-Star™
Twin-Star International, Inc.Delray Beach, FL 33483
Fabriqué en ChineImprimé en Chine
© 2007, Twin-Star International, Inc.F-9
Pour des mises à jour et révisions de cemanuel, veuillez consulter notre site web
www.twinstarhome.com/instructions
Courriel: [email protected] anglais, composez le : 866-661-1218en français, composez le : 866-374-9203en espagnol, composez le : 866-661-1218
Pour le service à la clientèle :
ATTENTIONIF YOU HAVE ANY PROBLEMS OR QUESTIONS, EMAIL OR CALL CUSTOMER SERVICE BEFORE YOU RETURN
THIS PRODUCT TO THE STORE WHERE IT WAS PURCHASED.For Customer Service: email: [email protected] English Call: 866-661-1218in Spanish Call: 866-661-1218in French Call: 866-374-9203
ATENCIÓNSI TIENE ALGÚN PROBLEMA O PREGUNTAS,
ENVÍE UN MENSAJE DE CORREO ELECTRÓNICO O LLAME AL SERVICIO DE ATENCIÓN AL CLIENTE ANTES DE DEVOLVER
ESTE PRODUCTO A LA TIENDA EN LA QUE LO COMPRÓ.Servicio de atención al cliente: Correo electrónico: [email protected]
Línea para llamadas en inglés: 866-661-1218Línea para llamadas en español: 866-661-1218Línea para llamadas en francés: 866-374-9203
STOP STOP
PARE PARE
ATTENTIONSI VOUS AVEZ DES PROBLÈMES OU QUESTIONS,
ENVOYEZ UN COURRIEL AU SERVICE À LA CLIENTÈLE OU APPELEZ LE SERVICE À LA CLIENTÈLE AVANT DE RETOURNER
CE PRODUIT OÙ VOUS L’AVEZ ACHETÉ.Pour le service à la clientèle : courriel : [email protected]
pour le service en anglais, composez le 866-661-1218pour le service en espagnol, composez le 866-661-1218pour le service en français, composez le 866-374-9203
ARRET ARRET
INSTRUCTION MANUAL ENCLOSEDMANUEL D’INSTRUCTION Á L’INTÉRIEURMANUAL DE INSTRUCCIONES ADJUNTO
INSTRUCTION MANUAL ENCLOSEDMANUEL D’INSTRUCTION Á L’INTÉRIEURMANUAL DE INSTRUCCIONES ADJUNTO