instruction manual - vivax-assist.com · of the product in this instruction manual! to not adhere...
TRANSCRIPT

INSTRUCTION MANUAL

VIVAX DRIVE GMBH & CO KG | BRIXENTALERSTR. 51 | 6300 WÖRGL | T: +43 5332 70317
PAGE 1
PREFACE
Dear customers and cycling fans!
From now on, your cycling experience will be enriched by a whole new dimension.
Thanks to our Austrian invention, previously inaccessible trails and destinations
are reachable at the mere touch of a button - and all within a healthy pulse range!
So now there’s nothing to stop you getting out for a leisurely, yet fitness-enhancing,
bicycle ride with your partner or group of friends.
A bicycle should remain a wonderful piece of sport equipment.
That is why we have developed an e-bike for the sporty rider.
One bike – two functions: the vivax two-in-one principle lets you enjoy a combina-
tion of active cycling, without using the motor, and comfortable cycling with motor
assistance, as required. The basic functions and handling characteristics of the bike
remain the same thanks to its minimal weight (less than 2 kilograms) and the opti-
mum positioning of the motor in the seat tube. From the outside, you would never
know.
Please read the operating information carefully before you start and keep the bro-
chure for later reference! Should you pass your bike with vivax assist on to a third
party, make sure you show them how to use the bike properly and advise them to
read these guidelines.
…RIDE ON(E)!
Your vivax assist Team
E-DRIVE FOR BICYCLES
PAGE 2
VIVAX DRIVE GMBH & CO KG | BRIXENTALERSTR. 51 | 6300 WÖRGL | T: +43 5332 70317
TABLE OF CONTENTS
1. For your safety ....................................................................................31.1 Introduction ..........................................................................................3
1.2 Intended conditions of use ....................................................................3
1.3 Safety information ................................................................................4
2. Technical specification........................................................................62.1 Technical data ......................................................................................7
2.2 Assembly .............................................................................................8
3. Before you cycle ................................................................................123.1 Installation / removing the battery .....................................................12
3.2 Recharching and storing the battery ..................................................13
3.3 Battery management / safety references.............................................15
3.4 Adjusting the seat post .......................................................................16
3.5 Saddlebag ...........................................................................................16
4. Operation and programming ............................................................174.1 Switching the drive on / off .................................................................17
4.2 Storing the pedal frequency ................................................................18
5. Service and maintenance .................................................................225.1 Inspection ...........................................................................................22
5.2 Maintenance .......................................................................................22
5.3 Cleaning .............................................................................................22
5.4 Service points .....................................................................................23
6. Troubleshooting ................................................................................237. Warranty / law ..................................................................................248. Disposal .............................................................................................269. Briefing check list .............................................................................2710. Short description ...............................................................................28

PAGE 3
VIVAX DRIVE GMBH & CO KG | BRIXENTALERSTR. 51 | 6300 WÖRGL | T: +43 5332 70317
1. FOR YOUR SAFETY
1.1 Introduction In this instruction manual, dangers and information are indicated by the following symbols:
Warning! Signifies danger arising from a product, which could lead to serious
physical injury or even death, if in adequate precautionary measures are not taken.
Attention! Signifies dangers, which can lead to minor physical injuries or damage to
the product when the appropriate precautionary measures are not taken. Note! Refers to useful, additional information and tips for handling the product.
1.2 Intended conditions of use The vivax assist is designed exclusively as an auxiliary drive to physically assist the cyclist. Using it in any other way does not comply with our conditions. The manufacturer / supplier shall not be liable for damages arising from misures. The operator bears the sole risk. The drive is not certified for competition. Using the product in compliance with conditions also involves observing the information included in this instructions manual regarding operation, safety regulations, as well as maintenance and inspections. Consider the operating and storage temperatures of the components. Protect the drive unit and the battery against extreme temperatures. The components (particularly the battery) can be damaged by extreme temperatures.
FOR YOUR SAFETY
PAGE 4
VIVAX DRIVE GMBH & CO KG | BRIXENTALERSTR. 51 | 6300 WÖRGL | T: +43 5332 70317
1.3 Safety information• Familiarise yourself with the operating instructions before starting the vivax assist!• Note the instructions from the bicycle manufacturer!• Note the safety information and instructions for operation and maintenance of the product in this instruction manual! To not adhere to the safety and care references can lead to damages of the product and / or damages / injuries of the rider.• Conduct a careful inspection before each cycling-tour!• It is recommended to make the first experiences with the system away from traffic.• Please always unplug the battery when parking the bike.• Only clean and perform maintenance work when the battery has been removed. Do not perform any repairs or maintenance work, you are not qualified for!• Keep children away during maintenance work!• Never pull the seatpost completely out of the frame and then lower it only to the fixing ring on the seat post. Avoid rotating motion and force, when highering and lowering otherwise the cables between motor-gear-unit and electronic control could be damaged.
• Damages on the drive unit and the electrical components must be repaired immediately by an authorized specialist dealer. • An unconventional manipulation i.e. reinstalling the system for yourself or changing it in any form expires any replacement / the warranty will be breached. The drive may be dismounted and inserted only by qualified specialist dealers and with the special tools.• Always start cycling with the motor off! Only turn the motor on when you are riding safely. The vivax assist has no start up help!
FOR YOUR SAFETY

PAGE 5
VIVAX DRIVE GMBH & CO KG | BRIXENTALERSTR. 51 | 6300 WÖRGL | T: +43 5332 70317
• Never clean the bicycle with a high-pressure cleaner or water jets (use clear water and a sponge) and store it dry. Immediately contact an authorized special dealer at water entry. • You should switch the system off in the following situations: when you ride downhill, in heavy traffic, when approaching crossings or obstacles, critical situations.• After ending of each journey, the battery should be removed, recharged and stored out of the reach of children.• Transport: Protect seat post and saddle bag from water (particularly in the case of transport at the car) - battery should always stowed away separately! Keep the bottle battery (can not be removed from the bike) in a watertight package When transporting by aeroplane, please enquire with your airline before your flight: Li-ion battery 30V, 6.0 Ah, 180 Wh Li-ion battery 30V, 9.0 Ah, 270 Wh UN 3480 – battery without fitting UN 3481 – battery in or with fitting (bicycle)• Further safety references to the battery as well as the battery- management, you can find on page 13. • Take the time and allow your specialist dealer to help you explain the vivax assist on the basis of the check list (page 27). Only with a filled out check list we can offer a free support and guarantee a fast support in case of a complaint.
FOR YOUR SAFETY

PAGE 6
VIVAX DRIVE GMBH & CO KG | BRIXENTALERSTR. 51 | 6300 WÖRGL | T: +43 5332 70317
TECHNICAL SPECIFICATION
Two different motor versions for optimal performance output
Version vivax assist 4.75 - This version is reccomanded for MTB and offers the optimal performance for 110 watts for 90 mins with a pedal frequency of 75 RPM (See fig. below)Version vivax assist 4.90 - This version is reccomanded for Riders that prefer higher cadence - especially for road bikes and offers the optimal performance from 100 watts for 100 mins with a pedal frequency of 90 RPM(See fig. below)
2. TECHNICAL SPECIFICATION
VIVAX ASSIST 4.75
VIVAX ASSIST 4.90
pedal frequency / revolutions per minute
0
20
40
60
80
100
120
140
0
20
40
60
80
100
120
mot
or pe
rform
ance
in w
att
run
time b
atte
ry in
min
utes
30 35 40 45 50 55 60 65 70 75 80 85 90 95 100 105
This version offers the optimal performance from 110 watts for90 mins with a pedal frequency of75 RPM
motor performance in watt
run time battery in minutes
0
20
40
60
80
100
120
140
160
0
20
40
60
80
100
120
140
160
mot
or pe
rform
ance
in w
att
run
time b
atte
ry in
min
utes
pedal frequency / revolutions per minute30 35 40 45 50 55 60 65 70 75 80 85 90 95 100 105
This version offers the optimal performance from 100 watts for100 mins with a pedal frequency of 90 RPM
motor performance in watt
run time battery in minutes
PAGE 7
VIVAX DRIVE GMBH & CO KG | BRIXENTALERSTR. 51 | 6300 WÖRGL | T: +43 5332 70317
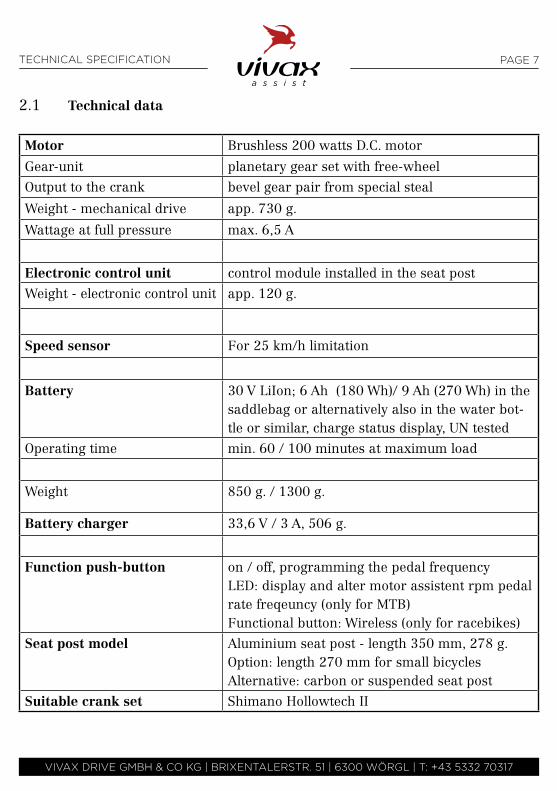
2.1 Technical data
Motor Brushless 200 watts D.C. motor
Gear-unit planetary gear set with free-wheel
Output to the crank bevel gear pair from special steal
Weight - mechanical drive app. 730 g.
Wattage at full pressure max. 6,5 A
Electronic control unit control module installed in the seat post
Weight - electronic control unit app. 120 g.
Speed sensor For 25 km/h limitation
Battery 30 V LiIon; 6 Ah (180 Wh)/ 9 Ah (270 Wh) in the saddlebag or alternatively also in the water bot-tle or similar, charge status display, UN tested
Operating time min. 60 / 100 minutes at maximum load
Weight 850 g. / 1300 g.
Battery charger 33,6 V / 3 A, 506 g.
Function push-button on / off, programming the pedal frequencyLED: display and alter motor assistent rpm pedal rate freqeuncy (only for MTB)Functional button: Wireless (only for racebikes)
Seat post model Aluminium seat post - length 350 mm, 278 g. Option: length 270 mm for small bicyclesAlternative: carbon or suspended seat post
Suitable crank set Shimano Hollowtech II
TECHNICAL SPECIFICATION

PAGE 8
VIVAX DRIVE GMBH & CO KG | BRIXENTALERSTR. 51 | 6300 WÖRGL | T: +43 5332 70317
TECHNICAL SPECIFICATION
2.2 Assembly The vivax assist is an electric motor for bicycles, which supports your own muscle power. This electric motor drives the pedal crank directly via a bevel gear (pair of spiral-toothed bevel gears). A high performance battery, stored in the saddlebag or alternatively in the drinking bottle, serves as the power supply. (See diagram page 10) It is operated via a control on the handlebars.
VIVAX ASSIST (MTB, CROSS, TREKKING)

PAGE 9
VIVAX DRIVE GMBH & CO KG | BRIXENTALERSTR. 51 | 6300 WÖRGL | T: +43 5332 70317
Drive unit 1 Motor 2 Gear-unit 3 Free-wheel 4 Bevel gear pair: Power transmission from the drive unit to the axis of the Hollowtech 2 crank 5 Controller: electronic control unit built in the provided seat post 6 Fixing ring – max. insert depth of the seat post. Must not be adjusted. Never pull out the seat post completely from the seat tube (10 cm must stay in the seat tube).
Power supply / battery 7 Saddlebag: storage space of the battery and cables (except for bottle battery) 8 Battery: comes in various versions 9 Connector plug of the battery for the charger / regulator
Operating elements 10 Button (Switch motor on / off and save the pedal frequency) Alternatively for MTB: 11 Control unit Wired LED display The 11 LEDs on the operating terminal show the charge level of the battery and the motor performanceSensor 12 Sensor for the 25km/h limitation
Battery charger 13 Power cable for the battery charger. If the grounding-type plug is not correct for your country, please use an adapter or aks your authorized special dealer. 14 Battery charger with a connecting cable for the battery
TECHNICAL SPECIFICATION
PAGE 10
VIVAX DRIVE GMBH & CO KG | BRIXENTALERSTR. 51 | 6300 WÖRGL | T: +43 5332 70317
TECHNICAL SPECIFICATION
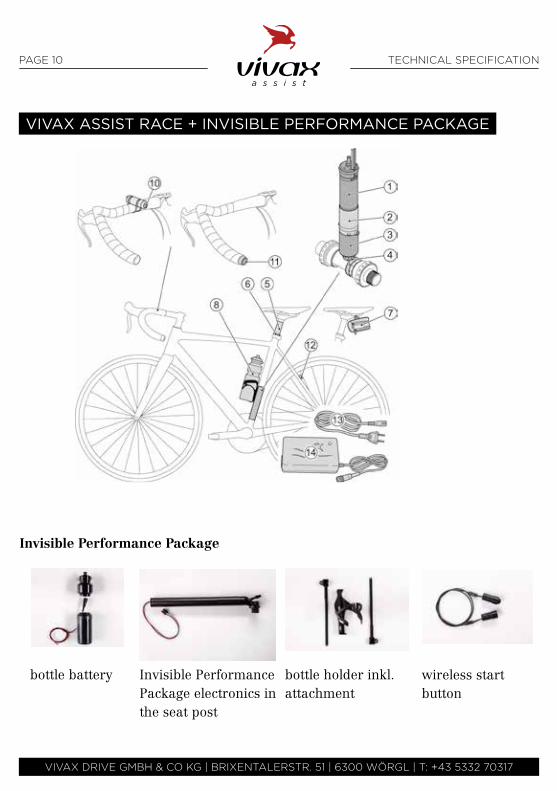
VIVAX ASSIST RACE + INVISIBLE PERFORMANCE PACKAGE
Invisible Performance Package
bottle battery Invisible Performance Package electronics in the seat post
bottle holder inkl. attachment
wireless start button

PAGE 11
VIVAX DRIVE GMBH & CO KG | BRIXENTALERSTR. 51 | 6300 WÖRGL | T: +43 5332 70317
Drive unit 1 Motor 2 Gear-unit 3 Free-wheel 4 Bevel gear pair: Power transmission from the drive unit to the axis of the Hollowtech 2 crank 5 Controller: electronic control unit built in the provided seat post 6 Fixing ring – max. insert depth of the seat post. Must not be adjusted. Never pull out the seat post completely from the seat tube (10 cm must stay in the seat tube).Power supply / battery 7 Racing bike version 1: battery in the saddlebag 8 Racing bike version 2: bottle batteryControl elements (Switching the motor on / off and saving the pedal frequency) 10 Racing bike version 1: Button in button casing on the handlebars – cabled 11 Racing bike version 2: Wireless buttons built into the end of the handlebarsSensor 12 Sensor for the 25km/h limitationBattery charger 13 Power cable for the battery charger. If the grounding-type plug is not correct for your country, please use an adapter or aks your authorized special dealer. 14 Battery charger with a connecting cable for the battery
TECHNICAL SPECIFICATION
PAGE 12
VIVAX DRIVE GMBH & CO KG | BRIXENTALERSTR. 51 | 6300 WÖRGL | T: +43 5332 70317
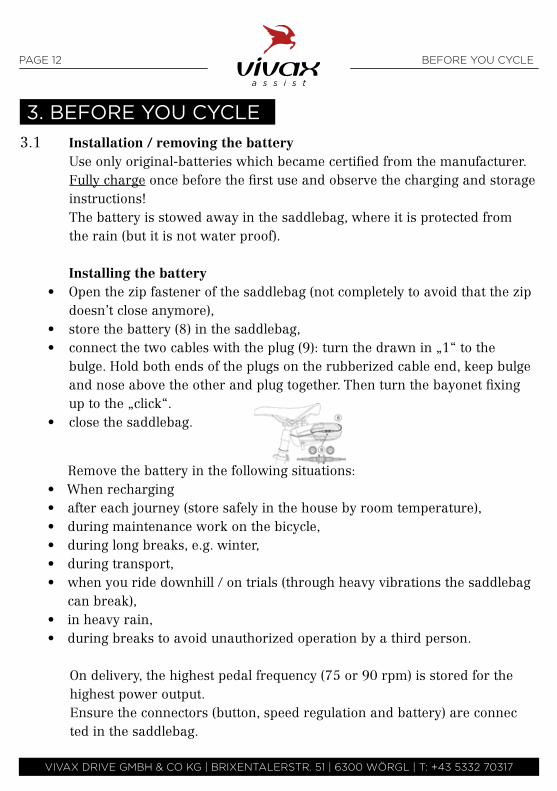
3.1 Installation / removing the battery Use only original-batteries which became certified from the manufacturer. Fully charge once before the first use and observe the charging and storage instructions!The battery is stowed away in the saddlebag, where it is protected from the rain (but it is not water proof).
Installing the battery• Open the zip fastener of the saddlebag (not completely to avoid that the zip doesn’t close anymore),• store the battery (8) in the saddlebag,• connect the two cables with the plug (9): turn the drawn in „1“ to the bulge. Hold both ends of the plugs on the rubberized cable end, keep bulge and nose above the other and plug together. Then turn the bayonet fixing up to the „click“.• close the saddlebag.
3. BEFORE YOU CYCLE
BEFORE YOU CYCLE
Remove the battery in the following situations: • When recharging • after each journey (store safely in the house by room temperature), • during maintenance work on the bicycle, • during long breaks, e.g. winter, • during transport, • when you ride downhill / on trials (through heavy vibrations the saddlebag can break), • in heavy rain, • during breaks to avoid unauthorized operation by a third person.
On delivery, the highest pedal frequency (75 or 90 rpm) is stored for the highest power output. Ensure the connectors (button, speed regulation and battery) are connec ted in the saddlebag.
PAGE 13
VIVAX DRIVE GMBH & CO KG | BRIXENTALERSTR. 51 | 6300 WÖRGL | T: +43 5332 70317
Removing the battery • Open the zip fastener of the saddlebag (not completely to avoid that the zip
doesn’t close anymore), • open the socket cap and disconnect the connection (9) carefully. Don’t pull
on the cables • watch out for the left cables from the push-button and the rotation speed
sensor in the saddlebag. The bottle battery (Invisible Performance Package) is fixed to the frame and cannot be removed. Please therefore take care when carrying out cleaning or maintenance work.
3.2 Recharging and storing the battery Note!
• The charge announcement (page 14) can be activated with a pressure on the black point and expires again when letting go.
• Do not charge the battery in the vicinity of flammable objects or on a flammable surface. Never leave it unattended on charge. The battery and charger will become warm during the charging process, and must never be covered – heat build up! Also do not charge in extreme heat! • Always disconnect the battery charger from the mains plug after each recharging process! • Recharging takes app. 2,5-4 hours – depends on battery capacity. • Never store uncharged! The battery must be stored at approx. 60% (never below) during longer storage times (e.g. over winter), and recharged every 3-6 months! Tip: If the battery is stored for a long time in an empty state, it can be irrepa rably damaged, despite having only a low self-discharge. However, it is also not advisable to leave the battery permanently connected to the charger, or interrupt sleep mode by continually pressing the charge status display. • Store in a dry place (cells age quicker otherwise), e.g. do not leave the battery in the car in summer and do not store in direct sunlight. Storage up to 3 months: -20~ +40 ° C Storage up to 1 year: -20 ~ +20°C • When operating at minus temperatures the range will be restricted.
BEFORE YOU CYCLE

PAGE 14
VIVAX DRIVE GMBH & CO KG | BRIXENTALERSTR. 51 | 6300 WÖRGL | T: +43 5332 70317
BEFORE YOU CYCLE
Charge battery • Connect the power cable (13) to the charger and plug • Connect the battery (8) to the charger (14) with the plug (see page 12 “insert battery”)
Charging process• The LED on the charger turns orange during the charging process• Completed charging process: LED on charger turns green• A full charge takes approx. 2.5 – 4 hours – depending on battery type
• You can find the exact information about the charge status on the battery • Li-ion batteries do not have a memory effect. It will not harm them if they are only partially discharged • At the end of the charging process, unplug the battery from the charger, and then unplug the power cable from the socket.Tip: Fully charge once before the first use and then run down until completely em-pty. In this way, the charge status display will be calibrated. This process must be repeated from time to time (once a year).
Charging the bottle batteryThe bottle battery is fixed to the seat tube and is not removable.To charge:
• Loosen and remove bottle attachment on the upper third of the bottle by turning (anti clockwise)• For charging process see Charge battery (top of page 14)• Once charged, click the bottle attachment back in again by turning (clockwise)
Kapazitätsanzeige am Bedienterminal
0-9 B10-19 O20-29 B O30-39 O O40-49 B O O50-59 O O O60-69 B O O O70-84 O O O O85-99 B O O O O100 O O O O O
B = blinken1 leuchtende LED = 20%1 blinkende LED = 10%
Charge status display on the battery0 = permanently litB = flashing1 LED lit up = 20%1 flashing LED = 10%

PAGE 15
VIVAX DRIVE GMBH & CO KG | BRIXENTALERSTR. 51 | 6300 WÖRGL | T: +43 5332 70317
Note! After charging, the green LED on the charger will light up. If you would now like to charge another battery, unplug the charger from the mains for at least 20 seconds and then plug it in again, to reset the me mory function of the charger.
3.3 Battery management / safety references • Never throw to the battery in the fire, let it never fall / damage / manipulate / short circuit it never - > danger of explosion! • Use only batteries which are certified from the manufacturer. The custom of other batteries can lead to injuries / fire / defects at the drive. The manu- facturer assumes no liability and warranty.• Do not open the battery. There is the danger of a short-circuit. With opened battery any guarantee or warranty is void. • With wrong application liquid can withdraw from the battery. Avoid the direct contact thereby. If the liquid comes into the eyes, visit a doctor immediately. • With damages and inappropriate use of the battery steams can withdraw. Supply to fresh air and visit a doctor at physical complaints.• Load the battery never unattended, never in an flammable environment and only with the battery charger, which was provided by the manufacturer. • The life span of the battery can be extended, if it is well maintained and operated and stored particularly at the correct temperatures. With increasing age the capacity of the battery will be reduced also with good care - see load cycles.
BEFORE YOU CYCLE

PAGE 16
VIVAX DRIVE GMBH & CO KG | BRIXENTALERSTR. 51 | 6300 WÖRGL | T: +43 5332 70317
3.4 Adjusting the seat postThe electronic control is installed in the seat post. To avoid damages to the electronics and the cables, the following points must be noted:
Attention!
• Never take the seat post completely out of the seat tube! Should a replacement be necessary, please contact an authorized specialist dealer.• Never push the seat post into the seat tube further than to the fix-ring (14) and never pull out the seat post from the seat tube more than to the min. insertion-deepness (10 cm). Never push it with violence in the seat tube or pull it out with violence. Re-lubricate the seat post. So you can adjust it more simply and protect the electronics against water intake. Never adjust the fix-ring (14) – the warranty will be invalid. • When adjusting the height of the seat post, avoid circular motions as far as possible; cables can be damaged! Further it’s possible that you have to retighten some cables (of the push-button) from the saddlebag.
3.5 SaddlebagThe saddlebag is an integral part of the vivax assist. (apart from bottle batte-ry). Cables are fed through the bag to protect the plug against moisture.
Attention!• Do not unfasten or detach the saddlebag from the mounting (cables can be damaged)! • Should it be necessary to replace the saddlebag, before you dissemble it, all of the socket connections must be disconnected and all of the cables - together with the grommet - must be pulled out carefully, then remove it.
BEFORE YOU CYCLE
Warning:Min. insertion depth 10cm

PAGE 17
VIVAX DRIVE GMBH & CO KG | BRIXENTALERSTR. 51 | 6300 WÖRGL | T: +43 5332 70317
The vivax assist is operated via the control unit on/in the handlebars.Thereby, the motor is switched on/off and the pedal frequency is stored. For the variant with LEDs, the battery charge status and the motor performance are also shown. (See description page 19)
4. OPERATION AND PROGRAMMING
4.1 Switching the motor on / off
Switching onPush the push-button for app. 1 second, the system will be activated with the last stored pedal frequency. Danger!Only activate the drive while cycling.If you switch the drive on with a raised rear wheel, the pedals and the rear wheel will be propelled immediately; danger of injury!
Switching off The motor is switched off by briefly pressing the button on the control unit (in the middle). The motor switches off automatically in the following situations:• Pedal frequency under 10 rotations per minute (the motor can’t be started below this)• If the battery is empty• In the case of short resistance – pedals are stationary (motor switches off straight away)• As soon as you ride over 25 km/h (25 km/h speed limitation)
OPERATION AND PROGRAMMING
LED user operation unit Mini button without LED Race bike mini button

PAGE 18
VIVAX DRIVE GMBH & CO KG | BRIXENTALERSTR. 51 | 6300 WÖRGL | T: +43 5332 70317
4.2 Storing the pedal frequencyThe vivax assist supports you, when your own pedal frequency is lower than the stored one. Therefore, store the pedal frequency while travelling on level ground so that the drive can then be started with the desired set-ting. Depending on the type of motor, you achieve the best motor assistance at 75 or 90 pedal revolutions per minute. Pedal frequencies below 50 (with version 4.90) or 40 (with version 4.75) and over 90 (with version 4.90) or 75 (with version 4.75) revolutions per minute are not stored. This function is similar to a sort of pedal frequency cruise control!
Pedal frequency storage process – to your individual frequency• Switch off the drive to store,• cycle with the required pedal frequency,• keep the push-button pressed for min. 5 to max. 8 seconds; the motor then supports only up to this pedal frequency – similar to a cruise control func- tion. Once the storage process is complete, the system is activated• With vivax assist 4.75, a pedal frequency of 40 to 75 revolutions can be stored, and with vivax assist 4.90 from 50 to 90 revolutions. Tip: we recommend storing the individual pedal frequency only in special cases, e.g. on the flat, to increase the range or if you want less than 100 (or 110) watts to match the performance of a partner or in a group.
OPERATION AND PROGRAMMING
0
20
40
60
80
100
120
140
0
20
40
60
80
100
120
mot
or p
erfo
rman
ce in
wat
t
run
time b
atte
ry in
min
utes
pedal frequency / revolutions per minute
30 35 40 45 50 55 60 65 70 75 80 85 90 95 100 105
Version 75 RPM as an exemple with individual pedal frequency of 60 RPM
motor performance in watt
run time battery in minutes
BEISPIELVARIANTE VIVAX ASSIST 4.75 MIT 60 UPM

PAGE 19
VIVAX DRIVE GMBH & CO KG | BRIXENTALERSTR. 51 | 6300 WÖRGL | T: +43 5332 70317
Storing procedure – at the highest frequency:You can store the highest pedal frequency by keeping the control unit pressed down for at least 10 seconds.We recommend programming the maximum pedal frequency. Optimum sup-port is then always guaranteed.
LED display control unit:The LED control unit consists of one on/off switch and 11 LEDs in a plastic casing to be attached to the handlebars.The red/orange/green LEDs in the right section show the charge status of the battery.
On the left-hand side, 5 yellow LEDs show the current motor performance. Optimum output is achieved when all 5 LEDs light up/flash. The fewer LEDs light up/flash, the lower the output of the motor. In this case, the battery consumption is also minimized (see example variant page 18).If the programmed pedal frequency is exceeded, the LEDs start to flash. The more the maximum speed is exceeded, the lower the performance and fewer LEDs flash.The 11th LED (orange above centre) shows that the motor is limited in ac-cordance with legal requirements, due to the speed (25 km/h) being excee-ded.
100-80%80-60%
60-40%
40-20%20/10-0%
100-80%80-60%
60-40%
40-20%20-0%
speed limitover 25km/h
on/offbutton
1-5 LED's shining 1-5 LED's flashing
performance
cadence
performance battery capacity
100-80%80-60%
60-40%
40-20%20/10-0%
100-80%80-60%
60-40%
40-20%20-0%
speed limitover 25km/h
on/offbutton
1-5 LED's shining 1-5 LED's flashing
performance
cadence
performance battery capacity
OPERATION AND PROGRAMMING

PAGE 20
VIVAX DRIVE GMBH & CO KG | BRIXENTALERSTR. 51 | 6300 WÖRGL | T: +43 5332 70317
OPERATION AND PROGRAMMING
You can also change the performance of the motor through the pedal fre-quency. The yellow LEDs help you to do this.
To achieve maximum motor performance, you must achieve a pedal fre-quency of 75 or 90 revolutions, depending on the type of motor. If you require higher physical effort on the terrain to achieve the optimum pedal frequency, select an easier gear ratio (change down one or several gears). If you tend towards a high pedal frequency, select a harder gear ratio (change up one or several gears).
However, if you want a lower power to achieve a larger range, select a correspondingly lower pedal frequency and adjust your own desired perfor-mance by selecting the gear ratio (set ideal gear).
If you exceed the maximum pedal frequency (75/90 rpm) by 10%, you have outpaced the motor and it will run in idle. Only the last LED will still be flashing.

PAGE 21
VIVAX DRIVE GMBH & CO KG | BRIXENTALERSTR. 51 | 6300 WÖRGL | T: +43 5332 70317
Tip! The pedal frequency is stored until it is replaced by a new storing procedu-
re. If you pedal faster than the stored pedal frequency with the motor activated, you “outpace” the motor and will no longer be supported. The motor is running idle. If you have any queries about programming, please contact a dealer or read “6. Troubleshooting” on page 23.
Tip! Tip on transporting on the outside of a car: When it rains, the bike is exposed to very large quantities of spraying water. Protect the electrical components, such as the control unit, saddlebag and seat post with a waterproof, tail wind resistant foil. Always remove the battery from the saddlebag, and transport separately (even when transporting inside the car). Fasten the bottle battery securely and in a waterproof manner.
OPERATION AND PROGRAMMING

PAGE 22
VIVAX DRIVE GMBH & CO KG | BRIXENTALERSTR. 51 | 6300 WÖRGL | T: +43 5332 70317
The vivax assist is maintenance-free. However, a thorough inspection before each cycling tour is absolutely necessary for your safety!
5. SERVICE AND MAINTENANCE
5.1 Inspection• Plug connections in saddlebag are fix: battery (bayonet fixing), push-button
(6 pole. plug), plug of the speed limiter (3 pole. plug - only with blocking at 25 km/h)• Check cables and plugs. Damaged cables and connections must be replaced immediately. Please contact your specialist dealer. • Inspect the saddlebag fastening for damages and mechanical security.• Check the saddlebag for tears and damage.• Control the battery charge.• Perform a function test. Press briefly on the control unit. On the LED operating terminal, the right LEDs show the current battery status. In the case of a button without LEDs, the pedals will twitch briefly.• After an accident, both the bicycle and the vivax assist should be inspected by an authorized dealer.
5.2 Warning• Never unfasten the motor mounting screw (16) on the seat tube!
SERVICE AND MAINTENANCE
5.3 Cleaning• Always remove the battery and close the saddlebag before cleaning, to ensure the plugs are protected.• Only clean your bicycle with clear water and a sponge!• Never use a high-pressure cleaner or water jets. The electrical equipment and electronics of the drive are not designed to cope with this!• Do not turn the bicycle upside down when you clean it.

PAGE 23
VIVAX DRIVE GMBH & CO KG | BRIXENTALERSTR. 51 | 6300 WÖRGL | T: +43 5332 70317
5.4 Service points You can find an overview of the authorized vivax assist specialist dealers on the internet at http://www.vivax-assist.com/en/haendler/haendlersuche.php
Should it not be possible to positively identify the cause of a problem or you cannot exlude that the problem occurs again, please contact an authorized specialist dealer.
6. TROUBLESHOOTING
TROUBLESHOOTING
Problem Cause SolutionMotor won‘t start The battery plug is loose
(6-pin, round), the plug connection of the control unit (6-pin, rectangular) in the saddlebag is loose
Check plug connection, unplug and plug back in again – do not pull on the cable
Elektronic defect Consult an authorised dealer
Motor defect Consult an authorised dealer
Motor switches off by itself
Battery empty Charge battery or replace with a char-ged one.
Exceeding the 25 km/h limitation for a long period of time
Pedal more slowly and start the motor again
Motor switches off after 20 seconds
Limitation sensor not recognised
Check the limitation sensor, the black 3-pin plug in the saddlebag, and the distance to the magnet, or contact an authorised dealer.
Motor provides too little or no support
Pedal frequency too low Switch to an easier gear and increase your pedal frequency (max. up to sto-red frequency).
Store a higher pedal frequency
Store the maximum pedal frequency by keeping the control unit pressed down (for min. 10 seconds)
PAGE 24
VIVAX DRIVE GMBH & CO KG | BRIXENTALERSTR. 51 | 6300 WÖRGL | T: +43 5332 70317
It shall apply the warranty conditions for end-customers of Austria.vivax drive GmbH & CO KG grants the warranty limited to production and material defects, which were present at the time of the distribution, limited of parts supplied by vivax drive GmbH & CO KG.The warranty does not refer to the normal wear or to damages, which results to improper treatment, abuse, for a prupose usage in adequate care or accidents. This also includes assebly errors by a not authorized dealer / person or installa-tion without the special tools. This applies in particular also with already used batteries, which exhibit clear customs traces. Performance losses at battery are no production errors. Batteries are subjects of consumption and are subjects to a certain aging (see load cycles). In no case vivax drive GmbH & CO KG is responsible for consequential- and besiders damages such as these may have originated.
With the help of this drive your bicycle becomes a Pedelec (pedal, electric and cycle), which describes a special type of electrical bicycle, with which the cyclist must pedal and get supported by the drive. The bicycle, as well as the electric motor must be subjected the StVo, if this should be certified for the public traffic.
Electric motor: It must be installed a blocking at 25 km/h. If this blocking is installed, the Pedelec is exempt also from the duty of insuracne (Austria). In some countries helmet obligation exists. We recommend always to wear a helmet when riding for your security.
7. WARRANTY / LAW
WARRANTY / LAW

PAGE 25
VIVAX DRIVE GMBH & CO KG | BRIXENTALERSTR. 51 | 6300 WÖRGL | T: +43 5332 70317
DISPOSAL / BRIEFING CHECK LIST
Intensive development work, the use of high quality materials, sophisticated technology, economic viability and re-liability create precision and long life. Vivax drive GmbH & Co KG offers a guarantee of 3 years or 1000 operating hours for the first owner, in accordance with the following guarantee specifications:
1. The guarantee exclusively relates to the motor system delivered by vivax drive GmbH & Co KG, not the bicycle components of the relevant bicycle manufacture.2. The guarantee encompasses the repair or replacement of the vivax assist motor system (and/or its individual parts) if it loses its functionality or this is limited within the agreed guarantee period, and it is not one of the cases below, according to which the gua-rantee is expressly excluded.3. Any other legal specifications, particularly guarantee regulations, will not be restricted by this guarantee.4. This guarantee exclusively applies to material or processing defects and only on presentation of proof of purchase, consisting of an original purchase receipt or a till receipt showing the purchase date and the name of the retailer. The documents for the annual inspection (see point 16) must also be presented in a guarantee claim. Vivax drive GmbH & Co Kg reserves the right to reject the guarantee case if the documents sent in for vivax assist components are not complete and/or the goods themselves are not complete.5. In a guarantee claim, vivax drive GmbH & Co KG is obliged to repair or replace the contested system components, as it sees fit.6. Guarantee repairs are exclusively carried out by vivax drive GmbH & Co KG or an authorised dealer, whereby a component to be repaired in the scope of the guarantee must be sent to vivax drive GmbH & Co KG or an authorised dealer at your own cost and risk, or collected there after successful repair or sent to you at your own cost and risk and on your instigation. All costs (transport, fees, customs…) will be borne by the buyer. To determine in advance whether it is a guarantee claim, the end user must assert their guarantee claim to the dealer where the product was bought: here, the dealer takes on dispatch to vivax drive GmbH & Co KG at his own costs and risk (however, they also have the right to pass these costs on to the end user).7. Costs for repairs (or inspections), which have been carried out by a centre not authorised by vivax drive GmbH & Co KG, will not be reimbursed. In this case, any claim to guarantee and warranty lapses.8. Repair services or a replacement during the guarantee period do not entitle you to an extension or new start of the guarantee period. Repairs and a direct exchange during the guarantee period can occur through the functionally equal exchange of units.9. The three-year (or 1000 operating hours) guarantee period starts at the time of purchase from vivax drive GmbH & Co KG. Any guarantee claim must be reported immediately.10. If the battery no longer achieves full capacity on the basis of normal use: each battery is subject to a natural aging process or loss of performance. Here, vivax drive GmbH & Co KG guarantees that the battery still has at least 70% of the initial capacity within the guarantee period of 500 charging cycles, if the prescribed storage and use instructions were adhered to. The guarantee period for the battery is max. 6 months.11. There is no guarantee claim without considering further reasons for damages in the following cases:a) External influences, in particular rock falls, collision, accidents or other directly external events, due to mechanical force.b) Wilful or malicious actions, such as theft and robbery or elementary events or acts of warc) Incorrect use or damages, which can be attributed to inadequate care (or use of unsuitable operating devices) – if the product is e.g. exposed to liquids or chemicals of any kind or extreme temperatures, wet or moisture.d) Damage to the battery due to overcharging or non-adherence to instructions for handling of the battery (see operating instruc-tions).e) Minor defects, which do not impede the function, easily broken parts, transport damages, damages due to storage, damages due to unauthorized intervention.12. There is no guarantee claim:a) In the case of inspection, maintenance, repair, adjustment and replacement works on the basis of normal use and operating devices.b) If the model, series or product number on the vivax drive product has been changed, deleted, made unrecognizable or removed. The same applies if the seal (serial number sticker) on the battery has been removed or manipulated.c) When using the battery in systems, which are not authorised for use with this product.d) When operating the vivax assist motor system with a battery other than the one belonging to the system.e) If one or more vivax assist components were opened, changed or varnished.f) If the regulations on handling, maintenance and care are not followed, or the damages can be attributed to an operating error by the rider.g) If errors/damages can be attributed to natural wear and tear. The guarantee does not exist for parts, which are subject to continual wear in their normal function. Normal riding noises of vibrations, which have no influence on the function or quality of the product are also exempt from the guarantee.13. The guarantee only encompasses the referred to repair or replacement of the defective or impeded components, but not a claim to replacement of financial loss, break down times, costs for loan or rental devices, travel costs, loss of earnings or other further claims. The liability of vivax drive GmbH & Co.KG from the guarantee service is limited to the purchase value of the product.14. The guarantee only relates to the original vivax assist components. The use of spare parts of unknown origin, for example replacement batteries from third party suppliers, is strictly prohibited and leads to the lapse of the guarantee or warranty of all other components included in the system.15. In the case of modifications or manipulations to the software or hardware, the guarantee or warranty for the complete system is null and void.16. The guarantee only applies if the annual inspection is carried out by vivax drive GmbH & Co. KG or an authorised dealer. The punctual adherence to the inspection times (every 12 months over the whole guarantee period) and presentation of complete docu-ments (purchase receipt, service receipts…) are requirements of a guarantee claim. The costs for the inspection are not included in the guarantee but must be borne by the end user.17. Further developments and innovations do not fall under the guarantee: if vivax drive GmbH & Co KG offers new products/parts after a purchase, then the exchange/upgrade (if required/demanded by customer) does not fall under the “guarantee”. The costs for the exchange/upgrade are borne by the customer.18. Working time/shipping costs/fees/customs are not subject to the guarantee and are borne by the buyer in all cases.
8. GUARANTEE-3 YEARS/1000 OPERATING HOURS

PAGE 26
VIVAX DRIVE GMBH & CO KG | BRIXENTALERSTR. 51 | 6300 WÖRGL | T: +43 5332 70317
According to European guidelines, no longer usable electrical appliances or used batteries must be collected separately and disposed of in an environ-mentally suitable manner.Hand in no longer usable batteries and other components to an authorised dealer or disposal point intended for this purpose.Do not throw parts in household rubbish!
8. DISPOSAL
Please allow your dealer to explain the system to you in detail. Free support/guarantee and quick handling in the case of a complaint can only be carried out with a correctly completed instruction checklist
9. INSTRUCTION CHECKLIST
Tip! Vivax drive GmbH & Co KG can adjust the content of these operating inst- ructions at any time without further notice.
Date Dealer Signature of agent
Date Dealer Signature of agent
1. INSPECTION - 12 MONTHS FROM PURCHASE
2. INSPECTION - 24 MONTHS FROM PURCHASE
Company stamp
Company stamp

PAGE 27
VIVAX DRIVE GMBH & CO KG | BRIXENTALERSTR. 51 | 6300 WÖRGL | T: +43 5332 70317
Instructions handed out.
Connecting and disconnecting battery demonstrated.
Activate and deactivate the drive on rear stand.
Programming pedal frequency – very slow app. 50 rpm (no support withfaster pedalling).
Programming pedal frequency – very quickly (appr.75/90 rpm).
Programming pedal frequency to suit customer.
Test drive on site: ideally on a slight slope, once with and once without motor assis-tance – customer must remain below the programmed pedal frequency, otherwise they will not notice the support.
Could the customer feel the support of the drive?
Instruction of battery given
Operating element variants: MTB normal (without LEDs), MTB with LEDs (explanation of display of pedal frequency and battery charge display), racing bike cabled, racing bike wireless button.
Battery should never be dropped – can be fire hazard.
Lower the seat post only as far as the fixing ring and pull out only up to the mark –fixing ring must not be released – never use force – wires could be damaged!
Never loosen the motor mounting screws in the seat tube (app. 7 cm over the bottombracket)!
Seat post may need extra grease – especially when it is used in bad weather.
Do not clean with high-pressure cleaner – water must not get into the seat tube!
Regularly check that the plugs in the saddlebag are still securely connected.
Has the customer received everything he ordered (e.g. short seat post, pedals, ext-ras…)? Bicycle: gear, suspension fork, airpressure, saddleheight, stem…
Programming of personal pedal frequency carried out and understood?
Vivax drive GmbH & Co KG assumes no liability for self-installation or incorrect hand-ling and possible subsequent damages. Defects must be claimed immediately. Bring invoice with you.
Explanation of 25km/h limitation (incl. sensor)
Advisory staff member: Instruction carried out/ product checked (customer’s signature):
Date:
Stamp:
BRIEFING CHECK LIST

PAGE 28
VIVAX DRIVE GMBH & CO KG | BRIXENTALERSTR. 51 | 6300 WÖRGL | T: +43 5332 70317
10. SHORT DESCRIPTION
SHORT DESCRIPTION
Battery management: Please charge the battery completely before the first use and then completely empty it. Observe the charging and storage regulations! Further info. from P.12.Charge status display: When pressing the operating symbol on the battery (charge status display) the current charge status is shown by 1-5 LEDs – checking is possible even while charging! The battery is fully charged as soon as the green LED on the charger lights up.Storage: Do not store or charge at minus temperatures or above 35°C. In the case of longer storage of the battery, store at 60% charge, but never below that. Recharging is necessary after approx. 3-6 months. Further storage requirements from p.13.Transport: When transporting the bike, always disconnect the battery. We recom-mended storing this in a dry and impact resistant place, outside of the saddlebag. Package the bottle battery in a safe and waterproof way (can not be removed). In the case of serious damage to the battery pack, there is a risk of fire!Operation of the motor: Connect the charged battery in the saddlebag with the large, black round plug (bayonet fitting). The small black plugs must also be connected! Close the saddlebag.Please only activate the control unit on the handlebars when riding – pedals begin to turn immediately! With a short press on the control unit, the motor drives the crank shaft with the most recently programmed pedal frequency. Another short press switches the motor off!Storing the pedal frequency: The highest frequency (75 or 90 rpm) is stored with a long press (10-15 seconds) on the control unit. This way you will always receive optimum support.The pedal rotation speed can be controlled by lifting the rear wheel and pressing the control unit. (CAUTION – pedals begin to turn immediately – risk of injury!).If you pedal faster than the programmed frequency, you will outpace the motor – let yourself fall back. Under 10 revolutions (pedal frequency) or if the pedals are at a standstill, the motor switches off. Further information from page 19.Disconnect the battery after every ride, and store it in a safe place! This also protects against unauthorized use.LED control unit: The yellow LEDs show the pedal frequency. The more LEDs light up (max. 5), the more motor assistance you get. If you are only drawing a low per-formance, fewer LEDs will light up. If the yellow LEDs are flashing, you are pedalling faster than the programmed frequency (see page 19).As at: April 2015

PAGE 29
VIVAX DRIVE GMBH & CO KG | BRIXENTALERSTR. 51 | 6300 WÖRGL | T: +43 5332 70317
NOTES

…RIDE ON(E)!
VIVAX DRIVE GMBH & CO KG | BRIXENTALERSTR. 51 | 6300 WÖRGL | T: +43 5332 70317
WWW.vivax-assist.COM