instructions manual - hay.dk · attached or detached tables in different heights for sitting as...
TRANSCRIPT

NEW ORDERSHELVING SYSTEM
By STEFAN DIEZ
> INSTRUCTIONS MANUAL <
HAY

> INTRODUCTION <
New Order is born of 100% industrial production, reflecting
our ambition to create uncompromising and high-precision
quality products. At first glance, the system architecture
is ultra-simple, but on closer acquaintance it proves
quite complex in its multi-purpose versatility. New Order
can be tall or short, wide or narrow, open or closed – or
any combination in between.
New Order’s simple grid and innovative elements that are
up to 2 metres long let you build airy, open compositions or
closed constructions with side panels and folding doors. By
adding panels all around you can achieve a wall-like
expression. The functionality is exceptional, with doors,
back panels and side panels that can be clicked on and
off without the use of tools.
Shelving and storing units form the backbone of New Order
Workspace Elements. Attached or detached tables in
different heights for sitting as well as standing enable an
almost infinite number of customized configurations.
> CARE AND MAINTENANCE <
When you move the shelving system make sure to lift it
rather than pulling or pushing it, as that would damage
the mountings. We recommend that you tighten up the
screws after one to two months’ use. Wood is a natural
material, which may change in colour and will patinate
over time. To reduce changes avoid placing the
shelving system in direct sunlight or near a heat source.
To avoid permanent stains and scratches, use coasters
under damp, hot or sharp objects. Always remove stains
quickly before they can do any permanent damage to
the surface.
CLEANING
Powder-coated aluminium / Clean with a damp cloth
wrung in a solution of water and a neutral detergent.
Remove soap residue immediately using a clean, dry
cloth. Avoid using scouring cream or scouring pads, as
they may scratch the surface.
Lacquered or stained wood / For daily maintenance, wipe
the surface with a clean, dry cloth. For cleaning, use a
clean cloth wrung in water or in a solution of water and a
neutral detergent (soap flakes) or a care product suited
especially for lacquered or stained wood. Remove soap
residue immediately using a clean, dry cloth. To remove
stains, use a clean, damp cloth wrung in luke¬warm water
with one part vinegar to nine parts water. Follow up
immediately with a clean dry cloth. If the surface is
scratched or appears matt, use lacquer care. Avoid using
detergents containing silicone, as that would seal the
stain in and make subsequent repairs more difficult. Avoid
using scouring cream or scouring pads, as they may
scratch the surface.
Untreated wood / For daily maintenance, wipe the table
with a clean, dry cloth. For cleaning, use a clean cloth
wrung in water or in a solution of water and a neutral
detergent (soap flakes) or a care product suited
especially for untreated wood. Remove soap residue
immediately using a clean, dry cloth. To remove stains,
clean and scrub using a thick solution of soap flakes
that is not allowed to stay on the wood for more than 2
minutes. Then remove the remaining soap residue using a
damp cloth. If the grain of the wood rises after cleaning,
gently sand down the wood using fine-grit sandpaper (No.
220), always going with the grain.

Shelf Top
> PARTS <
CornerDoubleSingle
PROFILE
The profiles are used to link the Shelves/Trays together. There are three types of profiles:
Single, Double, and Corner.
SHELF
There are three different types of shelves:
Top, Middle, and Bottom
Shelf Middle
Shelf Bottom

TRAY
There are three different types of trays:
Top, Middle, and Bottom
Tray Top
Tray Middle
Tray Bottom
SHELF SHELF TRAY
The New Order System shown below is made from the following elements:
1 x Shelf Bottom 1m, 1 x Shelf Middle 1m, 1 x Tray Top 1m, 2 x Single Profile Sets
DOUBLE SHELF SHELF TRAYThe New Order System shown below is made from the following elements:
2 x Shelf Bottom 1m, 2 x Shelf Middle 1m, 2 x Tray Top 1m, 2 x Single Profile Sets, 2 x Double Profile Sets

6 x SHELF
The New Order System shown above is made from the following elements:
1 x Shelf Bottom 1m, 4 x Shelf Middle 1m, 1 x Shelf Top 1m, 5 x Single Profile Sets
DISCLAIMER
The assembly instructions is to be used as a guide showcasing the
concept of the system. It will not necessarily be equal tothe system
you have acquired.

3.
GETTING THE BASE LEVEL
Place a spirit level on the bottom Shelves/Trays in order to check whether the base is level. A
perfectly leveled base is essential to achieve a satisfying end result.
4.
LEVELING USING THE FEET
If the New Order bottom Shelves/Trays are not level, adjust them by unscrewing the four
adjustable feet. They can either be adjusted by unscrewing by hand or with an allen key.
> ALUMINIUM PARTS <
1.
IDENTIFYING BOTTOM SHELVES/TRAYS
The bottom Shelves/Trays have black adjustable nylon
feet mounted in each corner.
2.
PLACING BOTTOM SHELVES/TRAYS
Place the bottom Shelves/Trays in the desired position
and formation.

5.
MOUNT PROFILE SET SCREW PLACEMENT
When mounting the profiles to the Shelf/Tray make sure that the set
screws are pointing towards the middle of the Shelf/Tray.
SINGLE PROFILEMount the Single Profile in each outer
corner of the system.
CORNER PROFILEMount the Corner Profile where threeShelves/Trays need to be connected.
DOUBLE PROFILE
Mount the Double Profile where two
Shelves/Trays need to be connected.

IDENTIFYING MIDDLE SHELVES/TRAYSThe middle Shelves/Trays have connectors on both top and bottom.
6.
MIDDLE SHELVES/TRAYS
The New Order System is constructed in a way that requires you to assemble one complete layer
at a time. When a layer is finished you can move on to the next. Alternating between profiles and
Shelves/Trays until you reach the top.
AVOIDING GAPS
Make sure that the profiles are pressed firmly
against the Shelf/Tray leaving no gaps. Any gaps
can lead to difficulties later on in the assembly
process.

7.
IDENTIFYING TOP SHELVES/TRAYS
The Top Shelves/Trays have only a connector on the bottom
side and a clean top.
8.
SET SCREW PLACEMENT
Each profile contains set screws that lock into the Shelf/Tray in order to stabilize the construction.
When you have finished building the New Order system make sure to tighten all set screws.
NEW ORDERPANELS
By STEFAN DIEZ
> INSTRUCTIONS MANUAL <
HAY
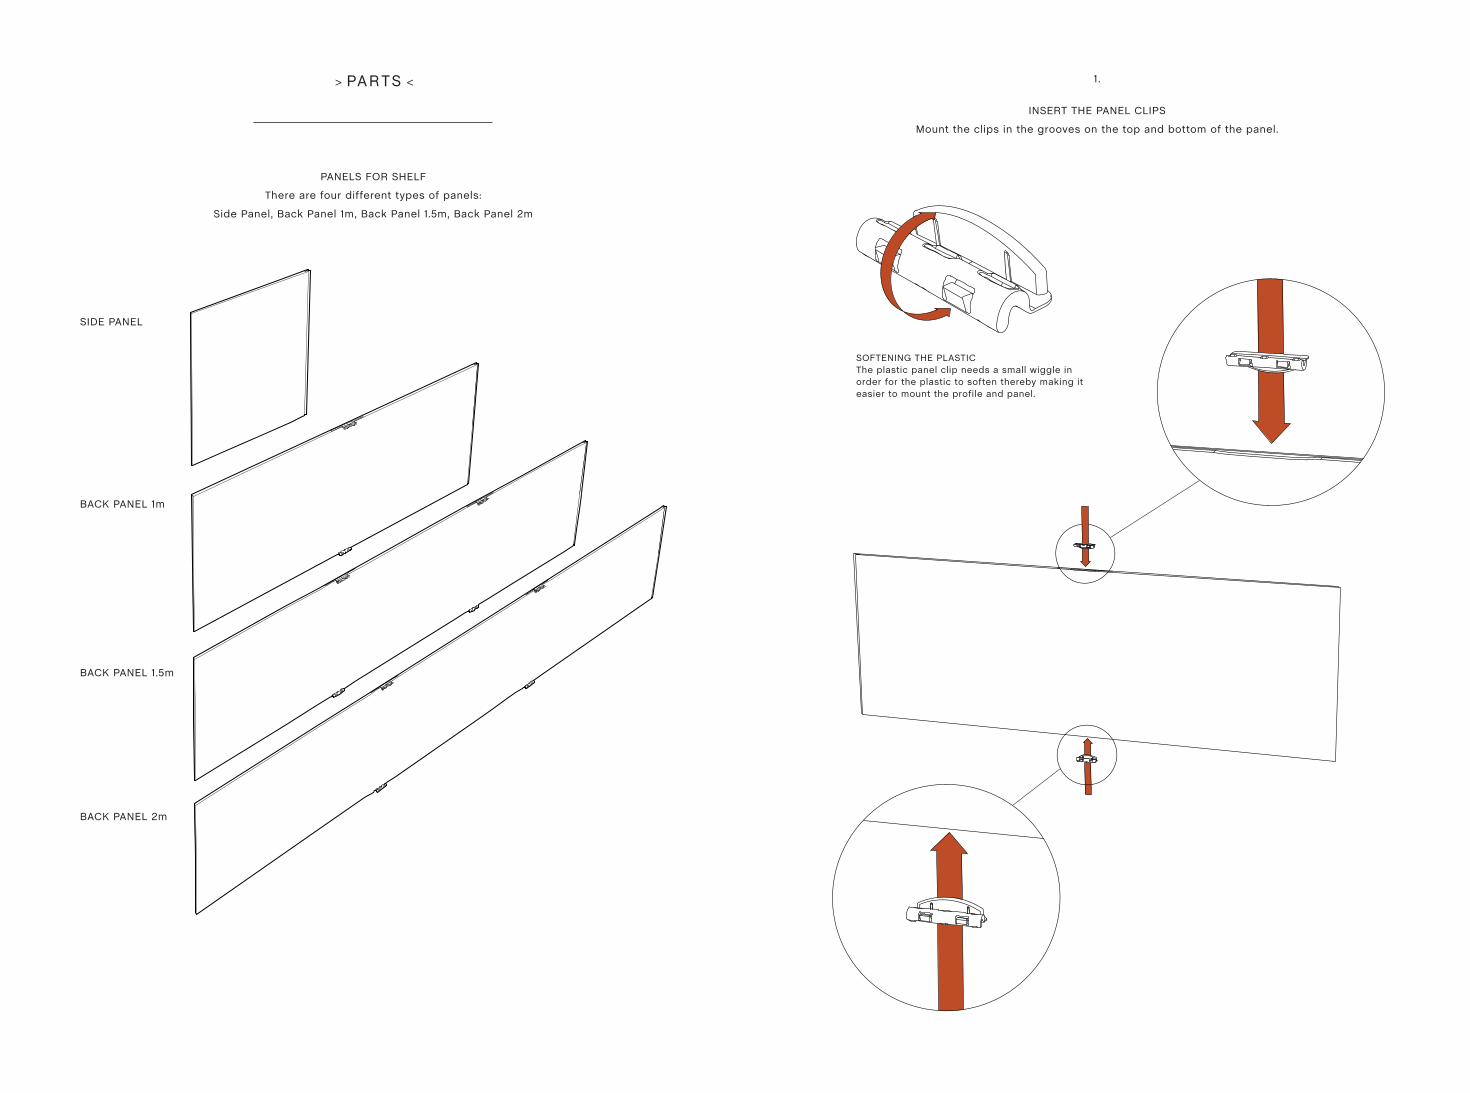
1.
INSERT THE PANEL CLIPS
Mount the clips in the grooves on the top and bottom of the panel.
SOFTENING THE PLASTICThe plastic panel clip needs a small wiggle in order for the plastic to soften thereby making it easier to mount the profile and panel.
> PARTS <
BACK PANEL 1m
SIDE PANEL
PANELS FOR SHELF
There are four different types of panels:
Side Panel, Back Panel 1m, Back Panel 1.5m, Back Panel 2m
BACK PANEL 1.5m
BACK PANEL 2m

2.
INSERTING THE PANELS
WOODEN PANEL END FIRST
Insert the end of the panel made from wood
into the profile first.
PLASTIC PANEL END SECOND
Insert the end of the panel made from plastic
into the other profile.
3.
INSERT THE PANEL CLIPS
Mount the clips in the grooves on the top and bottom of the panel.

4.
MOUNTING THE PLASTIC SNAP LOCK
After the wooden end of the panel is inserted in the profile move the plastic end
of the panel to the second profile
SNAPPING INTO PLACE
The plastic end of the panel is made to bend thereby snapping into place in the groove in the
profile. Don`t be afraid to apply pressure to the top and bottom of the panel in order to secure
the panel in the profile.
5.
SECURE THE PANEL IN PLACE
Secure the panel in place with the clips between the panel and profile.

6.
INSERT THE SIDE PANEL
Slide the panel from the inside of the shelving system.
Insert the wooden end of the panel into the groove in the profile. Make sure that the
recess is pointing outwards.
7.
INSERT THE PANEL CLIPS
Mount the clips in the grooves on the top and bottom of the panel.
SNAPPING INTO PLACE
The plastic end of the panel is made to bend thereby snapping into place in the groove in the
profile. Don’t be afraid to apply pressure to the top and bottom of the panel in order to secure
the panel in the profile.

NEW ORDERSLIDING DOORS
By STEFAN DIEZ
> INSTRUCTIONS MANUAL <
HAY

> PARTS <
SLIDING DOORS RIGHT
SLIDING DOOR
SLIDING DOOR/DOORS
There are two different door setups depending on your New Order dimensions. Systems 1m and
below use a single Sliding Door whereas systems longer than 1m use two Sliding Doors.
1.
INSERT THE DOORS
The cut out must be facing up when mounting the sliding doors
SLIDING DOORS LEFT
DOOR GLIDER HANDLE
2.
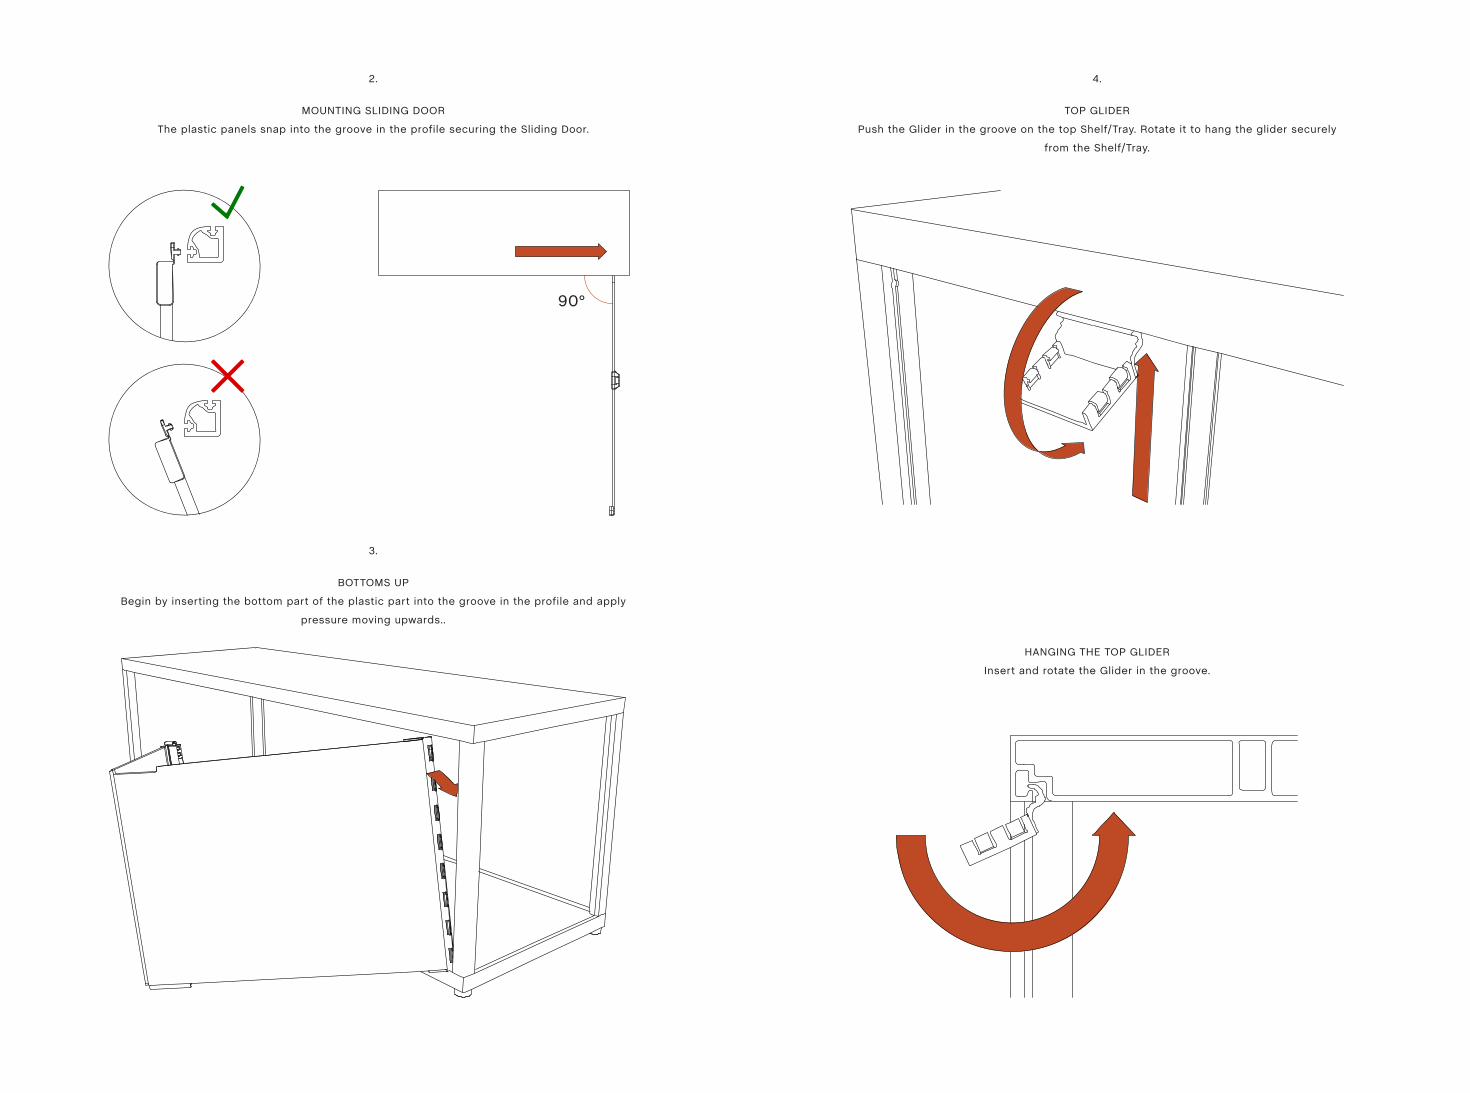
MOUNTING SLIDING DOOR
The plastic panels snap into the groove in the profile securing the Sliding Door.
3.
BOTTOMS UP
Begin by inserting the bottom part of the plastic part into the groove in the profile and apply
pressure moving upwards..
4.
TOP GLIDER
Push the Glider in the groove on the top Shelf/Tray. Rotate it to hang the glider securely
from the Shelf/Tray.
HANGING THE TOP GLIDER
Insert and rotate the Glider in the groove.
90°

5.
BOTTOM GLIDER
Push the glider in the groove on the bottom Shelf/Tray.
Rotate it to secure the Glider to the Shelf/Tray.
6.
DOOR TO GLIDER
Align the end of the door that is not fixed to the shelving system to the Gliders.
BOTTOM GLIDER
When the top part is secure proceed to the
bottom Glider and repeat.
TOP GLIDER
Start by pressing the Sliding Door into the top
Glider.

7.
MOUNTING THE HANDLE
Align the Handle with the holes in the recessed part of the Sliding Door.
The Handle should be facing out relative to the shelving system.
8.
HANDLE SNAPPING
Press the Handle all the way to the bottom of the Sliding Door allowing
it to snap into the plastic bracket.
9.
DOUBLE SECURITY
Press the pins into the Sliding Doors and allow the plastic bracket on the rear of the Sliding Door
to snap to the Handle.

NEW ORDERWHEELS
By STEFAN DIEZ
> INSTRUCTIONS MANUAL <
HAY

> PARTS <
STANDARD FEET
WHEELS
There are two different types of wheels:
Wheel with brake, Wheel without brake
WHEEL WHEEL WITH BRAKE
1.
UNSCREW FEETTurn the bottom Shelf/Tray over and unscrew the feet from the base.
2.
MOUNTING WHEELS
Mount the wheels using the supplied wrench.

3.
DIAGONAL MOUNTING
Mount identical wheels diagonally to ensure optimal stability.
Retighten all wheels three to four
weeks after assembly.
NEW ORDERWALL MOUNTING BRACKET
By STEFAN DIEZ
> INSTRUCTIONS MANUAL <
HAY

> PARTS <
WALL MOUNTING BRACKETS
There are two types of Wall Mounting Brackets:
Brackets for Shelves and Brackets for Trays
WALL MOUNTING BRACKETS SHELF WALL MOUNTING BRACKETS TRAY
1.
LEVELING THE BRACKETS
Use a spirit level to make sure the Wall Mounting Brackets are level prior to drilling.
2.
MARK HOLES
While the Wall Brackets are held in place mark the center of the holes using a pen.

3.
DRILL HOLES
Remove the Wall Brackets and proceed to drill the holes using a drill for
the supplied dowel and screws.
4.
DOWEL AND SCREWS
Insert the provided dowel in the drilled holes. Place the Wall Mount Brackets in place and secure
them using the supplied screws and a power drill.
6.
MOUNTING THE SHELVING SYSTEM
Push the Shelving system up against the wall and let it slide down hooking on to the Wall
Mounting Brackets both on the top and bottom.
5.
UNSCREW FEET
Remove feet or wheels before mounting the shelving system to the wall.
Turn the bottom Shelf/Tray over and unscrew the feet from the base.

7.
MOUNTING THE SHELVING SYSTEM
The grooves in the top and bottom Shelf/Tray will accommodate the Wall Mounting Bracket
and secure it in place.
9.
PANELS FOR WALL MOUNT
When mounting the special panel for the wall mounted New Order it is of great importance that
the two cutouts point upwards.
Otherwise they will not snap into place and the panel can not be mounted. The installation of the
panel is otherwise identical to that of the standard panels.
8.
BUILDING VERTICALLY
To build vertically with the Wall Mounting Bracket simply mount the desired amount of Wall
Brackets in extension of each other.

NEW ORDERBOOKEND
By STEFAN DIEZ
> INSTRUCTIONS MANUAL <
HAY

> PARTS <
SHELF BOOK DIVIDER LEFT
BOOKENDS
There are five types of Bookends:
Shelf Book Divider Left, Shelf Book Display, Shelf Book Divider With Stopper,
Shelf Book Divider Right and Tray Book Divider
TRAY BOOK DIVIDER
SHELF BOOK DIVIDER WITH STOPPER SHELF BOOK DISPLAY
SHELF BOOK DIVIDER RIGHT
2.
LOWERING INTO PLACE
Having inserted the end of the Bookend in the groove lower it until it rests on the Shelf.
1.
INSERTING THE BOOKEND
Start by inserting the Shelf Bookend in the groove in the Shelf.

2.
LOWERING INTO PLACE
Having inserted the end of the Bookend in the groove lower it until it rests on the Tray.
1.
INSERTING THE BOOKEND
Start by inserting the Tray Bookend in the groove in the Tray.
