integrating cisco unity and call manger
TRANSCRIPT

8/8/2019 Integrating Cisco Unity and Call Manger
http://slidepdf.com/reader/full/integrating-cisco-unity-and-call-manger 1/16
Integrating Cisco Unity and CallManager
Document ID: 13986
Introduction
Prerequisites
Requirements
Components Used
Conventions
Cisco Unity Configuration
Cisco CallManager Configuration
Related Information
Introduction
This document assists you with the initial integration of Cisco Unity and Cisco CallManager. Cisco Unity and
Cisco CallManager communicate with each other via a TAPI Service Provider (TSP) which is installed on the
Cisco Unity server. It is available for download at Cisco Unity Software ( registered customers only) . Consult theQualified Product Combinations table contained in the readme file before you instal.
Note: The screen shots used in this document were captured from a Cisco Unity server running on Windows
2000. Some screens and names might appear slightly different under Windows NT or not at all. In addition,
this document assumes that you have already installed Cisco Unity and Cisco CallManager.
Prerequisites
Requirements
Cisco recommends that you have knowledge of these topics:
Cisco Unity•
Cisco CallManager•
Components Used
This document is not restricted to specific software and hardware versions.
Conventions
Refer to Cisco Technical Tips Conventions for more information on document conventions.
Cisco Unity Configuration
Complete these steps:
Double−click on the downloaded TSP file. Click Unzip. Leave the default Unzip to folder value the
same unless you have a need to change it.
1.

8/8/2019 Integrating Cisco Unity and Call Manger
http://slidepdf.com/reader/full/integrating-cisco-unity-and-call-manger 2/16
Click Start, then Run and type in the path the TSP was unzipped to. The default is c:\AVCiscoTSP
Install. Click OK.
2.
Double−click the setup icon.
Note: A status window appears.
3.
Click OK at this prompt.4.

8/8/2019 Integrating Cisco Unity and Call Manger
http://slidepdf.com/reader/full/integrating-cisco-unity-and-call-manger 3/16
Click Next.5.
Click Next to choose the default install path, or click Change if you wish to install into a different
path. The default is recommended.
6.

8/8/2019 Integrating Cisco Unity and Call Manger
http://slidepdf.com/reader/full/integrating-cisco-unity-and-call-manger 4/16
Click Install.7.
Click Finish.8.

8/8/2019 Integrating Cisco Unity and Call Manger
http://slidepdf.com/reader/full/integrating-cisco-unity-and-call-manger 5/16
Click Yes to reboot the server.
Note: Make sure to save all data and close all windows you might have opened before you click Yes.
9.
After the machine reboots and you have logged in to the console, you are prompted with this
AV−Cisco Service Provider window. Click Add.
10.
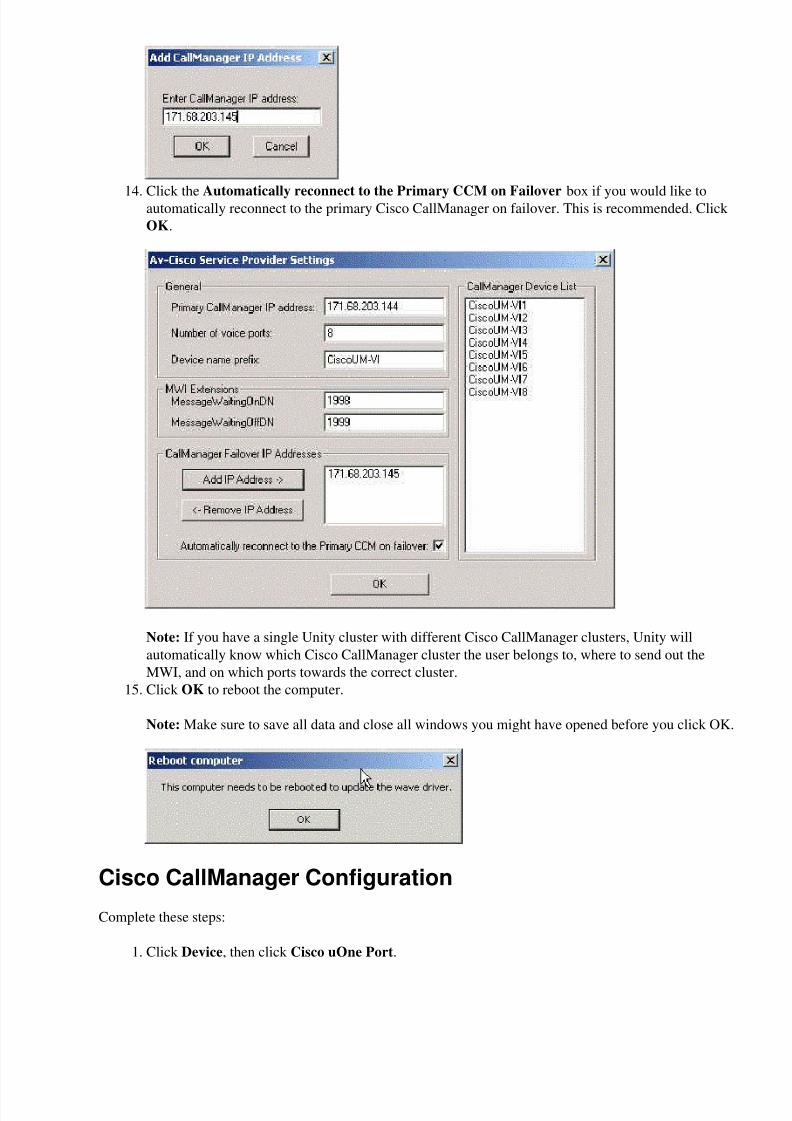
Enter the IP address of your primary Cisco CallManager and then click OK.11.

8/8/2019 Integrating Cisco Unity and Call Manger
http://slidepdf.com/reader/full/integrating-cisco-unity-and-call-manger 6/16
Enter the appropriate information in each of the fields.
Enter the number of ports you have purchased in the Number of voice ports field. The
numbers of voice ports automatically propagates on the CallManager Device List located on
the right of the window.
♦
Enter the device name prefix you wish in the Device name prefix field. The name of the
voice ports automatically propagates on the CallManager Device List located on the right of
the window.
Note: You use the prefix name when you configure uOne ports. Make note of the value
entered.
♦
Enter the message waiting on and off dialed number (DN) under MessageWaitingOnDN and
MessageWaitingOffDN, respectively.
Note: You use the message waiting on and off DN value when you configure the Message
Waiting Indicator (MWI) on the CallManager.
♦
12.
Click Add IP Address to add the IP address of a redundant Cisco CallManager, if applicable. Click
OK.
13.
8/8/2019 Integrating Cisco Unity and Call Manger
http://slidepdf.com/reader/full/integrating-cisco-unity-and-call-manger 7/16
Click the Automatically reconnect to the Primary CCM on Failover box if you would like toautomatically reconnect to the primary Cisco CallManager on failover. This is recommended. Click
OK.
Note: If you have a single Unity cluster with different Cisco CallManager clusters, Unity will
automatically know which Cisco CallManager cluster the user belongs to, where to send out the
MWI, and on which ports towards the correct cluster.
14.
Click OK to reboot the computer.
Note: Make sure to save all data and close all windows you might have opened before you click OK.
15.
Cisco CallManager Configuration
Complete these steps:
Click Device, then click Cisco uOne Port.1.

8/8/2019 Integrating Cisco Unity and Call Manger
http://slidepdf.com/reader/full/integrating-cisco-unity-and-call-manger 8/16
Enter the appropriate information in each of the fields.
Enter the prefix name + 1 for the first port. The prefix name was configured in step 12.♦
Enter the administrative name you would like to have for the port in the Description Field.
Note: The Description does not affect the function of the port.
♦
Enter the Device Pool you wish to place the port in.♦
Enter the Calling Search Space you wish to place the port in.
Note: Ports can only call phones that are in partitions defined in the Calling Search Space
selected.
♦
Select the Location you wish to place the port in.♦
Assign the port a Directory Number. The directory number is the DN that users dial to
access the voicemail system.
♦
Assign a Partition.♦
Enter the Calling Search Space you wish to place the DN in.
Note: Ports can only call phones that are in partitions defined in the Calling Search Space
selected.
♦
Enter the Display Name you would like to use. This is the name users see when accessing
this port.
♦
It is not recommended to Forward All on voicemail ports, so leave this field blank.♦
Enter the DN of the next port that is configured. Select the appropriate Calling Search
Space.
Note: Ports can only call phones that are in partitions defined in the Calling Search Space
selected.
♦
2.

8/8/2019 Integrating Cisco Unity and Call Manger
http://slidepdf.com/reader/full/integrating-cisco-unity-and-call-manger 9/16
Click Insert to add the newly configured port.3.
Repeat steps 1 through 3 for all of the ports defined in step 12, incrementing the port number for each
port.
Once completed, the configuration looks similar to this:
4.
8/8/2019 Integrating Cisco Unity and Call Manger
http://slidepdf.com/reader/full/integrating-cisco-unity-and-call-manger 10/16
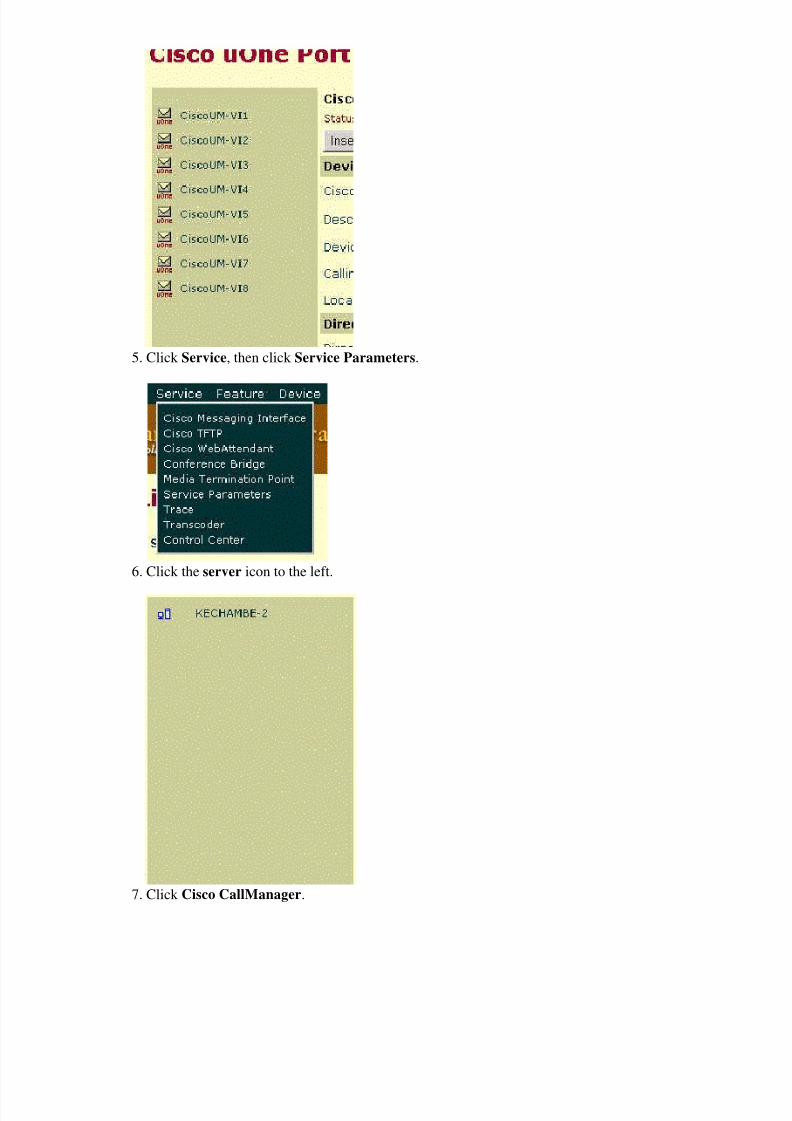
Click Service, then click Service Parameters.5.
Click the server icon to the left.6.
Click Cisco CallManager.7.

8/8/2019 Integrating Cisco Unity and Call Manger
http://slidepdf.com/reader/full/integrating-cisco-unity-and-call-manger 11/16
Click VoiceMail. Enter the value you wish to use as your voicemail pilot point. Click Update.
If this is a Cisco CallManager cluster, this must be performed on all servers in the cluster.
Note: This is usually the first uOne port configured.
8.

8/8/2019 Integrating Cisco Unity and Call Manger
http://slidepdf.com/reader/full/integrating-cisco-unity-and-call-manger 12/16
Enter the DN you would like to use for message waiting on under MessageWaitingOnDN. Click
Update.
If this is a Cisco CallManager cluster, this must be performed on all servers in the cluster.
9.
Enter the DN you would like to use for message waiting off under MessageWaitingOffDN. Click
Update.
If this is a Cisco CallManager cluster, this must be performed on all servers in the cluster.
Note: This must match the value entered in step 12 in the Cisco Unity Configuration section. Also,make sure that this number does not conflict with a route pattern.
10.

8/8/2019 Integrating Cisco Unity and Call Manger
http://slidepdf.com/reader/full/integrating-cisco-unity-and-call-manger 13/16
Enter the number of ports you have purchased in the VoiceMailMaximumHopCount field. Click
Update.
If this is a Cisco CallManager cluster, this must be performed on all servers in the cluster.
Note: This is important to eliminate voicemail forwarding loops.
11.

8/8/2019 Integrating Cisco Unity and Call Manger
http://slidepdf.com/reader/full/integrating-cisco-unity-and-call-manger 14/16
Stop and start all Cisco CallManagers and the Cisco Unity server.12.
Select Start > Settings > Control Panel and double−click the Phone and Modem Options icon.13.

8/8/2019 Integrating Cisco Unity and Call Manger
http://slidepdf.com/reader/full/integrating-cisco-unity-and-call-manger 15/16
Select Av−Cisco Service Provider and click Configure.14.
Click Test.
Note: Refer to the MWI Troublehooting Guide if the test does not complete successfully.
15.

8/8/2019 Integrating Cisco Unity and Call Manger
http://slidepdf.com/reader/full/integrating-cisco-unity-and-call-manger 16/16
Related Information
Voice Technology Support•
Voice and Unified Communications Product Support•
Recommended Reading: Troubleshooting Cisco IP Telephony•
Technical Support & Documentation − Cisco Systems•
Contacts & Feedback | Help | Site Map
© 2009 − 2010 Cisco Systems, Inc. All rights reserved. Terms & Conditions | Privacy Statement | Cookie Policy | Trademarks of
Cisco Systems, Inc.
Updated: Jun 23, 2006 Document ID: 13986