integrity client management guide · integrity client management guide i zld 1-0218-0501-2005-04-21...
TRANSCRIPT

Smarter Security™
A Check Point Company
Integrity Client Management GuideDeploying and Managing Integrity Flex and Integrity Agent
ZLD 1-0218-0501-2005-04-21

Integrity Client Management Guide iZLD 1-0218-0501-2005-04-21
Preface
This document is the Integrity Client Management Guide for Integrity Server version 5.0.
About Zone Labs, LLC.Zone Labs®, a Check Point® company (Nasdaq: CHKP), is one of the most trusted brands in Internet security. Zone Labs is a leading creator of endpoint security solutions protecting millions of PCs and the valuable, personally-identifiable information on those PCs, from hackers, spyware and data theft. The company's award-winning endpoint security product line is deployed in global enterprises, small businesses and consumers' homes, protecting them from Internet-borne threats. Check Point Integrity™ is an endpoint security management platform that protects corporate data and productivity. The ZoneAlarm family of products is among the most popular and successful Internet security products available today while IMsecure® Pro offers comprehensive security for instant messaging. Please visit http://www.zonelabs.com for more information.

Integrity Client Management Guide iiZLD 1-0218-0501-2005-04-21
Editor's Notes:
©2005 Check Point Software Technologies Ltd. All rights reserved. Check Point, Application Intelligence, Check Point Express, the Check Point logo, AlertAdvisor, ClusterXL, Cooperative Enforcement, ConnectControl, Connectra, CoSa, Cooperative Security Alliance, FireWall-1, FireWall-1 GX, FireWall-1 SecureServer, FloodGate-1, Hacker ID, IMsecure, INSPECT, INSPECT XL, Integrity, InterSpect, IQ Engine, Open Security Extension, OPSEC, Policy Lifecycle Management, Provider-1, Safe@Home, Safe@Office, SecureClient, SecureKnowledge, SecurePlatform, SecurRemote, SecurServer, SecureUpdate, SecureXL, SiteManager-1, SmartCenter, SmartCenter Pro, Smarter Security, SmartDashboard, SmartDefense, SmartLSM, SmartMap, SmartUpdate, SmartView, SmartView Monitor, SmartView Reporter, SmartView Status, SmartViewTracker, SofaWare, SSL Network Extender, TrueVector, UAM, User-to-Address Mapping, UserAuthority, VPN-1, VPN-1 Accelerator Card, VPN-1 Edge, VPN-1 Pro, VPN-1 SecureClient, VPN-1 SecuRemote, VPN-1 SecureServer, VPN-1 VSX, Web Intelligence, ZoneAlarm, Zone Alarm Pro, Zone Labs, and the Zone Labs logo, are trademarks or registered trademarks of Check Point Software Technologies Ltd. or its affiliates. All other product names mentioned herein are trademarks or registered trademarks of their respective owners. The products described in this document are protected by U.S. Patent No. 5,606,668, 5,835,726 and 6,496,935 and may be protected by other U.S. Patents, foreign patents, or pending applications. This product includes software developed by the Apache Software Foundation http://www.apache.org.
This product includes software developed by the Apache Software Foundation http://www.apache.org.
Integrity Client Management Guide iiiZLD 1-0218-0501-2005-04-21
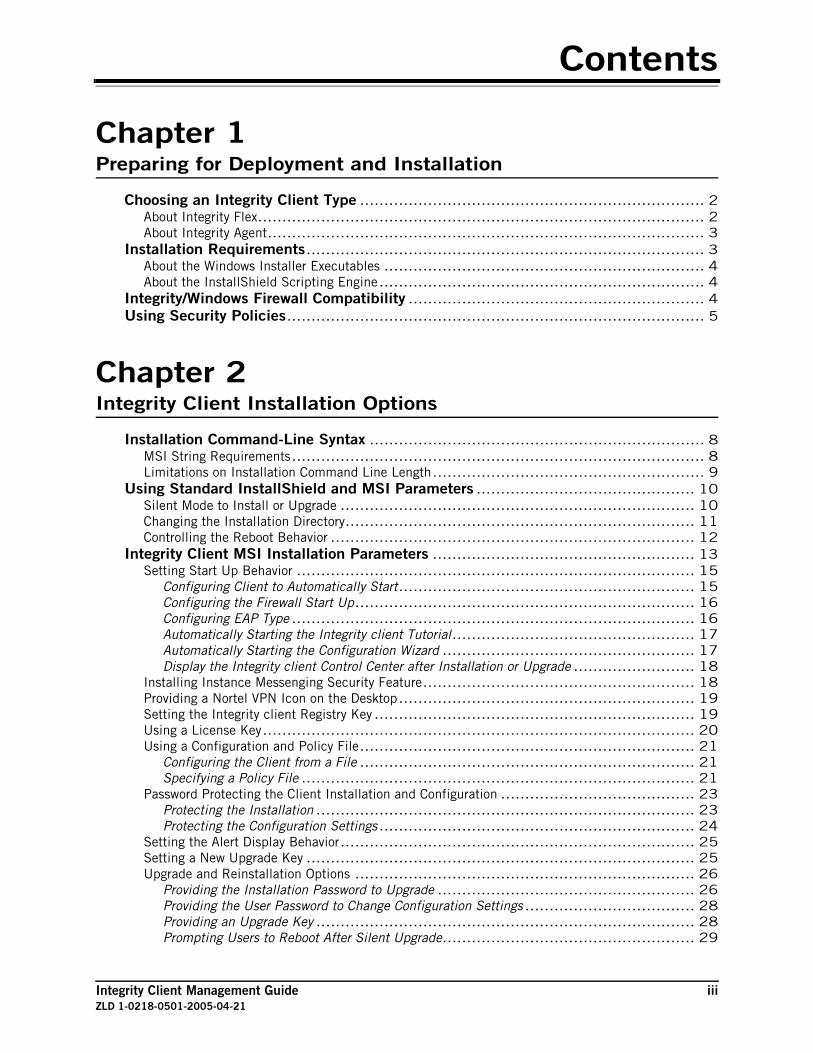
Contents
Chapter 1Preparing for Deployment and Installation
Choosing an Integrity Client Type ....................................................................... 2About Integrity Flex............................................................................................ 2About Integrity Agent.......................................................................................... 3
Installation Requirements.................................................................................. 3About the Windows Installer Executables .................................................................. 4About the InstallShield Scripting Engine................................................................... 4
Integrity/Windows Firewall Compatibility ............................................................. 4Using Security Policies...................................................................................... 5
Chapter 2 Integrity Client Installation Options
Installation Command-Line Syntax ..................................................................... 8MSI String Requirements..................................................................................... 8Limitations on Installation Command Line Length........................................................ 9
Using Standard InstallShield and MSI Parameters ............................................. 10Silent Mode to Install or Upgrade ......................................................................... 10Changing the Installation Directory........................................................................ 11Controlling the Reboot Behavior ........................................................................... 12
Integrity Client MSI Installation Parameters ...................................................... 13Setting Start Up Behavior .................................................................................. 15
Configuring Client to Automatically Start............................................................. 15Configuring the Firewall Start Up...................................................................... 16Configuring EAP Type ................................................................................... 16Automatically Starting the Integrity client Tutorial.................................................. 17Automatically Starting the Configuration Wizard .................................................... 17Display the Integrity client Control Center after Installation or Upgrade ......................... 18
Installing Instance Messenging Security Feature........................................................ 18Providing a Nortel VPN Icon on the Desktop............................................................. 19Setting the Integrity client Registry Key .................................................................. 19Using a License Key......................................................................................... 20Using a Configuration and Policy File..................................................................... 21
Configuring the Client from a File ..................................................................... 21Specifying a Policy File ................................................................................. 21
Password Protecting the Client Installation and Configuration ........................................ 23Protecting the Installation .............................................................................. 23Protecting the Configuration Settings ................................................................. 24
Setting the Alert Display Behavior......................................................................... 25Setting a New Upgrade Key ................................................................................ 25Upgrade and Reinstallation Options ...................................................................... 26
Providing the Installation Password to Upgrade ..................................................... 26Providing the User Password to Change Configuration Settings ................................... 28Providing an Upgrade Key .............................................................................. 28Prompting Users to Reboot After Silent Upgrade.................................................... 29

Integrity Client Management Guide ivZLD 1-0218-0501-2005-04-21
Reverting to the Default Settings ...................................................................... 30Using an INI File when CLI Limit Exceeded ............................................................. 30
Chapter 3Configuring Client Packages
Creating Client Packages ................................................................................. 33Configuring a Package .................................................................................. 34Creating a New Package or Copying an Existing Package .......................................... 34
Deleting Packages........................................................................................... 41
Chapter 4Deploying Clients to End-Users
Using the Integrity Server Sandbox page ........................................................... 44How Client Deployment Works ............................................................................. 44The End-User Experience................................................................................... 45Client Deployment View Panel ............................................................................. 46
Using an Enterprise Software Distribution Tool .................................................. 47Using Microsoft System Management Server ........................................................ 47
Using Tivoli ................................................................................................... 48Using a Remote Administration Tool...................................................................... 48Using Active Directory to Deploy Integrity Clients....................................................... 49
Step 1: Create a Distribution Point.................................................................... 49Step 2: Create a Group Policy Object ................................................................. 49Step 3: Assign the installation package to the group policy ....................................... 50
Chapter 5Supporting Integrity Client Users
The Sandbox URL ........................................................................................... 51Reason Codes ............................................................................................ 51
Downloading Localized Client Installers .................................................................. 52Adding New Locales......................................................................................... 52Customizing the Sandbox HTML files..................................................................... 53Security Considerations ..................................................................................... 55Sandbox Placement ......................................................................................... 55
Client Lockup Situations ................................................................................. 55Lockup port use (8081, 8082, 8083).................................................................... 56
Changing the Lockup Server IP Address .............................................................. 56Disabling the Lockup Function ........................................................................ 56
Startup Rules................................................................................................. 56Example: Low Startup Security ............................................................................ 57Example: Medium Startup Security ....................................................................... 57Example: High Startup Security ........................................................................... 58

Integrity Client Management Guide vZLD 1-0218-0501-2005-04-21
Chapter 6Uninstalling Integrity Clients
Silently Removing a Client............................................................................... 59Uninstalling Client Version 4.5 and earlier............................................................... 59Uninstalling Client Version 5.0 and Later ................................................................ 59Prompting or Preventing Restart After Uninstall ........................................................ 60
Chapter 7 Operational CLI Switches
Overview of Operational Command Lines........................................................... 62The Configuration File Operational Command Line Switch ............................................ 62
Operational Command Line Switches................................................................ 63Set or Change License Key Operational Command Line Switch....................................... 64Set or Modify Passwords Operational Command Line Switches ....................................... 65The -config Operational Command Line Switch ......................................................... 67The Policy Operational Command Line Switch .......................................................... 67Overview of the Config Command Line Switch........................................................... 68Overview of the Policy Command Line Switch ........................................................... 68
Using Config to connect to Integrity Server........................................................ 69The Connection Parameter and VPN Gateway Connections ............................................ 69The Connection Parameter and LAN or other non-VPN Connections ................................. 69
Using Policy to Preload an Enterprise Policy...................................................... 70Uninstallation Command Line Switches ............................................................ 71
Appendix A Integrity Client 4.X CLI Switches
Differences Installing 4.x and 5.x Versions ........................................................ 75Using Configuration and Policy Files (.xml and .ini) .................................................... 75Comparing Command-Line Syntax (Wise and MSI) ..................................................... 75
Differences between 5.x and 4.x Switches ........................................................ 76Switches for Client Version 4.5 and Earlier ....................................................... 78
Overview................................................................................................... 78Limitations on Installation Command Line Length.................................................. 78The Configuration File Installation Command Line Specifier ...................................... 79Installation Command Line Error Messages .......................................................... 79Installation Command Line Switches ................................................................. 79General Installation Command Line Switches ....................................................... 80Tutorial and Wizard Installation Command Line Switches ......................................... 89Set or Modify Password Installation Command Line Switches..................................... 89The Configuration File Installation Command Line Specifier ...................................... 93The Policy File Installation Command Line Switch ................................................. 93

Integrity Client Management Guide viZLD 1-0218-0501-2005-04-21
Index..................................................................................................................... 95

Integrity Client Management Guide 1ZLD 1-0218-0501-2005-04-21
Chapter 1Preparing for Deployment and Installation
This chapter explains consideration and requirements before you deploy Integrity client on your network.
“Choosing an Integrity Client Type,” on page 2
“Installation Requirements,” on page 3
“Integrity/Windows Firewall Compatibility,” on page 4
“Using Security Policies,” on page 5

Chapter 1 Preparing for Deployment and Installation
Integrity Client Management Guide 2ZLD 1-0218-0501-2005-04-21
Choosing an Integrity Client TypeIntegrity clients are an endpoint security solution designed to address the most rigorous of network security challenges posed by existing and emerging hostile threats on the Internet and an internal network. This includes targeted as well as random intrusions such as port scanning and denial of service attacks, as well as the full array of malware threats such as Trojan horses and malicious code.
The Integrity client security engine does not rely on signature updates as antivirus software and intrusion detection systems do. Instead, Integrity clients use advanced application control and sophisticated protection at the network protocol layer to neutralize threats.
About Integrity FlexIntegrity Flex provides Integrity administrators with the option to control security policy configurations themselves or allow end users to control their own security policies.
The combination of enterprise policy and personal policy maximizes protection and is ideal for telecommuters and mobile workers who use their PCs for different purposes in different environments.
Installing Integrity Flex or Integrity Agent on a computer with another firewall product installed may cause system problems. The Integrity client installer prevents installation on computers where PC-Cillin firewall is detected. If your endpoints are running other firewalls (either stand-alone or as part of a security suite), Check Point recommends that you uninstall them before deploying Integrity clients.

Chapter 1 Preparing for Deployment and Installation
Integrity Client Management Guide 3ZLD 1-0218-0501-2005-04-21
With the Integrity Flex client, users can control which applications are trusted to access the local network and/or Internet, and can decide whether to permit/block applications with each use, or save permissions permanently.
Integrity Flex also allows the user to establish custom levels of security for specific trusted and restricted domains, subnets and IP Addresses. This is especially useful if the user requires a different level of security for a specific IP address compared to the default security level.
Integrity Flex allows users to define application specific or global packet filtering rules that can be applied to incoming, outgoing, or bi-directional traffic.
About Integrity AgentIntegrity Agent is a client that is non-interactive for end-users. It can be configured to run unobtrusively (silent mode) in the background.
When connected to the local network, Integrity Agent will always enforce enterprise policy.
Personal Policies for Integrity Agent are permissive settings by default. Use a configuration file to alter settings for the personal policy in Integrity Agent. Refer to the Integrity XML Policy Reference or Integrity INI Reference for additional details on accomplishing this set of tasks.
Installation RequirementsBefore installing Integrity Server 5.0 or later clients, make sure that your endpoint computers support Windows Installer technology. This involves confirming that the Windows Installer executable files and script are present on the target endpoint computers.

Chapter 1 Preparing for Deployment and Installation
Integrity Client Management Guide 4ZLD 1-0218-0501-2005-04-21
About the Windows Installer ExecutablesWindow Installer executables (INSTMSIW.EXE, INSTMSIA.EXE) are automatically included in Windows XP, but not in Windows 95, 98, Me, NT 4.0, and 2000 systems. To make these systems Windows Installer capable, go to the Microsoft website and download either:
Windows Installer Redistributable for Windows 95, 98, and ME
Windows Installer Redistributable for Windows NT 4.0 and 2000
Install the redistributable package on your endpoints before deploying the Integrity client installer.
About the InstallShield Scripting EngineThe Windows installer for the Integrity client requires the InstallShield scripting engine. You can use the following command example to install the scripting engine on most computers:
%systemroot%\system32\msiexec.exe /qn /iI ISScript9.Msi
For more information please refer to the InstallShield web site at http://support.installshield.com
Integrity/Windows Firewall CompatibilityMicrosoft Windows with SP2 includes an integrated personal firewall. However, Zone Labs recommends that only one firewall be run on an endpoint. Microsoft has made a similar recommendation. Using a new setting in the Client Settings tab of Policy Studio, you can configure the Integrity client to shut down the Windows firewall using the Microsoft-provided APT, and restart the Windows firewall if Integrity client is shut down. Zone Labs recommends that you use this configuration option. See “To configure Integrity to shut down the Windows firewall:,” on page 5.
Whether SP2 is installed on a computer already running Integrity client version 5.0.556.144 or later, or the Integrity client is installed on an endpoint that already has SP2 installed, the behavior is similar:
Integrity will shut down the Windows firewall after the post-SP2 installation restart.
If the Integrity client is shut down after SP2 is installed, the client notifies Windows that it is being shut down, and Windows restarts the windows firewall.
If Integrity client is restarted, the Windows firewall is again shut down.
If a user or administrator re-enables the Windows firewall while the Integrity client firewall is running, they should coexist without problems, as the two firewall operate on different system levels.

Chapter 1 Preparing for Deployment and Installation
Integrity Client Management Guide 5ZLD 1-0218-0501-2005-04-21
To configure Integrity to shut down the Windows firewall:
1. Go to Policy Studio | Policies.
2. From the Policy List, select a policy, then Click Edit.
3. Go to the Client Settings tab.
4. Under Policy Arbitration Rules, choose Disable Windows Firewall.
5. Save and deploy the policy.
Notification in the Windows Security Center
If the endpoint computer is not being administered as a member of a domain, the Windows XP Security Center will show an indication that the Integrity client is installed and running.
However, if the computer is a member of a domain, the Windows security center will not indicate that Integrity client is installed and active. This is because in a domain security is assumed to be centrally managed.
Using Security PoliciesA policy is a set of rules that govern the behavior of Integrity clients installed on endpoint computers connected to a corporate network. There are three policy types that Integrity enforces: enterprise, disconnected, and personal.

Chapter 1 Preparing for Deployment and Installation
Integrity Client Management Guide 6ZLD 1-0218-0501-2005-04-21

Integrity Client Management Guide 7ZLD 1-0218-0501-2005-04-21
Chapter 2Integrity Client Installation Options
Beginning version 5.0, Integrity clients use MSI (Microsoft Installer) technology. To install, reinstall, or upgrade to Integrity Agent, Integrity Flex, or Integrity Desktop 5.0 or later, use the set of installation command-line switches specified in this chapter.
Some of the command line switches and parameters described in this chapter have corresponding settings that can be selected in the Integrity Server Administration Console Client Deployment interface.
After creating a configuration or policy file, use command line switches to do the following:
Specify non-default installation program behaviors
Set or change user-level or installation-level passwords
Force Integrity client to load an optional configuration or policy file
See Appendix A, ”Integrity Client 4.X CLI Switches,“ for more information. on installing an Integrity client version 4.x or earlier. For a summary of the differences, see Table 1: Comparison of Integrity client 4.x and 5.x command-line switches.

Chapter 2 Integrity Client Installation Options
Integrity Client Management Guide 8ZLD 1-0218-0501-2005-04-21
Installation Command-Line SyntaxThe installer for Integrity client versions 5.0 and later uses a combination of InstallShield and Microsoft Installer technology. The following is the general form of installation command lines for version 5.0 and later:
iclientSetup_Fen.exe [/InstallShieldswitch_1 /InstallShieldswitch_n] /v”/MSIswitch_n Iclient_install_parameter_n”
The installation command line consists of these primary elements:
Integrity client setup executable the filename of the Integrity client installation program.
For example, iclientSetup_Fen.exe is the English version (en) of Integrity Flex (F).
Optional InstallShield switches, preceded by the slash mark (“/”), specify non-default installation and post-installation behaviors.
For example, to run the InstallShield in silent mode use the /s switch:iclientSetup_Fen.exe /s /v” ... ”
InstallShield switch /v, followed by MSI switches and Integrity client parameters enclosed in quotes. This switch passes the quote-enclosed string that follows it to the MSI installer.
Optional MSI switches within the InstallShield /v switch. Any standard MSI can be used.
For example, to run MSI in silent mode include the /qn switch: iclientSetup_Fen.exe /s /v” /qn ...” (This example runs both InstallShield and MSI in silent mode.)
Integrity client installation parameters described in this chapter.
MSI String RequirementsIn the MSI string, enclose properties and values that include spaces, such as C:\Program Files, with escaped quotes, that is a quote preceded by a backslash.
Example of valid string
For example, to specify a configuration and policy file in the MSI string use the following syntax:
/v”/qn INSTALLPASSWORD=secret CONFIGFILE= \”C:\Configuration Files\config.xml\” POLICYFILE=\”C:\Policy Files\policy.xml\” ”
Example of invalid strings
The following examples are invalid MSI strings:
Always enter Integrity client installation parameters in uppercase.
Do not use a space between the MSI switch (/v) and the opening quote.

Chapter 2 Integrity Client Installation Options
Integrity Client Management Guide 9ZLD 1-0218-0501-2005-04-21
/v”CONFIGFILE=C:\my local directory\config.xml”
Paths that contain spaces must be enclosed in escaped-quotes.
/v”CONFIGFILE=\”C:\my local directory\config.xml”
The ending escaped-quote for the configuration file path is missing.
Limitations on Installation Command Line LengthDifferent versions of Microsoft Windows place differing constraints on the maximum size of installation command lines.
The following table contains the known limitations for installation command lines supplied directly to different versions of Microsoft Windows, as well as for installation command lines included as part of an Integrity Server installation package.
Windows Version Maximum Installation CommandLine Length (characters + spaces)
Command line installation values
98 SE 127
NT, 2000, XP 277
Integrity Server client deployment package values
98 219
NT 226
2000 195
XP 199
For a workaround to this limitation see “Using an INI File when CLI Limit Exceeded,” on page 30.

Chapter 2 Integrity Client Installation Options
Integrity Client Management Guide 10ZLD 1-0218-0501-2005-04-21
Using Standard InstallShield and MSI Parameters
This section explains the most commonly used standard InstallShield switches and MSI parameters to control the Integrity client installation.
Silent Mode to Install or UpgradeTo install an Integrity client in silent mode, use the standard silent mode command-line switches of both the InstallShield (s) and MSI (qn). To upgrade or reinstall Integrity client in silent mode, you must also supply the Integrity client installation password in the MSI parameters (see “Protecting the Installation,” on page 23).
You can only upgrade or re-install Integrity client in silent mode, that is without shutdown and configuration messages, when an installation password is set for the Integrity client on the protected computer.
Consider the following limitations, when you reinstall, or upgrade in silent mode:
The installer forces a reboot if an existing Integrity client or ZoneAlarm product is detected on the computer and those files cannot be replaced. Even when you use the Clean Install option.
To prevent automatic reboot, specify REBOOT=R in the MSI string. (See “Controlling the Reboot Behavior,” on page 12.)
The installer automatically creates an error log file named ErrorLog.txt and saves it in the Internet Logs folder.
To change the default path of the Integrity client program folder or the error log file name, use the errlog switch.
MSI Parameters and InstallShield Switches
/s and /qn None Use both to suppress user prompts during installation.
10
INSTALLDIR= \”FullPath\” C:\Program Files\Zone Labs\Integrity Client
Specifies a non-default location for Integrity client program files.
11
REBOOT=F | S | R NO Causes/suppresses automatic rebooting after an upgrade.
12
Switch Parameter Description
/s InstallShield switch that suppresses user prompts.
/qn MSI parameter switch that suppress user prompts.
If you use the silent mode s and qn switches and an installation password has not been set or is not supplied, then the Integrity client installation program displays shutdown and reconfiguration warning messages.

Chapter 2 Integrity Client Installation Options
Integrity Client Management Guide 11ZLD 1-0218-0501-2005-04-21
Integrity client does not allow you to silently shut down the TrueVector security engine unless an installation-level password is supplied.
To shut down the TrueVector security engine, specify INSTALLPASSWORD=password in the MSI string. (See “Providing the Installation Password to Upgrade,” on page 26.)
Do not use INSTALLDIR= and the silent mode switches in the same installation command line.
If you use INSTALLDIR= with silent mode switches, errors resulting from invalid path and filename specifications are not displayed during installation.
Example of installing Integrity client in silent mode
The following illustrates the how to upgrade Integrity client in silent mode with a configuration file:
IclientSetup_IFen.exe /s /v"/qn INSTALLPASSWORD=installpword CONFIGFILE= \"C:\path\config.xml\""
Changing the Installation DirectoryUse INSTALLDIR= to specify an alternative destination for the Integrity client program files. INSTALLDIR does not change the storage locations of Integrity client database. Consider the following when changing the installation directory:
Always enclose the complete path name in quotation marks, preceded by an escape character (\).
Do not use with the silent mode switches, described on page 10.
If you specify INSTALLDIR with the silent mode switches, described on page 10, Integrity client can not display errors resulting from an invalid path or filenames.
Example of changing the installation directory
The following illustrates the general form of this property.
IclientSetup_IFen.exe /v" INSTALLDIR=\"path to directory\" CONFIGFILE= \"path to config file\""
The InstallShield s switch must be the first switch on the installation command line and the MSI qn switch must be the first entry in the MSI parameters.
Parameter Description
INSTALLDIR= \”FullPath\” Default Value: C:\Program Files\Zone Labs\Integrity Client\.
Specify the full path to the local directory where you want to install Integrity client. Note that Check Point recommends using the default path.

Chapter 2 Integrity Client Installation Options
Integrity Client Management Guide 12ZLD 1-0218-0501-2005-04-21
Controlling the Reboot BehaviorTo force, suppress, or defer the reboot that is required to complete an installation, upgrade, or reinstallation of Integrity client use the standard MSI reboot parameter. Integrity client begins protecting the computer after the reboot.
Set the reboot parameter to “ReallySuppress” to suppress all attempts to reboot when an installation, upgrade, or reinstallation of Integrity client is managed by a third-party installer setup tool such as Microsoft’s SMS, and that setup tool must perform more tasks after the upgrade of Integrity client. Setting the reboot parameter to “ReallySuppress” does not remove the requirement to reboot the computer to complete an upgrade. After the third-party installer’s completes its tasks, the tool must force a reboot of the client computer to complete the upgrade.
Example of deferring reboot after upgrade
The following illustrates the general form of this property:
IclientSetup_IFen.exe /s /v"/qn INSTALLPASSWORD=installpword CONFIGFILE= \"path to configuration file\" REBOOT=R"
Parameter Options Description
REBOOT=F | S | R F Default Value: F.
Force: Prompts the user to reboot the computer at the end of the installation.
S Suppress: Suppress prompts to reboot and automatically reboots the computer at the end of the installation process.
R Really Suppress: suppress all prompts and reboots.

Chapter 2 Integrity Client Installation Options
Integrity Client Management Guide 13ZLD 1-0218-0501-2005-04-21
Integrity Client MSI Installation ParametersThe following table summarizes the MSI installer properties specific to Check Point Integrity client. The standard MSI installer switches and properties are also supported.
The table groups the installation command line switches into four functional categories and identifies the page in this chapter where a complete description of the switch can be found.
Always enter Integrity client installation parameters in uppercase.
MSI Parameter Default Description Page
Setting the Start Up Options
CLIENTSTARTUP=YES | NO YES Allows or suppresses automatic startup of Integrity client at system start.
15
FWSTARTUP= 1 | 2 | 3 | 4 | 5 1 Specifies when in the Windows boot process the firewall driver starts.
16
EAPTYPE=n 44 Sets the Check Point EAP type. 16
SHOWTUTORIAL=YES | NO YES Suppresses display of the product tutorial. 17
SHOWWIZARDS=YES | NO YES Suppresses display of the configuration wizard.
17
MINIMIZECLIENT=YES | NO NO After installation, hides or displays the Integrity client Control Center.
18
Installing Instance Messenging Security Feature
IMSECURITY=NO | YES NO Installs IM Secure module that protects support instant messenging traffic.
18
Providing Nortel CE VPN Client Icon on the Desktop
NORTELICON=YES | NO YES Puts a Nortel VPN icon on the users desktop when a Nortel VPN client is present.
19
Setting the Integrity client Registry Key
REGISTRYFILE=\”path\registrykey.reg\”
None Specifies the path to a file containing Windows Registry entries.
20
Providing a License Key
LICENSEKEY=LicenseKey None Specifies the product license key. 20
Using a Configuration and Policy File
CONFIGFILE=\”C:\path\configfile.xml\” None Specifies the path and name of an optional installation configuration file.
21
POLICYFILE=\”Path to Policy File\" None Specifies the path and name of an optional installation policy file.
22
Password Protecting the Client
NEWINSTALLPASSWORD=InstallPwordNew None Specifies a new optional installation-level password.
24

Chapter 2 Integrity Client Installation Options
Integrity Client Management Guide 14ZLD 1-0218-0501-2005-04-21
NEWUSERPASSWORD=UserPwordNew None Specifies a new optional user-level password.
24
Setting the Alert Display Behavior
ALERTMODE=SWITCHTO | SETFOREGROUND | SHOWNA | TOPMOST | PASSIVE
SWITCHTO Sets Alert window display behavior. 25
Setting a New Upgrade Key
NEWUPGRADEKEY=new_upgrade_key None Specifies a new upgrade key. 26
Upgrade and Reinstallation Options
INSTALLPASSWORD=InstallPwordOld None Supplies an existing installation-level password.
26
USERPASSWORD=UserPwordOld None Supplies an existing user-level password. 28
UPGRADEKEY=upgrade_key None Supplies an existing upgrade key. 28
REBOOTPROMPTWITHSILENT=NO | YES NO If yes, overrides silent install by displaying a reboot prompt.
29
RESETCONFIG=YES | NO NO If yes, performs a clean installation rather than an upgrade installation. If no, suppresses the display of the Previous Settings dialog box, forcing the user to preserve configuration settings.
30
ZLPROPERTYFILE=\”C:\path\install.ini\” None Supplies the path to a configuration file to be implemented.
30
MSI Parameter Default Description Page

Chapter 2 Integrity Client Installation Options
Integrity Client Management Guide 15ZLD 1-0218-0501-2005-04-21
Setting Start Up BehaviorUse the MSI string parameters in this section to specify:
Configuring Client to Automatically Start
Configuring the Firewall Start Up
Configuring EAP Type
Automatically Starting the Integrity client Tutorial
Automatically Starting the Configuration Wizard
Configuring Client to Automatically Start
Use CLIENSTARTUP= to enable or disable automatic start of Integrity client after the installation completes and when the protected computer is started.
Example of Disabling Client Start Up
The following example illustrates how to disable automatic start up of the Integrity client:
IclientSetup_IFen.exe /s /v"/qn CONFIGFILE= \"path to configuration file\" CLIENTSTARTUP=NO"
Parameter Options Description
CLIENTSTARTUP=YES | NO YES Default Value: YES.
The installation program prompts to start Integrity client after an initial installation and each time the protected computer starts.
NO The installation program does not start Integrity client, and the user must manually start Integrity client each time the protected computer starts.

Chapter 2 Integrity Client Installation Options
Integrity Client Management Guide 16ZLD 1-0218-0501-2005-04-21
Configuring the Firewall Start Up
Use FWSTARTUP to determine when in the Windows boot process the firewall driver will start.
Example of Changing the Firewall Start Up
The following example illustrates how to start the firewall during system initialization:
IclientSetup_IFen.exe /s /v"/qn FWSTARTUP=2 INSTALLPASSWORD=password CONFIGFILE= \"config_path\""
Configuring EAP Type
Use EAPTYPE= to specify an EAP type other than the default (type 44).
Example of Specifying a Different EAP Type
The following example illustrates how to change the EAP type:
IclientSetup_IFen.exe /s /v"/qn CONFIGFILE= \"path to configuration file\" EAPTYPE=43
Parameter Options Description
FWSTARTUP= 1 | 2 | 3 | 4 | 5 1 SERVICE_BOOT_START (0x0) Driver will be started by the operating system loader.
Default: 1
2 SERVICE_SYSTEM_START (0x1) Driver will be started during system initialization.
3 SERVICE_AUTO_START (0x2) Driver will be started by the Service Control Manager during system startup.
4 SERVICE_DEMAND_START (0x3) Driver will be started by the Service Control Manager starts on demand.
5 SERVICE_DISABLED (0x4) The driver cannot be started.
Parameter Options Description
EAPTYPE=n enum: 0-255 Default Value: 44.
The enumeration value can be any number between 0 and 255.

Chapter 2 Integrity Client Installation Options
Integrity Client Management Guide 17ZLD 1-0218-0501-2005-04-21
Automatically Starting the Integrity client Tutorial
Use the tutorial parameter to specify whether or not the Integrity client tutorial launches after installation process completes.
Example of Suppressing the Tutorial
The following example illustrates how to disable the automatic launch of the Tutorial after the installation process completes:
IclientSetup_IFen.exe /s /v”/qn CONFIGFILE= \"path to configuration file\" SHOWTUTORIAL=NO"
Automatically Starting the Configuration Wizard
Use this property to allow or suppress the automatic display of the Integrity client configuration wizard after installation is completed.
Example of Automatically Launching the Configuration Wizard
The following example illustrates how to configure the Wizard to automatically launch after installation completes without prompting the user:
IclientSetup_IFen.exe /s /v"/qn CONFIGFILE= \"path to configuration file\" SHOWWIZARDS=YES"
Parameter Options Description
SHOWTUTORIAL=YES | NO YES Default Value: YES.
Launches the Tutorial after the installation process completes and the Integrity client first launches.
NO Suppresses the automatic launch of the Tutorial after the installation process completes.
Parameter Options Description
SHOWWIZARDS=YES | NO YES Default Value: YES.
The Wizard automatically launches after the installation completes and the Integrity client first launches.
NO The Wizard is not launched after installation completes. The installation program asks if the user wants to run the configuration wizard as part of an initial installation.

Chapter 2 Integrity Client Installation Options
Integrity Client Management Guide 18ZLD 1-0218-0501-2005-04-21
Display the Integrity client Control Center after Installation or Upgrade
Use MINIMIZECLIENT= to display or hide of the Integrity client Control Center when Integrity client starts for the first time after installation.
When the /s switch is included as part of an installation command line, the Integrity client installation program starts Integrity client for the first time in minimized mode. Only the Integrity icon appears in the Windows system tray. MINIMIZECLIENT=NO overrides this default behavior.
Example of displaying the Integrity client control center after installation
The following example illustrates how to configure the Integrity client control center to display after installation:
IclientSetup_IFen.exe /s /v"/qn CONFIGFILE= \"path to configuration file\" MINIMIZECLIENT=NO"
Installing Instance Messenging Security FeatureUse IMSECURITY= to install the IM Secure instant messaging (IM) security solution for MSN Messenger, Yahoo! Messenger, and AOL Instant Messenger as well as third-party clients such as Trillian. IMsecure Pro keeps IM conversations private and protects PCs from IM spammers, identity thieves, hackers and predators who exploit vulnerable IM connections.
Example of displaying the Integrity client control center after installation
The following example illustrates how to install the IM Secure feature:
IclientSetup_IFen.exe /s /v"/qn CONFIGFILE= \"path to configuration file\" IMSECURITY=YES"
Parameter Options Description
MINIMIZECLIENT=YES | NO YES Default Value: YES.
The Integrity client control center is minimized after installation.
NO The Integrity client control center displays after installation.
Parameter Options Description
IMSECURITY=NO | YES NO Default Value: NO.
IM Secure feature is not installed.
YES IM Secure feature is installed with the Integrity client.

Chapter 2 Integrity Client Installation Options
Integrity Client Management Guide 19ZLD 1-0218-0501-2005-04-21
Providing a Nortel VPN Icon on the DesktopUse NORTELICON= to put an icon on the user desktop of protected computers that have Integrity client and Nortel Cooperative Enforcement integration. This icon allows the user to easily connect to the enterprise network using Cooperative Enforcement..
Example of installing without a Nortel VPN Icon appearing on the desktop
The following example illustrates how to install without putting a Nortel VPN icon on the desktop:
IclientSetup_IFen.exe /s /v"/qn CONFIGFILE= \"path to configuration file\" NORTELICON=NO"
Setting the Integrity client Registry KeyUse REGISTRYFILE= to have the Integrity client installation program apply Windows Registry keys and values contained in a “.reg” file to the Windows Registry at the time of installation. Any valid Windows filename can be used, but the .reg file must:
Contain valid Windows Registry keys and values
Use the .reg file name extension
When creating a client installation package with Integrity Server, you can include a .reg file in an installation package. REGISTRYFILE= directs the Integrity client installation program to apply the keys and values of the .reg file to the Windows Registry.
To include a registry file in the client installation package:
1 Create a package using the Client Deployment | New Package screen.
2 In the Integrity Server folder hierarchy, navigate to the folder containing the package you just created. The following illustrates the default path (line break added):.0
c:\Program Files/ZoneLabs/Integrity/jakarta-tomcat-n.n.n/webapps/integrity/package/PackageName
3 In the folder specified by PackageName:
a Create a new folder named extras.
b Place the .reg file in the extras folder.
The installer automatically detects and integrates with the Nortel VPN client.
Parameter Options Description
NORTELICON=YES | NO YES Default Value: YES.
If the installer detects and integrates with a Nortel client, the icon is placed on the desktop.
NO If the installer detects and integrates with a Nortel client, the icon is not placed on the desktop.

Chapter 2 Integrity Client Installation Options
Integrity Client Management Guide 20ZLD 1-0218-0501-2005-04-21
4 In Integrity Server, return to the Client Deployment | List dialog box, select the installation package, and click Edit.
The Client Deployment’s Edit Package screen appears.
5 In the Install Parameters section, in the Additional Command Line Switches text entry area, add the MSI installation parameter REGISTRYFILE=\”pathtofile\file.reg\”.
6 Click Save.
A registry file can also be referenced by the Policy Update Utility.
Example of configuring the registry key file
The following illustrates the general form of the regfile command.
iclientSetup_1101.exe /v”REGISTRYFILE=\”path\registrykey.reg\”"
Using a License KeyUse LICENSEKEY= to supply an existing Integrity client license key to the installation program. The Integrity client license key can also be entered manually from the Integrity Flex or Integrity Desktop Control Center after installation.
When using LICENSEKEY=, do not:
Include dash characters
Enclose the license key in quotation marks.
Example of providing a license key
The following example illustrates how to specify a license key:
IclientSetup_IFen.exe /s /v"/qn LICENSEKEY=mmmmmmmmmmm CONFIGFILE= \"path to configuration file\""
Parameter Description
REGISTRYFILE=\”path\registrykey.reg\” Default: none.
Enter the path to the file that contains the registry keys.
Parameter Description
LICENSEKEY=LicenseKey Default: none.
Enter the license key, do not include dashes.

Chapter 2 Integrity Client Installation Options
Integrity Client Management Guide 21ZLD 1-0218-0501-2005-04-21
Using a Configuration and Policy FileWhen installing, reinstalling, or upgrading an Integrity client you can automatically configure, set a disconnected policy, and set a policy file to be used immediately following the installation. This section explains how to specify the following:
Configuring the Client from a File
Specifying a Policy File
Configuring the Client from a File
The configuration file controls Integrity client personal policy settings, which Integrity Flex and Integrity Desktop users can manage from the client Control Center. This file also controls basic client functionality such as the connection to Integrity Server.
The CONFIGFILE= property, which tells the installer which configuration file to use, can appear anywhere within the MSI parameters.
The installation configuration file name must be specified in the following manner:
Always enclose the path and filename in quotation marks preceded by an escape character, for example: CONFIGFILE= \"C:\fullpath\configfile.xml\”.
Use absolute path to the file on the local computer or to refer to a file on a shared network resource use the Microsoft Windows Universal Naming Convention (UNC), for example: CONFIGFILE= \"\\servername\sharename\configfile.xml\”.
The file must have a valid Windows filename and have the XML filename extension.
Example of configuring the client with a configuration file
The following example illustrates how to specify a configuration file during installation:
IclientSetup_IFen.exe /v"CONFIGFILE= \"C:\fullpath\configfile.xml\""
Specifying a Policy File
Use either one of these properties to specify a policy file to enforce after installation and before the endpoint connects to Integrity Server. Specifying either an enterprise policy or disconnected policy protects the computer as soon as Integrity client launches. Once the Integrity client connects to Integrity Server, it downloads and enforces the assigned policies. If
When you specify a configuration file and a policy file, Integrity client ignores the Policy_Info section of the configuration file.
Parameter Description
CONFIGFILE=\”C:\path\configfile.xml\” Default: Integrity client default configuration file.
Specify the full path to the local or shared directory of the configuration file.

Chapter 2 Integrity Client Installation Options
Integrity Client Management Guide 22ZLD 1-0218-0501-2005-04-21
you specify both an enterprise policy and a disconnected policy using these properties, only the disconnected policy will be enforced.
The policy file name must be specified in the following manner:
Always enclose the path and filename in quotation marks preceded by an escape character, for example: POLICYFILE= \"C:\fullpath\policyfile.xml\” or DISCONNECTEDPOLICY= \"C:\fullpath\disconnectedpolicyfile.xml\”.
Use absolute path to the file on the local computer or to refer to a file on a shared network resource use the Microsoft Windows Universal Naming Convention (UNC), for example: POLICYFILE= \"\\servername\sharename\policyfile.xml\” or DISCONNECTEDPOLICY= \"\\servername\sharename\disconnectedpolicyfile.xml\”.
The file must have a valid Windows filename and have the XML filename extension.
Example of Specifying an Enterprise Policy to use after Installation
The following example illustrates the how to assign a policy file to use after installation.
IclientSetup_IFen.exe /v" POLICYFILE=\"C:\fullpath\policyfile.xml\""
IclientSetup_IFen.exe /v" DISCONNECTEDPOLICY=\"C:\fullpath\disconnectedpolicy.xml\""
When you specify a configuration file and a policy file, Integrity client ignores the Policy_Info section of the configuration file.
Parameter Description
POLICYFILE=\”Path to Policy File\" Default: none.
Specify the full path to the local or shared directory of the enterprise policy file.
DISCONNECTEDPOLICY=\”Path to Policy File\"
Default: none.
Specify the full path to the local or shared directory of the disconnected policy file.

Chapter 2 Integrity Client Installation Options
Integrity Client Management Guide 23ZLD 1-0218-0501-2005-04-21
Password Protecting the Client Installation and Configuration
Integrity clients recognize both a user-level and an installation-level password.
The following table lists the functional differences between the two password types.
Protecting the Installation
Use the NEWINSTALLPASSWORD to define a new installation password. Integrity client provides no other methods for changing or updating an installation-level password.
An installation-level password prevents unauthorized changes to an existing Integrity client installation. Installation-level passwords do not affect the user’s ability to change his or her personal security settings.
Consider the following when using Installation-level passwords:
Set from the command line only during initial installation
Changed during reinstallation using the INSTALLPASSWORD= and NEWINSTALLPASSWORD= parameters
The RESETCONFIG= property does not clear the installation password
If an installation-level password is set during installation and a user attempts to uninstall Integrity client without specifying the installation-level password, the password dialog box appears.
Check Point recommends you not set a user-level password. A user-level password prevents the end-user from responding to Integrity Desktop alerts and interferes with the application of centrally administered updates and changes.
Function User-levelPassword
Installation-levelPassword
Enable override of user-level password
Enable silent installations, uninstalls, or upgrades
Prevent changes to personal security settings
Prevent shutting down Integrity Desktop
Prevent uninstalling Integrity Desktop
Settable from Control Center
Settable from installation command line
Changeable from operational command line

Chapter 2 Integrity Client Installation Options
Integrity Client Management Guide 24ZLD 1-0218-0501-2005-04-21
If the correct installation level password is not supplied, the uninstallation process stops.
Examples of setting and changing the Installation Password
The following example illustrates how to set the installation password in an initial installation:
IclientSetup_IFen.exe /s /v"/qn NEWINSTALLPASSWORD=InstallPwordNew CONFIGFILE= \"path to configuration file\""
The following example illustrates how to change an installation password in an upgrade or reinstallation:
IclientSetup_IFen.exe /s /v"/qn INSTALLPASSWORD=InstallPwordOld NEWINSTALLPASSWORD=InstallPwordNew CONFIGFILE= \"path to configuration file\""
Protecting the Configuration Settings
Use this property to define a new user-level password. A user-level password can only be set when no Integrity client database files (“.rdb” file name extension) are present in the computer’s C:\%windir%\Internet Logs folder
Example of setting and changing the user password
The following illustrates how to set the initial user password:
IclientSetup_IFen.exe /s /v"/qn NEWUSERPASSWORD=UserPwordNew CONFIGFILE= \"path to configuration file\""
Parameter Description
NEWINSTALLPASSWORD=InstallPwordNew Default Value: No default value.
Enter the new Installation Password. It must be a minimum of 6 characters and a maximum of 31 characters, and can not contain spaces.
Check Point recommends that a user-level password not be set during initial installation of Integrity client. A user-level password prevents the end-user from responding to Integrity client alerts and interferes with the application of centrally administered updates and changes.
Parameter Description
NEWUSERPASSWORD=UserPwordNew Default Value: No default value.
Enter the new User Password. It must be a minimum of 6 characters and a maximum of 31 characters, and can not contain spaces.

Chapter 2 Integrity Client Installation Options
Integrity Client Management Guide 25ZLD 1-0218-0501-2005-04-21
Setting the Alert Display Behavior
Use ALERTMODE to set the display behavior of the Integrity client Alert window.
By default, Integrity client automatically switches the active window to the Alert. This behavior emulates changing between open windows using the Windows ALT+Tab feature. If a user is typing and an alert displays, their next keystroke is intercepted. In some cases, this results in the Alert being acknowledged and settings applied before the user sees the Alert.
Example of setting the Alert display behavior
The following illustrates how to set the Alert to display as the top most window:
IclientSetup_IFen.exe /s /v" ALERTMODE=TOPMOST"
Setting a New Upgrade KeyUse the NEWUPGRADEKEY= installation command line switch to specify the upgrade key during initial installation. After initial installation, use the upgradekey operational command line switch, described on page, to change an existing upgrade key.
The upgrade key suppresses:
Any dialogs that normally appear during reconfiguration or upgrade. Contrast this with the installation-level password which prevents anyone from uninstalling or upgrading Integrity Client without supplying the password.
The TrueVector shutdown dialog box.
Parameter Description
ALERTMODE=SWITCHTO | SETFOREGROUND | SHOWNA | TOPMOST | PASSIVE
Default Value: SWITCHTO
Enter one of the following settings:
• SWITCHTO: Switches active window to Alert.
• SETFOREGROUND: Gives Alert priority, but allows some applications to deny switching active window to Alert.
• SHOWNA: Displays Alerts in an inactive window.
• TOPMOST: Displays Alerts in an inactive window persistently on top of all other active and inactive windows.
• PASSIVE: Initially displays Alerts in the topmost inactive window; after a few milliseconds the Alert is no longer persistently the top most window.
Note that if set to zero, invalid, or if it is not set, then ALERTMODE is set to default, SWITCHTO.

Chapter 2 Integrity Client Installation Options
Integrity Client Management Guide 26ZLD 1-0218-0501-2005-04-21
For example, if an upgrade key is set, and someone attempts to reconfigure or re-install without supplying the upgrade key, the Integrity client installation program completes the upgrade: Any upgrade dialogs will, however, be shown.
The Integrity client installation program suppresses dialogs if an installation-level password is specified. This means upgrades performed in conjunction with an installation-level password do not also need to specify the upgrade key.
Example of using an upgrade key
The following illustrates the general form of the NEWUPGRADEKEY:
iclientSetup_1101.exe /v”NEWUPGRADEKEY=new_key”
The following illustrates how to change the:
iclientSetup_1101.exe /v”UPGRADEKEY=old_key NEWUPGRADEKEY=new_key”
Upgrade and Reinstallation OptionsThis section describes the options that are specific to upgrade and reinstallation; most of the other options in this chapter can also be used during the upgrade and reinstallation process. Options not available during upgrade and reinstallation are noted.
The upgrade and reinstallation specific options are as follows:
Providing the Installation Password to Upgrade
Providing the User Password to Change Configuration Settings
Providing an Upgrade Key
Controlling the Reboot Behavior
Prompting Users to Reboot After Silent Upgrade
Reverting to the Default Settings
Providing the Installation Password to Upgrade
Use this property to supply a previously defined installation-level password to the Integrity client installation program.
Parameter Description
NEWUPGRADEKEY=new_upgrade_key Default Value: No default value.
Enter the existing upgrade key.
Parameter Description
INSTALLPASSWORD=InstallPwordOld Default: none.
Enter the existing Installation Password.

Chapter 2 Integrity Client Installation Options
Integrity Client Management Guide 27ZLD 1-0218-0501-2005-04-21
Example of providing the installation password
The following example illustrates how to upgrade a client that has an installation password:
IclientSetup_IFen.exe /s /v"/qn INSTALLPASSWORD=InstallPwordOld [additional properties]"
The following example illustrates how to upgrade a client that has an installation password, and change the password:
IclientSetup_IFen.exe /s /v"/qn INSTALLPASSWORD=InstallPwordOld NEWINSTALLPASSWORD=InstallPwordNew [additional properties]"

Chapter 2 Integrity Client Installation Options
Integrity Client Management Guide 28ZLD 1-0218-0501-2005-04-21
Providing the User Password to Change Configuration Settings
Use this property to supply a previously defined user-level password to the Integrity client installation program. After installation, the password switch can be used in conjunction with NEWUSERPASSWORD= (described in the preceding table entry) to update an existing user-level password.
Example of changing and setting the User Password
The following example illustrates how to initially set the User Password:
IclientSetup_IFen.exe /s /v"/qn USERPASSWORD=userpword CONFIGFILE= \"path to configuration file\""
The following example illustrates how to change the User Password:
IclientSetup_IFen.exe /s /v"/qn USERPASSWORD=userpwordold NEWUSERPASSWORD= userpwordnew CONFIGFILE= \"path to configuration file\""
Providing an Upgrade Key
Use the UPGRADEKEY= to specify an existing upgrade key. The upgrade key suppresses any dialogs that normally appear during reconfiguration or upgrade. Contrast this with the installation-level password which prevents anyone from uninstalling or upgrading Integrity Client without supplying the password.
For example, if an upgrade key is set, and someone attempts to reconfigure or re-install without supplying the upgrade key, the Integrity client installation program completes the upgrade: Any upgrade dialogs will, however, be shown.
The Integrity client installation program suppresses dialogs if an installation-level password is specified. This means upgrades performed in conjunction with an installation-level password, the upgrade key does not also need to be specified.
Parameter Description
USERPASSWORD=UserPwordOld Default Value: No default value.
Enter the new User Password. It must be a minimum of 6 characters and a maximum of 31 characters, and can not contain spaces.
Use the -upgradekey operational command line switch to specify an existing upgrade key during reconfiguration of an existing instance of Integrity client.
Parameter Description
UPGRADEKEY=upgrade_key Default Value: No default value.
Enter the existing upgrade key.

Chapter 2 Integrity Client Installation Options
Integrity Client Management Guide 29ZLD 1-0218-0501-2005-04-21
Example of using an upgrade key
The following illustrates the general form of the upgradekey switch:
iclientSetup_1101.exe /s /v”/qn UPGRADEKEY=upgradeKeyOld”
Prompting Users to Reboot After Silent Upgrade
Use REBOOTPROMPTWITHSILENT= in conjunction with the silent mode switches, to prompt the user to perform the reboot required to complete an upgrade of Integrity client after a silent upgrade.
Consider the following when using the REBOOTPROMPTWITHSILENT parameter:
If REBOOTPROMPTWITHSILENT=YES is specified as part of an upgrade of Integrity client that is managed by a third-party installer setup tool such as Microsoft’s SMS, this installer will require a response to the reboot prompt before allowing the setup script to continue.
Integrity Server’s Client Deployment feature automatically includes the silent mode switches and REBOOTPROMPTWITHSILENT=YES parameter as part of an Integrity client installation package.
To reboot automatically after an upgrade do not select the Run installer without UI… check box.
Instead, in the Additional Commands text entry area, specify the silent mode command line switches without a corresponding REBOOTPROMPTWITHSILENT= property.
Using REBOOTPROMPTWITHSILENT=YES on the same installation command line as the REBOOT=NO property modifies behavior of the reboot prompt dialog box.
In this situation, clicking OK in response to the reboot prompt does not immediately reboot the computer. Instead, REBOOT=NO defers the reboot to the controlling third-party installation setup tool, such as SMS.
Example of prompting the user to reboot after upgrade or reinstallation
The following illustrates the general form of the REBOOTPROMPTWITHSILENT=installation command line switch:
IclientSetup_IFen.exe /s /v"/qn INSTALLPASSWORD=installpword CONFIGFILE= \"path to configuration file\" REBOOTPROMPTWITHSILENT=YES"
This property can only be used in conjunction with the silent mode switches: it allows a reboot prompt, and only a reboot prompt, to be displayed as part of a silent upgrade.
Parameter Options Description
REBOOTPROMPTWITHSILENT=NO | YES NO Default value: NO.
YES Modifies the default behavior of the silent mode switches to prompt the user to reboot the computer after the upgrade completes.

Chapter 2 Integrity Client Installation Options
Integrity Client Management Guide 30ZLD 1-0218-0501-2005-04-21
Reverting to the Default Settings
Use this property during a silent reinstallation to reset all Integrity client settings to their default state. RESETCONFIG=YES forcibly resets existing Integrity client settings to default values, even if they are not specified in a configuration file.
When an existing instance of Integrity client is reinstalled, the default installation mode is upgraded. This means that the existing Integrity client database settings are preserved, unless they are explicitly overwritten by a new configuration file.
If an installation-level password was specified during initial installation, the INSTALLPASSWORD= property must appear on the same command line with reset.
Example of resetting the configuration settings to default
The following illustrates the general form of this property:
IclientSetup_IFen.exe /s /v"/qn INSTALLPASSWORD=installpword RESETCONFIG=YES CONFIGFILE= \"path to configuration file\""
Using an INI File when CLI Limit ExceededOn Microsoft Windows NT, 2000, and XP, there is a limitation of 277 characters for command lines. This can cause issues for some Integrity installations if the desired command line requires more than 277 characters.
If you want to use a longer command line, you can put some of the command line properties into an .ini file and reference it with the ZLPROPERTYFILE=<filepath> attribute.
To see a sample of an .ini file, which you can then modify for your use, use a ZIP file extractor to extract an installation package you configured with Integrity Server 5.0, and look at the file msi.ini.
Reset is a powerful command that must be used with caution. After using reset, all Integrity client settings, except the installation-level password, are lost and must be reinitialized.
Parameter Options Description
RESETCONFIG=YES | NO NO Default value: NO
Uses the existing configuration information on the protected computer.
YES Resets the Integrity client configuration to the default settings.
Parameter Description
ZLPROPERTYFILE=\”C:\path\install.ini\” Default Value: No default value.
Enter the full path to the file that contains values you want to pass to the MSI installer. Note that the files should contain the entire command line passed to MSI.

Chapter 2 Integrity Client Installation Options
Integrity Client Management Guide 31ZLD 1-0218-0501-2005-04-21
Example of how to use an INI file to pass Integrity client installation parameters to MSI
The following illustrates the general form of this property:
IclientSetup_IFen.exe /s /v"ZLPROPERTYFILE=\”C:\path\install.ini\”"

Chapter 2 Integrity Client Installation Options
Integrity Client Management Guide 32ZLD 1-0218-0501-2005-04-21

Integrity Client Management Guide 33ZLD 1-0218-0501-2005-04-21
Chapter 3Configuring Client Packages
This chapter describes Integrity features relating to management of Integrity client software. Topics covered include:
“Creating Client Packages,” on page 33
“Deleting Packages,” on page 41
Creating Client PackagesAccess the Client Package feature by navigating to Configuration/Required Setup/Client Deployment within Integrity Server Administration Console. Use the Client Deployment page to configure client packages for distribution The name of the package is a hyperlink; click the link to view details of the package configuration.
Beginning with version 5.0, Integrity clients are compatible with Microsoft Windows XP Service Pack 2. For information about the interaction between Integrity clients and the Windows firewall, see “Integrity/Windows Firewall Compatibility,” on page 4.
The first time you access this page there are two default packages created during the Integrity Server installation.

Chapter 3 Configuring Client Packages
Integrity Client Management Guide 34ZLD 1-0218-0501-2005-04-21
Configuring a Package
There are two ways to specify configuration information for a deployment package. One way is to enter the configuration details in the Create/Edit Package panel. The other way is to specify options using a configuration file.
A configuration file encapsulates all the configuration options for running Integrity Client. While most configuration options can be specified in the user interface, some can only be specified in a configuration file.
There are two types of configuration files, distinguished by their file extensions: .ini and .xml. The .ini format is an older format, and is the only format that can be used with Integrity Client versions older than 4.0. The .xml format is new with version 4.0 of Integrity Server, and is required for installers for Integrity Client 4.0.
Creating a New Package or Copying an Existing Package
If you decide to customize a package, it is a good practice to copy an existing package rather than editing a pre-configured original. To copy a pre-configured package, proceed with the following steps:
1. Choose a package to copy by selecting the appropriate radio button. Press the Copy button. This will lead to the New Package screen.
2. The Package Details area requires a name to be assigned to the package. Make it distinct as this name will later be displayed in the List panel. The default name created for a copied package is “Copy of [original package name]”

Chapter 3 Configuring Client Packages
Integrity Client Management Guide 35ZLD 1-0218-0501-2005-04-21
3. The Product Information section will provide a drop down menu to choose the type of client, a field for the installer location and a field for product version. All fields are required.
Field Function
Client Type The two selections are Integrity Agent and Integrity Flex.
Installer File This is the installer executable file that is bundled with the package. Use the Browse button to choose an installer file on the browser’s local computer to upload Integrity Server.
The latest Integrity Agent and Integrity Flex installers can be downloaded from the Zone Labs Enterprise Resource Center.
Product Version Provide the version number of the client installer that you uploaded, for example, 4.0.146.0.
You can determine the installer file version number by right-clicking on the file and selecting Properties, then access the version tab.
NOTE: The version number you enter here MUST match the version number of the installer file.
SecureClient Installer File
Selecting a SecureClient installer file creates a unified SecureClient and Integrity client installation package. The SecureClient installer file must be on the same computer as Integrity Server. (See the Check Point documentation to find out how to get a SecureClient installer file.) Use the Browse button to upload the SecureClient installer file. When creating a unified installation package, clear the Install Method Run installer without UI check box.

Chapter 3 Configuring Client Packages
Integrity Client Management Guide 36ZLD 1-0218-0501-2005-04-21
4. The Configuration Details section establishes the configuration parameters for Integrity clients.
Language Selecting a language indicates that an installer is created with a client localized for that language. The URL generated for this package will refer to a page localized for that language. You must ensure that you are actually bundling a localized client with this package. Since only English versions of client installers are bundled with Integrity Server, you need to download localized client installers before creating packages for other languages.
Field Function
Use Configuration File Select to configure an Integrity client using an .ini or .xml configuration file. Click the Browse button to locate and upload the configuration file.
IMPORTANT: The configuration file you use must include connection information that tells the Integrity client how and when to connect to Integrity Server. This is contained in the <connection> element in the configuration file.
Refer to the Integrity XML Policy Reference for = information on using the <connection> element, as well as the <Integrity> container element.
Connection Name, Server IP Address and Server Port
The default selection designates the package-provided configuration which automatically fills in the Connection Name, Server IP Address and Server Port fields. The Server IP address is the Integrity Server which you are currently logged into. Integrity Server uses port 5054 for establishing connections to and from clients.
Field Function
Chapter 3 Configuring Client Packages
Integrity Client Management Guide 37ZLD 1-0218-0501-2005-04-21
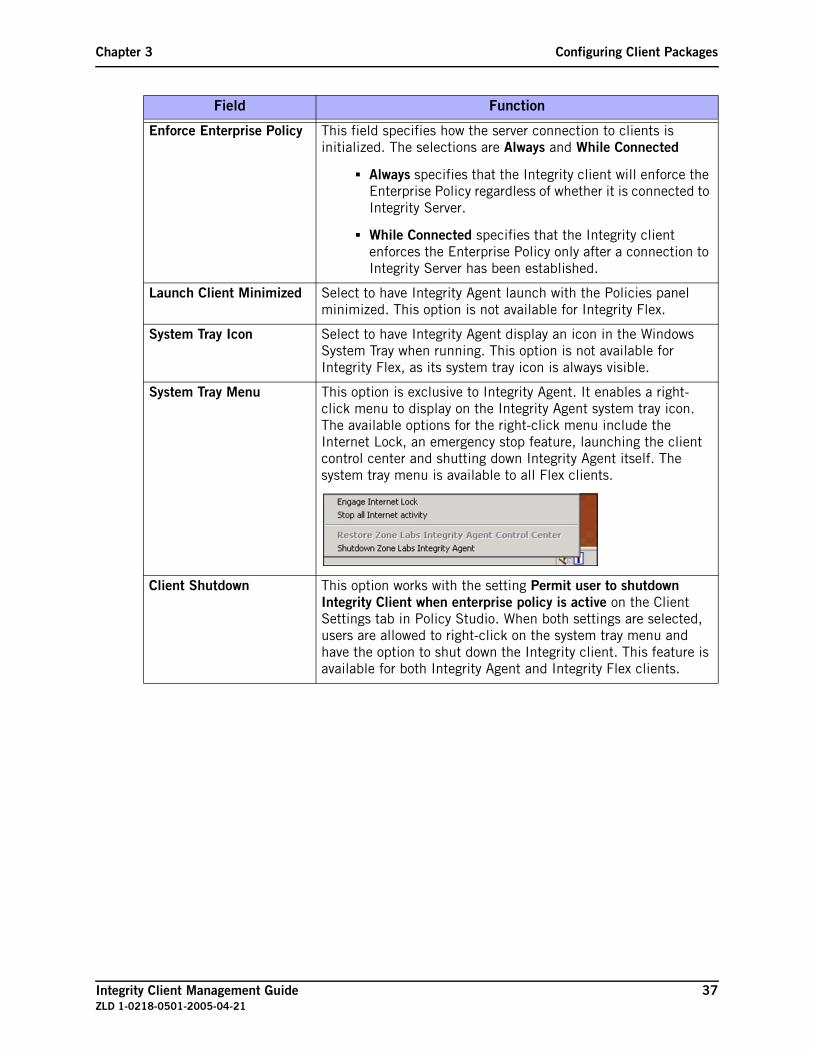
Enforce Enterprise Policy This field specifies how the server connection to clients is initialized. The selections are Always and While Connected
Always specifies that the Integrity client will enforce the Enterprise Policy regardless of whether it is connected to Integrity Server.
While Connected specifies that the Integrity client enforces the Enterprise Policy only after a connection to Integrity Server has been established.
Launch Client Minimized Select to have Integrity Agent launch with the Policies panel minimized. This option is not available for Integrity Flex.
System Tray Icon Select to have Integrity Agent display an icon in the Windows System Tray when running. This option is not available for Integrity Flex, as its system tray icon is always visible.
System Tray Menu This option is exclusive to Integrity Agent. It enables a right-click menu to display on the Integrity Agent system tray icon. The available options for the right-click menu include the Internet Lock, an emergency stop feature, launching the client control center and shutting down Integrity Agent itself. The system tray menu is available to all Flex clients.
Client Shutdown This option works with the setting Permit user to shutdown Integrity Client when enterprise policy is active on the Client Settings tab in Policy Studio. When both settings are selected, users are allowed to right-click on the system tray menu and have the option to shut down the Integrity client. This feature is available for both Integrity Agent and Integrity Flex clients.
Field Function

Chapter 3 Configuring Client Packages
Integrity Client Management Guide 38ZLD 1-0218-0501-2005-04-21
5. The Install Parameters section is the final section on the panel:
Field Function
License Key Enter the key provided to you by Zone Labs sales. Omit any dash (“-”) characters. This key is unique for Integrity Agent and Integrity Flex clients.
Install Directory Specifies the file path under which the Integrity client is installed on the endpoint machine. Leaving this field blank results in Integrity clients being installed in the default path (C:\Program Files\Zone Labs\Integrity Client).
Install Instant Messaging Select to include Instant Messaging Security in the install package. If Zone Labs IMsecure is installed on the endpoint, the installer will prompt the user to uninstall IMsecure and run the installer again. If Run installer without UI is selected and the installer detects an IMsecure installation, the installer will silently fail to install Instant Messaging Security, but will continue with the rest of the installation.
Choose Enable IM client whitelisting to limit LSP filtering of IM Security to IM clients. Enable this feature to eliminate connectivity problems stemming from LSP conflicts with other software.

Chapter 3 Configuring Client Packages
Integrity Client Management Guide 39ZLD 1-0218-0501-2005-04-21
Install Method Select the Run installer without UI check box to enable the client installation to run without a UI wizard. This option adds the /s /i and /rbprompt switches to the installation package.
The /s switch enables a silent installation.
The /i switch suppresses the client tutorial wizards. This switch is only used with Integrity Flex.
The /rbprompt switch enables a reboot warning to the end user before a reboot of the machine takes place.
If this option is selected for client upgrades, the existing client must have an install key (see Install Key options in the next section).
For additional information on command line switches, refer to the Integrity XML Policy Reference or Integrity INI Reference.
If you are using an enterprise software distribution tool:
a. Clear the “Run installer without UI…” option.
b. In the Additional Switches entry field, enter: /s /noreboot
This combination of switches creates a package that runs the installer silently. The enterprise distribution tool reboots endpoints according to its predefined schedule, rather than immediately. Note that changes at the driver level will not take effect until the next reboot. To force a reboot on the endpoint, use only the /s switch.
Field Function

Chapter 3 Configuring Client Packages
Integrity Client Management Guide 40ZLD 1-0218-0501-2005-04-21
6. Click the Save button when you have completed your configuration edits.
Install Key options These options control use of a client install key. Using an install key prevents end users from uninstalling the client and can suppress installation notification dialogs.
Don’t use an install key means that no install key is used for the client.
Selecting Use and set an install key requires you to furnish the install key for existing clients in the Install Key field.
The Use an install key and change it to a different key on installation sets an install password and requires providing the old install key so both of the following fields must be filled in. Use this option to allow an upgrade on a machine with an existing Integrity client protected by an install key and to change that key to a new one.
Providing an install key corresponds to the /PWINST switch. Setting an install key corresponds to the /PWINSTSET switch. For additional information on command line switches, refer to the Integrity XML Policy Reference or Integrity INI Reference.
Install Key This field is used to supply the install key for existing Integrity clients. It is displayed in clear text.
Set Install Key This field enables an administrator to set a new install key after the install key is used. Leave this field blank unless you want to change the install key. Changing an install key corresponds to the /PWINSTSET switch. For additional information on command line switches, refer to the Integrity XML Policy Reference or Integrity INI Reference.
Additional Parameters Include additional command line switches (for client version 4.5 and earlier) or properties and values (for client version 5.0 and later) to further refine installer behavior.
Refer to the Integrity XML Policy Reference or Integrity INI Reference for detailed information on the permitted switches and properties.
NOTE: Quotation marks used in this field (for example, to specify a file path) do not need to be preceded by an escape character (\).
Field Function

Chapter 3 Configuring Client Packages
Integrity Client Management Guide 41ZLD 1-0218-0501-2005-04-21
7. You are led to the Client Deployment Summary screen
Example:
8. Click OK to return to the Client Deployment List. Your new package is added to the list.
Deleting PackagesThe Delete function removes entries from the Client Deployment List and deletes the package from the sandbox server. Click the Delete button to discard packages administrators have created but have become obsolete. Do not delete the pre-configured client packages.
To delete a package:
1. Select the radio button for the client package to be deleted.
2. Click the Delete button.
3. A confirmation dialog box appears. Select OK if you want to delete the package or Cancel if you do not.
There are some features which cannot be configured using the packager. In these cases, clients would need to be configured using an .ini or .xml file. The Integrity XML Policy Reference or Integrity INI Reference details how to accomplish this and provides a reference source for the full range of parameters used. Using an .ini or .xml file for client configuration is an advanced feature that should only be used by administrators comfortable with command line functionality.

Chapter 3 Configuring Client Packages
Integrity Client Management Guide 42ZLD 1-0218-0501-2005-04-21

Integrity Client Management Guide 43ZLD 1-0218-0501-2005-04-21
Chapter 4Deploying Clients to End-Users
“Using the Integrity Server Sandbox page,” on page 44
“Using an Enterprise Software Distribution Tool,” on page 47
To properly initialize Windows settings and variables a newly installed Integrity Client must be run for the first time while the computer has an administrator-level user logged in.

Chapter 4 Deploying Clients to End-Users
Integrity Client Management Guide 44ZLD 1-0218-0501-2005-04-21
Using the Integrity Server Sandbox pageIntegrity’s client deployment feature enables administrators to create and modify Integrity client installation packages which can be distributed to endpoints. A client installation package consists of an installer executable and configuration parameters. The package is placed on a sandbox server, a Web server dedicated to providing support information and downloading Integrity installation packages. End users can download the package from the sandbox and extract it, which will install the client on their desktop. Each client configuration package can be customized with a desired set of parameters to meet the specific installation needs of your environment.
There are two types of Integrity Clients: Integrity Flex and Integrity Agent. Integrity Flex is intended to be deployed to autonomous users with a degree of familiarity with desktop protection functionality. Integrity Flex users would be expected to have the technical savvy to be responsible for their own firewall configuration. Integrity Agent on the other hand, is designed to be configured entirely by an administrator.
How Client Deployment WorksIntegrity’s client deployment feature uses a sandbox server that can be accessed by your user-base from a Web browser such as Internet Explorer or Netscape Navigator. There are two primary methods of distribution, both of which direct users to a URL supplied to them by way of the following options. The two primary methods of URL distribution are:
E-mail the full path of the Integrity client package to end-users. Users can simply click on the hyperlink provided or copy and paste the URL into a browser address field. This URL will point to the Integrity sandbox, for example:http://integrity.example.com/sandbox/en-us/package/Integrity_Agent_US_4_0_146_000/ia_client.exe
Post the download URL to your intranet as a convenient method of software distribution.
Both of the above methods rely on end user cooperation. However, once clients are installed, upgrades are handled seamlessly by way of policy enforcement. By setting a minimum client version required in deployed policies (see the Policy Studio: Client Settings chapter in the Integrity Administrator Guide for additional details on this feature), the client receiving the policy will check for compliance of the client version. If it is not a compliant version, a pop-up alert to the user will appear containing the URL hyperlink, asking them to click the URL to get the latest version of the client software. The URL leads to the sandbox server where the packages reside.

Chapter 4 Deploying Clients to End-Users
Integrity Client Management Guide 45ZLD 1-0218-0501-2005-04-21
If a user is installing or upgrading a client, they will be led to the sandbox server Web page, shown above. When initially deploying clients, the end-user clicks on a hyperlink that accesses the client package from the server.
The End-User ExperienceIn order to initially receive an Integrity client, end-users follow these steps:
1. Click on the provided URL or navigate to the sandbox by entering the full path into a browser window.
2. A Windows dialog box launches asking the user to open or save the file. Users should be instructed to select Open which will run the Integrity client installer.
3. If the installation package is configured for a silent installation then the end user will not see any activity on the desktop during installation except for an installer icon in the system tray.
4. Also depending on your installation package configuration, when the installation is complete, an Integrity client icon will appear in the system tray, as long as the client system tray icon is not suppressed.
In situations where no confirmation of the installation is needed and you would like policy enforcement to be transparent to the end-user, it is suggested to use a method of distribution other than e-mailing the packager URL or posting to an Intranet. Other options of distribution are discussed on page 47.

Chapter 4 Deploying Clients to End-Users
Integrity Client Management Guide 46ZLD 1-0218-0501-2005-04-21
Client Deployment View PanelThe names of packages in the Client Deployment List are hyperlinks to view package configuration settings. Click the link to go to the Client Deployment View panel.
There are various sections and fields within this panel which cannot be edited here. These features will be fully covered in the remainder of this chapter. Notice the hyperlinks in the Package Options section. This is the full path to the client deployment packager (e.g. http://172.16.100.69/sandbox/en-us/package/Integrity_Flex/flex_client.exe) and a link to the Integrity Server sandbox (e.g. http://172.16.100.69/sandbox/en-us/package/Integrity_Flex/package.html) which can be used to both deploy Integrity clients and also upgrade existing Integrity clients.
Click OK to return to the list panel.

Chapter 4 Deploying Clients to End-Users
Integrity Client Management Guide 47ZLD 1-0218-0501-2005-04-21
Using an Enterprise Software Distribution Tool
If your organization uses a software distribution tool, you can bypass Integrity’s client deployment mechanism and just use the packager to customize installation preferences. This section covers the basic requirements for using Microsoft’s SMS and Tivoli, as well as a generic remote administration tool. If you are using an enterprise software distribution tool not covered here, please contact your Zone Labs sales representative to confirm compatibility with Integrity.
Using Microsoft System Management Server
Microsoft SMS is a popular tool for distributing software in an enterprise environment. It requires some expertise to use effectively so if you are not familiar with Microsoft SMS but would like to use it to distribute Integrity clients, it is suggested to seek assistance from someone who is familiar enough with Microsoft SMS to accomplish the following tasks.
In order to distribute a software package, Microsoft SMS requires the following three components:
A Collection - a set of machines onto which to distribute the software.
A Package - a set of instructions that informs SMS about the software application: the location of the software, the operating system required on the computer, the user rights needed to install the software, what switches must be used to install the software, etc.
An Advertisement - a set of instructions that instructs SMS what package to install, when to install it, and which collection to send it to.
After setting up your collection and package, you can establish the command line parameters for Integrity clients. This is accomplished by navigating in the newly-created SMS package to show the included programs. Right-click on a program and select Properties from the menu.

Chapter 4 Deploying Clients to End-Users
Integrity Client Management Guide 48ZLD 1-0218-0501-2005-04-21
Enter the command line field using information from the chapter on command line settings in the Integrity XML Policy Reference or Integrity INI Reference.
After completing configuration of the Package, you can create the Advertisement and deploy.
Using TivoliTivoli has an extensive suite of products for enterprise software management. If your company is using Tivoli then you undoubtedly have trained personnel in which to distribute Integrity clients using Tivoli tools.
Using a Remote Administration ToolDistributing Integrity clients by way of a Remote Administration Tool (RAT) is an option for administrators comfortable using such tools. If your distribution base is large, you might want to consider an enterprise management solution such as SMS. Remote Administration Tools require connections to one target workstation at a time so it would be a time consuming series of tasks.
A common example of a Remote Administration Tool would be pcAnywhere but there are many varieties. To use a Remote Administration Tool, each target workstation would need to have the RAT server installed. From this point, it is just a matter of connecting to each target PC and pushing down the Integrity client package, then executing. Each PC must be logged into the domain when this occurs.
Using a RAT is a method recommended for pilot installations or for instances where there is no other method of reaching telecommuter or remote endpoints.

Chapter 4 Deploying Clients to End-Users
Integrity Client Management Guide 49ZLD 1-0218-0501-2005-04-21
Using Active Directory to Deploy Integrity ClientsThis tech note describes how to use Microsoft Active Directory application management features to easily deploy and manage Integrity clients. The procedure uses Windows 2000 Group Policy objects to assign Microsoft Installer (MSI) packages to a group of Windows 2000 Professional-based workstations based on their membership in an organizational unit (OU).
There are two ways to distribute programs through Active Directory: assigning the program distribution to users’ computers, or publishing the program distribution to users. In order to maximize security and minimize user interaction, we recommend assigning the distribution. Publishing requires the user to use the Add/Remove Programs control panel to complete the installation, while assigning allows installation to occur automatically when the user logs in.
There are three steps to distributing Integrity clients with Active Directory:
1 Create a distribution point for the installation package.
2 Create a Group Policy Object.
3 Assign the installation package to the GPO.
Each step is explained in detail below.
Step 1: Create a Distribution Point
The first step is to set up a network directory from which the Integrity client installer will be distributed.
To create a distribution point:
1 Set up the permissions on the shared network folder to allow access to the distribution package (MSI) folder.
2 copy the MSI to the shared folder (or subfolder thereunder) you just set up and your distribution point is ready.
Step 2: Create a Group Policy Object
After creating a distribution point, create an Active Directory Group Policy to which you will assign the Integrity client program.
To create a Group Policy Object (GPO):
1 Start Active Directory Users and Computers mmc snap-in.
2 In the console tree right click your domain, and click Properties.
3 Click the Group Policy tab and then click New.
4 Type the name of the policy that you wish and press ENTER.
5 Click Properties, and then click the Security tab.
6 Click to clear the Apply Group Policy check box for the security groups that you want to prevent from having this policy applied.

Chapter 4 Deploying Clients to End-Users
Integrity Client Management Guide 50ZLD 1-0218-0501-2005-04-21
7 Click to select the Apply Group Policy check box for the groups to which you want to apply this policy. When you are finished, click OK.
Step 3: Assign the installation package to the group policy
Next, assign the Integrity client program to the group policy. Use the Computer Configuration section of group policy, making it a machine policy rather than user policy.
To assign the installation package to the group policy:
1 Give the machine accounts of your endpoint computers read access to the distribution point/package. You can do this in any of the following three ways:
Assign permissions directly to the machine accounts
Assign permissions to a security group, such as the Domain Computers or Authenticated Users group that contains the machine account
Group together machines into an organizational unit (OU) and assign read permissions to the OU.
2 Open the Group Policy tab for your domain.
3 Select the Group Policy Object that you created, then click Edit.
4 Under Computer Configuration, expand Software Settings.
5 Right-click Software installation, point to New, and then click Package.
6 In the Open dialog box, type the full Universal Naming Convention (UNC) path to the installation package you placed in your distribution point. For example, \\file server\share\Integrity_Agent_US_5_0_556_141.msi.
7 Click Open. Click Assigned, and then click OK.
The package is listed in the right pane of the Group Policy window.
8 Close the Group Policy snap-in, click OK, and then quit the Active Directory Users and Computers snap-in.
Deployment setup is now complete. When the client computer starts, the managed software package is automatically installed.
Computer-assigned programs cannot be deployed from different forests. Your file server must be in the same forest as your clients that need access to it since Kerberos cannot be used across Active Directory forests and computer authentication does not happen over NTLM.
Do not browse to the location; instead, type or paste the path. Ensure that you use the UNC path to the shared folder.

Integrity Client Management Guide 51ZLD 1-0218-0501-2005-04-21
Chapter 5Supporting Integrity Client Users
The SandboxIntegrity Server relies on a sandbox server to provide a user support environment. The sandbox is a Web server dedicated to providing Integrity end-user support and downloading Integrity Client installer packages. It is the only location on the corporate network that is accessible to clients that have been restricted because they are not in compliance with security policies or are not running an up-to-date Integrity client.
The sandbox is installed as part of the Integrity Server installation. The sandbox files can be found in the directory <integrity-directory>\jakarta-tomcat-4.0.1\webapps\sandbox
Within the sandbox directory are sandbox files for several language locales: English, French, German and Japanese. Each locale includes a number of Web pages that can be displayed when an end-user receives various alerts.
The Sandbox URLWhen a user receives an alert, Integrity Client generates a URL to an appropriate sandbox page. The sandbox URL is of the form:
http://<address>/sandbox/index.html?locale=<ll-cc>&reason=<r>
In this URL, <address> is the IP or DNS address of the sandbox server, <ll-cc> is the language/country code, and <r> is the reason code. There may also optionally be program information appended for program-related alerts.
The index.html file contains JavaScript routines that redirect to different sandbox pages based on locale and reason codes. If you prefer to use a server-side redirection scheme (such as CGI or a Perl script), you can create one based on the logic contained in index.html.
Reason Codes
A reason code is an indicator Integrity Server uses to identify why a client is out of compliance. Integrity will automatically append a reason code to the base URL of the sandbox. Based on the reason code, the user will be directed to the appropriate sandbox page containing details on the reason for their client being out of compliance and a method to restore their client to compliance.
For example if the base URL is http://<address>/sandbox/index.html and the client system's anti-virus protection is out of compliance with the policy, Integrity will generate the following URL:
http://<address>/sandbox/index.html?locale=<ll-cc>&reason=av
The sandbox URL must be manually configured in each policy on the Client Settings tab in Policy Studio.

Chapter 5 Supporting Integrity Client Users
Integrity Client Management Guide 52ZLD 1-0218-0501-2005-04-21
A list of reason codes can be found in comments in the index.html file in the base sandbox directory.
Downloading Localized Client InstallersThe Integrity Server installation includes Integrity Client installers for the English language only. While there are sandbox support pages for other locales, the client installers are not included in the standard installation. If you want to provide localized client installers on your sandbox site, you will need to download them from the Zone Labs Web site.
To download localized Integrity Client installers:
1. Log in to the Zone Labs Enterprise Resource Center at http://enterprise.zonelabs.com
You will need your user ID and password to log in.
2. Navigate to the Enterprise Downloads page.
The localized installers are listed under the download options for the various versions of Integrity Client.
3. Click on the locale name to download the client installer. Do this for each type, version and locale you want to download. You can download the installers to any location that is convenient.
After the localized installers have been downloaded, they can be used to create deployment packages in the Client Deployment panel.
To upload the localized installer to the sandbox:
1. Go to Client Deployment and click New to create a new package.
2. Click the Installer File: Browse button and choose the installer you just downloaded.
3. Enter the client type, version and language information for the client.
4. Complete entering configuration information for the package, and click Save.
The localized installer is uploaded to the sandbox server and placed in a directory for that locale, along with the corresponding package.html page.
Adding New LocalesNew locales can be added to the sandbox to support end-users with different language support requirements. Each locale is contained in its own folder that is named using standard ISO language and country codes. Each locale contains two kinds of content: HTML pages, and client installer packages. To add a new locale, you must create a new directory, and add localized content.

Chapter 5 Supporting Integrity Client Users
Integrity Client Management Guide 53ZLD 1-0218-0501-2005-04-21
To add a new sandbox locale:
1. Create a new directory in the sandbox directory.
The new directory must be named using the ISO-639 language codes and the ISO-3166 country codes, separated by a dash. For example, a locale for Canadian French would be named “fr-ca”.
2. Place a set of localized sandbox HTML files in the new directory.
Typically, files are localized by localization specialists. The new files should be equivalent to the HMTL files found in the en-us locale, but with different user visible text.
3. Optionally, download localized client installer packages for the new locale.
If localized clients for the new locale are available, follow the procedure in “Downloading Localized Client Installers,” on page 52. Localized clients are not required for the sandbox to provide localized support pages.
New locales can be added to the sandbox while Integrity Server is running. There is no need to stop and restart the server.
If a locale is not available in the sandbox, the English language pages are displayed.
Customizing the Sandbox HTML filesThe sandbox HTML files can be customized according to the needs of your environment. Customizing the HTML would include for example, creating links to the location of the Integrity client installer so users can restore themselves to compliance with minimal support and interaction from IT staff.
If you choose to customize the HTML pages and change names or locations of HTML files, be sure to make the appropriate adjustments to the links based on the reason codes in the index.html file.
A current reference of ISO-639 language codes can be found at:http://lcweb.loc.gov/standards/iso639-2/A current reference of ISO-3166 country codes can be found at:http://www.iso.ch/iso/en/prods-services/iso3166ma/index.html
Page Function
av.html This page displays when the installed Integrity client does not detect the designated anti-virus software on the endpoint.
avdatupdate.html This page displays when out of date anti-virus DAT files are detected.
avemergency.html This page displays when an anti-virus alert broadcast has been issued by an Integrity administrator.
avengineupdate.html This page displays when an out of date anti-virus engine is detected.

Chapter 5 Supporting Integrity Client Users
Integrity Client Management Guide 54ZLD 1-0218-0501-2005-04-21
default.html This page displays when an Integrity endpoint is out of compliance but the specific reason is not entirely defined. From this page, users will have a variety of explanations and options to restore their endpoint to compliance.
enforcement.html This page displays when a Cooperative Enforcement rule is violated and the client is out of compliance. Cooperative Enforcement rules are managed in Policy Studio on the Client Settings tab.
firewall.html This page provides information concerning firewall alerts received by the client. These alerts can range in scope and would be analogous to your selections for permissible traffic through the Firewall Security Rules tab and alerts displayed/suppressed (controlled within the Client Settings tab) when editing your policies.
iainstall.html This page displays if no Integrity client is detected on an endpoint.
iaversion.html This page displays when the installed Integrity client does not comply with the client minimum version setting as defined in the policy on the Client Settings tab.
index.html This page redirects to the sandbox. The index.html file handles the locale code and alert-specific parameters appended to the custom URL. This file can be edited in MS Wordpad or an HTML editor. However, MS Notepad is not suitable for editing this file.
lockup8081.html This page displays when in a client lockup situation with error code 8081.
lockup8082.html This page displays when in a client lockup situation with error code 8082.
lockup8083.html This page displays when in a client lockup situation with error code 8083.
programAsk.html This page is used to retrieve additional information concerning programs that have requested access to the local network or the Internet. This page is generally used with Integrity Flex because the user will be permitted the option of granting a program access or not.
programBlock.html This page is used for restricted applications where the user has no option of granting a program access to the LAN or Internet.
support.html This page directs users to their corporate technical support resources. Administrators should configure the HTML source of the page to redirect browsers to their corporate support site. This approach is preferable to modifying the SupportURL field in a client deployment package’s config.ini file. More information about customization of the SupportURL can be found in the Integrity XML Policy Reference or Integrity INI Reference.
Page (continued) Function

Chapter 5 Supporting Integrity Client Users
Integrity Client Management Guide 55ZLD 1-0218-0501-2005-04-21
Security ConsiderationsIntegrity Server uses HTTPS (port 8443) while the sandbox uses HTTP (port 80). The reason for this is so users directed to the sandbox do not need to download an SSL certificate. Make sure the machine running the sandbox does not have applications or services competing for the use of this port, for example, Microsoft IIS.
Sandbox PlacementThe Integrity Sandbox resides on Integrity Server by default. If you are using an Integrity-supported gateway, your users who are out of compliance will be restricted from accessing your network. Therefore, it is recommended to maintain the sandbox on a machine other than Integrity Server. In this configuration, you will need to set up a router with port re-direction. This will allow multiple machines to utilize a single IP address via the same port. Other reasons for setting up the sandbox on a machine other than Integrity Server would include performance issues. If you expect high usage of the sandbox, it might be advantageous to consider the following configuration.
If the sandbox is placed on a different computer than Integrity Server, the package will not automatically be moved to the sandbox. When creating or modifying a package, you must manually copy it to the sandbox server.
Client Lockup SituationsA lockup situation can result when the Integrity client does not start up properly or was improperly installed.
When a lockup situation occurs two things occur:
The endpoint is confined to a specific page in the sandbox, file name lockup<port>.html, where <port> is either 8081, 8082, or 8083, depending on the client’s specific situation.
Startup firewall rules are enforced to tighten the security on the endpoint

Chapter 5 Supporting Integrity Client Users
Integrity Client Management Guide 56ZLD 1-0218-0501-2005-04-21
Lockup port use (8081, 8082, 8083)When a client lockup occurs, Integrity client contacts Integrity Server by default on either port 8081, 8082, or 8083, displaying the proper information for the situation.
8081: The TrueVector service was unexpectedly shut down. Shutdown can be caused by an error on the endpoint computer, or by a threat such as a Trojan horse.
8082: An error occurred during the installation of the Integrity client. This can be caused by an attempt to disable security, so the Integrity client has blocked network access to protect the endpoint from attack
8083: An error prevented the TrueVector service from starting properly. This can be caused by an attempt to disable security, so the Integrity client has blocked network access to protect the endpoint from attack.
Changing the Lockup Server IP Address
If you want clients to be directed elsewhere than the Integrity Server, change the server= attribute of the <lockupRedirect> element in the config.xml file that you upload to your client packager.
Disabling the Lockup Function
If ports 8081, 8082, and 8083 are in use on your network, you can disable the lockup functionality.
To disable lockup functionality:
1. Locate and open the file C:\Program Files\Zone Labs\Integrity\jakarta-tomcat-4.0.1\conf\server.xml
2. Locate the element <Service Name=”Lockup Server”/>
3. Comment out the entire element using the <!-- and --> brackets. The beginning and end of the element should look like this:<!--<Service name="Lockup Server"> <Connector className=......etc. </Service>-->
Startup RulesThe Integrity client firewall includes settings that are applied when Microsoft Windows first starts up. These firewall rules are then replaced by the personal and enterprise policy settings when the client itself is fully started. By default, the startup firewall settings block all incoming traffic and allow all outbound traffic.
If these ports are already in use on your network, you can disable the lockup redirect functionality. See“To disable lockup functionality:,” on page 56.

Chapter 5 Supporting Integrity Client Users
Integrity Client Management Guide 57ZLD 1-0218-0501-2005-04-21
The startup firewall rules are also applied if the Integrity client encounters a lockup situation. A lockup situation can result when the Integrity client does not start up properly or was improperly installed. When a lockup situation occurs, the startup firewall rules will be used to tighten the security on the endpoint.
The startup firewall rules are defined in a file named vsconfig.xml located in the “C:\windows\system32\” directory (or “C:\winnt\system32\”). To modify the startup firewall, you can use the following examples.
To reconfigure vsconfig.xml:
1. Re-boot your Windows computer in Safe mode.
The msconfig.xml file can only be edited in Windows Safe mode.
2. Modify the vsconfig.xml file.
a. The file is most likely hidden. In Windows, turn on display of hidden files to see it.
b. Edit the file in a plain text editor such as Windows Notepad.
c. Pick one of the examples below. Add the <ruleset> element in the example to the contents of the <securitypolicy> element of the vsconfig.xml file. Do not delete any existing configuration rules in the vsconfig.xml file.
3. From the command line run “iclient.exe -fwstartup vsconfig.xml”
Example: Low Startup SecurityThe settings in this example allow all network traffic.
<?xml version="1.0"?><securitypolicy version="1"><ruleset name="startupruleset" start="onstartup" stop="afterstartup"><firewall><rule name="FWAllowAll"><execute action="accept"/>
</rule></firewall>
</ruleset></securitypolicy>
Example: Medium Startup SecurityThe settings in this example allow all outgoing traffic and incoming DHCP traffic.
<?xml version="1.0"?><securitypolicy version="1"><ruleset name="startupruleset" start="onstartup" stop="afterstartup"><firewall><rule name="FWAllowDHCPIn" rulestack="soft"
relativeposition="first" direction="RECEIVE"><execute action="accept"/><source><port protocol="IP_UDP" port="67"/>
</source>

Chapter 5 Supporting Integrity Client Users
Integrity Client Management Guide 58ZLD 1-0218-0501-2005-04-21
<destination><port protocol="IP_UDP" port="68"/>
</destination></rule><rule name="FWAllowOut" rulestack="soft"
relativeposition="first" direction="SEND"><execute action="accept"/>
</rule><rule name="FWBlockAll" rulestack="soft" relativeposition="last"><execute action="drop"/>
</rule></firewall>
</ruleset></securitypolicy>
Example: High Startup SecurityThe settings in this example allow only inbound and outbound DHCP traffic.
<?xml version="1.0"?><securitypolicy version="1"><ruleset name="startupruleset" start="onstartup" stop="afterstartup"><firewall><rule name="FWAllowDHCPIn" rulestack="soft"
relativeposition="first" direction="RECEIVE"><execute action="accept"/><source><port protocol="IP_UDP" port="67"/>
</source><destination><port protocol="IP_UDP" port="68"/>
</destination></rule><rule name="FWAllowDHCPOut" rulestack="soft"
relativeposition="first" direction="SEND"><execute action="accept"/><source><port protocol="IP_UDP" port="68"/>
</source><destination><port protocol="IP_UDP" port="67"/>
</destination></rule><rule name="FWBlockAll" rulestack="soft" relativeposition="last"><execute action="drop"/>
</rule></firewall>
</ruleset></securitypolicy>

Integrity Client Management Guide 59ZLD 1-0218-0501-2005-04-21
Chapter 6Uninstalling Integrity Clients
Integrity clients can be uninstalled from the command line or the endpoint user interface. Pre-5.0 versions used a separate executable, zauninst.exe, to uninstall. Versions 5.0 and higher, because they use MSI technology, do not have a separate uninstaller program; the same database used for installation and uninstallation.
Silently Removing a ClientIntegrity clients can be removed silently from the command line. By default, running a silent installation automatically restarts the endpoint computer without warning to complete the installation process. However, you can use additional parameters to either suppress the restart, or prompt the endpoint user to restart manually.
Uninstalling Client Version 4.5 and earlierIntegrity client versions 4.5 and earlier include a separate executable, zauninst.exe, that is run to uninstall the client. It can be run from the command line.
To uninstall silently and restart without warning:
1. Run the uninstaller with this command line:zauninst.exe /s /pwinst <password>
To uninstall silently but prompt the user to restart:
1. Run the uninstaller with this command line: zauninst.exe /s /pwinst <password> /rbprompt
To uninstall silently with no restart and no prompt:
1. Run the uninstaller with this command line:zauninst.exe /s /pwinst <password> /noreboot
Using this command line will prompt the user to restart after uninstallation.
Uninstalling Client Version 5.0 and LaterTo silently uninstall client versions 5.0 and later, there are three command lines that can be used:
iclientSetup_IFen.exe /X /s /V" /qn INSTALLPASSWORD=<password>"Msiexec /X /qn <Product GUID> INSTALLPASSWORD=<password>Msiexec /X /qn <installDatabase.msi> INSTALLPASSWORD=<password>

Chapter 6 Uninstalling Integrity Clients
Integrity Client Management Guide 60ZLD 1-0218-0501-2005-04-21
In all of these command lines, the /X switch tells the MSI executable to uninstall the program. The second uses the product’s Globally Unique Identifier (GUID) to identify the program, the third uses the location of the .msi file.
To locate the product ID (GUID), use the type the following at the command line:cd "%WINDIR%\Downloaded Installations"
To locate the .msi file, type the following: dir /s iclient*
This will show you the Integrity client installers on your computer and you can see what the .msi file name is and what the GUID is since the directory is named for the product code GUID.
Prompting or Preventing Restart After UninstallIt is necessary to restart the endpoint computer after uninstalling the Integrity client to completely remove all components.
The command lines given above finish the uninstall and restart the endpoint computer without warning the user. However, you can use other command line options to suppress restart or to prompt the user to restart manually.
To prompt the user to restart:
Add the property REBOOTPROMPTWITHSILENT=YES to the command line.
To prevent automatic restart:
Add REBOOT=S, REBOOT=R, or REBOOT=NO to the command line.
Note that if automatic restart is suppressed, the user must manually restart the computer to complete uninstallation of the Integrity client.

Integrity Client Management Guide 61ZLD 1-0218-0501-2005-04-21
Chapter 7Operational CLI Switches
Use operational command lines to:
Set or change user-level or installation-level passwords
Force Integrity client to load an optional configuration or policy file

Chapter 7 Operational CLI Switches
Integrity Client Management Guide 62ZLD 1-0218-0501-2005-04-21
Overview of Operational Command LinesThe following illustrates the general form of an Integrity client operational command line (line break added for readability):
iclient.exe [-switch_1 -switch_2 … -switch_n] [-config "C:\full\path\to\configuration.xml"]
The operational command line consists of three primary elements:
iclient.exe is the name of the Integrity client program.
Optional command line switches, preceded by a dash (“-”), set new installation-level or user-level passwords, modify existing passwords, or specify a license key value.
-config C:\full\path\to\configuration.xml specifies the path to an optional configuration file to be loaded by a previously installed instance of Integrity client.
The following table illustrates the primary differences between the two types of command lines.
The Configuration File Operational Command Line Switch
Special syntactic rules apply to the installation configuration file command line switch (-config "C:\full\path\to\configuration.xml" in the example in the preceding section). If specified in an installation operational command line, the -config switch:
Must be the last switch on the command line, followed by the path name and file name of the configuration file
Must be prefaced by a dash (“-”)
OperationalCharacteristic Installation Command Line Operational Command Line
When used During installation After installation
Used with file Integrity client Installation program iclientSetup_IXen.exe.a
a.Where IX equals ID for Integrity Desktop, IF for Integrity Flex, of IA for Integrity Agent, and en is the language code.
Integrity client program file iclient.exe.
Parameter delimiter • Slash mark (“/”) (versions 4.5 and earlier)
• Variable (versions 5.0 and later)
Dash (“-”)
Configuration file specifier • Does not include a special preced-ing command line switch (versions 4.5 and earlier)
• Preceded by CONFIGFILE= property (versions 5.0 and later).
• Must be the last switch on an installation command line (versions 4.5 and earlier)
• Must be preceded by the -config command line switch
• Must be the last switch on an operational command line

Chapter 7 Operational CLI Switches
Integrity Client Management Guide 63ZLD 1-0218-0501-2005-04-21
Must enclose the path name and filename in quotation marks (")
Can use Microsoft Windows’ Universal Naming Convention (UNC) of \\servername\sharename to refer to a policy file located on a shared network resource
When the operational configuration file command line switch is used, Integrity client ignores the Policy_Info section of the specified configuration file.
Operational Command Line SwitchesAll operational command line switches are preceded by a dash (“-”).
Integrity client recognizes seven operational command line switches (six for Integrity Desktop). The following table groups the operational command line switches into four functional categories and identifies the page in this chapter where a complete description of the switch can be found.
Command Line Switch Description Page
General Operational Command Line Switch
-lickey LicenseKey Specifies the product license key. 64
Set or Modify Password Operational Line Switches
-passwset UserPwordNew Specifies a new optional user-level password. 65
-password UserPwordOld Specifies an existing user-level password. 65
-pwinstset InstallPwordNew Specifies a new optional installation-level password.l 66
-pwinst InstallPwordOld Specifies an existing installation-level password. 66
Specify an optional operational configuration file
-config "Path to Configuration File" Specifies the path and name of an optional installation configuration file. 67
For networks with Integrity Server only, specify an optional operational policy file
-policy "Path to Policy File" Specifies the path and name of an optional installation policy file. 67
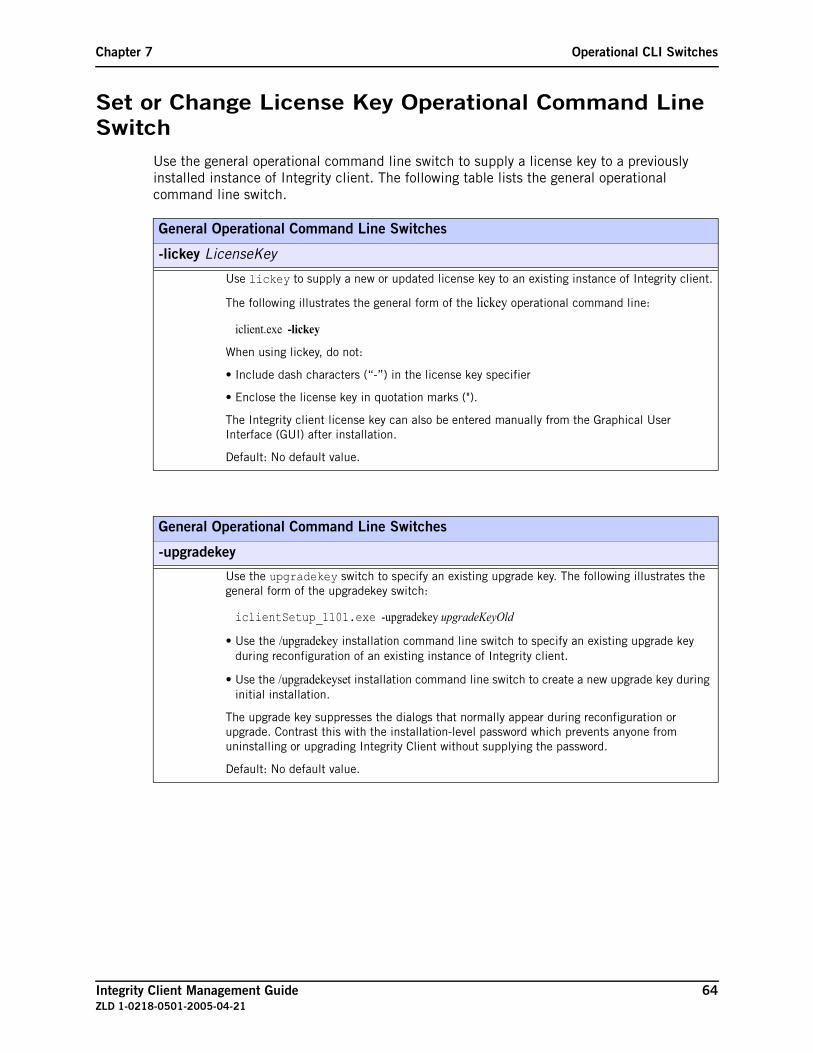
Chapter 7 Operational CLI Switches
Integrity Client Management Guide 64ZLD 1-0218-0501-2005-04-21
Set or Change License Key Operational Command Line Switch
Use the general operational command line switch to supply a license key to a previously installed instance of Integrity client. The following table lists the general operational command line switch.
General Operational Command Line Switches
-lickey LicenseKey
Use lickey to supply a new or updated license key to an existing instance of Integrity client.
The following illustrates the general form of the lickey operational command line:
iclient.exe -lickey
When using lickey, do not:
• Include dash characters (“-”) in the license key specifier
• Enclose the license key in quotation marks (").
The Integrity client license key can also be entered manually from the Graphical User Interface (GUI) after installation.
Default: No default value.
General Operational Command Line Switches
-upgradekey
Use the upgradekey switch to specify an existing upgrade key. The following illustrates the general form of the upgradekey switch:
iclientSetup_1101.exe -upgradekey upgradeKeyOld
• Use the /upgradekey installation command line switch to specify an existing upgrade key during reconfiguration of an existing instance of Integrity client.
• Use the /upgradekeyset installation command line switch to create a new upgrade key during initial installation.
The upgrade key suppresses the dialogs that normally appear during reconfiguration or upgrade. Contrast this with the installation-level password which prevents anyone from uninstalling or upgrading Integrity Client without supplying the password.
Default: No default value.

Chapter 7 Operational CLI Switches
Integrity Client Management Guide 65ZLD 1-0218-0501-2005-04-21
Set or Modify Passwords Operational Command Line SwitchesUse the general operational command line switches group to set new user-level or installation-level passwords, or to supply existing passwords. The following tables list the four set or modify passwords operational command line switches.
Set or Modify Password Operational Command Line Switches
-passwset UserPwordNew
Use passwset to set a new user-level password.
A user-level password:
• Must be a minimum of 6 characters and a maximum of 31 characters, and can not contain spaces
• Can only be set when no Integrity client database files (“.rdb” file name extension) are present in the computer’s C:\%windir%\Internet Logs folder
The following illustrates the general form of the passwset operational command line switch:
iclientSetup_IFen.exe /passwset UserPwordNew
Check Point that a user-level password not be set. A user-level password prevents the end-user from responding to Integrity client alerts and interferes with the application of centrally administered updates and changes.
Default Value: No default value.
Set or Modify Password Operational Command Line Switches
-password UserPwordOld
Use the password switch to supply a previously defined user-level password to Integrity client. The following illustrates the general form of the password operational command line switch:
iclient.exe -password UserPwordOld
After installation, the password switch can be used in conjunction with passwset (described in the preceding table entry) to update an existing user-level password. In the following, password enables an existing user-level password to be modified:
iclient.exe -password UserPwordOld -passwset UserPwordNew
Default: None.

Chapter 7 Operational CLI Switches
Integrity Client Management Guide 66ZLD 1-0218-0501-2005-04-21
Set or Modify Password Operational Command Line Switches
-pwinstset InstallPwordNew
Use pwinstset to set a new installation-level password. An installation-level password prevents unauthorized changes to an existing Integrity Desktop installation.
• An installation-level password must be a minimum of 6 characters and a maximum of 31 characters, and can not contain spaces.
• Installation-level passwords do not affect the user’s ability to change his or her personal security settings.
The following table inset illustrates three uses of the pwinstset operational command line switch.
Installation-level passwords can be:
• Set from the command line only during initial installation
• Changed during reinstallation if the pwinst switch appears on the same installation command line to enable the change
The reset switch, does not clear the installation password.
Integrity client provides no other methods for changing or updating an installation-level password.
Default Value: No default value.
Set or Modify Password Operational Command Line Switches
-pwinst InstallPwordOld
Use pwinst to supply a previously defined installation-level password to a previously installed instance of Integrity client. The following illustrates two variations of the pwinst operational command line switch:
iclient.exe -pwinst InstallPwordOld [/additional switches…]
iclient.exe -pwinst InstallPwordOld -pwinstset InstallPwordNew
Default Value: None.
No current installation-level password
iclient.exe -pwinstset InstallPwordNew
• In this example pwinstset sets the installation-level password for the first time.
Changing an existing installation-level password
iclient.exe -pwinst InstallPwordOld -pwinstset InstallPwordNew
In this example:
• Pwinst specifies the existing installation-level password to enable a change to the installation-level password
• Pwinstset changes the installation-level password

Chapter 7 Operational CLI Switches
Integrity Client Management Guide 67ZLD 1-0218-0501-2005-04-21
The -config Operational Command Line SwitchUse the config operational command line switch to direct a previously installed instance of Integrity client to load a configuration file. The following table lists the config operational command line switch.
The following table describes the config operational command line switch.
The Policy Operational Command Line SwitchUse the policy switch to load an enterprise policy.
If used, the config operational command line switch must be prefaced by a dash (“-”) and must be the last switch on an operational command line.
Configuration File Operational Command Line Switch
-config "Path to Configuration File"
Direct a previously installed instance of Integrity client to load a configuration file. The following examples illustrate the placement of the configuration file command line switch.
iclient.exe [/switches…] -config "C:\Full\path\to\Configuration.xml"
Do not confuse the -config operational command line switch with the -policy operational command line switch.
If used, the config operational command line switch:
• Must not be used on the same command line with the policy operational command line switch.
• Must be prefaced with a dash (“-”)
• Must be the last switch on the command line
The path and file name specifier used with the config switch:
• Must be enclosed in quotation marks (")
• Can be any valid Windows filename, but must use the .xml filename extension
• Can use Microsoft Windows Universal Naming Convention (UNC) of \\servername\sharename to refer to an installation configuration file located on a shared network resource
After using -config, the Control Center does not display certain new settings until after Integrity Desktop has been restarted.
When config is specified on a command line, Integrity client ignores the Policy_Info section of the specified configuration file.
Use the policy operational command line switch only with Integrity Agent or Integrity Flex and only in networks equipped with Integrity Server.

Chapter 7 Operational CLI Switches
Integrity Client Management Guide 68ZLD 1-0218-0501-2005-04-21
At first glance, the policy and config command line switches appear very similar. In both cases, the switches are placed on the command line followed by the path and filename of a policy or configuration file (XML file name extension). For example:
iclient.exe -policy "C:\pathToFile\policy.xml"
There are, however, important differences in the way that Integrity client processes the two different command line switches. The following section describes the operational differences between the policy and config command line switches.
Overview of the Config Command Line SwitchUse the config switch to configure Integrity Flex or Integrity Agent to connect to Integrity Server under specific conditions.
Overview of the Policy Command Line SwitchUse the policy switch to preload an enterprise security policy into Integrity Flex or Integrity Agent. By preloading an enterprise policy, you ensure that enterprise security settings are in effect even before Integrity client receives an enterprise security policy from Integrity Server.
After a connection to Integrity Server is established, and if the connection identifiers are properly configured, Integrity client overwrites the preloaded policy with the enterprise policy deployed from Integrity Server.
Policy File Operational Command Line Switch
-policy "Path to policy File"
Use -policy to force an existing instance of Integrity Agent or Integrity Flex to read an enterprise policy file. The following examples illustrate the use of config:
iclient.exe [-switches…] -policy "C:\Full\path\to\PolicyFile.xml"
Do not confuse the policy operational command line switch with the config operational command line switch.
If used, the policy operational command line switch:
• Must not be used on the same command line with the config operational command line switch.
• Must be the last switch on the command line
• Must, like all operational command line switches, be prefaced by a dash (“-”)
The path and file name referenced by the policy switch:
• Must be enclosed in quotation marks (")
• Can be any valid Windows filename, but must use the .ini or .xml filename extension
• Can use Microsoft Windows’ Universal Naming Convention (UNC) of \\servername\sharename to refer to a policy file located on a shared network resource
When policy is specified on a command line, Integrity client ignores the Integrity section of the specified policy file.

Chapter 7 Operational CLI Switches
Integrity Client Management Guide 69ZLD 1-0218-0501-2005-04-21
The following sections provide a detailed description of the proper use of the config and policy command line switches to replace a preloaded policy with a policy deployed from Integrity Server.
Using Config to connect to Integrity ServerThe Connection= parameter in the [Integrity] section of the configuration file contains the variables necessary for Integrity client to connect to Integrity Server.
The Connection parameter operates in one of two modes: in conjunction with a VPN gateway, or in conjunction with a LAN or other non-VPN connection.
The Connection Parameter and VPN Gateway Connections
If you are using Integrity Server with a compatible VPN gateway device (such as a Cisco 30xx), you do not need to configure the [Integrity] section, or use the config switch: the client pro-gram for that gateway provides Integrity Flex (or Integrity Agent) with the IP address of an Integrity Server.
The Connection Parameter and LAN or other non-VPN Connections
If you are not using Integrity with a compatible gateway device, use the [Integrity] section to tell Integrity client:
Where to find Integrity Server by specifying the Connnection parameter’s ISAddr variable.
Under what conditions to try to connect to Integrity Server by using the Connection parameter’s TriggerType variable.
What policy to enforce before a connection to Integrity Server is established, and after the connection has been broken, using the Connection parameter’s TriggerType and DelayValue variables.
The following illustrates the general form of a Connection parameter statement.
[Integrity]Connection=Name, ISAddr, ISPort, TriggerType,VPNAddr, VPNPort, ConnID, Delay
You can also refer to Chapter 2 of the Client Reference Guide for more information about the differences between configuration and policy files.
Complete the following procedure to configure Integrity client to connect to Integrity Server.
To configure Integrity client to connect to Integrity Server:
1 Create a configuration file (XMLfile name extension) with information appropriate to your situation in the [Integrity] section.

Chapter 7 Operational CLI Switches
Integrity Client Management Guide 70ZLD 1-0218-0501-2005-04-21
2 Perform one of the following:
a During client installation, place the configuration file specifier in an installation command line
b After client installation, place the configuration file in an operational command line.
Using Policy to Preload an Enterprise PolicyPreconfiguring an enterprise policy enables you to protect your endpoints immediately after Integrity client installation—even before Integrity Server deploys a policy.
When the client first connects to Integrity Server, you generally want the settings that were preloaded with the policy switch to be entirely overwritten by the settings in the policy that Integrity Server sends to the client. To make sure this happens, it is necessary to match the Connection identifier in the preloaded policy file with the client's Integrity Server connection identifier. Otherwise, security settings not specifically addressed in the policy deployed from Integrity Server will remain as set in the preloaded policy.
Complete the following procedure to ensure that the preloaded enterprise policy will be overwritten by the first policy sent down by Integrity Server.
To configure a preloaded policy:
1 Set the AlwaysActive= parameter in the [Policy_Info] section to Yes.
This makes the policy active before connecting to Integrity Server. If you do not set this value, the rest of the settings will not take effect.
2 If you are using a compatible Cisco gateway, go to step 5. Otherwise, continue with step 3.
3 Use a text editor to open the policy file (XML file name extension) used to establish the client's connection with Integrity Server.
This is the policy file specified by the -config switch in the installation command line.
4 In the policy file copy the ConnID value from the Connection= parameter in the [Integrity] section.
5 In the policy file (the one that will be specified by the -policy switch), enter the correct value for ConnectionID in the [PolicyInfo] section of the policy file.
If you are using a Cisco gateway, enter the value cvpnd.exe.
If you are not using a Cisco gateway, paste the copied ConnID value from the configuration file in as the ConnectionID= value or enter a value.
6 Use an installation or operational command line to force Integrity client to read the previously configured policy.
If a value for ConnectionID is not automatically by a third-party device, such as a VPN gateway, you must manually supply a value.

Chapter 7 Operational CLI Switches
Integrity Client Management Guide 71ZLD 1-0218-0501-2005-04-21
Uninstallation Command Line SwitchesThe following command line switches are supported by the zauninst.exe uninstaller command. Their behavior is identical to the behavior of the same switches in the installer.
Command Line Switch Description Page
General Installation Command Line Switches
/noreboot Suppresses automatic rebooting after an upgrade. 71
/rbprompt Overrides silent install by displaying a reboot prompt. 72
/s Specifies silent (prompt-free) installation. 72
Password Command Line Switches
/password UserPwordOld Supplies an existing user-level password. 74
/pwinst InstallPwordOld Supplies an existing installation-level password. 73
Version 4.x and later of Integrity client automatically perform a clean uninstallation. Because of this, Integrity client version 4.x and later no longer support the /clean command line switch.
General Installation Command Line Switches
/noreboot
Use noreboot to defer the computer reboot required to complete an upgrade of Integrity client. The following illustrates the general form of the noreboot installation command line switch:
iclientSetup_1101.exe /noreboot
For upgrades:
• The noreboot switch prevents the reboot required to complete an upgrade of Integrity client. Use noreboot when an upgrade of Integrity client will be managed by a third-party installer setup tool such as Microsoft’s SMS, and that setup tool needs to perform more tasks after performing an upgrade of Integrity client.
After the third-party installer’s tasks are completed, the installer tool must force a reboot of the client computer to complete the upgrade.
Noreboot does not remove the requirement to reboot the computer to complete an upgrade. Noreboot merely defers the required reboot so that reboot can be managed by a third-party installation process such as SMS.
• Integrity client begins protecting the upgraded computer only after a reboot has completed.
Initial (sometimes referred to as “clean”) installations of Integrity client do not require reboot of the computer.
Default Value: Use noreboot to suppress the automatic rebooting necessary to complete an upgrade. Because initial (so-called “clean”) installations of Integrity client do not automatically reboot, the use of noreboot is unnecessary for initial installations. Instead, to properly initialize Windows settings and variables a newly installed Integrity Client must be run for the first time while the computer has an administrator-level user logged in.

Chapter 7 Operational CLI Switches
Integrity Client Management Guide 72ZLD 1-0218-0501-2005-04-21
General Installation Command Line Switches
/rbprompt
Use rbprompt in conjunction with the s (“silent”) switch, described on page 72, to prompt the user to perform the reboot required to complete an upgrade of Integrity client; the reboot prompt is only displayed if reboot is required by the upgrade process.
The following illustrates the general form of the rbprompt installation command line switch:
iclientSetup_1101.exe /s /rbprompt
The rbprompt can only be used in conjunction the s switch: rbprompt allows a reboot prompt, and only a reboot prompt, to be displayed as part of a silent upgrade.
• If rbprompt is specified as part of an upgrade of Integrity client that is managed by a third-party installer setup tool such as Microsoft’s SMS, rbprompt will require a response to the reboot prompt before allowing the installer setup script to continue.
• Integrity Server’s Client Deployment feature automatically includes the “/s /rbprompt” command pair as part of an Integrity client installation package. To reboot automatically after an upgrade do not select the Run installer without UI… check box. Instead, in the Additional Commands text entry area, specify the s command line switch without a corresponding /rbprompt switch.
• Using rbprompt on the same installation command line as the noreboot installation com-mand line switch, described on page 71, suppresses the display of the reboot prompt dialog box: noreboot defers the reboot to the controlling third-party installation setup tool, such as SMS. (As described in the description of /noreboot, an upgrade is not complete until a reboot has been performed).
Default Value: Use rbprompt to modify the default operation of the s switch. Unless explicitly specified by rbprompt, the s switch suppresses all messages, and after an upgrade (as distin-guished from a clean install) automatically reboots the computer.
General Installation Command Line Switches
/s
Use s (for “silent”) to suppress all Integrity client installation program messages.
If used, the s switch must be the first switch on the installation command line.
The following illustrates the general form of the s installation command line switch:
iclientSetup_1101.exe /s
If used, the s switch:
• Must be the first switch on the installation command line.
• Forces a reboot if the installer detects files from an existing Integrity client or ZoneAlarm product on the computer, and those files cannot be replaced at the time the installation or upgrade of Integrity client is performed. This is true even if the Clean Install check box is selected by the user.

Chapter 7 Operational CLI Switches
Integrity Client Management Guide 73ZLD 1-0218-0501-2005-04-21
• Automatically creates an error log file named ErrorLog.txt and saves it in the Integrity client program folder. To change the default path and file name of the Integrity client program folder, use the errlog switch.
Do not use installdir and the /s switch in the same installation command line. If installdir and s are used together on the same command line, errors resulting from invalid path and filename specifications will not be displayed during installation.
Integrity client does not allow the TrueVector security engine to be shut down silently unless an installation-level password is supplied.
There are two conditions that affect how an upgrade will or will not be performed:
• An installation-level password was set for the existing installation, and you supply the installation-level password on the command line during re-installation, then a silent installation is performed. If the installation-level password is not correctly specified, the upgrade fails silently.
• An upgrade key was set for the existing installation, and you supply the upgrade key on the command line during re-installation, then a silent installation is performed. If the upgrade key is not correctly specified, the upgrade is performed but not silently.
The following illustrates the use of the s command line switch in conjunction with the pwinst switch:
iclientSetup_1101.exe /s /pwinst InstallPwordOld
See pwinst, on page 73, for more information.
Default value: Off. Unless explicitly disabled by the use of s, messages and prompts are displayed by the Integrity client installation program.
Set or Modify Password Installation Command Line Switches
/pwinst InstallPwordOld
Use pwinst to supply a previously defined installation-level password to the Integrity client installation program. The following illustrates two variations of the pwinst installation command line switch:
iclientSetup_1101.exe /pwinst InstallPwordOld [/additional switches…]
iclientSetup_1101.exe /pwinst InstallPwordOld /pwinstset InstallPwordNew
Default Value: Not applicable during initial installation.
General Installation Command Line Switches (continued)
/s

Chapter 7 Operational CLI Switches
Integrity Client Management Guide 74ZLD 1-0218-0501-2005-04-21
Set or Modify Password Installation Command Line Switches
/password UserPwordOld
Use the password switch to supply a previously defined user-level password to the Integrity client installation program. The following illustrates the general form of the password installation command line switch:
iclientSetup_1101.exe /password UserPwordOld
After installation, the password switch can be used in conjunction with passwset (described in the preceding table entry) to update an existing user-level password. In the following, password enables an existing user-level password to be modified:
iclientSetup_1101.exe /password UserPwordOld /passwset UserPwordNew
Default Value: Not applicable during initial installation.

Integrity Client Management Guide 75ZLD 1-0218-0501-2005-04-21
Appendix AIntegrity Client 4.X CLI Switches
Beginning version 5.0, Integrity clients use MSI (Microsoft Installer) technology. This means that if you are installing or upgrading to Integrity Agent, Integrity Flex, or Integrity Desktop 5.0 or later, you will use a new set of installation command line specifiers. For a summary of the differences, see “Comparison of Integrity client 4.x and 5.x command-line switches,” on page 76.
Differences Installing 4.x and 5.x VersionsThis section provides information on notable differences between different versions of Integrity client that may affect how command line switches are used.
Using Configuration and Policy Files (.xml and .ini)Beginning in version 4.0, Integrity clients began using XML-based policy and configuration files. Files in the .ini format are still supported in all versions for features that existed in pre-4.0 versions of Integrity clients. Either type of file can be referenced from the command line.
For more information on Integrity client configuration files see the Configuration File Reference Guide.
For more information on Integrity client policy files see the Policy File Reference Guide.
Comparing Command-Line Syntax (Wise and MSI)The examples below illustrate some important differences between the older and newer command lines.
Example installation command line, version 4.5
IclientSetup_IFen.exe /s /pwinst secret /rbprompt “path to configuration file”
Equivalent example, version 5.0
IclientSetup_IFen.exe /s /v” /qn INSTALLPASSWORD=secret CONFIGFILE= \”path to configuration file\””
Notable differences in the newer version
Properties and values specific to the Integrity client installation (for example, configuration file location) are preceded by the /v switch and enclosed in quotation marks. These properties

Integrity Client Management Guide 76ZLD 1-0218-0501-2005-04-21
and values are passed to msiexec.exe (the Microsoft installer executable). Quotation marks within that set of properties and values are preceded by an escape character (\).
Switches not enclosed in /v”...” are Install Shield switches.
The /pwinst switch is replaced by the INSTALLPASSWORD property
The path to the configuration file is specified as the value of the CONFIGFILE property, rather than being placed on the command line with no switch.
Both the InstallShield (/s) and MSI (/qn) silent mode switches are required to run the installation in silent mode.
Differences between 5.x and 4.x SwitchesIf you use the Additional Command Line Switches field in the client packager, and are creating packages with a 5.0 or later client, you will use MSI-based command line parameters.
The table below maps the relationship between the command line switches used by pre-5.0 clients, and the properties and values used by 5.0 and later clients.
The use of escape characters is not required when adding switches to the Additional Parameters field in the client packager in Integrity Server.
Table 1: Comparison of Integrity client 4.x and 5.x command-line switches
Command Line Interface Switch/Property/ValueDescription
4.x or earlier 5.x or higher
General Installation Command Line Switches
/errlog Path MSI switch /L , followed by path to log file.
Specifies an installation error log file.
/forceupgrade RESETCONFIG=NO. Suppresses the display of the Previous Settings dialog box, forcing the user to upgrade rather than perform a clean install.
/installdir Path Client property and value INSTALLDIR=”C:Path|to|directory”
Specifies a non-default location for Integrity client program files.
/lickey LicenseKey LICENSEKEY= Specifies the product license key.
/noreboot REBOOT=NO Suppresses automatic rebooting after an upgrade.
/nostartup CLIENTSTARTUP=NO Suppresses automatic startup of Integrity client at boot.
/notminimized MINIMIZECLIENT=NO After installation, displays the Integrity client Control Center.

Integrity Client Management Guide 77ZLD 1-0218-0501-2005-04-21
/rbprompt REBOOTPROMPTWITHSILENT=YES
Overrides silent install by displaying a reboot prompt.
/reboot ALWAYSREBOOTPROMPT=YES Forces a reboot after installation.
/regfile REGISTRYFILE= Specifies the path to a file containing Windows Registry entries.
/reset RESETCONFIG=YES Clears existing Zone Labs configuration settings.
/s InstallShield switch /s silences InstallShield screens. Use the MSI switch /qn to silence MSI screens.
Specifies silent (prompt-free) installation.
/upgradekey UPGRADEKEY= Supplies an existing upgrade key.
/upgradekeyset NEWUPGRADEKEY= Specifies a new upgrade key.
/X None. Uninstalls the client
Tutorial and Wizard Installation Command Line Switches
/notutorial SHOWTUTORIAL=NO Suppresses display of the product tutorial.
/nowizards SHOWWIZARDS=NO Suppresses display of the configuration wizard.
/i Use both the SHOWTUTORIAL and SHOWWIZARDS properties.
Suppresses both the product tutorial and configuration wizard.
Set or Modify Password Command Line Switches
/passwset UserPwordNew
NEWUSERPASSWORD= Specifies a new optional user-level password.
/password UserPwordOld
USERPASSWORD= Supplies an existing user-level password.
/pwinstset InstallPwordNew
NEWINSTALLPASSWORD= Specifies a new optional installation-level password.
/pwinst InstallPwordOld INSTALLPASSWORD= Supplies an existing installation-level password.
Specify an optional installation configuration file
"Path to Configuration File"
CONFIGFILE= Specifies the path and name of an optional installation configuration file.
For networks with Integrity Server only, specify an optional installation policy file
/policy "Path to Policy File"
POLICYFILE= Specifies the path and name of an optional installation policy file.
Table 1: Comparison of Integrity client 4.x and 5.x command-line switches
Command Line Interface Switch/Property/ValueDescription
4.x or earlier 5.x or higher

Integrity Client Management Guide 78ZLD 1-0218-0501-2005-04-21
Switches for Client Version 4.5 and EarlierThis section describes the general syntax and use of Integrity client installer command lines for Integrity client versions. 4.5 and earlier.
Overview
The following illustrates the general form of an Integrity client installation command line (line break added for readability):
iclientSetup_110n.exe [/switch_1 /switch_2 … /switch_n] ["C:\full\path\to\configuration.ini"]
The installation command line consists of three primary elements:
iclientSetup_110n.exe is the name of the Integrity client installation program, where n is 1, 2, or 3, depending on client type.
Optional command line switches, preceded by the slash mark (“/”), specify non-default installation and post-installation behaviors.
C:\full\path\to\configuration.ini specifies the path to an optional installation configuration file to be loaded by Integrity client after installation is completed.
Limitations on Installation Command Line Length
Different versions of Microsoft Windows place differing constraints on the maximum size of installation command lines.
The following table contains the known limitations for installation command lines supplied directly to different versions of Microsoft Windows, as well as for installation command lines included as part of an Integrity Server installation package.
If you are installing or upgrading to version 5.0 or later, see “Integrity Client 5.x Installation Options,” on page 6.
Windows Version Maximum Installation CommandLine Length (characters + spaces)
Command line installation values
98 SE 127
NT, 2000, XP 277
Integrity Server client deployment package values
98 219
NT 226
2000 195
XP 199

Integrity Client Management Guide 79ZLD 1-0218-0501-2005-04-21
The Configuration File Installation Command Line Specifier
Special syntactic rules apply to the installation configuration file command line specifier ("C:\full\path\to\configuration.ini" in the example in the preceding section). If specified in an installation command line, the configuration file specifier:
Must be the last element on the command line
Must not be prefaced by a slash. This is the only command line element that does not require a delimiter character.
Must enclose the path name and filename in quotation marks (")
Can use Microsoft Windows’ Universal Naming Convention (UNC) of \\servername\sharename to refer to a policy file located on a shared network resource
When the installation configuration file command line specifier is used, Integrity client ignores the Policy_Info section of the specified configuration file.
Installation Command Line Error Messages
If you use a dash delimiter (“-”) in an installation command line, the Integrity client installation programs displays the following error message.
Installation Command Line Switches
All installation command line switches are preceded by a slash mark (“/”).
Integrity client recognizes eighteen installation command line switches (seventeen for Integrity Desktop). The following table groups the installation command line switches into four functional categories and identifies the page in this chapter where a complete description of the switch can be found.
If you use a dash delimiter (“-”) in an installation command line, the Integrity client installation program displays this Command Line Error message box.
Command Line Switch Description Page
General Installation Command Line Switches
/errlog Path Specifies an installation error log file. 81
/forceupgrade Suppress the display of the Previous Settings dialog box. 81
/installdir Path Specifies a non-default location for Integrity client program files. 82
/lickey LicenseKey Specifies the product license key. 82
/noreboot Suppresses automatic rebooting after an upgrade. 83
/nostartup Suppresses automatic startup of Integrity client at boot. 83
/notminimized After installation, display the Integrity client Control Center. 84

Integrity Client Management Guide 80ZLD 1-0218-0501-2005-04-21
General Installation Command Line Switches
Use the General installation command line switches group to specify:
Non-default installation behaviors
Non-default locations for the post-installation folders and files used by Integrity client
/rbprompt Overrides silent install by displaying a reboot prompt. 84
/reboot Force a reboot after installation. 85
/regfile Specifies the path to a file containing Windows Registry entries. 85
/reset Clears existing Zone Labs configuration settings. 86
/s Specifies silent (prompt-free) installation. 86
/upgradekey Supplies an existing upgrade key. 87
/upgradekeyset Specifies a new upgrade key. 88
/X Uninstalls the product 88
Tutorial and Wizard Installation Command Line Switches
/notutorial Suppresses display of the product tutorial. 89
/nowizards Suppresses display of the configuration wizard. 89
/i Suppresses both the product tutorial and configuration wizard. 89
Set or Modify Password Command Line Switches
/passwset UserPwordNew Specifies a new optional user-level password. 90
/password UserPwordOld Supplies an existing user-level password. 91
/pwinstset InstallPwordNew Specifies a new optional installation-level password.l 91
/pwinst InstallPwordOld Supplies an existing installation-level password. 92
Specify an optional installation configuration file
"Path to Configuration File" Specifies the path and name of an optional installation configuration file. 93
For networks with Integrity Server only, specify an optional installation policy file
/policy "Path to Policy File" Specifies the path and name of an optional installation policy file. 93
Command Line Switch Description Page

Integrity Client Management Guide 81ZLD 1-0218-0501-2005-04-21
The following tables list the nine general installation command line switches in alphabetical order.
General Installation Command Line Switches
/errlog Path
Use errlog to specify an error log file’s name and storage location.
The following illustrates the general form of the errlog installation command line switch (line break added for readability):
IDSetup_1101.exe/errlog "C:\PathName\ErrorLogFileName.txt" … "C:\Path\To\Configuration.ini"
The path specifier:
• Must be enclosed in quotation marks (")
• Can use Microsoft Windows’ Universal Naming Convention (UNC) of \\servername\sharename to refer to an installation configuration file located on a shared network resource
If errlog is used in a command line with the /s (“silent”) switch, described on page 86, the s switch must immediately precede the errlog command.
The following illustrates the use of the errlog installation command line switch in conjunction with the s installation command line switch (line break added for readability):
IDSetup_1101.exe [/s] /errlog "C:\PathName\ErrorLogFileName.txt" /… C:\Path\to\ErrorLog.txt"
Specifying the s switch without the errlog switch automatically creates an error log file named ErrorLog.txt and saves it in the Integrity client program folder at C:\Program Files\Zone Labs\Integrity Client\. To modify the default behavior of the s switch, use the errlog switch to specify a different path and file name. See the s switch for more information.
Default Value: None—ErrLog must include a path and file name specifier.
General Installation Command Line Switches
/forceupgrade
Use forceupgrade to suppress the Previous Settings dialog box that offers the user the choice of overwriting their existing settings during the upgrade process: This has the effect of forcing users to retain their existing Integrity client settings.
The following illustrates the general form of the forceupgrade installation command line parameter:
iclientSetup_1101.exe /forceupgrade
When used on the same installation command line as the /s switch, the forceupgrade switch has no effect.
Default: No default value.

Integrity Client Management Guide 82ZLD 1-0218-0501-2005-04-21
General Installation Command Line Switches
/installdir Path
Use installdir to specify an alternative destination for the Integrity client program files. The following illustrates the general form of the installdir installation command line switch:
iclientSetup_1101.exe /installdir "C:\Program Files\ Folder"
• The installdir switch specifies where Integrity client program files are stored: installdir does not change the storage locations of Integrity client database files.
• When using installdir, always enclose the complete path name in quotation marks (").
• Do not use installdir and the /s switch, described on page 86, in the same installation command line: if installdir and the s switch, described on page 86, are used in the same command line, Integrity client can not display errors resulting from invalid path and filename specifications.
Default Value: C:\Program Files\Zone Labs\Integrity Client\. Zone Labs, LLC. recommends that the default folder name be used.
General Installation Command Line Switches
/lickey LicenseKey
Use lickey to supply an existing Integrity client license key to the installation program.
The following illustrates the general form of the lickey installation command line:
iclientSetup_1101.exe /lickey nnnnnnnnnnnnnnnnnnnn
When using lickey, do not:
• Include dash characters (“-”)
• Enclose the license key in quotation marks (").
The Integrity client license key can also be entered manually from the Graphical User Interface (GUI) after installation.
Default: No default value.

Integrity Client Management Guide 83ZLD 1-0218-0501-2005-04-21
General Installation Command Line Switches
/noreboot
Use noreboot to defer the computer reboot required to complete an upgrade of Integrity client. The following illustrates the general form of the noreboot installation command line switch:
iclientSetup_1101.exe /noreboot
For upgrades:
• The noreboot switch prevents the reboot required to complete an upgrade of Integrity client. Use noreboot when an upgrade of Integrity client will be managed by a third-party installer setup tool such as Microsoft’s SMS, and that setup tool needs to perform more tasks after performing an upgrade of Integrity client.
After the third-party installer’s tasks are completed, the installer tool must force a reboot of the client computer to complete the upgrade.
Noreboot does not remove the requirement to reboot the computer to complete an upgrade. Noreboot merely defers the required reboot so that reboot can be managed by a third-party installation process such as SMS.
• Integrity client begins protecting the upgraded computer only after a reboot has completed.
Initial (sometimes referred to as “clean”) installations of Integrity client do not require reboot of the computer.
Default Value: Use noreboot to suppress the automatic rebooting necessary to complete an upgrade. Because initial (so-called “clean”) installations of Integrity client do not automatically reboot, the use of noreboot is unnecessary for initial installations. Instead, to properly initialize Windows settings and variables a newly installed Integrity Client must be run for the first time while the computer has an administrator-level user logged in.
General Installation Command Line Switches
/nostartup
Use nostartup to specify that the Integrity client installation program not ask whether to start the program after an initial installation.
The following illustrates the general form of the nostartup installation command line switch:
iclientSetup_1101.exe /nostartup
Because the nostartup installation command line switch does not provide the user with an opportunity to respond to the startup prompt, the newly installed instance of Integrity client will not be started after installation.
Default Value: Off. Unless specified by nostartup, the installation program asks to start Integrity client after an initial installation.

Integrity Client Management Guide 84ZLD 1-0218-0501-2005-04-21
General Installation Command Line Switches
/notminimized
Use notminimized to force the display of the Integrity client Control Center when Integrity client starts for the first time after installation.
When the /s switch is included as part of an installation command line, the Integrity client installation program starts Integrity client for the first time in so-called “minimized” mode: Only the Integrity icon appears in the Windows system tray. The notminimized installation command line switch overrides this default behavior.
Default Value: Off (Control Center is minimized) for installations that include the /s installation command line switch.
General Installation Command Line Switches
/rbprompt
Use rbprompt in conjunction with the s (“silent”) switch, described on page 86, to prompt the user to perform the reboot required to complete an upgrade of Integrity client; the reboot prompt is only displayed if reboot is required by the upgrade process.
The following illustrates the general form of the rbprompt installation command line switch:
iclientSetup_1101.exe /s /rbprompt
The rbprompt can only be used in conjunction the s switch: rbprompt allows a reboot prompt, and only a reboot prompt, to be displayed as part of a silent upgrade.
• If rbprompt is specified as part of an upgrade of Integrity client that is managed by a third-party installer setup tool such as Microsoft’s SMS, rbprompt will require a response to the reboot prompt before allowing the installer setup script to continue.
• Integrity Server’s Client Deployment feature automatically includes the “/s /rbprompt” command pair as part of an Integrity client installation package. To reboot automatically after an upgrade do not select the Run installer without UI… check box. Instead, in the Additional Commands text entry area, specify the s command line switch without a corresponding /rbprompt switch.
• Using rbprompt on the same installation command line as the noreboot installation com-mand line switch, described on page 83, suppresses the display of the reboot prompt dialog box: noreboot defers the reboot to the controlling third-party installation setup tool, such as SMS. (As described in the description of /noreboot, an upgrade is not complete until a reboot has been performed).
Default Value: Use rbprompt to modify the default operation of the s switch. Unless explicitly specified by rbprompt, the s switch suppresses all messages, and after an upgrade (as distin-guished from a clean install) automatically reboots the computer.

Integrity Client Management Guide 85ZLD 1-0218-0501-2005-04-21
General Installation Command Line Switches
/reboot
Use reboot to force a reboot of Integrity client after installation.
Normally, when the Integrity client installation program does not detect files from an existing Zone Labs product during the installation process, the computer is not automatically rebooted. Use the reboot switch to force a reboot under all circumstances.
Default: No default value.
General Installation Command Line Switches
/regfile
Use the regfile switch to have the Integrity client installation program apply Windows Registry keys and values contained in a “.reg” file to the Windows Registry at the time of installation.
The following illustrates the general form of the regfile command.
iclientSetup_1101.exe /regfile="c:\full\path\to\registry\RegFile.reg"
Any valid Windows filename can be used, but the .reg file must:
• Contain valid Windows Registry keys and values
• Use the .reg file name extension
When creating a client installation package with Integrity Server, you can include a .reg file in an installation package. The /regfile switch directs the Integrity client installation program to apply the keys and values of the .reg file to the Windows Registry.
To include a registry file in the client installation package:
1 Create a package using the Client Deployment | New Package screen.
2 In the Integrity Server folder hierarchy, navigate to the folder containing the package you just created. The following illustrates the default path (line break added):.0
c:\Program Files/ZoneLabs/Integrity/jakarta-tomcat-n.n.n/webapps/integrity/package/PackageName
3 In the folder specified by PackageName:
a Create a new folder named extras.
b Place the .reg file in the extras folder.

Integrity Client Management Guide 86ZLD 1-0218-0501-2005-04-21
4 In Integrity Server, return to the Client Deployment | List dialog box, select the installation package, and click Edit.
The Client Deployment’s Edit Package screen appears.
5 In the Install Parameters section, in the Additional Command Line Switches text entry area, add the command line switch /regfile.
6 Click Save.
A registry file can also be referenced by the Policy Update Utility.
General Installation Command Line Switches
/reset
Use reset during upgrade or reinstallation to completely clear all Integrity client settings. The following illustrates the general form of the reset installation command line switch:
iclientSetup_1101.exe /pwinst InstallPasswordOld /reset
If an installation-level password was specified during initial installation, the pwinst switch must appear on the same command line with reset.
Default Value: Off.
The reset installation command line switch must be used with caution. After using reset, all Integrity client personal policy settings except the installation-level password are lost and must be reinitialized.
General Installation Command Line Switches
/s
Use s (for “silent”) to suppress all Integrity client installation program messages.
If used, the s switch must be the first switch on the installation command line.
The following illustrates the general form of the s installation command line switch:
iclientSetup_1101.exe /s
If used, the s switch:
• Must be the first switch on the installation command line.
• Forces a reboot if the installer detects files from an existing Zone Labs product on the computer, and those files cannot be replaced at the time the installation or upgrade of Integrity client is performed. This is true even if the Clean Install check box is selected by the user.
General Installation Command Line Switches (continued)
/regfile

Integrity Client Management Guide 87ZLD 1-0218-0501-2005-04-21
• Automatically creates an error log file named ErrorLog.txt and saves it in the Integrity client program folder. To change the default path and file name of the Integrity client program folder, use the errlog switch.
Do not use installdir and the /s switch in the same installation command line. If installdir and s are used together on the same command line, errors resulting from invalid path and filename specifications will not be displayed during installation.
Integrity client does not allow the TrueVector security engine to be shut down silently unless an installation-level password is supplied.
There are two conditions that affect how an upgrade will or will not be performed:
• An installation-level password was set for the existing installation, and you supply the installation-level password on the command line during re-installation, then a silent installation is performed. If the installation-level password is not correctly specified, the upgrade fails silently.
• An upgrade key was set for the existing installation, and you supply the upgrade key on the command line during re-installation, then a silent installation is performed. If the upgrade key is not correctly specified, the upgrade is performed but not silently.
The following illustrates the use of the s command line switch in conjunction with the pwinst switch:
iclientSetup_1101.exe /s /pwinst InstallPwordOld
See pwinst, on page 92, for more information.
Default value: Off. Unless explicitly disabled by the use of s, messages and prompts are displayed by the Integrity client installation program.
General Installation Command Line Switches
/upgradekey
Use the upgradekey switch to specify an existing upgrade key. The following illustrates the general form of the upgradekey switch:
iclientSetup_1101.exe /upgradekey upgradeKeyOld
• Use the /upgradekeyset installation command line switch, described in the following table in this section, to create a new upgrade key during initial installation.
• Use the /upgradekey and /upgradekeyset installation command lines on the same command line to change the value of an existing upgrade key during a re-installation.
• Use the -upgradekey operational command line switch to specify an existing upgrade key during reconfiguration of an existing instance of Integrity client.
The upgrade key suppresses:
• Any dialogs that normally appear during reconfiguration or upgrade. Contrast this with the installation-level password which prevents anyone from uninstalling or upgrading Integrity Client without supplying the password.
• The TrueVector shutdown dialog box.
General Installation Command Line Switches (continued)
/s

Integrity Client Management Guide 88ZLD 1-0218-0501-2005-04-21
For example, if an upgrade key is set, and someone attempts to reconfigure or re-install without supplying the upgrade key, the Integrity client installation program completes the upgrade: Any upgrade dialogs will, however, be shown.
The Integrity client installation program suppresses dialogs if an installation-level password is specified. This means upgrades performed in conjunction with an installation-level password, the upgrade key does not also need to be specified.
Use the upgradekeyset installation command line switch, described in the next table in this section, to specify the upgrade key during initial installation. After initial installation, use the upgradekey operational command line switch, described on page, to change an existing upgrade key.
Default: No default value.
General Installation Command Line Switches
/upgradekeyset
Use the upgradekeyset switch to create a new upgrade key at the time Integrity client is installed. The following illustrates the general form of the upgrade key switch:
iclientSetup_1101.exe /upgradekeyset upgradeKeyNew
• Use the /upgradekey installation command line switch, described in the previous table in this section, to specify a silent (prompt free) upgrade of an existing installation.
• Use the /upgradekey and /upgradekeyset installation command lines on the same command line to change the value of an existing upgrade key during a re-installation.
• Use the -upgradekey operational command line switch to specify an existing upgrade key during reconfiguration of an existing instance of Integrity client.
The upgrade key suppresses the dialogs that normally appear during reconfiguration or upgrade. Contrast this with the installation-level password which prevents anyone from uninstalling or upgrading Integrity Client without supplying the password.
For example, if an upgrade key is set, and someone attempts to reconfigure or re-install without supplying the upgrade key, the Integrity client installation program completes the upgrade: Any upgrade dialogs will, however, be shown.
The Integrity client installation program suppresses dialogs if an installation-level password is specified. This means upgrades performed in conjunction with an installation-level password, the upgrade key does not also need to be specified.
Default: No default value.
General Installation Command Line Switches
/x
Use the /x switch to uninstall the Integrity client.
General Installation Command Line Switches (continued)
/upgradekey

Integrity Client Management Guide 89ZLD 1-0218-0501-2005-04-21
Tutorial and Wizard Installation Command Line Switches
Use the tutorial and wizard command line switches group to specify whether or not the Integrity client tutorial and wizard are displayed as part of the installation process. The following tables list the three tutorial and wizard command line switches.
Set or Modify Password Installation Command Line Switches
Integrity Desktop recognizes both a user-level and an installation-level password.
Tutorial and Wizard Installation Command Line Switches
/notutorial
Use notutorial to suppress the automatic display of the Integrity client tutorial after installation is completed. The following illustrates the general form of the notutorial installation command line switch:
iclientSetup_1101.exe /notutorial
Default Value: Off. If not explicitly disabled by the use of notutorial, the installation program asks the user if they want to view the tutorial as part of an initial installation.
Tutorial and Wizard Installation Command Line Switches
/nowizards
Use nowizards to suppress the automatic display of the Integrity client configuration wizard after installation is completed. The following illustrates the general form of the nowizards command line switch:
iclientSetup_1101.exe /nowizards
Default value: Off. If not explicitly disabled by the use of nowizards, the installation program asks if the user wants to run the configuration wizard as part of an initial installation.
Tutorial and Wizard Installation Command Line Switches
/i
Use i to combine the operation of both the notutorial and nowizards command line switches. The following illustrates the general form of the i installation command line switch:
iclientSetup_1101.exe /i
In this example, the i switch suppresses both the automatic start of the Integrity client tutorial and the automatic start of the Integrity client configuration wizard after installation is completed.
Default value: Off.
Zone Labs, LLC. recommends you not set a user-level password. A user-level password prevents the end-user from responding to Integrity Desktop alerts and interferes with the application of centrally administered updates and changes.

Integrity Client Management Guide 90ZLD 1-0218-0501-2005-04-21
The following table lists the functional differences between the two password types.
Use the set or modify password installation command line switches group to:
Set passwords during installation
Change existing passwords during reinstallation
Enable changes to an existing instance of Integrity client
The following tables list the four set or modify passwords command line switches.
Function User-levelPassword
Installation-levelPassword
Enable override of user-level password
Enable silent installations, uninstalls, or upgrades
Prevent changes to personal security settings
Prevent shutting down Integrity Desktop
Prevent uninstalling Integrity Desktop
Settable from Control Center
Settable from installation command line (“/” delimiter)
Changeable from operational command line (“-” delimiter)
Set or Modify Password Installation Command Line Switches
/passwset UserPwordNew
Use passwset to define a new user-level password.
A user-level password:
• Must be a minimum of 6 characters and a maximum of 31 characters, and cannot contain spaces
• Can only be set when no Integrity client database files (“.rdb” file name extension) are present in the computer’s C:\%windir%\Internet Logs folder
The following illustrates the general form of the passwset installation command line switch:
iclientSetup_1101.exe /passwset UserPwordNew
Zone Labs, LLC. recommends that a user-level password not be set during initial installation of Integrity client. A user-level password prevents the end-user from responding to Integrity client alerts and interferes with the application of centrally administered updates and changes.
Default Value: No default value.

Integrity Client Management Guide 91ZLD 1-0218-0501-2005-04-21
Set or Modify Password Installation Command Line Switches
/password UserPwordOld
Use the password switch to supply a previously defined user-level password to the Integrity client installation program. The following illustrates the general form of the password installation command line switch:
iclientSetup_1101.exe /password UserPwordOld
After installation, the password switch can be used in conjunction with passwset (described in the preceding table entry) to update an existing user-level password. In the following, password enables an existing user-level password to be modified:
iclientSetup_1101.exe /password UserPwordOld /passwset UserPwordNew
Default Value: Not applicable during initial installation.
Set or Modify Password Installation Command Line Switches
/pwinstset InstallPwordNew
Use pwinstset to define a new installation-level password. An installation-level password prevents unauthorized changes to an existing Integrity client installation.
If an installation-level password was set during installation, and a user attempts to uninstall Integrity client without specifying the installation-level password, the following dialog box appears.
If the correct installation level password is not supplied, the uninstallation process stops.
• An installation-level password must be a minimum of 6 characters and a maximum of 31 characters, and can not contain spaces.
Installation-level passwords do not affect the user’s ability to change his or her personal security settings.
Installation-level passwords can be:
• Set from the command line only during initial installation
• Changed during reinstallation if the pwinst switch appears on the same installation command line to enable the change
The reset switch, does not clear the installation password.
Integrity client provides no other methods for changing or updating an installation-level password.
Install Password dialog box.

Integrity Client Management Guide 92ZLD 1-0218-0501-2005-04-21
The following table inset illustrates three uses of the pwinstset installation command line switch.
Default Value: No default value.
Set or Modify Password Installation Command Line Switches
/pwinst InstallPwordOld
Use pwinst to supply a previously defined installation-level password to the Integrity client installation program. The following illustrates two variations of the pwinst installation command line switch:
iclientSetup_1101.exe /pwinst InstallPwordOld [/additional switches…]
iclientSetup_1101.exe /pwinst InstallPwordOld /pwinstset InstallPwordNew
Default Value: Not applicable during initial installation.
Set or Modify Password Installation Command Line Switches (continued)
/pwinstset InstallPwordNew
Initial installation
iclientSetup_1101.exe /pwinstset InstallPwordNew
• In this example pwinstset sets the installation-level password for the first time.
Changing an installation-level password without the reset switch.
iclientSetup_1101.exe /pwinst InstallPwordOld /pwinstset InstallPwordNew
In this example:
• Pwinst specifies the existing installation-level password to enable a change to the installation-level password
• Pwinstset changes the installation-level password
Clearing the user-level password with the reset switch (line break added).
iclientSetup_1101.exe /pwinst InstallPwordOld /pwinstset InstallPwordNe /reset
In this example:
• Pwinst specifies the existing installation-level password to enable specifying a new installation-password
• Pwinstset specifies a new installation-level password
• Reset clears the existing user-level password

Integrity Client Management Guide 93ZLD 1-0218-0501-2005-04-21
The Configuration File Installation Command Line Specifier
Use the installation configuration file command line specifier to specify an optional installation configuration file to load when installation is completed. The following table lists the installation configuration file command line switch.
The following table describe the installation configuration file command line specifier.
The Policy File Installation Command Line Switch
In networks equipped with Integrity Server, use the /policy installation command line switch to specify an optional installation policy file to load when installation is completed.
If used, the installation configuration file specifier must not be prefaced by a slash (“/”) and must be the last switch on an installation command line.
Configuration File Installation Command Line Switch
"Path to Configuration File"
Use the installation configuration file specifier to specify an installation configuration file to be loaded after installation has completed. The following illustrates the placement of the configuration file command line switch.
iclientSetup_1101.exe [/switches…] "C:\Full\path\to\Configuration.ini"
Do not confuse the installation configuration file specifier with the /policy switch. If used, the installation configuration file specifier:
• Must not be used on the same installation command line as the /policy switch
• Must not be prefaced by a slash mark (“/”)
• Must be the last switch on the command line
The installation configuration file specifier:
• Must be enclosed in quotation marks (")
• Can be any valid Windows filename, but must use the .ini filename extension
• Can use Microsoft Windows Universal Naming Convention (UNC) of \\servername\sharename to refer to an installation configuration file located on a shared network resource
When an installation configuration file is specified on a command line, Integrity client ignores the Policy_Info section of the specified configuration file.
The policy installation command line switch must be prefaced by a slash (“/”).

Integrity Client Management Guide 94ZLD 1-0218-0501-2005-04-21
The following table describes the policy file installation command line switch.
Configuration File Installation Command Line Switch
/policy "Path to Policy File"
In networks equipped with Integrity Server, use the policy switch to specify an installation policy file to be loaded after installation has completed. The following illustrates the placement of the policy installation command line switch.
iclientSetup_1101.exe [/switches…] /policy "C:\Full\path\to\Policy.ini"
Do not confuse the /policy switch with the installation configuration file switch.
If used, the policy installation command line switch:
• Must not be used on the same installation command line with the configuration file specifier
• Must be prefaced by a slash mark (“/”)
• Must be the last switch on the command line
The path and file name used with the policy switch:
• Must be enclosed in quotation marks (")
• Can be any valid Windows filename, but must use the .ini filename extension
• Can use Microsoft Windows Universal Naming Convention (UNC) of \\servername\sharename to refer to an installation configuration file located on a shared network resource
When policy is specified on a command line, Integrity client ignores the Integrity section of the specified policy file.

Integrity Client Management GuideZLD 1-0218-0501-2005-04-21
Index
Symbols"Path to Configuration File" 93/errlog Path 81/forceupgrade 81/i 39, 89/installdir Path 82/lickey LicenseKey 82/noreboot 71, 83/nostartup 83/notminimized 84/notutorial 89/nowizards 89/password UserPwordOld 74, 91/passwset UserPwordNew 90/policy "Path to Policy File" 94/pwinst InstallPwordOld 73, 92/pwinstset InstallPwordNew 91/qn 11/rbprompt 39, 72, 84/reboot 85/regfile 85/reset 86/s 11, 39, 72, 86/s/noreboot 39/upgradekey 28, 87/upgradekeyset 88/X 88
0-95.0 Command Line Switch/Property/Value 13
AALERTMODE switch
default value for 25syntactic requirements for 25
AOL Instant Messenger 18av.html 53avdupdate.html 53avemergency.html 53avengineupdate.html 53
Cclean switch
availability of 71deprecated 71
clean uninstallation, as default 71
CLI INI Filedefault value for 30
CLIENTSTARTUP= 15command line limit
ZLPROPERTYFILE= 30Command Line Switch 63, 71, 79command lines, see installation command lines or operational command lines
Command lines, types of 62-config "Path to Configuration File" 67Config command line switch
preceding by dash 62syntactic requirements 62
config command line switchand Policy_Info section 67, 79compared to Policy command line switch 68general form of 67syntactic requirements 79using 68
CONFIGFILE= 21Configuration File Installation Command Line Switch 94
Configuration File Installation Command Line Switch 93Configuration File Operational Command Line Switch 67
Configuration filesand policy switch 21, 22file and pathname specifier 62Policy_Info section ignored in 21, 22
configuration filesand policy switch 93and slash mark 93general form of 93policy_Info section ignored in 67, 93post-installation use of 62, 79specifying during installation 93
Configuration Wizard, see wizardconnection parameter, and policy command line switch 69
ConnID variable, and policy command line switch 69Control Center
displaying after installation 84
DDash
use of 23dash
use of 62, 90Default 13default.html 54

Integrity Client Management GuideZLD 1-0218-0501-2005-04-21
DelayValue variable, and Policy command line switch 69
Description 13, 63, 71, 79DISCONNECTEDPOLICY= 22
EEAPTYPE= 16enforcement.html 54Enterprise policy 2, 3, 37Enterprise security policies
overwriting 70errlog switch
and s switch 81default value for 81general form of 81
Error log file, location of 10error log file, location of 73, 81, 87error message, command line 79
Ffirewall.html 54FWSTARTUP= 16
GGeneral Installation Command Line Switches 71, 72, 81, 82, 83, 84, 85, 86, 88
General Installation Command Line Switches (continued) 72, 85, 86, 87
General Operational Command Line Switches 64
General Operational Command Line Switches 64
Ii switch
default value for 89general form of 89
iainstall.html 54iaversion.html 54IDSetup_110n.exe 62IMSECURITY= 18index.html 54Ini file 36, 41Install Key 40installation
display of wizard duringInstallation Command Line 62Installation command lines
compared to operational command lines 68compared with operational
command lines 62delimiters in 62overview 62overview of differences between 62switches in 15–21, ??–22
installation command linesdelimiters in 78, 81elements of 8, 78error messages in 79general form of 8, 78limitations on size 9, 78switches in 80–93used for 80
Installation-level passwordcompared to user-level password 23reset of 23scope of 23
installation-level passwordcompared to user-level password 90reset of 66, 91scope of 90
Installdir switchand invalid path and file names 11and quotation marks 11and S switch 11and s switch 11default value for 11
installdir switchand invalid path and file names 82and quotation marks 82and s switch 73, 82, 87default value for 82general form of 82
INSTALLDIR= 11INSTALLPASSWORD= 26Integrity Agent 3, 44Integrity Client
configuring with .ini or .xml files 41install key options 40localized installers, downloading 52preventing uninstallation 40reboot warning 39silent installation 39specifying the language 36version enforcement 35
Integrity Flex 2about 44suppressing tutorial wizards 39
Integrity Sandboxabout 51customizing HTML files 53placement of 55port used 55
Integrity sectionand LAN 69and VPN 69ignored by policy switch 94
Integrity Serverreasons codes 51–??sandbox 44
LLicense Key 38license key
format for 64installation command line switch 63, 76, 79
License key, see Lickey switchlicense key, see lickey switchLICENSEKEY= 20-lickey LicenseKey 64Lickey switch
general form of 20lickey switch
default value for 64, 81, 82, 85general form of 64, 81, 82
lickey, see License keylocales, adding to Integrity Sandbox 52
lockup 55
MMaximum Installation CommandLine Length (characters + spaces) 9, 78
MicrosoftInternet Explorer 44System Management Server 47Systems Management Server 12, 29, 71, 72, 83, 84Universal Naming Convention 81
MSN Messenger 18
NNetscape
Navigator 44New upgrade key
default value for 26syntactic requirements for 26
NEWINSTALLPASSWORD= 24NEWUPGRADEKEY= 26NEWUSERPASSWORD=UserPwordNew 24
Noreboot switchand SMS 12default value of 12

Integrity Client Management GuideZLD 1-0218-0501-2005-04-21
noreboot switchand SMS 71, 83default value of 71, 83general form of 71, 83installation versus upgrade 71, 83required by upgrade 71, 83
Nortel icon switchdefault value for 19
NORTELICON= 19Nostartup switch
default value for 15, 16nostartup switch
default value for 83, 84, 86general form of 83, 86
Notutorial switchdefault value for 17
notutorial switchdefault value for 89general form of 89
Nowizards switchdefault value for 17, 18, 89general form of 89
OOperational Command Line 62Operational command lines
compared to installation command lines 68compared with Installation command lines 62delimiters in 62overview 62
operational command linesdelimiters in 62elements of 62
OperationalCharacteristic 62Overwriting an enterprise security policy 70
Overwriting preloaded policies 70
PPage 63, 71, 79Passwinstset switch
default value for 24passwinstset switch
default value for 92general form of 92
Password switchand passwset switch 28default value for 28
password switchand passwset switch 74, 91default value for 65, 74, 91general form of 65, 74, 91
-password UserPwordOld 65
Passwordsand qn switch 10and s switch 10behaviors of 23scope of 23
passwordsbehaviors of 90modifying 66recommendations for 65scope of 90setting 65syntactic requirements for 65, 66
passwsetdefault value for 65
passwset switchdefault value for 24, 90general form of 65, 90syntactic requirements for 24, 28, 90syntactic requirements of 24, 91
-passwset UserPwordNew 65pcAnywhere, and client deployment 48
Personal policy 2, 3policies
about 5–??-policy "Path to policy File" 68Policy command line switch
and DelayValue variable 69and Integrity section 68compared to Config command line switch 68general form of 94limitations on use 67, 93syntax 68, 93using 68
policy command line switchand ConnID variable 69
Policy File Operational Command Line Switch 68
Policy filesIntegrity section ignored in 68, 94
Policy StudioClient Settings 54Client Settings tab 44Firewall Security Rules 54
policy_Info sectionand config switch 67
policy_Info section, ignored by config command line switch 79
POLICYFILE= 22ports
used by Integrity Sandbox 55programAsk.html 54programBlock.html 54-pwinst InstallPwordOld 66Pwinst switch
default value for 26
pwinst switchand pwinsetset switch 73, 92default value for 66, 73, 92general form of 66, 73, 92
-pwinstset InstallPwordNew 66pwinstset switch
and pwinst switch 66, 73, 92and reset switch 92default value for 66general form of 66
Qqn switch
and paswwords 10position of 11requirements for use 10syntactic requirements 11
Quotation marksuse of 21, 22, 94
quotation marksuse of 67, 93
RRbprompt switch
and GUI reboot prompt 29and s switch 29default value for 29
rbprompt switchand GUI reboot prompt 72, 84and s switch 72, 84default value for 72, 84general form of 20, 72, 84, 85
Rebootafter upgrade 12and S switch 10messages 29
rebootafter upgrade 71, 83and s switch 72, 86messages 72, 84
reboot, forcing after installation 85REBOOT= 12REBOOTPROMPTWITHSILENT= 29REGISTRYFILE= 20Remote Administration Tool (RAT) 48Reset switch
and pwinst switch 30and pwinstset switch 92default value for 30scope of 30
reset switchuse of 77, 80
reset switch, scope of 86reset switch, use of 86RESETCONFIG= 30

Integrity Client Management GuideZLD 1-0218-0501-2005-04-21
SS switch
and error log 10and installdir switch 11and Rbprompt switch 29and reboot 10risks of using 11used during upgrade
s switchand errlog switch 81and error log 73, 87and installdir switch 73, 82, 87and paswwords 10and rbprompt switch 72, 84and reboot 72, 86default value for 73, 87general form of 72, 86position of 11, 72, 86requirements for use 10risks of using 73, 87syntactic requirements 11, 72, 86used during upgradeused with errlog switch 81
SecureClient Installer File 35Set Install Key 40Set or Modify Password Installation Command Line Switches 73, 74, 90, 91, 92
Set or Modify Password Installation Command Line Switches (continued) 91
Set or Modify Password Operational Command Line Switches 65, 66
SHOWTUTORIAL= 17, 18silent mode 3silent mode switches 11Silent upgrade, see S switchsilent upgrade, see s switchSlash mark
use of 23, 94slash mark
use of 8, 67, 78, 90, 93SMS
see Microsoft, Systems Management Server
SSL (Secure Socket Layer) 55startup firewall rules 55support.html 54ALERTMODE= 25Syntactic conventions
slash mark 93, 94syntactic conventions
dash 62slash mark 8, 67, 78
System tray 37, 45
TTivoli, and client deployment 48TriggerType variable, and Policy command line switch 69
Tutorial and Wizard Installation Command Line Switches 89
tutorial, controlling display of 89
UUNC see Microsoft Universal Naming Convention
UNC, see Microsoft Universal Naming Convention
Upgrade keydefault value for 28syntactic requirements for 28
-upgradekey 64Upgrading
completing 12rebooting after 12silent 29
upgradingand user settings 81completing 71, 83rebooting after 71, 83silent 72, 84
User-level passwordcompared to installation-level password 23recommendations for 24scope of 23
user-level passwordcompared to installation-level password 90recommendations for 65, 89, 90reset of 92scope of 90
USERPASSWORD=UserPwordOld 28
VVPN connections 69vsconfig.xml 57
WWindows
and installation command lines 9, 78command line limitations 9, 78Universal Naming Convention 21, 22, 67, 93, 94
Windows Version 9, 78
YYahoo! Messenger 18
ZZLPROPERTYFILE= 30