introducing eservices for claimants - microsoft€¦ · introducing eservices for claimants ....
TRANSCRIPT

1
Introducing eServices for claimants eServices is the Employment Security Department’s secure website for applying for unemployment benefits, submitting weekly claims and accessing information about your benefits.
Table of contents What you can do through eServices................................................................................................................ 1
Create an account ............................................................................................................................................. 1
Apply for benefits ............................................................................................................................................... 4
Navigate eServices ............................................................................................................................................ 9
Submit a weekly claim .................................................................................................................................... 11
Sign up for direct deposit or a debit card..................................................................................................... 17
Send or reply to a message ............................................................................................................................ 20
Respond to requests for additional information ............................................................................................... 23
What you can do through eServices • Apply for benefits. • Submit your weekly claims. • Get information about your benefits, including how much you’ll be paid and whether we’ve
processed your payment. • Read letters from us. • Change your contact information. • Sign up for direct deposit or a debit card. • Check your overpayment balance and pay it back. • Change your Personal Identification Number (PIN) for our phone system. • Request federal income tax to be withheld or not withheld from your benefits. • Apply for training benefits. • Respond to requests for more information (fact-finding questions). • Send us a question. • Look up your past wages.
Create an account To create an eServices account, select Sign in or create account from esd.wa.gov.

2
1. You will need to sign in with a SecureAccess Washington (SAW) account. If you created a SAW account for WorkSourceWA.com or another state service, you can use that same user name and password. If not, select Create new account and follow the instructions. You must provide an email address.
2. After creating an account, you must activate it. Select the link you received by email.

3
3. Next, select For yourself and the Continue button.
4. Select Verify my identity.

4
You’ll provide your personal information, including your Social Security number, address and birth date.
6. If you need help registering, call 855-682-0785.
Apply for benefits Select Apply for unemployment benefits or manage your current and past claims.
5
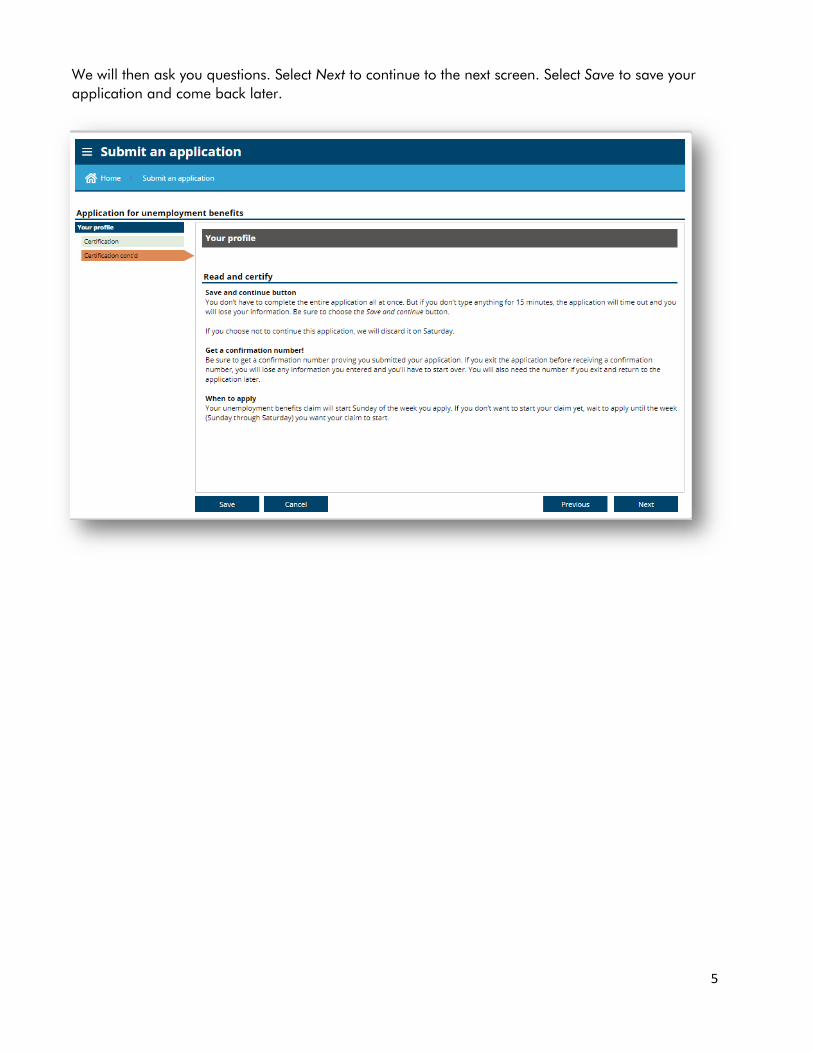
We will then ask you questions. Select Next to continue to the next screen. Select Save to save your application and come back later.

6
When you get to the Contact information screen, type in your address. Select the Check address button in the top right corner of the screen to verify your address.
Select from the list of addresses. In most cases, you will select the address marked Suggested, which is the address recognized by the U.S. Postal Service.

7
To enter your occupation, first select the Search occupation button.
On the left, enter your job title and select Search. On the right, you’ll see a list of positions. Select the title that most closely matches your job.

8
Before you submit your application, you can go back and review your answers by selecting the buttons on the left side of the screen. When you’ve finished answering all the questions, select the Submit button. Write down your confirmation number and read the important instructions that follow.

9
Navigate eServices Once you have established a claim and are logged into eServices, your screen will default to the Summary view. Blue text indicates a hyperlink. Select the UI claim link…
…to view your current claim and see benefits you have been paid. “UI” stands for unemployment insurance.

10
Select the Online activity tab to view a list of tasks you completed or need to complete on eServices.
Select the Notices/letters tab to view unread letters and notices.

11
Submit a weekly claim Select the blue hyperlink that says You have a weekly claim to file. You can find this link on the Summary view, as shown below. If you select UI claim…
…you will also find the weekly claim link at the top of the screen under Account alerts.

12
Choose the week you want to claim. If you missed a week, you can start from where you left off and catch up.
We will then ask you questions. To receive benefits, you must be able to work, available for work and complete at least three job search activities each week.

13
You can enter your job search activities online, including employer contacts and workshops you attend at WorkSource career centers. Select Add contact.
14
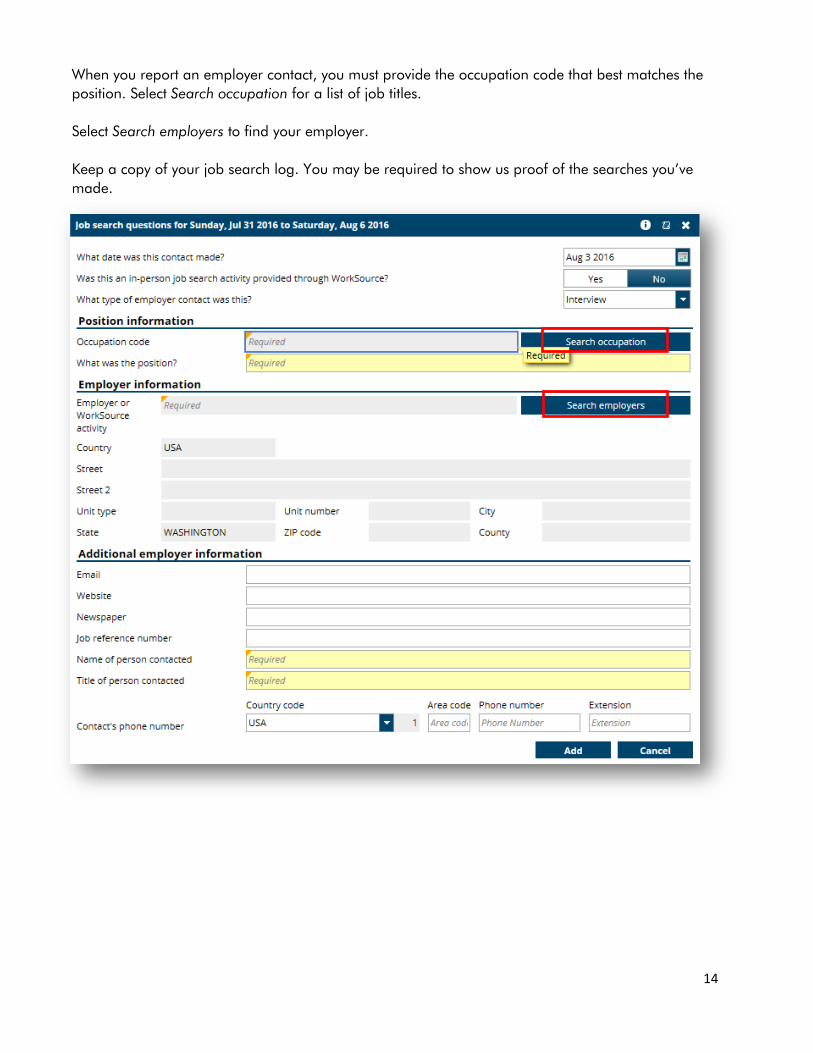
When you report an employer contact, you must provide the occupation code that best matches the position. Select Search occupation for a list of job titles. Select Search employers to find your employer. Keep a copy of your job search log. You may be required to show us proof of the searches you’ve made.

15
Tell us the number of hours you worked during the week, if any. And report any wages you earned, even if you don’t get paid until later. To report wages, first select your employer from the list provided or choose I can’t find the employer I’m looking for to enter another employer.
Select the employer’s name to enter your earnings and hours worked. When you report income, give us the amount you earned before any taxes were taken out.

16
When you’ve finished answering all the questions, select Submit.

17
Sign up for direct deposit or a debit card From the Summary view, choose Update next to About me.
Under I want to, select Update payment information.

18
To sign up for direct deposit, answer “Yes” to the first question: “Do you wish to provide your bank information so that your benefit payments will be automatically direct deposited into your account?”
You will then be asked to provide your bank account details. After providing your account information, select Submit.

19
If you prefer to have your benefits paid to a debit card, select “No” to the first question, and “Yes” to the second question: “Would you like us to deposit your benefit payments into a debit card?” Then select Submit.

20
Send or reply to a message To send a new message to the claims center, select the Send us a message link under I want to.
When sending a new message, you will see the following screen. Select Send us a message under Message type, add a subject and type your message. To include an attachment, select the Add button to the right of Attachments. Enter a description of the document and upload it from your computer.

21
To reply to a message we sent you, select the Notices/letters tab. Then select All notices to the right of Unread notices.
You’ll see a list of your notices, if any. To reply to one, select the subject line.
22
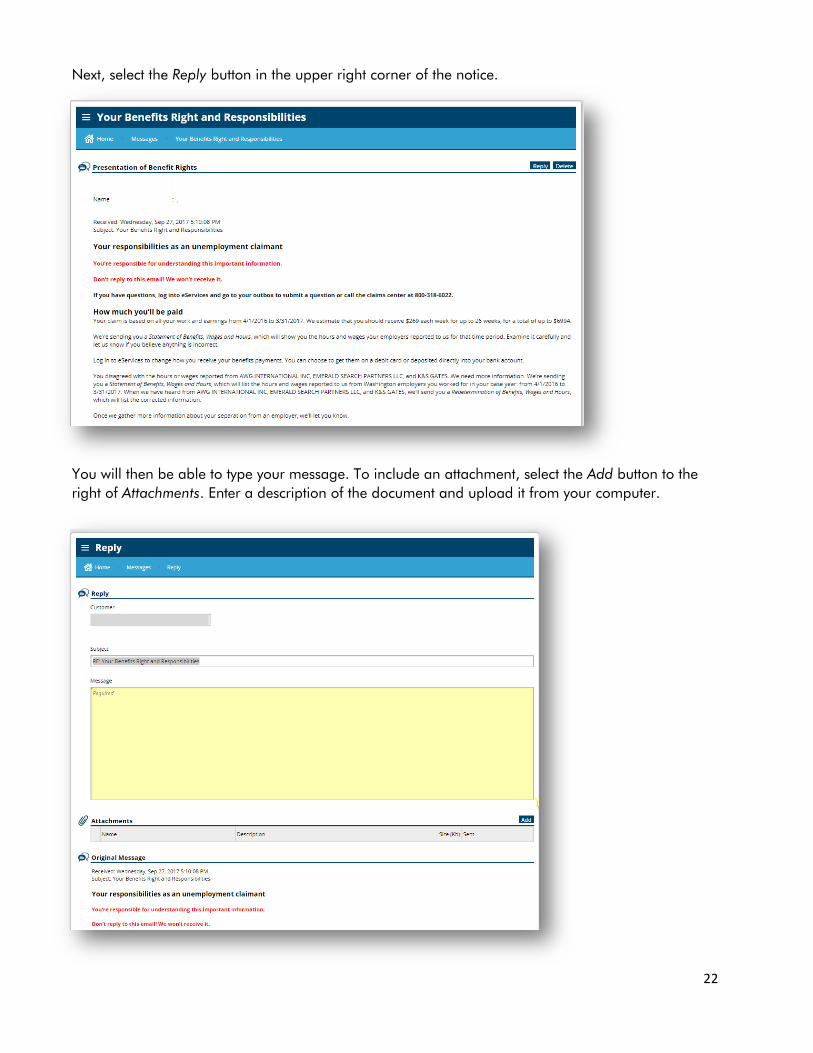
Next, select the Reply button in the upper right corner of the notice.
You will then be able to type your message. To include an attachment, select the Add button to the right of Attachments. Enter a description of the document and upload it from your computer.
23
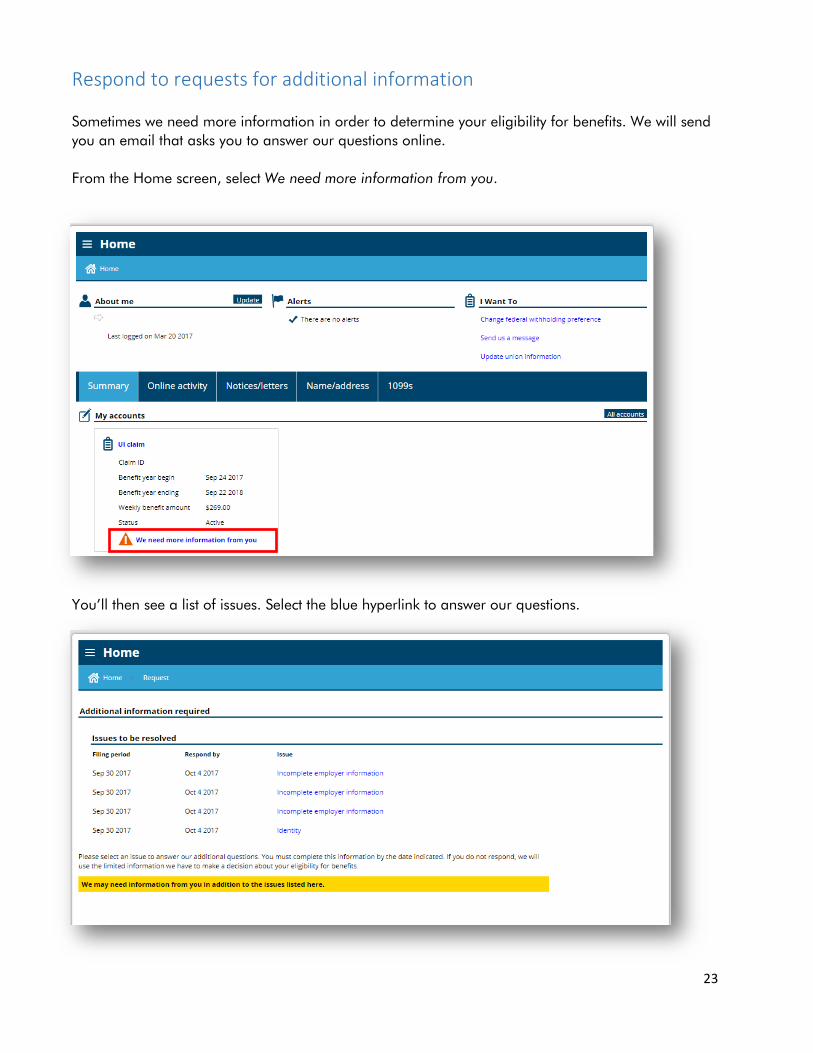
Respond to requests for additional information Sometimes we need more information in order to determine your eligibility for benefits. We will send you an email that asks you to answer our questions online. From the Home screen, select We need more information from you.
You’ll then see a list of issues. Select the blue hyperlink to answer our questions.

24
Read and select the box showing you understand your rights.