introduction - starlight instrumentsstarlightinstruments.com/store/image/data/coma correctors... ·...
TRANSCRIPT
Introduction
Thank you for purchasing the Starlight Integrated Paracorr System (referred to as SIPS
hereafter), which incorporates all the benefits of the Paracorr Type 2. SIPS is the only
combination focuser and stationary coma corrector currently on the market.
By placing the SIPS at the proper constant distance from the primary mirror, the SIPS
ensures that you will see the best results that the Paracorr system is capable of producing,
no matter the focal ratio of your telescope, and no matter which TeleVue eyepiece you
place in the focuser.
With this finely-crafted piece of equipment, all you have to do is put in an eyepiece.
There is no tuning of the SIPS required in order to obtain optimal image quality. Just
enjoy the views.
Coma Correction
The Paracorr Type 2 is the updated version of the popular Paracorr coma corrector. It
offers improved performance over the Type 1 at all focal ratios, especially in the range
below F/4. It also offers a flatter field than the Type 1, making stars at the edges of the
field more in-focus.
Diagram
The parts of the SIPS are labeled in Figure 1. (The eyepiece is not included!)
The focuser portion is a standard 1.5"-travel Feather Touch focuser, the finest available
on the market. (NOTE: The focuser can be purchased with the rest of the unit, or you
may use your own 1.5"-travel Feather Touch if you already have one.)
IMPORTANT: The SIPS unit was designed for use with the 1.5"-travel, 2"
diameter Feathertouch focuser. Other diameters will not fit. Longer focusers will
bottom out, possibly providing insufficient travel. Shorter focusers may also
provide insufficient travel.
By removing the need to “tune” the Paracorr, less focuser travel is required to reach focus
with all TeleVue eyepieces. The 1.5"-travel model comfortably covers the required
focusing range.
The focuser portion is mounted on the Paracorr module of the SIPS. It is attached with
three setscrews. The Paracorr module sits below it. A locking ring is threaded onto the
Paracorr module. Loosening this ring allows the whole assembly to be rotated. This
adjusts the height of the whole assembly by threading it into or out of the mounting ring,

which sits below the locking ring and inside of the base. The base mounts on your
telescope.
Installation
Carefully unpack the SIPS unit parts.
If you already have a 1.5"-travel Feather Touch focuser mounted on your telescope,
detach it from the base by loosening the two setscrews that hold it in place. Either a
leveling base or standard base (without leveling screws) may be used with the SIPS.
If you do not have a Feather Touch focuser, you will need to purchase and install the
focuser and SIPS package.
To install the base, accurately center the base over the existing hole and drill mounting
holes. Install the base using the provided bolts and nuts (Figure 2).
Next, verify that the mounting ring and locking ring are both threaded onto the SIPS
Unit. Install this assembly in the base by tightening the two setscrews on opposite sides
of the base (Figures 3, 4) using the provided hex wrench.
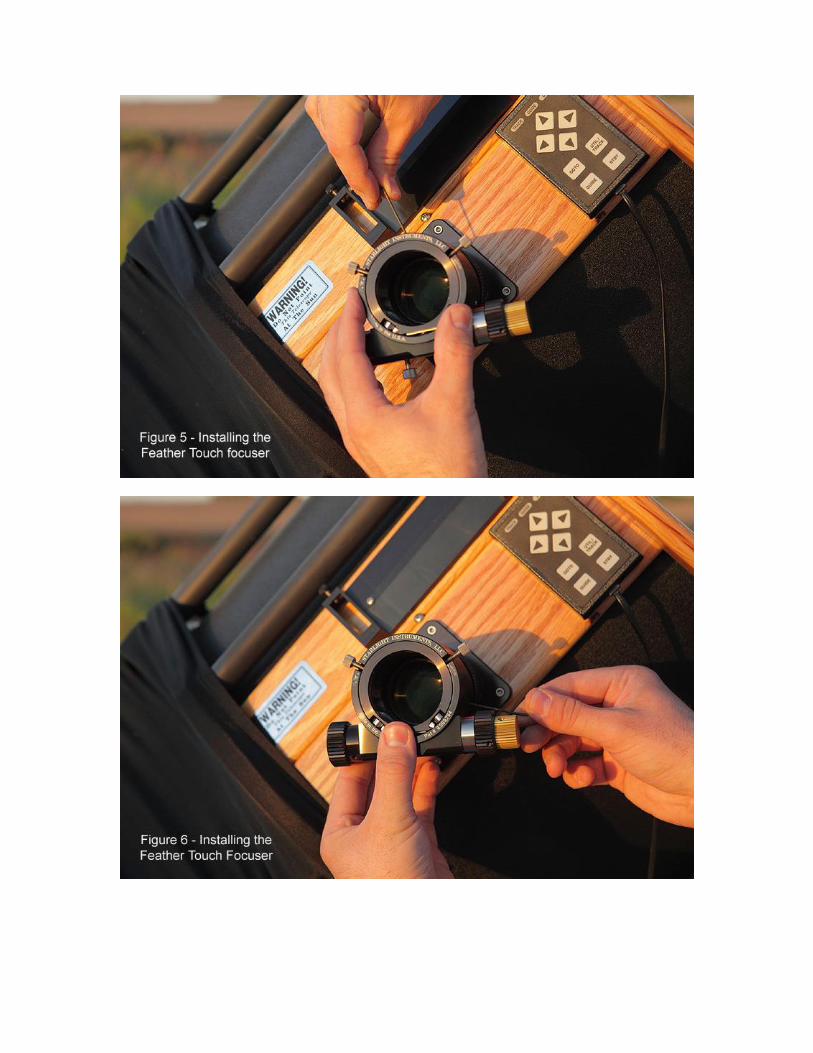
Install the Feather Touch focuser on top of the SIPS Unit by tightening the three
setscrews around the top of the unit (Figures 5, 6).
This completes the assembly of the SIPS unit.
If you have purchased a leveling base, then after the focuser is installed, align the focuser
using the adjustment screws.
Assemble your telescope if you have not already done so.
Collimation
To collimate your telescope, you must remove the Paracorr lens group.
We recommend pointing your telescope near or at the horizon before removing the lens
group. (This will reduce the chance of dropping it onto the ground should you lose your
grip on it.)
Reach inside the secondary cage and grasp the knurled bottom of the Paracorr lens group.
Carefully unscrew it (counterclockwise). You will feel gentle resistance from an O-ring
that provides friction - this prevents the lens group from becoming loose or falling out
due to vibration during transport. After a few turns, the lens group will disengage from
the threads and it can then be pulled out carefully into the secondary cage. (See Figure
12.)

Carefully set it aside where it will be safe and clean.
Perform your collimation procedure as normal with your laser, autocollimator, or other
collimation tool.
To replace the lens group, carefully insert it back into the bottom of the SIPS and turn it
clockwise until it stops. Do not over-tighten it.
Adjustment
Now the Paracorr lens group must be positioned the proper distance from your primary
mirror. The SIPS may be used before this step is completed, but the best performance
will only be obtained after positioning is done.
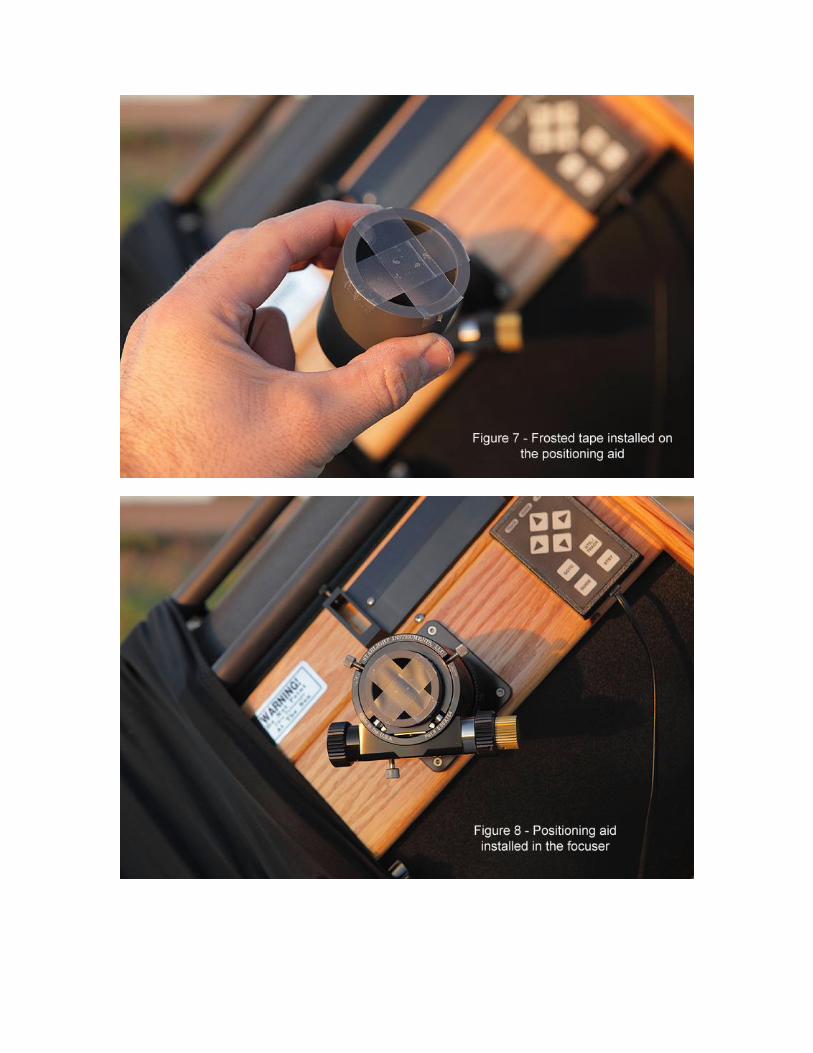
If there is no tape present, place two pieces of frosted tape (scotch-tape) across the top of
the positioning aid (plastic cylinder). This is shown in Figure 7.
Under the night sky, point the telescope at the moon, a bright planet, or a bright star.
Using an eyepiece, center the object in the field of view. If your telescope has tracking,
engage the drive so that the object stays centered in the field of view. If it does not have
tracking, you will need to move the telescope every so often to keep it in the field of
view.
With the object roughly centered, remove the eyepiece, and set it aside where it will be
safe.
Slide the positioning aid all the way down into the focuser barrel (Figure 8). It will
bottom out when it touches the top of the Paracorr lens group. This places the tape at a
particular distance from the lenses. Tighten the thumbscrews on the focuser to hold the
positioning aid in place.
IMPORTANT: Verify that the focuser is racked all the way in, that is, it will go
no farther down. The top of the barrel will be even with the top of the focuser
housing.
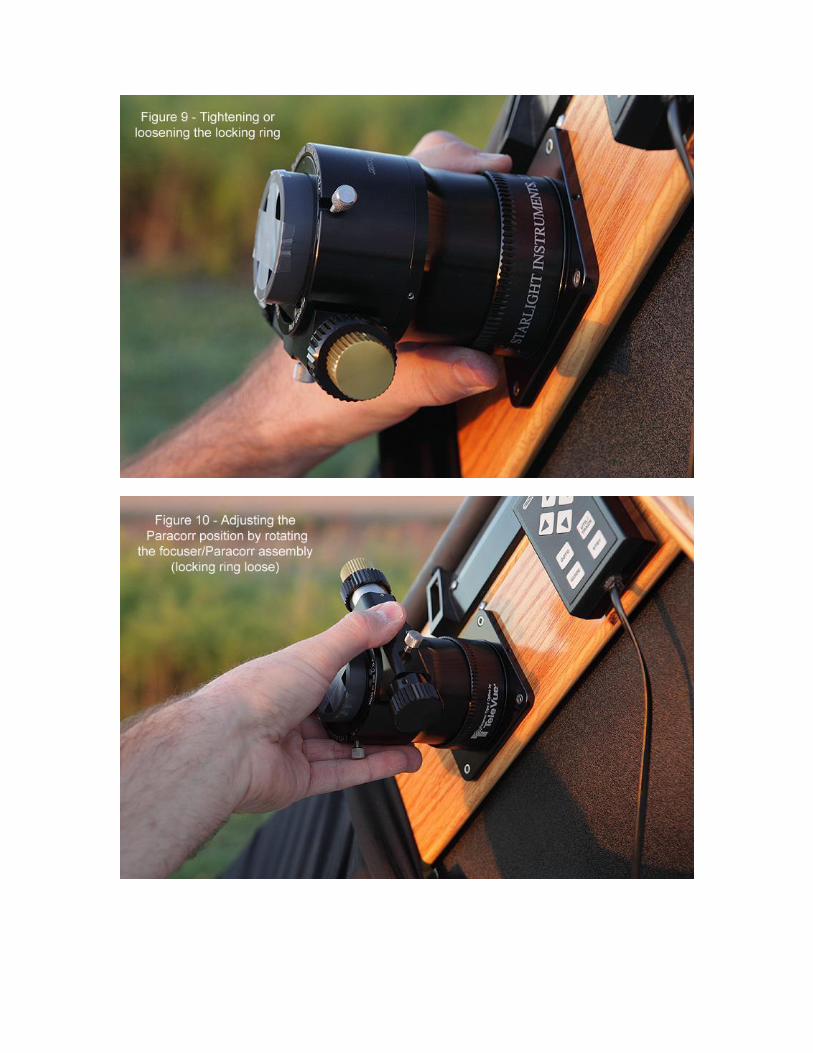
Loosen the locking nut by turning it counterclockwise (Figure 9).
The entire SIPS assembly may now be turned (Figure 10). Turning it counterclockwise
will raise the unit, and turning it clockwise will lower it.
Adjust the height of the unit so that the bright object is sharply focused on the tape. This
means that you should make the image of a bright star or planet as small as possible on
the tape. The moon, however, should be focused as sharply as possible. (Using the edge
of the moon's disk may be the easiest way to do this.)

Figure 11 shows Jupiter focused on the tape. (Figure 11 was a time exposure and the
telescope was not tracking, so it appears as a short, thin line rather than a point.)
One method that may make adjustment easier is to thread the SIPS all the way into the
base until it stops. Use the focuser to find the sharpest focus, and then raise the unit by
rotating it counterclockwise until the sharpest focus occurs when the focuser is racked all
the way in (down).
With the object focused sharply on the tape and the focuser racked all the way in,
adjustment is complete.
It is important to realize that this procedure sets the distance between the Paracorr lens
group and the primary mirror. If the primary mirror moves up or down in its cell due to
collimation adjustments that are made over time, the SIPS position should be adjusted
periodically to maintain the proper distance between the Paracorr lens group and the
primary mirror.
Remove the positioning aid, insert an eyepiece, and enjoy the views!
Usage
The SIPS should always be used when using an eyepiece. Frequent removal and
installation of the lens group is not recommended.
To use other accessories, such as cameras, binoviewers, etc., the focuser may be detached
from the SIPS unit. The SIPS unit is then removed from the base without loosening the
locking ring or mounting ring (thus ensuring that it will be positioned properly when it is
reinstalled.) The focuser may then be mounted directly on the base.
Accessories
Various accessories, such as cameras, binoviewers, etc. may be used so long as they do
not come into contact with the Paracorr lens group.
Be careful when inserting these accessories into the focuser barrel if you have not
previously verified that they do not contact the lenses.
Final Notes
For information on cleaning of the Paracorr lenses go to the link below, or contact
TeleVue directly. http://www.televue.com/engine/TV3_Page.asp?return=Advice&id=103 Credits: Mike Lockwood for his time and effort in the production of this manual.