investigator site oc rdc pdf user...
TRANSCRIPT
Oracle® ClinicalRemote Data Capture 4.5.1 PDF
Investigator Site User Guide (OC RDC)
Investigator Site OC RDC PDF
User Guide
If you experience any problems with OC RDC, contact the EDC Support Center Toll free numbers and a Support Center email form can be found at http://edc.ppdi.com
Version 1.0 Page 1 of 40 May 16, 2007
Oracle is a registered trademark of Oracle Corporation.
Oracle® ClinicalRemote Data Capture 4.5.1 PDF
Investigator Site User Guide (OC RDC)
If you experience any problems with OC RDC, contact the EDC Support Center Toll free numbers and a Support Center email form can be found at http://edc.ppdi.com
Version 1.0 Page 2 of 40 May 16, 2007
Oracle is a registered trademark of Oracle Corporation.
TABLE OF CONTENTS Accessing OC RDC Steps for Access 3 Logging On 4 Change Password 4 Laptop and System Security 5 Change Study 5
Navigating OC RDC Activity List Window 6 OC RDC Main Spreadsheet 7 eCRF Cells 8 eCRF Icons 9 Data Entry Window 10 RDC Tools 11 eCRF Buttons 12
Data Entry and Saving Data Options Data Capture Fields 13 Starting a Data Capture Session 14 Saving Complete vs. Incomplete 15 Modifying Saved Data 17 Data Capture Tips 17 Selecting a New Group of Patients 18 Marking and Unmarking an eCRF Blank 18 Inserting Additional Visits 21
Discrepancy Management System vs. Manual Discrepancies 23 Validation Error Processing Window 24 Discrepancy Resolution during Data Entry 26 Routing Discrepancies 27 Viewing Discrepancy History 28
OC RDC Tools Audit History Tool 29 CRF Navigator Tool 30 CRF Status Activities Tool 31 Investigator Comment Tool 31 Search Feature 34 Validating at a Site or Patient Level 36 Principal Investigator Approval Process 37
Logging Out of OC RDC 38
Training and Support 39

Oracle® ClinicalRemote Data Capture 4.5.1 PDF
Investigator Site User Guide (OC RDC)
ACCESSING OC RDC
Steps for Access 1) Complete Online Training or Hands-on Training at an Investigator/Study Coordinator
Meeting 2) Complete, print and submit the “Register your training completion” form found in the Online
Training link at http://edc.ppdi.com. 3) Complete, print and submit an RDC Account Request Form found at http://edc.ppdi.com.
If you have followed these steps and have not received your login information within 5 days, please contact the EDC Support Center.
Existing OC RDC PDF Account Users: If your site is participating in another PDF study, you will need to complete an RDC Account Request Form (Step #3 above) for each separate study you will need to access.
If the study is on the same server (database) as your current study, you will be granted access to the new study and use your existing Username and Password. If the new study is on a different server, your Username will remain the same, but you will receive a new password for that server.
If you have access to multiple servers, you can reset your password so that it will be the same for each server.
NOTE: If your site participates in a study that uses OC RDC Classic, you must complete the training for Classic as noted in step 1 above and complete steps 2 and 3 before access will be granted.
Click Login button to access the Logon window
IMPORTANT NOTE: Do not click the button to close an open eCRF or any window within the application. Use the function buttons within each window. The system will not recognize that the eCRF is closed and users will receive the following error message: “This action cannot be performed as an active PDF form is currently open. Please close the PDF form before continuing with this action.” Users will be forced to log out of OC RDC and then log back in.
If you experience any problems with OC RDC, contact the EDC Support Center Toll free numbers and a Support Center email form can be found at http://edc.ppdi.com
Version 1.0 Page 3 of 40 May 16, 2007
Oracle is a registered trademark of Oracle Corporation.

Oracle® ClinicalRemote Data Capture 4.5.1 PDF
Investigator Site User Guide (OC RDC)
ACCESSING OC RDC con’t
Steps for Logging On 1) Click the Login button on the edc.ppdi.com/ website specific to your study
(Server 1, Server 2 or Server 3) 2) Enter the OC RDC Username, Password and assigned Database
Note: Text is not case sensitive. The user is allowed three log on attempts after which the account will lock. The user will need to call the EDC Support Center to unlock the account.
3) Click the Connect button
NOTE: Upon successful log in, the following window will appear. DO NOT CLOSE this window. It will automatically minimize to the Task Bar at the bottom of the screen. Leave this window open during your entire session of OC RDC to avoid errors.
CHANGE PASSWORD
There are instances in which users are required to change their password: • Upon initial log in • Every 90 days • As needed if users feel someone knows their password
To change your password:
1) From the EDC Website, click the Change Password link
2) On the Logon window, enter the OC RDC Username, Password and assigned Database
3) Click the Connect button 4) On the Change Password screen, enter the existing password and the new password
twice for confirmation 5) Click the Change Password button 6) The News window displays
If you experience any problems with OC RDC, contact the EDC Support Center Toll free numbers and a Support Center email form can be found at http://edc.ppdi.com
Version 1.0 Page 4 of 40 May 16, 2007
Oracle is a registered trademark of Oracle Corporation.
Oracle® ClinicalRemote Data Capture 4.5.1 PDF
Investigator Site User Guide (OC RDC)
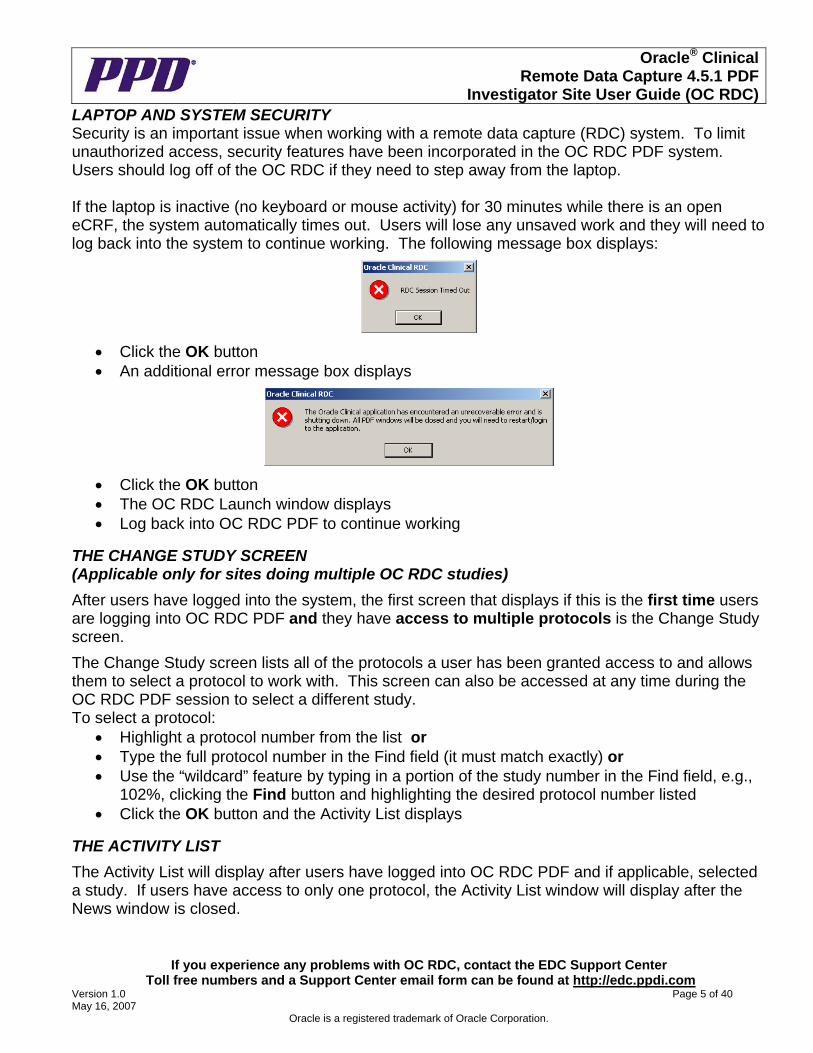
LAPTOP AND SYSTEM SECURITY Security is an important issue when working with a remote data capture (RDC) system. To limit unauthorized access, security features have been incorporated in the OC RDC PDF system. Users should log off of the OC RDC if they need to step away from the laptop. If the laptop is inactive (no keyboard or mouse activity) for 30 minutes while there is an open eCRF, the system automatically times out. Users will lose any unsaved work and they will need to log back into the system to continue working. The following message box displays:
• Click the OK button • An additional error message box displays
• Click the OK button • The OC RDC Launch window displays • Log back into OC RDC PDF to continue working
THE CHANGE STUDY SCREEN (Applicable only for sites doing multiple OC RDC studies)
After users have logged into the system, the first screen that displays if this is the first time users are logging into OC RDC PDF and they have access to multiple protocols is the Change Study screen.
The Change Study screen lists all of the protocols a user has been granted access to and allows them to select a protocol to work with. This screen can also be accessed at any time during the OC RDC PDF session to select a different study. To select a protocol:
• Highlight a protocol number from the list or • Type the full protocol number in the Find field (it must match exactly) or • Use the “wildcard” feature by typing in a portion of the study number in the Find field, e.g.,
102%, clicking the Find button and highlighting the desired protocol number listed • Click the OK button and the Activity List displays
THE ACTIVITY LIST
The Activity List will display after users have logged into OC RDC PDF and if applicable, selected a study. If users have access to only one protocol, the Activity List window will display after the News window is closed.
If you experience any problems with OC RDC, contact the EDC Support Center Toll free numbers and a Support Center email form can be found at http://edc.ppdi.com
Version 1.0 Page 5 of 40 May 16, 2007
Oracle is a registered trademark of Oracle Corporation.

Oracle® ClinicalRemote Data Capture 4.5.1 PDF
Investigator Site User Guide (OC RDC)
THE ACTIVITY LIST con’t
The Activity List is used to select a task or the data that they wish to view on the RDC main spreadsheet. Additionally, the list can be accessed at any time during the OC RDC PDF session to select other tasks.
Hyperlinks
Navigation Pane
Buttons
The protocol number selected from the Change Study window or the protocol number of the study worked with prior to exiting the last OC RDC PDF session displays in the left hand Navigation Pane.
The associated site and patient numbers are listed below the protocol number. The protocol, site and patient numbers display automatically. Patient numbers are populated by PPD for viewing in the Navigation Pane.
To expand or open the site and list of patient numbers, click the (+) symbol to the left of the protocol or site number. When expanded, the (+) symbol becomes a (-) symbol.
Subject icons display next to the patient numbers once data has been entered and saved.
If patient initials are being populated in the Navigation Pane, users will see the initials displayed after they have been manually entered by Data Management.
If your study has not contracted for initials to be entered for the study, then (No inits) will display next to the patient number.
Also note that the icons have color coding, which indicate the presence or absence of discrepancies (data errors).
• Red indicates a discrepancy actionable to the person or user group logged into the system. • Yellow indicates a discrepancy actionable to someone within a different user group (i.e.
CRA, DM or PVG) • White indicates there are no discrepancies on the patient data.
When a protocol, site or patient number is highlighted in the Navigation Pane, the Task Pane displays a list of pre-set tasks, represented as hyperlinks, which are associated with the current selection. The hyperlinks provide access to the OC RDC Main Spreadsheet to view or enter data. On the right side of the screen, Buttons are available for selecting another study if users have access to multiple protocols, accessing the Search window, canceling out of the Activity List and launching the Oracle RDC Online Help.
If you experience any problems with OC RDC, contact the EDC Support Center Toll free numbers and a Support Center email form can be found at http://edc.ppdi.com
Version 1.0 Page 6 of 40 May 16, 2007
Oracle is a registered trademark of Oracle Corporation.

Oracle® ClinicalRemote Data Capture 4.5.1 PDF
Investigator Site User Guide (OC RDC)
OC RDC MAIN SPREADSHEET
To display the OC RDC Main Spreadsheet
• Highlight the site or patient number from the Navigation Pane
• Click the desired hyperlink from the Task Pane to display the Main Spreadsheet
• Click the Maximize button on the top right corner of the OC RDC Main Spreadsheet to obtain a full screen view
Not Maximized Maximized
Note: When your OC RDC Main Spreadsheet is maximized, you will be able to view the scroll bar on the right, allowing you to scroll up and down.
The title bar displays the current protocol, site and user information.
The toolbar and menu options contain the same options and gives access to the most frequently used commands.
At the bottom of the patient numbers list, the Activity List window can be accessed by clicking the Activity List button. The data selected from the Activity List or Search window displays in the Status Bar.
If you experience any problems with OC RDC, contact the EDC Support Center Toll free numbers and a Support Center email form can be found at http://edc.ppdi.com
Version 1.0 Page 7 of 40 May 16, 2007
Oracle is a registered trademark of Oracle Corporation.
Tool Bar
Menu Bar Title Bar
Column Header
Visit Tabs
Patient Numbers
Activity List
Status BarTask Tabs
The OC RDC Main Spreadsheet consists of columns and rows. Each row and column is uniquely identified with descriptive information in the form of visit names, page numbers and patient numbers.
Oracle® ClinicalRemote Data Capture 4.5.1 PDF
Investigator Site User Guide (OC RDC)
OC RDC MAIN SPREADSHEET con’t
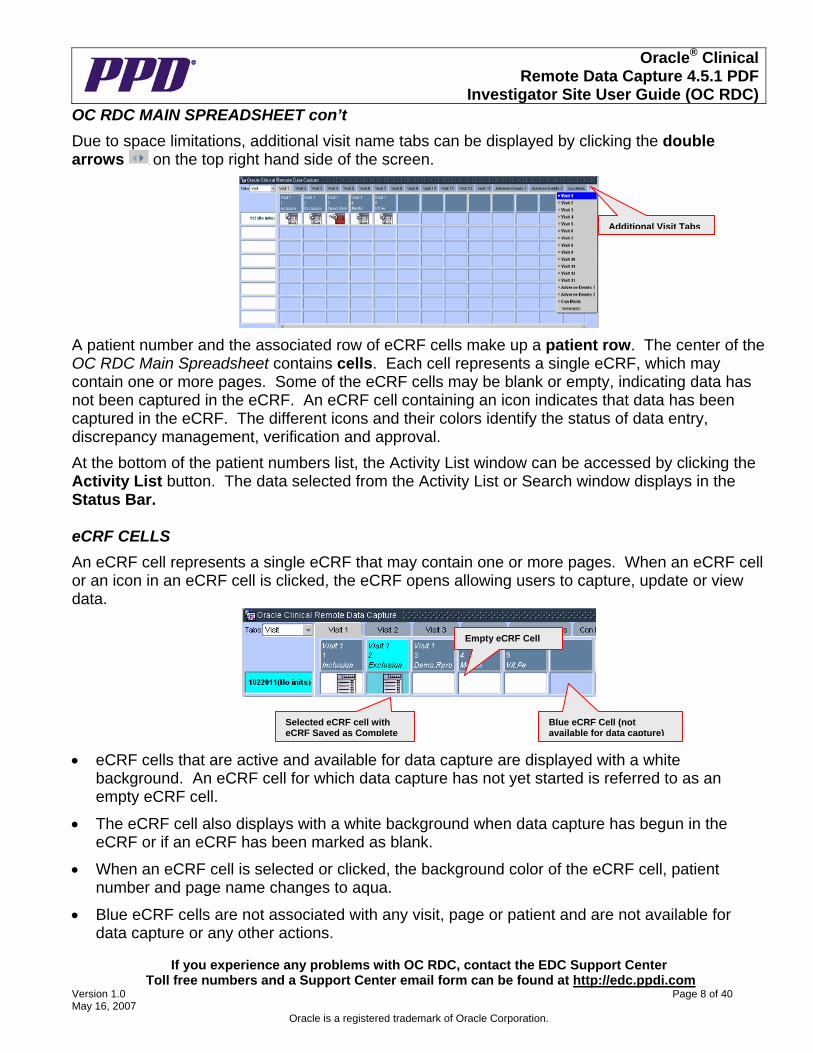
Due to space limitations, additional visit name tabs can be displayed by clicking the double arrows on the top right hand side of the screen.
Additional Visit Tabs
A patient number and the associated row of eCRF cells make up a patient row. The center of the OC RDC Main Spreadsheet contains cells. Each cell represents a single eCRF, which may contain one or more pages. Some of the eCRF cells may be blank or empty, indicating data has not been captured in the eCRF. An eCRF cell containing an icon indicates that data has been captured in the eCRF. The different icons and their colors identify the status of data entry, discrepancy management, verification and approval.
At the bottom of the patient numbers list, the Activity List window can be accessed by clicking the Activity List button. The data selected from the Activity List or Search window displays in the Status Bar. eCRF CELLS
An eCRF cell represents a single eCRF that may contain one or more pages. When an eCRF cell or an icon in an eCRF cell is clicked, the eCRF opens allowing users to capture, update or view data.
Empty eCRF Cell
Blue eCRF Cell (not available for data capture)
Selected eCRF cell with eCRF Saved as Complete
• eCRF cells that are active and available for data capture are displayed with a white background. An eCRF cell for which data capture has not yet started is referred to as an empty eCRF cell.
• The eCRF cell also displays with a white background when data capture has begun in the eCRF or if an eCRF has been marked as blank.
• When an eCRF cell is selected or clicked, the background color of the eCRF cell, patient number and page name changes to aqua.
• Blue eCRF cells are not associated with any visit, page or patient and are not available for data capture or any other actions.
If you experience any problems with OC RDC, contact the EDC Support Center Toll free numbers and a Support Center email form can be found at http://edc.ppdi.com
Version 1.0 Page 8 of 40 May 16, 2007
Oracle is a registered trademark of Oracle Corporation.

Oracle® ClinicalRemote Data Capture 4.5.1 PDF
Investigator Site User Guide (OC RDC)
eCRF ICONS
In addition to colors, eCRF cells also contain icons. Icons appear in eCRF cells to represent the data capture, discrepancy, verification, and approval status of an eCRF.
eCRF icons allow users to see what work needs to be done by simply looking at the main spreadsheet. Please refer to the table below to view the icons and their descriptions.
The goal for each study is to have all icons white, saved as complete, verified by the CRA and approved by the Investigator such as in the screenshot below.
eCRF ICON DESCRIPTIONS
Icon Description
Icon Description
Blank CRF
The eCRF has been marked as blank.
Other Discrepancy
The eCRF has at least one open discrepancy that requires someone else’s attention.
Created
The eCRF page has been saved but no data has been entered yet.
Verified by CRA
The eCRF has been source verified by the CRA.
Entry Started
At least one field in the body of the eCRF contains data and the eCRF has been saved as Incomplete.
Requires Re-Verification
The data on the page has been changed since CRA verification.
Entry Complete
This icon represents several items which include: - all data fields have been captured and the eCRF has been saved as Complete - the eCRF contains no discrepancies or closed discrepancies - the eCRF has not been verified by the monitor
Approved
The eCRF has been approved by the Investigator.
Batch Loaded
The data has been electronically loaded via batch data load into the database by data management. (i.e. Central Lab, ECG) In some instances, batch loaded data may not be visible.
Requires Re-approval
Data on the page has been changed since Investigator approval.
Active Discrepancy
The eCRF has at least one open discrepancy that requires the current users’ attention.
Locked
All eCRF data has been collected and verified. A locked eCRF may be viewed in a read-only mode and its data cannot be updated. The locking task is typically performed by a data manager at PPD.
If you experience any problems with OC RDC, contact the EDC Support Center Toll free numbers and a Support Center email form can be found at http://edc.ppdi.com
Version 1.0 Page 9 of 40 May 16, 2007
Oracle is a registered trademark of Oracle Corporation.
Oracle® ClinicalRemote Data Capture 4.5.1 PDF
Investigator Site User Guide (OC RDC)
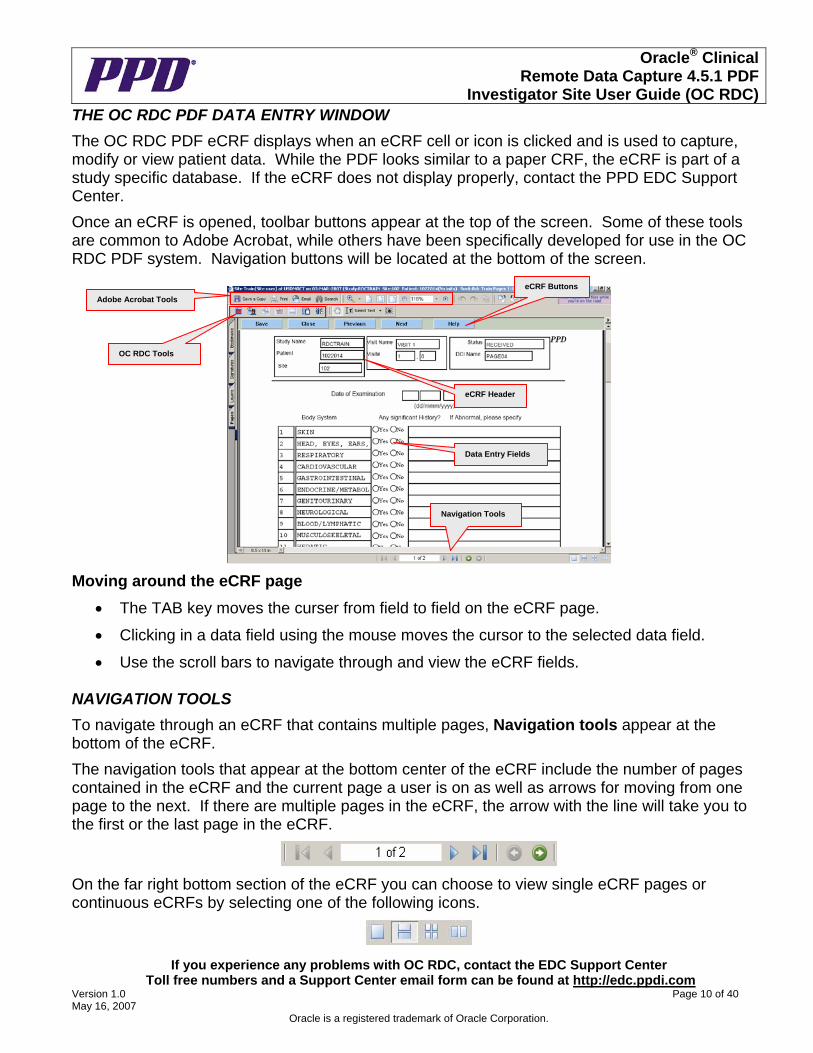
THE OC RDC PDF DATA ENTRY WINDOW
The OC RDC PDF eCRF displays when an eCRF cell or icon is clicked and is used to capture, modify or view patient data. While the PDF looks similar to a paper CRF, the eCRF is part of a study specific database. If the eCRF does not display properly, contact the PPD EDC Support Center.
Once an eCRF is opened, toolbar buttons appear at the top of the screen. Some of these tools are common to Adobe Acrobat, while others have been specifically developed for use in the OC RDC PDF system. Navigation buttons will be located at the bottom of the screen.
Adobe Acrobat Tools
OC RDC Tools
eCRF Buttons
eCRF Header
Data Entry Fields
Navigation Tools
Moving around the eCRF page
• The TAB key moves the curser from field to field on the eCRF page.
• Clicking in a data field using the mouse moves the cursor to the selected data field.
• Use the scroll bars to navigate through and view the eCRF fields. NAVIGATION TOOLS
To navigate through an eCRF that contains multiple pages, Navigation tools appear at the bottom of the eCRF.
The navigation tools that appear at the bottom center of the eCRF include the number of pages contained in the eCRF and the current page a user is on as well as arrows for moving from one page to the next. If there are multiple pages in the eCRF, the arrow with the line will take you to the first or the last page in the eCRF.
On the far right bottom section of the eCRF you can choose to view single eCRF pages or continuous eCRFs by selecting one of the following icons.
If you experience any problems with OC RDC, contact the EDC Support Center
Toll free numbers and a Support Center email form can be found at http://edc.ppdi.com Version 1.0 Page 10 of 40 May 16, 2007
Oracle is a registered trademark of Oracle Corporation.

Oracle® ClinicalRemote Data Capture 4.5.1 PDF
Investigator Site User Guide (OC RDC)
RDC TOOLS
RDC tools provide access to common tasks performed within the application. The table below outlines the specific tool and its associated tasks.
Toolbar button Name Description
Data Entry/Hand
The default tool that allows users to navigate the CRF, perform initial data entry, and data update. This tool is part of the Adobe Reader/Acrobat application.
Discrepancy Management
Allows site users to review or edit existing discrepancies.
Investigator Comment
Allows users to review or edit existing investigator comments and to initiate new investigator comments (subject to appropriate privilege).
Audit Trail Allows users to review the Audit Trail for response fields in the current eCRF.
Navigator
Allows users to view a list of Investigator Comments, open Discrepancies, and audit history. This tool also allows users to navigate to individual entries, and update entries (subject to appropriate privilege).
CRF Activities Allows users based on their privilege to access the Delete CRF, Verify CRF, and Approve CRF functions.
Blank Flag Processing
Allows users to mark the entire CRF or one or more individual sections blank.
RDC User Preferences Preferences are preset for users based on roles/privileges.
RIGHT-CLICK FUNCTIONALITY
Right-click functionality is available when working in an eCRF. The popup menu that displays provides some of the same options as the RDC tools.
With the Hand tool selected, right-click on a data field in an eCRF and choose to address or view a discrepancy, view the audit history of the field, create, view or modify an investigator comment, view the entire text contained in a field through a popup box or delete all of the responses in the row of a question group. Some options may not be available depending upon the status of the field selected.
If you experience any problems with OC RDC, contact the EDC Support Center Toll free numbers and a Support Center email form can be found at http://edc.ppdi.com
Version 1.0 Page 11 of 40 May 16, 2007
Oracle is a registered trademark of Oracle Corporation.

Oracle® ClinicalRemote Data Capture 4.5.1 PDF
Investigator Site User Guide (OC RDC)
RIGHT-CLICK FUNCTIONALITY con’t
• On an open eCRF and right-click on a data field to display the list. Select the desired option from the list and proceed with the action selected.
eCRF BUTTONS
The eCRF Buttons appear at the top of each eCRF page and allow users to take certain actions on and navigate through the current eCRF that is open. Some of the buttons are available in all situations, while the presence of others is dependant on context.
Button Description
Saves any new or modified data or responses to discrepancies in the eCRF. Users are given the option of saving the eCRF as Complete or Incomplete if the eCRF was never saved as Complete. It is only present on eCRFs that are open in active mode.
If you experience any problems with OC RDC, contact the EDC Support Center Toll free numbers and a Support Center email form can be found at http://edc.ppdi.com
Version 1.0 Page 12 of 40 May 16, 2007
Oracle is a registered trademark of Oracle Corporation.
Closes the PDF Data Entry window and indirectly saves any new or modified data and responses to discrepancies. Users must click the button a second time to close the eCRF if work has been indirectly saved. The Close button is present on eCRFs inboth active and browse mode.
Changes the CRF mode from active (data entry) to browse (read only). Multiple eCRFs may be open in browse mode at any one time .This button is only displayed for active CRFs that have been saved at least once.
Changes the CRF mode from browse (read only) to active (data entry). While in active mode, users are able to enter and update data or respond to discrepancies. Only one eCRF may be open in active mode at any one time. It is only present on eCRFs that are in browse mode.
Closes the current CRF and opens the previous CRF in sequence. This button also indirectly saves any new or modified data and responses to discrepancies. It is necessary to click the button a second time if work has been indirectly saved. The Previous button is only present on eCRFs that are open in active mode. This action is not available if users are on the first eCRF in the first visit in their study. Also, Previous and Next buttons are not available if users only have browse privileges.
Oracle® ClinicalRemote Data Capture 4.5.1 PDF
Investigator Site User Guide (OC RDC)
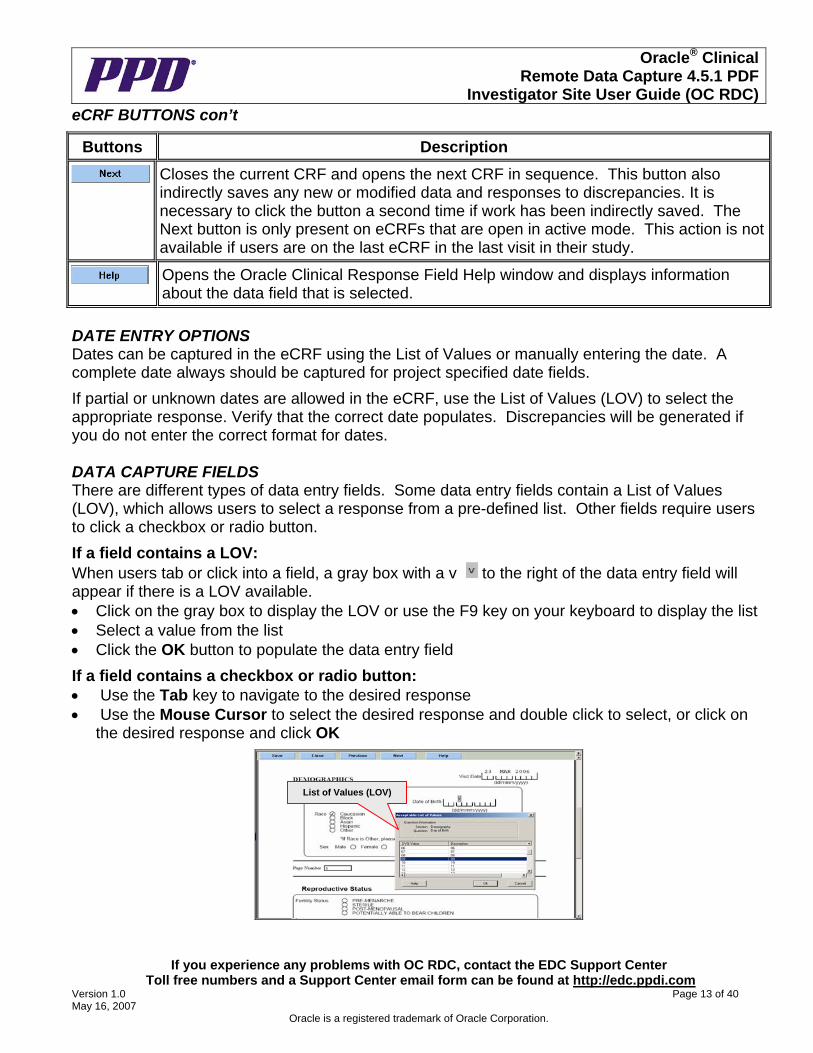
eCRF BUTTONS con’t
Buttons Description
Closes the current CRF and opens the next CRF in sequence. This button also indirectly saves any new or modified data and responses to discrepancies. It is necessary to click the button a second time if work has been indirectly saved. The Next button is only present on eCRFs that are open in active mode. This action is not available if users are on the last eCRF in the last visit in their study.
If you experience any problems with OC RDC, contact the EDC Support Center Toll free numbers and a Support Center email form can be found at http://edc.ppdi.com
Version 1.0 Page 13 of 40 May 16, 2007
Oracle is a registered trademark of Oracle Corporation.
Opens the Oracle Clinical Response Field Help window and displays information about the data field that is selected.
DATE ENTRY OPTIONS Dates can be captured in the eCRF using the List of Values or manually entering the date. A complete date always should be captured for project specified date fields.
If partial or unknown dates are allowed in the eCRF, use the List of Values (LOV) to select the appropriate response. Verify that the correct date populates. Discrepancies will be generated if you do not enter the correct format for dates. DATA CAPTURE FIELDS There are different types of data entry fields. Some data entry fields contain a List of Values (LOV), which allows users to select a response from a pre-defined list. Other fields require users to click a checkbox or radio button.
If a field contains a LOV: When users tab or click into a field, a gray box with a v to the right of the data entry field will appear if there is a LOV available. • Click on the gray box to display the LOV or use the F9 key on your keyboard to display the list • Select a value from the list • Click the OK button to populate the data entry field
If a field contains a checkbox or radio button: • Use the Tab key to navigate to the desired response • Use the Mouse Cursor to select the desired response and double click to select, or click on
the desired response and click OK
List of Values (LOV)
Oracle® ClinicalRemote Data Capture 4.5.1 PDF
Investigator Site User Guide (OC RDC)
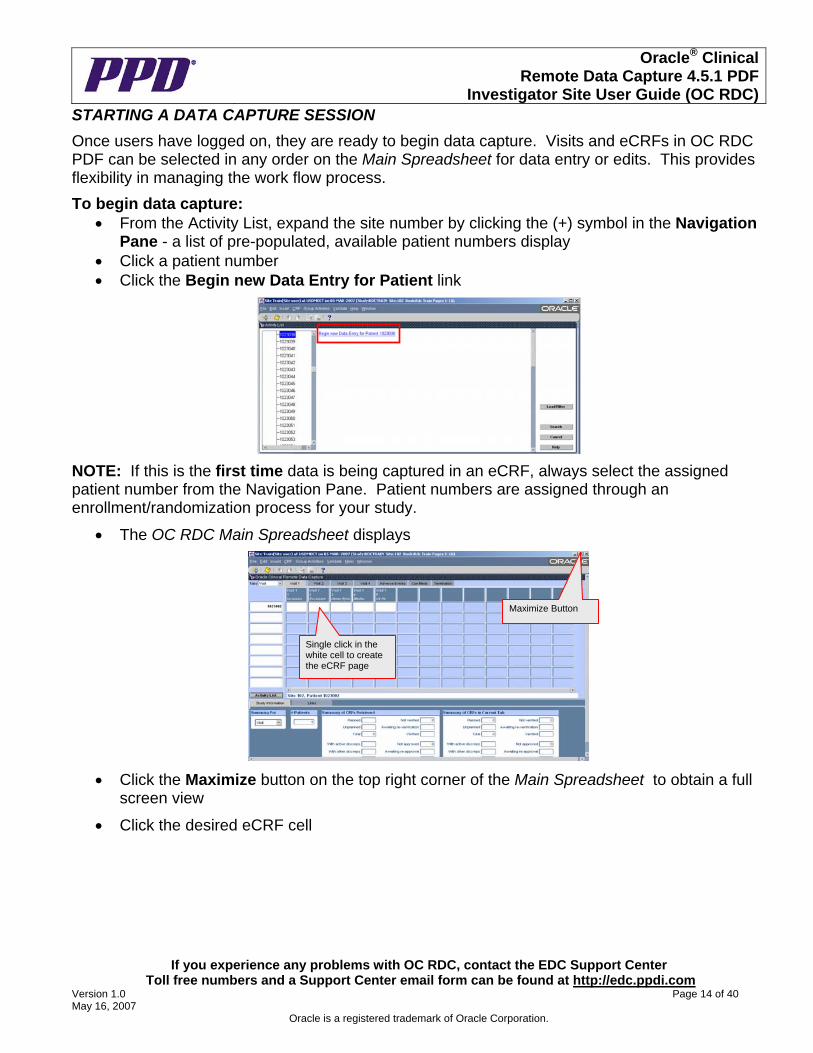
STARTING A DATA CAPTURE SESSION
Once users have logged on, they are ready to begin data capture. Visits and eCRFs in OC RDC PDF can be selected in any order on the Main Spreadsheet for data entry or edits. This provides flexibility in managing the work flow process.
To begin data capture: • From the Activity List, expand the site number by clicking the (+) symbol in the Navigation
Pane - a list of pre-populated, available patient numbers display • Click a patient number • Click the Begin new Data Entry for Patient link
If you experience any problems with OC RDC, contact the EDC Support Center Toll free numbers and a Support Center email form can be found at http://edc.ppdi.com
Version 1.0 Page 14 of 40 May 16, 2007
Oracle is a registered trademark of Oracle Corporation.
NOTE: If this is the first time data is being captured in an eCRF, always select the assigned patient number from the Navigation Pane. Patient numbers are assigned through an enrollment/randomization process for your study.
• The OC RDC Main Spreadsheet displays
Single click in the white cell to create the eCRF page
Maximize Button
• Click the Maximize button on the top right corner of the Main Spreadsheet to obtain a full screen view
• Click the desired eCRF cell
Oracle® ClinicalRemote Data Capture 4.5.1 PDF
Investigator Site User Guide (OC RDC)
STARTING A DATA CAPTURE SESSION con’t
NOTE: If the same eCRF is being accessed by more than one user, the first user to display the eCRF will be in Active mode. The other user will be in Browse mode. The eCRF will remain in Browse mode upon closing the eCRF until a refresh of the Main Spreadsheet is performed by selecting the File=>Refresh menu command. The eCRF can then be accessed in Active mode • If this is the first time you are accessing an eCRF page, it may take a moment for Adobe to
open the page. Do not close the window; simply allow time for the eCRF to load.
• If the eCRF page is not centered, you may double click on the blue title bar at the top of the window. This will maximize your eCRF page.
• The eCRF displays - If the eCRF does not display properly, contact the EDC Support Center
• Press the Tab key or use the mouse cursor to click in the first data entry field - use the scroll bars if necessary to display additional data fields on the eCRF
• Complete all other required fields and when finished, click the Save button.
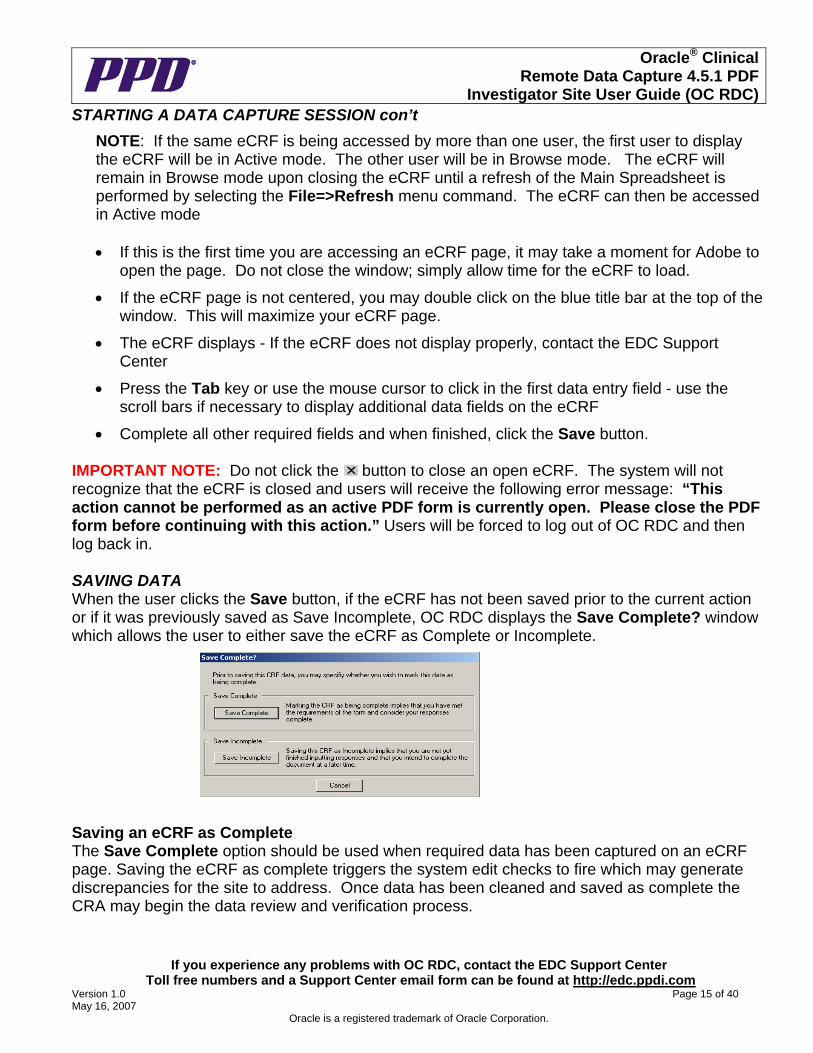
IMPORTANT NOTE: Do not click the button to close an open eCRF. The system will not recognize that the eCRF is closed and users will receive the following error message: “This action cannot be performed as an active PDF form is currently open. Please close the PDF form before continuing with this action.” Users will be forced to log out of OC RDC and then log back in. SAVING DATA When the user clicks the Save button, if the eCRF has not been saved prior to the current action or if it was previously saved as Save Incomplete, OC RDC displays the Save Complete? window which allows the user to either save the eCRF as Complete or Incomplete.
Saving an eCRF as Complete The Save Complete option should be used when required data has been captured on an eCRF page. Saving the eCRF as complete triggers the system edit checks to fire which may generate discrepancies for the site to address. Once data has been cleaned and saved as complete the CRA may begin the data review and verification process.
If you experience any problems with OC RDC, contact the EDC Support Center Toll free numbers and a Support Center email form can be found at http://edc.ppdi.com
Version 1.0 Page 15 of 40 May 16, 2007
Oracle is a registered trademark of Oracle Corporation.
Oracle® ClinicalRemote Data Capture 4.5.1 PDF
Investigator Site User Guide (OC RDC)
SAVING DATA con’t
Once an eCRF is saved as complete, the eCRF cannot be subsequently saved as incomplete.
Saving an eCRF as Incomplete The Save Incomplete option should only be used if the data capture session is not complete and will be finished at a later time. To change the status of an eCRF from Incomplete to Complete, at least one data modification needs to occur.
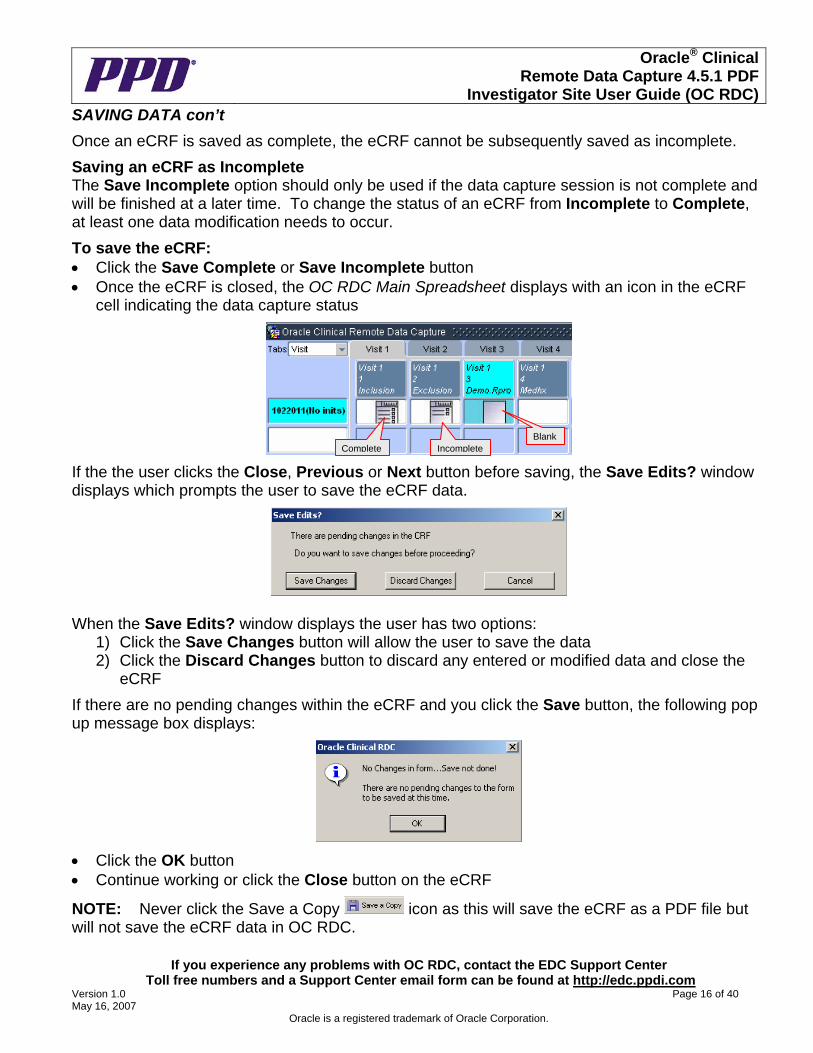
To save the eCRF: • Click the Save Complete or Save Incomplete button • Once the eCRF is closed, the OC RDC Main Spreadsheet displays with an icon in the eCRF
cell indicating the data capture status
Blank
Complete Incomplete
If the the user clicks the Close, Previous or Next button before saving, the Save Edits? window displays which prompts the user to save the eCRF data.
When the Save Edits? window displays the user has two options:
1) Click the Save Changes button will allow the user to save the data 2) Click the Discard Changes button to discard any entered or modified data and close the
eCRF
If there are no pending changes within the eCRF and you click the Save button, the following pop up message box displays:
• Click the OK button • Continue working or click the Close button on the eCRF
NOTE: Never click the Save a Copy icon as this will save the eCRF as a PDF file but will not save the eCRF data in OC RDC.
If you experience any problems with OC RDC, contact the EDC Support Center Toll free numbers and a Support Center email form can be found at http://edc.ppdi.com
Version 1.0 Page 16 of 40 May 16, 2007
Oracle is a registered trademark of Oracle Corporation.

Oracle® ClinicalRemote Data Capture 4.5.1 PDF
Investigator Site User Guide (OC RDC)
MODIFYING SAVED DATA
There may be times when data needs to be added or modified after the eCRF has been saved as complete. The system automatically prompts users to provide a change reason through the use of the Reason for Change window when modifications occur on a completed eCRF.
To modify saved data: • From the OC RDC Main Spreadsheet, click the desired cell to open the eCRF
• Navigate to the field requiring modification o If modifying a value in a checkbox, the Reason for Change window displays as soon as
the user clicks in the field o If adding or modifying data, the Reason for Change window displays after the user tabs
off of the field
• Click the drop down arrow in the Reason field • Select a reason for change from the list – in most cases, users should select Data Entry Error • Add an optional comment, if desired • Click the OK button to display the eCRF • Click the Save button on the eCRF DATA CAPTURE TIPS The following data capture tips can assist with a data entry session: • If partial or unknown dates are allowed in the eCRF, use the List of Values (LOV) to select the
appropriate response. • Use the LOV when available to prevent data entry errors • Use the Tab key to move from field to field or use the Mouse Cursor to click in a field • Use the Save Complete option if data has been captured on an eCRF page • Only use the Save Incomplete option if you need to exit the application after data entry has
started but you will return the same day to complete the data entry on the page • Call the EDC Support Center for any technical difficulties. Worldwide toll-free numbers can be
found at http://edc.ppdi.com
If you experience any problems with OC RDC, contact the EDC Support Center Toll free numbers and a Support Center email form can be found at http://edc.ppdi.com
Version 1.0 Page 17 of 40 May 16, 2007
Oracle is a registered trademark of Oracle Corporation.
Oracle® ClinicalRemote Data Capture 4.5.1 PDF
Investigator Site User Guide (OC RDC)
SELECTING A NEW GROUP OF PATIENTS
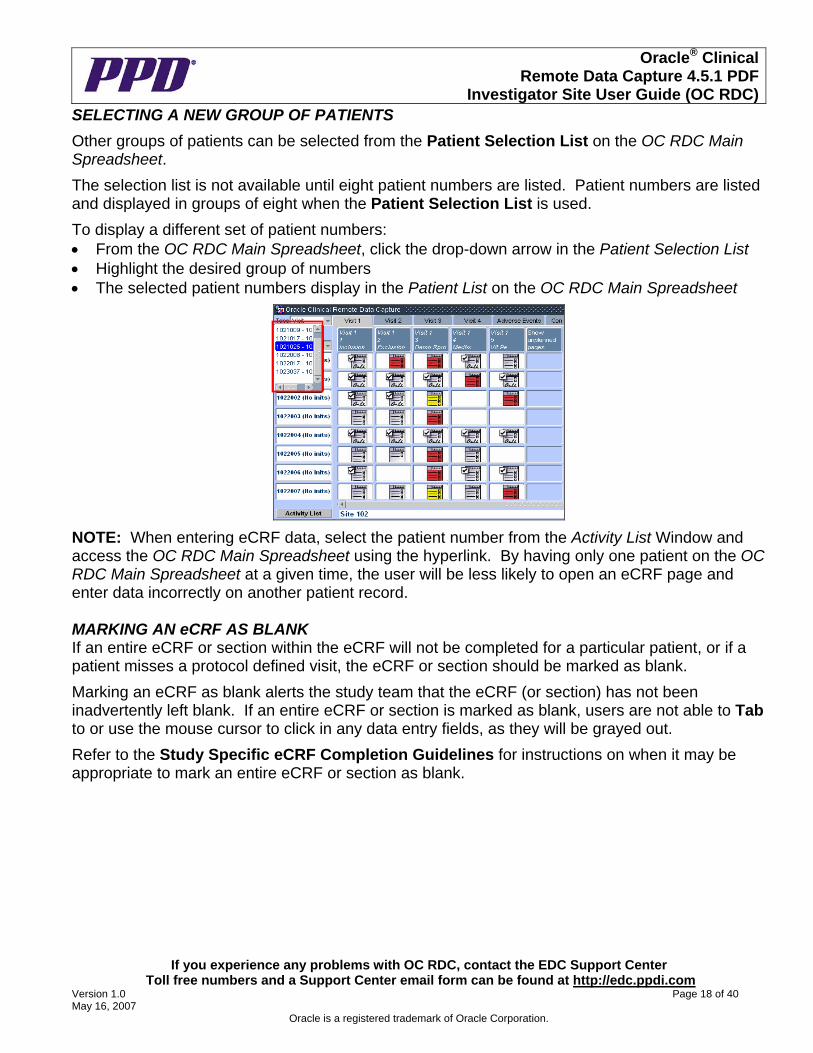
Other groups of patients can be selected from the Patient Selection List on the OC RDC Main Spreadsheet.
The selection list is not available until eight patient numbers are listed. Patient numbers are listed and displayed in groups of eight when the Patient Selection List is used.
To display a different set of patient numbers: • From the OC RDC Main Spreadsheet, click the drop-down arrow in the Patient Selection List • Highlight the desired group of numbers • The selected patient numbers display in the Patient List on the OC RDC Main Spreadsheet
NOTE: When entering eCRF data, select the patient number from the Activity List Window and access the OC RDC Main Spreadsheet using the hyperlink. By having only one patient on the OC RDC Main Spreadsheet at a given time, the user will be less likely to open an eCRF page and enter data incorrectly on another patient record. MARKING AN eCRF AS BLANK If an entire eCRF or section within the eCRF will not be completed for a particular patient, or if a patient misses a protocol defined visit, the eCRF or section should be marked as blank.
Marking an eCRF as blank alerts the study team that the eCRF (or section) has not been inadvertently left blank. If an entire eCRF or section is marked as blank, users are not able to Tab to or use the mouse cursor to click in any data entry fields, as they will be grayed out.
Refer to the Study Specific eCRF Completion Guidelines for instructions on when it may be appropriate to mark an entire eCRF or section as blank.
If you experience any problems with OC RDC, contact the EDC Support Center Toll free numbers and a Support Center email form can be found at http://edc.ppdi.com
Version 1.0 Page 18 of 40 May 16, 2007
Oracle is a registered trademark of Oracle Corporation.
Oracle® ClinicalRemote Data Capture 4.5.1 PDF
Investigator Site User Guide (OC RDC)
MARKING AN eCRF AS BLANK con’t
Users are also able to mark an eCRF that contains data as blank. All previously entered data on that eCRF page will be deleted.
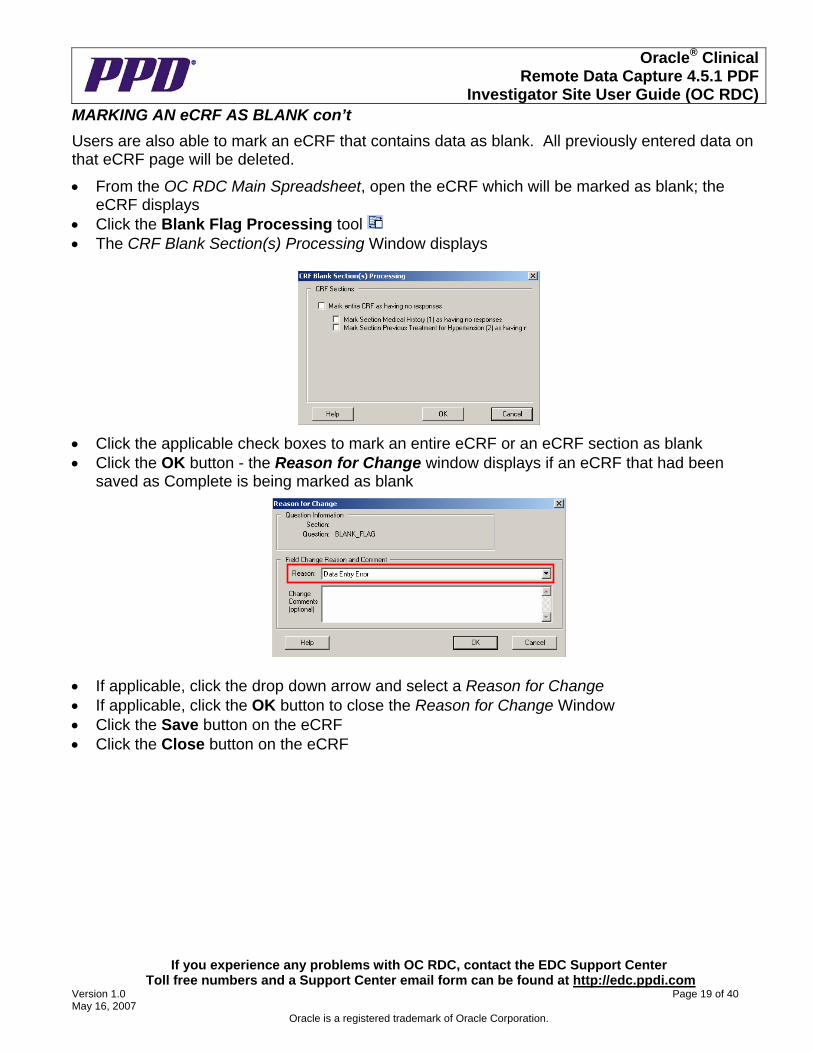
• From the OC RDC Main Spreadsheet, open the eCRF which will be marked as blank; the eCRF displays
• Click the Blank Flag Processing tool • The CRF Blank Section(s) Processing Window displays
• Click the applicable check boxes to mark an entire eCRF or an eCRF section as blank • Click the OK button - the Reason for Change window displays if an eCRF that had been
saved as Complete is being marked as blank
• If applicable, click the drop down arrow and select a Reason for Change • If applicable, click the OK button to close the Reason for Change Window • Click the Save button on the eCRF • Click the Close button on the eCRF
If you experience any problems with OC RDC, contact the EDC Support Center Toll free numbers and a Support Center email form can be found at http://edc.ppdi.com
Version 1.0 Page 19 of 40 May 16, 2007
Oracle is a registered trademark of Oracle Corporation.
Oracle® ClinicalRemote Data Capture 4.5.1 PDF
Investigator Site User Guide (OC RDC)
UNMARKING AN eCRF AS BLANK
The eCRF or sections marked as blank can be unmarked as blank to allow data to be entered on the eCRF. This is helpful if an eCRF or an eCRF section was marked blank in error, or if a patient did show up for the scheduled visit.
To unmark an eCRF as blank: • From the OC RDC Main Spreadsheet, click the eCRF cell for the eCRF that has been marked
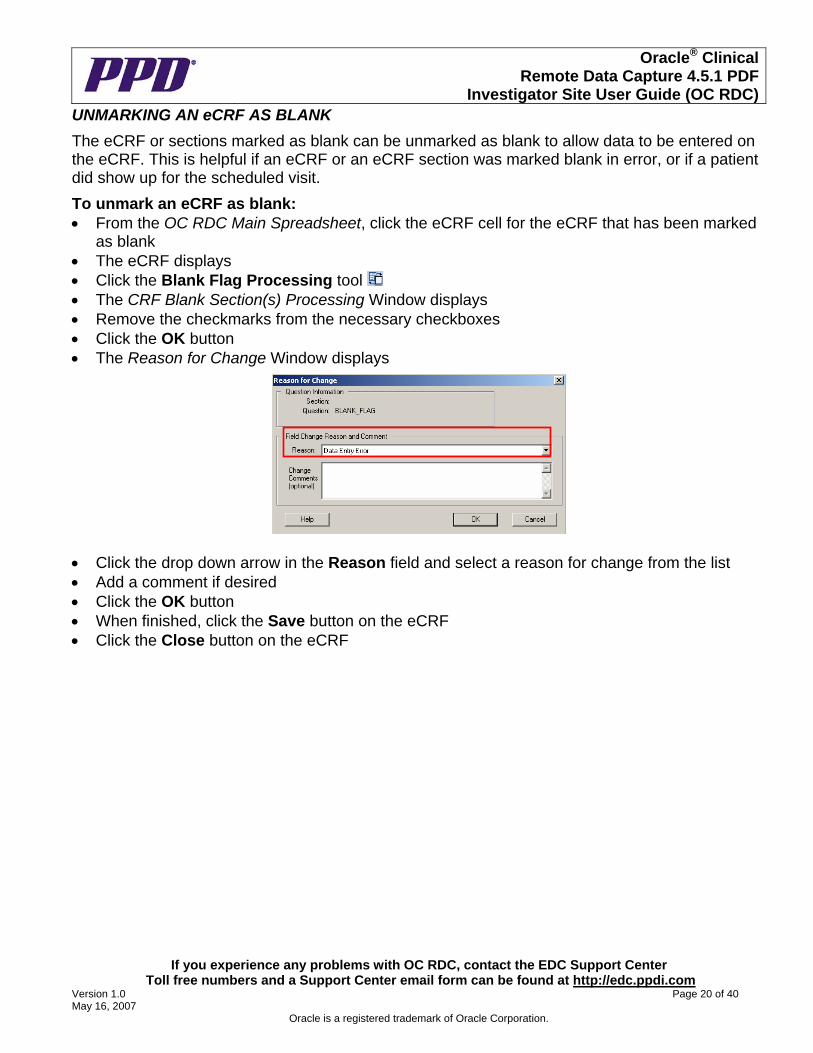
as blank • The eCRF displays • Click the Blank Flag Processing tool • The CRF Blank Section(s) Processing Window displays • Remove the checkmarks from the necessary checkboxes • Click the OK button • The Reason for Change Window displays
• Click the drop down arrow in the Reason field and select a reason for change from the list • Add a comment if desired • Click the OK button • When finished, click the Save button on the eCRF • Click the Close button on the eCRF
If you experience any problems with OC RDC, contact the EDC Support Center Toll free numbers and a Support Center email form can be found at http://edc.ppdi.com
Version 1.0 Page 20 of 40 May 16, 2007
Oracle is a registered trademark of Oracle Corporation.
Oracle® ClinicalRemote Data Capture 4.5.1 PDF
Investigator Site User Guide (OC RDC)
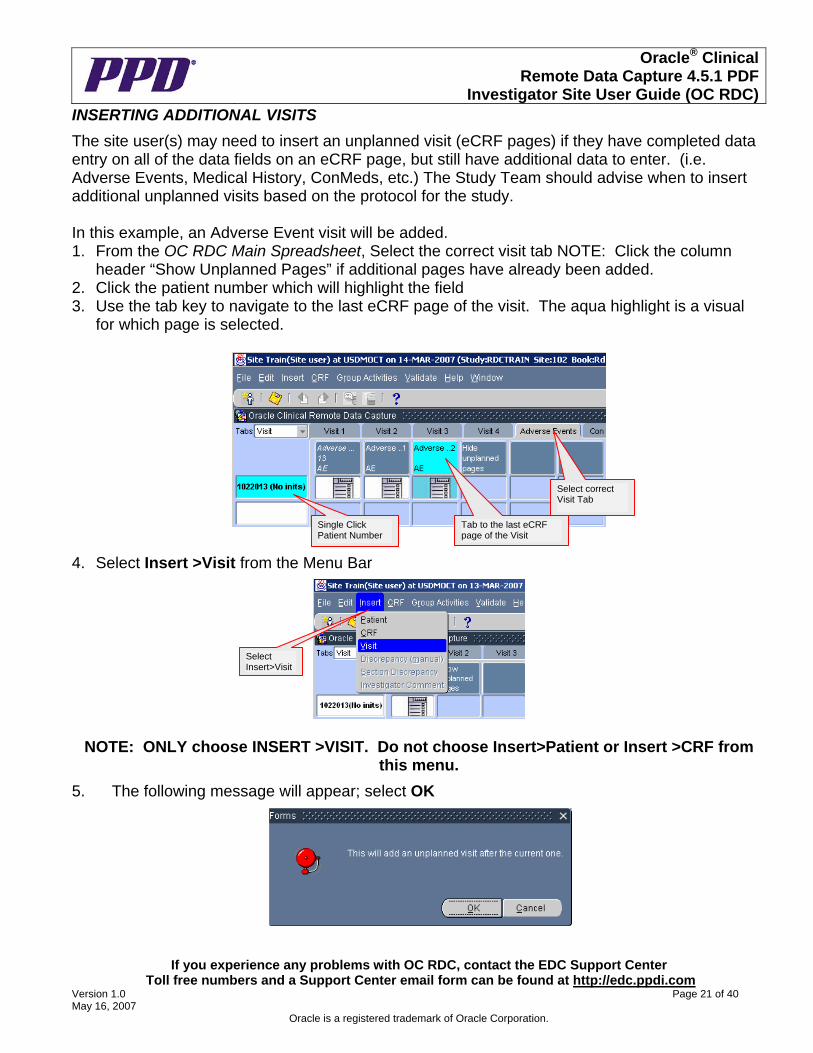
INSERTING ADDITIONAL VISITS
The site user(s) may need to insert an unplanned visit (eCRF pages) if they have completed data entry on all of the data fields on an eCRF page, but still have additional data to enter. (i.e. Adverse Events, Medical History, ConMeds, etc.) The Study Team should advise when to insert additional unplanned visits based on the protocol for the study. In this example, an Adverse Event visit will be added. 1. From the OC RDC Main Spreadsheet, Select the correct visit tab NOTE: Click the column
header “Show Unplanned Pages” if additional pages have already been added. 2. Click the patient number which will highlight the field 3. Use the tab key to navigate to the last eCRF page of the visit. The aqua highlight is a visual
for which page is selected.
If you experience any problems with OC RDC, contact the EDC Support Center Toll free numbers and a Support Center email form can be found at http://edc.ppdi.com
Version 1.0 Page 21 of 40 May 16, 2007
Oracle is a registered trademark of Oracle Corporation.
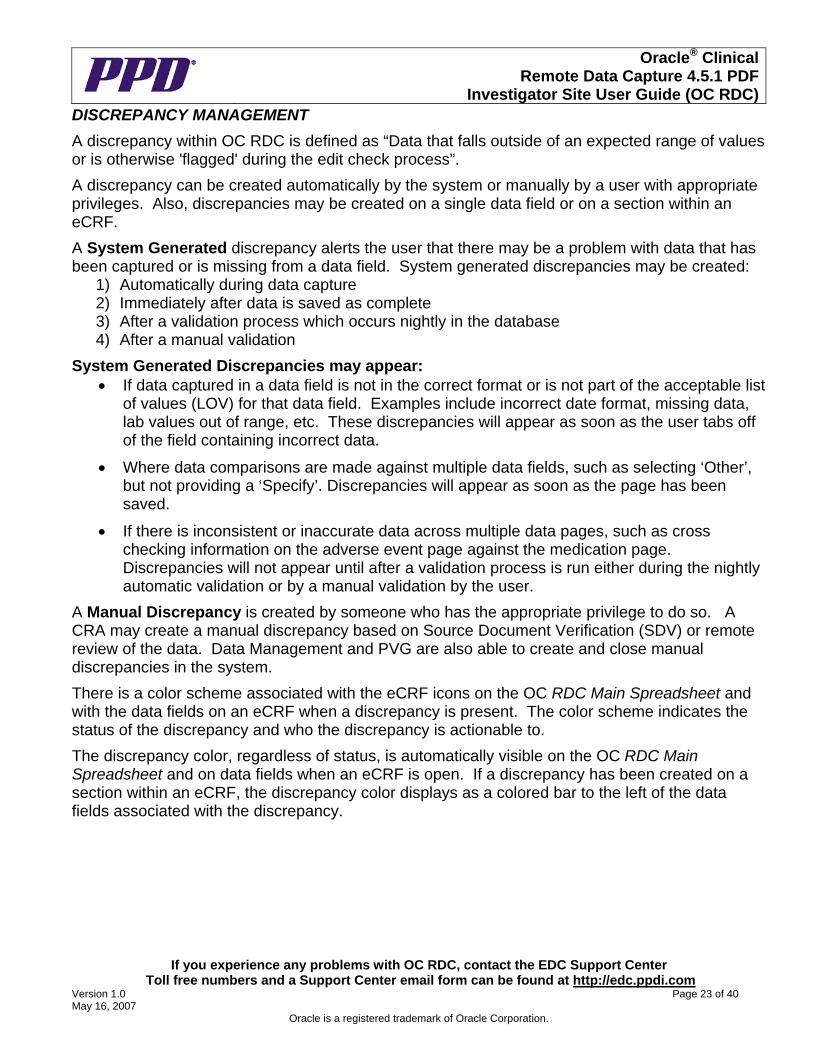
4. Select Insert >Visit from the Menu Bar
Select correct Visit Tab
Single Click Patient Number
Tab to the last eCRF page of the Visit
Select Insert>Visit
NOTE: ONLY choose INSERT >VISIT. Do not choose Insert>Patient or Insert >CRF from
this menu.
5. The following message will appear; select OK

Oracle® ClinicalRemote Data Capture 4.5.1 PDF
Investigator Site User Guide (OC RDC)
INSERTING ADDITIONAL VISITS con’t
The inserted eCRF will open. If multiple eCRFs appear within the visit, the first eCRF will open while all others can be created by single clicking in the empty cell. The example below notes unplanned visits that have been added and how they are numbered. Also note the “Hide unplanned pages” column header indicating additional visits have been added.
Additional visit eCRF numbering
Hide unplanned pages column header
New eCRF
Upon subsequent log-ins, users will need to click on the “Show unplanned pages” column header to access the added visits.
Show unplanned pages column header
INSERTING ADDITIONAL VISITS TIPS
• Do not create eCRF pages in visits that you have added if you do not need them • Do not insert visits until you need them • Due to space limitations across the top of the OC RDC Main Spreadsheet, it may be
necessary to click the double arrows on the top right side of the screen to display a list of all visits (as shown on next page)
• Use the arrows at the top and bottom of the list to scroll through and display all of the visits • ALWAYS select the Insert >Visit menu command
Additional Visit Tabs
If you experience any problems with OC RDC, contact the EDC Support Center Toll free numbers and a Support Center email form can be found at http://edc.ppdi.com
Version 1.0 Page 22 of 40 May 16, 2007
Oracle is a registered trademark of Oracle Corporation.
Oracle® ClinicalRemote Data Capture 4.5.1 PDF
Investigator Site User Guide (OC RDC)
If you experience any problems with OC RDC, contact the EDC Support Center Toll free numbers and a Support Center email form can be found at http://edc.ppdi.com
Version 1.0 Page 23 of 40 May 16, 2007
Oracle is a registered trademark of Oracle Corporation.
DISCREPANCY MANAGEMENT
A discrepancy within OC RDC is defined as “Data that falls outside of an expected range of values or is otherwise 'flagged' during the edit check process”.
A discrepancy can be created automatically by the system or manually by a user with appropriate privileges. Also, discrepancies may be created on a single data field or on a section within an eCRF.
A System Generated discrepancy alerts the user that there may be a problem with data that has been captured or is missing from a data field. System generated discrepancies may be created:
1) Automatically during data capture 2) Immediately after data is saved as complete 3) After a validation process which occurs nightly in the database 4) After a manual validation
System Generated Discrepancies may appear: • If data captured in a data field is not in the correct format or is not part of the acceptable list
of values (LOV) for that data field. Examples include incorrect date format, missing data, lab values out of range, etc. These discrepancies will appear as soon as the user tabs off of the field containing incorrect data.
• Where data comparisons are made against multiple data fields, such as selecting ‘Other’, but not providing a ‘Specify’. Discrepancies will appear as soon as the page has been saved.
• If there is inconsistent or inaccurate data across multiple data pages, such as cross checking information on the adverse event page against the medication page. Discrepancies will not appear until after a validation process is run either during the nightly automatic validation or by a manual validation by the user.
A Manual Discrepancy is created by someone who has the appropriate privilege to do so. A CRA may create a manual discrepancy based on Source Document Verification (SDV) or remote review of the data. Data Management and PVG are also able to create and close manual discrepancies in the system.
There is a color scheme associated with the eCRF icons on the OC RDC Main Spreadsheet and with the data fields on an eCRF when a discrepancy is present. The color scheme indicates the status of the discrepancy and who the discrepancy is actionable to.
The discrepancy color, regardless of status, is automatically visible on the OC RDC Main Spreadsheet and on data fields when an eCRF is open. If a discrepancy has been created on a section within an eCRF, the discrepancy color displays as a colored bar to the left of the data fields associated with the discrepancy.
Oracle® ClinicalRemote Data Capture 4.5.1 PDF
Investigator Site User Guide (OC RDC)
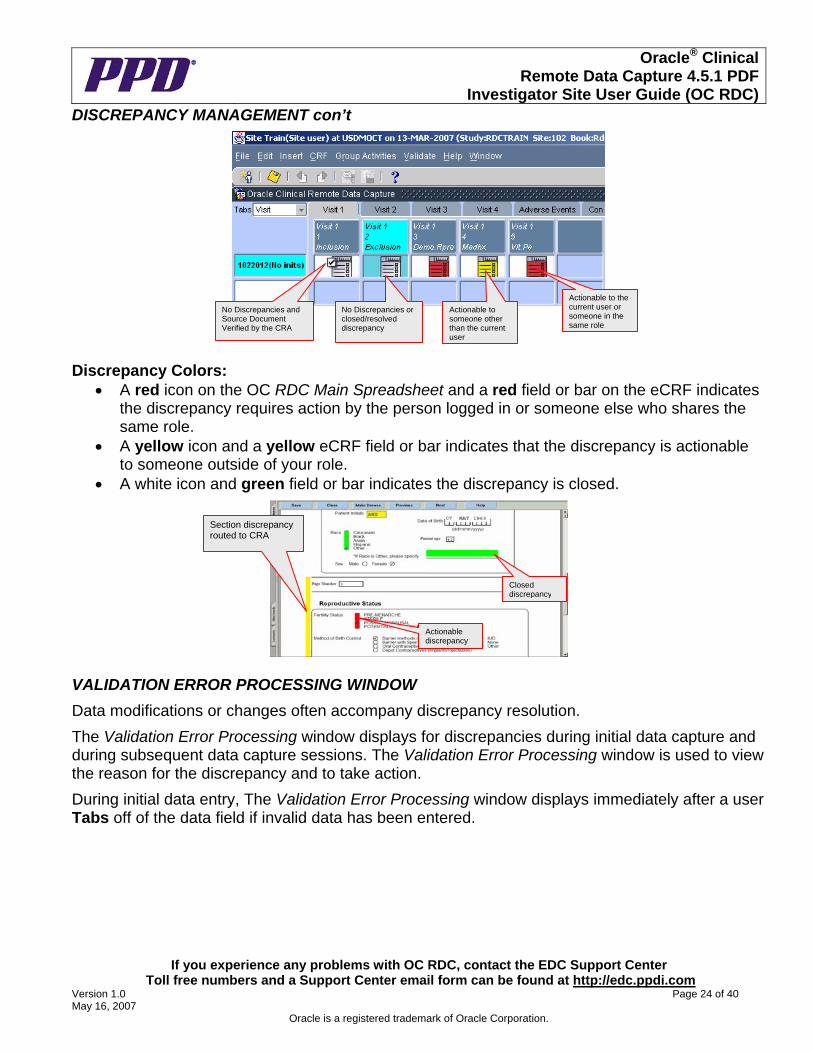
DISCREPANCY MANAGEMENT con’t
No Discrepancies and Source Document Verified by the CRA
Actionable to the current user or someone in the same role
Actionable to someone other than the current user
No Discrepancies or closed/resolved discrepancy
Discrepancy Colors:
• A red icon on the OC RDC Main Spreadsheet and a red field or bar on the eCRF indicates the discrepancy requires action by the person logged in or someone else who shares the same role.
• A yellow icon and a yellow eCRF field or bar indicates that the discrepancy is actionable to someone outside of your role.
• A white icon and green field or bar indicates the discrepancy is closed.
Section discrepancy routed to CRA
Closed discrepancy
Actionable discrepancy
VALIDATION ERROR PROCESSING WINDOW
Data modifications or changes often accompany discrepancy resolution.
The Validation Error Processing window displays for discrepancies during initial data capture and during subsequent data capture sessions. The Validation Error Processing window is used to view the reason for the discrepancy and to take action.
During initial data entry, The Validation Error Processing window displays immediately after a user Tabs off of the data field if invalid data has been entered.
If you experience any problems with OC RDC, contact the EDC Support Center Toll free numbers and a Support Center email form can be found at http://edc.ppdi.com
Version 1.0 Page 24 of 40 May 16, 2007
Oracle is a registered trademark of Oracle Corporation.
Oracle® ClinicalRemote Data Capture 4.5.1 PDF
Investigator Site User Guide (OC RDC)
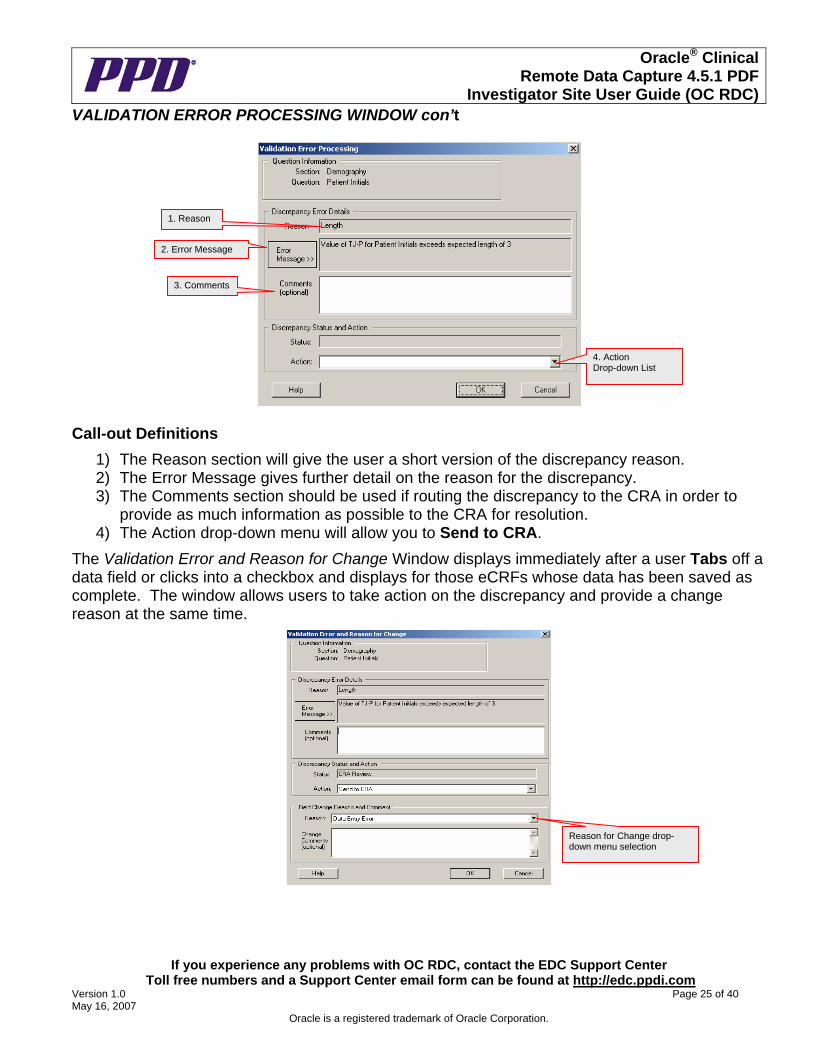
VALIDATION ERROR PROCESSING WINDOW con’t
1. Reason
2. Error Message
3. Comments
4. Action Drop-down List
Call-out Definitions
1) The Reason section will give the user a short version of the discrepancy reason. 2) The Error Message gives further detail on the reason for the discrepancy. 3) The Comments section should be used if routing the discrepancy to the CRA in order to
provide as much information as possible to the CRA for resolution. 4) The Action drop-down menu will allow you to Send to CRA.
The Validation Error and Reason for Change Window displays immediately after a user Tabs off a data field or clicks into a checkbox and displays for those eCRFs whose data has been saved as complete. The window allows users to take action on the discrepancy and provide a change reason at the same time.
Reason for Change drop-down menu selection
If you experience any problems with OC RDC, contact the EDC Support Center Toll free numbers and a Support Center email form can be found at http://edc.ppdi.com
Version 1.0 Page 25 of 40 May 16, 2007
Oracle is a registered trademark of Oracle Corporation.
Oracle® ClinicalRemote Data Capture 4.5.1 PDF
Investigator Site User Guide (OC RDC)
If you experience any problems with OC RDC, contact the EDC Support Center Toll free numbers and a Support Center email form can be found at http://edc.ppdi.com
Version 1.0 Page 26 of 40 May 16, 2007
Oracle is a registered trademark of Oracle Corporation.
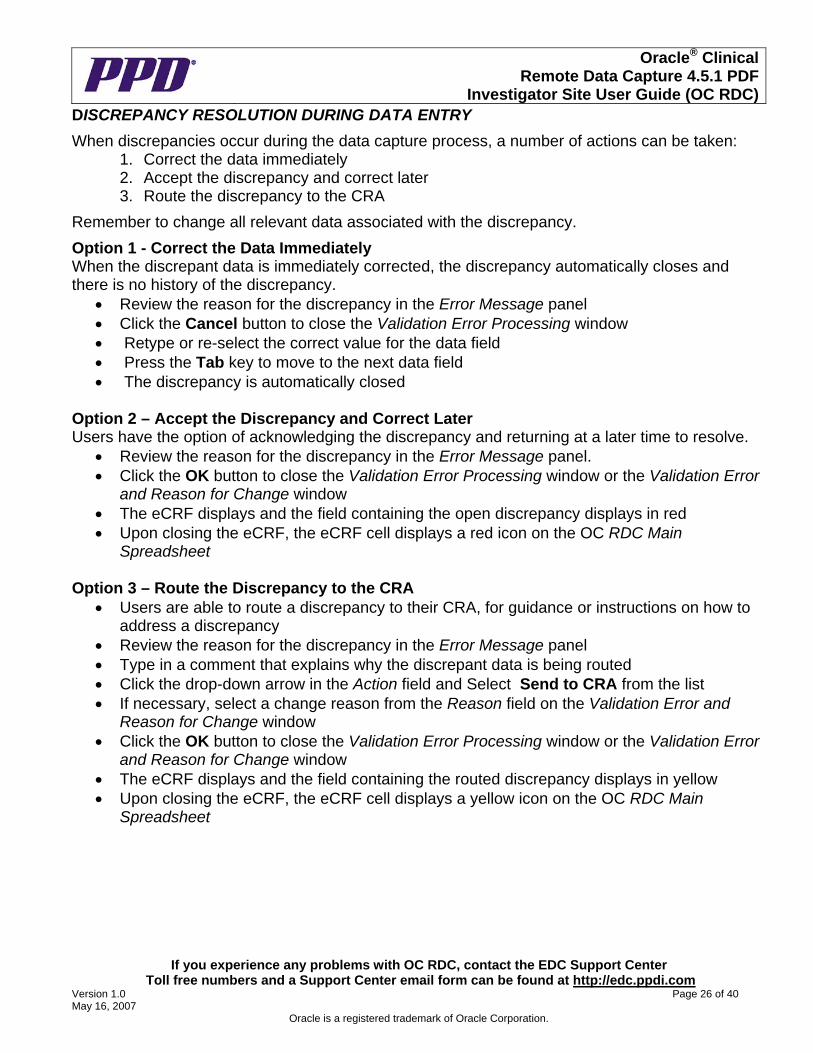
DISCREPANCY RESOLUTION DURING DATA ENTRY
When discrepancies occur during the data capture process, a number of actions can be taken: 1. Correct the data immediately 2. Accept the discrepancy and correct later 3. Route the discrepancy to the CRA
Remember to change all relevant data associated with the discrepancy.
Option 1 - Correct the Data Immediately When the discrepant data is immediately corrected, the discrepancy automatically closes and there is no history of the discrepancy.
• Review the reason for the discrepancy in the Error Message panel • Click the Cancel button to close the Validation Error Processing window • Retype or re-select the correct value for the data field • Press the Tab key to move to the next data field • The discrepancy is automatically closed
Option 2 – Accept the Discrepancy and Correct Later Users have the option of acknowledging the discrepancy and returning at a later time to resolve.
• Review the reason for the discrepancy in the Error Message panel. • Click the OK button to close the Validation Error Processing window or the Validation Error
and Reason for Change window • The eCRF displays and the field containing the open discrepancy displays in red • Upon closing the eCRF, the eCRF cell displays a red icon on the OC RDC Main
Spreadsheet
Option 3 – Route the Discrepancy to the CRA • Users are able to route a discrepancy to their CRA, for guidance or instructions on how to
address a discrepancy • Review the reason for the discrepancy in the Error Message panel • Type in a comment that explains why the discrepant data is being routed • Click the drop-down arrow in the Action field and Select Send to CRA from the list • If necessary, select a change reason from the Reason field on the Validation Error and
Reason for Change window • Click the OK button to close the Validation Error Processing window or the Validation Error
and Reason for Change window • The eCRF displays and the field containing the routed discrepancy displays in yellow • Upon closing the eCRF, the eCRF cell displays a yellow icon on the OC RDC Main
Spreadsheet

Oracle® ClinicalRemote Data Capture 4.5.1 PDF
Investigator Site User Guide (OC RDC)
DISCREPANCY RESOLUTION DURING DATA ENTRY con’t
Discrepancies that are present post data capture are addressed through the Discrepancy Management window. The site user will have the option to resolve or route the discrepancy. RESOLVING DISCREPANCIES When resolving discrepancies, if you are making a change to the data it may be a two part process. One, address the open discrepancy, and two, modify the data in the data field or eCRF section.
• From the OC RDC Main Spreadsheet, click the eCRF cell containing a red icon • The eCRF displays • Navigate to the discrepant field (red color) or to the vertical red bar to the left of the eCRF
section • Click the Discrepancy Management tool • Click the discrepant field or eCRF section bar • The Discrepancy Management window displays • Click the Open Discrepancy tab, if necessary • Review the reason for the discrepancy in the Error Message panel • Click the OK button • The Discrepancy Management window closes • Click the Hand tool • Modify any data • If the eCRF was previously saved as complete, supply a reason for change via the Change
Reason window • Click Save • The eCRF appears with the field that previously contained an open discrepancy displayed
in green (closed) • After closing the eCRF, the eCRF cell will display either a white icon (closed) if there are no
other discrepancies on the eCRF. ROUTING DISCREPANCIES
When managing discrepancies, if you are not making a change to the data the discrepancy will need to be routed to the CRA for further action.
From the OC RDC Main Spreadsheet, click the eCRF cell containing a red icon • The eCRF displays • Navigate to the discrepant field (red color) or to the vertical red bar to the left of the eCRF
section • Click the Discrepancy Management tool • Click the discrepant field or eCRF section bar • The Discrepancy Management window displays • Click the Open Discrepancy tab, if necessary • Review the reason for the discrepancy in the Error Message panel • Enter comment to explain why the data is not being changed • Click the Action drop-down list and select Send to CRA
If you experience any problems with OC RDC, contact the EDC Support Center Toll free numbers and a Support Center email form can be found at http://edc.ppdi.com
Version 1.0 Page 27 of 40 May 16, 2007
Oracle is a registered trademark of Oracle Corporation.
Oracle® ClinicalRemote Data Capture 4.5.1 PDF
Investigator Site User Guide (OC RDC)
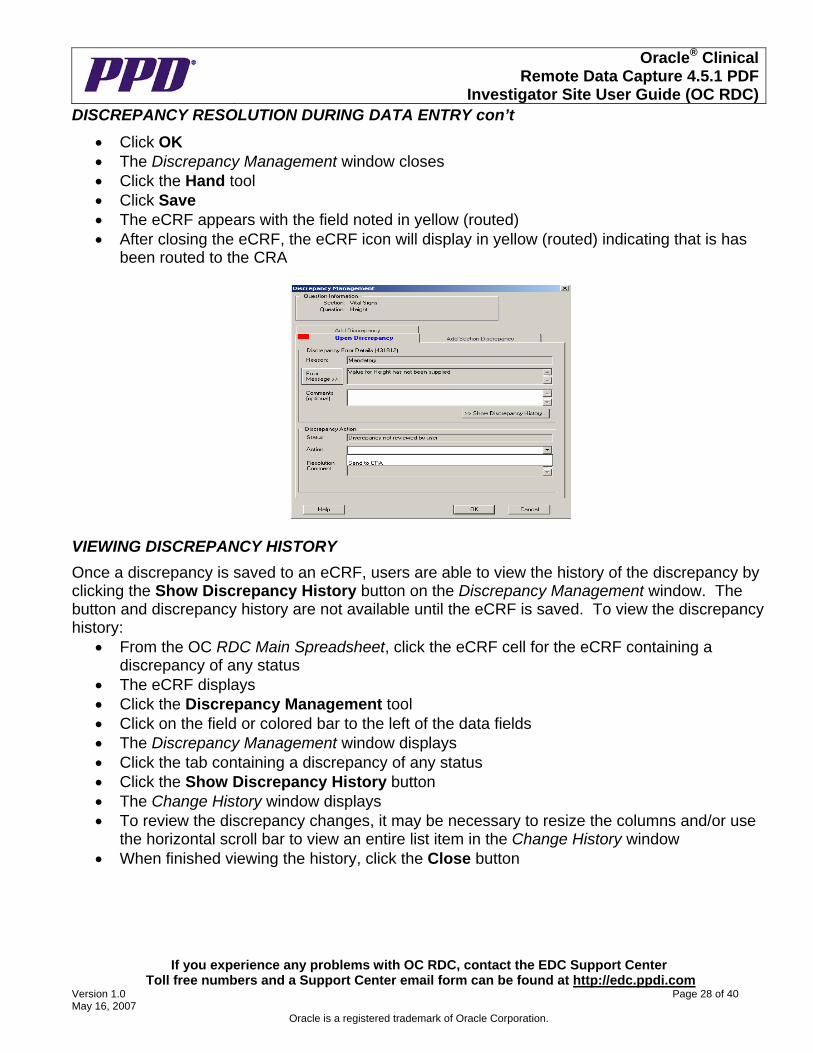
DISCREPANCY RESOLUTION DURING DATA ENTRY con’t
• Click OK • The Discrepancy Management window closes • Click the Hand tool • Click Save • The eCRF appears with the field noted in yellow (routed) • After closing the eCRF, the eCRF icon will display in yellow (routed) indicating that is has
been routed to the CRA
VIEWING DISCREPANCY HISTORY
Once a discrepancy is saved to an eCRF, users are able to view the history of the discrepancy by clicking the Show Discrepancy History button on the Discrepancy Management window. The button and discrepancy history are not available until the eCRF is saved. To view the discrepancy history:
• From the OC RDC Main Spreadsheet, click the eCRF cell for the eCRF containing a discrepancy of any status
• The eCRF displays • Click the Discrepancy Management tool • Click on the field or colored bar to the left of the data fields • The Discrepancy Management window displays • Click the tab containing a discrepancy of any status • Click the Show Discrepancy History button • The Change History window displays • To review the discrepancy changes, it may be necessary to resize the columns and/or use
the horizontal scroll bar to view an entire list item in the Change History window • When finished viewing the history, click the Close button
If you experience any problems with OC RDC, contact the EDC Support Center Toll free numbers and a Support Center email form can be found at http://edc.ppdi.com
Version 1.0 Page 28 of 40 May 16, 2007
Oracle is a registered trademark of Oracle Corporation.

Oracle® ClinicalRemote Data Capture 4.5.1 PDF
Investigator Site User Guide (OC RDC)
DISCREPANCY RESOLUTION DURING DATA ENTRY con’t
• The Discrepancy Management window displays • Click the Cancel button • The eCRF displays • Click the Hand tool
Change History Detail
AUDIT HISTORY TOOL
OC RDC automatically keeps a history of any data changes that have occurred for each field after the eCRF has been saved the first time regardless of the save status (Complete or Incomplete).
The system prompts users to supply a change reason when data is modified on an eCRF that has been saved as Complete. The history contains information on who changed the data, the previous value, the date and time the modification occurred and a reason for the change. Any field that has an audit history displays in blue when the Audit History tool is selected.
To view the history of a data field: • On an open eCRF, click the Audit History tool • The cursor changes to an image of the tool and any field containing a history displays in
blue • Click on the blue field • The Change History window displays
If you experience any problems with OC RDC, contact the EDC Support Center Toll free numbers and a Support Center email form can be found at http://edc.ppdi.com
Version 1.0 Page 29 of 40 May 16, 2007
Oracle is a registered trademark of Oracle Corporation.
Oracle® ClinicalRemote Data Capture 4.5.1 PDF
Investigator Site User Guide (OC RDC)
AUDIT HISTORY TOOL con’t
• To review the audit history, it may be necessary to resize the columns and/or use the horizontal scroll bar to view an entire list item in the Change History window
• When finished reviewing the history, click the Close button • The eCRF displays • Click the Hand tool • The data field turns white
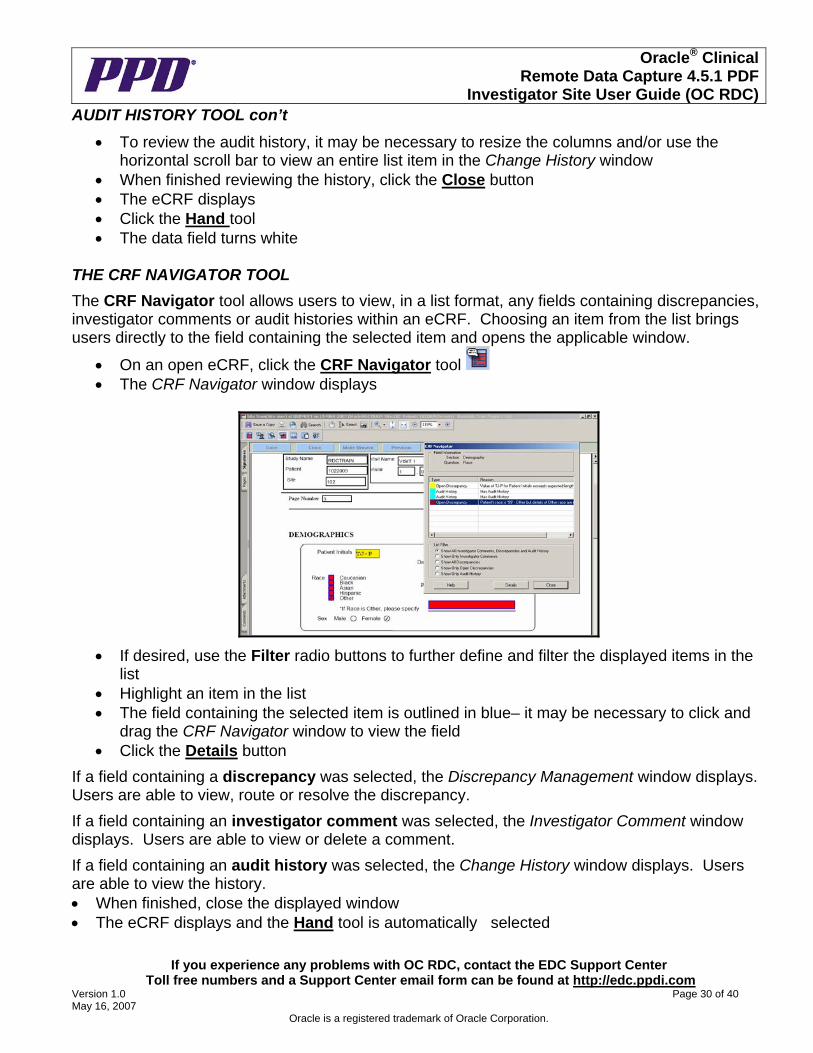
THE CRF NAVIGATOR TOOL
The CRF Navigator tool allows users to view, in a list format, any fields containing discrepancies, investigator comments or audit histories within an eCRF. Choosing an item from the list brings users directly to the field containing the selected item and opens the applicable window.
• On an open eCRF, click the CRF Navigator tool • The CRF Navigator window displays
• If desired, use the Filter radio buttons to further define and filter the displayed items in the list
• Highlight an item in the list • The field containing the selected item is outlined in blue– it may be necessary to click and
drag the CRF Navigator window to view the field • Click the Details button
If a field containing a discrepancy was selected, the Discrepancy Management window displays. Users are able to view, route or resolve the discrepancy.
If a field containing an investigator comment was selected, the Investigator Comment window displays. Users are able to view or delete a comment.
If a field containing an audit history was selected, the Change History window displays. Users are able to view the history. • When finished, close the displayed window • The eCRF displays and the Hand tool is automatically selected
If you experience any problems with OC RDC, contact the EDC Support Center Toll free numbers and a Support Center email form can be found at http://edc.ppdi.com
Version 1.0 Page 30 of 40 May 16, 2007
Oracle is a registered trademark of Oracle Corporation.

Oracle® ClinicalRemote Data Capture 4.5.1 PDF
Investigator Site User Guide (OC RDC)
CRF STATUS ACTIVITIES TOOL
The CRF Status Activities tool allows users to delete saved data from an eCRF. This is useful if data was entered for the wrong patient or if the incorrect visit was selected and completed. Any discrepancies and investigator comments will also be deleted along with the data. When deleting data that has been saved as Complete, the system prompts users for a deletion reason. The CRF Status Activities tool also allows users to view the verification history of an eCRF, if the eCRF contains a verification history, e.g., has been verified by the monitor. • From the OC RDC Main Spreadsheet, click the eCRF cell for the eCRF data to delete; the
eCRF displays • Click the CRF Status Activities tool • The CRF Status Activities window displays • Click the Delete CRF tab, if necessary – to view the verification history of an eCRF click the
CRF Verification tab • If the eCRF was saved as Incomplete, click the Delete button
• If the eCRF was saved as Complete, select a deletion reason from the drop down list, add an optional comment if desired and click the Delete button
• A confirmation box displays, Click the Yes button
• The OC RDC Main Spreadsheet displays with an empty eCRF cell for the deleted eCRF ADDING AN INVESTIGATOR COMMENT
NOTE: It is recommended that sites DO NOT USE Investigator Comments. Most protocols will have a comments log page where that information should be captured. Please consult the CRA for your study prior to utilizing this feature of OC RDC.
The Investigator Comment tool is used by the investigator site to add clinically pertinent details to a data field. The comment function is not a communication tool and in no way replaces the normal channels of communication such as e-mails, phone calls or site visits.
If you experience any problems with OC RDC, contact the EDC Support Center Toll free numbers and a Support Center email form can be found at http://edc.ppdi.com
Version 1.0 Page 31 of 40 May 16, 2007
Oracle is a registered trademark of Oracle Corporation.
Oracle® ClinicalRemote Data Capture 4.5.1 PDF
Investigator Site User Guide (OC RDC)
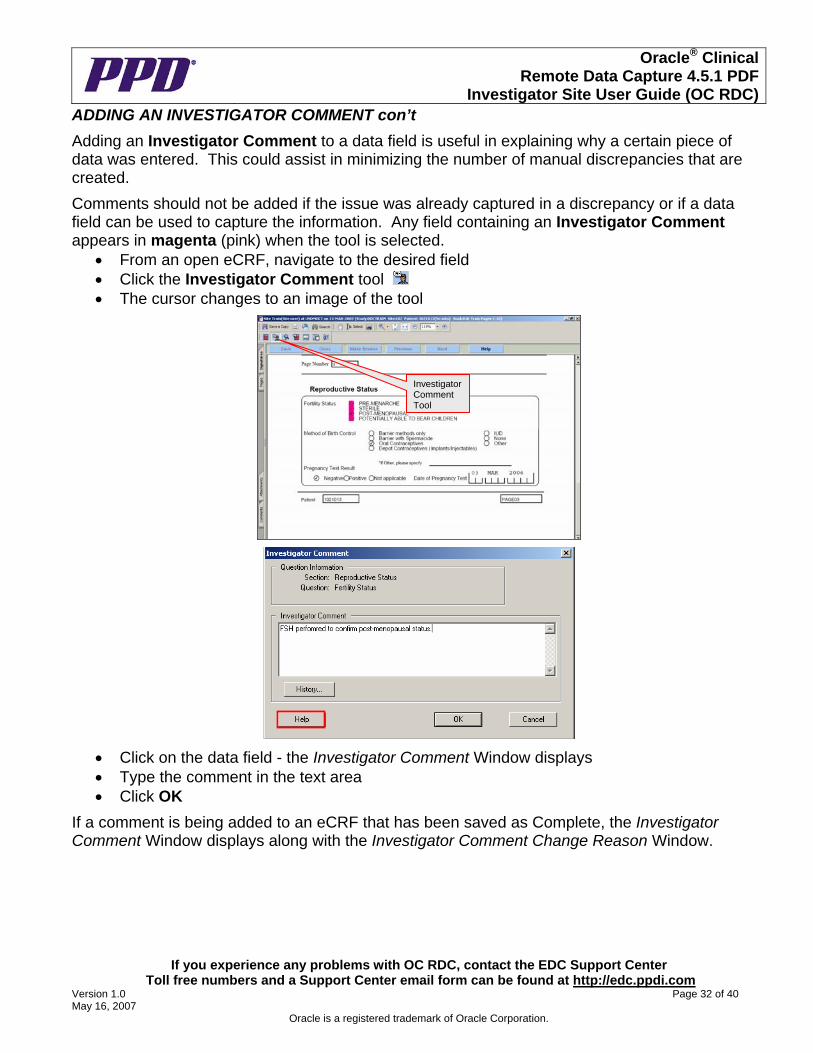
ADDING AN INVESTIGATOR COMMENT con’t
Adding an Investigator Comment to a data field is useful in explaining why a certain piece of data was entered. This could assist in minimizing the number of manual discrepancies that are created.
Comments should not be added if the issue was already captured in a discrepancy or if a data field can be used to capture the information. Any field containing an Investigator Comment appears in magenta (pink) when the tool is selected.
• From an open eCRF, navigate to the desired field • Click the Investigator Comment tool • The cursor changes to an image of the tool
If you experience any problems with OC RDC, contact the EDC Support Center Toll free numbers and a Support Center email form can be found at http://edc.ppdi.com
Version 1.0 Page 32 of 40 May 16, 2007
Oracle is a registered trademark of Oracle Corporation.
Investigator Comment Tool
• Click on the data field - the Investigator Comment Window displays • Type the comment in the text area • Click OK
If a comment is being added to an eCRF that has been saved as Complete, the Investigator Comment Window displays along with the Investigator Comment Change Reason Window.
Oracle® ClinicalRemote Data Capture 4.5.1 PDF
Investigator Site User Guide (OC RDC)
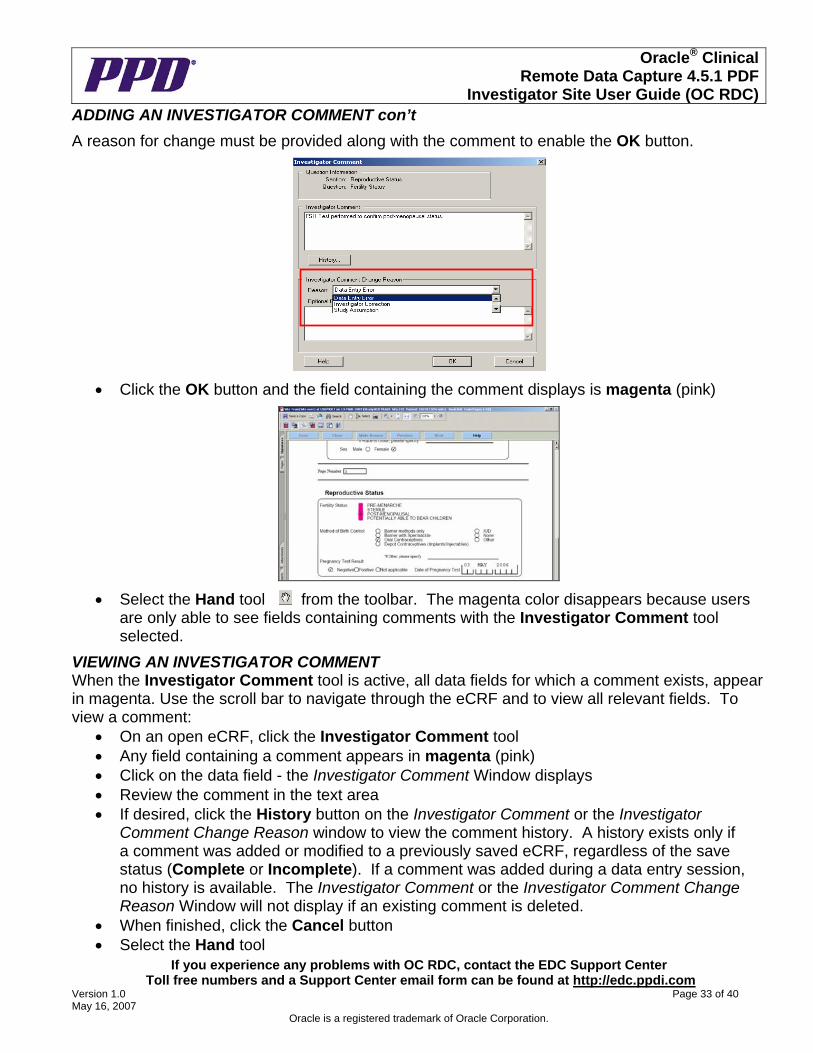
ADDING AN INVESTIGATOR COMMENT con’t
A reason for change must be provided along with the comment to enable the OK button.
• Click the OK button and the field containing the comment displays is magenta (pink)
• Select the Hand tool from the toolbar. The magenta color disappears because users are only able to see fields containing comments with the Investigator Comment tool selected.
VIEWING AN INVESTIGATOR COMMENT When the Investigator Comment tool is active, all data fields for which a comment exists, appear in magenta. Use the scroll bar to navigate through the eCRF and to view all relevant fields. To view a comment:
• On an open eCRF, click the Investigator Comment tool • Any field containing a comment appears in magenta (pink) • Click on the data field - the Investigator Comment Window displays • Review the comment in the text area • If desired, click the History button on the Investigator Comment or the Investigator
Comment Change Reason window to view the comment history. A history exists only if a comment was added or modified to a previously saved eCRF, regardless of the save status (Complete or Incomplete). If a comment was added during a data entry session, no history is available. The Investigator Comment or the Investigator Comment Change Reason Window will not display if an existing comment is deleted.
• When finished, click the Cancel button
If you experience any problems with OC RDC, contact the EDC Support Center Toll free numbers and a Support Center email form can be found at http://edc.ppdi.com
Version 1.0 Page 33 of 40 May 16, 2007
Oracle is a registered trademark of Oracle Corporation.
• Select the Hand tool

Oracle® ClinicalRemote Data Capture 4.5.1 PDF
Investigator Site User Guide (OC RDC)
THE SEARCH WINDOW
Once data capture has begun for the study, users are able to use the Search window to sub-set or filter data for display. The Search window allows users to specify the data display in greater detail. The Search window is a useful tool that has the potential of assisting users with their work flow for data capture and discrepancy management. The Search window consists of a series of criteria that transition from general to more specific as users move down in the window. The first two options, Book and Site, establish the protocol to work with. The remaining five options, Patients, Visit/Pages, CRF Status, Date Window and Data, allow users to “drill-down” to display more specific data within the specified protocol.
It is recommended that the Search window be used to search for any eCRFs that may have inadvertently been left marked as Incomplete or for any eCRFs that contains active discrepancies. This ensures that all eCRFs are in a Complete status with closed discrepancies when it comes time to lock to database.
To display the Search window: • From the OC RDC Main Spreadsheet, click the Activity List button and then click the
Search button -or- • From the OC RDC Main Spreadsheet select the File=>New Search menu command • The Search window displays
There is a default button adjacent to each option, noted by <All>. It remains inactive or grayed out until you make a selection that is something other than the default value for the option.
The Specify... button is adjacent to the default buttons, except for Book and Site. It gives users access to the Subsearch window associated with the current option, which allows them to select the subset of data to display. After clicking a Specify... button, the applicable Subsearch window allows users to select the data to display for each option selected.
If you experience any problems with OC RDC, contact the EDC Support Center Toll free numbers and a Support Center email form can be found at http://edc.ppdi.com
Version 1.0 Page 34 of 40 May 16, 2007
Oracle is a registered trademark of Oracle Corporation.
Oracle® ClinicalRemote Data Capture 4.5.1 PDF
Investigator Site User Guide (OC RDC)
THE SEARCH WINDOW con’t
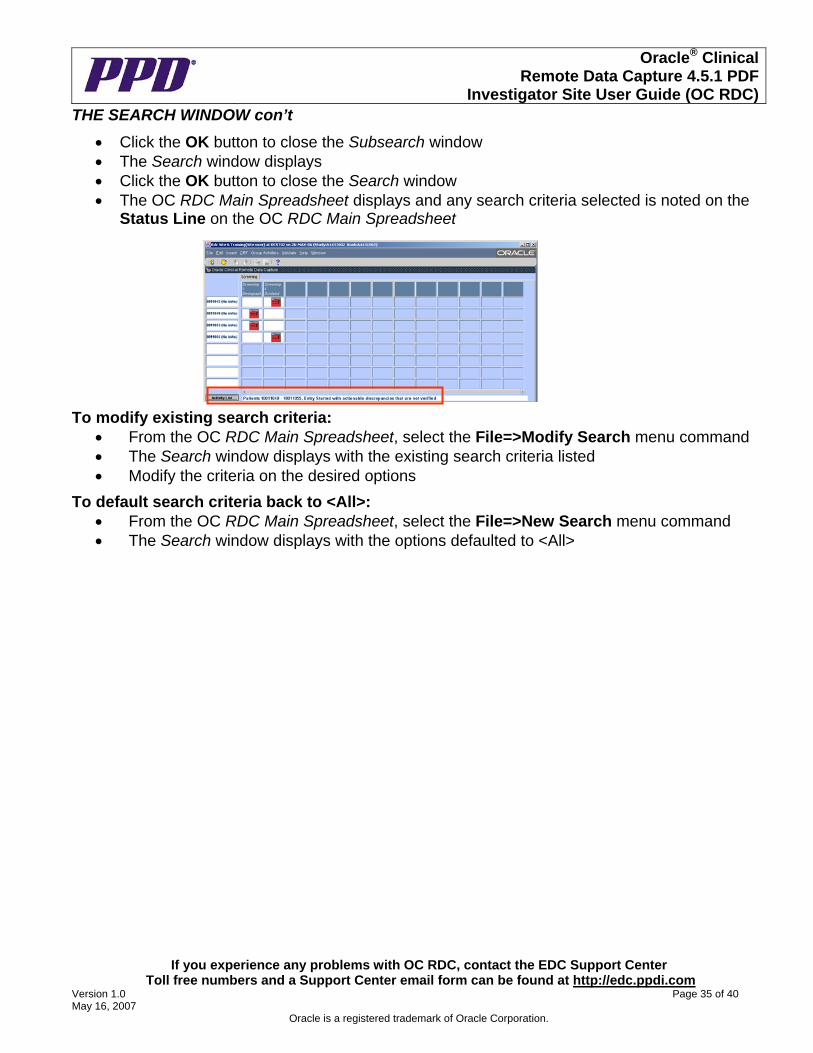
• Click the OK button to close the Subsearch window • The Search window displays • Click the OK button to close the Search window • The OC RDC Main Spreadsheet displays and any search criteria selected is noted on the
Status Line on the OC RDC Main Spreadsheet
To modify existing search criteria: • From the OC RDC Main Spreadsheet, select the File=>Modify Search menu command • The Search window displays with the existing search criteria listed • Modify the criteria on the desired options
To default search criteria back to <All>: • From the OC RDC Main Spreadsheet, select the File=>New Search menu command • The Search window displays with the options defaulted to <All>
If you experience any problems with OC RDC, contact the EDC Support Center Toll free numbers and a Support Center email form can be found at http://edc.ppdi.com
Version 1.0 Page 35 of 40 May 16, 2007
Oracle is a registered trademark of Oracle Corporation.

Oracle® ClinicalRemote Data Capture 4.5.1 PDF
Investigator Site User Guide (OC RDC)
VALIDATING AT A SITE OR A PATIENT LEVEL
Each database has an automatic validation process to run edit checks on a nightly basis. These edit checks are part of the protocol specific database design and ensure that fields within an eCRF and across multiple eCRFs contain data that corresponds appropriately. If data fields contain data outside of the edit check parameters, a discrepancy will be generated by the system.
While these nightly edit checks are helpful, there may be instances when a site user would like to confirm that all data fields are correct as entered without waiting for the nightly validation.
The site user is capable of running a validation at both the site level and an individual patient level.
Site Validation
The site validation menu command runs validation on all eCRFs in a site that are saved as complete. This may include eCRFs that are not part of the current workset. Validating a site allows you to view and manage your discrepancies in real time.
To validate the eCRFs associated with a site:
1) Select the appropriate site from the Activity List window or the Search window.
2) Select the Validate > Site menu command. A confirmation window displays a message that identifies the site that will be validated.
3) In the Forms window: a. Click the OK button to proceed with the validation b. Click the Cancel button to discontinue the validation
Patient Validation
The Patient validation menu command runs validation procedures on all saved as complete eCRFs associated with the selected patient. Validating a patient allows you to view and manage your discrepancies in real time.
1) On the OC RDC Main Spreadsheet, highlight the patient number you wish to validate. 2) Select the Validate > Patient menu command. 3) In the Forms window:
a. Click the OK button to proceed with the validation b. Click the Cancel button to discontinue the validation
If you experience any problems with OC RDC, contact the EDC Support Center Toll free numbers and a Support Center email form can be found at http://edc.ppdi.com
Version 1.0 Page 36 of 40 May 16, 2007
Oracle is a registered trademark of Oracle Corporation.

Oracle® ClinicalRemote Data Capture 4.5.1 PDF
Investigator Site User Guide (OC RDC)
PRINCIPAL INVESTIGATOR APPROVAL PROCESS
After eCRFs have been verified by the CRA and have no outstanding discrepancies, they are ready for approval by the Principle Investigator and/or their designee.
The following steps outline the process for approving eCRFs.
1) Log into OC RDC PDF using credentials emailed from PPD. 2) The Activity List window displays. Select a patient number on the left navigation pane. 3) Click the Show All Data for Patient… hyperlink 4) The OC RDC Main Spreadsheet displays 5) Click Group Activities>Approve CRFs
6) Enter Username and Password again. 7) Click OK.
8) The Group Approval Processing window displays. Leave default settings checked to Skip CRFs with Discrepancies and Skip Un-verified CRFs.
9) Click OK.
If you experience any problems with OC RDC, contact the EDC Support Center Toll free numbers and a Support Center email form can be found at http://edc.ppdi.com
Version 1.0 Page 37 of 40 May 16, 2007
Oracle is a registered trademark of Oracle Corporation.
Oracle® ClinicalRemote Data Capture 4.5.1 PDF
Investigator Site User Guide (OC RDC)
PRINCIPAL INVESTIGATOR APPROVAL PROCESS con’t
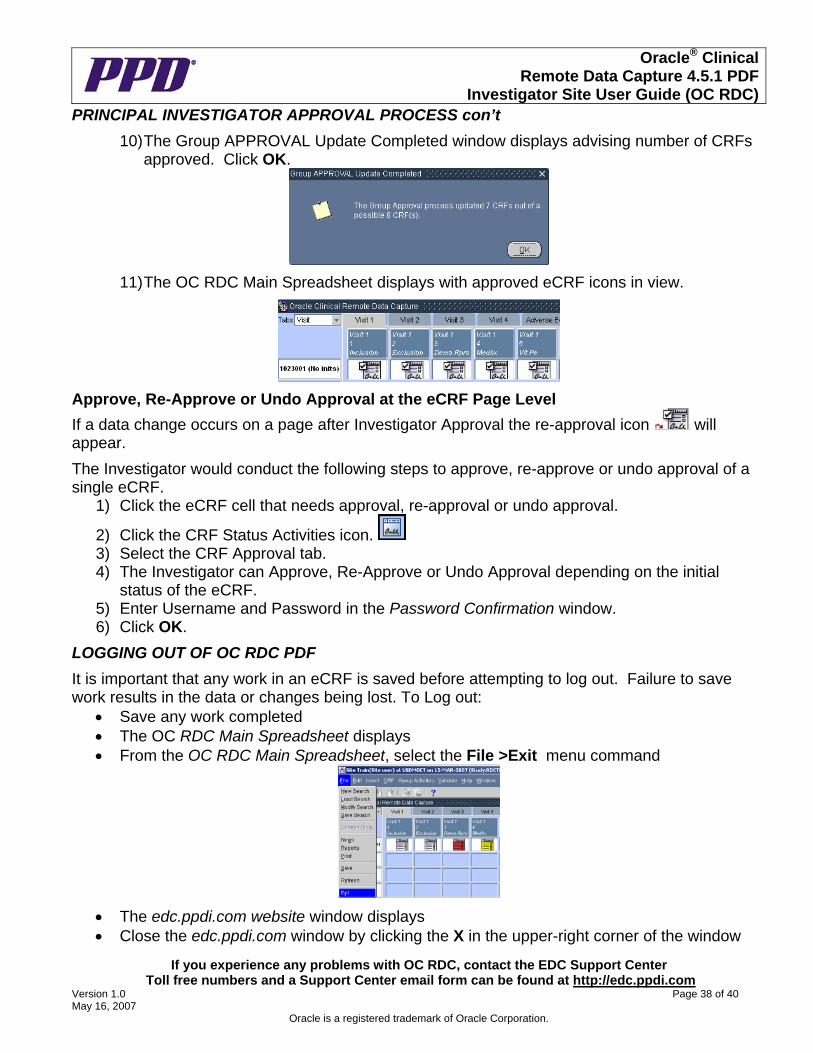
10) The Group APPROVAL Update Completed window displays advising number of CRFs approved. Click OK.
11) The OC RDC Main Spreadsheet displays with approved eCRF icons in view.
Approve, Re-Approve or Undo Approval at the eCRF Page Level If a data change occurs on a page after Investigator Approval the re-approval icon will appear.
The Investigator would conduct the following steps to approve, re-approve or undo approval of a single eCRF.
1) Click the eCRF cell that needs approval, re-approval or undo approval.
2) Click the CRF Status Activities icon. 3) Select the CRF Approval tab. 4) The Investigator can Approve, Re-Approve or Undo Approval depending on the initial
status of the eCRF. 5) Enter Username and Password in the Password Confirmation window. 6) Click OK.
LOGGING OUT OF OC RDC PDF
It is important that any work in an eCRF is saved before attempting to log out. Failure to save work results in the data or changes being lost. To Log out:
• Save any work completed • The OC RDC Main Spreadsheet displays • From the OC RDC Main Spreadsheet, select the File >Exit menu command
• The edc.ppdi.com website window displays • Close the edc.ppdi.com window by clicking the X in the upper-right corner of the window
If you experience any problems with OC RDC, contact the EDC Support Center Toll free numbers and a Support Center email form can be found at http://edc.ppdi.com
Version 1.0 Page 38 of 40 May 16, 2007
Oracle is a registered trademark of Oracle Corporation.
Oracle® ClinicalRemote Data Capture 4.5.1 PDF
Investigator Site User Guide (OC RDC)
If you experience any problems with OC RDC, contact the EDC Support Center Toll free numbers and a Support Center email form can be found at http://edc.ppdi.com
Version 1.0 Page 39 of 40 May 16, 2007
Oracle is a registered trademark of Oracle Corporation.
OC RDC TRAINING SUPPORT
Training Options & Access Requests OC RDC PDF application training is available for all OC RDC PDF users. Application training covers functionality of OC RDC PDF.
• OC RDC PDF is an eCRF and not a direct data entry system; source documentation is required.
• All equipment provided to the site should ONLY be used for OC RDC PDF or other PPD approved applications.
• The PPD EDC Support Center is available 24 hours a day, 7 days a week, 365 days a year. Multilingual translators are available.
• The PPD EDC Support Center is for technical questions only. Please contact the CRA for study protocol or eCRF related questions.
• At the end of the study, a CD of all subject data will be provided to the sites - Investigator confirmation and sign-off is required after receipt of the entire site’s study data on the CD. Until the CD is received, sites must continue to have access to PPD and their OC RDC data.
• Training can be requested through the Study Team. All training sessions must be documented before access to a study protocol in the OC RDC PDF application is granted.
Training Materials
The following OC RDC PDF training materials are available for all site users: • On-line training • Quick Reference Guide • Investigator Site User Guide • Functionality Guides
Oracle® ClinicalRemote Data Capture 4.5.1 PDF
Investigator Site User Guide (OC RDC)
If you experience any problems with OC RDC, contact the EDC Support Center Toll free numbers and a Support Center email form can be found at http://edc.ppdi.com
Version 1.0 Page 40 of 40 May 16, 2007
Oracle is a registered trademark of Oracle Corporation.
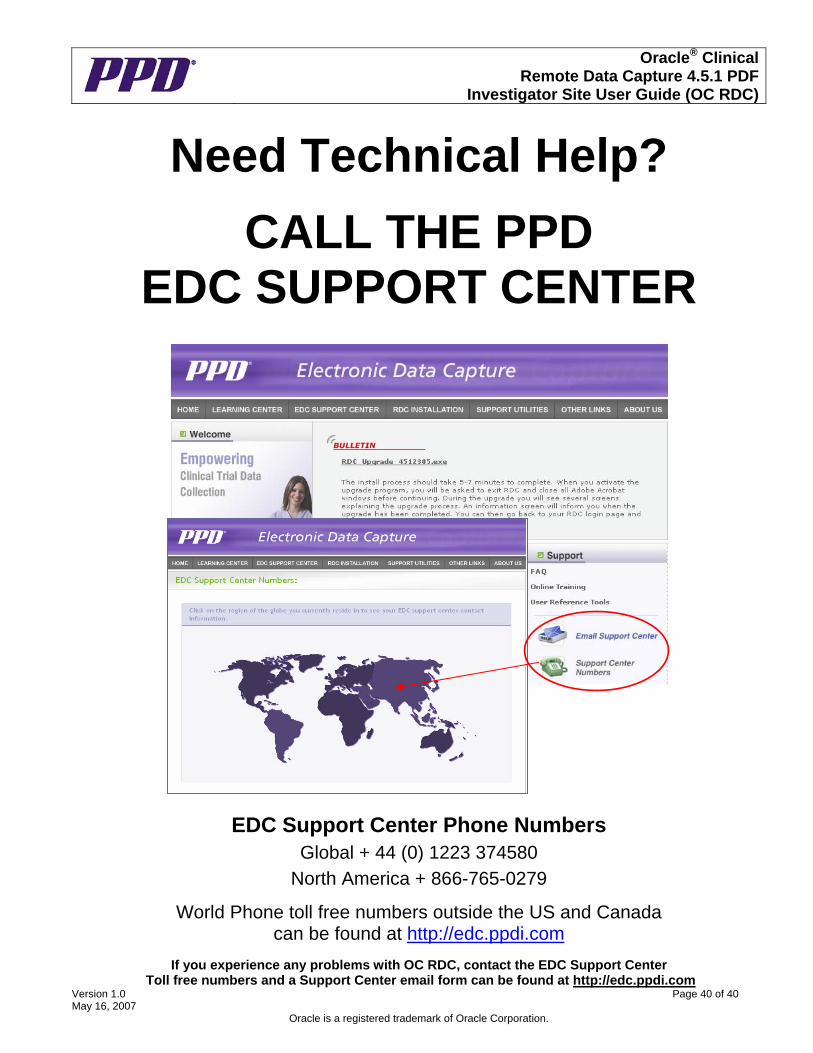
Need Technical Help?
CALL THE PPD EDC SUPPORT CENTER
EDC Support Center Phone Numbers
Global + 44 (0) 1223 374580
North America + 866-765-0279
World Phone toll free numbers outside the US and Canada can be found at http://edc.ppdi.com