jan 23, 2017a6ce85f34b101e4ba428-38e91d4533ffbe5c8042650a77a3ed34.r56.cf1...page | i contents...
TRANSCRIPT


Revised – Jan 23, 2017
Trademarks: NewTek, NewTek VMC1, NewTek VMC1 IN, NewTek VMC1 OUT, NewTek VMC1 STREAM, TriCaster, TriCaster Advanced Edition, TriCaster XD,
TriCaster 8000, TriCaster TCXD8000, TCXD8000, TriCaster 860, TriCaster TCXD860, TCXD860, TriCaster 460, TriCaster TCXD460, TCXD460, TriCaster 410,
TriCaster TCXD410, TCXD410, TriCaster Mini SDI, TriCaster Mini, TriCaster 40, TriCaster TCXD40, TCXD40, TriCaster 855, TriCaster TCXD855, TCXD855,
TriCaster 455, TriCaster TCXD455, TCXD455, TriCaster EXTREME, TriCaster 850 EXTREME, TriCaster TCXD850 EXTREME, TCXD850 EXTREME, TriCaster 450
EXTREME, TriCaster TCXD450 EXTREME, TCXD450 EXTREME, TriCaster 850, TriCaster TCXD850, TCXD850, TriCaster 450, TriCaster TCXD450, TCXD450,
TriCaster 300, TriCaster TCXD300, TCXD300, TriCaster PRO, TriCaster STUDIO, TriCaster BROADCAST, TriCaster DUO, MediaDS, MDS1, 3PLAY, 3Play, 3Play
4800, 3PXD4800, 3Play 440, 3PXD440, 3Play Mini, 3Play 820, 3PXD820, 3Play 425, 3PXD425 3Play 330, 3PXD330, TalkShow, TalkShow VS 4000, TalkShow
VS100, Network Device Interface, NDI, NewTek Connect, NewTek IsoCorder, ProTek, ProTek Care, ProTek Elite, iVGA, SpeedEDIT, IsoCorder, LiveText,
DataLink, LiveSet, TriCaster Virtual Set Editor, Virtual Set Editor Advanced Edition, TriCaster VSE, TriCaster VSE Advanced Edition, LiveMatte, TimeWarp, VT,
VT[3], VT[4], V[T5], Video Toaster, Toaster, Inspire 3D, 3D Arsenal, Aura, LightWave, LightWave 3D and LightWave CORE are trademarks, service marks, and
registered trademarks of NewTek. All other brand names, product names, or trademarks belong to their respective holders.

Page | i
C O N T E N T S
CHAPTER 1 GETTING STARTED .................................................................................................................... 3
SECTION 1.1 INTRODUCTION .......................................................................................................................................................... 3 SECTION 1.2 IP ADVANTAGES ......................................................................................................................................................... 4
1.2.1 What is NDI? .............................................................................................................................................................. 4 SECTION 1.3 LEARN MORE ABOUT NDI ........................................................................................................................................... 5
CHAPTER 2 INSTALLATION AND CONFIGURATION ..................................................................................... 6
SECTION 2.1 SYSTEM REQUIREMENTS .............................................................................................................................................. 6 SECTION 2.1 INSTALLING THE SOFTWARE .......................................................................................................................................... 6 SECTION 2.2 CONFIGURATION ........................................................................................................................................................ 8
2.2.1 Grab.......................................................................................................................................................................... 10 2.2.2 Overlay ..................................................................................................................................................................... 10 2.2.3 Info, and NDI Online ................................................................................................................................................. 11
CHAPTER 3 PAINTING TOOLS .................................................................................................................... 12
CHAPTER 4 VIEW, CAPTURE AND MANAGE YOUR NDI OUTPUT .............................................................. 14
SECTION 4.1 MONITOR ............................................................................................................................................................... 14 SECTION 4.2 CAPTURE ................................................................................................................................................................ 15 SECTION 4.3 CONTROL ACCESS ..................................................................................................................................................... 16
APPENDIX A HELP ...................................................................................................................................... 17
SECTION A.1 CONNECTIONS ......................................................................................................................................................... 17 A.1.1 Client System does not see My NDI Output? ............................................................................................................ 17
SECTION A.2 DEBUGGING FAILED CONNECTIONS .............................................................................................................................. 17 SECTION A.3 NDI AND YOUR NETWORK ......................................................................................................................................... 18 SECTION A.4 ROUTERS AND FIREWALLS .......................................................................................................................................... 18 SECTION A.5 DOES MY PRODUCTION SYSTEM SUPPORT NDI? ............................................................................................................. 19
A.1.2 NewTek TriCaster Mini, Mini SDI, 410, 460, 860, 8000 ............................................................................................ 19 A.1.3 NewTek TriCaster Advanced Edition ........................................................................................................................ 19 A.1.4 Other TriCaster Models ............................................................................................................................................ 19 A.1.5 NewTek TalkShow .................................................................................................................................................... 19
CREDITS ..................................................................................................................................................... 20


Page | 3
CHAPTER 1 GETTING STARTED
SECTION 1.1 INTRODUCTION
Thank you for choosing NewTek® NDI™ Telestrator. We hope you will quickly fall in love with this application, and find it fulfills your live video markup needs very well indeed.
FIGURE 1-1
Where you are drawing using a stylus, mouse or finger-tip, for dynamic ‘follow-the-action’ markup, NewTek® NDI™ Telestrator provides a simple, convenient and responsive toolset.
FIGURE 1-2
The applications purposeful interface requires little explanation, yet provides the ability to easily freehand strokes, shapes (filled and unfilled), and solid of fading arrows. Paint in standard or highlight mode, and selectively erase objects or clear the entire canvas with one click. Frame grabbing is supported too, as is a static overlay you can use as a station identifier ‘bug’ or for commercial branding.

Page | 4
SECTION 1.2 IP ADVANTAGES
In a way, this software is a fine example of the benefits of NewTek’s revolutionary NDI (Network Device Interface) system for video over IP. Consider that, generally speaking, a telestrator is by design a pretty simple piece of software (you don’t really want to have to deal with a complex interface when trying to keep up with the action in a game). Still, telestrator systems are typically pretty costly. Why so?
Traditionally, a big part of the expense accrues from the need to supply the operator with a high-quality, full motion video source (say, a camera feed from a basketball game or soccer match) to paint over, and do so with as little latency as possible. Then you must send that markup back to the production switcher. In some cases, you need to supply a second output feed to handle transparency. This all involves hardware, and costs can quickly mount as you support at least one HD-SDI input, perhaps an SDI matrix router ahead of that, and one (if not two) HD-SDI outputs, not to mention cables and so on.
This is where NewTek’s innovative NDI protocol comes in, reducing expense, and saving a lot of setup time, too! Matrix router? Forget it, no need. Low latency, broadcast quality video – check. Embedded alpha channel in the output, NDI has you covered. (If you need to supply the output over traditional SDI connections, this can be done too, as we’ll discuss a bit later.)
1.2.1 WHAT IS NDI?
“It was a dark and stormy night. Outside, the world was caught up in a mad Babel of competing IP video transport schemes incapable of communicating with one another (or at least disinclined to do so).”
OK, it was only dark and stormy metaphorically ... but the rest does not require much exaggeration. Enter NewTek’s Network Device Interface™ (NDI), a fresh IP video over Ethernet standard for live production that has been freely shared with qualified developers around the globe. NDI allows video systems and devices to identify and communicate with each other, and to encode, transmit, and receive high quality, low latency, frame-accurate video and audio over IP in real time.
NDI enabled-devices and software have the potential to greatly enhance your video production pipeline by making video input and output available anywhere your network runs. Devices such as NewTek’s TriCaster® and a growing number of third party systems provide direct NDI support.
As well, you can connect older devices and systems to your NDI workflow using the free NewTek Connect™ application with a supported third-part video i/o card (Blackmagic Design®, Deltacast, and AJA® Video Systems).

Page | 5
SECTION 1.3 LEARN MORE ABOUT NDI
The applications of NDI in production workflows, and the number of innovative NDI-enabled devices, systems and applications is constantly growing. We highly recommend a visit to ndi.NewTek.com as a good starting point to discover how you can benefit. While there, download the free “Getting Started with NDI” download, as it will give you a nice introduction to the topic. NewTek also maintains NDI user forums – you can find these at http://forums.newtek.com/.

Page | 6
CHAPTER 2 INSTALLATION AND CONFIGURATION
This chapter will walk you through the simple steps required to install your NewTek® NDI™ Telestrator software and configure the various host applications from Adobe®.
SECTION 2.1 SYSTEM REQUIREMENTS
Minimum system requirements:
• 64-bit Microsoft® Windows 7 operating system (OS) or better • Intel i5 Sandy Bridge CPU or better with integrated GPU and support for AVX instructions • 4GB system memory • Gigabit LAN connection for signal transmission over IP via NDI™ technology • Display with screen resolution of 1024 x 768 or higher
SECTION 2.1 INSTALLING THE SOFTWARE
Here is a walk-thru of the installation process:
1. Begin by double clicking the installer’s “.exe” file to begin the set up process. The first page you will see is the Welcome page – click “Next” at the bottom.
2. The License Agreement is shown after the Welcome page. Please read this, select a switch in the footer to indicate whether you accept the agreement, and click Next (Figure 2-1).
FIGURE 2-1
3. The next few pages establish where the software will be installed and where Start Menu shortcuts will be placed.

Page | 7
FIGURE 2-2
4. The defaults should be just fine, so click Next, and installation will begin.
FIGURE 2-3

Page | 8
FIGURE 2-4
5. Finally, a confirmation page will pop up to indicate success, and inform you of the need to restart the system to complete the installation.
SECTION 2.2 CONFIGURATION
Making sure you are on a network with one or more active NDI sources, launch the NDI Telestrator.
FIGURE 2-5
Initially on launch, the NDI Telestrator window is rather barren (Figure 2-5).

Page | 9
FIGURE 2-6
A small panel at upper right (Figure 2-6) constitutes the Configuration widget, which expands to provide video source configuration options (Figure 2-7) when you click or tap the downward pointing triangle gadget at right.
FIGURE 2-7
Click (or tap) the drop-down menu box to the right of the button labeled NDI to see a list of *all NDI video sources available on your network, and make a suitable selection.
Hint: Section 4.3 discusses access control for NDI sources, and explains how to limit which ones are visible
on your system, and who can receive the output from your NDI Telestrator application.
The NDI source you select will appear in full motion as background of your drawing canvas. You can toggle the display of this background video layer using the NDI visibility button just left of the source menu (Figure 2-8).
Having selected your video source, you can minimize the Configuration widget by clicking /tapping the same button you used to open it (of course, you can re-open it at any time to select another background source). While we’re in this area, let’s take a look at the rest of the features associated with the Configuration widget.

Page | 10
2.2.1 GRAB
FIGURE 2-8
The Grab button looks like a camera – click/tap it to capture the current frame from an NDI channel you have selected as just described. The captured still image will be immediately displayed over the video background. This may be useful when you wish to concentrate your efforts on a specific play in a game and don’t have control over playback.
Note: Actually, the background video layer need not be displayed for Grab to work. This may seem odd,
but you might actually find it useful: even while you are marking up a still, you can watch the full motion
action on another monitor (perhaps using NewTek NDI Monitor) – and grab an updated still image.
The ‘eyeball’ button next to Grab controls visibility of the grabbed image, which appears ‘above’ the background video, but behind the painting canvas layer. The features are always shown, even when the Configuration widget is minimized.
2.2.2 OVERLAY
FIGURE 2-9
The expanded Configuration widget also displays an Overlay button. Click/tap this to open a system file browser that will let you select an image that will appear over your NDI output. This feature allows you to show a station identification ‘bug’, or monetize your replay and telestration segment by showing a sponsor logo.
Hint: The overlay appears in front of all other layers, including strokes in the paint canvas layer.
The overlay image should be full-screen size and aspect such as, for example, a 1920x1080 image. Obviously you don’t want it to obscure the entire frame, so it should include transparency and be saved as a 32 bit PNG format file with embedded alpha channel. This layer has a visibility button (eyeball), as well.
Page | 11
2.2.3 INFO, AND NDI ONLINE
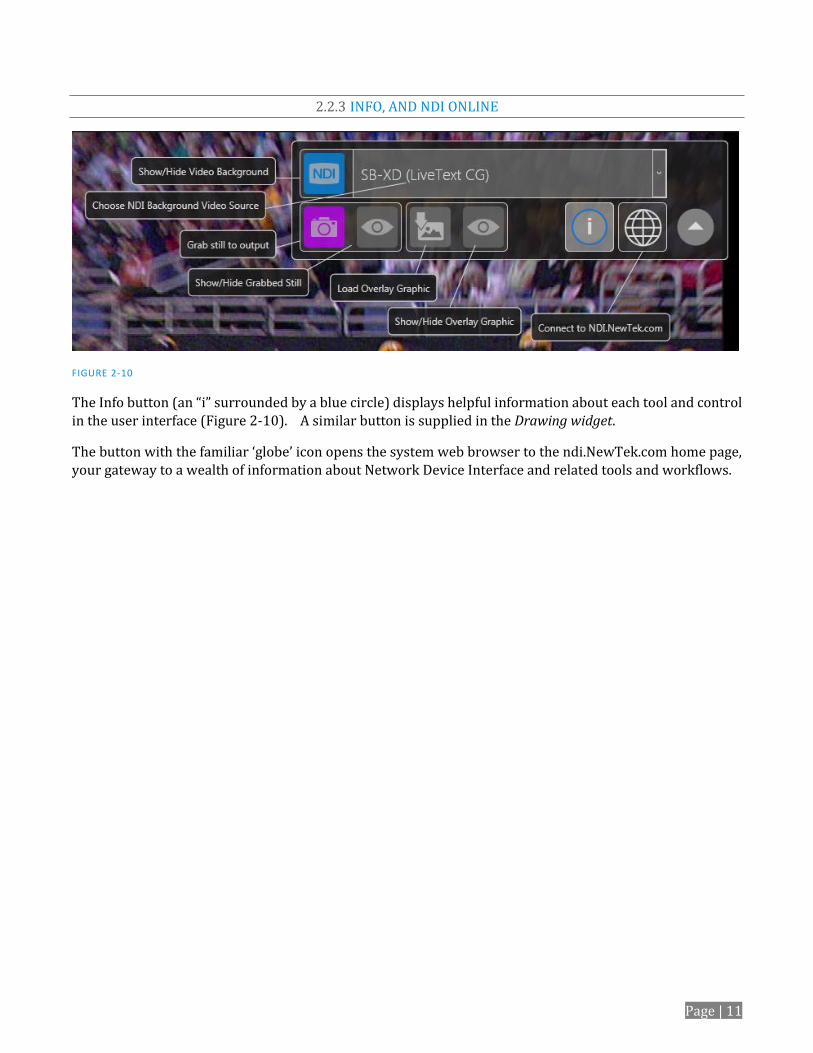
FIGURE 2-10
The Info button (an “i” surrounded by a blue circle) displays helpful information about each tool and control in the user interface (Figure 2-10). A similar button is supplied in the Drawing widget.
The button with the familiar ‘globe’ icon opens the system web browser to the ndi.NewTek.com home page, your gateway to a wealth of information about Network Device Interface and related tools and workflows.

Page | 12
CHAPTER 3 PAINTING TOOLS
FIGURE 3-1
The actual painting tools and options are located at the bottom of the screen. The Drawing widget is minimized on launch, and for many purposes can stay that way. From left to right it contains the following buttons:
Stroke size – select from the three most popular ‘pen sizes’
Freehand draw – use this to switch back to standard strokes when you have made brief use of one of the other drawing tools (such as the circle or arrow tools)
Quick colors - a 3-item history of recent paint colors
Clear canvas - the trashcan button clears the drawing canvas
Minimize/Maximize
FIGURE 3-2
When expanded, the Drawing widget provides additional options, from left to right as follows:
Color palette – click/tap to select the current drawing color (the color of the tool icons at right will update to reflect your choice)
Drawing tools – the upper button row, consisting of 7 buttons:
o Freehand draw
o Circle/filled circle – a circle is centered on the point of origin. Click/tap again to toggle filled and unfilled mode.
o Ellipse/filled ellipse – an ellipse is defined by dragging the edge of an invisible (so it doesn’t appear on output) bounding box. Click/tap again to toggle filled and unfilled strokes.

Page | 13
o Square/filled square – a square is centered on the point of origin. Click/tap again to toggle filled and unfilled mode.
o Rectangle/filled rectangle – a rectangle is centered on the point of origin. Click/tap again to toggle filled and unfilled mode.
o Solid/Gradient Line – drag to draw a straight line. Click/tap again to toggle solid or fading gradient drawing mode.
o Solid/Gradient Arrow – drag to draw a straight line terminating in an arrowhead. Click/tap again to toggle solid or fading gradient drawing mode.
Shape size - seven buttons below the drawing tools control stroke shape and size (round or square).
FIGURE 3-3
The last button group in the Drawing widget (Figure 3-3) provides special tools. We discussed the Clear Canvas (trashcan), Info and Minimize/Maximize buttons in Section 2.2, so let’s consider the remaining three items.
Highlight mode – the ‘highlighter’ icon toggles 50% transparency drawing mode, allowing you to paint without completely obscuring the background
Stroke smoothing – toggles automatic ‘post-stroke’ smoothing on and off
Erase mode – the eraser button removes single items from the canvas. In this mode, as you move the drawing pointer around the frame, objects you the stroke touches are deleted from the canvas.

Page | 14
CHAPTER 4 VIEW, CAPTURE AND MANAGE YOUR NDI OUTPUT
SECTION 4.1 MONITOR
Of course, now that you’ve installed NewTek® NDI™ Telestrator®, you’re going to want to view the output. One easy way to do so is to use the free NewTek NDI Video Monitor utility.
This application is included with the NewTek® Tools available free of charge from ndi.NewTek.com. Your NDI Telestrator always sends its output to the network as an NDI source, so there’s no need to ‘enable’ it. Simply launch NewTek NDI Video Monitor (Figure 4-1) from the Windows® Start menu on the host system.
FIGURE 4-1
Hint: Simple instructions are shown at upper-left in the NewTek NDI Video Monitor window ().
1. Right-click the NDI Video Monitor window, wait a few seconds for the source list to refresh, then select the entry representing your application output in the menu – e.g., “MyMachineName (NDI Telestrator)”. (The first part of the source listing is your computer’s name on the network).
NewTek NDI Video Monitor is now showing the output from the NDI Telestrator application.
Hint: Double-click NDI Video Monitor to toggle full screen display.
You’ll appreciate that for NDI sources, networked client systems do not need a hardware card with SDI connectors, long SDI cables, or another external monitor to view your NDI source. If your computer has a network connection already, your NDI Telestrator is already broadcasting high quality, low latency, full-framerate video across your local network, and each NDI-enabled application and system has realtime access to it. You’ll want to test out this capability by installing the NDI Tools pack on an external network client too. In many ways your NDI-enabled network is now operating like a powerful video matrix router connecting
FIGURE 4-2

Page | 15
everything to everything, with NDI maintaining complete visibility, identification, bandwidth management, and so on.
SECTION 4.2 CAPTURE
You may find it very useful to be able to capture your video output to media files. NewTek NDI IsoCorder™ provides the necessary functionality, allowing NDI channels on your network to be both monitored and recorded. Capture from different sources can be started and stopped independently or simultaneously, and files are encoded to a broadcast quality Quicktime format compatible with all common production software
You can download NewTek codec packs for both Windows® and OS X® systems without cost from the URL shown below:
http://www.newtek.com/support/documentation.html#codecs).
A more powerful commercial application named NewTek NDI IsoCorder Pro provides additional recording capabilities. With suitable hardware, NewTek NDI IsoCorder Pro can record up to 16 different NDI channels directly from your network to disk at one time.
FIGURE 4-3 (NDI ISOCORDER PRO)
NewTek NDI IsoCorder Pro includes many powerful features, including realtime color correction tools, safe area overlays, checkerboard and dual monitor display options, still image grabs, 8-channel audio level control, and also includes support for directly capturing files with embedded alpha from 32bit NDI sources.
This powerful application can make media capture and archiving operations in your studio much more economical than traditional alternatives, and much more flexible as well.

Page | 16
SECTION 4.3 CONTROL ACCESS
As you come to appreciate the power of NDI, you’ll doubtless want more and more of such convenient video sources. You could easily wind up having hundreds of video sources available. In most production facilities, though, you will want to limit visibility of NDI channels from selected systems to certain viewers or specified systems.
The NewTek NDI Group Manager (included in the NewTek NDI Tools Pack) makes all of this quite easy. It enables you to group video sources together, choose which groups your local sending sources are members of, and which groups you want to see listed on your (or any) system.
By default, all NDI channels on your network are in the ‘Public’ group, making them visible to all other NDI clients.
Adding a custom Output group* allows others to access your local NDI output by simply adding that entry to their local Receive group list.
Then, if you remove Public from your Output groups, only those systems configured to receive one of your active Output groups will ever see your NDI output.
Similarly, by removing Public from your own Receive groups, your system will ignore all channels that are not members of your remaining Receive groups.
This simple mechanism allows completely configurable NDI channel control at each NDI-enabled access point on your network.
*Note: Modifications require a re-start.
FIGURE 4-4

Page | 17
Appendix A HELP
In this section, we’ll consider some issues you may encounter first using when NewTek NDI™ Connect. Where appropriate, we’ll also point you to explanatory information elsewhere in this manual or elsewhere. If you’ve largely mastered NDI Telestrator but have a few questions, this may be the best place to look first.
Hint: The NewTek website includes a comprehensive FAQ database containing a wealth of useful
information on all of its products – please see http://www.newtek.com/faq/
Table of Contents
CONNECTIONS ........................................................................................................................................................................... 17 Client System does not see My NDI Output ....................................................................................................................... 17 Debugging Failed Connections .......................................................................................................................................... 17
NDI AND YOUR NETWORK ........................................................................................................................................................... 18 Routers and Firewalls ........................................................................................................................................................ 18
DOES MY PRODUCT SUPPORT NDI? .............................................................................................................................................. 19 NewTek TriCaster Mini, Mini SDI, 410, 460, 860, 8000 ..................................................................................................... 19 TriCaster Advanced Edition ............................................................................................................................................... 19 Other TriCaster Models ..................................................................................................................................................... 19 NewTek TalkShow ............................................................................................................................................................. 19
SECTION A.1 CONNECTIONS
Like any network based system, NDI depends on at least two machines or devices being able to connect and communicate with each-other; of course there are a number of reasons why this might not be successful in any environment. This section will help explain the most common issues and help you diagnose and correct them to get the full benefit of NDI.
A.1.1 CLIENT SYSTEM DOES NOT SEE MY NDI OUTPUT?
If you cannot see other NDI sources on the network, the two most common causes are:
1. The NDI sources might not be in the same NDI groups as you are monitoring. The easiest way to
check this is to use the NDI Group Manager (provided in NDI Tools) and remove to all of the listed
sending and receiving groups for both systems.
2. The mDNS ports NDI requires are blocked on either the sender, receiver or network.
SECTION A.2 DEBUGGING FAILED CONNECTIONS
If you can see other NDI sources on the network, the most common cause is that the port numbers required for video transfer are blocked by local firewalls, or by the network hub itself.

Page | 18
To debug failed connections, proceed as follows:
1. Run reliable NDI sending and receiving applications (such as NDI Test Patterns and NDI Video
Monitor, both in NDI Tools) on the same computer system. This approach bypasses the local
network infrastructure. If they fail to connect, then the problem is either your NDI group
configuration, or local software based firewalls.
2. Connect two computers together using a network crossover cable. If NDI connections succeed in
this configuration but fail when attached to the network, the network infrastructure is the most
likely cause of the problem.
SECTION A.3 NDI AND YOUR NETWORK
Basically, NDI networking consists of just two operations:
1. It detects other NDI sources on the network using mDNS. mDNS uses port 5353.
2. It establishes direct communication between sources using ports provided by the operating system.
In Microsoft Windows, for example, you can determine what range of port numbers might be used
with:
netsh int ipv4 show dynamicport tcp
High port numbers are relatively common. On modern OSes the port numbers typically start around 49000.
SECTION A.4 ROUTERS AND FIREWALLS
Obviously your local network router or switch must permit communication using the ports assigned to NDI. Although most common networks do not block the mDNS port, it is not uncommon for networks to be configured to block high port numbers. This would prevent NDI from transmitting video.
Similarly, a software based firewall on the system itself might block the ports used by NDI. It is best to first test with firewalls turned off, then add the relevant firewall rules as needed.
Although it is not recommended, the default range of ports are used for dynamic allocation can be configured in most modern OSes. For instance, Microsoft Windows can be instructed to use ports 10000-11000 with the following command:
netsh int ipv4 set dynamicport tcp start=10000 num=1000
Note, too, that WIFI routers often block multicast traffic or transfer over certain port ranges between wired and wireless networks.
Page | 19
SECTION A.5 DOES MY PRODUCTION SYSTEM SUPPORT NDI?
A.1.2 NEWTEK TRICASTER MINI, MINI SDI, 410, 460, 860, 8000
Version 2-5 for these systems provides support for NDI using the Net 1 and 2 inputs and Network output. This update may be downloaded from the NewTek website.
A.1.3 NEWTEK TRICASTER ADVANCED EDITION
The TriCaster Advanced Edition version 3-2 provides support for NDI using the Net 1 and 2 inputs and Network output. and may be downloaded from the NewTek website.
The upcoming TriCaster Advanced Edition IP version offers a complete, end-to-end, NDI and IP based workflow on every input and output.
A.1.4 OTHER TRICASTER MODELS
NDI has not been extended to other TriCaster models at the present time, but may be added in the future.
A.1.5 NEWTEK TALKSHOW
The TalkShow version 1-2 update (or better) available from the NewTek website adds full NDI support.

Page | 20
CREDITS
Acknowledgments: Tim Jenison, Jim Plant
Engineering: Andrew Cross, Alvaro Suarez, Brian Brice, Cary Tetrick, Charles Steinkuehler, Dan Fletcher, Gil Triana, Greg
Heine, James Killian, Jan Uribe, Jarrod Davis, Jeremy Brosius, Jeremy Wiseman, John Perkins, Karen Zipper, Kevin Rouviere,
Kirk Morger, Mahdi Mohajer, Masaaki Konno, Menghua Wang, Michael Joiner, Michael Watkins, Mike Murphy, Nathan
Kovner, Naveen Jayakumar, Ryan Hansberger, Shawn Wisniewski, Steve Bowie, Troy Stevenson, Zack Lounsbury
Additional thanks to: NewTek Marketing, Sales, Business Development, Customer Support, Training and Development, and
Operations
Past and Present Contributors and Friends: (Past and Present):
Eugene Kosarovich, Joe de Max, John Powell, Kevin Nations, Kris Gurrad, Wendell 'Wink' Friesen
This product uses Inno Setup. Copyright (C) 1997-2010 Jordan Russell. All rights reserved. Portions Copyright (C) 2000-2010
Martijn Laan. All rights reserved. Inno Setup is provided subject to its license, which can be found at:
http://www.jrsoftware.org/files/is/license.txt. Inno Setup is distributed WITHOUT ANY WARRANTY; without even the
implied warranty of MERCHANTABILITY of FITNESS FOR A PARTICULAR PURPOSE.
Trademarks: NewTek, NewTek VMC1, NewTek VMC1 IN, NewTek VMC1 OUT, NewTek VMC1 STREAM, TriCaster, TriCaster Advanced Edition, TriCaster XD,
TriCaster 8000, TriCaster TCXD8000, TCXD8000, TriCaster 860, TriCaster TCXD860, TCXD860, TriCaster 460, TriCaster TCXD460, TCXD460, TriCaster 410,
TriCaster TCXD410, TCXD410, TriCaster Mini SDI, TriCaster Mini, TriCaster 40, TriCaster TCXD40, TCXD40, TriCaster 855, TriCaster TCXD855, TCXD855,
TriCaster 455, TriCaster TCXD455, TCXD455, TriCaster EXTREME, TriCaster 850 EXTREME, TriCaster TCXD850 EXTREME, TCXD850 EXTREME, TriCaster 450
EXTREME, TriCaster TCXD450 EXTREME, TCXD450 EXTREME, TriCaster 850, TriCaster TCXD850, TCXD850, TriCaster 450, TriCaster TCXD450, TCXD450,
TriCaster 300, TriCaster TCXD300, TCXD300, TriCaster PRO, TriCaster STUDIO, TriCaster BROADCAST, TriCaster DUO, MediaDS, MDS1, 3PLAY, 3Play, 3Play
4800, 3PXD4800, 3Play 440, 3PXD440, 3Play Mini, 3Play 820, 3PXD820, 3Play 425, 3PXD425 3Play 330, 3PXD330, TalkShow, TalkShow VS 4000, TalkShow
VS100, Network Device Interface, NDI, NewTek Connect, NewTek IsoCorder, ProTek, ProTek Care, ProTek Elite, iVGA, SpeedEDIT, IsoCorder, LiveText,
DataLink, LiveSet, TriCaster Virtual Set Editor, Virtual Set Editor Advanced Edition, TriCaster VSE, TriCaster VSE Advanced Edition, LiveMatte, TimeWarp, VT,
VT[3], VT[4], V[T5], Video Toaster, Toaster, Inspire 3D, 3D Arsenal, Aura, LightWave, LightWave 3D and LightWave CORE are trademarks, service marks, and
registered trademarks of NewTek. All other brand names, product names, or trademarks belong to their respective holders.

Page | 21